It was very powerful and enlightening experience today to do 2 day sessions with Dr. Armen and Damien. I learned a lot, quite amazed by how much we can do with knowledge and Medit scanner. As usual great support by CAD-RAY always. I absolutely love M...read moreIt was very powerful and enlightening experience today to do 2 day sessions with Dr. Armen and Damien. I learned a lot, quite amazed by how much we can do with knowledge and Medit scanner. As usual great support by CAD-RAY always. I absolutely love Medit scanner.read less - 8/08/2021
David Paquette
Cad-Ray has been super-efficient and very easy to work with! Highly recommend them for Medit sales and support! - 11/09/2021
Amazing customer service. Wayne Glassoff helped me with purchase decision, taking the time to find out my needs, and then my order was delivered quickly! Easily the best "dental" purchase experience that I have ever had. - 9/07/2022
Asi Cohen
Armen Mirzayan's knowledge base sets CAD-RAY.COM apart from all other digital dental-equipment dealers. Not content with linking manufacturer support content, Armen's team provide instant feedback to any equipment queries, in-depth video tutorials, a...read moreArmen Mirzayan's knowledge base sets CAD-RAY.COM apart from all other digital dental-equipment dealers. Not content with linking manufacturer support content, Armen's team provide instant feedback to any equipment queries, in-depth video tutorials, and regular product testing, streamlining, and pushing the boundaries of their products - be it software, hardware, or connectivity between various brands. I highly recommend this team if you want to fully utilise your equipment and have the backup needed going forward!read less - 11/05/2019
Shout out to Nick, Frank and Armen ! Cheers . Great customer service by Nick and Frank. Too early to make a comment about the scanner but these guys are awesome. - 9/19/2020
Jennifer Hastings
Andy was wonderful with setting everything up and explaining everything. The Medit i700 has been great thus far, easy set up! The only "issue" is that it can be occasionally glitchy. - 1/11/2022
Nothing but great things to say about Cad-Ray! Excellent customer support from Laura after the purchase of our Medit i500 and the cart from Damien. I’ve been very impressed with the Medit in restoring crown and bridge, as well as fixed hybrids, and...read moreNothing but great things to say about Cad-Ray! Excellent customer support from Laura after the purchase of our Medit i500 and the cart from Damien. I’ve been very impressed with the Medit in restoring crown and bridge, as well as fixed hybrids, and learning more of its capabilities each day. We have intentions to buy a second Medit shortly and will definitely be using Cad-ray again.read less - 12/13/2021
Preston Poole
Great company with even better customer service. Premier dental business with digital dentistry and scanners! - 11/03/2022
Lake Shore Dental of Tempe
Absolutely the best customer service I have ever seen. I couldn't be happier with the service received. I won't be going anywhere else!! Thank you again. - 2/01/2022
Aaron - Cooleysmiles
fantastic experience with this company for over 7 years! Top customer service and support! Its great having them as part of our team! Highly recommend! - 3/22/2022
Susan Latimer
Cad Ray has always provided me with the best customer support for my Medit scanner. Today, I worked with Destiny. She is quick to respond and identify problems and also great at explaining how to fix them! I highly recommend this company! - 5/01/2025
Kurt Adamson
I was on the fence for a few years about getting into intra-oral scanning. I finally did it in the fall of 2019 and haven't looked back. I was hesitant mostly because I didn't want to spend a lot on $$$ on something that I don't end up implementing. ...read moreI was on the fence for a few years about getting into intra-oral scanning. I finally did it in the fall of 2019 and haven't looked back. I was hesitant mostly because I didn't want to spend a lot on $$$ on something that I don't end up implementing. I found that I love scanning, I feel like it has improved my quality of preps and my OCD of being able to verify accuracy. I recommend Cad-ray because they want you to succeed. They are always available. They have been through this process many times, they know what does and doesn't work. My experience is with the Medit i500 IOS.read less - 6/19/2020
Allen Mortimer
So glad we used Cad-Ray. They absolutely helped set everything up and even helped us tremendously when we needed a replacement. We are using the i700 and are thrilled with it! - 11/03/2022
Steven Polasek
The cad ray team is the best! Jon and Nick offer first class service! I ordered a medit i500 from another supplier and had to cancel my order after it had not arrived within 3 weeks. Placed my order with Jon and Nick, had the scanner to me within 24 ...read moreThe cad ray team is the best! Jon and Nick offer first class service! I ordered a medit i500 from another supplier and had to cancel my order after it had not arrived within 3 weeks. Placed my order with Jon and Nick, had the scanner to me within 24 hours of purchase. I love my medit! Best scanner on the market!read less - 6/15/2020
A while ago I became interested in an intra oral scanner for my office especially for dental sleep medicine and TMJ appliances. I searched online for Medit and found cad ray. Laura from Cad-ray quickly responded and set up a zoom meeting so she could...read moreA while ago I became interested in an intra oral scanner for my office especially for dental sleep medicine and TMJ appliances. I searched online for Medit and found cad ray. Laura from Cad-ray quickly responded and set up a zoom meeting so she could demo the unit. Great job at helping me understand. She set up the financing and I got my unit. A few glitches with my internet speed and getting IT to help with my upload and download speeds and I was ready to go. Every time I had a question I texted Laura and almost like she was waiting for my call she responds. We it turned out my unit wasn't just right so she immediately responded we will replace you unit. Laura has been a joy to work with and the customer service given will only encourage me to do business with cad-ray again.
Benjamin Polan DMD, D,ABDSMread less - 8/27/2021
I would like to let you know that Kaila Larson is excellent communicator, personable, professional and knowledgeableI have had the opportunity to talk to her 3 times and it has always been awesome.Regards,Dr Carlos santos - 4/08/2022
Oleg Eisenstein
Great products and services. Highly recommended - 6/16/2020
I am beyond impressed with Destaney and Cad-Ray! Despite accidentally throwing away my old scanner, which I was supposed to return, their team went above and beyond to advocate for me. Their exceptional support and understanding turned a stressful si...read moreI am beyond impressed with Destaney and Cad-Ray! Despite accidentally throwing away my old scanner, which I was supposed to return, their team went above and beyond to advocate for me. Their exceptional support and understanding turned a stressful situation into a seamless experience. Highly recommend!read less - 8/02/2024
Jordan Bower
Frank helped me out when 3dbiocad could not help me with my trios issue. Thank you cad-ray. - 9/15/2024
K. Banani
Amazing customer service. I haven’t ever worked with a company where there is an issue, you can immediately get help and assistance and so far have not had an issue that CADRAY wasn’t able to fix. They made the process buy buying and maintaining a sc...read moreAmazing customer service. I haven’t ever worked with a company where there is an issue, you can immediately get help and assistance and so far have not had an issue that CADRAY wasn’t able to fix. They made the process buy buying and maintaining a scanner seamless. Highly recommend!read less - 2/23/2024
Brandon Erickson
I have strong feelings about how great CAD-Ray has been. I purchased a medit i500 scanner from my lap, they wanted to use it for courses which aren't happening now so he didn't want to be sitting with this expensive piece of technology sitting aroun...read moreI have strong feelings about how great CAD-Ray has been. I purchased a medit i500 scanner from my lap, they wanted to use it for courses which aren't happening now so he didn't want to be sitting with this expensive piece of technology sitting around. Before purchasing he and I both talked to the Nobel sales rep who assured me that everything would transfer over just fine. I was concerned about the learning curve and wanted to be sure that I would have tech support. I asked the rep directly and he assured me again that everything would be great and he would come do an in-depth training with me. Long story short, the sales rep had no clue what he was doing and put very little effort in to helping me once the purchase was complete. I asked him over the phone how to do a few things and his response was to call CAD-Ray. They explained that this happens, they would love to help me but asked that I purchase the service package. That was a game changer. Now all of my questions getting answered, their response time is amazing and their understanding of the machine is by far better then the Nobel reps. The scanner is great but combine that with their tech support and I feel like I'm set up for success. If I were to do this again, I would skip the headache of trying to save a little bit of money and purchase it through CAD-Ray. But even with making the mistake, I feel like they have programs and support set up to point me in the right direction.read less - 10/15/2020
Brian Wilkinson
This company is genuinely amazing. Amazingly good products, but the thing that sets them apart is the support. Frank and Sean have answered any questions I have unbelievably fast. And I LOVE the DOF Craft 5x milling unit. Learning the flow of same da...read moreThis company is genuinely amazing. Amazingly good products, but the thing that sets them apart is the support. Frank and Sean have answered any questions I have unbelievably fast. And I LOVE the DOF Craft 5x milling unit. Learning the flow of same day milling was tricky for me, but they held my hand the whole way. Can’t go wrong here.read less - 1/06/2024
Brent Hale
Been using my i700 for a month now and it's been great. The tutorials that Cad-ray provides have been very helpful. This scanner with a fast computer turns out great results. - 11/01/2021
Great 1st lesson with Ryan on the Mediti700. We are ready to scan:) - 12/30/2022
Yoav Taub
I purchased my Medit from Cad-Ray just prior to Covid and they have been fantastic in getting me the proper training on the machine, both through there 2 day class as well as the many video's they post on the website. I recently purchased some acce...read moreI purchased my Medit from Cad-Ray just prior to Covid and they have been fantastic in getting me the proper training on the machine, both through there 2 day class as well as the many video's they post on the website. I recently purchased some accessories for a different office and they accidently sent it somewhere else. After a quick email they had my stuff at my door within 24 hrs and they threw in a box of tips which I was not expecting (around $300). It is a pleasure to deal with them!read less - 7/19/2021
Ramin Goshtasbi
Great service even if you own a Primescan. Company is built on customer service. Thanks for the help guys…. - 1/05/2022
Sean Landgraf
Truly Great Service. Glad I purchased my scanner here. - 8/03/2023
Sarju Patel
Perfectly Placed Implant course in San Diego was very good. Armen and Brian are excellent lecturers and educators. A lot of practical tips and pearls of wisdom for those getting into cone beam and guided surgery. Would recommend this course highly. ...read morePerfectly Placed Implant course in San Diego was very good. Armen and Brian are excellent lecturers and educators. A lot of practical tips and pearls of wisdom for those getting into cone beam and guided surgery. Would recommend this course highly. Looking forward to other courses that they offerread less - 2/18/2017
Bracy Haynie
I have had the wonderful experience of working with Ryan at Cad-Ray for the last several weeks and he has been very professional and informative on how to properly use the Medit I700 scanner with regard to the software. I would highly recommend using...read moreI have had the wonderful experience of working with Ryan at Cad-Ray for the last several weeks and he has been very professional and informative on how to properly use the Medit I700 scanner with regard to the software. I would highly recommend using Cad-Ray and contacting Ryan for any of your Medit needs.read less - 1/27/2023
Zachary Hickman
High quality scanner. Super fast. Have been happy with the support that Cad-Ray has offered. I really like the innovative technology that medit allows users to implement into their practice. - 10/13/2021
CAD-Ray is an amazing company. I purchased my scanner 3 years ago. Any small issue immediately resolved by calling them for help. I originally scanned with Cerec. The ROI doesn't even compare. The Medit was by far the best technology purchase of my ...read moreCAD-Ray is an amazing company. I purchased my scanner 3 years ago. Any small issue immediately resolved by calling them for help. I originally scanned with Cerec. The ROI doesn't even compare. The Medit was by far the best technology purchase of my 20 plus years in dentistry. I will upgrade at some point and will buy again from CAD-RAY!read less - 2/04/2022
Dixie Jernigan
The customer service we have received while working with Frank DeLuca is second to none! He is incredibly knowledgeable and enthusiastic, as well as always available to help with any issues. We are very pleased with CAD-RAY and relationship that they...read moreThe customer service we have received while working with Frank DeLuca is second to none! He is incredibly knowledgeable and enthusiastic, as well as always available to help with any issues. We are very pleased with CAD-RAY and relationship that they have with their clients.read less - 1/25/2023
John Pobanz
We had an outstanding experience purchasing two Medit scanners. The delivery was timely . The onboarding clean. Laura was dazzling with her acumen and quick solutions . We highly recommend the investment in Cad Ray .Pobanz Orthodontics , Ogden Utah :...read moreWe had an outstanding experience purchasing two Medit scanners. The delivery was timely . The onboarding clean. Laura was dazzling with her acumen and quick solutions . We highly recommend the investment in Cad Ray .Pobanz Orthodontics , Ogden Utah :)read less - 12/10/2021
Alderman Dental
Frank DeLuca from CAD-Ray has been absolutely awesome from day one. Readily available and very knowledgeable to provide support when needed. - 1/25/2023
Yordanka Ivanova
I had been on the market for a scanner for a while and the i700 is my first intraoral scanner purchase. We are still new to the scanning world and its capabilities. Frank DeLuca was my main contact from the beginning and the person who did our traini...read moreI had been on the market for a scanner for a while and the i700 is my first intraoral scanner purchase. We are still new to the scanning world and its capabilities. Frank DeLuca was my main contact from the beginning and the person who did our training. The scanner is incredible and has surpassed our expectations even though we haven’t used it to its full potential yet. Frank has been amazing and always there to guide us every step of the way. Having such fabulous customer service and support from CAD-Ray was key for us when making this purchase decision. Thank you!read less - 6/23/2022
Aaron Gelfand
Worked with Laura and she is incredibly knowledgeable. She gave me all the right advice and steered me in the right direction. Her ongoing support is as good as it gets. I feel like I have a 24 hour team at my beckoning call. For the meat and pot...read moreWorked with Laura and she is incredibly knowledgeable. She gave me all the right advice and steered me in the right direction. Her ongoing support is as good as it gets. I feel like I have a 24 hour team at my beckoning call. For the meat and potatoes. I got an Icam 4D from her and now I am printing all on 4 arches same day surgery at our practice in Denver(NUSET). We are going to put ICams and Trios’ in all our offices thanks to Laura and the Cad-Ray team. If you have any questions about the workflow and the success we are having with the Digital work flow call Laura and I will help you succeed with her product support.Thank you Laura and Cad-Ray!read less - 4/28/2022
Archstone Weatherford
Medit i700 intraoral scanner is the first scanner that I actually used on my patients. Before I put my hands on it, I had some prejudices against all scanners. They were bulky, laggy in capturing the images, etc. When I finally had the chance to use ...read moreMedit i700 intraoral scanner is the first scanner that I actually used on my patients. Before I put my hands on it, I had some prejudices against all scanners. They were bulky, laggy in capturing the images, etc. When I finally had the chance to use an intraoral scanner and get introductory training with Laura from CAD-RAY a few weeks ago, I totally changed my view of this product. Very soon, I was able to scan crown, bridge, and even denture cases. Of course, I have had some knowledge about the digital scanner from CEs provided in the past, but being able to apply it in the daily practice in such a short time was beyond my expectations. I would highly recommend MEDIT i700 and training from CAD-RAY.
Big thanks to Laura!
-Lei Fu, D.D.S.read less - 9/12/2021
Cad-Ray has provided a great product! They have been super helpful with getting all of our questions answered and products to us in a timely matter! - 3/01/2022
Mike Davis
I have been very happy with the Medit I purchased from Cad Ray. Everyone has been very helpful and quick to respond to my questions. They have an awesome video library for the medit, I am new to scanning and have really enjoyed the tutorial videos. - 6/16/2020
Mitchell Rubinstein
I purchased my medit i500 scanner about a year ago from CAD Ray, and I have been extremely happy with both the scanner and the service / support.
Armen and Frank consider your purchase to be the beginning of your relationship with them, not...read moreI purchased my medit i500 scanner about a year ago from CAD Ray, and I have been extremely happy with both the scanner and the service / support.
Armen and Frank consider your purchase to be the beginning of your relationship with them, not the end. They do their best to make sure you learn everything you need to know in order to get the best possible results .
They answer calls and messages promptly, and it never takes me very long to get my questions answered.
I am VERY glad I bought from them, and not from one of the "big box" Dental Mega retailers.read less - 10/09/2019
5 stars for a great product and great service. After much research I knew I was set on the Medit 500. I considered some of my local equipment reps, as well as cad-ray. Cad-ray won out due to their efficiency, speed of service, and knowledge. The...read more5 stars for a great product and great service. After much research I knew I was set on the Medit 500. I considered some of my local equipment reps, as well as cad-ray. Cad-ray won out due to their efficiency, speed of service, and knowledge. Their online presence makes it easy to get help via messaging, social media, or phone.
The scanner itself works great, but make sure to contact them to get the minimum specs required for a laptop -- it will make a difference in how the scanner performs.
To make the scanner mobile, I purchased this cart from Staples: https://www.staples.com/Oklahoma-Sound-Premium-Audio-Visual-Presentation-Cart-40-1-2-H-x-18-W-x-30-D-Black-Ivory-Wood/product_932437.
Lastly, I purchased "3M Dual Lock Fastener" to keep the power module attached to the wand from falling off the cart. I carry the scanner between two offices, so I wanted something sturdy, but removable. (see in photos). The hockey puck shaped holder (comes with the scanner) works great for holding the wand itself.read less - 10/10/2019
I purchased a SprintRay through them. I'm new to the 3D printer realm and they've been great with answering my questions and getting me set up. I've just really have been impressed with the quick responses, its much appreciated, thank you! - 4/20/2022
Nate Cherof
Excellent customer service and communication. Could not recommend them more - 2/14/2023
Tiffany Lee
This is a unique place because it serves both dentists and patients. For patients, this is an imaging center only. There are no diagnostics done here. There is a dentist on staff, but he is only there for imaging purposes, no diagnosis. As a dentist,...read moreThis is a unique place because it serves both dentists and patients. For patients, this is an imaging center only. There are no diagnostics done here. There is a dentist on staff, but he is only there for imaging purposes, no diagnosis. As a dentist, I would say that to be fair a niche place like this couldn't be expected to bill insurances. They would have to hire an entire separate staff to deal with all the thousands of types of insurances you have. For dentists: This is a great service to your patients because if you do not own a 3d x ray machine, you don't have to invest the $200,000.00, you can refer your patients here and cad ray will send you the digital files. You can also send them files to have custom surgical guides made. The folks who work here go out of their way to explain how things work. If you don't have a doctor, they can refer you to a dentist who can diagnose your problems. I always call ahead to make an appointment.read less - 6/02/2018
Vivek Singh
I have had done business with these guys. I am impressed with their Amazing Customer service. John and Armen are great. I have and will order lots of stuff from them. Kudos to them!!!! - 6/19/2020
Barton Davis
Every time I need support for my scanner, the Cad-Ray team is there to help. I recently had a question on how to manipulate a scan and export it back to Medit Scan. Damien logged in and helped me out. Problem solved in under five minutes. Awesome ser...read moreEvery time I need support for my scanner, the Cad-Ray team is there to help. I recently had a question on how to manipulate a scan and export it back to Medit Scan. Damien logged in and helped me out. Problem solved in under five minutes. Awesome service. Thanks Cad-Ray support team!read less - 3/04/2022
Chase Funk
This has been awesome, to be honest I have know idea how to use it but our team members have picked it up so easy!! - 6/16/2020
Charlyn Quiec
Fast response. Customer service eager to help and very friendly. :) - 3/21/2023
Ryan Crain
I love my Medit and Cad-Ray has been so easy to work with, both from a sales and support standpoint. - 7/16/2020
I am about the worst person when it comes to technology. I decided to get a scanner and chose the Medit due to all the positive comments users had. I haven't used it much-the pandemic started right as I received it, however, the customer service has ...read moreI am about the worst person when it comes to technology. I decided to get a scanner and chose the Medit due to all the positive comments users had. I haven't used it much-the pandemic started right as I received it, however, the customer service has truly been amazing! I had an online training and a rep checked in with me several times to see if I needed help. I am going to do another online training soon as a refresher. I wouldn't hesitate to recommend this company and scanner to anyone!read less - 6/16/2020
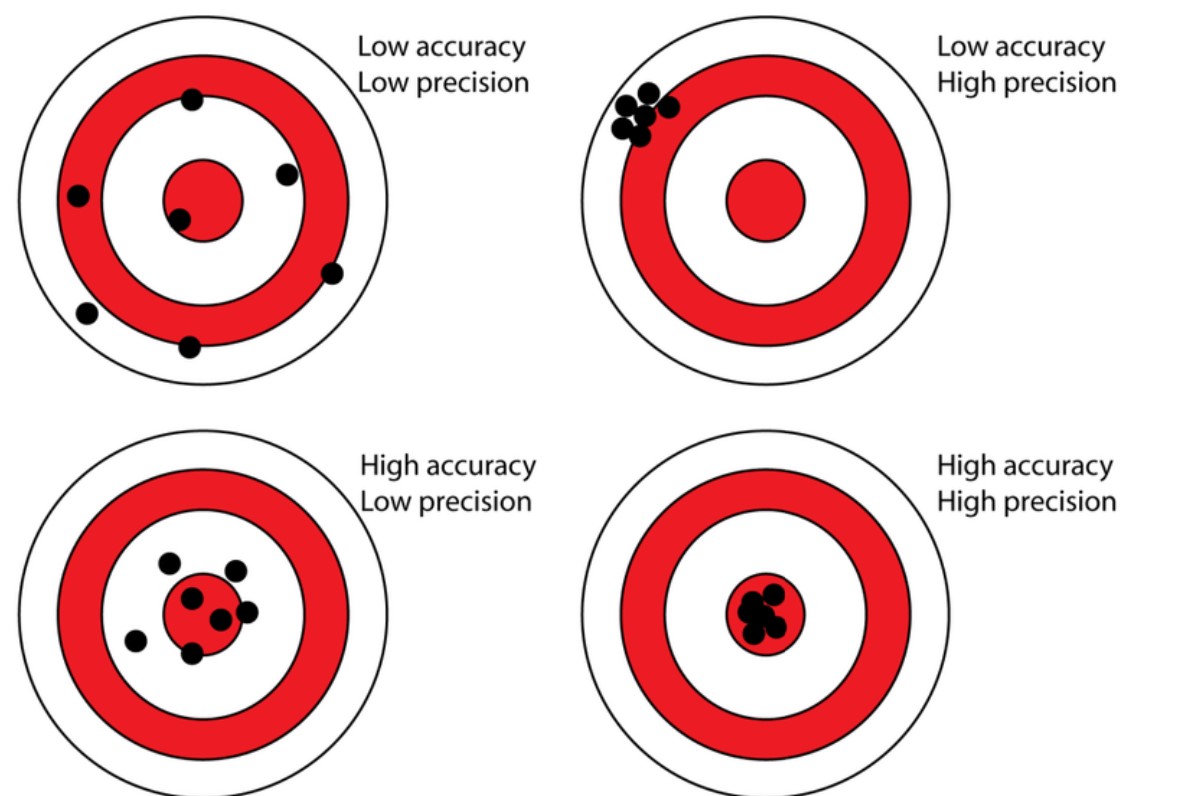
A common property that is oftentimes used to describe how well scanners perform is how accurate, precise, or true it is. A lot of people use this incorrectly to describe intraoral scanners and it is utilized in poor judgment because there are too many variables in the input of the equation to ascertain any conclusion from the output file. But these characteristics CAN be used to study photogrammtery.
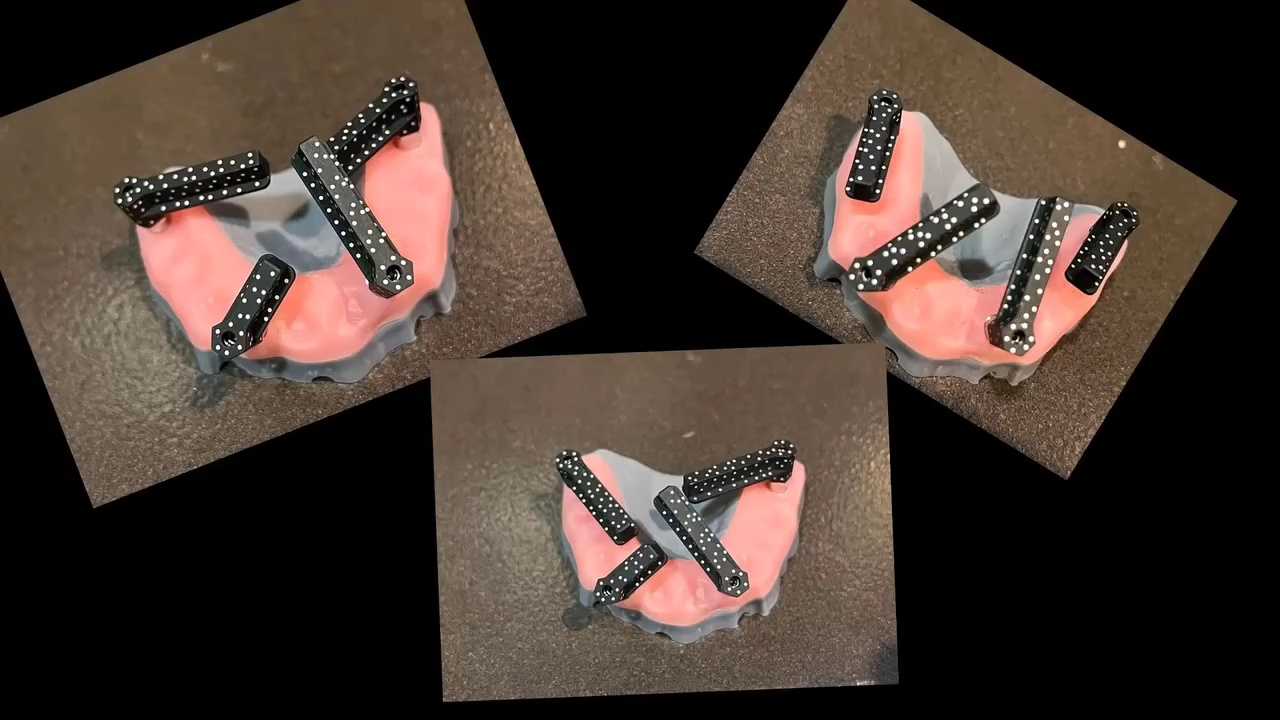
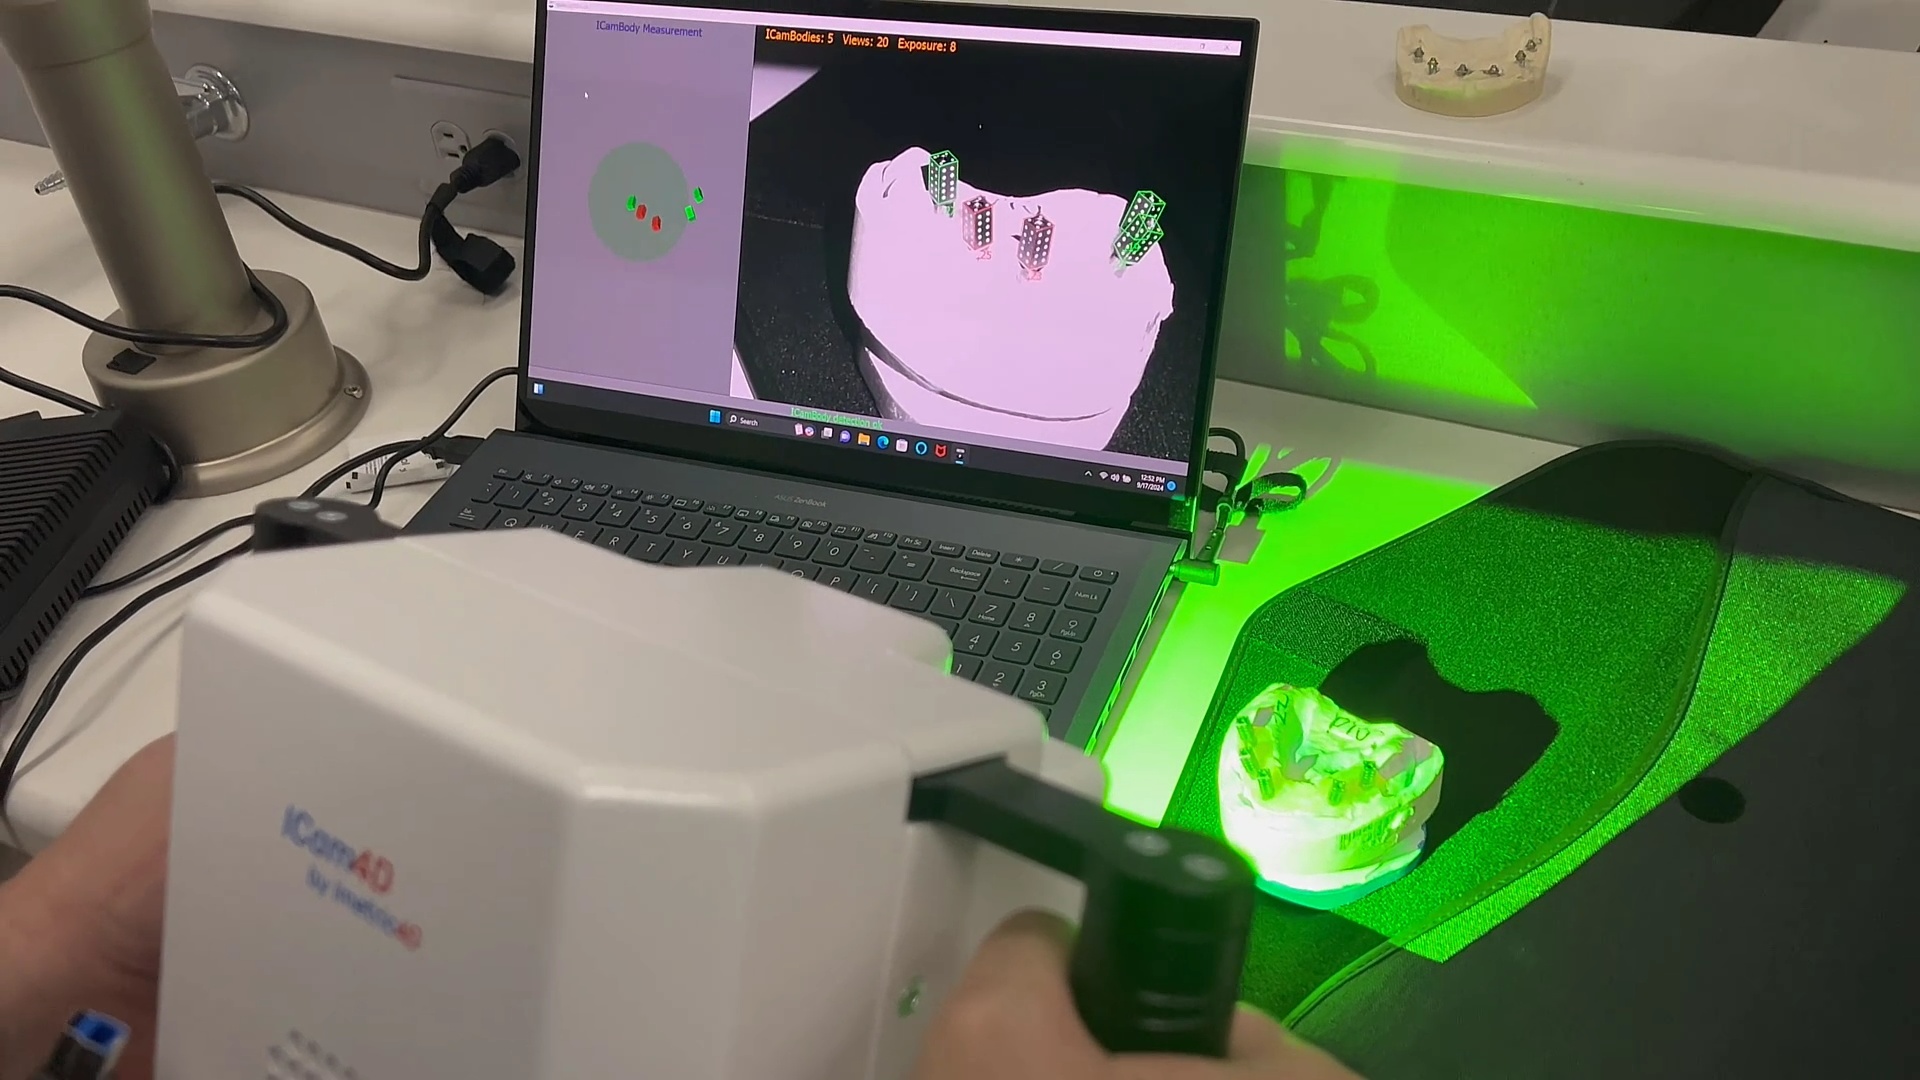
In this chart, the bullseye represents the true value (true location of the object), while black dots represent measurements (the estimated 3D locations of the object based on the 2D images) from this source. To measure the precision, we took 3 random arrangements of the dominos and found the output files to be identical. To measure its accuracy and trueness, we related it to a desktop scan of the same model
A frequent question we field is how does an operator know how much of the dominos / scanflags to capture. The manufacturer recommends a specific scan path and to completely capture the suprastructure. Our internal testing shows that there is no difference between the results as long as you allow the software to spit out the scanflag geometry while you are scanning. See this video for an explanation
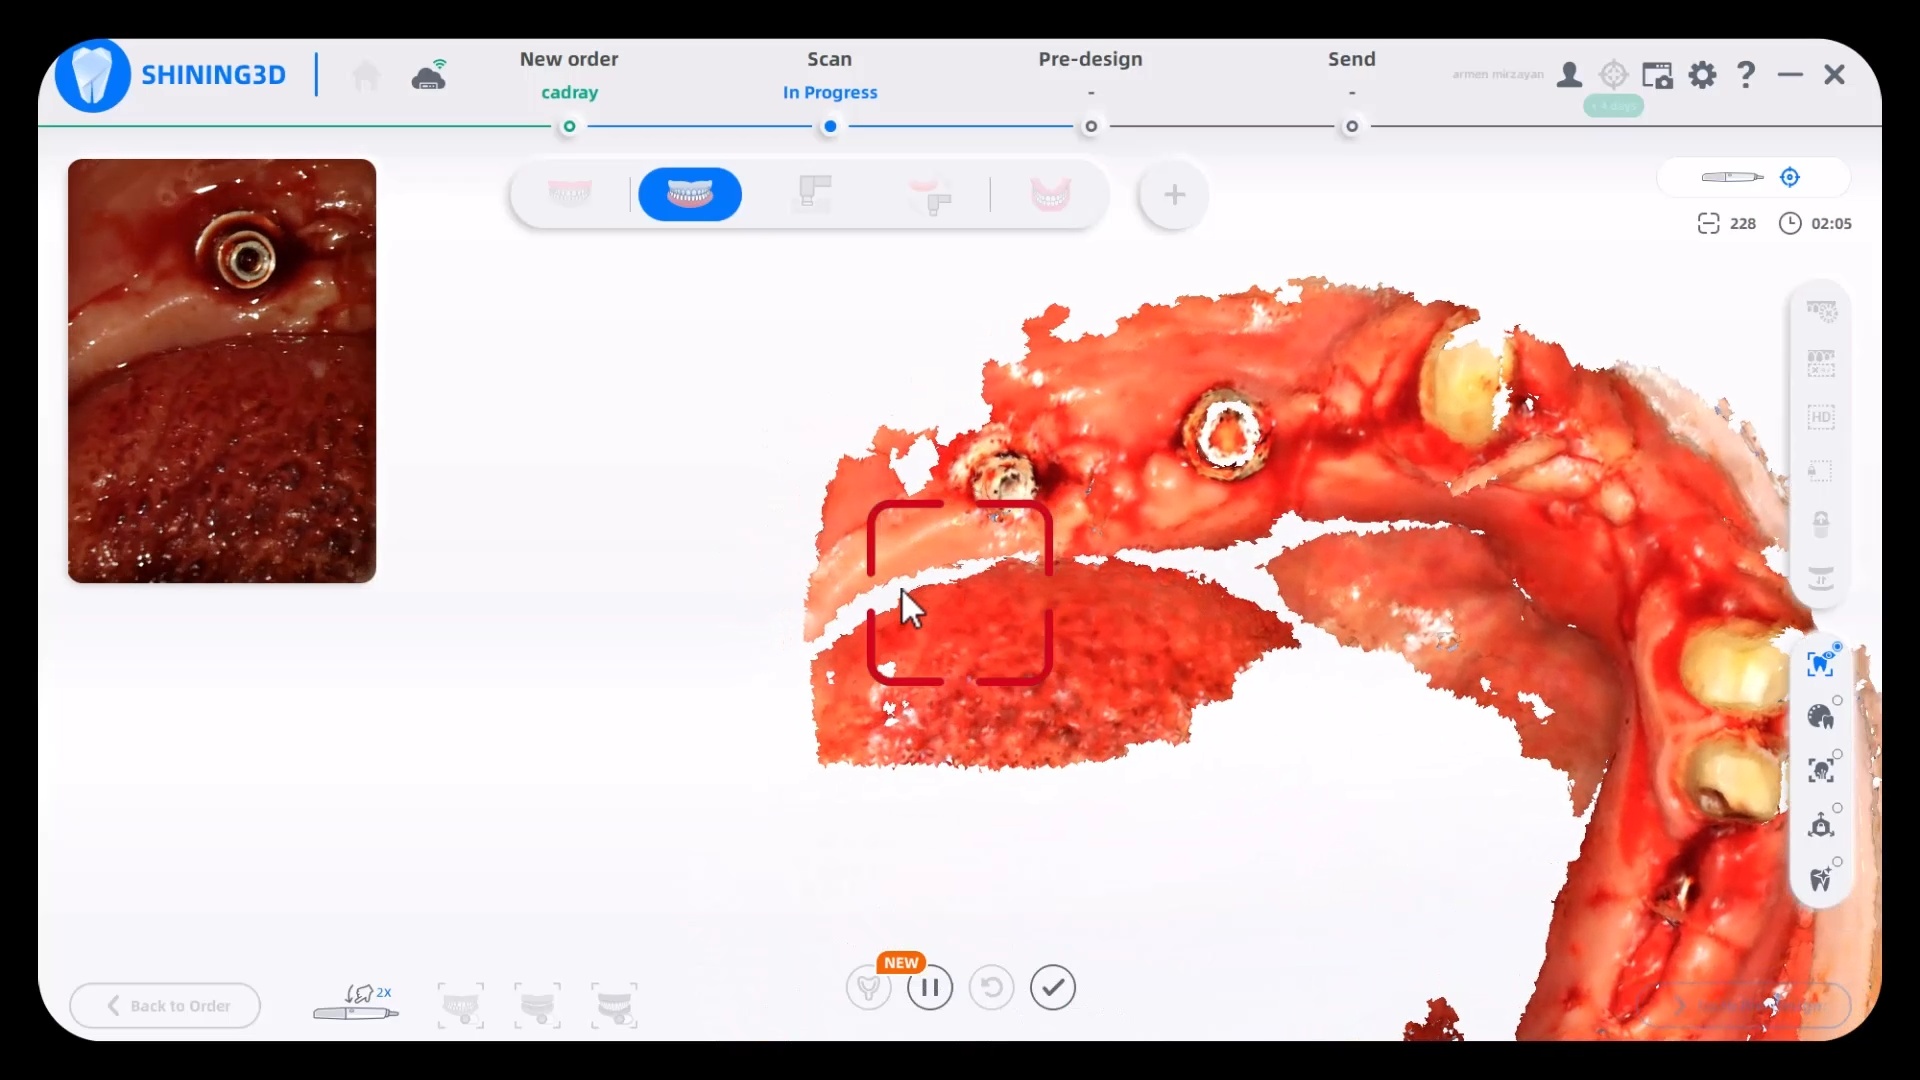
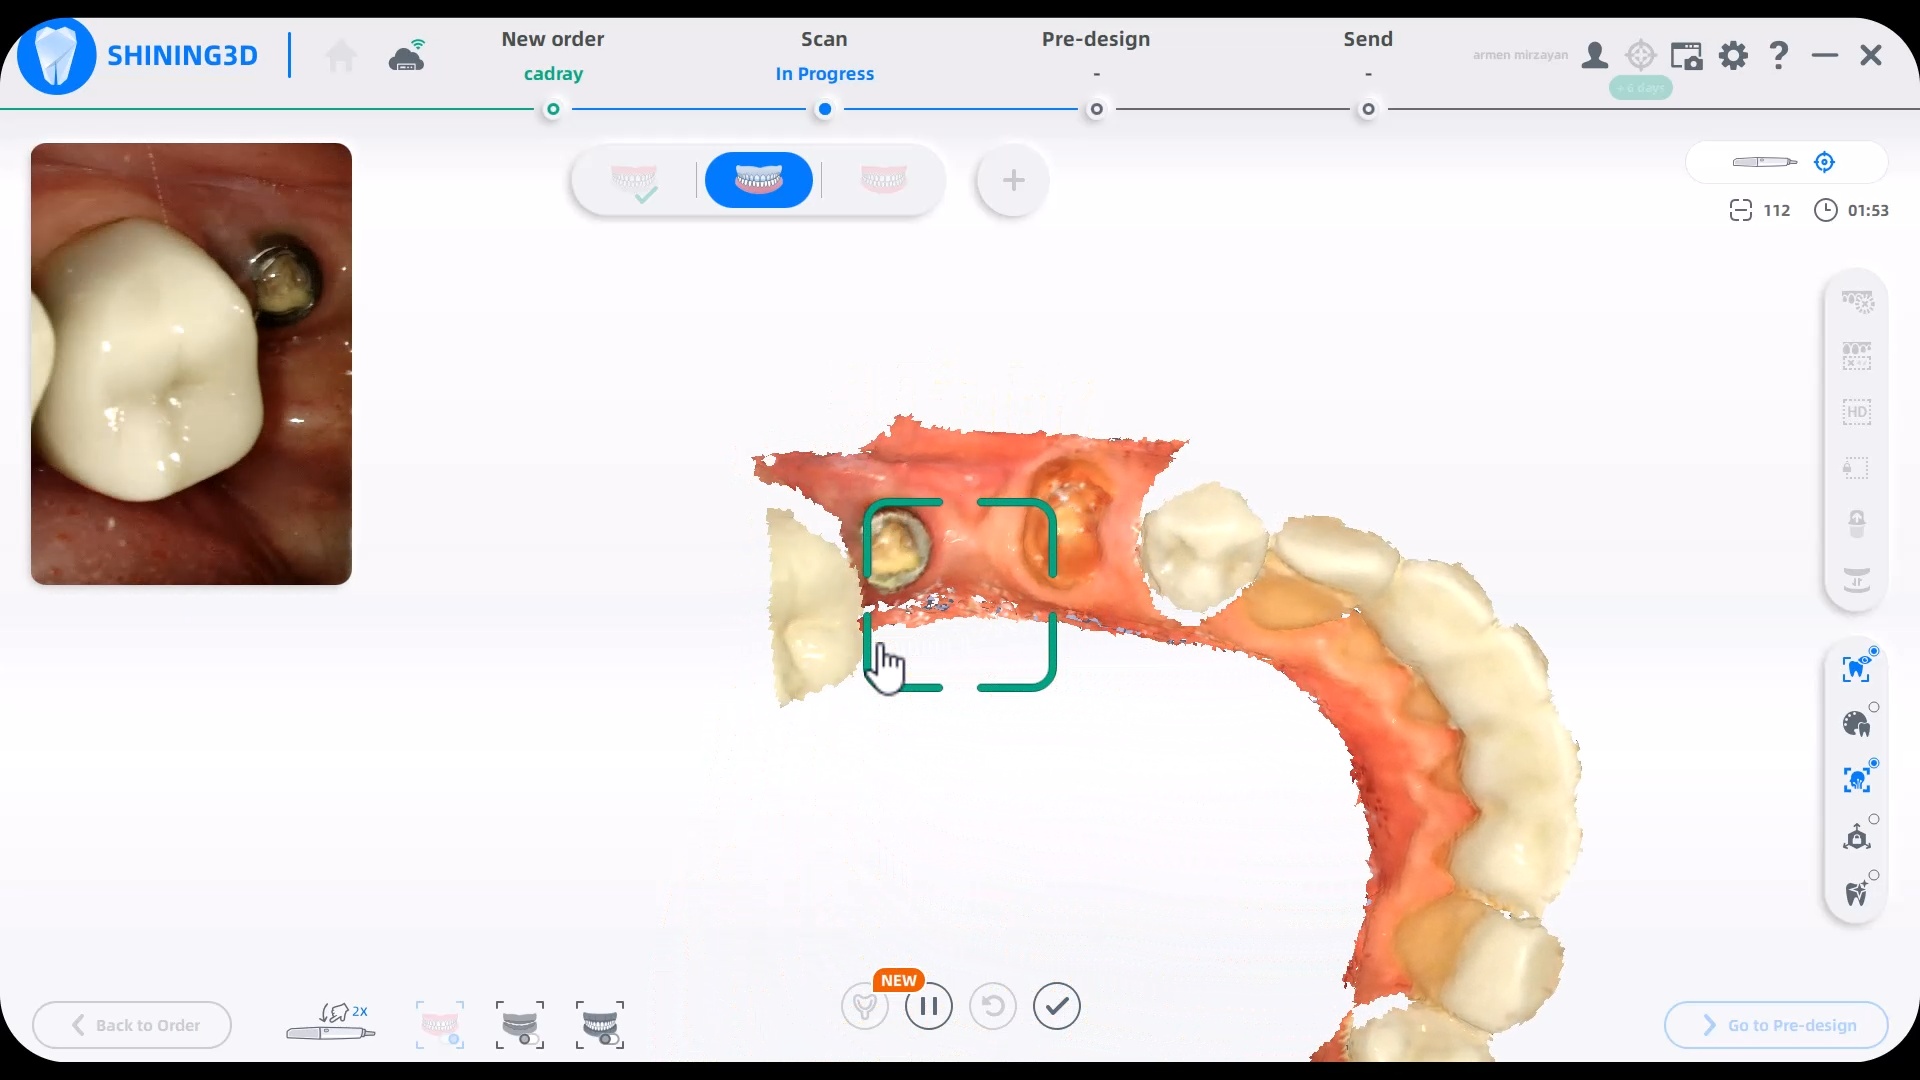
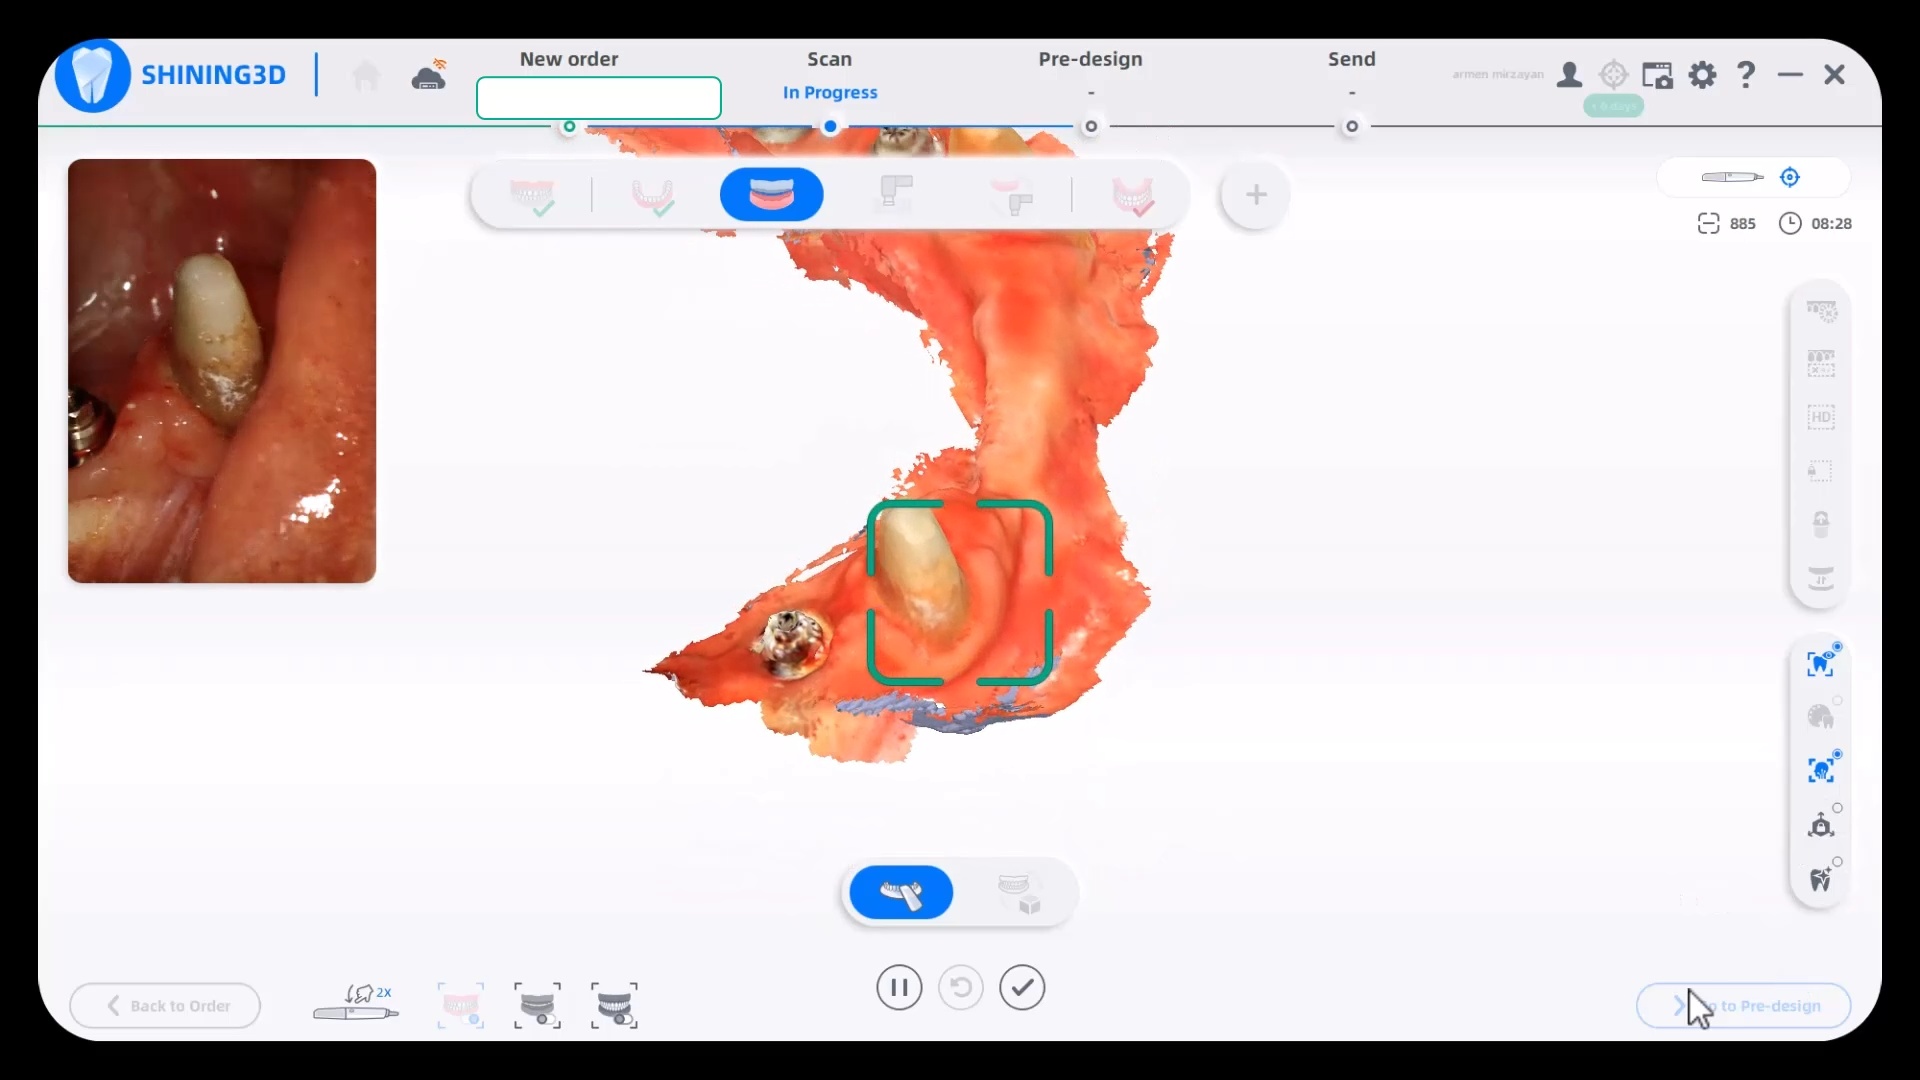
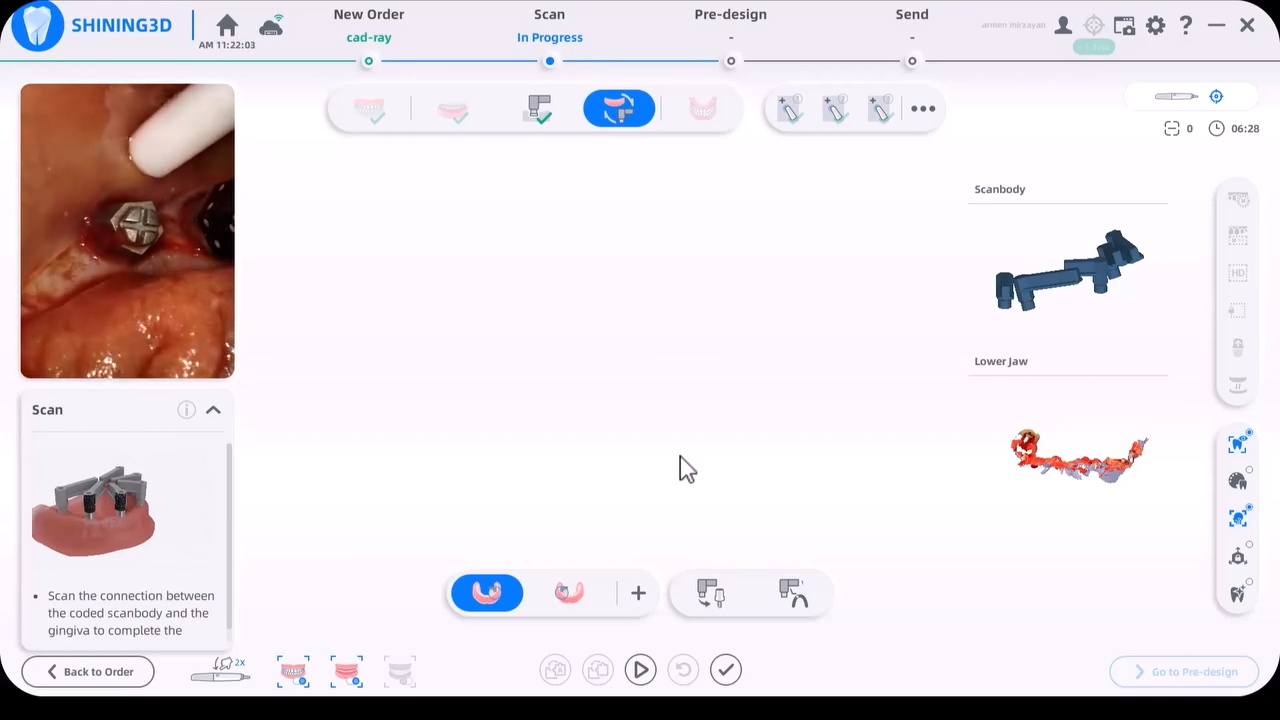
How Well does the Intraoral Scanner Work on Soft and Hard Tissue?
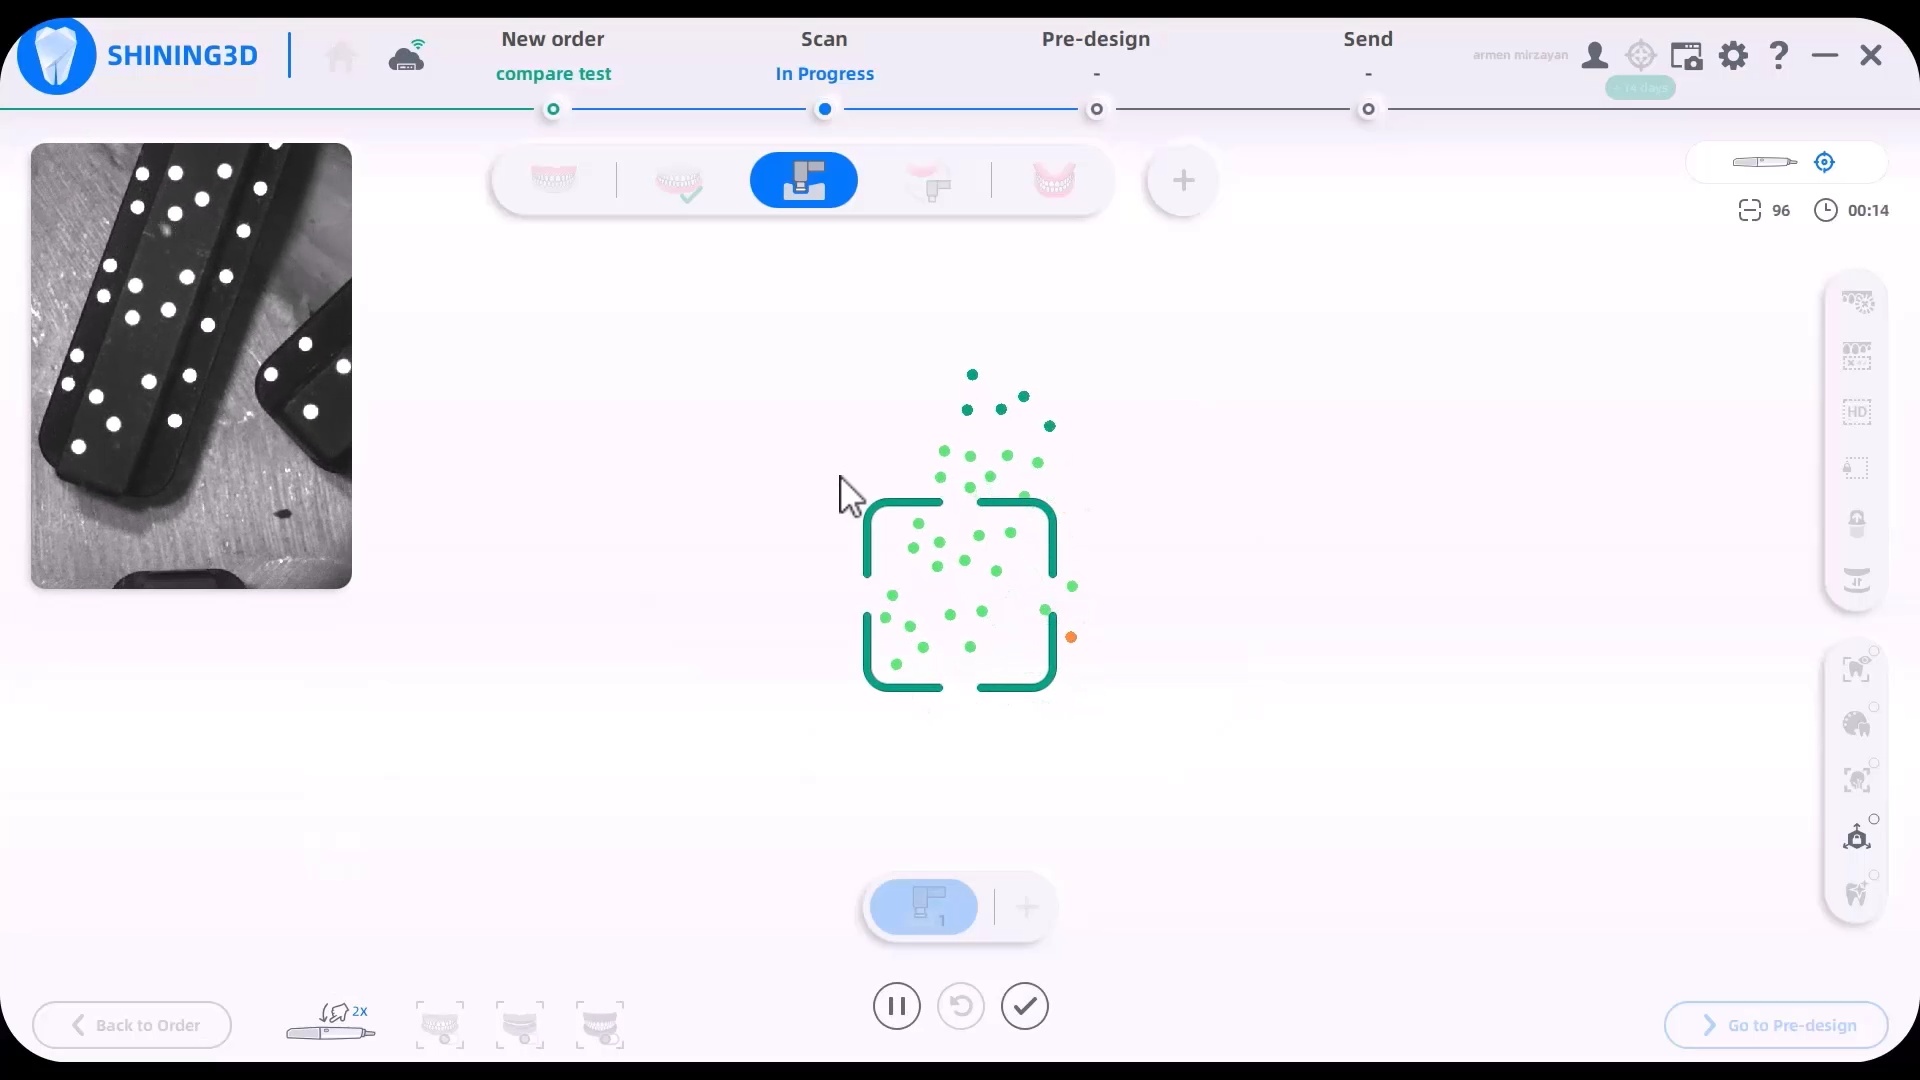
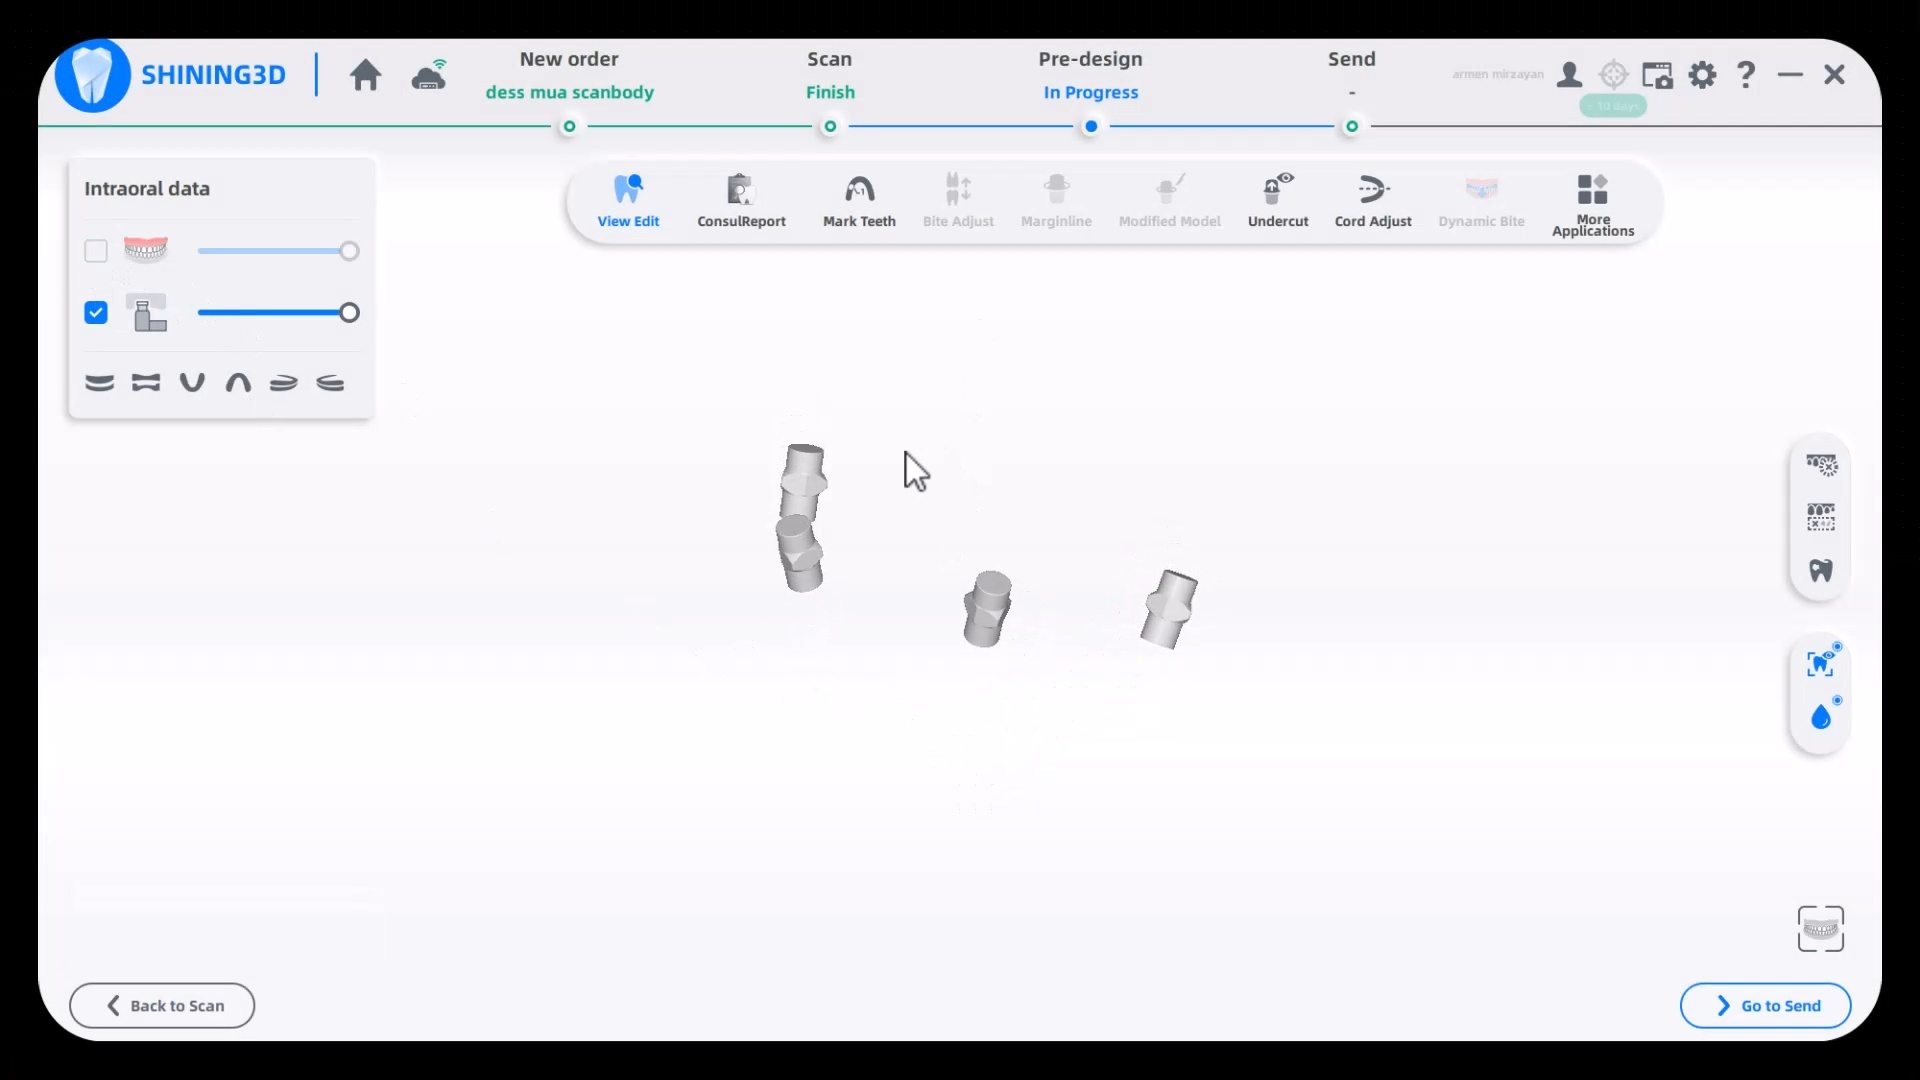
lots of people ask about the intra oral scanning experience with the shining elite device. please note that this is COMPLETELY different technology than the intraoral photogrammetry unit. it has performed on par with every other scanner i use, if not better. it has such a huge field of view it picks up a lot of data at once. It is prone to every issue that all ios have, ranging from double models to introducing errors over long edentulous and symmetric spans, etc… so scan path is still important.
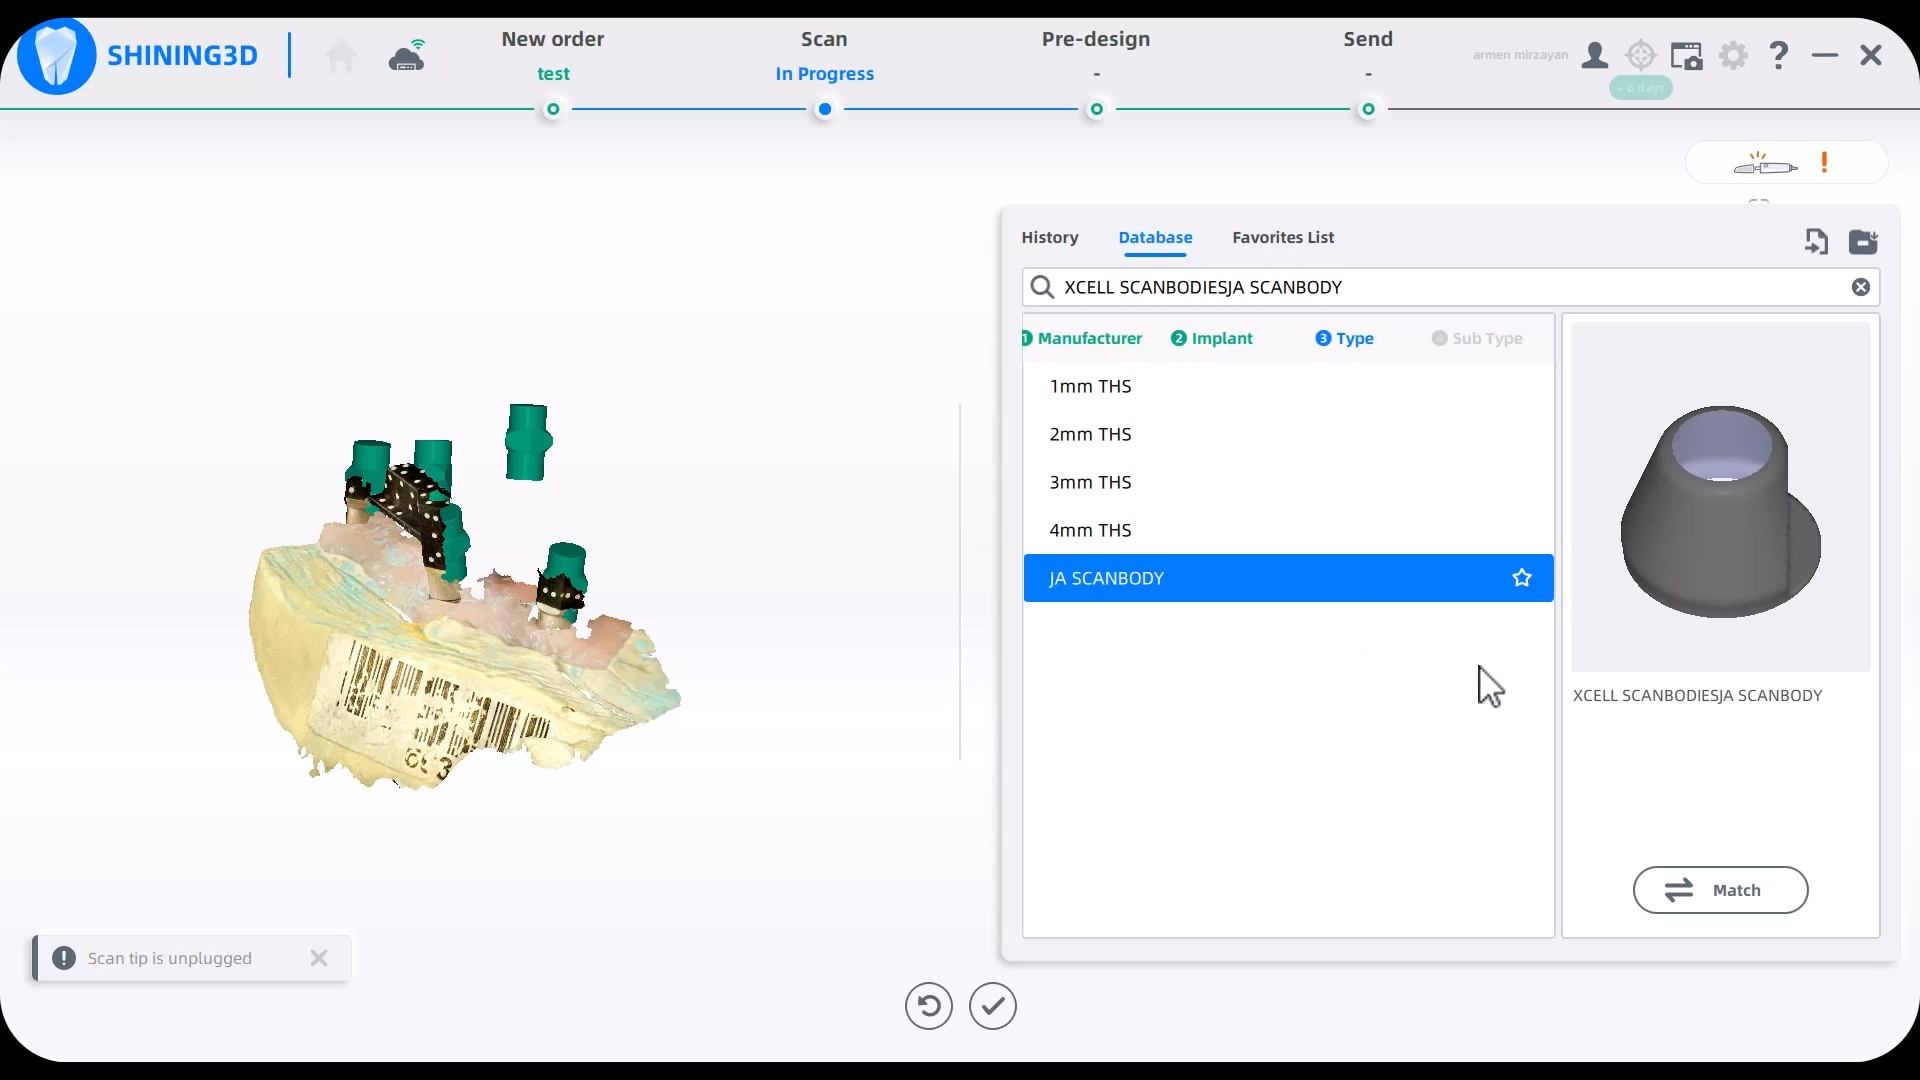
How to load libraries into Shining 3D Elite Intra-Oral Photogrammetry Software
This should be done by an experienced person. Here we load a dess MUA library into the equation in the first video. In the second video we import Jonathan Abeneim’s Xcell libraries, followed by Danny Domingue Vortex library import
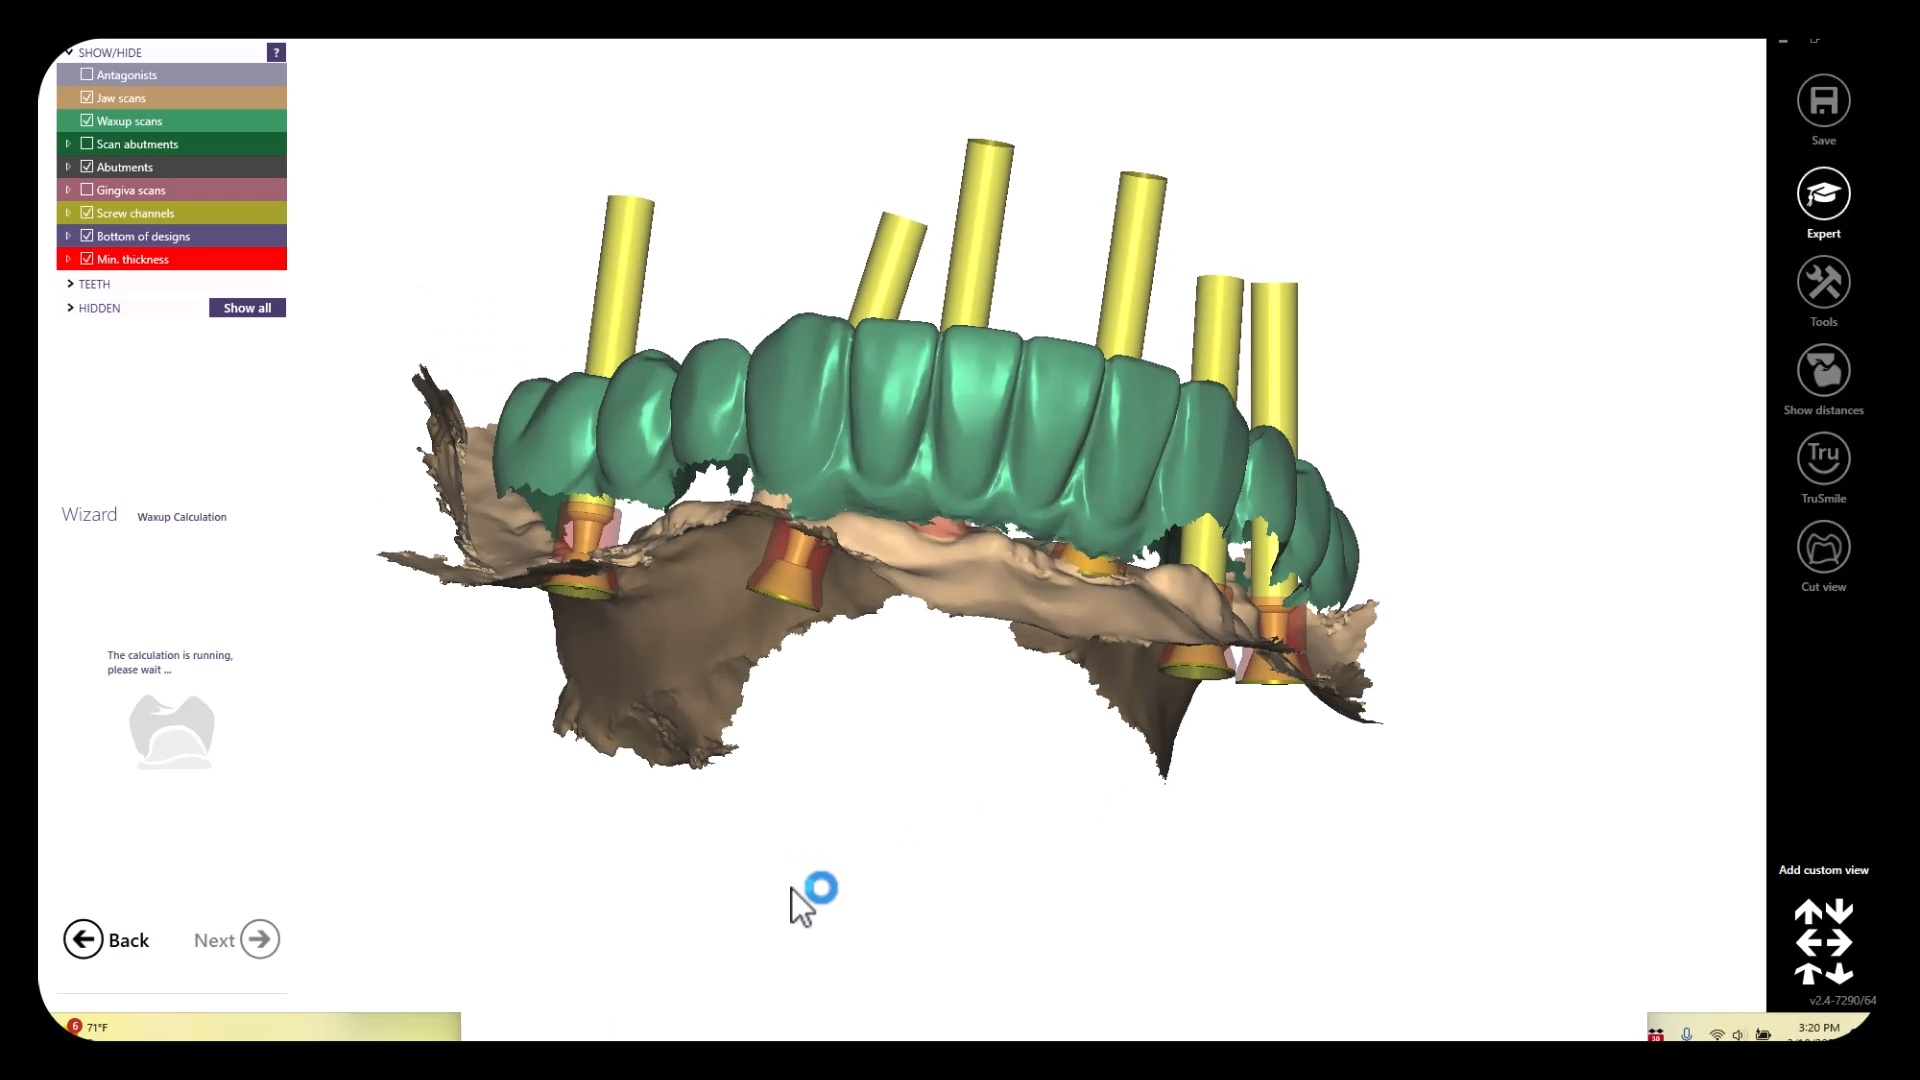
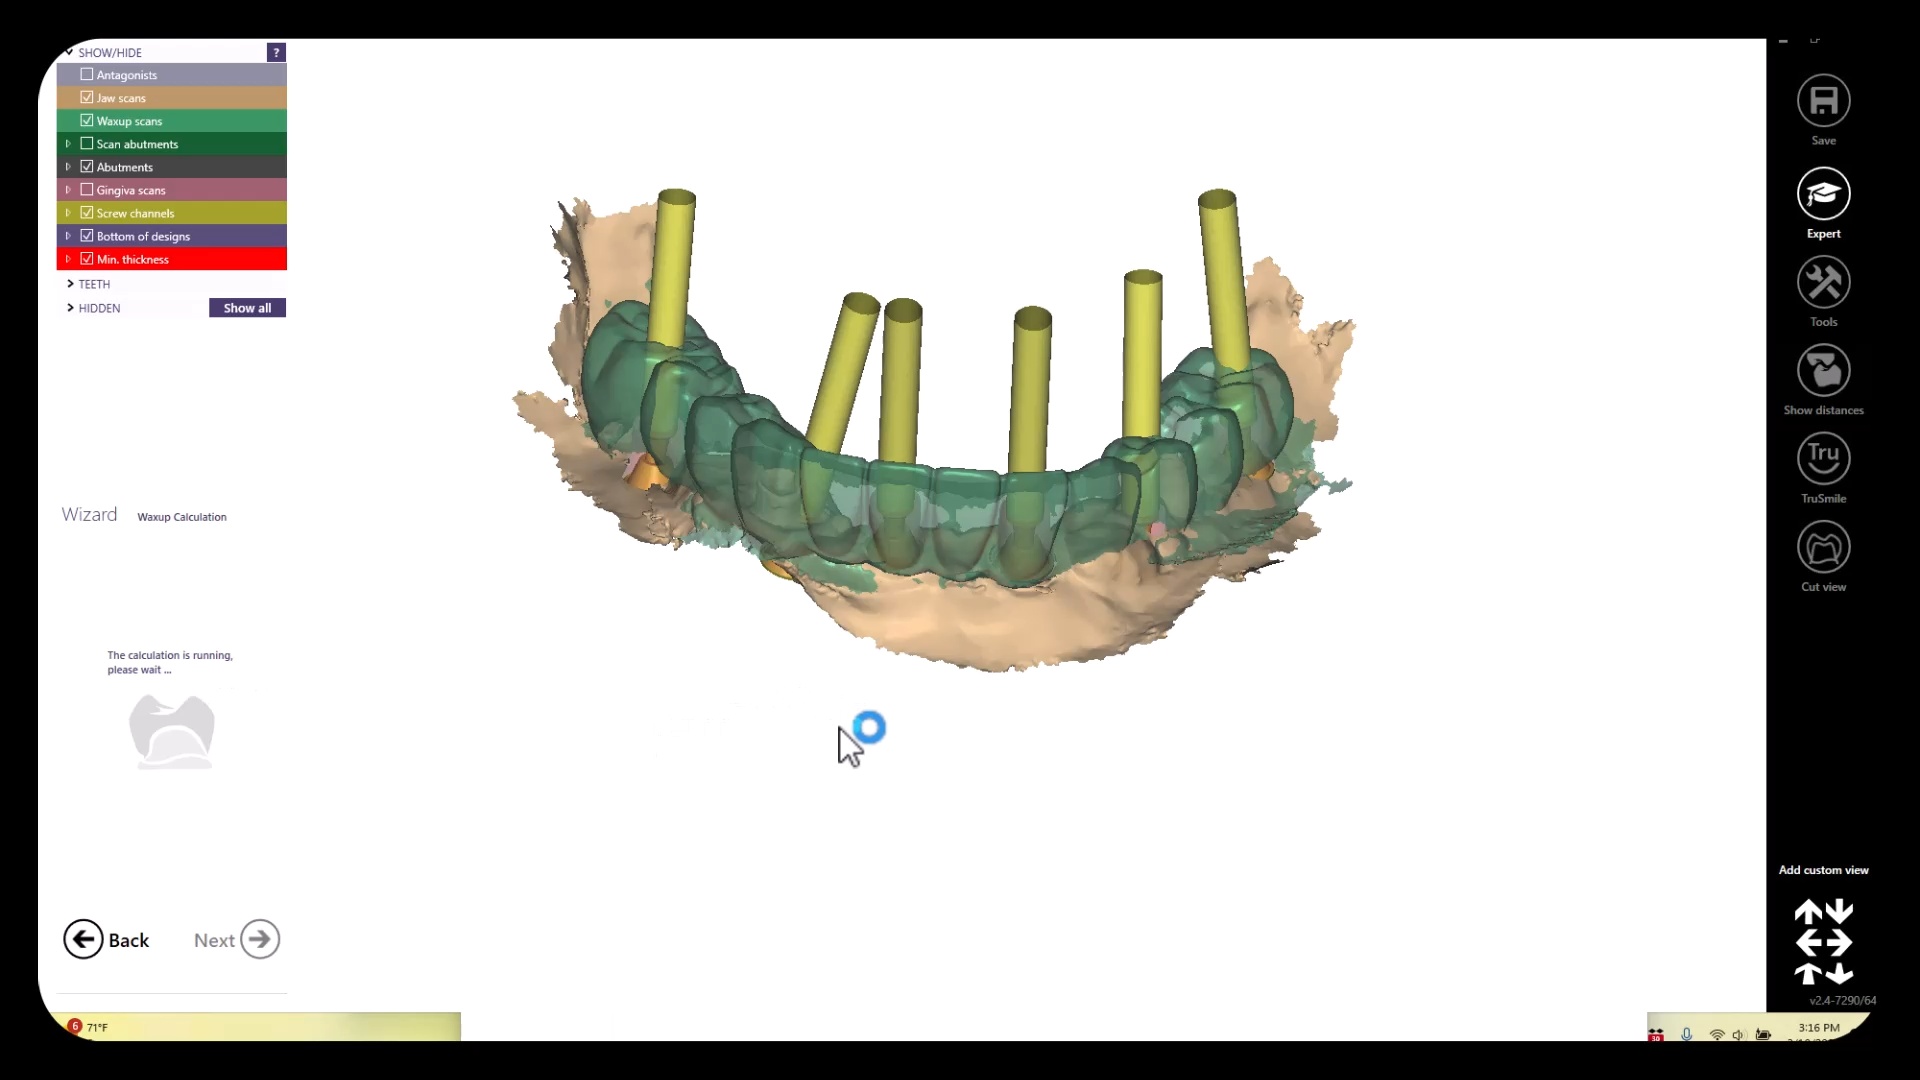
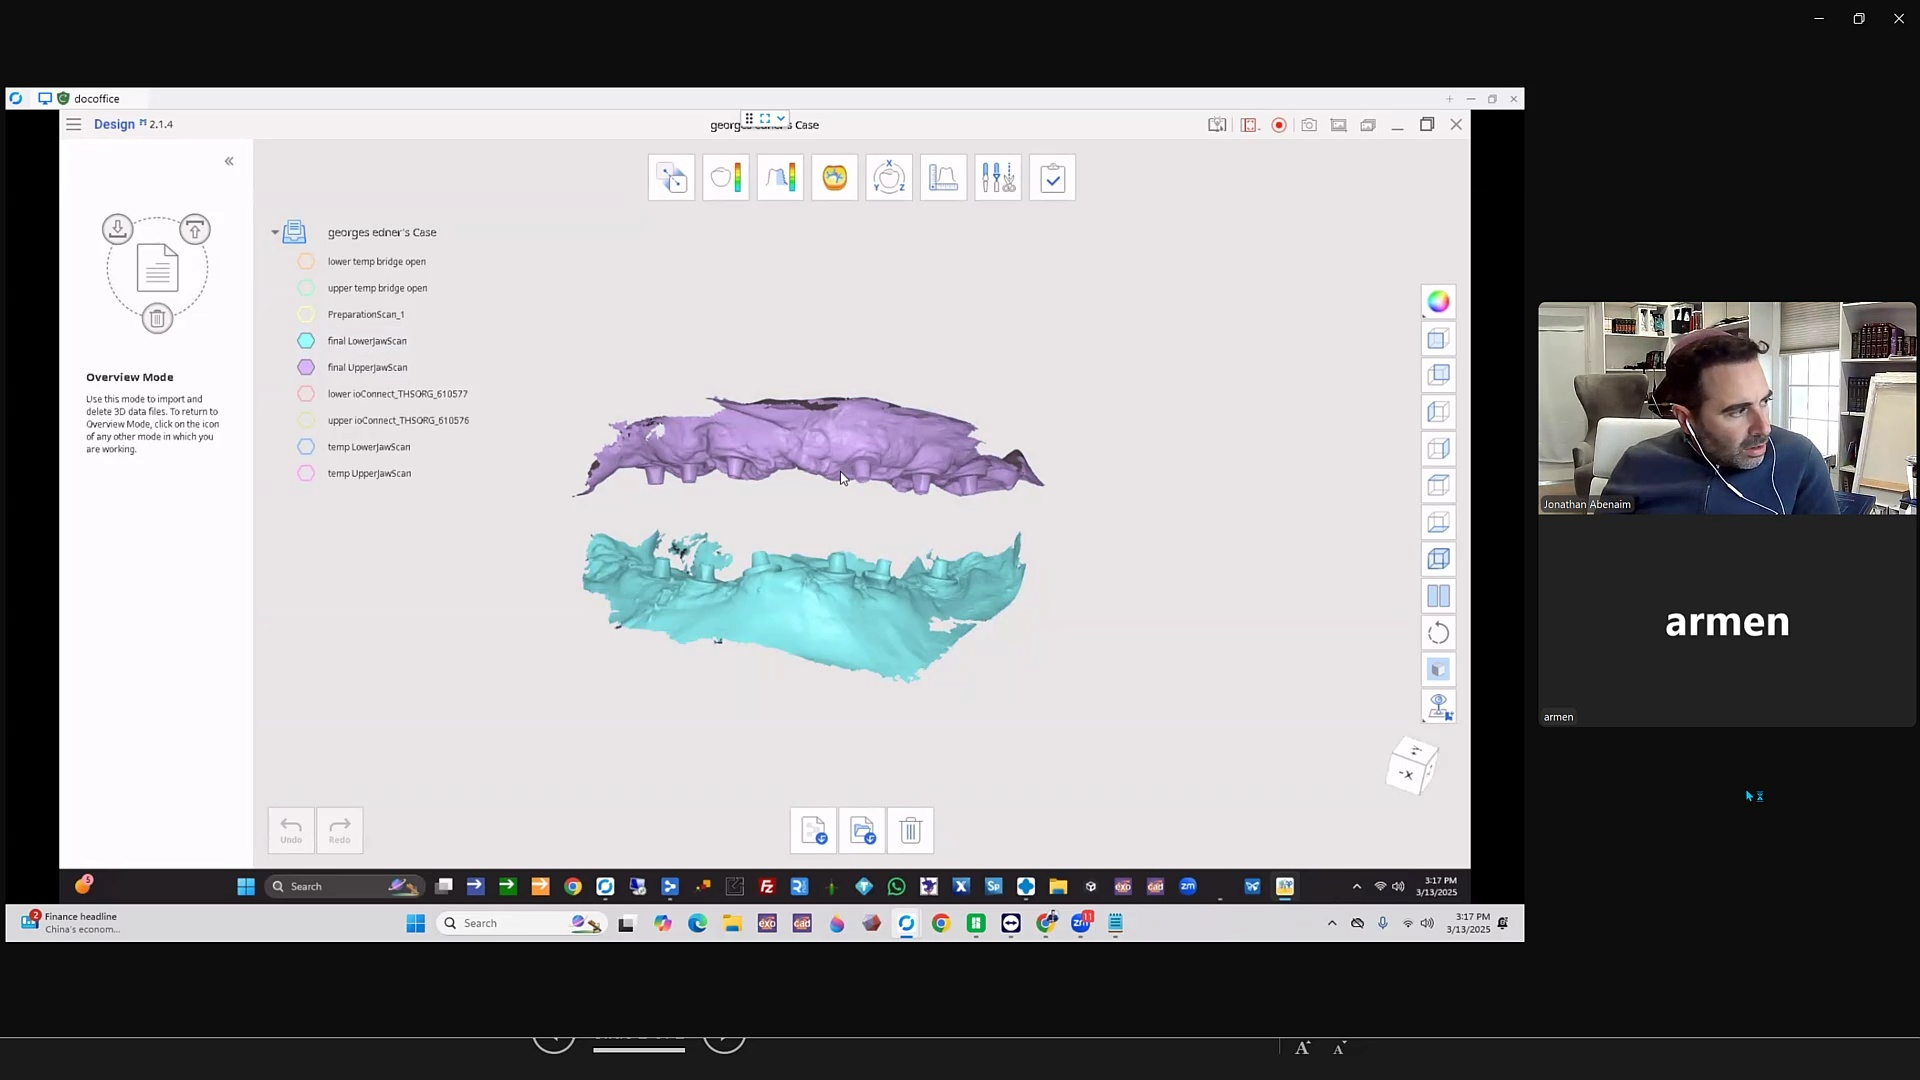
In this article we detail everything you need to capture to design and all on x type of restoration so you can quickly print a prosthesis and deliver it to your patient as quickly after surgery as possible. We think it is best to start with the end in mind and work backwards to the models you need to capture.
Models Needed to Design
These are the models you need to bring into exocad per arch. Of course, you can bring in more information into the equation if you chose to:
Tissue scan (ideally when sutured and not a bloody field). This is usually captured with an intra-oral scanner. Some take an alginate of the arch and scan it with a desktop scanner.
Implant locations, which are the multi-unit abutment margins. These are captured in a variety of ways, all of which have to address the limitations of scanning edentulous flat and symmetric surfaces which introduce Veersing Errors. These options include extra-oral photogrammetry, intra-oral photogrammetry, and/or implant suprastructures that reduce or eliminate scanning errors, like the Scan Ladder, io connect from TruAbutment, etc…
Preop Scan, or more ideally a wax up scan to the correct vertical dimension
A designer also ideally would want the opposing model and buccal bites as well.
All of these models need to be properly related to each other which is an endeavor in itself. All of the models listed above are also disciplines of their own and many chapters could be devoted to each topic. Assuming you have this information imported into CAD software correctly, you can design the temps very quickly and get them into the printer for a temporary
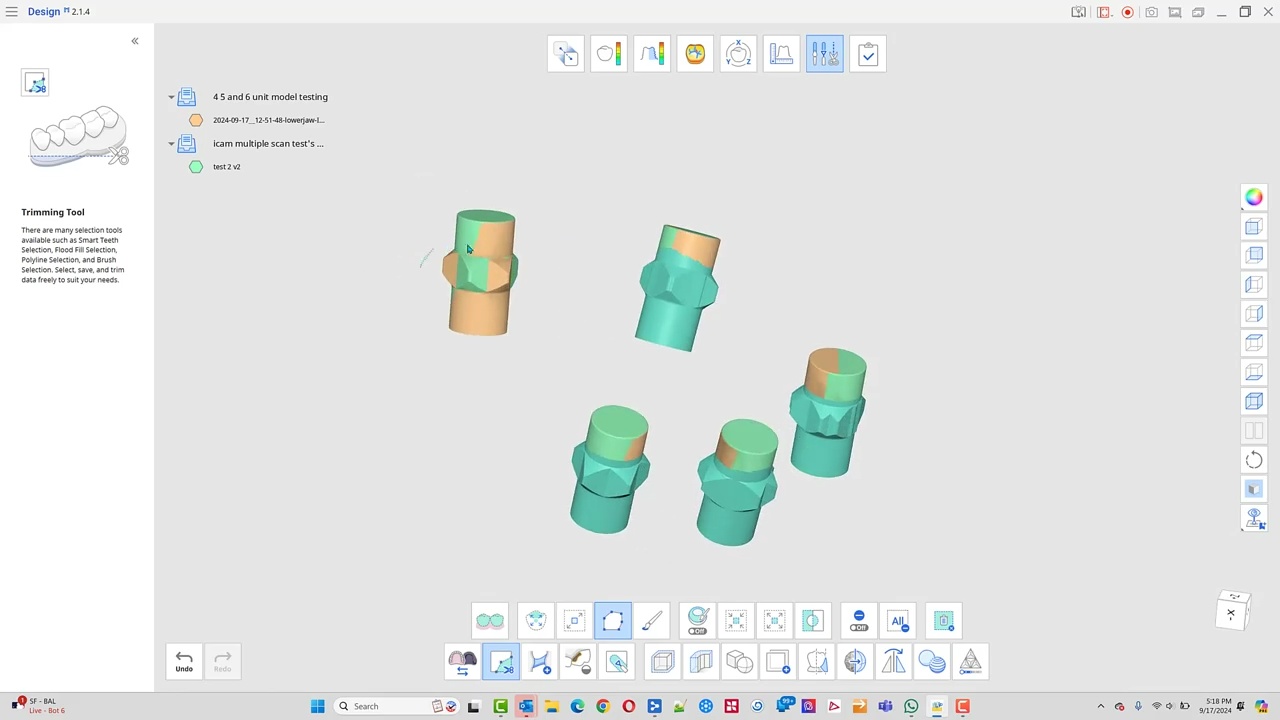
The traditional approach to these cases required a model of the arch with some suprastructure that could be used to relate it to the photogrammetry scan. This process can be quite arduous and involves lots of steps. Other current systems, like the Shining Elite allow you to merge models in the native scanning software. Alternatively, you must make sure you have common stitching abutments to related models to each other in CAD software. You can use common landmarks that are found in both models to accomplish this like in this demonstration
Using Common Landmarks to Relate Models to Each Other
Managing Surgical Cases Where Stitching Landmarks are Removed to Accommodate Space for the Prosthesis
The approach to these get much more complicated when you don’t have those landmarks available to you from one model to the next, usually because the they have been surgically removed. You must:
Capture the pre-op or wax up and relate it to the tissue scan
capture the tissue scan and relate it to the implant location models.
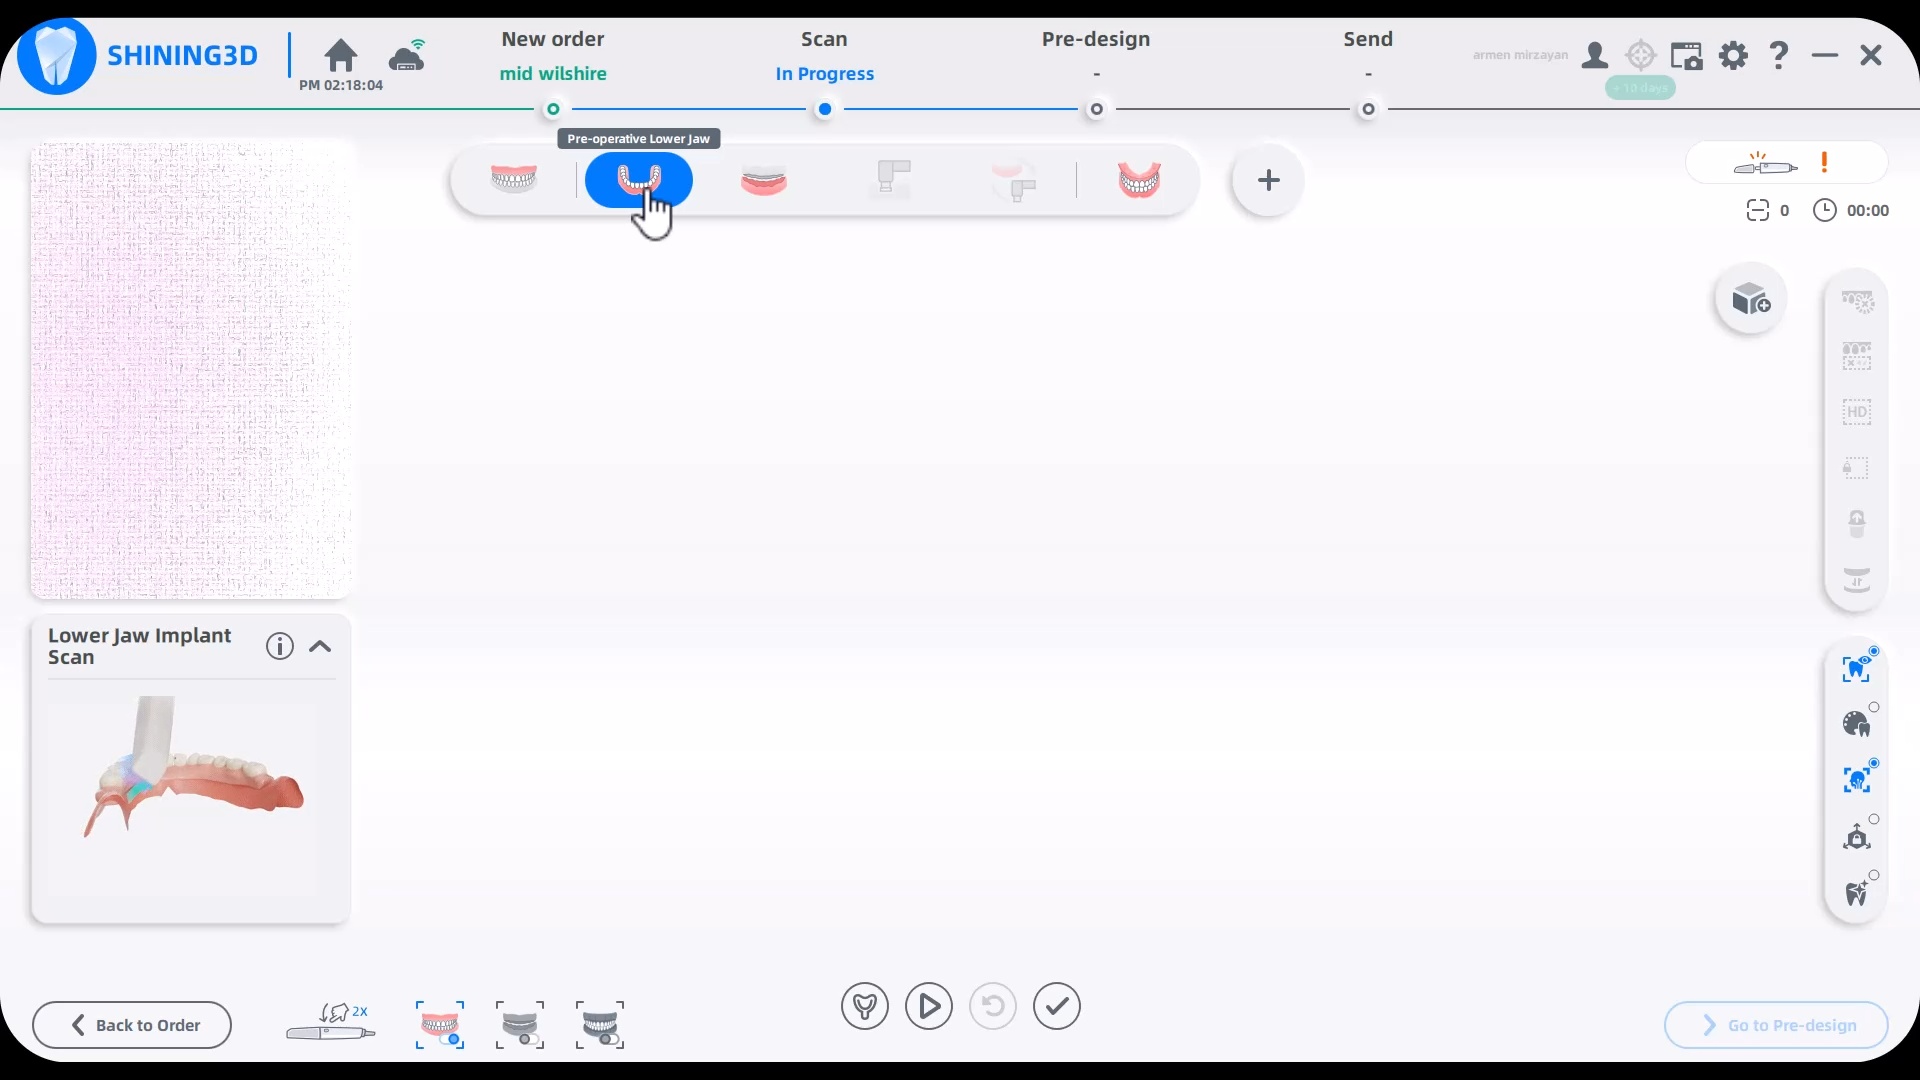
One way to do this is to place arch trackers in areas away from the crucial areas of the arch, namely the retromolar pad area on buccal to the mental foramen. The Shining Elite Scanner allows you to do this in their own native imaging software. In the first video you will see how the arch tracker allows you to relate the iPG scans with your tissue scans.
Arch Tracker used to Relate the iPG and Ios Models to each other
You have to leave the arch tracker in place from the very beginning to the very end. If possible, we recommend you remove them only after you have placed the temporaries as it leaves you a back up in case something goes awry in the process. You will use it to relate the preop to the tissue to the iPG models.
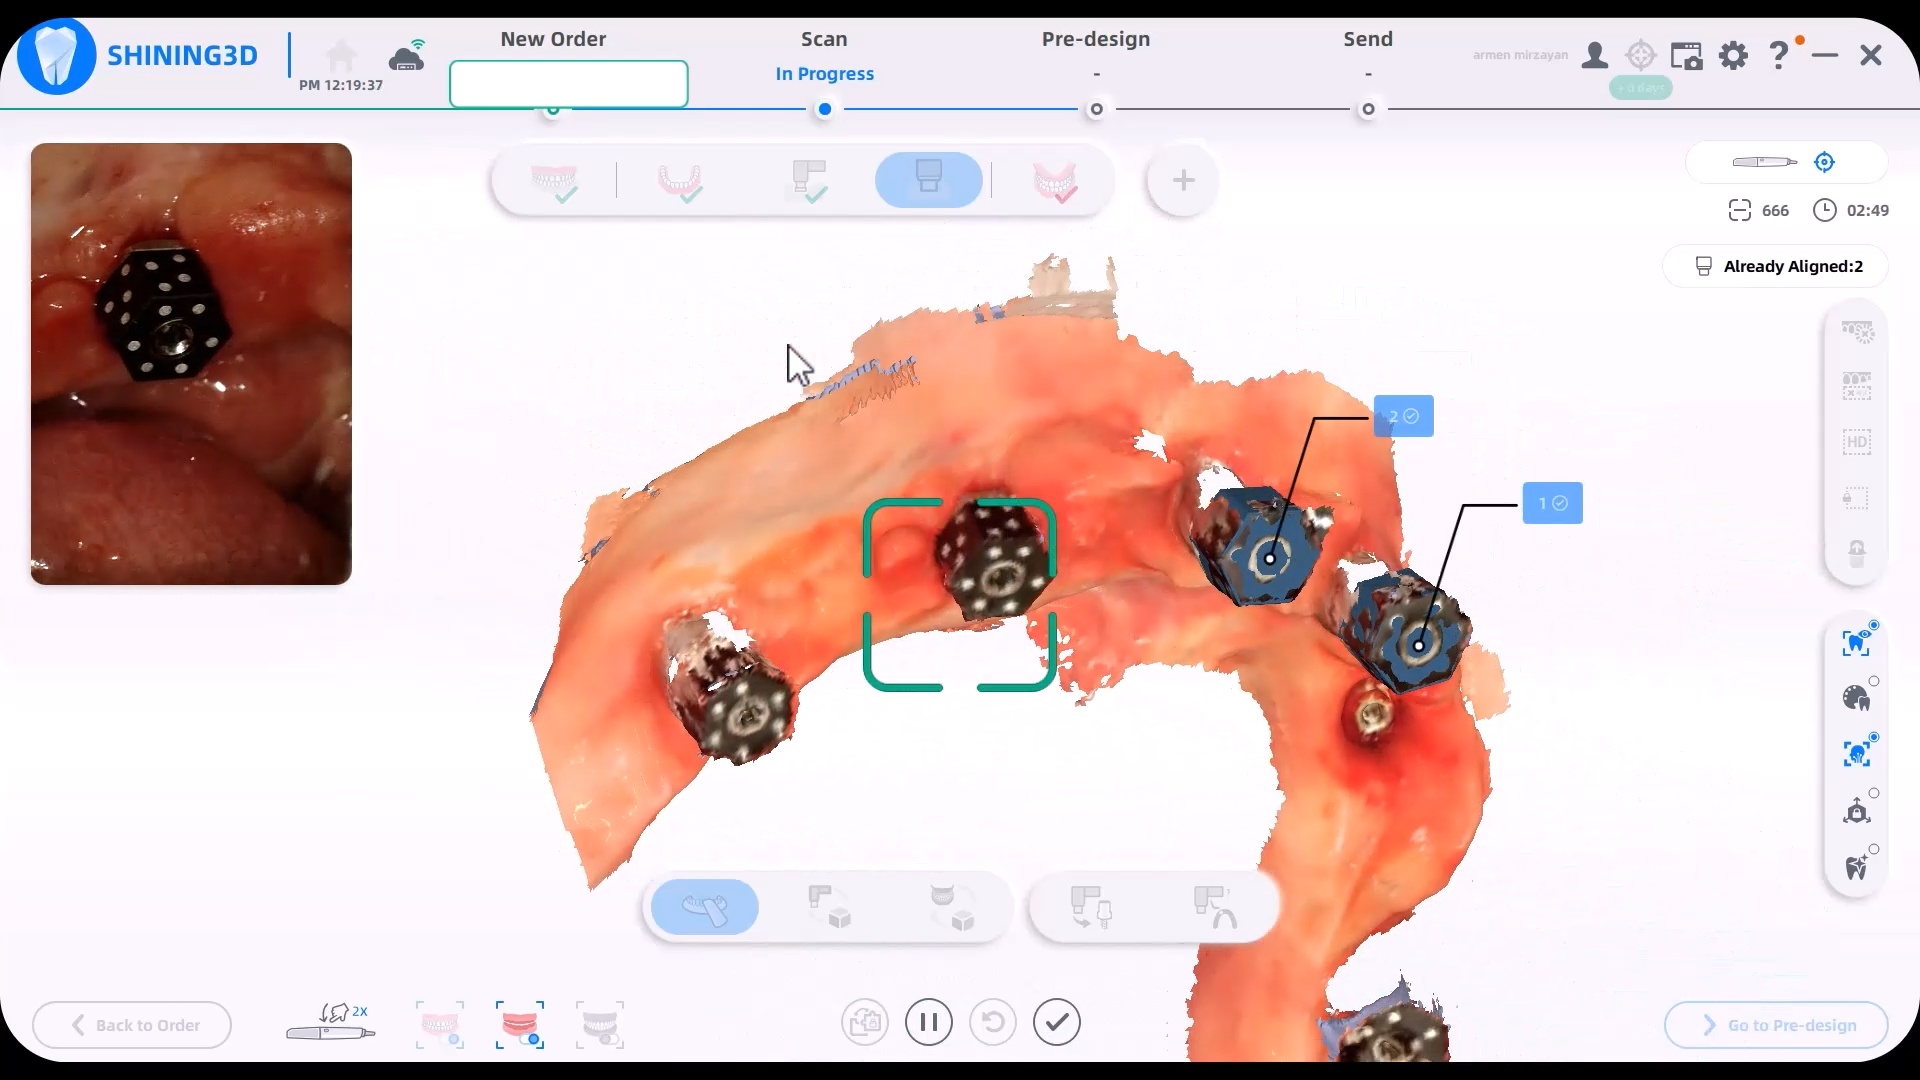
The BIGGEST issue most people have with digital impression for full arch cases is how to keep track of relating models to each other, namely relating the preop to the tissue scan and to the domino scans.
In healed cases, this is much easier to manage. you have landmarks that are immobile in the tissue that you can use for this purpose, so make sure to capture data beyond your pre-existing prosthetic/teeth so that you can easily merge them later. relating the tissue scan to the dominos are also easy as the unaltered tissue between the two models can readily aid in that process
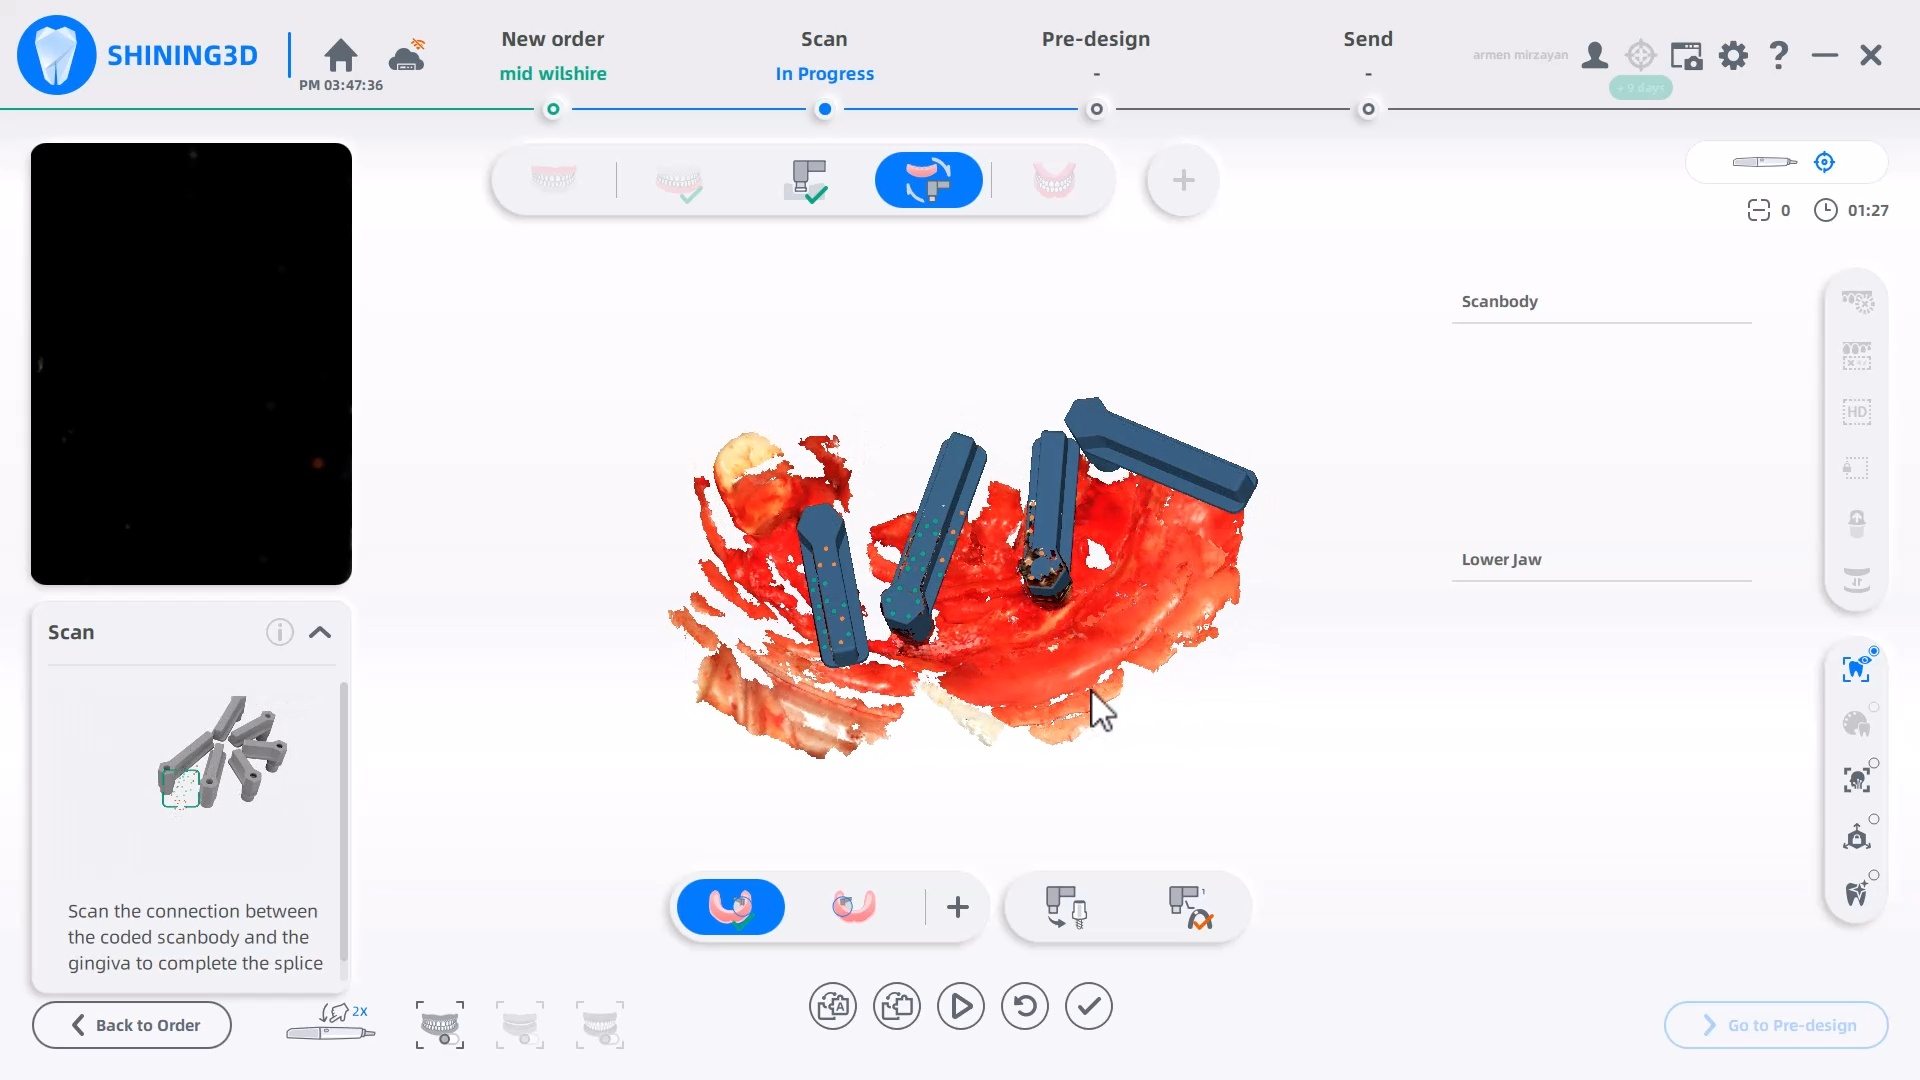
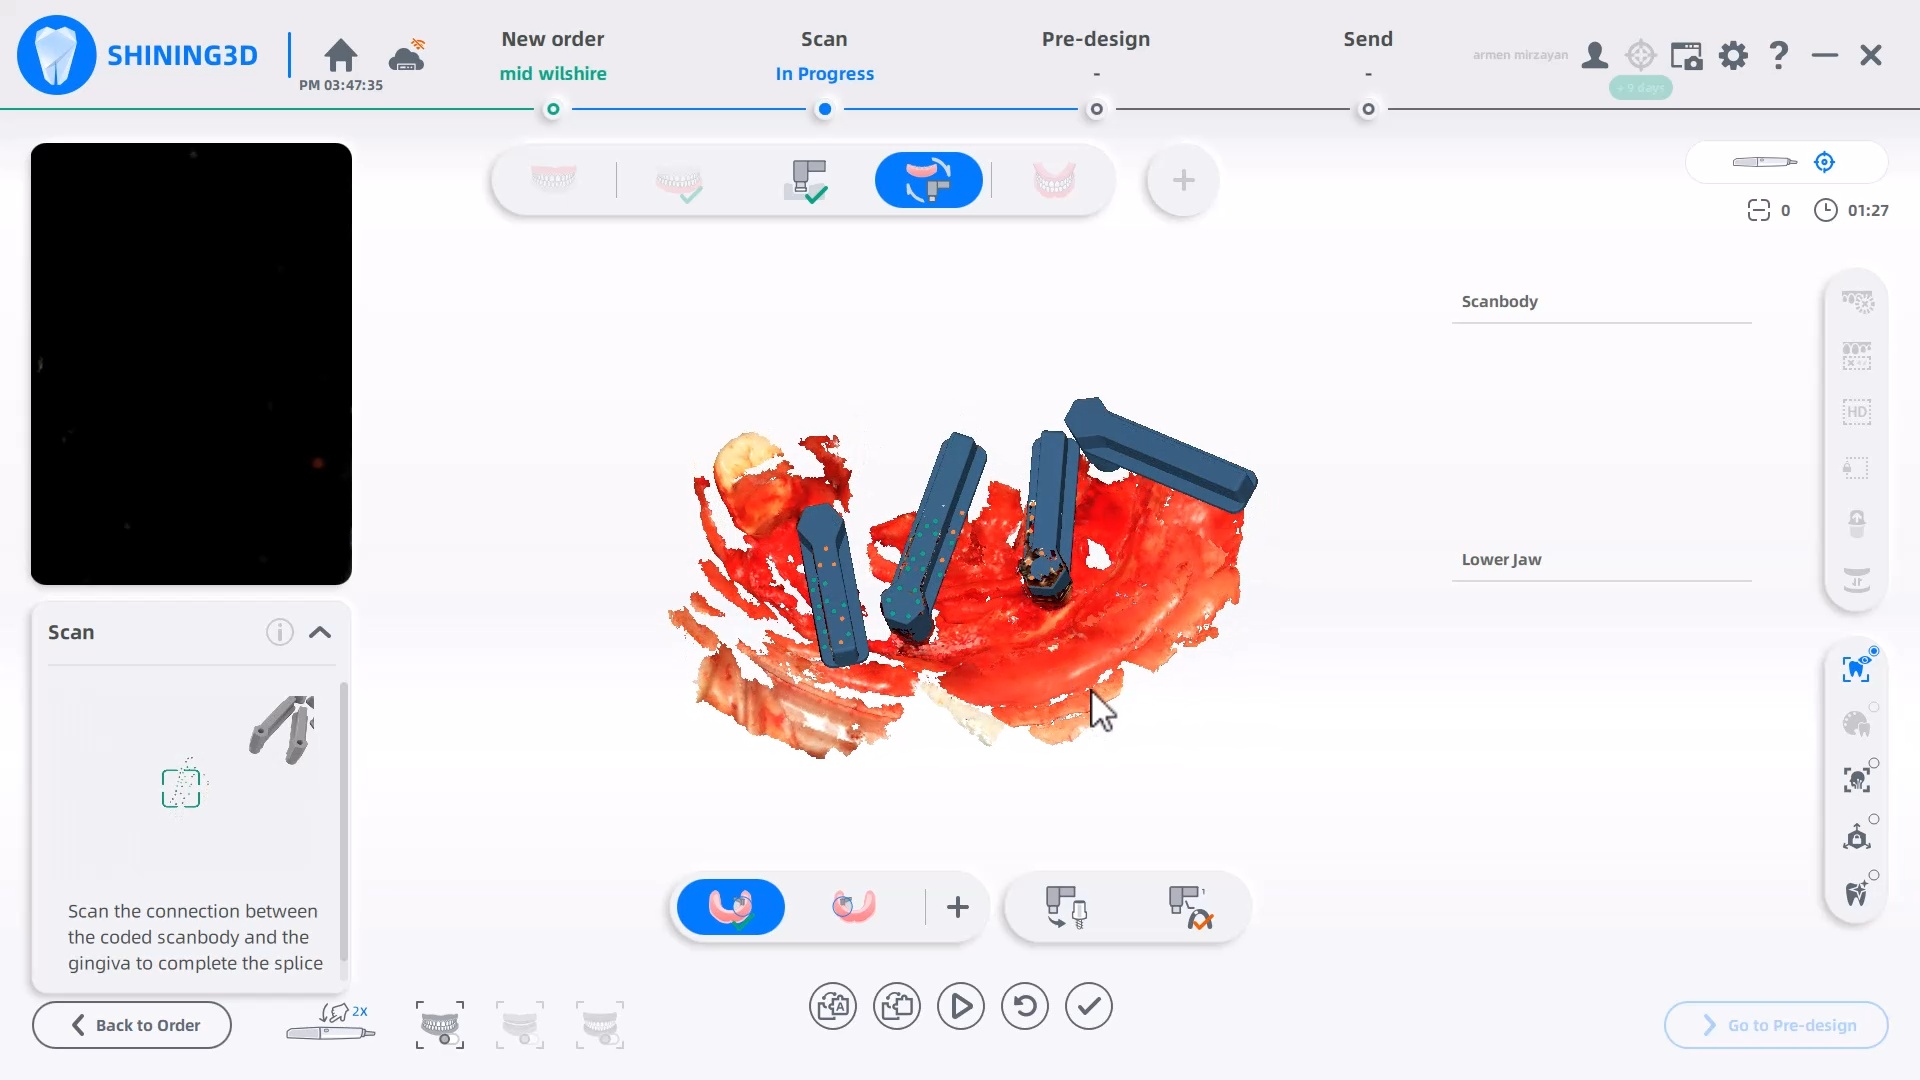
the degree of difficulty skyrockets when you have a surgical field with flaps moving and blood everywhere and you have many choices. my preference is to use a arch tracker that you place in bone and that stays in place throughout the whole process. the trouble with the arch tracker is that i can be in the way of surgical guides if you use them, or that they may move during the procedure if you bump into them. you’re ultimate savior then is the scancap. it is hard coded by shining to let you merge the dominos (scanbodies) with the scancaps.
Alternate methods include using proprietary material from sources that are very well versed in this matter, like Jonathan Abeneim’s Excel Protocol, which he highlights in this webinar. He used his THS caps to not only related these models to each other but also perfectly mount your models to the opposing arch
Stitching Abutments
One of the most important things to keep in mind when imaging with scanner is to keep a stitching abutments in tact between various models. In dentate cases, we usually keep a few teeth and extract them at the very end. Other times, some surgeons prefer to extract all the teeth, place the implants, and then scan the multi unit abutments. In that situation, it is imperative that you add adjuncts to the equation like bone screws or arch trackers.
This must be applied to relating the preop jaw scan with the jaw scan AND also the tissue scan and domino scan flags in the equation.
If you do not have the stitching landmarks to relate his tissue scan and the domino scan. What gets even more complicated is that the software forces you capture the tissue and merge it to the dominos before you proceed.
The first video explains the software requirements, and the second video demonstrates how you can bypass that requirement for an immediate case
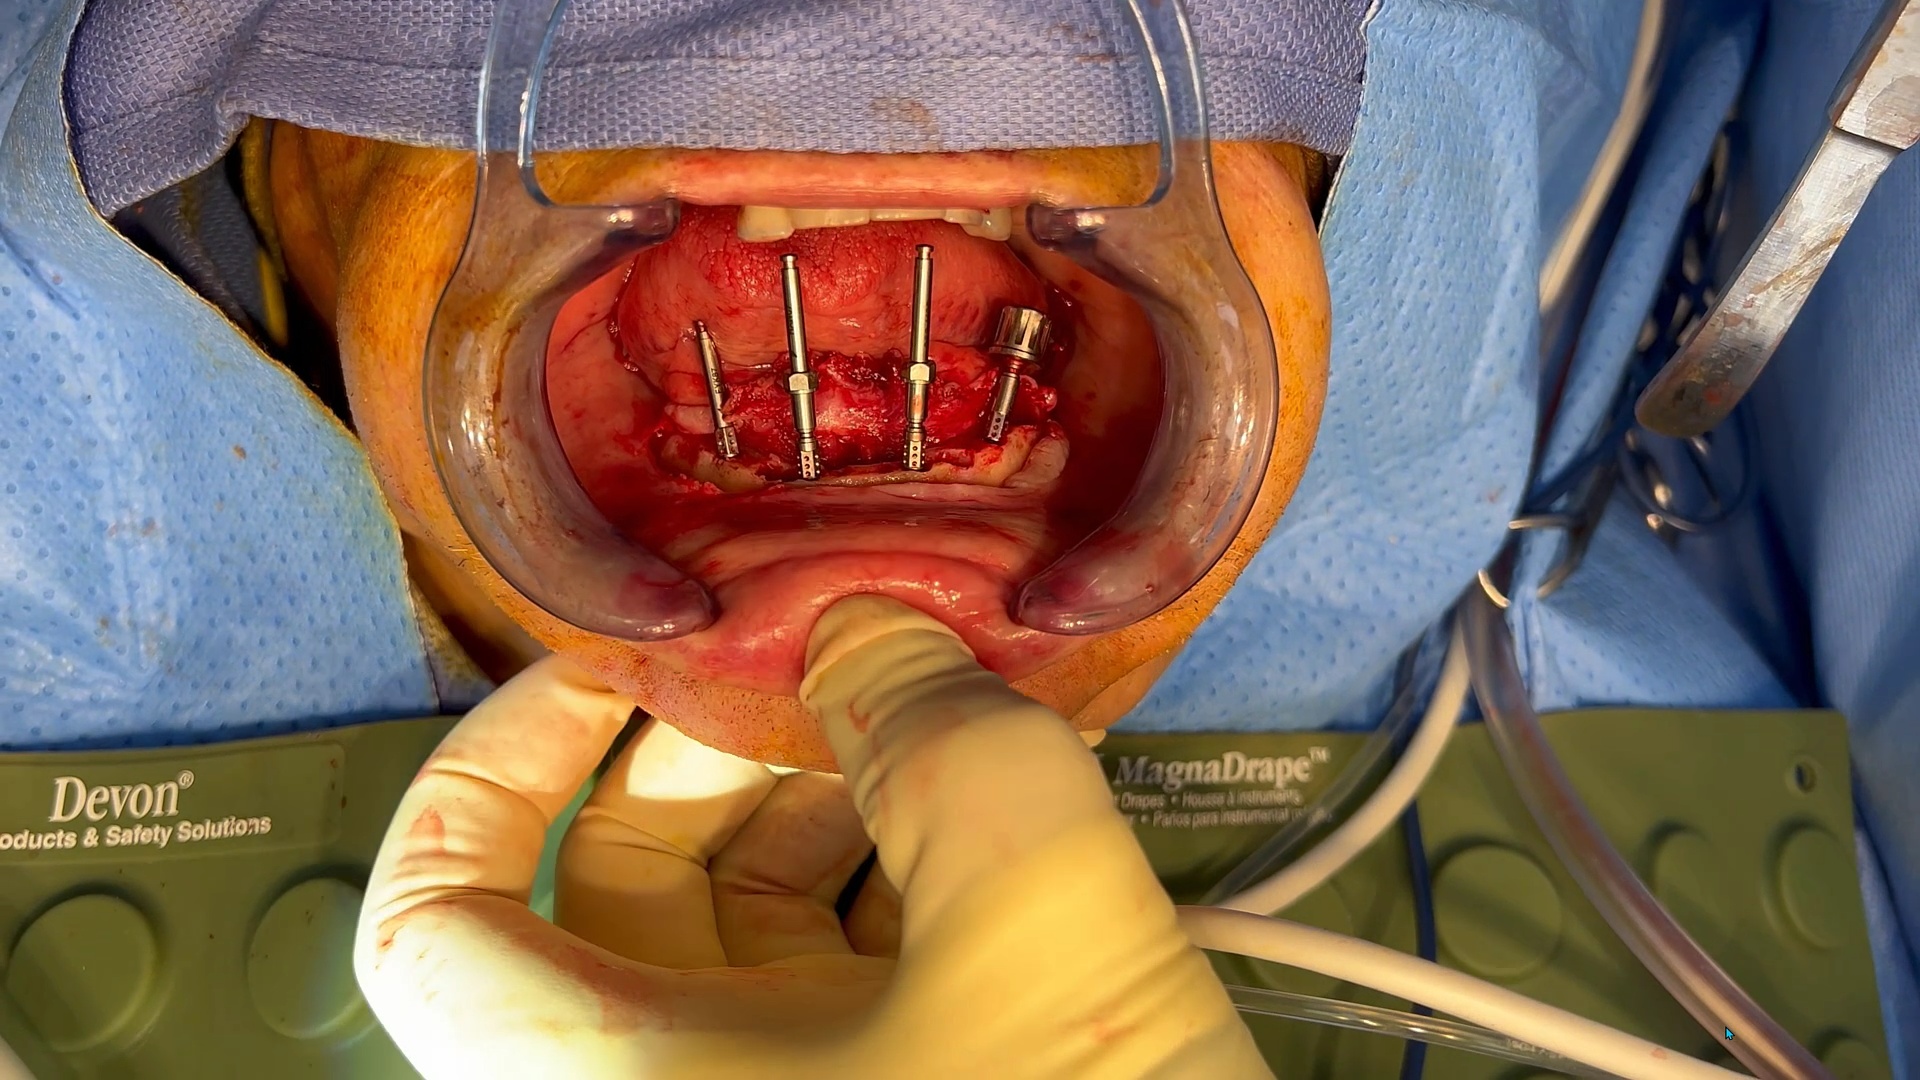
How to Image Immediate Extraction and Fixture Placement
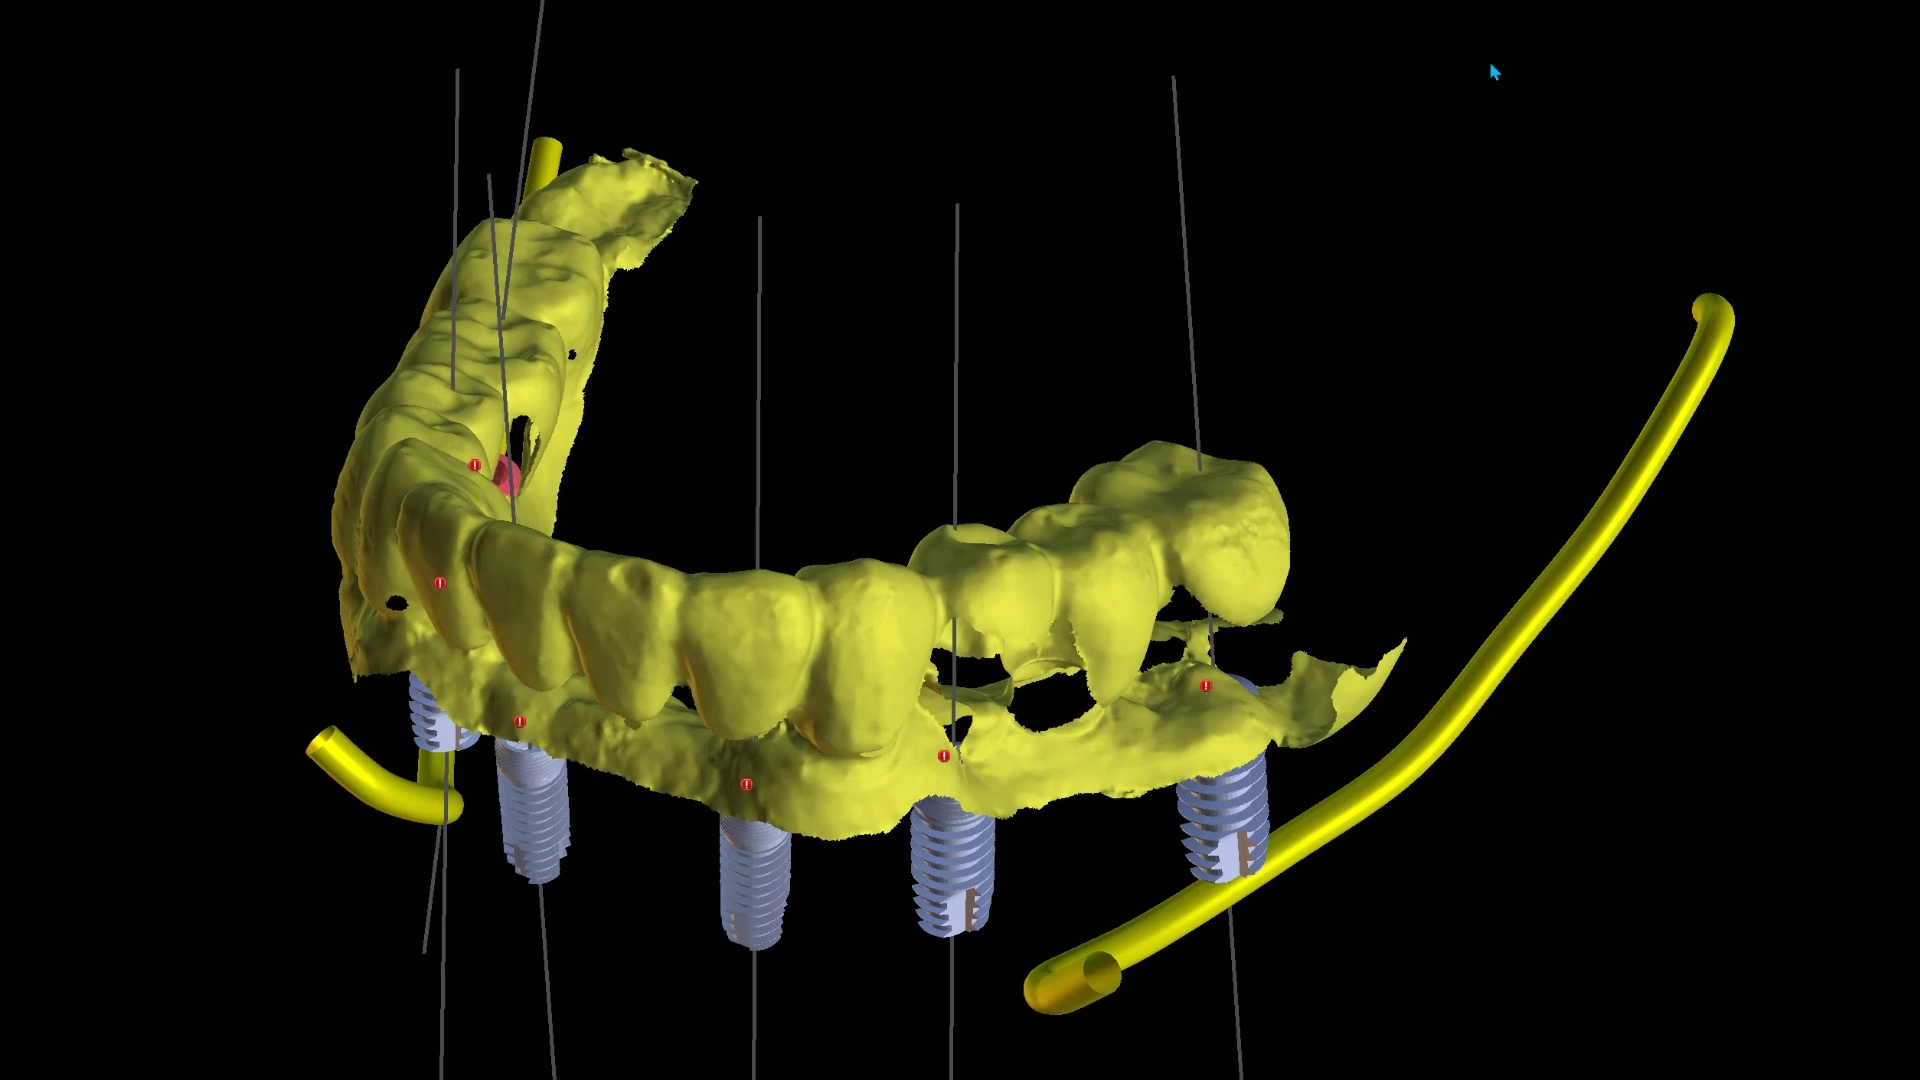
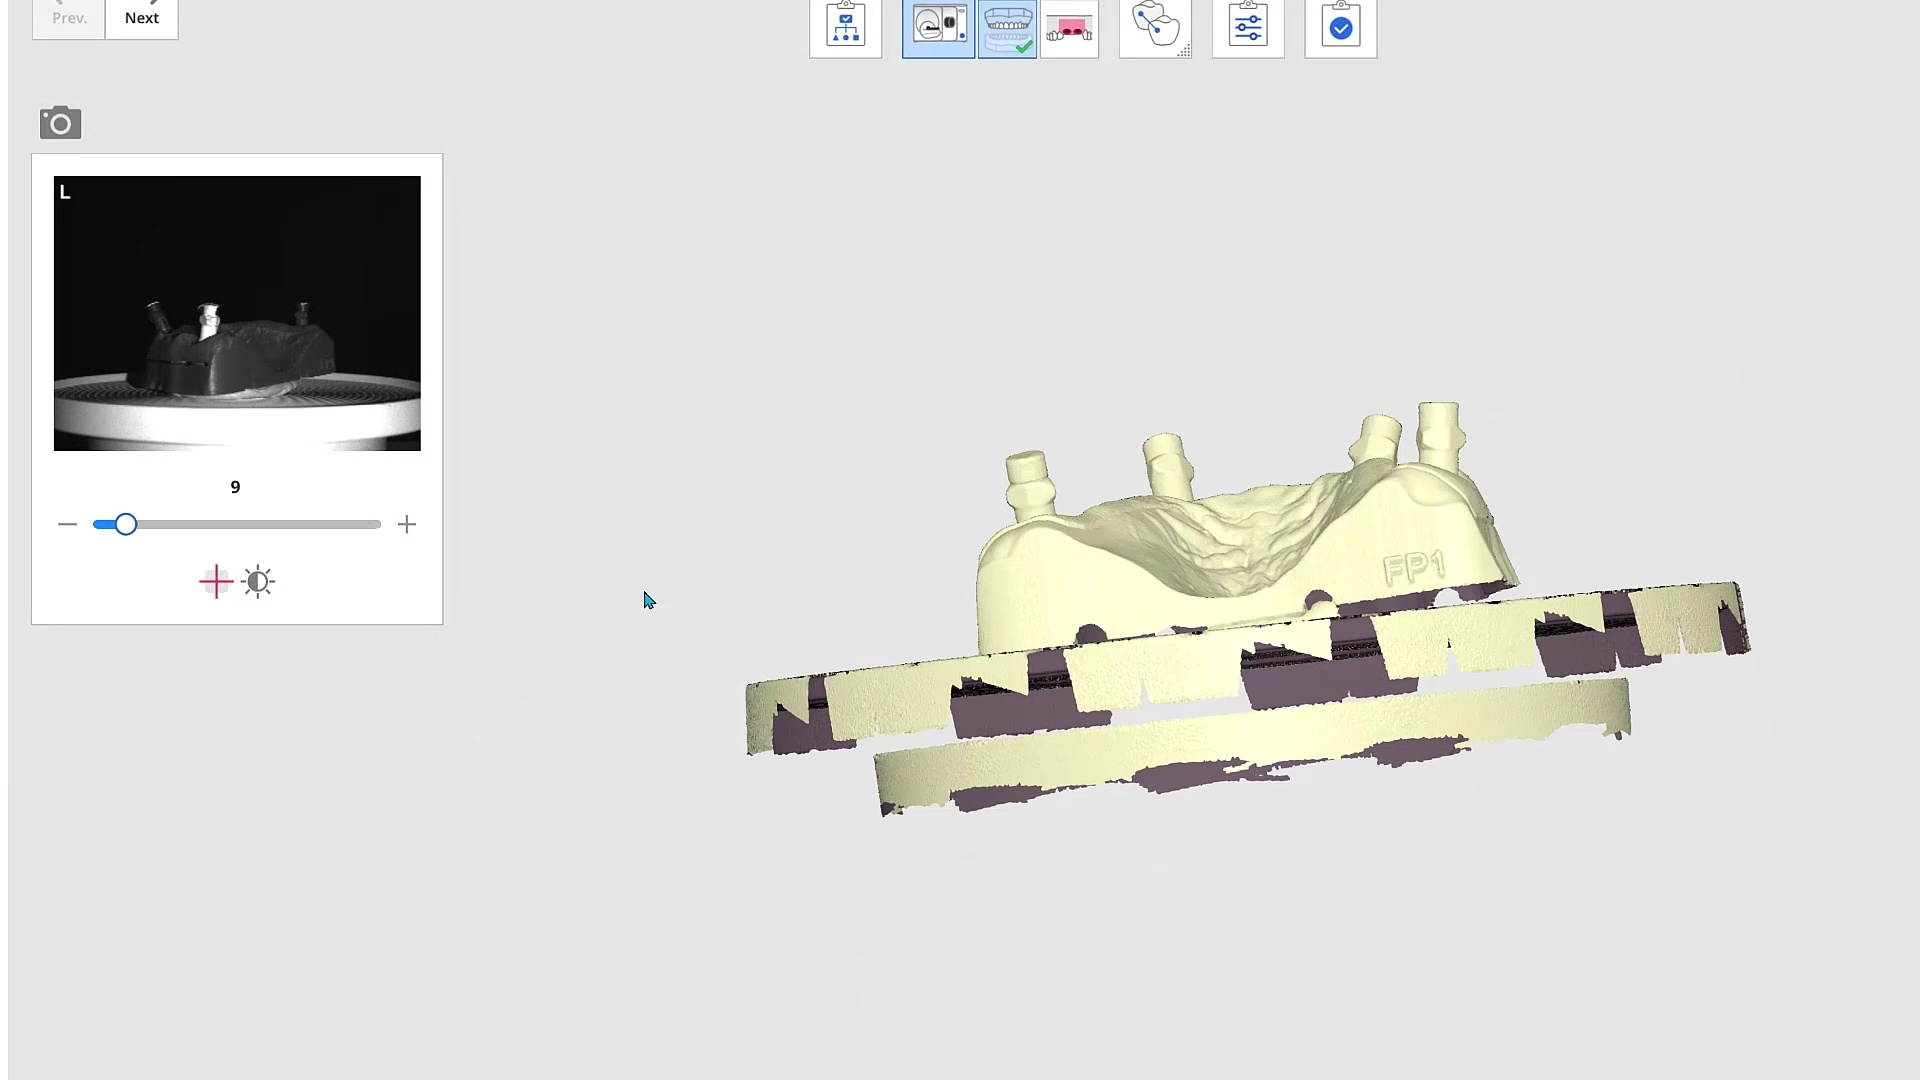
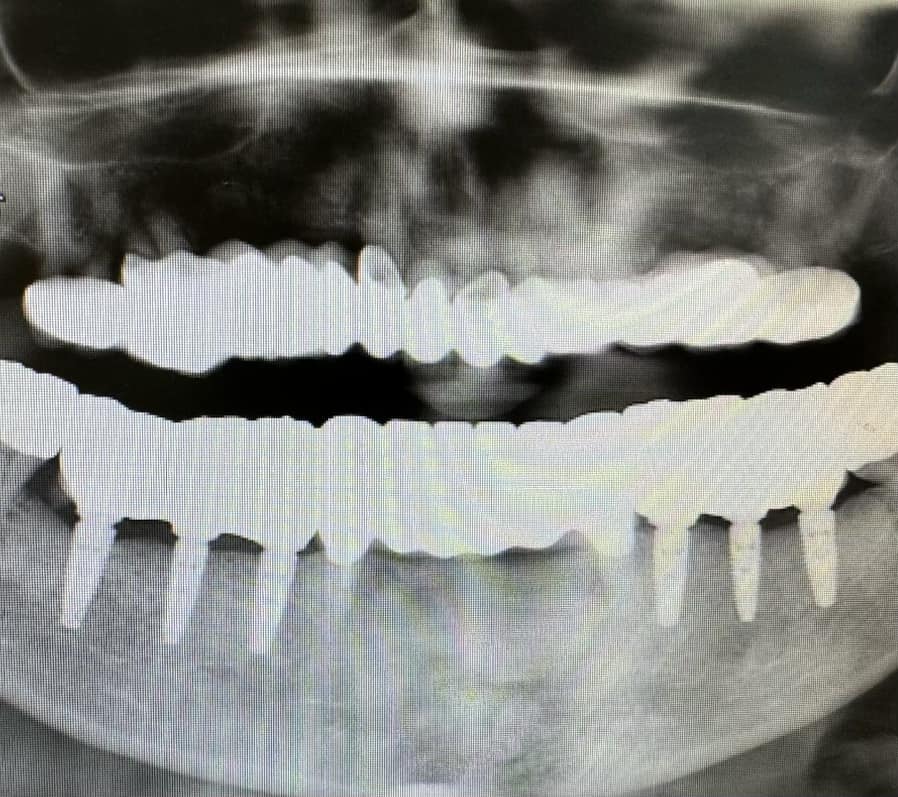
Comparing the results of this case between the icam scan and the shining intra-oral photogrammetry machine
You can download these models and compare them for yourself:
How to Choose the Right SHINING 3D Denture Workflow One of the most important decisions in the SHINING 3D denture workflow happens before design even begins: choosing the right case...
At CAD-Ray, our mission has always been clear: to provide dental professionals with the most innovative technologies and the best possible value. Today, we’re proud to announce an exclusive partnership...
Here is a quick introductory video of how the process works and the subsequent cases provide a lot more detail and information Case 1 In this video we detail how...
In this article we detail everything you need to capture to design and all on x type of restoration so you can quickly print a prosthesis and deliver it to...
If you use trios, and you have been thinking about adding a 3D printer or milling setup to your office, but have been nervous about designs or CAD – time...


You must be logged in to post a comment.