


If you are new to Medit i500, or any introral scanner, and you are trying to scan full arches, there are some important concepts to keep in mind to make your life easier. The scanners do not like parts that move (lips and tongue) and love landmarks that keep their position. They also dislike air or dark areas, but not as much as moving tissue. Some times, if you image the lips or tongue enough, the software and camera can interpret that to be hard tissue and introduce errors. So lip and tongue retraction certainly help.
Humidity of the mouth can cause fogging of the lens, but that is not a big deal with the Medit i500 because the fan on the camera lens prevents that from happening. While keeping this in mind, and if you are new to full arch scanning, here’s a recommendation that works real well. It’s the concept of establishing a “Home Base”, a purchase point, or an anchor abutment. Not only does the camera like immobile parts, it likes these objects to cover large surface areas and also to cross multiple planes.
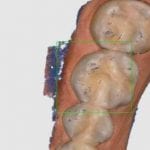
To build this home base, we recommend that you place the camera on top of the posterior and then turn on the scanning. Note, there is a setting in the software that starts to autoscan the surfaces. As a newcomer, you may inadvertently scan areas that you don’t want to. So start in the manual mode, place the camera on the first molar, and start scanning that occlusal surface, Then move the camera to the distal to capture the second molar and come back to the premolar area. Once you have the occlusal surfaces captured, we recommend you roll to the buccal and lingual of this quadrant.
Once you have the foundation of your scan established, you can proceed to capture the rest of the arch. If you get lost in the process, or your camera can no longer continue capturing because you moved to fast or you lost your orientation, you an always go back to your home-base and start from there again. The software will quickly orient itself to that landmark. If you watch the video, you can see how we get back on track on a few occasions by applying this concept.
The first sequence shows how the camera is looking at the opposing arch, and just by moving the camera back to the original landmark, the software quickly recognizes where it is. The second sequence shows how we scan a blue glove and then move the camera to that position. It takes little time for the system to recognize where it is and what it needs to do next.
[videopress O2MFOsZk]
You must be logged in to post a comment.