Outstanding customer service! Laura helped me purchase my first Trios scanner and she took the time to go over all the specs, models, and details with me. Their on going tech support is what sets this company a part from others. - 3/05/2024
Marc Prince
We’ve been using the Medit i700 in our office for approximately a year now. It has been a game changer and hard to remember what it’s like without using the intra-oral scanner. The Cad-Ray support team has been remarkable as well! - 9/11/2022
Lauri Ann
I am about the worst person when it comes to technology. I decided to get a scanner and chose the Medit due to all the positive comments users had. I haven't used it much-the pandemic started right as I received it, however, the customer service has ...read moreI am about the worst person when it comes to technology. I decided to get a scanner and chose the Medit due to all the positive comments users had. I haven't used it much-the pandemic started right as I received it, however, the customer service has truly been amazing! I had an online training and a rep checked in with me several times to see if I needed help. I am going to do another online training soon as a refresher. I wouldn't hesitate to recommend this company and scanner to anyone!read less - 6/16/2020
Mike Capio
Nothing but good things to say about CAD-Ray. All of the education, recommendations, and products they provide are truly the best in digital dentistry at the time. - 6/20/2020
Varghese George
The customer service has been top notch, every single time. I have only good things to say about them. - 4/05/2022
Kristian Dietz
My wife and I practice together and bought our first i500 in August of 2018. This was very early on before Armen had a vast number of technique and online support articles in his blog! Little was publicly known at the time about this new scanner bu...read moreMy wife and I practice together and bought our first i500 in August of 2018. This was very early on before Armen had a vast number of technique and online support articles in his blog! Little was publicly known at the time about this new scanner but I felt confident in my purchase for a few reasons: 1) Armen had validated the product and was standing behind it... I knew of Armen from DentalTown and had many years of public posts to evaluate his character; 2) Limited demos available at the time; 3) some clinical accuracy data out of Europe that required zooming in on a powerpoint presentation that was recorded second-hand via camera phone ha! SO needless to say, I put a lot of eggs in the "Armen is standing behind this product" basket. We have NOT been disappointed. From personalized service from both Frank and Armen, to our vast success and joy using the product and deciding in late 2018 to buy a second Medit i500, I have nothing but good things to say about the product and Cad-Ray. What a bunch of self-less individuals. Armen has offered to remote in and I even took him up on the offer once and he remoted in immediately to take a look at something. Good luck getting service like this from ANYONE else in the industry. Cheers to digital dentistry with the RIGHT partner. Kristian C. Dietz, DDSread less - 3/08/2020
For a few years I have been hesitating to get an intra oral scanner. I finally made the decision to get one and it turned out to be the best purchase I made in 2021!I love my Medit i700! - 11/23/2021
Cad-Ray has been awesome to work with, very knowledgeable and quick to respond. Nick has been answering all my questions since day 1 and made the entire process of purchasing the Medit i700 a breeze. Can't believe how quick the product shipped and ca...read moreCad-Ray has been awesome to work with, very knowledgeable and quick to respond. Nick has been answering all my questions since day 1 and made the entire process of purchasing the Medit i700 a breeze. Can't believe how quick the product shipped and cannot wait to start scanning with it!read less - 12/15/2021
CAD-RAY has the best customer service. They go above and beyond to make sure you have a good experience with your medit scanner. With most tech companies, the person that answers the phone has to put you on hold for who knows how long before getting ...read moreCAD-RAY has the best customer service. They go above and beyond to make sure you have a good experience with your medit scanner. With most tech companies, the person that answers the phone has to put you on hold for who knows how long before getting you in touch with someone to fix the issue. With CAD-RAY, I called and Heather answered the phone. Heather was able to remotely fix my issue within 30 minutes and have me back up and running. No holds, no waiting!!! I highly recommend.read less - 9/01/2022
DERYCK PHAM
STOP SEARCHING NOW!
Best bang for your buck scanner on the market. we have been using out medit for 8 months now. love our crowns, margins are fantastic. almost no adjustments needed at all. maybe one in ten crowns might have to adjust mesial or...read moreSTOP SEARCHING NOW!
Best bang for your buck scanner on the market. we have been using out medit for 8 months now. love our crowns, margins are fantastic. almost no adjustments needed at all. maybe one in ten crowns might have to adjust mesial or distal to get crown to drop in. occlusion is always spot on. patients love the technology and WOW factor -"SOOO COOOLLL." customer service is great also! dont waste your money on anythign else. our lab even comments on how easy it is to deal with medit and how good the scans are. they recommend it to their other doctors now as well.read less - 10/09/2019
Couldn't be happier with the support I've gotten from these guys. Trouble-shooting a problem real time so you can call a patient and get them right back in with a solution is extremely hard customer service to match. Thanks a ton and no question wher...read moreCouldn't be happier with the support I've gotten from these guys. Trouble-shooting a problem real time so you can call a patient and get them right back in with a solution is extremely hard customer service to match. Thanks a ton and no question where I'll be going for any more purchases!read less - 10/06/2021
I love this scanner. Seriously, how can you fit so much quality into the scanner, software and support and such a low price? Magic?!?! Probably. But, for real, we really like using this scanner and it produces great results. Best dental purchas...read moreI love this scanner. Seriously, how can you fit so much quality into the scanner, software and support and such a low price? Magic?!?! Probably. But, for real, we really like using this scanner and it produces great results. Best dental purchase I've ever made!read less - 10/09/2019
Awesome company. The video collection CAD-Ray has put together for their equipment is unparalleled. There is literally no other company that has a library of learning tools like Armen and his team have put together. I highly recommend this company if...read moreAwesome company. The video collection CAD-Ray has put together for their equipment is unparalleled. There is literally no other company that has a library of learning tools like Armen and his team have put together. I highly recommend this company if you are considering making a digital equipment investment. 5 stars!read less - 6/16/2020
Gabriel Joel
Medit i500 is an incredible scanner. I have experience with other types of scanners including IO and Desktop but this one is really impressive. It is blazing fast and takes beautiful scans. But more importantly is the company itself. Medit is an amaz...read moreMedit i500 is an incredible scanner. I have experience with other types of scanners including IO and Desktop but this one is really impressive. It is blazing fast and takes beautiful scans. But more importantly is the company itself. Medit is an amazing company and is constantly trying to improve. They are always on the cutting edge and releasing new improvements all the time. They are always LISTENING to the customers on how to improve the scanning experience and change accordingly. The customer service is second to none. I highly recommend this scanner but even more highly recommend considering buying the scanner as a result of the great company and PEOPLE that stand behind it.read less - 10/09/2019
Our office has been using the Medit scanner for a few months now and are loving it! CAD-Ray was super easy to work with in purchasing the scanner and providing support as needed. Their Facebook forum with the updates and video tutorials are incredibl...read moreOur office has been using the Medit scanner for a few months now and are loving it! CAD-Ray was super easy to work with in purchasing the scanner and providing support as needed. Their Facebook forum with the updates and video tutorials are incredibly helpful.read less - 6/16/2020
Robert Crosby
The i700 is the second scanner I have purchased. It is hands down far superior in terms of quality and ease of use than my first scanner (3M Tru Def). I was hesitant to enter the market again but wanted to mainly for implant reasons. After talking...read moreThe i700 is the second scanner I have purchased. It is hands down far superior in terms of quality and ease of use than my first scanner (3M Tru Def). I was hesitant to enter the market again but wanted to mainly for implant reasons. After talking with Laura and watching her presentation with my staff, we were sold! The i700 was extremely reasonable in price while being similar to units costing twice as much. CAD-Ray made this possible. I found their on line training to be adequate in learning the necessary skills to start scanning, I continue to watch these videos as I sharpen my skills. Initially I was concerned about the on line training. But now I actually prefer this way of training as it is self paced and you always have the library of videos to watch when needed. Laura has been there to answer questions and help me whenever needed and I’m talking on nights and weekends too! I admit I was was extremely hesitant to get another scanner, especially with an online outfit; but I have no regrets and highly recommend CAD-Ray and Laura for anyone needing a scanner! They provide excellent services.read less - 4/23/2022
Samir Rana
Ive had the medit since 2018. One of the best decisions in dentistry ive made. I met some of the great trend setters in digital dentistry(armen, jonathan ab and others through social media platforms). Medit Has changed The way i practice, live and ...read moreIve had the medit since 2018. One of the best decisions in dentistry ive made. I met some of the great trend setters in digital dentistry(armen, jonathan ab and others through social media platforms). Medit Has changed The way i practice, live and think! Happy not to have a monthly fee as i did for years. Support is always a message or call away. Would be glad
To further share my experience with you if u need.read less - 6/16/2020
Johnny Vredenburg III
Before working with cad-ray, I was hesitant to dive into digital dentistry due to the complexity of it. Working with Laura at cad-ray made all of my concerns go away. She was there to help me with my Exocad software installation, even outside of norm...read moreBefore working with cad-ray, I was hesitant to dive into digital dentistry due to the complexity of it. Working with Laura at cad-ray made all of my concerns go away. She was there to help me with my Exocad software installation, even outside of normal business hours - really hard to come by! I also purchased a Medit i500 and getting that setup and working in my clinic was seamless. I could not have asked for better support while navigating digital dentistry. My next purchase will be a 3D printer, and i know exactly where i will buy it from! Highly recommend these guys.read less - 11/20/2020
Daniel Thrall
I have owned this scanner for six months now. I have experience with other scanners including Trios and Carestream. The Medit scanner can stand with the big names. The scanned images are good. The ease of communication through the software with the l...read moreI have owned this scanner for six months now. I have experience with other scanners including Trios and Carestream. The Medit scanner can stand with the big names. The scanned images are good. The ease of communication through the software with the lab is probably my favorite part. Another thing I like is that the company is very open to improvements and listens to what its customers are wanting.
Cad Ray has a great team working alongside this product and continually updates all of the users on new features or new ways to use existing features. They are extremely responsive to questions and provide fast and competent support to the product that they sell.
I would recommend both the scanner and the company to anyone looking to get into the digital scanning world.read less - 10/09/2019
I bought my Medit I-500 from them. Everything has been been first class, from the training to the customer support. I highly recommend buying through CAD RAY. - 6/16/2020
Harrison MacKenzie
Purchased Medit i700 from Frank/CAD-Ray and everything has been absolutely top-notch! Great service, quick responses, great training. Very happy with CAD-Ray and our i700! - 10/20/2022
Andrew Cole
The D.I.Y. Medit i500 package was right for me. I bought a nice gaming PC for my 2 operative rooms, downloaded the software, watched some videos, and started scanning. It's really easy to use, my crowns fit better with fewer adjustments, and they cos...read moreThe D.I.Y. Medit i500 package was right for me. I bought a nice gaming PC for my 2 operative rooms, downloaded the software, watched some videos, and started scanning. It's really easy to use, my crowns fit better with fewer adjustments, and they cost less because they are made model-less and without impression materials. I will start to see a return on investment in less than 2 years and it makes my work more fun, and I can deliver better results. Armen puts on a 2 day course which is very helpful to refine your technique. Start with watching the videos, scan your employees, and then use it on patients. I considered buying an iTero Element 2 and I'm so glad I didn't. The Medit is smaller, as good or better, and it costs ~$25,000 less over the course of 5 years. Ongoing fees for other scanners are a joke. Medit keeps providing updates that make the software even better and there are no additional charges.read less - 3/29/2020
One of the best investments I’ve made for my office. A fraction of the cost compared to cerec. No monthly club fee. Easy maintenance. Saving a ton on lab costs. Milling and designing crowns is honestly my favorite things to do now. - 6/29/2020
These guys are great. Always quick to answers questions and trouble shoot. Only a text away...they are spot on. Would purchase from them again in a heart beat......and will soon! We are getting close to adding a second Medit i500 to the office. Every...read moreThese guys are great. Always quick to answers questions and trouble shoot. Only a text away...they are spot on. Would purchase from them again in a heart beat......and will soon! We are getting close to adding a second Medit i500 to the office. Everyone whats to use the one we have!read less - 6/19/2020
Page Barden
I have just recently purchased the Medit i700, and although it is "on its way" I have to comment on the support that I have already received, especially from Nick. He walked me through the benefits and features of the scanner and the transaction was...read moreI have just recently purchased the Medit i700, and although it is "on its way" I have to comment on the support that I have already received, especially from Nick. He walked me through the benefits and features of the scanner and the transaction was extremely easy. I can only think that the rest of the onboarding will be the same and in six months I will revisit this site and be extremely grateful I made the purchase.read less - 12/09/2021
I recently made a purchase from Cad-Ray and the experience was truly outstanding. From my initial enquiry, Nick was incredibly supportive and knowledgeable, answering all of my questions thoroughly and guiding me to the product that would best meet m...read moreI recently made a purchase from Cad-Ray and the experience was truly outstanding. From my initial enquiry, Nick was incredibly supportive and knowledgeable, answering all of my questions thoroughly and guiding me to the product that would best meet my needs. What really set this experience apart was his non-pushy approach. Nick showed genuine interest in understanding my specific requirements, ensuring that I would be fully satisfied with my choice. This type of customer service is rare and it made the whole process much more enjoyable. I can confidently recommend Cad-Ray to others not just for their high-quality products, but for their exceptional customer service. A big thank you to Nick and the entire Cad-Ray team for their professionalism and dedication.read less - 5/17/2023
Alec Keon
I was on the fence on getting a scanner for years and finally pulled the trigger. CAD-Ray's support and knowledge has made this one of the best investments in my practice to date. When I spoke with Damien on the phone about my options he literally sa...read moreI was on the fence on getting a scanner for years and finally pulled the trigger. CAD-Ray's support and knowledge has made this one of the best investments in my practice to date. When I spoke with Damien on the phone about my options he literally saved me thousands after figuring out what my exact needs were. I went with the Medit i600, MSI laptop and 3D dental systems cart. The final product looks and feels as premium as it gets.read less - 2/21/2024
Kallen Wheeler
I always have enjoyed working with Cad-ray. Customer service is always on-point! - 5/25/2022
Island Dental Lab
Just got my Medit IOS delivered last week and the service from Jon was great! I had a ton of questions before placing the order and he happily answered. This is the type of customer support many dental suppliers are missing. Great company to work wit...read moreJust got my Medit IOS delivered last week and the service from Jon was great! I had a ton of questions before placing the order and he happily answered. This is the type of customer support many dental suppliers are missing. Great company to work with.read less - 6/23/2020
Nancy Hartrick
I am absolutely in love with my MEDIT i700, as is my entire staff. The Medit i700 is reliable, fast, easy to use and the software is incredibly intuitive. I couldn't be happier with the team at CAD-Ray. They are true professionals, and very hands and...read moreI am absolutely in love with my MEDIT i700, as is my entire staff. The Medit i700 is reliable, fast, easy to use and the software is incredibly intuitive. I couldn't be happier with the team at CAD-Ray. They are true professionals, and very hands and responsive in terms of their support and training. Thank you to the entire team.read less - 8/24/2021
Matt Newman was excellent solving a cable problem.! Quick response and good follow up! - 9/11/2024
William Daily
Excellent support and price on our medit IOS! Bought a second one a year later. Can always count on Armen and Frank for help when we need it. - 6/16/2020
LoAn Huynh
Erika is one of a kind! She truly is patient with me. She has gone above and beyond to help me every time I call her. We have a few locations and she is always prompt in her responses and always manages to find a solution for me. I wish every rep was...read moreErika is one of a kind! She truly is patient with me. She has gone above and beyond to help me every time I call her. We have a few locations and she is always prompt in her responses and always manages to find a solution for me. I wish every rep was reachable ALL THE TIME and helpful! Thank you Erika! ❤️read less - 6/04/2025
AMISH DESAI
Awesome! Great support. If you are planning on getting a scanner, make sure you have Cad-Ray on your side ! - 4/20/2022
Thomas Lim
5 stars for a great product and great service. After much research I knew I was set on the Medit 500. I considered some of my local equipment reps, as well as cad-ray. Cad-ray won out due to their efficiency, speed of service, and knowledge. The...read more5 stars for a great product and great service. After much research I knew I was set on the Medit 500. I considered some of my local equipment reps, as well as cad-ray. Cad-ray won out due to their efficiency, speed of service, and knowledge. Their online presence makes it easy to get help via messaging, social media, or phone.
The scanner itself works great, but make sure to contact them to get the minimum specs required for a laptop -- it will make a difference in how the scanner performs.
To make the scanner mobile, I purchased this cart from Staples: https://www.staples.com/Oklahoma-Sound-Premium-Audio-Visual-Presentation-Cart-40-1-2-H-x-18-W-x-30-D-Black-Ivory-Wood/product_932437.
Lastly, I purchased "3M Dual Lock Fastener" to keep the power module attached to the wand from falling off the cart. I carry the scanner between two offices, so I wanted something sturdy, but removable. (see in photos). The hockey puck shaped holder (comes with the scanner) works great for holding the wand itself.read less - 10/10/2019
Nicely done Cad-Ray- Thanks for helping me get back to work! The new i700 is our tech fav! - 3/03/2022
jeremiah choi
Never had customer care like Cad-Ray, you can't go wrong purchasing through them. Trios is a great scanner. All the reps at Cad-Ray are very knowledgeable and helpful and will make sure you are up and running smoothly. Above and beyond customer serv...read moreNever had customer care like Cad-Ray, you can't go wrong purchasing through them. Trios is a great scanner. All the reps at Cad-Ray are very knowledgeable and helpful and will make sure you are up and running smoothly. Above and beyond customer service.read less - 8/27/2022
Finally going digital and Cad-Ray was the place to start. Got the Medit i500 and began scanning right away. Now I am doing digital dentures, making my own surgical stents, etc. The support available is the best. "Frank" is always available! :) - 10/09/2019
I've been fortunate to have had the opportunity to work with Frank DeLuca this past year. He is always pleasant, willing to help, responsive to my questions and extremely knowledgeable. I highly recommend Frank!! - 12/16/2021
Engy Hassan
Amazing customer service! Excellent on time feedback. Thank you Kaila - 12/08/2021
Caleb King
Kaila Larson is the support specialist for our office and has been outstanding. She gets back to us quickly with any questions we have, and will log into the computer and fix issues so we don't even have to worry about them. She is extremely knowled...read moreKaila Larson is the support specialist for our office and has been outstanding. She gets back to us quickly with any questions we have, and will log into the computer and fix issues so we don't even have to worry about them. She is extremely knowledgeable about the MEDIT scanner and the supporting software. She responds to calls and texts or emails and will communicate with us in whatever way is most convenient for our office. She has saved us hours of time and headache by always being available to help.read less - 5/25/2022
Ramin Goshtasbi
Great service even if you own a Primescan. Company is built on customer service. Thanks for the help guys…. - 1/05/2022
Cody Boseman
Cad-ray has been amazing, not to mention they have an amazing product in the medit i500. Their training is great, customer service is quick and thorough, and follow up is consistent. I highly recommend using cad-ray for anything that you may need. - 6/19/2020
Shant Aharonian
Cad-ray has to be the best company to work with when it comes to digital dentistry solutions. Here are the reasons why: 1. Experience. Everyone in the company has extensive experience in dentistry. They have used all digital platforms and offer custo...read moreCad-ray has to be the best company to work with when it comes to digital dentistry solutions. Here are the reasons why: 1. Experience. Everyone in the company has extensive experience in dentistry. They have used all digital platforms and offer customers first hand experience. 2. Honesty. Based on their experience they share all the good/bad of different systems. They work with you to find a solution that works best for you. Not sell you the piece of the equipment that gives them the biggest commission. 3. Support. Cad-ray offers the missing piece of the dentist/digital manufacturer puzzle. Many other distributors sell you a piece of equipment but don’t have true day-to-day experience with that equipment. Cad-ray’s team openly share their expertise to help customers optimize their workflows with great technology. 4. Passionate. The Cad-ray team is extremely passionate about their craft. They truly believe in what they have to offer. I took Armen Mirzayan’s course on intraoral scanning and it was truly mind blowing. Armen’s insights will help any dentist optimize their craft. I purchased the full sprintray 3d printing ecosystem the help of Frank. I plan to purchase more equipment from cad-ray. Also, Jesse is a genius in regards to all aspect of digital workflows. I’m truly grateful for this company and everyone who I’ve worked with so far.read less - 10/07/2022
Otto Herod
I received my Medit scanner a couple months ago from Cad-ray, and I can't express enough how awesome it is. I have done a ton of research and used the latest IOS from one of the big guys, and due to many software issues I was able to return that mach...read moreI received my Medit scanner a couple months ago from Cad-ray, and I can't express enough how awesome it is. I have done a ton of research and used the latest IOS from one of the big guys, and due to many software issues I was able to return that machine. And thank God, because it was so over priced and came with a $300/month support fee forever! The Medit scanner is as good or better than that one when it was working properly, and for the price it's a no brainier.read less - 9/17/2020
Mark Geddes
Love my medit! Cad-ray has been awesome to work with and very educational in learning all things digital . Was doing a study club with 4 other dr's showing off the medit and the cerec dr who had just bought the newest kept saying, "mine doesn't do...read moreLove my medit! Cad-ray has been awesome to work with and very educational in learning all things digital . Was doing a study club with 4 other dr's showing off the medit and the cerec dr who had just bought the newest kept saying, "mine doesn't do that. No way! I wish mine could do that. For real? I paid 4 times as much."
Needless to say the medit is awesome.read less - 6/18/2020
Jonathan and Nick have been a great tremendous help. They went out of their ways to help me upgrade my Medit i500 even though I didn’t purchase my Medit i500 scanner from them. They are the largest Medit scanner distributor and they have the custome...read moreJonathan and Nick have been a great tremendous help. They went out of their ways to help me upgrade my Medit i500 even though I didn’t purchase my Medit i500 scanner from them. They are the largest Medit scanner distributor and they have the customers’ interest at heart. They are super responsive to phone calls, emails, and Facebook messages. I highly recommend their servicesread less - 9/01/2021
Matt McReynolds
Great scanner (medit i500) and mill (coritec one). They were great for an open system that allows me to do just about anything. - 6/16/2020
Penelope Lee
Frank and his team have always been ready and able to help us with any issue we’ve come across in the last 2 years since we purchased our mill and equipment from them. Today, Griffen went above and beyond to find a solution to our software issue. I w...read moreFrank and his team have always been ready and able to help us with any issue we’ve come across in the last 2 years since we purchased our mill and equipment from them. Today, Griffen went above and beyond to find a solution to our software issue. I was able to finish a project on time for a patient in pain because of his dedication. “We’ve never had a more helpful team for any of our equipment” was a quote from our head Doctor today. Excellent job Griffen and team!read less - 5/14/2025
Asi Cohen
Armen Mirzayan's knowledge base sets CAD-RAY.COM apart from all other digital dental-equipment dealers. Not content with linking manufacturer support content, Armen's team provide instant feedback to any equipment queries, in-depth video tutorials, a...read moreArmen Mirzayan's knowledge base sets CAD-RAY.COM apart from all other digital dental-equipment dealers. Not content with linking manufacturer support content, Armen's team provide instant feedback to any equipment queries, in-depth video tutorials, and regular product testing, streamlining, and pushing the boundaries of their products - be it software, hardware, or connectivity between various brands. I highly recommend this team if you want to fully utilise your equipment and have the backup needed going forward!read less - 11/05/2019
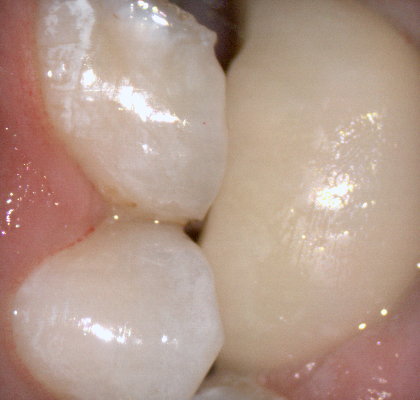
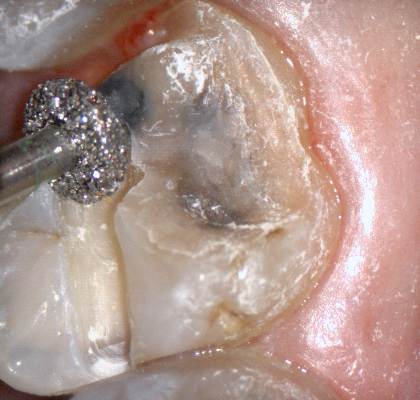
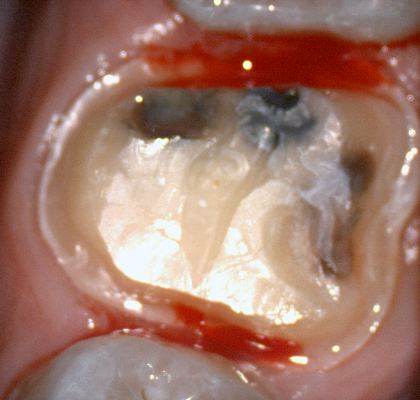
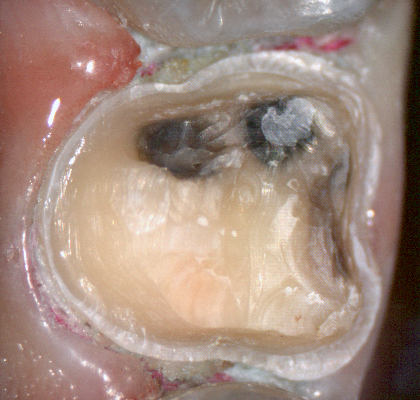
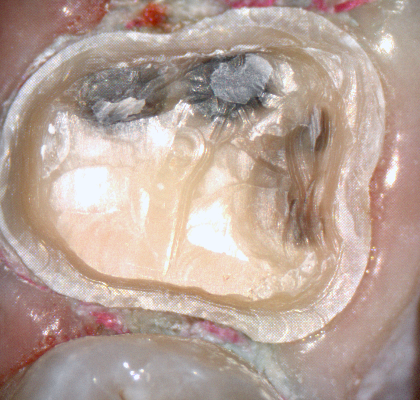
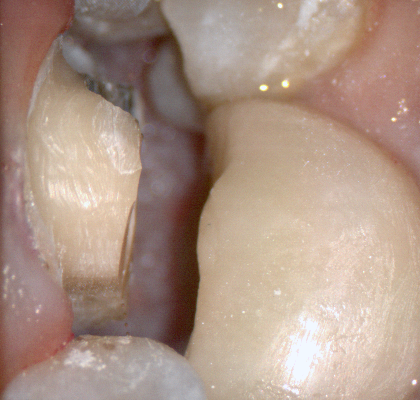
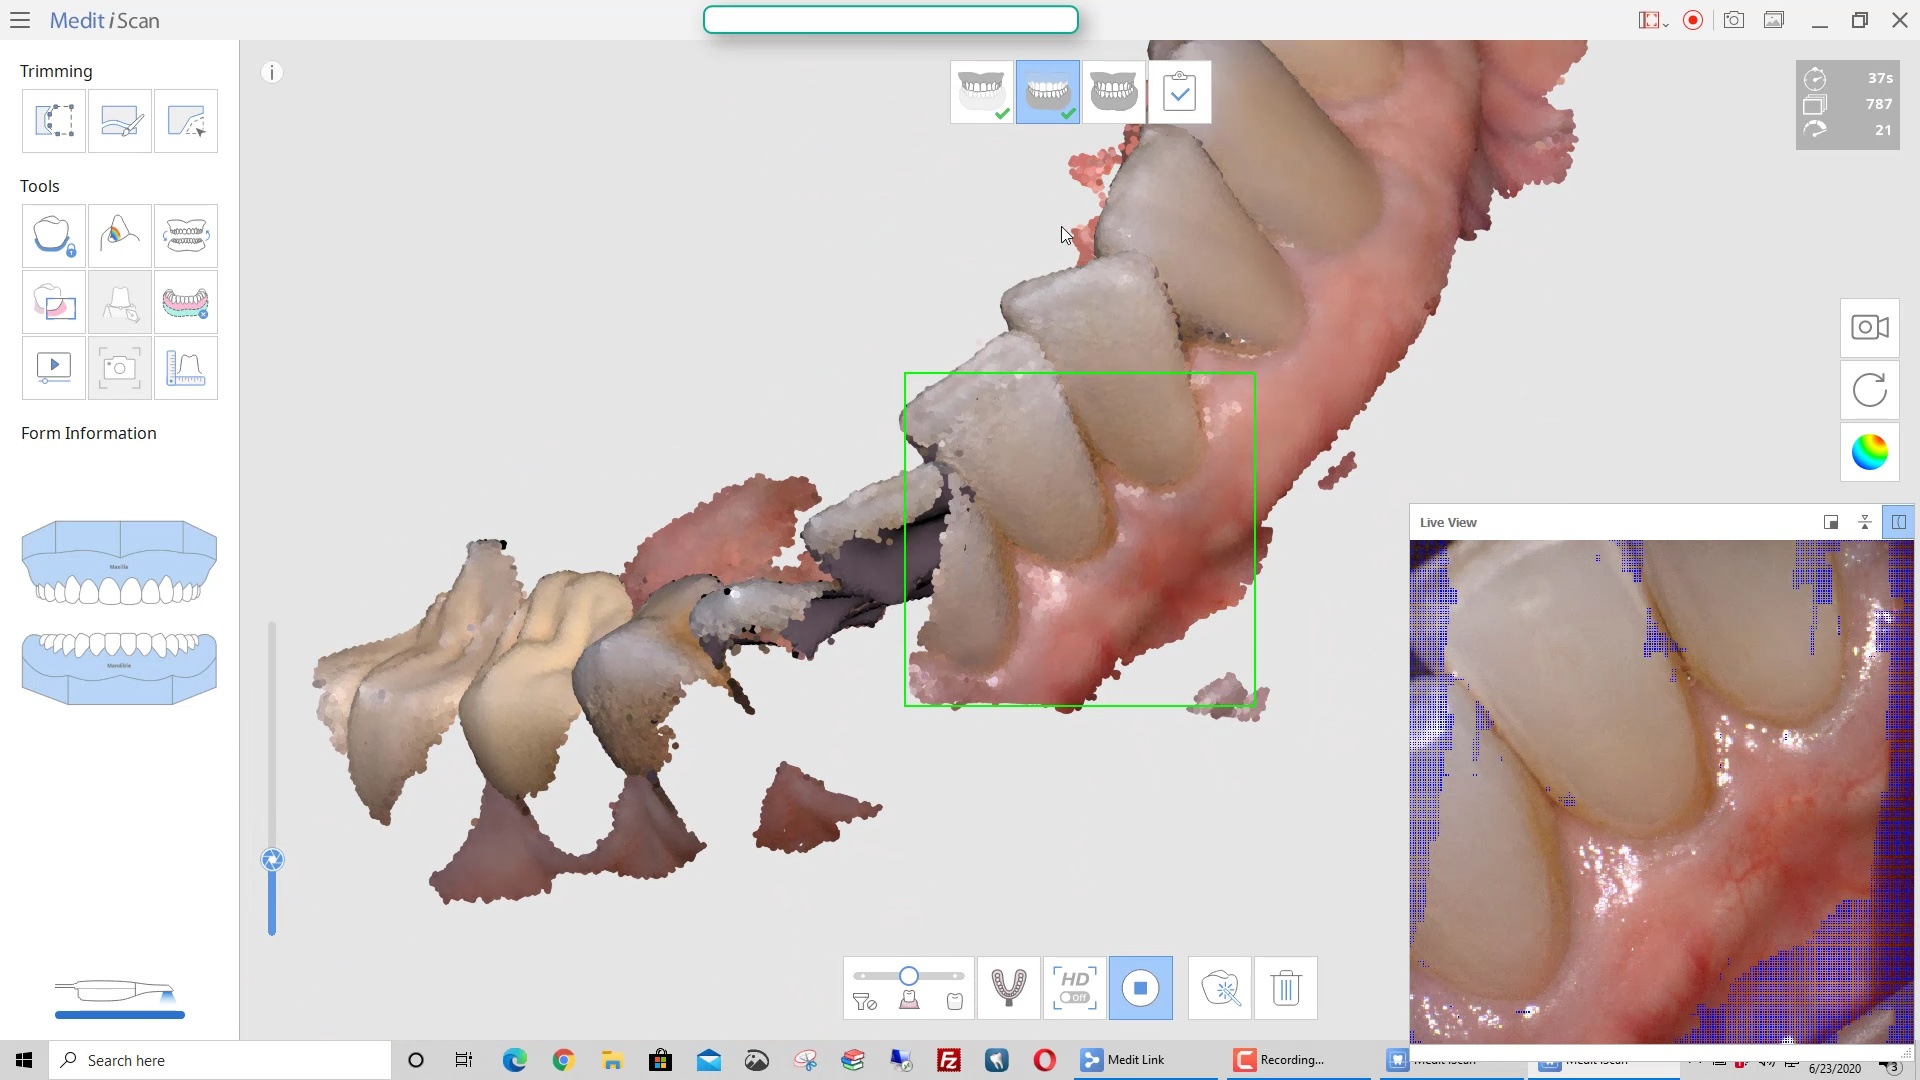
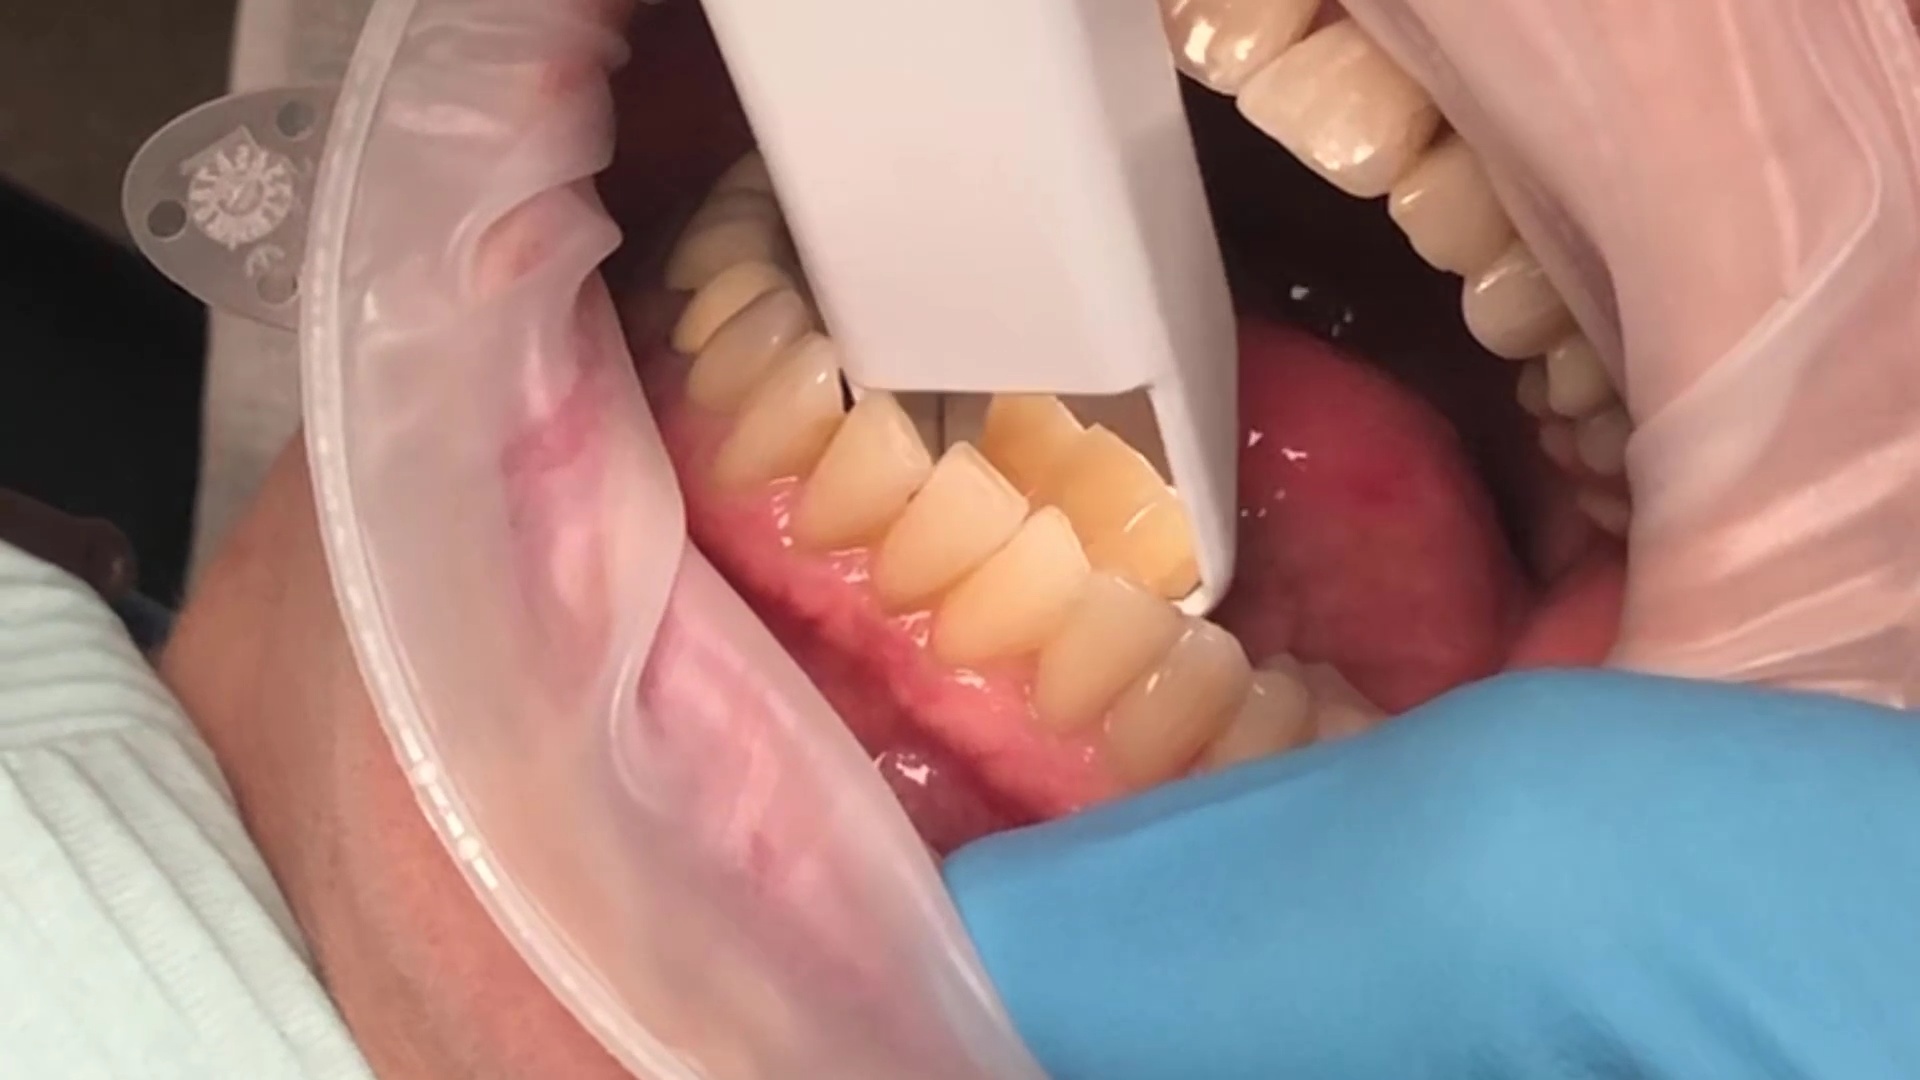
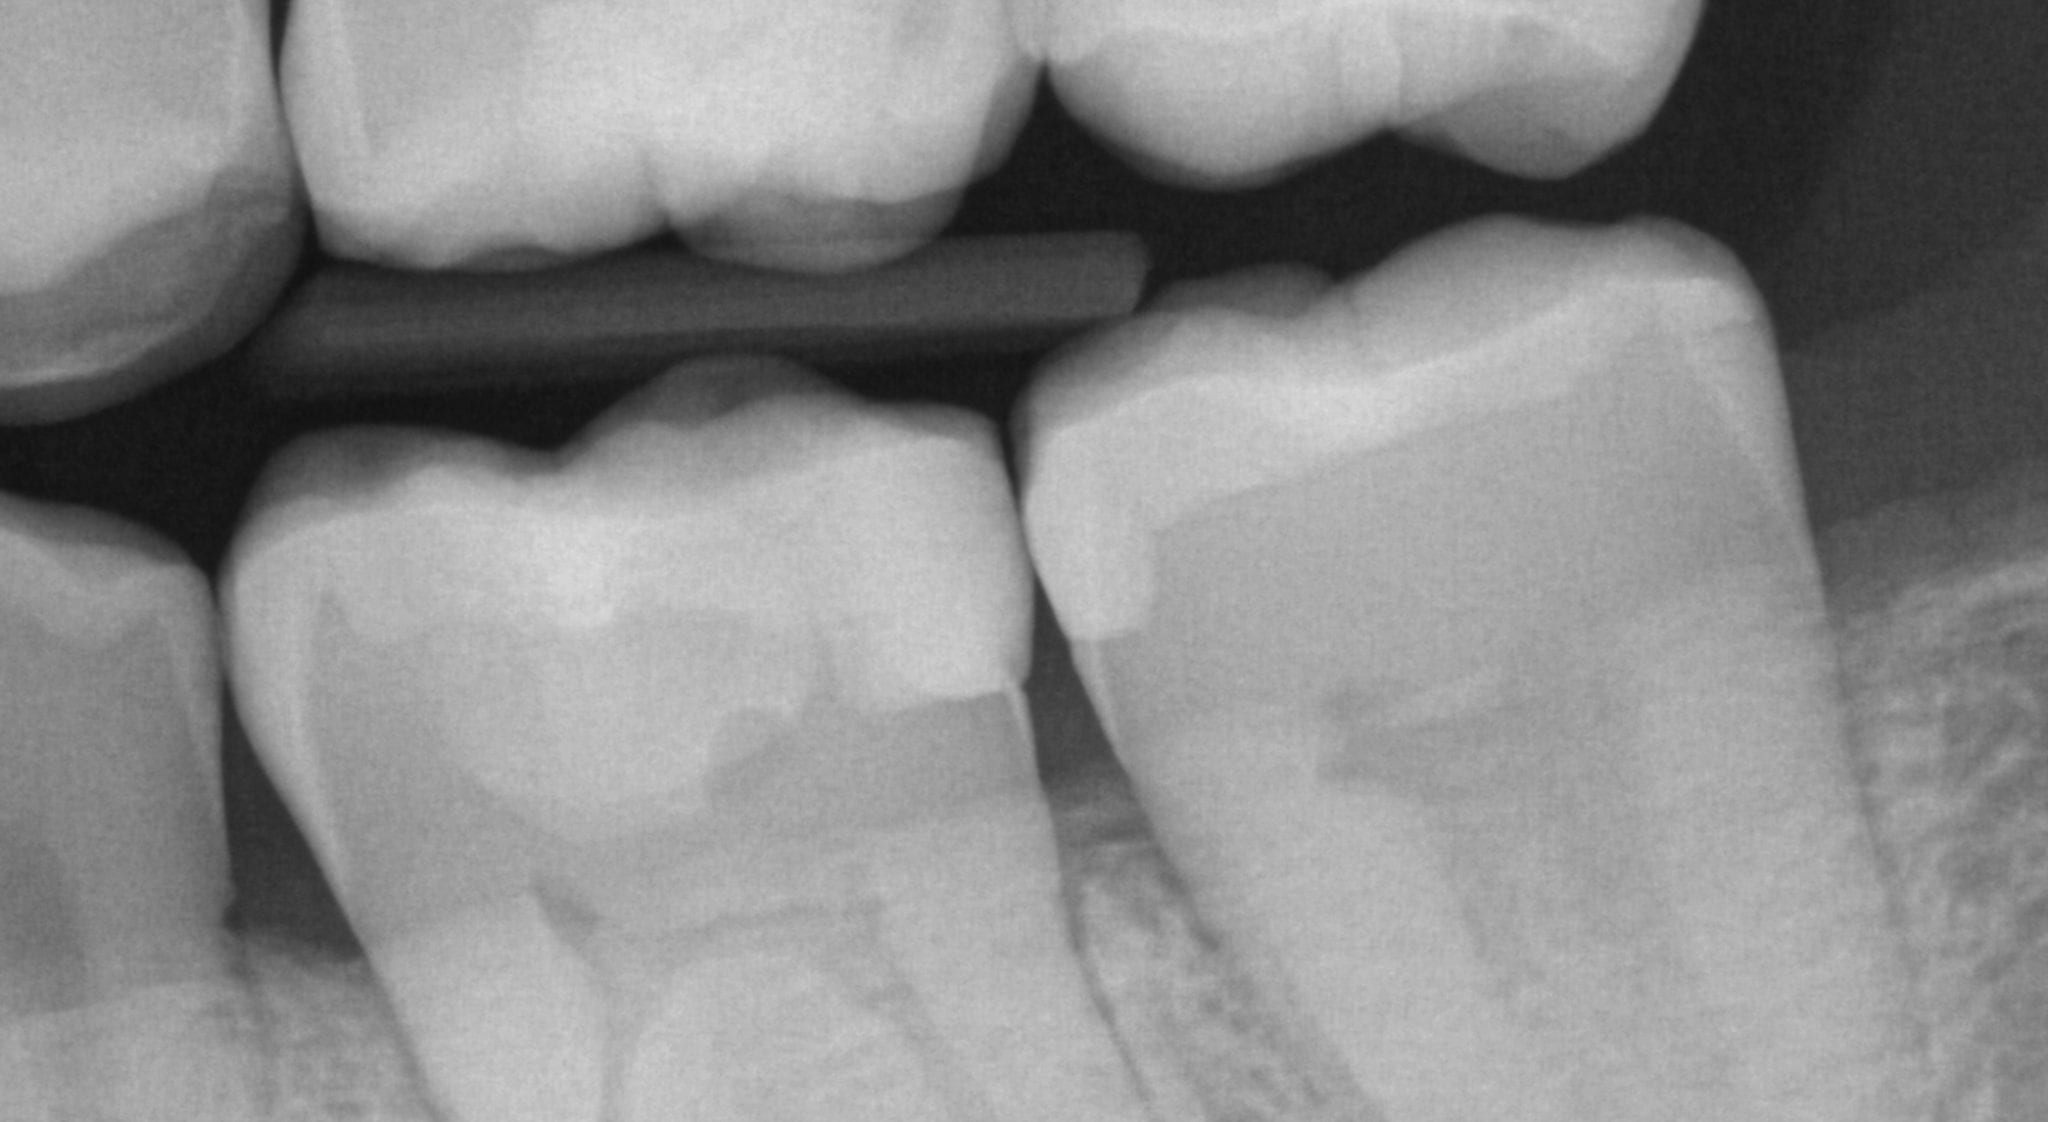
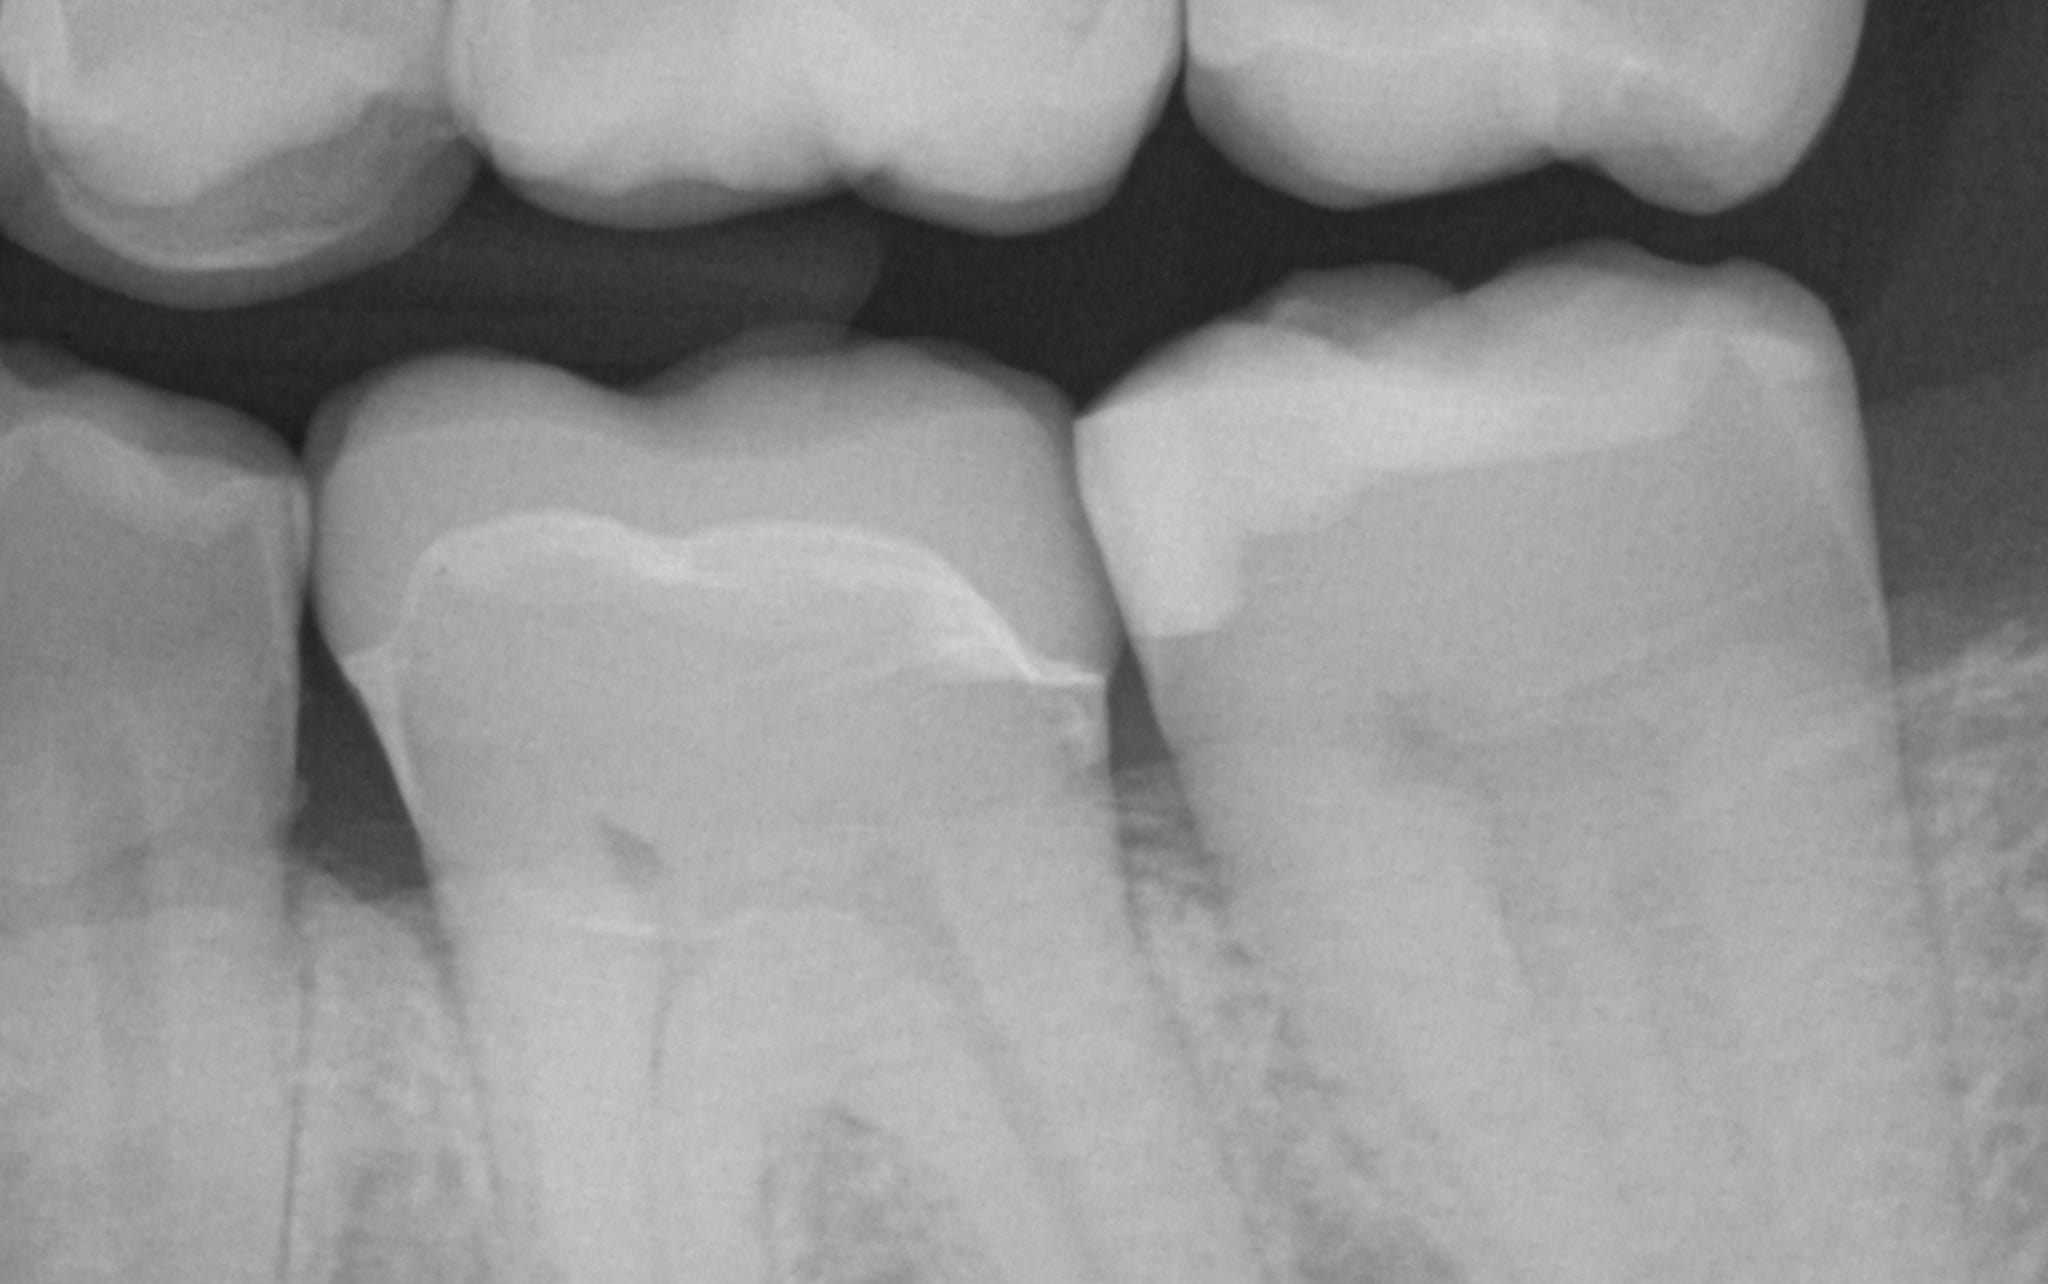
The following pictures depict the sequence of burs we recommend that you use to finish a preparation quickly. While patient is getting numb, take a quick look at the clearance you will need to reach proper material thickness. Once the quadrant is isolated with isolite and optragate, take an occlusal router bur and create a trough to gain the proper depth. Follow that with a flat disk, and you can quickly reduce the occlusal height.
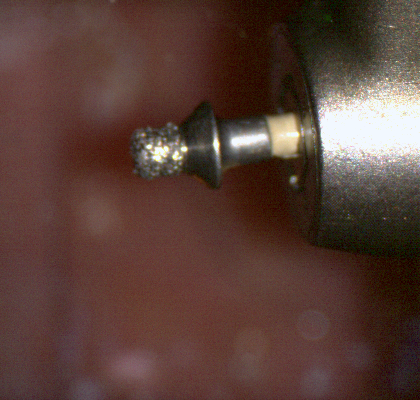
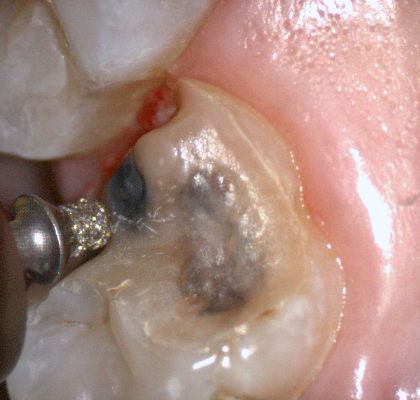
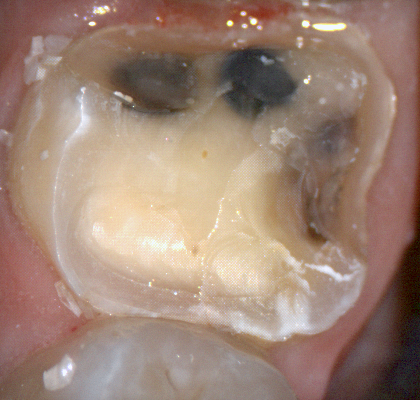
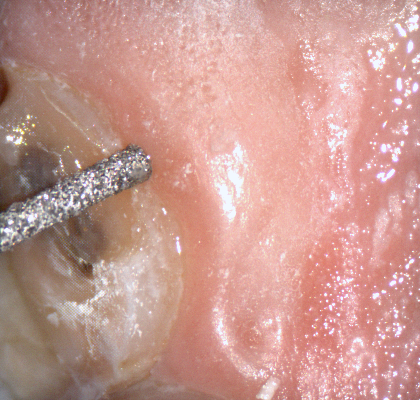
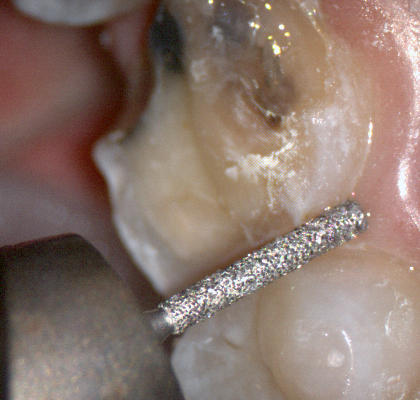
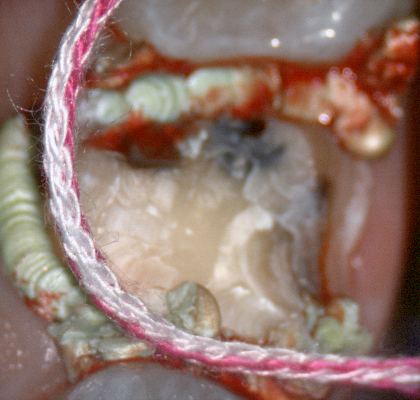
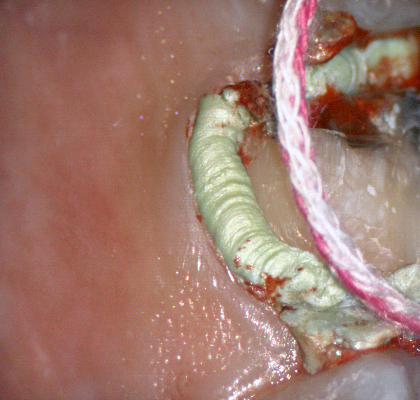
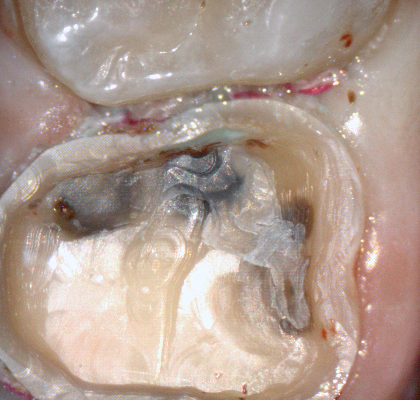
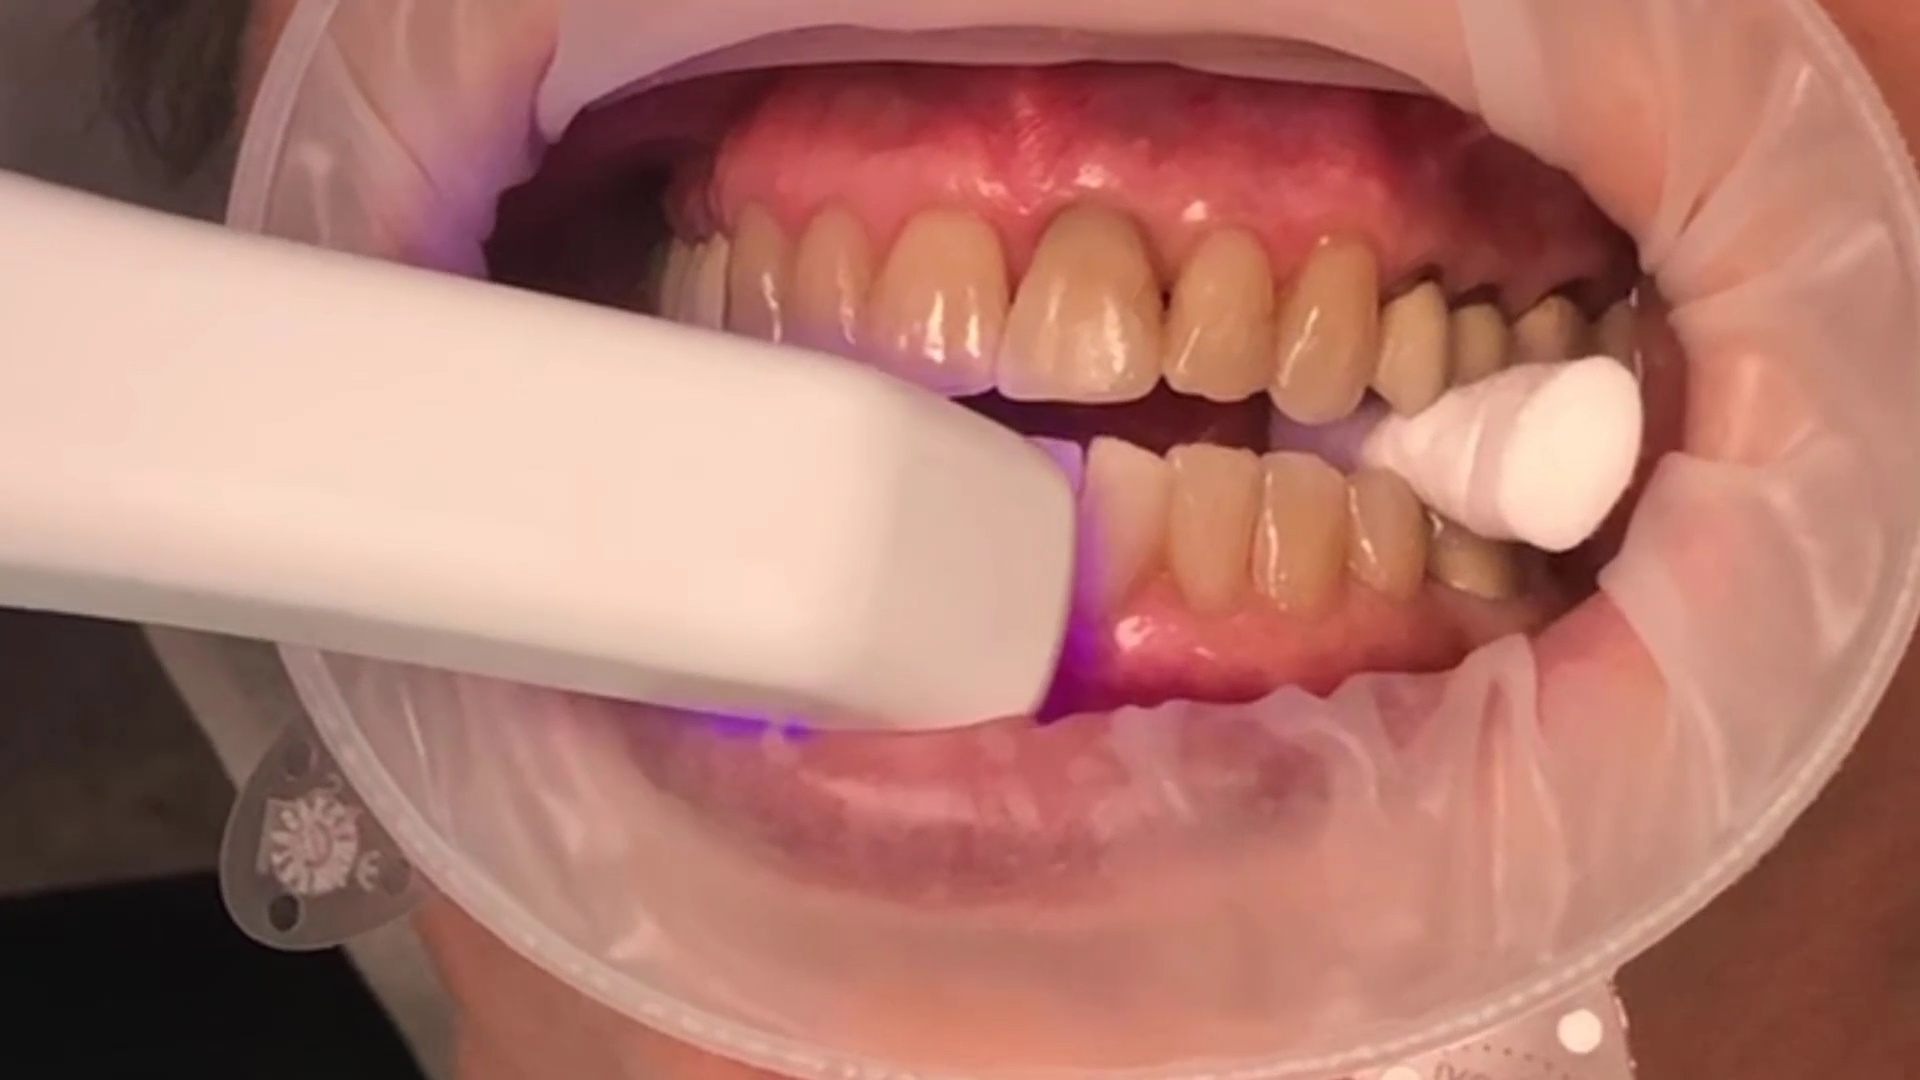
A shoulder bur of .8 mm thickness can help you reduce the interproximal areas as well as the buccal and lingual margin lines. Before finishing the prep, place hemostatic agent like expasyl in the sulcus and place retraction cord. while it is setting, check your reduction. If you need more space, now is the time to reduce some more.
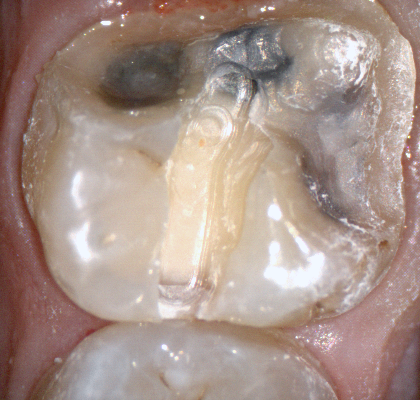
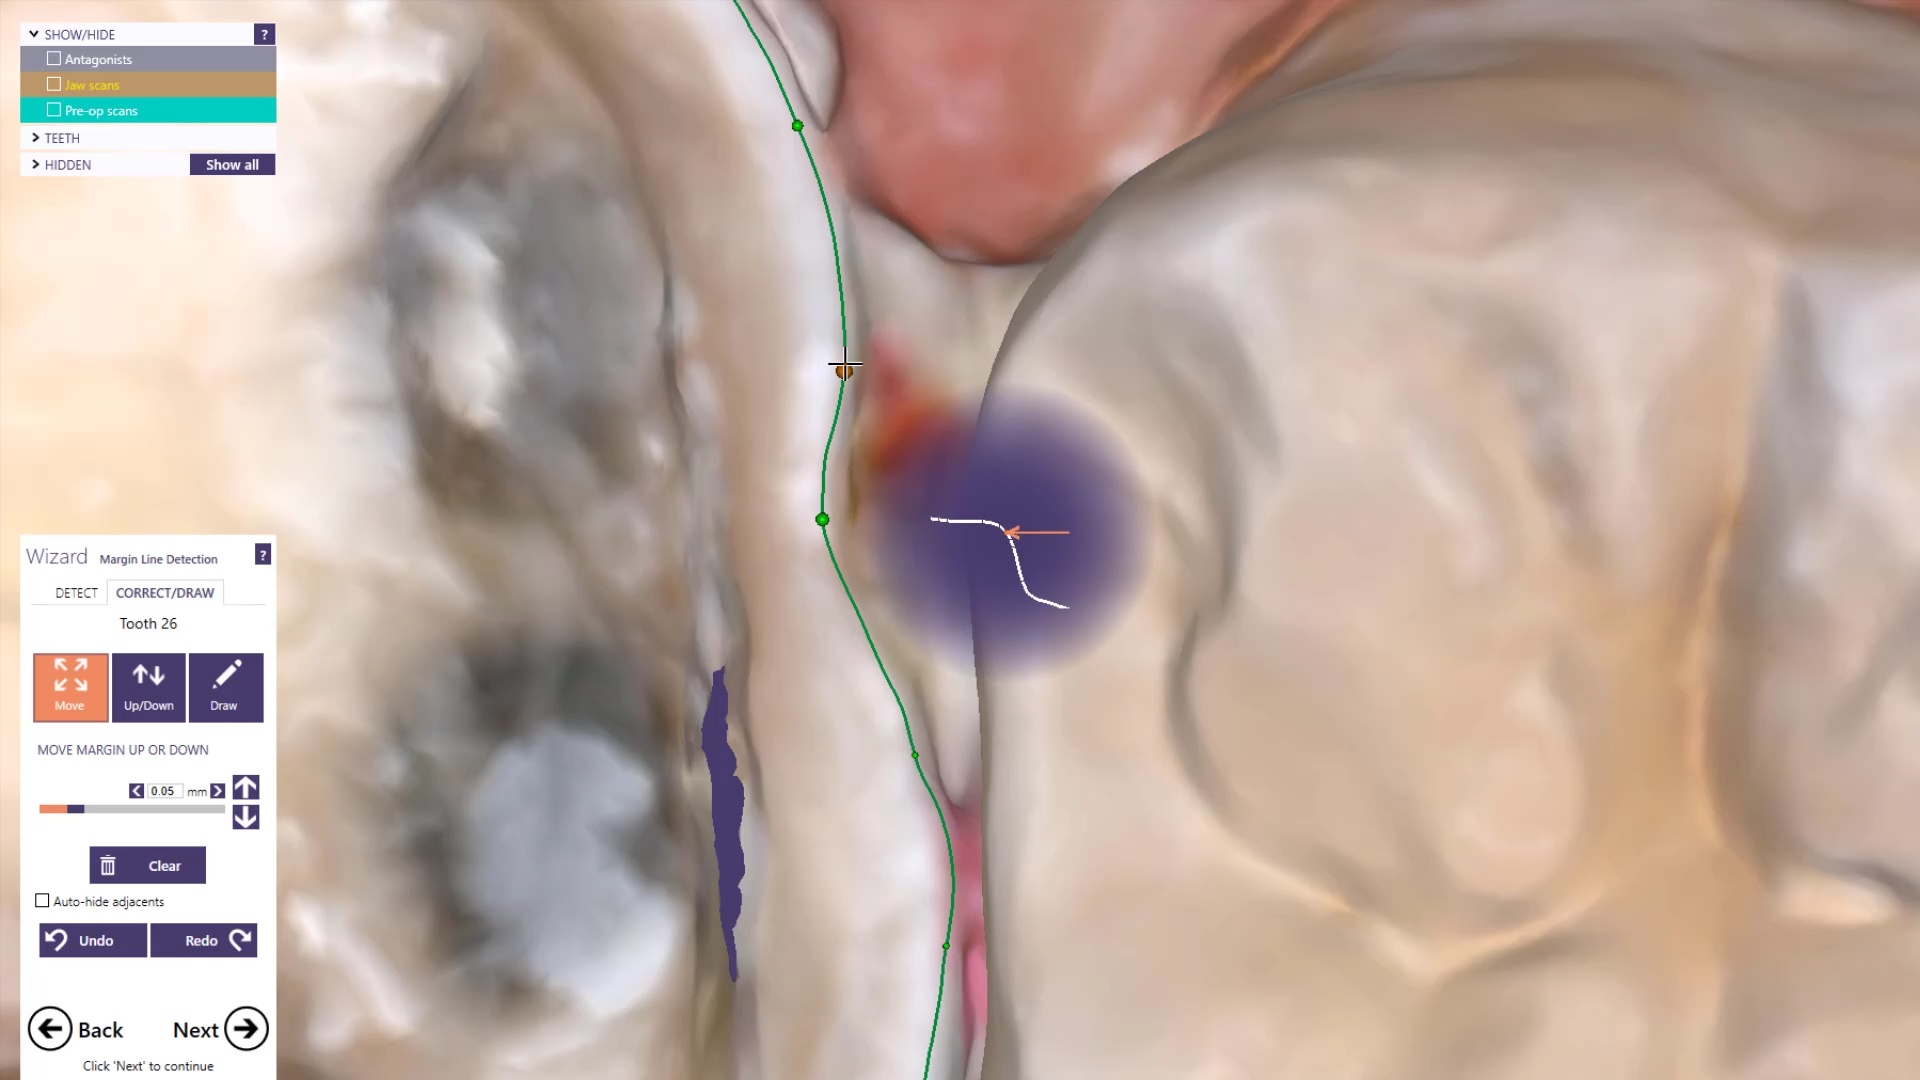
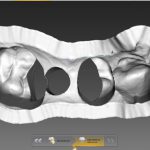
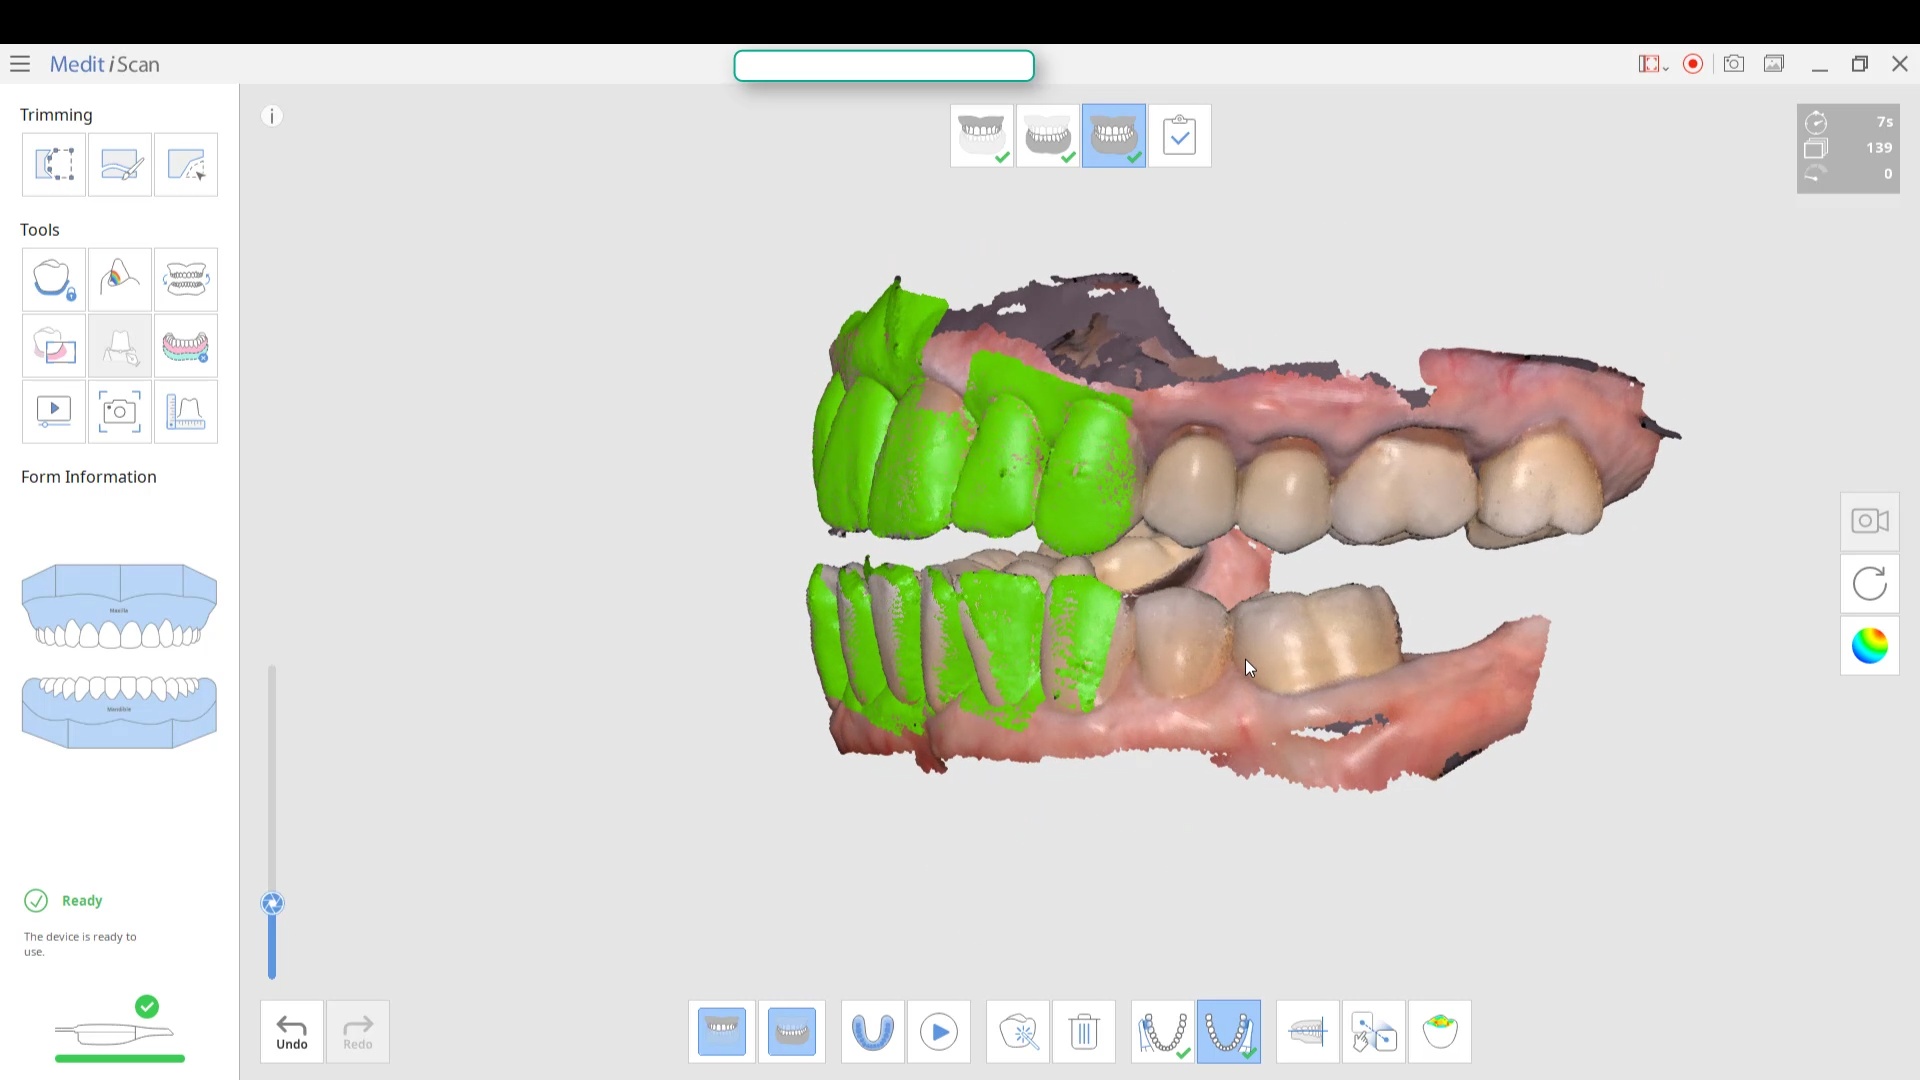
Once you have adequate clearance, retraction, and hemostatis, you can readily image and find your margins in the CAD software
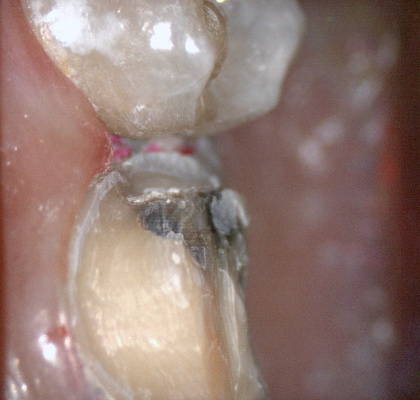
One of the big limitations of CEREC (a registered trademark of denstply sirona) with tibases and implant crowns is that it is limited to very few implant lines and the antirotational notch can just ruin your day as it needs to go into a specific location. You also have to deal with making sure the tibase is seated all the way and the scanbody is properly indexed. The one benefit is that you are dealing with just crown and bridge and you do not need to know implant position or timing at all when doing the design.
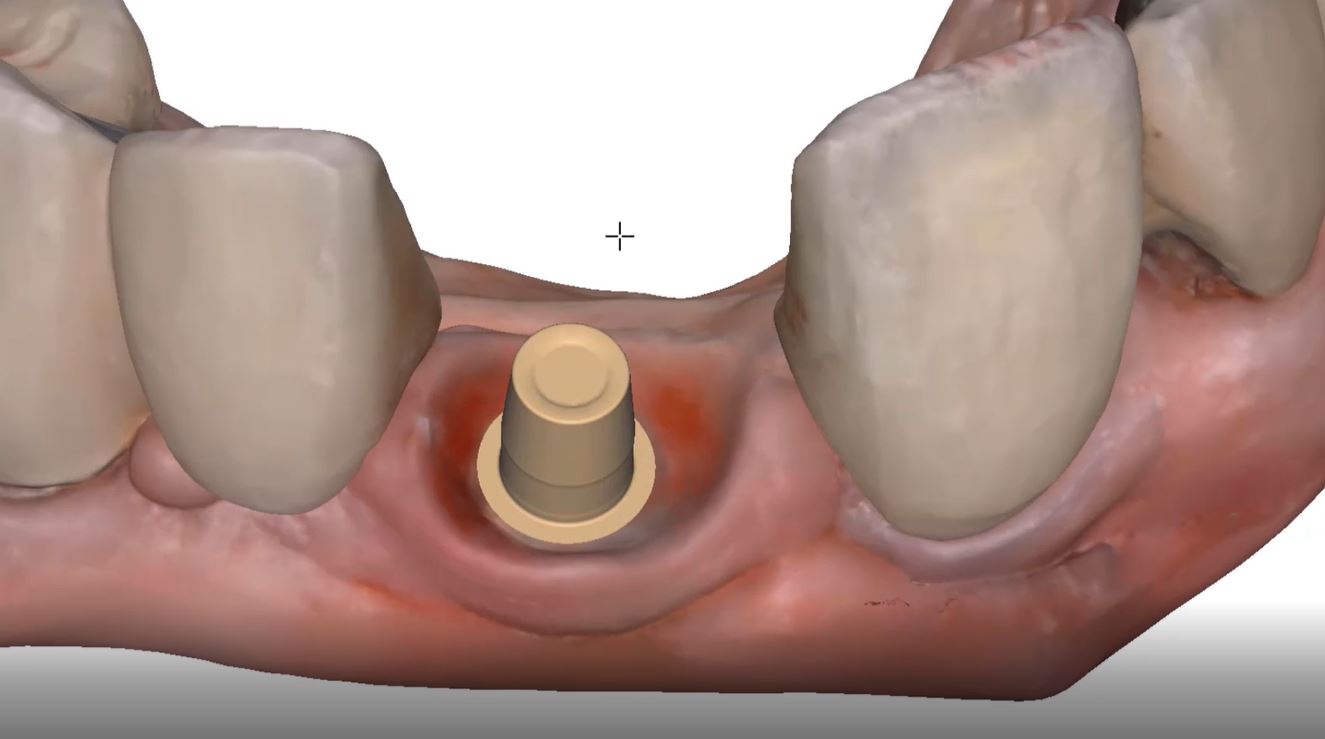
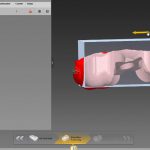
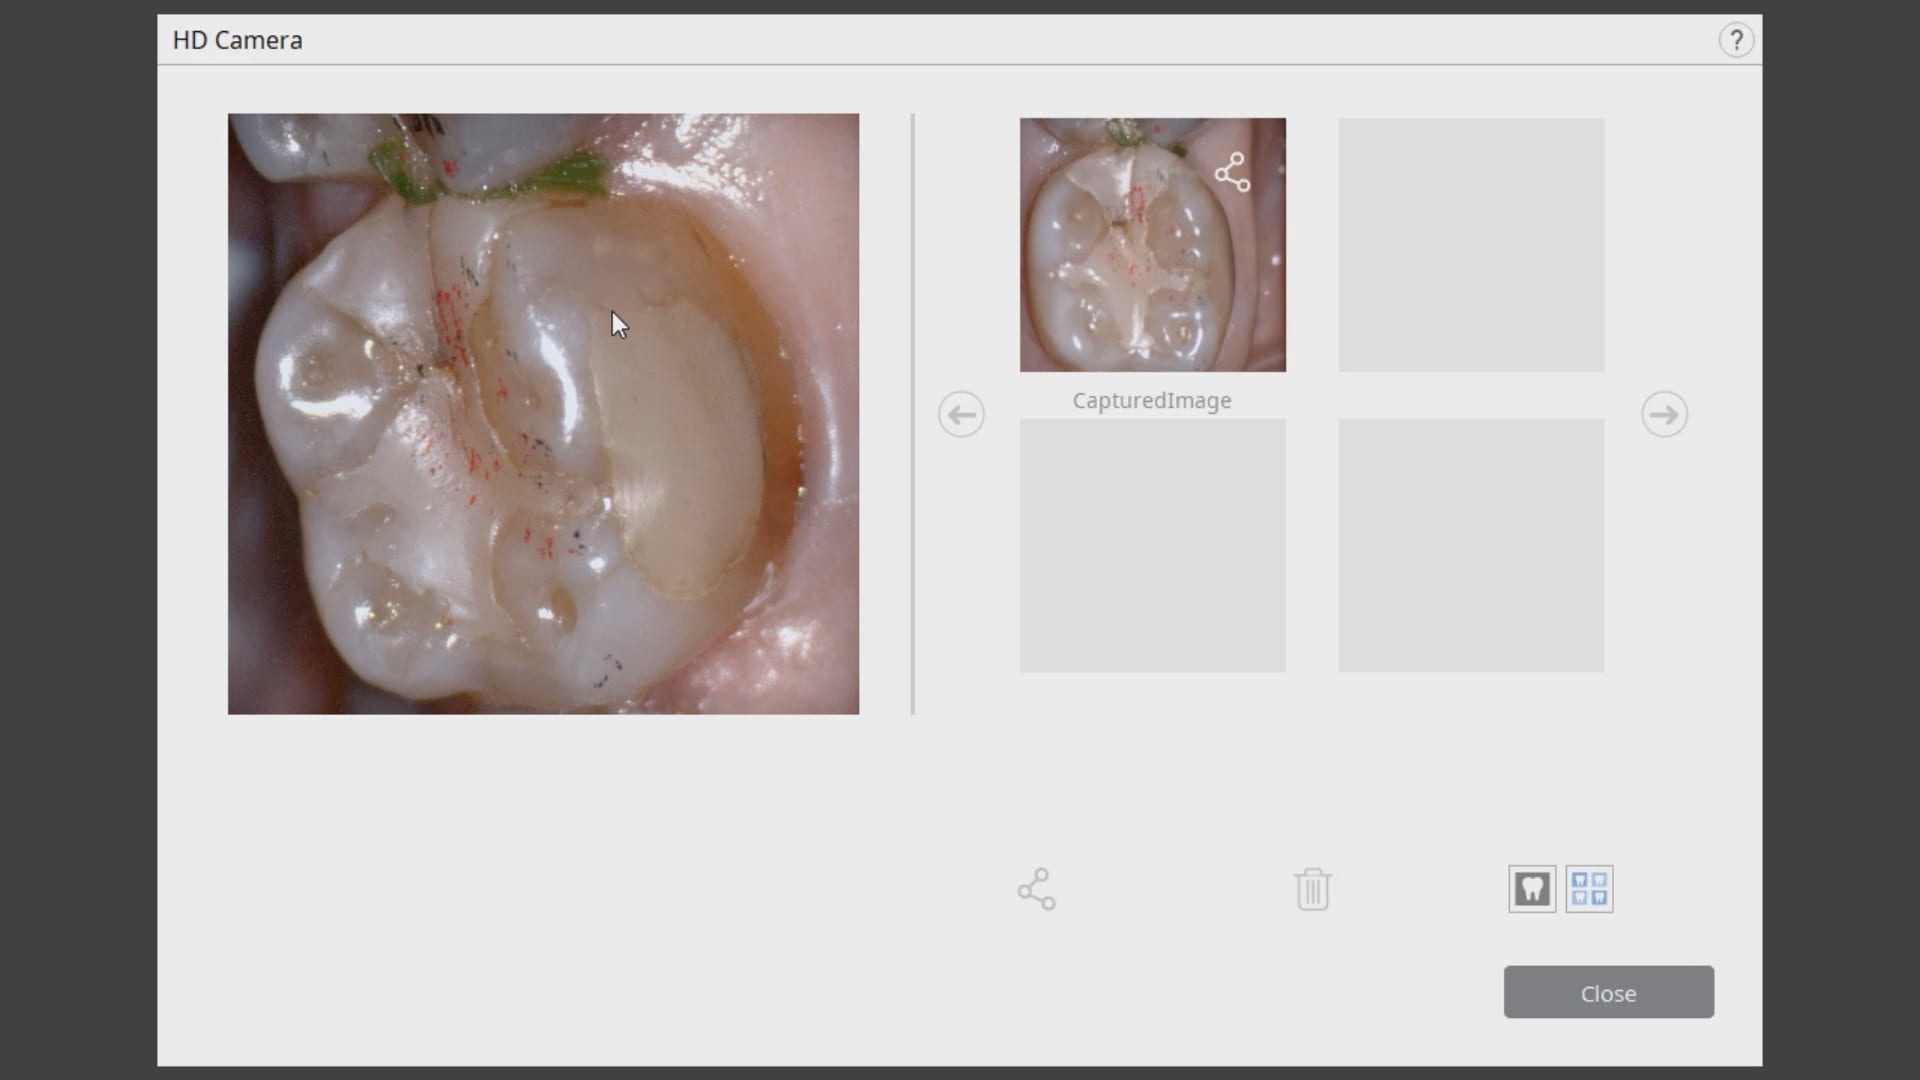
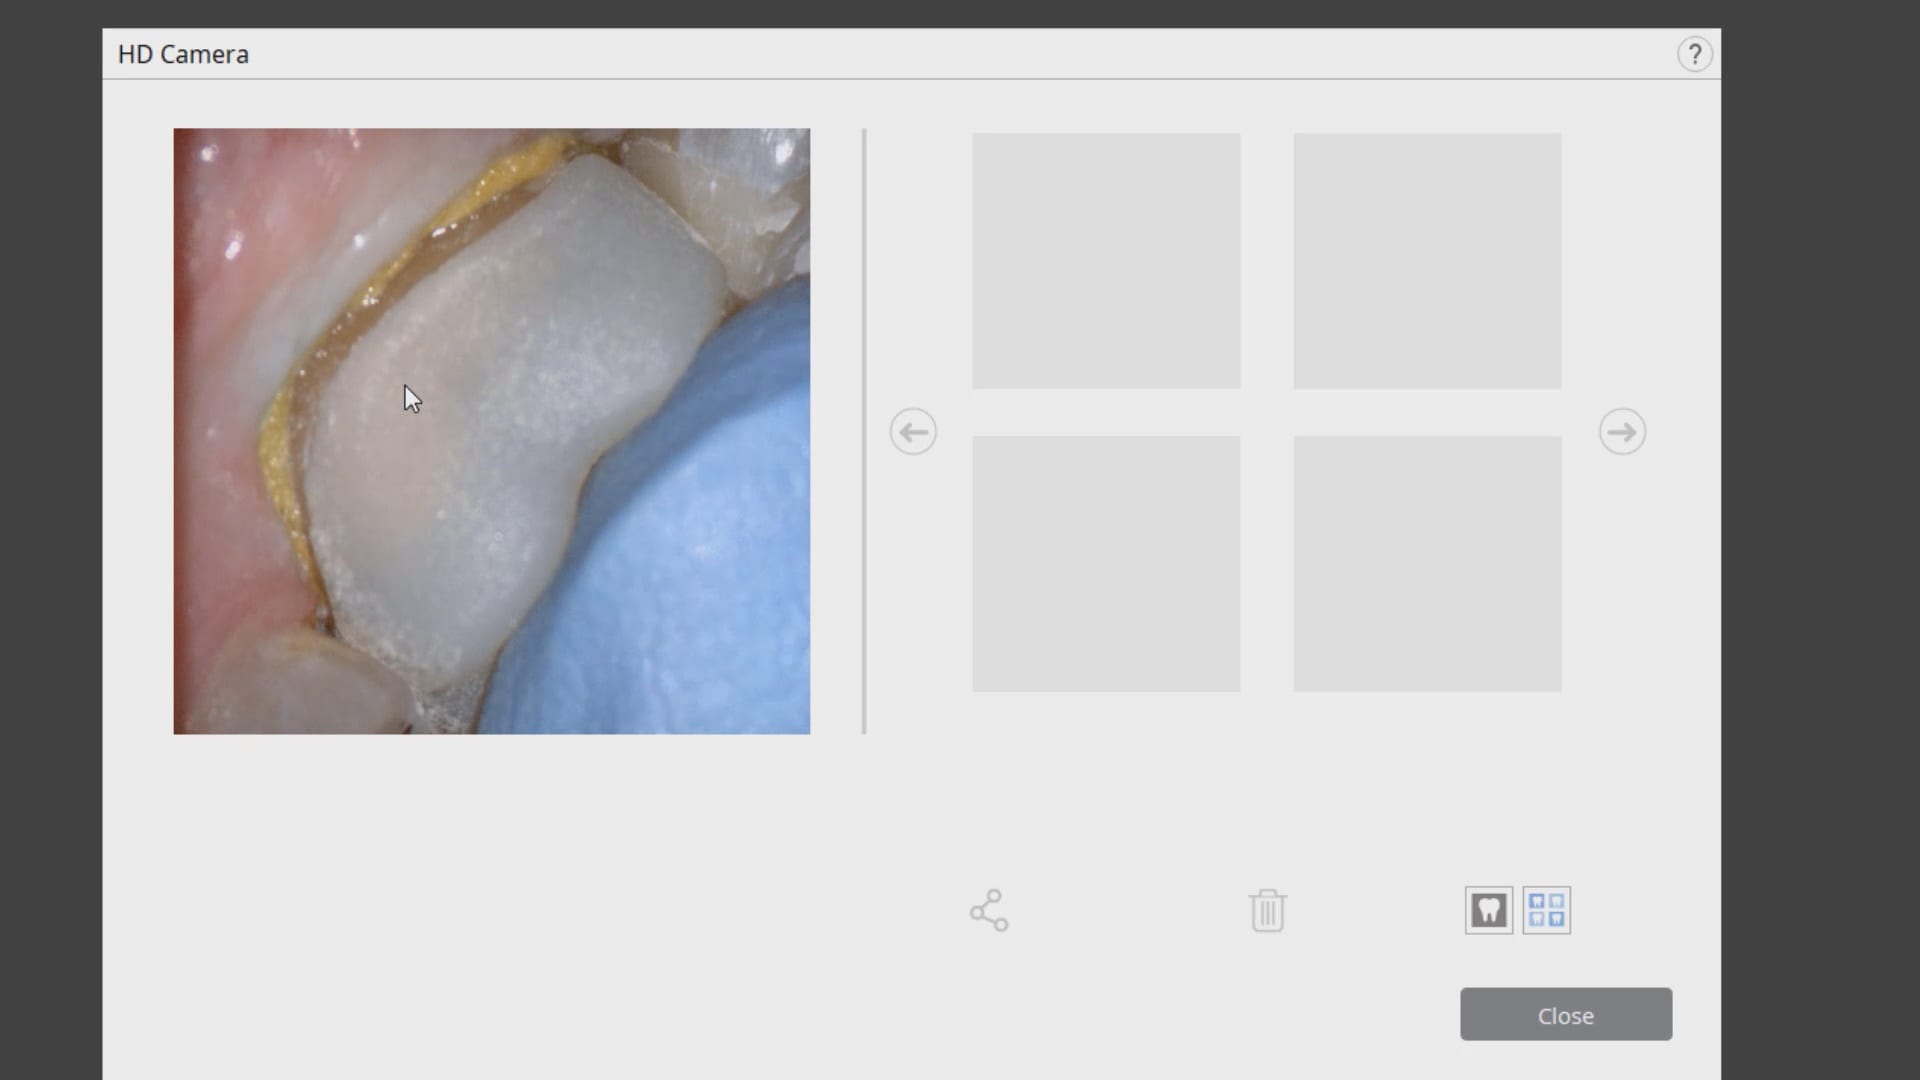
In this case, we demonstrate how we utilize the Medit i500 to capture a Tibase from Blueskybio, Biomax NP Conical Connection. Once the tibase is seated, we simply start scanning and then use the artificial intelligent implant suprastructure identification system to identify the location of the tibase. This in essence allows you to capture your margins OUTSIDE the mouth and you don’t have to bother with imaging the tibase, which is highly reflective in the patient’s mouth.
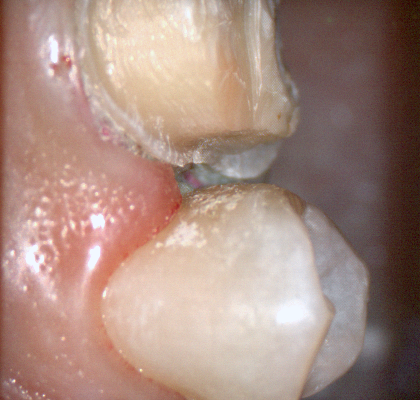
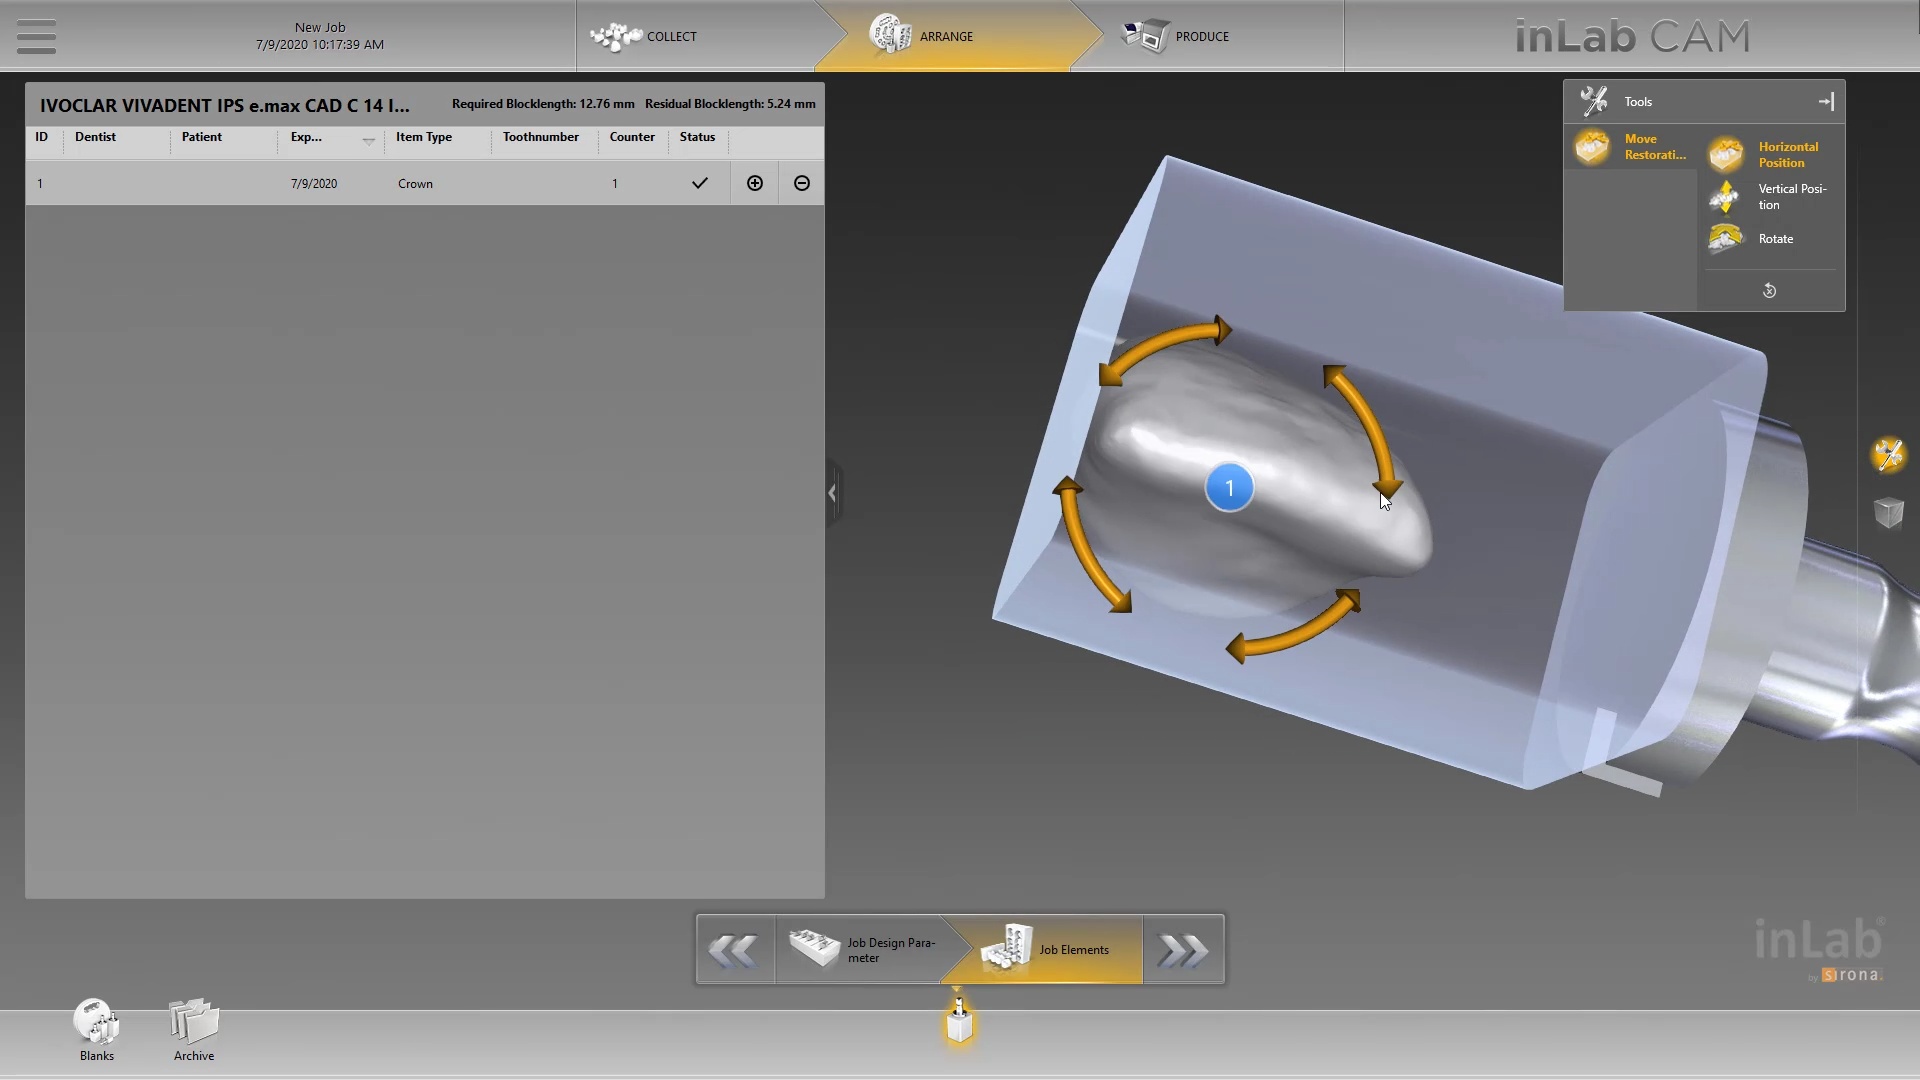
Once processed, you can then modify the tissue digitally and gain access to the tibase margins. You can print the model if you want and manufacture the restoration. In this particular case, we took the design to the CEREC mcxl inlab cam, nested it, and milled it out to demonstrate how we can image with one device from one manufacturer and fabricate a restoration by another company’s manufacturing machine. But the single greatest benefit is that you can place the sprue wherever you want.
IMPORTANT NOTE: The Tibase that you use MUST be wider than the drill milling the intaglio and the sprue must be thick enough to handle the milling process.
Once you understand how the digital workflow goes, you can image with one device, design in another, and then either print or manufacture with yet another device. Here we mill a sectional stent with the cerec that was designed in Blueskybio plan, although printing makes more sense because it is less wear and tear on your drills