Cad ray has been very nice to work with. Excellence service and support since I bought my Medit scanner - 6/16/2020
Tara Ericson
Very pleased with the EXCELLENT support we have received from Frank DeLuca! Loving our new Medit so far, definitely more user friendly than our previous one. - 6/02/2022
A Palmer
I'm a dentist in Maine and have been working remotely with CAD-RAY for about 5 years. They do all my implant planning and fabrication of surgical guides. I just send them a CBCT image and digital impressions and they take care of all the rest, it cou...read moreI'm a dentist in Maine and have been working remotely with CAD-RAY for about 5 years. They do all my implant planning and fabrication of surgical guides. I just send them a CBCT image and digital impressions and they take care of all the rest, it couldn't be smoother. I've only had good experiences with CAD-RAY, and am very grateful for this awesome service they offer.read less - 6/02/2019
Brian Wilkinson
This company is genuinely amazing. Amazingly good products, but the thing that sets them apart is the support. Frank and Sean have answered any questions I have unbelievably fast. And I LOVE the DOF Craft 5x milling unit. Learning the flow of same da...read moreThis company is genuinely amazing. Amazingly good products, but the thing that sets them apart is the support. Frank and Sean have answered any questions I have unbelievably fast. And I LOVE the DOF Craft 5x milling unit. Learning the flow of same day milling was tricky for me, but they held my hand the whole way. Can’t go wrong here.read less - 1/06/2024
Laura
Very helpful and attentive when setting up my new Medit scanner. Seamless process from start to finish - 10/28/2024
Jennifer Hastings
Andy was wonderful with setting everything up and explaining everything. The Medit i700 has been great thus far, easy set up! The only "issue" is that it can be occasionally glitchy. - 1/11/2022
I cannot say enough about the support I have received from the beginning. I chose CadRay ultimately because of the support reviews...I can attest first hand...they are all right on...though I have been practicing for more than 35 years, this old dog ...read moreI cannot say enough about the support I have received from the beginning. I chose CadRay ultimately because of the support reviews...I can attest first hand...they are all right on...though I have been practicing for more than 35 years, this old dog has been taught a lot of new tricks from the support staff at Cad Ray...Truly impressed with every interaction so far! Thanks 10/4/2023 And they did it again today with ten minutes before the pt came in 3Shpe server would not connect with the computer and Andy got to 3Shape directly and had us up and running...thankfully I didn't have to call anyone but CadRay...thanks again....read less - 10/05/2023
jeff-J65
You guys are great! I have been a Cerec user for about a decade and wanted to expand my horizons. I bought the I700 and have just loved it. We don't do impressions any more, only scanning, even for the full arch. The customer service has been excelle...read moreYou guys are great! I have been a Cerec user for about a decade and wanted to expand my horizons. I bought the I700 and have just loved it. We don't do impressions any more, only scanning, even for the full arch. The customer service has been excellent, even though I haven't had any problems with the scanner. I really like the online learning modules, they have been awesome getting me up to speed with the scanner quickly. I am looking forward to some of the in person courses to maximize the usefulness of this scanner. -- Jeff Allred, DDS FAGD DABOI FAAIDread less - 9/28/2021
Fantastic folks. I'm an orthodontist and opened an office in 2020. They helped me find the perfect intraoral scanner to suit my needs. Not too much or too little, and a great price. Every time we have a technical question, a sharp human answers the p...read moreFantastic folks. I'm an orthodontist and opened an office in 2020. They helped me find the perfect intraoral scanner to suit my needs. Not too much or too little, and a great price. Every time we have a technical question, a sharp human answers the phone, troubleshoots, and remotes in when needed-- navigating MS updates and graphics card issues. My i500 died this week. They overnighted me a trade-in at a totally reasonable price, and even shipped me a laptop to drive the i600 while I got a new one (they knew my 2020 laptop wouldn't keep up!). CAD-Ray has consistently hit it out of the park.read less - 4/14/2025
Jeff Keh
I love my medit i-500. Cad-Ray has wonderful customer support, I can not imagine getting a scanner from anyone else. Armen and Frank are great! Thanks again. Will recommend cad-ray to all my friends. - 6/16/2020
North Bakersfield Dental
Excellent customer service and product!! - 3/16/2022
Rebecca Booth
Great scanner easy to use with the software. Definitely recommend the i700 scanner. Great customer service from Laura. - 12/09/2021
Vivek Singh
I have had done business with these guys. I am impressed with their Amazing Customer service. John and Armen are great. I have and will order lots of stuff from them. Kudos to them!!!! - 6/19/2020
Mathew Rosinsky
Amazing support. Great product. Thoroughly happy with all that this organization offers and provides to our team. Looking forward to doing more business with them in the future. - 12/13/2021
Bracy Haynie
I have had the wonderful experience of working with Ryan at Cad-Ray for the last several weeks and he has been very professional and informative on how to properly use the Medit I700 scanner with regard to the software. I would highly recommend using...read moreI have had the wonderful experience of working with Ryan at Cad-Ray for the last several weeks and he has been very professional and informative on how to properly use the Medit I700 scanner with regard to the software. I would highly recommend using Cad-Ray and contacting Ryan for any of your Medit needs.read less - 1/27/2023
Hieu Pham
Been super happy with service from this company. Very responsive, really passionate about their work. - 7/16/2020
Engy Hassan
Amazing customer service! Excellent on time feedback. Thank you Kaila - 12/08/2021
Ashley Guarisco
Cad-Ray's customer service has been amazing since day one! From getting a quote to setting everything up and doing my first scan. Everyone has been super helpful! Heather Gramley has been awesome, it's like having a tech in my back pocket! They offer...read moreCad-Ray's customer service has been amazing since day one! From getting a quote to setting everything up and doing my first scan. Everyone has been super helpful! Heather Gramley has been awesome, it's like having a tech in my back pocket! They offer tons of training videos and offer one on one training. I would 10/10 recommend them for all of your scanning needs!read less - 11/21/2022
David Wheeler
I have had excellent , prompt , customer service and support from the entire team . Especially from Frank DeLuca as I move along the learning curve. His patients and expertise is much appreciated - 1/24/2023
Chase Benson
New technology can be intimidating, but this i700 is user friendly and is everything you could ask for in regards to a great scanner. Cad-ray also made the transition easy and smooth. Customer support here is unreal. Telling all my dental buddies abo...read moreNew technology can be intimidating, but this i700 is user friendly and is everything you could ask for in regards to a great scanner. Cad-ray also made the transition easy and smooth. Customer support here is unreal. Telling all my dental buddies about these guys, and plan to make more purchases in the future.read less - 4/18/2022
Nothing but good things to say about CAD-Ray. All of the education, recommendations, and products they provide are truly the best in digital dentistry at the time. - 6/20/2020
arthur lyford
I cannot say enough about the support I have received from the beginning. I chose CadRay ultimately because of the support reviews...I can attest first hand...they are all right on...though I have been practicing for more than 35 years, this old dog...read moreI cannot say enough about the support I have received from the beginning. I chose CadRay ultimately because of the support reviews...I can attest first hand...they are all right on...though I have been practicing for more than 35 years, this old dog has been taught a lot of new tricks from the support staff at Cad Ray...Truly impressed with every interaction so far! Thanksread less - 5/11/2023
Daniel Hwang
Fantastic scanner and best company to buy from. They make sure you are happy with your product. Armen, Frank, and team are the best. High recommendations for CADRAY and the i500. - 7/18/2020
W are an Oral Surgery practice. We started treating TMD patients with the Urbanek TMJ device and decided to switch from impressions to a scanner. We have no past experience with using a scanner. Ryan was very nurturing and patient. Though we are no...read moreW are an Oral Surgery practice. We started treating TMD patients with the Urbanek TMJ device and decided to switch from impressions to a scanner. We have no past experience with using a scanner. Ryan was very nurturing and patient. Though we are not ready to make the switch, we are well on our way. Looking forward to our next session.read less - 11/21/2022
Greg Camfield
CAD-Ray keeps knocking it out of the park. Upgraded from i500 to i700. Transition was seamless! Thanks again guys! - 11/15/2022
Suresh Goel
CAD-Ray is a great resource for all things digital. Knowledgeable team but also able to anticipate your needs and because they’ve done it so many times they seem to know what you need before you do! Definitely the first place to look for digital ha...read moreCAD-Ray is a great resource for all things digital. Knowledgeable team but also able to anticipate your needs and because they’ve done it so many times they seem to know what you need before you do! Definitely the first place to look for digital hardware and integration!read less - 6/16/2020
David Stall
These guys are great. Always available and helpful. My scanning issues were dealt with quickly and courteously. - 10/01/2021
Samuel Koth DDS
These guys are great. Always quick to answers questions and trouble shoot. Only a text away...they are spot on. Would purchase from them again in a heart beat......and will soon! We are getting close to adding a second Medit i500 to the office. Every...read moreThese guys are great. Always quick to answers questions and trouble shoot. Only a text away...they are spot on. Would purchase from them again in a heart beat......and will soon! We are getting close to adding a second Medit i500 to the office. Everyone whats to use the one we have!read less - 6/19/2020
Tiffany Lee
Update to CAD-Ray as this company has morphed into something even better and grander than it was previously. This is the company where you go to when you need a scanner or 3d printer. Their customer service is second to none and their training on sca...read moreUpdate to CAD-Ray as this company has morphed into something even better and grander than it was previously. This is the company where you go to when you need a scanner or 3d printer. Their customer service is second to none and their training on scanners is top level. Don't buy your scanners anywhere else because Cad-Ray is the only company who knows how to solve any of your problems and provides the best technical support. I recently had purchased a software to mill crowns from my medit to my MCXL. No body could get it to work.12 months in and I was resigned to it not working and not being able to mill in house. With Cad-Ray's tremendous hard work, we were able to get the milling unit synchronized to the inlab and inlab synchronized to clinux and clinux meshed to medit. I am now milling scanned crowns for the first time in about 12 months. Yay Cad-Ray, Thank you!!!!!read less - 3/06/2024
Buddy “BTay” Taylor
I600 - so far its great! - 8/23/2022
Levy Do
I'm a repeat customer because Cad-Ray's customer service is fast, efficient, and no nonsense. The classes offered for training for particularly for the Medit is awesome and it comes included which is phenomenal. All the classes that I've gotten to at...read moreI'm a repeat customer because Cad-Ray's customer service is fast, efficient, and no nonsense. The classes offered for training for particularly for the Medit is awesome and it comes included which is phenomenal. All the classes that I've gotten to attend so far has been well organized and I left learning very practical things. Remote support team solves my problem right then and there. Recently I had an issue, and instead of me talking to a sales rep who doesn't know what to do, Kaila remoted in and got it fixed just like that. Thank you and great job guys!read less - 4/19/2022
Madhavi Chavda
Still beginner to use IO scanner. best customer service. Live training was very useful. Andy Nova was great in improving my skill for scanning and showing me all features. Thank you. - 5/19/2022
Great scanner at a good price...Excellent customer service . I never want to take a conventional impression again! Best upgrade to my office in years. - 11/16/2021
Steve Acker
We received our i700 scanner from CAD-Ray yesterday. It was an upgrade from our i500. The scanner is amazing and Laura was amazing in helping us get up and running in no time. Their support, professionalism, and expertise is unmatched. Thanks CAD-Ray...read moreWe received our i700 scanner from CAD-Ray yesterday. It was an upgrade from our i500. The scanner is amazing and Laura was amazing in helping us get up and running in no time. Their support, professionalism, and expertise is unmatched. Thanks CAD-Ray!- Helena from Elite Dentalread less - 12/23/2021
Infinite Smiles
Can not say enough great things about Cad-Ray. Purchase an intraoral scanner from them and have had to have their support team help out a couple of times. They are top notch! I will be purchasing all of my tech they offer through them - 7/07/2022
Thuy Nguyen
CAD-Ray is amazing! Prompt replies, quick delivery, knowledgeable team! I had some cracks on my scanner that I read on their FB group may be a manufacturer's defect. My scanner was still covered under warranty. They overnighted a brand new one to me ...read moreCAD-Ray is amazing! Prompt replies, quick delivery, knowledgeable team! I had some cracks on my scanner that I read on their FB group may be a manufacturer's defect. My scanner was still covered under warranty. They overnighted a brand new one to me before I even knew they were going to replace it! That's how quick they are! Highly recommend them!!!read less - 12/23/2021
Dixie Jernigan
The customer service we have received while working with Frank DeLuca is second to none! He is incredibly knowledgeable and enthusiastic, as well as always available to help with any issues. We are very pleased with CAD-RAY and relationship that they...read moreThe customer service we have received while working with Frank DeLuca is second to none! He is incredibly knowledgeable and enthusiastic, as well as always available to help with any issues. We are very pleased with CAD-RAY and relationship that they have with their clients.read less - 1/25/2023
Chris Kleist
Cad-Ray is the absolute best if you're in the market for digital dental tools. I have purchased two Medit scanners through them. There will be hiccups with any complex piece of machinery, but every time I have needed Cad-Ray, they have been there. I ...read moreCad-Ray is the absolute best if you're in the market for digital dental tools. I have purchased two Medit scanners through them. There will be hiccups with any complex piece of machinery, but every time I have needed Cad-Ray, they have been there. I recently had a scanner go down. I called Cad-Ray tech support and they got me on the phone with Medit immediately. Within a day, a replacement scanner was sitting on my desk. It doesn't get much better than that.read less - 10/03/2024
Francois Dillinger
These guys are the best. They provide so much help and insight with the Medit. I can't say enough great things about them and their continued support. I truly appreciate everything!! - 6/16/2020
Shahnam Shifteh
I just ordered my i700 and am
Very excited to get into the digital world of dentistry and Nick was extremely helpful with answering any questions and helping to put the order together. - 12/09/2021
Nothing but great things to say about Cad-Ray! Excellent customer support from Laura after the purchase of our Medit i500 and the cart from Damien. I’ve been very impressed with the Medit in restoring crown and bridge, as well as fixed hybrids, and...read moreNothing but great things to say about Cad-Ray! Excellent customer support from Laura after the purchase of our Medit i500 and the cart from Damien. I’ve been very impressed with the Medit in restoring crown and bridge, as well as fixed hybrids, and learning more of its capabilities each day. We have intentions to buy a second Medit shortly and will definitely be using Cad-ray again.read less - 12/13/2021
Greg Stepka
Highly Recommend working with Cad-Ray. Just purchased a MeditI700. So easy to work with. Training with Destaney was awesome. - 3/19/2024
Dr Grace Simco
I bought I500 scanner two years ago. The scanner is great and the service is excellent. I have contacted Heather Gramley and Andy Nova about the updates of my scanner recently. They are absolutely amazing people. They go above and beyond. They repres...read moreI bought I500 scanner two years ago. The scanner is great and the service is excellent. I have contacted Heather Gramley and Andy Nova about the updates of my scanner recently. They are absolutely amazing people. They go above and beyond. They represent the company very well.read less - 7/05/2022
This has changed my way of doing things forever. I can’t live without my Medit scanner. I promote it to all my friends like crazy. Support with Cad ray is awesome. They return calls within seconds. The price for scanner is ridiculously good and the ...read moreThis has changed my way of doing things forever. I can’t live without my Medit scanner. I promote it to all my friends like crazy. Support with Cad ray is awesome. They return calls within seconds. The price for scanner is ridiculously good and the quality of images is amazing. Their website has soo many educational videos. It doesn’t end. I love the ability to mobilize it from one off to another until I buy a second one. I’m can’t wait u til I have the time to learn all the other cool technology cad ray has. It’s amazing.read less - 7/24/2020
P. Andrew Benson
For me, getting this scanner was not a choice between Medit vs Itero or Medit vs Trios. Those companies have already eliminated themselves from consideration based on ridiculous cost, ridiculous ongoing fees, and greater concern for petty proprieta...read moreFor me, getting this scanner was not a choice between Medit vs Itero or Medit vs Trios. Those companies have already eliminated themselves from consideration based on ridiculous cost, ridiculous ongoing fees, and greater concern for petty proprietary posturing than for ensuring full functionality of their products to their usership. Typical dental tech company stuff.
The real decision was between Medit vs continuing life in analog dentistry. Medit through Cad-ray was really the only choice. Awesome packages , awesome access to free training videos, awesome software updates, awesome access to live support, awesome support staff.
There's just nothing better in dentistry than to get a great product AND a chance to stick it to the man.read less - 6/16/2020
Cad-Ray is great! Great customer service and they are consistent with their followthrough . Always helpful when you need questions answered and helping to lower the learning curve with newly purchased equipment. I’m very satisfied with my medit i-...read moreCad-Ray is great! Great customer service and they are consistent with their followthrough . Always helpful when you need questions answered and helping to lower the learning curve with newly purchased equipment. I’m very satisfied with my medit i-500 intraoral scanner. Armen and Frank are solid!read less - 6/16/2020
Gregory Camfield
These guys are 1st in class service every time! - 7/08/2022
A good maintenances practice for any milling machine is to check that the tip of the drill is getting adequate water, otherwise you may see sparks flying as you are essentially dry milling material that is not supposed to be dry milled leading to drill and block breakage. We recommend that you run the water for a minute or two at the start of the day and check and make sure the spray is right on the tip of the drill. A simple ortho wire can help unclog the ports and redirect the water spray to where it belongs.
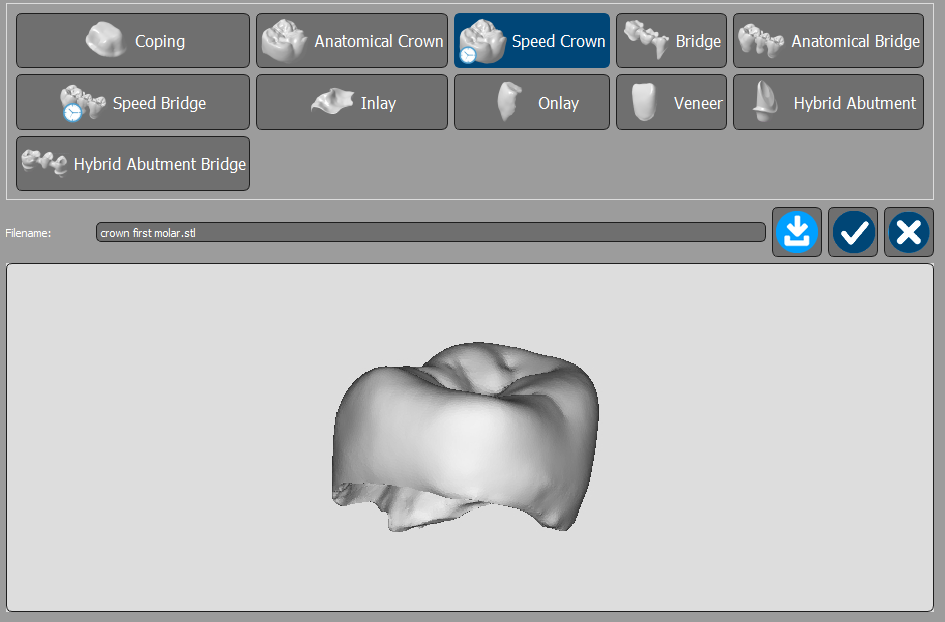
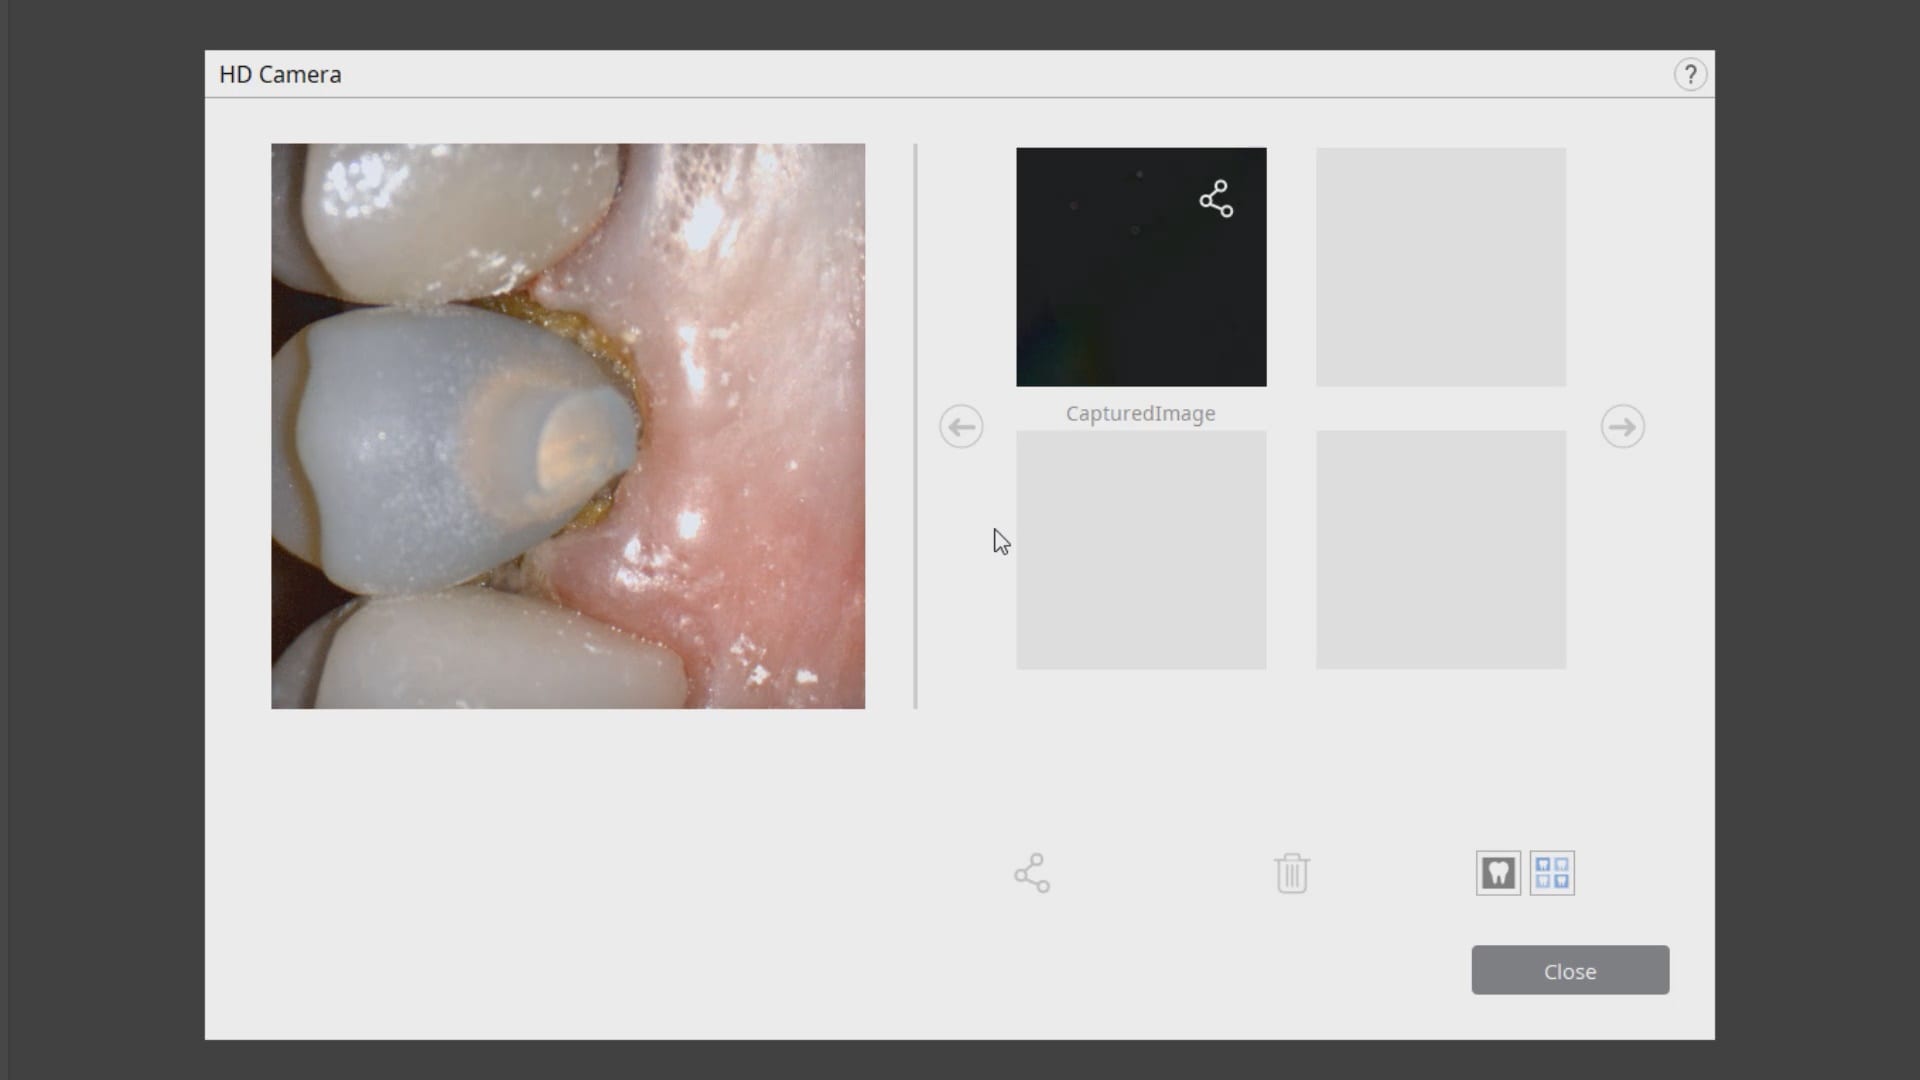
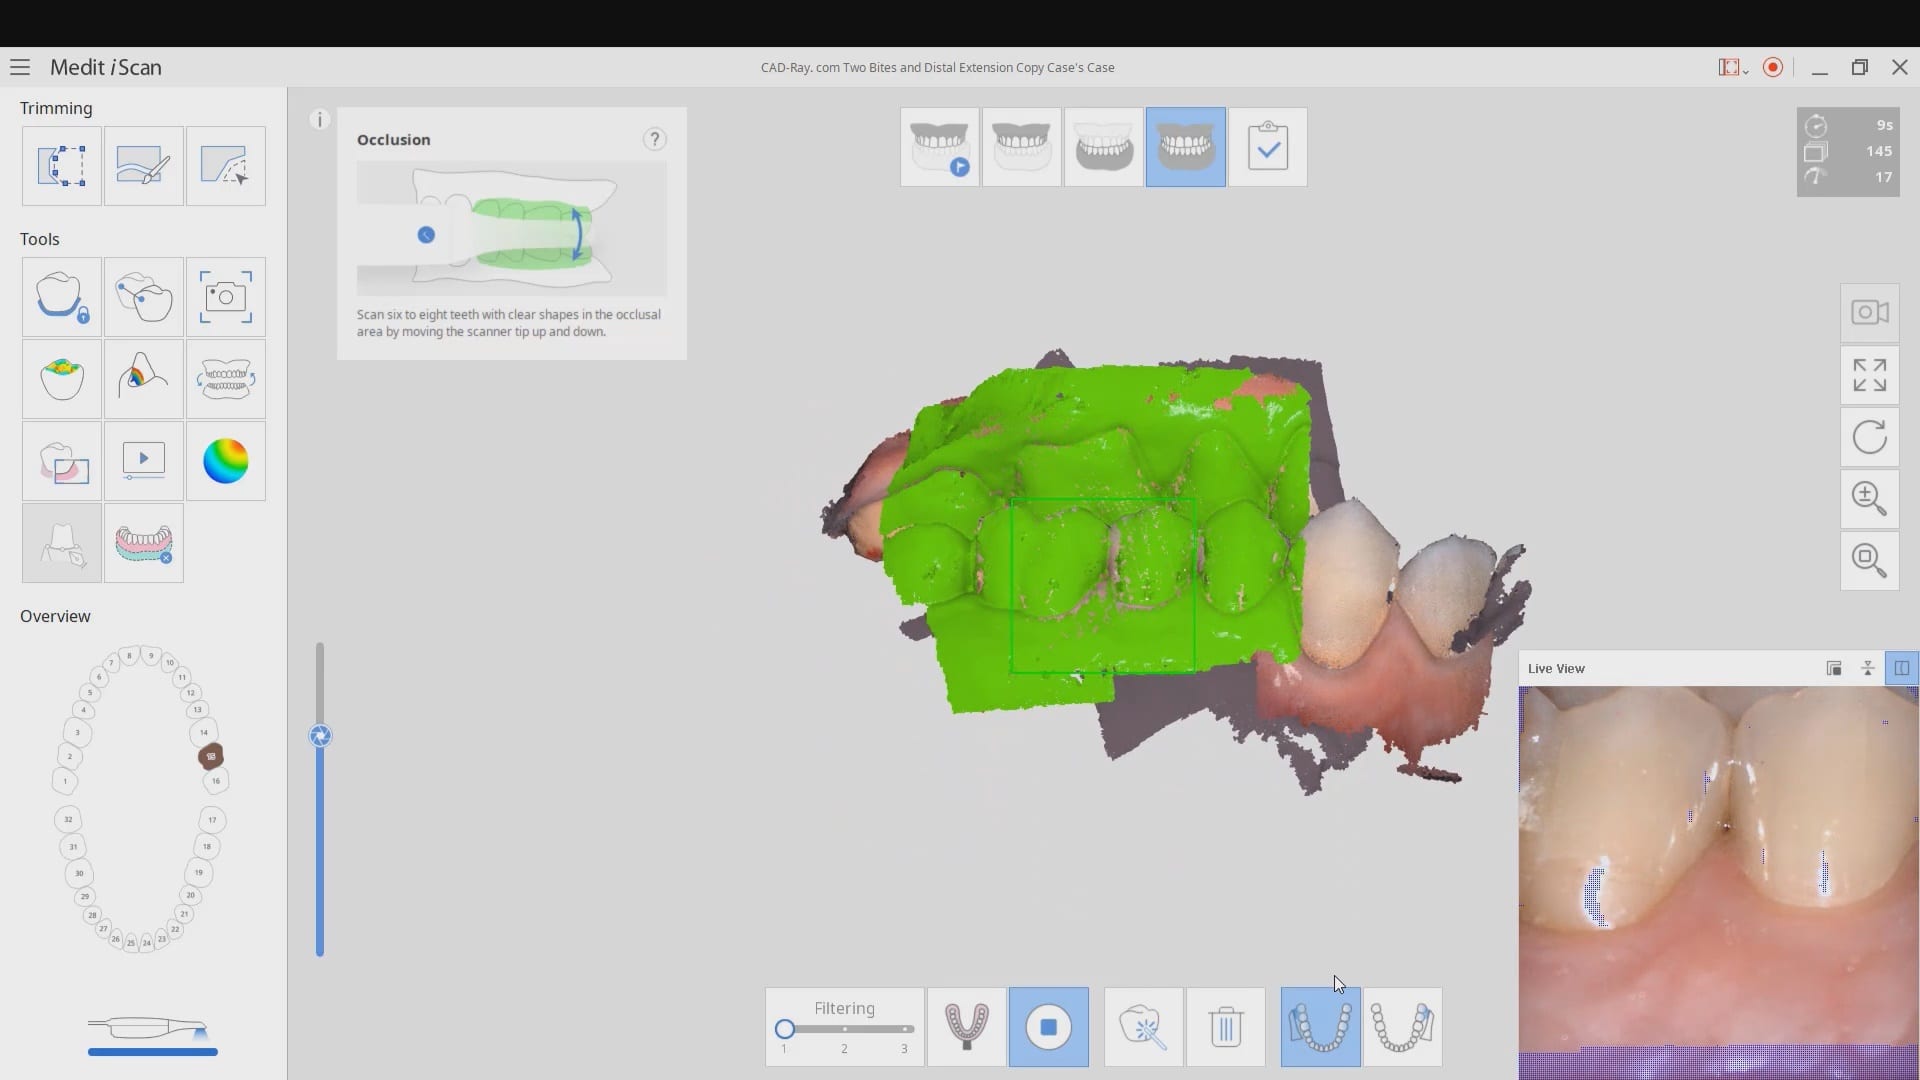
This article features the new Meditlink 2.3 software which has some advanced functionality. One of the greatest achievements is he ability to tell the scanner to avoid imaging certain colors like green and blue. This greatly facilitates the imaging of full arches as you can let your gloves / fingers guide the camera and displace all the soft tissue that impedes image capturing. We also feature how easy it is to launch CAD software to design the restoration and mill it out of lithium disilicate material
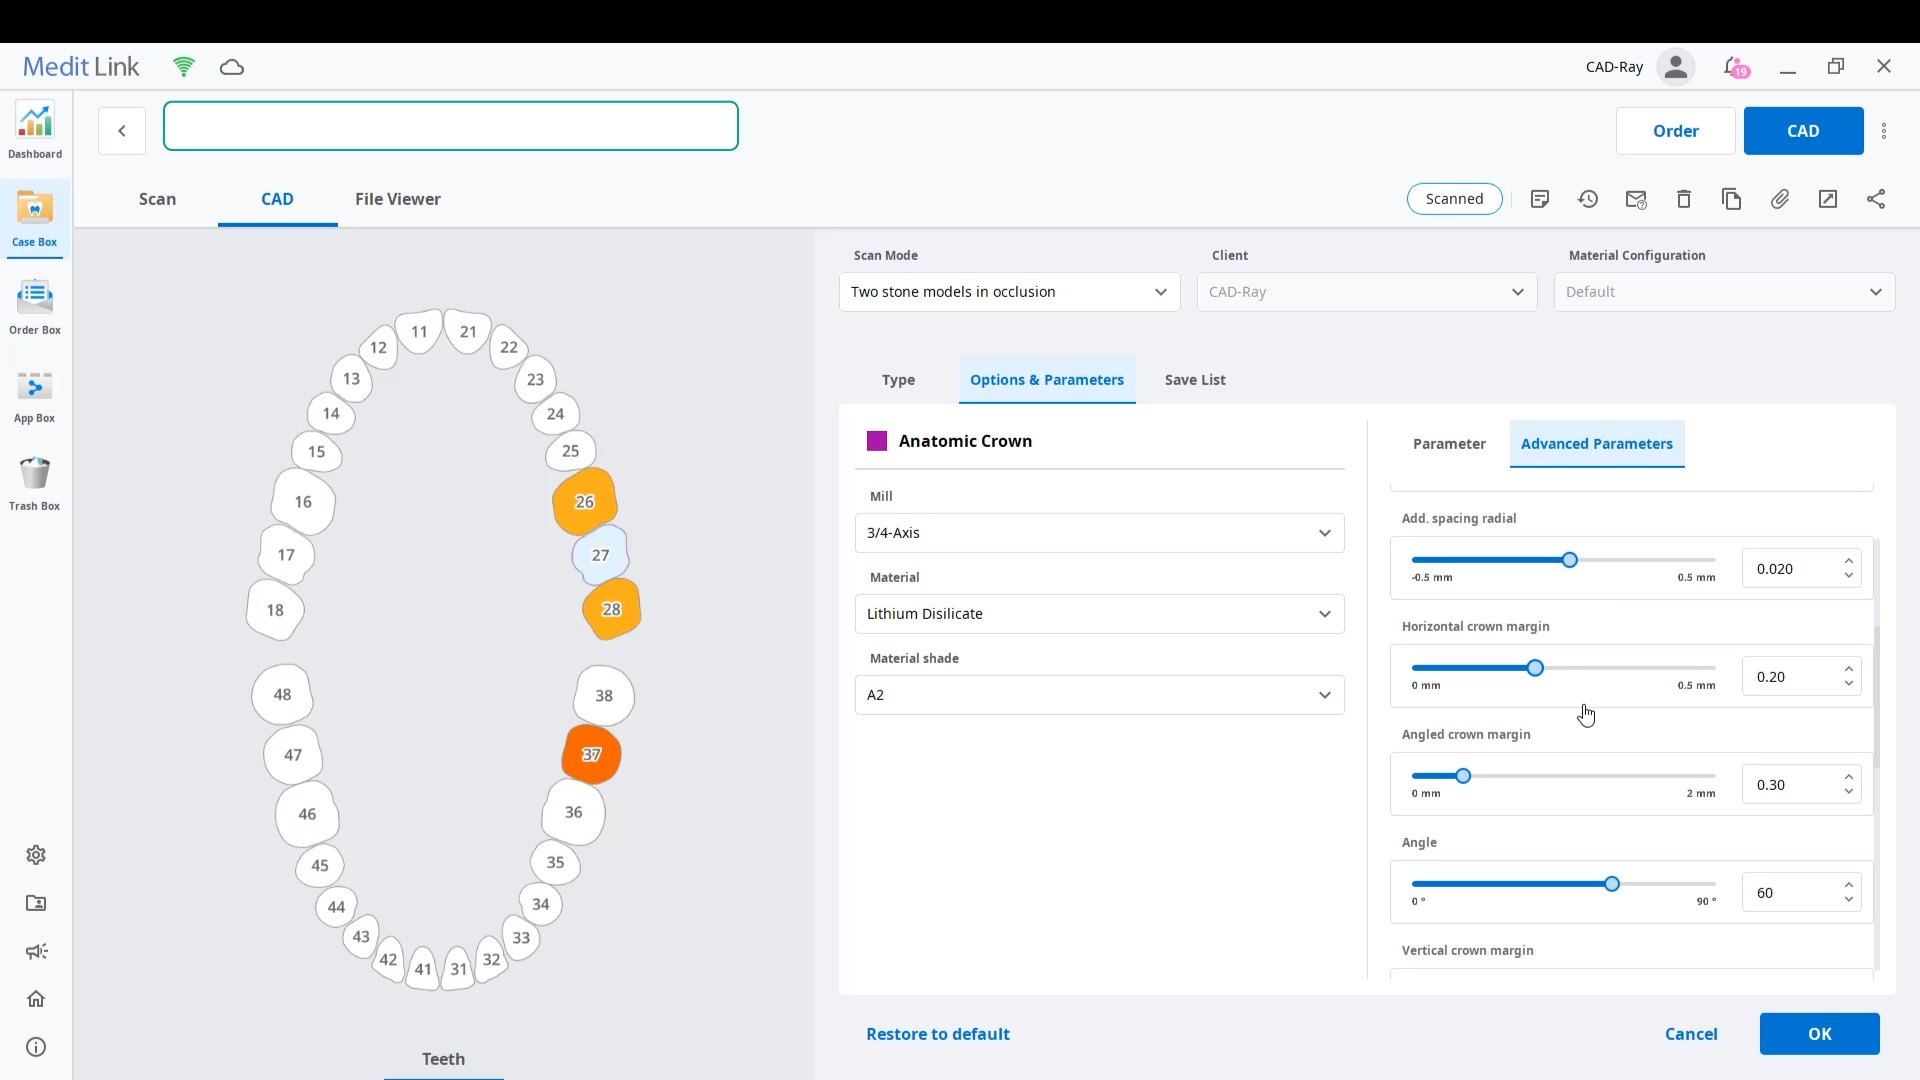
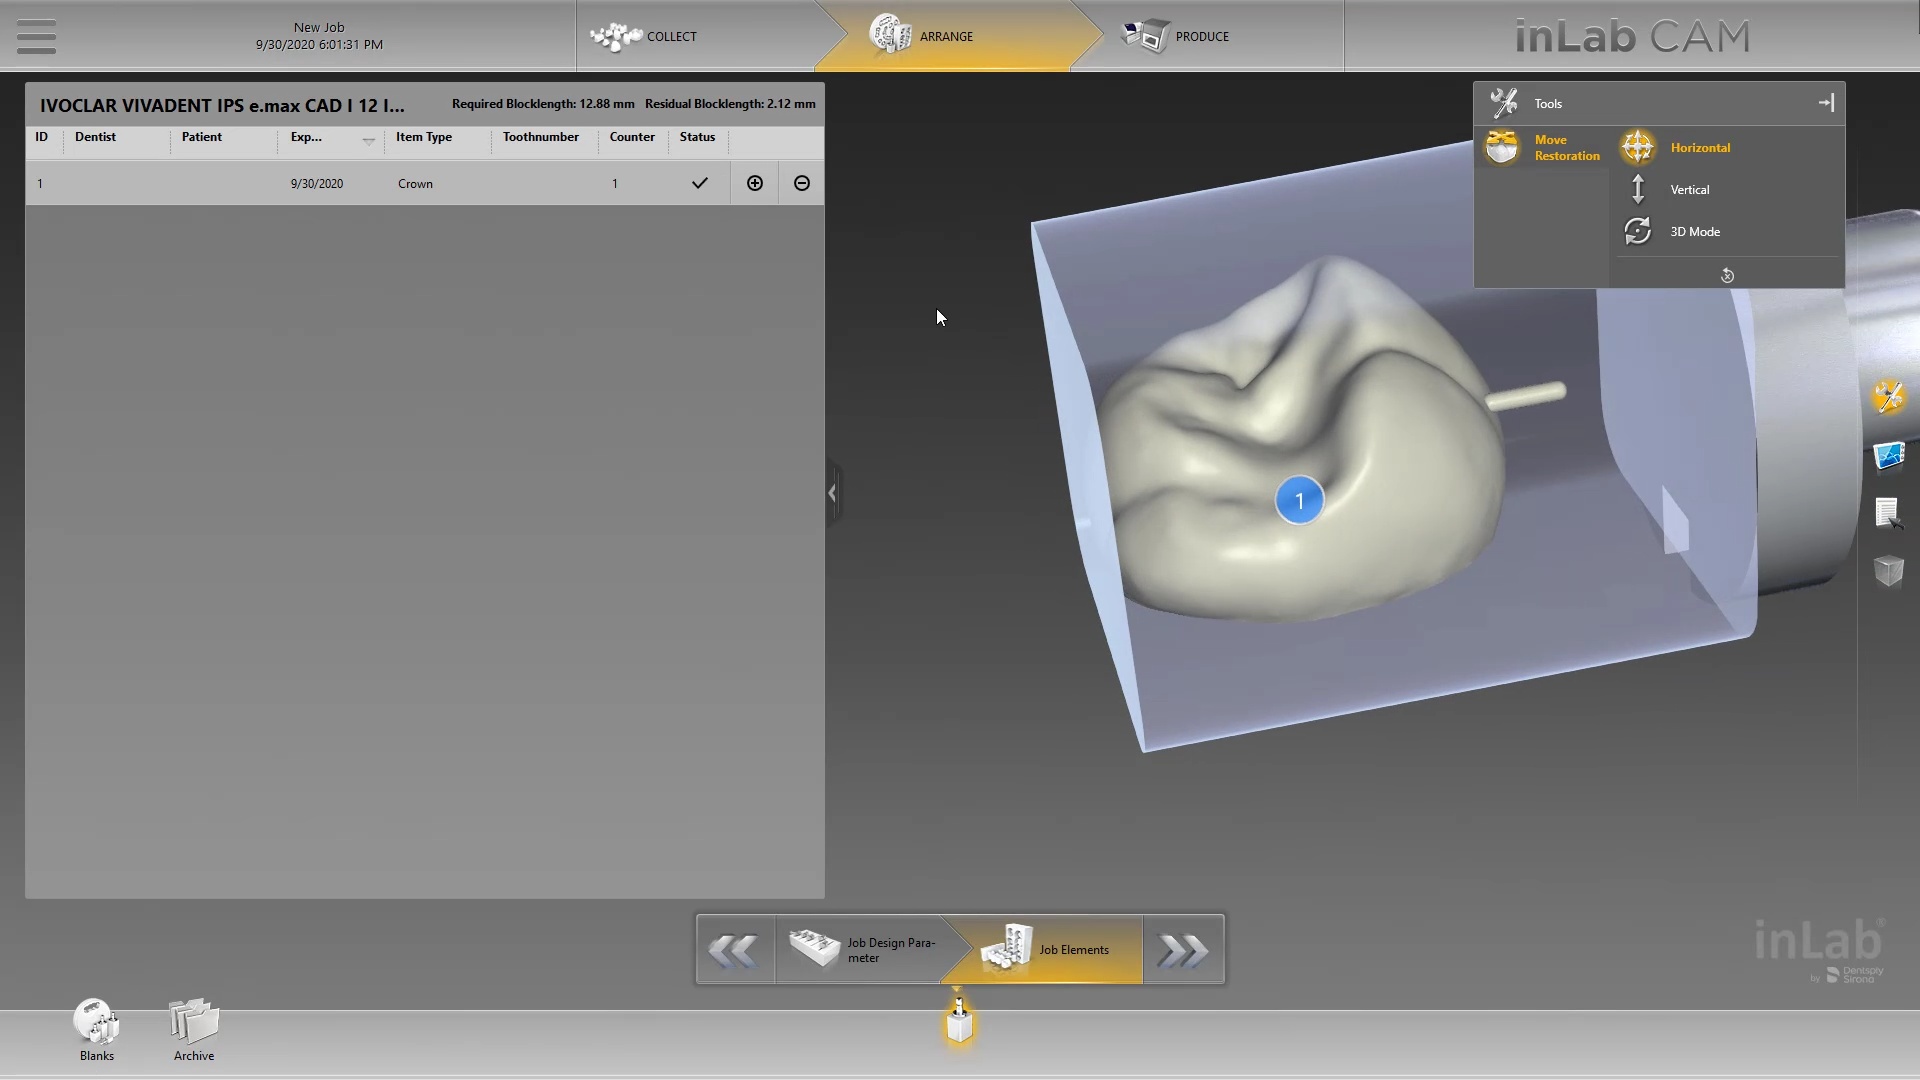
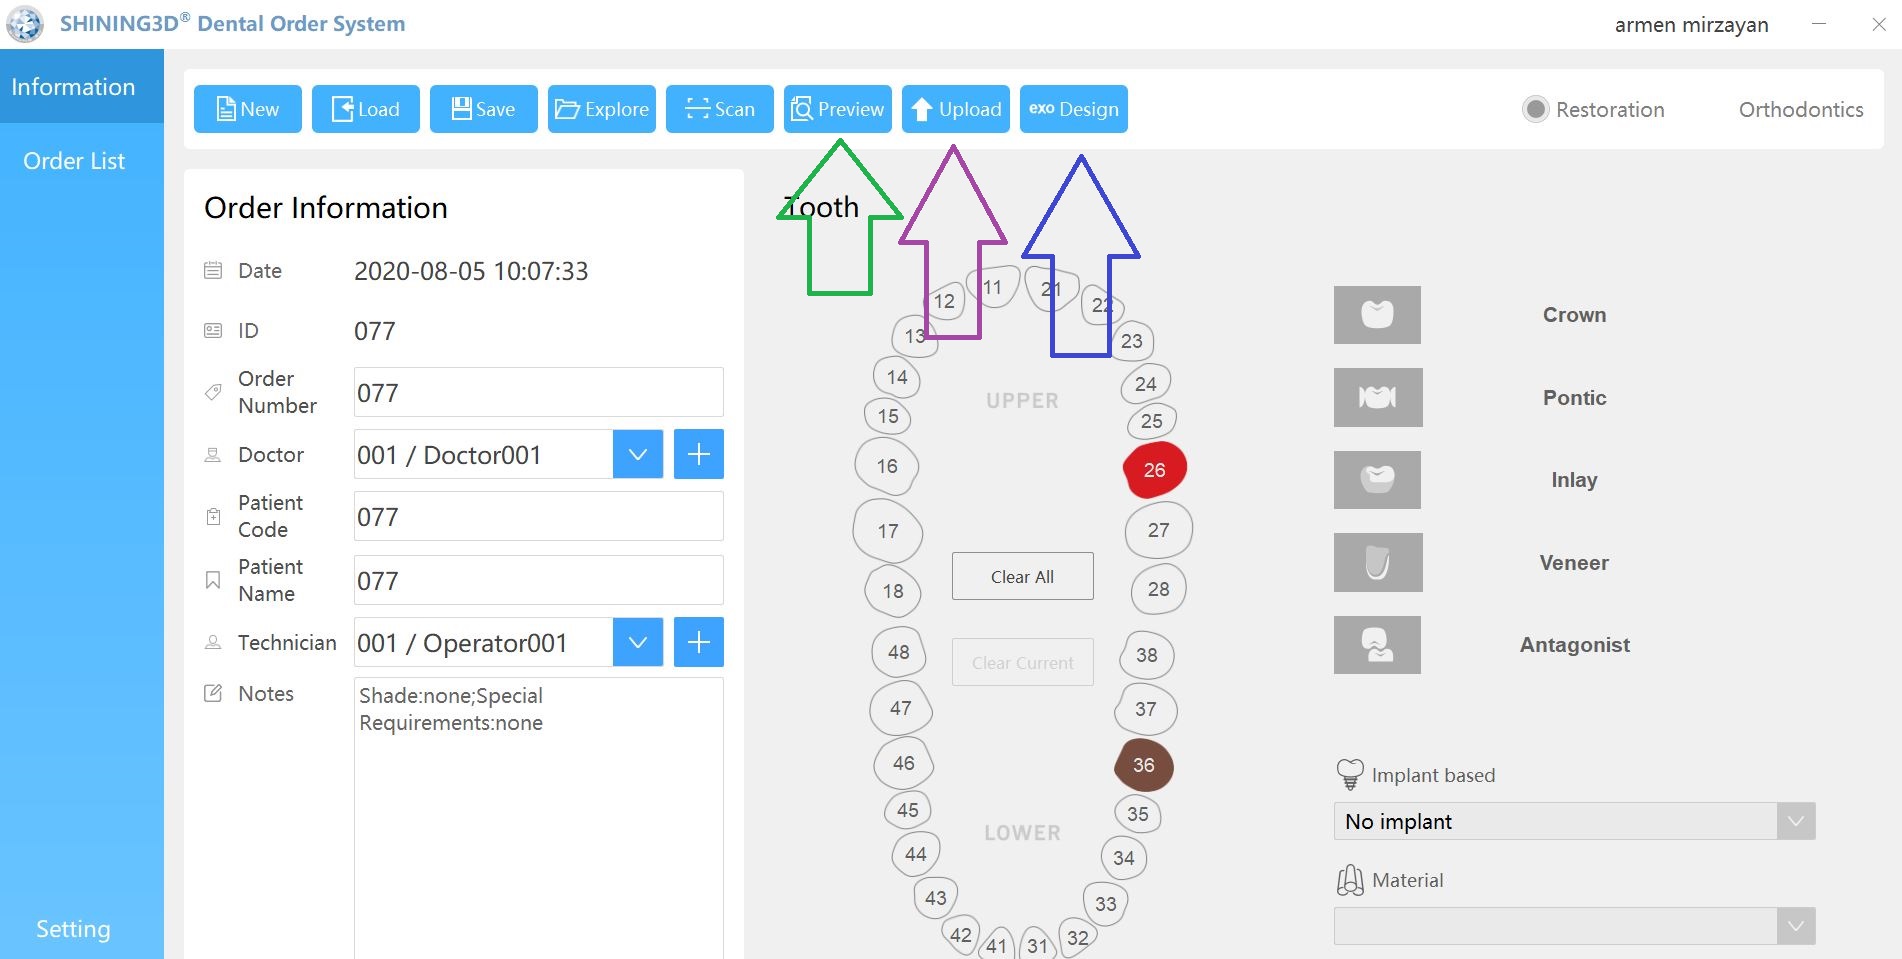
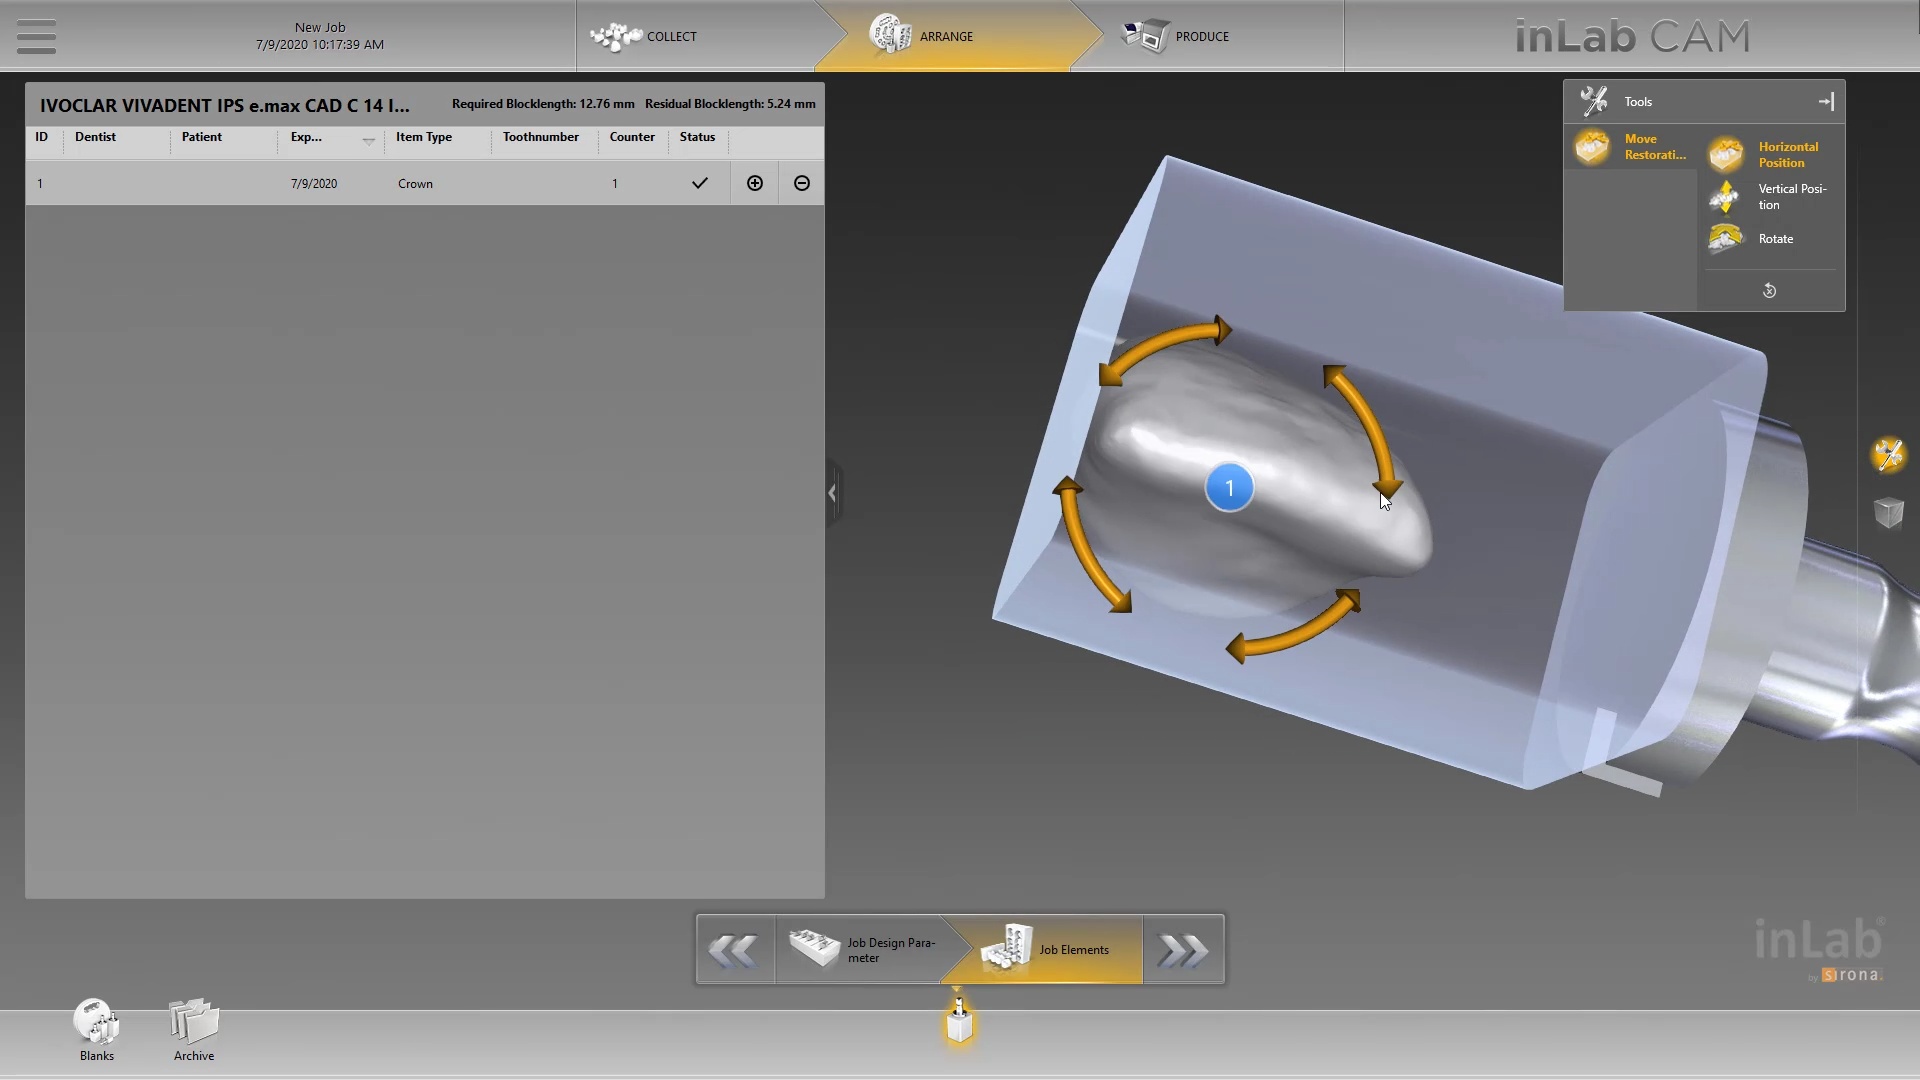
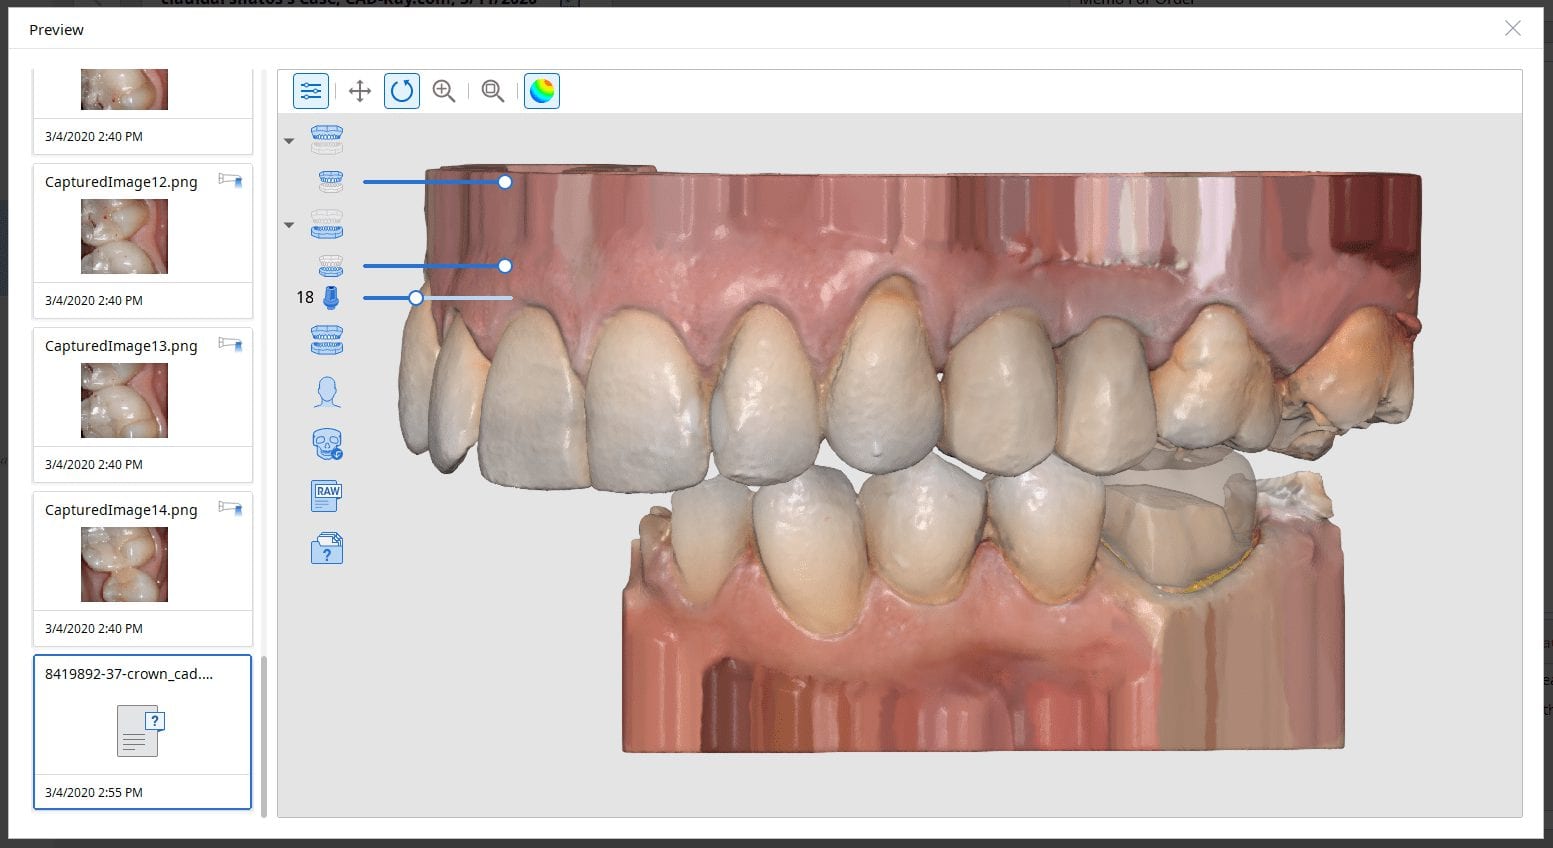
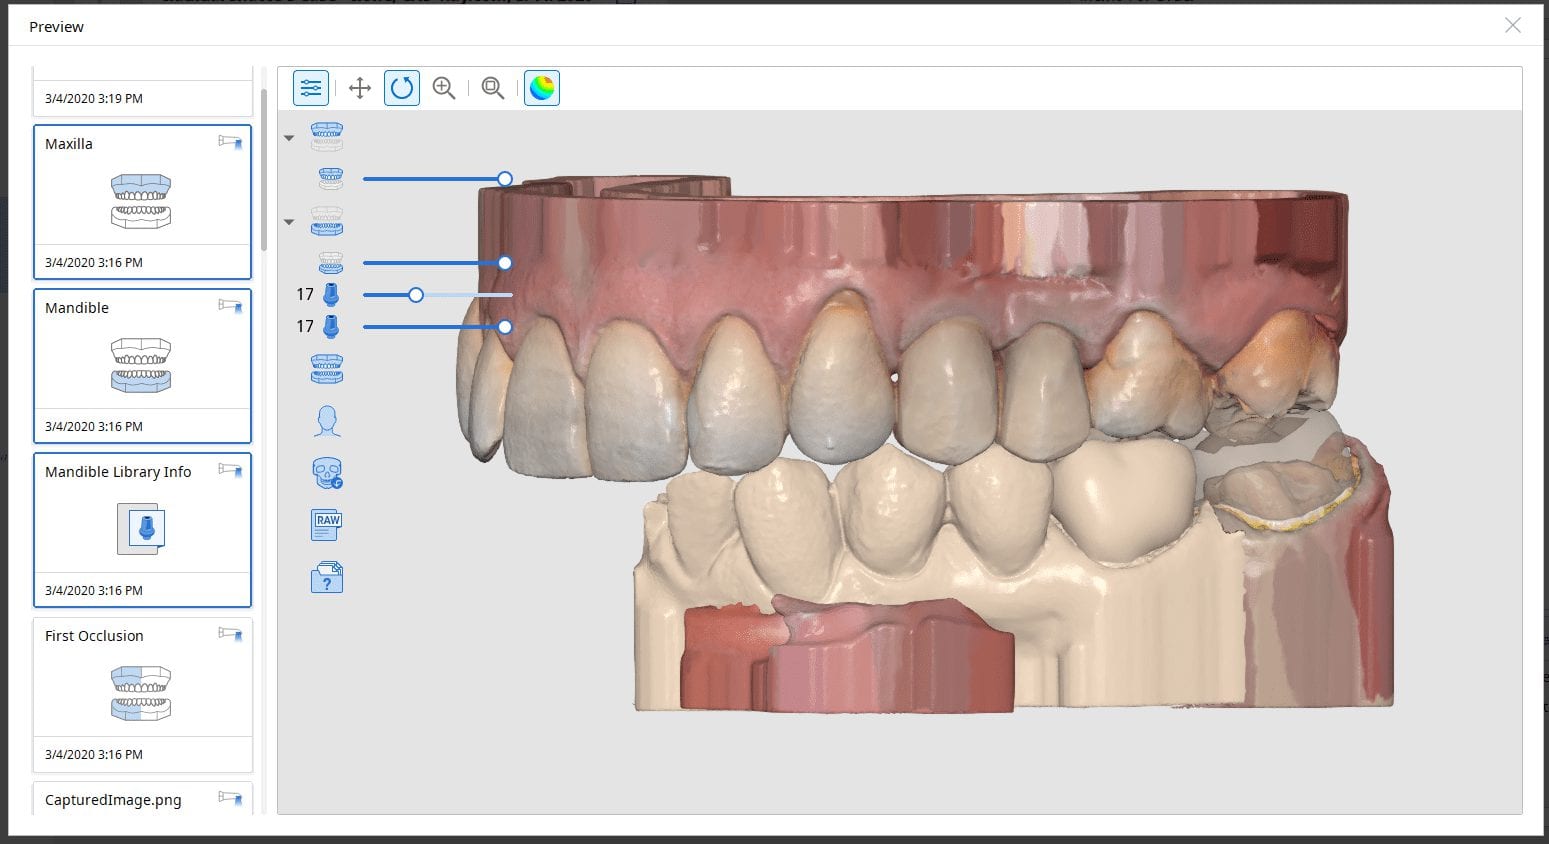
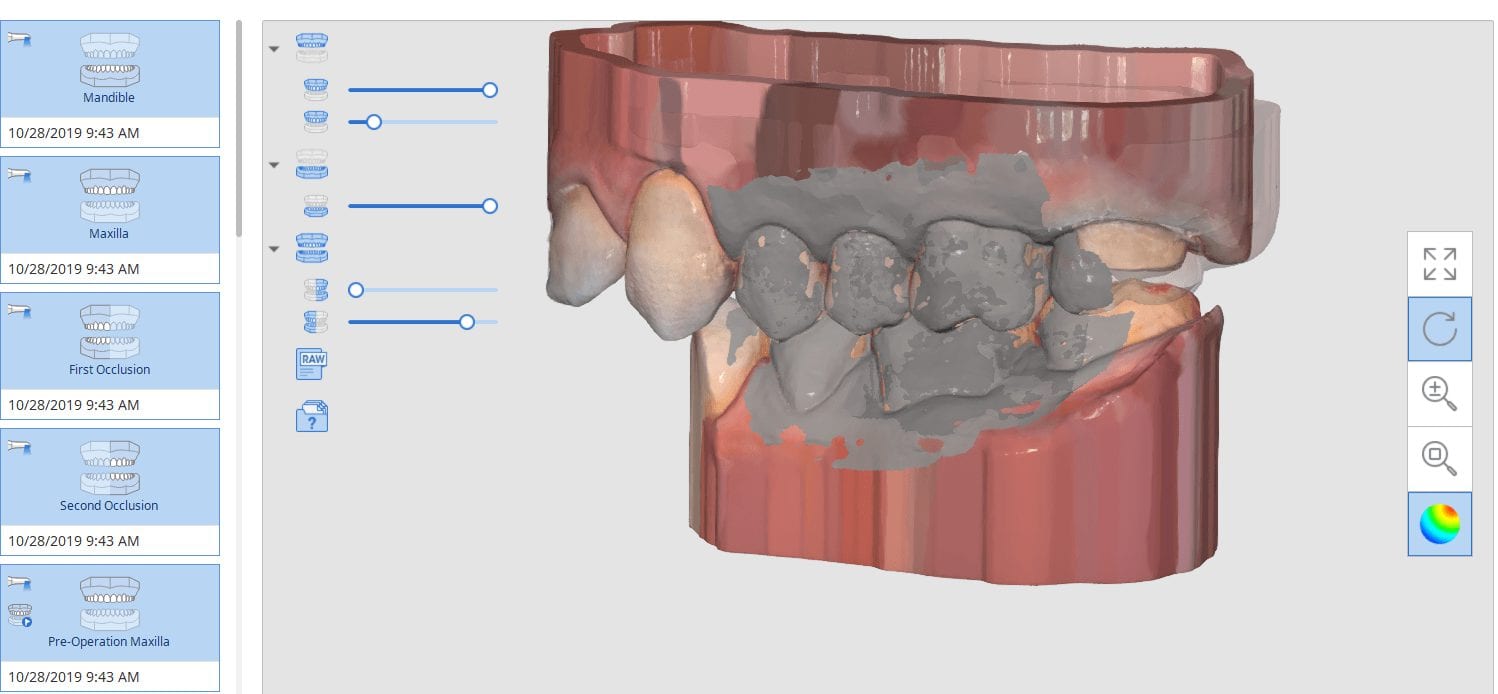
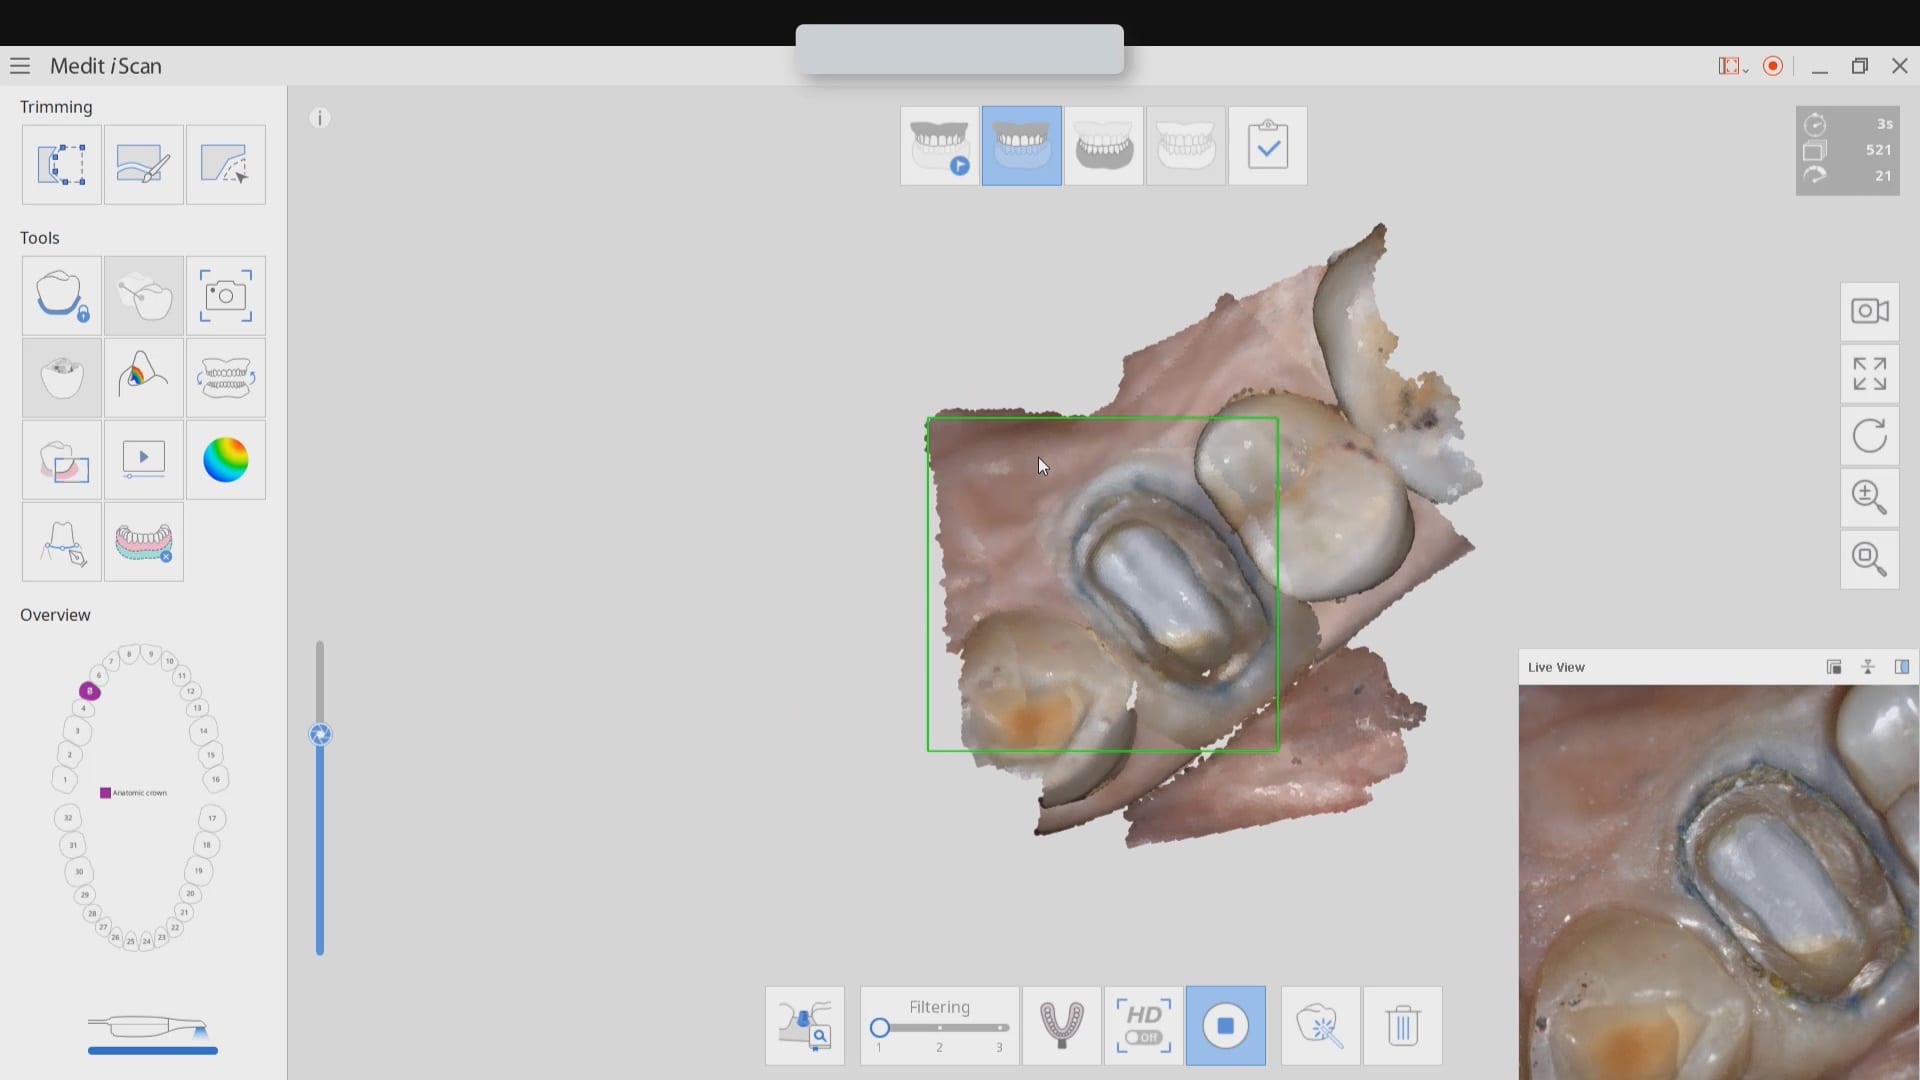
Case set up: here we enter the patients name and a simple tab appears where we chose the material and restoration tab. Once you image, you can place an order to the lab or you can advance to the CAD tab:
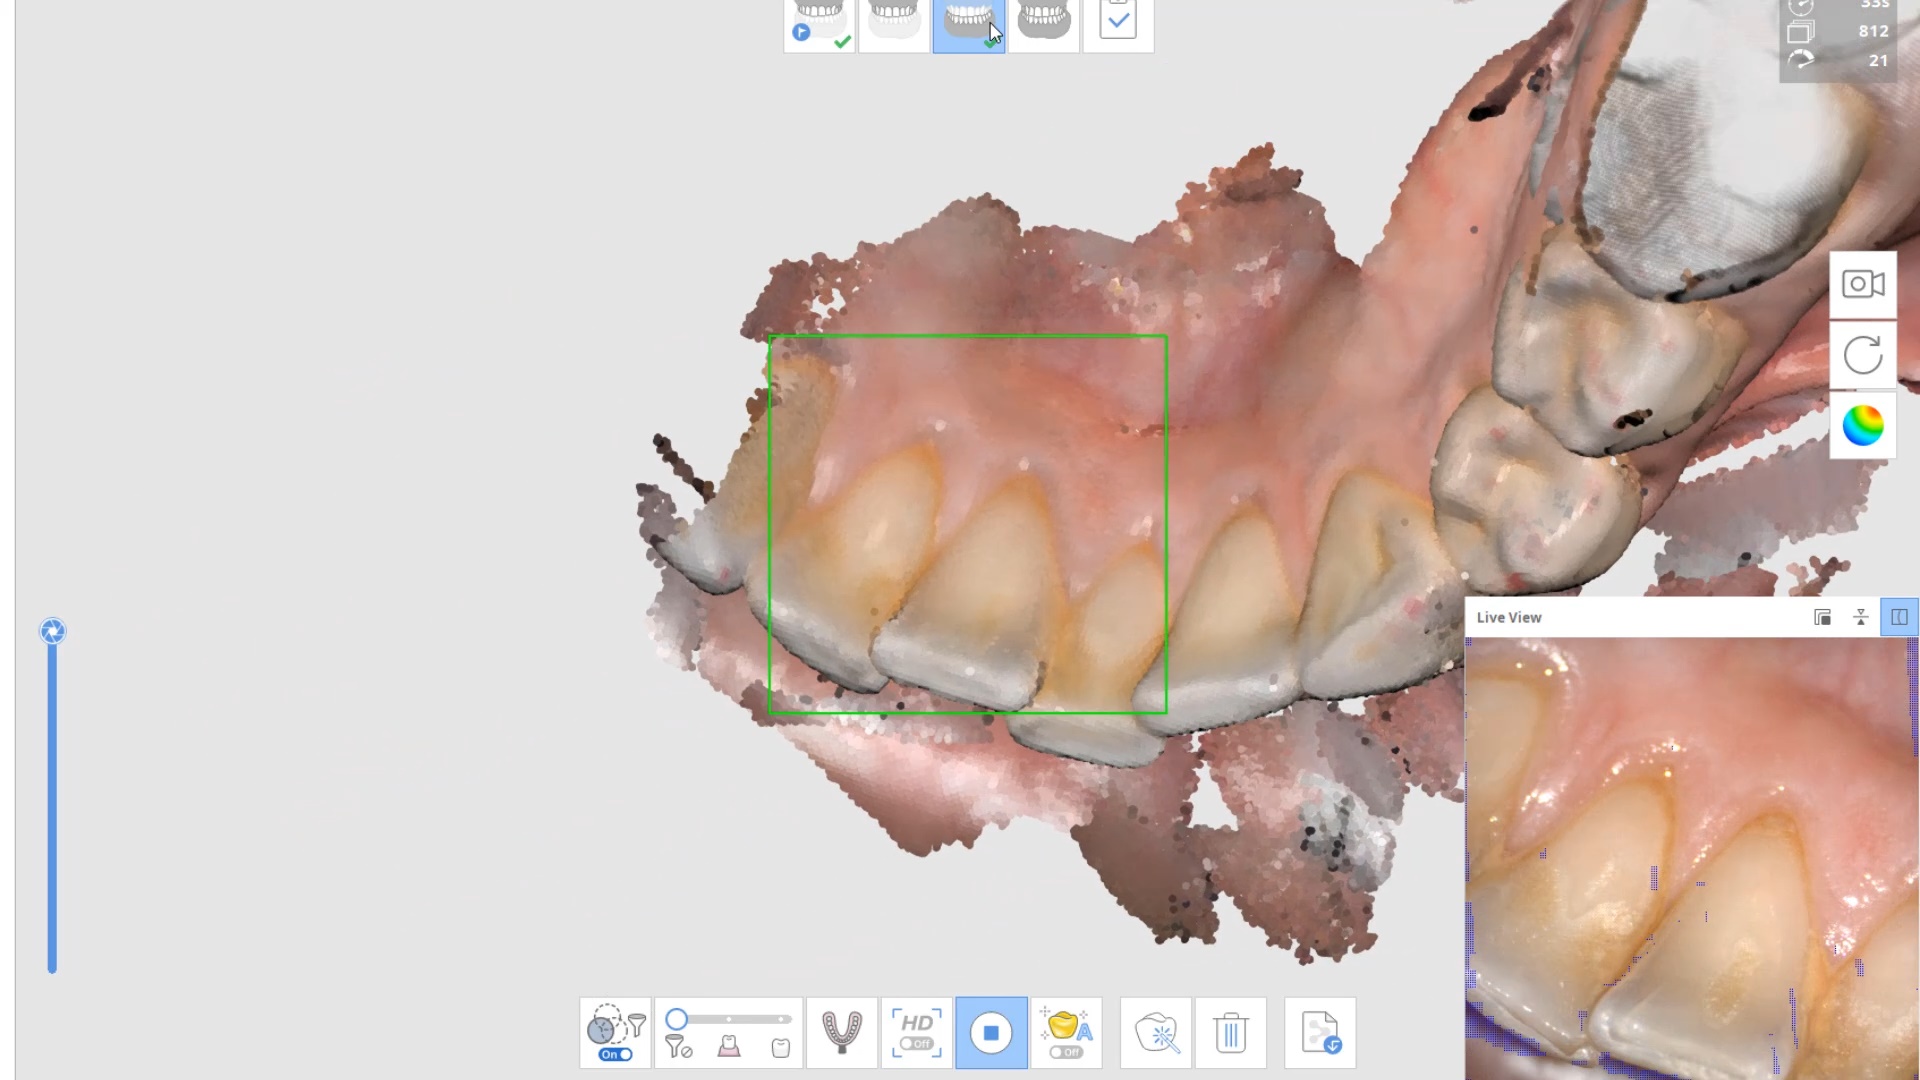
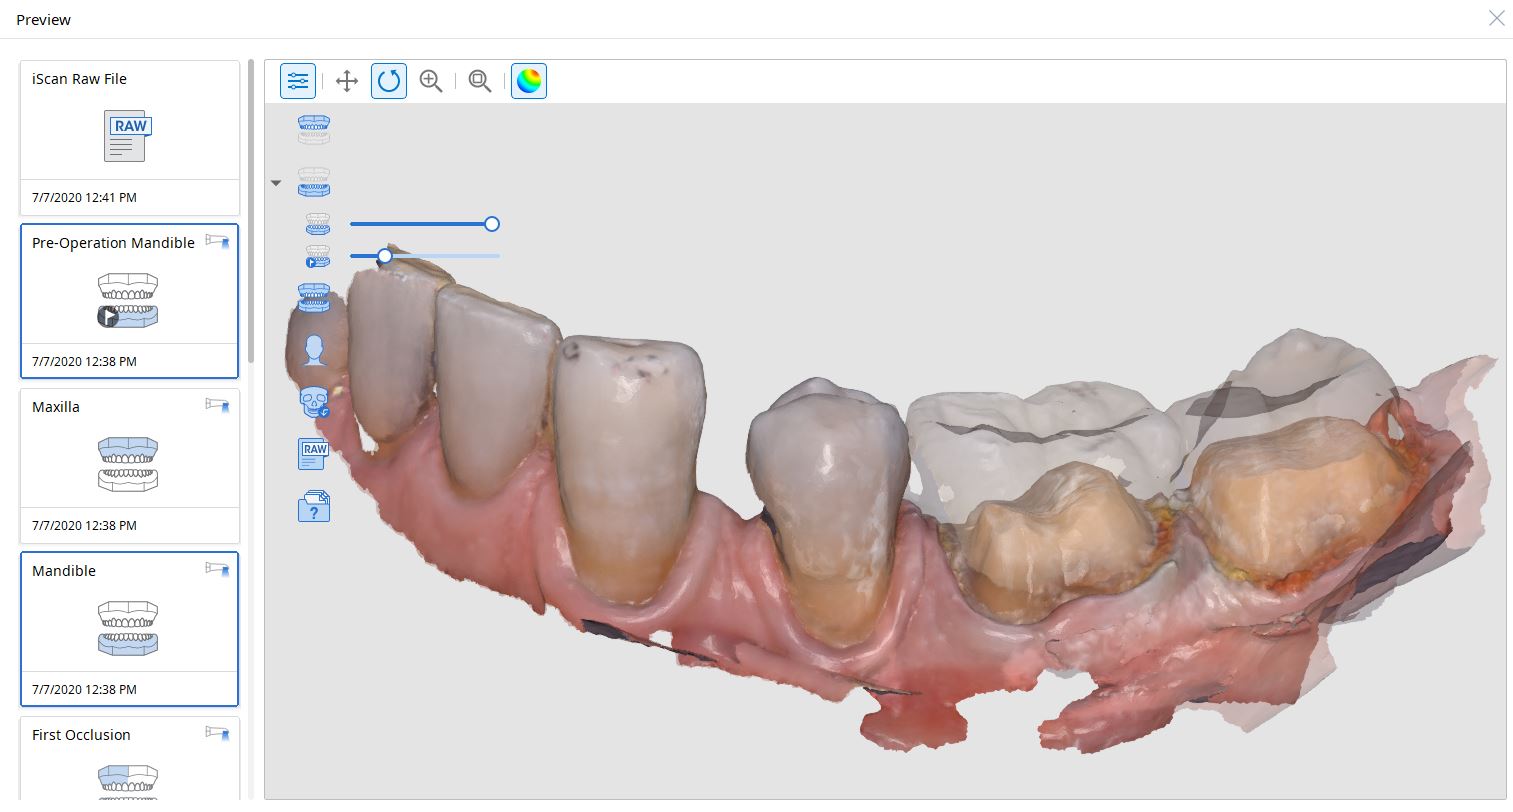
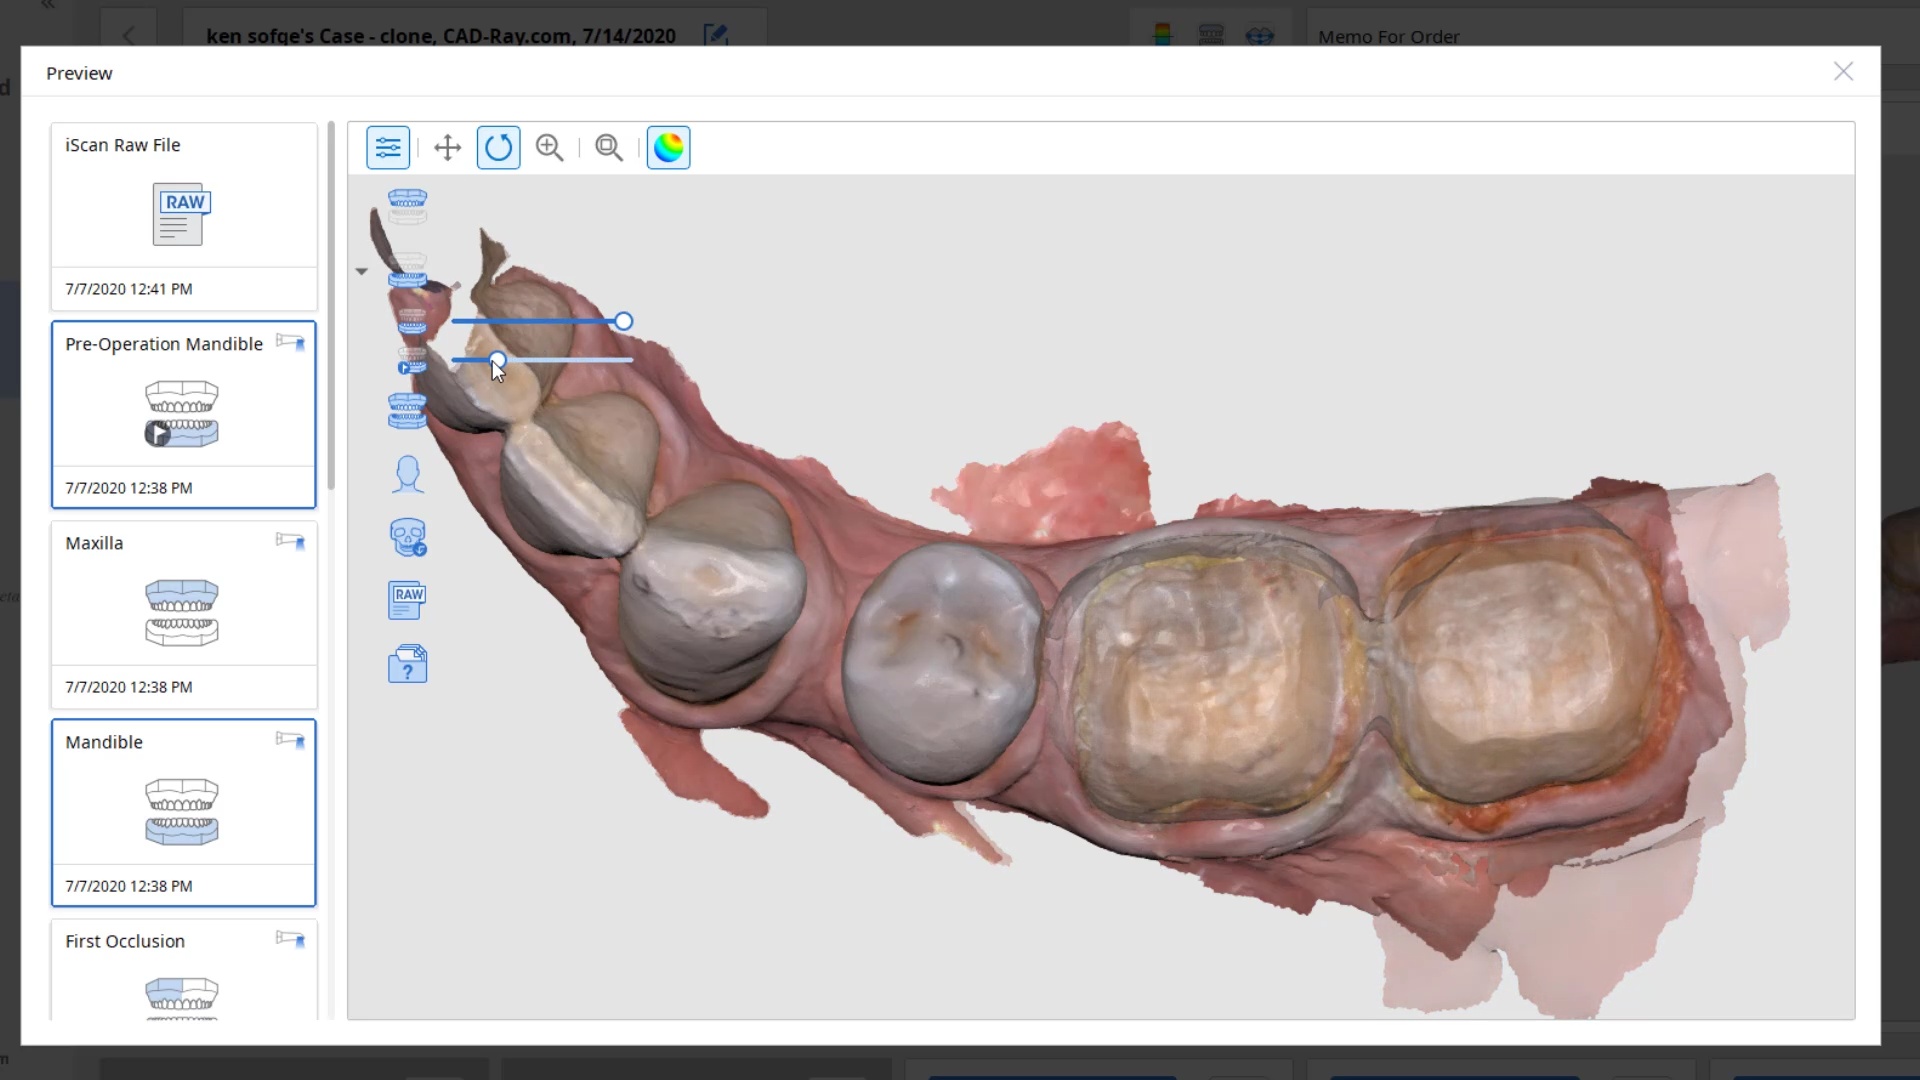
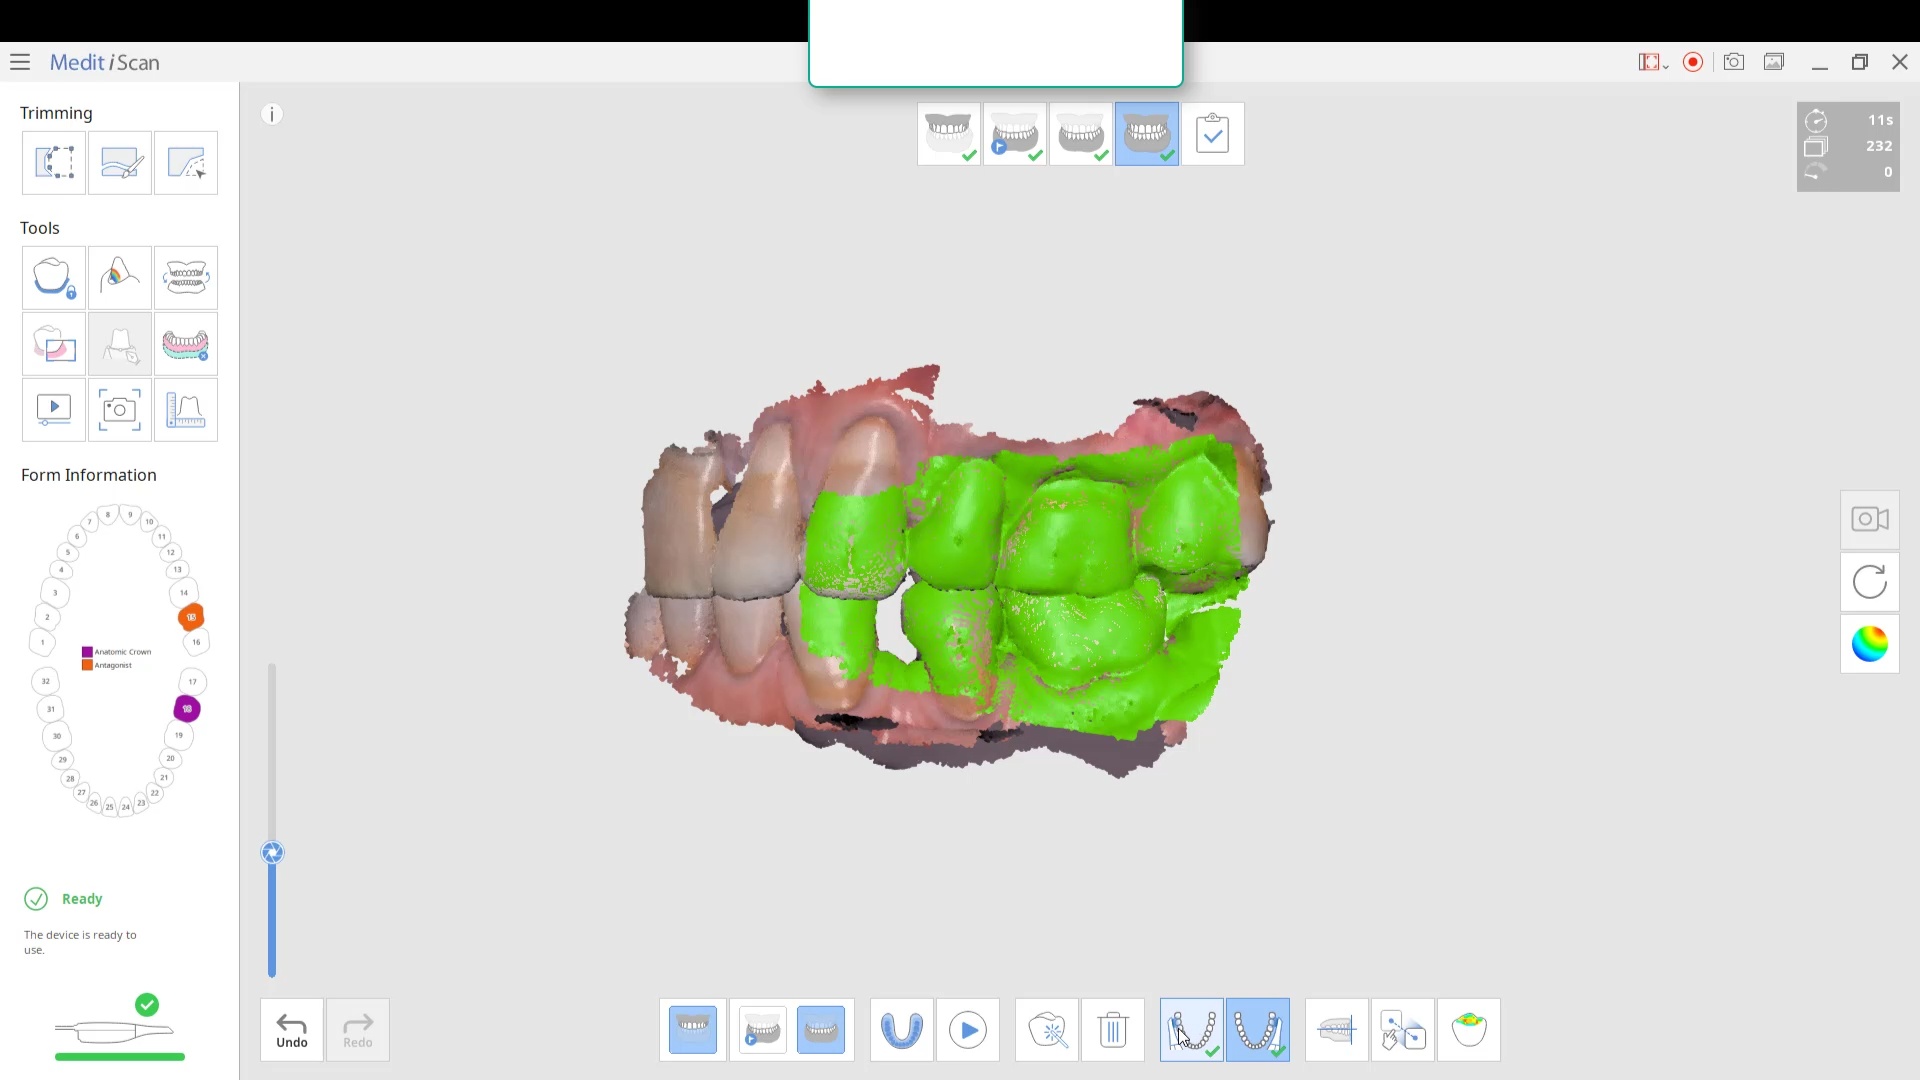
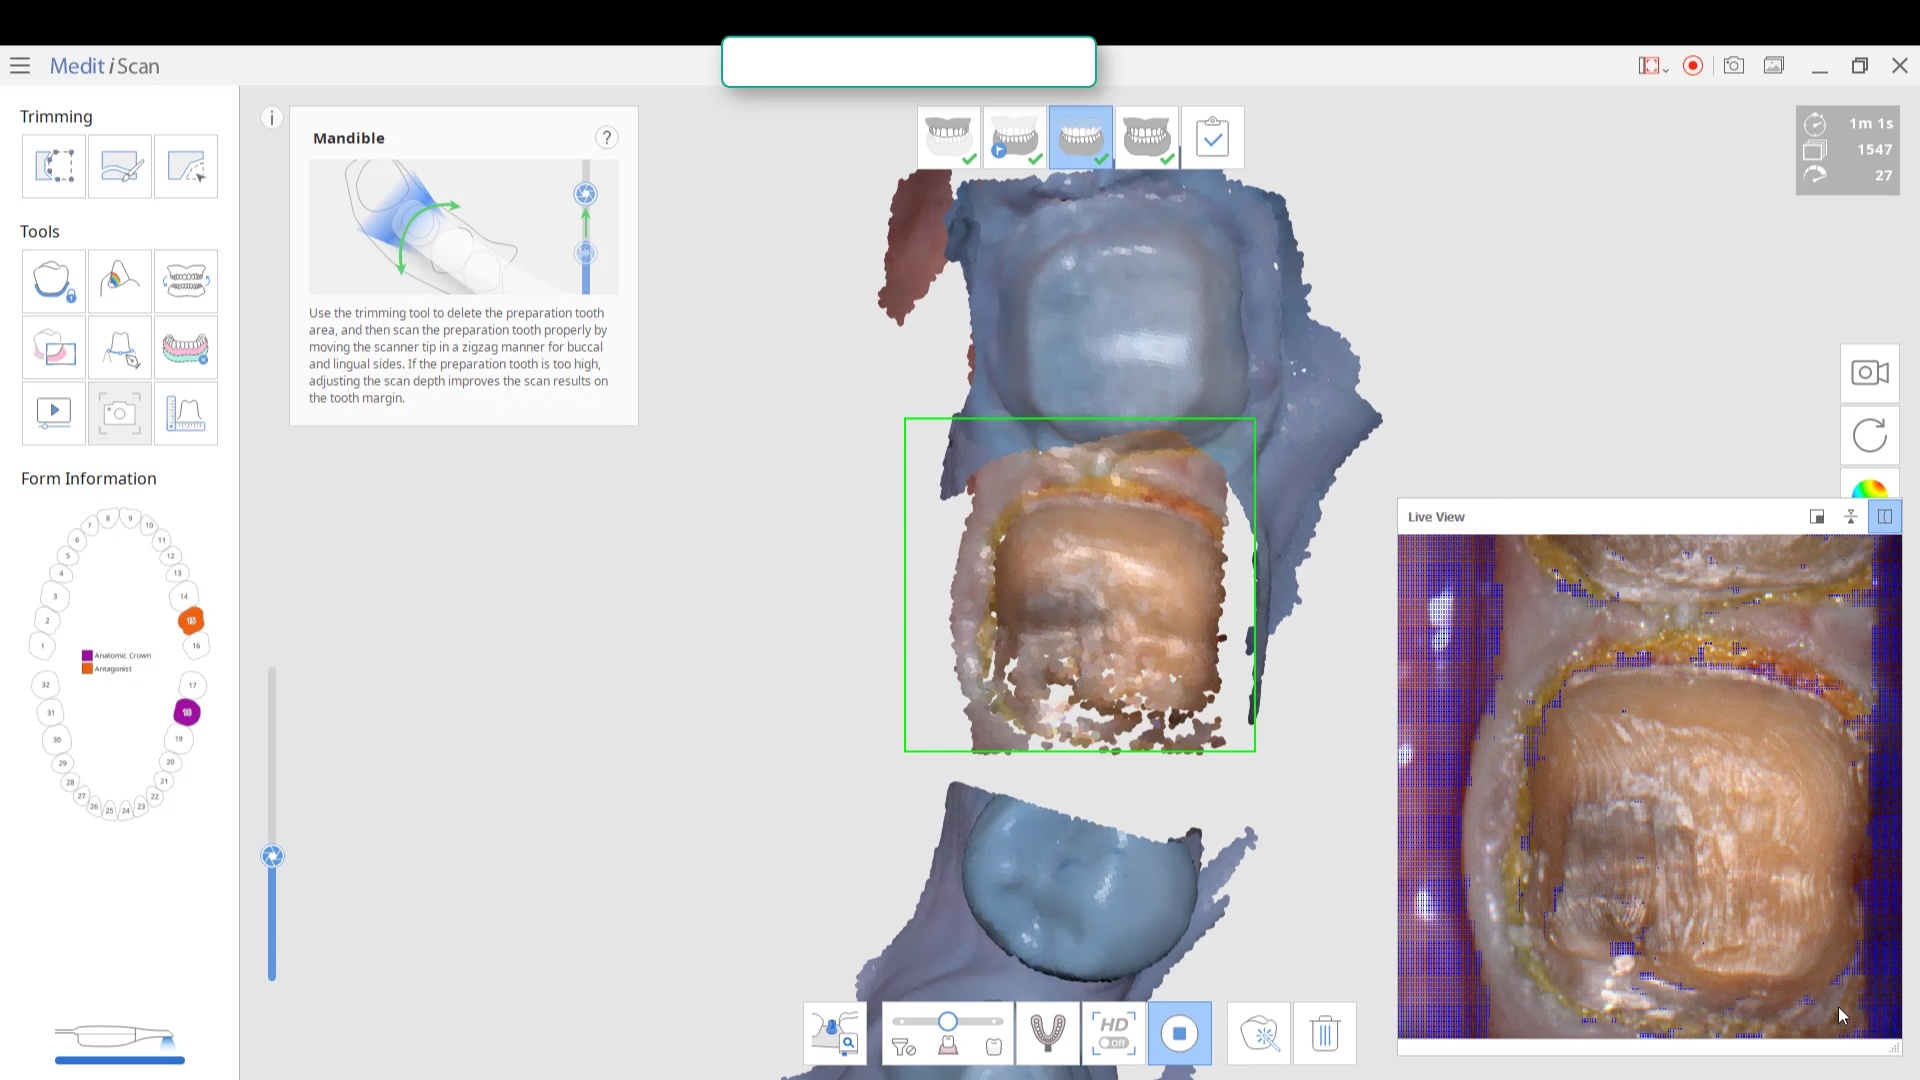
After the Rx has been filled out, you can launch the Medit Scan and image the upper and lower arches. Please note how we tell the camera to avoid the color blue and it ignores the clinicians fingers during imaging. The upper jaw and lower jaw were captured, then the bite registration even before the preparation was finished. This allows the verification of proper reduction and space for the ceramic material
Lower Arch Scan
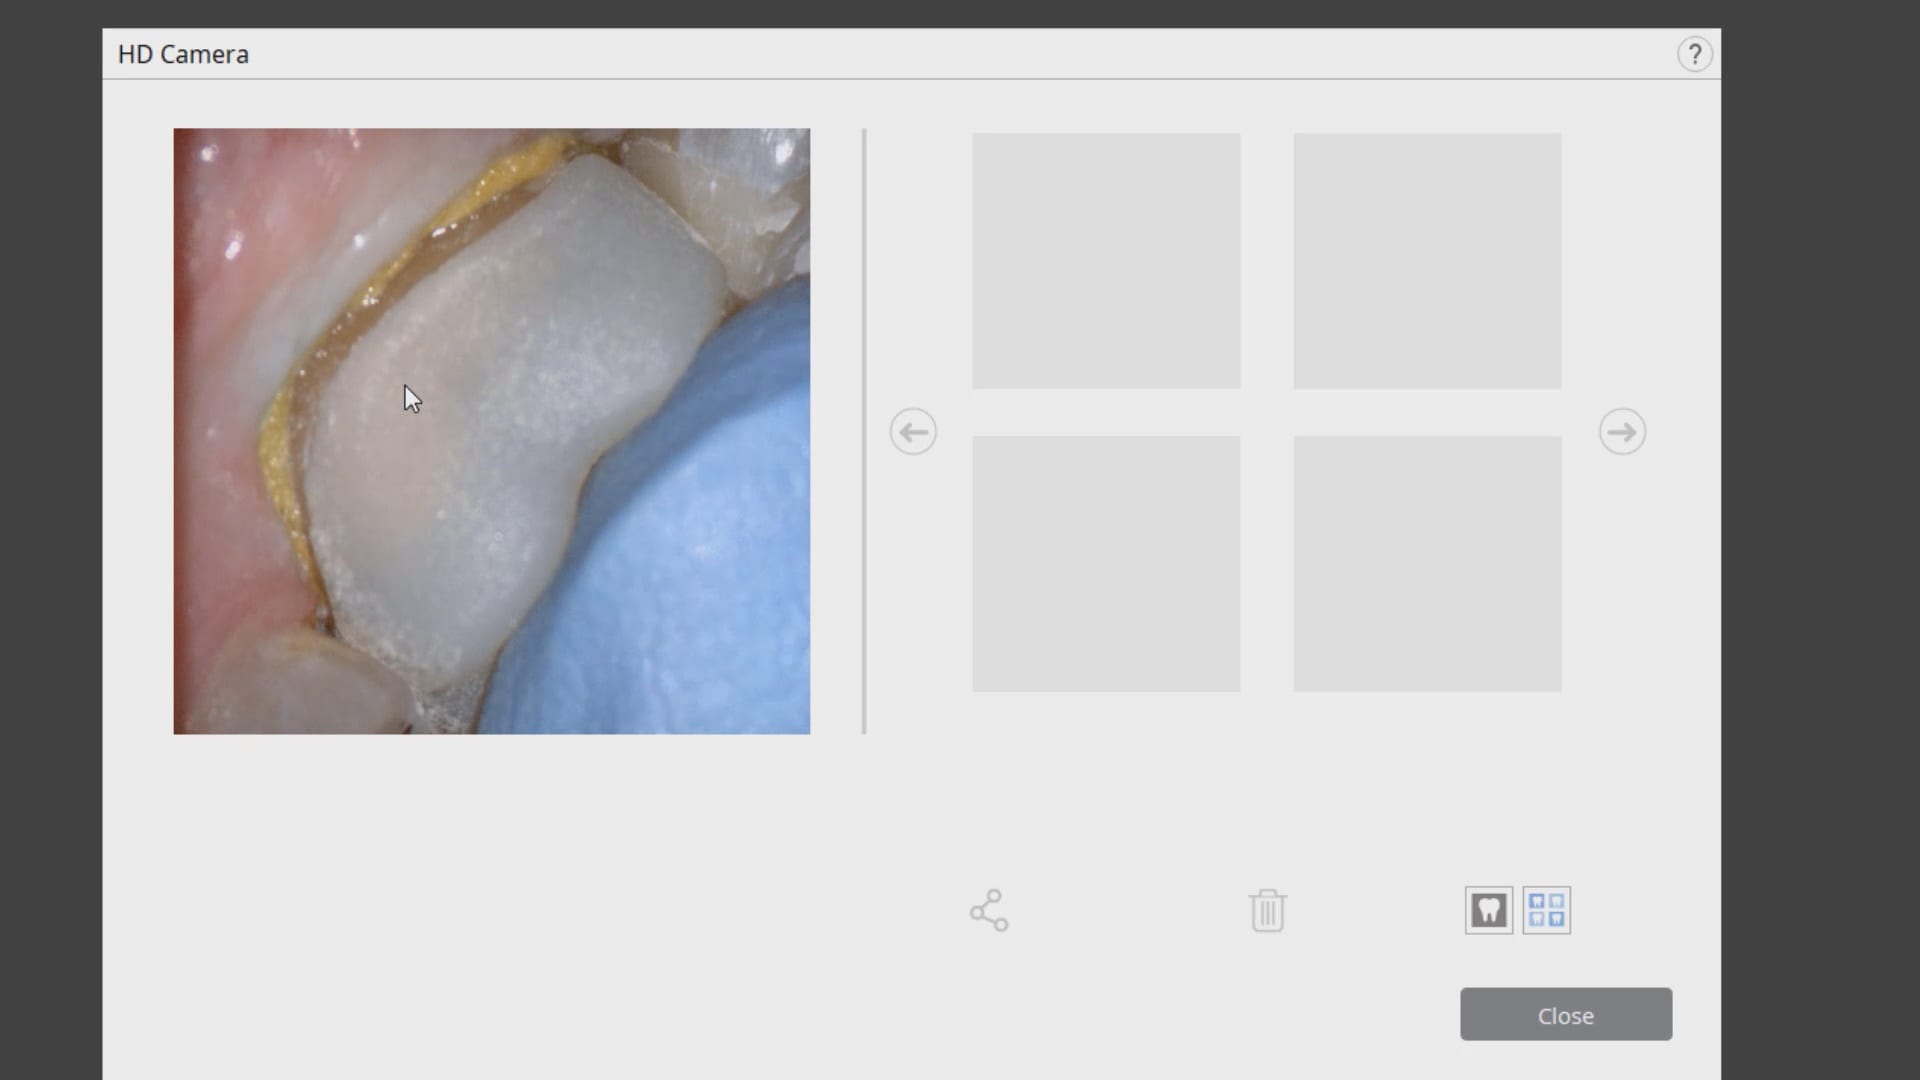
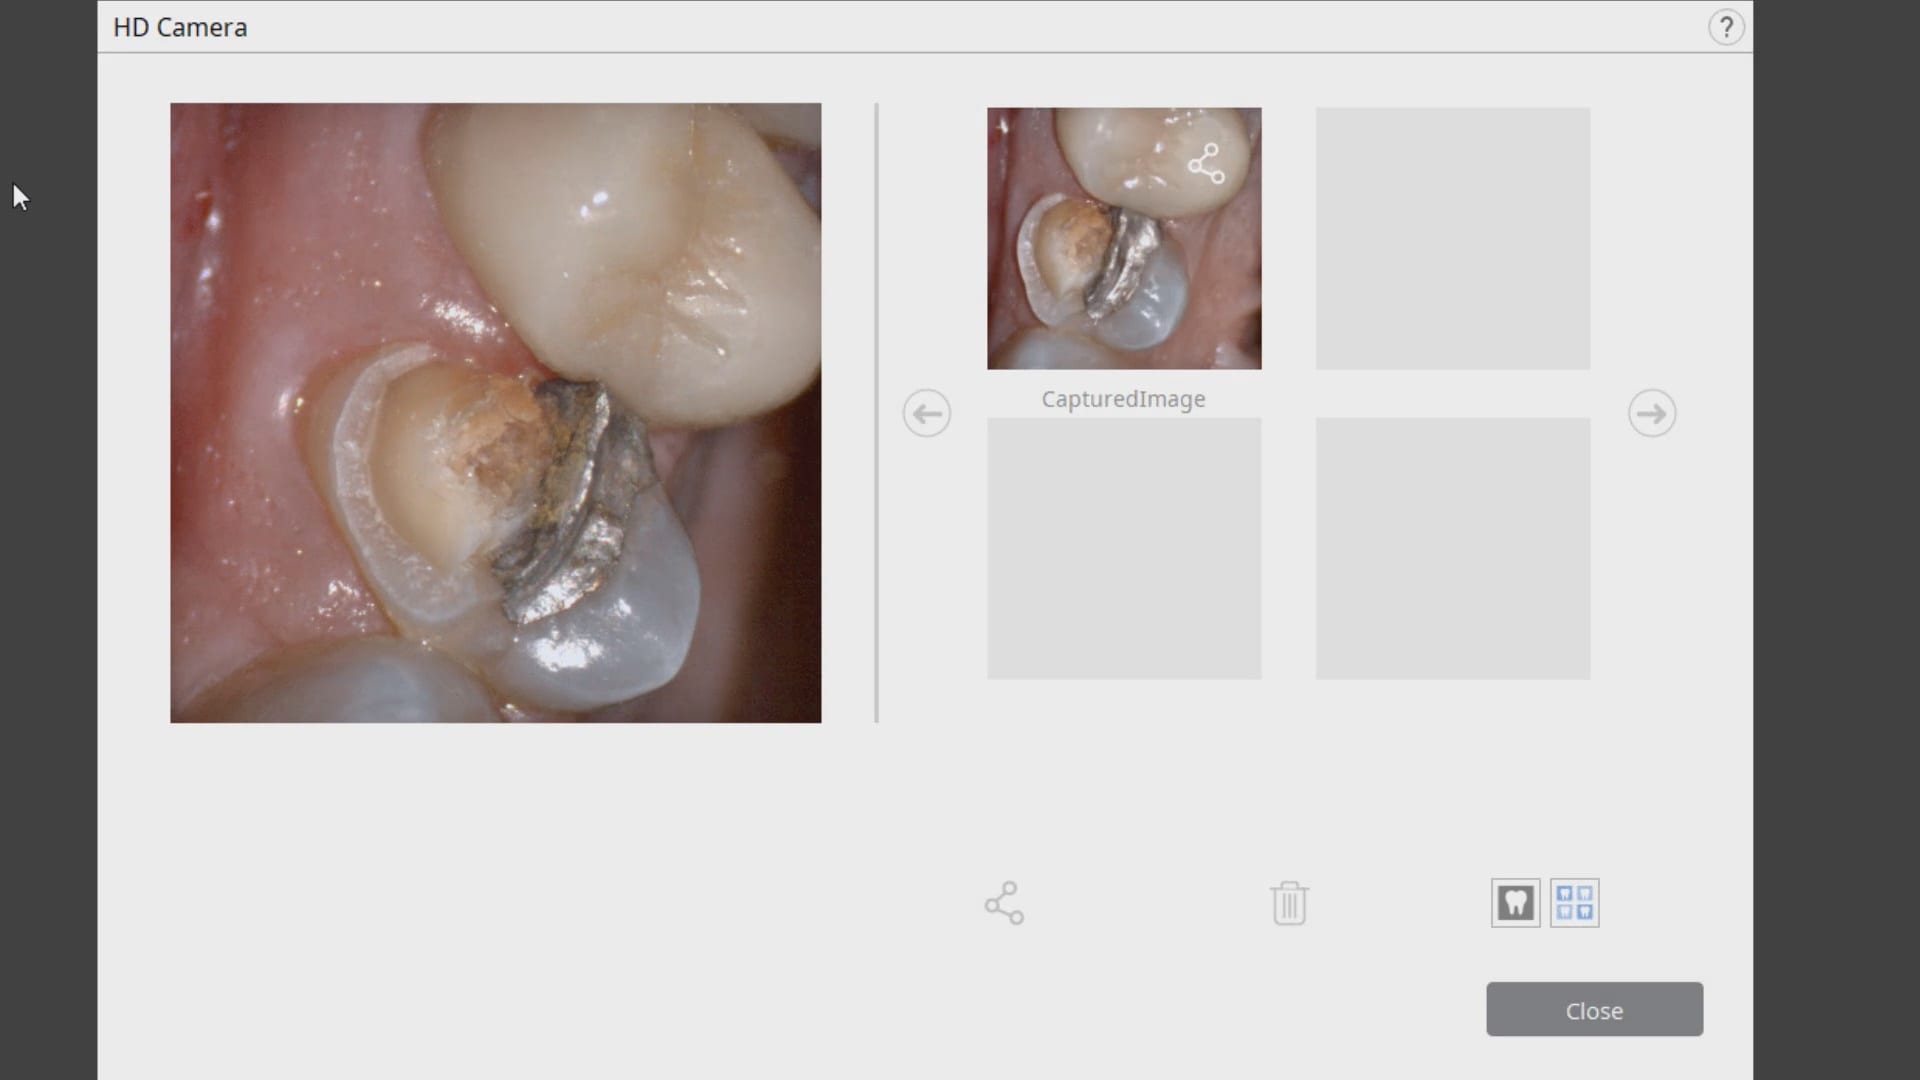
The lower arch is the most difficult area to scan as you frequently have to battle the tongue, saliva, and the lips. The optragate can be of great help but notice how we use the color filter to hide the blue gloves while we advance the camera. It is a great aid in facilitating the capture of the lower arch
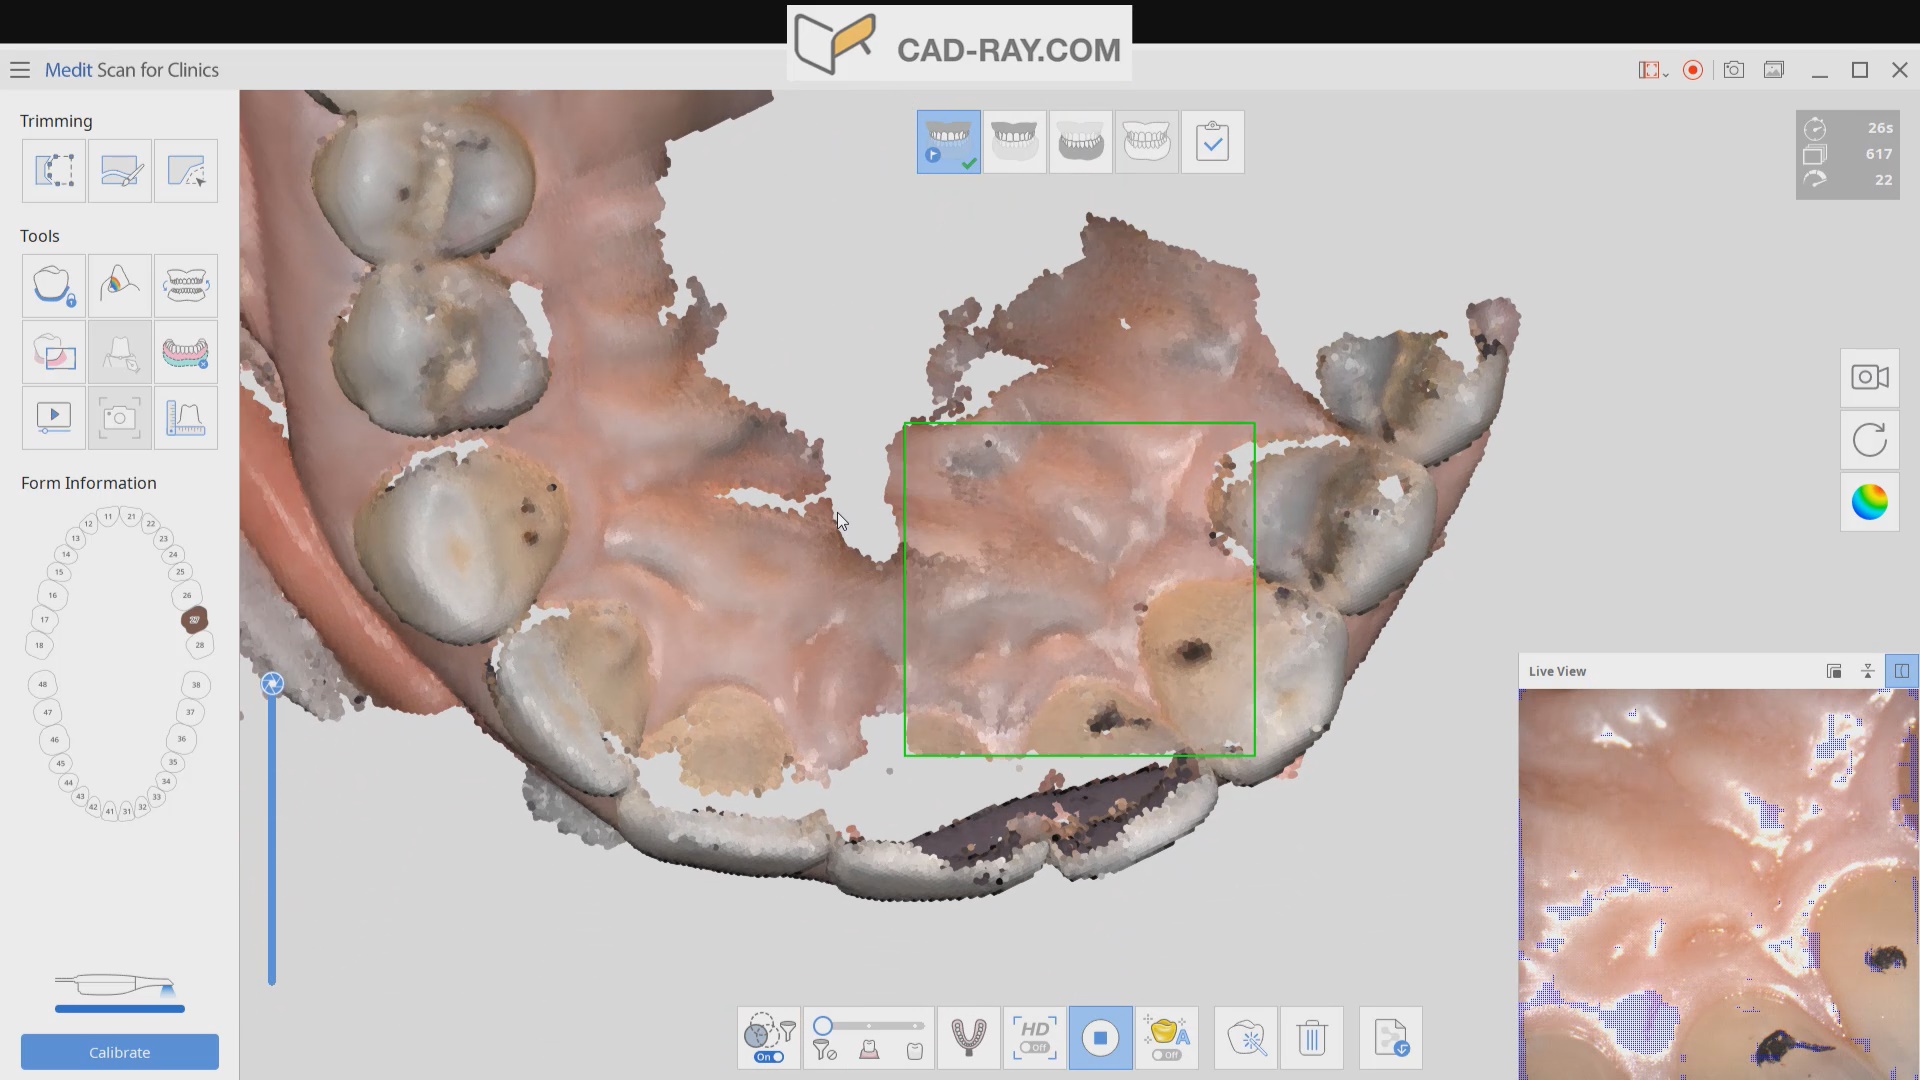
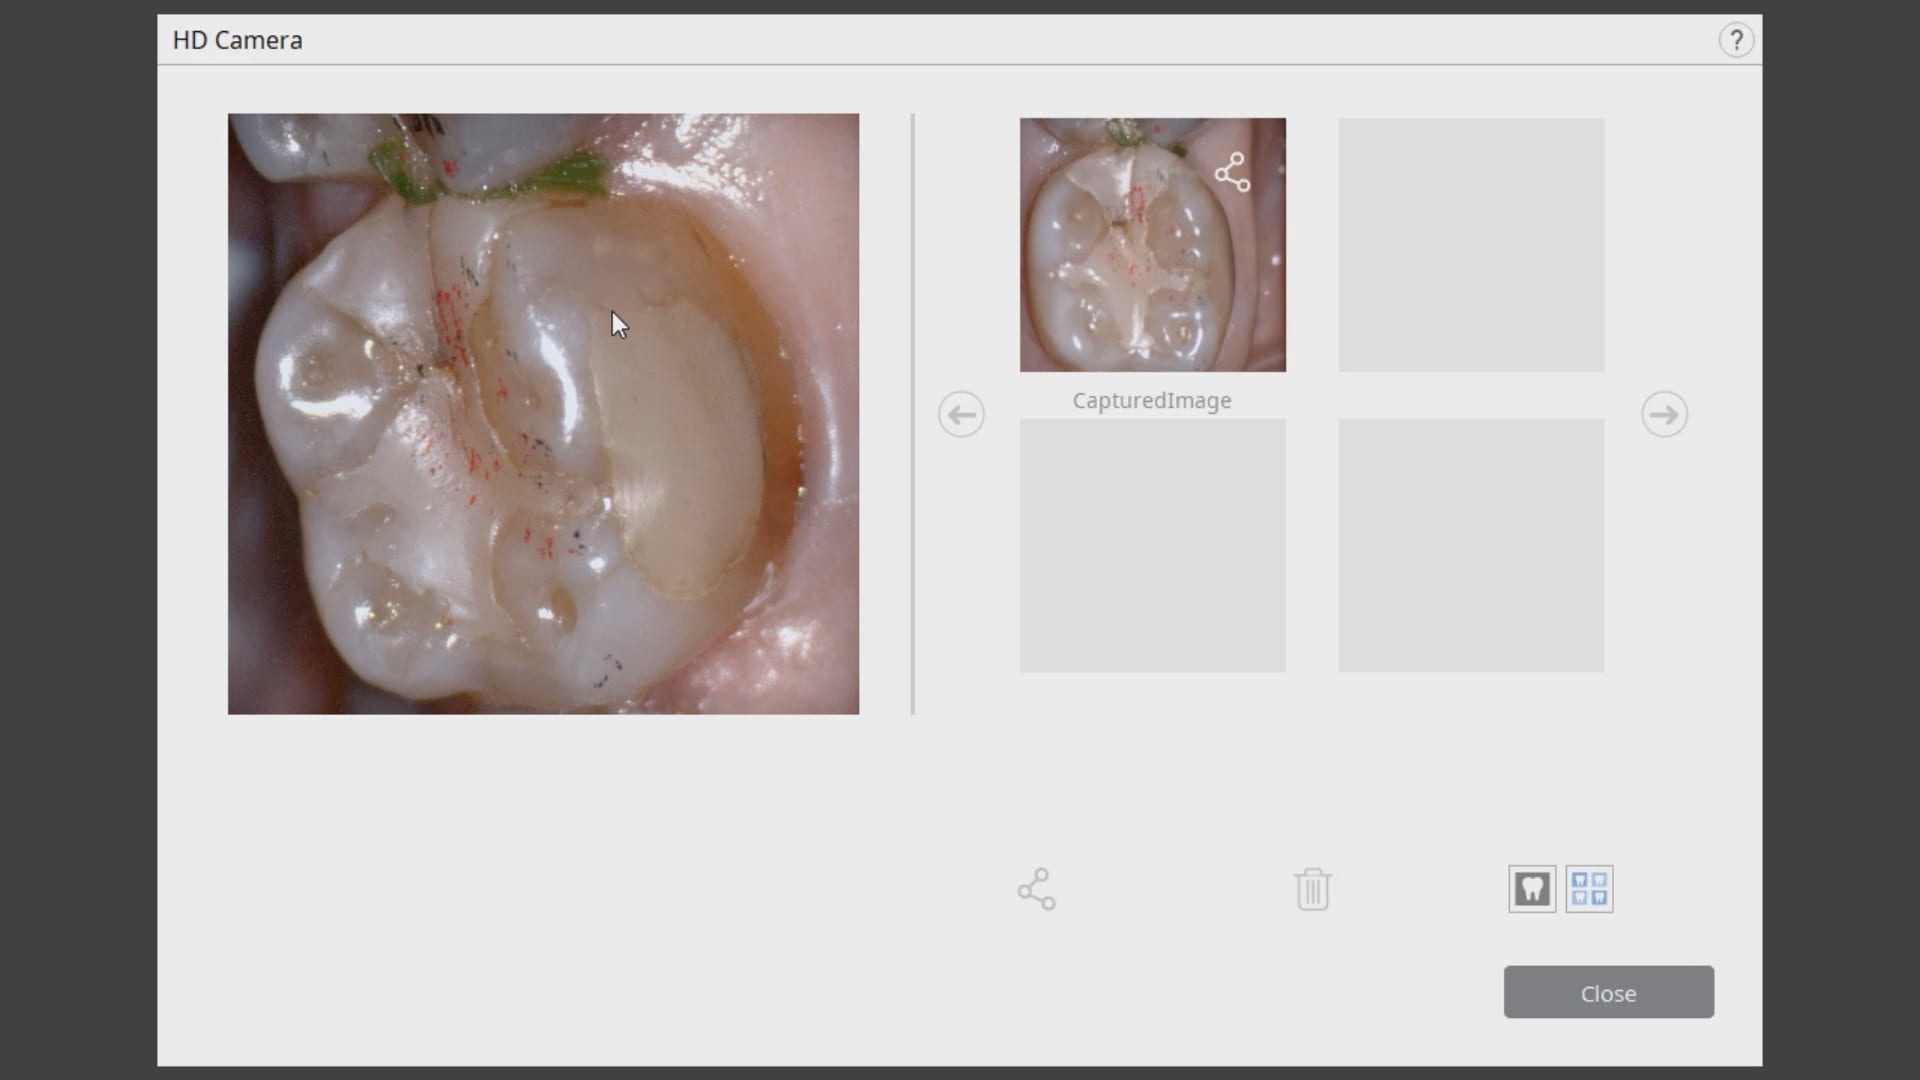
The same principle is applied to the upper arch. Notice that the software does not care if you start with the upper or lower arch. Here, you can visualize how the blue glove was used to displace the cheek and capture the pre-op condition of the upper second molar. The rest of the arch was easily imaged. It is not necessary to capture full arch impressions and this was done just for demonstration purposes. For a single unit case, generally imaging distal from the canine is adequate.
Checkingthe reduction and aquiiring the bite registration
We recommend that you capture the bite before you finish imaging the preparation. This gives you one last chance to verify that you have reduced enough to accommodate material thickness. You can see how we just take regular photos to document the lack of clearance and we continue to adjust the height of the preparation until we achieve the required space. We then activate the imaging process and capture the occlusal relationship between the upper jaw and the lower jaw
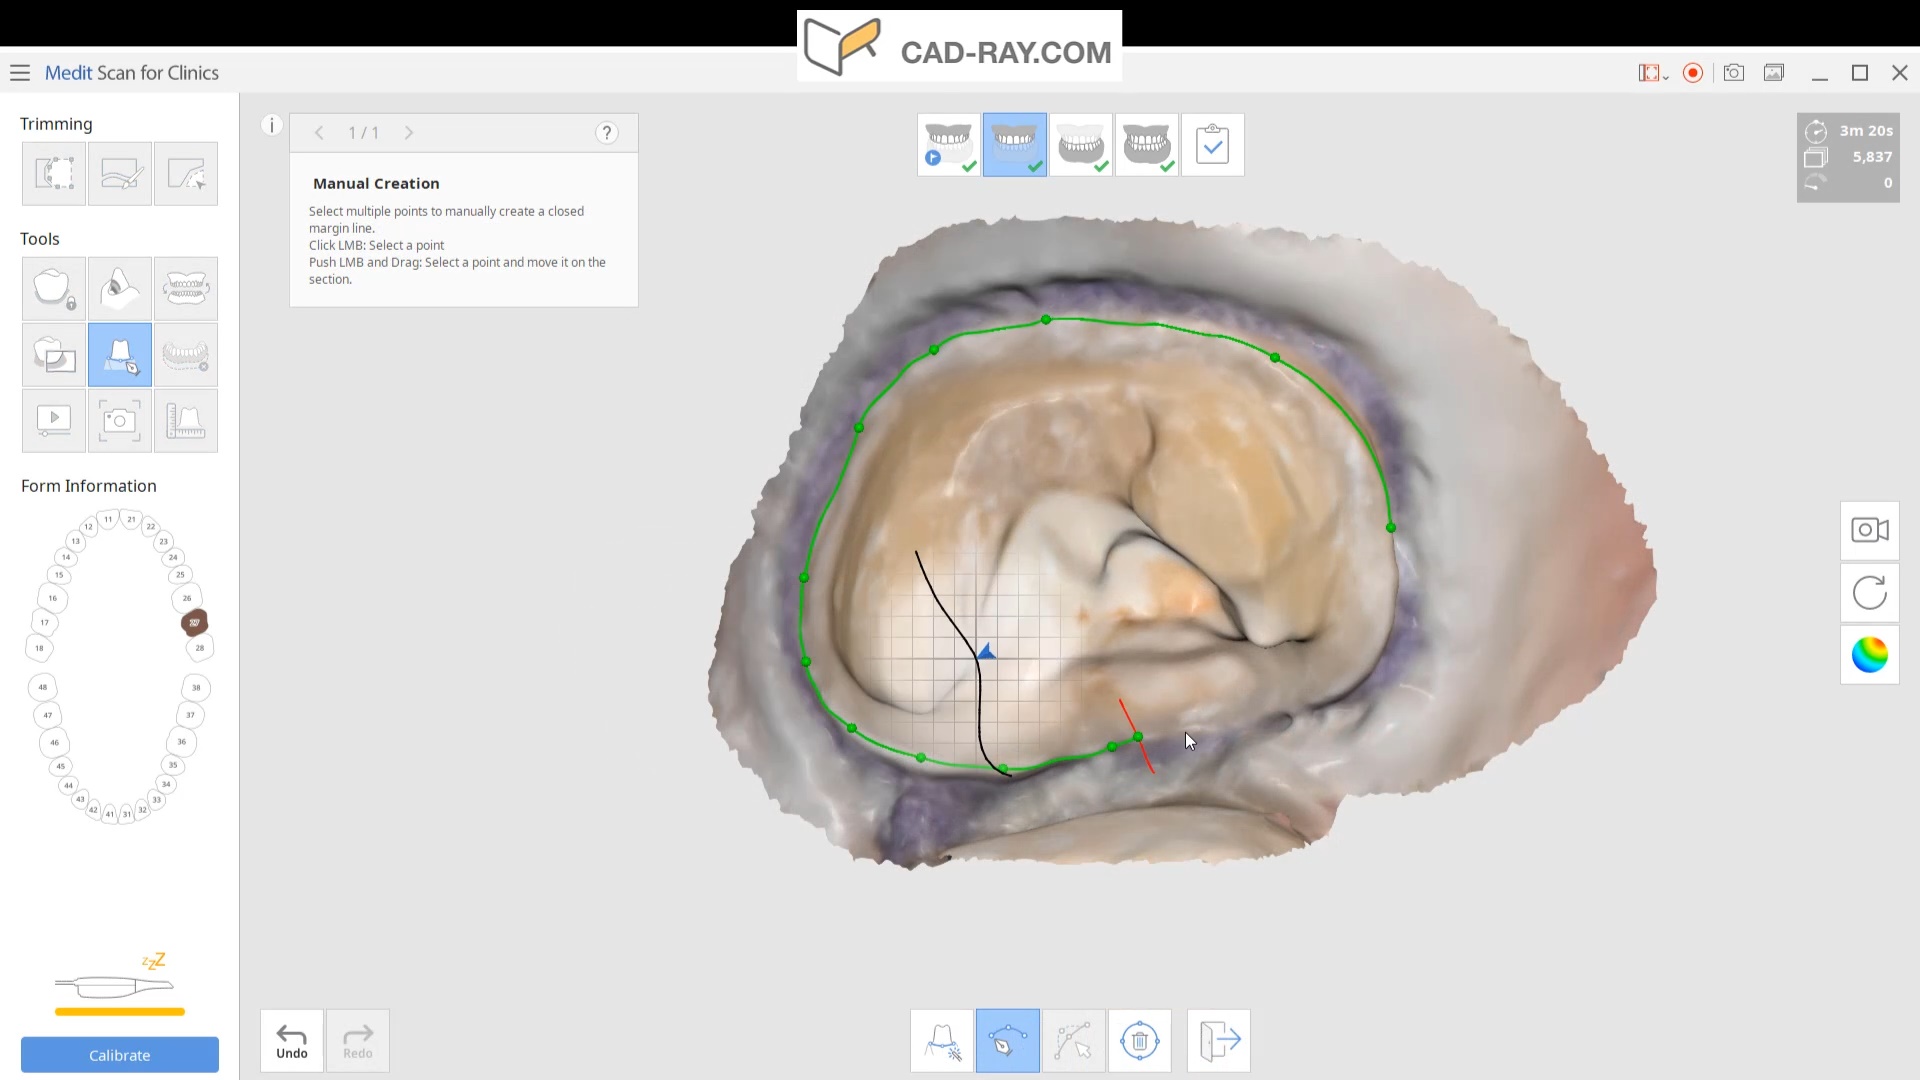
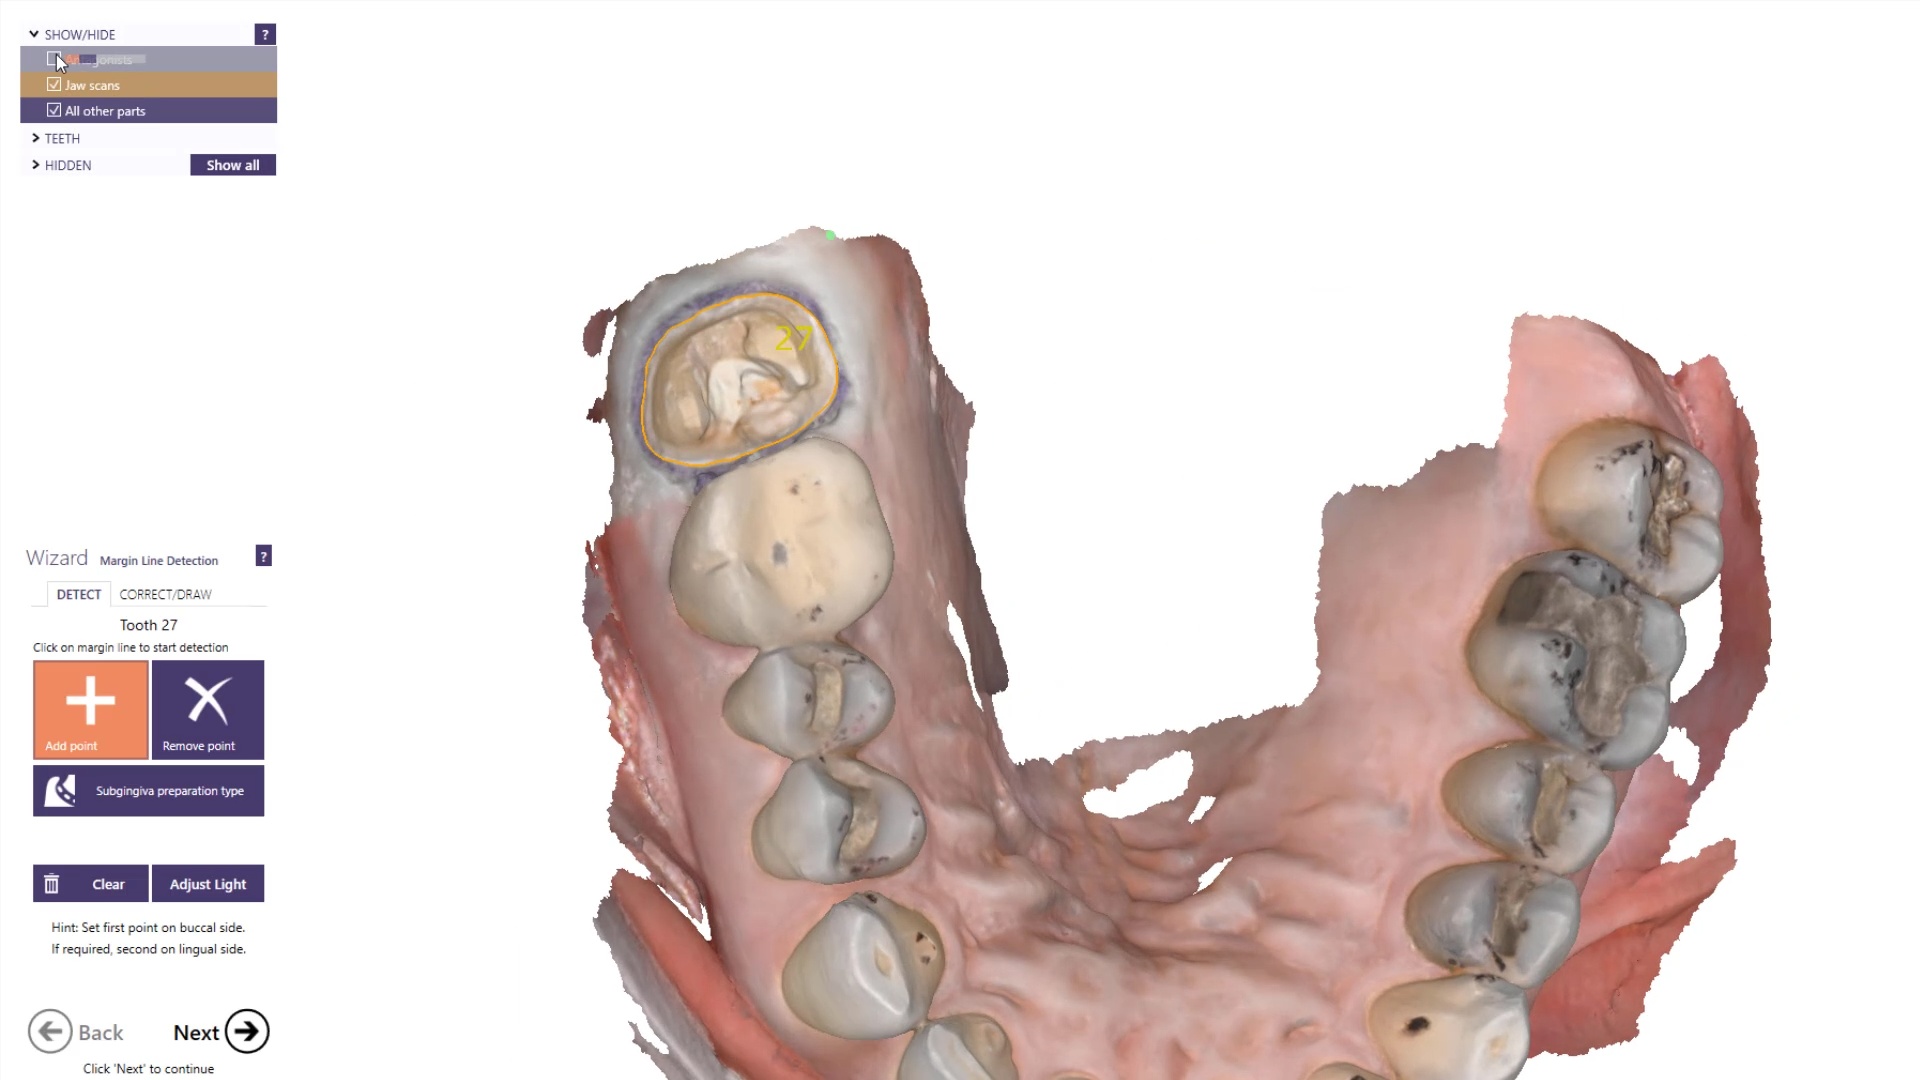
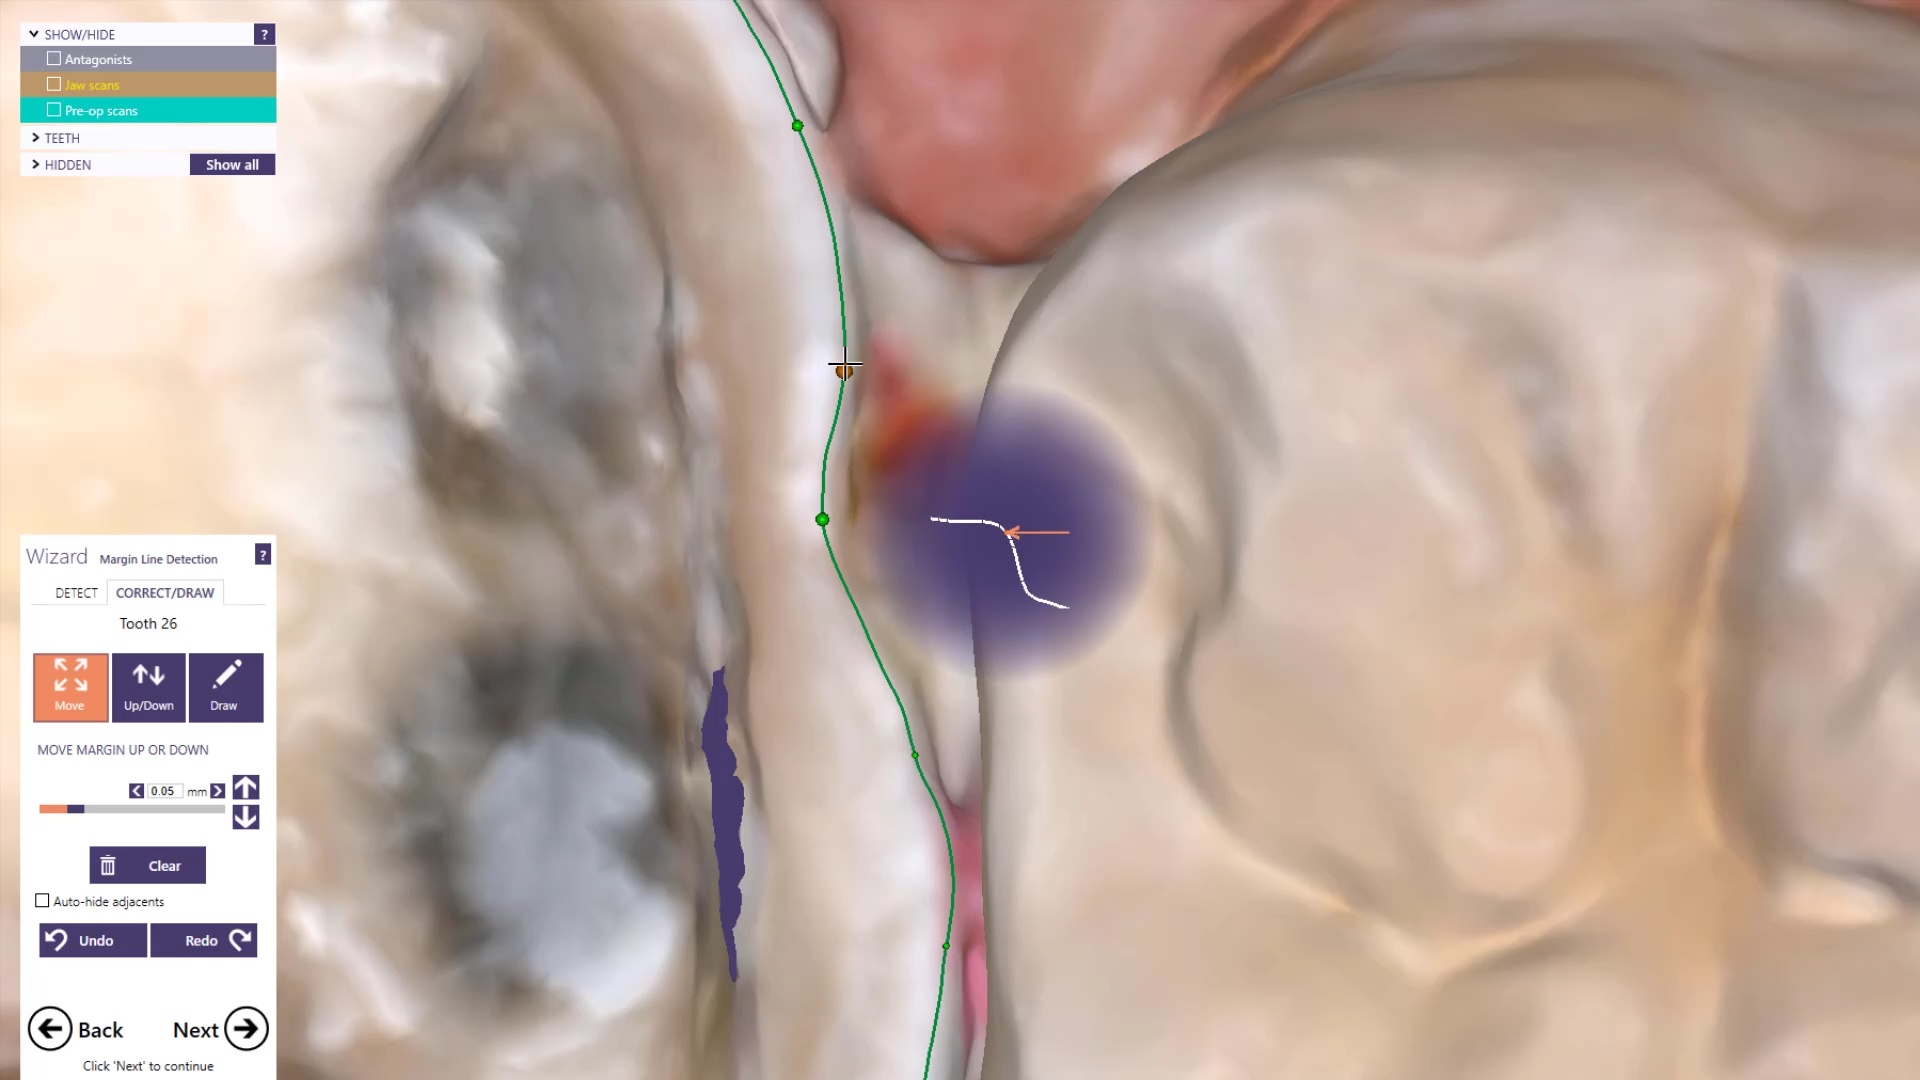
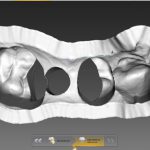
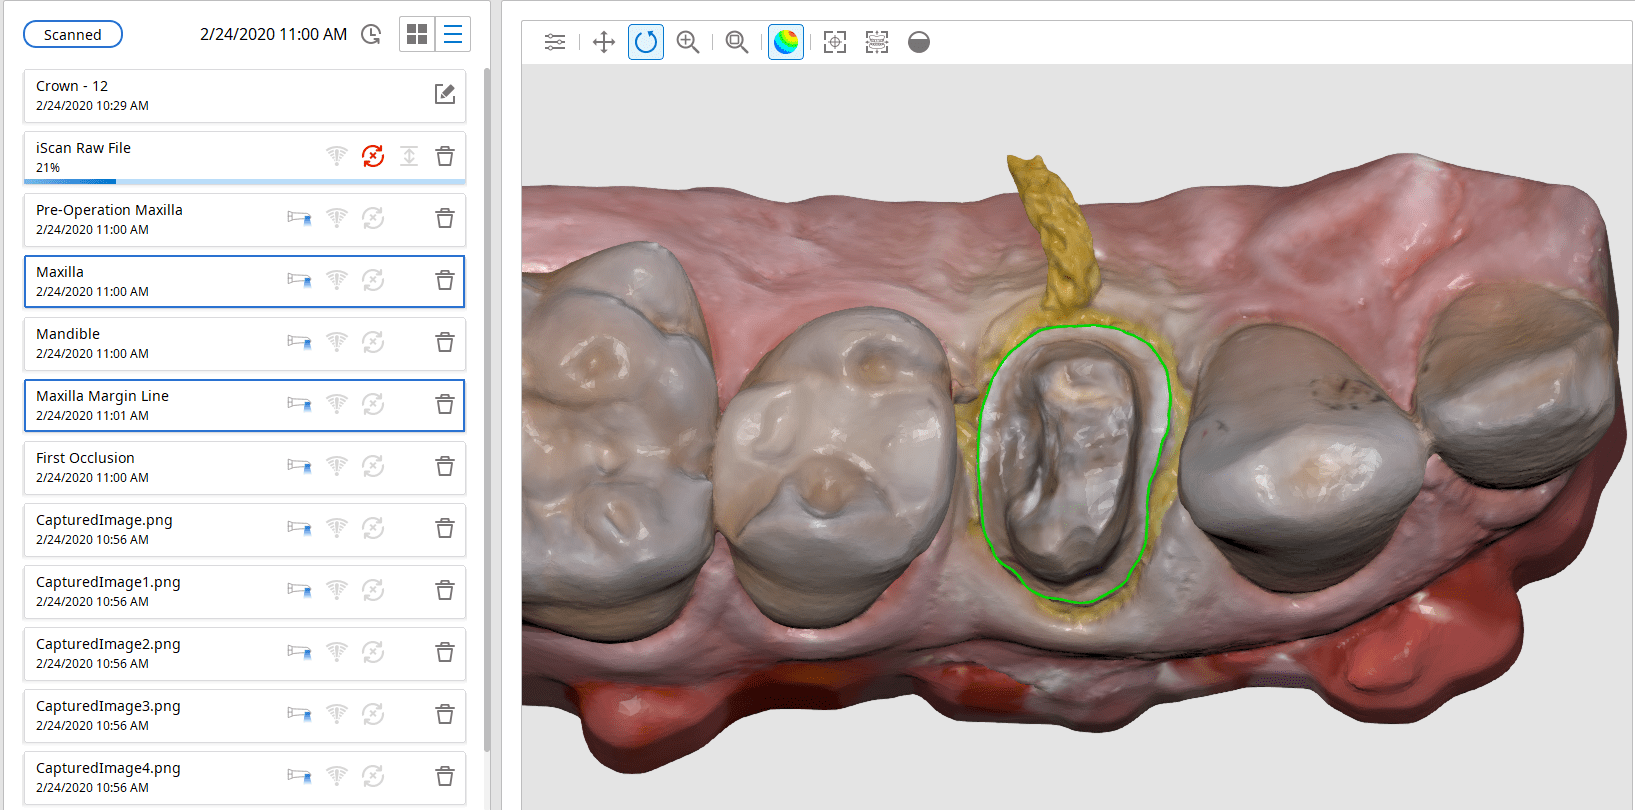
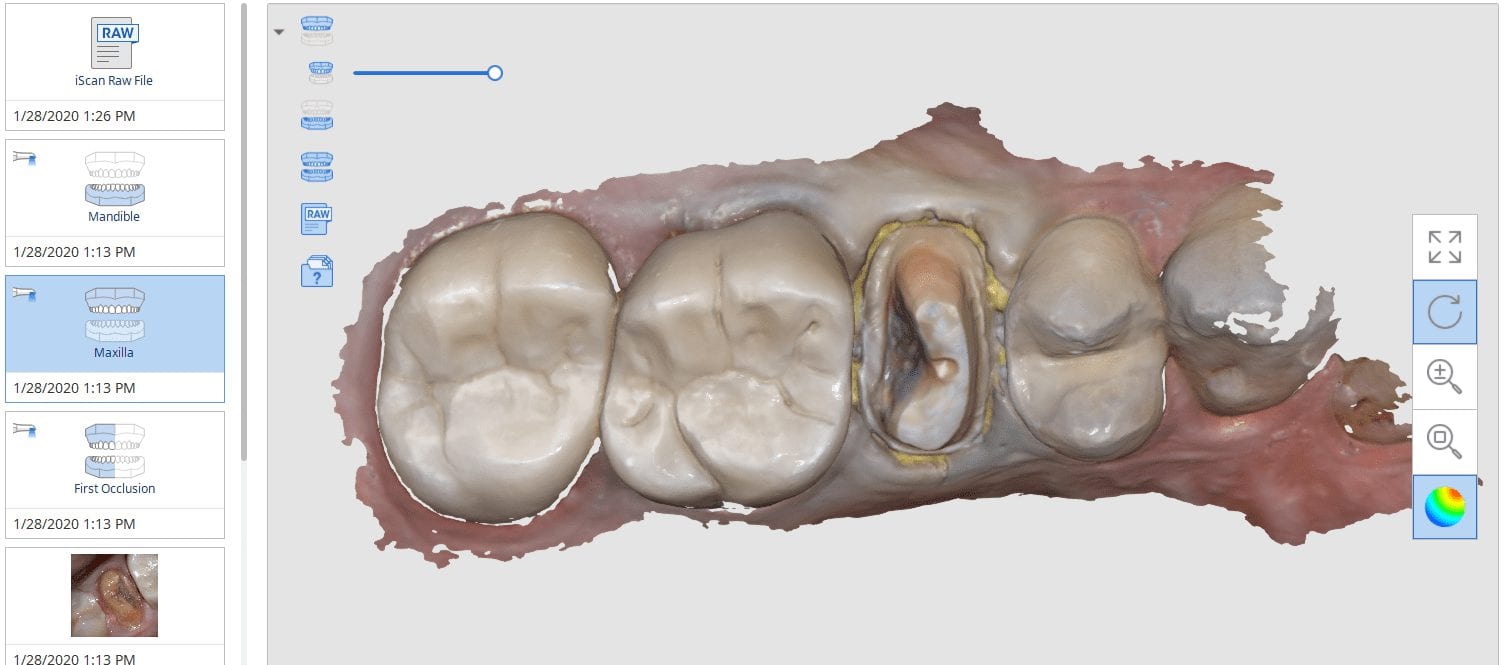
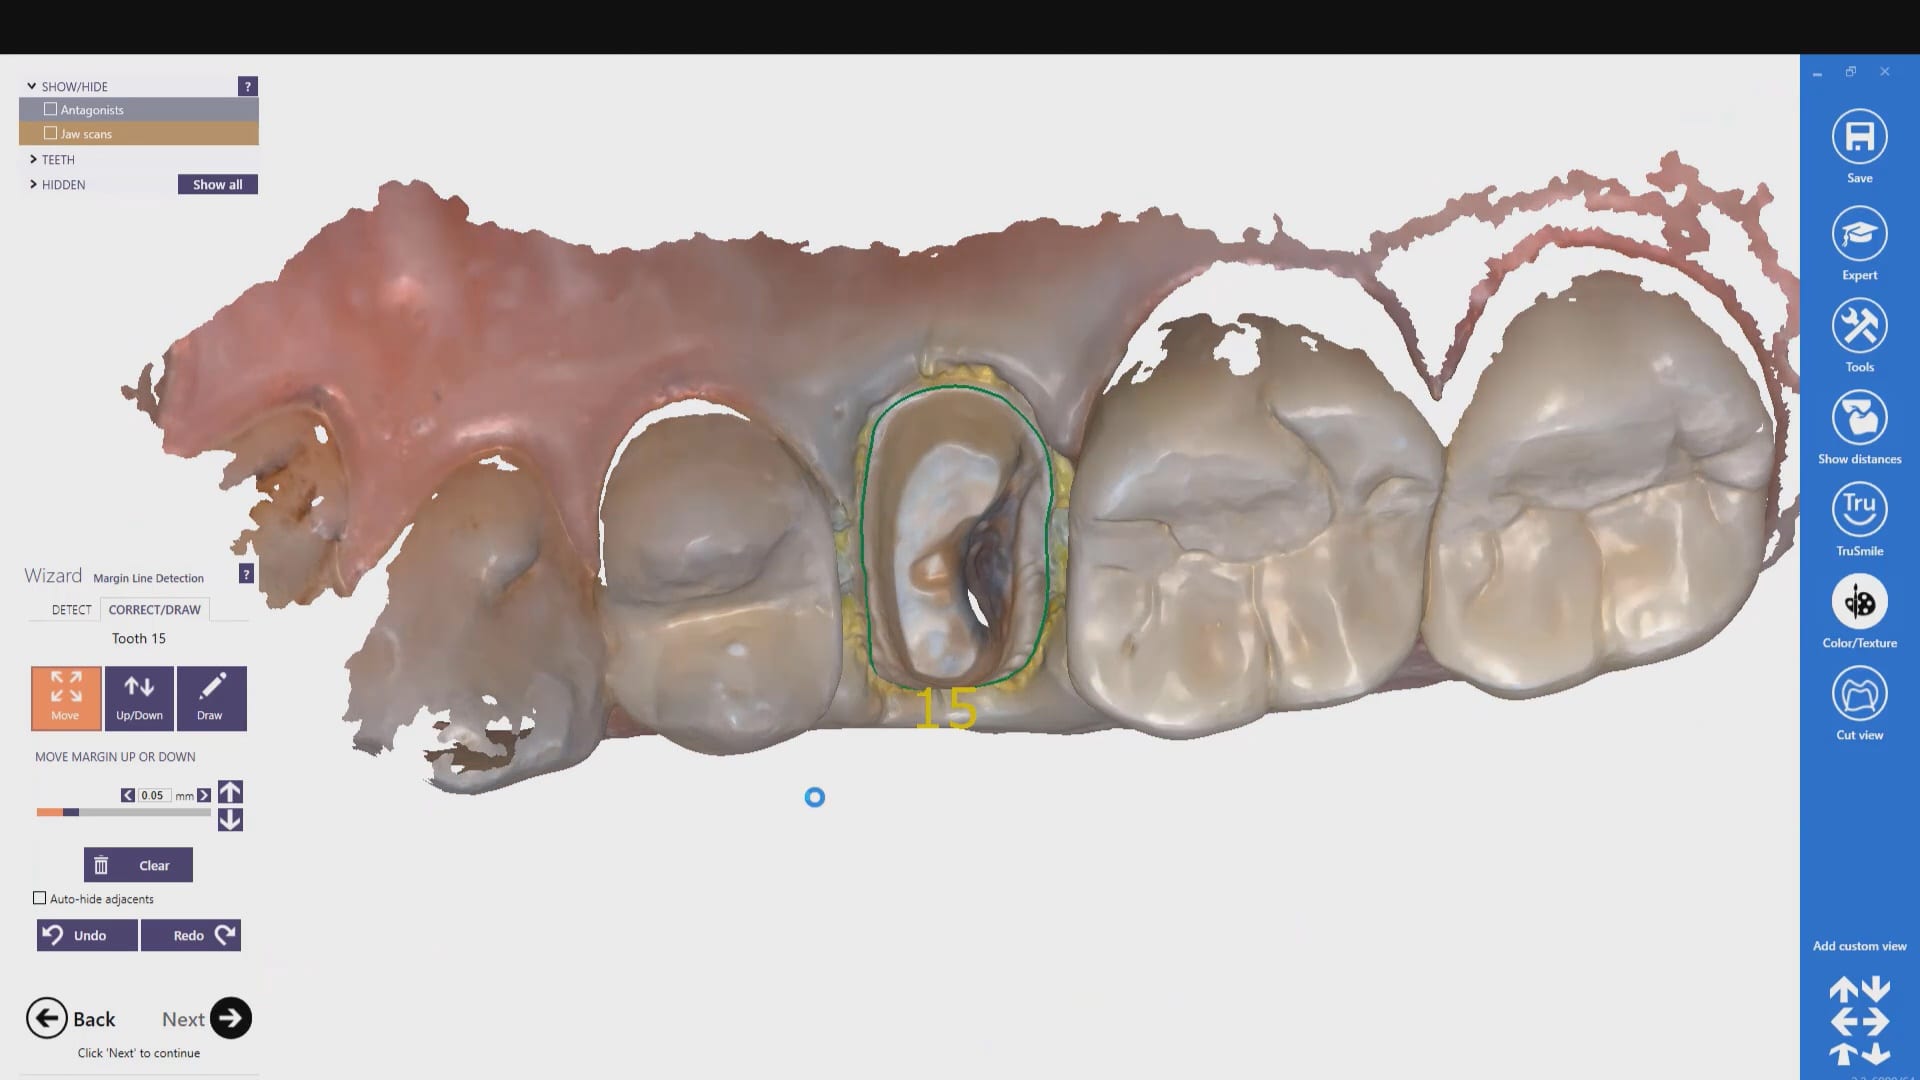
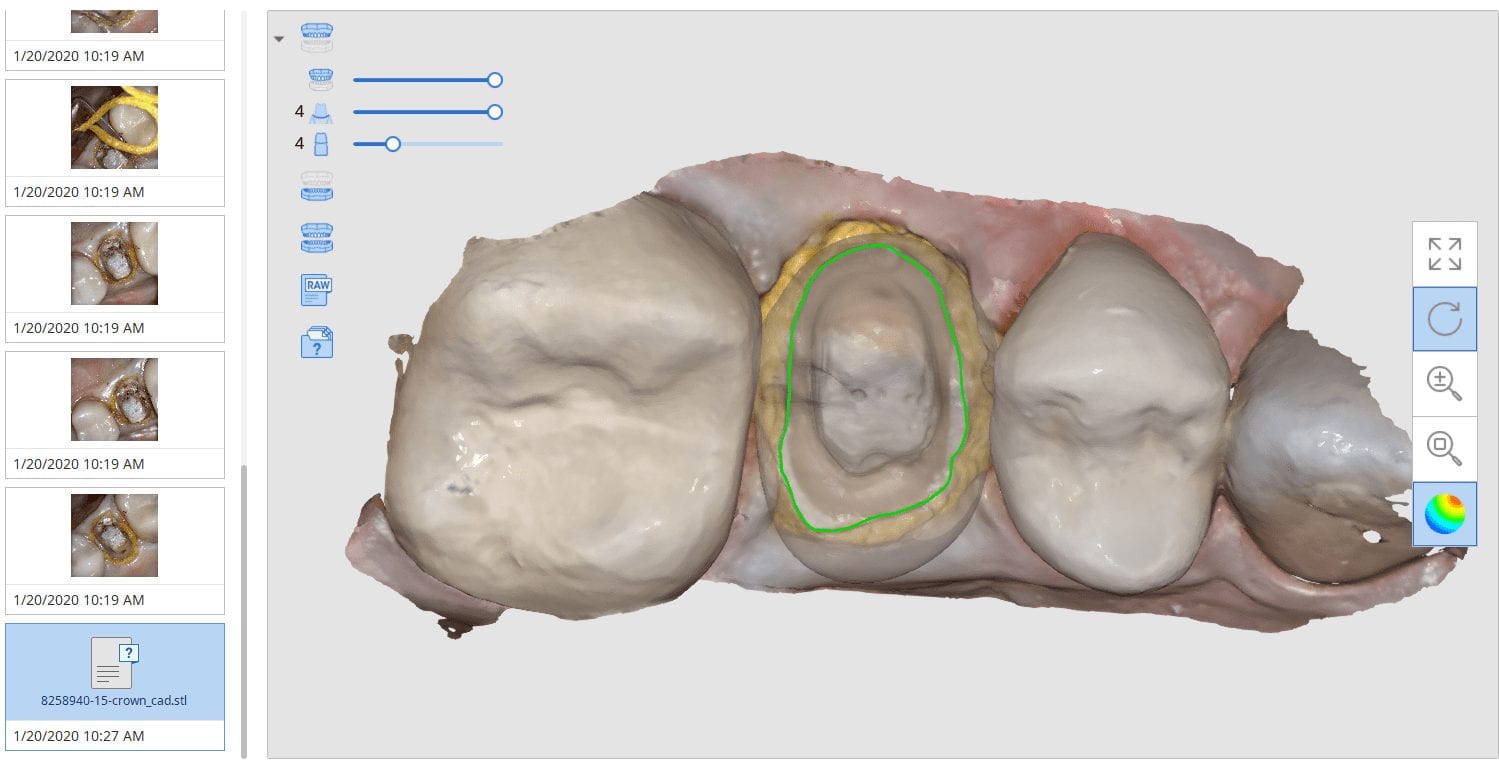
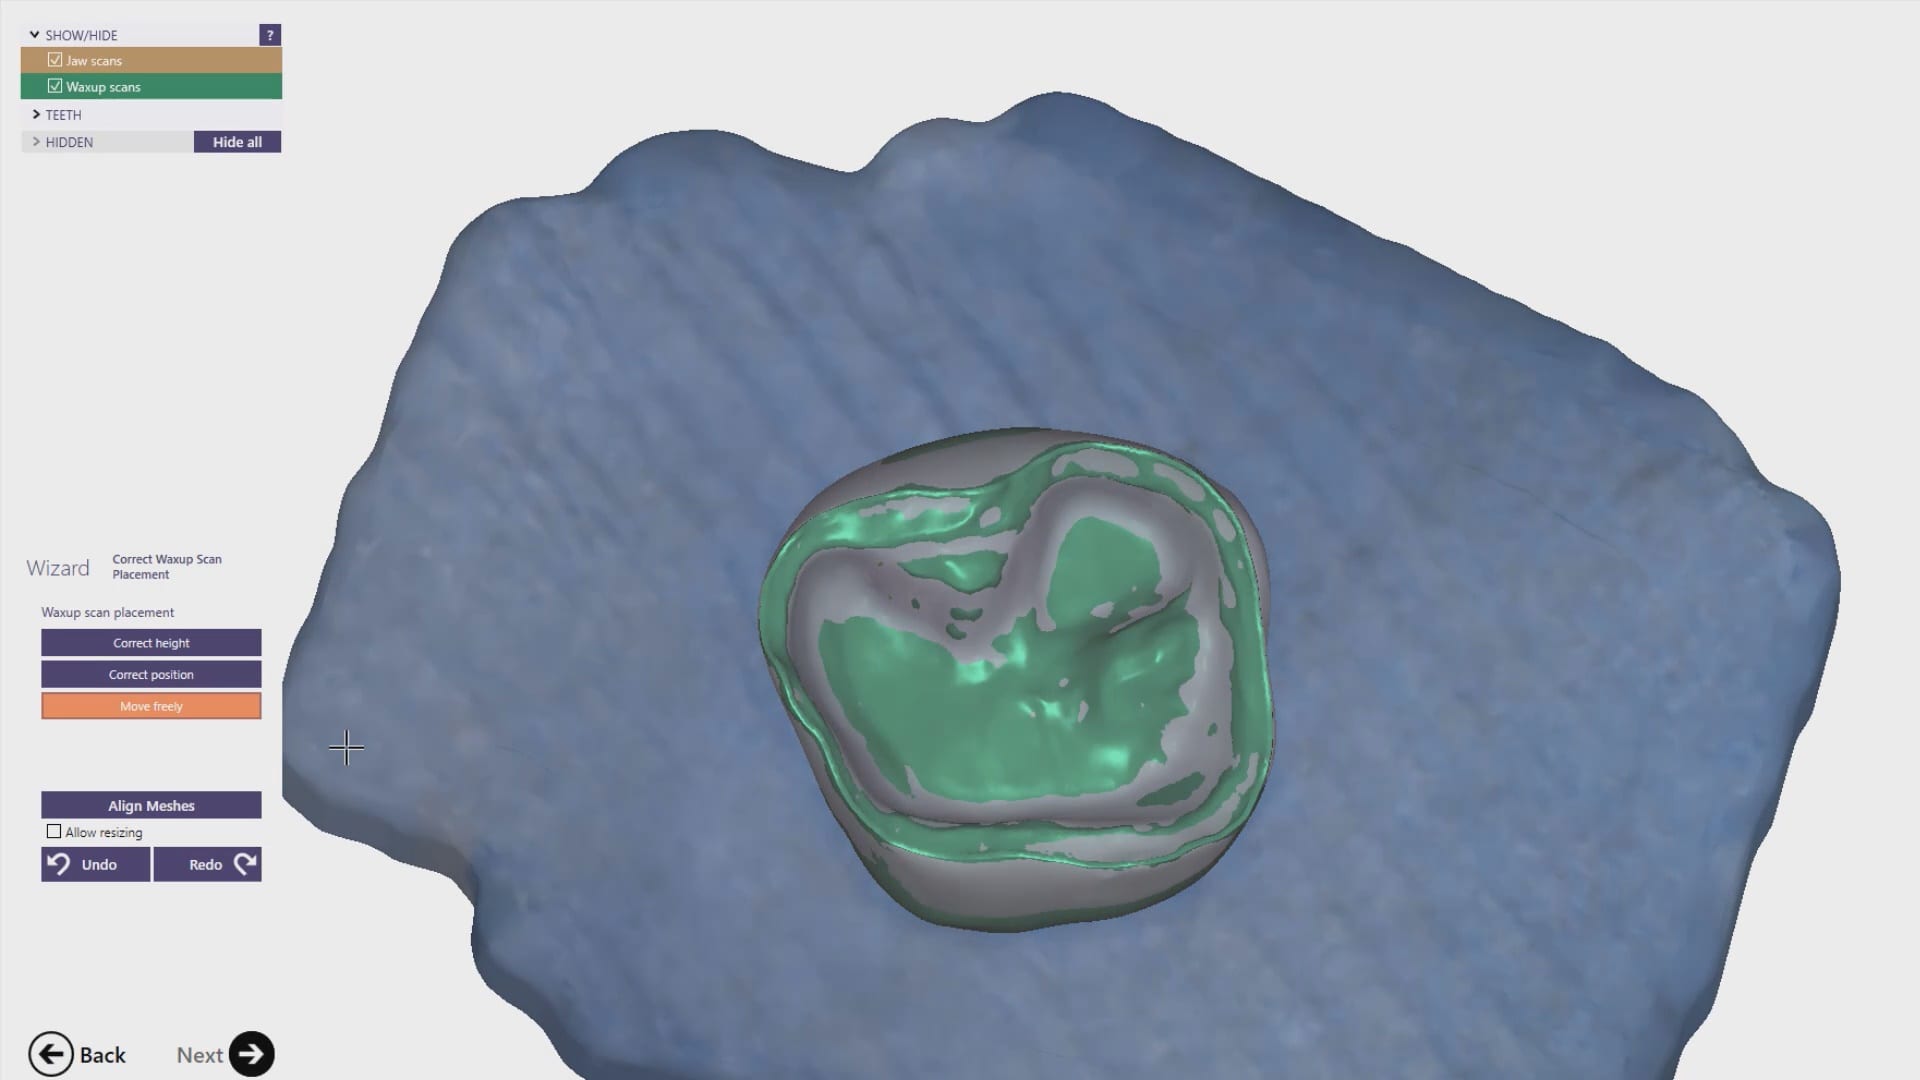
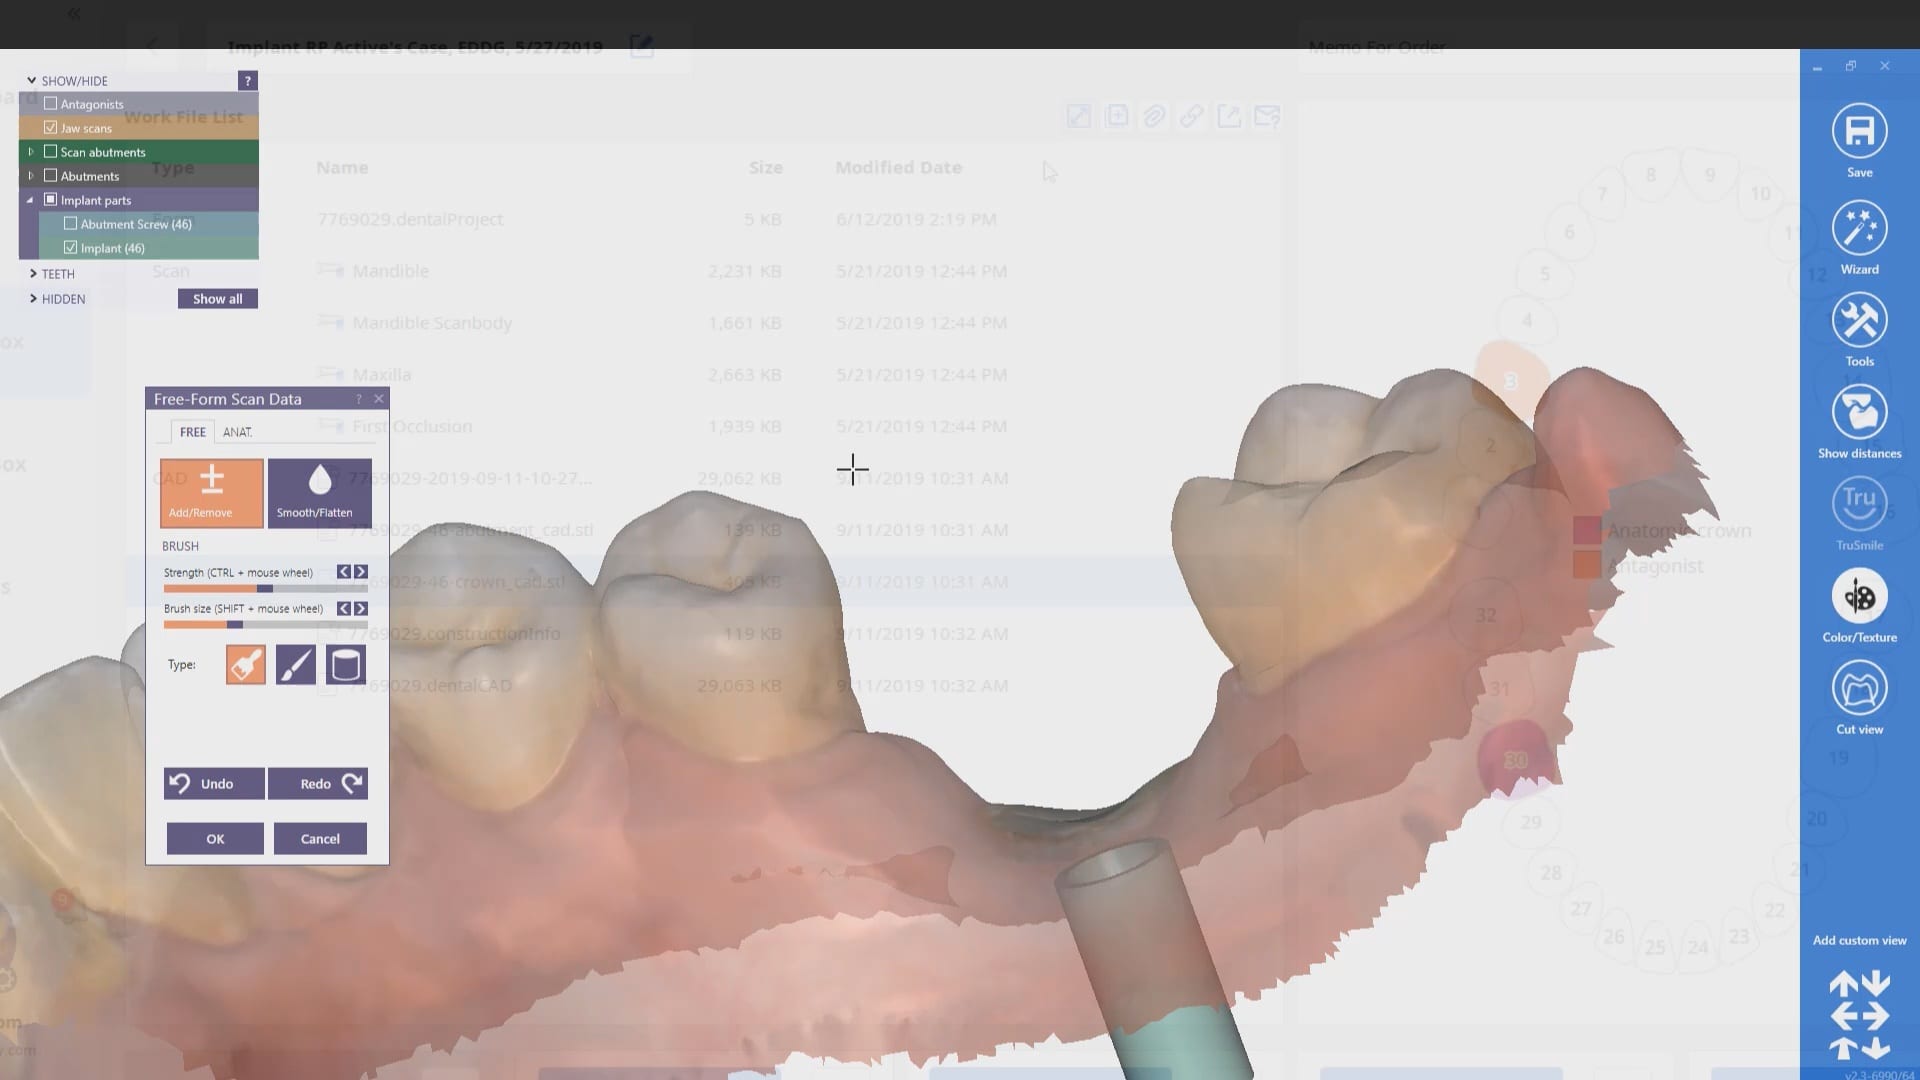
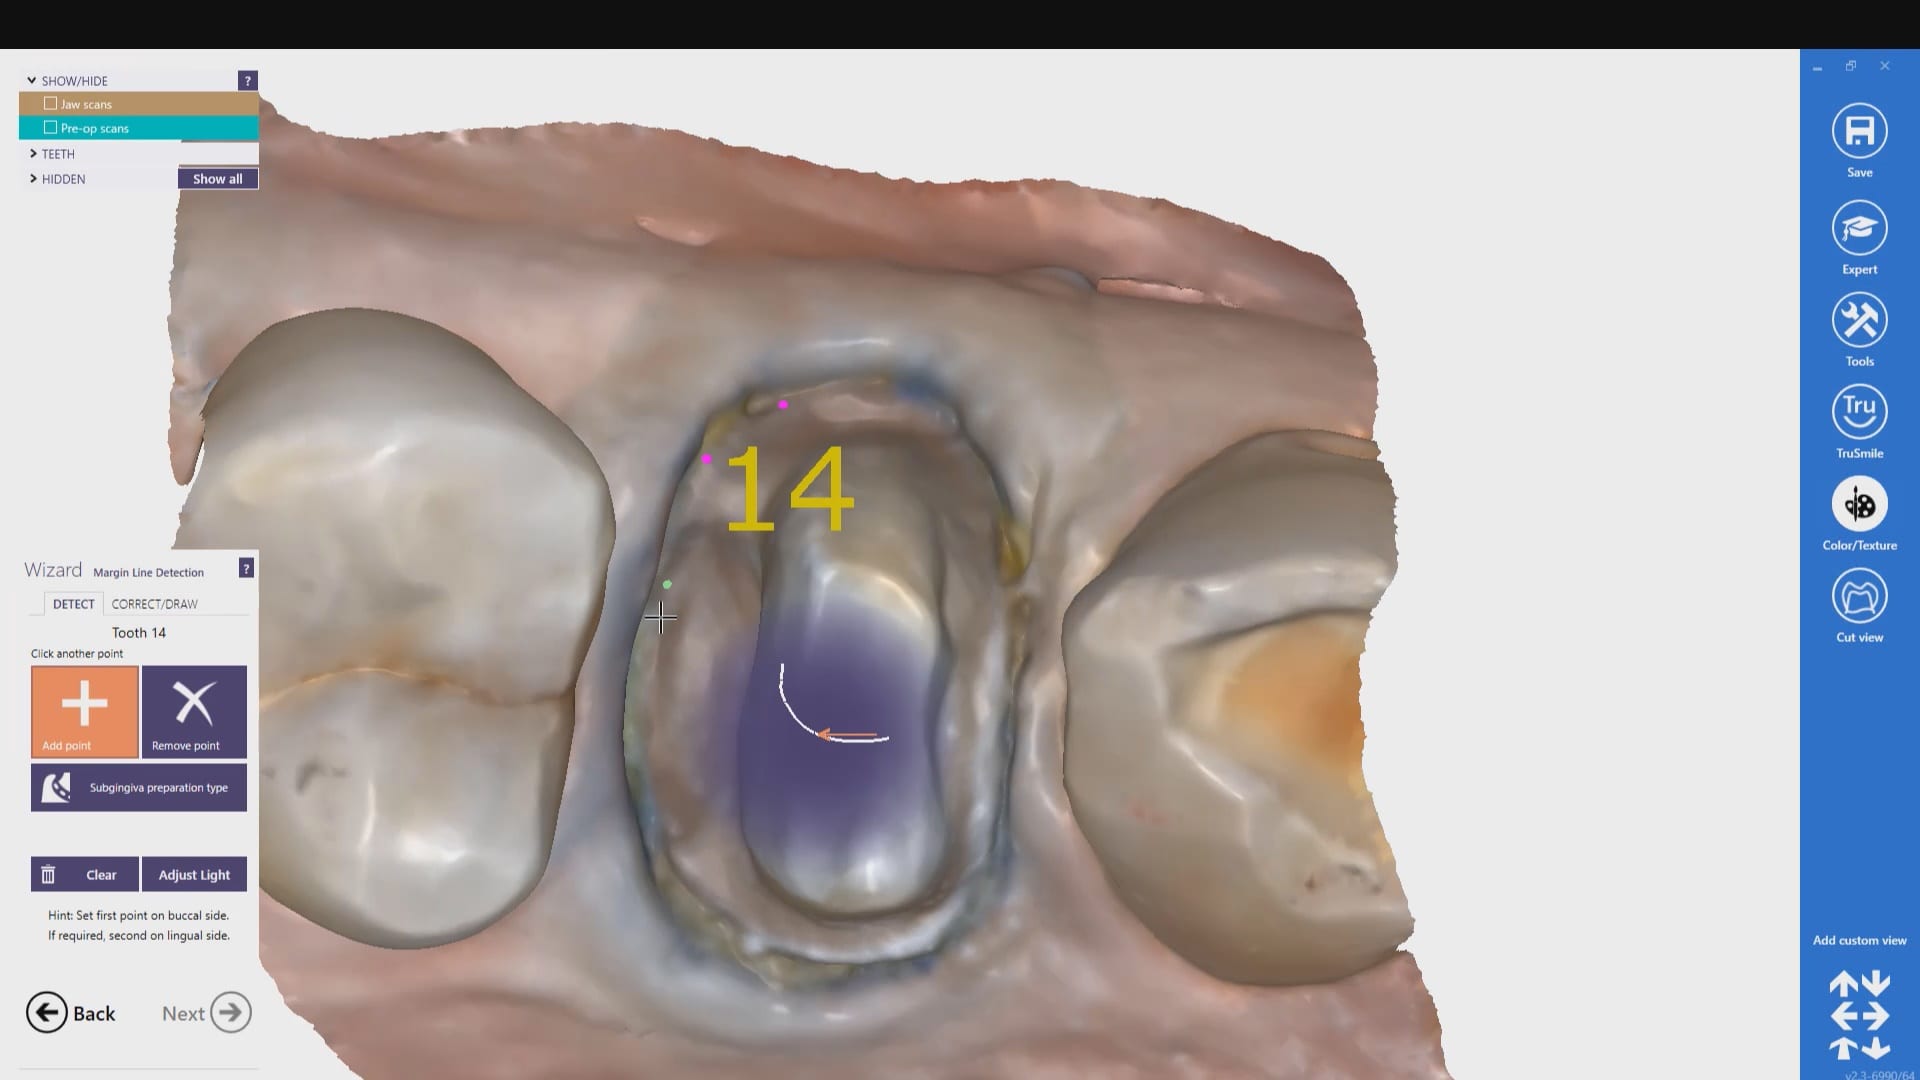
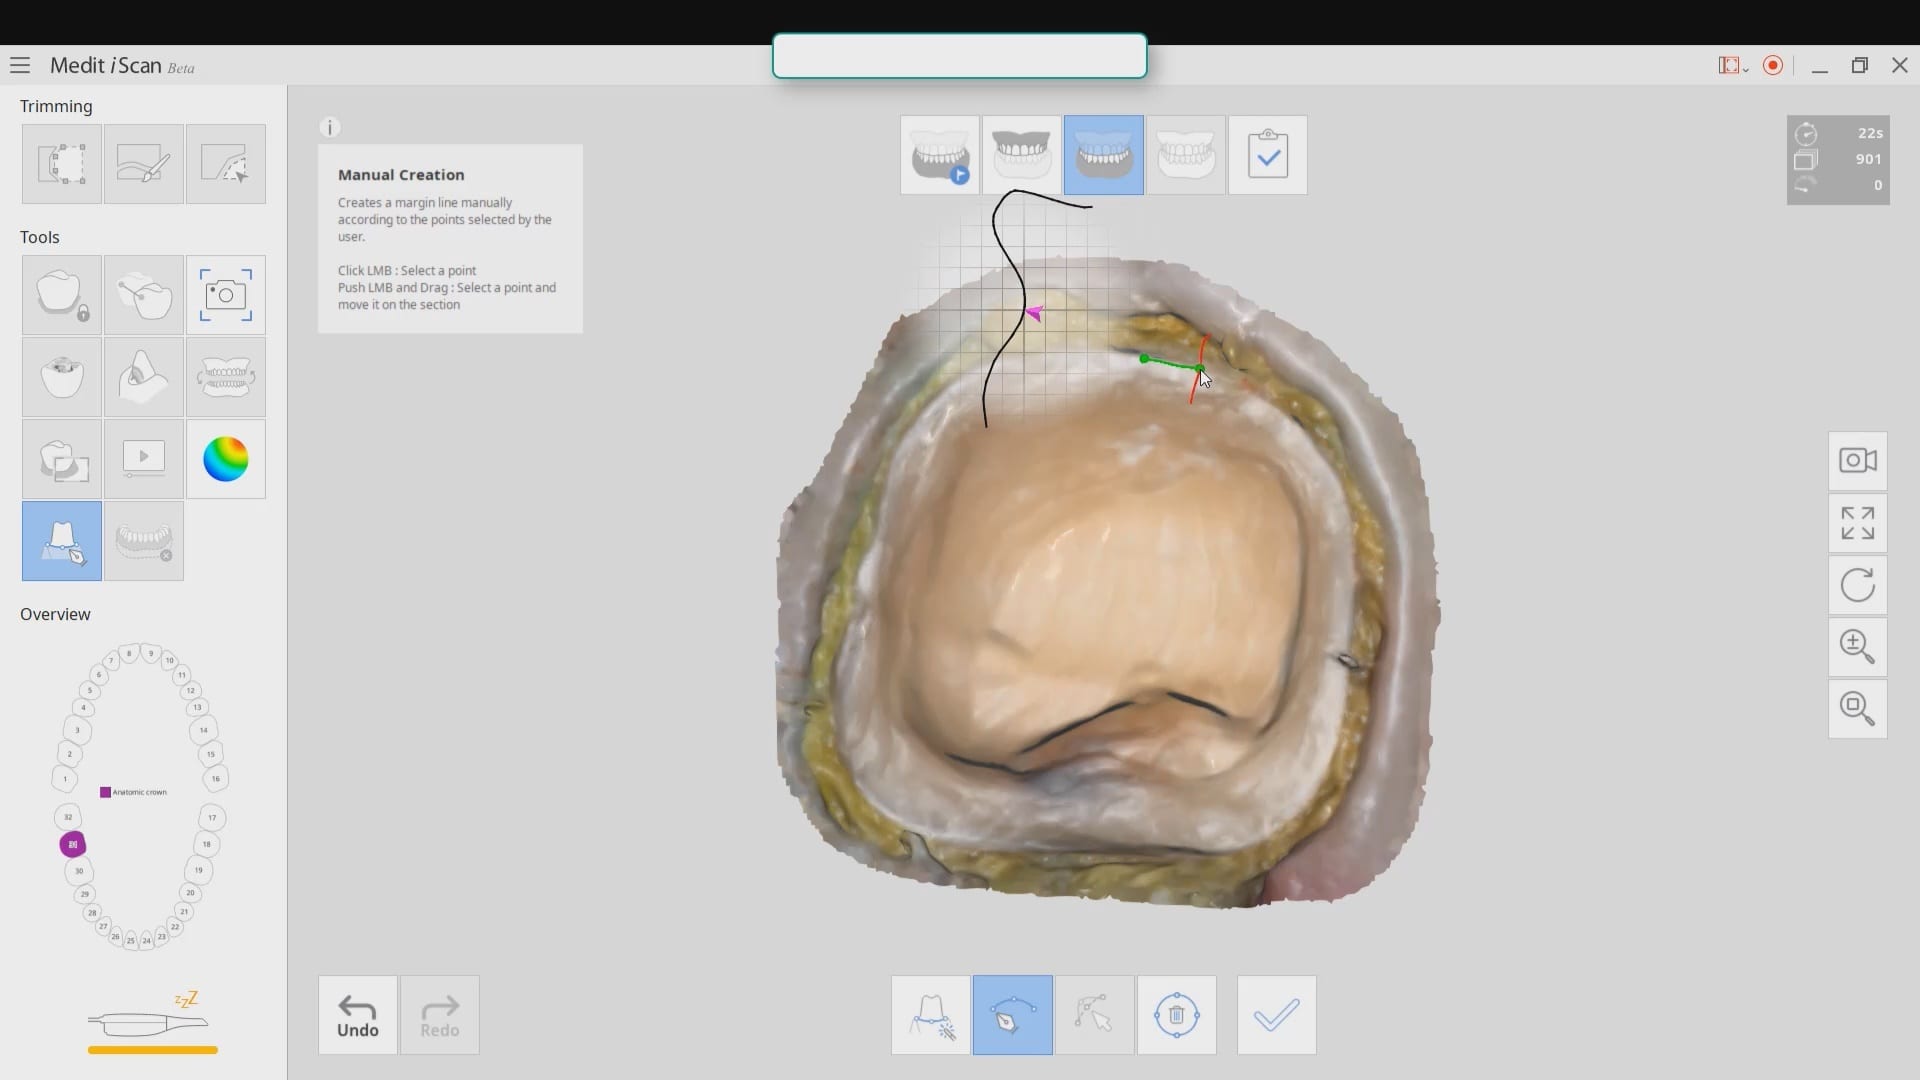
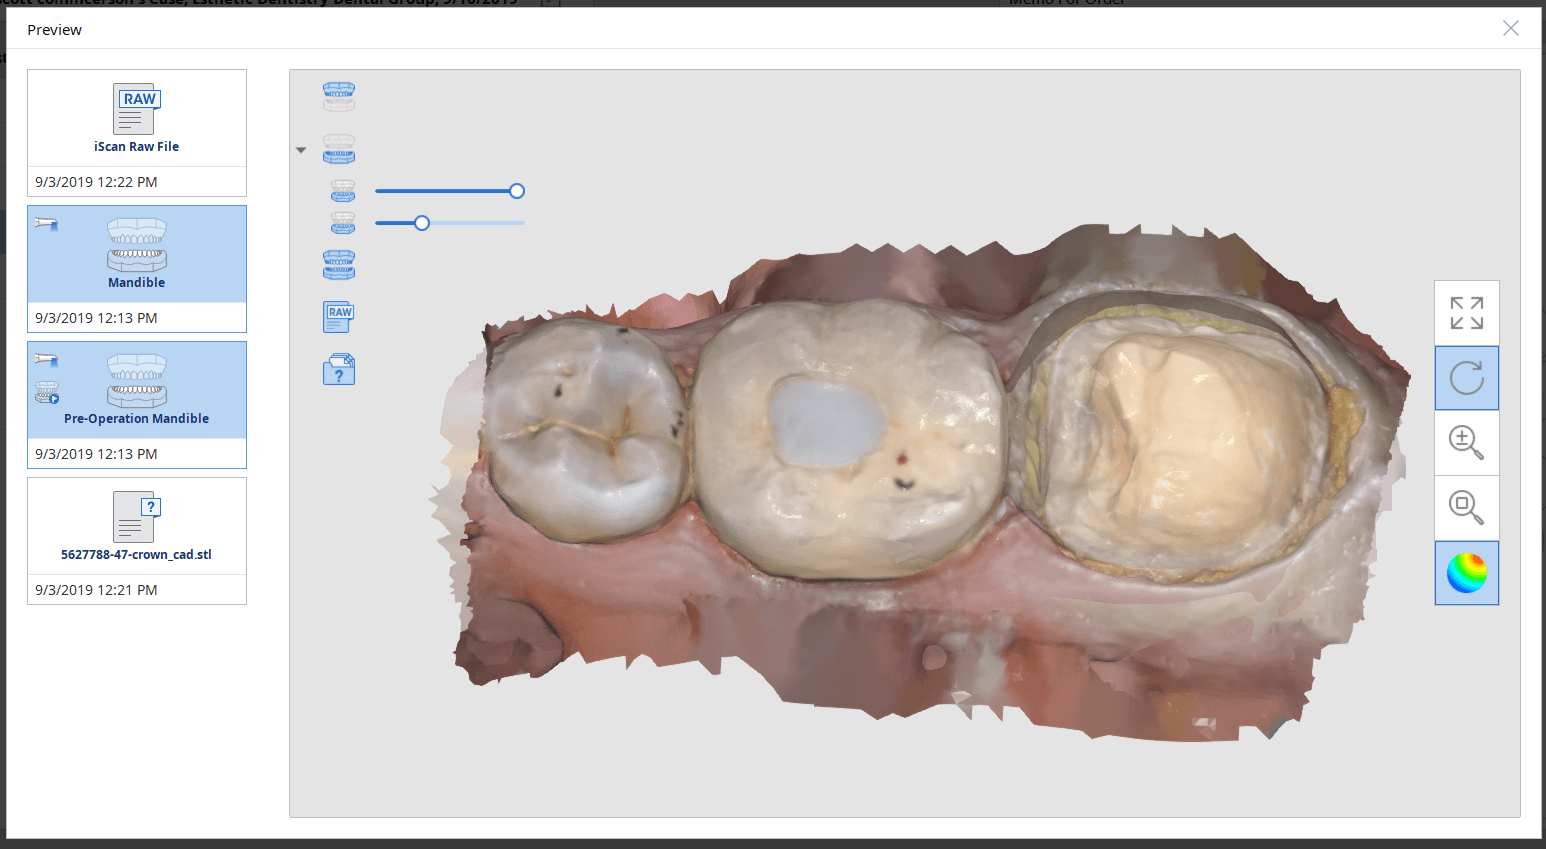
Image the preparation and place margin in native MeditScan Software that transfers to CAD Software
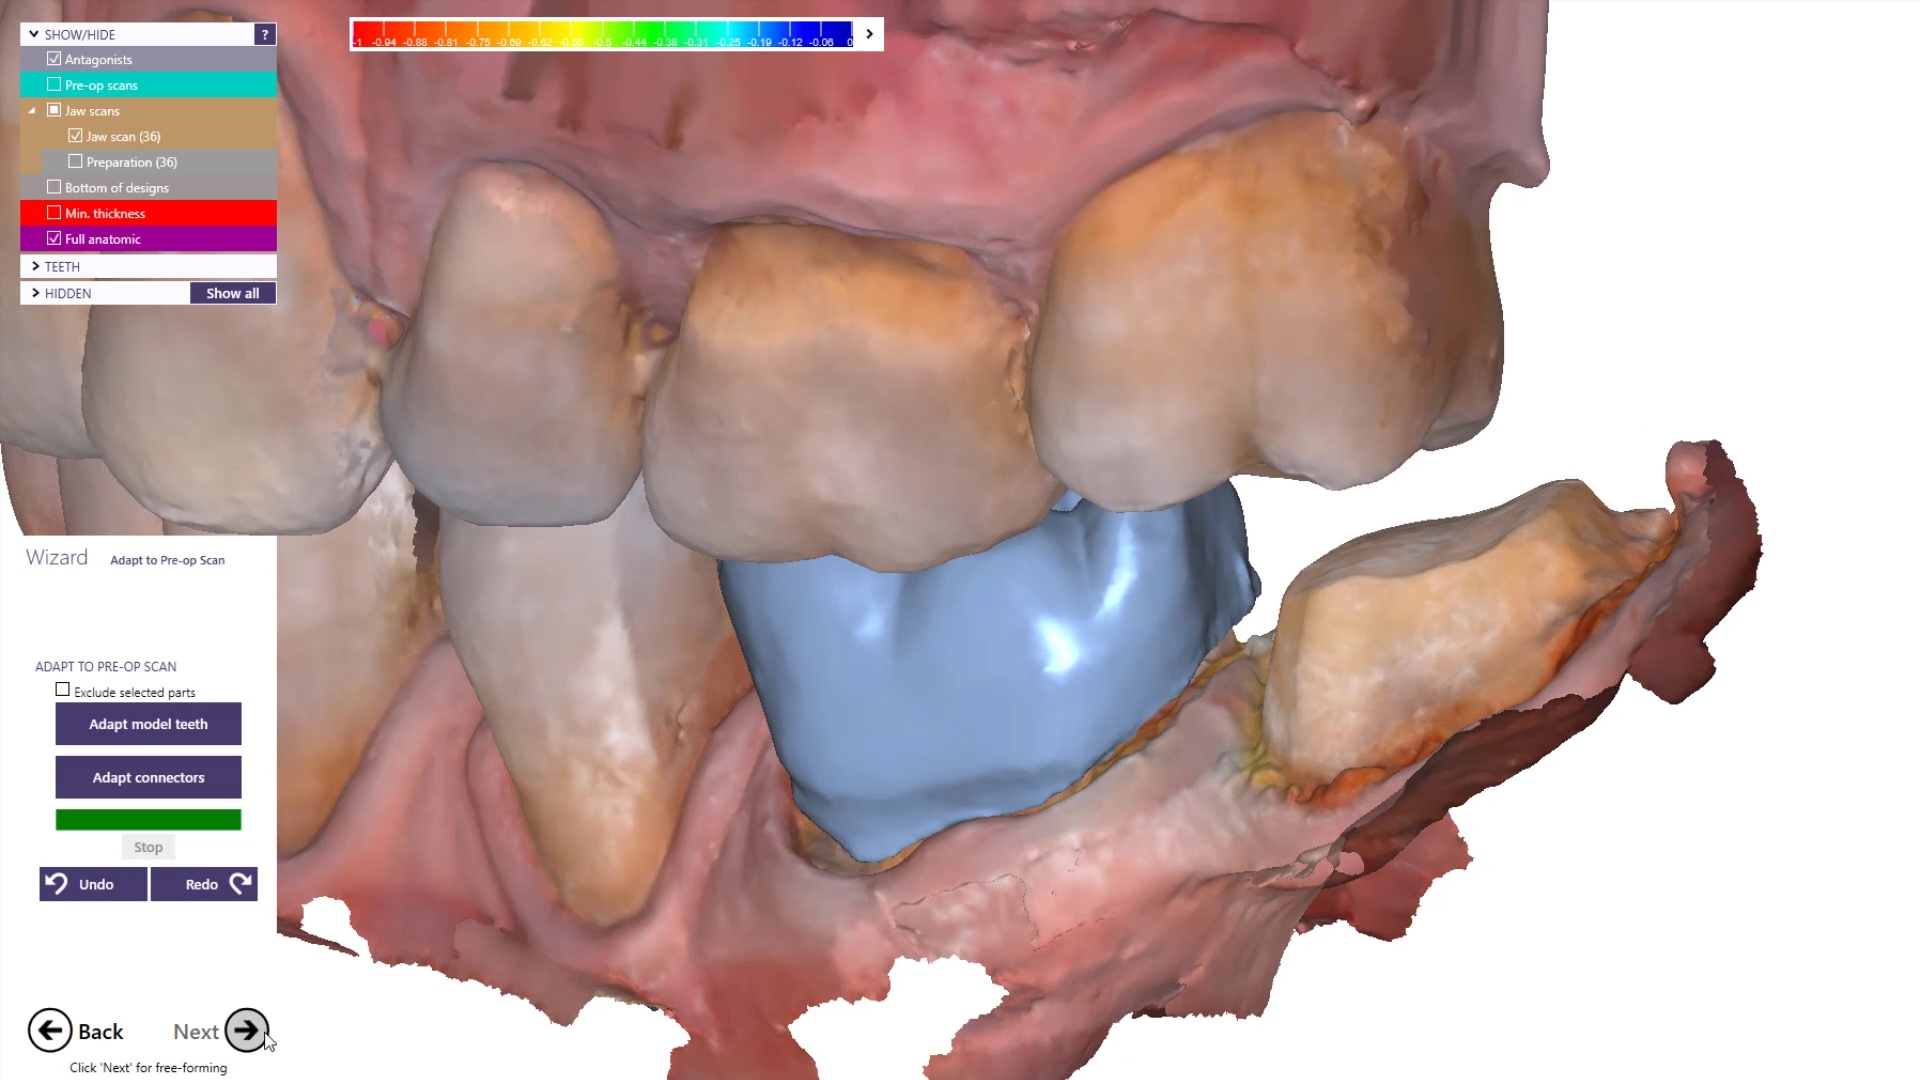
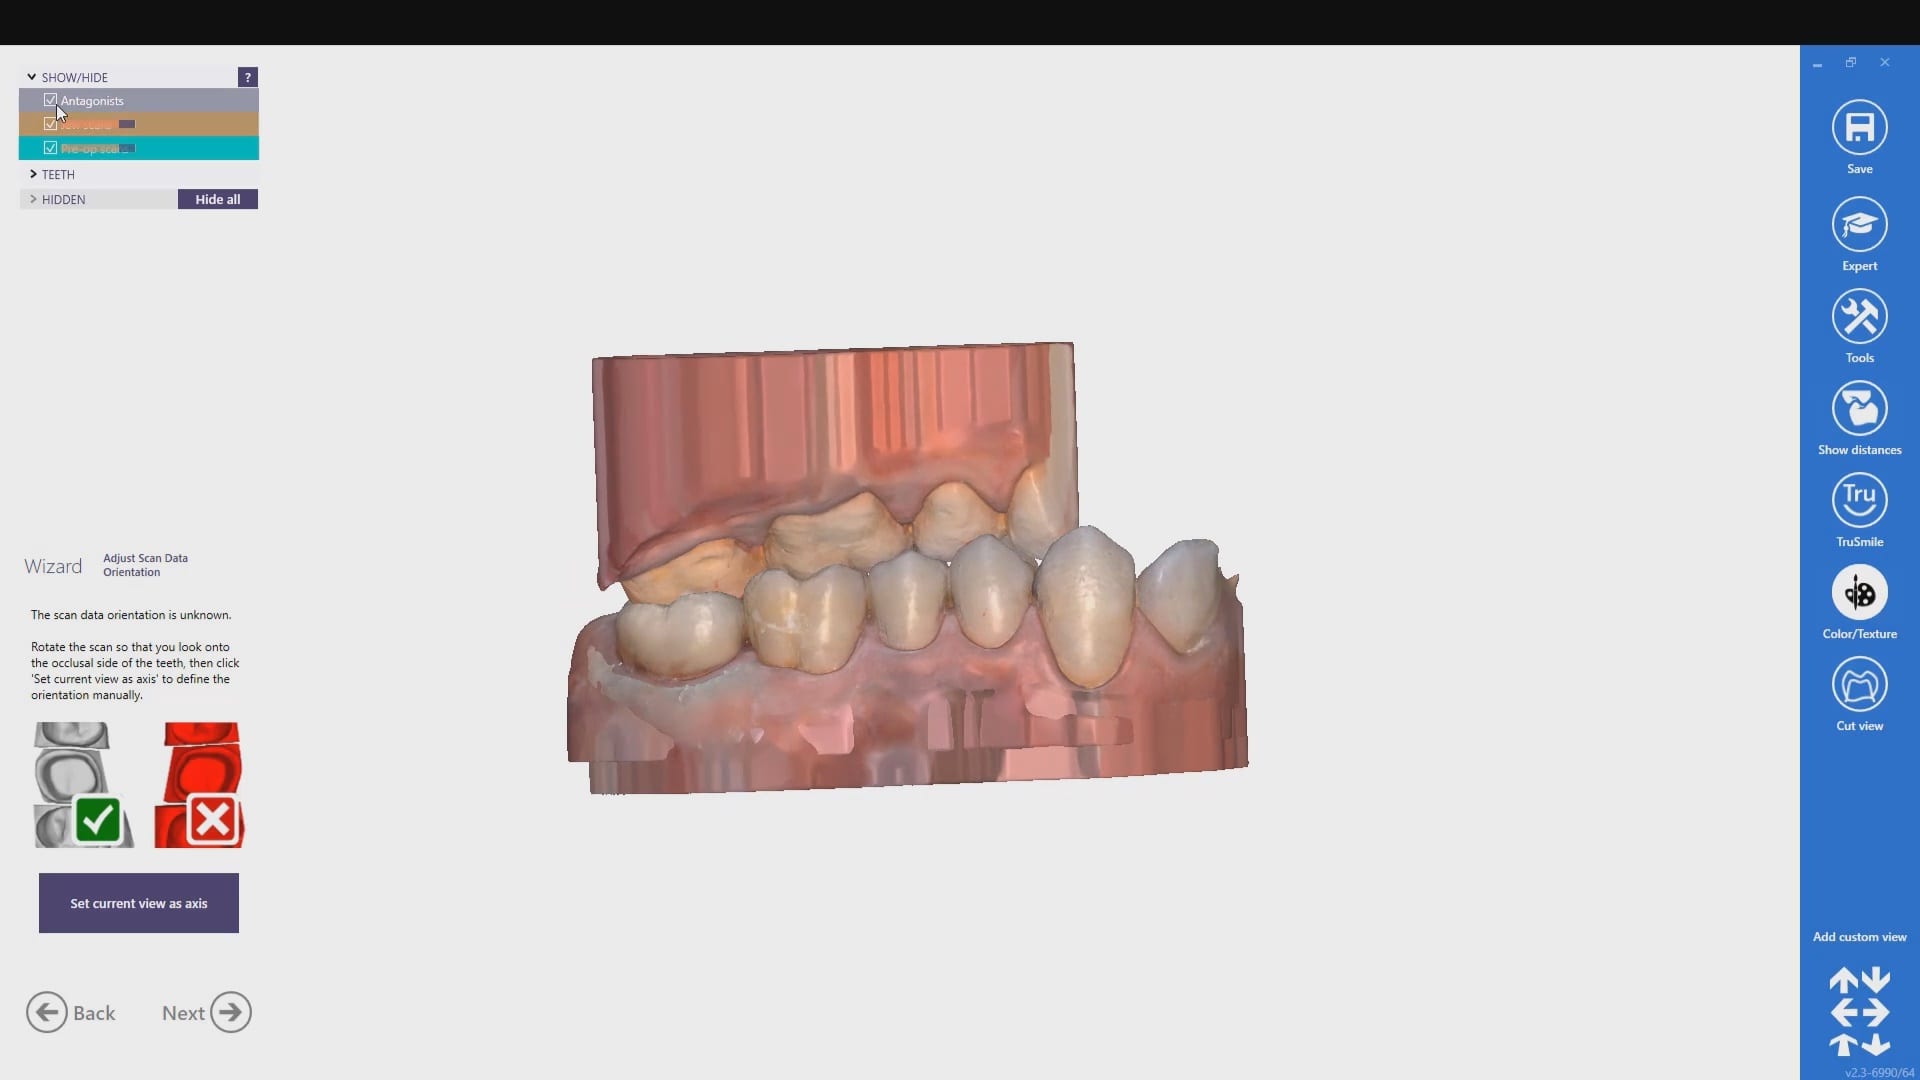
The preop condition is then transferred to the arch model and the tooth in question is cropped out. The rest of the arch is protected so no extra data is added unnecessarily to the equation. This protect feature is used for demonstration purposes and is subsequently removed. The prep in question is then highlighted and the local area is processed and the margins are placed. This margin line can be sent to the lab or it can be automatically carried to the design software
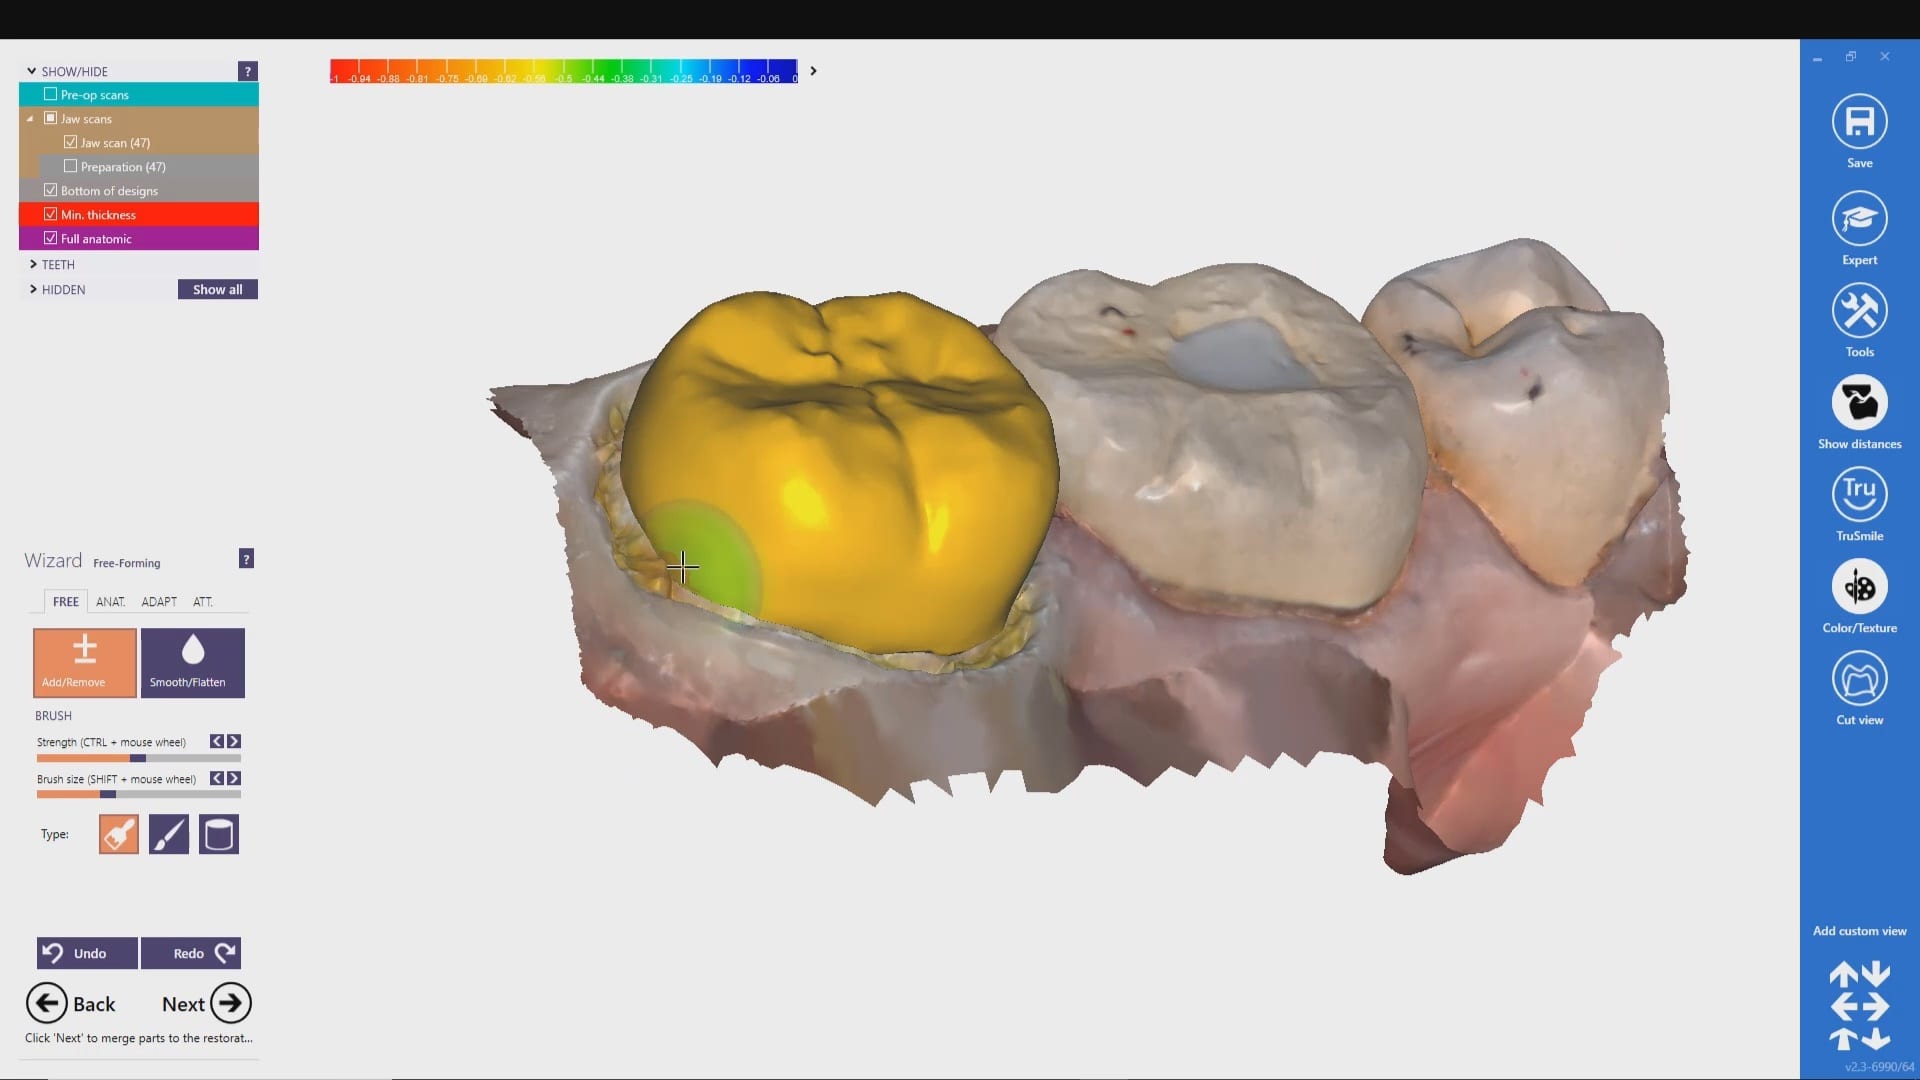
The Meditlink software allow you to launch a variety of CAD programs that include 3shape, exocad, cerec, etc… Here we launch exocad which automatically imports and aligns the models and marks the margins. The restoration is then designed to completion.
The CAD software allows you or the lab to alter the marked margins if necessary. The restoration is aligned in the arch for and the contacts are adapted to the adjacents and the oppising
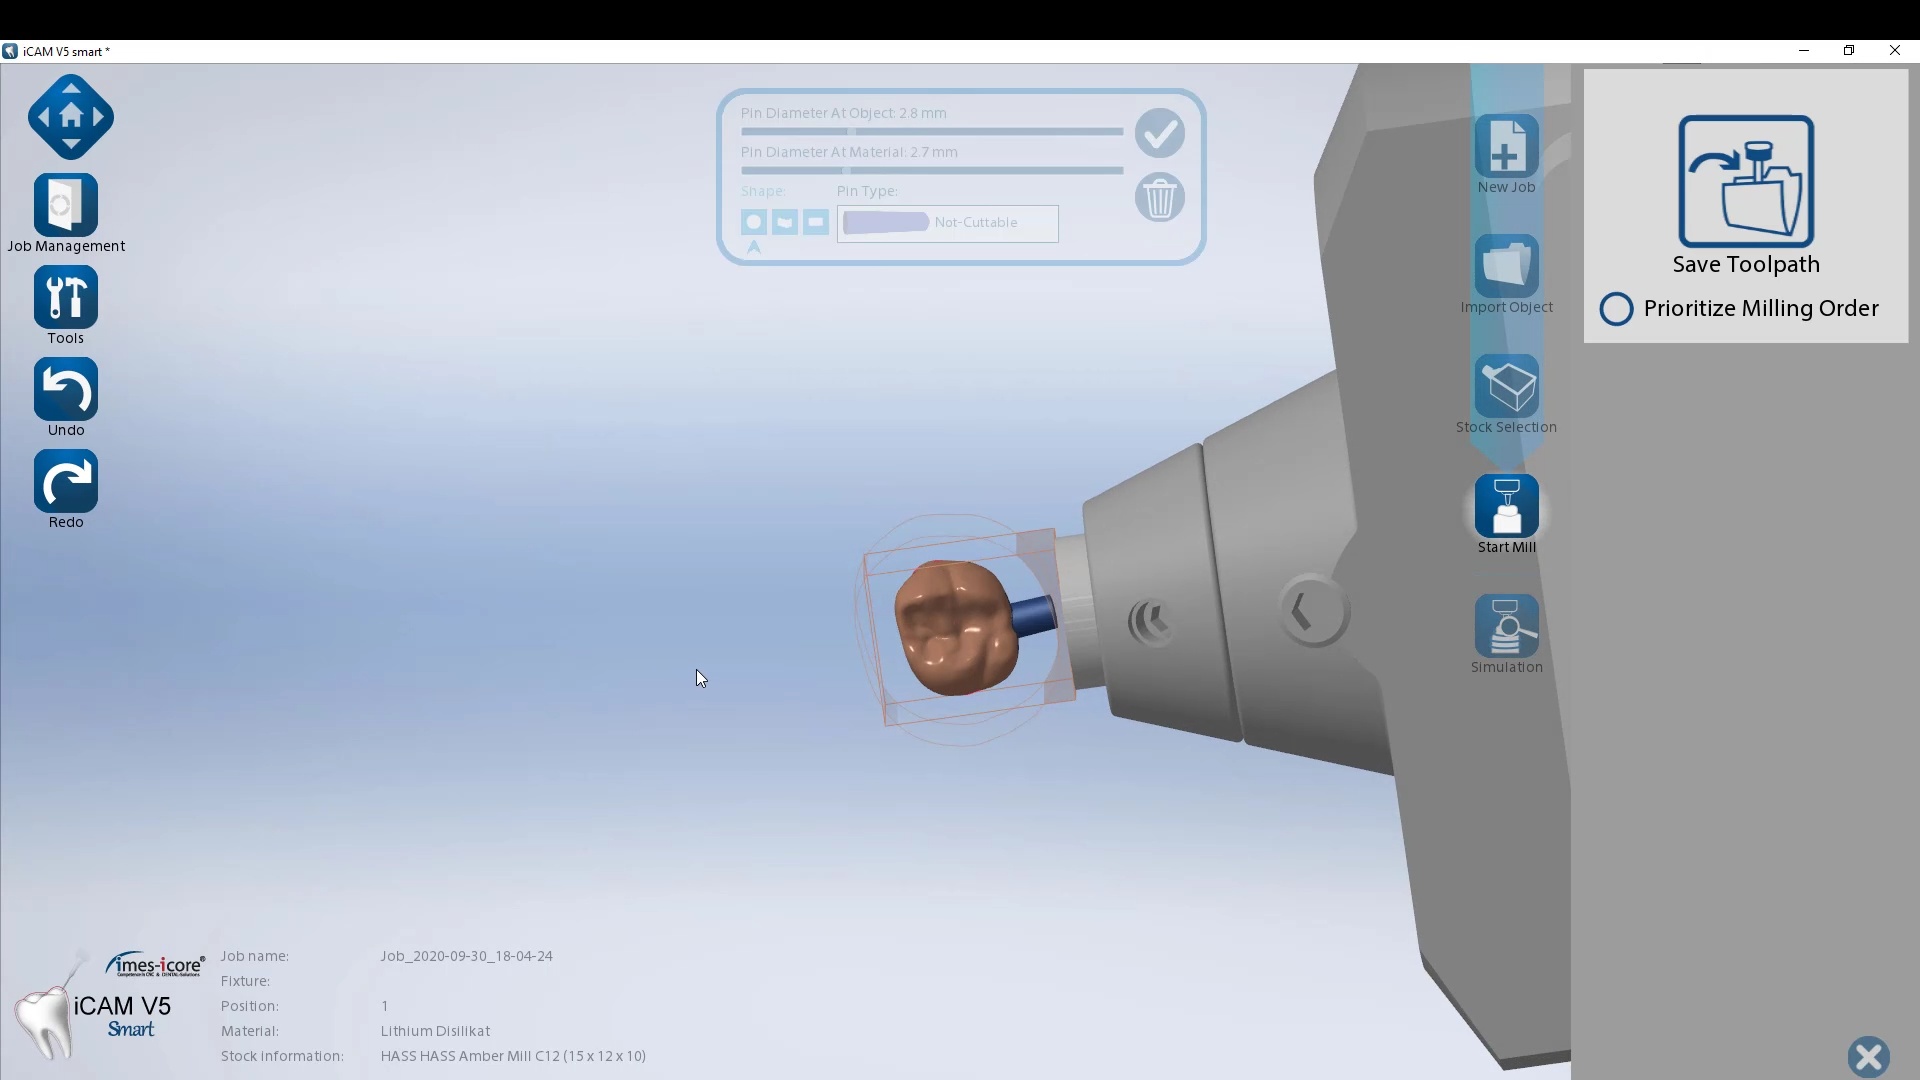
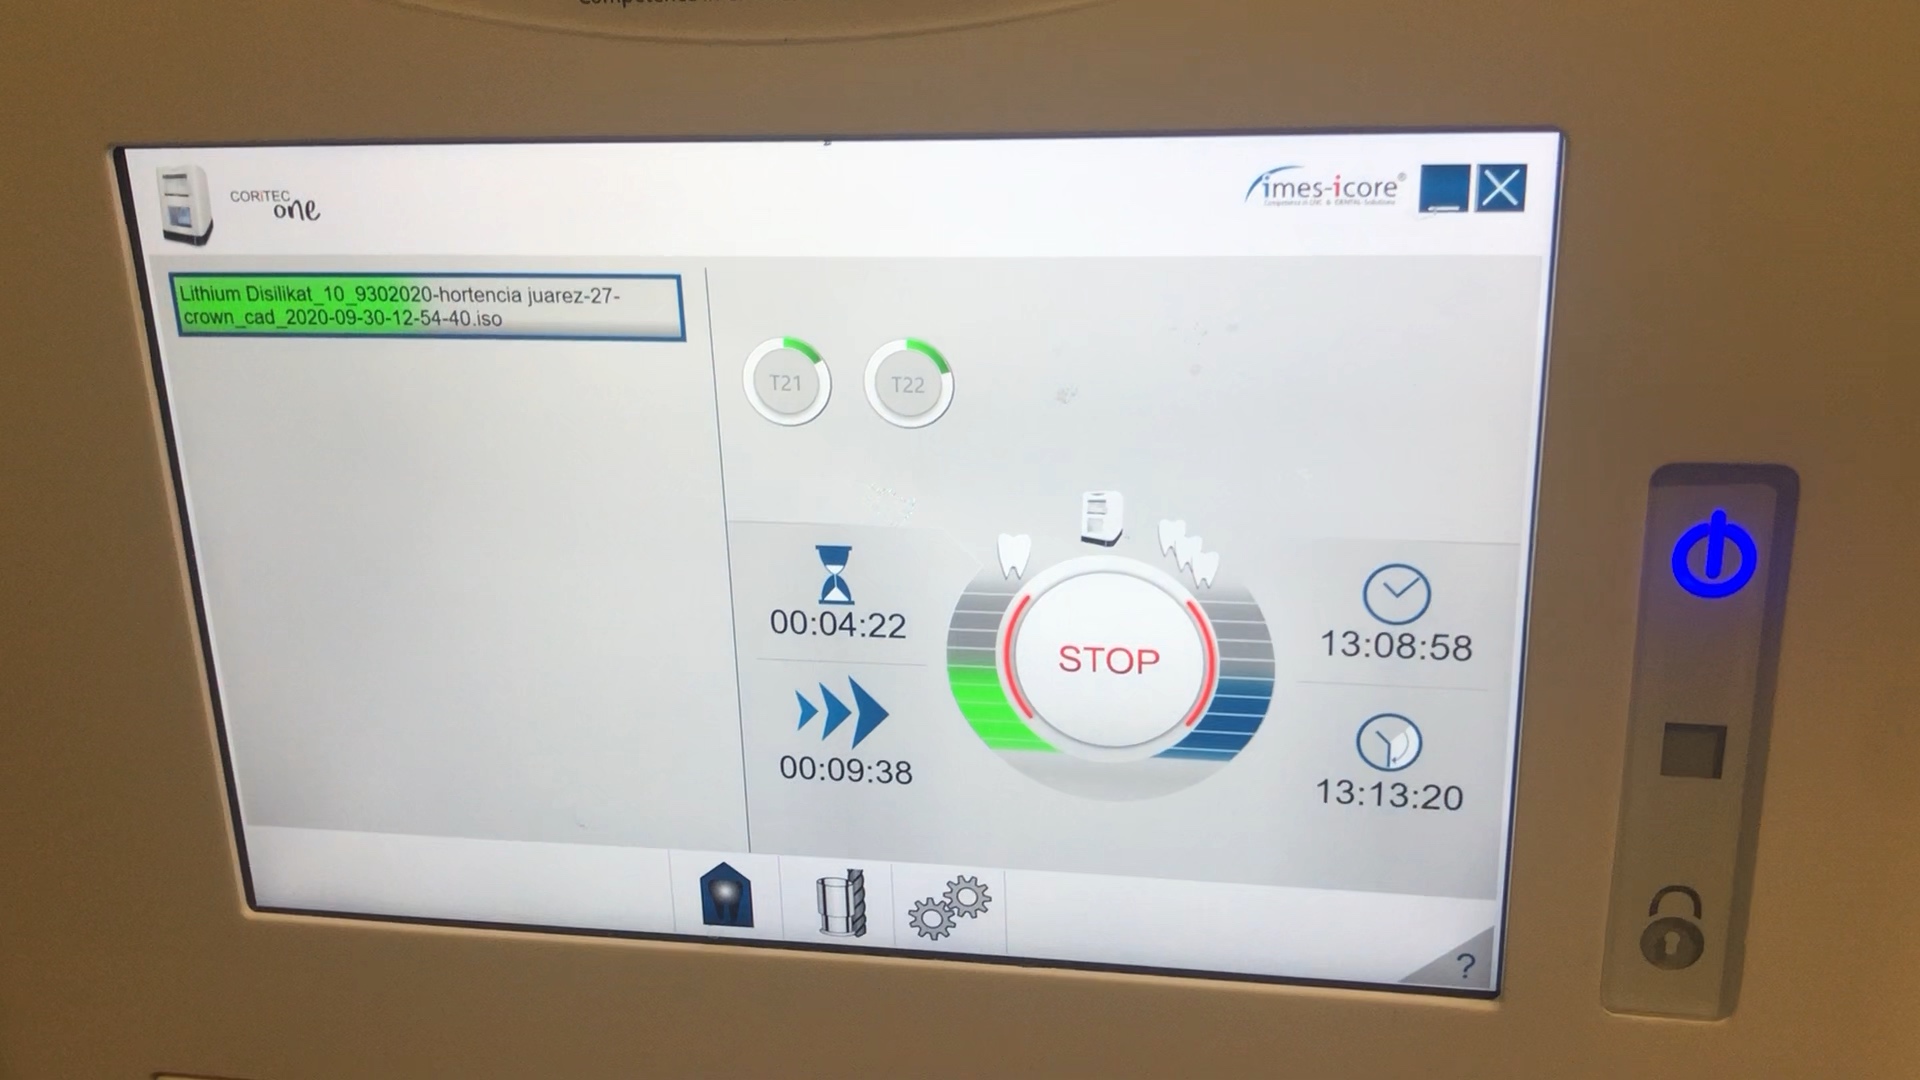
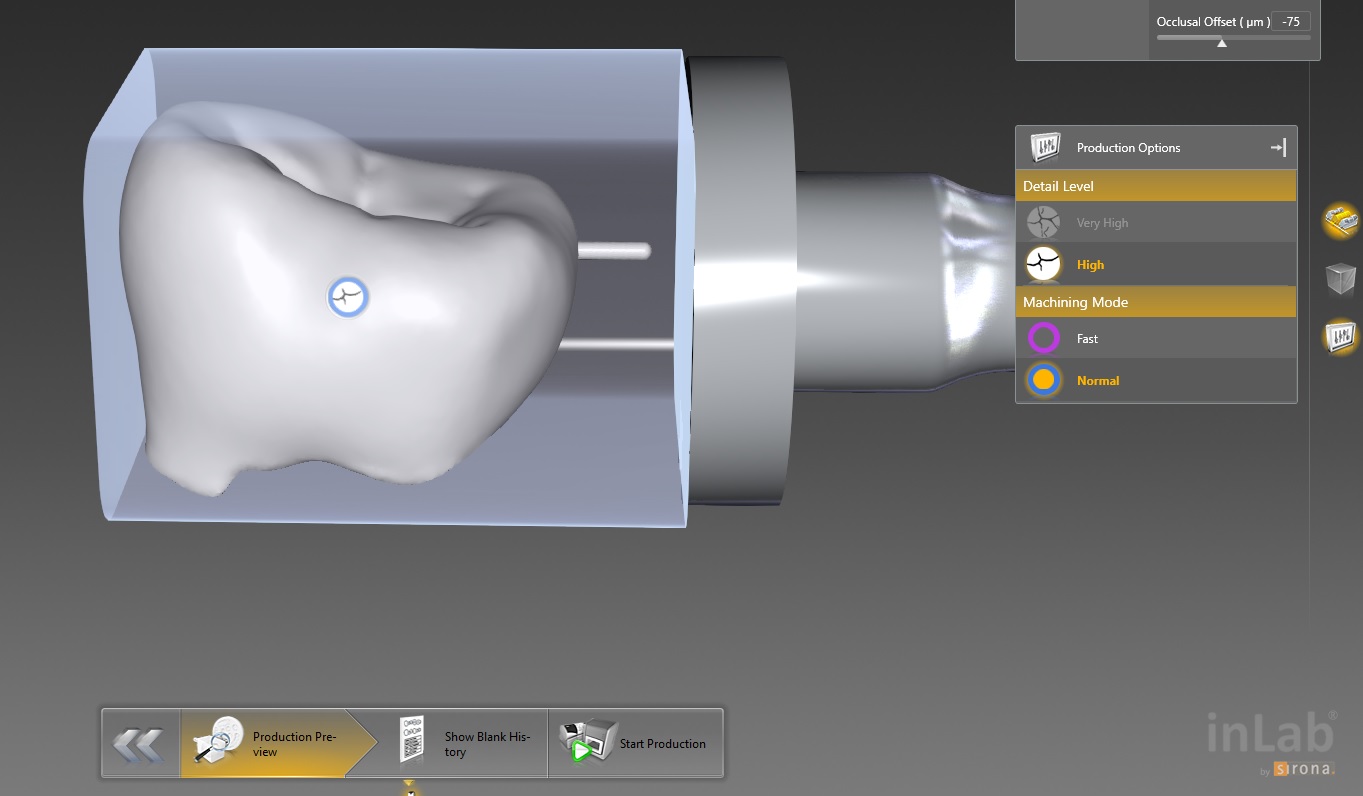
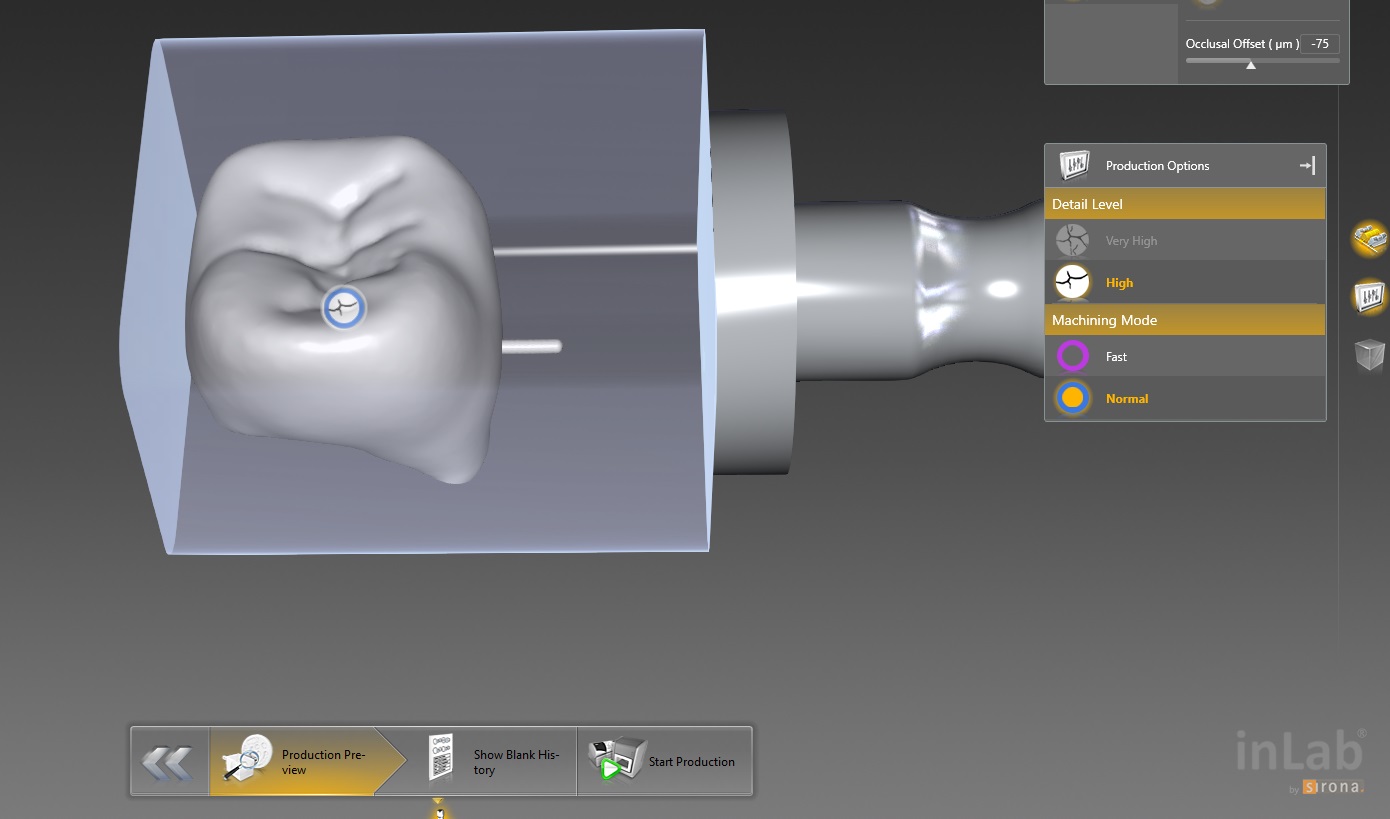
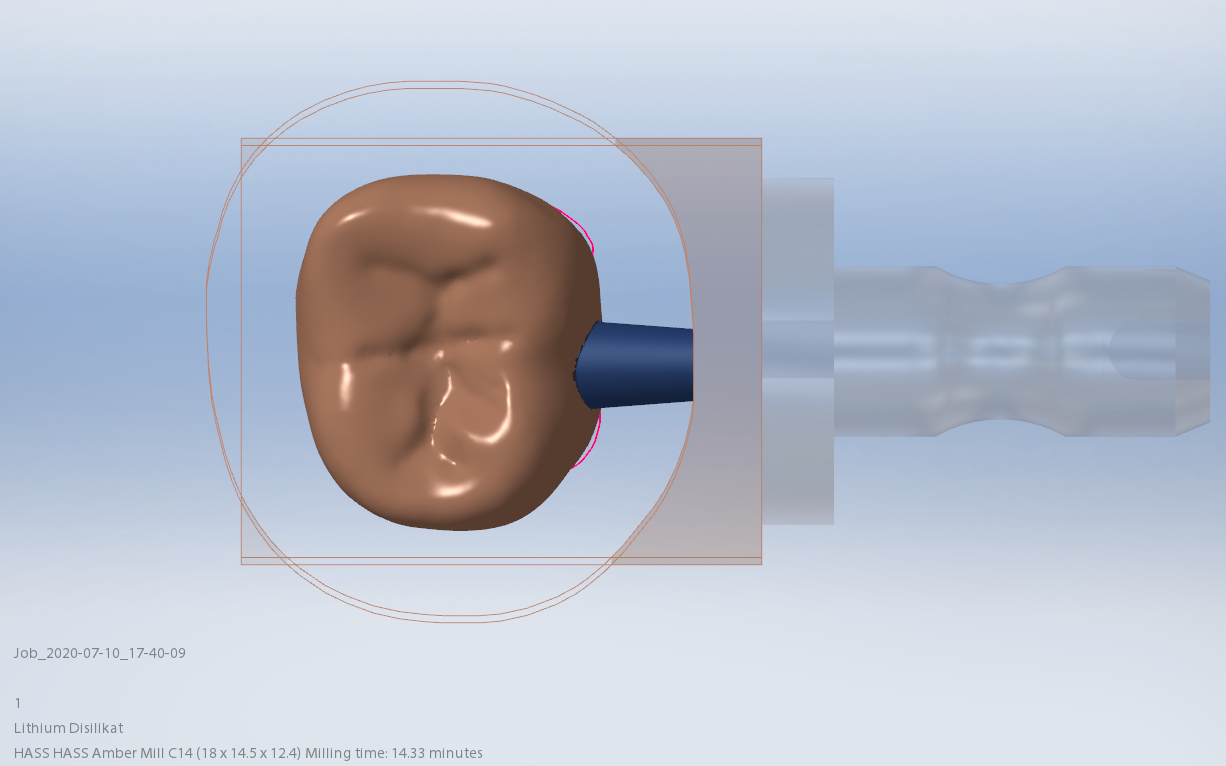
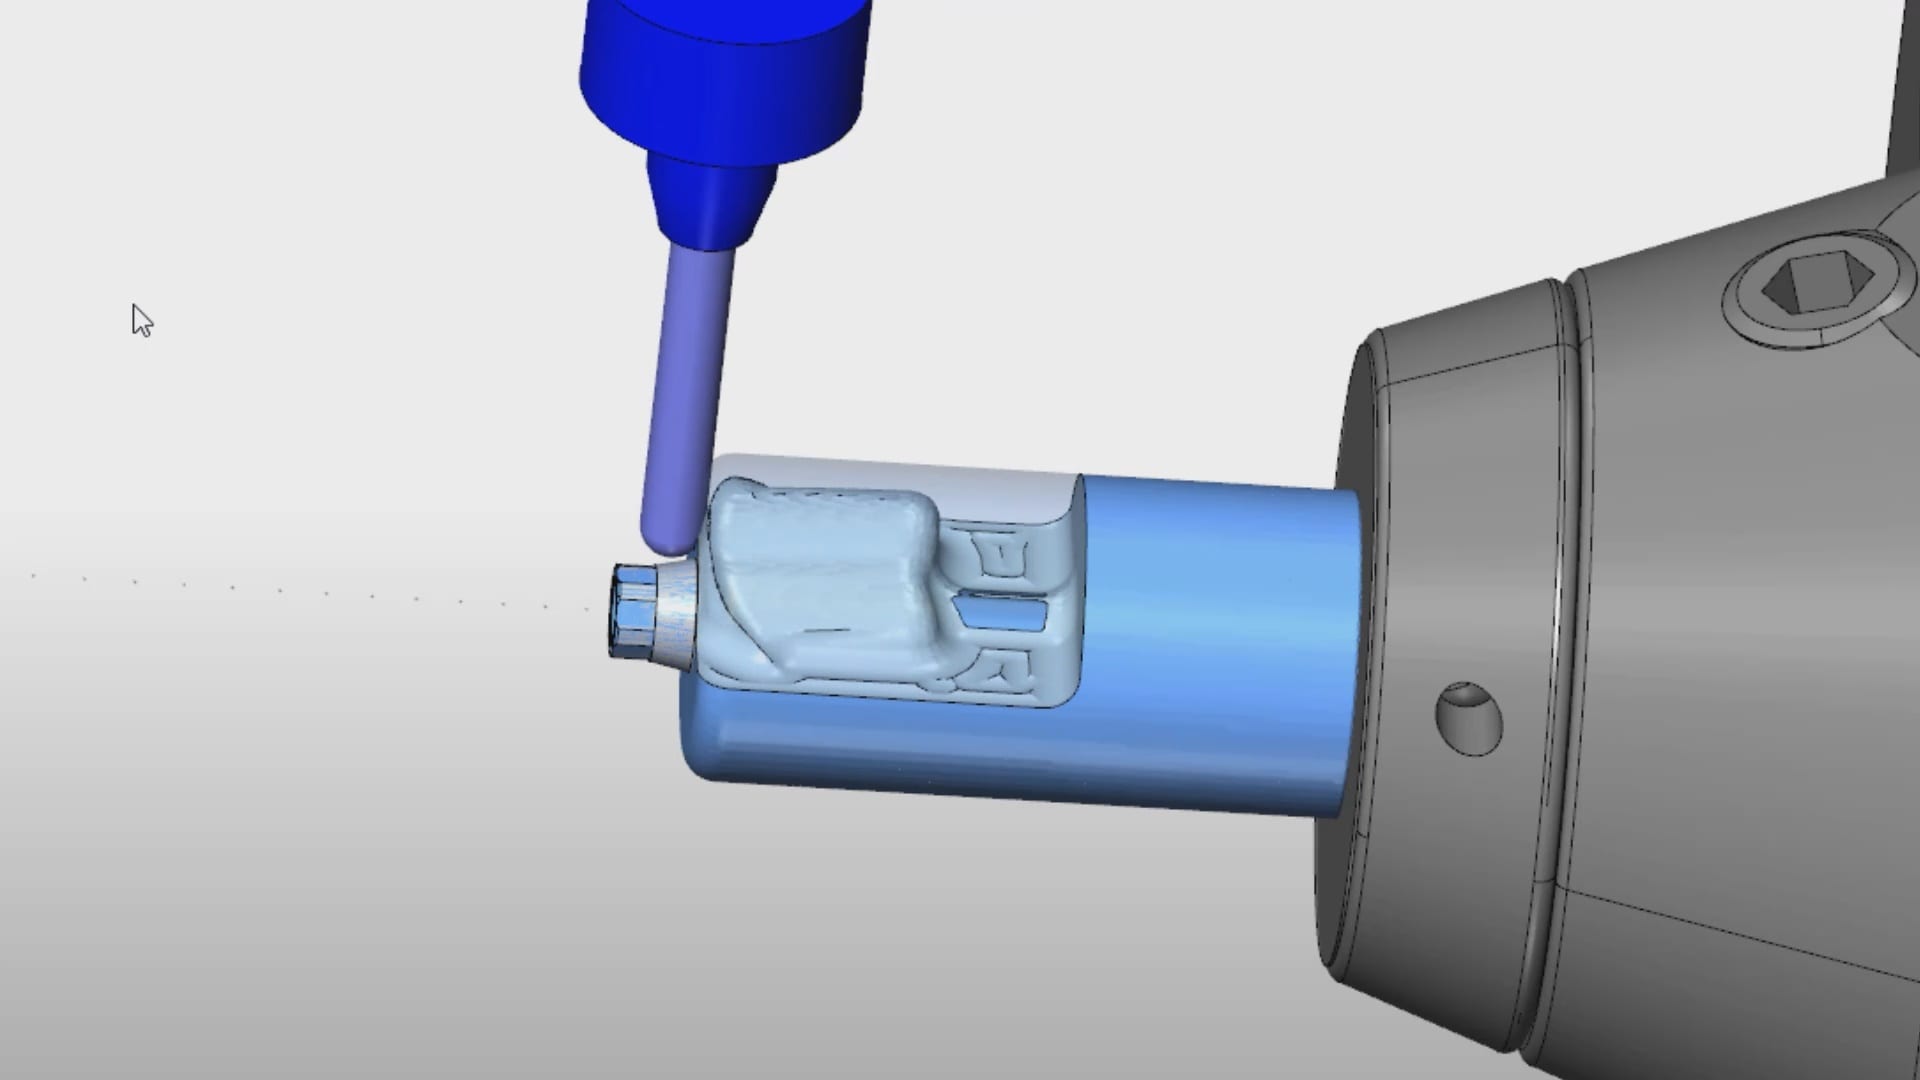
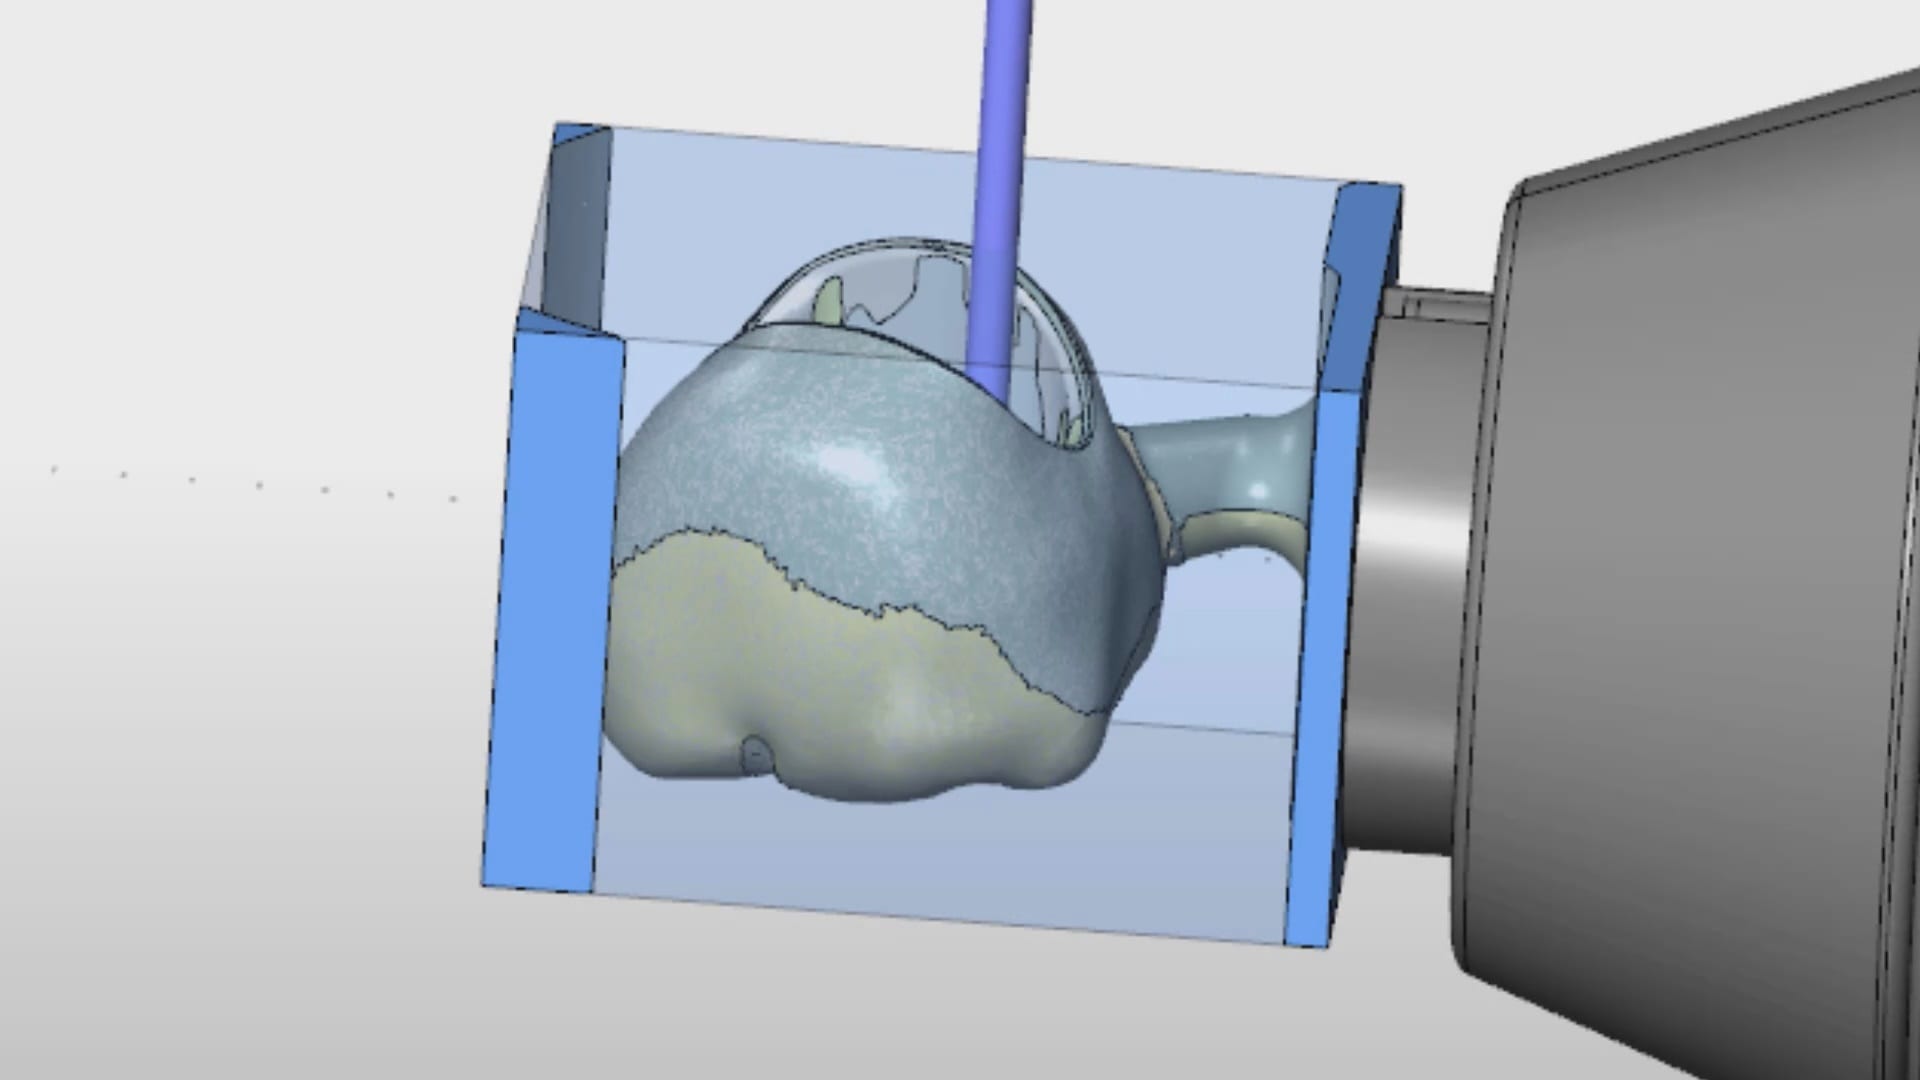
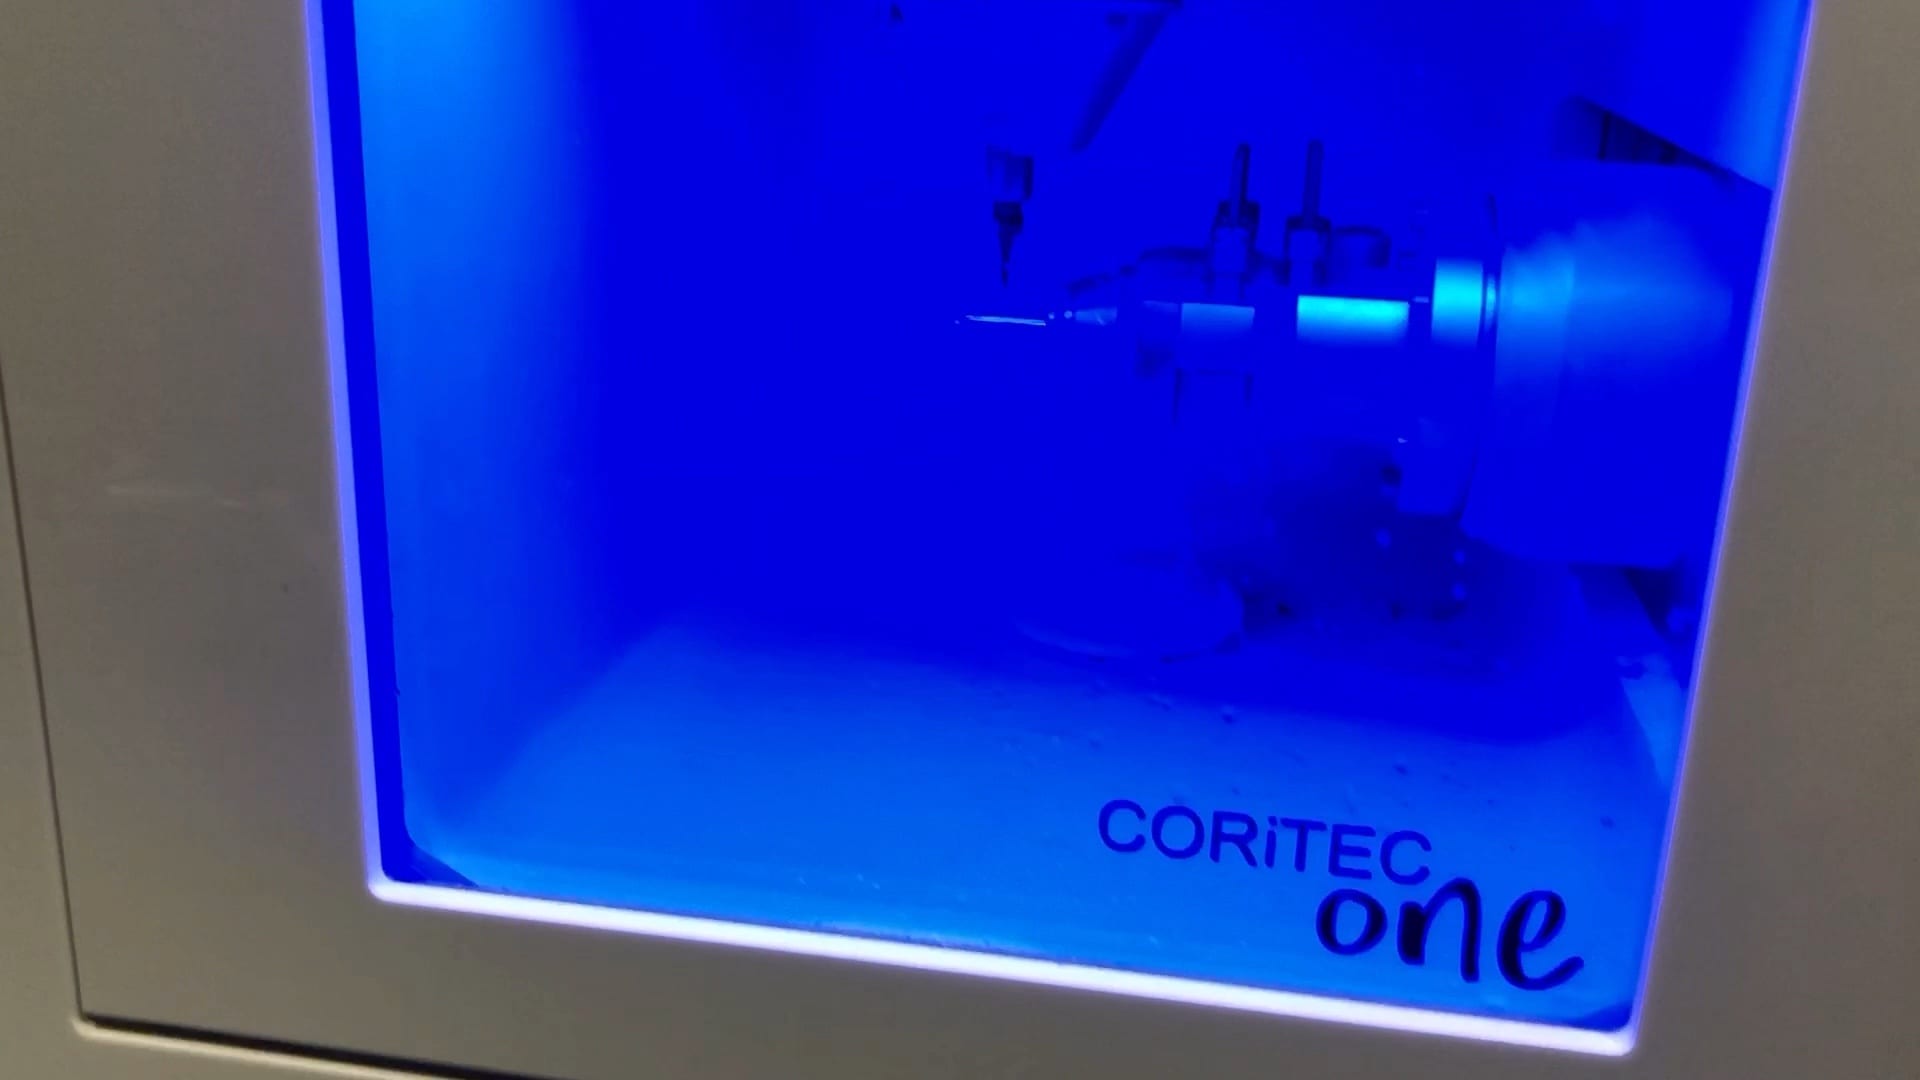
Milling of Lithium Disilicate with Imes Icore Coritec One
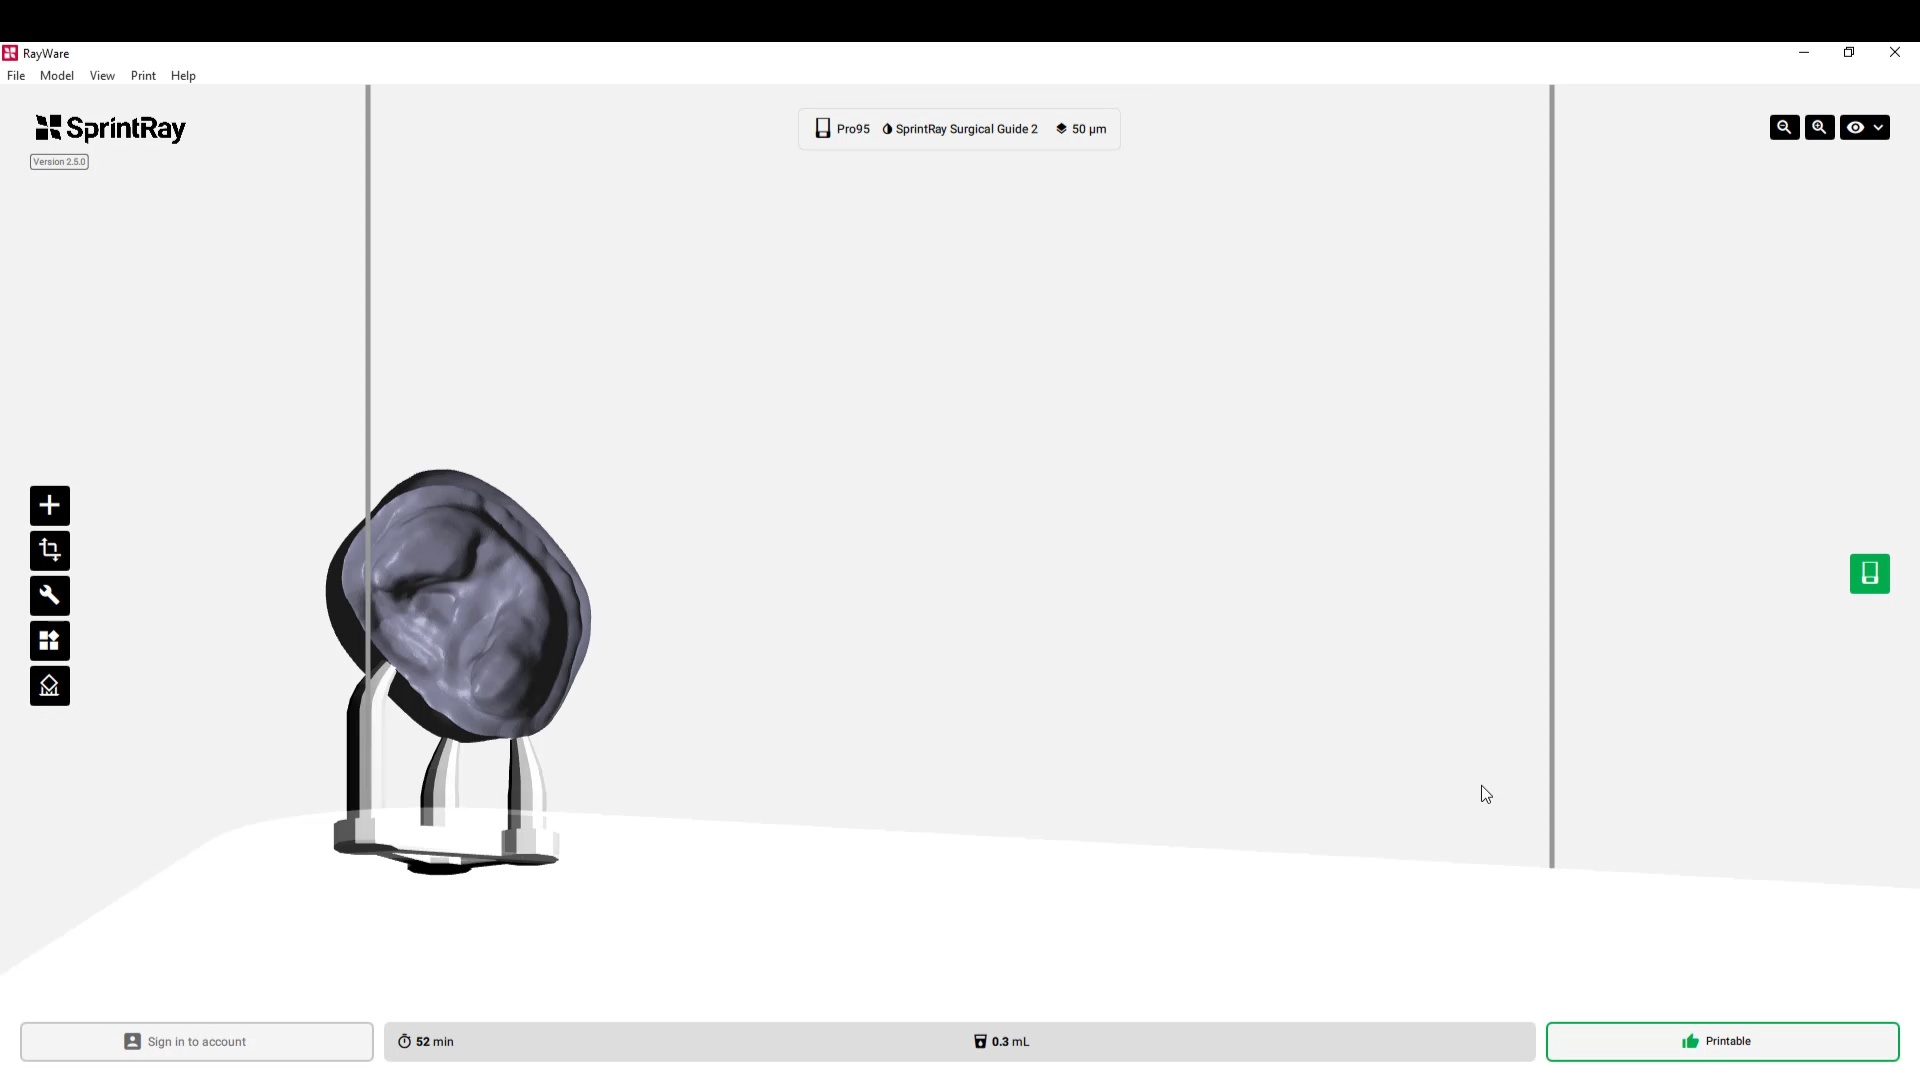
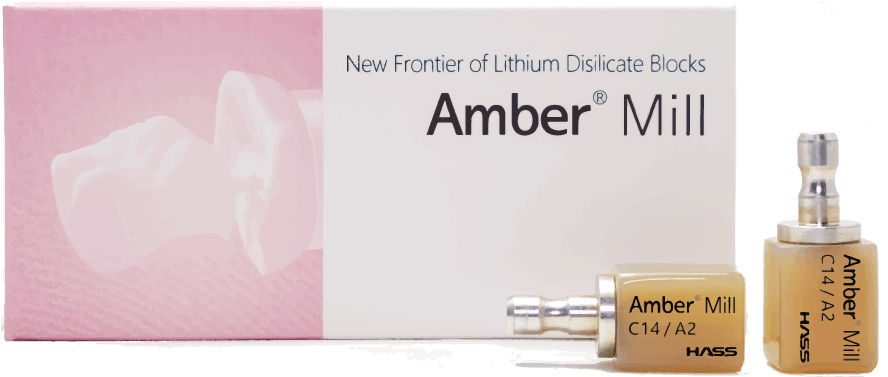
The final restoration design can be exported as an stl and taken to a variety of mills or printers. Here we designed it millbox and milled with the coritec One. The material used was Amber Mill and it was crystalized and seated
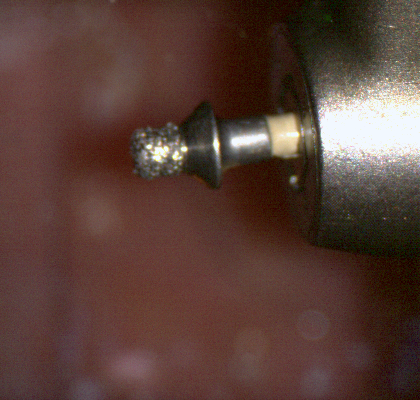
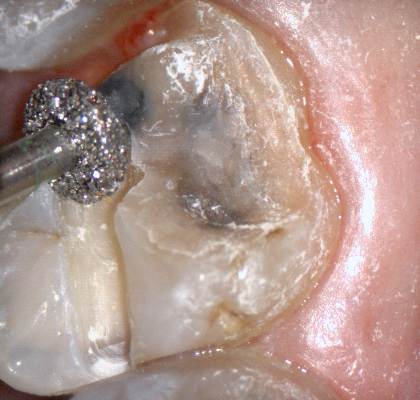
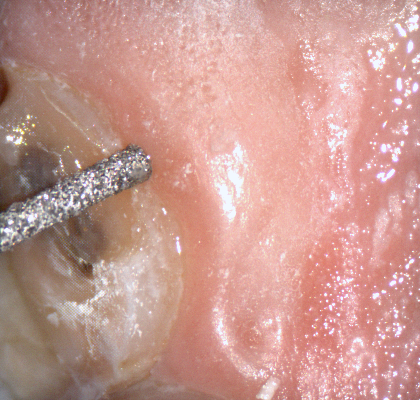
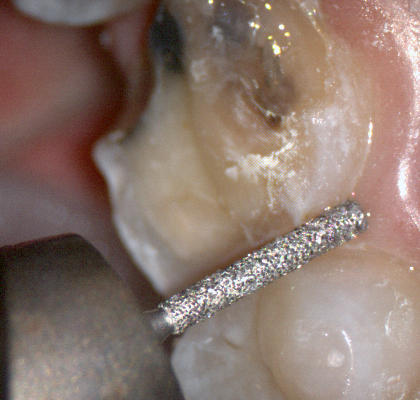
The following pictures depict the sequence of burs we recommend that you use to finish a preparation quickly. While patient is getting numb, take a quick look at the clearance you will need to reach proper material thickness. Once the quadrant is isolated with isolite and optragate, take an occlusal router bur and create a trough to gain the proper depth. Follow that with a flat disk, and you can quickly reduce the occlusal height.
A shoulder bur of .8 mm thickness can help you reduce the interproximal areas as well as the buccal and lingual margin lines. Before finishing the prep, place hemostatic agent like expasyl in the sulcus and place retraction cord. while it is setting, check your reduction. If you need more space, now is the time to reduce some more.
Once you have adequate clearance, retraction, and hemostatis, you can readily image and find your margins in the CAD software
Shining3d has a projector and a single camera that takes photos of the surfaces it is scanning. at first, you may think this is a shortcoming, but in many ways, it dramatically reduces errors a new user can introduce.
in the early days of cerec, all you needed to do was capture the margins and the area above the height of contours of the adjacent teeth. This made the try-in and the contacts really easy as the design software just dropped straight a straight wall down to make contacts to. same concept here!
also, after you image and place margins, A SINGLE CLICK takes you to design software where you can finish the case and mill it right away.
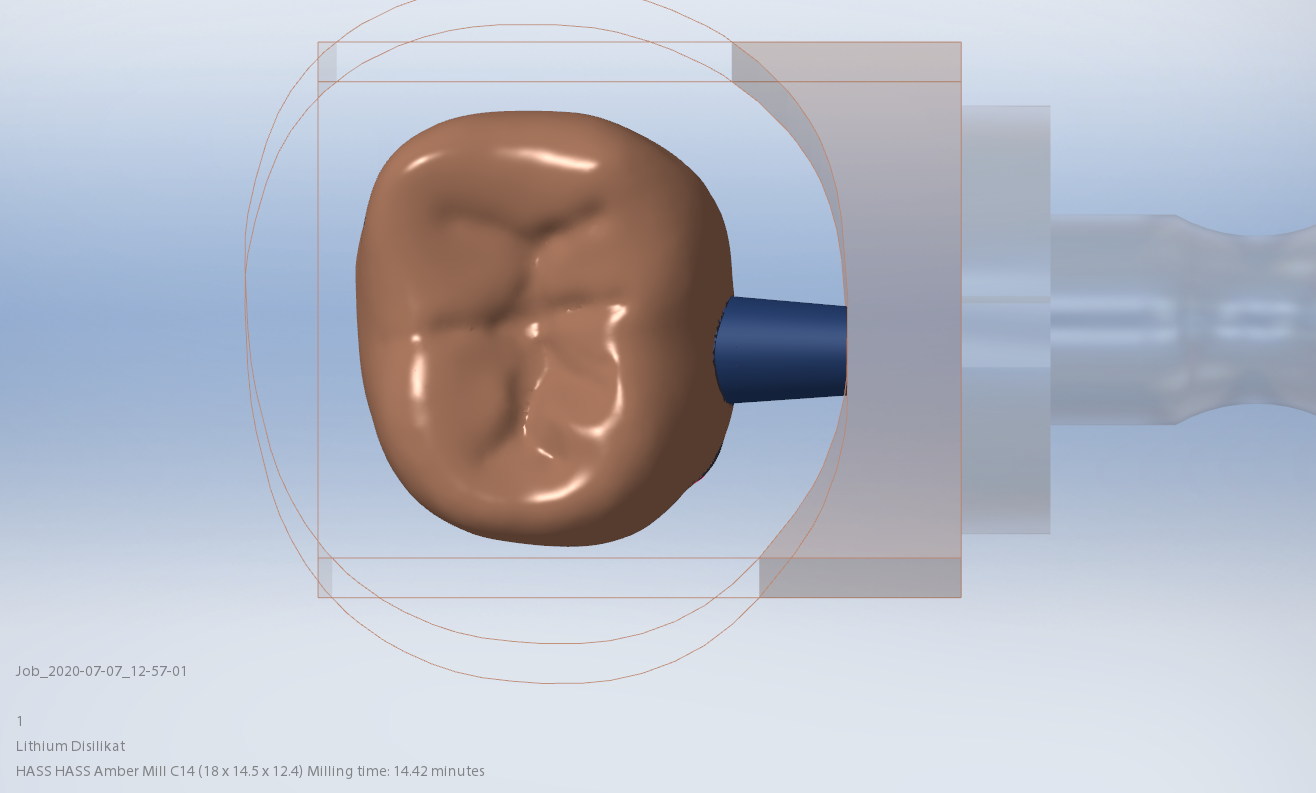
This molar’s suggested mill times with the MCXL are for either Size 12 or 14 blocks:
Sprue on distal in normal speed mode is 14:05 minutes, fast speed at 7:54
Sprue on buccal in normal speed is 13:48 minutes, fast speed at 7:46
This molar would only fit in a size 14 block of Amber Mill in Imes Icore Coritec
Sprue on distal in normal speed mode is 14:15 minutes, sprue on buccal in normal speed is 14:42 and speed crown is proosed at 13:23
For our advanced users who mill in house or what to speed up their digital impressions we advocate taking advantage of digital dentistry’s unique features that allow you to take impressions over a period of time and segments, building larger models over different sequences and time. In this particular case we have two molars in the lower left quadrant that warranted replacement. The traditional method would be to prep both, isolate both, retract both, and take your final impression, but we will approach this as if there are two separate patients involved
Case Presentation on how to manage two crowns with a single milling machine
For the second molar, we will take advantage of the anesthesia time and capture the first bite, the opposing, the pre-existing situation and then crop out the preparation area digitally. Once the tooth is prepared, we will check for proper reduction. We will then take the second bite to verify the vertical dimension has not changed.
While the second molar is being designed and milled in the first case, we will launch a second window by cloning the first case. All the data remains the same and this time we crop out the first molar digitally and protect the rest of the arch. Once the first molar is isolated, it is digitally captured and then designed and milled.
image first molar while second molar is being milled
To manage the contact between the two crowns, there are many advanced applications. Here is a simple explanation of how we use the prep model from case 1 as the pre-op model for case two. Since the second molar in case 1 made contact with the distal wall of the first molar, when we design the crown for the first molar in case 2, all we have to do is make sure the distal wall is flush to the pre-op. This guarantees us a contact between the two. There are lots of shortcuts to this puzzle once you get the basics of digital impressions under your belt.
One of the big limitations of CEREC (a registered trademark of denstply sirona) with tibases and implant crowns is that it is limited to very few implant lines and the antirotational notch can just ruin your day as it needs to go into a specific location. You also have to deal with making sure the tibase is seated all the way and the scanbody is properly indexed. The one benefit is that you are dealing with just crown and bridge and you do not need to know implant position or timing at all when doing the design.
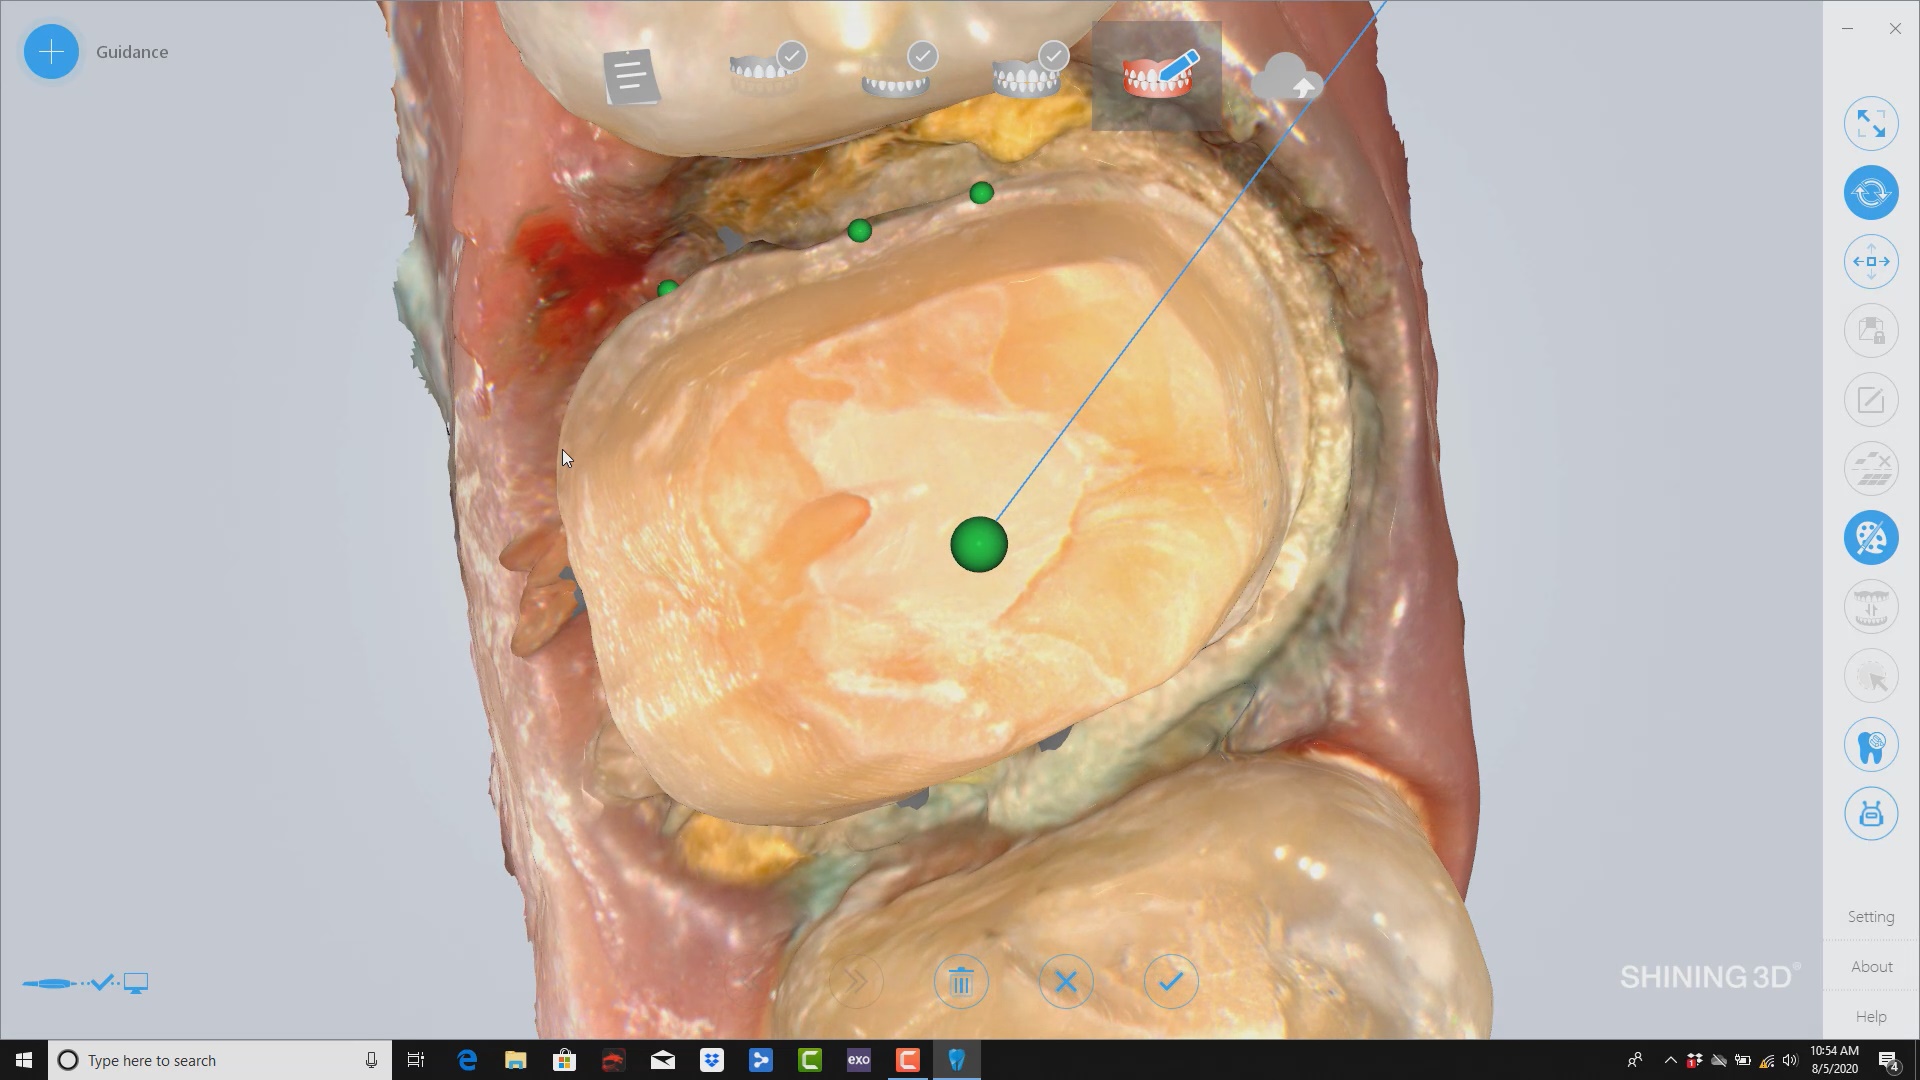
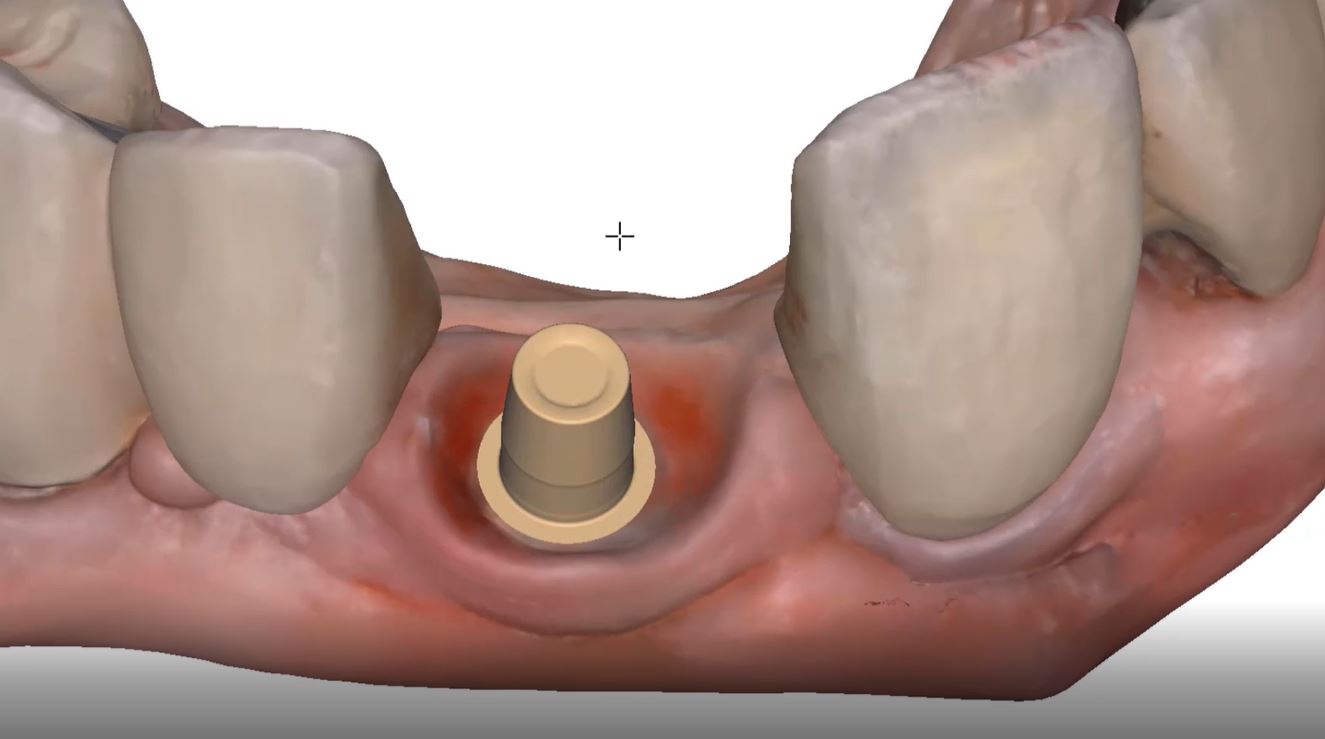
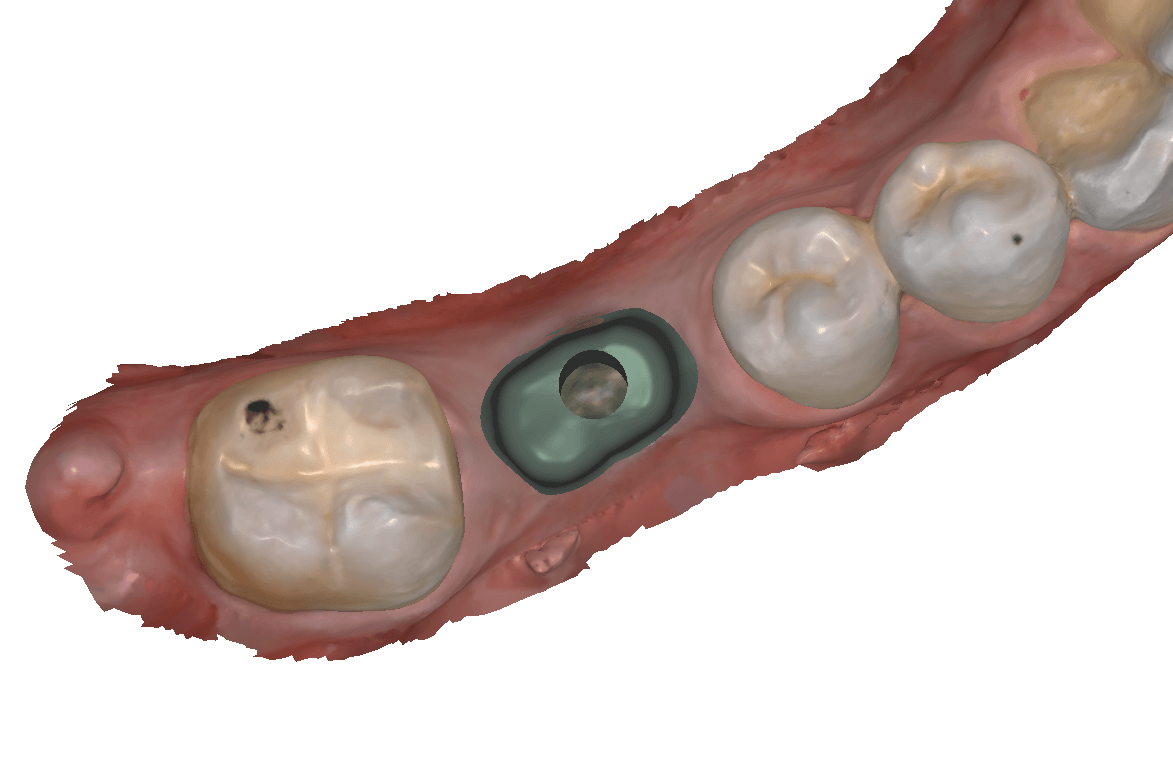
In this case, we demonstrate how we utilize the Medit i500 to capture a Tibase from Blueskybio, Biomax NP Conical Connection. Once the tibase is seated, we simply start scanning and then use the artificial intelligent implant suprastructure identification system to identify the location of the tibase. This in essence allows you to capture your margins OUTSIDE the mouth and you don’t have to bother with imaging the tibase, which is highly reflective in the patient’s mouth.
Once processed, you can then modify the tissue digitally and gain access to the tibase margins. You can print the model if you want and manufacture the restoration. In this particular case, we took the design to the CEREC mcxl inlab cam, nested it, and milled it out to demonstrate how we can image with one device from one manufacturer and fabricate a restoration by another company’s manufacturing machine. But the single greatest benefit is that you can place the sprue wherever you want.
IMPORTANT NOTE: The Tibase that you use MUST be wider than the drill milling the intaglio and the sprue must be thick enough to handle the milling process.
Once you understand how the digital workflow goes, you can image with one device, design in another, and then either print or manufacture with yet another device. Here we mill a sectional stent with the cerec that was designed in Blueskybio plan, although printing makes more sense because it is less wear and tear on your drills
For our coritec users: new users often mislabel restorations in the Rx form that leads to a lot of trouble. like calling a crown and onlay or vice versa. this can lead to all kinds of trouble
first sign of trouble is if the two purple lines don’t define the borders of the the restoration. sometimes it is missing, other times it is off the restoration. so always double check this step and usually the missed nomenclature is what causes the trouble.
the next problem people have is that the default setting for the sprue design is poor. it makes the sprue thicker at the mandrel than the restoration. this creates a crevice that the drill can’t get to. this leads to quick drill breakage as it tries to drill into that space (red circle). it is easy to set change these settings so the drill “flows” with the design of the sprue and you get a lot of use out of it. it’s annoying to do this manually so a subsequent video shows you how to change this by default.
another problem is the offset. the last video shows the distance from the restoration to the mandrel as 2mm. the drill is 2.5 in diameter. if you set it at 2, the calculation doesn’t allow enough space for the drill that also breaks it off. set it at 2.7 or 3 and it will last you a long time.
two subsequent videos will show you how to create your own blocks and change their orientation, so you can fit a taller design into a smaller size block
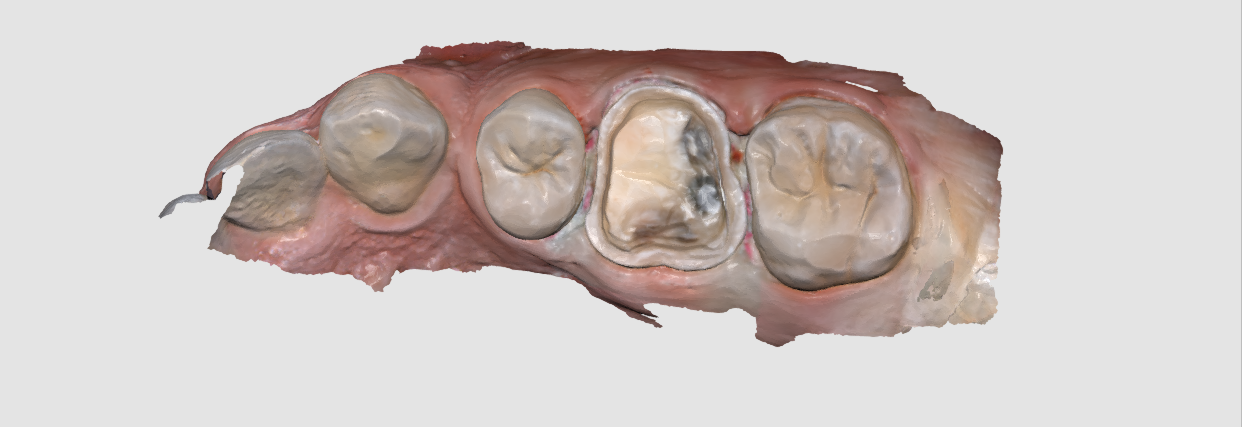
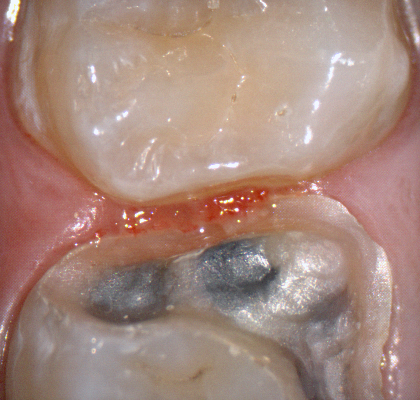
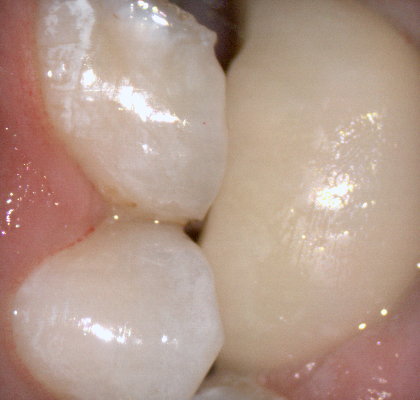
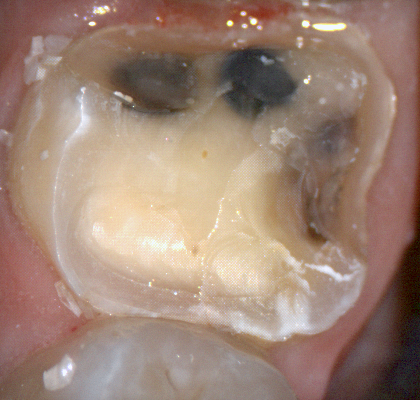
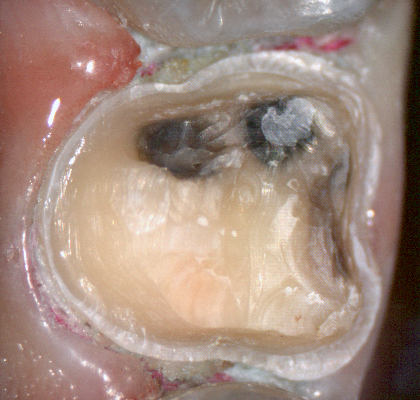
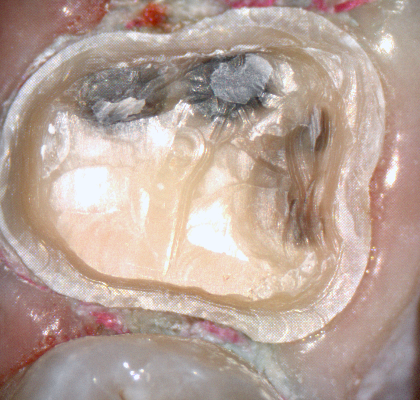
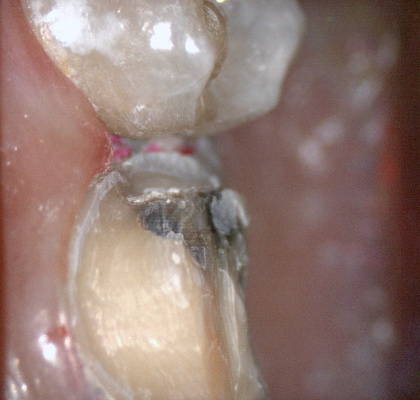
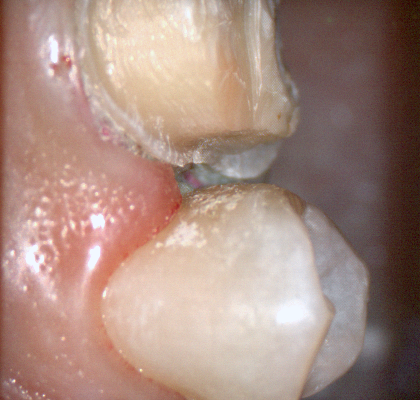
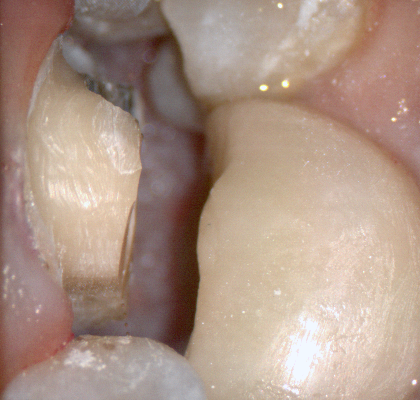
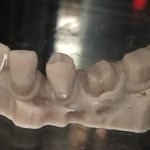
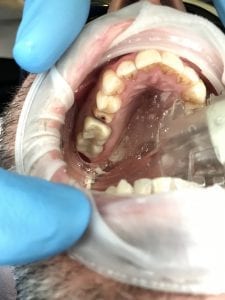
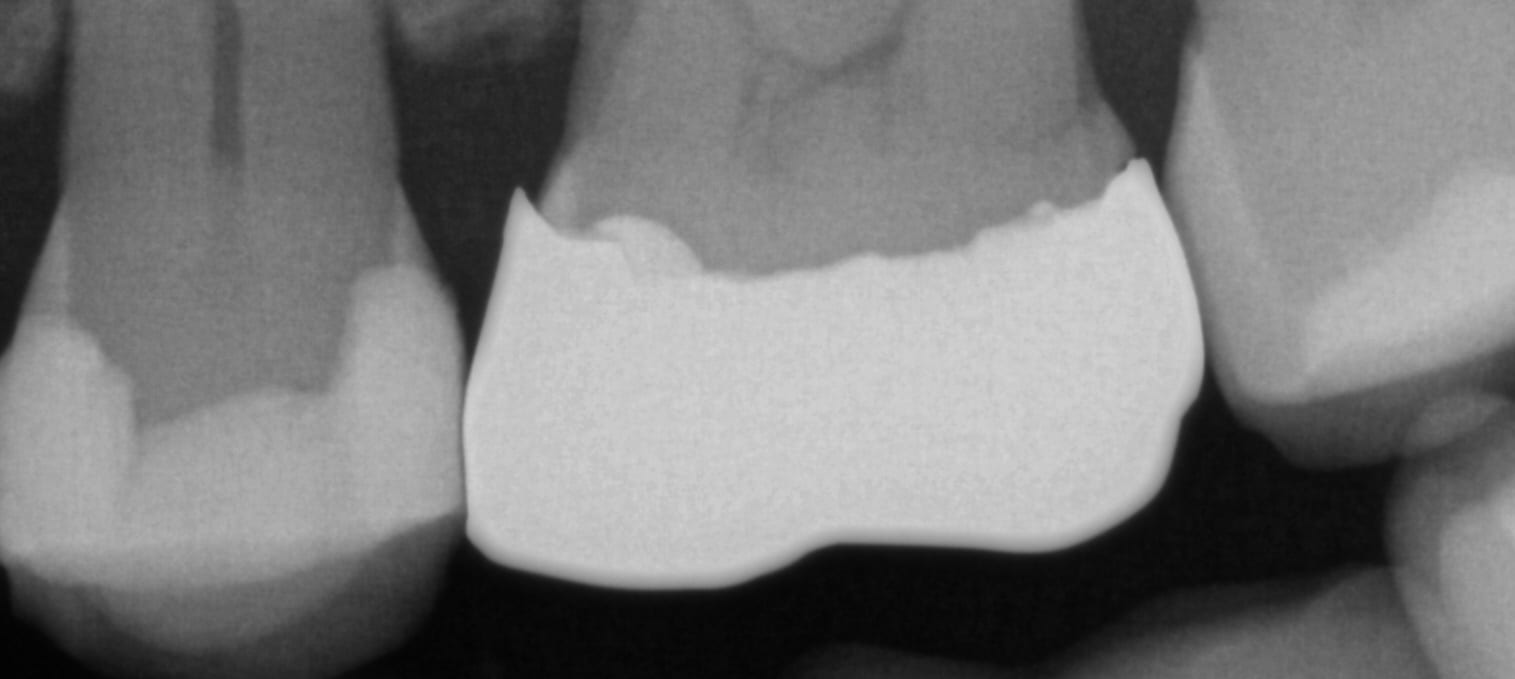
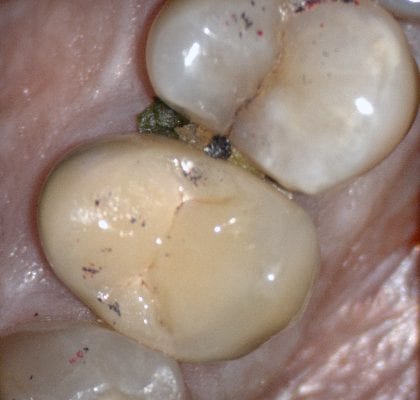
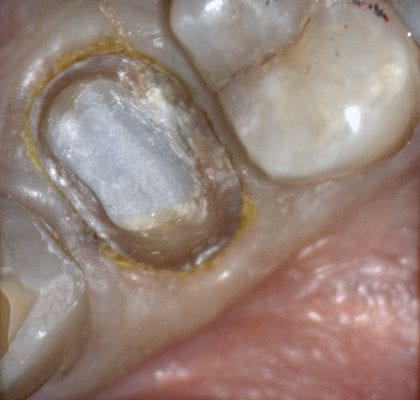
In this clinical case a patient lost a pre-existing crown. The remaining tooth structure had recurrent decay and a new crown was warranted.
After anesthesia was administered, the clearance from opposing dentition was assessed. The preparation was reduced to accommodate the necessary thickness of the material.
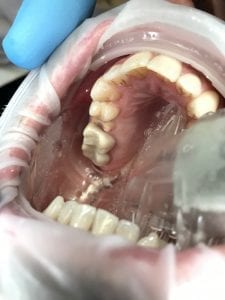
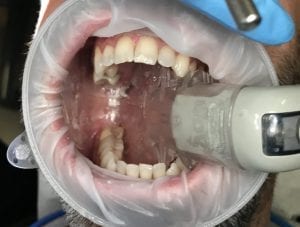
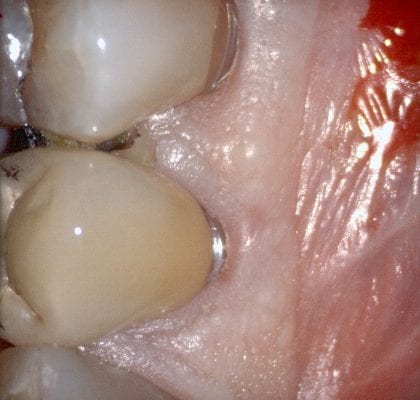
Once adequate clearance was achieved an Optragate was placed and an isolite was used to isolate the area. The preparation was scanned and then the lower arch was captured. The buccal bite was then taken to along the arches together
With Meditlink software, you have the option of designing the case yourself or sending it off to your partnered lab. The following video shows what happens to your case once the lab downloads the case
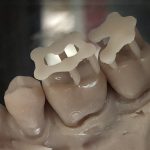
In this particular case, we designed our own crown and milled it with the coritec one milling machine
Once the amber lithium disilicate material was milled, its for was verified clinically. The crown was then crystallized and seated with NX3 resin cement
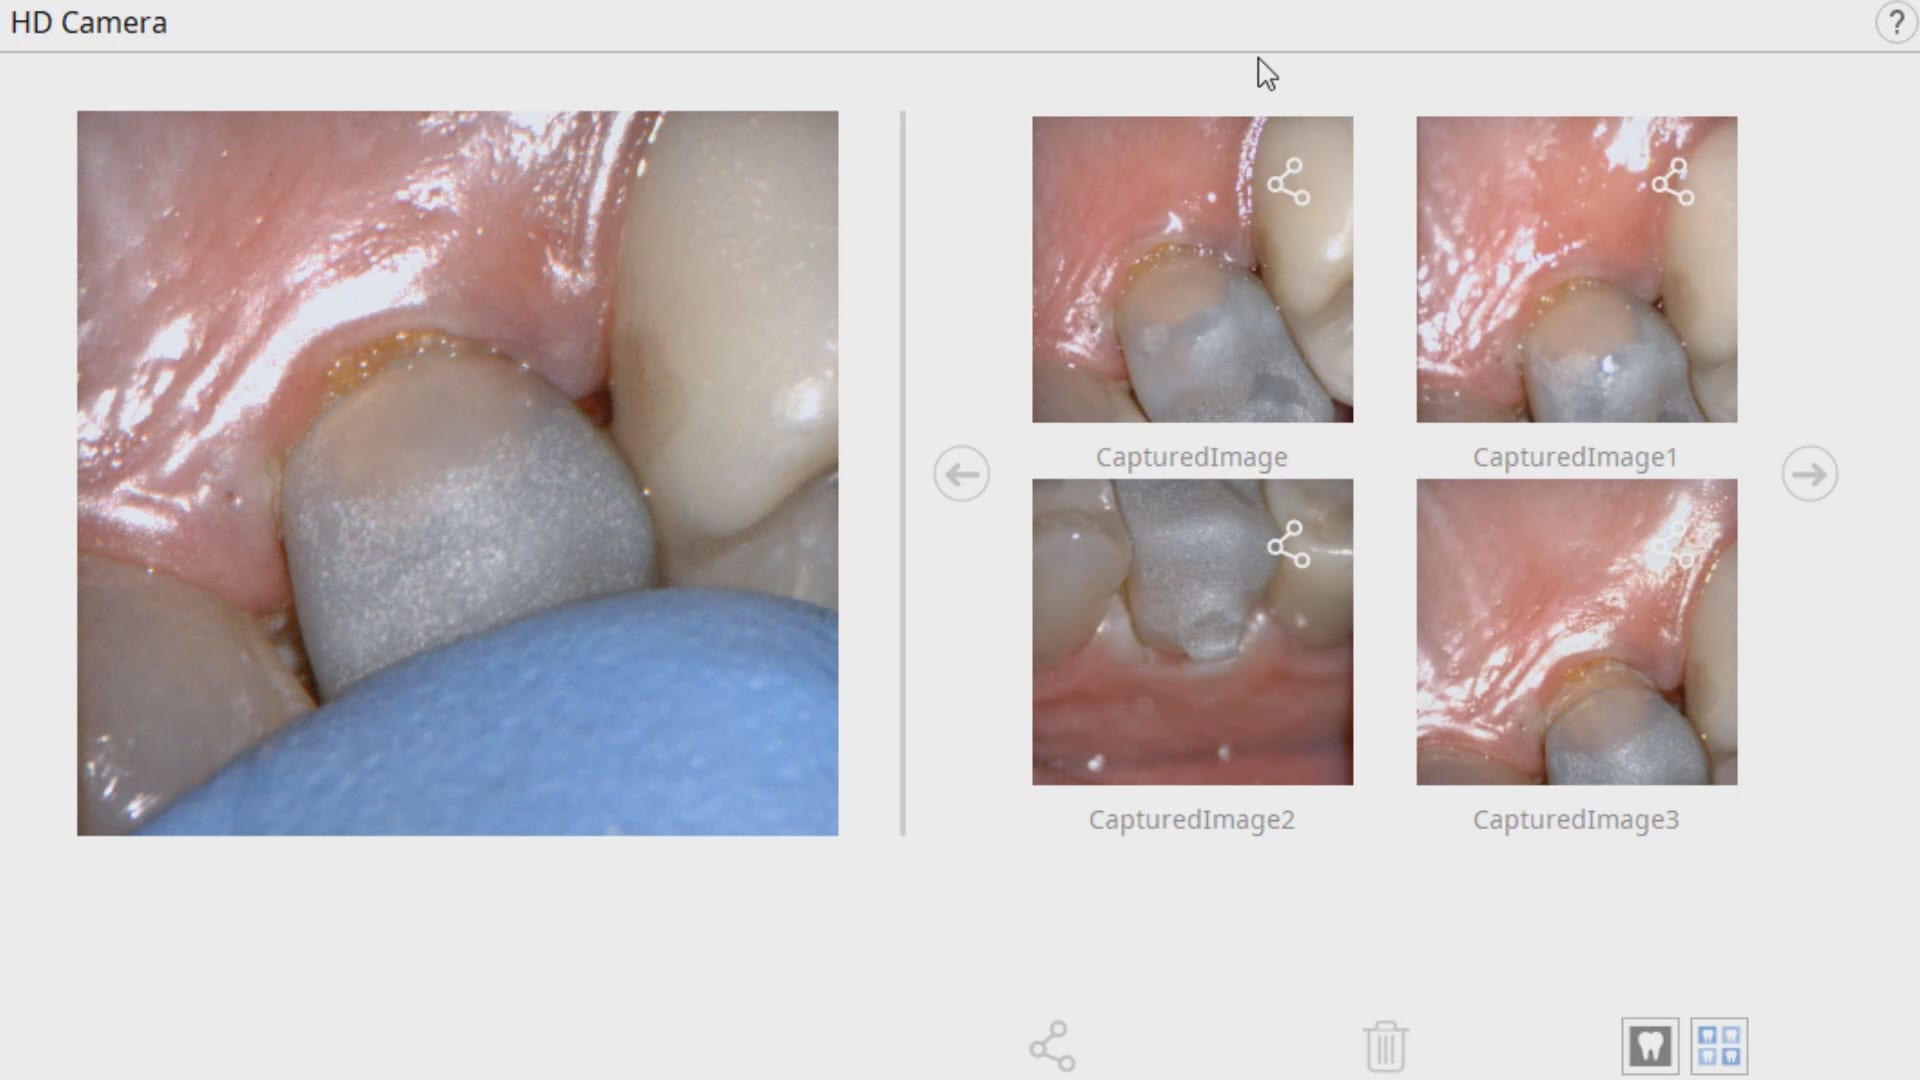
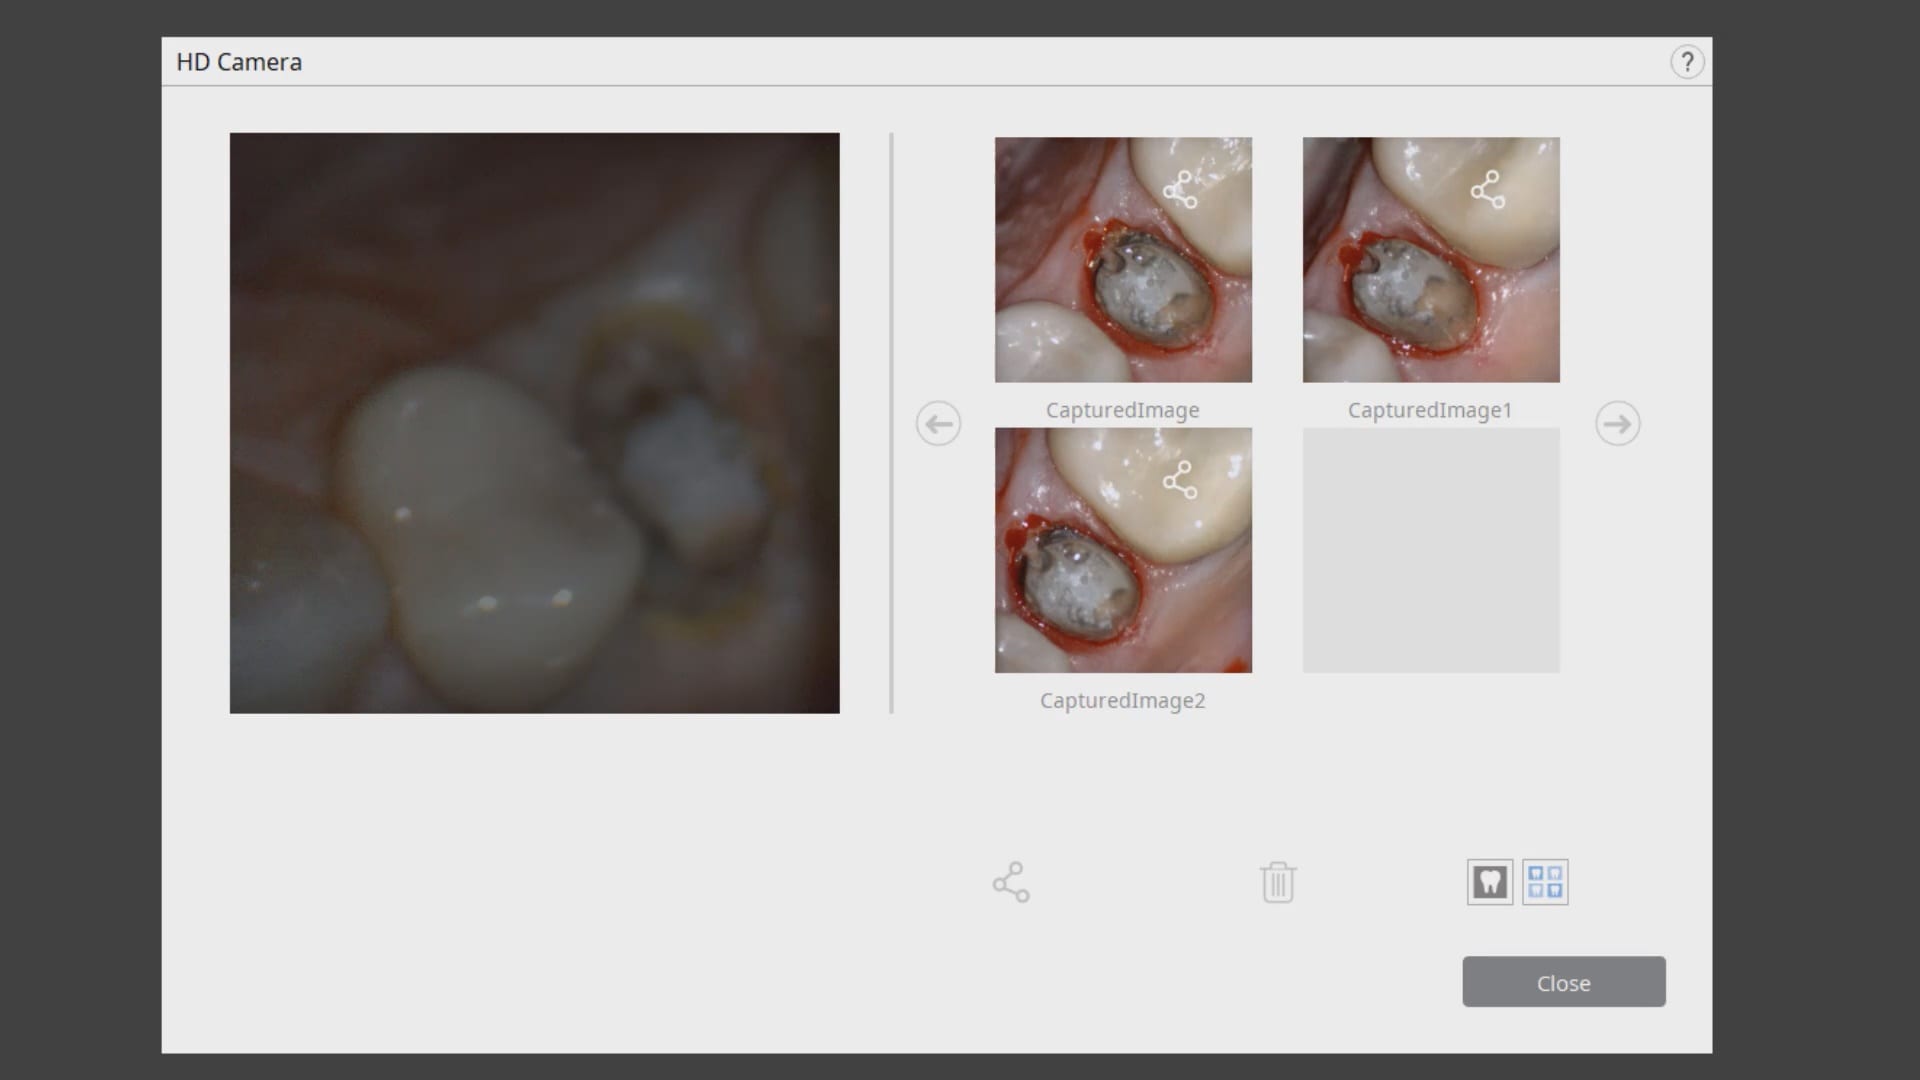
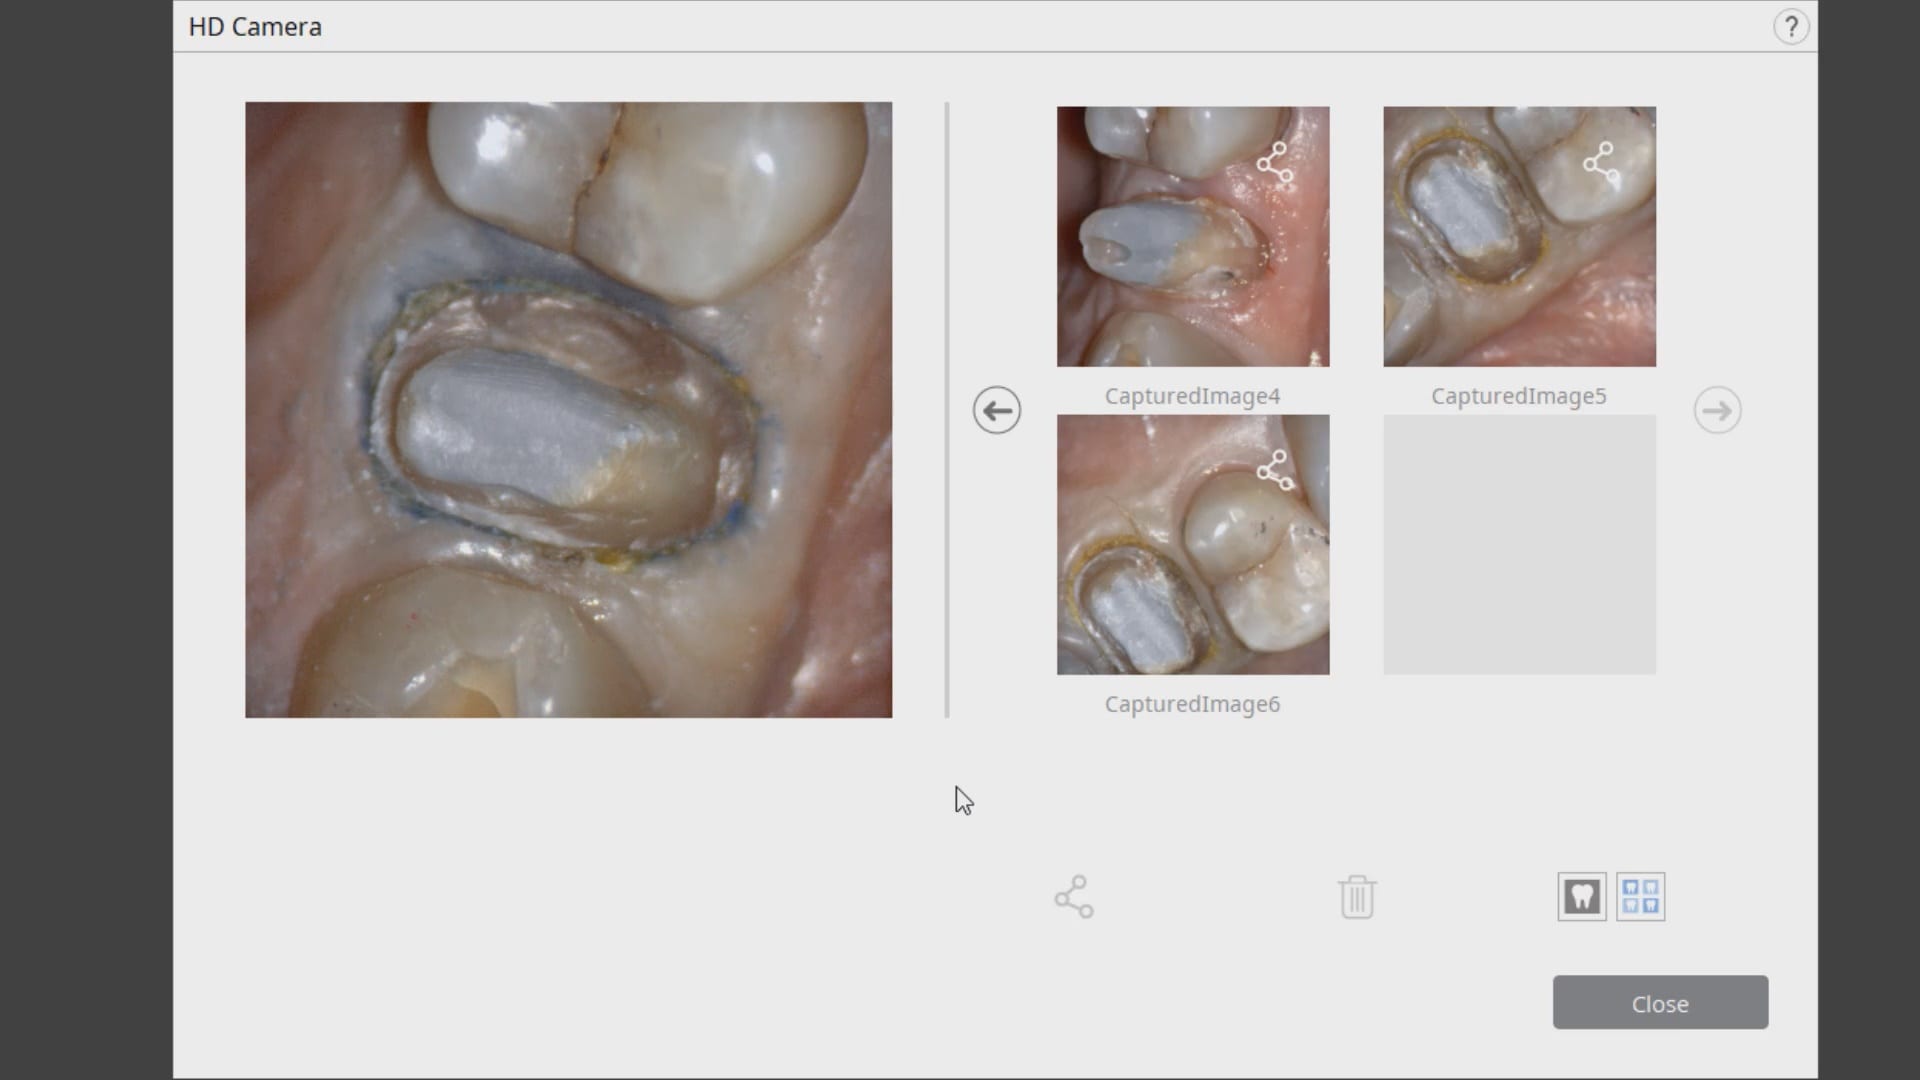
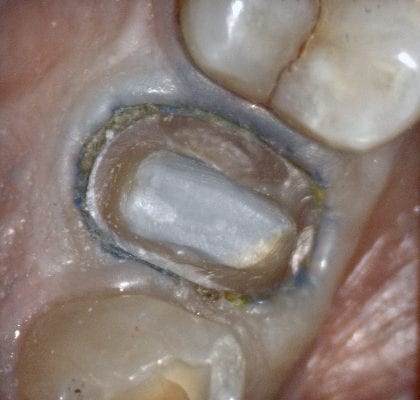
In this clinical presentation, we demonstrate the removal of a crown that has recurrent decay. The bleeding tissue was managed with a double cord technique and expasyl and the margin was captured with the medit i500. The margin was also defined in the native imaging software which allows the user to visualize the detail before designing it or send it off to the lab. Once the case is transferred to cad software, the designed margins carry through and there is an opportunity to modify it
Have you ever compared the milled product with the designed restoration?
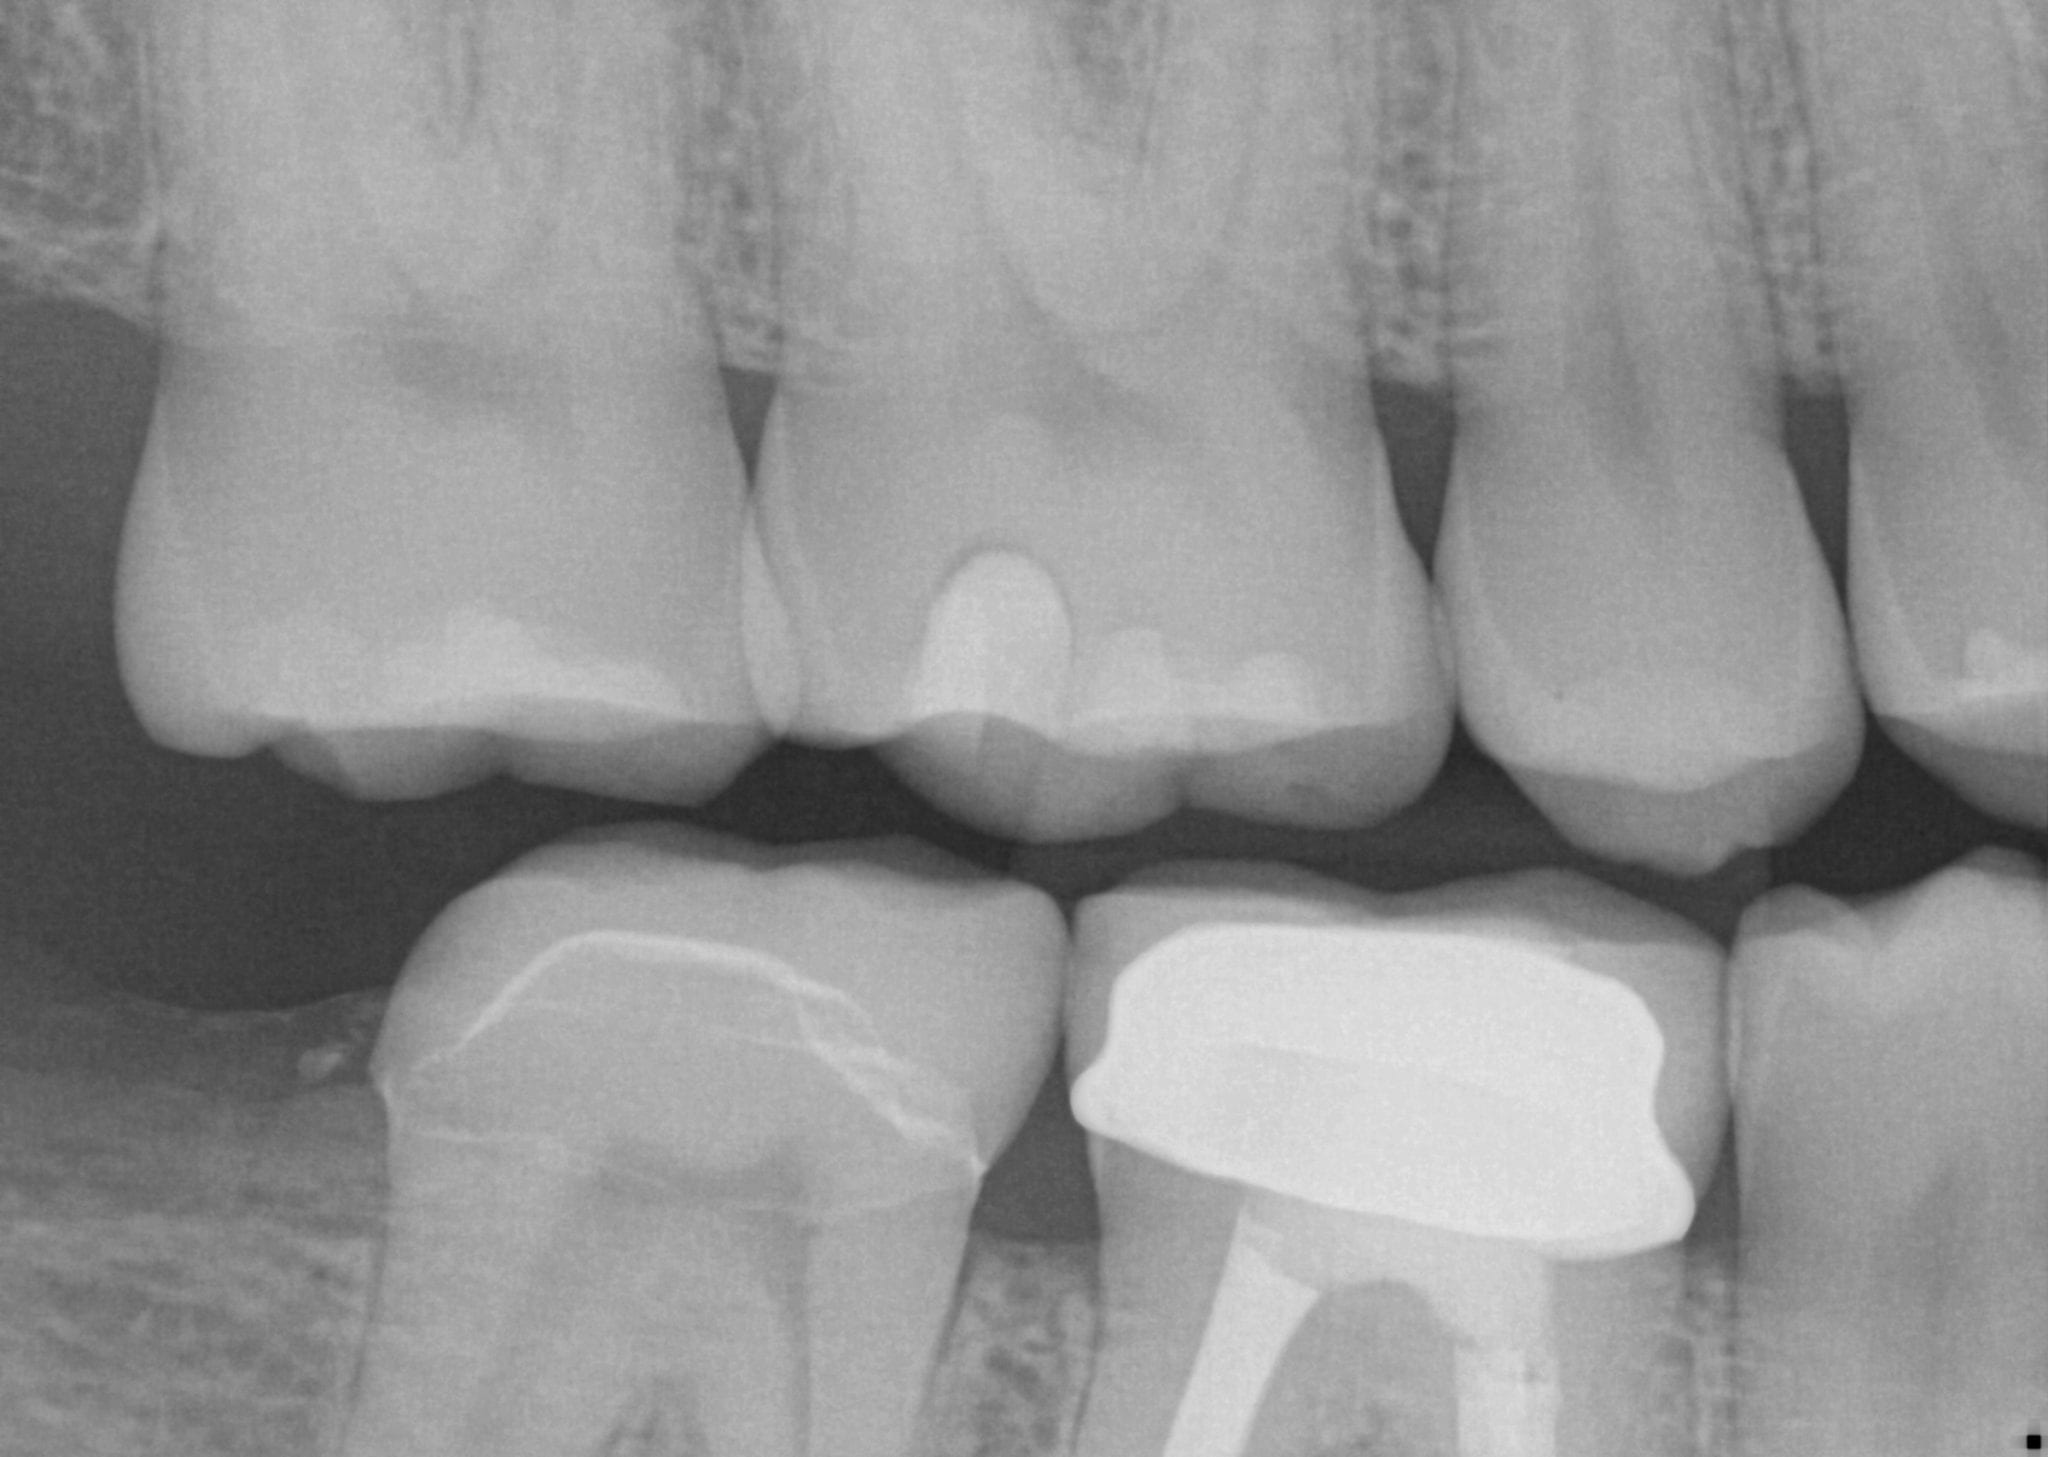
We scanned with the medit i500, designed with exocad and milled with coritec. after try-in, we scanned the restoration in the bluephase and then merged it with the design in exocad to see how well our material, or design, and our margins measured up against the proposal. we also documented the fit clinically and with radiographs. you can download the 3d models of the case and compared them yourself
In this video we demonstrate a simple premolar case that is prepared and imaged with the Medit i500, designed in the cad software named exocad and then milled with the imes icor coritec one machine. Pay attention to the order and sequence of events and how we leverage anesthesia time with scanning time.
We have a large library of instructional videos on our site that can be found on our support page that can help you learn everything there is to know about the Medit i500
Every distal extension case I have to accomplish the following:
take two bites to make sure my vertical dimension does not change with pre-op and prep images
make sure I have proper clearance
We usually take the bites and all other images BEFORE I have even imaged the prep- I usually grab the prep images last
most of this you can delegate to your team and just take the prep images and make it simple for yourself
this video shows the clinical steps. to see what the lab does with your case, click in the link to see the subsequent steps. you can also choose to design and mill it, which is what I did
We are very pleased with millbox and the imes icore coritec one for a chairside milling solution. We’ve been testing it for a long time and its CAM (millbox) is very intuitive and the results are always predictable. It can mill titanium abutments, emax, and zirconia blocks.
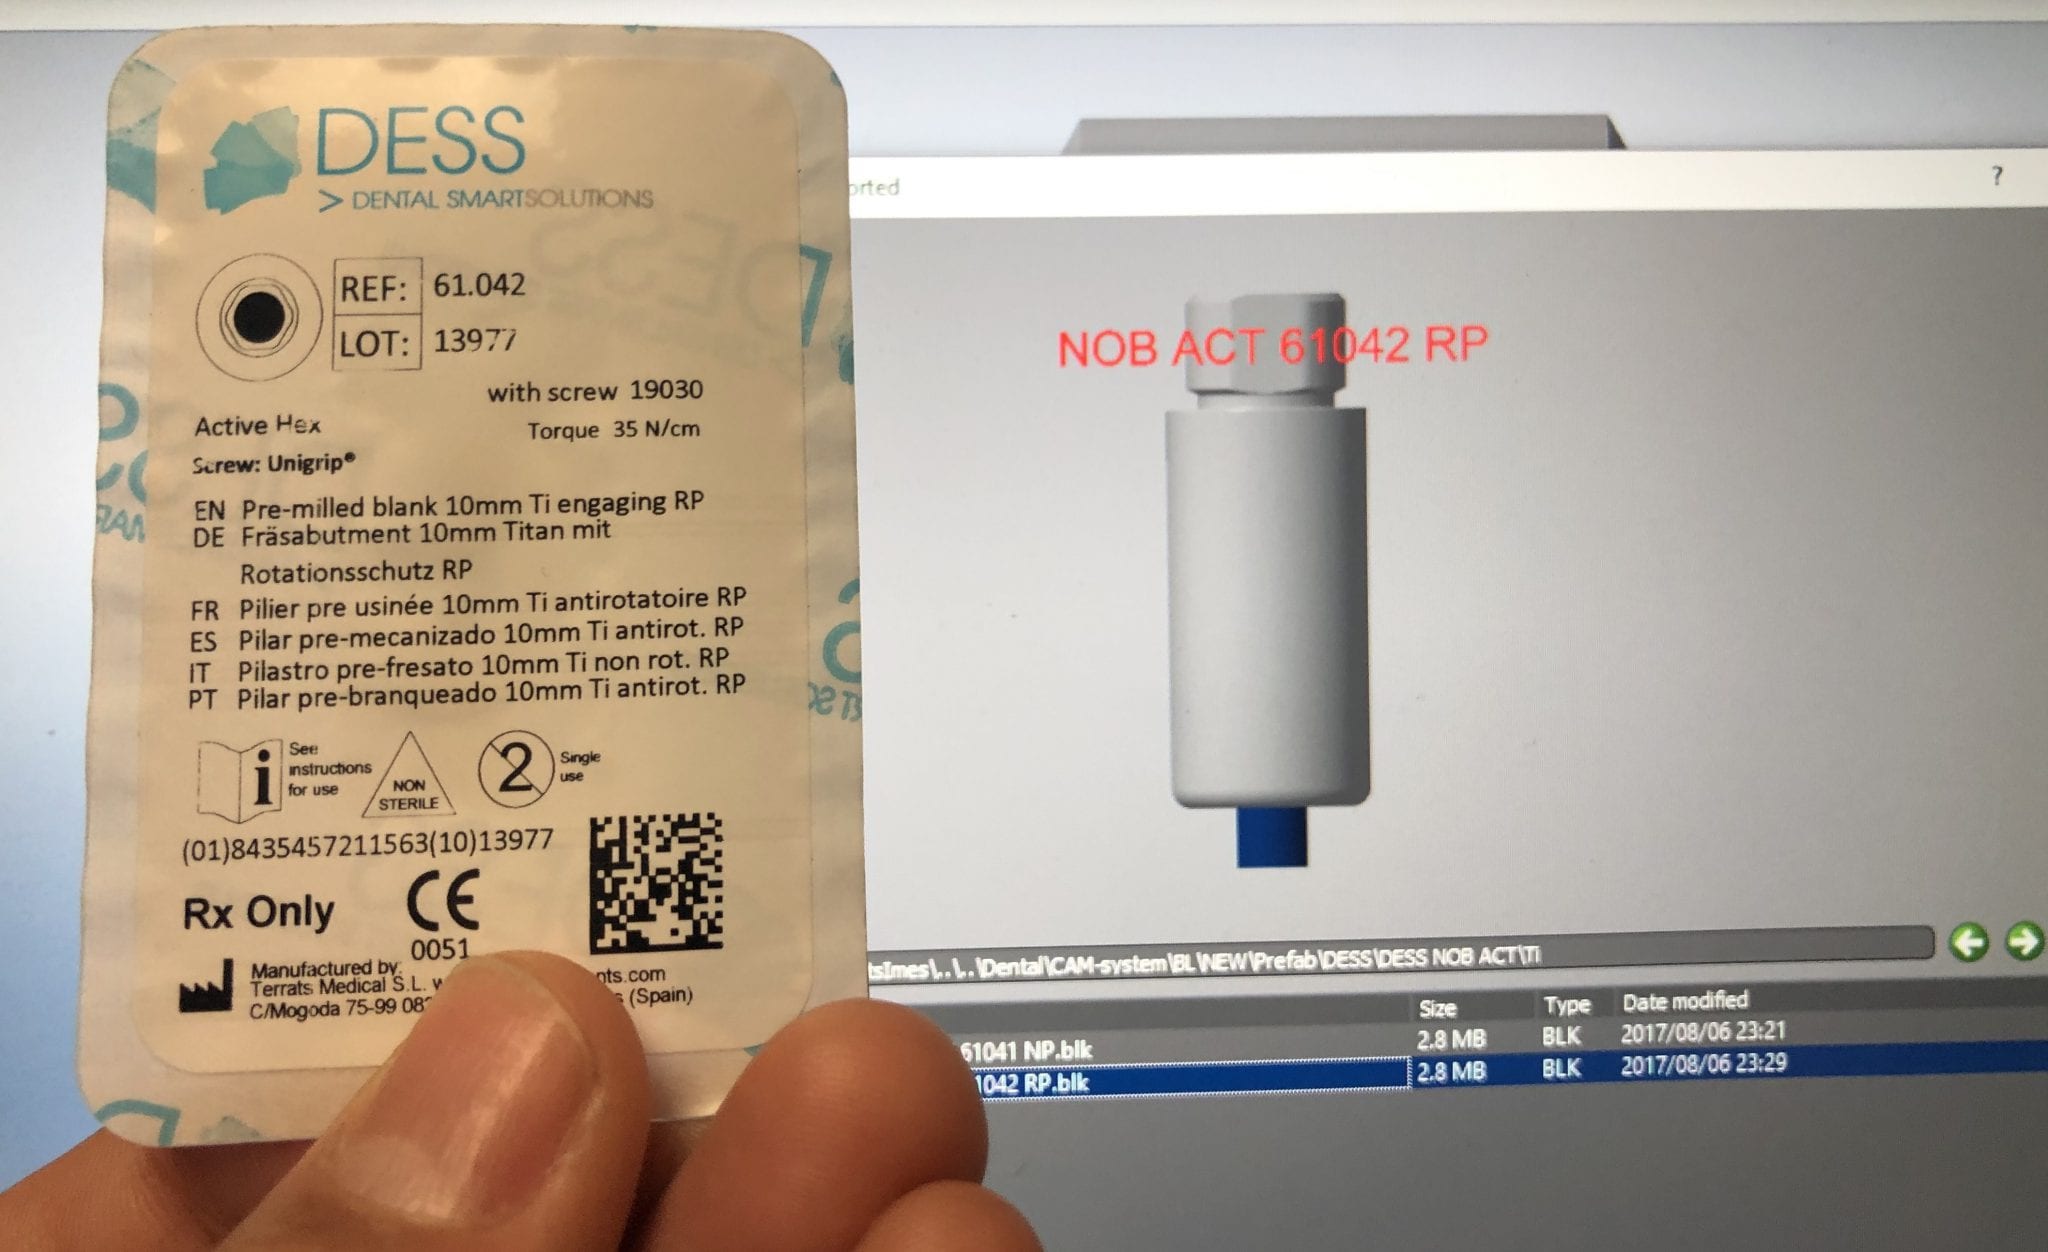
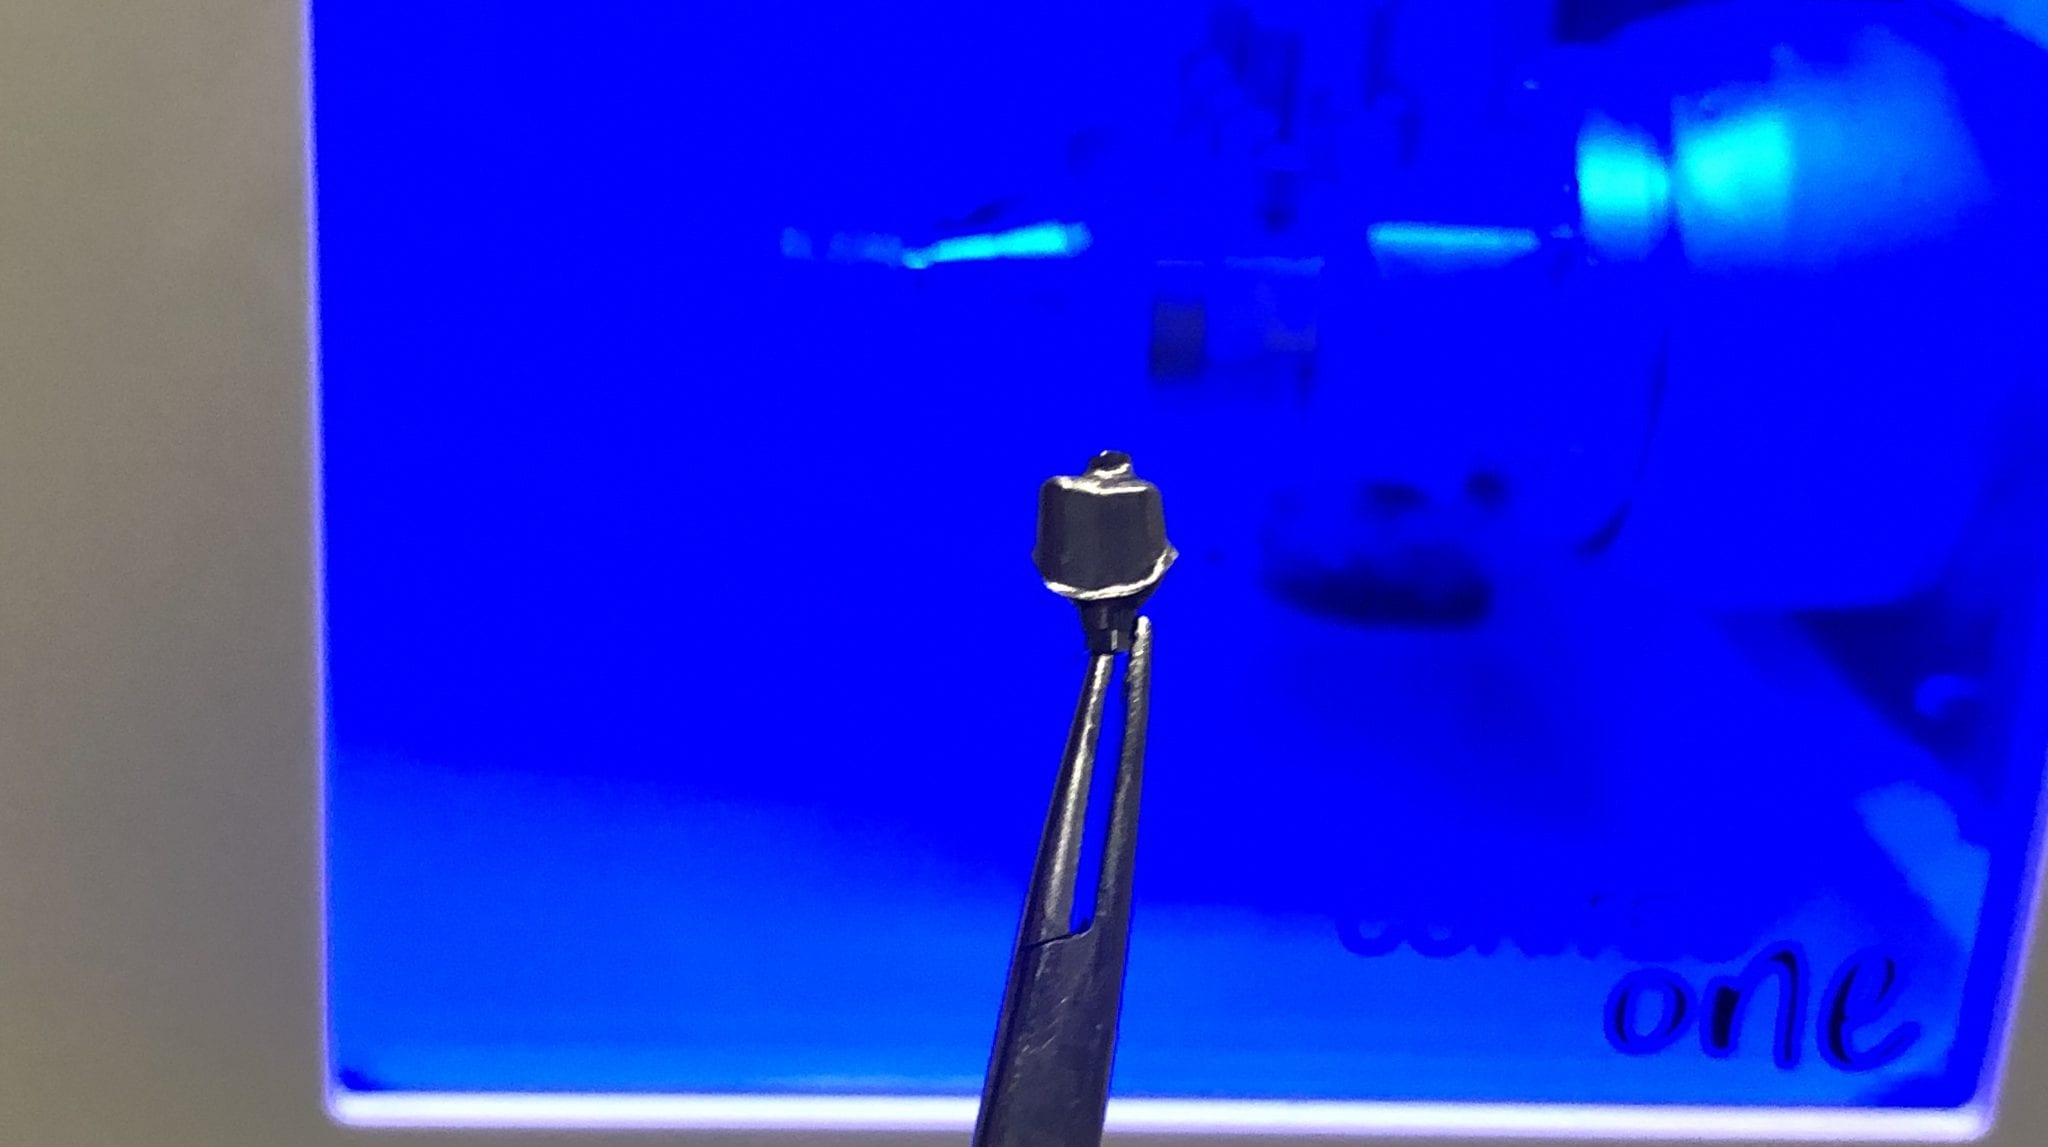
The following videos illustrate how you can image a scanbody intra-orally and then design it in cad software. Here we used exocad to identify the biomax RP implant and designed both the custom titanium abutment and the suprastructure, both of which were milled with the CORiTEC ONE
There are so many implant and component libraries in cad/cam dentistry which can lead to a lot of confusion. What we highly recommend is that you visually compare the part numbers that you will be using with the part numbers displayed on the millbox software. One letter or number difference and the mistakes will have a profound impact on the bottom line of a dental practice
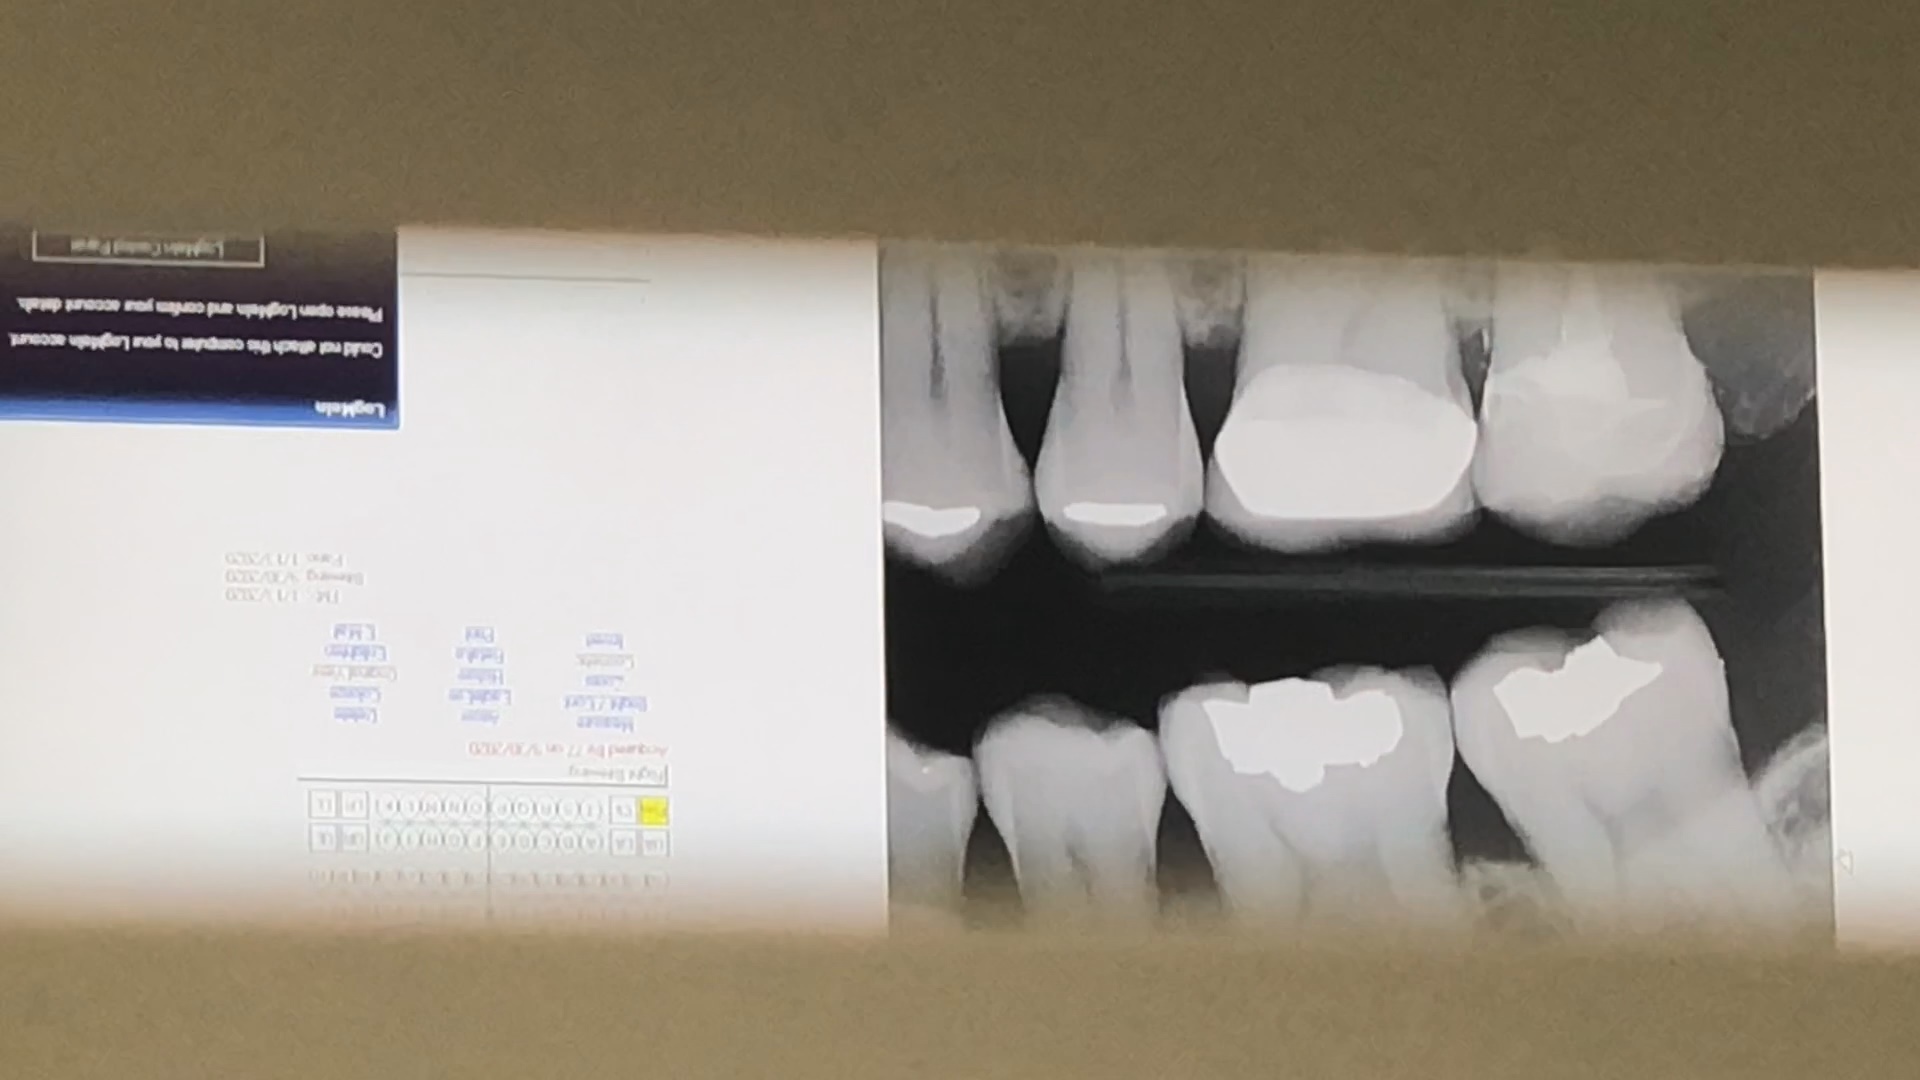
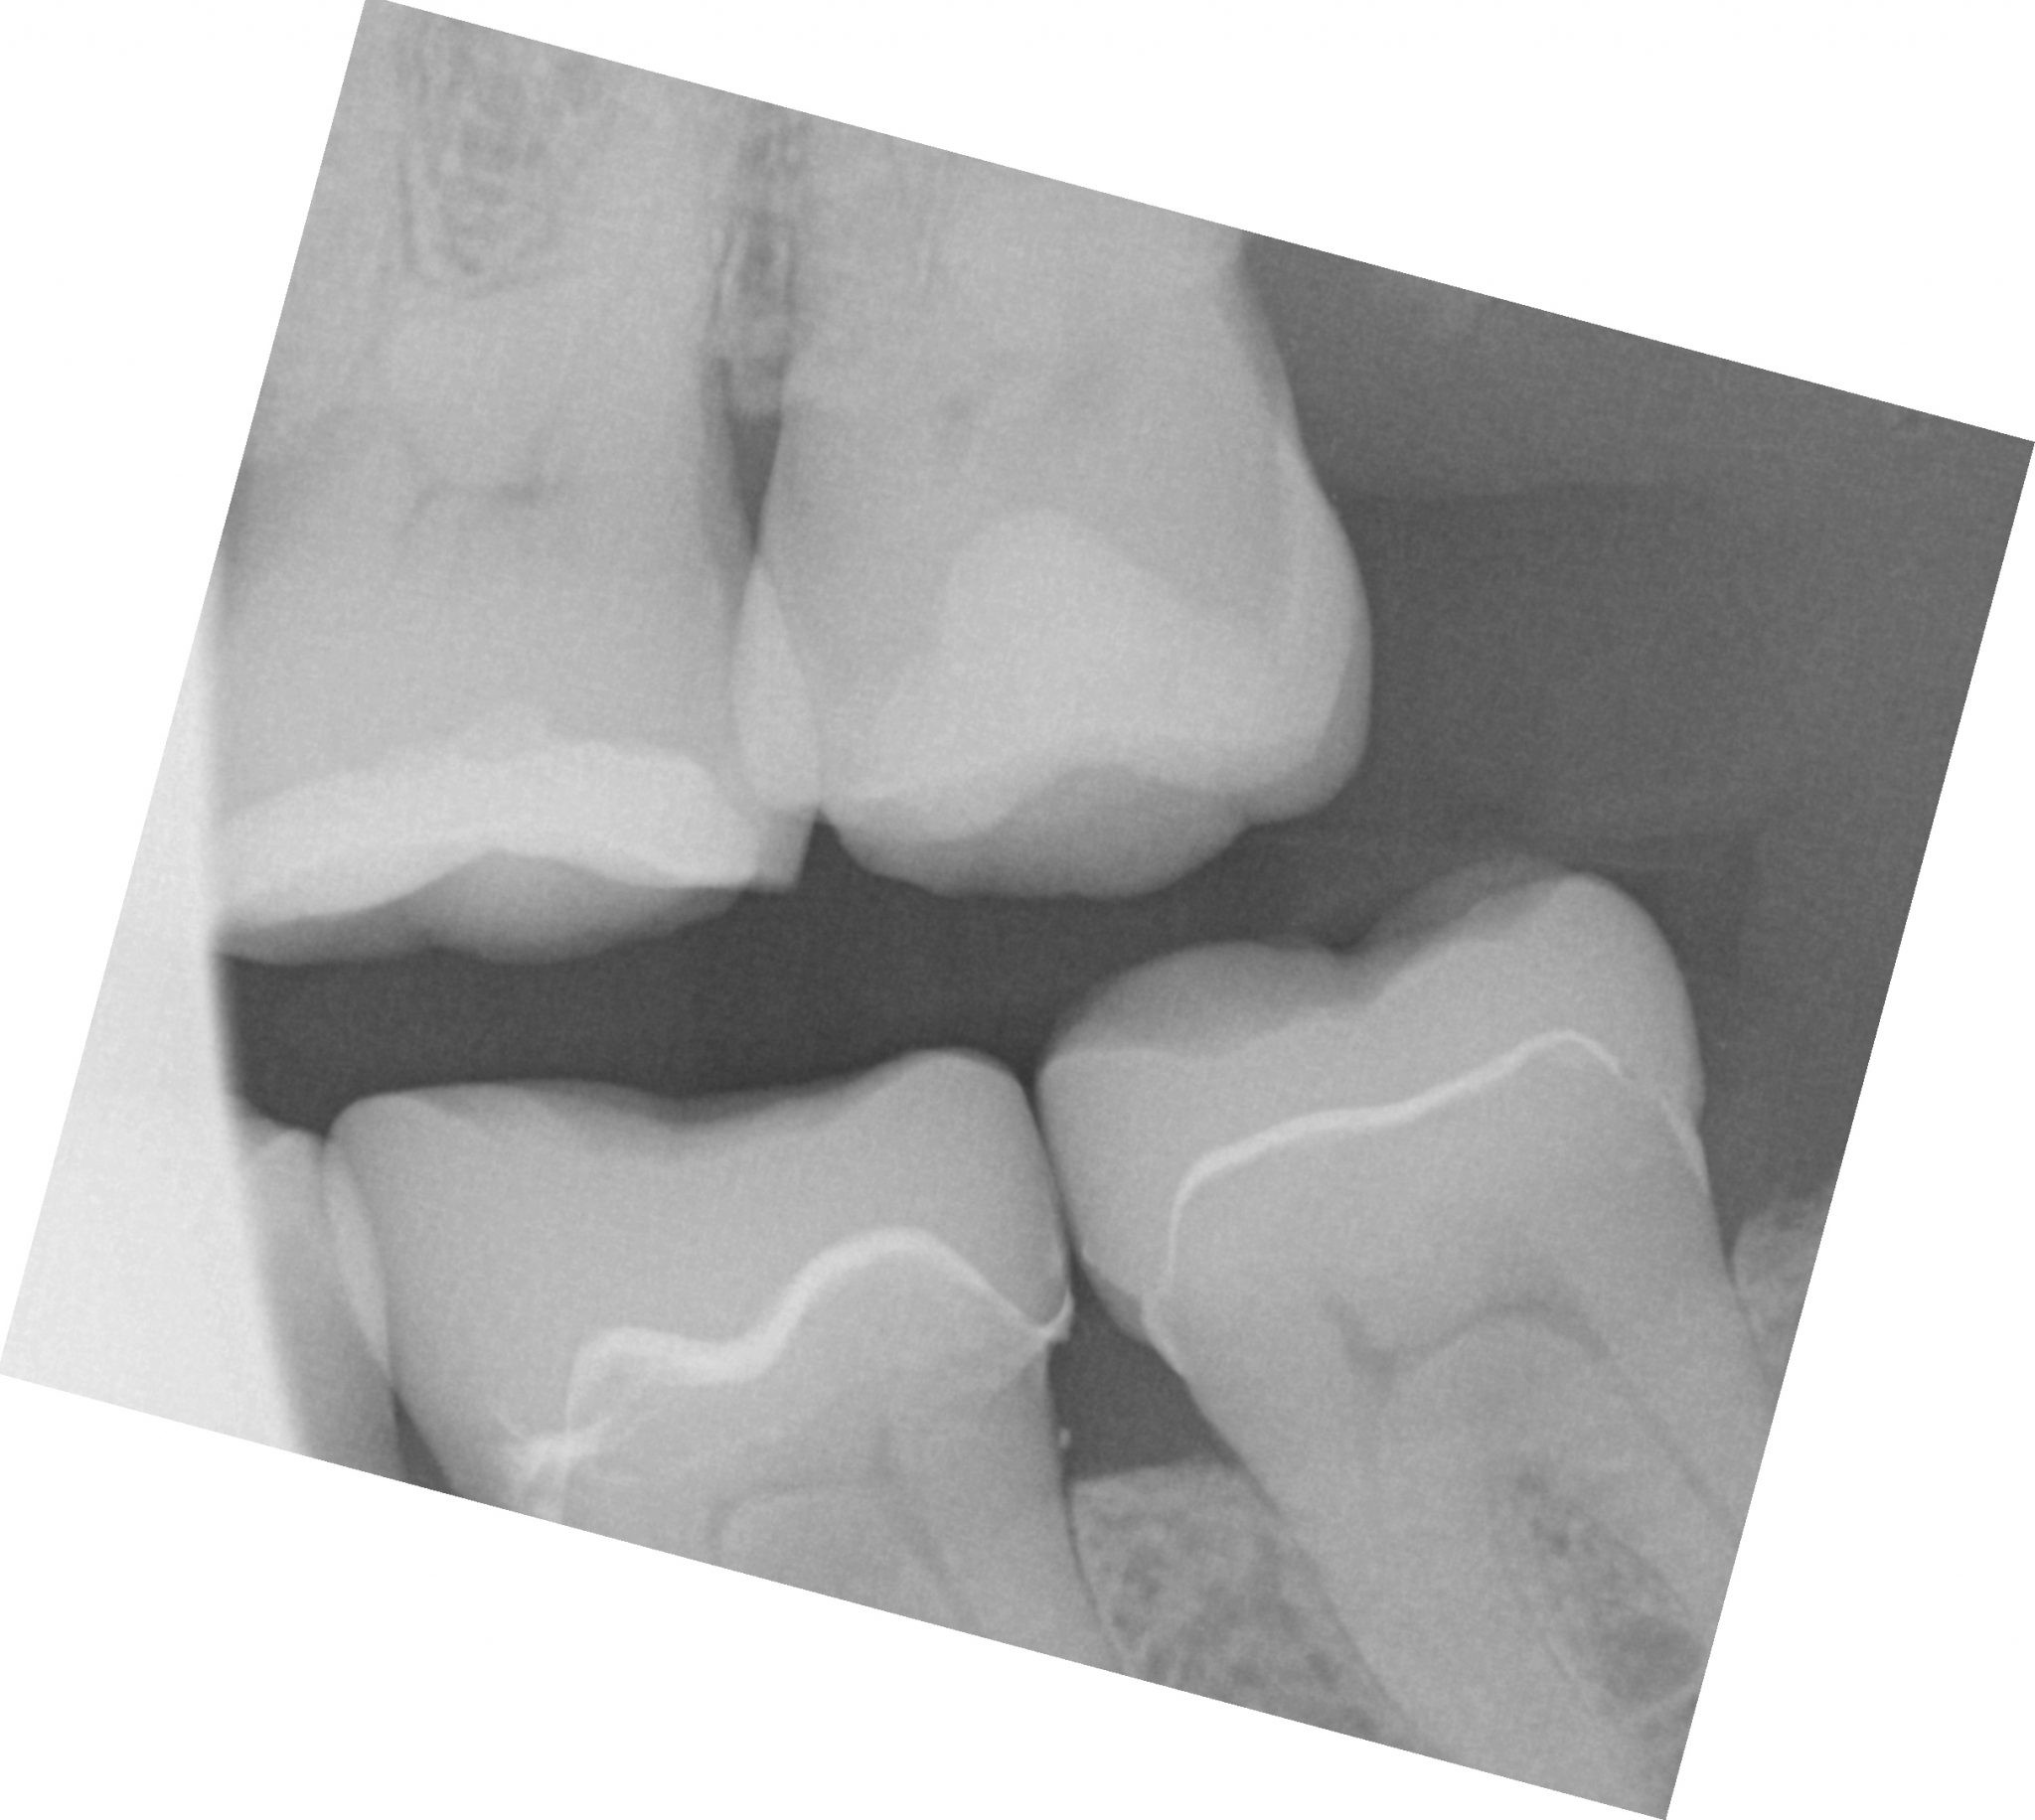
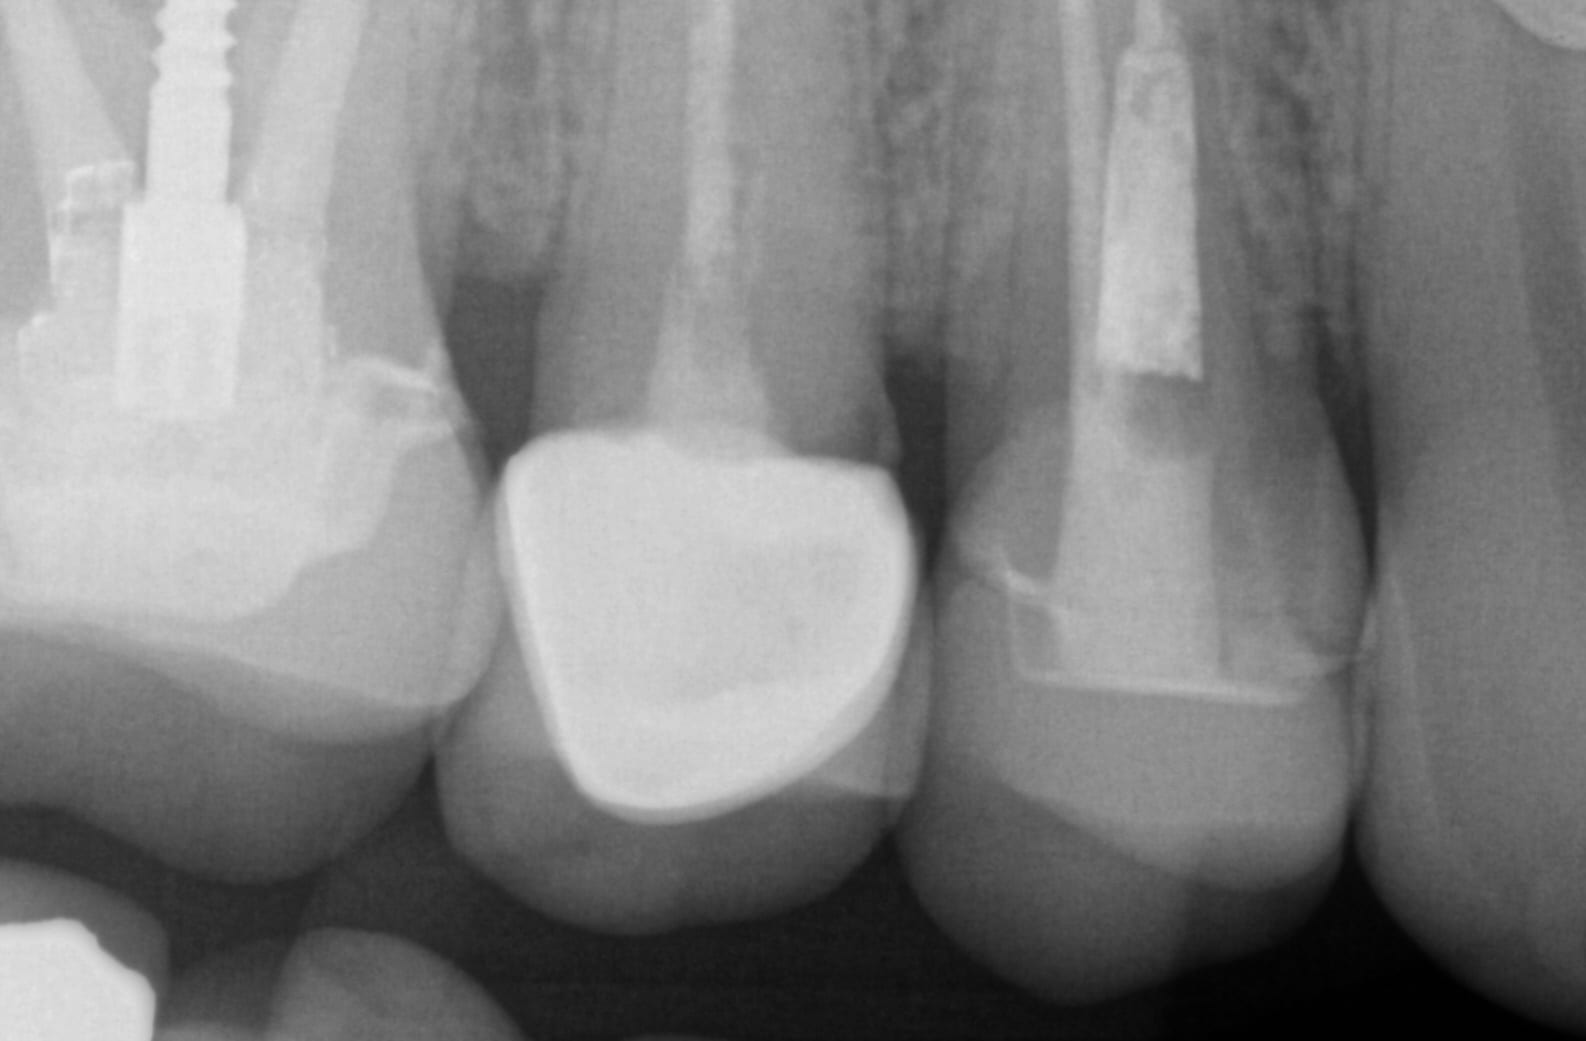
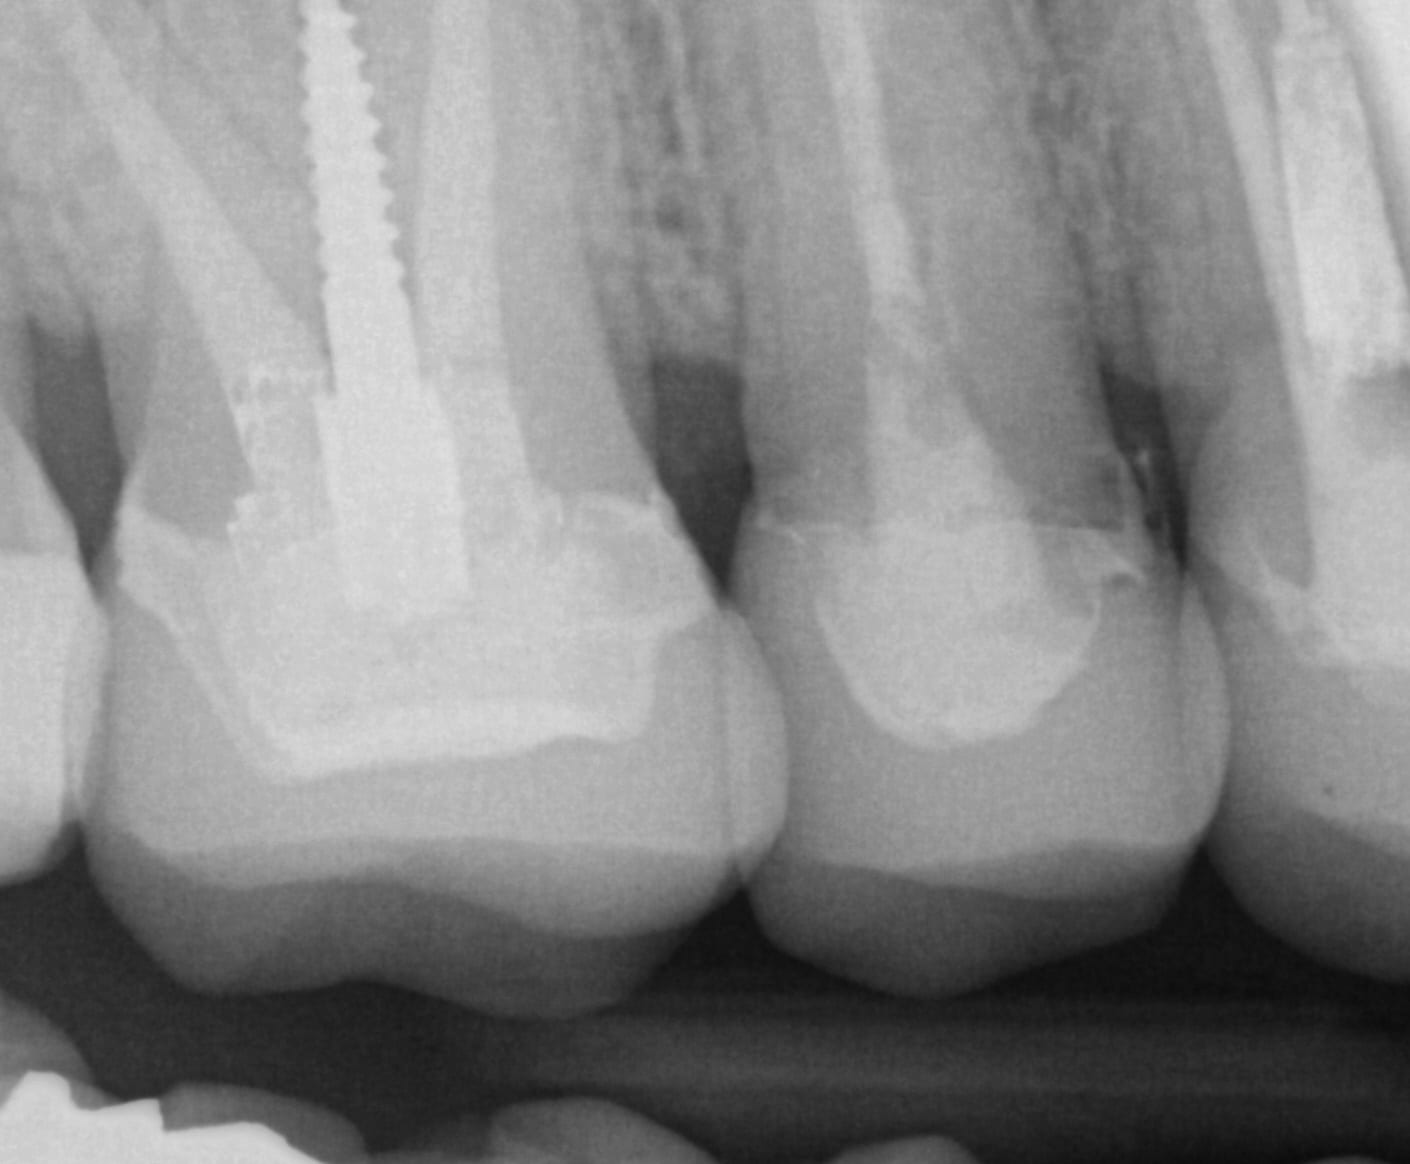
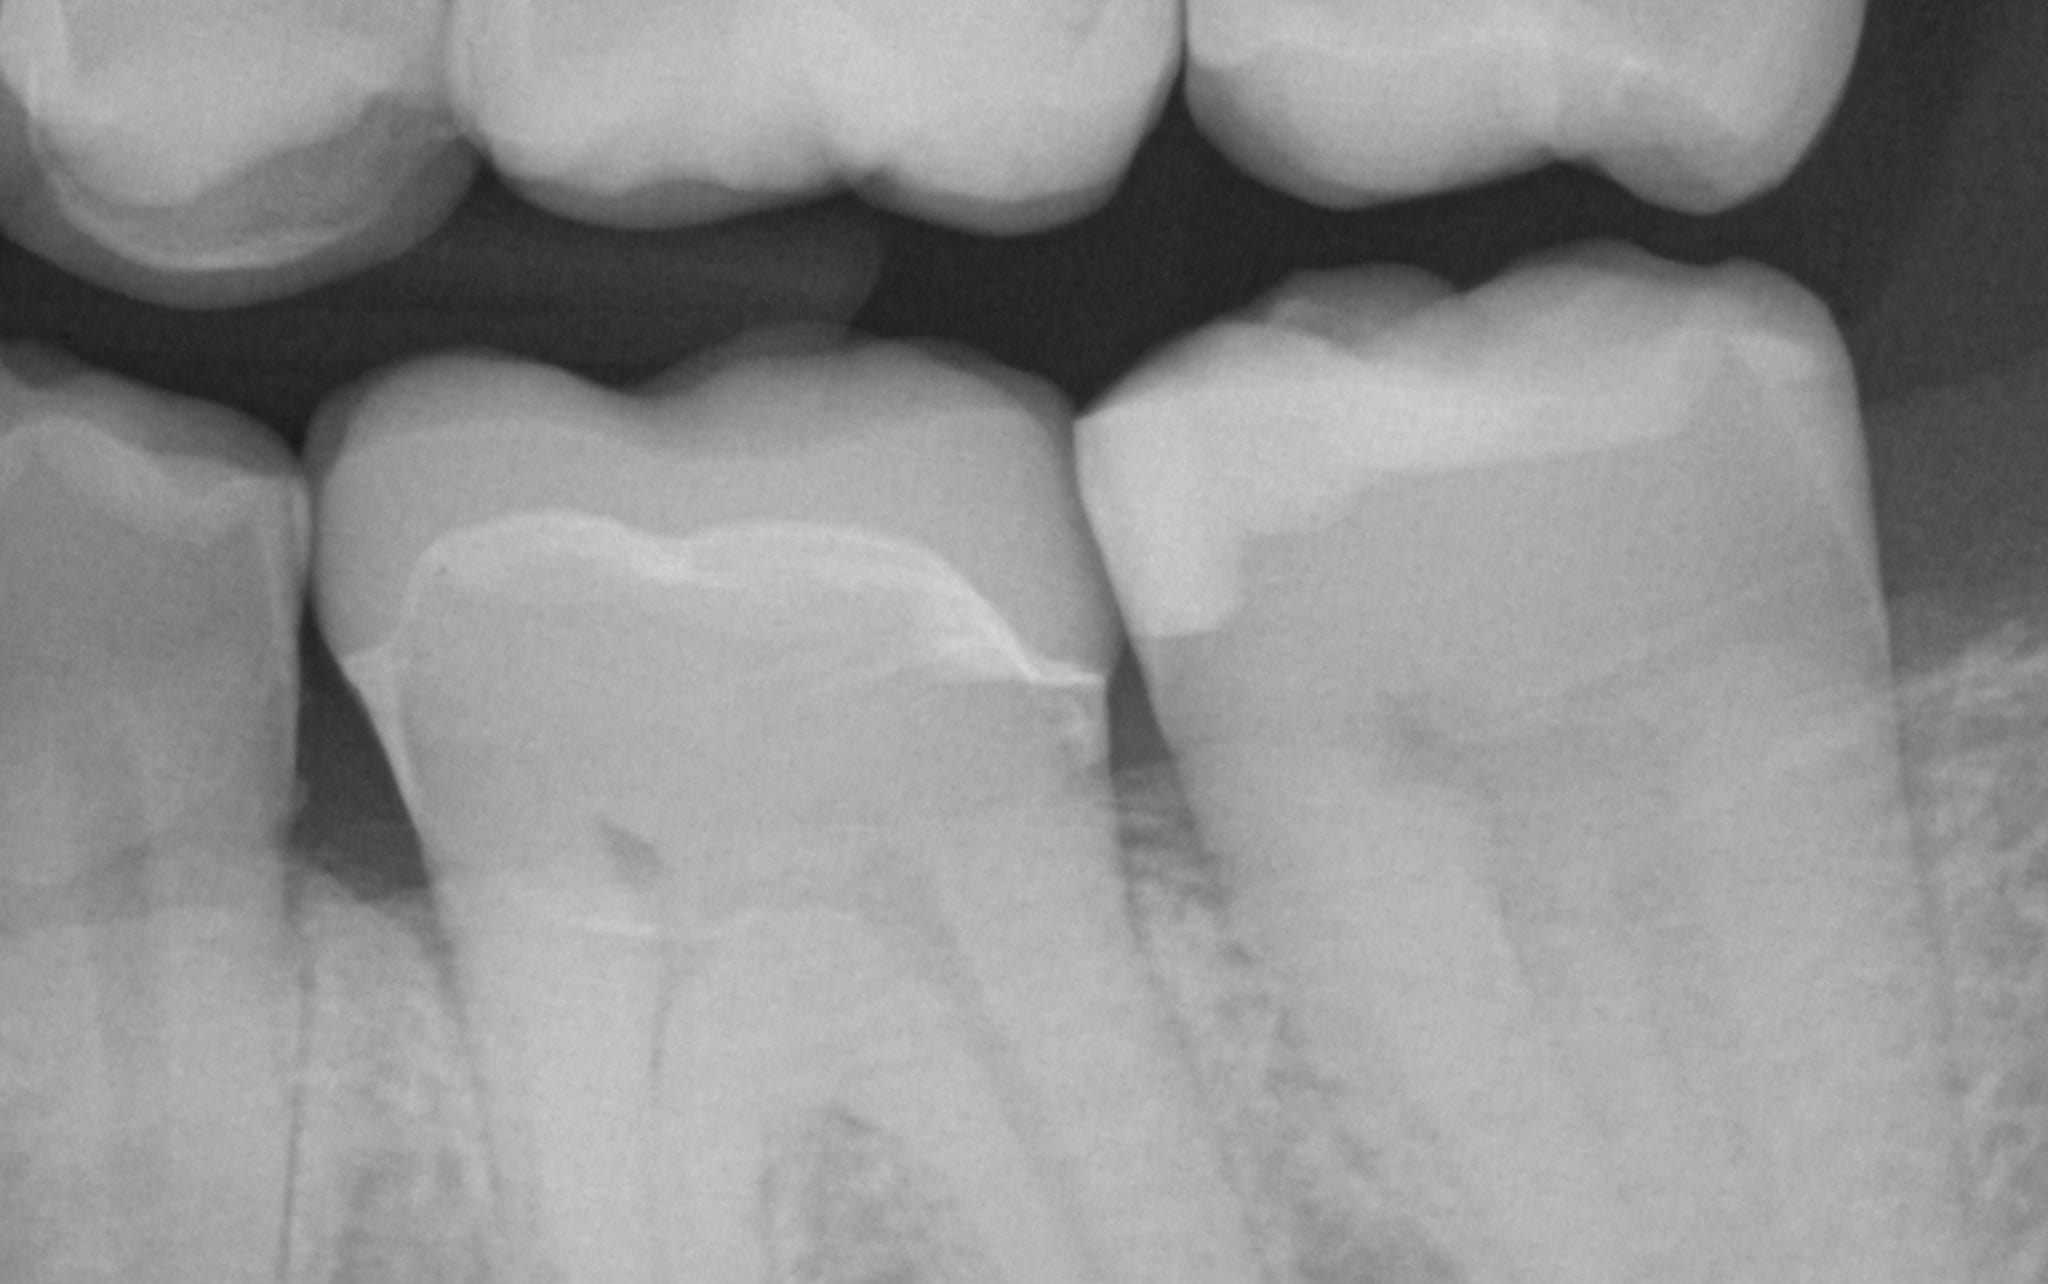
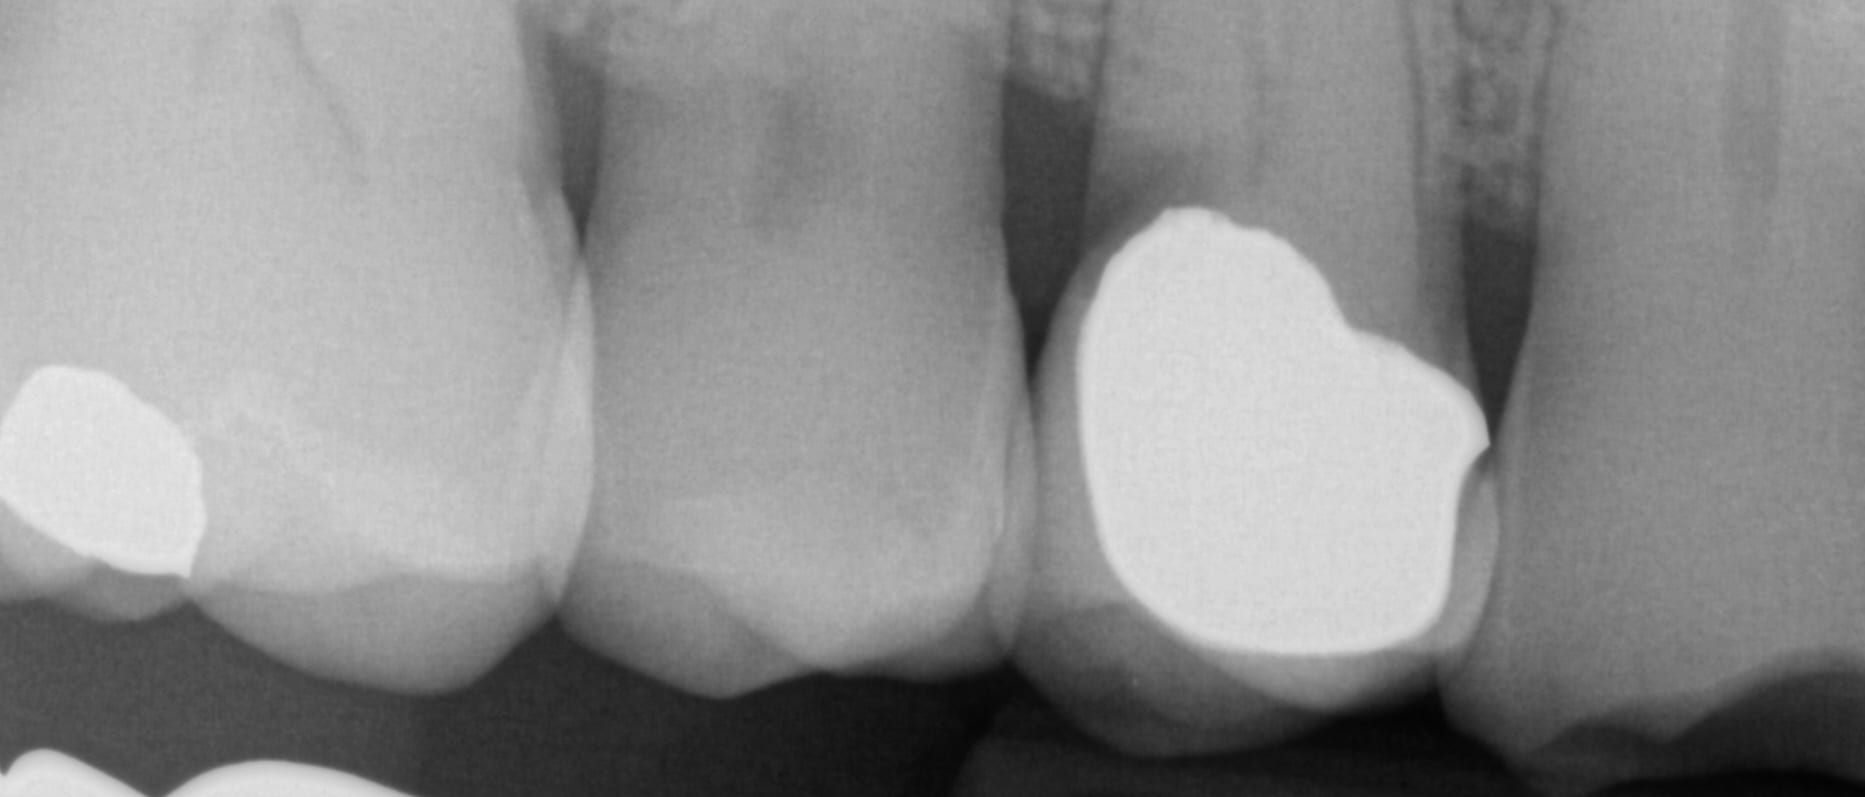
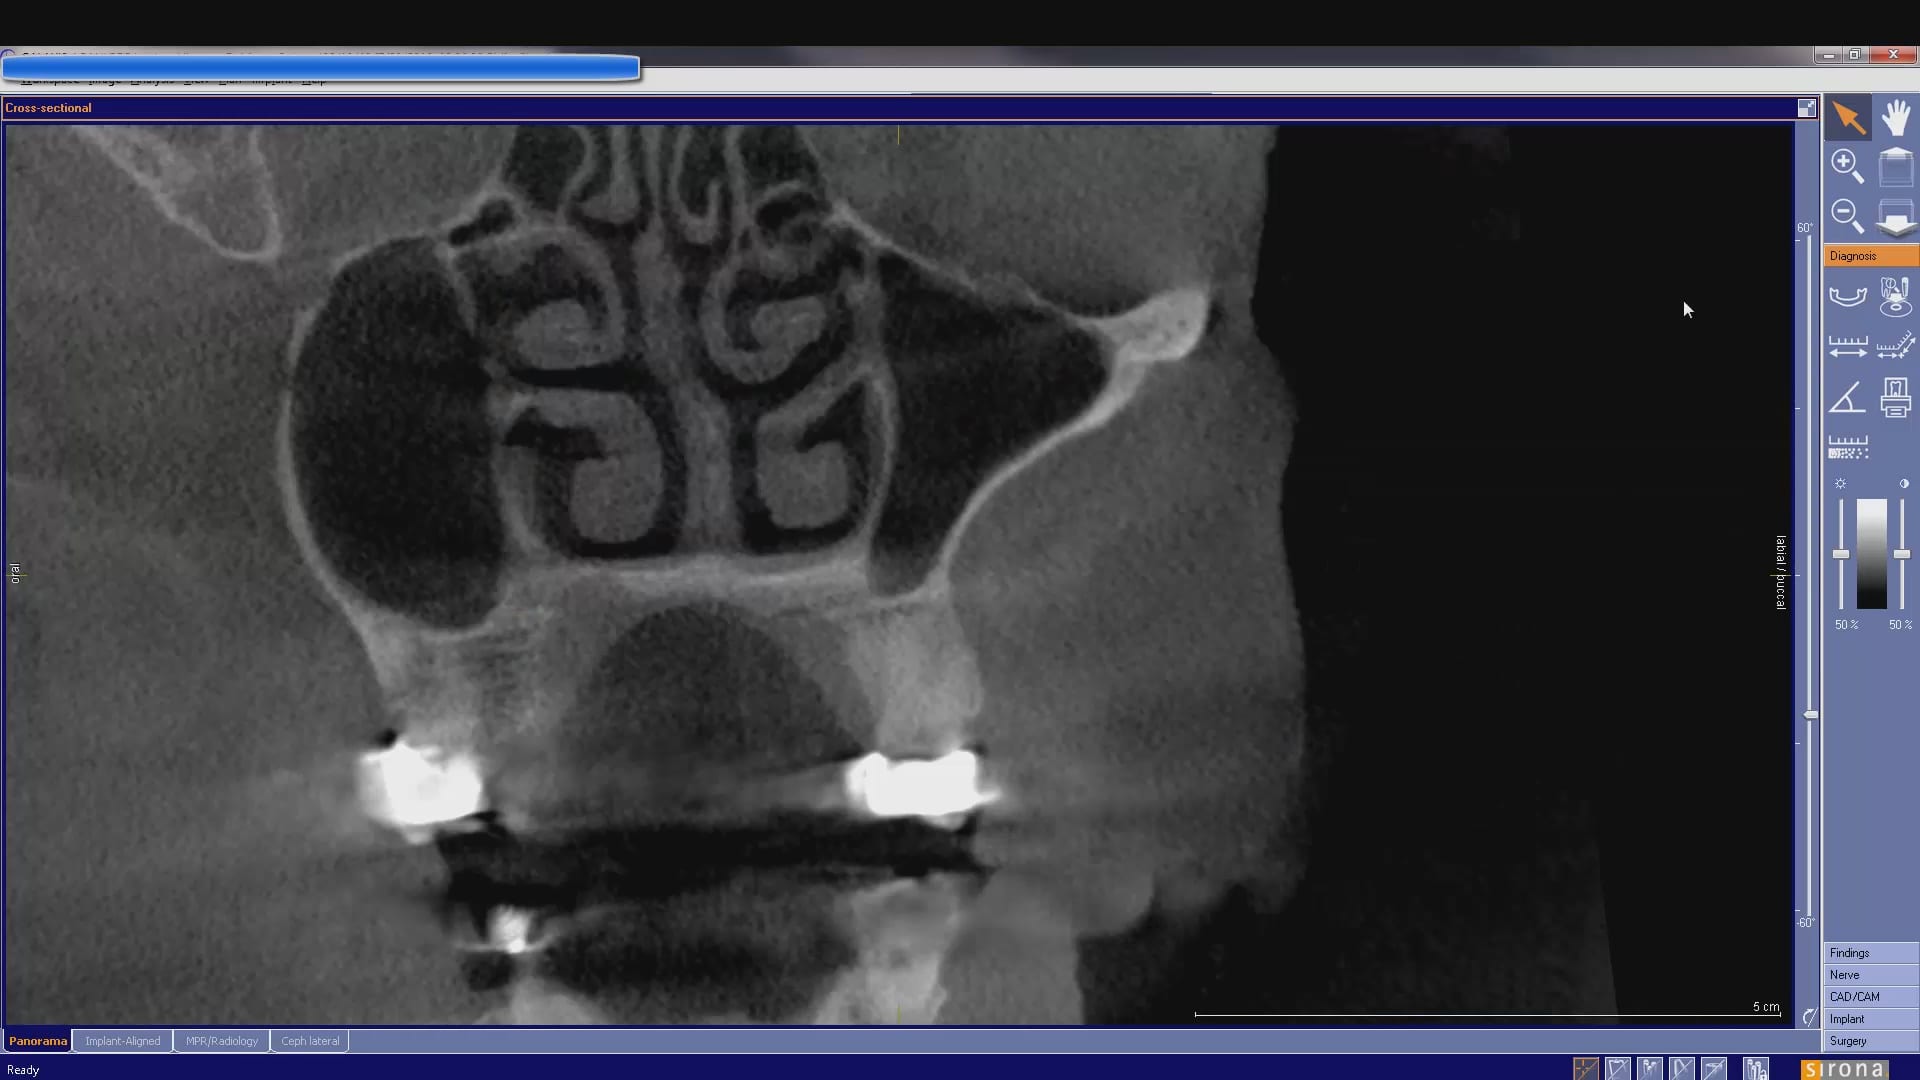
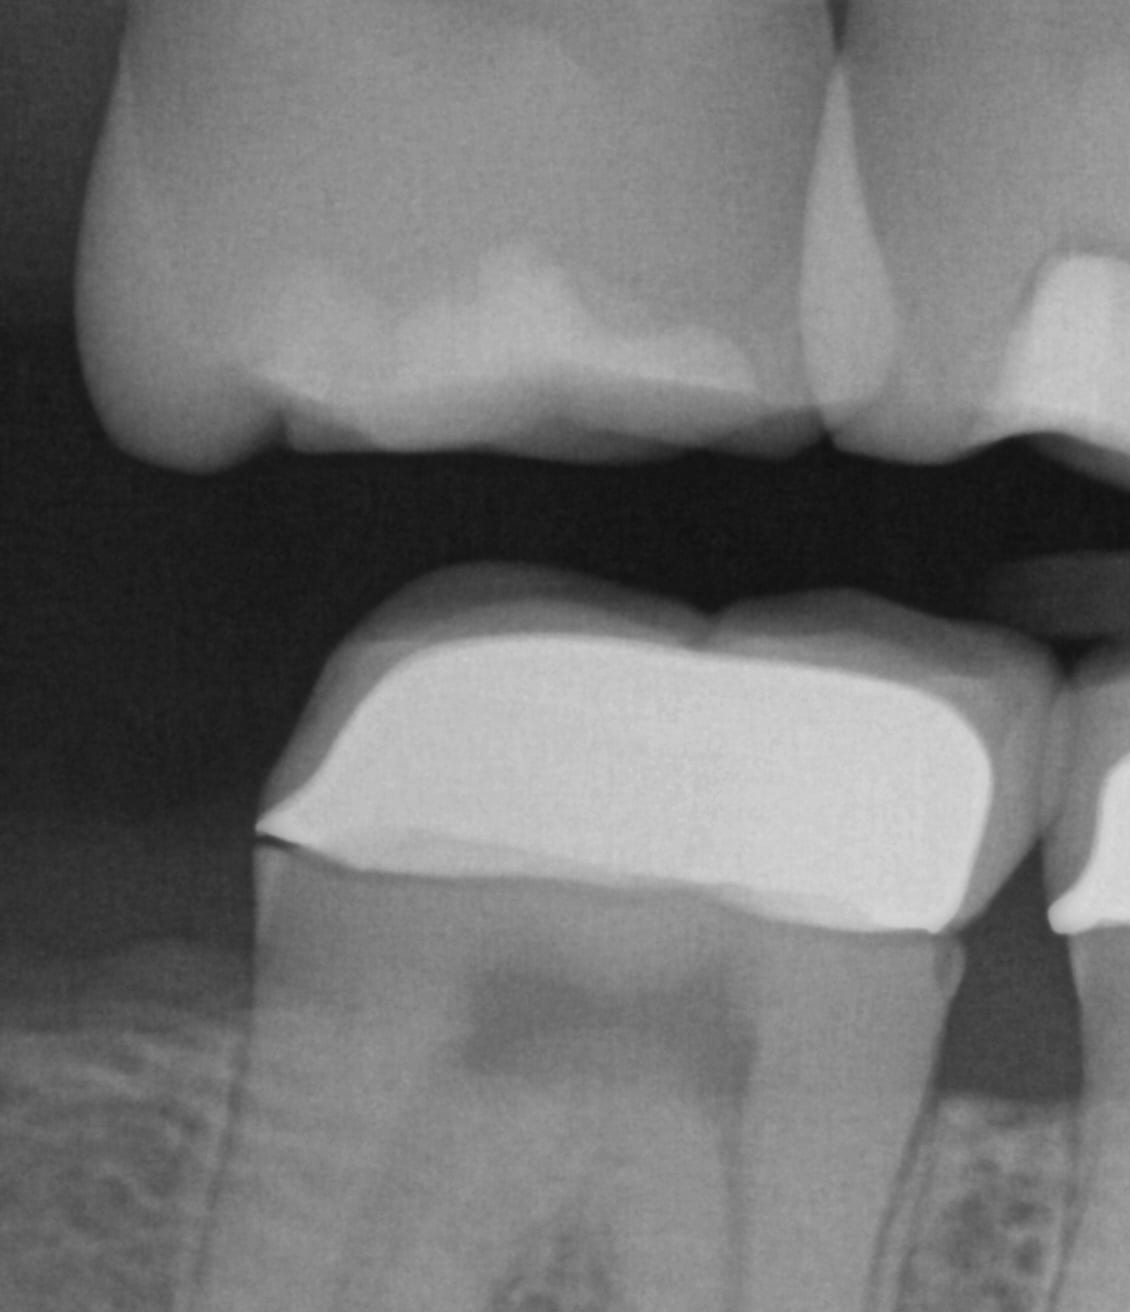
In this case presentation, we utilize the medit i500 to image the pre-existing crown and to fabricate a restoration that is a replica of the pre-existing condition. The patient was advised that the recurrent decay was in close proximity to the canal space and that endodontic treatment may be a possibility. The CBCT showed no evidence of any peri-apical radiolucency and the premolar tested vital prior to treatment
CT used to evaluate apex of premolar for crown replacement
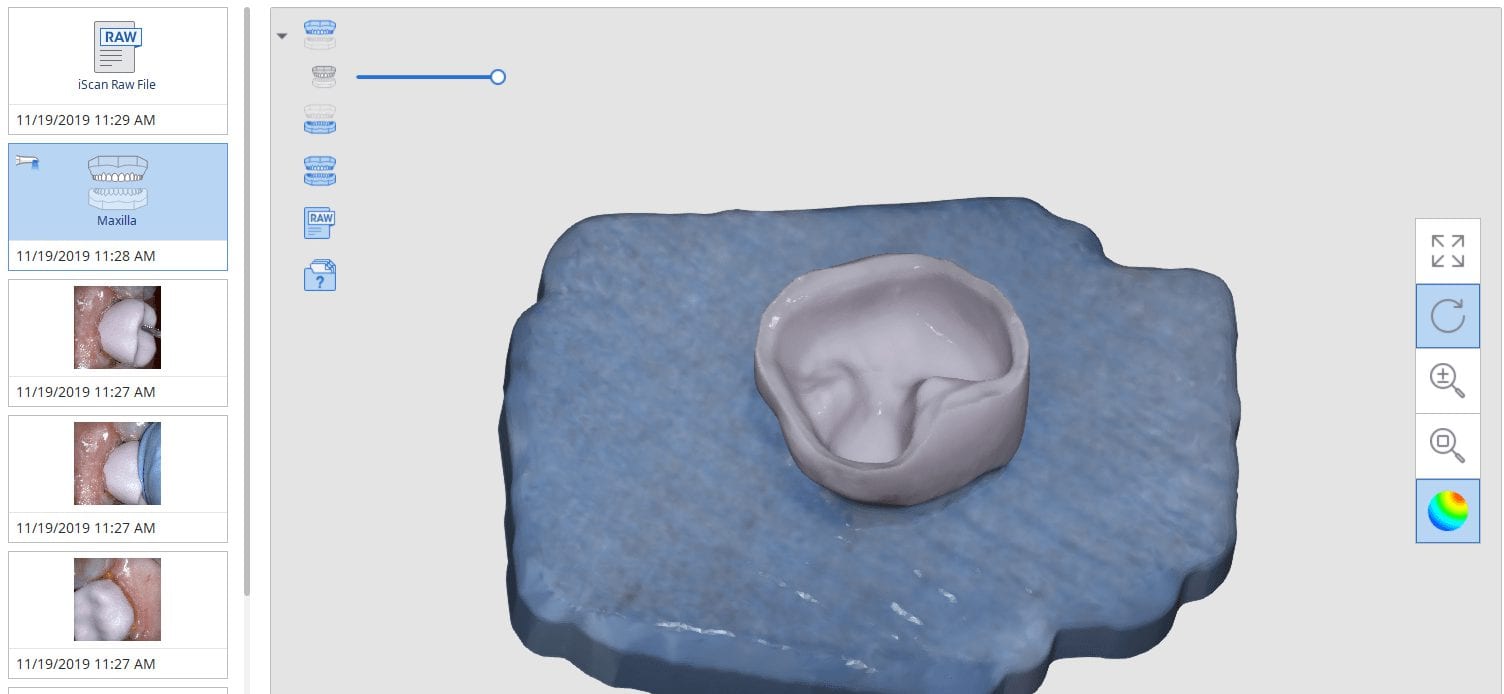
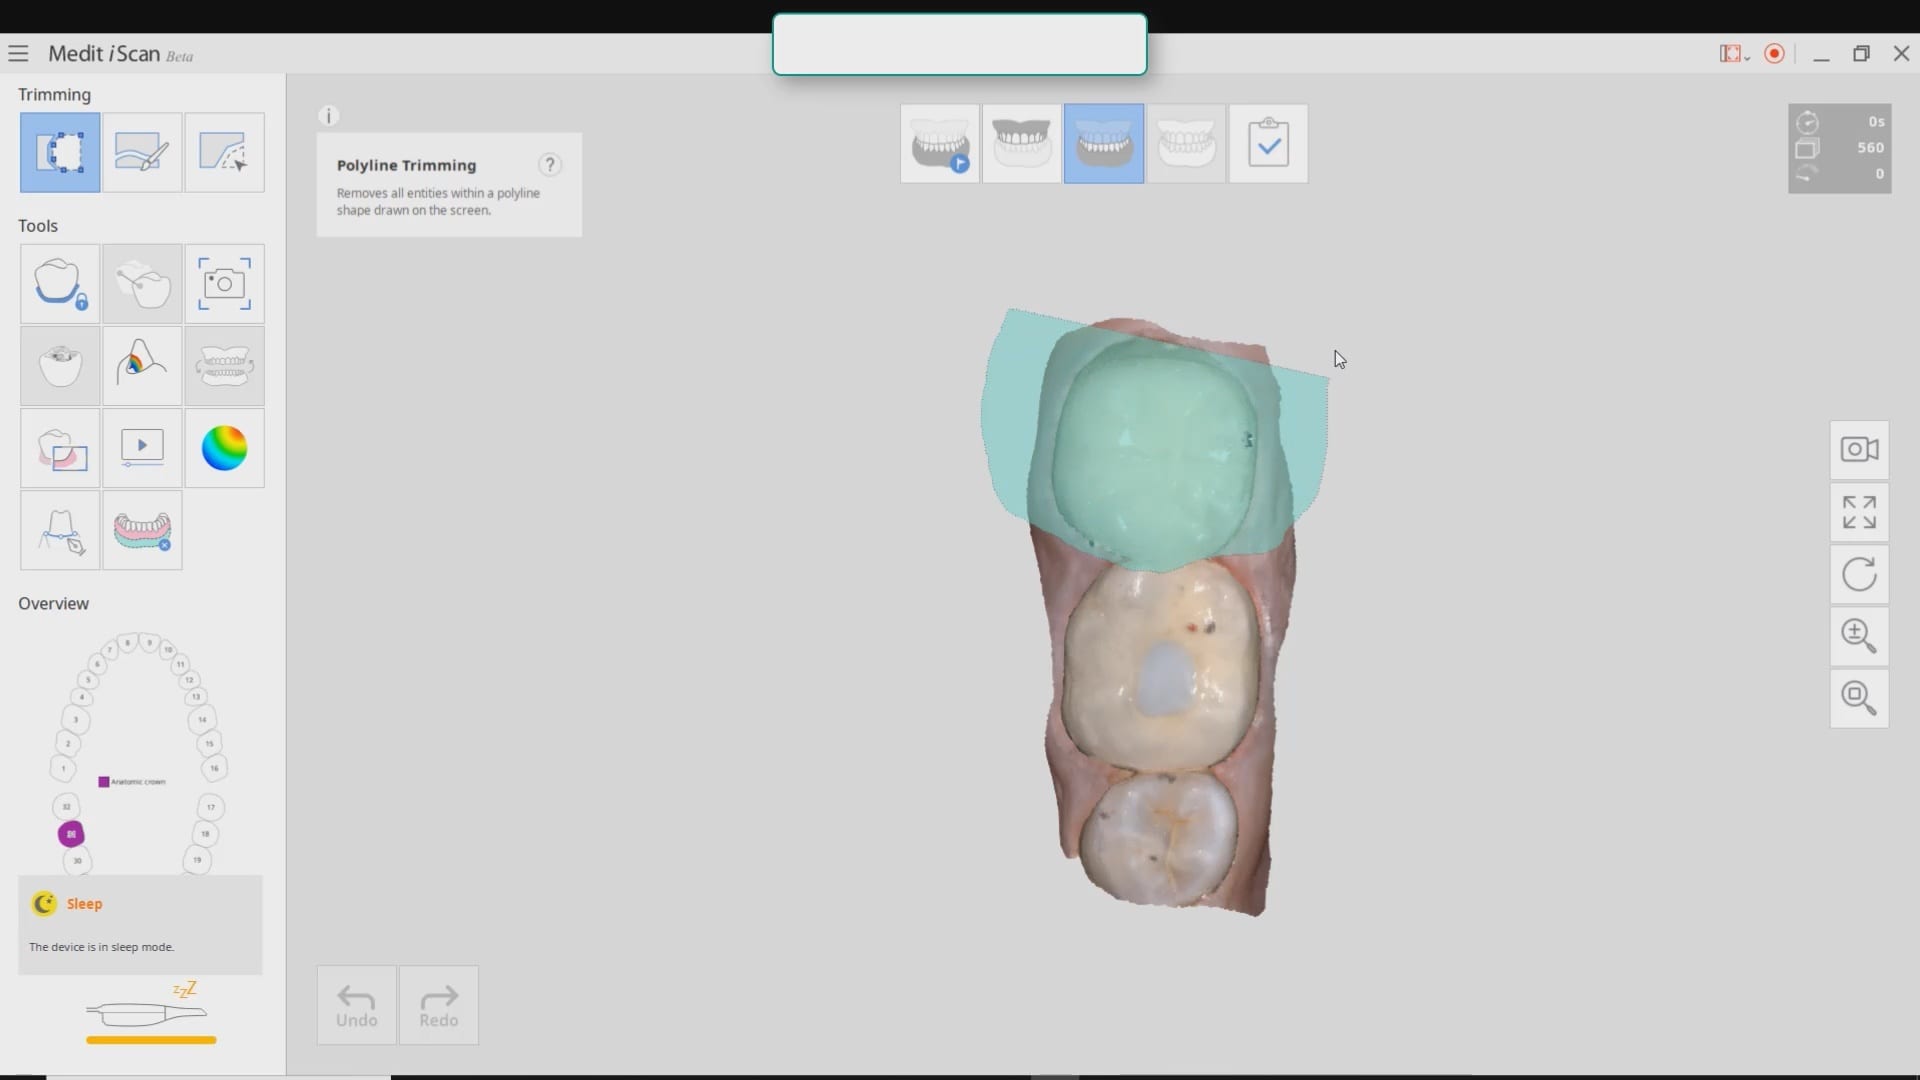
Case set up involved imaging the pre-existing condition in the pre-op catalog box. Excess information was cropped to reduce file size. The data was then copied to the maxillary arch catalog box and the area to prepared was edited out in preparation for final optical impressions.
Immediate Post Op
The remaining decay and previous build up material was removed just prior to bonding the restoration with NX3 dual cure resin cement so the dentin was exposed for the least amount of time possible.
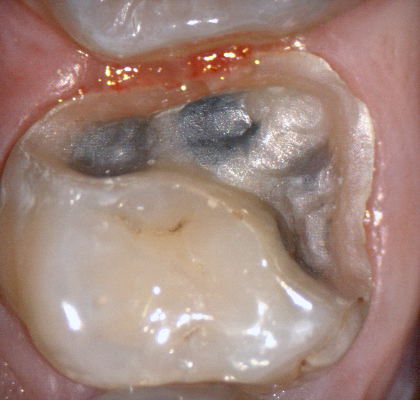
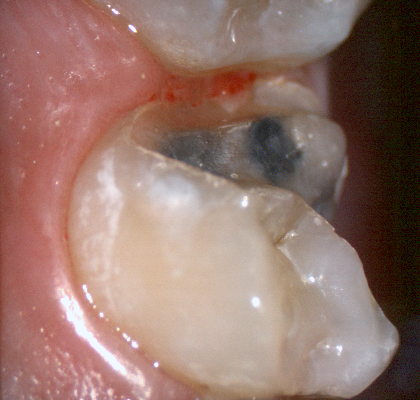
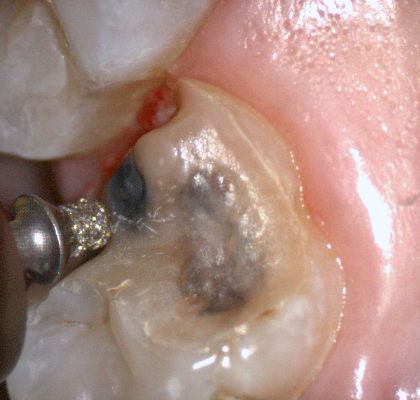
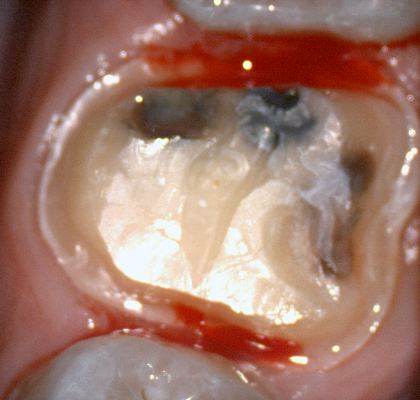
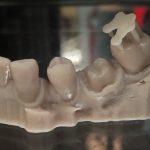
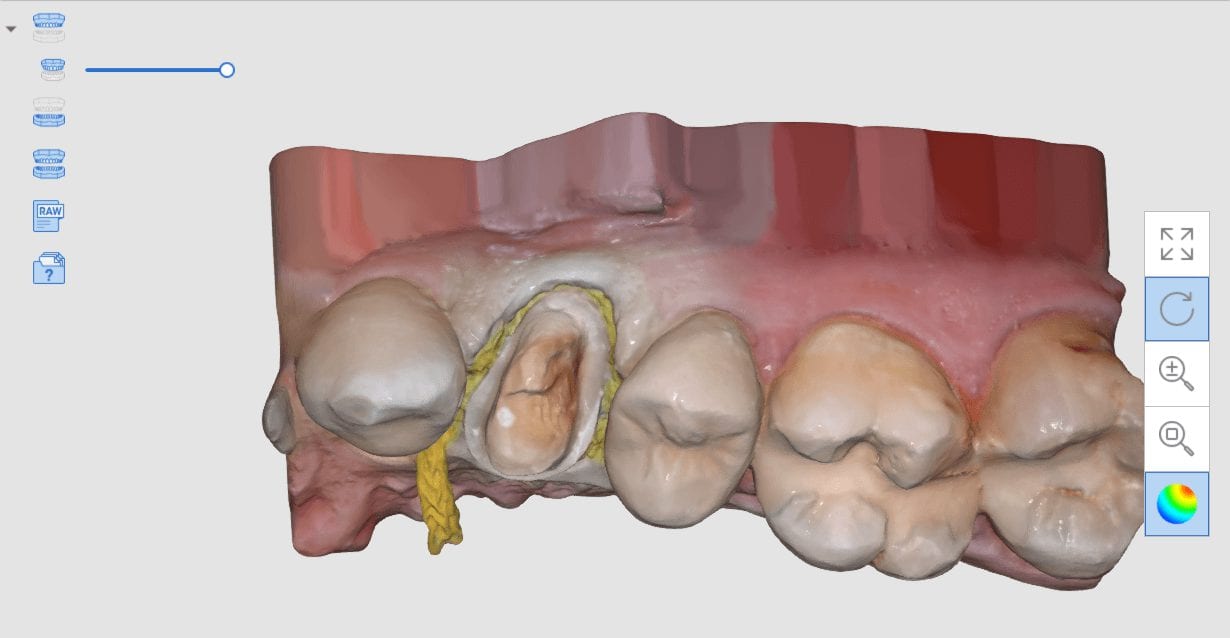
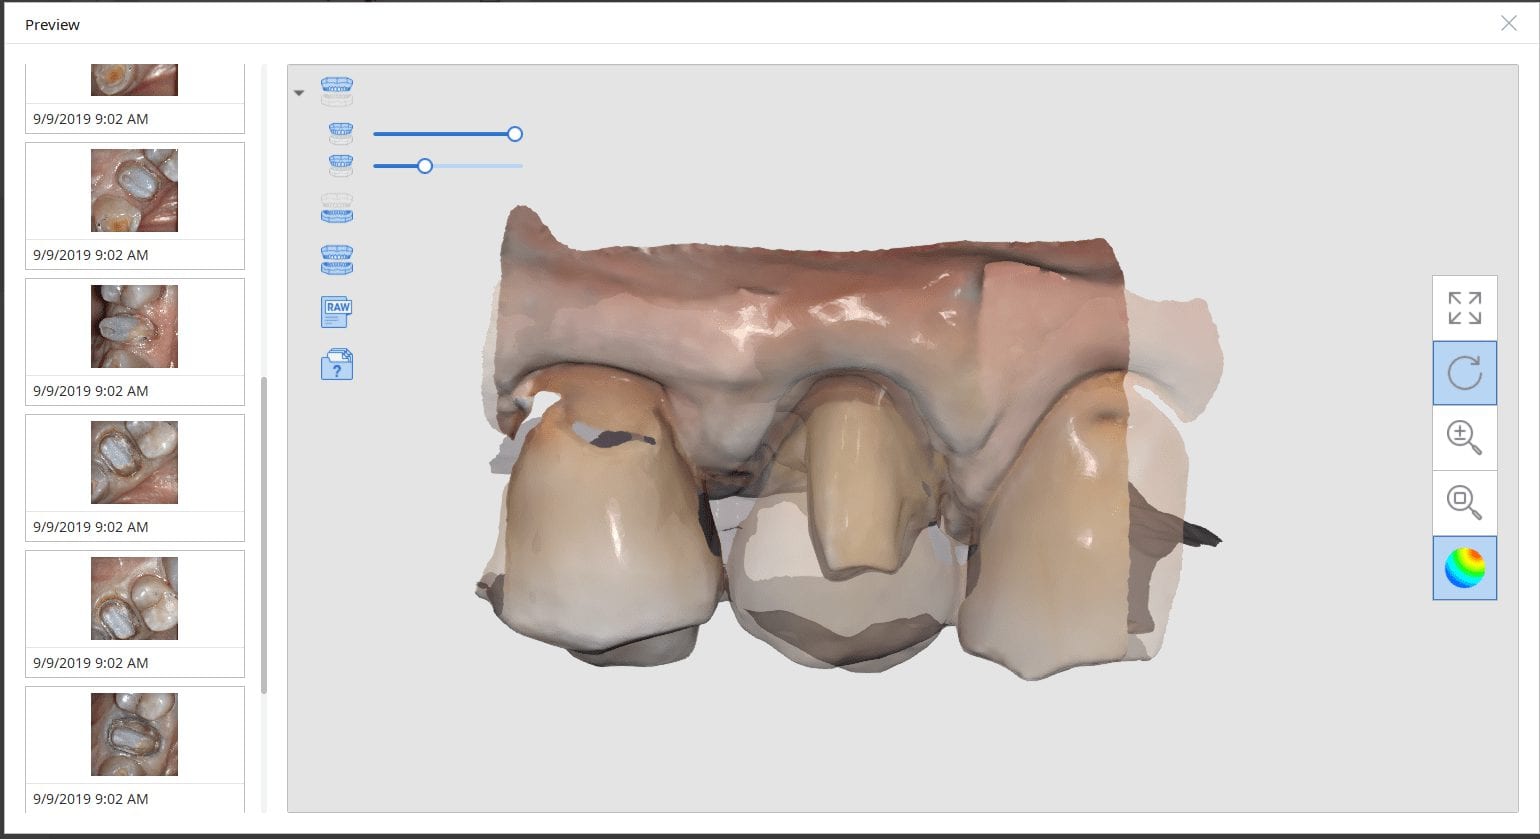
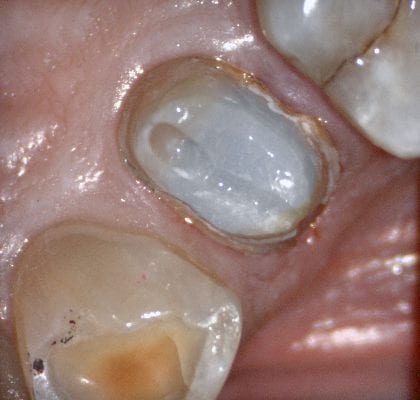
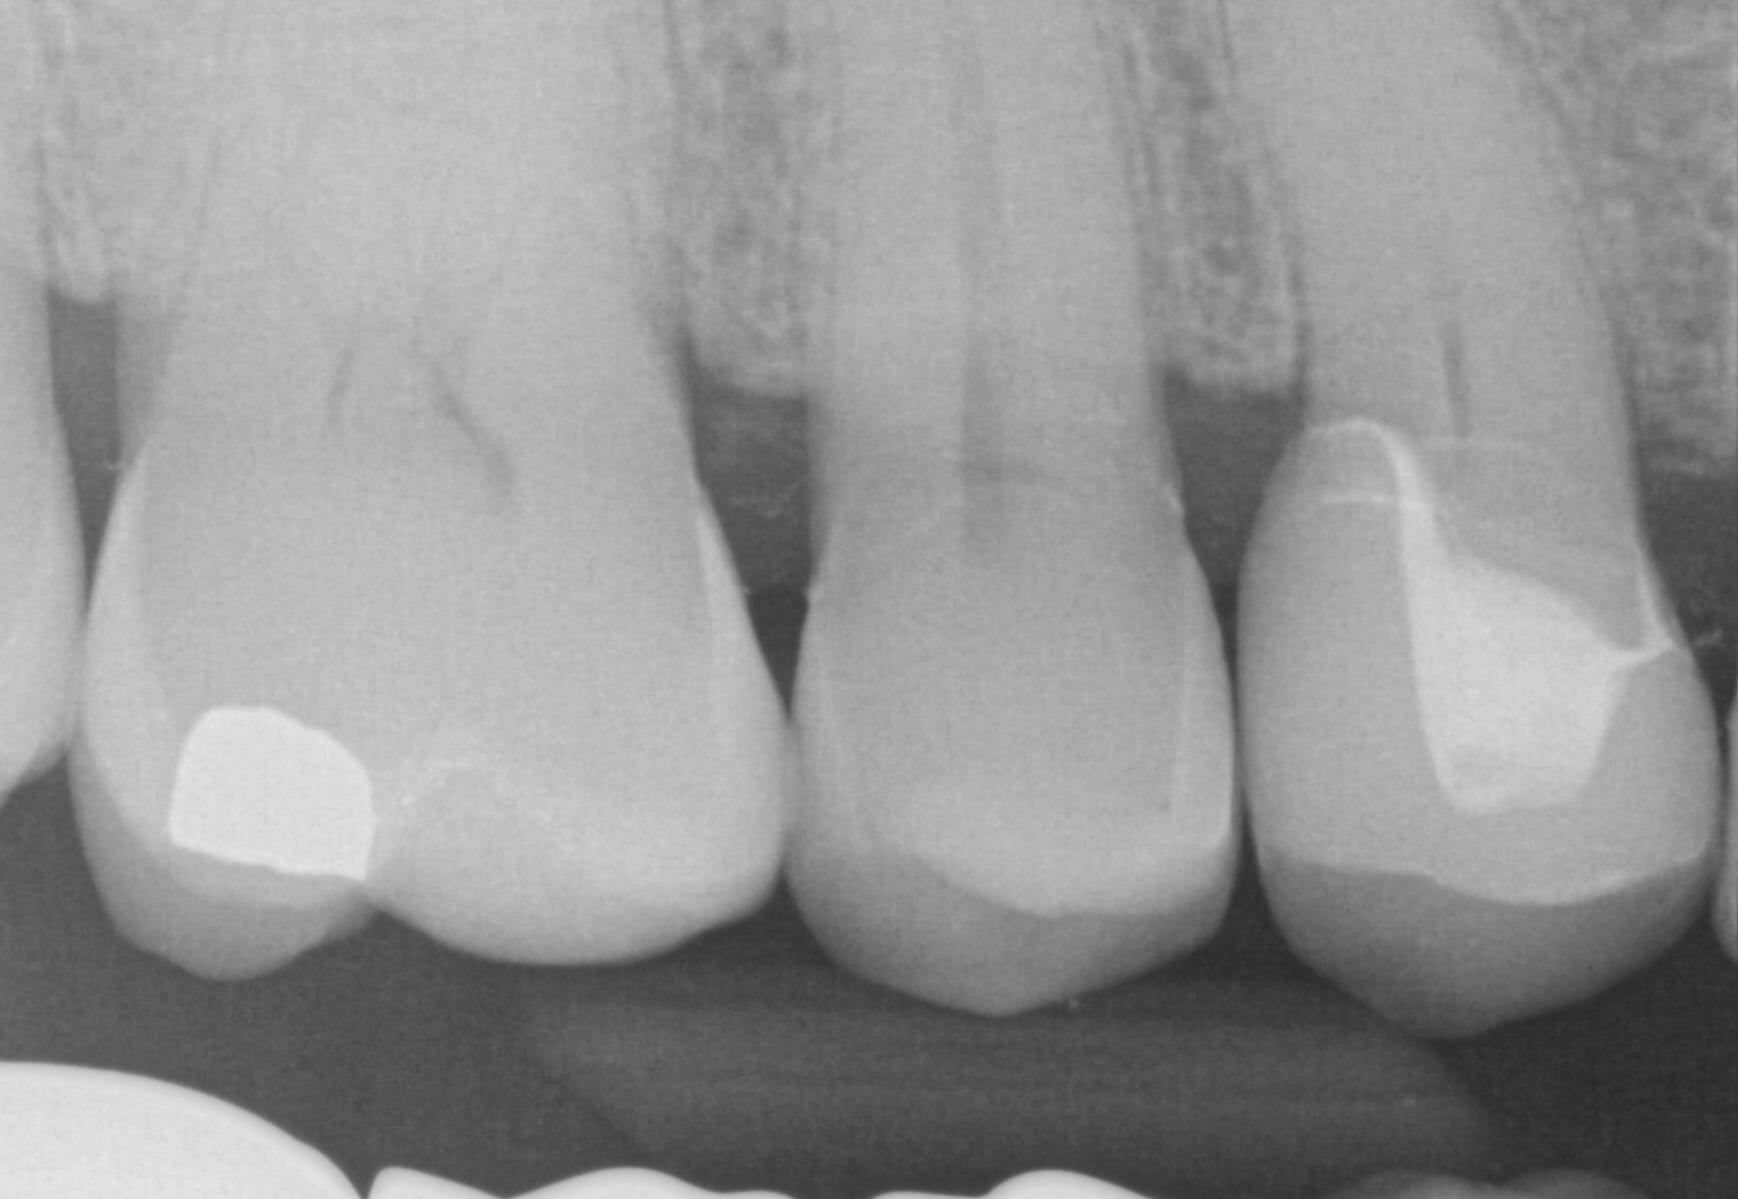
In this case presentation, we feature a crown that needs to be replaced due to open margins and recurrent decay.
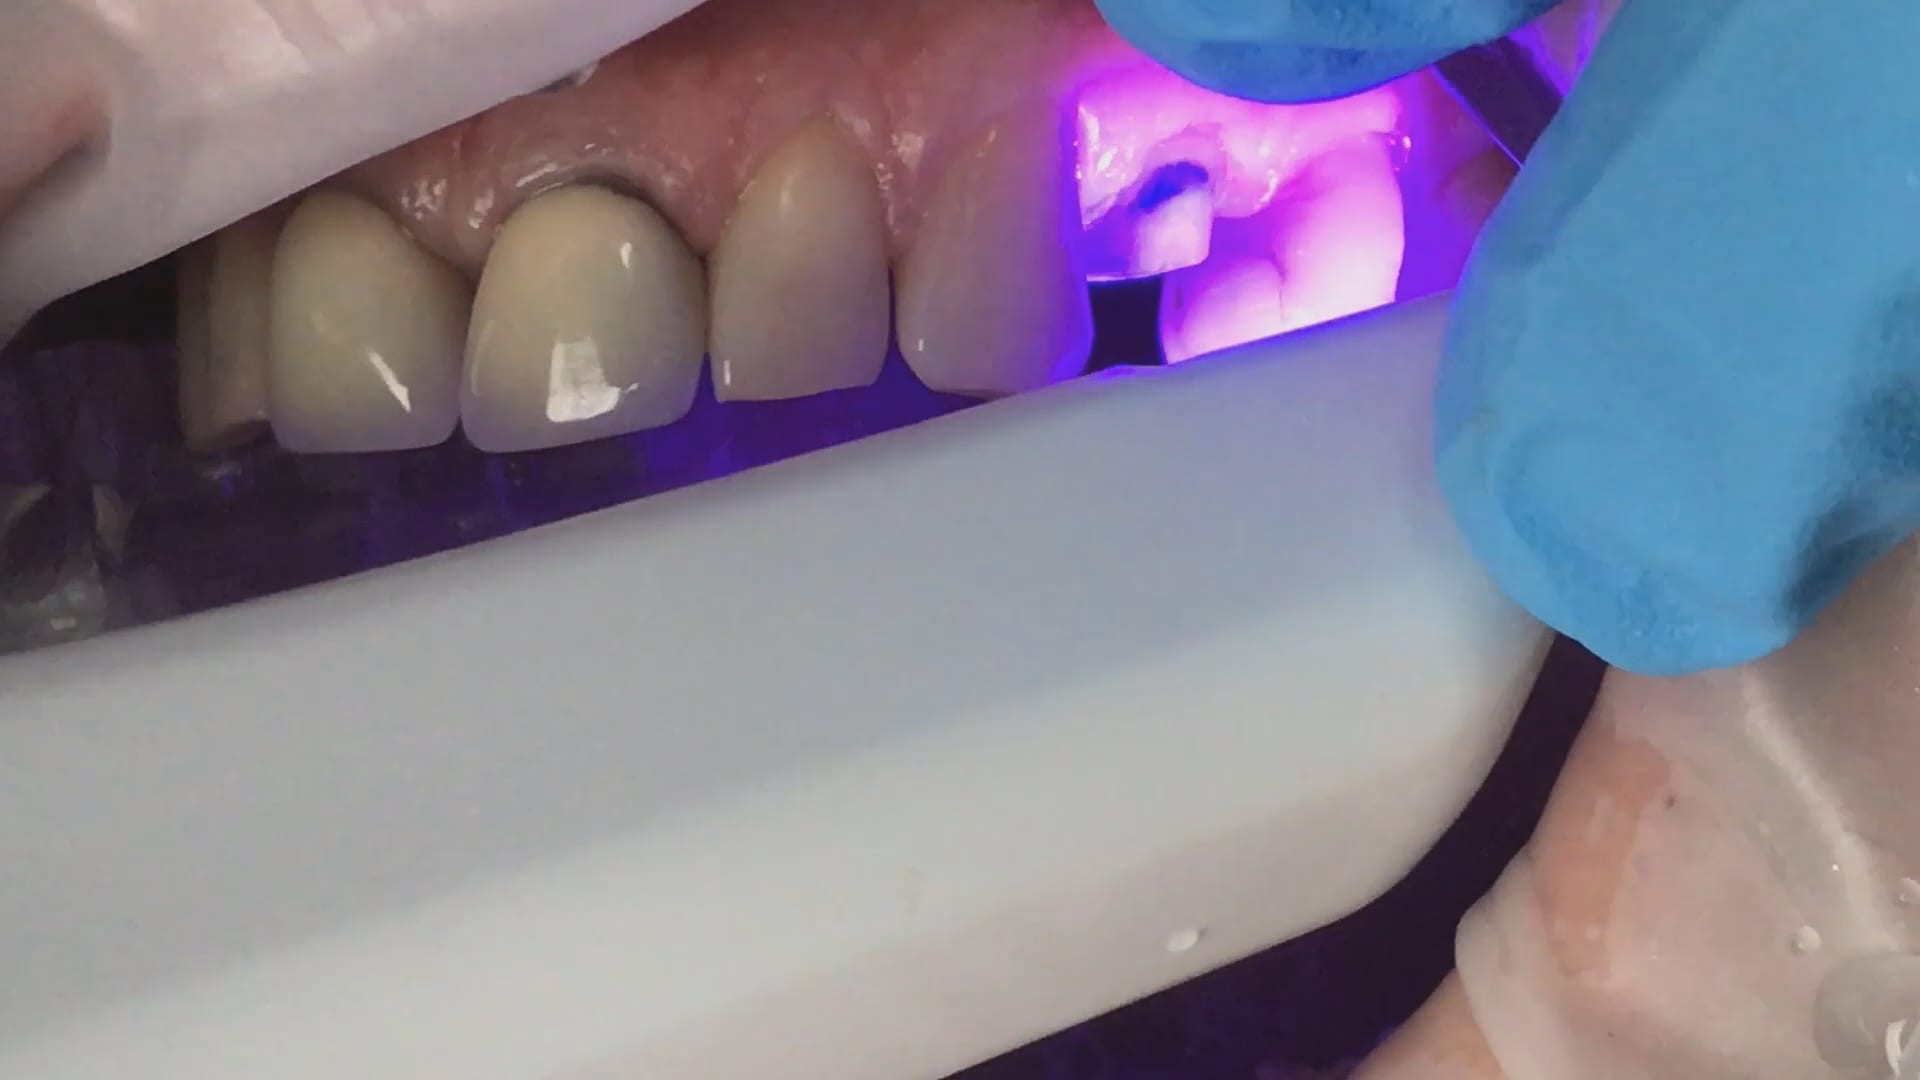
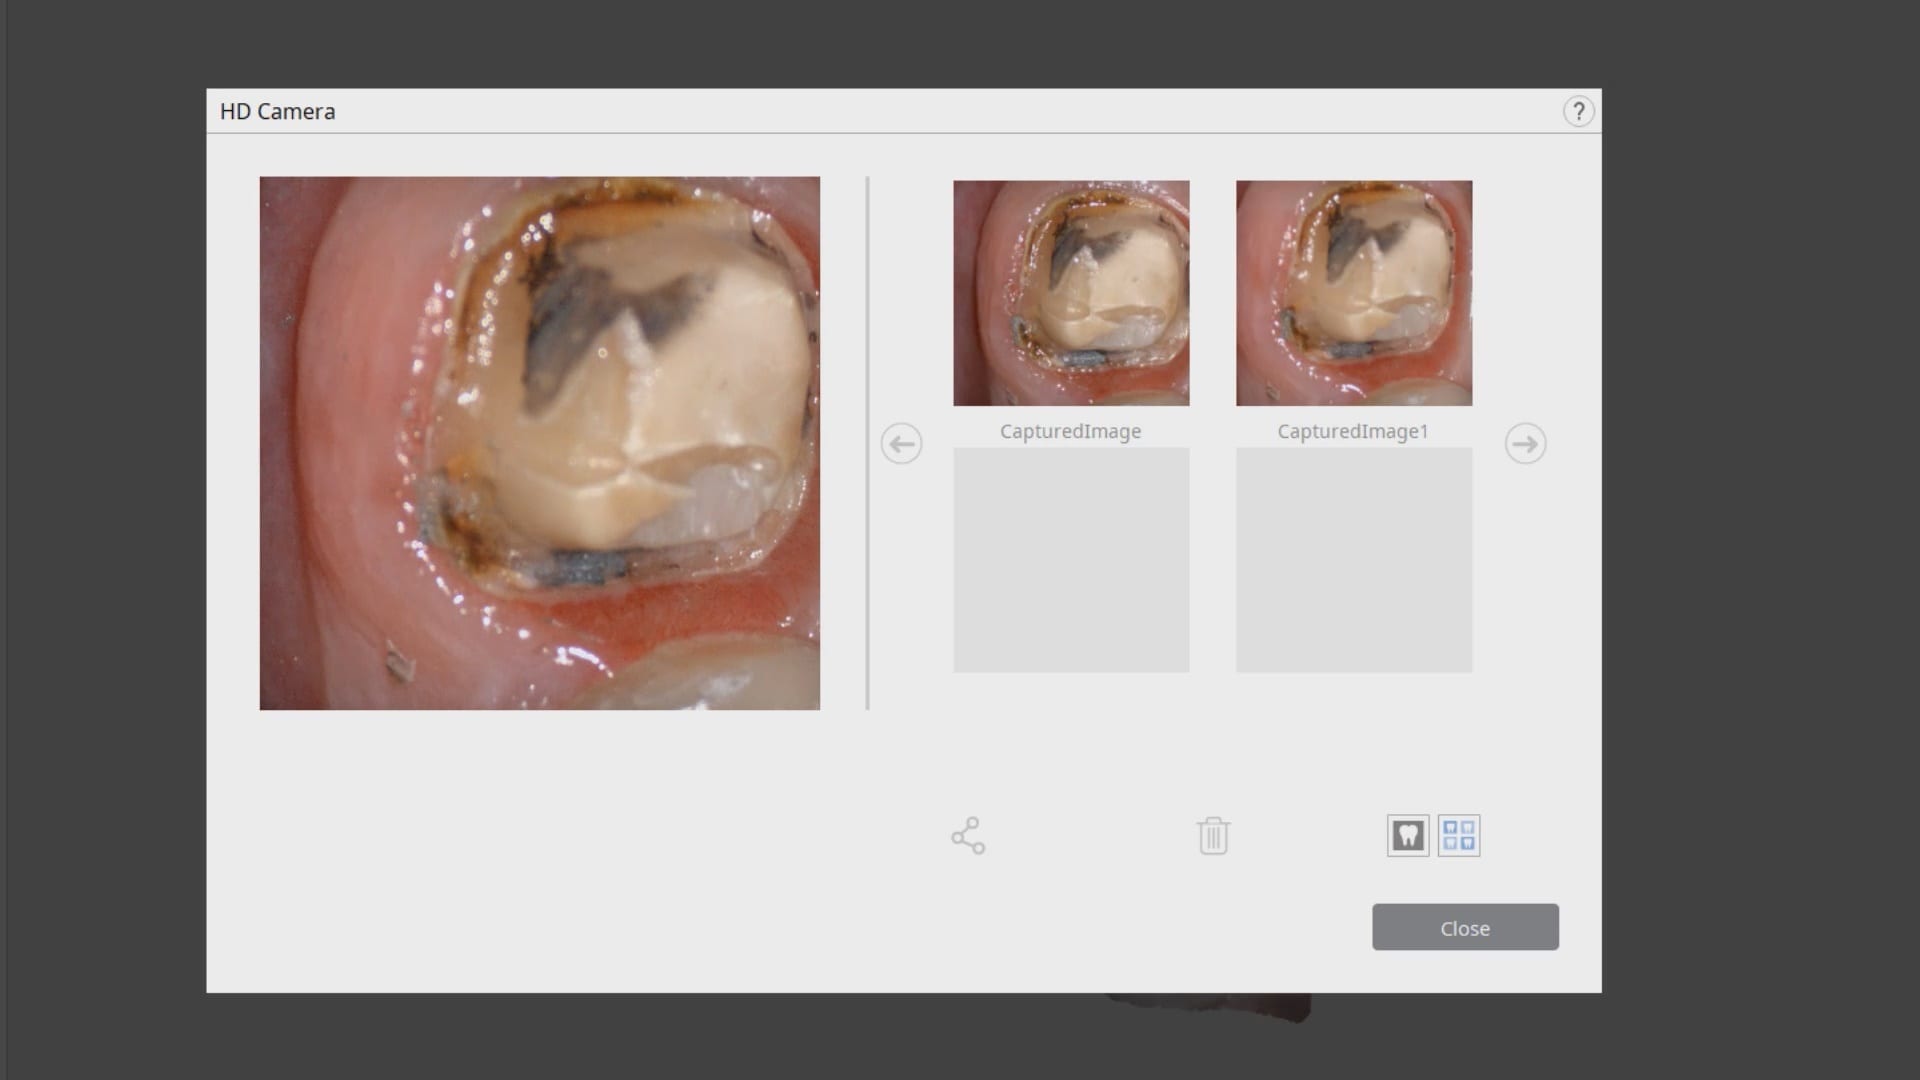
With the Medit i500, after the patient is anesthetized and the area is isolated, the pre-existing crown is imaged in the pre-op catalog box. The area to be prepared is cropped out in anticipation of the imaging the modified preparation.
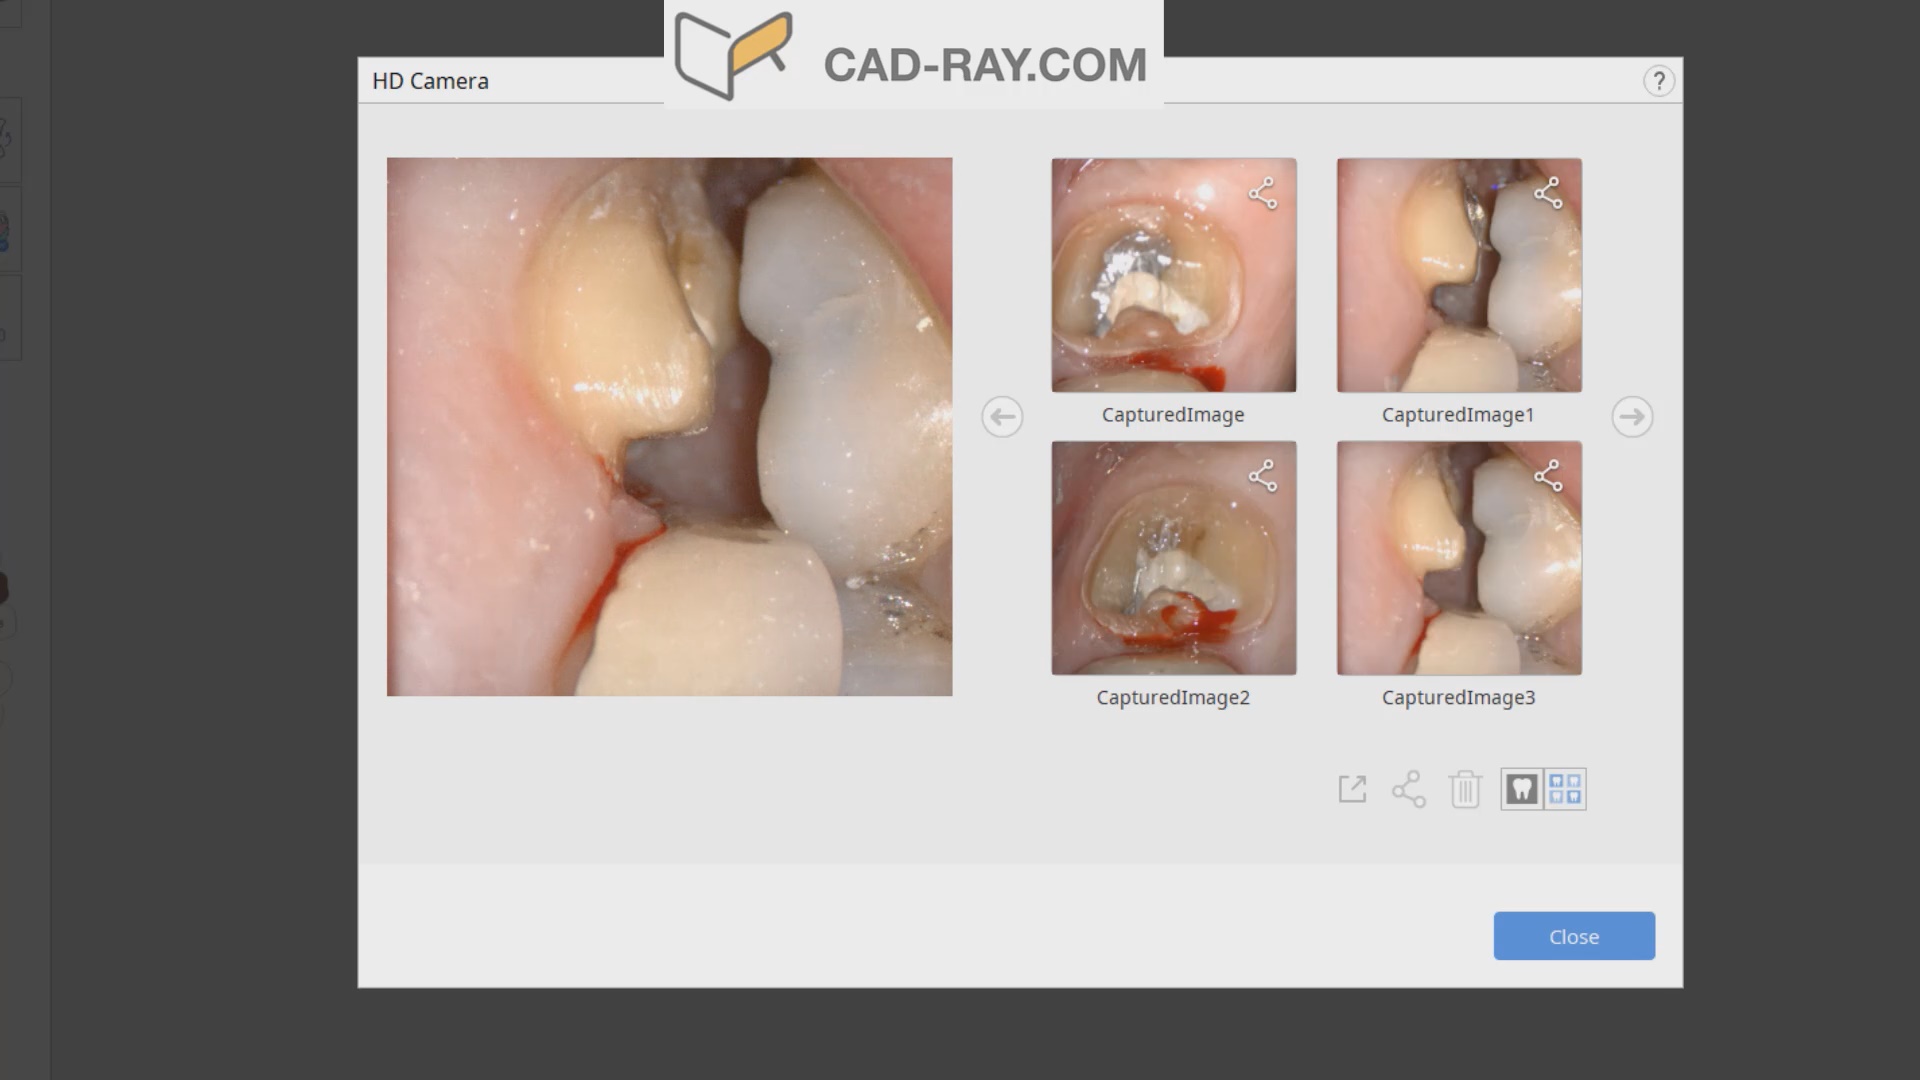
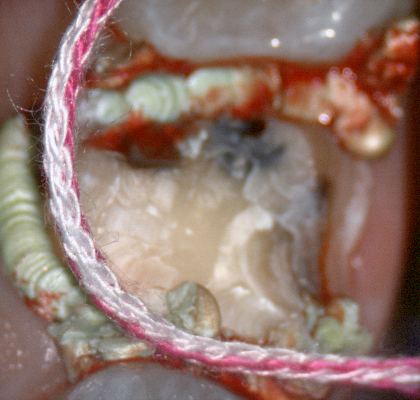
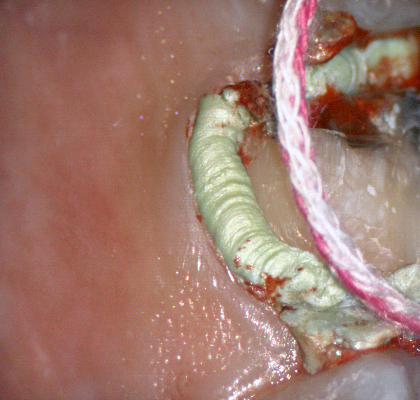
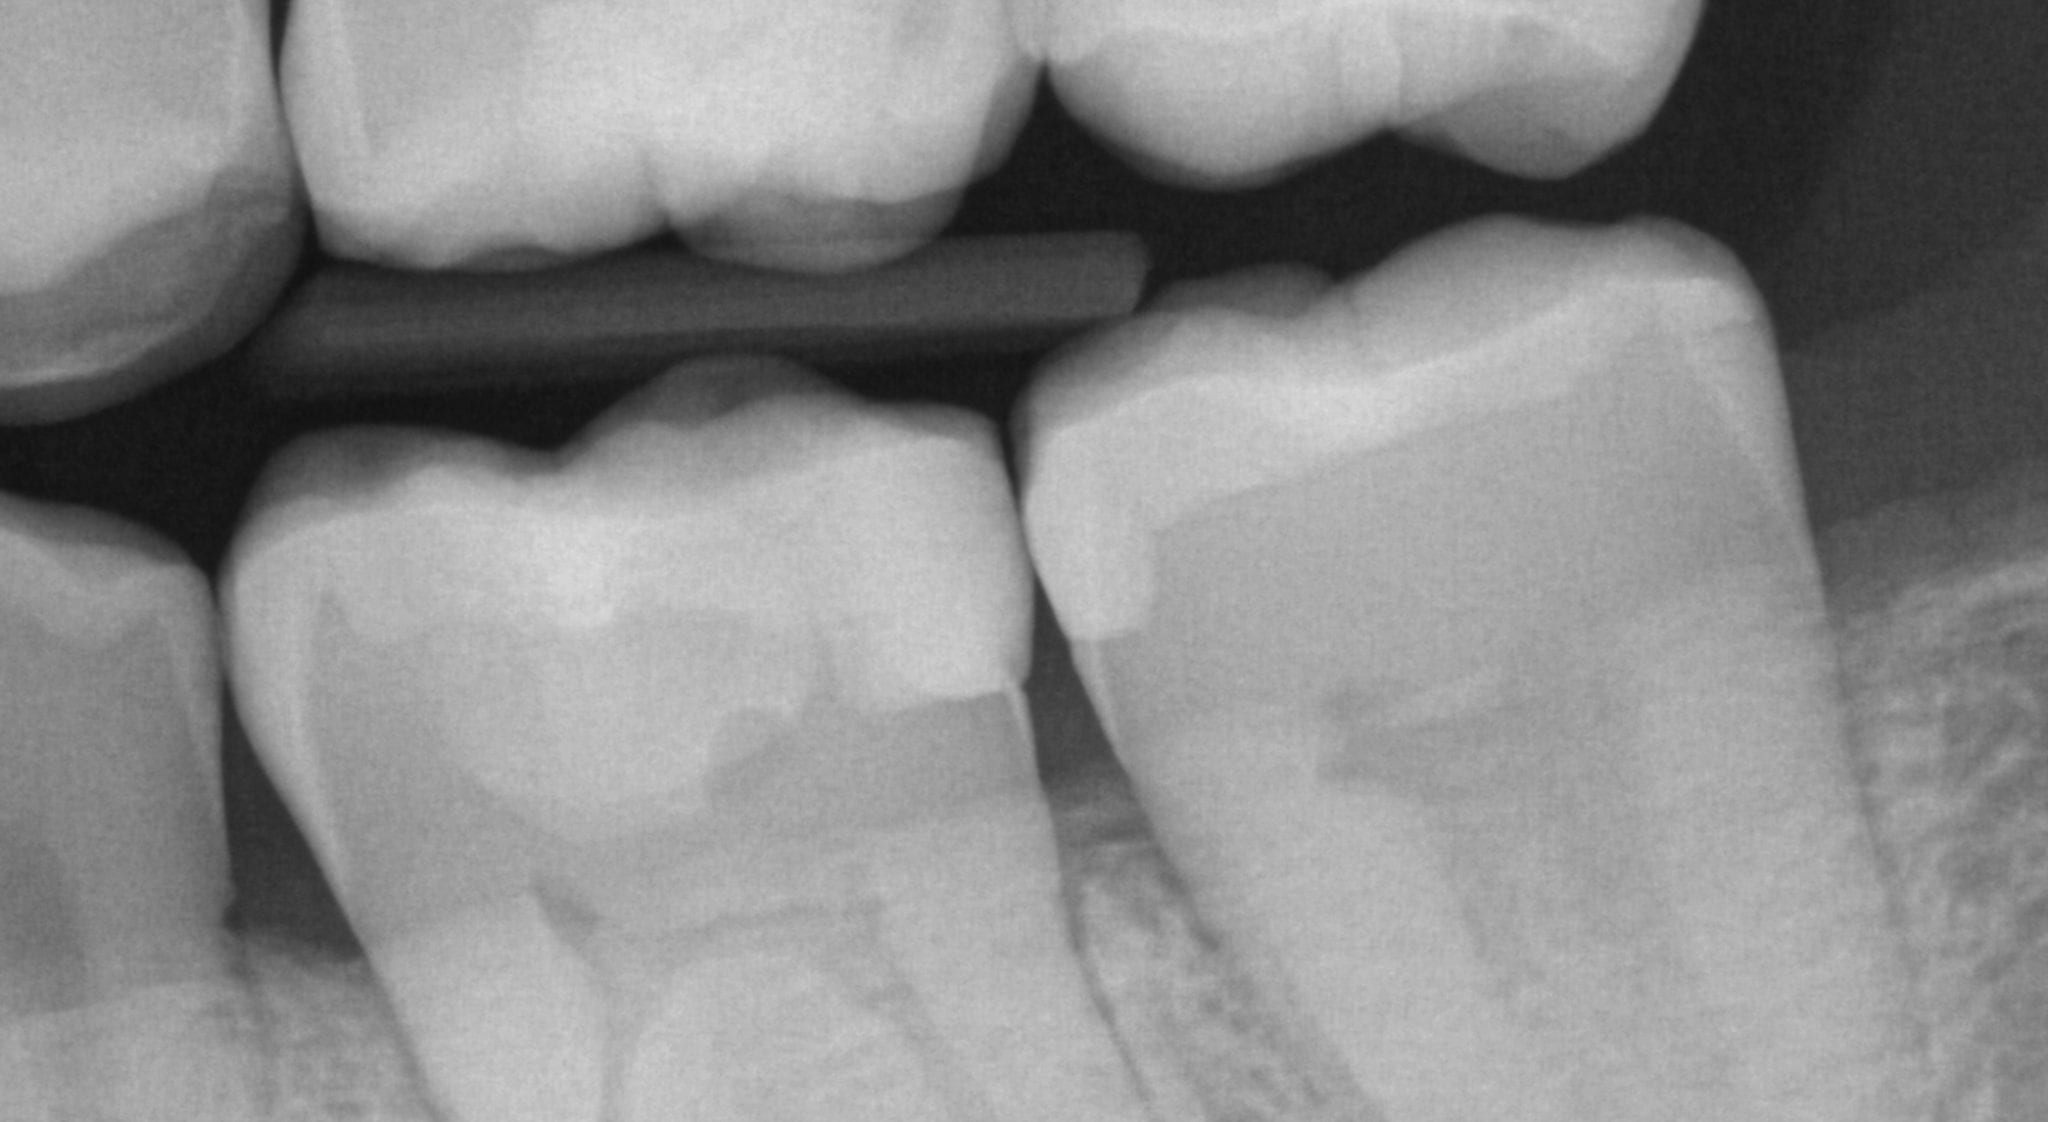
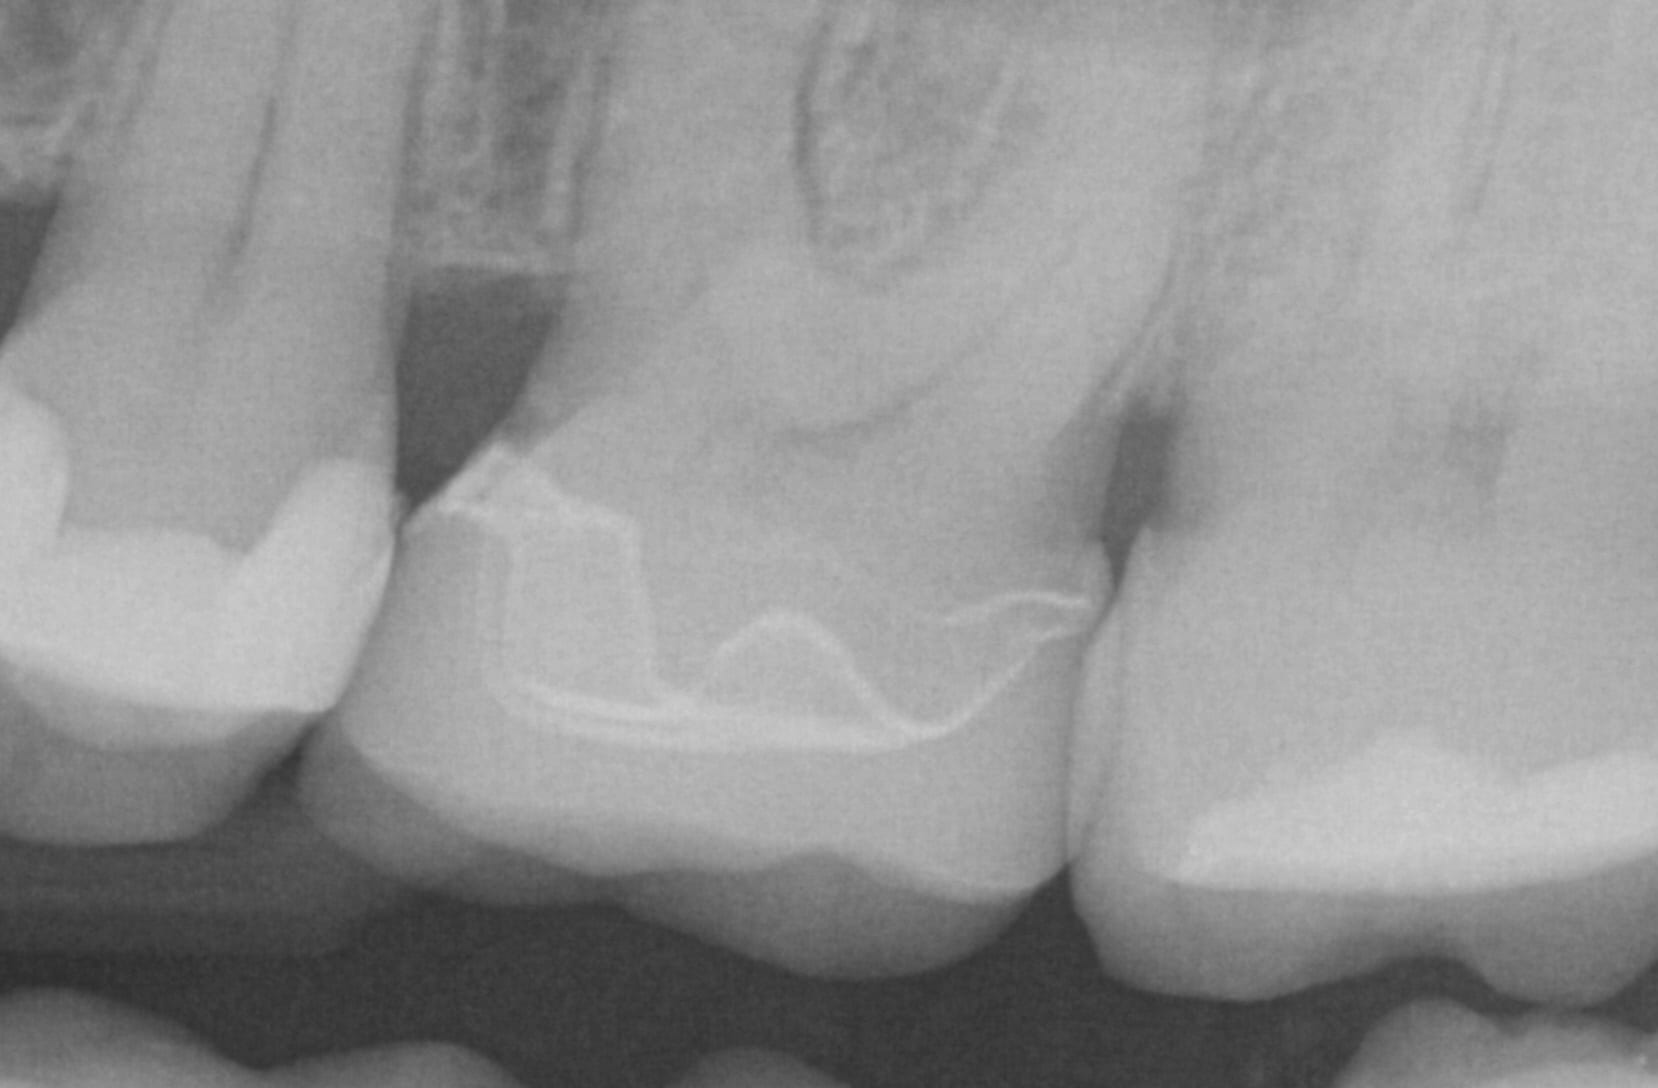
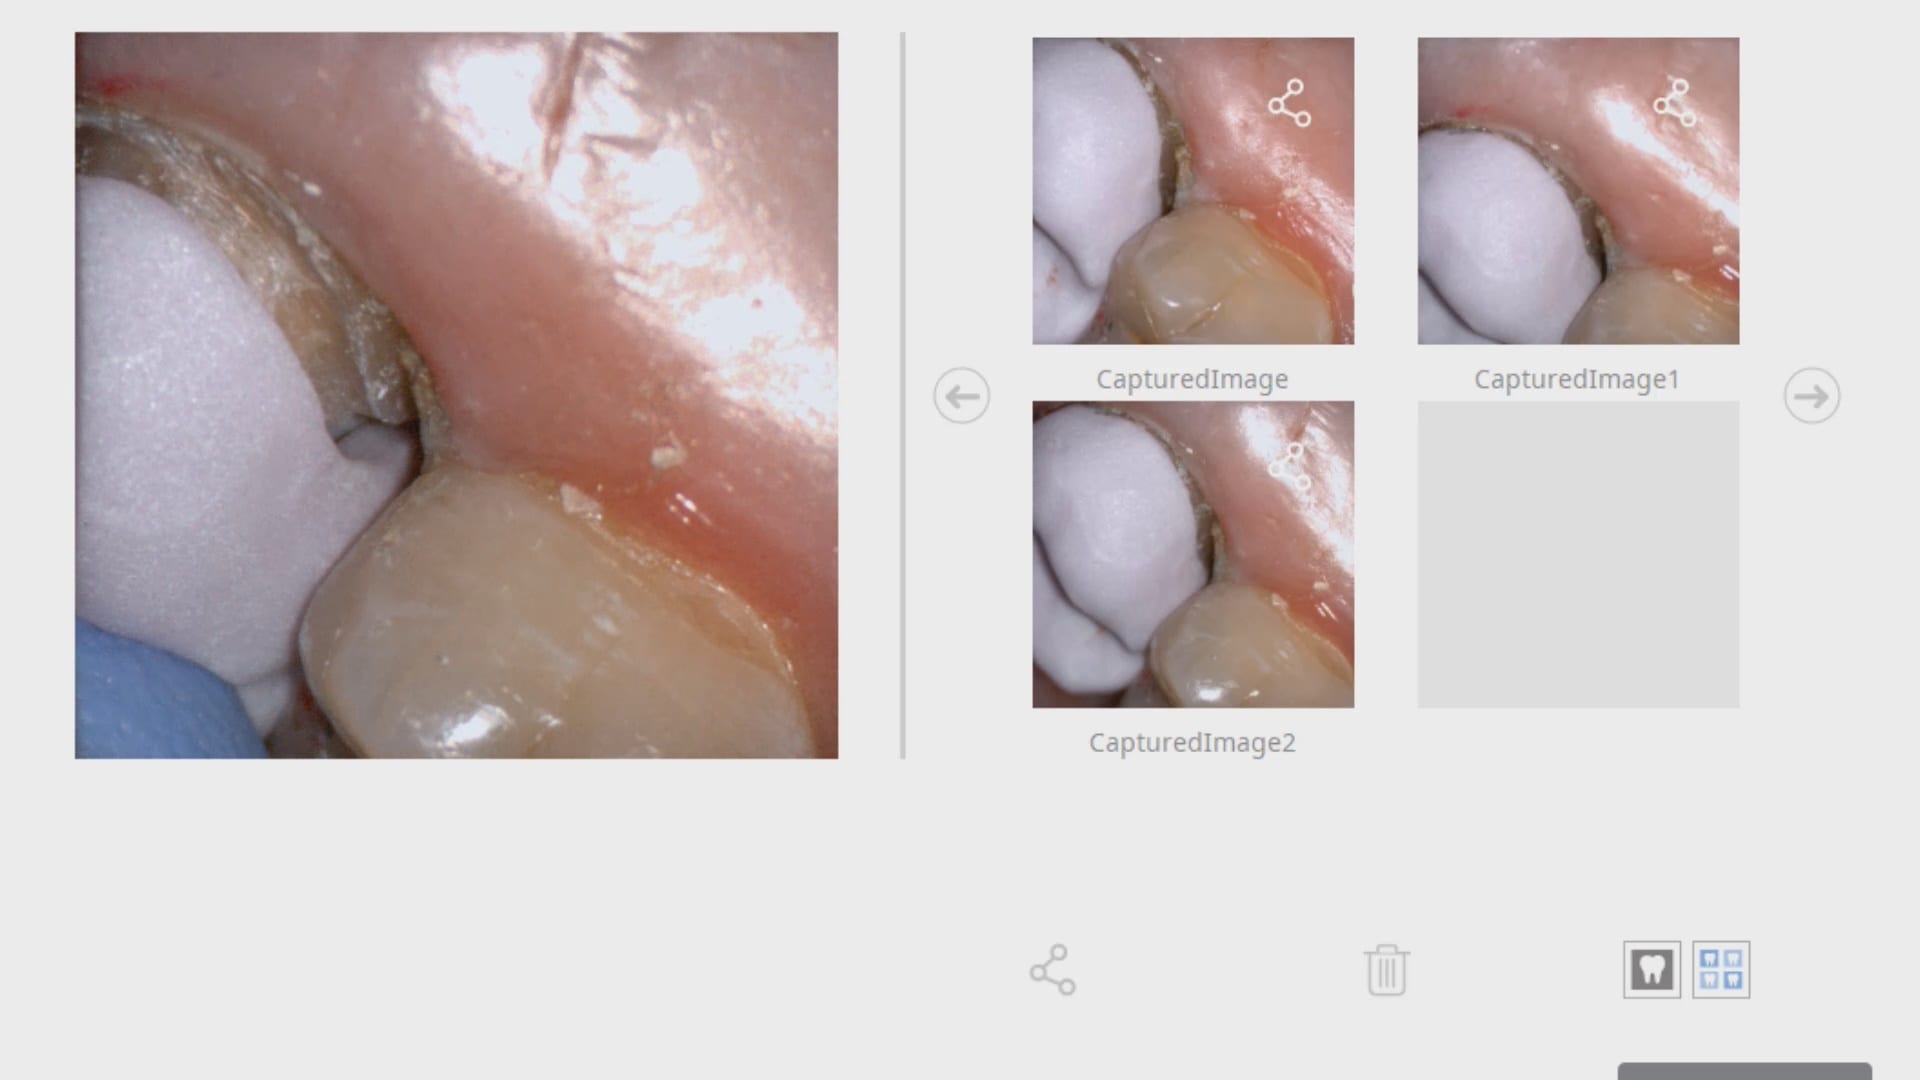
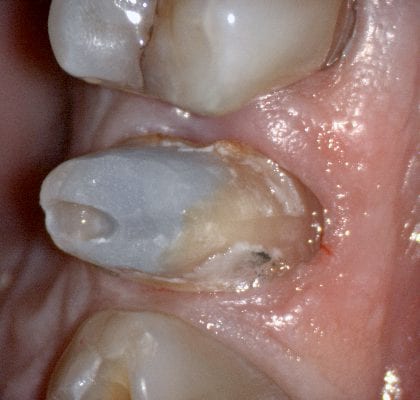
Once the crown is removed, expasyl is packed into the sulcus with a Number 2 cord. With the pre-op bitewings X-ray it was readily apparent that the tissue should be positively displaced in order to capture the margins. It took two layers of cord to achieve hemostasis for imaging with the Medit i500.
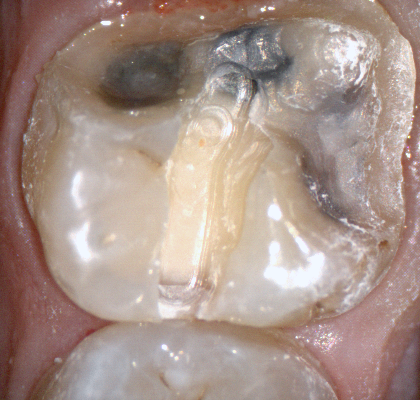
While placing the margin in the native imaging software, it was noted that some tissue was obscuring the margin on the lingual side. The area was isolated both clinically and in the software. It was cropped out and filled in with ‘good data’ after proper protection of the adjacent teeth and margins so that we did not obscure their geometry.
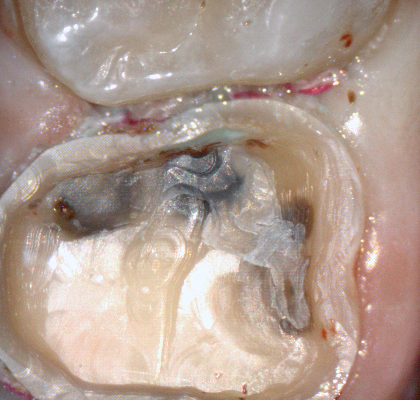
Once the margins are identified and the case is processed it is automatically imported into exocad for design and then sent to the Imes Icore CORiTEC Once for manufacturing. The emax restoration was tried in and then delivered after crystalization.