Cad-Ray's support is truly exceptional. While the equipment represents a significant investment, the peace of mind that comes from knowing they stand firmly behind their products is invaluable. Their support team is efficient, professional, and remar...read moreCad-Ray's support is truly exceptional. While the equipment represents a significant investment, the peace of mind that comes from knowing they stand firmly behind their products is invaluable. Their support team is efficient, professional, and remarkably persistent in ensuring everything runs smoothly. I'm especially grateful to Destaney and Laura for their ongoing assistance- their dedication and expertise have made a world of a difference!read less - 5/15/2025
We have been using the Medit i700 for about a year now. Frank and his customer service team has made it a smooth transition. He is always quick to reply and is friendly and professional! - 1/26/2023
Gwen Giannina
CAD-Ray is an amazing company. I purchased my scanner 3 years ago. Any small issue immediately resolved by calling them for help. I originally scanned with Cerec. The ROI doesn't even compare. The Medit was by far the best technology purchase of my ...read moreCAD-Ray is an amazing company. I purchased my scanner 3 years ago. Any small issue immediately resolved by calling them for help. I originally scanned with Cerec. The ROI doesn't even compare. The Medit was by far the best technology purchase of my 20 plus years in dentistry. I will upgrade at some point and will buy again from CAD-RAY!read less - 2/04/2022
Nisarg Parikh
Absolutely a phenomenal company. Everyone you engage with is extremely knowledgeable and helpful.I’m sure they get the same questions day in, day out but they are happy to help you without being condescending. The entire team has been helpful through...read moreAbsolutely a phenomenal company. Everyone you engage with is extremely knowledgeable and helpful.I’m sure they get the same questions day in, day out but they are happy to help you without being condescending. The entire team has been helpful through phone calls, the Cad-Ray FB group, and recorded webinars. Jonathan helped me get a great deal, Laura was awesome on the webinar, Damien is always answering questions on FB, and Armen had a great in-person presentation in Dallas. 100% recommend.read less - 4/22/2022
Jeffrey Martins
Service at CAD-Ray has been really great. About 6 months ago I purchased a Medit i700 scanner from them and have been really happy with it. Fortunately, I haven’t run into many problems, but if I need help they are so easy and friendly to work with. ...read moreService at CAD-Ray has been really great. About 6 months ago I purchased a Medit i700 scanner from them and have been really happy with it. Fortunately, I haven’t run into many problems, but if I need help they are so easy and friendly to work with. When my scanner did stop working, they quickly got me set up with a new one. If I have a computer question, they offer to log in and look at the computer with you. If you’re in the market for an intraoral scanner or any of their other products, I encourage you to talk with them to meet your goals. Thanks CAD-Ray!read less - 11/04/2022
Oleg Eisenstein
Great products and services. Highly recommended - 6/16/2020
Erika is one of a kind! She truly is patient with me. She has gone above and beyond to help me every time I call her. We have a few locations and she is always prompt in her responses and always manages to find a solution for me. I wish every rep was...read moreErika is one of a kind! She truly is patient with me. She has gone above and beyond to help me every time I call her. We have a few locations and she is always prompt in her responses and always manages to find a solution for me. I wish every rep was reachable ALL THE TIME and helpful! Thank you Erika! ❤️read less - 6/04/2025
Travis Kendall
This scanner is amazing! It’s hard to believe that it is less then half the price of 3 shape with zero yearly charges. I highly recommend you give it a try! - 10/09/2019
I bought my Medit I-500 from them. Everything has been been first class, from the training to the customer support. I highly recommend buying through CAD RAY. - 6/16/2020
Graham Reed
I got the Medit scanner last fall and I have been nothing but impressed by it and the support by CAD-Ray. The level of support, training videos, and continuously upgraded software is really impressive. If you are on the fence, you should feel confide...read moreI got the Medit scanner last fall and I have been nothing but impressed by it and the support by CAD-Ray. The level of support, training videos, and continuously upgraded software is really impressive. If you are on the fence, you should feel confident in moving forward with CAD-Ray.read less - 6/16/2020
Daniel Thrall
I have owned this scanner for six months now. I have experience with other scanners including Trios and Carestream. The Medit scanner can stand with the big names. The scanned images are good. The ease of communication through the software with the l...read moreI have owned this scanner for six months now. I have experience with other scanners including Trios and Carestream. The Medit scanner can stand with the big names. The scanned images are good. The ease of communication through the software with the lab is probably my favorite part. Another thing I like is that the company is very open to improvements and listens to what its customers are wanting.
Cad Ray has a great team working alongside this product and continually updates all of the users on new features or new ways to use existing features. They are extremely responsive to questions and provide fast and competent support to the product that they sell.
I would recommend both the scanner and the company to anyone looking to get into the digital scanning world.read less - 10/09/2019
Cad-Ray is the absolute best if you're in the market for digital dental tools. I have purchased two Medit scanners through them. There will be hiccups with any complex piece of machinery, but every time I have needed Cad-Ray, they have been there. I ...read moreCad-Ray is the absolute best if you're in the market for digital dental tools. I have purchased two Medit scanners through them. There will be hiccups with any complex piece of machinery, but every time I have needed Cad-Ray, they have been there. I recently had a scanner go down. I called Cad-Ray tech support and they got me on the phone with Medit immediately. Within a day, a replacement scanner was sitting on my desk. It doesn't get much better than that.read less - 10/03/2024
Mayoor Patel
Kaila is awesome with training and her customer service skills. Enjoy learning from her... Product (scanner) so far loving it. - 12/02/2021
P. Andrew Benson
For me, getting this scanner was not a choice between Medit vs Itero or Medit vs Trios. Those companies have already eliminated themselves from consideration based on ridiculous cost, ridiculous ongoing fees, and greater concern for petty proprieta...read moreFor me, getting this scanner was not a choice between Medit vs Itero or Medit vs Trios. Those companies have already eliminated themselves from consideration based on ridiculous cost, ridiculous ongoing fees, and greater concern for petty proprietary posturing than for ensuring full functionality of their products to their usership. Typical dental tech company stuff.
The real decision was between Medit vs continuing life in analog dentistry. Medit through Cad-ray was really the only choice. Awesome packages , awesome access to free training videos, awesome software updates, awesome access to live support, awesome support staff.
There's just nothing better in dentistry than to get a great product AND a chance to stick it to the man.read less - 6/16/2020
Very pleased with Heather :) She has been able to solve any and all issues I may be having, and does so within the same day if not right away! - 6/16/2022
Michael White
Everyone I have dealt with during the process of buying my new N4 VHF mill (which by the way is fantastic) last year to buying a new iMedit 500 scanner. Having the open type system has been a God send. No more held hostage by the 2 main systems us ...read moreEveryone I have dealt with during the process of buying my new N4 VHF mill (which by the way is fantastic) last year to buying a new iMedit 500 scanner. Having the open type system has been a God send. No more held hostage by the 2 main systems us same day crown dentists have had to deal with for years. Cad-ray made the financing a snap and the post customer support is unbelievable. Thank you everyone at Cad-Rayread less - 5/12/2020
Charlyn Quiec
Fast response. Customer service eager to help and very friendly. :) - 3/21/2023
Jennifer Hastings
Andy was wonderful with setting everything up and explaining everything. The Medit i700 has been great thus far, easy set up! The only "issue" is that it can be occasionally glitchy. - 1/11/2022
I bought the Medit i500 and self installed to save $$$. The web site provided great step by step instructions. The Facebook group filled in the gaps. The software has been continuously upgraded and works great for scanning and tracking cases sent and...read moreI bought the Medit i500 and self installed to save $$$. The web site provided great step by step instructions. The Facebook group filled in the gaps. The software has been continuously upgraded and works great for scanning and tracking cases sent and received. My tip for scanning single crowns: While waiting for anesthesia, Scan the upper and lower quadrants and record the bite. Then i delete the tooth to be scanned. That saves time later after tooth preparation. At that time, switch to HD and scan the prep, done!read less - 6/16/2020
Zachary Breen
I purchased the Medit i700 from CAD-Ray back in May and the purchasing process, setting-up and trouble shooting has been extremely easy and straight forward with CAD-Ray. The Medit i700 is one of the best, if not the best, scanner I have used in the ...read moreI purchased the Medit i700 from CAD-Ray back in May and the purchasing process, setting-up and trouble shooting has been extremely easy and straight forward with CAD-Ray. The Medit i700 is one of the best, if not the best, scanner I have used in the past 5 years of using intraoral scanners. Recently I ran into a software issues with my scanner and I am extremely impressed with CAD-Ray and Medit's timely manner in addressing my issue. Within minutes I was on the phone with them and they had my concerns addressed and solved. I previously recommended a few colleagues to CAD-Ray and I will continue to recommend with even greater enthusiasm. I am very pleased with their customer service and the Medit i700. Thank you CAD-Ray!read less - 9/30/2021
I purchased my Medit i500 scanner almost a year ago from CAD-Ray. Laura and the team there have been so responsive and ready to help. It is so nice to have a person answer the phone and be willing and able to assist! - 12/09/2021
Kurt Adamson
I purchased My first Medit i500 in Sept 2019, fairly easy to set up and learn. I was able to follow the instructions and videos without a problem. I learned tips and trick along the way by following the facebook groups. Anytime help was needed the g...read moreI purchased My first Medit i500 in Sept 2019, fairly easy to set up and learn. I was able to follow the instructions and videos without a problem. I learned tips and trick along the way by following the facebook groups. Anytime help was needed the group at Cad-Ray were quick and sincere finding a solution to problems. I ended up purchasing 2 more i500's in Dec 2019 for my other 2 offices. I didn't think I would enjoy the digital workflow as much as I do. If you on the fence like i was, just do it. get on the facebook groups and post the tips you learn along the way.read less - 1/17/2020
Se ve muy bien, aunque yo le tengo, pánico, a los Dentistas, Sorry, pero tengo que ir, Ni modo - 2/25/2015
Cole Smith
These guys are great. My favorite part about them is they set you up for success with your products. A lot of dental companies will be happy to sell you big ticket tech item but don't have much to set you up for success. I bought the Medit i500 and t...read moreThese guys are great. My favorite part about them is they set you up for success with your products. A lot of dental companies will be happy to sell you big ticket tech item but don't have much to set you up for success. I bought the Medit i500 and they have tons of videos on how to get it working and working well for you in your office. If you need a much of hand holding they have that our if you are like me and like the do it yourself videos they have that. I am sure you can buy these products all over but it is there service that sets them apart. If to are looking to buy some dental tech use these guys!read less - 6/05/2020
David Chong
Digital dentistry has changed my work flow for the better and could not imagine going back. So important that I have the support when things don't work as expected. CAD-Ray has been there every step and trust their expertise and knowledge! - 4/20/2022
Angelique Freking
I recently purchased the Medit i500 and am in love. I've used all the other scanners in my career, but this is my favorite hands down. I had a very easy, great purchasing experience and would happily refer anyone to this company and this particular s...read moreI recently purchased the Medit i500 and am in love. I've used all the other scanners in my career, but this is my favorite hands down. I had a very easy, great purchasing experience and would happily refer anyone to this company and this particular scanner.read less - 6/19/2020
John T
Frank and the CAD-Ray crew are awesome! They are always available for support with the technology you purchase from them. - 1/25/2023
jeremiah choi
Never had customer care like Cad-Ray, you can't go wrong purchasing through them. Trios is a great scanner. All the reps at Cad-Ray are very knowledgeable and helpful and will make sure you are up and running smoothly. Above and beyond customer serv...read moreNever had customer care like Cad-Ray, you can't go wrong purchasing through them. Trios is a great scanner. All the reps at Cad-Ray are very knowledgeable and helpful and will make sure you are up and running smoothly. Above and beyond customer service.read less - 8/27/2022
I had an issue that was due to the Medit settings. Damien logged on remotely to my laptop, and resolved the issue in a couple of minutes. Fantastic service. Thank you. - 8/27/2021
Provinces Dental
Cad-Ray has provided a great product! They have been super helpful with getting all of our questions answered and products to us in a timely matter! - 3/01/2022
Milton Ruiz
Best customer service I have ever experienced from any company I have worked with! They alway answer the phone and are ready to help with whatever question you may have. Love that I do not have to press 500 buttons to get to a live person. Bought my...read moreBest customer service I have ever experienced from any company I have worked with! They alway answer the phone and are ready to help with whatever question you may have. Love that I do not have to press 500 buttons to get to a live person. Bought my Medit from them and could not be happier with decision!read less - 12/20/2022
Jared Gustafson
We started our journey with CAD-Ray 3 years ago them helping us find a digital scanner that fits our practice needs and have relied on them for our 3D printing needs. They are an excellent company and I highly recommend them for their knowledge and s...read moreWe started our journey with CAD-Ray 3 years ago them helping us find a digital scanner that fits our practice needs and have relied on them for our 3D printing needs. They are an excellent company and I highly recommend them for their knowledge and service they provide. I would buy and dental tech needs from them!read less - 9/07/2022
Dixie Jernigan
The customer service we have received while working with Frank DeLuca is second to none! He is incredibly knowledgeable and enthusiastic, as well as always available to help with any issues. We are very pleased with CAD-RAY and relationship that they...read moreThe customer service we have received while working with Frank DeLuca is second to none! He is incredibly knowledgeable and enthusiastic, as well as always available to help with any issues. We are very pleased with CAD-RAY and relationship that they have with their clients.read less - 1/25/2023
Steven Cisternas
The future of digital dentistry is here now. Cad-ray provides all the tools needed to make it possible for us to provide digital care to our patients. Thanks Damien and Armen for a great course. - 8/07/2021
ryan ku
I've been using this for almost 2 months now and I just love it. At this price point, ROI is a no-brainer. The convenience factor is amazing. I only did the DIY online training and I'm pretty confident doing the scan. I've signed up for the actual ...read moreI've been using this for almost 2 months now and I just love it. At this price point, ROI is a no-brainer. The convenience factor is amazing. I only did the DIY online training and I'm pretty confident doing the scan. I've signed up for the actual course so looking forward to seeing it's greater potentials.read less - 10/14/2019
The support is even better then the camera itself. I used many other scanners and this is by far the best one. Recommended to many people. Looking to purchase a second one for my practice. The use and results are amazing. No adjustments to the p...read moreThe support is even better then the camera itself. I used many other scanners and this is by far the best one. Recommended to many people. Looking to purchase a second one for my practice. The use and results are amazing. No adjustments to the prosthetics at all.read less - 7/15/2020
Benjamin Polan
A while ago I became interested in an intra oral scanner for my office especially for dental sleep medicine and TMJ appliances. I searched online for Medit and found cad ray. Laura from Cad-ray quickly responded and set up a zoom meeting so she could...read moreA while ago I became interested in an intra oral scanner for my office especially for dental sleep medicine and TMJ appliances. I searched online for Medit and found cad ray. Laura from Cad-ray quickly responded and set up a zoom meeting so she could demo the unit. Great job at helping me understand. She set up the financing and I got my unit. A few glitches with my internet speed and getting IT to help with my upload and download speeds and I was ready to go. Every time I had a question I texted Laura and almost like she was waiting for my call she responds. We it turned out my unit wasn't just right so she immediately responded we will replace you unit. Laura has been a joy to work with and the customer service given will only encourage me to do business with cad-ray again.
Benjamin Polan DMD, D,ABDSMread less - 8/27/2021
Been using my i700 for a month now and it's been great. The tutorials that Cad-ray provides have been very helpful. This scanner with a fast computer turns out great results. - 11/01/2021
I'm really grateful with the service CAD-Ray has provided! I'm also very happy with Laura's presentation with the Medit i700, and overall help in choosing the right scanner for my practice. I'm really happy with the scanner and the SprintRay Pro 95 P...read moreI'm really grateful with the service CAD-Ray has provided! I'm also very happy with Laura's presentation with the Medit i700, and overall help in choosing the right scanner for my practice. I'm really happy with the scanner and the SprintRay Pro 95 Printer as well. Thank you.read less - 8/31/2021
Ive had the medit since 2018. One of the best decisions in dentistry ive made. I met some of the great trend setters in digital dentistry(armen, jonathan ab and others through social media platforms). Medit Has changed The way i practice, live and ...read moreIve had the medit since 2018. One of the best decisions in dentistry ive made. I met some of the great trend setters in digital dentistry(armen, jonathan ab and others through social media platforms). Medit Has changed The way i practice, live and think! Happy not to have a monthly fee as i did for years. Support is always a message or call away. Would be glad
To further share my experience with you if u need.read less - 6/16/2020
Rusty Fitton
Super happy with our purchase of the Medit i500 from Cad Ray. Overall its a work horse scanner that has handled anything weve thrown at it. The key to success with it is definitely taking the time to actually learn how to use it after purchase. Ca...read moreSuper happy with our purchase of the Medit i500 from Cad Ray. Overall its a work horse scanner that has handled anything weve thrown at it. The key to success with it is definitely taking the time to actually learn how to use it after purchase. Cad Ray has an immense library of straight forward education videos that are updated basically daily. I havent done the 2 day course but that is also included in the purchase. You really cant find that sort of service and education with any of the other scanners on the market. Id recommend them to anyone.read less - 6/26/2020
Aaron LaRock
Dentist here. Bought a scanner, mill and 3d printer with Cad-Ray. I don't know what I'd do if I bought these items without their support. They've helped me so much and are awesome. I felt I had to repay by writing them this nice review. You won't reg...read moreDentist here. Bought a scanner, mill and 3d printer with Cad-Ray. I don't know what I'd do if I bought these items without their support. They've helped me so much and are awesome. I felt I had to repay by writing them this nice review. You won't regret getting whatever you need through Cad Ray.read less - 3/15/2024
Farshad Rouhani
I do not know if it is okay to use the F word on this page. But I F@#KING LOVE MY MEDIT with the new filters now.
Scan the teeth with the middle filter, then go to the first 1 and get the palate in less than 1 minute. AMAZING
I have since s...read moreI do not know if it is okay to use the F word on this page. But I F@#KING LOVE MY MEDIT with the new filters now.
Scan the teeth with the middle filter, then go to the first 1 and get the palate in less than 1 minute. AMAZING
I have since sold my ITERO and JUST HATE my OMNICAM EVERYDAY.read less - 3/01/2020
Great help when you need it. Frank, Armen and team will take care of you. - 12/10/2021
Michael Gagaoudakis
Awesome company. The video collection CAD-Ray has put together for their equipment is unparalleled. There is literally no other company that has a library of learning tools like Armen and his team have put together. I highly recommend this company if...read moreAwesome company. The video collection CAD-Ray has put together for their equipment is unparalleled. There is literally no other company that has a library of learning tools like Armen and his team have put together. I highly recommend this company if you are considering making a digital equipment investment. 5 stars!read less - 6/16/2020
Cody Boseman
Cad-ray has been amazing, not to mention they have an amazing product in the medit i500. Their training is great, customer service is quick and thorough, and follow up is consistent. I highly recommend using cad-ray for anything that you may need. - 6/19/2020
Yen Tran
Jonathan and Nick have been a great tremendous help. They went out of their ways to help me upgrade my Medit i500 even though I didn’t purchase my Medit i500 scanner from them. They are the largest Medit scanner distributor and they have the custome...read moreJonathan and Nick have been a great tremendous help. They went out of their ways to help me upgrade my Medit i500 even though I didn’t purchase my Medit i500 scanner from them. They are the largest Medit scanner distributor and they have the customers’ interest at heart. They are super responsive to phone calls, emails, and Facebook messages. I highly recommend their servicesread less - 9/01/2021
Aaron Gelfand
Worked with Laura and she is incredibly knowledgeable. She gave me all the right advice and steered me in the right direction. Her ongoing support is as good as it gets. I feel like I have a 24 hour team at my beckoning call. For the meat and pot...read moreWorked with Laura and she is incredibly knowledgeable. She gave me all the right advice and steered me in the right direction. Her ongoing support is as good as it gets. I feel like I have a 24 hour team at my beckoning call. For the meat and potatoes. I got an Icam 4D from her and now I am printing all on 4 arches same day surgery at our practice in Denver(NUSET). We are going to put ICams and Trios’ in all our offices thanks to Laura and the Cad-Ray team. If you have any questions about the workflow and the success we are having with the Digital work flow call Laura and I will help you succeed with her product support.Thank you Laura and Cad-Ray!read less - 4/28/2022
Mital Patel
Cad-ray has been awesome with support and training! I got the medit in 2018 and couldn’t imagine practicing without it! Armen and frank somehow seem to be available at all hours of the day, and I can typically have them remote in same day if I need a...read moreCad-ray has been awesome with support and training! I got the medit in 2018 and couldn’t imagine practicing without it! Armen and frank somehow seem to be available at all hours of the day, and I can typically have them remote in same day if I need any help.read less - 6/16/2020
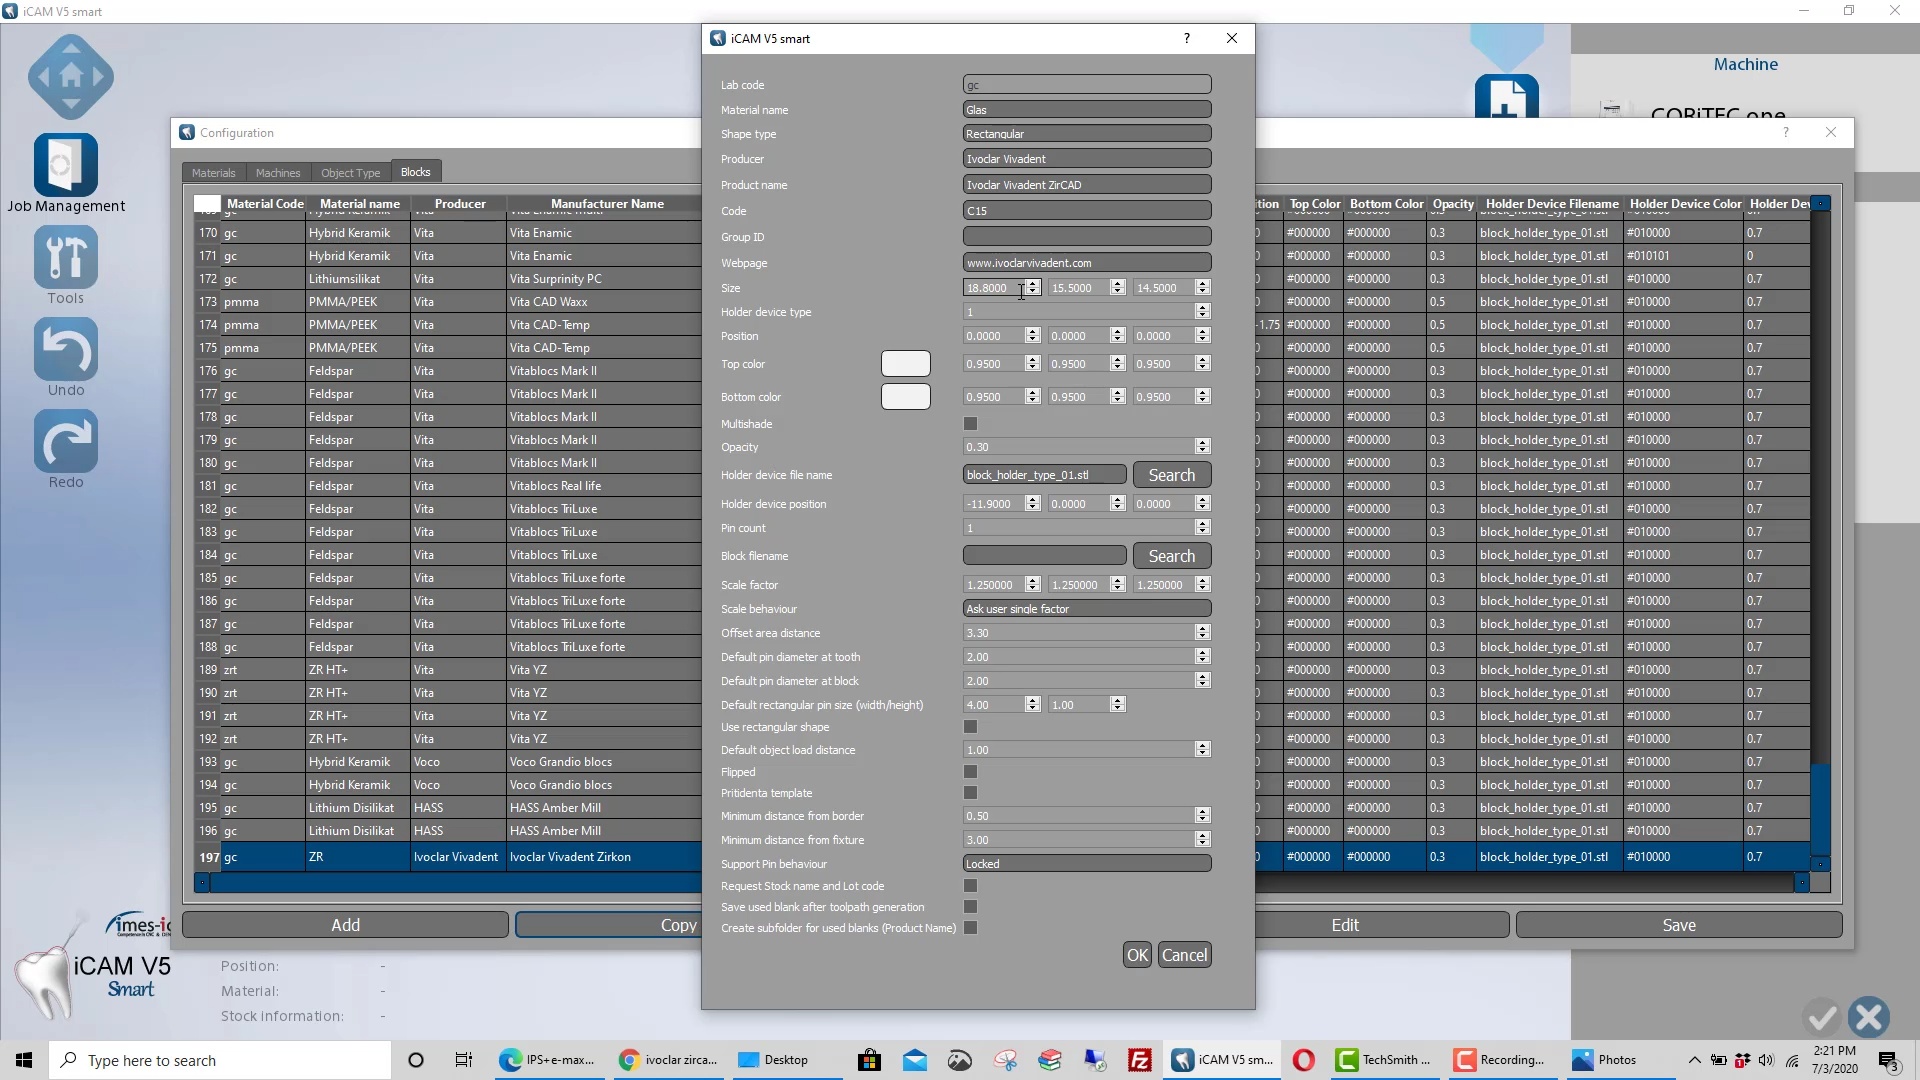
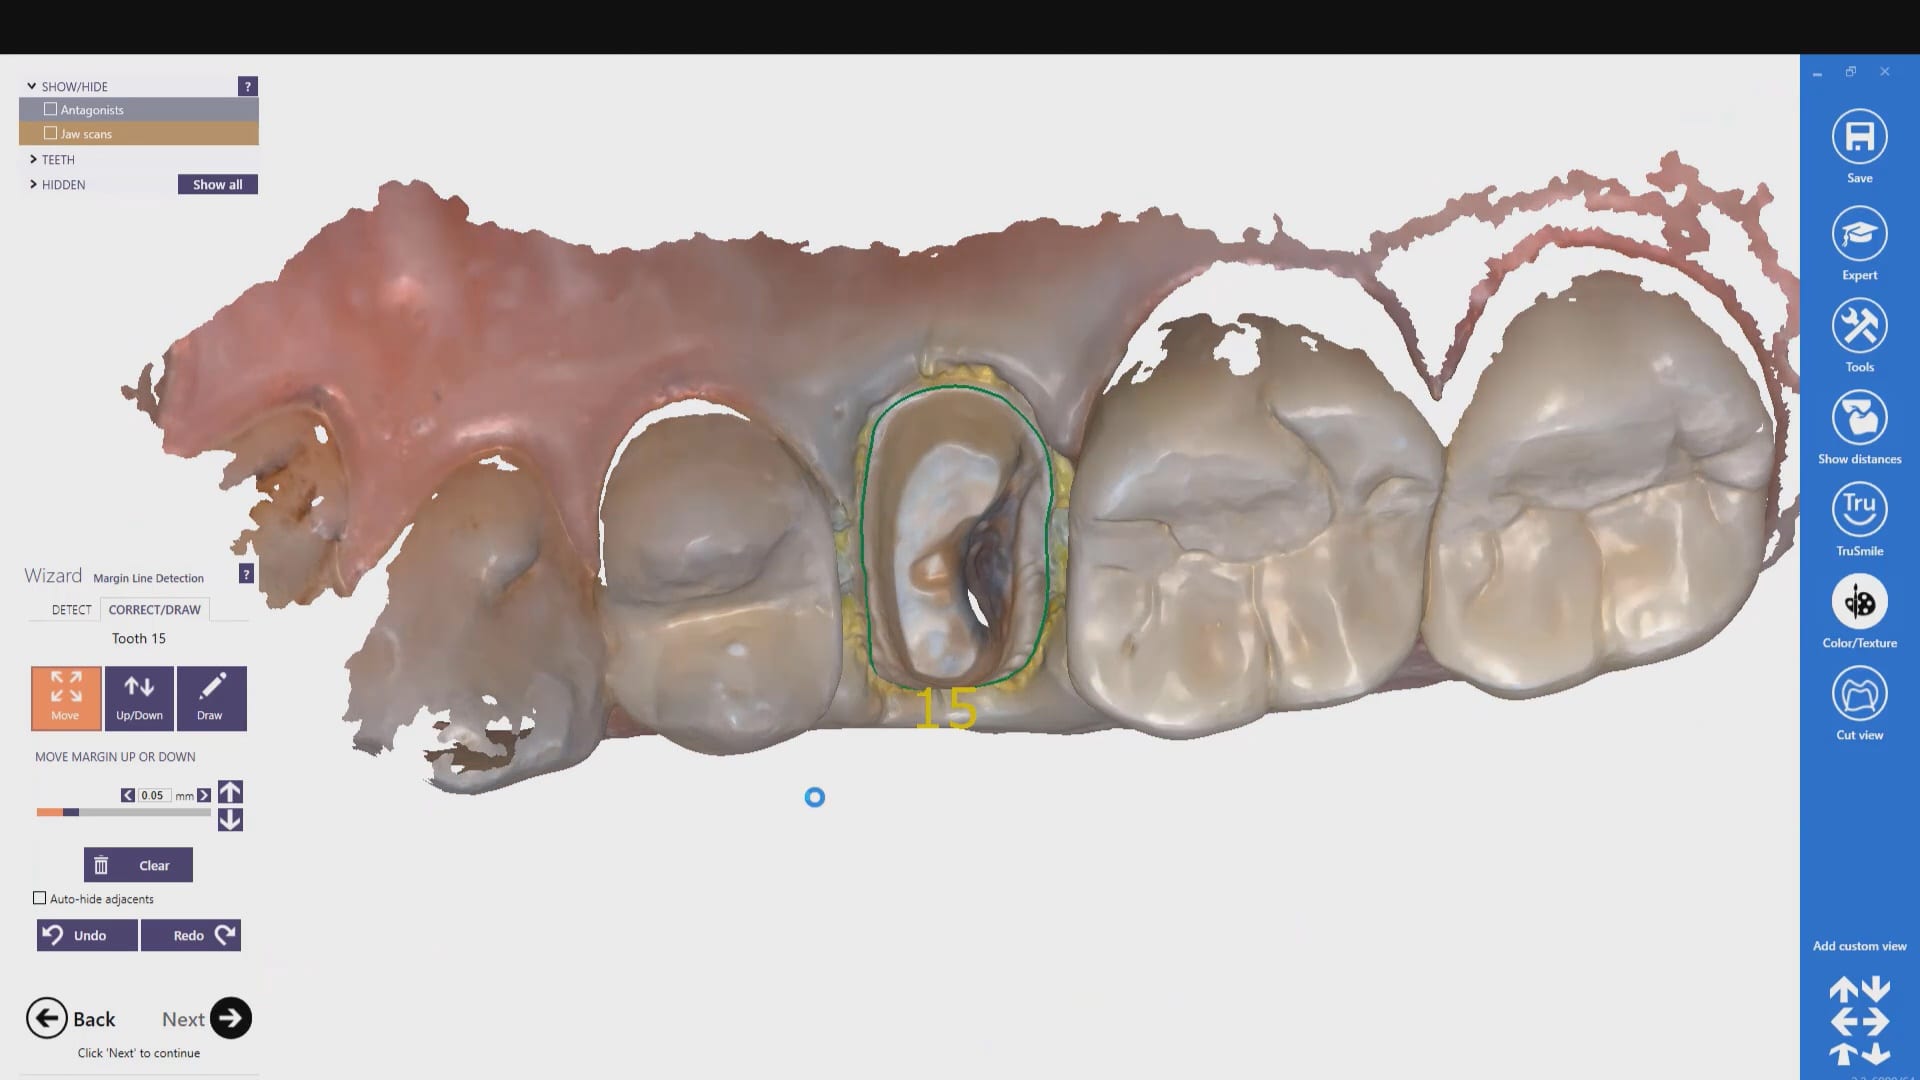
For our coritec users: new users often mislabel restorations in the Rx form that leads to a lot of trouble. like calling a crown and onlay or vice versa. this can lead to all kinds of trouble
first sign of trouble is if the two purple lines don’t define the borders of the the restoration. sometimes it is missing, other times it is off the restoration. so always double check this step and usually the missed nomenclature is what causes the trouble.
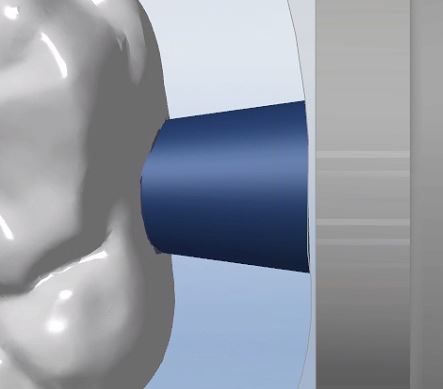
the next problem people have is that the default setting for the sprue design is poor. it makes the sprue thicker at the mandrel than the restoration. this creates a crevice that the drill can’t get to. this leads to quick drill breakage as it tries to drill into that space (red circle). it is easy to set change these settings so the drill “flows” with the design of the sprue and you get a lot of use out of it. it’s annoying to do this manually so a subsequent video shows you how to change this by default.
another problem is the offset. the last video shows the distance from the restoration to the mandrel as 2mm. the drill is 2.5 in diameter. if you set it at 2, the calculation doesn’t allow enough space for the drill that also breaks it off. set it at 2.7 or 3 and it will last you a long time.
two subsequent videos will show you how to create your own blocks and change their orientation, so you can fit a taller design into a smaller size block
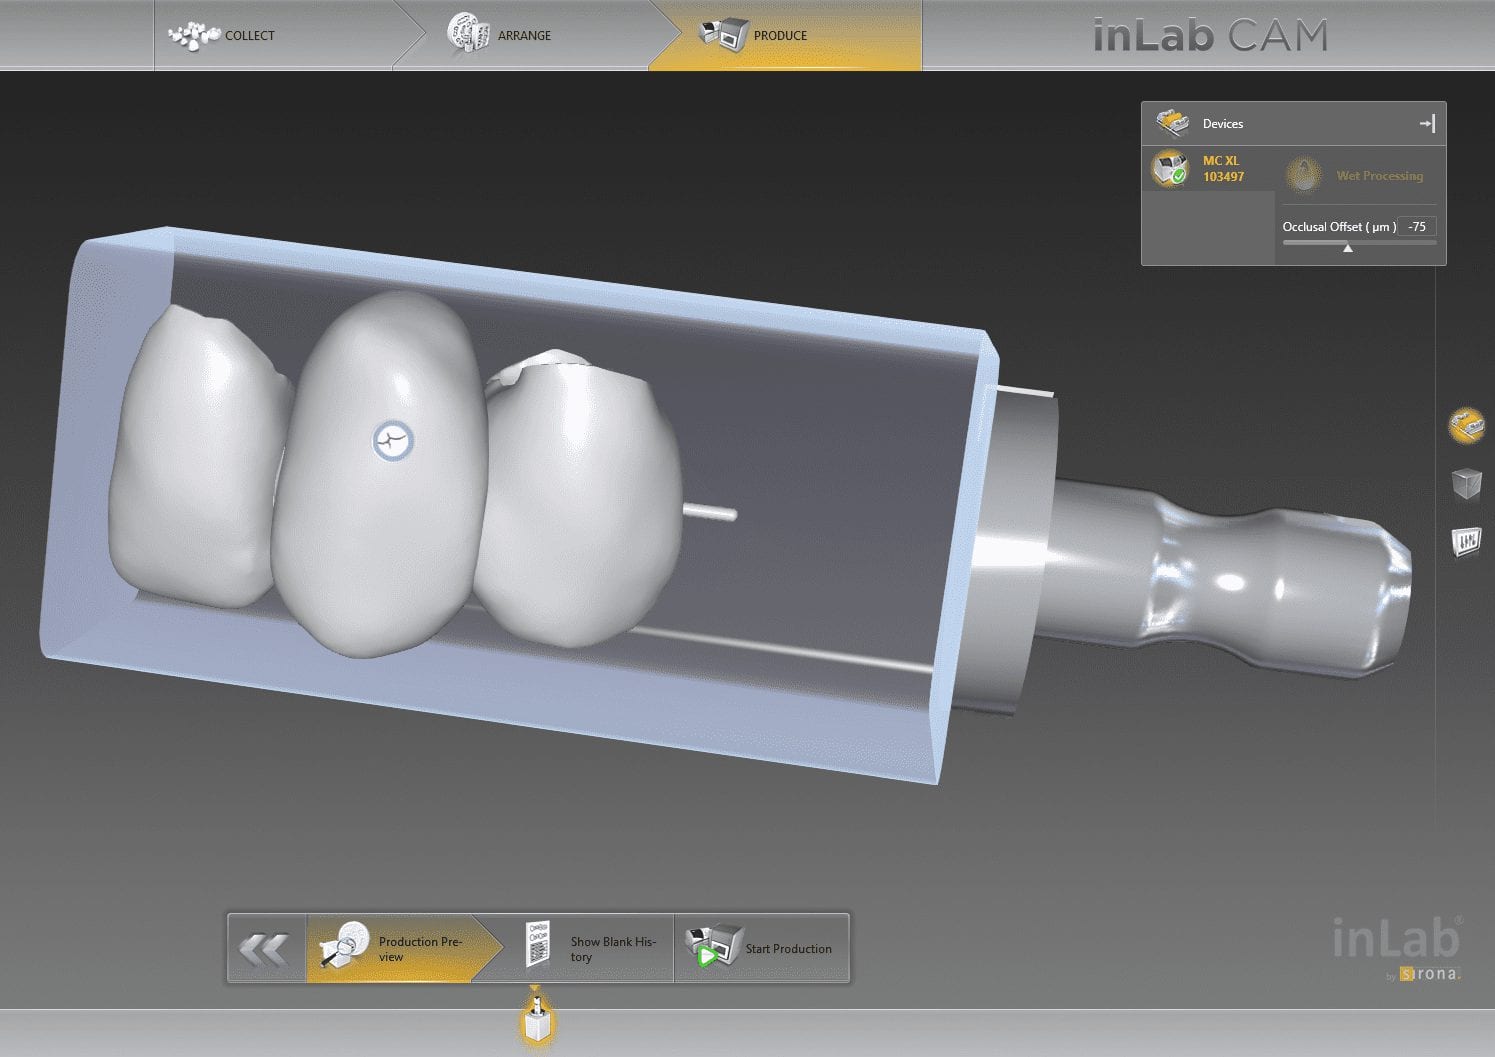
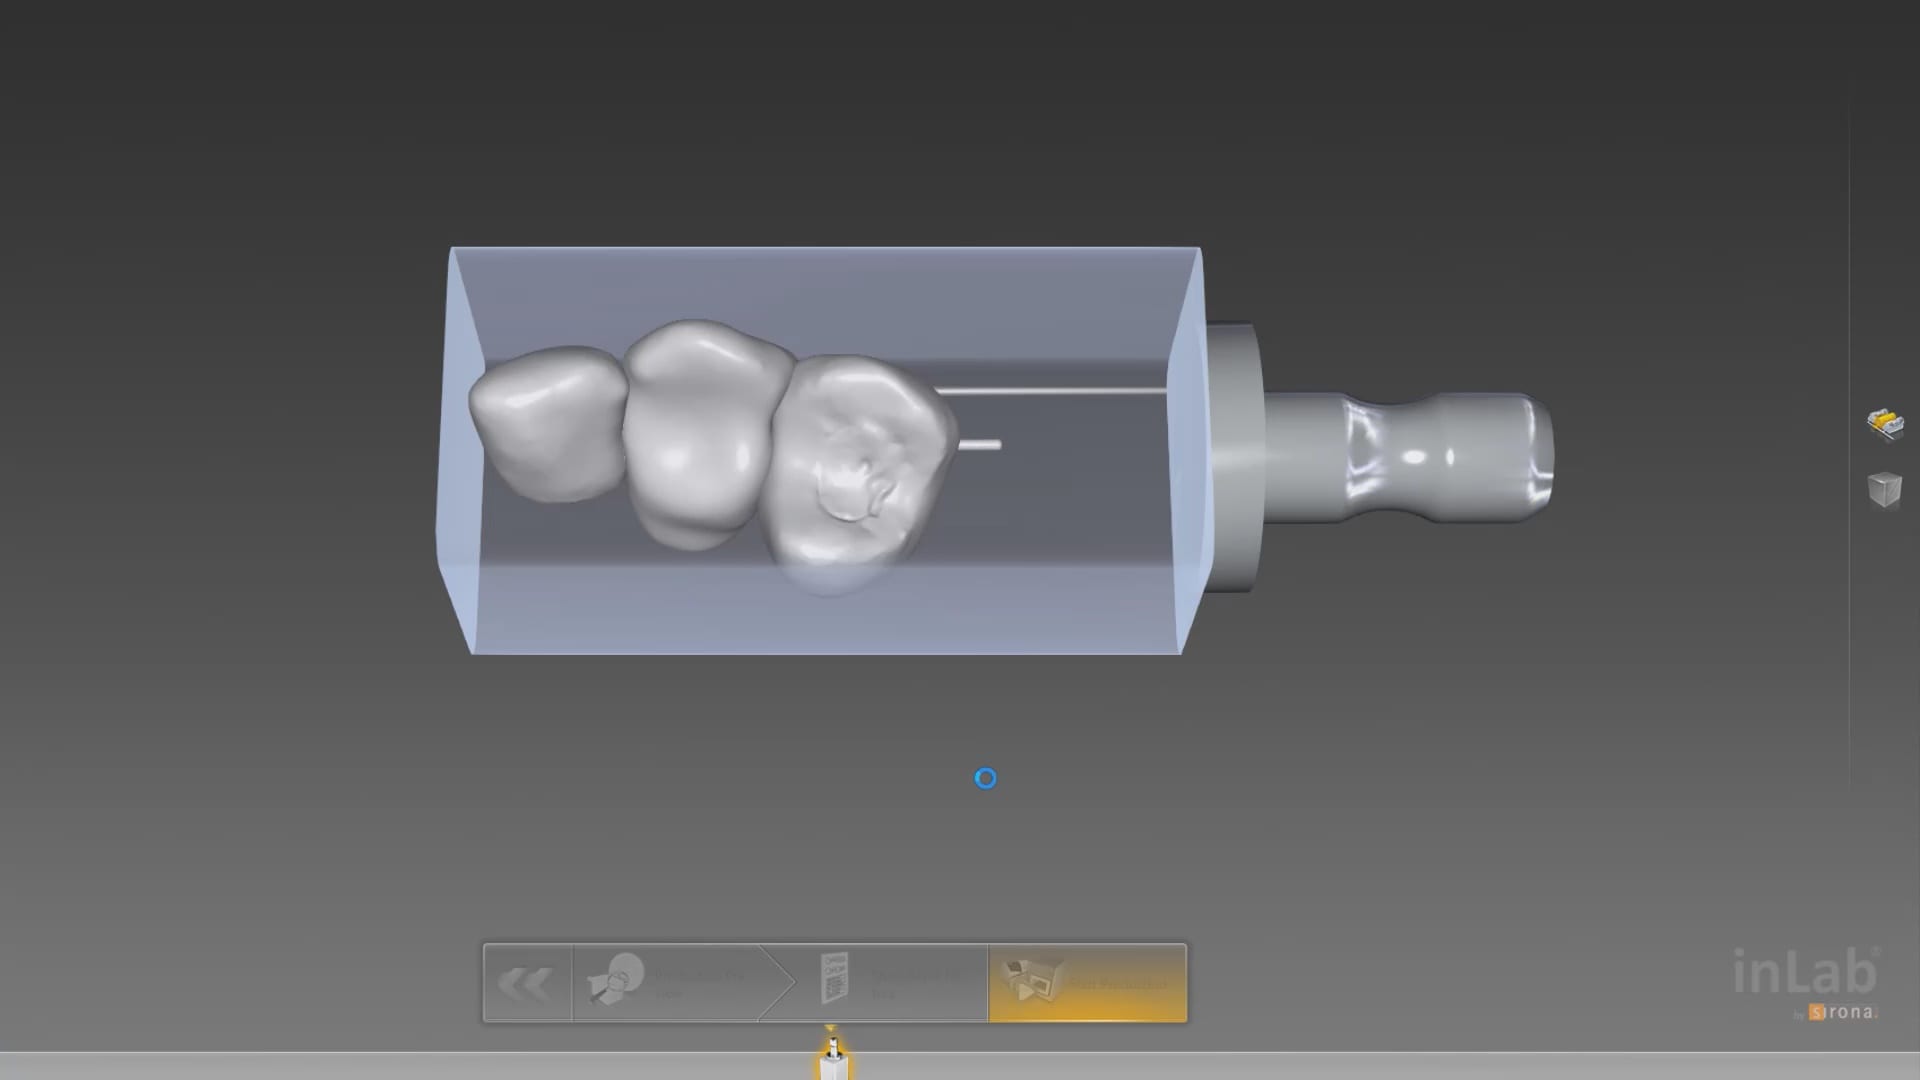
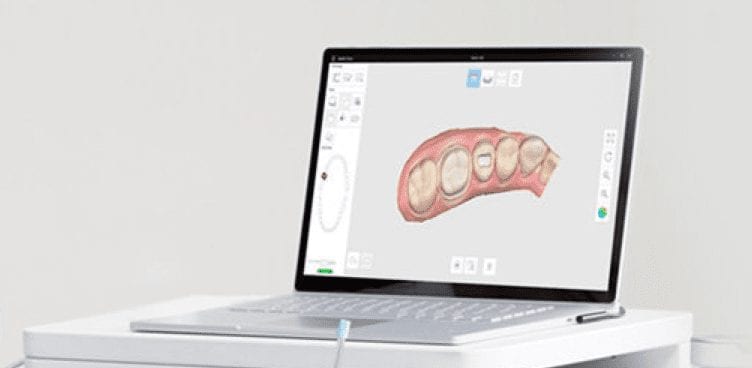
In Digital Dentistry, once you acquire your models accurately, the CAD software doesn’t care where and how you capture them. Once you are done with the design, the cam and the milling machine have no clue what scanner you used.
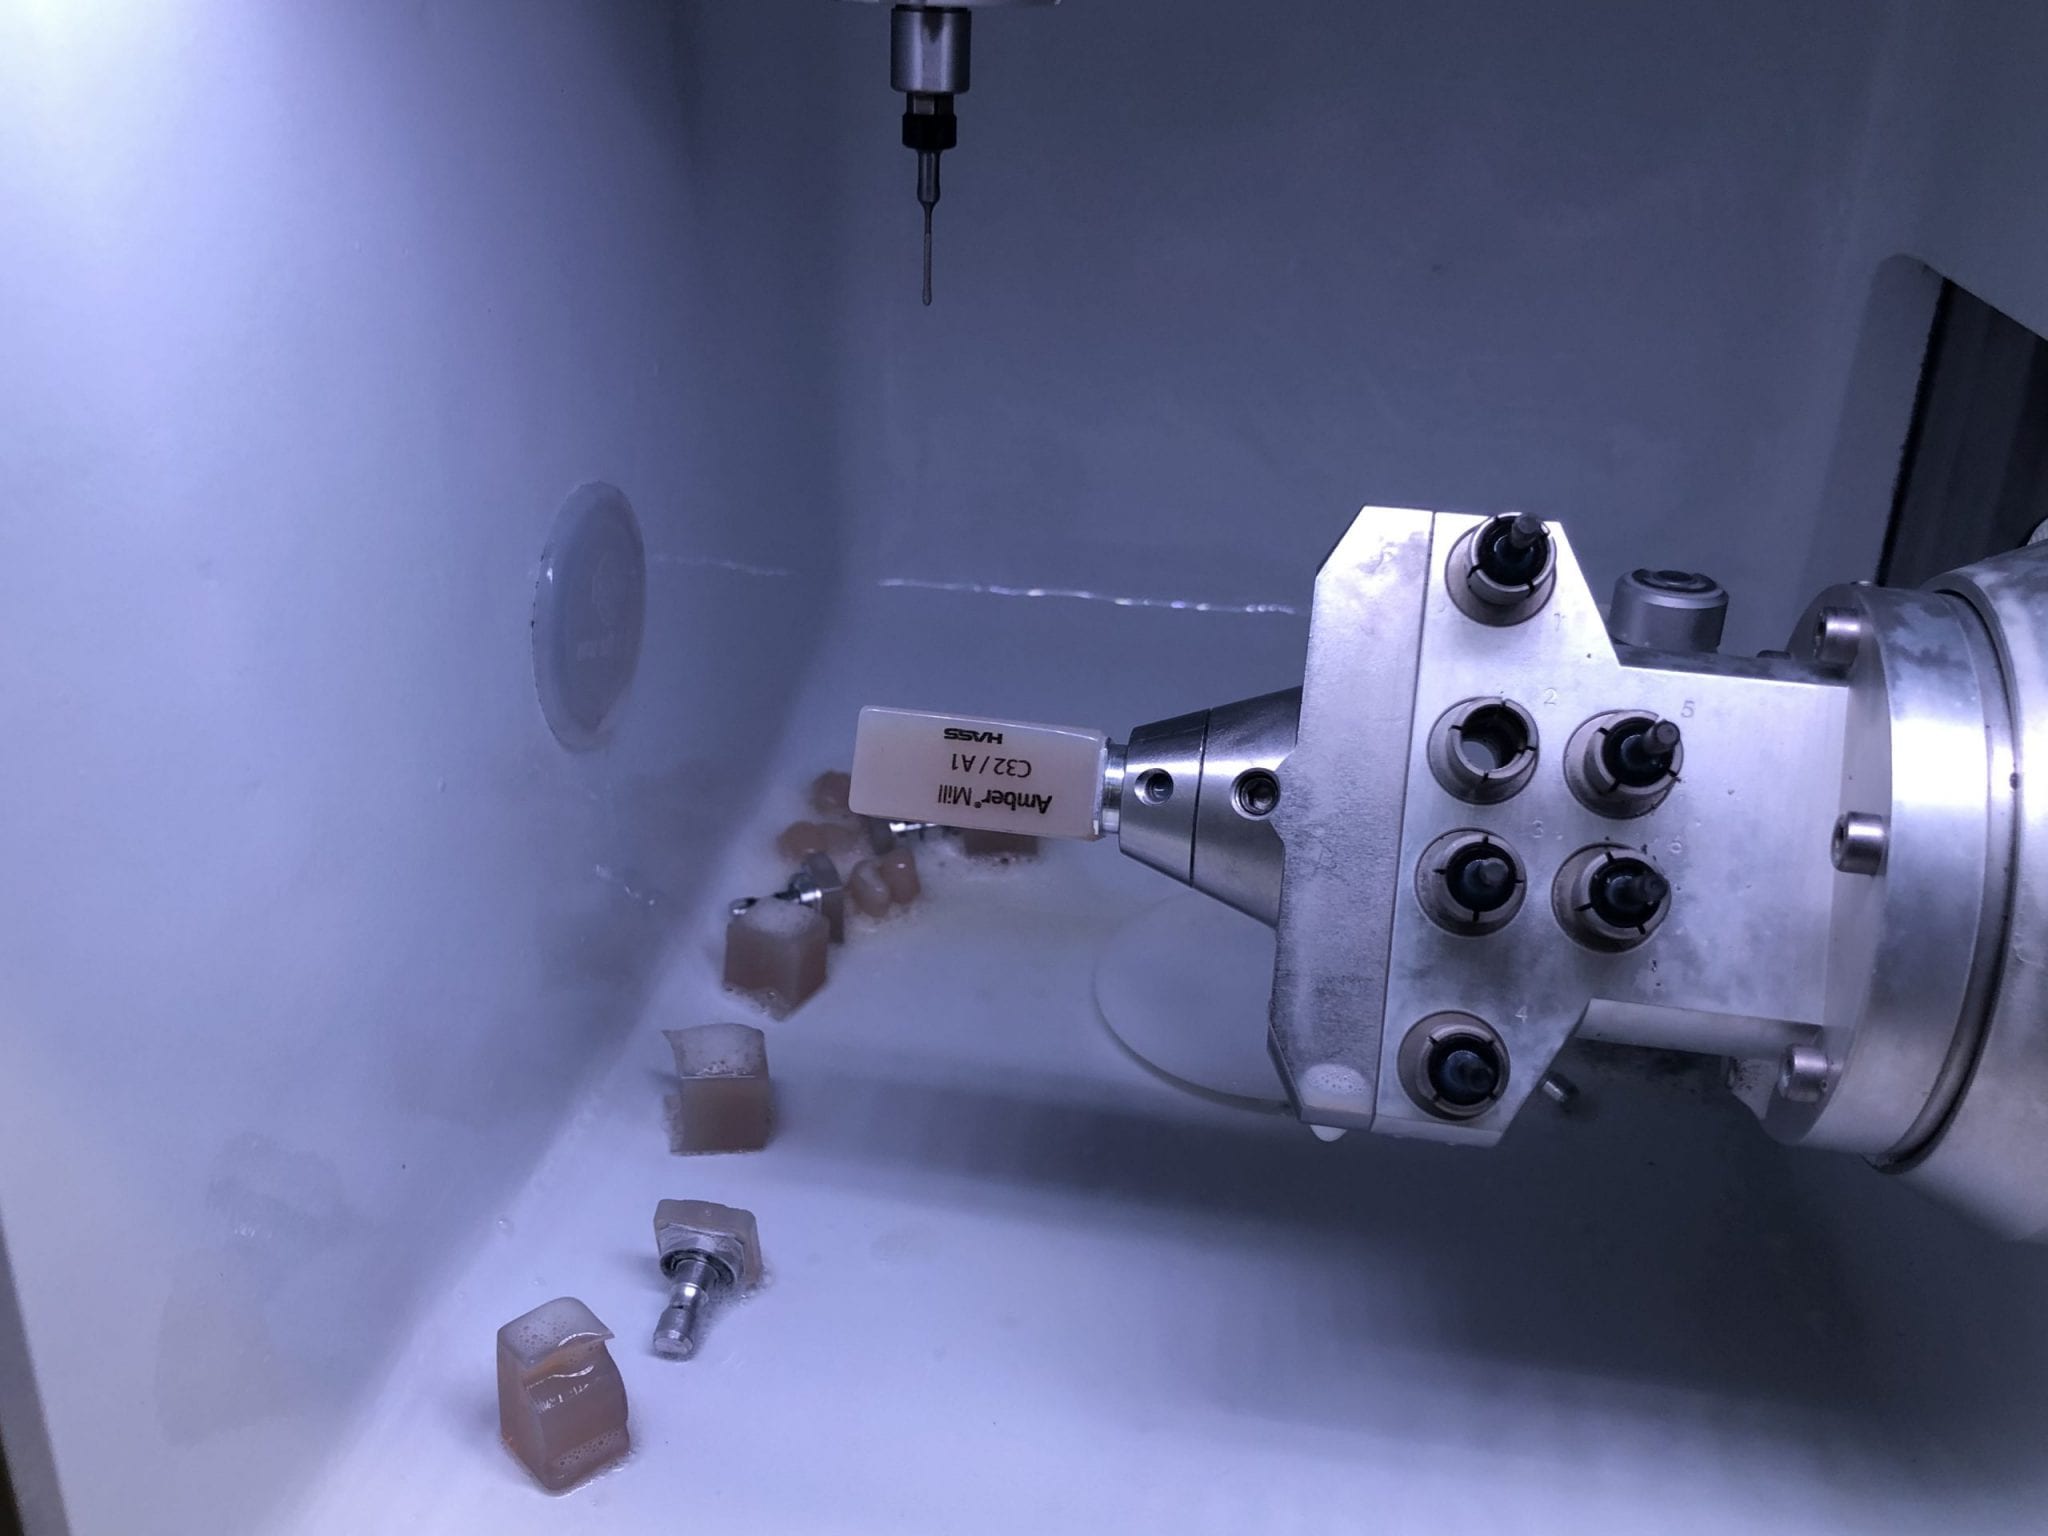
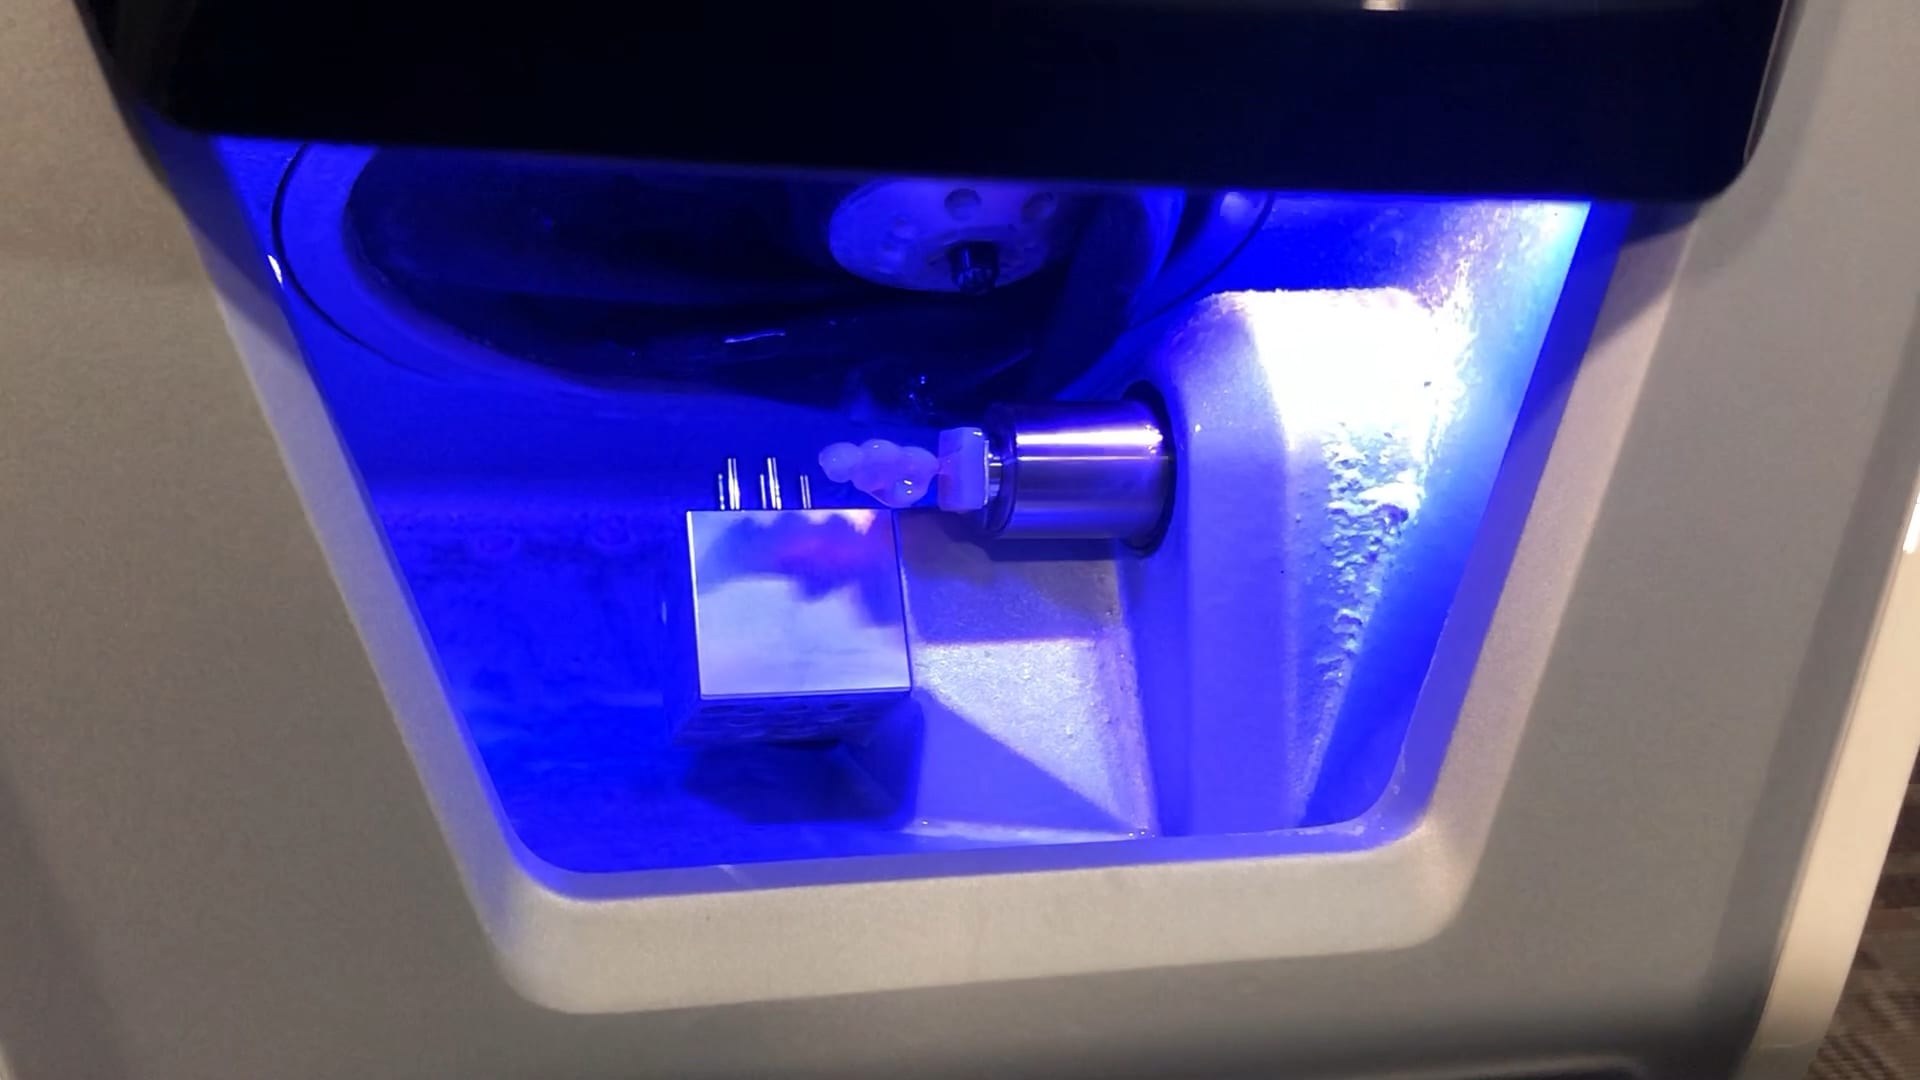
here we take an intra-oral scan with the medit i500 and design in exocad and send it to 2 different milling machines. One is the CEREC MCXL and the other is the imes icore coritec one.
Please Note: This page is from dentalcadcamshop.com: 13.03.2020
When it comes to single visit dentistry (procedures in under 90 minutes), CEREC is tough to beat. From the integrated camera, CAD software and mill, CEREC is the most streamlined technology to serve patients in one visit.
Nevertheless, increasingly doctors are expanding their range of indications with CAD/CAM technologies and sometimes we simply want to combine CEREC with other equipment and software manufacturers. But wait, isn’t CEREC a closed system? Yes and no. While nobody would accuse CEREC of being a completely open system, it is possible to export .STL files of CEREC scans which gives us some flexibility to bring CEREC scans into other programs.
But today we are not focusing on exporting CEREC scans, but rather:
1) How can we bring scans from other cameras into CEREC?
Example: I own a 3rd Party Camera and I want to import those scans into CEREC for making crowns, etc.
2) How can we use CEREC to mill CAD objects made from 3rd Party Software?
Example: I own a 3rd Party CAD Software and want to import those into CEREC for milling.
But wait, I thought no 3rd Party files (scans or CAD designs) may be imported into CEREC. How, then, can we unlock the system? The missing piece to the puzzle is the inLab Software! With inLab Software, the CEREC system can be opened up for all kinds of interesting workflows. Here are two workflows CEREC owners constantly ask us about:
1) I own a 3rd Party Camera – How do I mill from my MC XL?
2) I own a 3rd Party CAD Software (e.g. exocad) and I want to mill (e.g. crowns) designed with 3rd Party software and mill them with my MC XL
Please note carefully the Requirements listed above!
– If you want to import a Scan .STL… You will need the inLab SW Interfaces Module, inLab CAD Software (18.0 and above) andthe inLab CAM Software (18.0 and above).
– If you want to import CAD .STL designs for milling… You only need inLab CAM Software (18.0 and above).
– In case you never owned any inLab Software before, or your copy of inLab Software is below 4.X, you will additionally need to order the License Stick (SKU: 6364785) and install the License Stick on the PC or workstation on which you are using the inLab Software (CAD or CAM). Please note this is NOT the same License Stick as you have on your CEREC AC unit!
– In no case can the inLab Software mill on the CEREC MC!
Still have questions? No problem, we are here with answers: Contact us
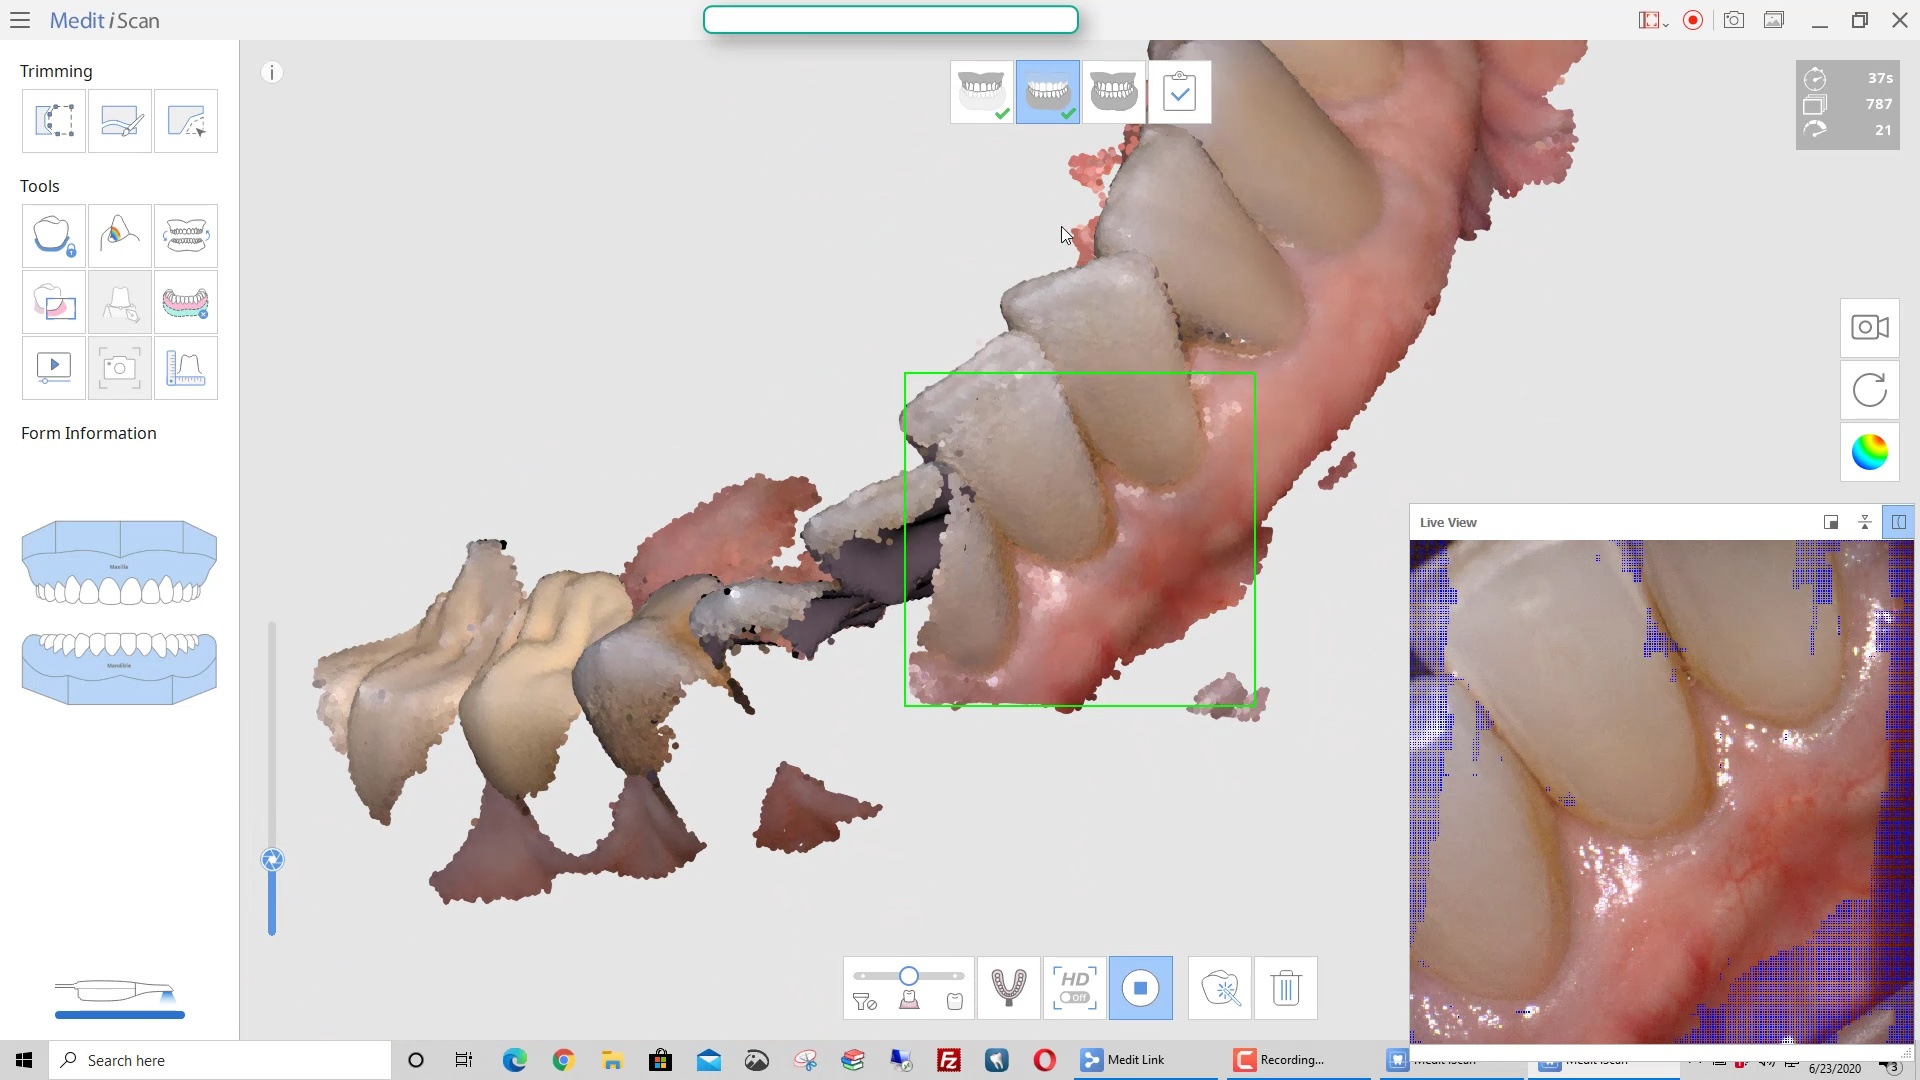
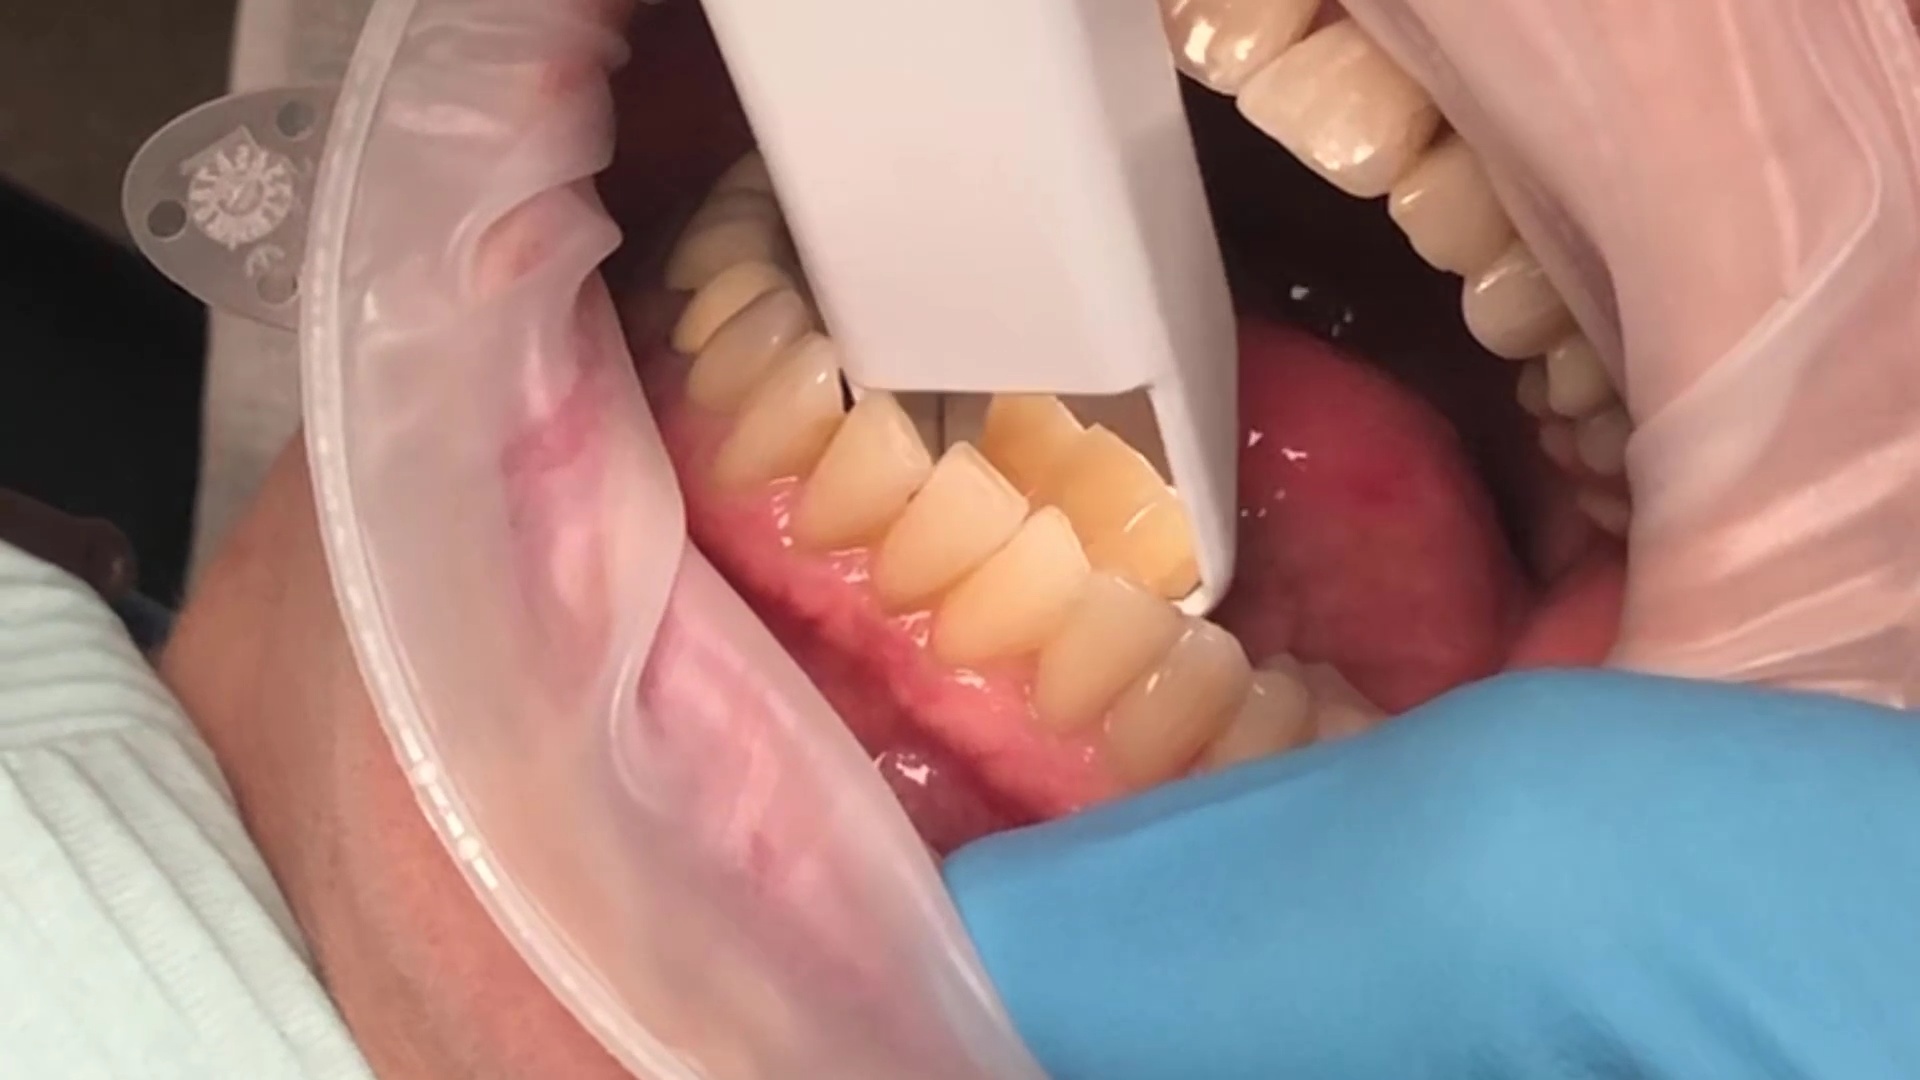
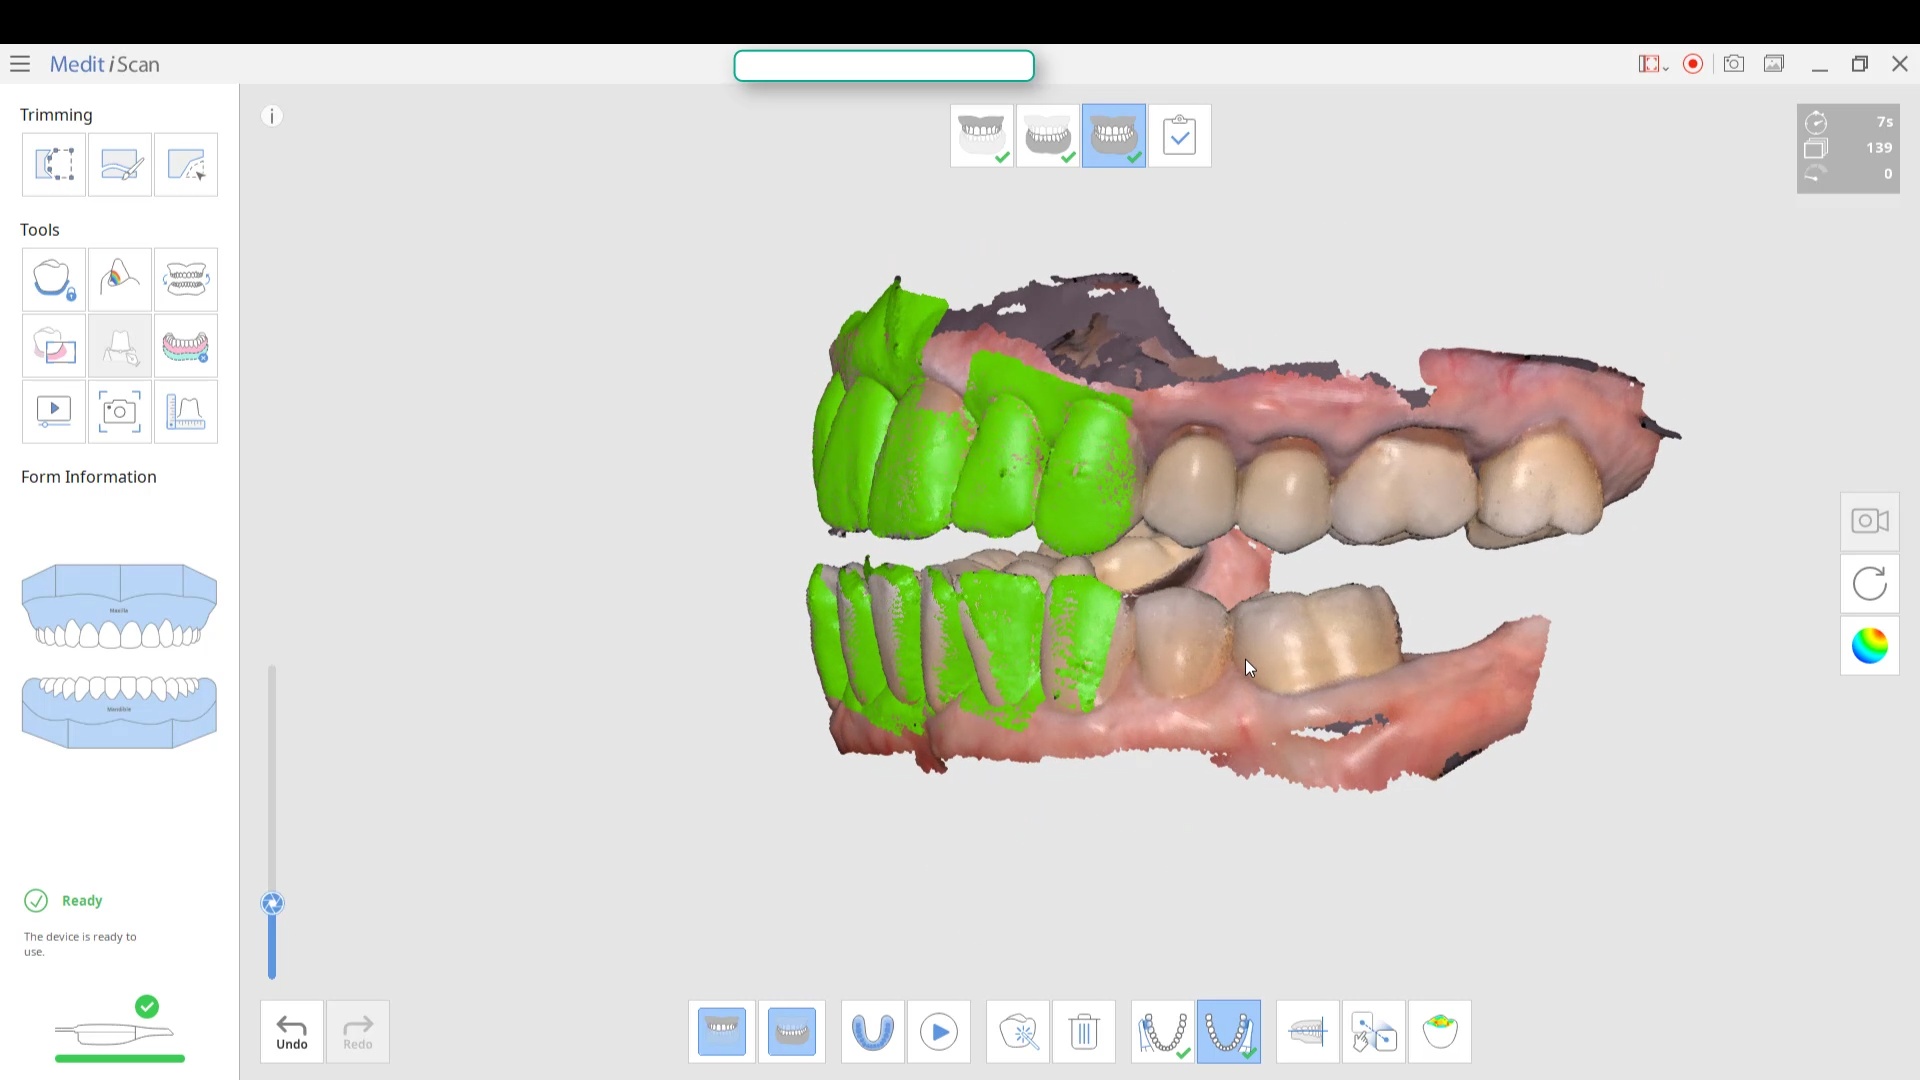
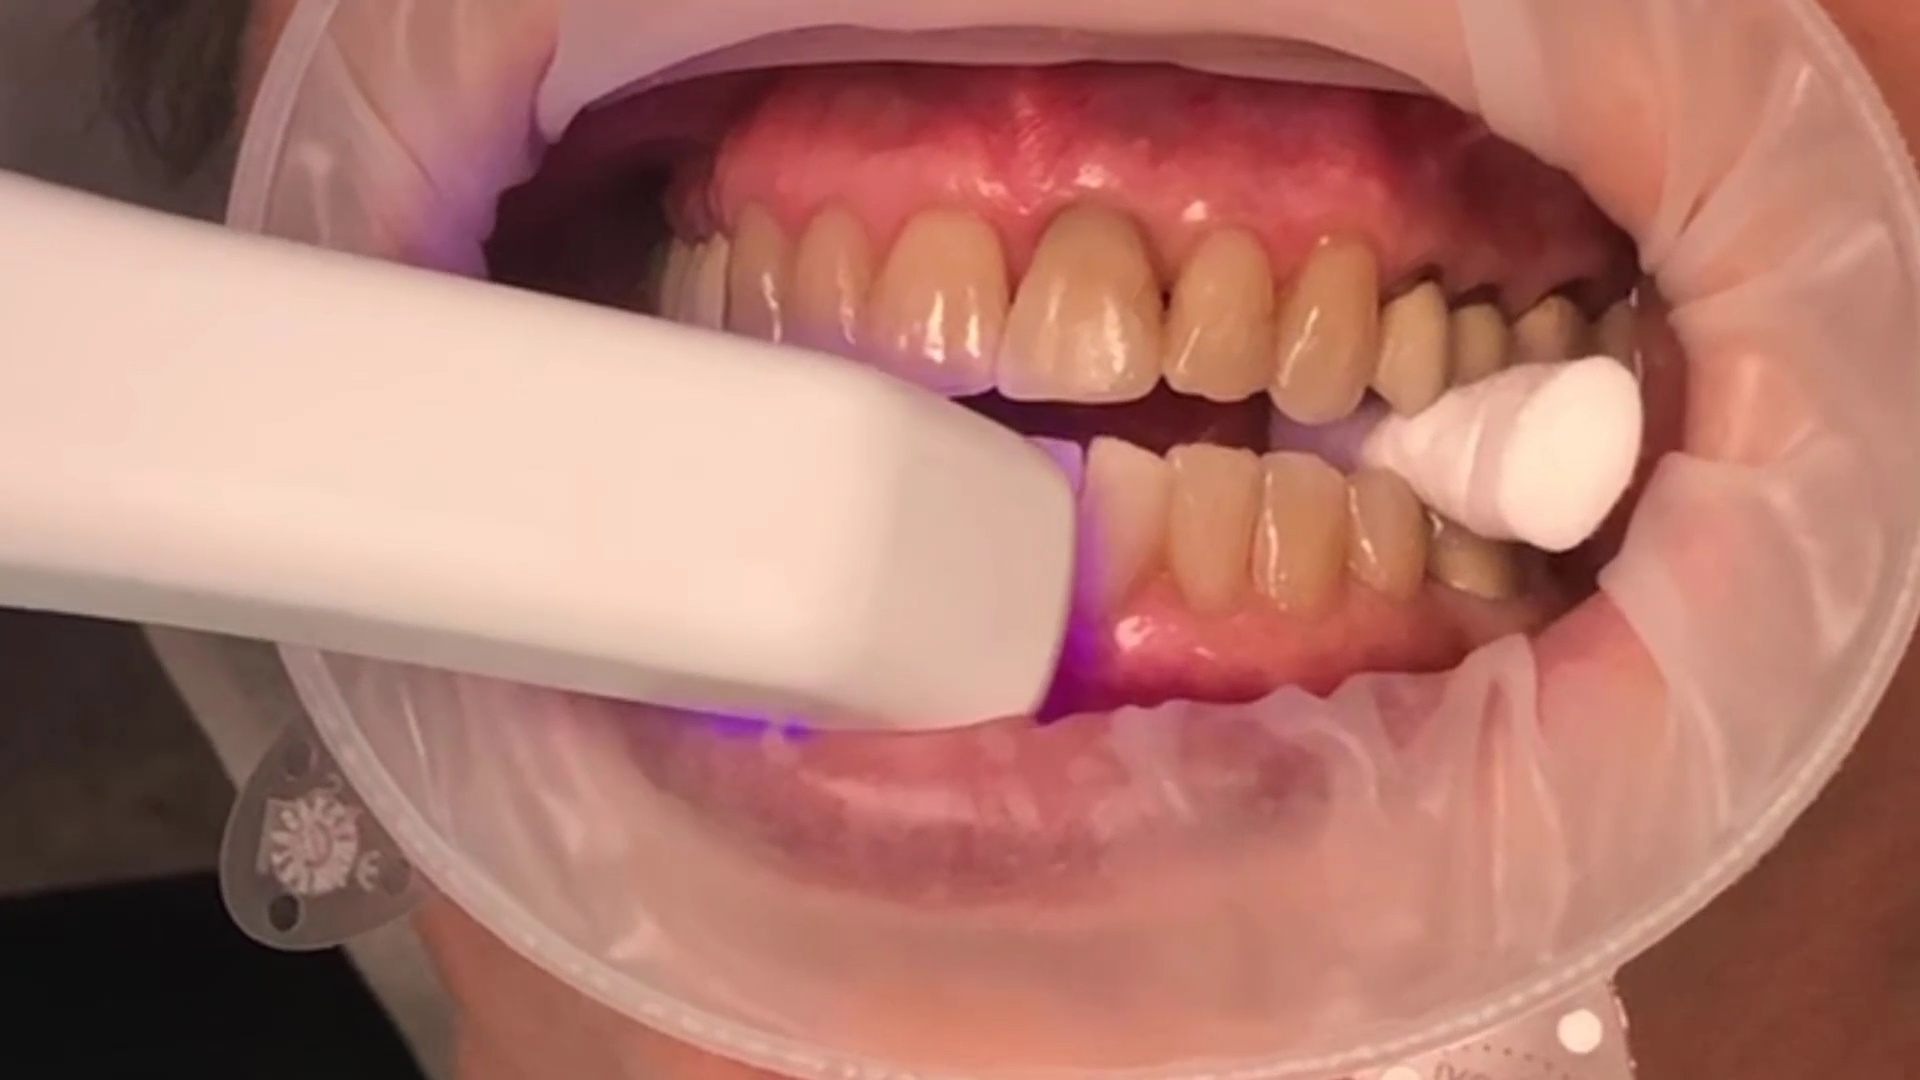
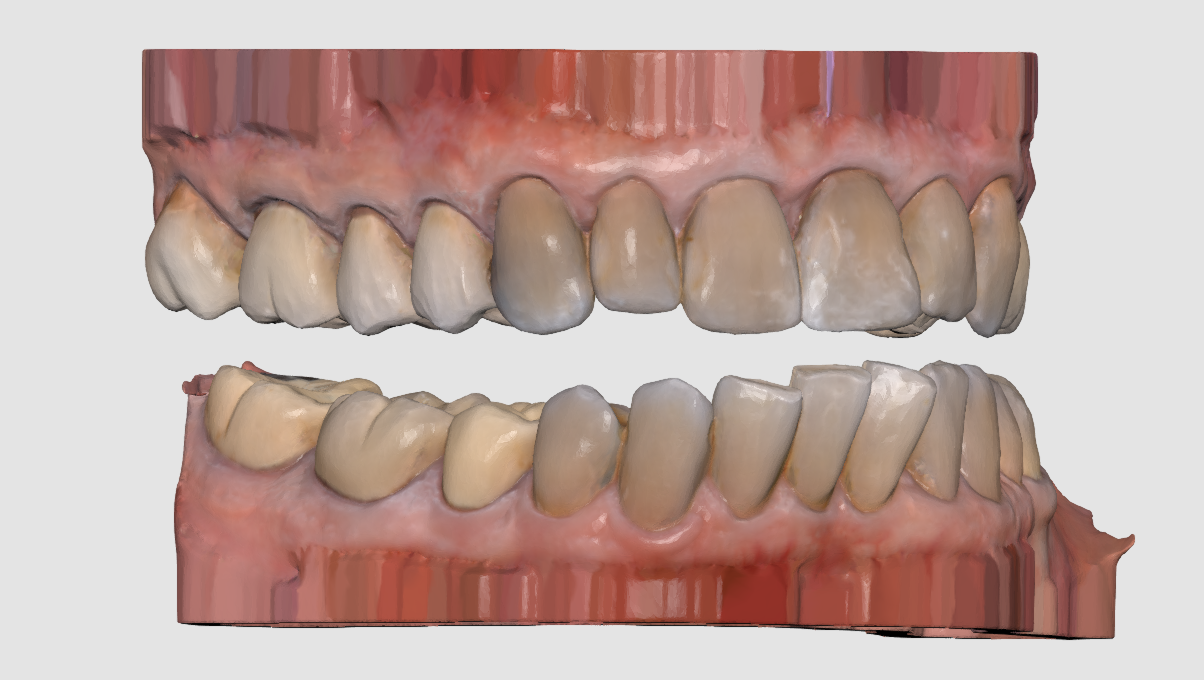
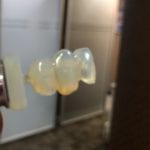
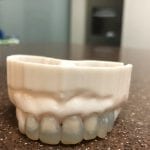
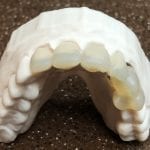
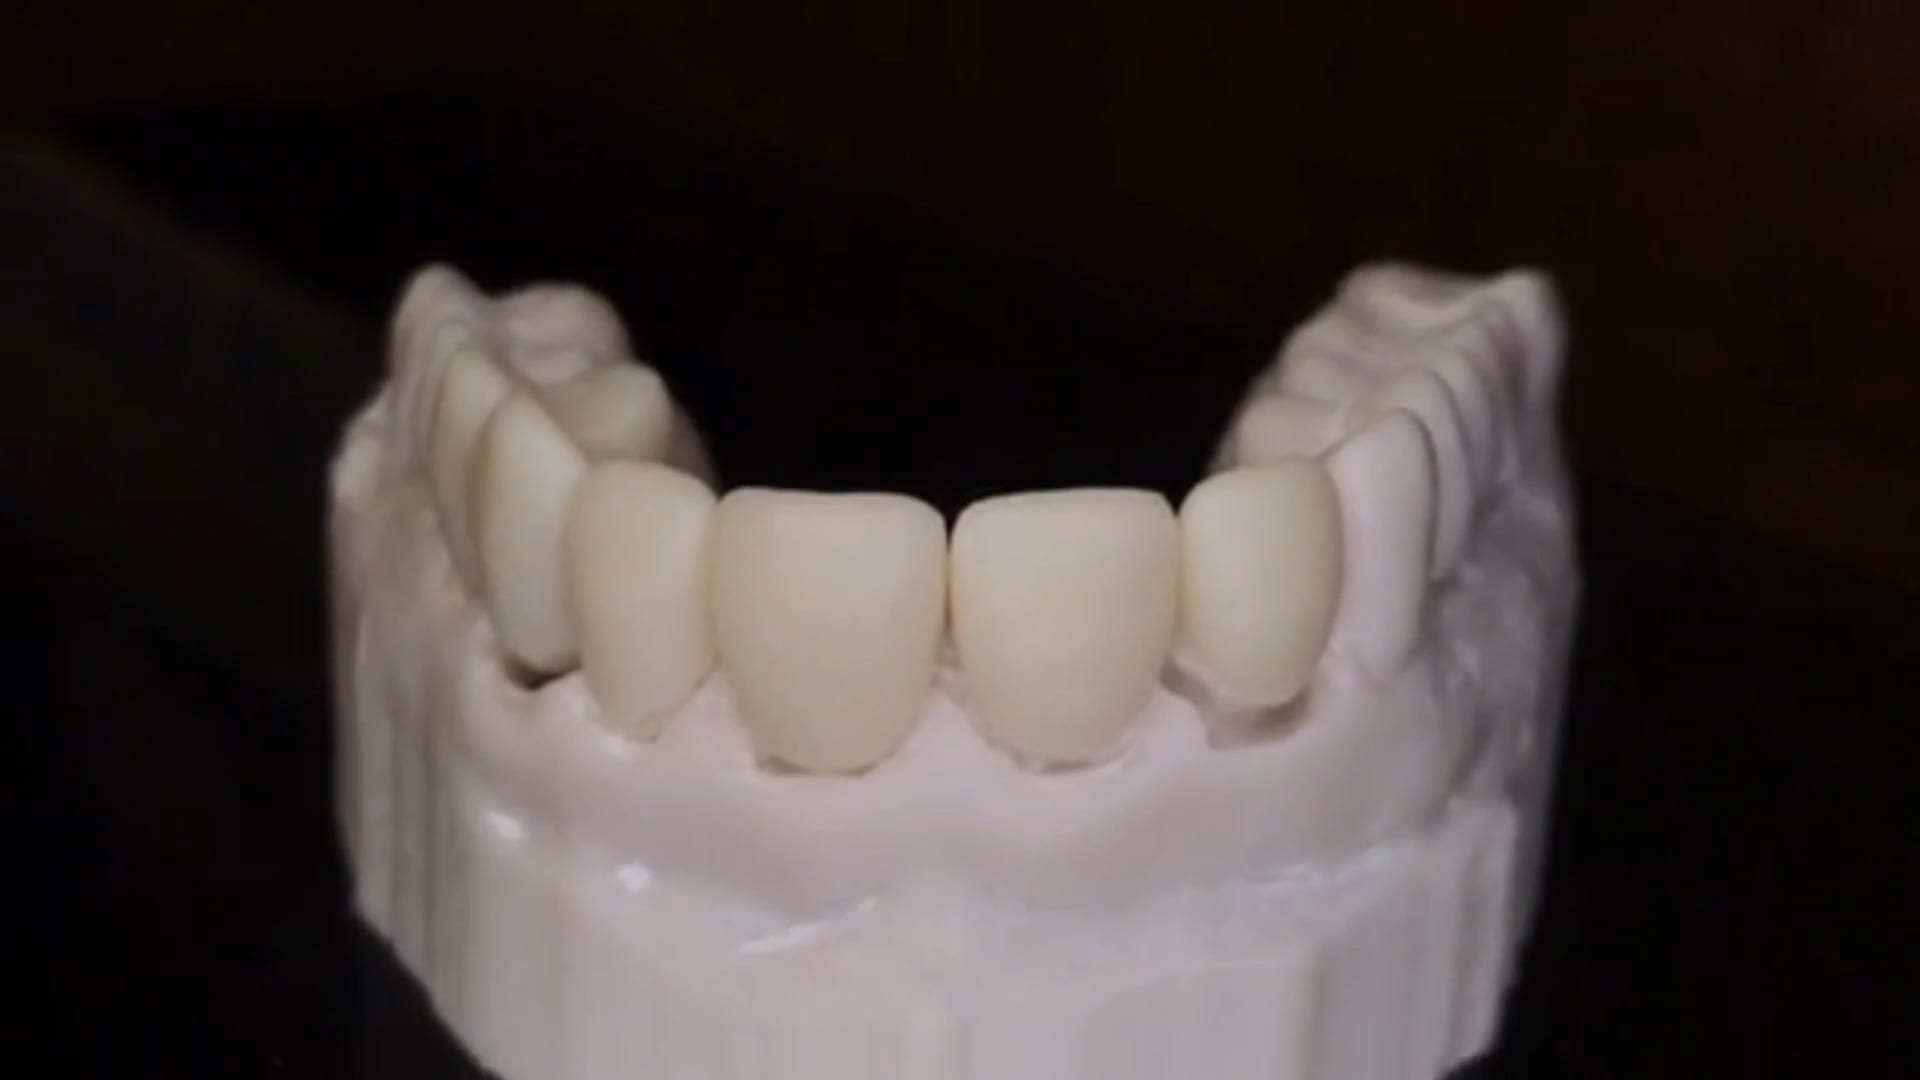
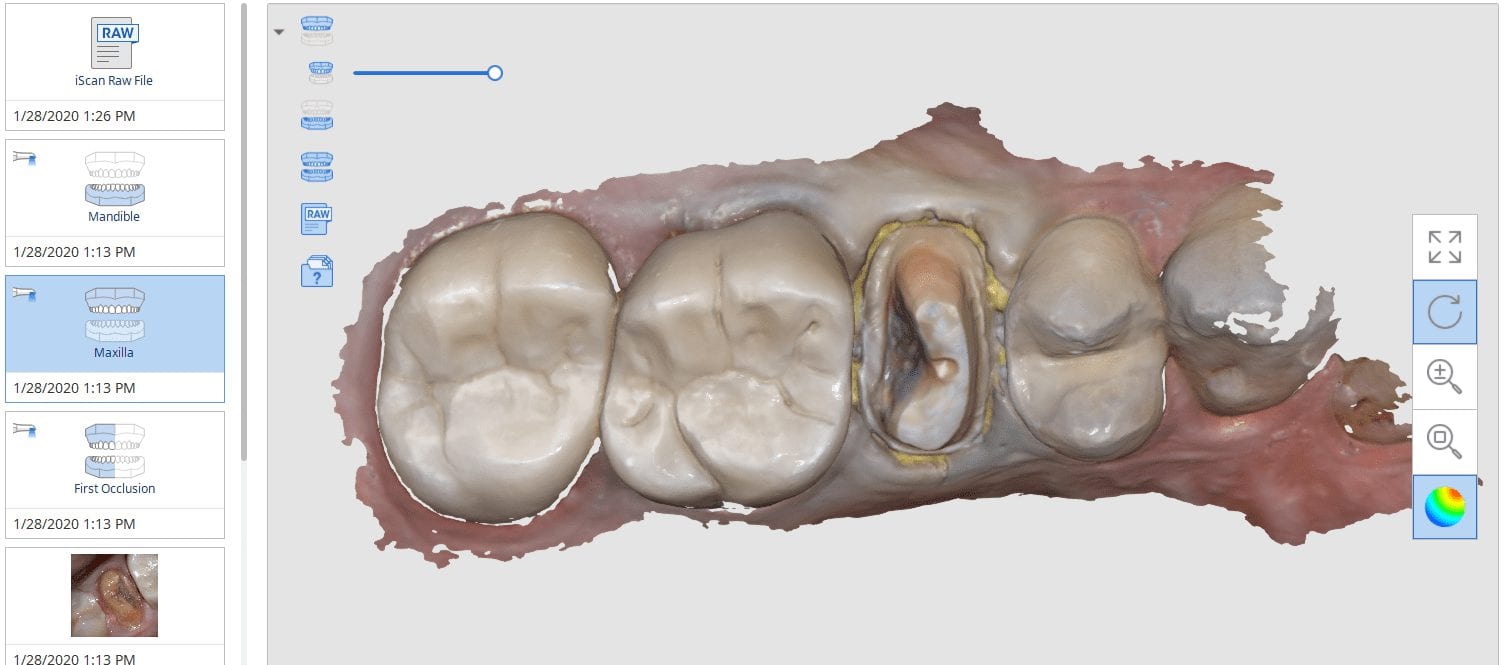
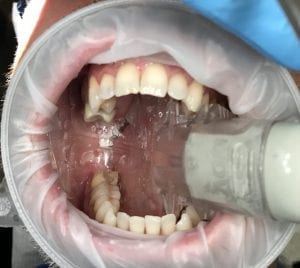
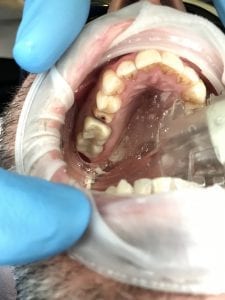
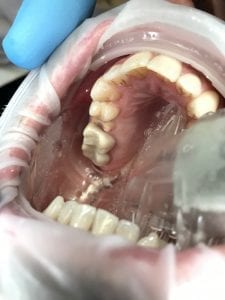
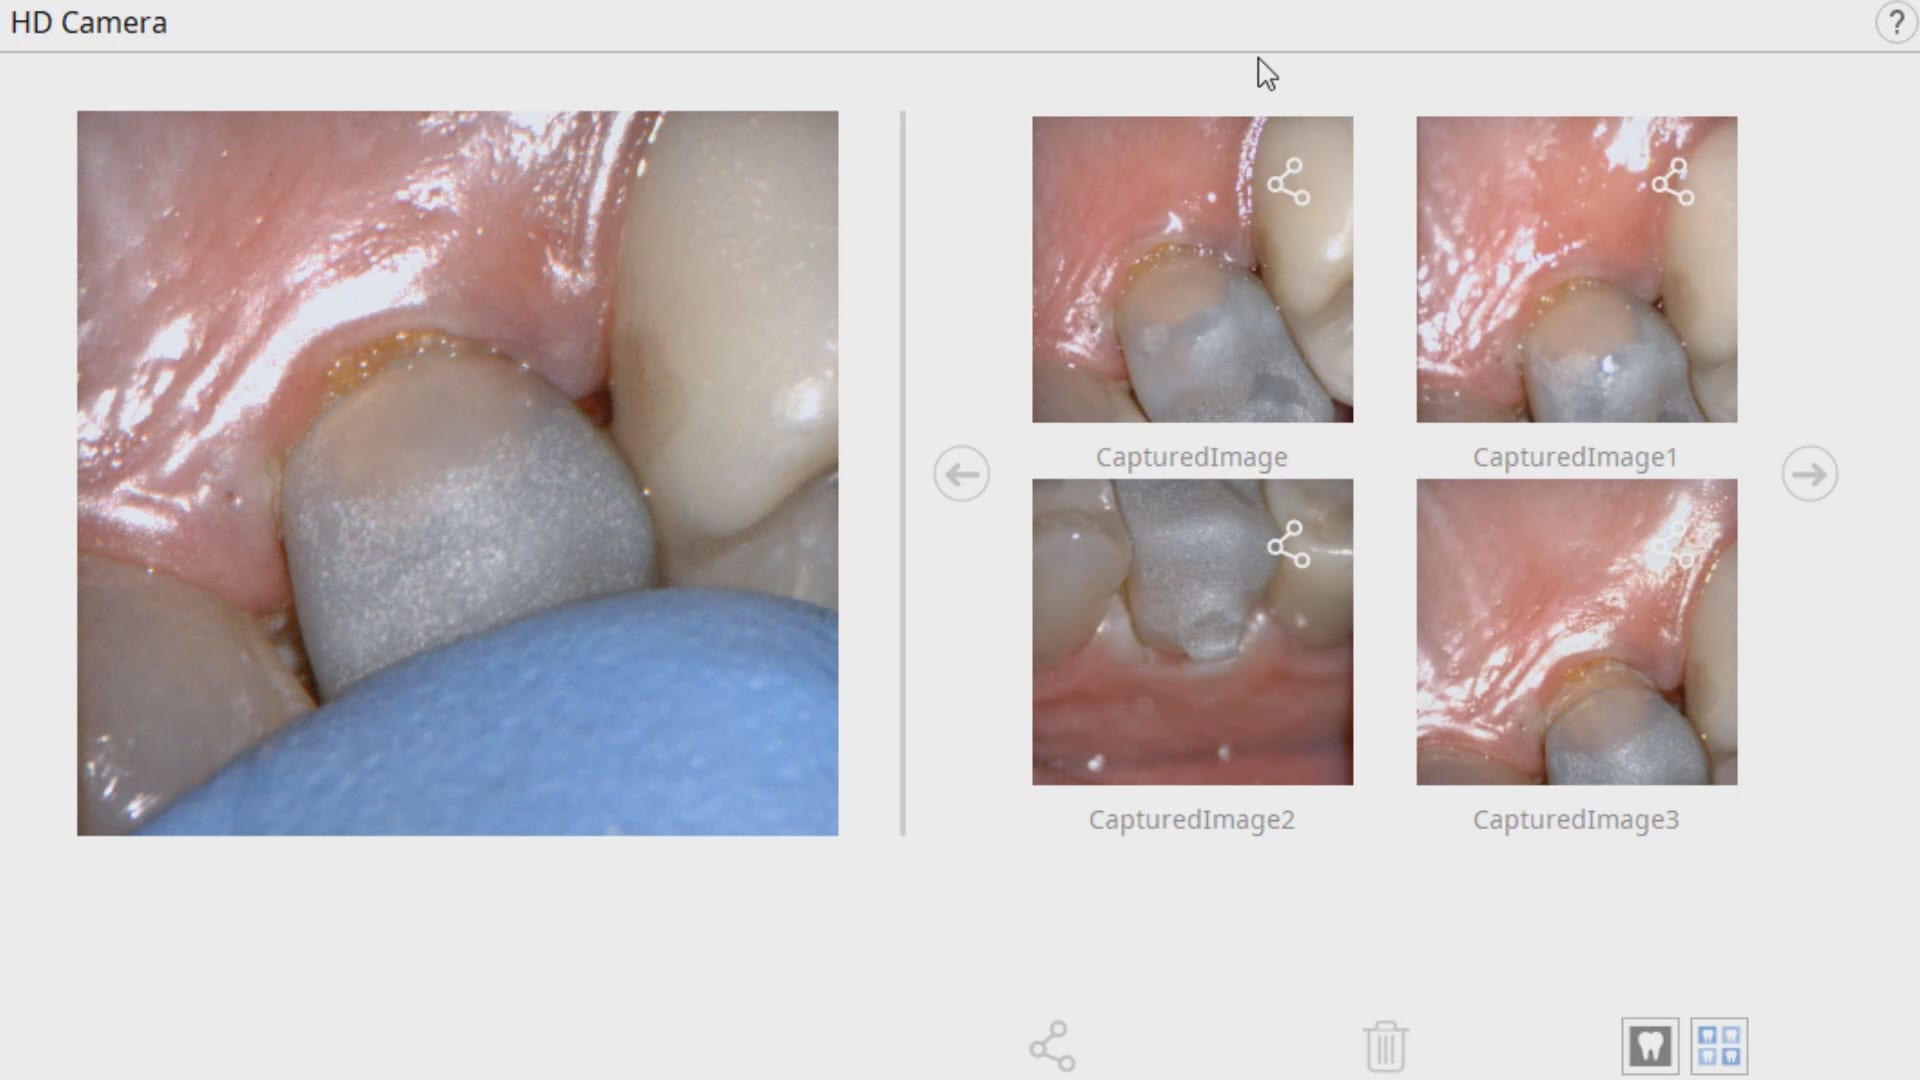
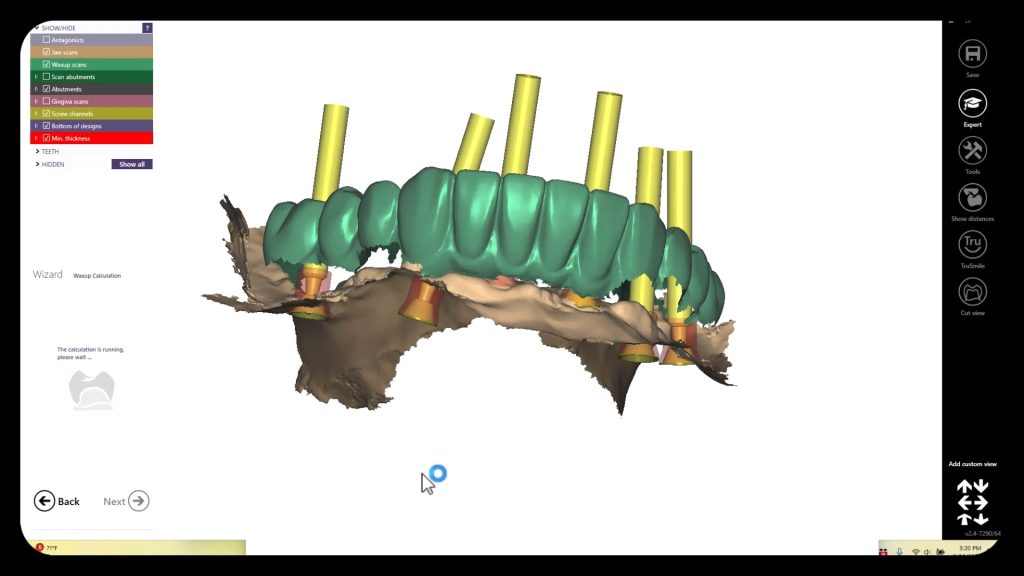
In this clinical case a patient lost a pre-existing crown. The remaining tooth structure had recurrent decay and a new crown was warranted.
After anesthesia was administered, the clearance from opposing dentition was assessed. The preparation was reduced to accommodate the necessary thickness of the material.
Once adequate clearance was achieved an Optragate was placed and an isolite was used to isolate the area. The preparation was scanned and then the lower arch was captured. The buccal bite was then taken to along the arches together
With Meditlink software, you have the option of designing the case yourself or sending it off to your partnered lab. The following video shows what happens to your case once the lab downloads the case
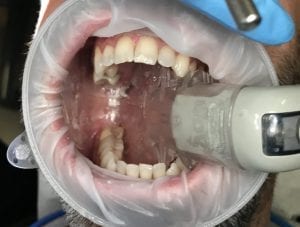
In this particular case, we designed our own crown and milled it with the coritec one milling machine
Once the amber lithium disilicate material was milled, its for was verified clinically. The crown was then crystallized and seated with NX3 resin cement
How to Choose the Right SHINING 3D Denture Workflow One of the most important decisions in the SHINING 3D denture workflow happens before design even begins: choosing the right case...
At CAD-Ray, our mission has always been clear: to provide dental professionals with the most innovative technologies and the best possible value. Today, we’re proud to announce an exclusive partnership...
Here is a quick introductory video of how the process works and the subsequent cases provide a lot more detail and information Case 1 In this video we detail how...
In this article we detail everything you need to capture to design and all on x type of restoration so you can quickly print a prosthesis and deliver it to...
If you use trios, and you have been thinking about adding a 3D printer or milling setup to your office, but have been nervous about designs or CAD – time...


You must be logged in to post a comment.