I bought I500 scanner two years ago. The scanner is great and the service is excellent. I have contacted Heather Gramley and Andy Nova about the updates of my scanner recently. They are absolutely amazing people. They go above and beyond. They repres...read moreI bought I500 scanner two years ago. The scanner is great and the service is excellent. I have contacted Heather Gramley and Andy Nova about the updates of my scanner recently. They are absolutely amazing people. They go above and beyond. They represent the company very well.read less - 7/05/2022
Last year when I started looking into the Medit i500 I had my front desk call 3 sellers to get preliminary information. She told me hands down call CAD-RAY and don’t bother with the others. Boy was she right! Frank got us going with all our hardware ...read moreLast year when I started looking into the Medit i500 I had my front desk call 3 sellers to get preliminary information. She told me hands down call CAD-RAY and don’t bother with the others. Boy was she right! Frank got us going with all our hardware needs and trained us until all our questions were answered. Then Jonathon and Armen jumped in at our 2 day live training in Baltimore. I still review my notes to implement all the great ideas. When I get myself in a jam time to time CAD-RAY responds immediately and fixes my problem. Best decision I have made in the practice in a long time - Thank you everyone at CAD-RAY!read less - 10/09/2019
I bought my Medit I-500 from them. Everything has been been first class, from the training to the customer support. I highly recommend buying through CAD RAY. - 6/16/2020
Aaron Gelfand
Worked with Laura and she is incredibly knowledgeable. She gave me all the right advice and steered me in the right direction. Her ongoing support is as good as it gets. I feel like I have a 24 hour team at my beckoning call. For the meat and pot...read moreWorked with Laura and she is incredibly knowledgeable. She gave me all the right advice and steered me in the right direction. Her ongoing support is as good as it gets. I feel like I have a 24 hour team at my beckoning call. For the meat and potatoes. I got an Icam 4D from her and now I am printing all on 4 arches same day surgery at our practice in Denver(NUSET). We are going to put ICams and Trios’ in all our offices thanks to Laura and the Cad-Ray team. If you have any questions about the workflow and the success we are having with the Digital work flow call Laura and I will help you succeed with her product support.Thank you Laura and Cad-Ray!read less - 4/28/2022
Dixie Jernigan
The customer service we have received while working with Frank DeLuca is second to none! He is incredibly knowledgeable and enthusiastic, as well as always available to help with any issues. We are very pleased with CAD-RAY and relationship that they...read moreThe customer service we have received while working with Frank DeLuca is second to none! He is incredibly knowledgeable and enthusiastic, as well as always available to help with any issues. We are very pleased with CAD-RAY and relationship that they have with their clients.read less - 1/25/2023
Matt v
Matt Newman was excellent solving a cable problem.! Quick response and good follow up! - 9/11/2024
Cary Ganz
One of the best companies I've dealt with in decades of dental practice. Not only is the product excellent but the support both personally and online has been just wonderful. - 8/08/2021
Ed Borio
I was dragging my feet before purchasing my first scanner because I was apprehensive of the effort required to change to a digital workflow. Laura assured me my fears were overblown and because of her patience and exceptional training abilities it h...read moreI was dragging my feet before purchasing my first scanner because I was apprehensive of the effort required to change to a digital workflow. Laura assured me my fears were overblown and because of her patience and exceptional training abilities it has been a rewarding and relatively seamless transition to the world of scanning. I never dreamed implementation would have been this easy and its attributed to Laura's skillful training ability. The scanner is wonderful and powerful, but we would have never been able to unlock its potential without her assistance.read less - 5/07/2021
Jared H
Purchasing my medit i700 from Cad-Ray was a great decision. I did my first training with Kaila and she was fantastic! Super knowledgeable, patient and truly helpful in making sure I was ready to hit the ground running with patient care. I put a call ...read morePurchasing my medit i700 from Cad-Ray was a great decision. I did my first training with Kaila and she was fantastic! Super knowledgeable, patient and truly helpful in making sure I was ready to hit the ground running with patient care. I put a call into cad-ray support in the middle of a case and sure enough Kaila was also the one to answer and handle the situation. She jumped right on my computer and had things fixed in a matter of a few minutes. Awesome support, great staff and overall super positive experience with Cad-ray thus far!read less - 5/06/2022
Jose Morales
Service is extremely quick and on point. Highly recommended to join the Cad Ray facebook group! - 6/01/2022
JCarlos Mendoza
Had a good experience when purchasing my scanner, it was very easy, and to date after three months of using the scanner no support is a plus, anytime I call me I will answer and troubleshoot - 7/10/2022
Collins Woodside
I purchased my Medit i500 scanner almost a year ago from CAD-Ray. Laura and the team there have been so responsive and ready to help. It is so nice to have a person answer the phone and be willing and able to assist! - 12/09/2021
Cody Boseman
Cad-ray has been amazing, not to mention they have an amazing product in the medit i500. Their training is great, customer service is quick and thorough, and follow up is consistent. I highly recommend using cad-ray for anything that you may need. - 6/19/2020
Laura
Very helpful and attentive when setting up my new Medit scanner. Seamless process from start to finish - 10/28/2024
Alexandra Lentz
Cad-Ray has been awesome to work with, very knowledgeable and quick to respond. Nick has been answering all my questions since day 1 and made the entire process of purchasing the Medit i700 a breeze. Can't believe how quick the product shipped and ca...read moreCad-Ray has been awesome to work with, very knowledgeable and quick to respond. Nick has been answering all my questions since day 1 and made the entire process of purchasing the Medit i700 a breeze. Can't believe how quick the product shipped and cannot wait to start scanning with it!read less - 12/15/2021
CAD-Ray's online resources and customer support has made my Medit scanner implementation possible without the need for any hands on training. They are full of resources and have expert knowledge. - 7/01/2021
Debra Haselton DDS PLC
I had a training session with Laila this morning and she was fantastic! Very organized training, easy to follow and was able to get my scanner up and running. Thank you Kaila! - 1/06/2022
Armen Mirzayan
Are you happy with the support and training you have received with our team at CAD-Ray.com?
Our business grows much like yours, with referrals and recommendations. We would greatly appreciate a quick review / testimonial
NOTE: ...read moreAre you happy with the support and training you have received with our team at CAD-Ray.com?
Our business grows much like yours, with referrals and recommendations. We would greatly appreciate a quick review / testimonial
NOTE: All testimonials are submitted by verified owners.read less - 5/08/2021
Nicely done Cad-Ray- Thanks for helping me get back to work! The new i700 is our tech fav! - 3/03/2022
Dong Lim
One of the best investments I’ve made for my office. A fraction of the cost compared to cerec. No monthly club fee. Easy maintenance. Saving a ton on lab costs. Milling and designing crowns is honestly my favorite things to do now. - 6/29/2020
Medit i500 is an incredible scanner. I have experience with other types of scanners including IO and Desktop but this one is really impressive. It is blazing fast and takes beautiful scans. But more importantly is the company itself. Medit is an amaz...read moreMedit i500 is an incredible scanner. I have experience with other types of scanners including IO and Desktop but this one is really impressive. It is blazing fast and takes beautiful scans. But more importantly is the company itself. Medit is an amazing company and is constantly trying to improve. They are always on the cutting edge and releasing new improvements all the time. They are always LISTENING to the customers on how to improve the scanning experience and change accordingly. The customer service is second to none. I highly recommend this scanner but even more highly recommend considering buying the scanner as a result of the great company and PEOPLE that stand behind it.read less - 10/09/2019
Kaila and Laura were amazing to work with. I would not hesitate to buy again from them. Super helpful/available and one of the best experiences I’ve had making such a big investment in equipment like I had to make for my practice. Way to go Cad Ray f...read moreKaila and Laura were amazing to work with. I would not hesitate to buy again from them. Super helpful/available and one of the best experiences I’ve had making such a big investment in equipment like I had to make for my practice. Way to go Cad Ray for running a solid business!read less - 11/15/2024
Aaron Olson
This product is the best out there. Do the math and your ROI makes more sense than most products we purchase as dentists. Get on the digital train or you’ll be left behind. This is the best product to make the jump with. - 6/16/2020
I do not know if it is okay to use the F word on this page. But I F@#KING LOVE MY MEDIT with the new filters now.
Scan the teeth with the middle filter, then go to the first 1 and get the palate in less than 1 minute. AMAZING
I have since s...read moreI do not know if it is okay to use the F word on this page. But I F@#KING LOVE MY MEDIT with the new filters now.
Scan the teeth with the middle filter, then go to the first 1 and get the palate in less than 1 minute. AMAZING
I have since sold my ITERO and JUST HATE my OMNICAM EVERYDAY.read less - 3/01/2020
Amazing customer service. I haven’t ever worked with a company where there is an issue, you can immediately get help and assistance and so far have not had an issue that CADRAY wasn’t able to fix. They made the process buy buying and maintaining a sc...read moreAmazing customer service. I haven’t ever worked with a company where there is an issue, you can immediately get help and assistance and so far have not had an issue that CADRAY wasn’t able to fix. They made the process buy buying and maintaining a scanner seamless. Highly recommend!read less - 2/23/2024
Abhinav Bhatnagar
We have been using the scanner for a few weeks now. It’s been a blast to use and they have made it easy to learn with video tutorials. We have yet to go to the training, but we are excited to continue learning and expanding our digital dentistry. - 6/19/2020
Matt McReynolds
These guys are ALWAYS there to help if you get stuck. I’ve been happy with the mill (coritec one) and scanner (i500) I bought from them 2 years ago. I’d do business with them again. - 7/01/2021
Luciana Bretz-Pavie
Wayne Glassoff is the go-to guy here! The BEST!!! He is always on it, he helps figuring out exactly what you need, the best way possible. And fast! Great working with CAD-Ray, they have pretty much everything when it comes to digital dentistry. And t...read moreWayne Glassoff is the go-to guy here! The BEST!!! He is always on it, he helps figuring out exactly what you need, the best way possible. And fast! Great working with CAD-Ray, they have pretty much everything when it comes to digital dentistry. And they give you a damn good support too. Jessica Knott is awesome… training and support, just the BEST! Very satisfied customer here!read less - 2/05/2023
David Weber
Much like dentistry is not a commodity, CAD-RAY's service is not a commodity. What CAD-RAY does so well is not just sell pieces of technology affordably and smoothly, but provides service, training, and insight so these tools can be used meaningfully...read moreMuch like dentistry is not a commodity, CAD-RAY's service is not a commodity. What CAD-RAY does so well is not just sell pieces of technology affordably and smoothly, but provides service, training, and insight so these tools can be used meaningfully and profitably.read less - 12/12/2022
Laveen Smiles
CAD-Ray has the best customer service and support that you will ever receive from any dental company anywhere. I had an issue with a sintering oven I purchased from them. I needed immediate assistance, because I was in the middle of a case. The perso...read moreCAD-Ray has the best customer service and support that you will ever receive from any dental company anywhere. I had an issue with a sintering oven I purchased from them. I needed immediate assistance, because I was in the middle of a case. The person at CAD-RAY who had the knowledge to help me had just gotten into a car accident and was at the ER. Now most companies and people would have said “Sorry, we can’t help right now due to extenuating circumstances.” Not CAD-RAY! That person called me from the ER, in the middle of his personal problems, and gave me the needed information to solve my problem. Exceptional customer service and support is what you will get from CAD-RAY, and it won’t be for a limited time after your purchase. You won’t go wrong with a purchase from CAD-RAY.read less - 1/29/2023
Stephanie O'Rourke
I am fairly new to scanning with my Medit I700. I am loving this in my business. It has had its challenges at times but the best part is the accessibility and support from Frank DeLuca. He has been instrumental in helping me when I have a patient in...read moreI am fairly new to scanning with my Medit I700. I am loving this in my business. It has had its challenges at times but the best part is the accessibility and support from Frank DeLuca. He has been instrumental in helping me when I have a patient in the chair and need assistance. I couldn't be more grateful for his help. Thanks, Frank!read less - 12/16/2021
Jennifer Goodale
Fantastic class. Amazing scanner.Cad Ray has been helpful not only with my purchase of the Medit i500, but every step of the way.Level 2 seminar with Armen and Damien was extremely informative, useful and practical! ⭐️⭐️⭐️⭐️⭐️ - 8/08/2021
Sonrisas Dental
Support was our main concern, and we chose very carefully. Frank is 100% every step of the way - 1/25/2023
Dr. Howard Lassin
Great 1st lesson with Ryan on the Mediti700. We are ready to scan:) - 12/30/2022
Levy Do
I'm a repeat customer because Cad-Ray's customer service is fast, efficient, and no nonsense. The classes offered for training for particularly for the Medit is awesome and it comes included which is phenomenal. All the classes that I've gotten to at...read moreI'm a repeat customer because Cad-Ray's customer service is fast, efficient, and no nonsense. The classes offered for training for particularly for the Medit is awesome and it comes included which is phenomenal. All the classes that I've gotten to attend so far has been well organized and I left learning very practical things. Remote support team solves my problem right then and there. Recently I had an issue, and instead of me talking to a sales rep who doesn't know what to do, Kaila remoted in and got it fixed just like that. Thank you and great job guys!read less - 4/19/2022
Jonathan Mason
I bought a Medit 3 years ago and have had amazing success with both the scanner and the support from Cad-Ray. My scanner recently broke and They were on the phone with my assistant trying to fix the problem, and when it was unfixable, they overnight...read moreI bought a Medit 3 years ago and have had amazing success with both the scanner and the support from Cad-Ray. My scanner recently broke and They were on the phone with my assistant trying to fix the problem, and when it was unfixable, they overnighted a new scanner and helped us set it up. Medit is now available through many dealers, but I would only buy next one from Cad-Ray.read less - 11/03/2022
Robert Mabry
I don't scan in my practice my assist does. She says it's awesome. Better than the trios or cerecs we have had in the past. The image quality while designing cases is amazing. Haven't seated a restoration from it yet but expect it to be great as well...read moreI don't scan in my practice my assist does. She says it's awesome. Better than the trios or cerecs we have had in the past. The image quality while designing cases is amazing. Haven't seated a restoration from it yet but expect it to be great as well.read less - 6/16/2020
The support is even better then the camera itself. I used many other scanners and this is by far the best one. Recommended to many people. Looking to purchase a second one for my practice. The use and results are amazing. No adjustments to the p...read moreThe support is even better then the camera itself. I used many other scanners and this is by far the best one. Recommended to many people. Looking to purchase a second one for my practice. The use and results are amazing. No adjustments to the prosthetics at all.read less - 7/15/2020
Jeff Muszynski
Fantastic customer service - 6/19/2020
lucas kim
Ordered some scanner parts. Laura was super helpful and replied very quickly. Great customer service! - 6/02/2022
Thomas Lim
5 stars for a great product and great service. After much research I knew I was set on the Medit 500. I considered some of my local equipment reps, as well as cad-ray. Cad-ray won out due to their efficiency, speed of service, and knowledge. Their on...read more5 stars for a great product and great service. After much research I knew I was set on the Medit 500. I considered some of my local equipment reps, as well as cad-ray. Cad-ray won out due to their efficiency, speed of service, and knowledge. Their online presence makes it easy to get help via messaging, social media, or phone. The fact that one of the employees of Medit (an engineer?) posts on the cad-Ray Facebook group speaks volumes of the vendor-mfg relations.
The scanner itself works great, but make sure to contact them to get the minimum specs required for a laptop — it will make a difference in how the scanner performs. I had some slow scans at first but upgraded from 8gb to 32gb ram and also got some coaching from customer service (Frank) to get me up to speed.
To make the scanner mobile, I purchased this cart from Staples: https://www.staples.com/Oklahoma-Sound-Premium-Audio-Visual-Presentation-Cart-40-1-2-H-x-18-W-x-30-D-Black-Ivory-Wood/product_932437.
Lastly, I purchased “3M Dual Lock Fastener” to keep the power module attached to the wand from falling off the cart. I carry the scanner between two offices, so I wanted something sturdy, but removable. (see in photos). The hockey puck shaped holder (comes with the scanner) is heavy and sticks to the countertop without needing any adhesive.read less - 10/12/2019
Frank was fantastic in helping me obtain my medit scanner. He answered all of my questions in detail. After the purchase of the scanner, he continued to follow up with me and presently remains a tremendous support with any concerns that may arise. Wa...read moreFrank was fantastic in helping me obtain my medit scanner. He answered all of my questions in detail. After the purchase of the scanner, he continued to follow up with me and presently remains a tremendous support with any concerns that may arise. Was a great experience overall from transitioning my practice into a digital world!read less - 1/25/2023
Diana Teverbaugh
What can I say ! I have been extremely pleased with my scanner ! I recommend it to all my colleagues ! The support is the best , I bought the extended warranty and my scanner hada small crack and within one day they shipped my a new one ! I can’t wo...read moreWhat can I say ! I have been extremely pleased with my scanner ! I recommend it to all my colleagues ! The support is the best , I bought the extended warranty and my scanner hada small crack and within one day they shipped my a new one ! I can’t work without it ! Thank you !read less - 2/09/2022
Evan Bedell
Laura has always been so helpful with the medit when we needed assistance or resources. The training she provided the office was invaluable! She is quick to respond whenever we reach out. 13/10 - would recommend her to anyone looking to get a medit ...read moreLaura has always been so helpful with the medit when we needed assistance or resources. The training she provided the office was invaluable! She is quick to respond whenever we reach out. 13/10 - would recommend her to anyone looking to get a medit scanner.read less - 12/16/2021
Daniel Thrall
I have owned this scanner for six months now. I have experience with other scanners including Trios and Carestream. The Medit scanner can stand with the big names. The scanned images are good. The ease of communication through the software with the l...read moreI have owned this scanner for six months now. I have experience with other scanners including Trios and Carestream. The Medit scanner can stand with the big names. The scanned images are good. The ease of communication through the software with the lab is probably my favorite part. Another thing I like is that the company is very open to improvements and listens to what its customers are wanting.
Cad Ray has a great team working alongside this product and continually updates all of the users on new features or new ways to use existing features. They are extremely responsive to questions and provide fast and competent support to the product that they sell.
I would recommend both the scanner and the company to anyone looking to get into the digital scanning world.read less - 10/09/2019
I received my Medit scanner a couple months ago from Cad-ray, and I can't express enough how awesome it is. I have done a ton of research and used the latest IOS from one of the big guys, and due to many software issues I was able to return that mach...read moreI received my Medit scanner a couple months ago from Cad-ray, and I can't express enough how awesome it is. I have done a ton of research and used the latest IOS from one of the big guys, and due to many software issues I was able to return that machine. And thank God, because it was so over priced and came with a $300/month support fee forever! The Medit scanner is as good or better than that one when it was working properly, and for the price it's a no brainier.read less - 9/17/2020
Jason Oh
Everyone at CAD Ray has been amazing. Glad I chose them for my Medit and Sprint Ray purchase. Our training with Kaila was awesome. Thank you - 1/04/2023
Nisarg Parikh
Absolutely a phenomenal company. Everyone you engage with is extremely knowledgeable and helpful.I’m sure they get the same questions day in, day out but they are happy to help you without being condescending. The entire team has been helpful through...read moreAbsolutely a phenomenal company. Everyone you engage with is extremely knowledgeable and helpful.I’m sure they get the same questions day in, day out but they are happy to help you without being condescending. The entire team has been helpful through phone calls, the Cad-Ray FB group, and recorded webinars. Jonathan helped me get a great deal, Laura was awesome on the webinar, Damien is always answering questions on FB, and Armen had a great in-person presentation in Dallas. 100% recommend.read less - 4/22/2022
John Pobanz
We had an outstanding experience purchasing two Medit scanners. The delivery was timely . The onboarding clean. Laura was dazzling with her acumen and quick solutions . We highly recommend the investment in Cad Ray .Pobanz Orthodontics , Ogden Utah :...read moreWe had an outstanding experience purchasing two Medit scanners. The delivery was timely . The onboarding clean. Laura was dazzling with her acumen and quick solutions . We highly recommend the investment in Cad Ray .Pobanz Orthodontics , Ogden Utah :)read less - 12/10/2021
Penelope Lee
Frank and his team have always been ready and able to help us with any issue we’ve come across in the last 2 years since we purchased our mill and equipment from them. Today, Griffen went above and beyond to find a solution to our software issue. I w...read moreFrank and his team have always been ready and able to help us with any issue we’ve come across in the last 2 years since we purchased our mill and equipment from them. Today, Griffen went above and beyond to find a solution to our software issue. I was able to finish a project on time for a patient in pain because of his dedication. “We’ve never had a more helpful team for any of our equipment” was a quote from our head Doctor today. Excellent job Griffen and team!read less - 5/14/2025
The clash of the titans are in full effect. We are not smart enough to understand all the dynamics of patented software and hardware. While we let the manufacturers sort it out, we wanted to demonstrate how the new mandibular jaw movements are captured in Meditlink
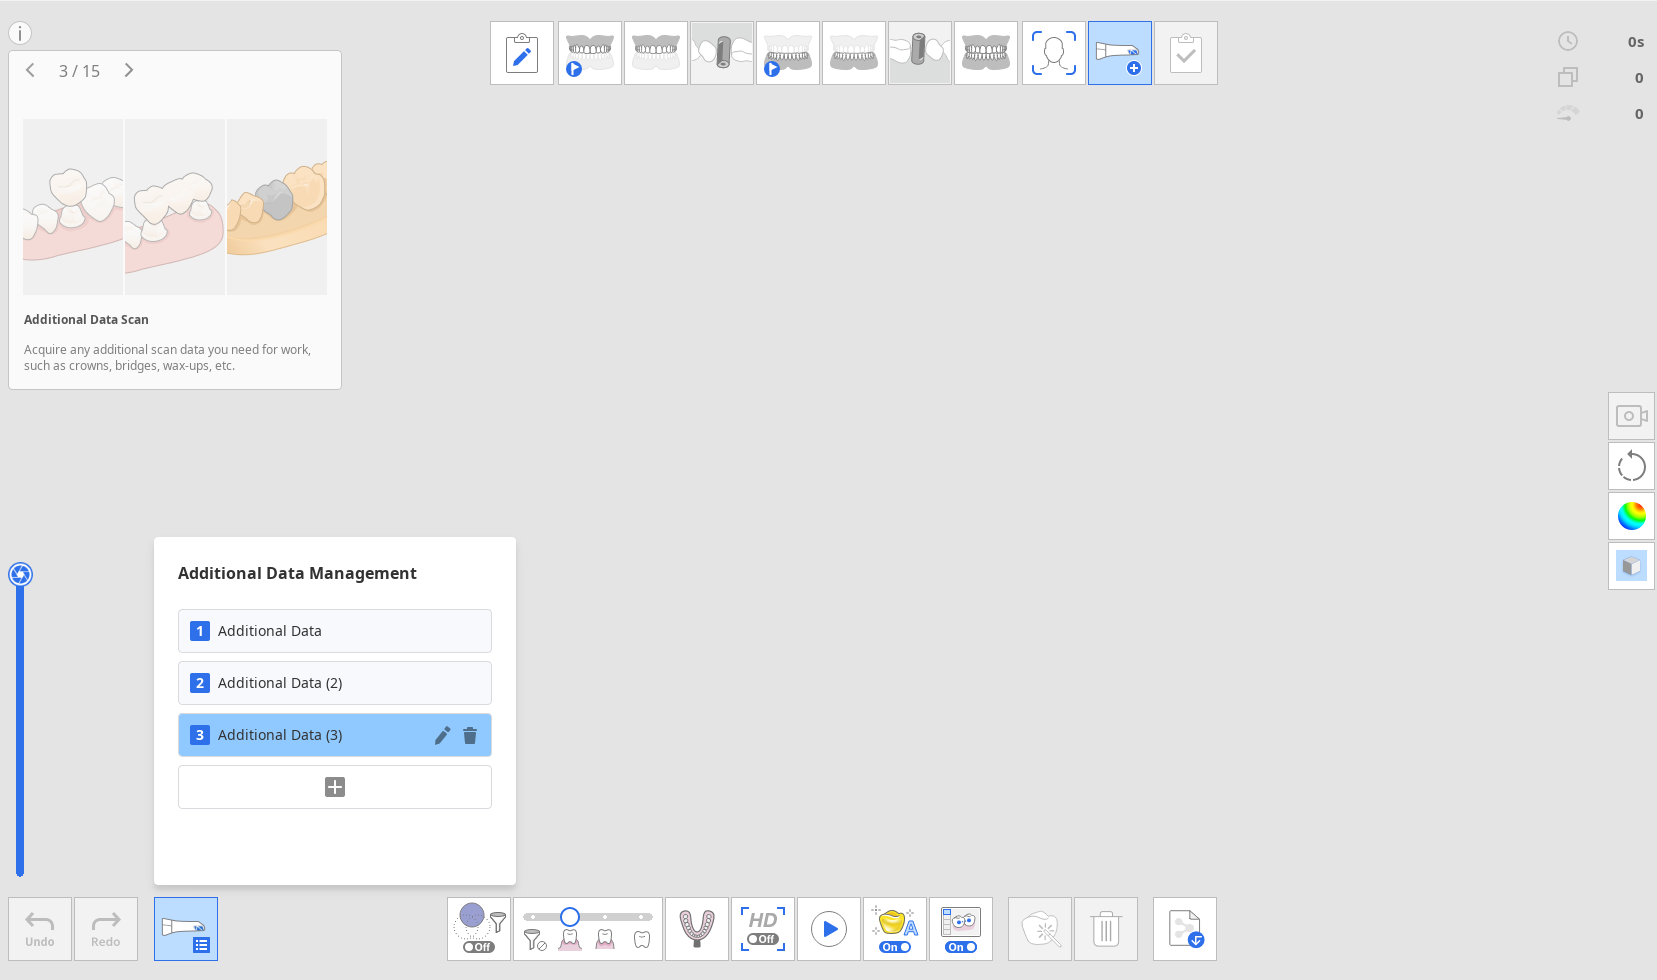
Many scanners limit the number of scans you can take on a patient. This becomes cumbersome when you want to image pre-existing conditions, tissue scans for implantology, and other advanced needs
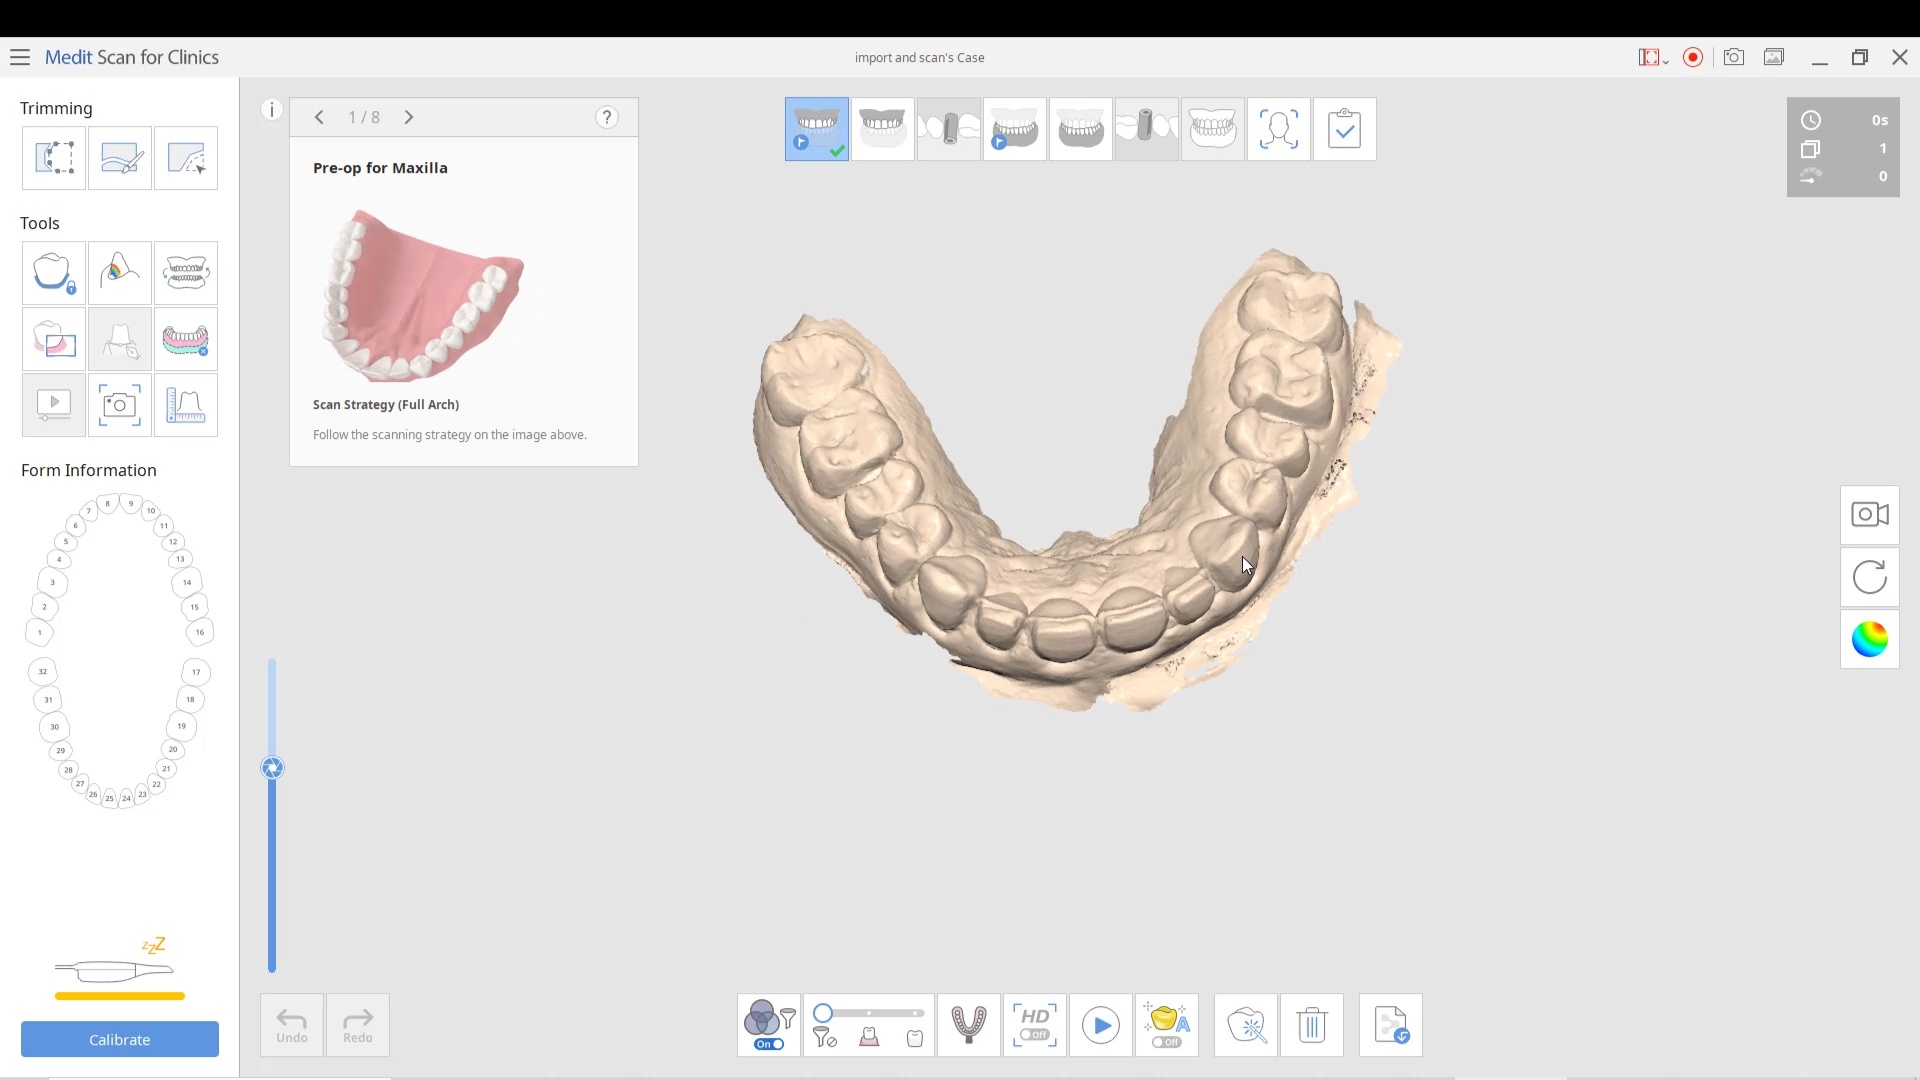
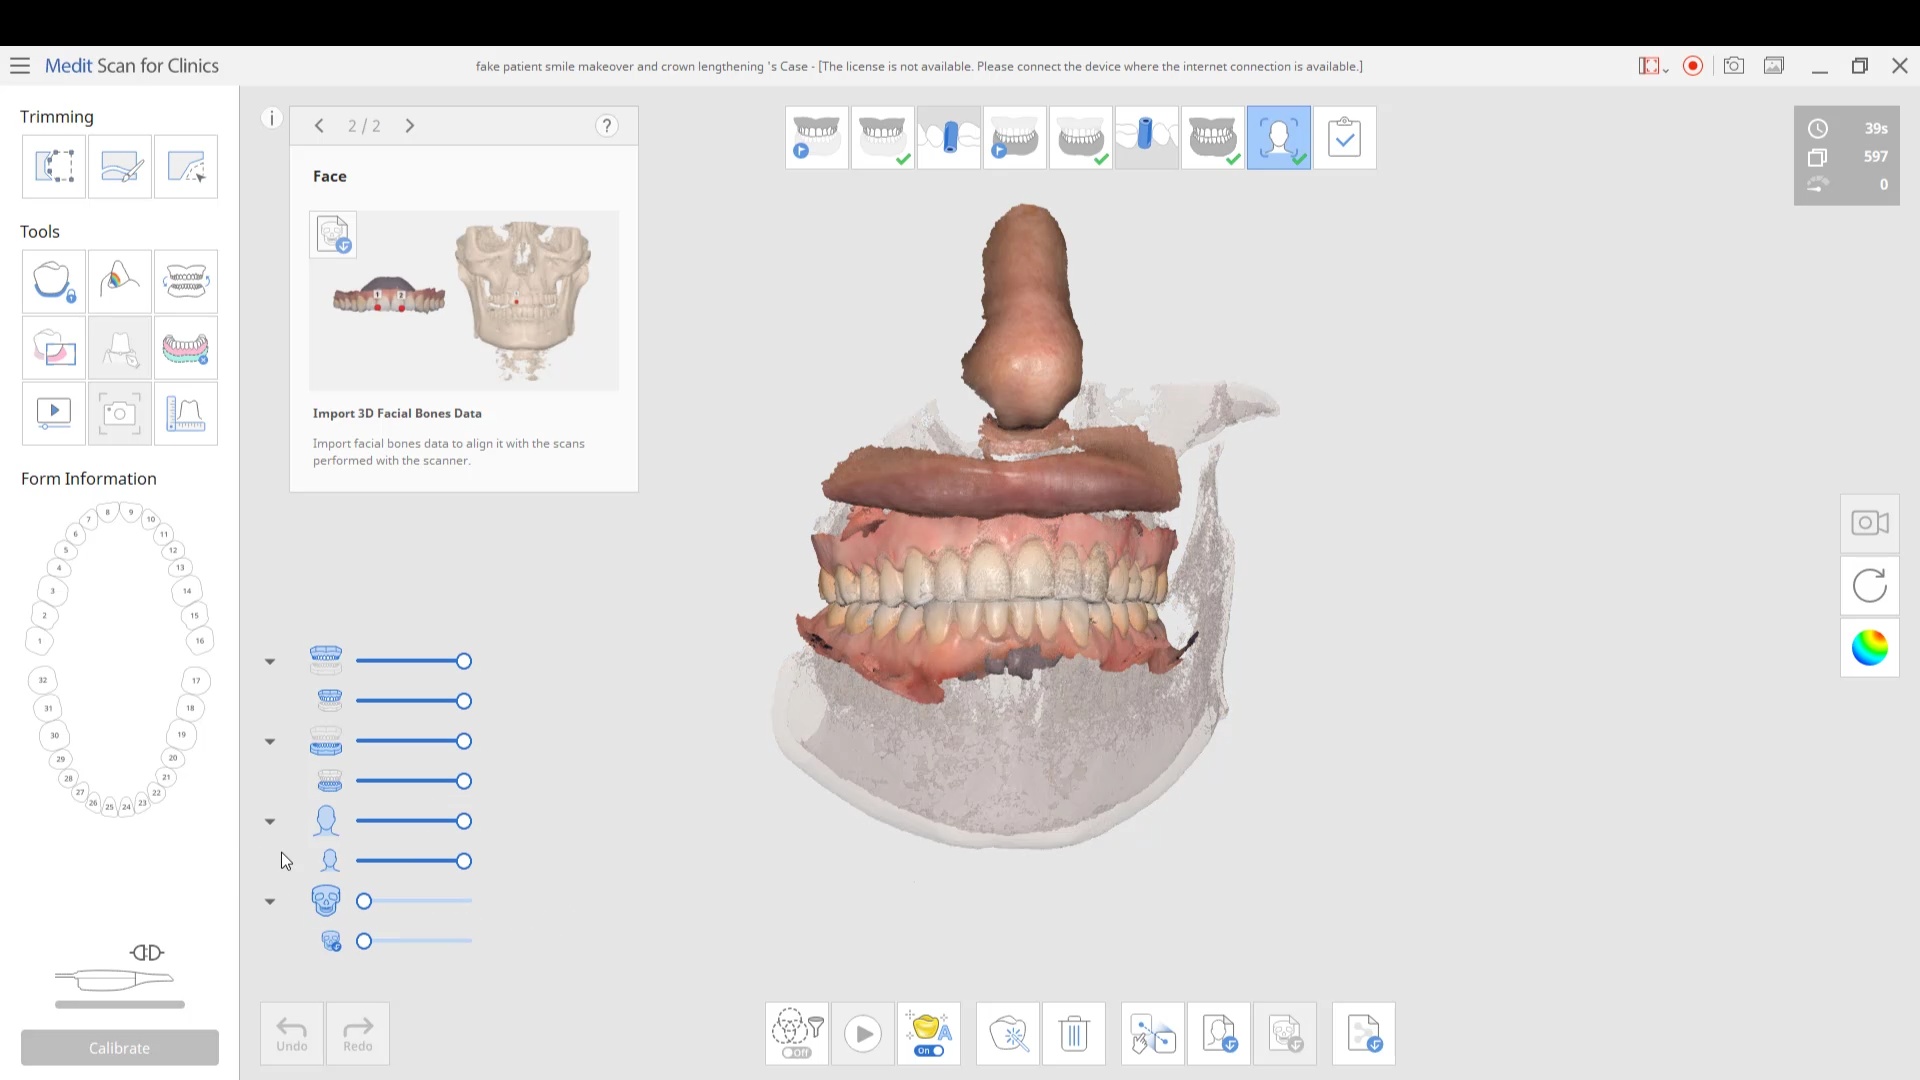
With version 3.0 in Meditlink software, launched in October of 2022, you can import or scan multiple models in the same patient chart
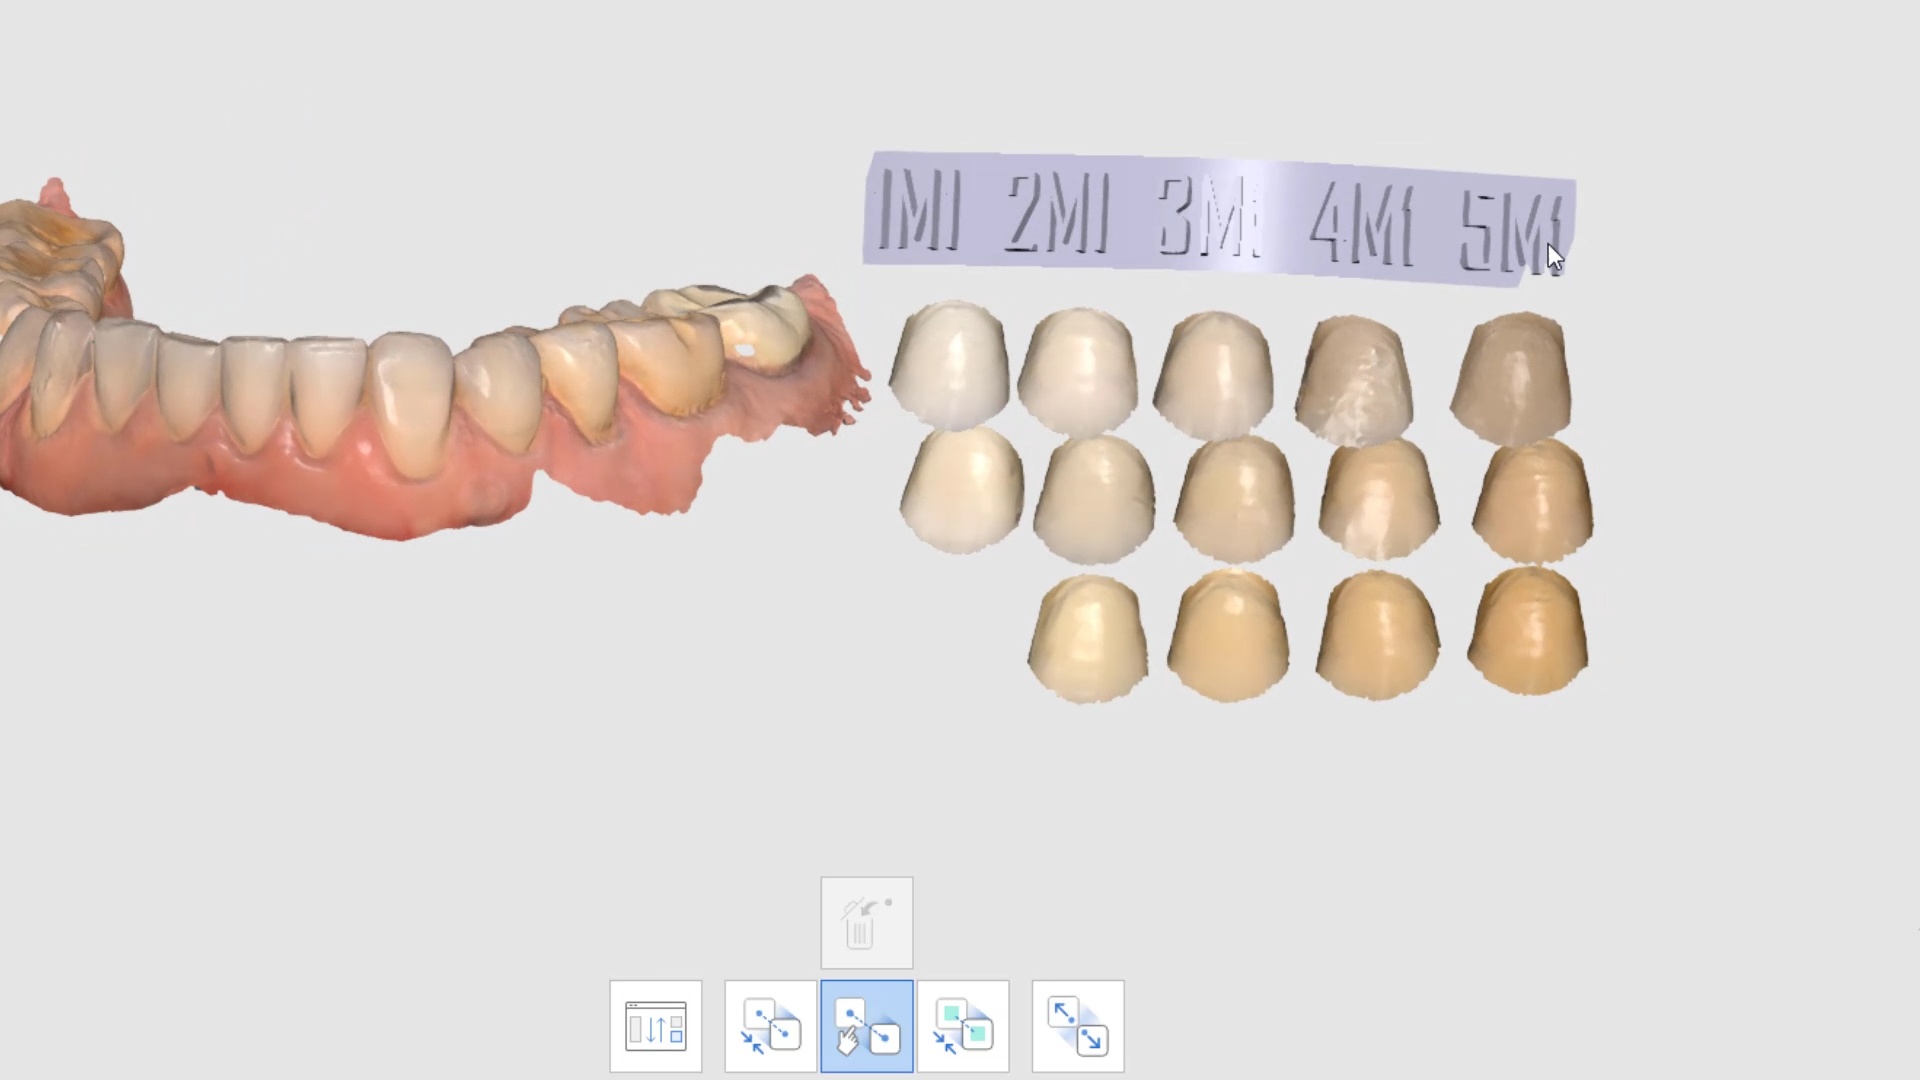
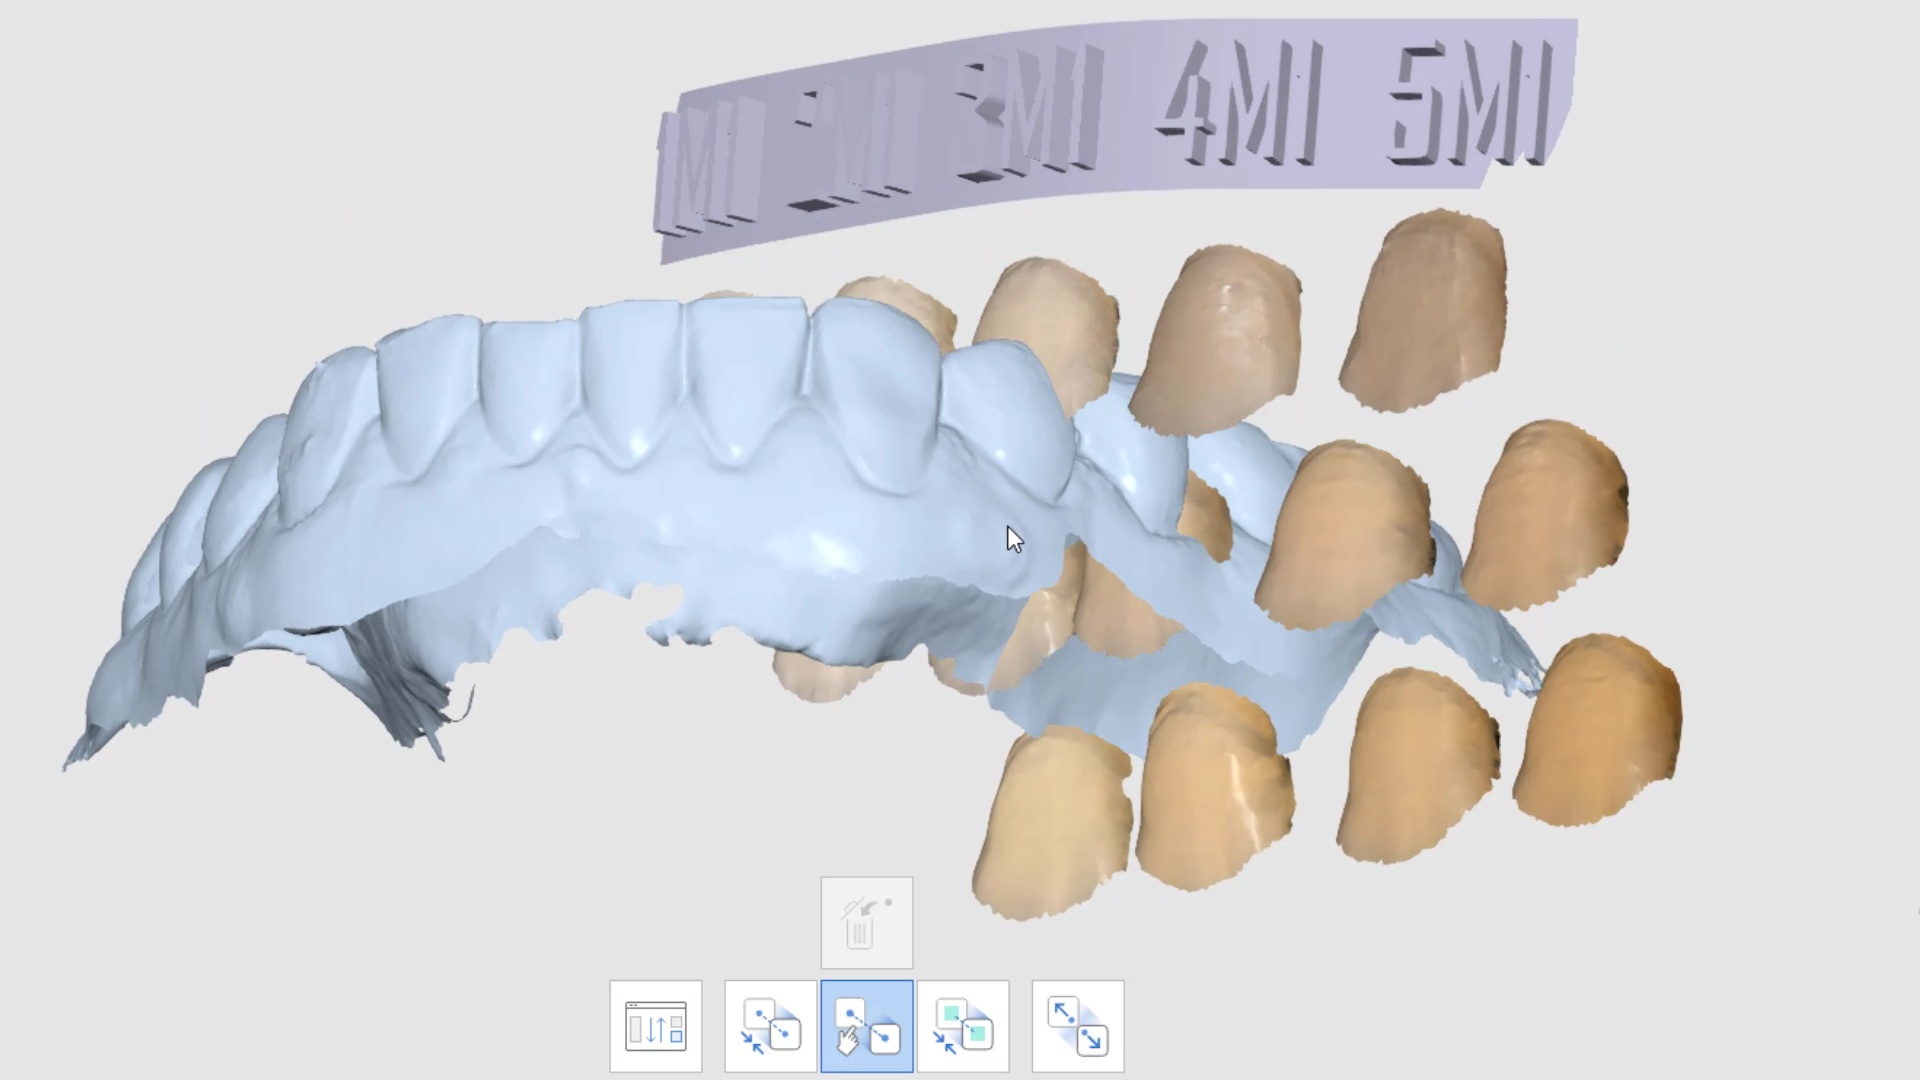
We’ve digitized the Vita 3D shade guide to help with color identification. The same Medit scanner was used to scan the tabs and then this digital file was created. the assumption is that the same camera and light will hit natural dentition and the net effect will be the same. Use at your own risk.
Still not a single article published that says Medit ios is a good scanner ! its just been user driven for 3 years now.
it’s a good thing, because the world just changed. it is irresponsible to extrapolate research done outside the mouth on stone models or impressions into clinical significance with intra-oral scanning. There are parameters that are impossible to quantify like focal distance throughout the scan (unlike desktop scanners with known focal distances), the codes use to do the algorithms, the scan patterns, and also how light is treated by enamel, dentin, and restored materials.
i can’t believe people still use terms like trueness and accuracy when they really don’t even exist when you scan intra-orally. Like analog impressions, it is impossible to judge digital impression accuracy LIVE while it is happening.
Enter Medit! There are a few distinct ways to demonstrate an accurate scan live while it is happening. One way is to import a geometric shape that doesn’t alter its form while models are being rendered. That’s what’s demonstrated here. To my knowledge no one has ever studied this approach because no other camera lets you do this. i did see some publications where the authors attached objects like radiographic markers and after it was processed, they could measure that object and see if it distorted or not, but nothing at this level.
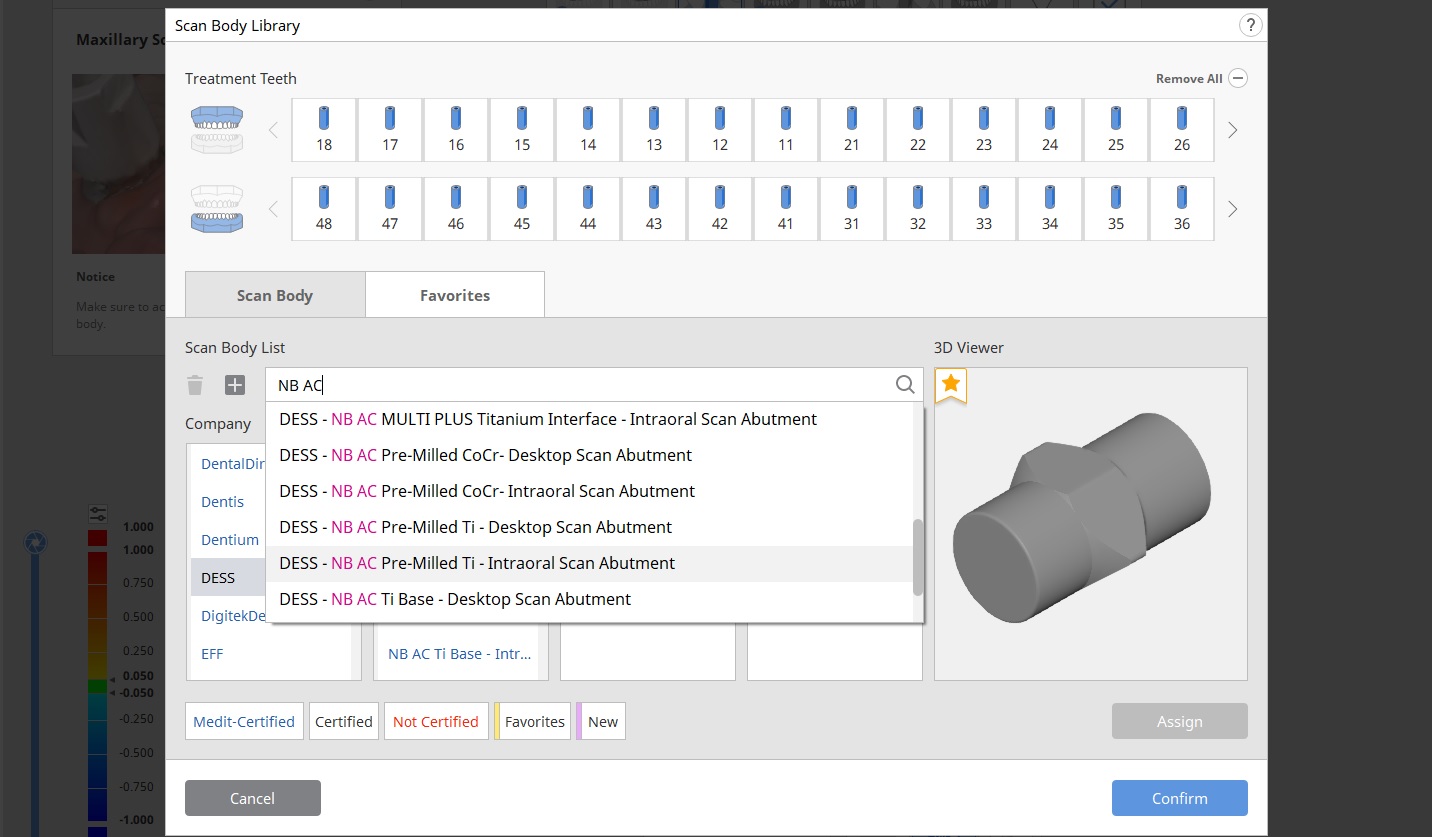
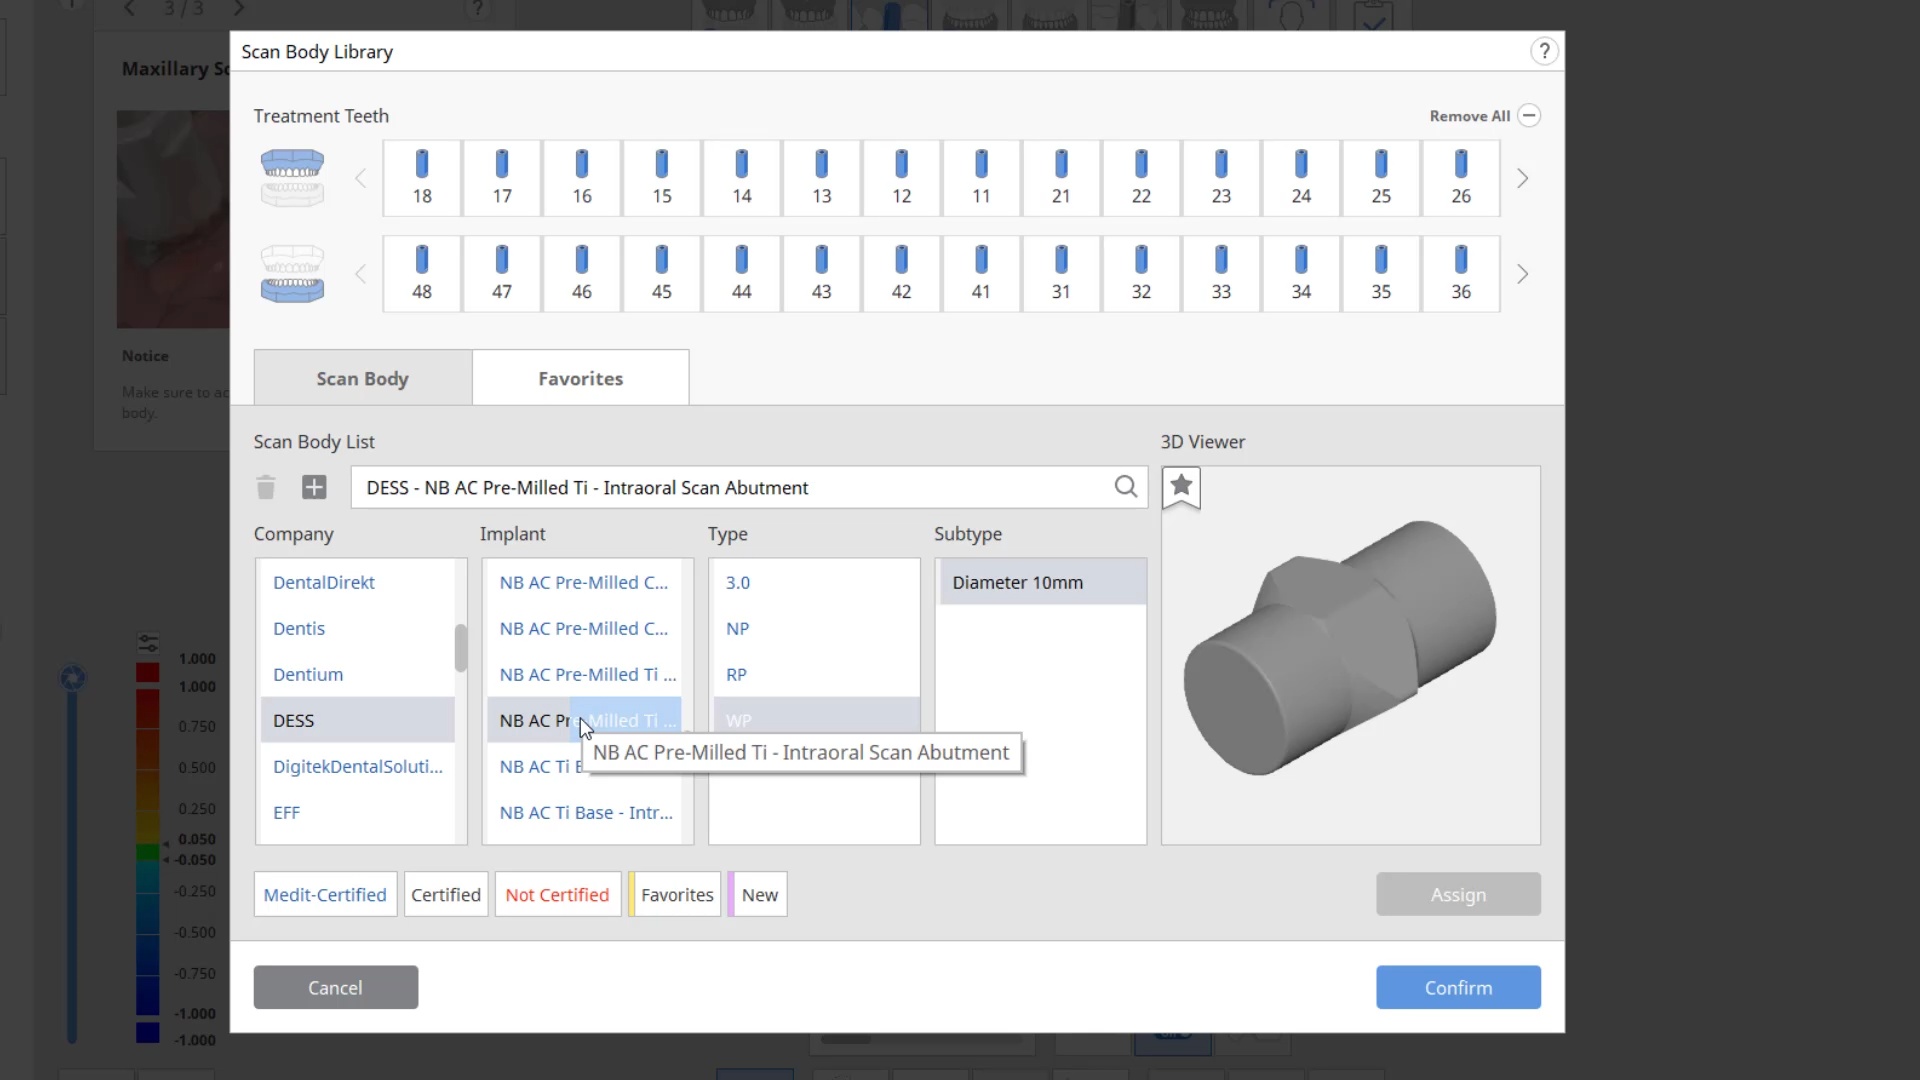
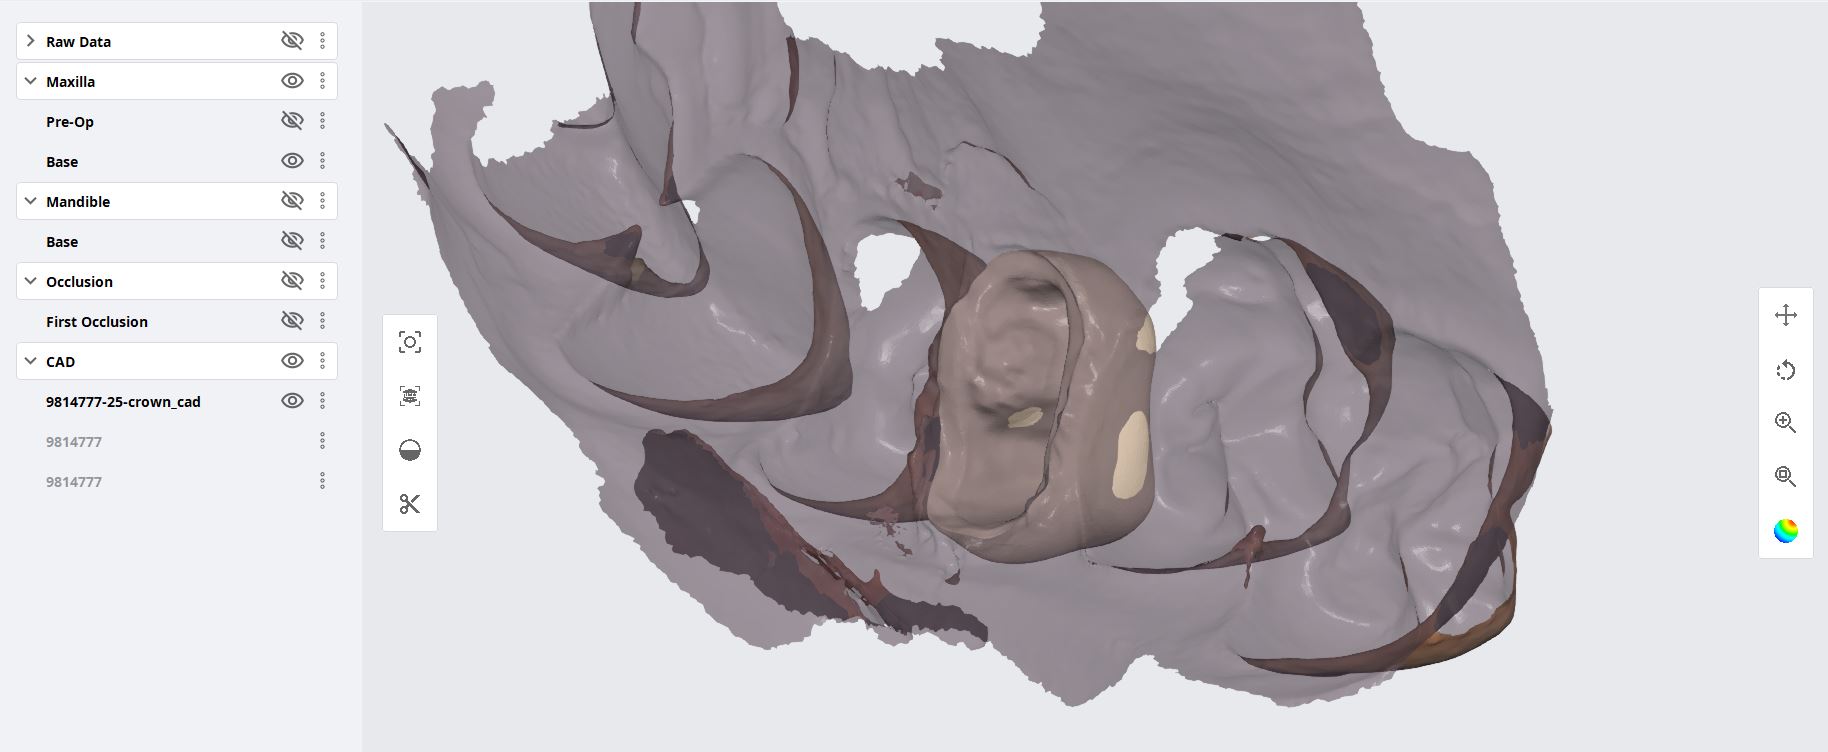
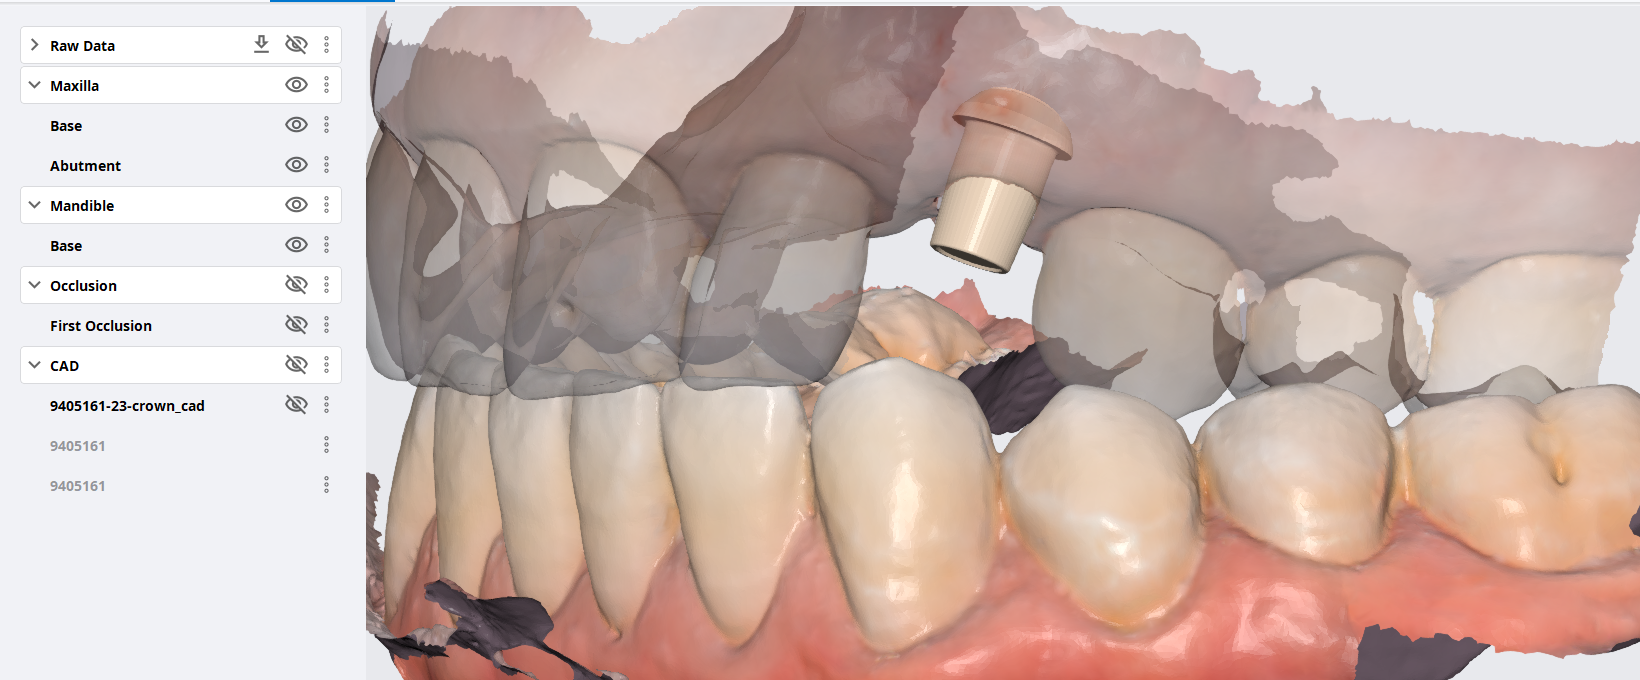
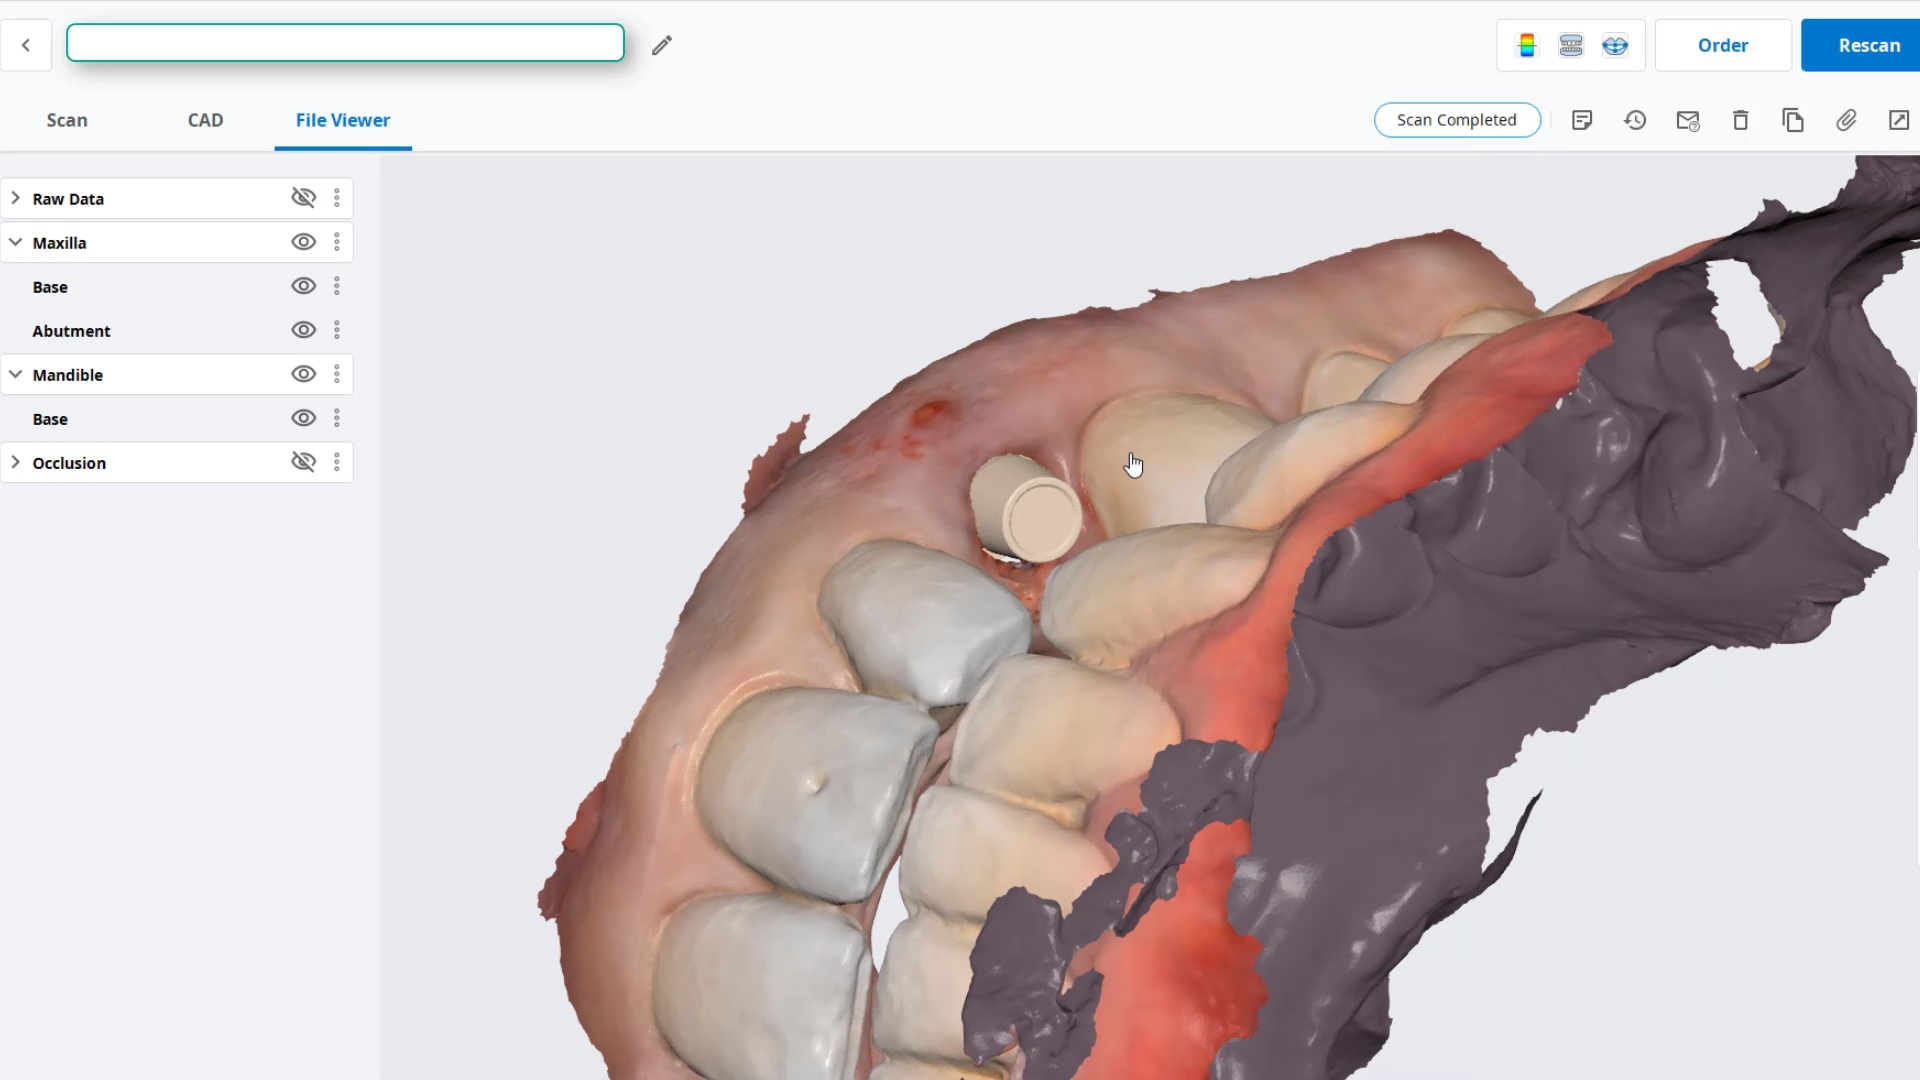
To use the Artificial Implant Suprastructure Identification Software to identify a scanbody, you have to understand how it is listed in the library. It is not listed by the name of the implant company but rather the manufacturer that fabricates that implant lines scanbody. For example, there are multiple choices for Nobel Active Conical Connection scanbodies. The easiest way to find them is to search for the pre-loaded brands, but be aware of the routing abbreviations many companies utilize. For Nobel Active, usually NB AC is used.
Then you must choose whether you are going to fabricate a Ti-Base or a Custom Abutment, and whether you are using an intra-oral or extra oral scanbody. The connection type (diameter) and the material (titanium vs. chrome cobalt) also must be selected. Here’s a quick video that illustrates the selection process. You must also consider if a 10 or 14 mm diameter blank is going to be used to mill the product. In molar areas, a size 14 is preferred so that you can reach the outer most boundaries of your desired margins, whereas a 10 mm blank may be too narrow and small for a molar.
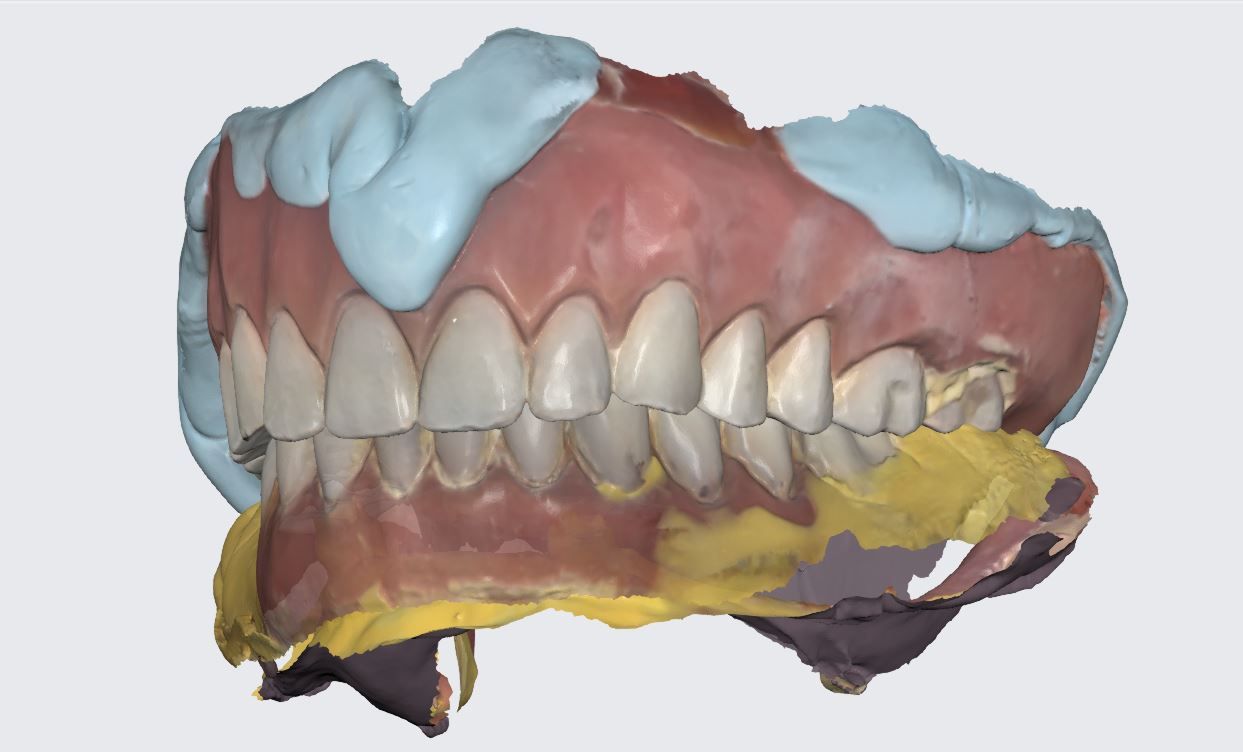
A fracture and worn overdenture greater than 10 years old was duplicated digitally where the lab was able to follow the vertical dimension and tooth position from digital impressions taken by the Medit i500. Clinically, we advise that you place the housings before taking the impressions to accommodate enough space for the chairside reline. In this particular case, most of the reline and imaging was done extra-orally
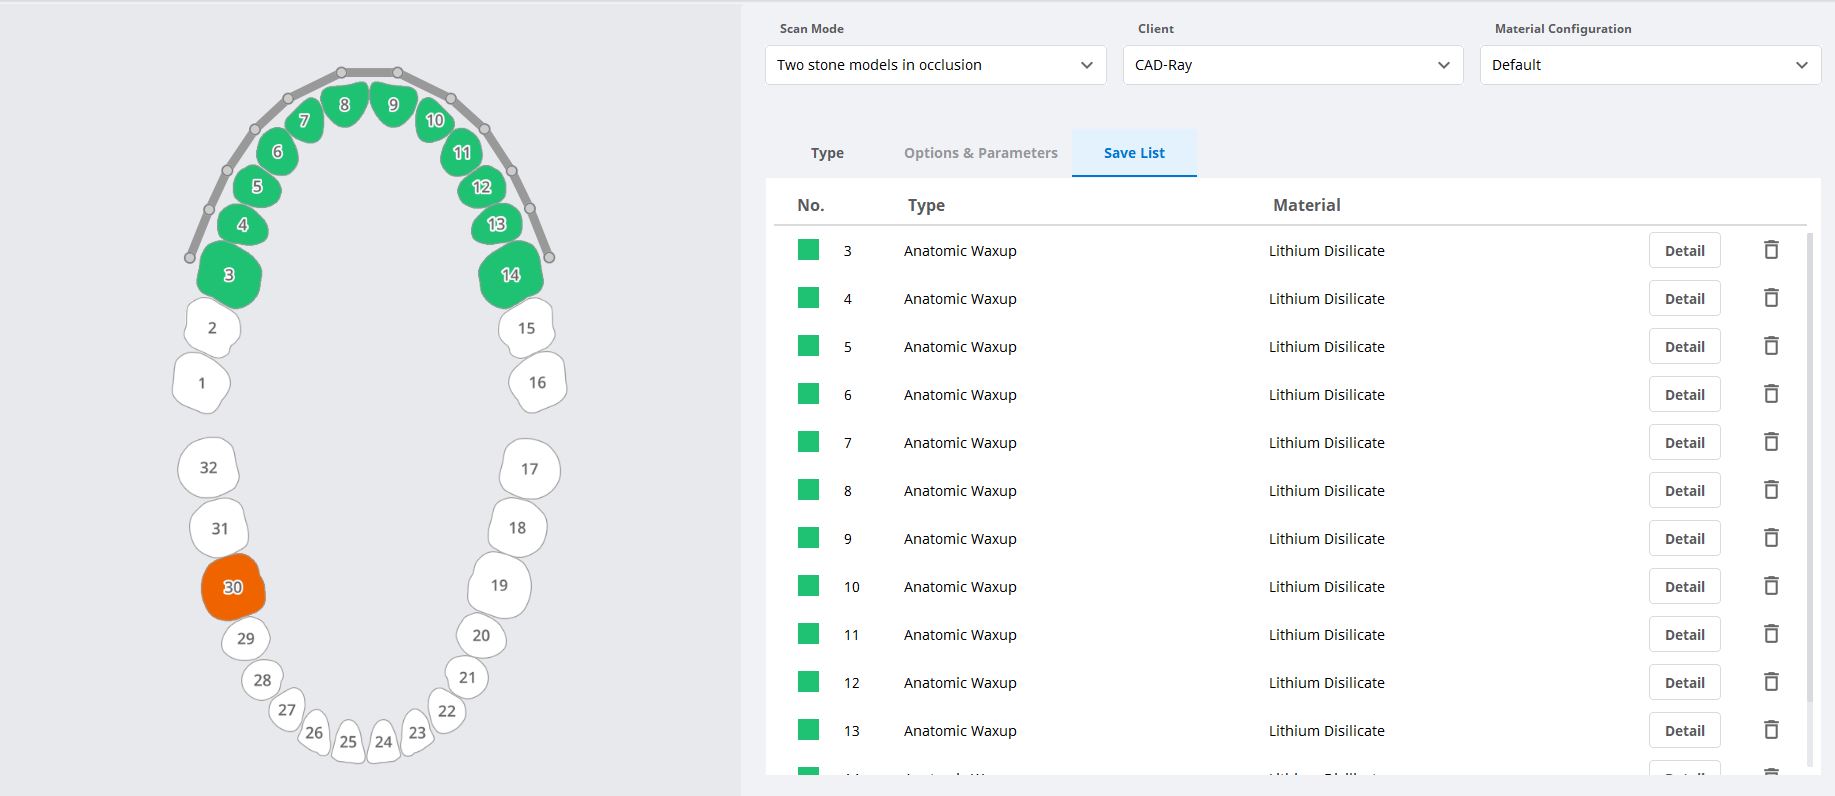
We have an MO a DO on adjacent teeth that need to be done and a crown in between. It took only 90 minutes to do all 3. I prepped the crown and got that milling and while it was milling I restored the adjacent teeth. I then tried the crown in. what’s great about lithium disilicate vs zirconia chairside is that I can easily add a contact on with powder while its crystalizing. or I can adjust the composites to nail the contacts. so we leverage mill time and oven time with prep time. Said another way, it takes me the exact same amount of time to do a crown + 2 class two’s as it does to do a single crown
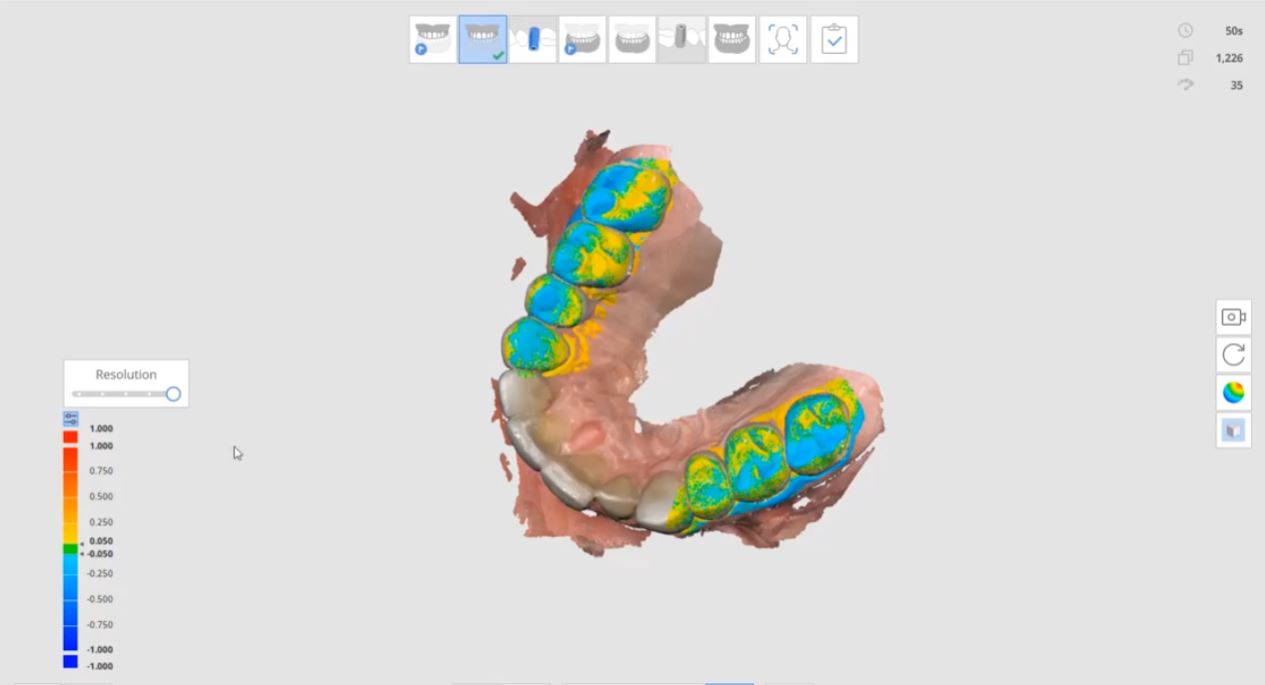
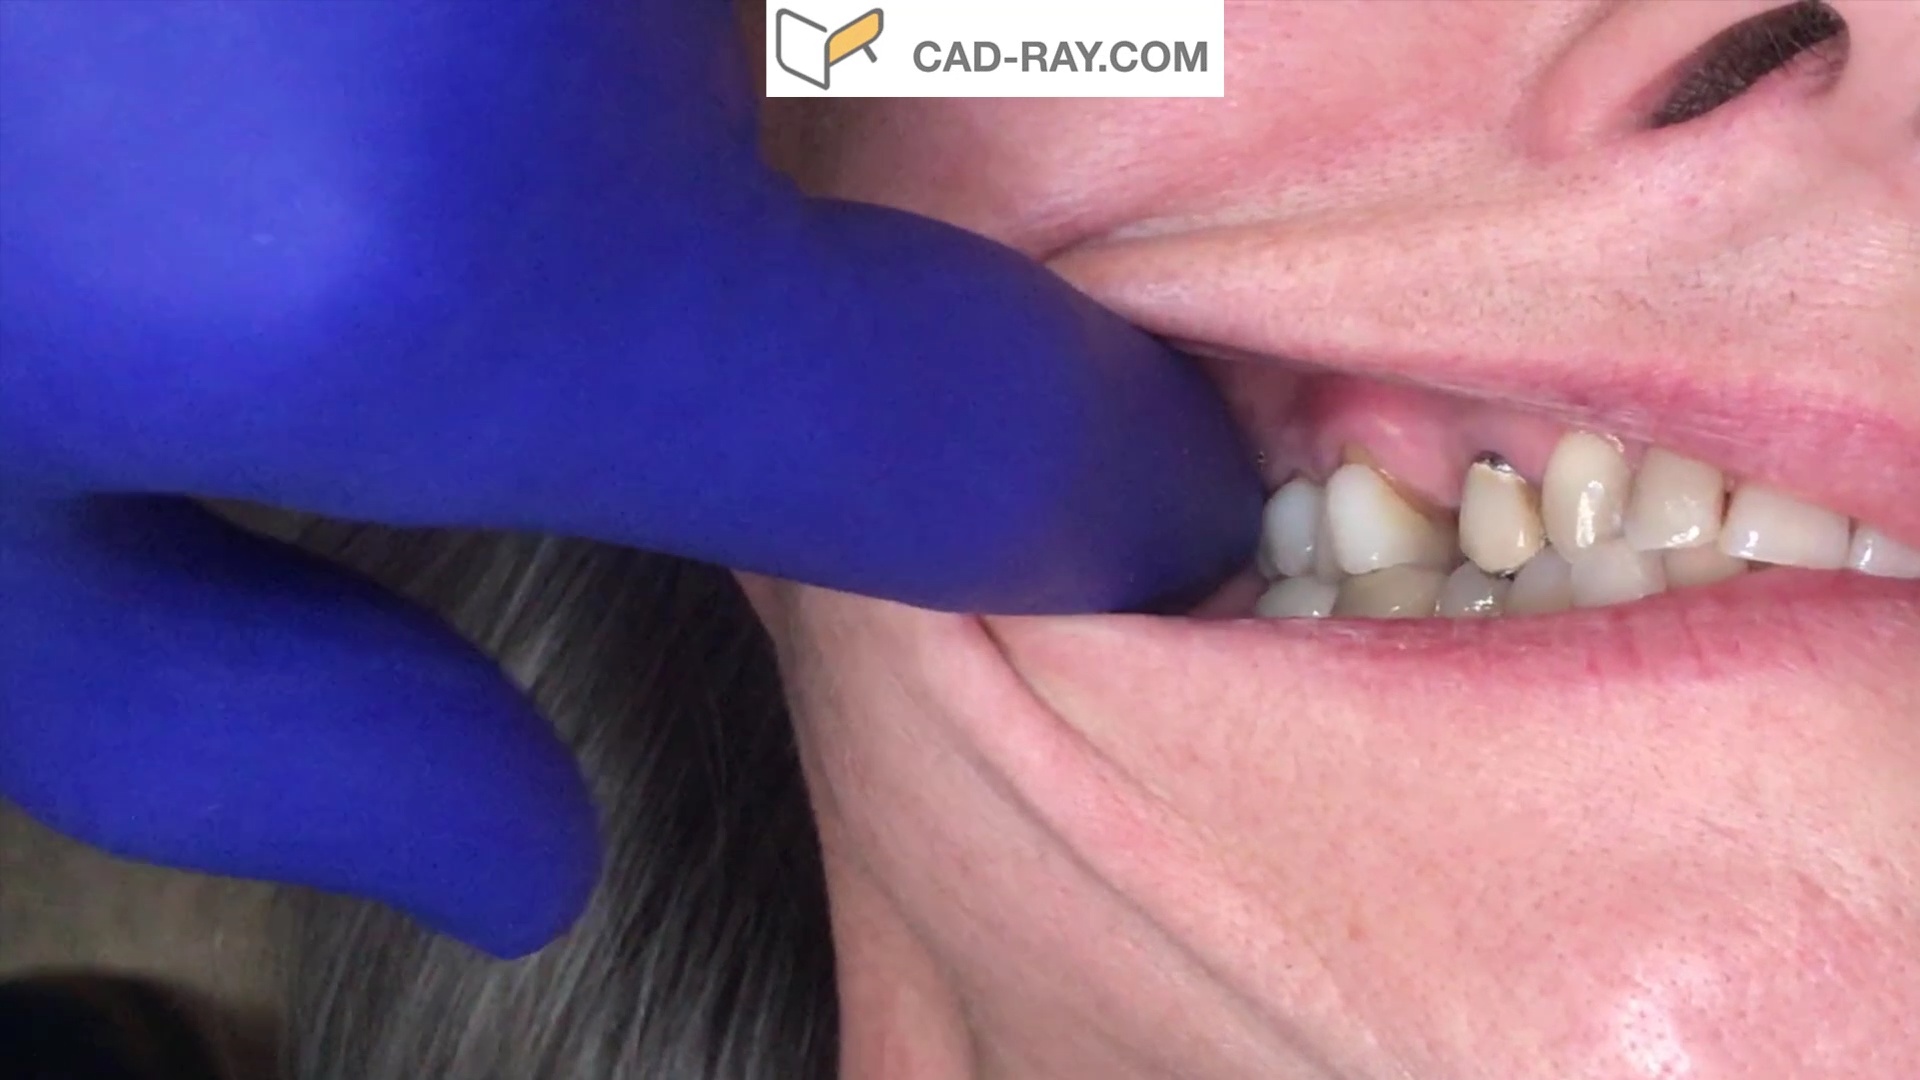
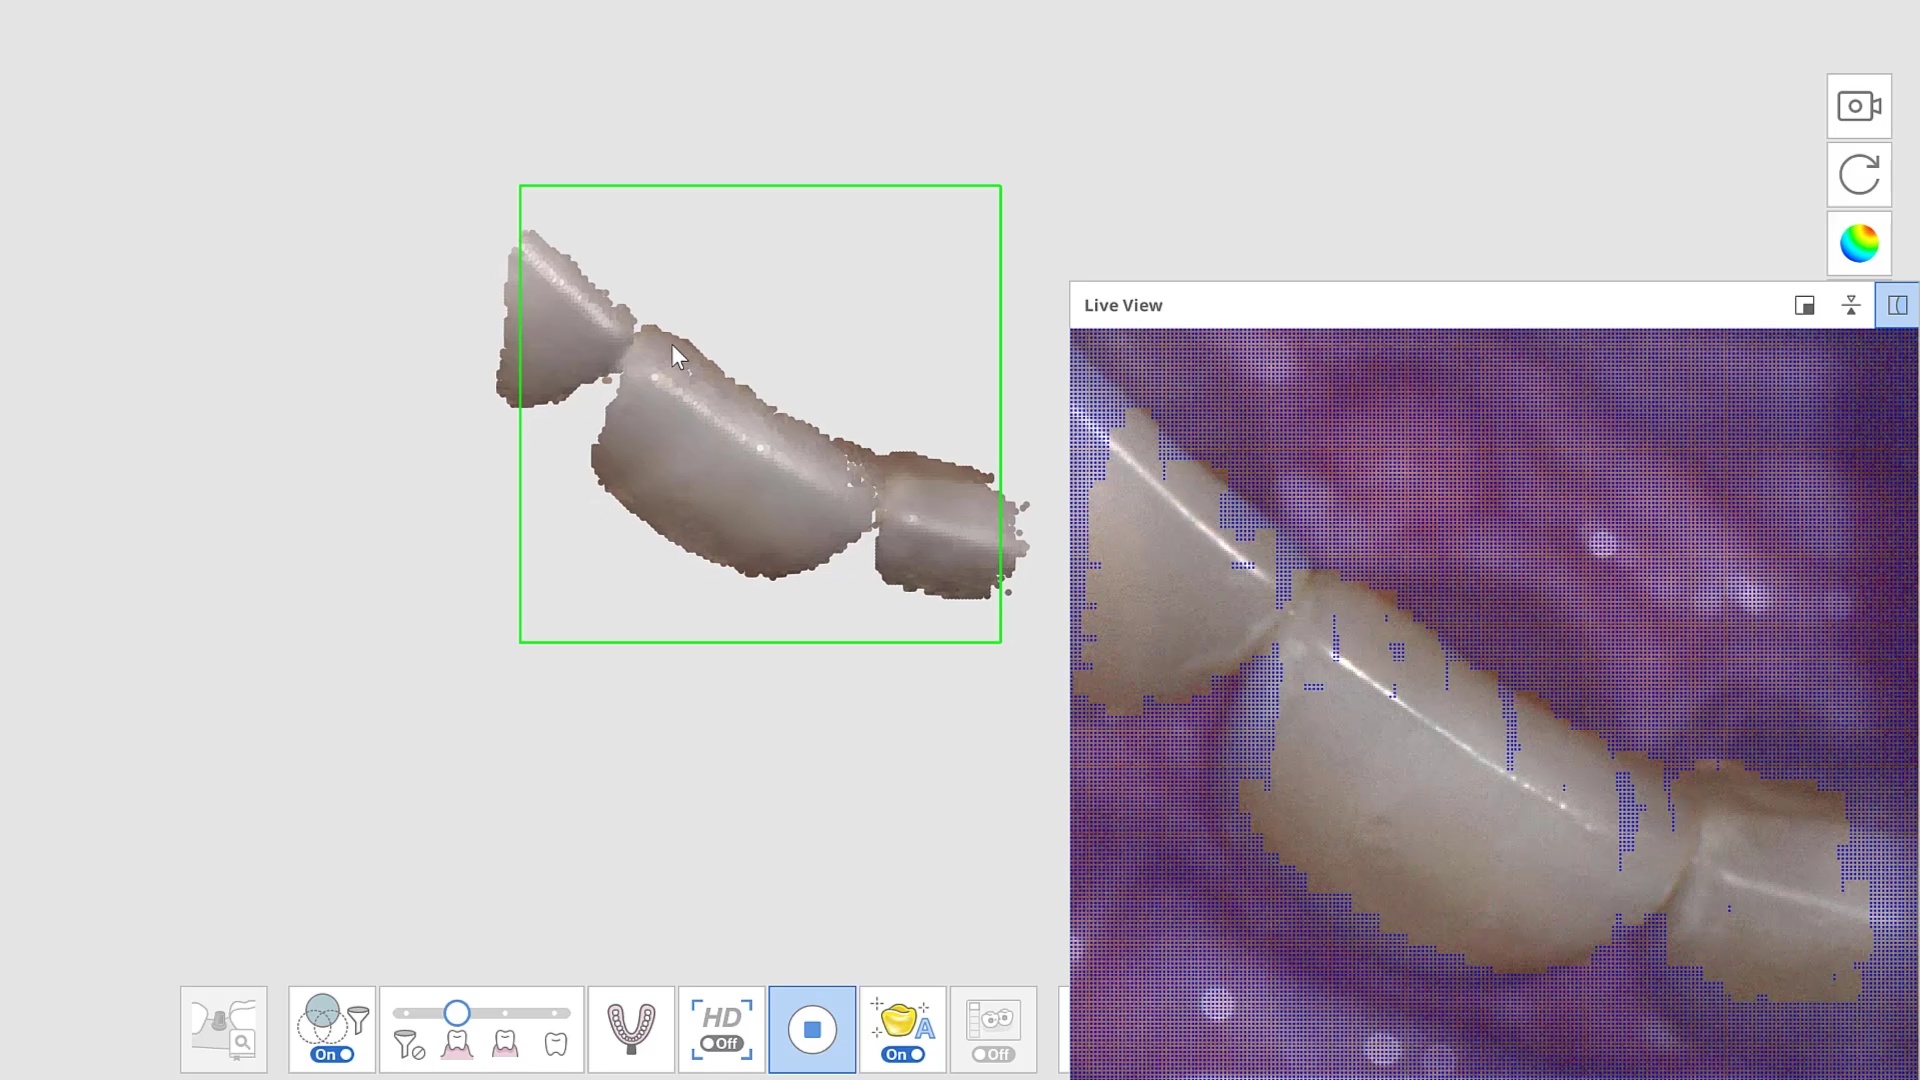
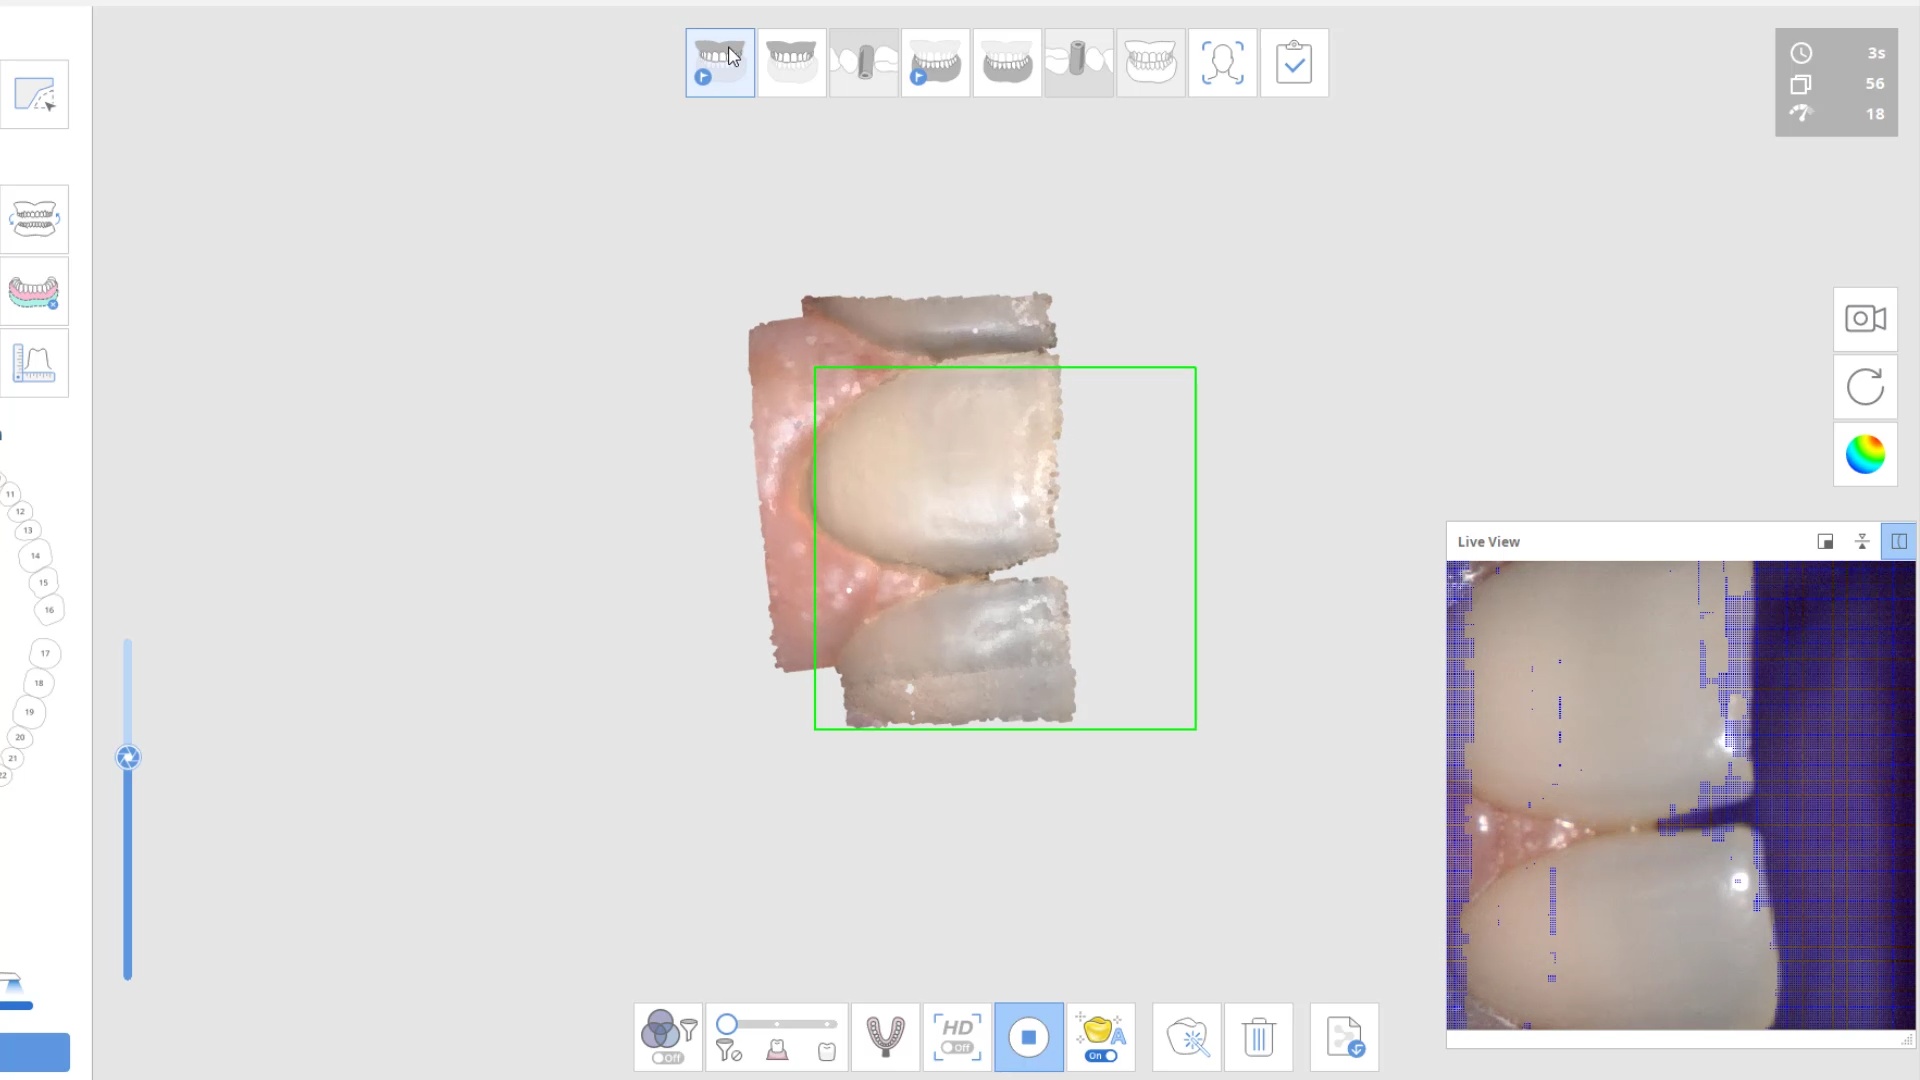
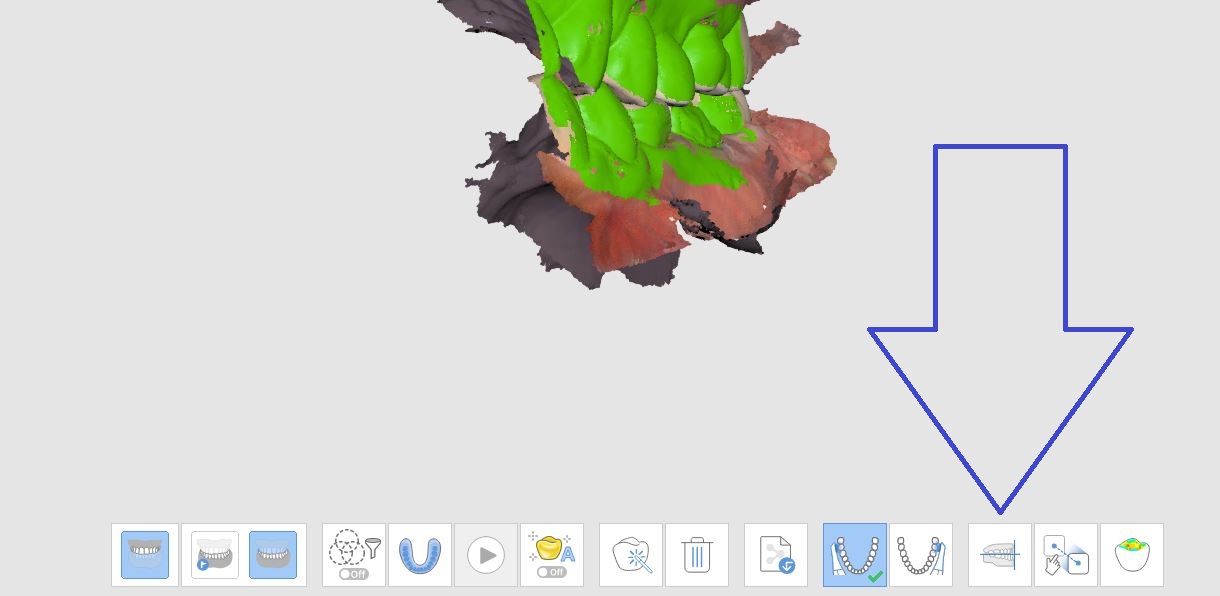
In this video we demonstrate how to use the color extraction feature of the Medit i500 scanner to displace and ignore the pesky tissue and the coronoid process that are annoying you while you try and image the distobucall area of an upper second molar
With Medit i500, there is an incredible feature where you can import a 3D model from source, even another scanner and be able to add live scans to that model. This is a first in the dental industry and has great impact for advanced users who utilize multiple models.
One of the most important lessons a digital dentist has to learn quickly is how to not introduce errors when scanning dentition. The most likely area when s/he can introduce errors is in the anterior area where the incisor are not only narrower than molars but can also have translucent enamel. Add just a little spacing between teeth with diastemas and you can quickly distort the accuracy of the model. This is true of ALL intra-oral scanners in the market
Incisal Translucency / Transparency Causing Model Distortion
There are a few ways you can overcome these issues and the second video highlights some of our preferred methods. The concept is easy- block the light from travelling through the tooth structure and you are set! Watch the videos to learn how to do it
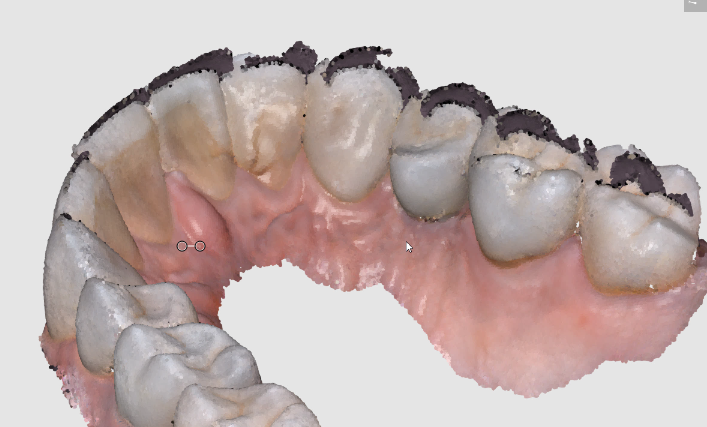
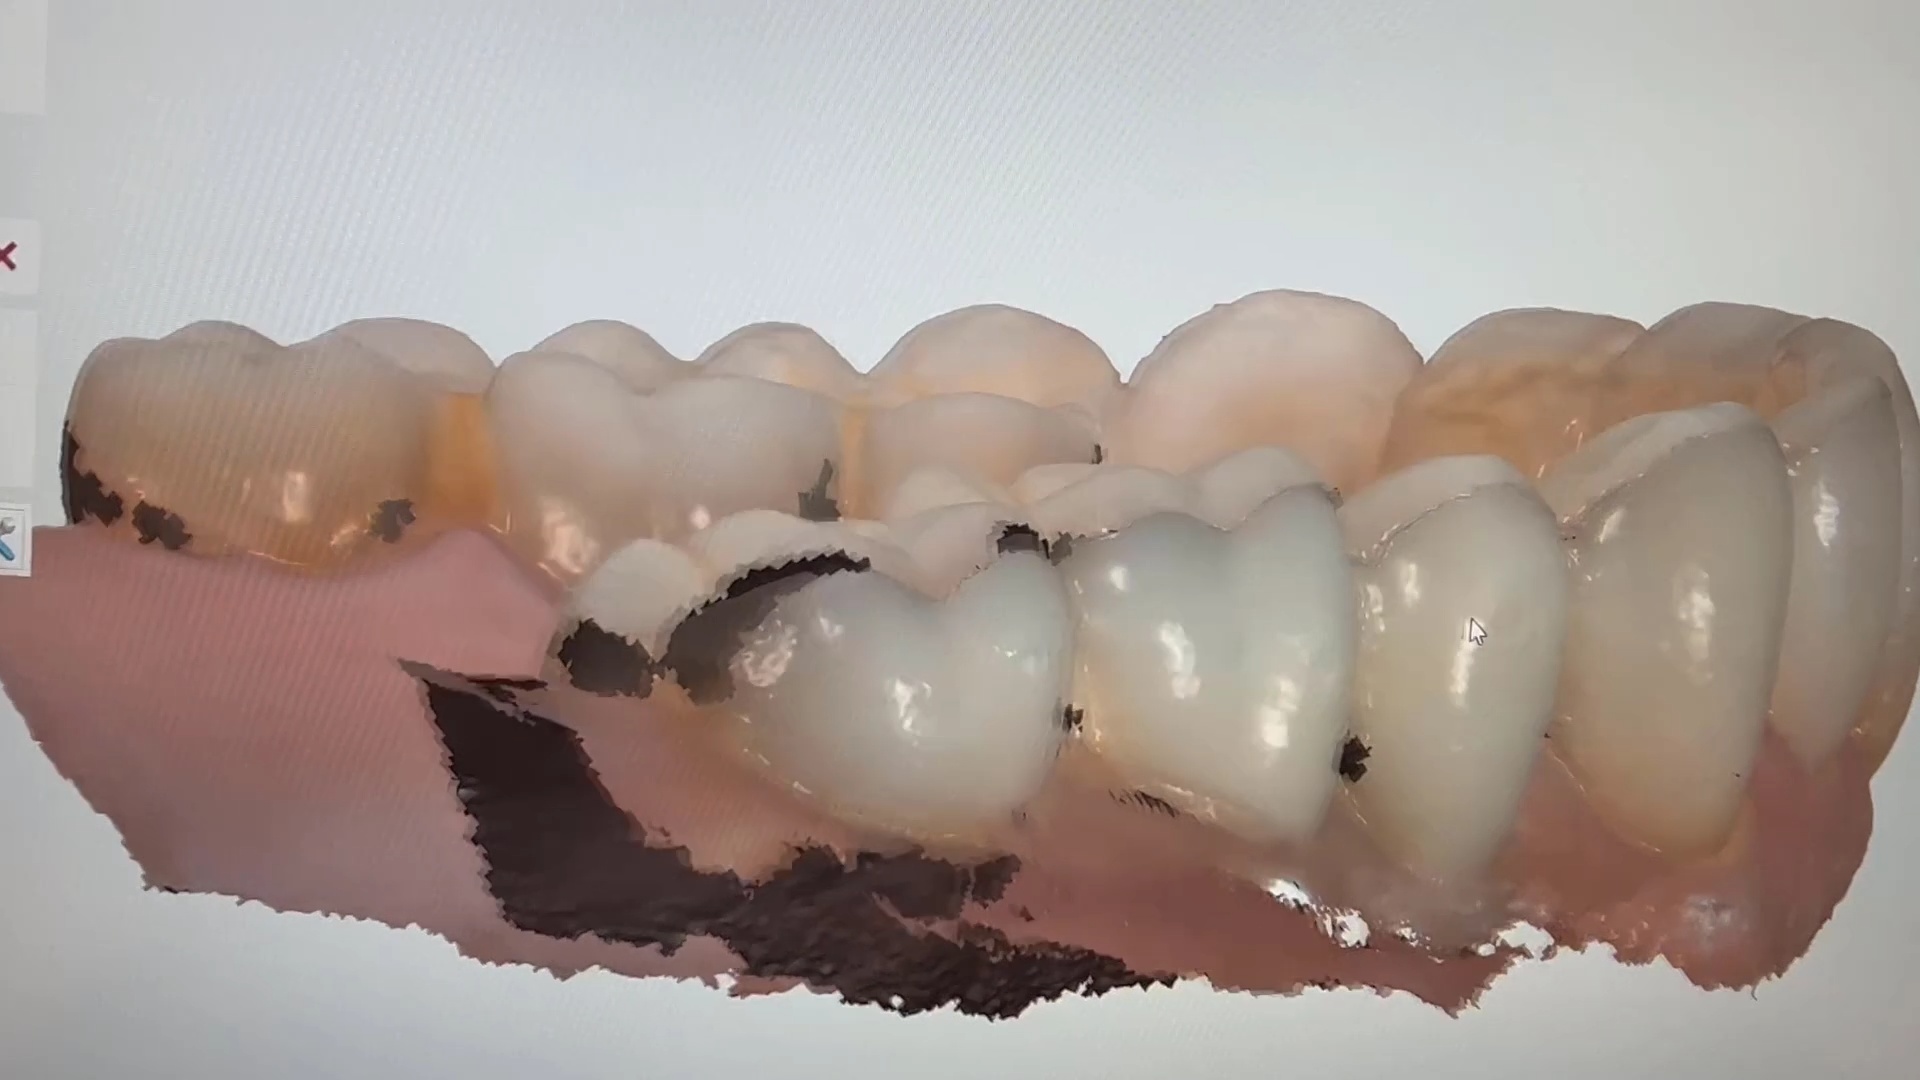
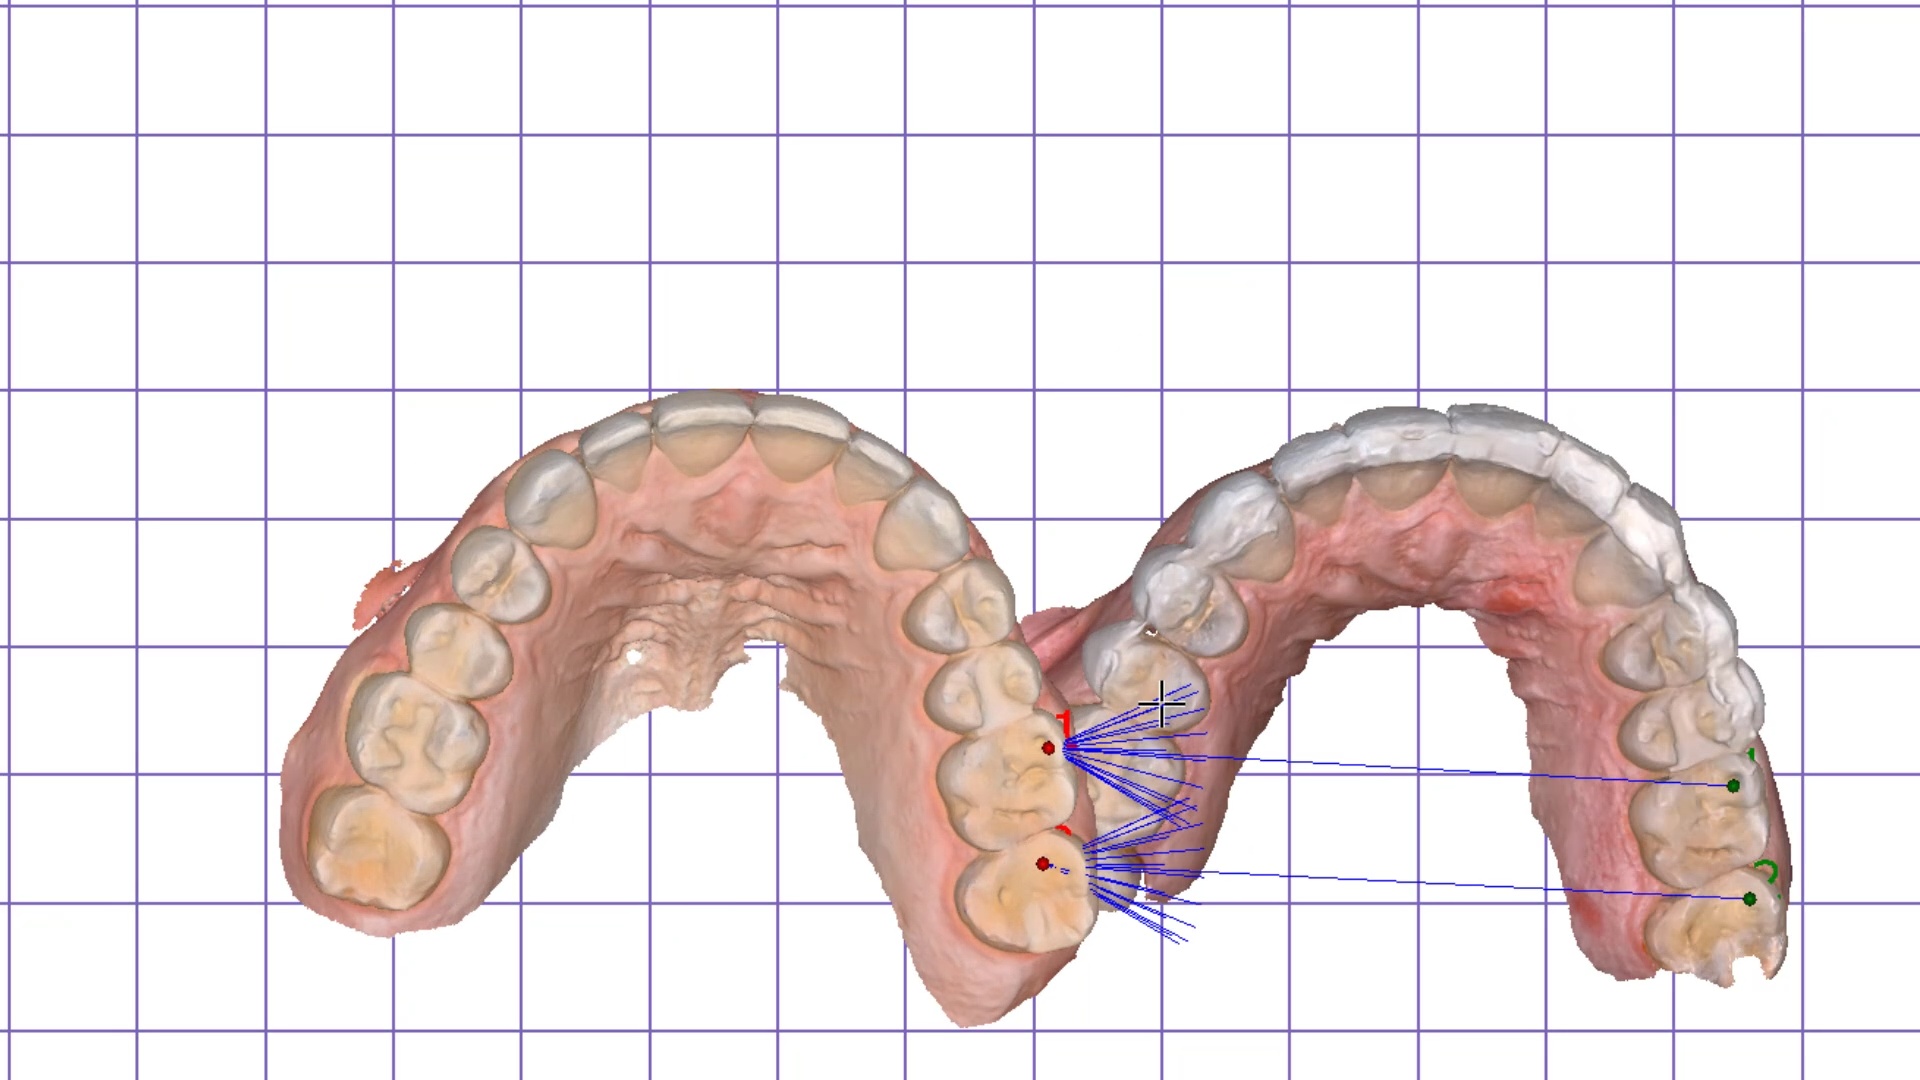
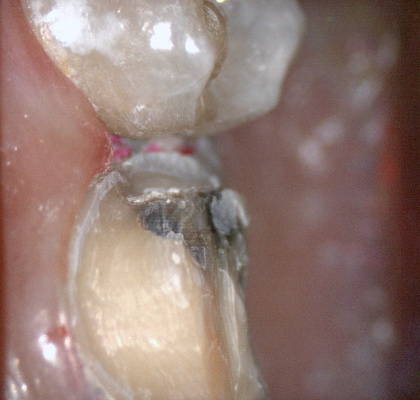
Here are some examples of how light shinning through the enamel and /or ceramic instead of bouncing back resulting in errors in model accuracy. Lesson #1 for every ios user is to know when and where they are likely to introduce error. in dentate cases, it usually is right that the transition from premolar to canine to lateral. The surface area decreases dramatically and if you have translucent enamel and / or material and / or highly reflective surfaces you can “derail” the model building. Here is an exaggerated demonstration
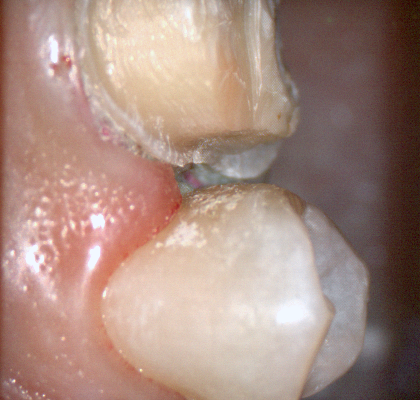
Translucent enamel can also play a role in distorting the cavosurface margins of a inlay or onlay restoration. When imaging from the occlusal, the gingiva below the margins acts as a barrier to block light transmission through the enamel, but as soon as you start to roll the camera to the buccal or lingual, and you have enamel with no substrate behind it to block light transmission, you can introduce errors in the equation with any scanner.
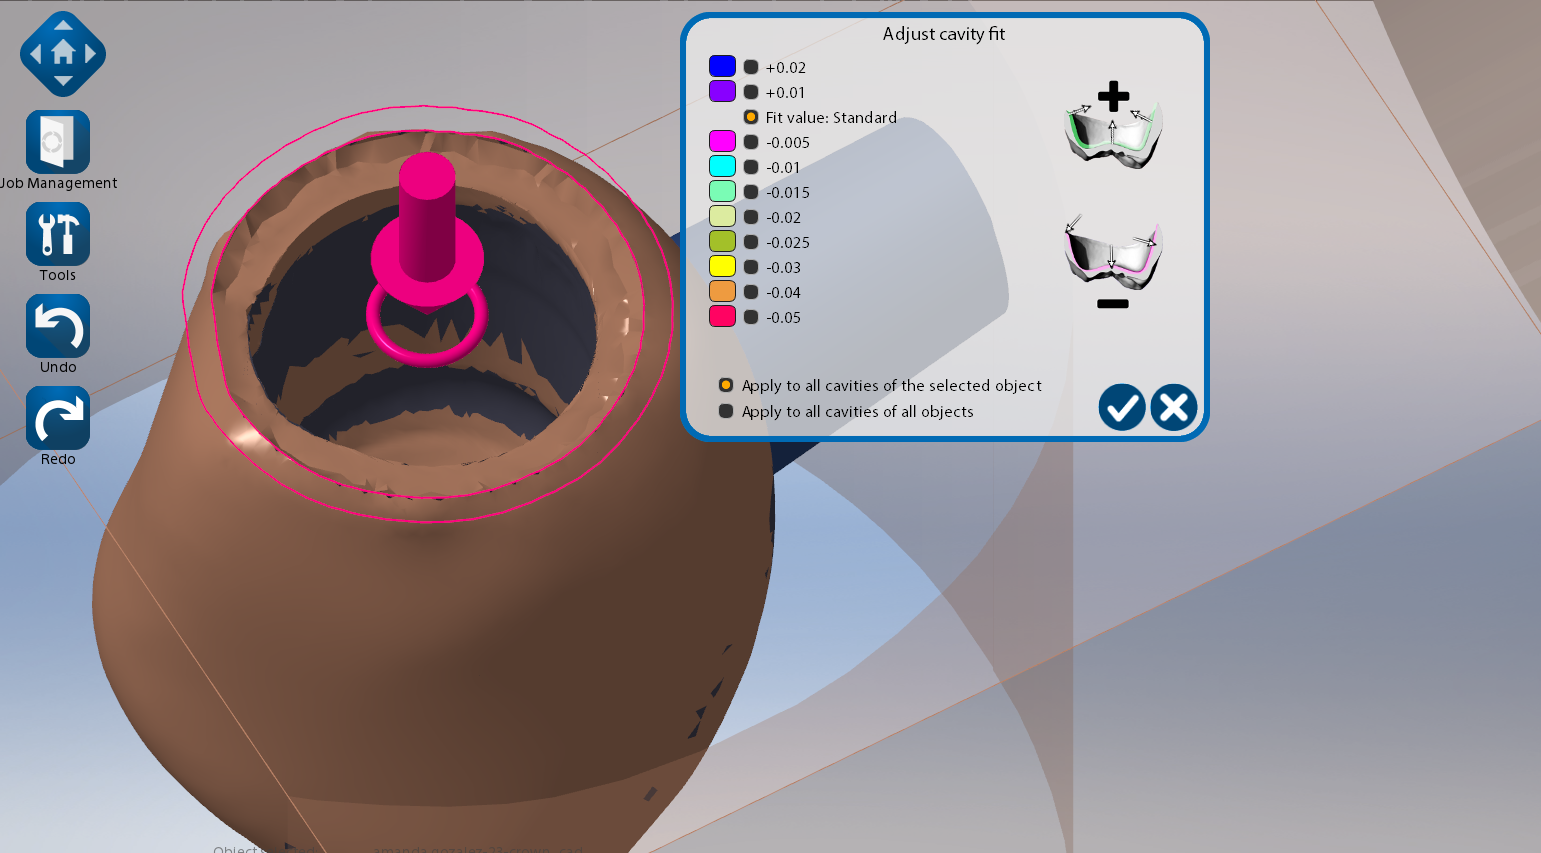
There are many ways to combat this which include powdering the tooth structure, using a rubber dam, or in Medit’s case, you can use the color subtraction filter. You selectively tell the scanner to ignore certain colors and you use that exact color (here, it is the color of the glove) to block light transmission through the enamel. So the software just ignores the blue, but the light is prevented from shining through reducing the errors you would introduce.
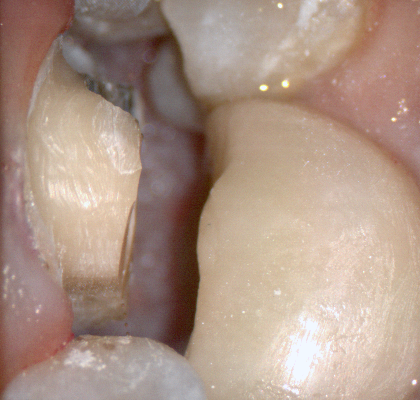
Here is another example of the distorted enamel margins on a conservative preparation and how blocking out the light from travelling through the tooth structure leads to crisp visualization of margins without any distortion or artifact
can you explain why we see blurred margins and artifact/distortion between the 2 centrals while in the second image the…
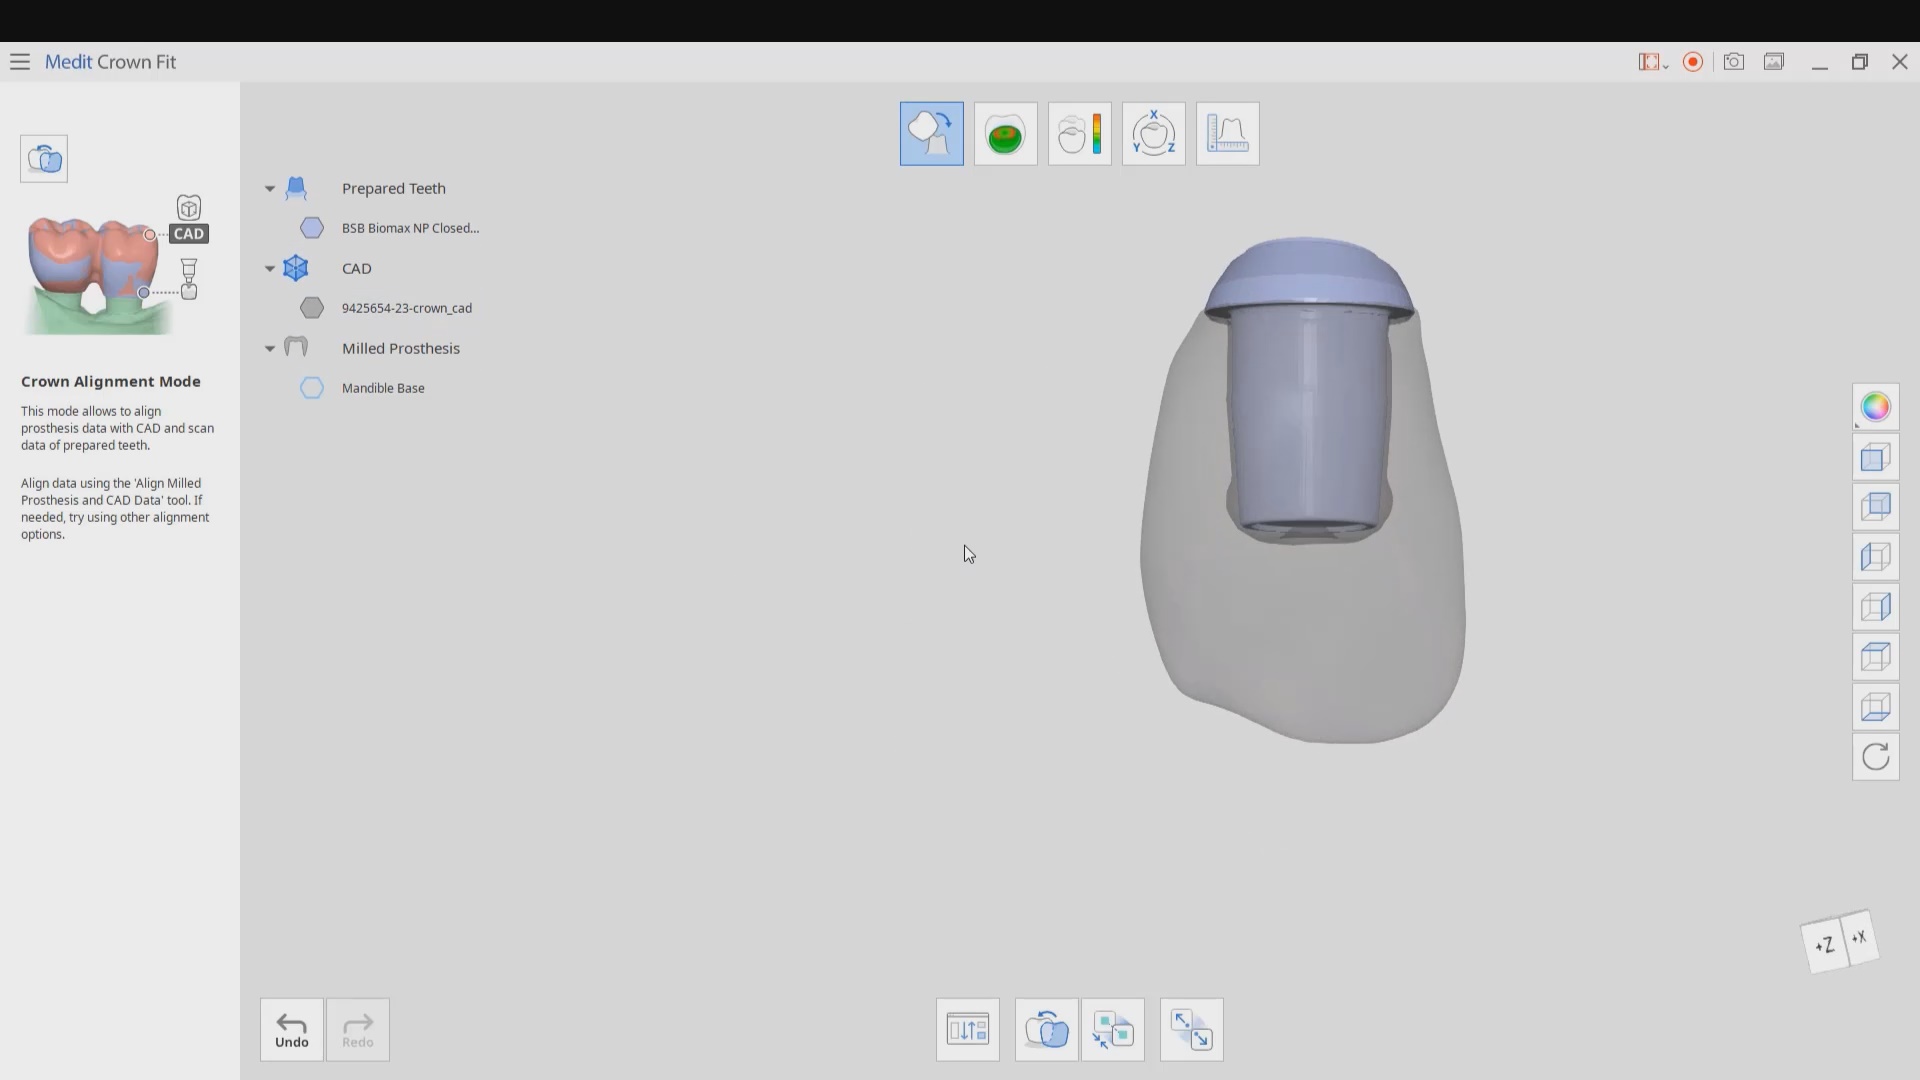
For advanced users of meditlink software, you can skip filling out the Rx form and go straight into scanning. But make sure to properly fill out the CAD Rx form so that all the necessary models are imported into the design software. If you don’t designate the opposing or the Pre-op / Wax-Up in the form, they will not be part of the design equation. Also, this video shows how to select multiple restorations at once.
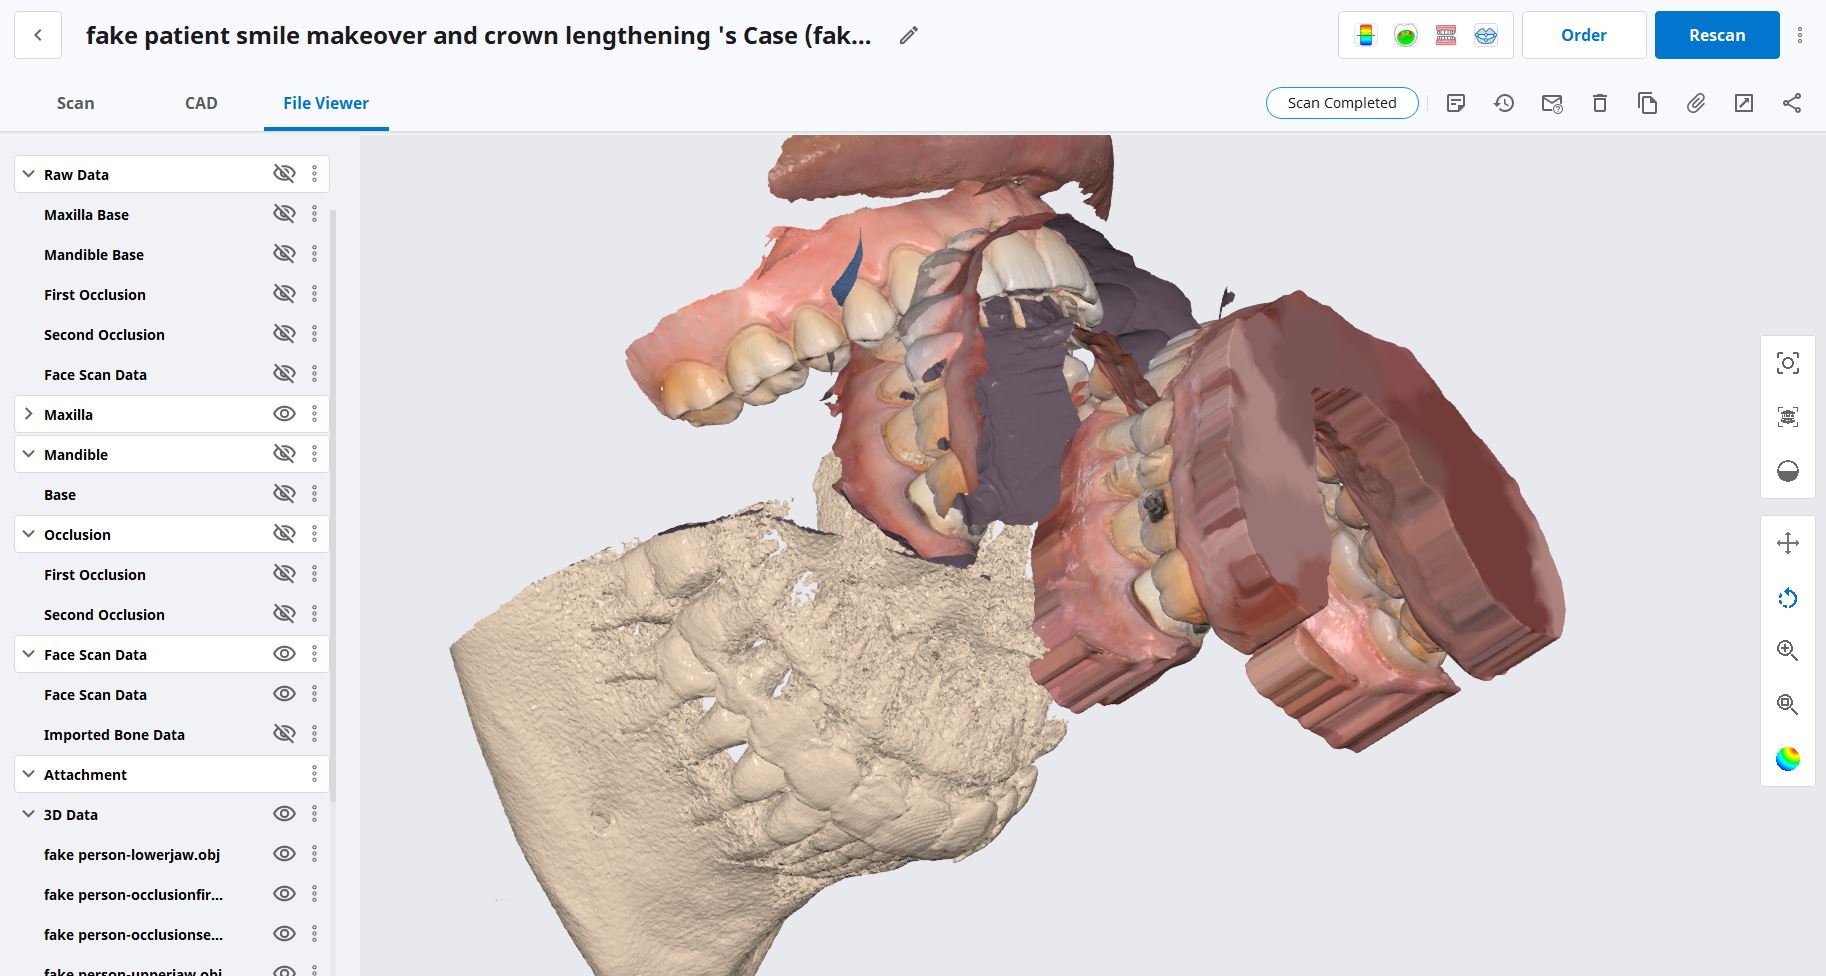
in this case we import multiple models, videos, CT scans, and Face Scans so that our users can utilize all of these features. Click here to enter the member’s section to download the whole case and design along
here is a list of why the Medit Artificial Intelligent Implant Suprastructure Identification System is significantly more advantageous over all other cadcam systems.
It s technically a crown and bridge case and the implant location or timing does not matter
You can find margins outside the mouth! See the first video to appreciate the significance of this
You don’t have to deal with retraction or hemostatis at all
You don’t have to worry about sprue position. Many other systems force the placement of the sprue to a specific location often making the case more difficult to manage than necessary
you are not limited to just a few implant lines
you don’t have to worry about location of anti rotational notch
you can digitally alter the prep and get a virtual reduction coping in cad
Use any restorative block you want. There is no need to order special blocks with pre-fabricated access channels and keep a large inventory of many colors. Your regular block inventory will suffice. Just make sure the top of the tibase is wider than the diameter of the drill used to mill out the intaglio. Also, the CAM and the milling machine determine the exact product and different settings maybe utilized to give you relief off the walls. Some will even remove the antirotational notch because the adaptation is so tight, the restoration will not rotate due to the tall walls of the tibase
You can check the fit outside the mouth on the same tibase or a one you keep chairside for every case to let you know that if you are not seating, it is clearly a contact or contour issue as opposed to an intaglio issue.
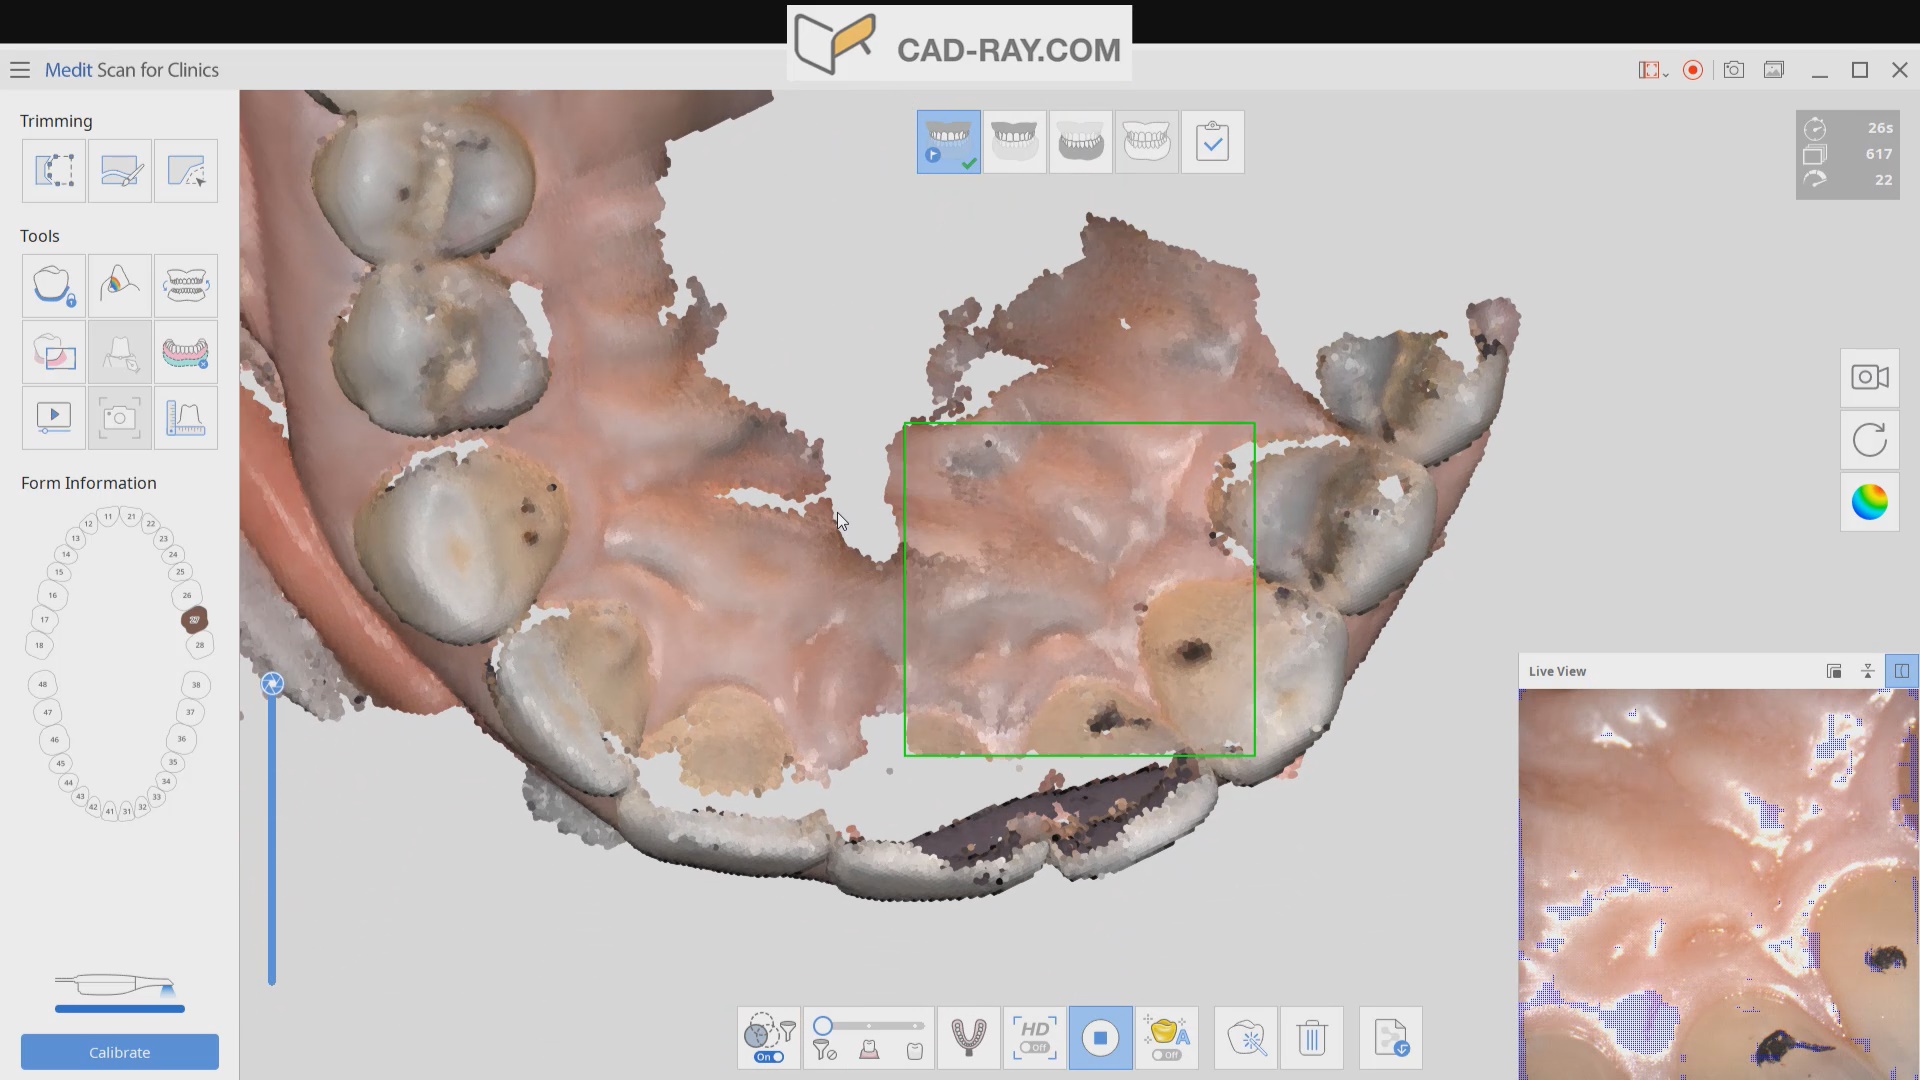
This article features the new Meditlink 2.3 software which has some advanced functionality. One of the greatest achievements is he ability to tell the scanner to avoid imaging certain colors like green and blue. This greatly facilitates the imaging of full arches as you can let your gloves / fingers guide the camera and displace all the soft tissue that impedes image capturing. We also feature how easy it is to launch CAD software to design the restoration and mill it out of lithium disilicate material
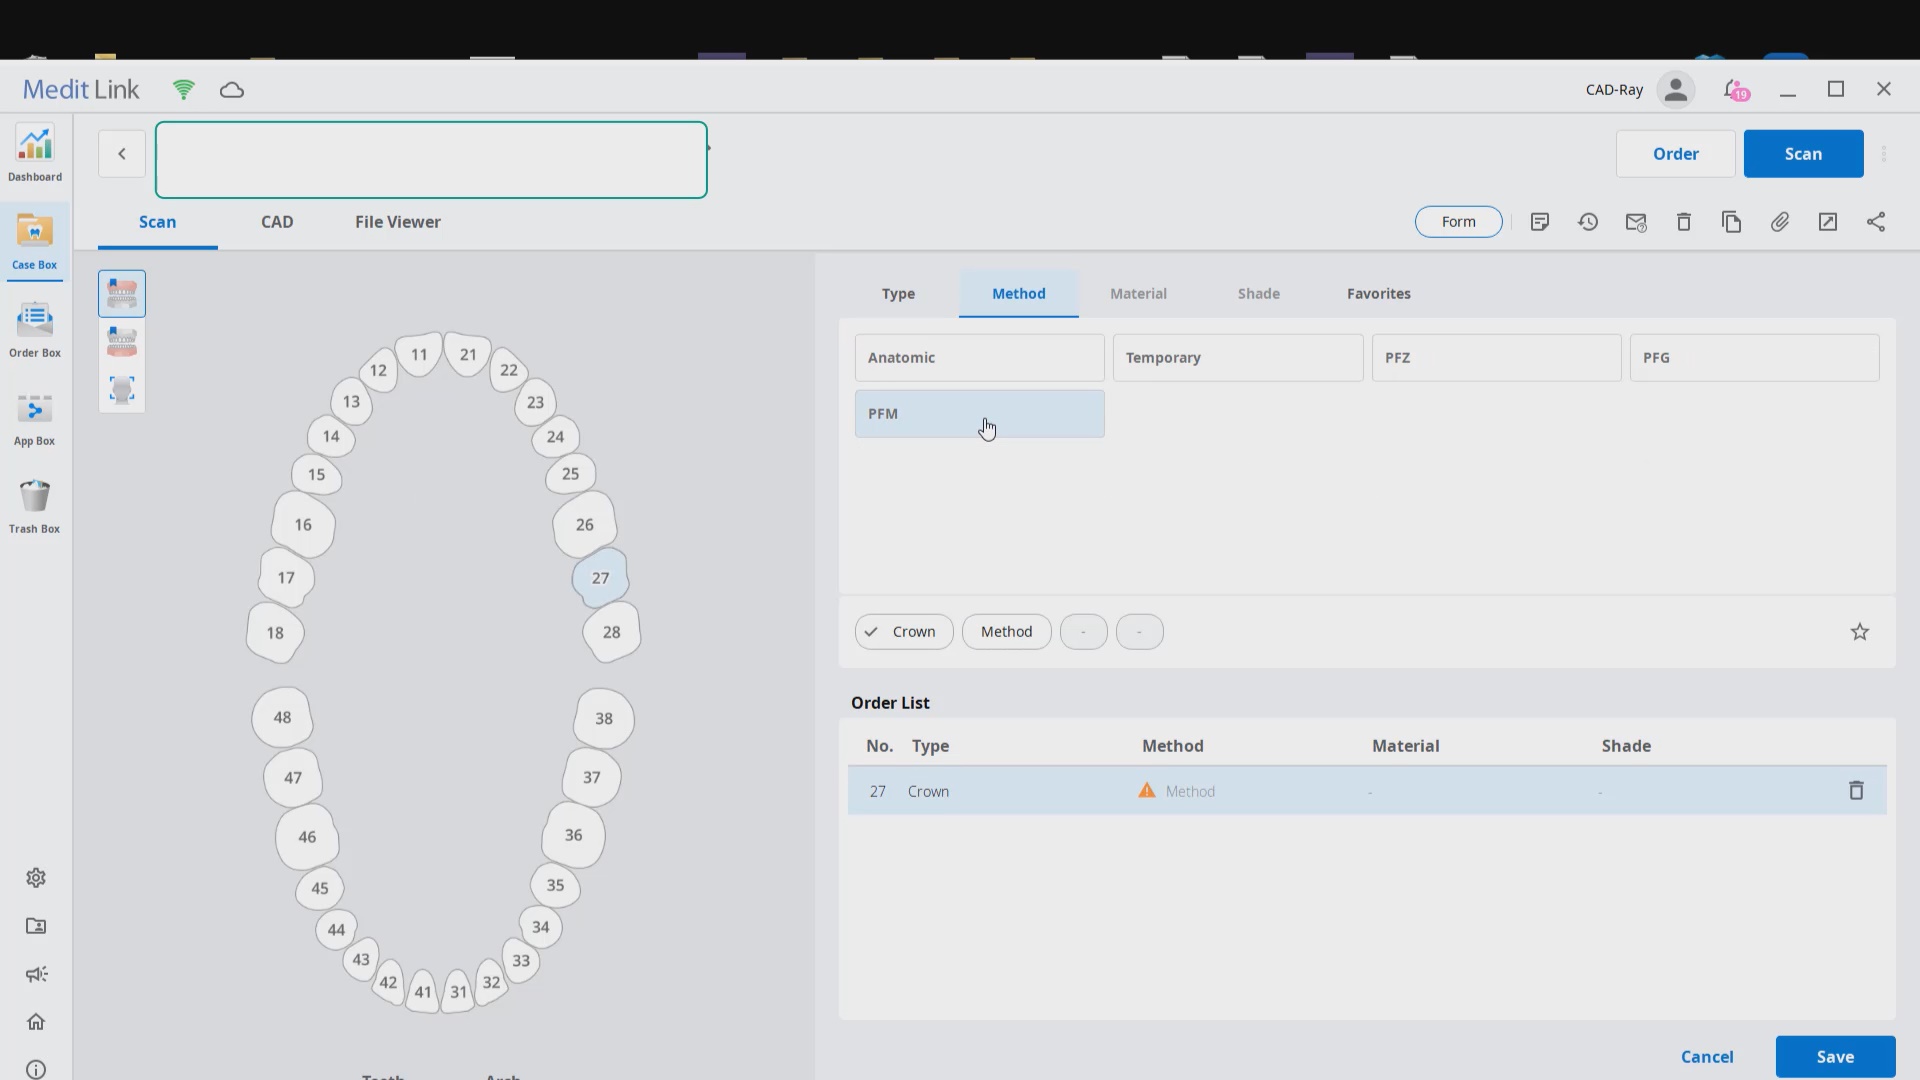
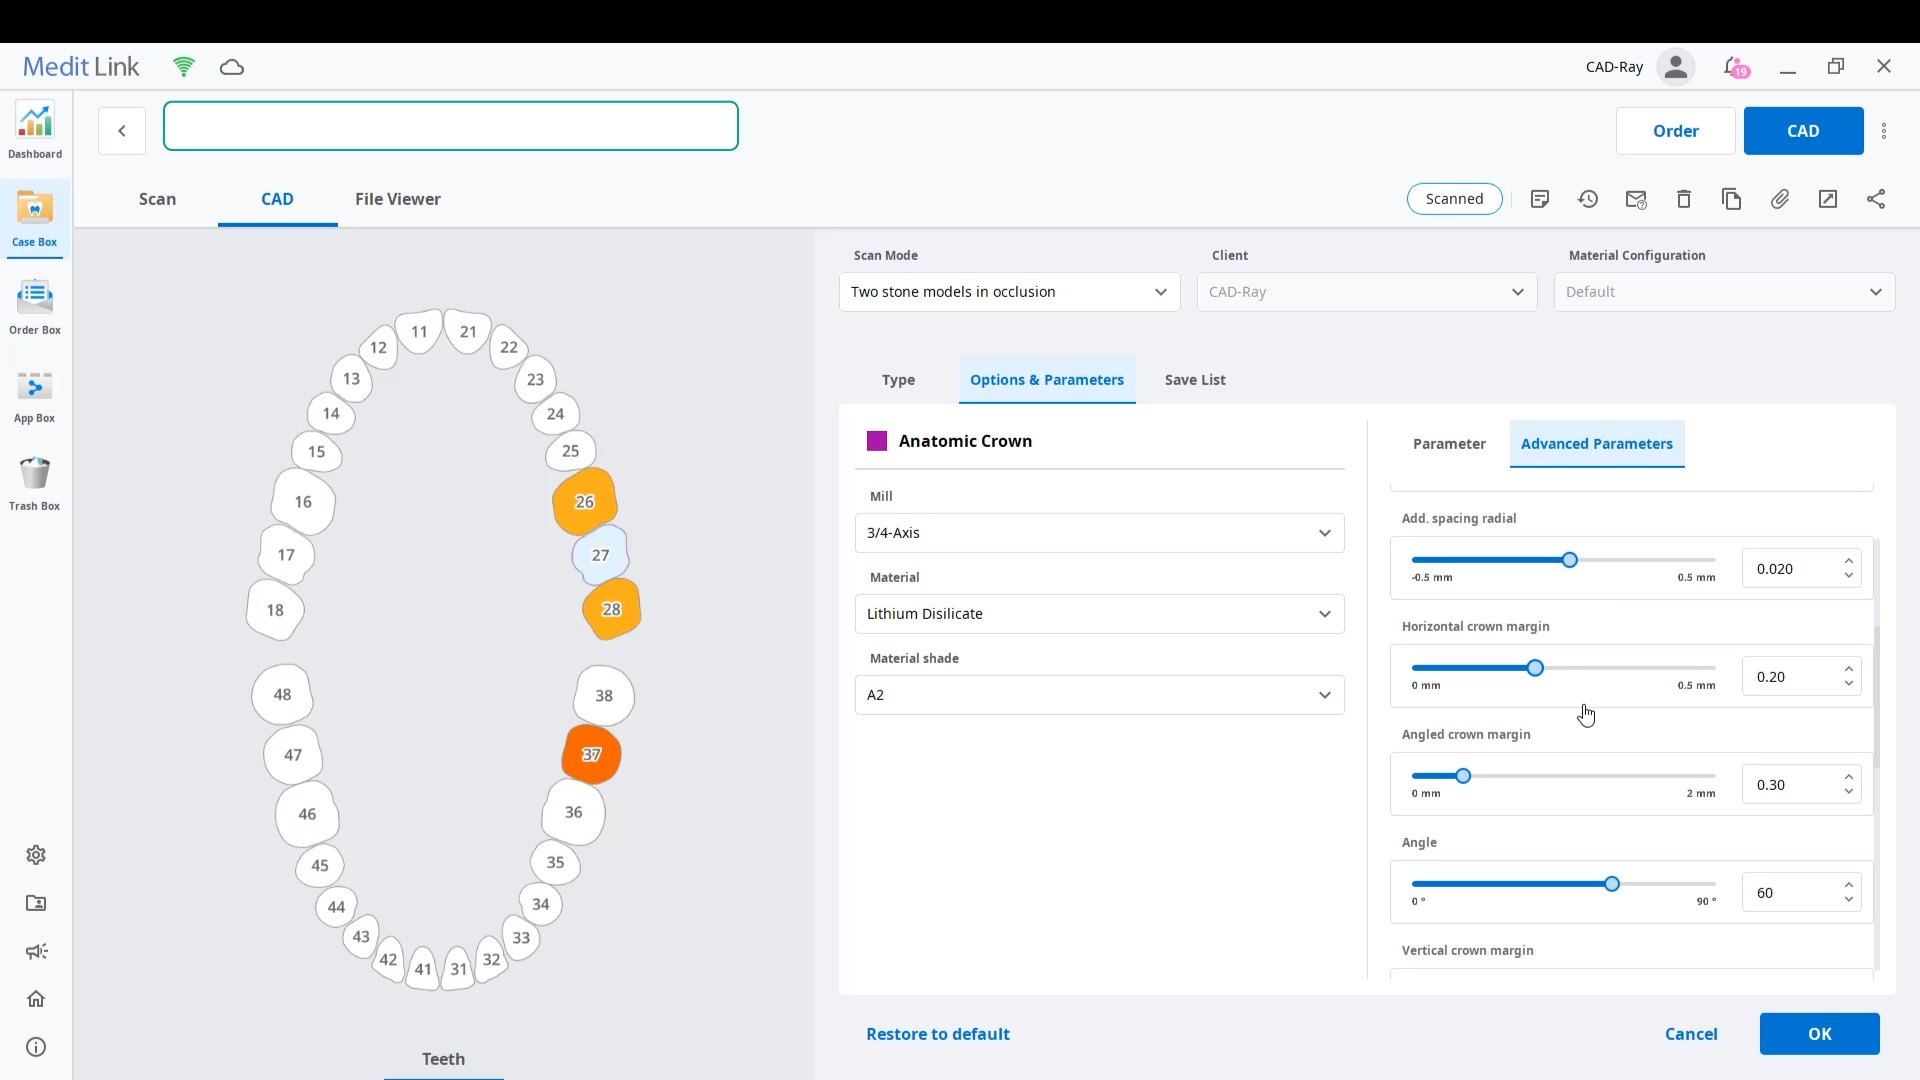
Case set up: here we enter the patients name and a simple tab appears where we chose the material and restoration tab. Once you image, you can place an order to the lab or you can advance to the CAD tab:
After the Rx has been filled out, you can launch the Medit Scan and image the upper and lower arches. Please note how we tell the camera to avoid the color blue and it ignores the clinicians fingers during imaging. The upper jaw and lower jaw were captured, then the bite registration even before the preparation was finished. This allows the verification of proper reduction and space for the ceramic material
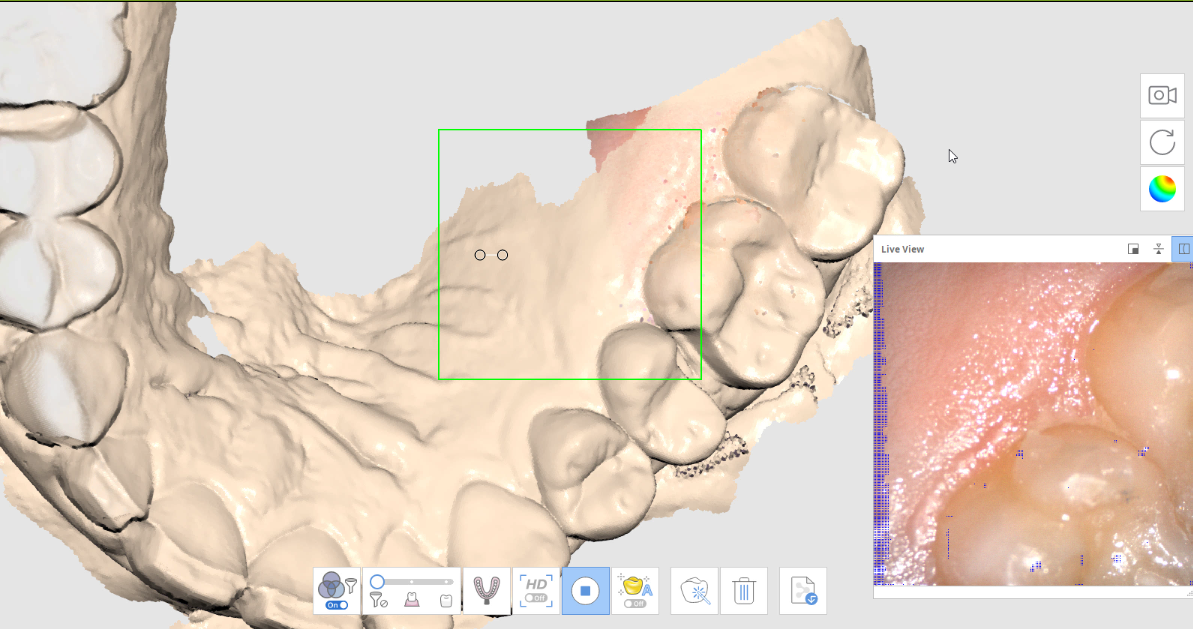
Lower Arch Scan
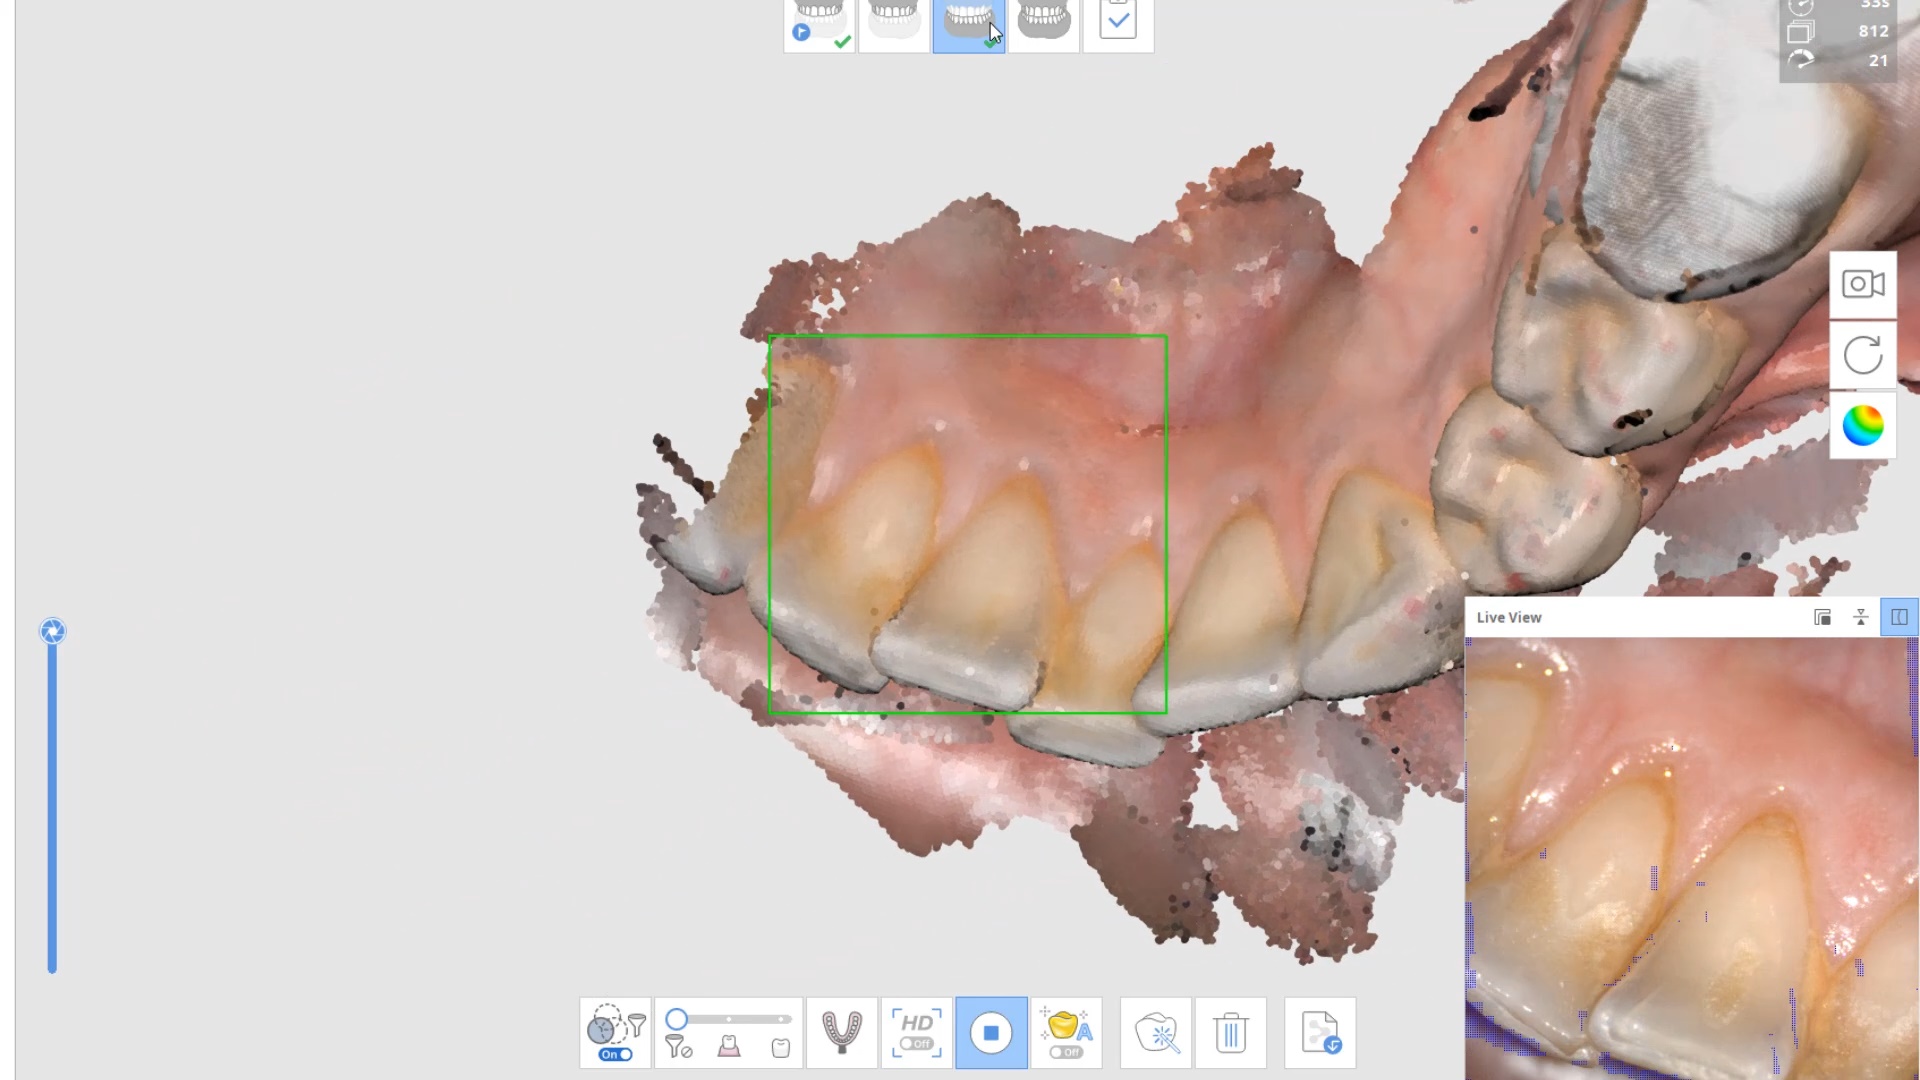
The lower arch is the most difficult area to scan as you frequently have to battle the tongue, saliva, and the lips. The optragate can be of great help but notice how we use the color filter to hide the blue gloves while we advance the camera. It is a great aid in facilitating the capture of the lower arch
The same principle is applied to the upper arch. Notice that the software does not care if you start with the upper or lower arch. Here, you can visualize how the blue glove was used to displace the cheek and capture the pre-op condition of the upper second molar. The rest of the arch was easily imaged. It is not necessary to capture full arch impressions and this was done just for demonstration purposes. For a single unit case, generally imaging distal from the canine is adequate.
Checkingthe reduction and aquiiring the bite registration
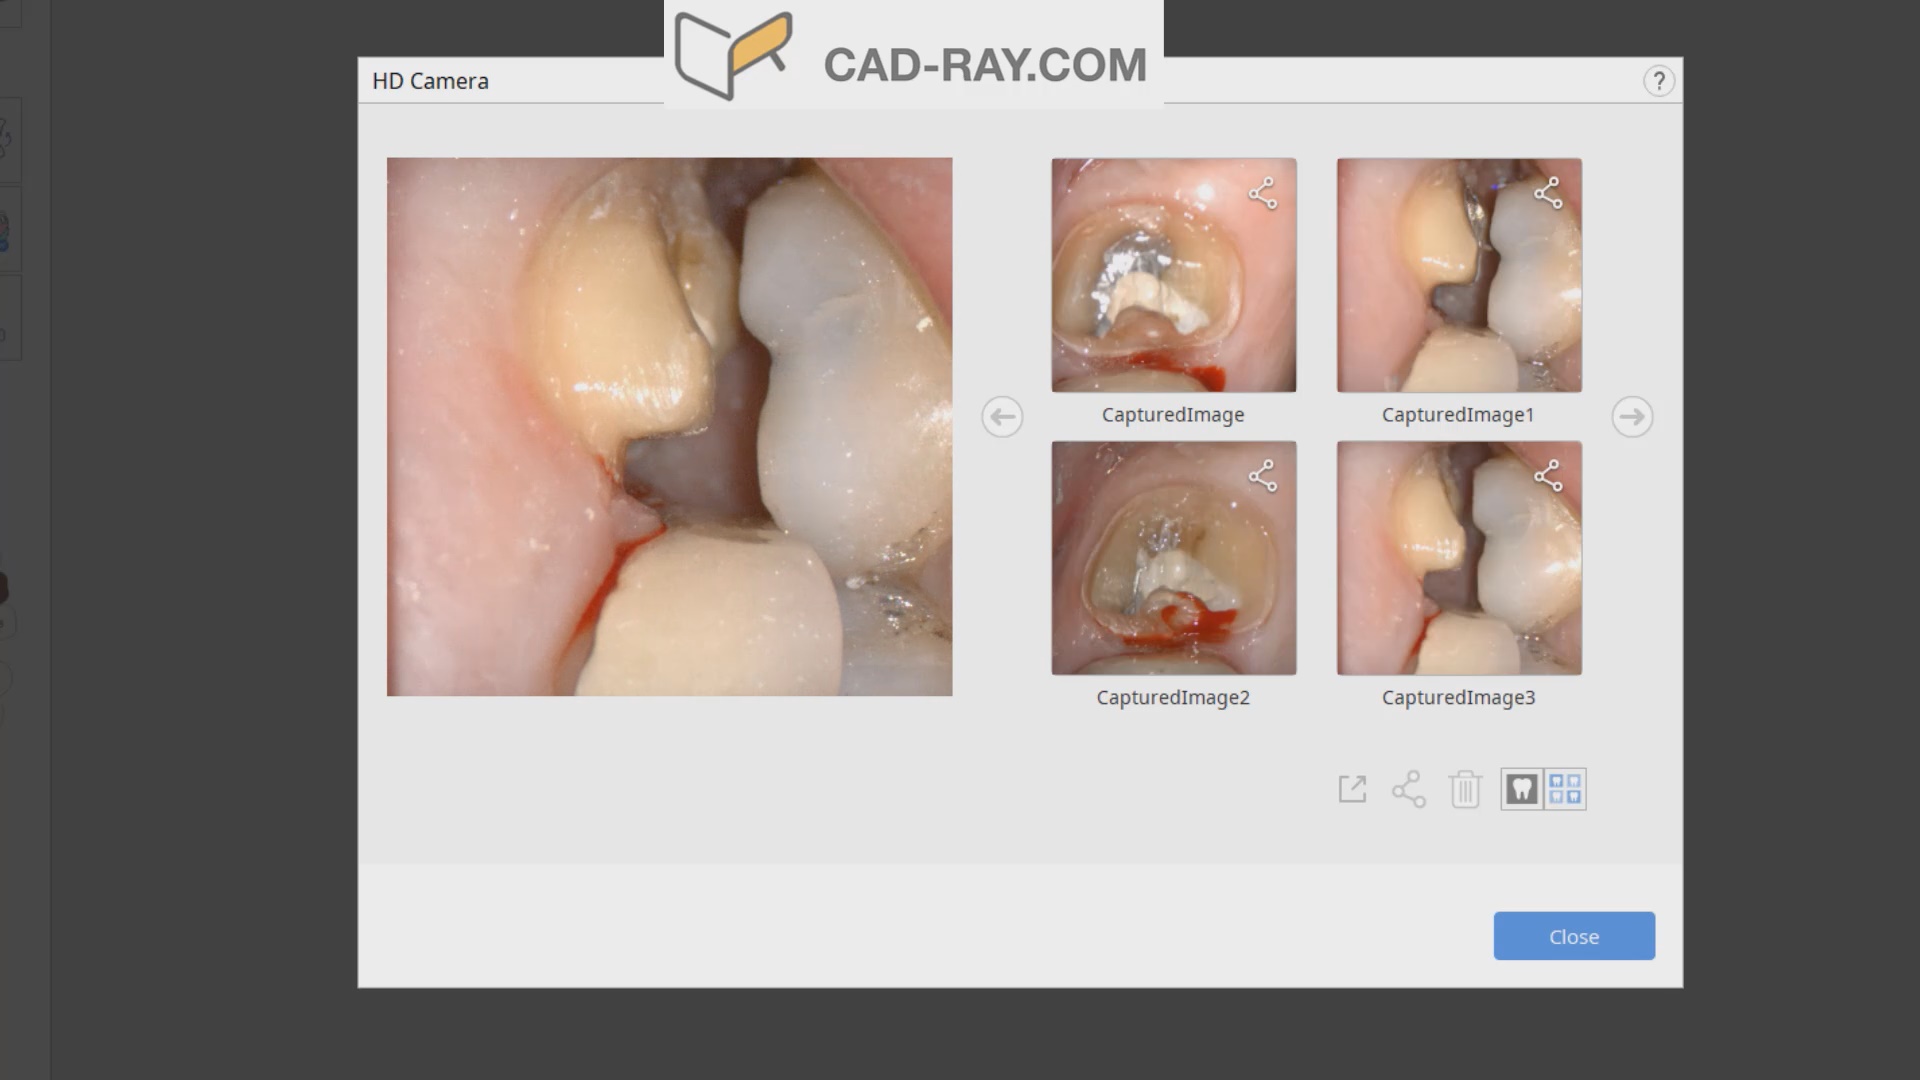
We recommend that you capture the bite before you finish imaging the preparation. This gives you one last chance to verify that you have reduced enough to accommodate material thickness. You can see how we just take regular photos to document the lack of clearance and we continue to adjust the height of the preparation until we achieve the required space. We then activate the imaging process and capture the occlusal relationship between the upper jaw and the lower jaw
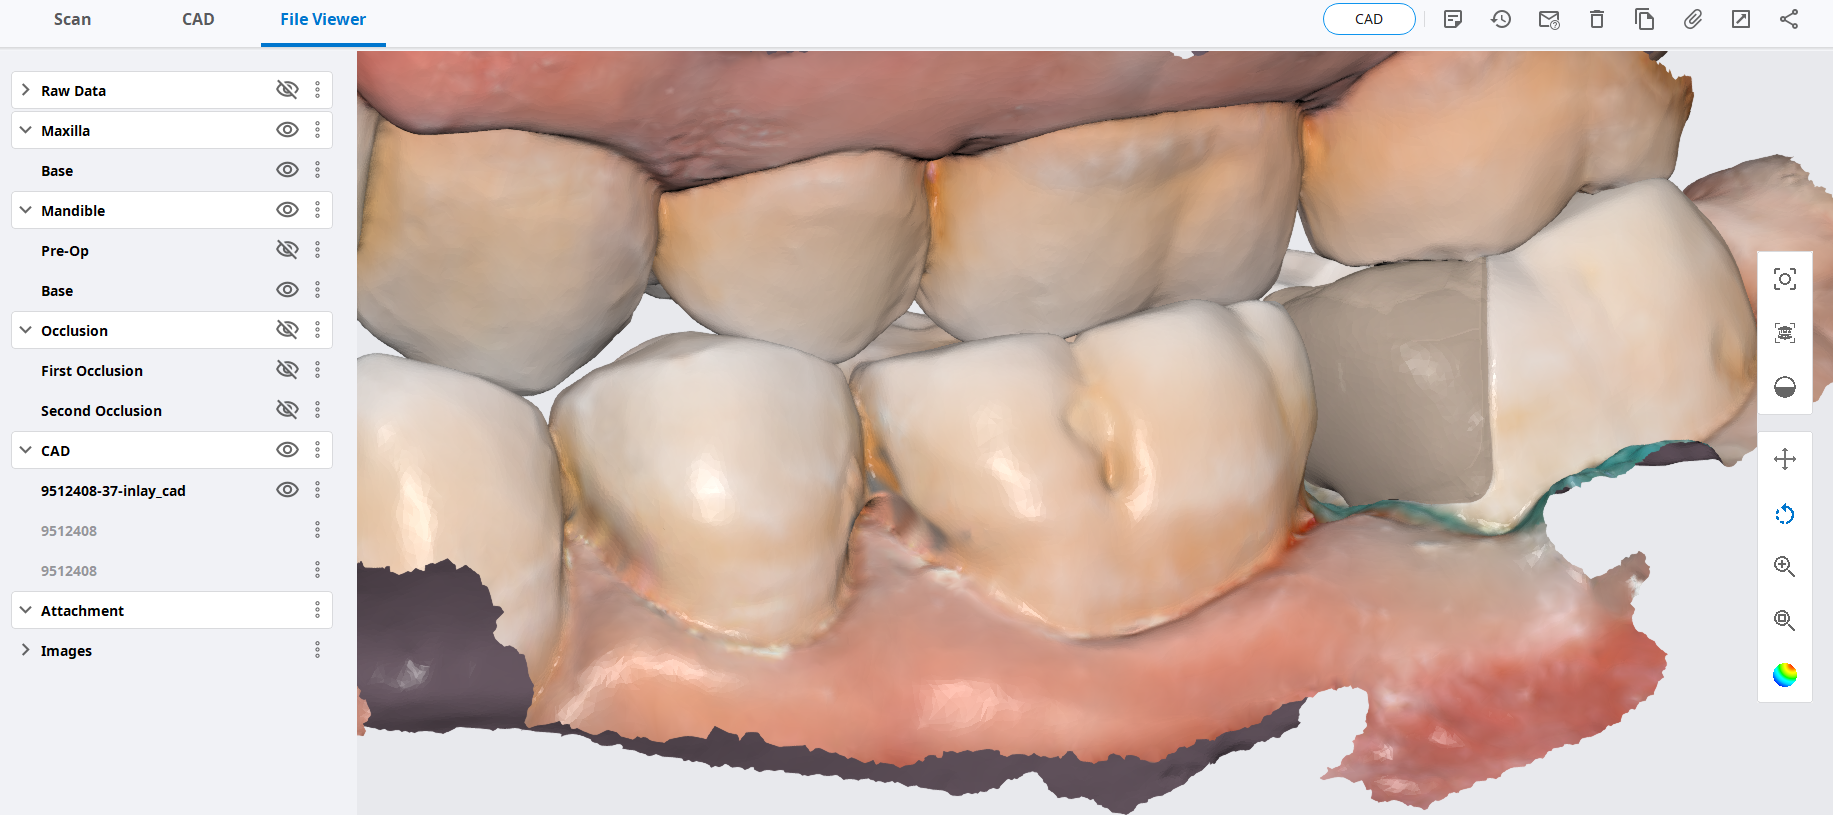
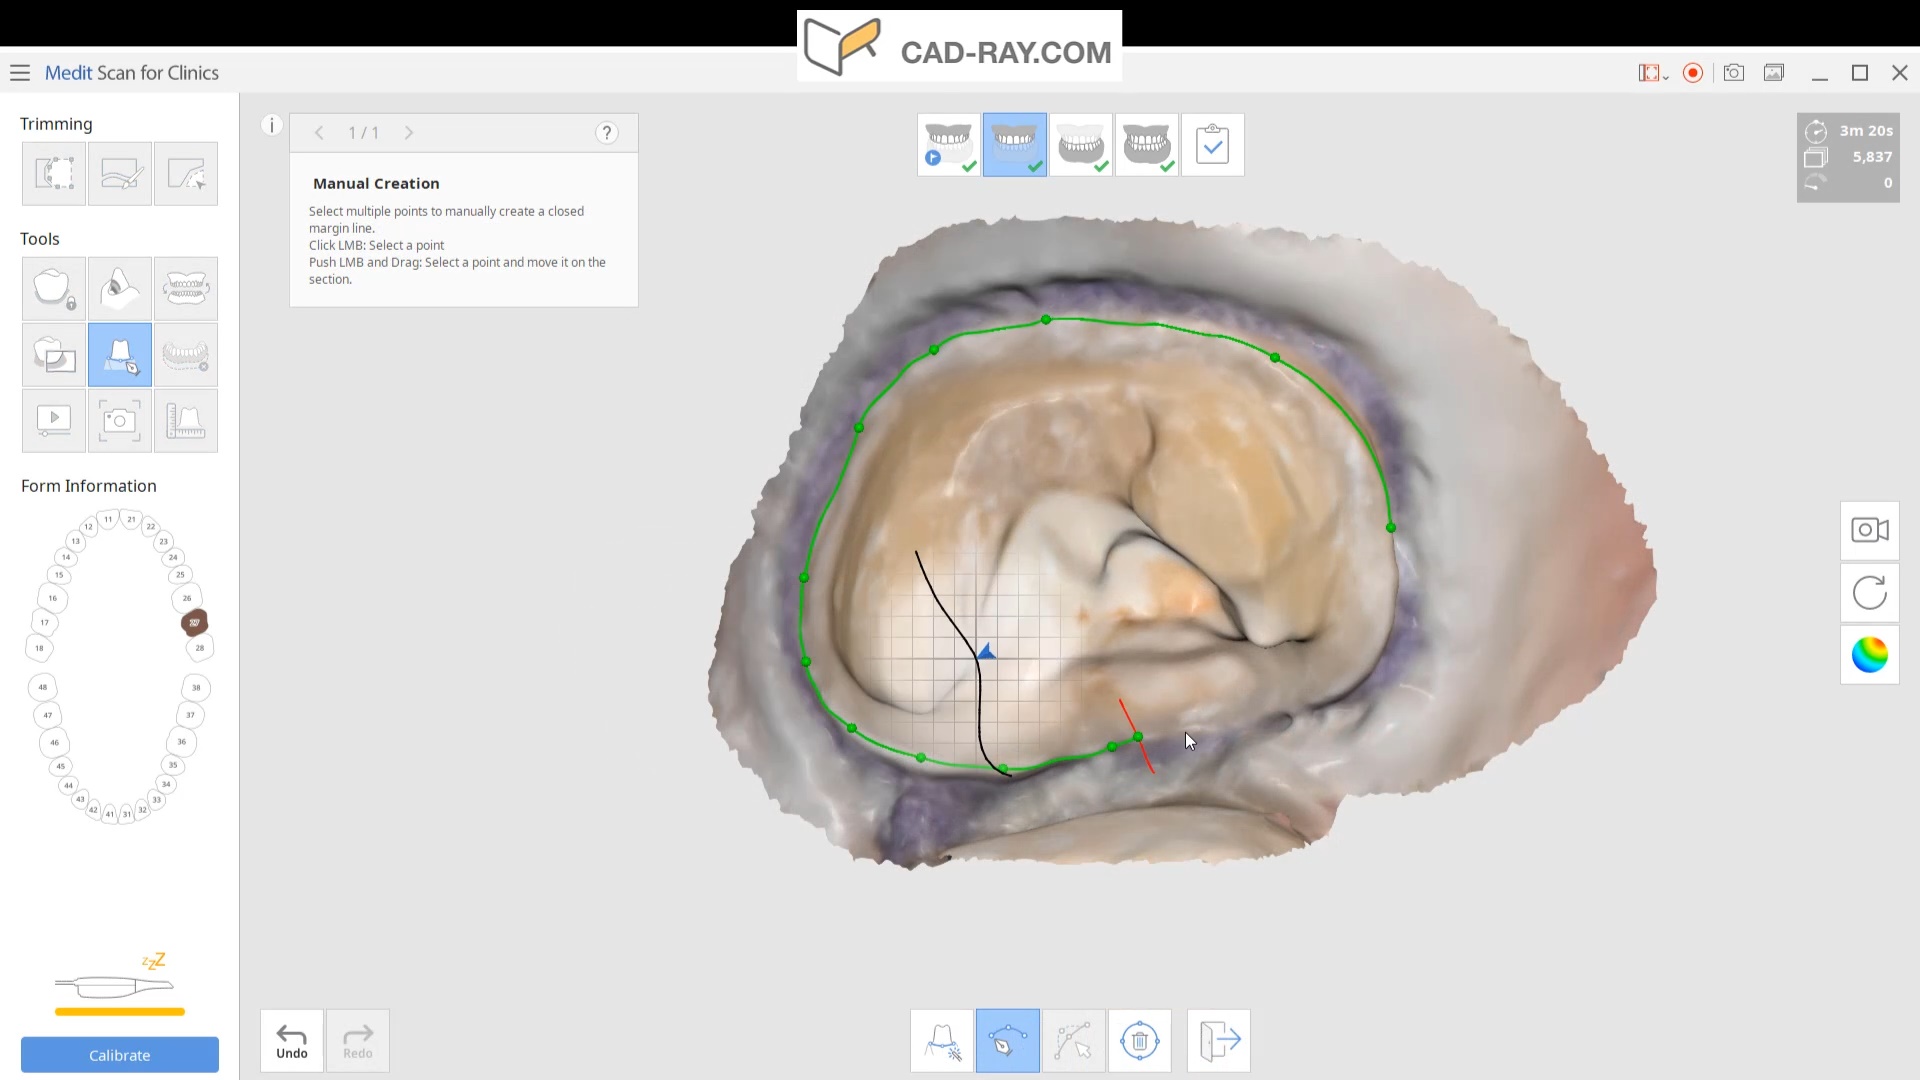
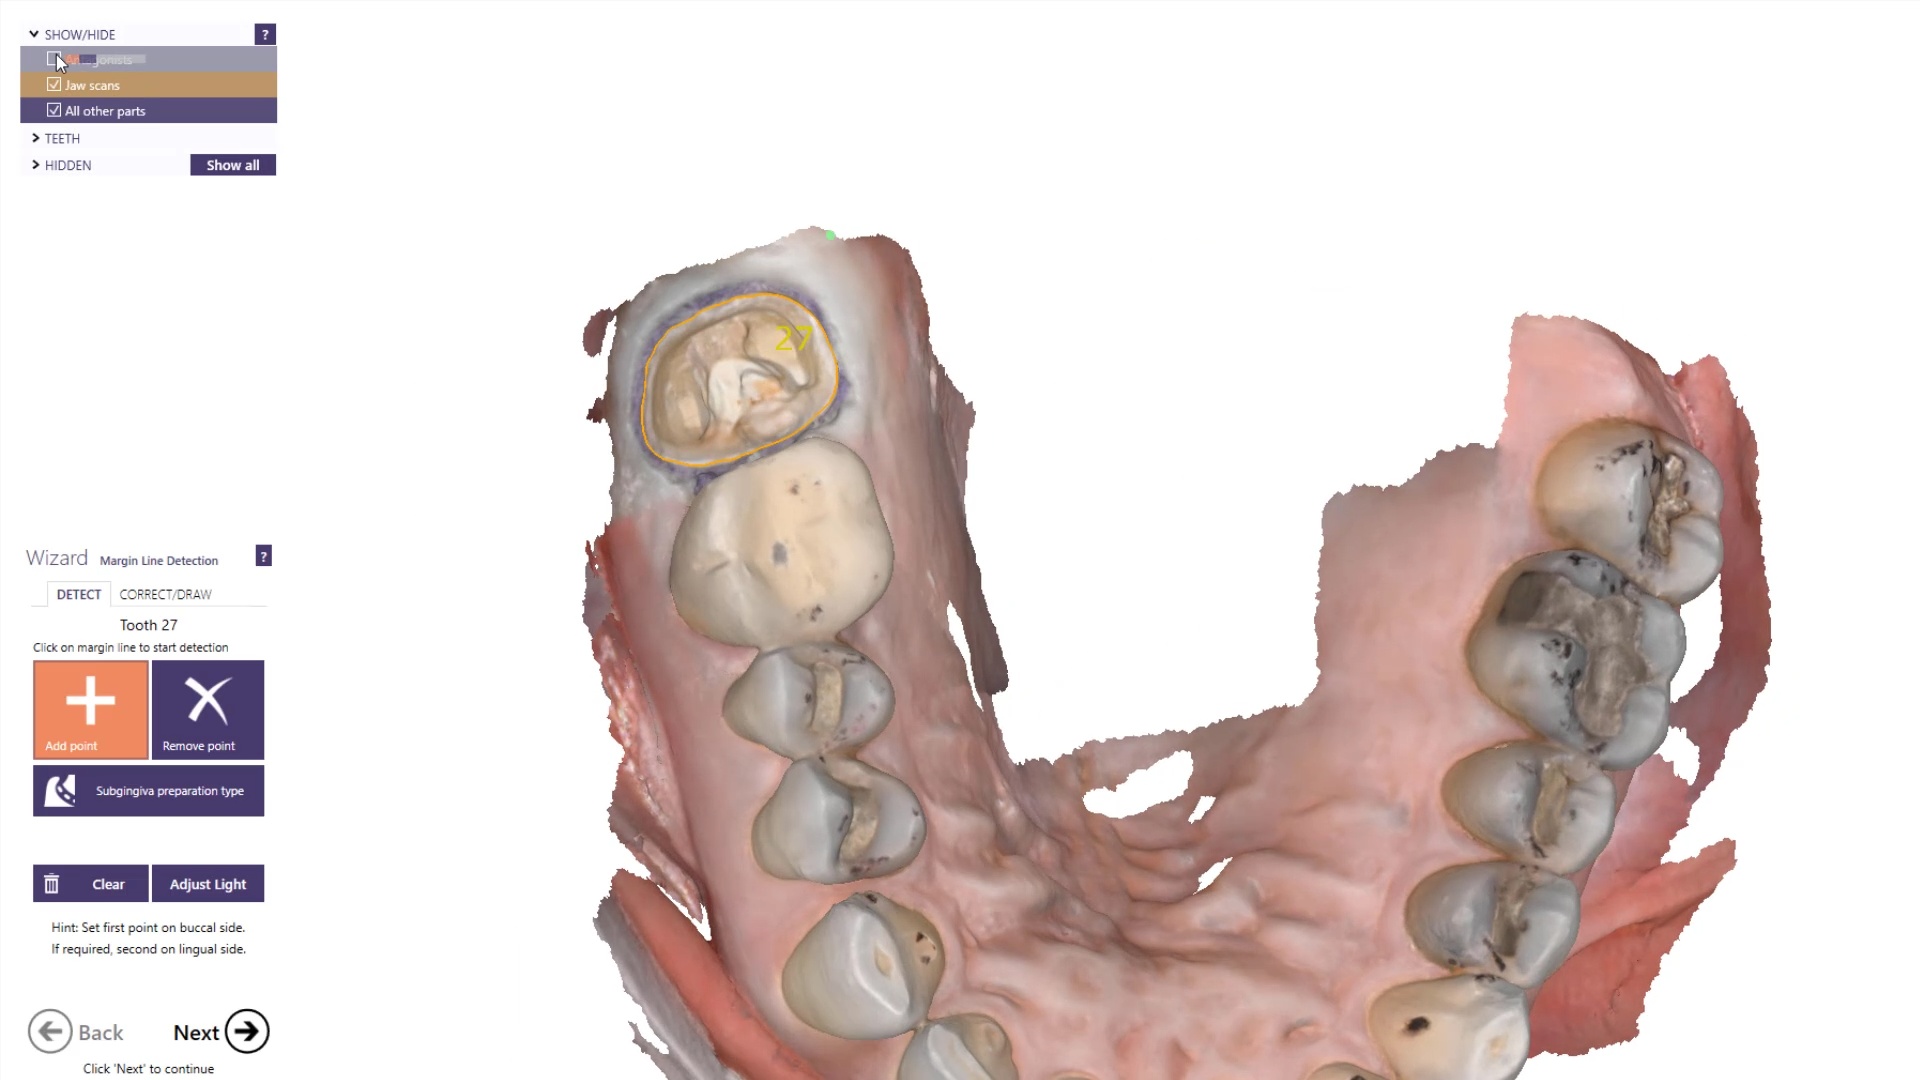
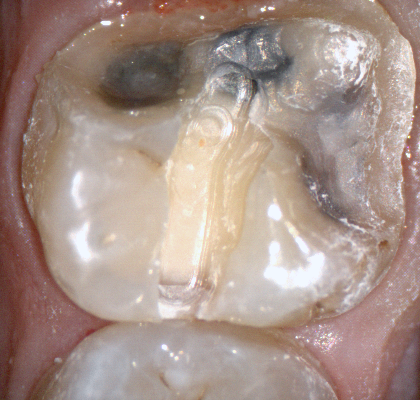
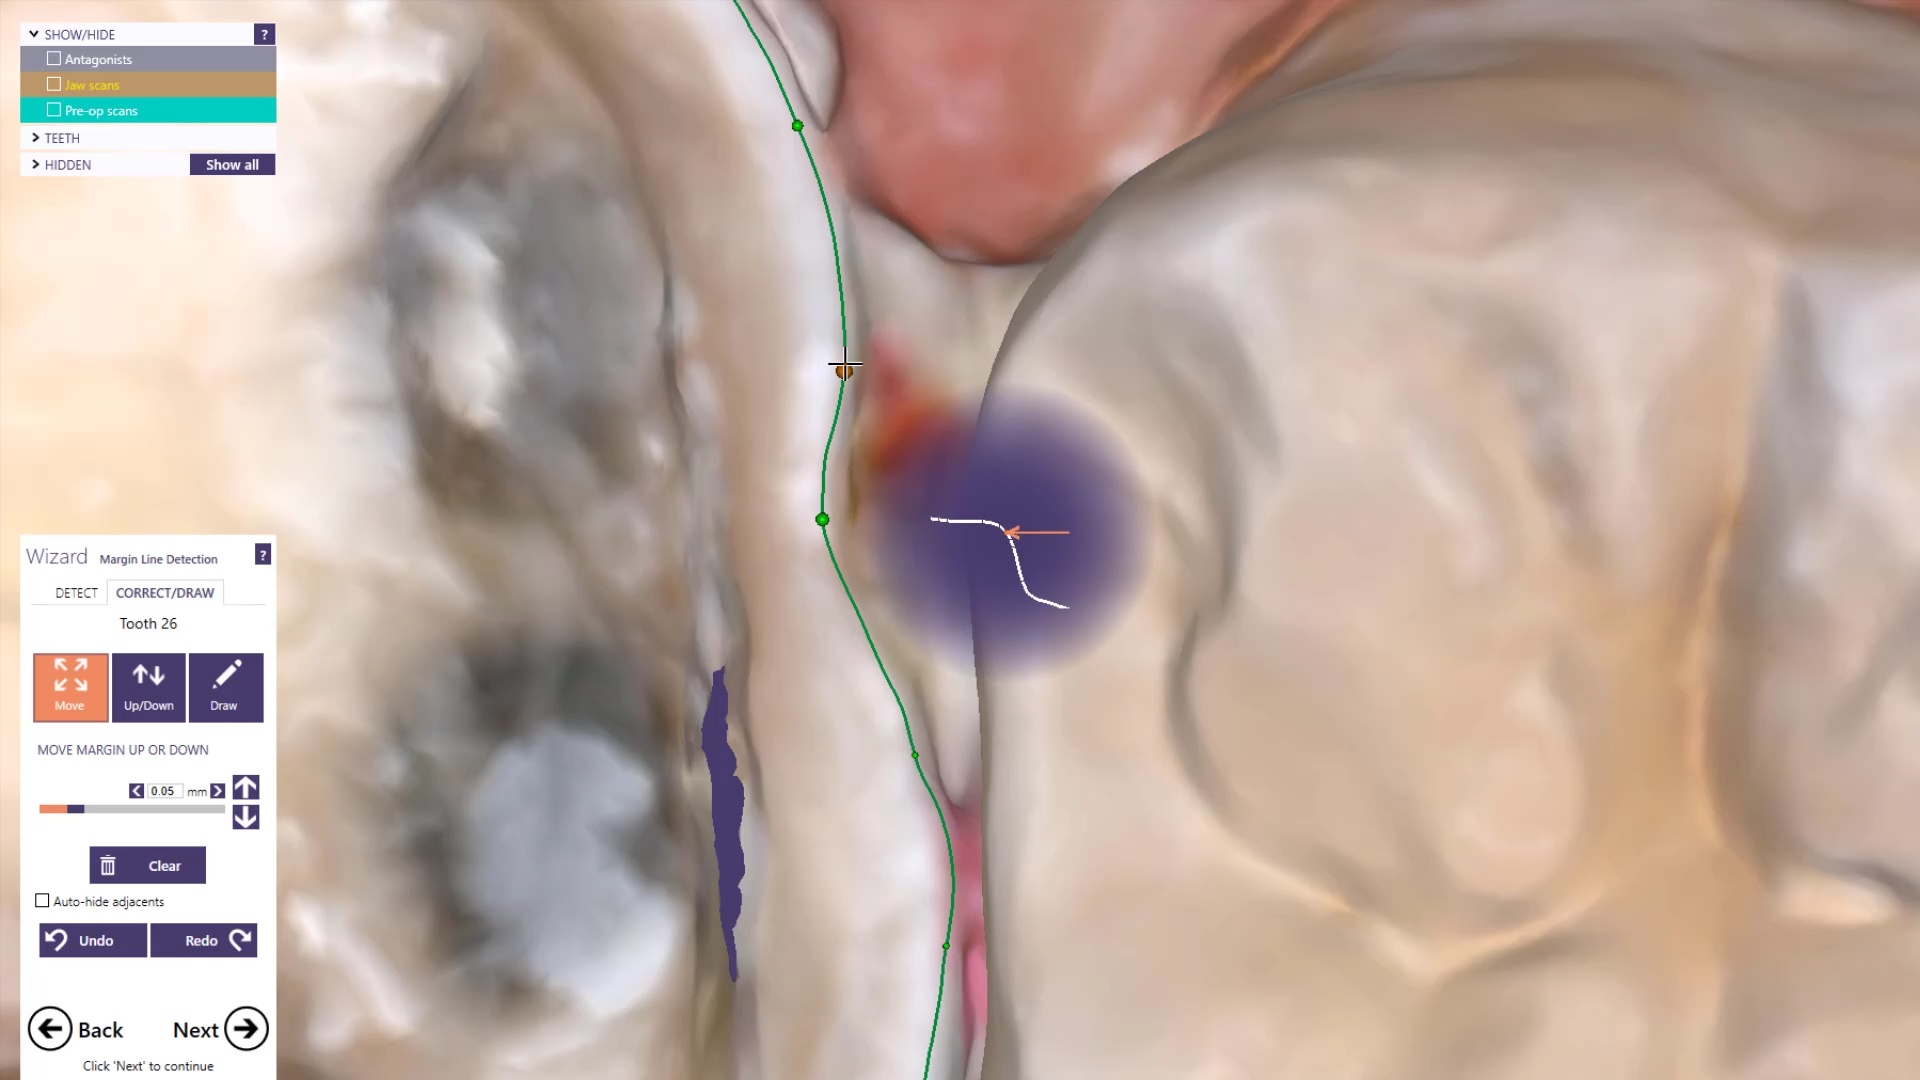
Image the preparation and place margin in native MeditScan Software that transfers to CAD Software
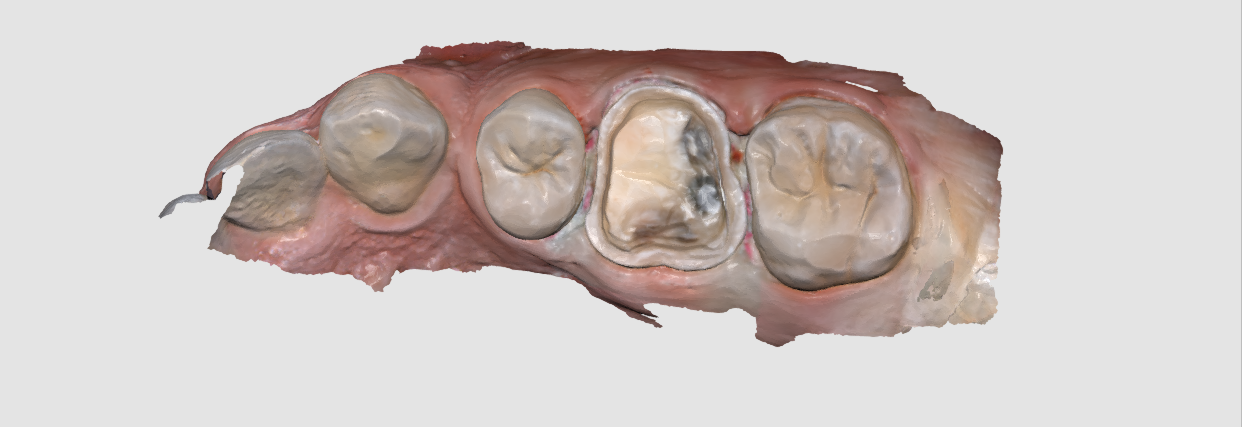
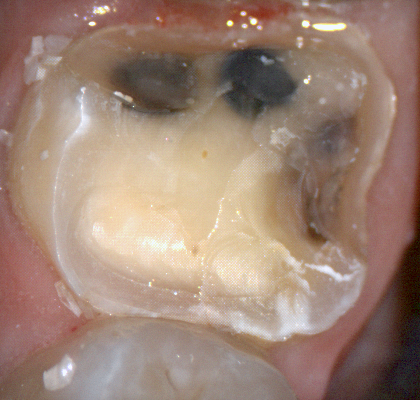
The preop condition is then transferred to the arch model and the tooth in question is cropped out. The rest of the arch is protected so no extra data is added unnecessarily to the equation. This protect feature is used for demonstration purposes and is subsequently removed. The prep in question is then highlighted and the local area is processed and the margins are placed. This margin line can be sent to the lab or it can be automatically carried to the design software
The Meditlink software allow you to launch a variety of CAD programs that include 3shape, exocad, cerec, etc… Here we launch exocad which automatically imports and aligns the models and marks the margins. The restoration is then designed to completion.
The CAD software allows you or the lab to alter the marked margins if necessary. The restoration is aligned in the arch for and the contacts are adapted to the adjacents and the oppising
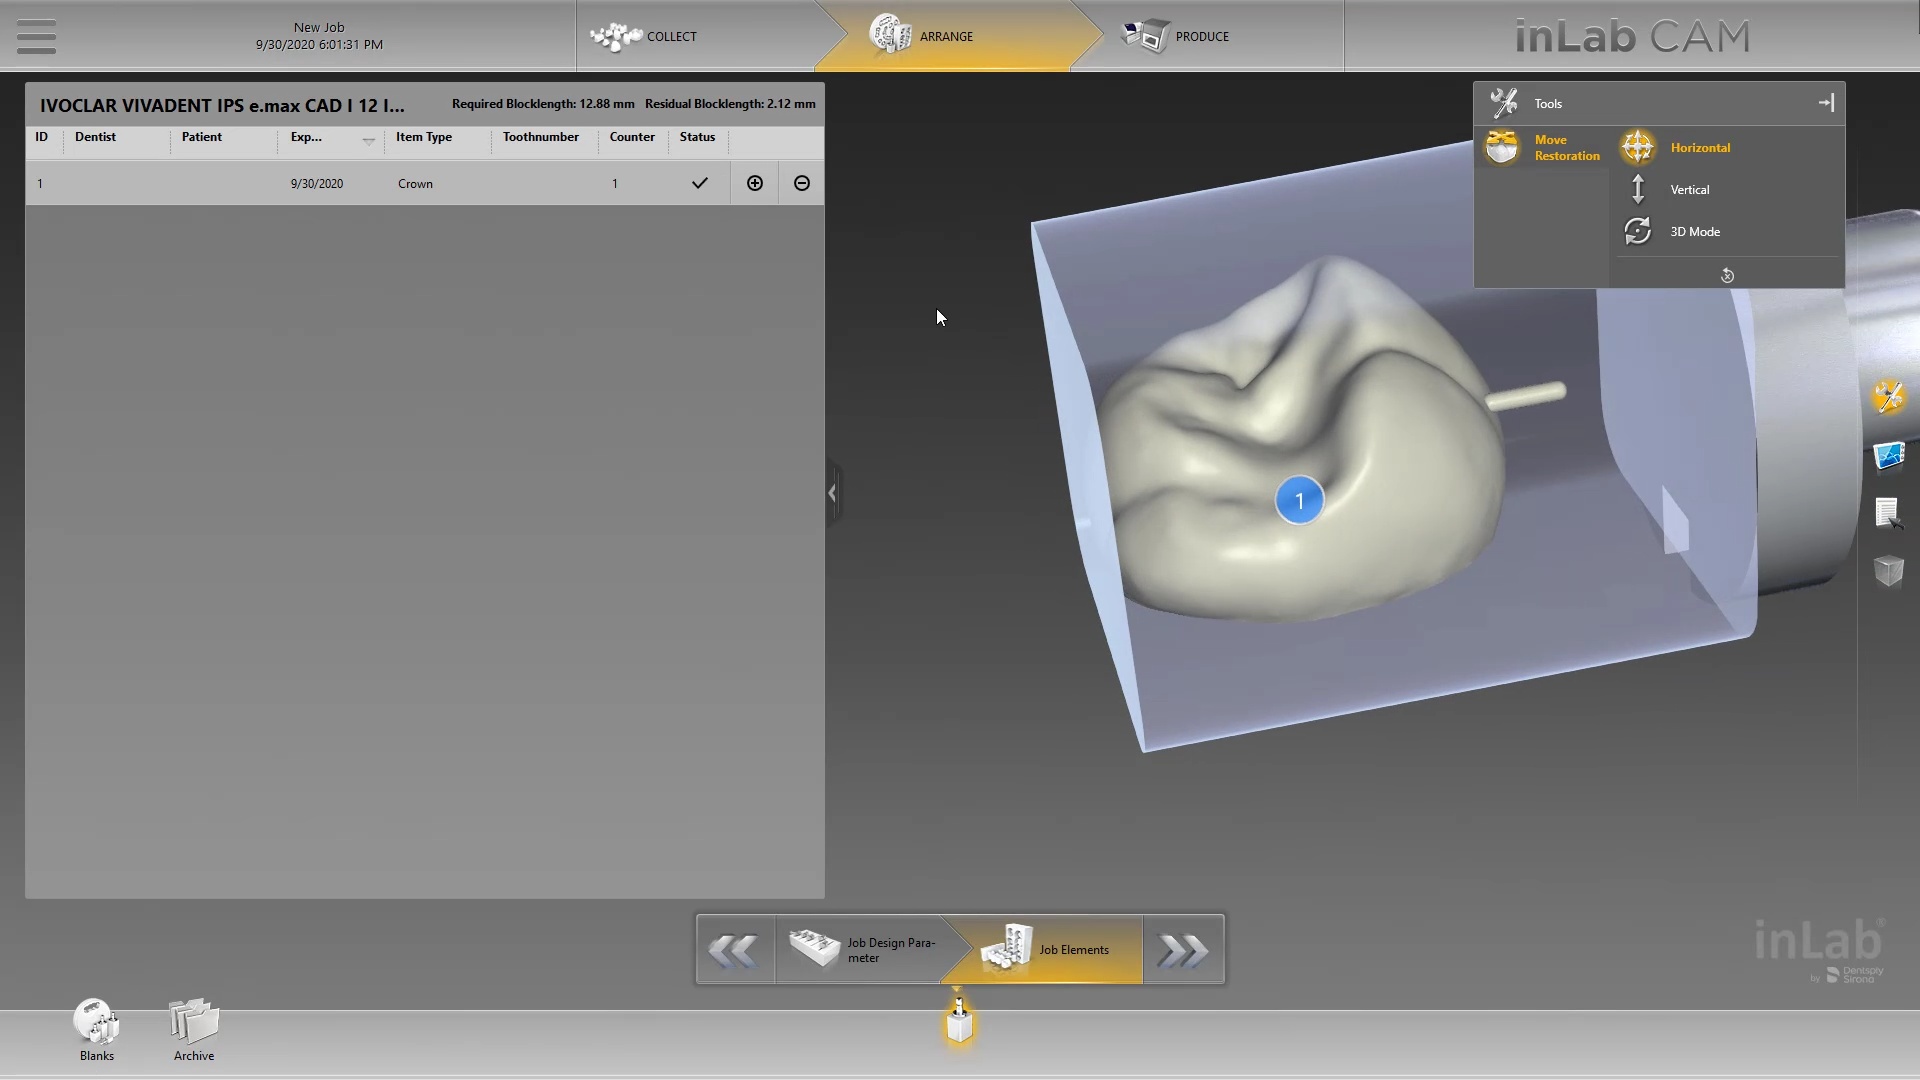
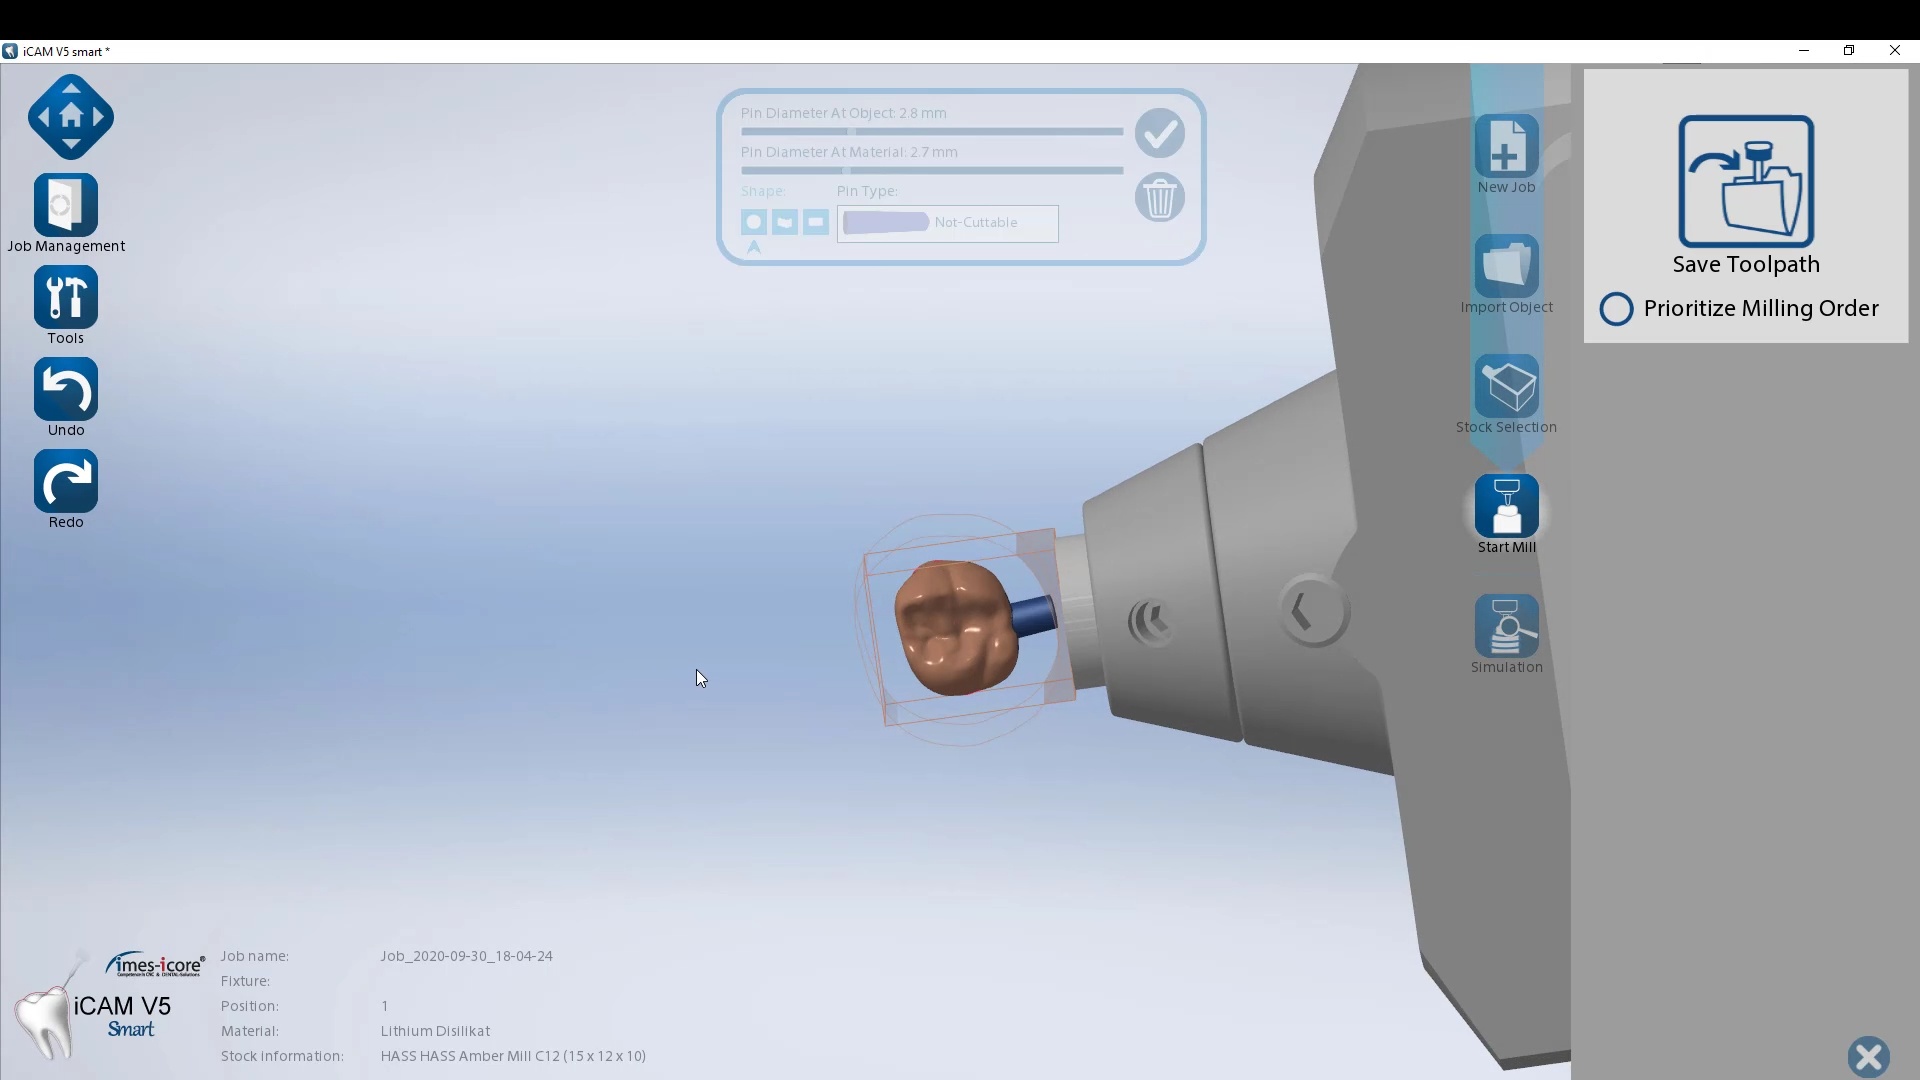
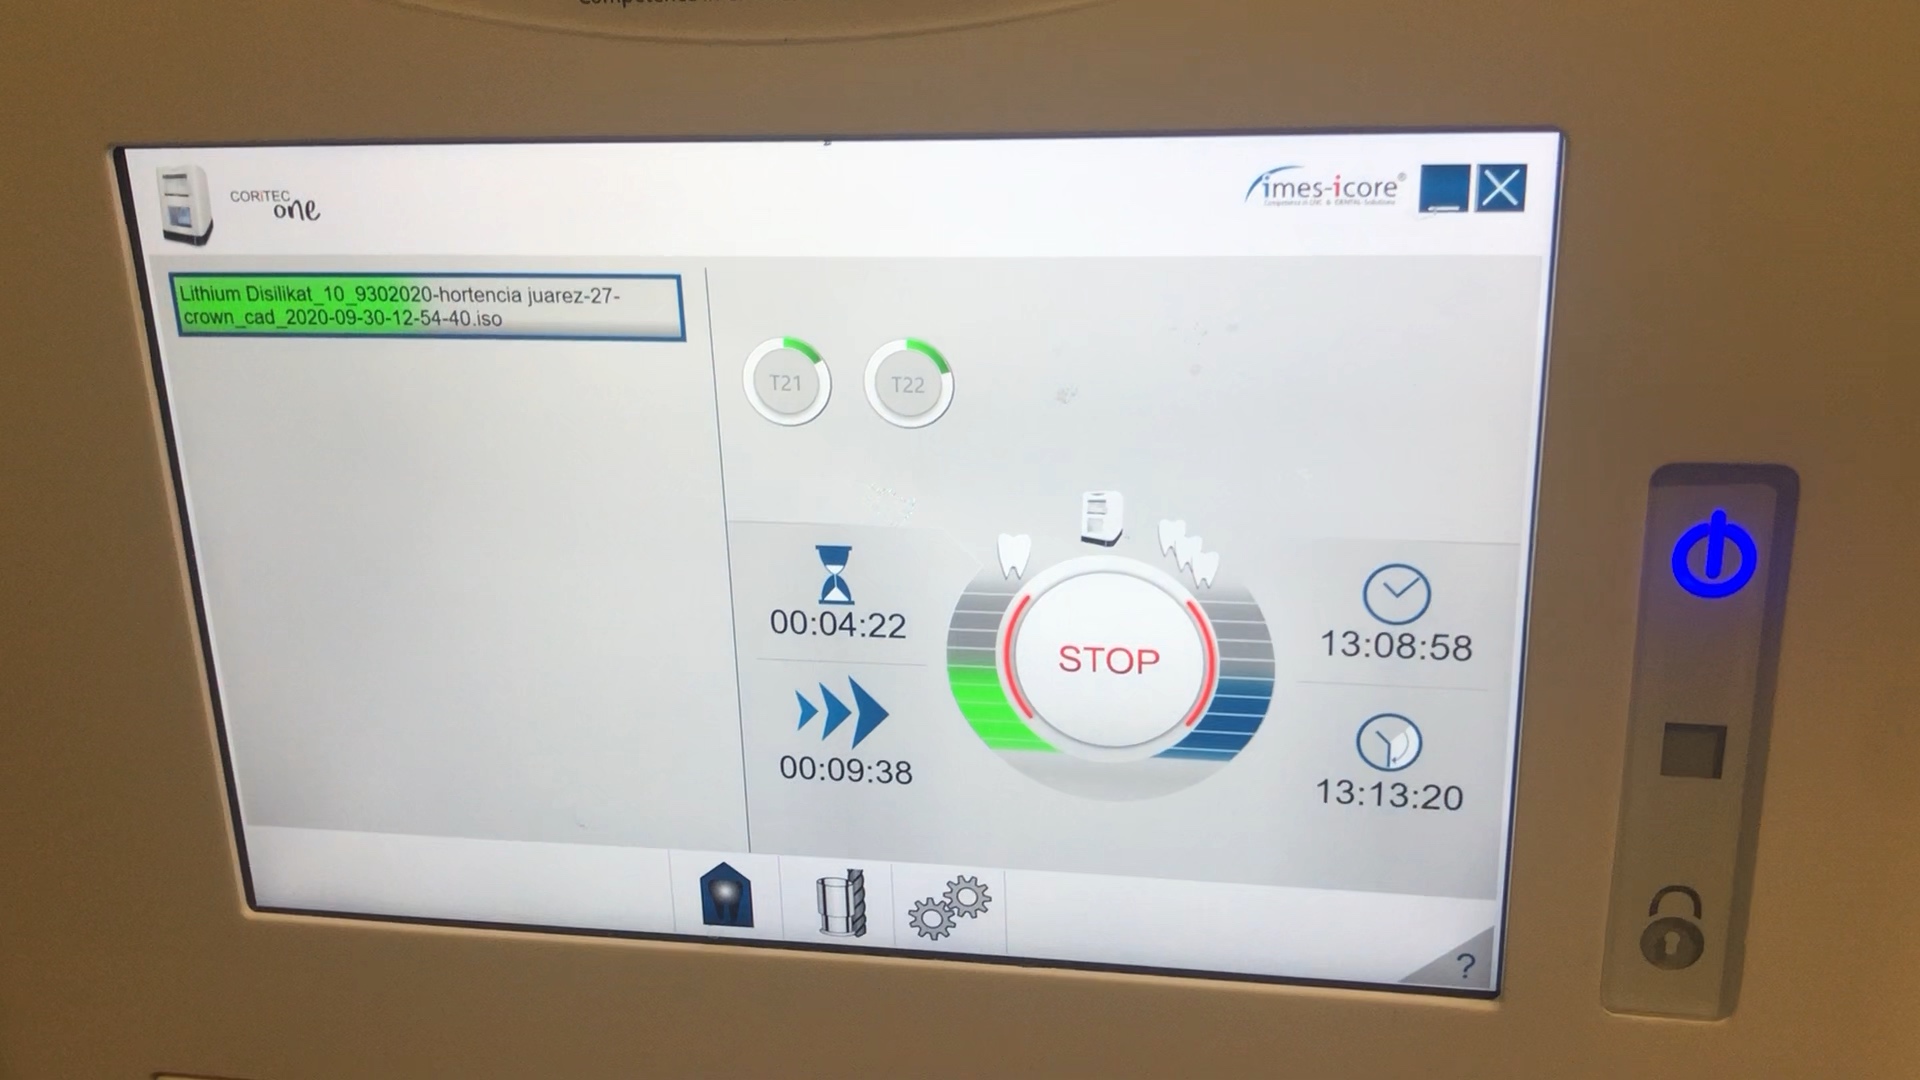
Milling of Lithium Disilicate with Imes Icore Coritec One
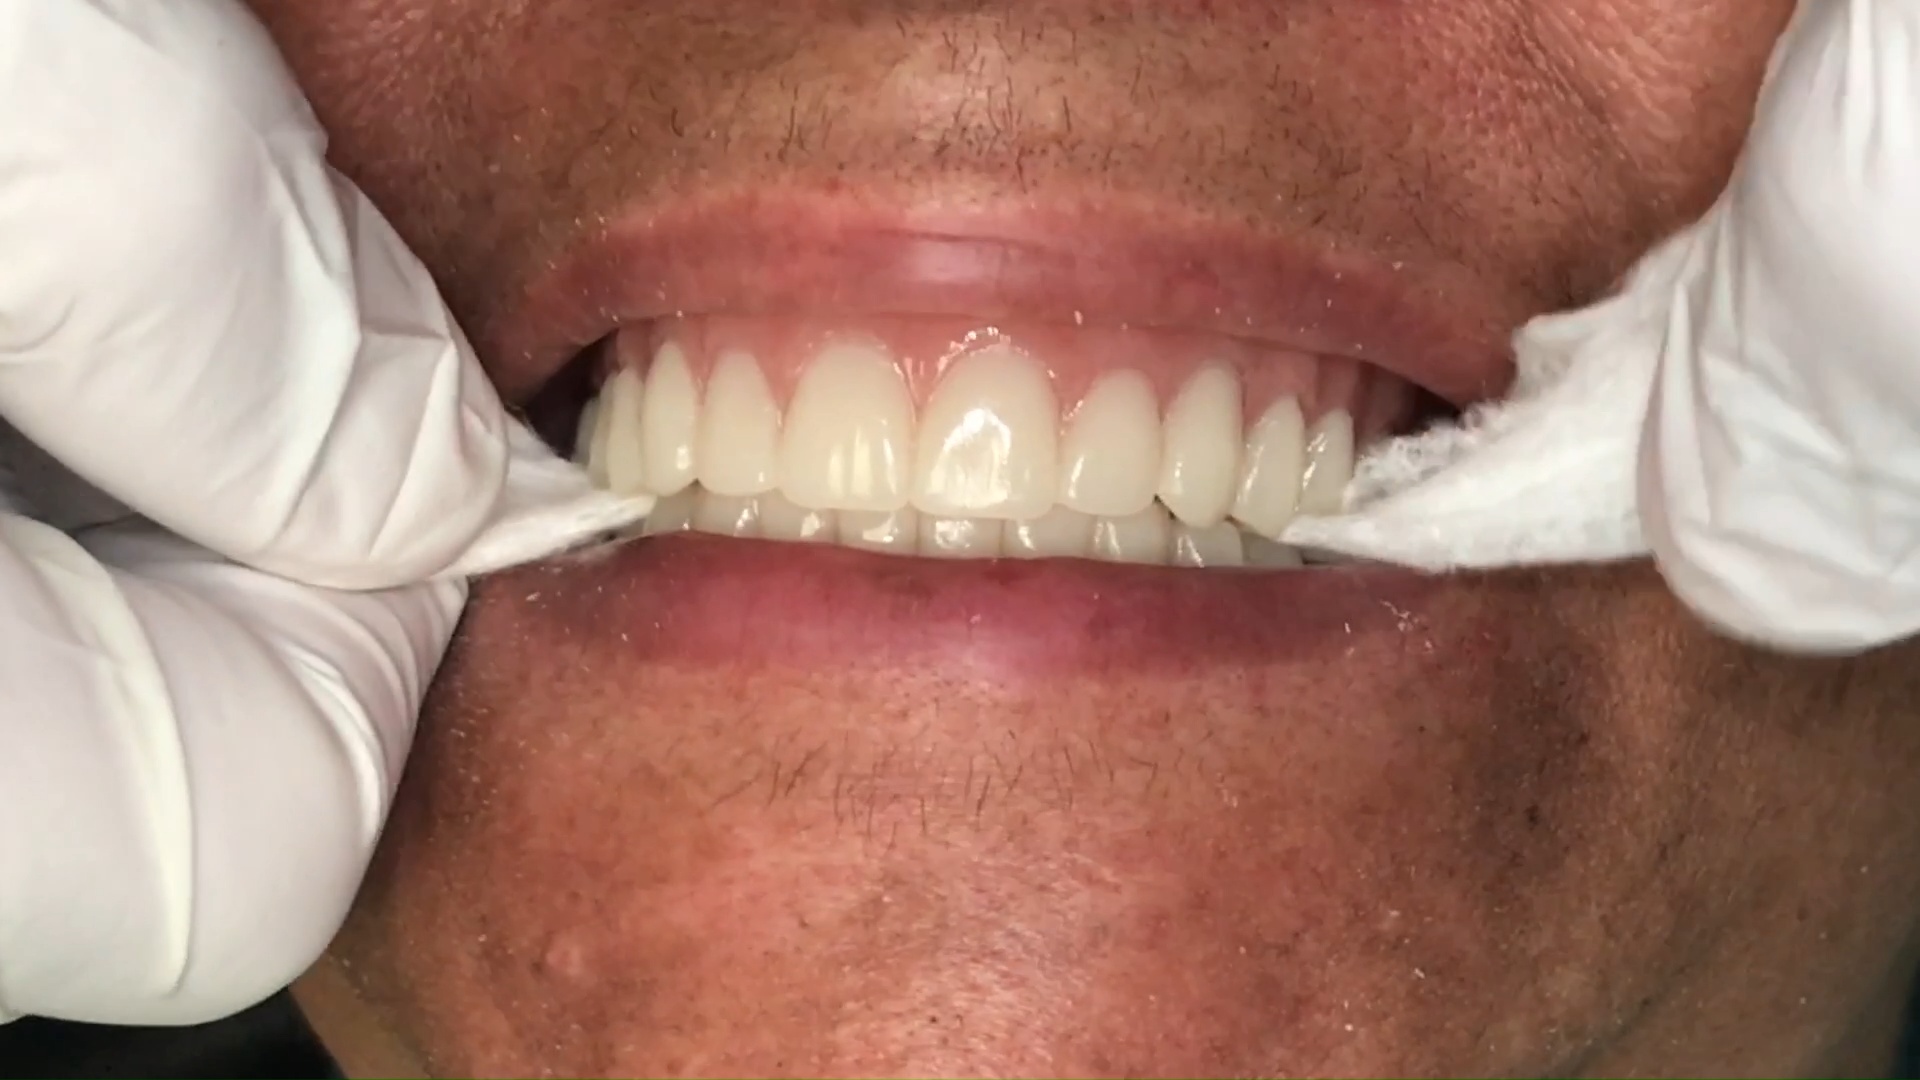
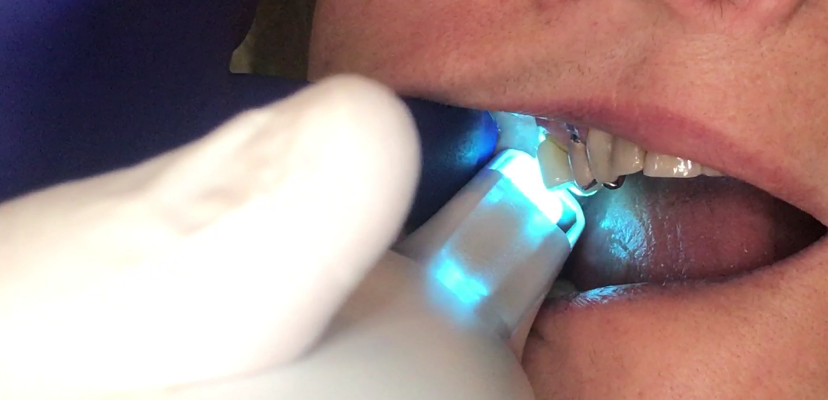
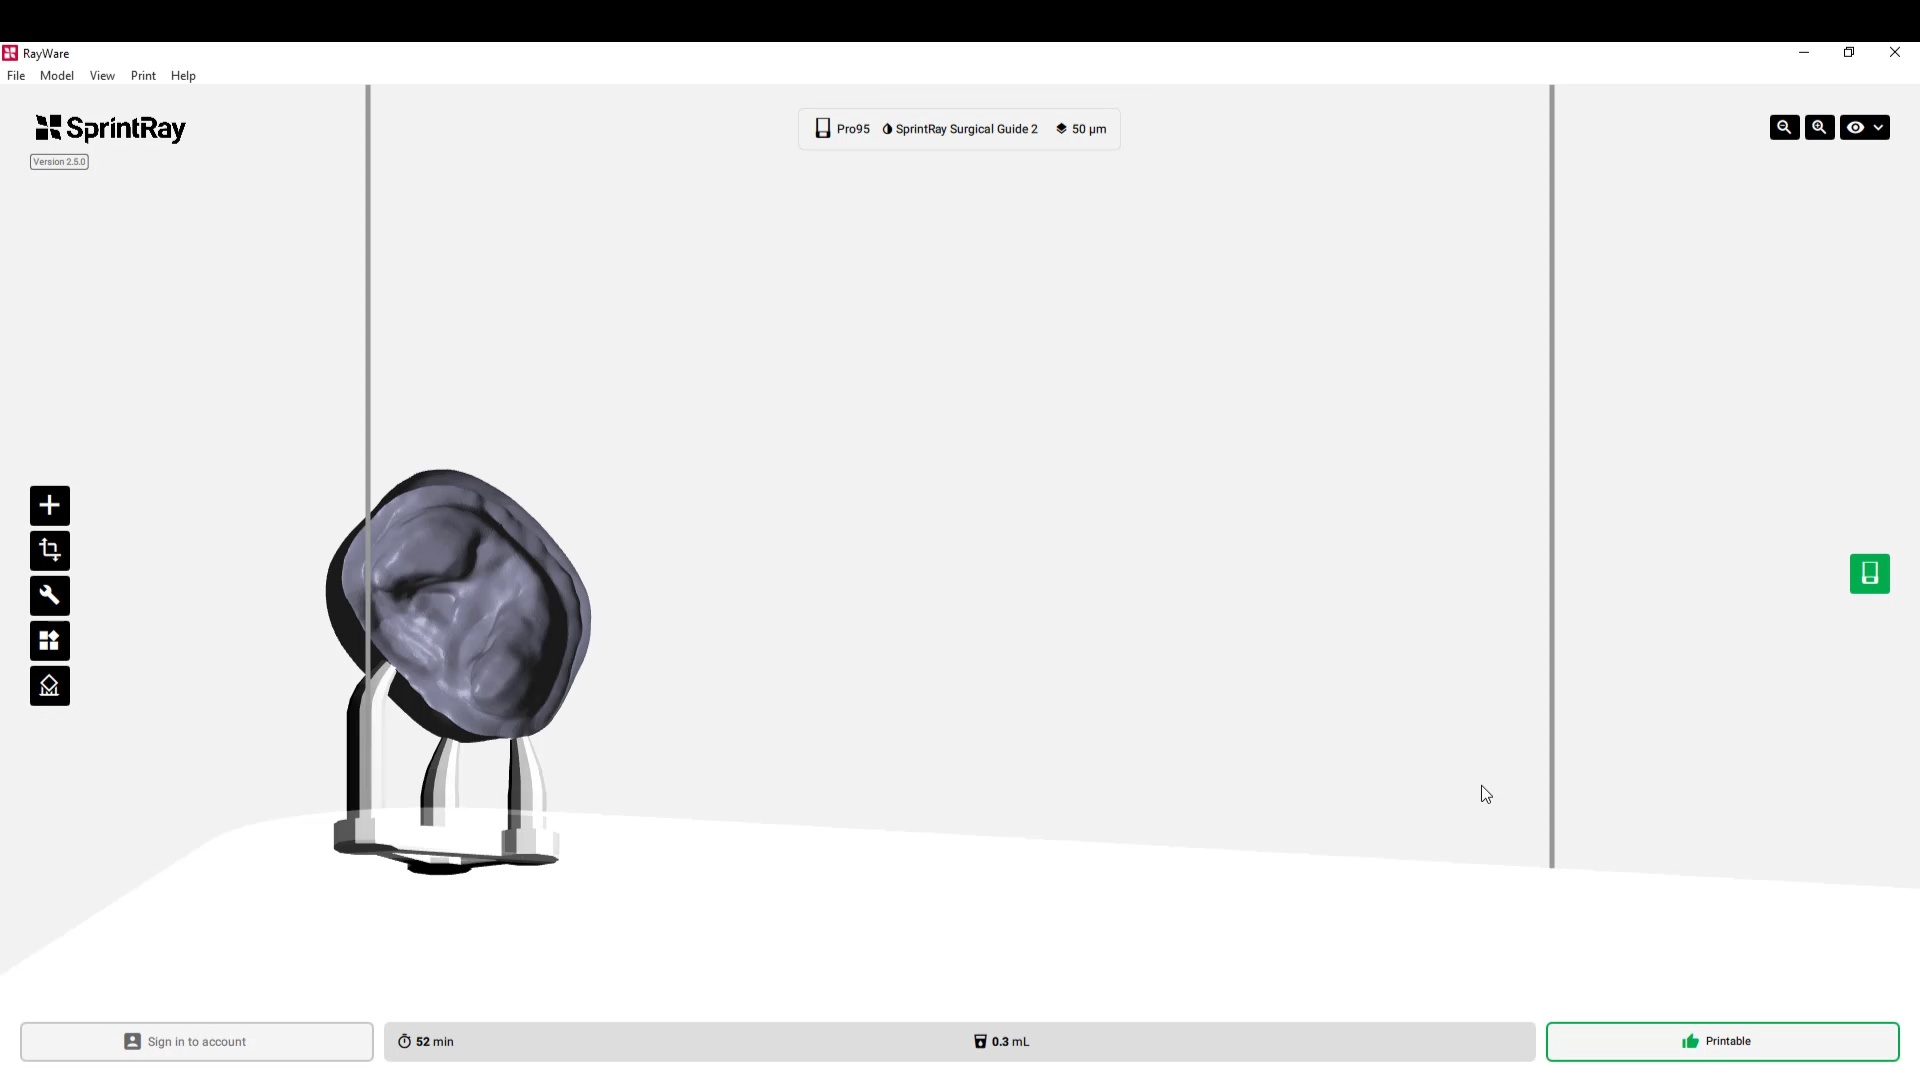
The final restoration design can be exported as an stl and taken to a variety of mills or printers. Here we designed it millbox and milled with the coritec One. The material used was Amber Mill and it was crystalized and seated
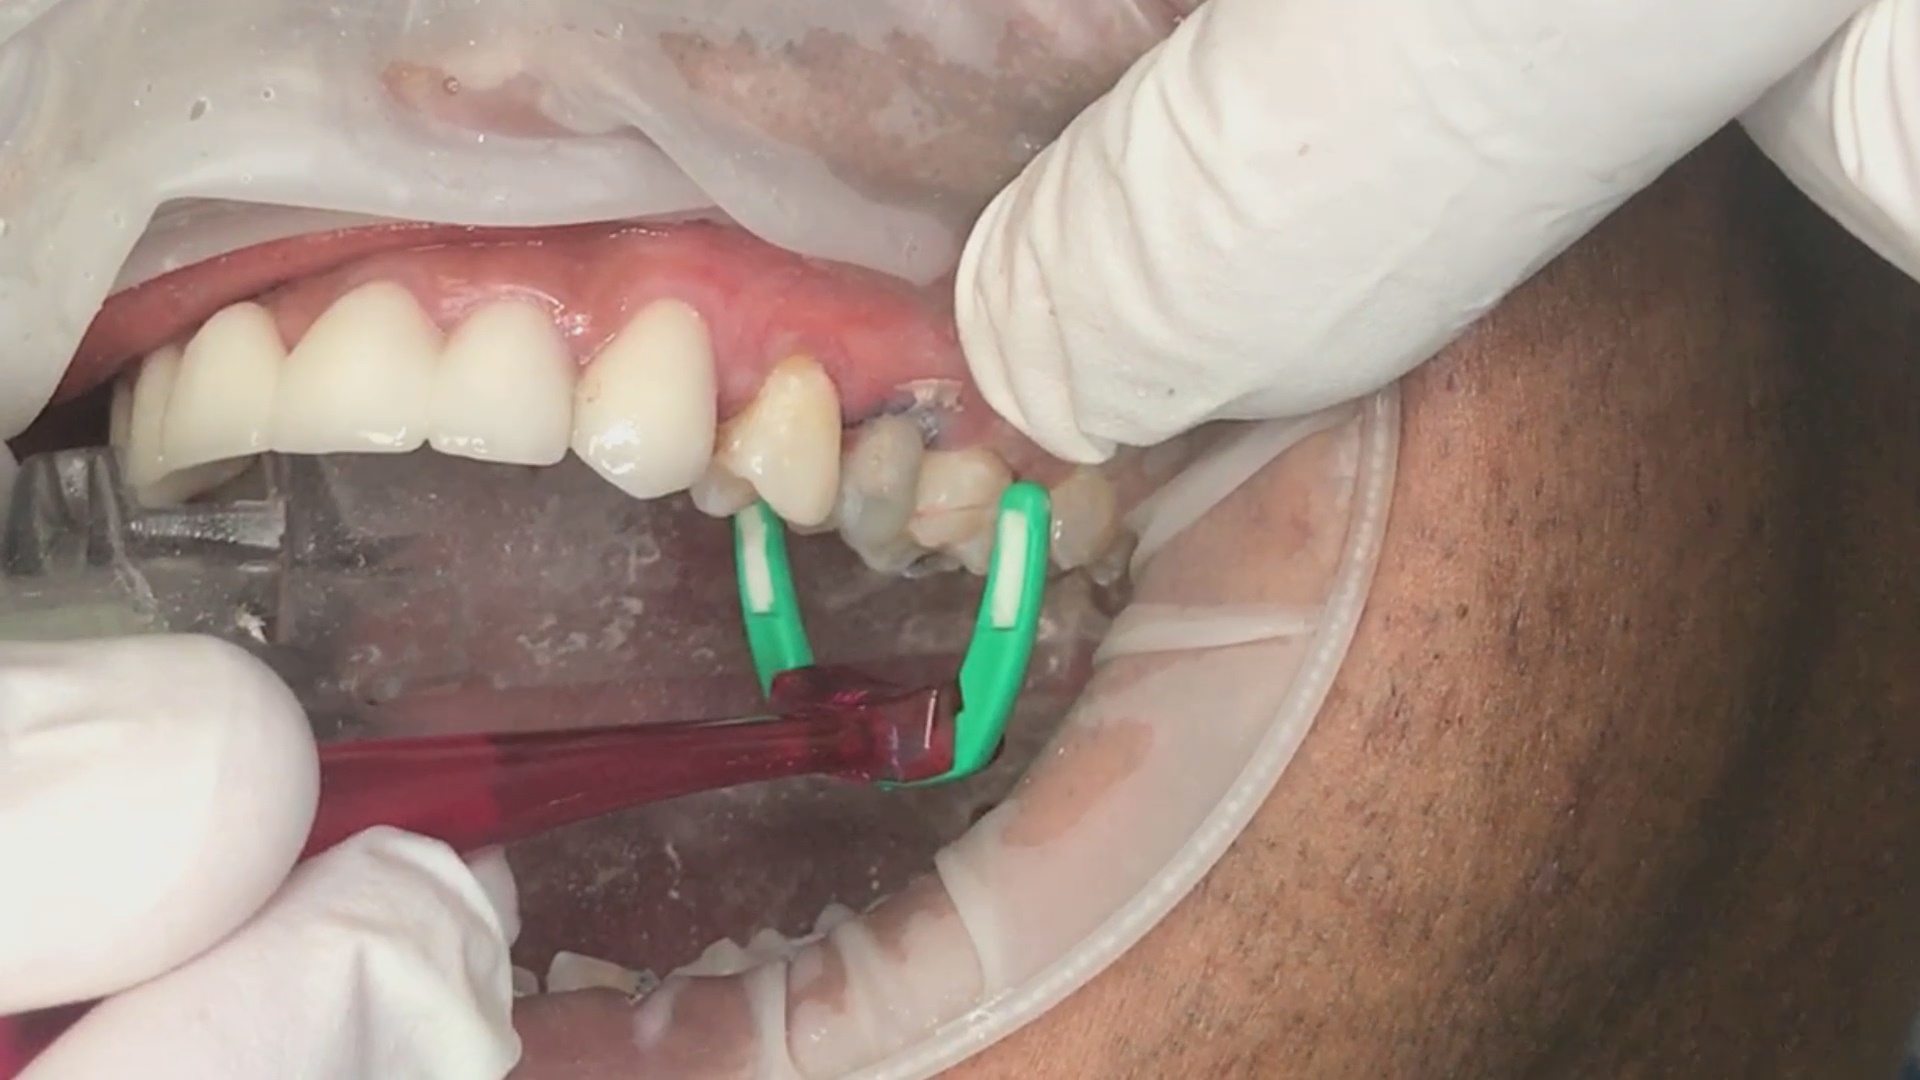
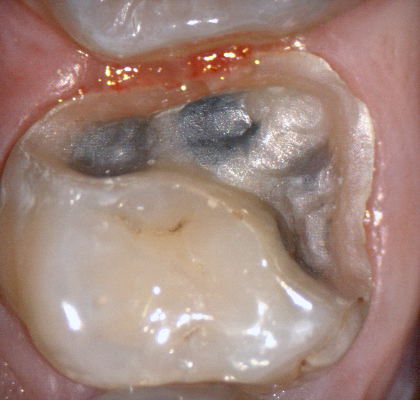
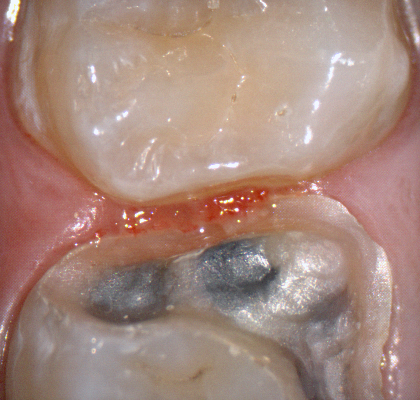
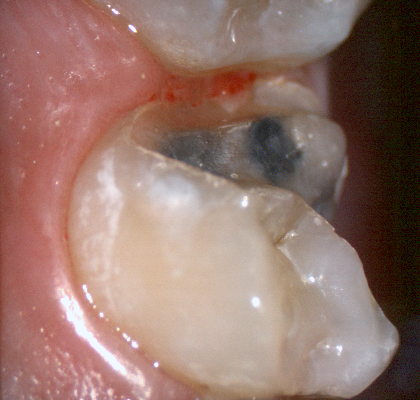
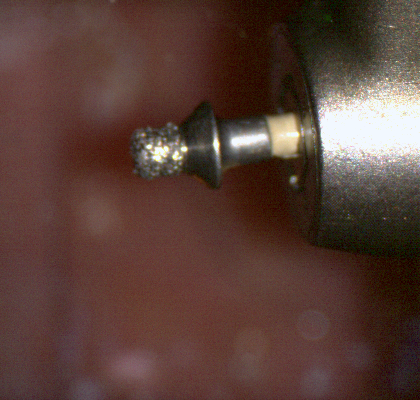
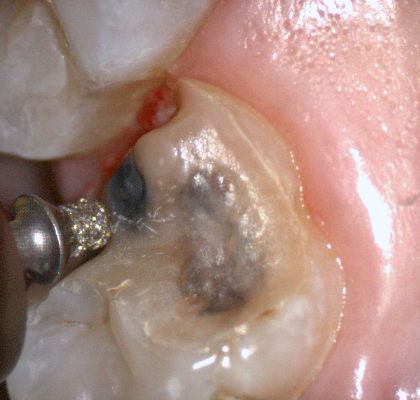
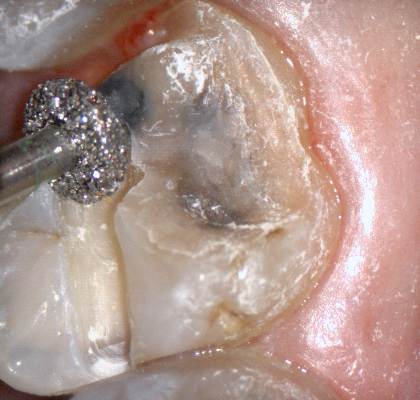
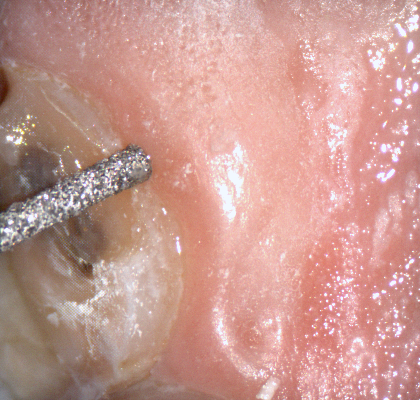
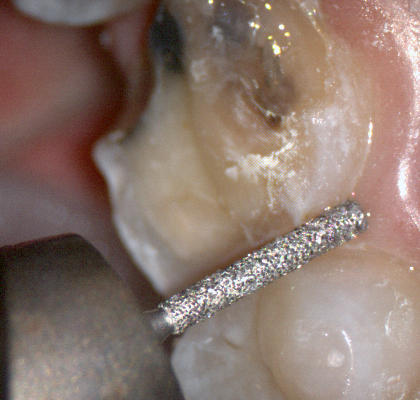
The following pictures depict the sequence of burs we recommend that you use to finish a preparation quickly. While patient is getting numb, take a quick look at the clearance you will need to reach proper material thickness. Once the quadrant is isolated with isolite and optragate, take an occlusal router bur and create a trough to gain the proper depth. Follow that with a flat disk, and you can quickly reduce the occlusal height.
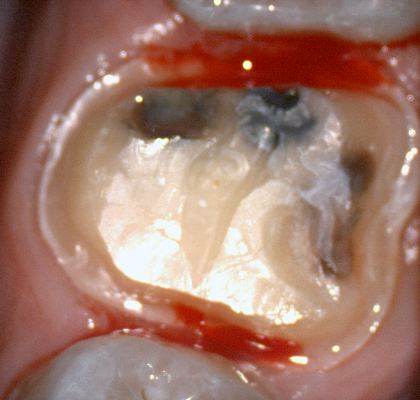
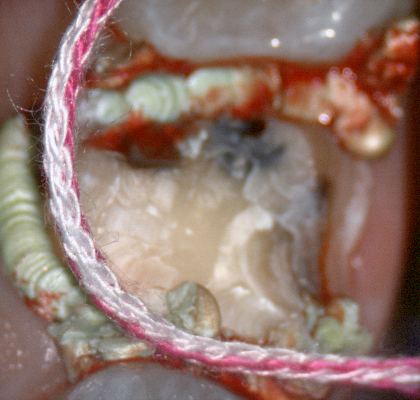
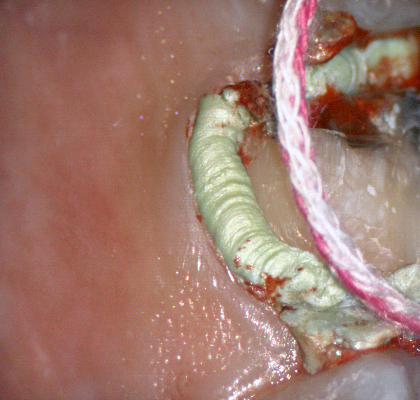
A shoulder bur of .8 mm thickness can help you reduce the interproximal areas as well as the buccal and lingual margin lines. Before finishing the prep, place hemostatic agent like expasyl in the sulcus and place retraction cord. while it is setting, check your reduction. If you need more space, now is the time to reduce some more.
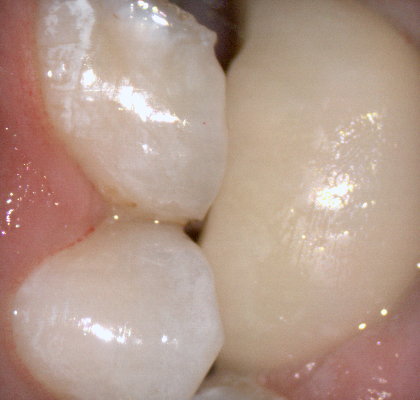
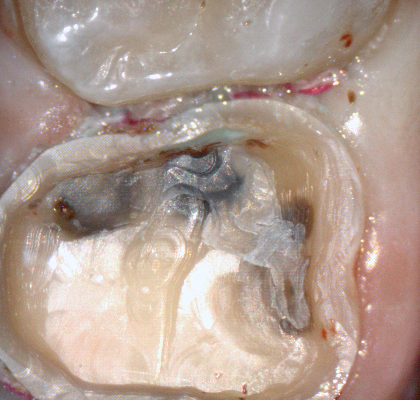
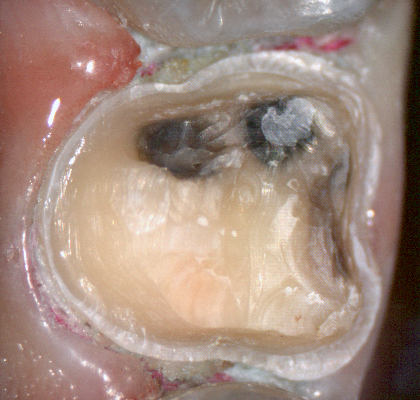
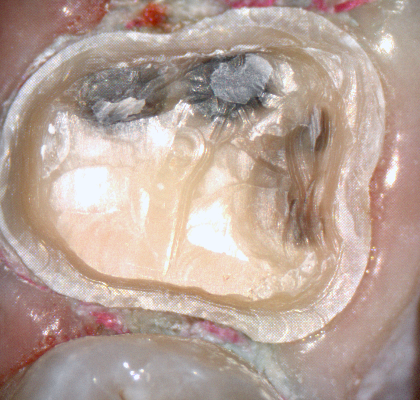
Once you have adequate clearance, retraction, and hemostatis, you can readily image and find your margins in the CAD software
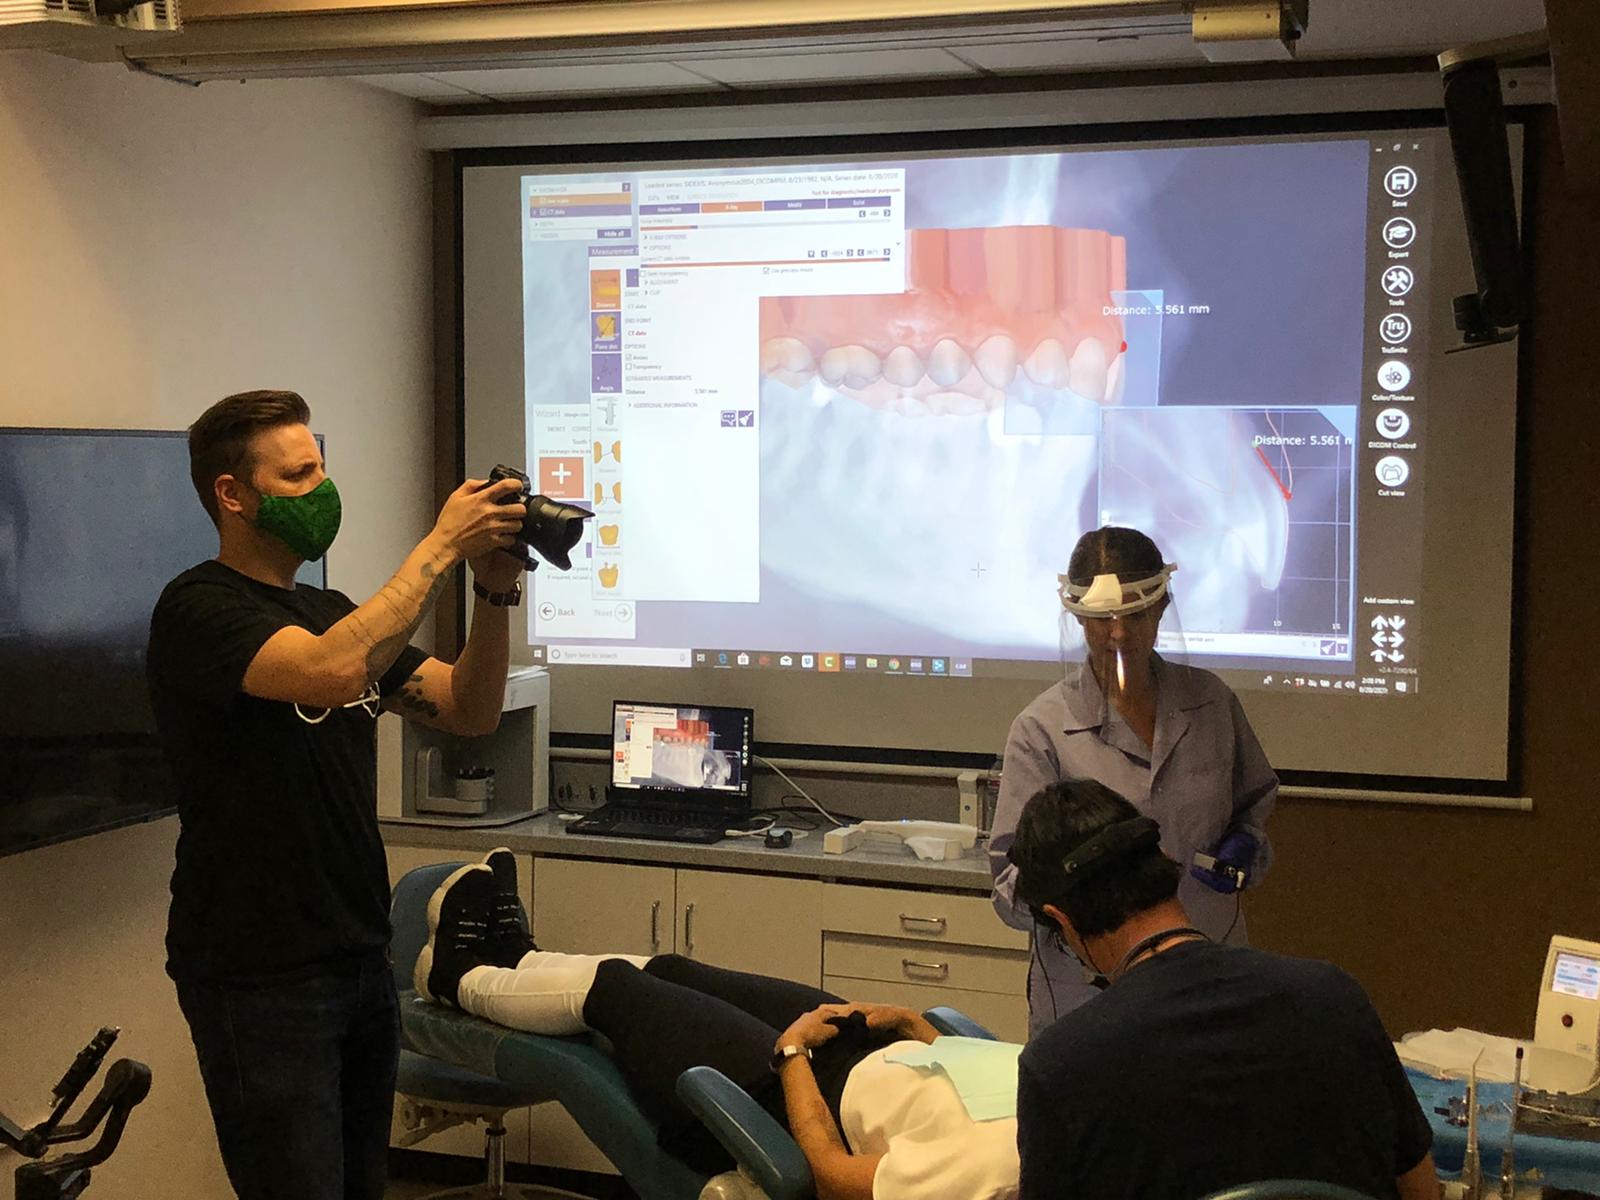
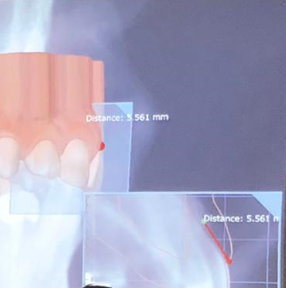
A Medit i500 scan was taken and merged with a CT scan and the distance to bone was measured (5.5 mm’s) giving enough space for soft tissue contouring with a diode laser. The 3D X-ray must be captured with cotton rolls placed in the vestibule so that you can differentiate between the gingiva and the lip. Ideally you should not close the base of the digital model by the intra-oral scanner as it can make the merge of the data sets more difficult than it needs to be.