fantastic experience with this company for over 7 years! Top customer service and support! Its great having them as part of our team! Highly recommend! - 3/22/2022
Zachary Breen
I purchased the Medit i700 from CAD-Ray back in May and the purchasing process, setting-up and trouble shooting has been extremely easy and straight forward with CAD-Ray. The Medit i700 is one of the best, if not the best, scanner I have used in the ...read moreI purchased the Medit i700 from CAD-Ray back in May and the purchasing process, setting-up and trouble shooting has been extremely easy and straight forward with CAD-Ray. The Medit i700 is one of the best, if not the best, scanner I have used in the past 5 years of using intraoral scanners. Recently I ran into a software issues with my scanner and I am extremely impressed with CAD-Ray and Medit's timely manner in addressing my issue. Within minutes I was on the phone with them and they had my concerns addressed and solved. I previously recommended a few colleagues to CAD-Ray and I will continue to recommend with even greater enthusiasm. I am very pleased with their customer service and the Medit i700. Thank you CAD-Ray!read less - 9/30/2021
Just ordered my i700 yesterday and it ships today. Customer support has been amazing in answering all my questions completely. Looking forward to my delivery day like a kid at Christmas. - 11/03/2021
Pretty much echoing what everyone else has said. Frank DeLuca and the whole team at CAD-RAY are fantastic. The best customer service and support in dentistry, hands down, not even a close second. We are thrilled with our Medit scanner and will certai...read morePretty much echoing what everyone else has said. Frank DeLuca and the whole team at CAD-RAY are fantastic. The best customer service and support in dentistry, hands down, not even a close second. We are thrilled with our Medit scanner and will certainly be choosing CAD-RAY for any future purchases.read less - 12/30/2021
Barton Davis
Every time I need support for my scanner, the Cad-Ray team is there to help. I recently had a question on how to manipulate a scan and export it back to Medit Scan. Damien logged in and helped me out. Problem solved in under five minutes. Awesome ser...read moreEvery time I need support for my scanner, the Cad-Ray team is there to help. I recently had a question on how to manipulate a scan and export it back to Medit Scan. Damien logged in and helped me out. Problem solved in under five minutes. Awesome service. Thanks Cad-Ray support team!read less - 3/04/2022
Maggie Sh
I’ve been using Medit 500 since spring of 2021 and really like it. The support system has been very good so far. I just called yesterday and spoke with Frank Deluca, he was very informative and helpful. - 12/07/2021
Jeffrey Martins
Service at CAD-Ray has been really great. About 6 months ago I purchased a Medit i700 scanner from them and have been really happy with it. Fortunately, I haven’t run into many problems, but if I need help they are so easy and friendly to work with. ...read moreService at CAD-Ray has been really great. About 6 months ago I purchased a Medit i700 scanner from them and have been really happy with it. Fortunately, I haven’t run into many problems, but if I need help they are so easy and friendly to work with. When my scanner did stop working, they quickly got me set up with a new one. If I have a computer question, they offer to log in and look at the computer with you. If you’re in the market for an intraoral scanner or any of their other products, I encourage you to talk with them to meet your goals. Thanks CAD-Ray!read less - 11/04/2022
Aram Grigoryan
I'm really grateful with the service CAD-Ray has provided! I'm also very happy with Laura's presentation with the Medit i700, and overall help in choosing the right scanner for my practice. I'm really happy with the scanner and the SprintRay Pro 95 P...read moreI'm really grateful with the service CAD-Ray has provided! I'm also very happy with Laura's presentation with the Medit i700, and overall help in choosing the right scanner for my practice. I'm really happy with the scanner and the SprintRay Pro 95 Printer as well. Thank you.read less - 8/31/2021
Fast response. Customer service eager to help and very friendly. :) - 3/21/2023
Sherif Gabr
I have been suing the Medit i500 scanner for a little over 2 months now and I have had great success. I have used it for implant cases, immediate dentures and single unit crowns.
What I like the most is that the software is continuously improving ...read moreI have been suing the Medit i500 scanner for a little over 2 months now and I have had great success. I have used it for implant cases, immediate dentures and single unit crowns.
What I like the most is that the software is continuously improving and adding new features.
You really can not ask for more than that! Great product, excellent support and a software development team that listens to their customers feedback!
Very happy with my purchase!!!read less - 2/26/2020
This summer I decided that it was time to purchase a scanner and train with my team. We could not be more excited as our experience with Laura at Cad-Ray has been just amazing. From the initial sales discussions to the support and training after the ...read moreThis summer I decided that it was time to purchase a scanner and train with my team. We could not be more excited as our experience with Laura at Cad-Ray has been just amazing. From the initial sales discussions to the support and training after the purchase I am very thankful to have purchased my Medit scanner from Cad-Ray. Every text and phone call has been given prompt attention and the after the sale support is first rate. It is a pleasure to leave a 5 star review for both the technology and for Laura!read less - 12/16/2021
Daniel Eley
I just bought the new Medit i700. I placed the order on Friday, it shipped on Monday, and it arrived on Tuesday. So far it has been a great experience. They also provide a lot of quality videos for learning to use the scanner. - 5/05/2021
Lisa Greenstein
Exceptional customer service - 7/26/2023
Michael Dickerson
Great experience purchasing my Medit through them. Always there if I have questions too. Thanks again! - 6/16/2020
Krupal Chhotu
Finally going digital and Cad-Ray was the place to start. Got the Medit i500 and began scanning right away. Now I am doing digital dentures, making my own surgical stents, etc. The support available is the best. "Frank" is always available! :) - 10/09/2019
I've only worked with this company for a short time but I have found them to be wonderful in every way. Call, emails, and texts are returned very quickly and the equipment that we have purchased works wonderfully. I would highly recommend. Dr Jim Ell...read moreI've only worked with this company for a short time but I have found them to be wonderful in every way. Call, emails, and texts are returned very quickly and the equipment that we have purchased works wonderfully. I would highly recommend. Dr Jim Ellisread less - 5/12/2020
Gregory Camfield
These guys are 1st in class service every time! - 7/08/2022
Meridien Dental
Got my Medit scanner from here. Purchase went very smoothly. Best part is the on going support. Cad-ray team is great with training and ongoing help if your scanner has hiccups here and there with various updates. - 12/11/2023
John Pobanz
We had an outstanding experience purchasing two Medit scanners. The delivery was timely . The onboarding clean. Laura was dazzling with her acumen and quick solutions . We highly recommend the investment in Cad Ray .Pobanz Orthodontics , Ogden Utah :...read moreWe had an outstanding experience purchasing two Medit scanners. The delivery was timely . The onboarding clean. Laura was dazzling with her acumen and quick solutions . We highly recommend the investment in Cad Ray .Pobanz Orthodontics , Ogden Utah :)read less - 12/10/2021
Brian Wilkinson
This company is genuinely amazing. Amazingly good products, but the thing that sets them apart is the support. Frank and Sean have answered any questions I have unbelievably fast. And I LOVE the DOF Craft 5x milling unit. Learning the flow of same da...read moreThis company is genuinely amazing. Amazingly good products, but the thing that sets them apart is the support. Frank and Sean have answered any questions I have unbelievably fast. And I LOVE the DOF Craft 5x milling unit. Learning the flow of same day milling was tricky for me, but they held my hand the whole way. Can’t go wrong here.read less - 1/06/2024
Madhavi Chavda
Still beginner to use IO scanner. best customer service. Live training was very useful. Andy Nova was great in improving my skill for scanning and showing me all features. Thank you. - 5/19/2022
Worked with Laura and she is incredibly knowledgeable. She gave me all the right advice and steered me in the right direction. Her ongoing support is as good as it gets. I feel like I have a 24 hour team at my beckoning call. For the meat and pot...read moreWorked with Laura and she is incredibly knowledgeable. She gave me all the right advice and steered me in the right direction. Her ongoing support is as good as it gets. I feel like I have a 24 hour team at my beckoning call. For the meat and potatoes. I got an Icam 4D from her and now I am printing all on 4 arches same day surgery at our practice in Denver(NUSET). We are going to put ICams and Trios’ in all our offices thanks to Laura and the Cad-Ray team. If you have any questions about the workflow and the success we are having with the Digital work flow call Laura and I will help you succeed with her product support.Thank you Laura and Cad-Ray!read less - 4/28/2022
Scott Terry
Six Stars! On a scale of one to five, I give CAD-Ray six stars. They really are that good. If you are purchasing an intra-oral scanner, I would recommend buying the Medit I-700. It is a dream machine. But, if you want incredible service every time, y...read moreSix Stars! On a scale of one to five, I give CAD-Ray six stars. They really are that good. If you are purchasing an intra-oral scanner, I would recommend buying the Medit I-700. It is a dream machine. But, if you want incredible service every time, you should buy your scanner from Cad-Ray. They have come through with flying colors each time I have contacted them. Their sales team great and their service is amazing. They have volumes of educational videos available, as well. I have worked with Jonathan, Damien, Frank, Armen and Laura. In a time where we are seeing the opposite, CAD-Ray will totally blow you away with the entire experience. I totally appreciate them and their value.read less - 11/01/2021
Victoria Rinando
Danielle was super helpful and kind trouble shooting to get us back up and going very quickly this morning. We appreciate it! - 4/15/2025
Page Barden
I have just recently purchased the Medit i700, and although it is "on its way" I have to comment on the support that I have already received, especially from Nick. He walked me through the benefits and features of the scanner and the transaction was...read moreI have just recently purchased the Medit i700, and although it is "on its way" I have to comment on the support that I have already received, especially from Nick. He walked me through the benefits and features of the scanner and the transaction was extremely easy. I can only think that the rest of the onboarding will be the same and in six months I will revisit this site and be extremely grateful I made the purchase.read less - 12/09/2021
Truly Great Service. Glad I purchased my scanner here. - 8/03/2023
Mark Sperling
Got a great deal in the medit i700 and the training was top notch. I had about 3 one hour sessions with Ryan at cadray and he was clear, concise and knowledgeable in both the software and hardware components of the computer/scanner and the detailed a...read moreGot a great deal in the medit i700 and the training was top notch. I had about 3 one hour sessions with Ryan at cadray and he was clear, concise and knowledgeable in both the software and hardware components of the computer/scanner and the detailed aspects of the dentistry itself. Got a direct line going forward and would recommend cad ray to anyoneread less - 8/17/2022
carlos Santos
I would like to let you know that Kaila Larson is excellent communicator, personable, professional and knowledgeableI have had the opportunity to talk to her 3 times and it has always been awesome.Regards,Dr Carlos santos - 4/08/2022
Aaron S
Great ongoing support and customer assistance. Been working with Frank for years, even before cad ray. Always there for any help i ever need. Cad ray support is like no other. - 1/26/2023
Benjamin Polan
A while ago I became interested in an intra oral scanner for my office especially for dental sleep medicine and TMJ appliances. I searched online for Medit and found cad ray. Laura from Cad-ray quickly responded and set up a zoom meeting so she could...read moreA while ago I became interested in an intra oral scanner for my office especially for dental sleep medicine and TMJ appliances. I searched online for Medit and found cad ray. Laura from Cad-ray quickly responded and set up a zoom meeting so she could demo the unit. Great job at helping me understand. She set up the financing and I got my unit. A few glitches with my internet speed and getting IT to help with my upload and download speeds and I was ready to go. Every time I had a question I texted Laura and almost like she was waiting for my call she responds. We it turned out my unit wasn't just right so she immediately responded we will replace you unit. Laura has been a joy to work with and the customer service given will only encourage me to do business with cad-ray again.
Benjamin Polan DMD, D,ABDSMread less - 8/27/2021
Cad-ray has been amazing, not to mention they have an amazing product in the medit i500. Their training is great, customer service is quick and thorough, and follow up is consistent. I highly recommend using cad-ray for anything that you may need. - 6/19/2020
Brenden Rogers
This company is excellent. Their knowledge, support, and sincerity is unmatched.Thank you, Frank, Damien, and Jonathan. You guys rock! - 5/08/2025
Vivek Singh
I have had done business with these guys. I am impressed with their Amazing Customer service. John and Armen are great. I have and will order lots of stuff from them. Kudos to them!!!! - 6/19/2020
Kyle Coffin
Bought a medit 6 months ago and customer service has been nothing short of amazing. Always very responsive and helpful. Great scanner, too! - 6/16/2020
Jennifer Hastings
Andy was wonderful with setting everything up and explaining everything. The Medit i700 has been great thus far, easy set up! The only "issue" is that it can be occasionally glitchy. - 1/11/2022
I Love it !!! I needed to replace my Omnicam because the computer hardware was old and not able to keep up with the software upgrades. The computer upgrade costs from Sirona were cost-prohibitive (another reason why the Medit is so good) and I wasn...read moreI Love it !!! I needed to replace my Omnicam because the computer hardware was old and not able to keep up with the software upgrades. The computer upgrade costs from Sirona were cost-prohibitive (another reason why the Medit is so good) and I wasn't about to make the same mistake twice and replace it with another system from Sirona. I was a bit unsure about making a big switch but after speaking with Nick Statly at Cad-Ray, he eliminated all of my reservations and I ordered it. I've used it for the past week and love it. Setting it up and getting it running was simple. I would not describe this as a do it yourself process, it's much easier. If you can make a cup of coffee you can set the scanner up and start making excellent scans. All one needs to do is watch the very well laid out and easy to follow videos and save a lot of money. The image quality and ease of use hands down beats the Omnicam. Also during the current pandemic, I really feel better about being able to cold sterlize the tips vs the omnicam's just "wiping down." I almost hope my desktop scanner craps out so I can get the Medit desktop. I'm glad I listened to you Nick!!!read less - 6/04/2020
Nothing but great things to say about Cad-Ray! Excellent customer support from Laura after the purchase of our Medit i500 and the cart from Damien. I’ve been very impressed with the Medit in restoring crown and bridge, as well as fixed hybrids, and...read moreNothing but great things to say about Cad-Ray! Excellent customer support from Laura after the purchase of our Medit i500 and the cart from Damien. I’ve been very impressed with the Medit in restoring crown and bridge, as well as fixed hybrids, and learning more of its capabilities each day. We have intentions to buy a second Medit shortly and will definitely be using Cad-ray again.read less - 12/13/2021
Andy M
It has been great to work with Laura and Heather. The purchase, financing, shipping, and training process has been smooth. The training was very comprehensive and not rushed at all. I love my Medit i-600 scanner, and I recommend CAD-RAY 100%! - 5/22/2024
Matt McReynolds
These guys are ALWAYS there to help if you get stuck. I’ve been happy with the mill (coritec one) and scanner (i500) I bought from them 2 years ago. I’d do business with them again. - 7/01/2021
Christopher Chin
This was my intro into intraoral scanning and I did research for quite awhile. The i500 and the team at Cad Ray are top notch. The company has done such a great job putting this scanner in the ranks of the premier ones. With constant updates it gets...read moreThis was my intro into intraoral scanning and I did research for quite awhile. The i500 and the team at Cad Ray are top notch. The company has done such a great job putting this scanner in the ranks of the premier ones. With constant updates it gets better and better (though I’m still behind on updates). My crowns have never been better. They drop right in with no models. I didn’t believe it but I’m loving digital dentistry. I can’t wait to go to the class after COVID calms down!read less - 6/16/2020
They all go absolutely above and beyond in all aspects. Whether it's tech support, products, CE, everything. Everyone I have dealt with has been wonderful. Love these guys! - 6/19/2020
Roger Wilson
CAD-Ray provides the best support around. I started scanning with Medit i500 in 2018 and my dental practice immediately changed for the better.As a rookie, I had a lot of questions and I calledCAD-Ray a lot in the beginning. They were great!Jonathan...read moreCAD-Ray provides the best support around. I started scanning with Medit i500 in 2018 and my dental practice immediately changed for the better.As a rookie, I had a lot of questions and I calledCAD-Ray a lot in the beginning. They were great!Jonathan Acker helped me get set up. Frank Weinstein answered tons of questions. Laura Geney became an important source of information as I moved into scan bodies, AI library, and had hardware questions. I’ve attended classes in Dallas featuring Armen Mirzayan who is incredibly knowledgeable and will tell you the good, bad, and the ugly about digital workflow. The possibilities are endless with scanning technology. I also want to mention Nick Statly who has visited my Dallas office and is a wealth of information. I have to admit that I frequently view the CAD-Ray User Group Face Book page just to pick up a few pearls here and there.I highly recommend CAD-Ray because their support is by far the best in the IOS industry and because their people honestly care about the customer and are truly committed to your success.read less - 12/23/2021
Cole Smith
These guys are great. My favorite part about them is they set you up for success with your products. A lot of dental companies will be happy to sell you big ticket tech item but don't have much to set you up for success. I bought the Medit i500 and t...read moreThese guys are great. My favorite part about them is they set you up for success with your products. A lot of dental companies will be happy to sell you big ticket tech item but don't have much to set you up for success. I bought the Medit i500 and they have tons of videos on how to get it working and working well for you in your office. If you need a much of hand holding they have that our if you are like me and like the do it yourself videos they have that. I am sure you can buy these products all over but it is there service that sets them apart. If to are looking to buy some dental tech use these guys!read less - 6/05/2020
Thuy Nguyen
CAD-Ray is amazing! Prompt replies, quick delivery, knowledgeable team! I had some cracks on my scanner that I read on their FB group may be a manufacturer's defect. My scanner was still covered under warranty. They overnighted a brand new one to me ...read moreCAD-Ray is amazing! Prompt replies, quick delivery, knowledgeable team! I had some cracks on my scanner that I read on their FB group may be a manufacturer's defect. My scanner was still covered under warranty. They overnighted a brand new one to me before I even knew they were going to replace it! That's how quick they are! Highly recommend them!!!read less - 12/23/2021
Erica Zolnierczyk
Purchased the Medit right before the COVID shut down, which gave us time to train on it by watching all the awesome videos CAD-Ray provides. If I couldn’t figure something out, our questions were answered quickly. Now we’re back and using it like cra...read morePurchased the Medit right before the COVID shut down, which gave us time to train on it by watching all the awesome videos CAD-Ray provides. If I couldn’t figure something out, our questions were answered quickly. Now we’re back and using it like crazy. It’s quick, my assistant picked it up quickly and my cases have been coming back perfect. Super happy with the Medit!read less - 6/16/2020
Faisal Mir
Exceptional customer service! - 4/11/2025
H C
I got my 3Dshape scanner, great support , my training with Destany was excellent. Great team!! - 2/15/2024
Aaron LaRock
Dentist here. Bought a scanner, mill and 3d printer with Cad-Ray. I don't know what I'd do if I bought these items without their support. They've helped me so much and are awesome. I felt I had to repay by writing them this nice review. You won't reg...read moreDentist here. Bought a scanner, mill and 3d printer with Cad-Ray. I don't know what I'd do if I bought these items without their support. They've helped me so much and are awesome. I felt I had to repay by writing them this nice review. You won't regret getting whatever you need through Cad Ray.read less - 3/15/2024
George W
Frank DeLuca has been my rep for almost a year and has provided excellent, caring, professional service and with a great attitude. - 1/25/2023
Brian Jaques
After weeks of research I purchased the i700 through Nick at cad-ray. My office has never used a scanner before and despite the great pricing, this was still a major purchase for me. Nick was incredibly helpful guiding me through the process while an...read moreAfter weeks of research I purchased the i700 through Nick at cad-ray. My office has never used a scanner before and despite the great pricing, this was still a major purchase for me. Nick was incredibly helpful guiding me through the process while answering my many questions. The customer service was very responsive and my friends who have purchased medit scanner were correct that this is the way to go. 5 Stars!read less - 5/08/2021
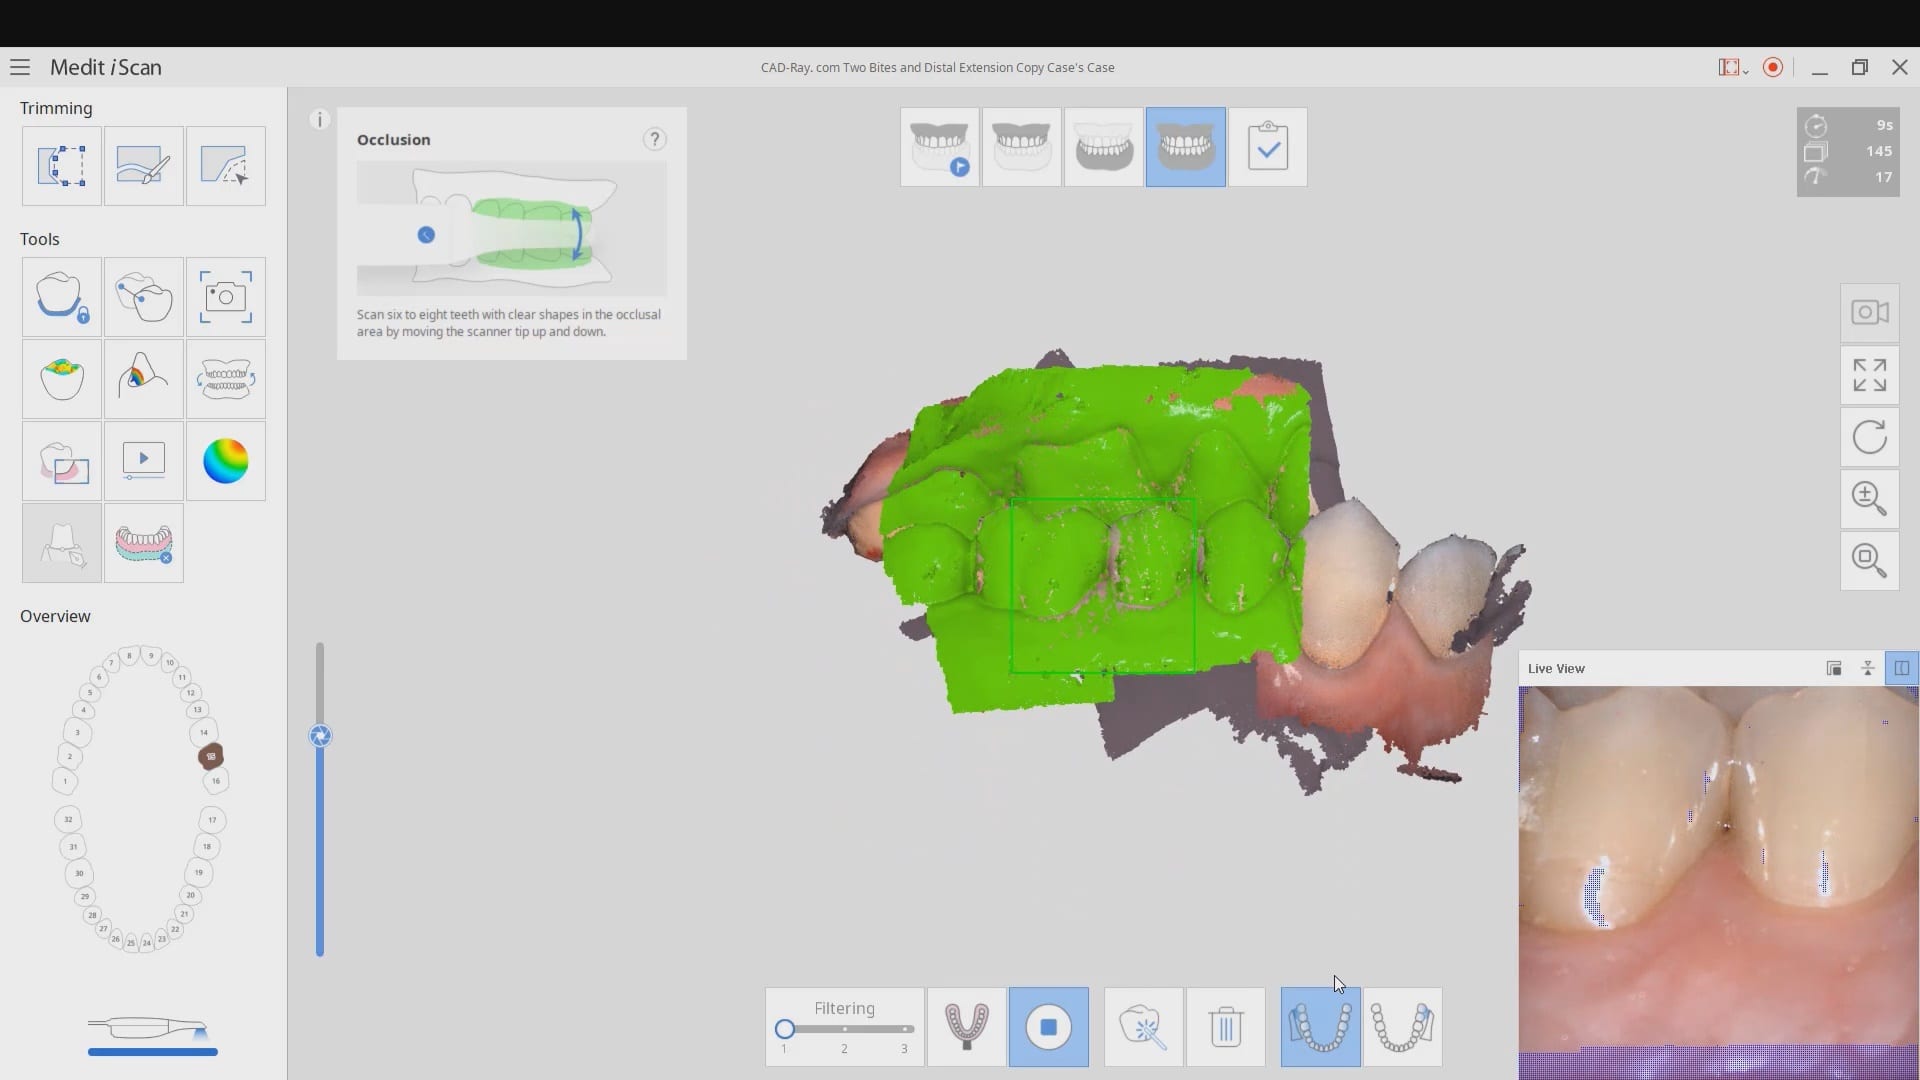
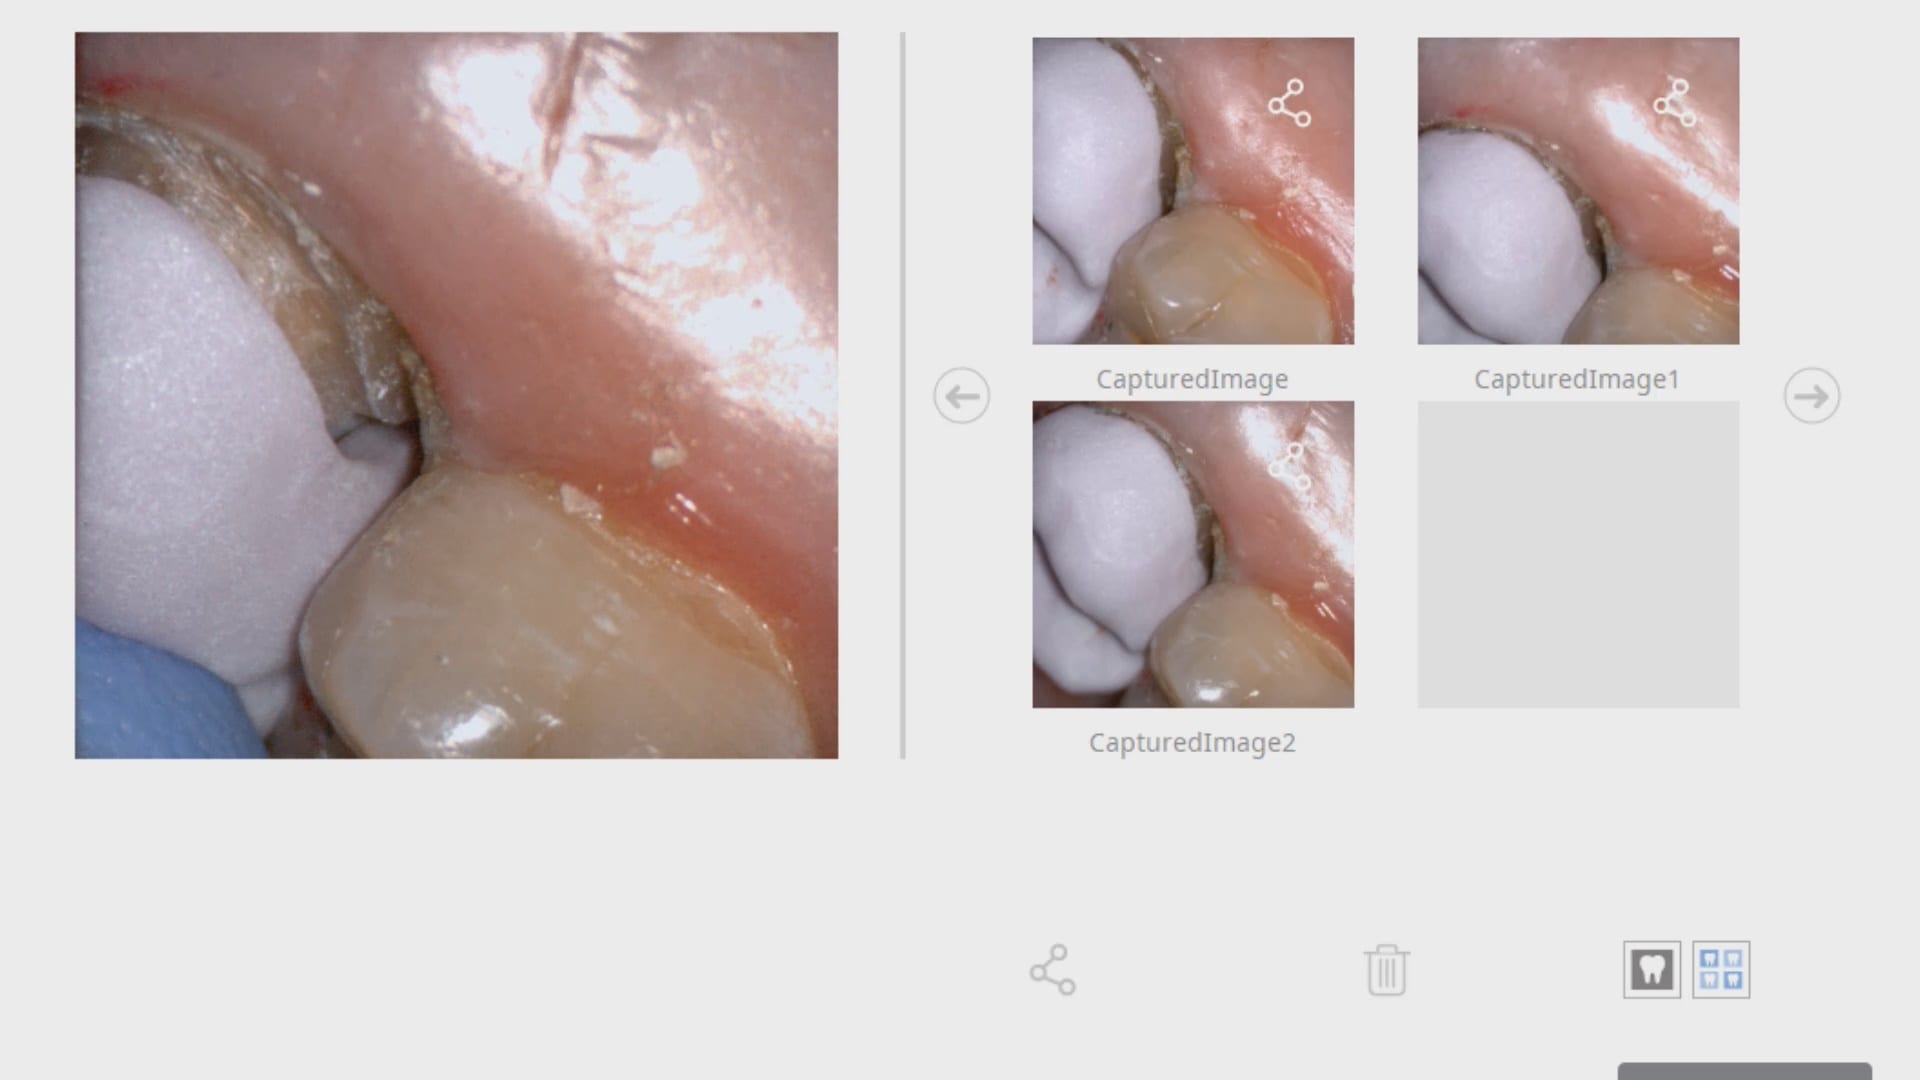
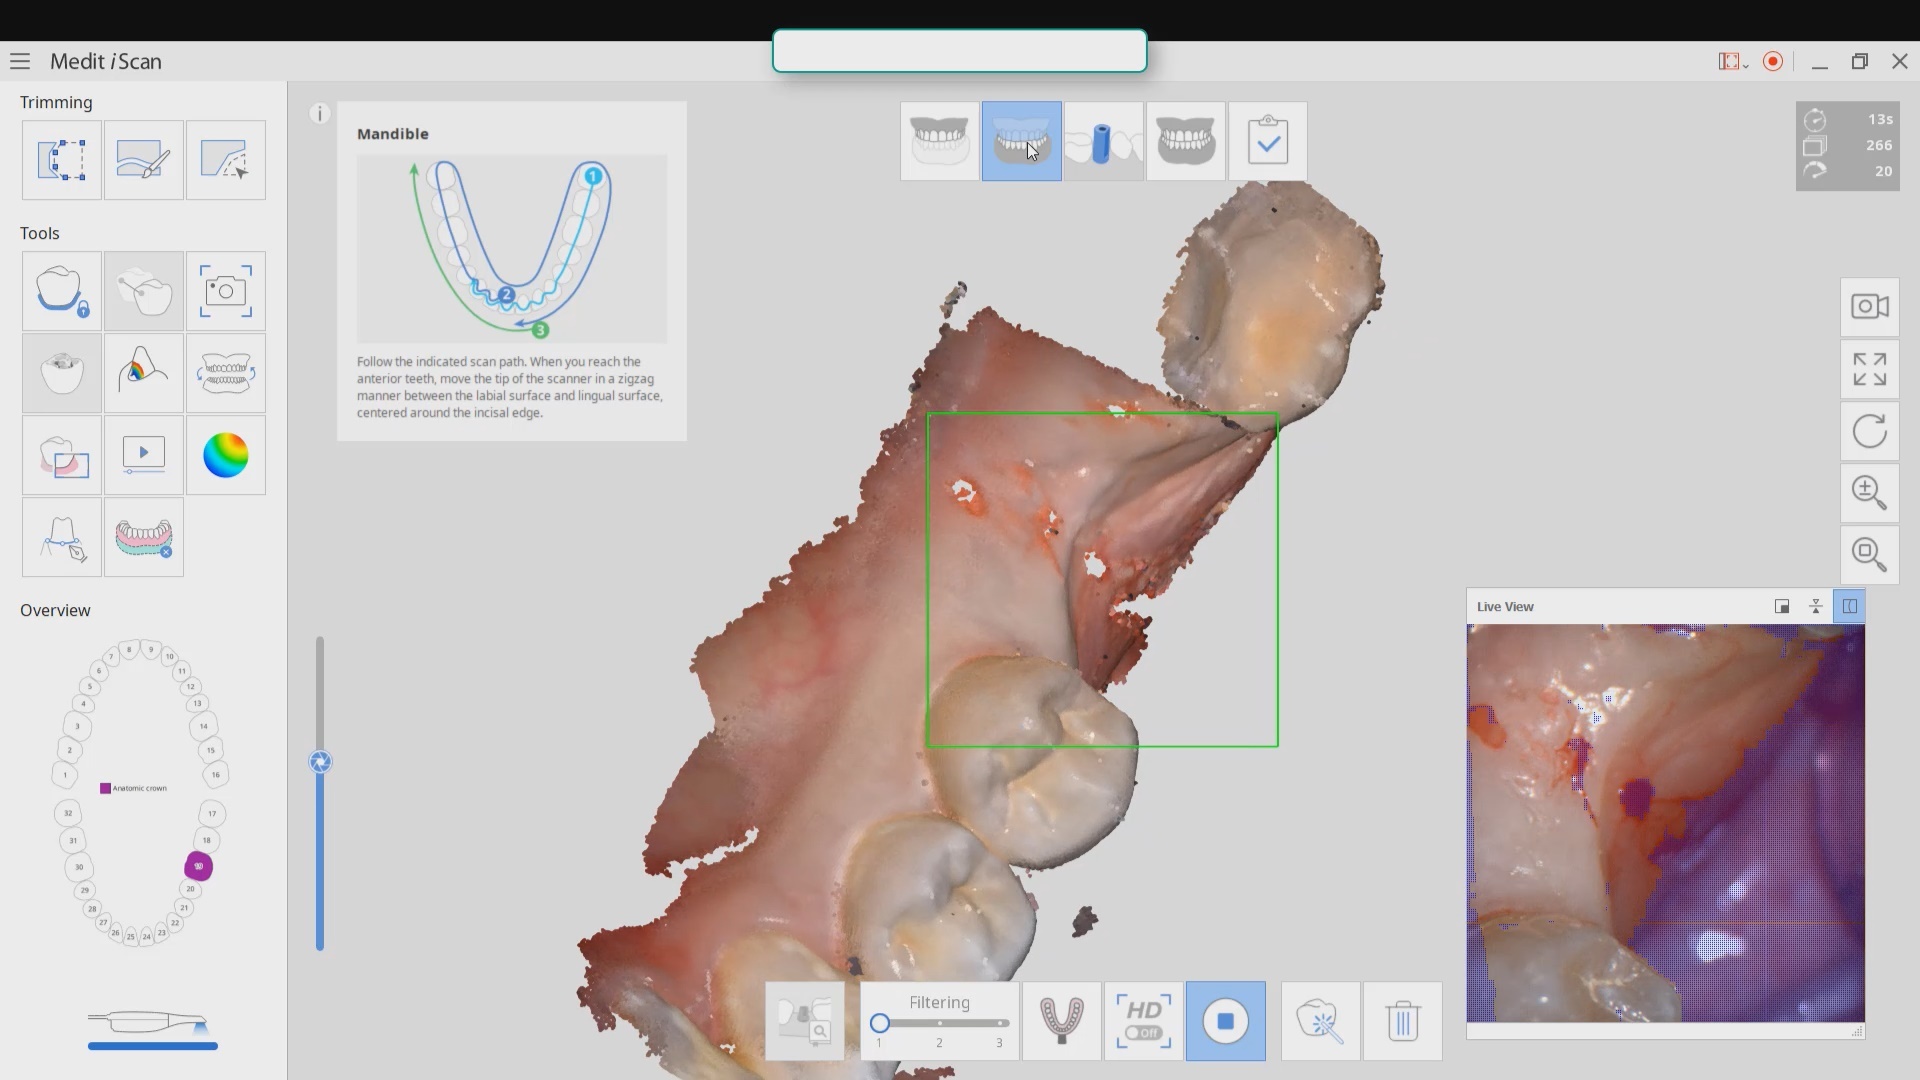
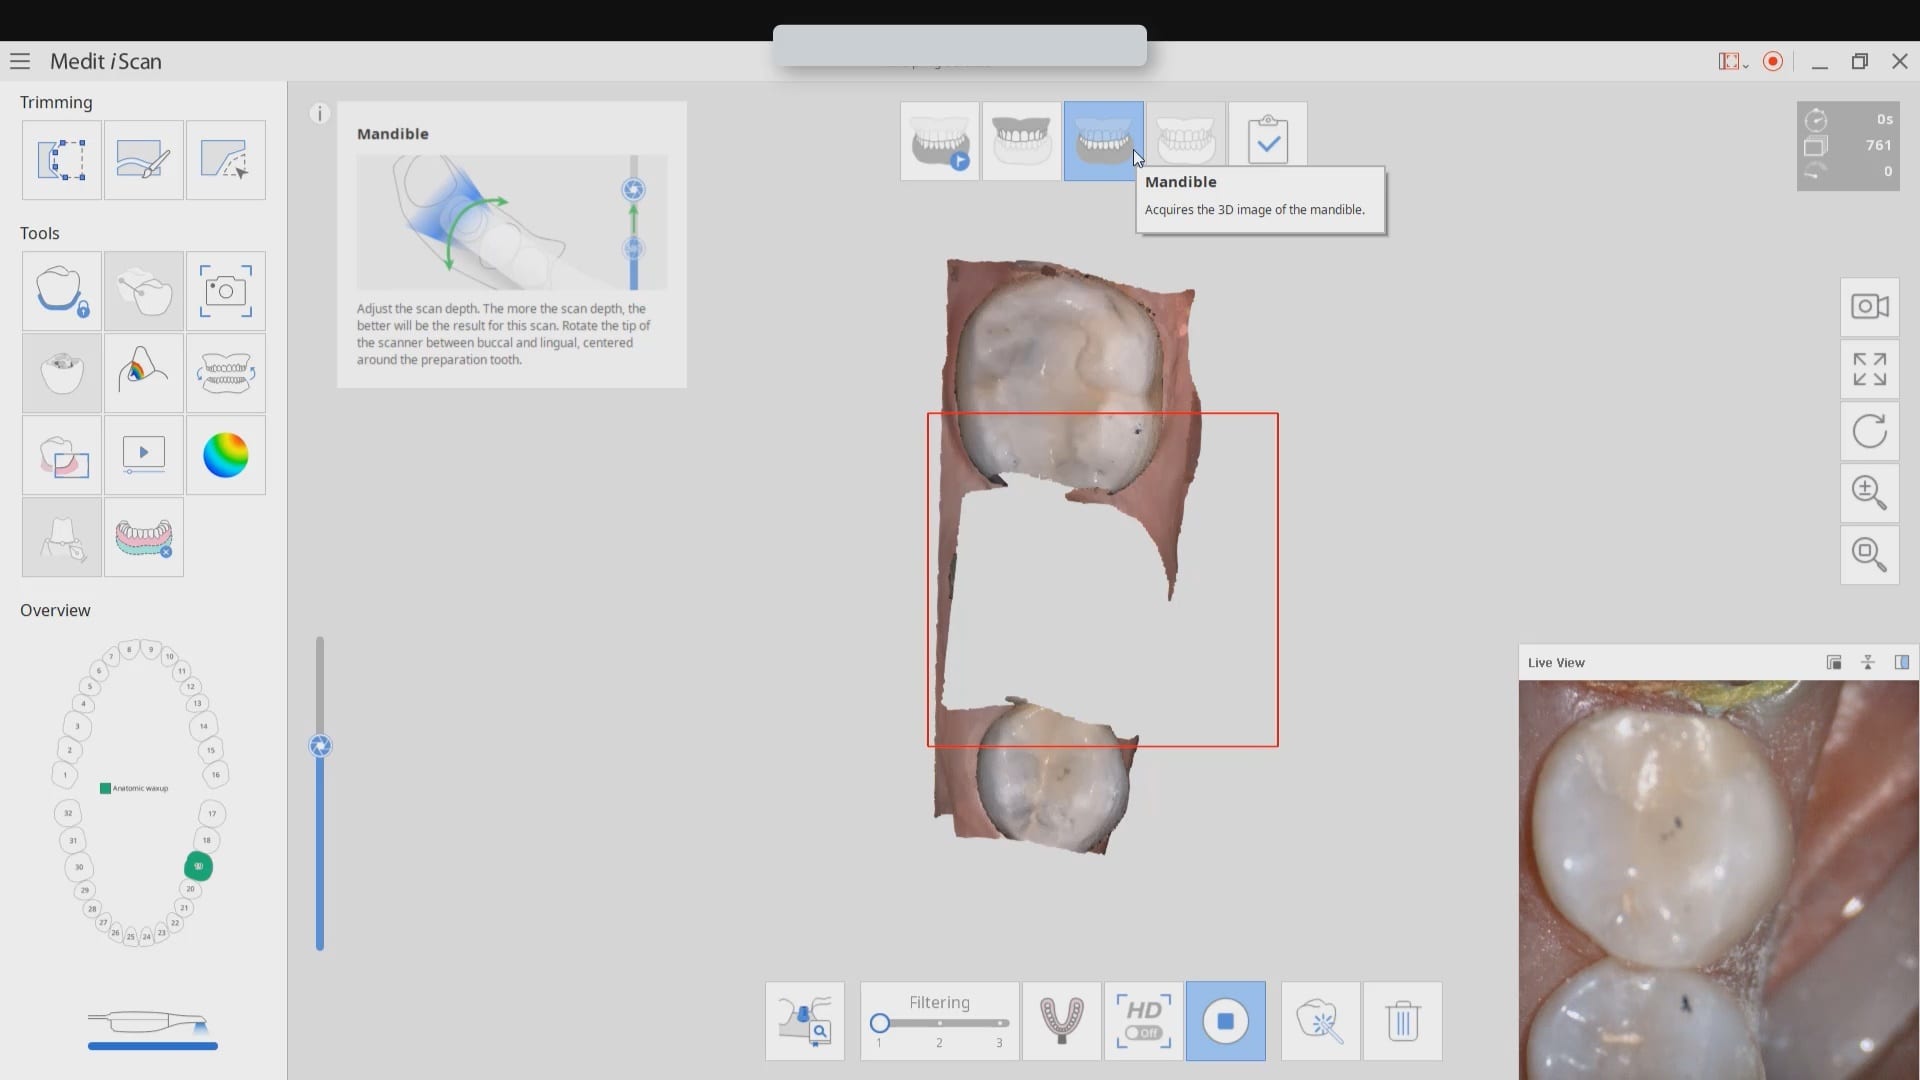
In this video we demonstrate some of the most common problems associated with second molar impressions. Usually the distal margins can be blurred by the presence of hemorrhaging or soft tissue. In this particular case, we use the tip of the camera to displace the tissue and digitall correct an area for better accuracy. The isolite systemisolite systemisolite system does a great job controlling the tongue and the lips and with proper retraction you can image a quadrant in very little time
The second most commong problem is a change in the vertical dimension before and after we prepare the last vertical stop in the arch. We advocate that you take two bites; one before preparing the distal extension and one after you prepare it. Comparing the two buccal bites will let you know if you will have issue with your vertical dimension and allow you to reduce the post op adjustments
In this video we demonstrate a simple premolar case that is prepared and imaged with the Medit i500, designed in the cad software named exocad and then milled with the imes icor coritec one machine. Pay attention to the order and sequence of events and how we leverage anesthesia time with scanning time.
We have a large library of instructional videos on our site that can be found on our support page that can help you learn everything there is to know about the Medit i500
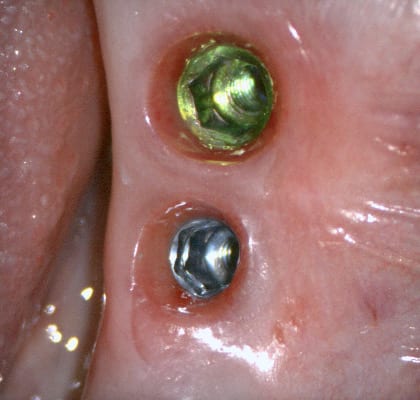
In this video, we show a recall of an implant restored with a scanbody. When the implant was initially placed, a scanbody was seated and an X-ray was taken to verify that it was seated. The titanium scanbody allows for visualization of seat. A peek scanbody does have a metal carrier but it is confusing to some users to verify that it is engaged with the fixture.
The proper placement of this biomax implant, followed by ideal contouring of tissue and bone around the head of the fixture, allowed for enough “running room” to create the desired emergence profile
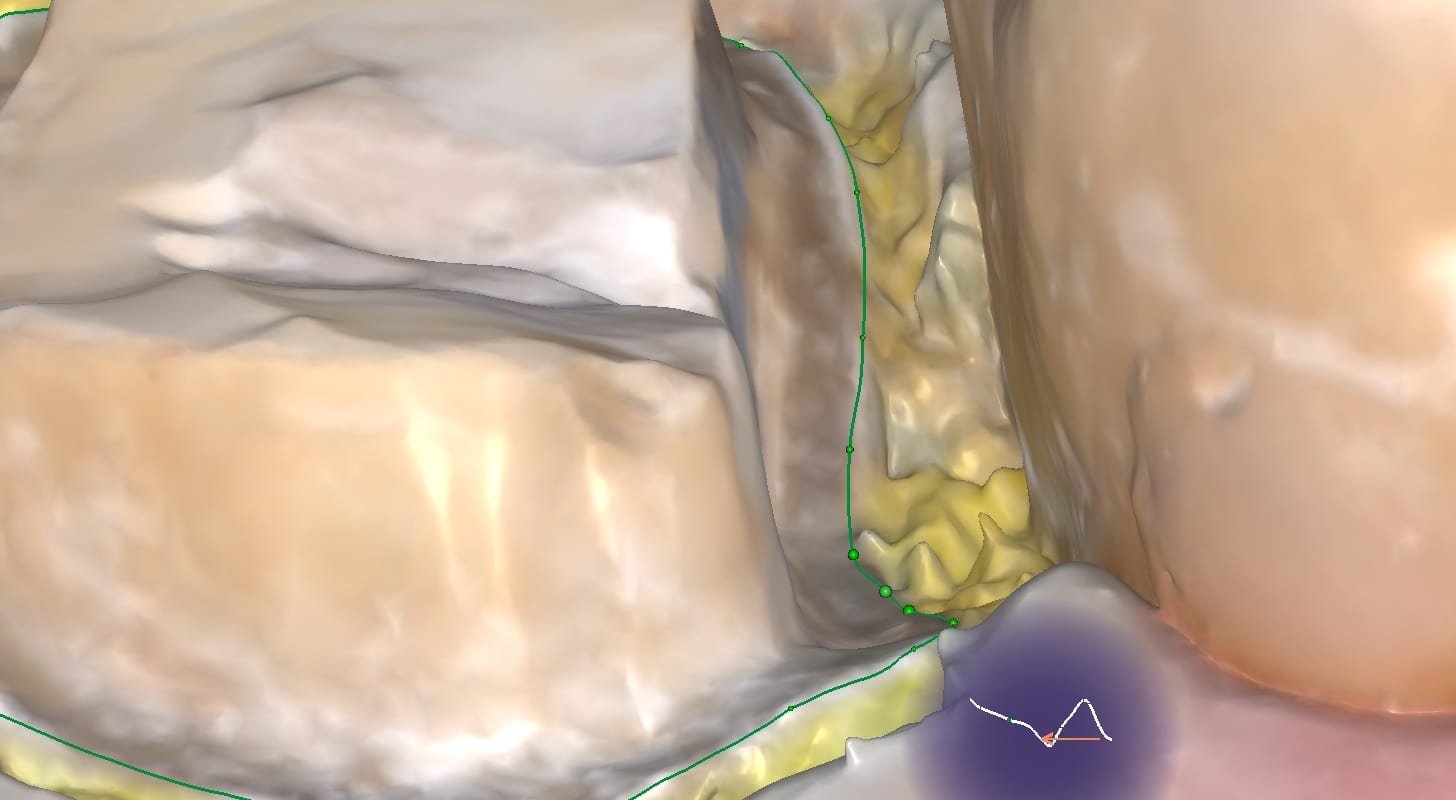
With digital dentistry and designing cases in color, you do not need flash like you do for analog impressions. The purpose of flash is so that you can discern the separation of the margin from the tissue in stone. You still need to displace the tissue to expose the line of sight to your margins, but you don’t necessarily need the flash. But if you get both, it certainly helps! You can see an example of this with the margins scanned in HD mode with the Medit i500.
flash and flush help expose the margins for the Medit i500 ios
In the following video we demonstrate how we set up the case and image the prep. With digital dentistry, you can image the opposing, the arch, and the bite in any sequence you want. This has great implications clinically where team members can scan most of the data needed and the dentist can step, prepare the tooth, and just image the prep and the contacts of the neighboring teeth. Advanced users who are looking for speed can process the case even before the prep is imaged, and then just image the prep and only process that arch and merge them in the cad software, greatly speeding up the process
Every distal extension case I have to accomplish the following:
take two bites to make sure my vertical dimension does not change with pre-op and prep images
make sure I have proper clearance
We usually take the bites and all other images BEFORE I have even imaged the prep- I usually grab the prep images last
most of this you can delegate to your team and just take the prep images and make it simple for yourself
this video shows the clinical steps. to see what the lab does with your case, click in the link to see the subsequent steps. you can also choose to design and mill it, which is what I did
With analog dental impressions, it is imparative to separate the gum tissue from tooth structure and to create a trough for flash for dye work. This is not the case with the intra-oral scanner by Medit. All you need to do is displace the tissue so you have a clear line of site to the margins, and you just need to be flush. You don’t need flash like you do with stone work
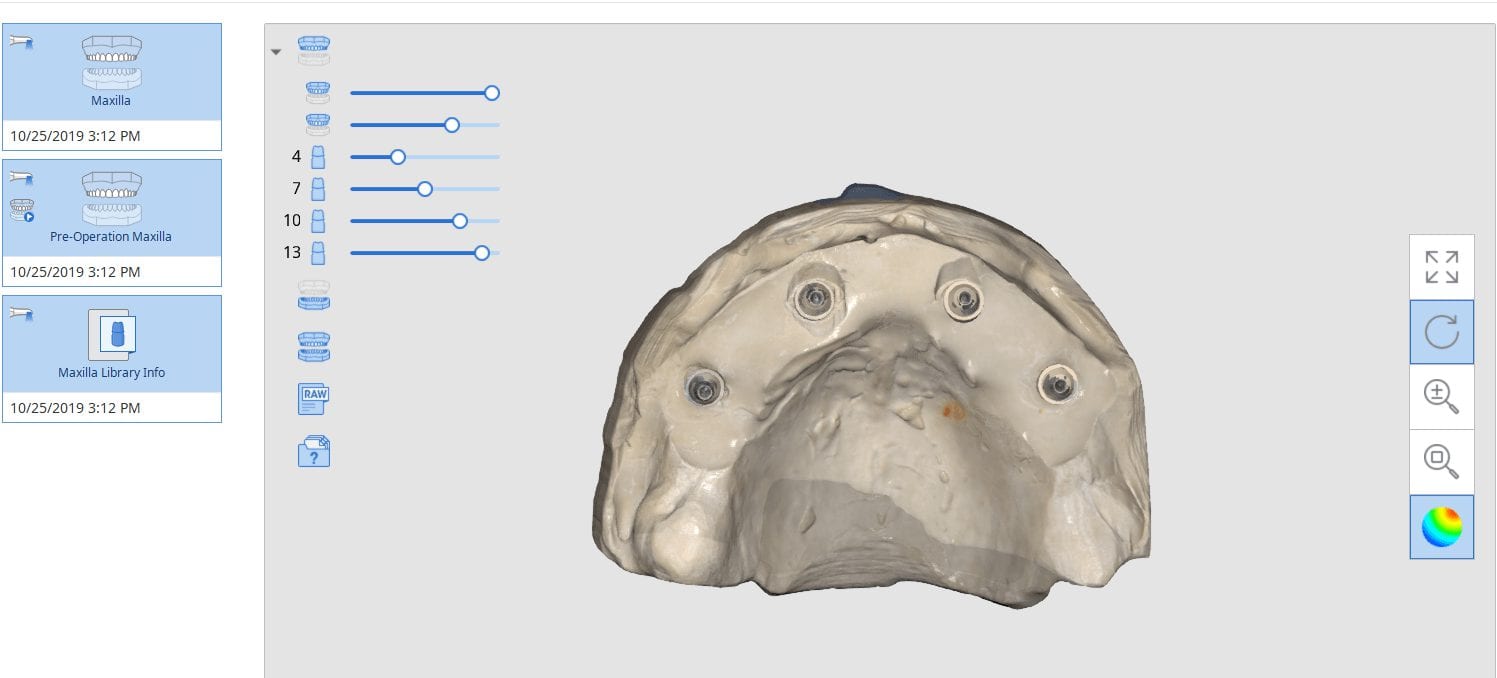
This is a detailed video demonstration that shows you how to capture full arch scans for multi unit implant cases in edentulous jaws and, more importantly, how to assess its accuracy.
this is a very controversial topic and most aspire to capture intra-oral scans without the need for a verification jig. to date, this has been impossible to measure during live intra-oral scans. you can only do so with trueness and precision studies on benchtops, with known reference frames.
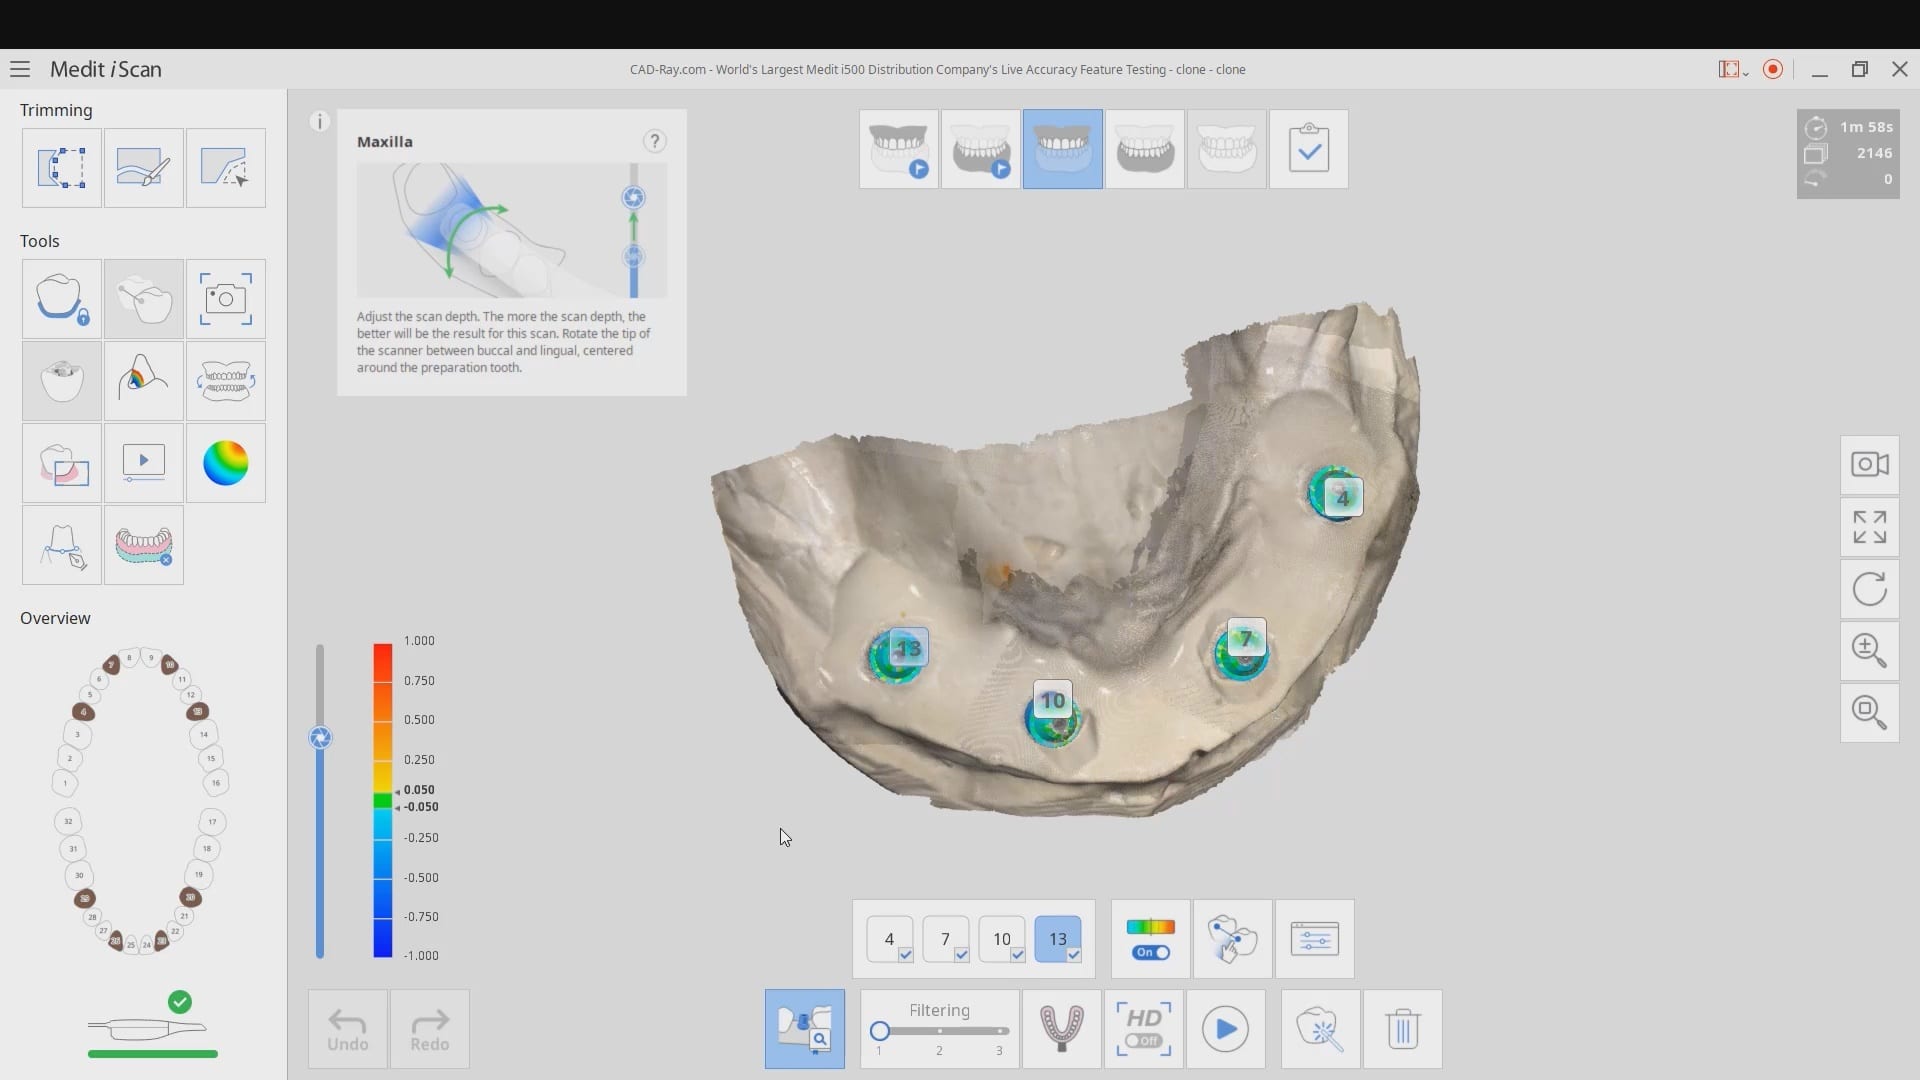
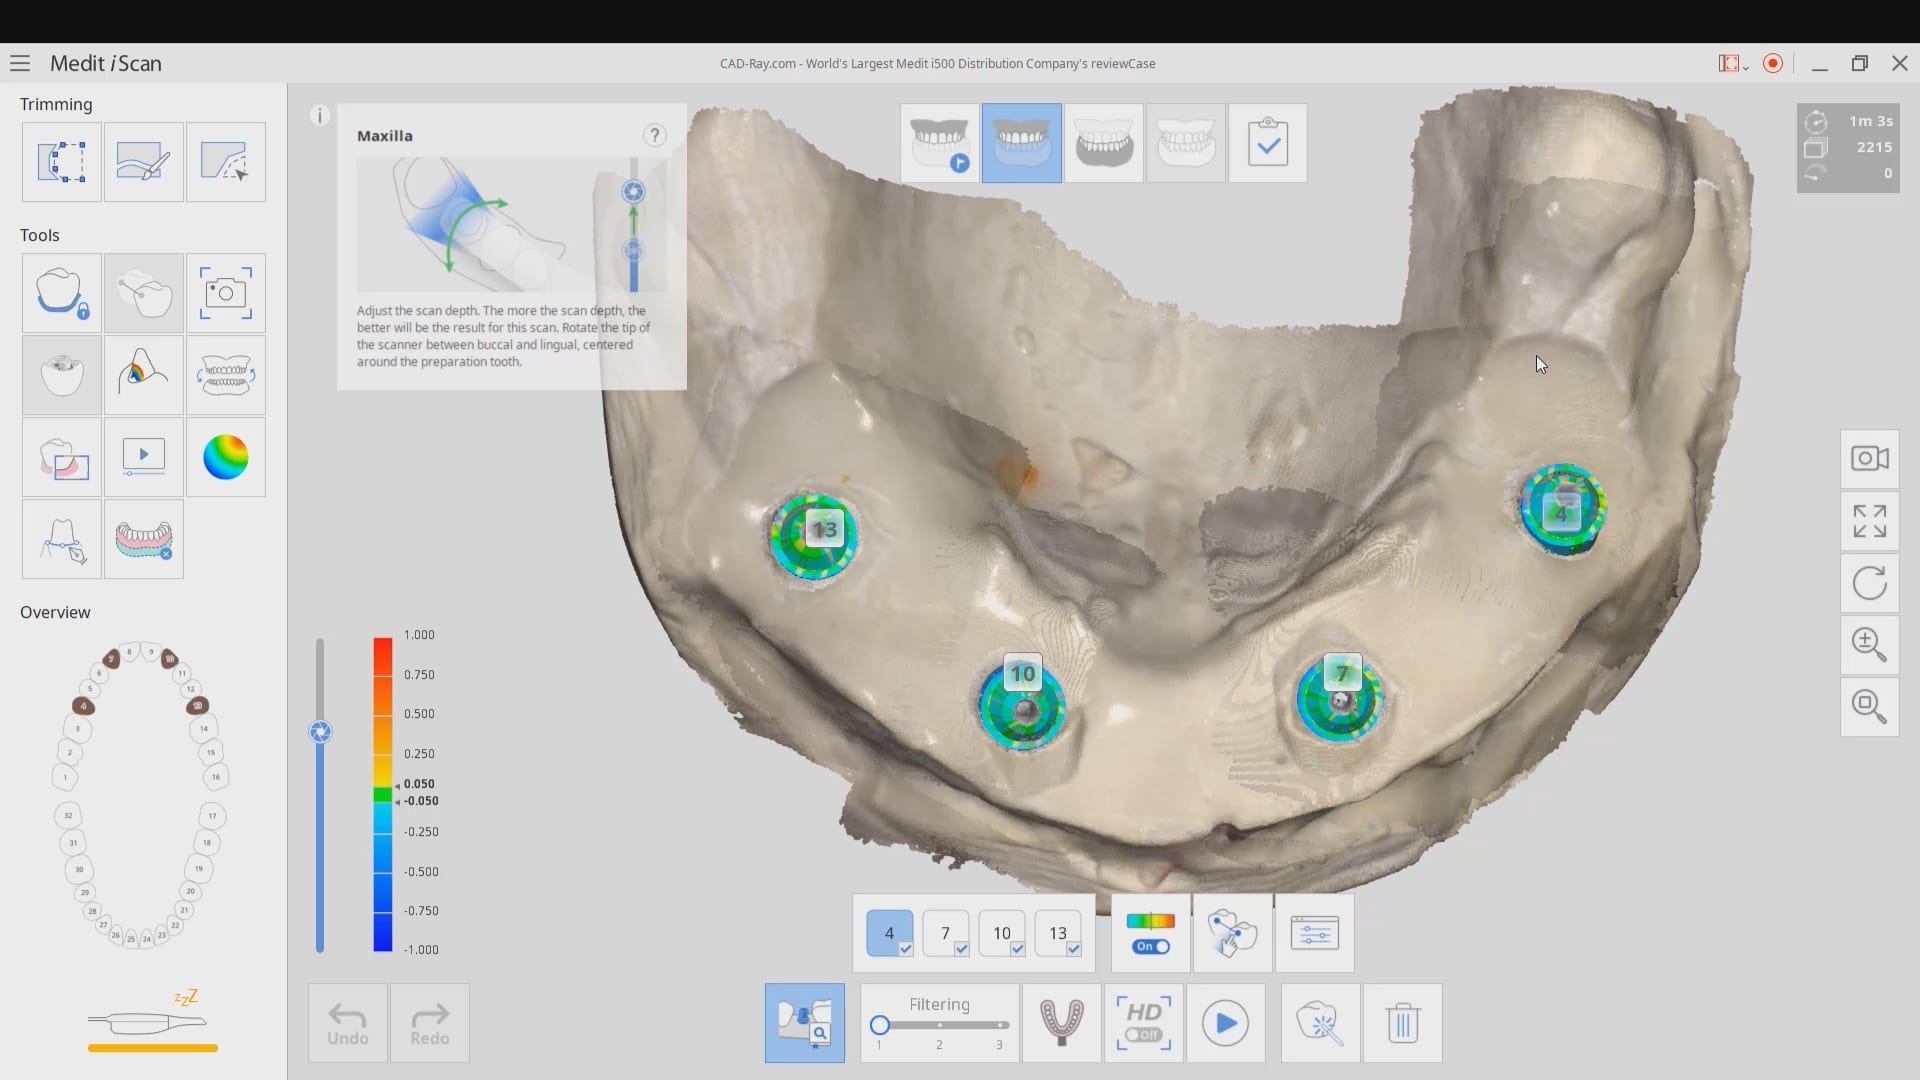
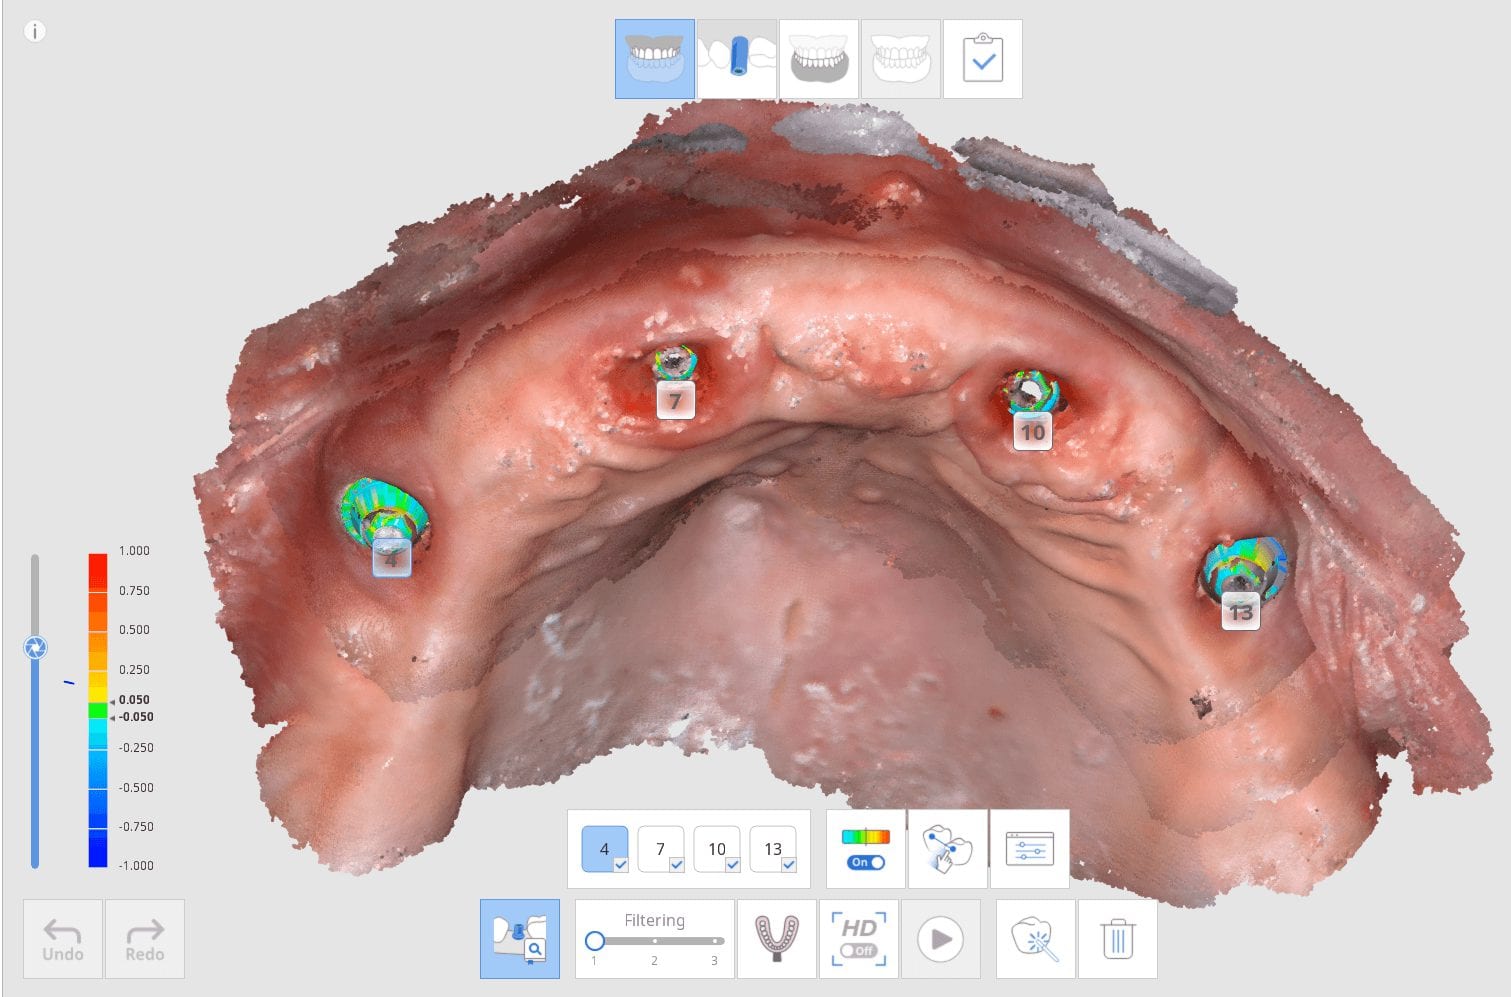
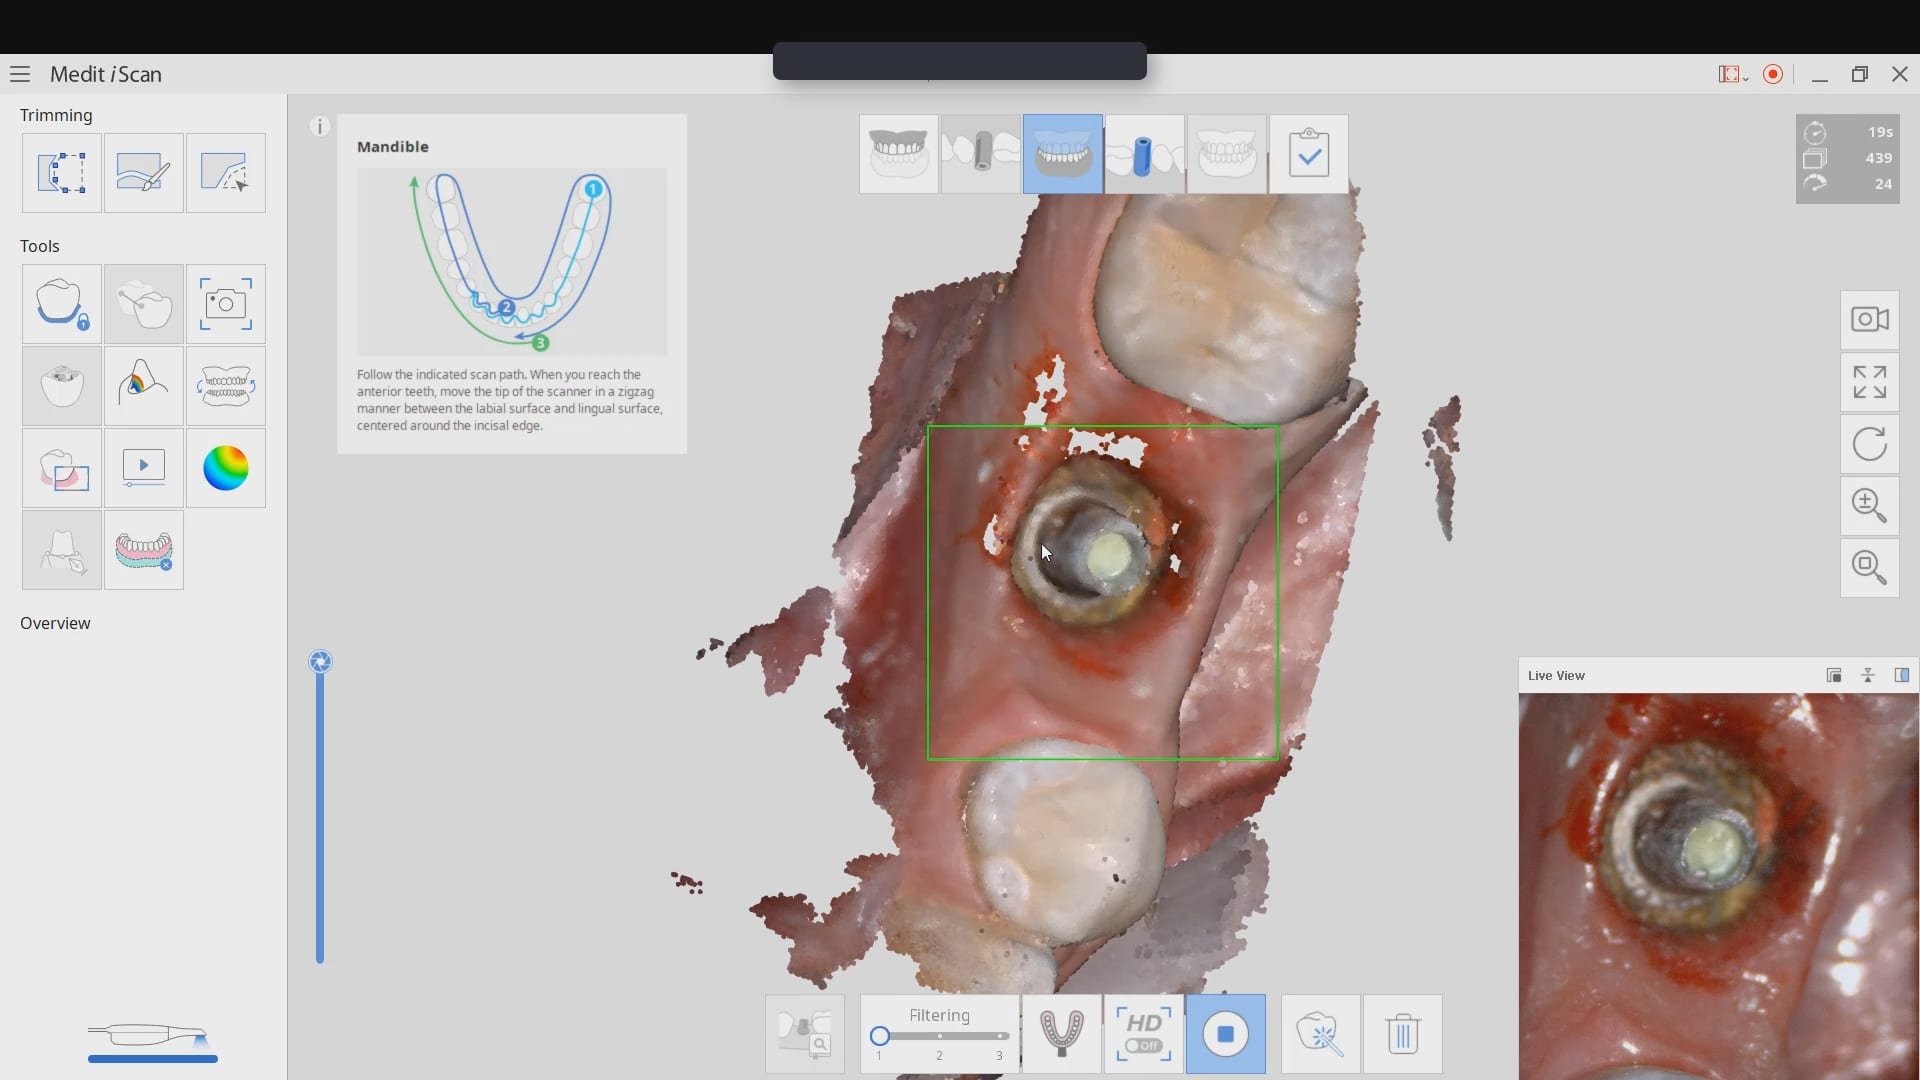
All that changed this month with the launch of Medit’s AI (artifical intelligent implant suprastructure automatic identification) system. it is meant to primarily identify a scanbody and the location of the fixture. But we can use it to our advantage to give us a LIVE verification jig.
this is not comparing telegammetry to ios scans. it is showing how you can assess the accuracy of your live global scan, which was impossible a month ago. it should be readily apparent to you that every scanner on the market can produce accurate or inaccurate models, and the end result is completely up to the operator.
this invalidates most if not all studies to date that assess trueness and precision of intra-oral scanners because none of them can measure those values intra-orally. this is a new benchmark that all manufacturers should try to achieve now
Medit i500 Artificial Intelligent Implant Suprastructure Identfication System not only simplifies advanced implant prosthetics but can be used for immediate assessment of cross arch accuracy.
Using Medit’s Artificial Intelligent Implant Suprastructure Identification System to assess the accuracy of a cross arch digital impression! long title but it had to be to do it justice. For a primer, we highly recommend that you watch all of our videos on imaging fundamentals
here we put all the pieces of a puzzle together to answer how you can capture full arch impressions for implants accurately (or inaccurately). As the user, you are completely responsible for not introducing errors or capturing the data correctly
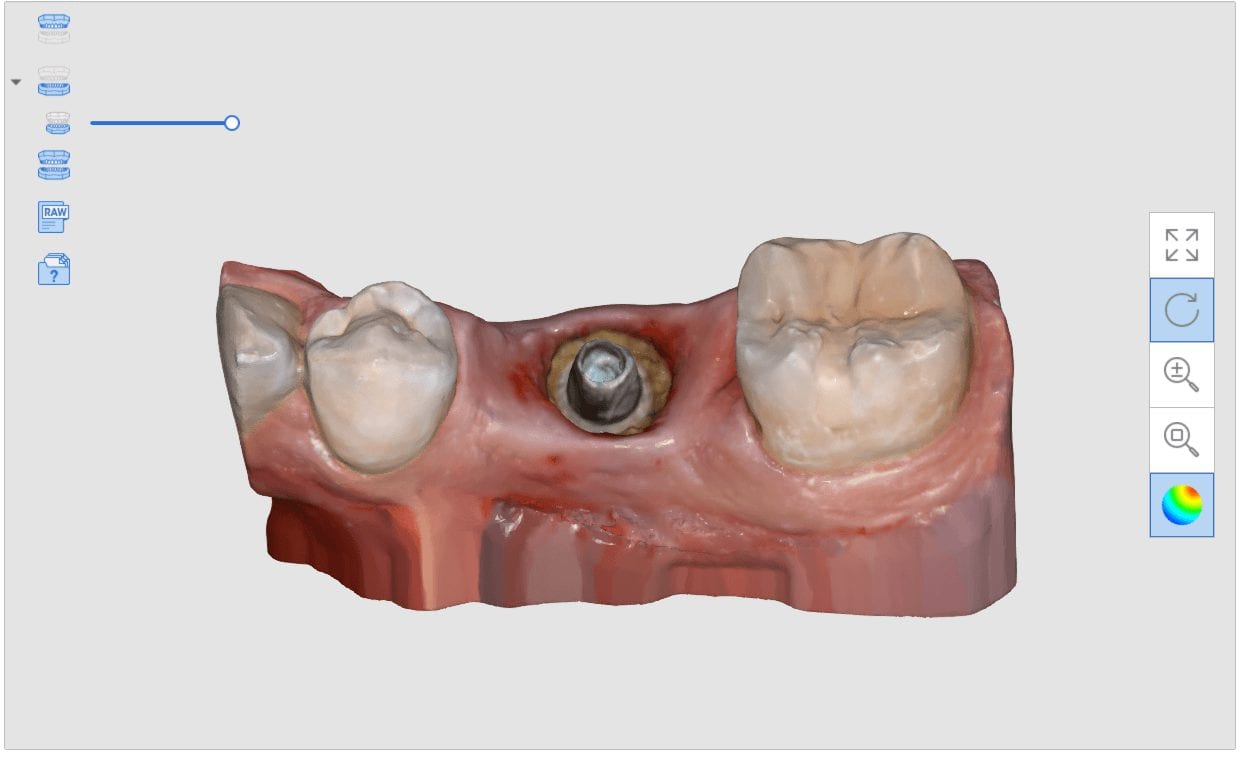
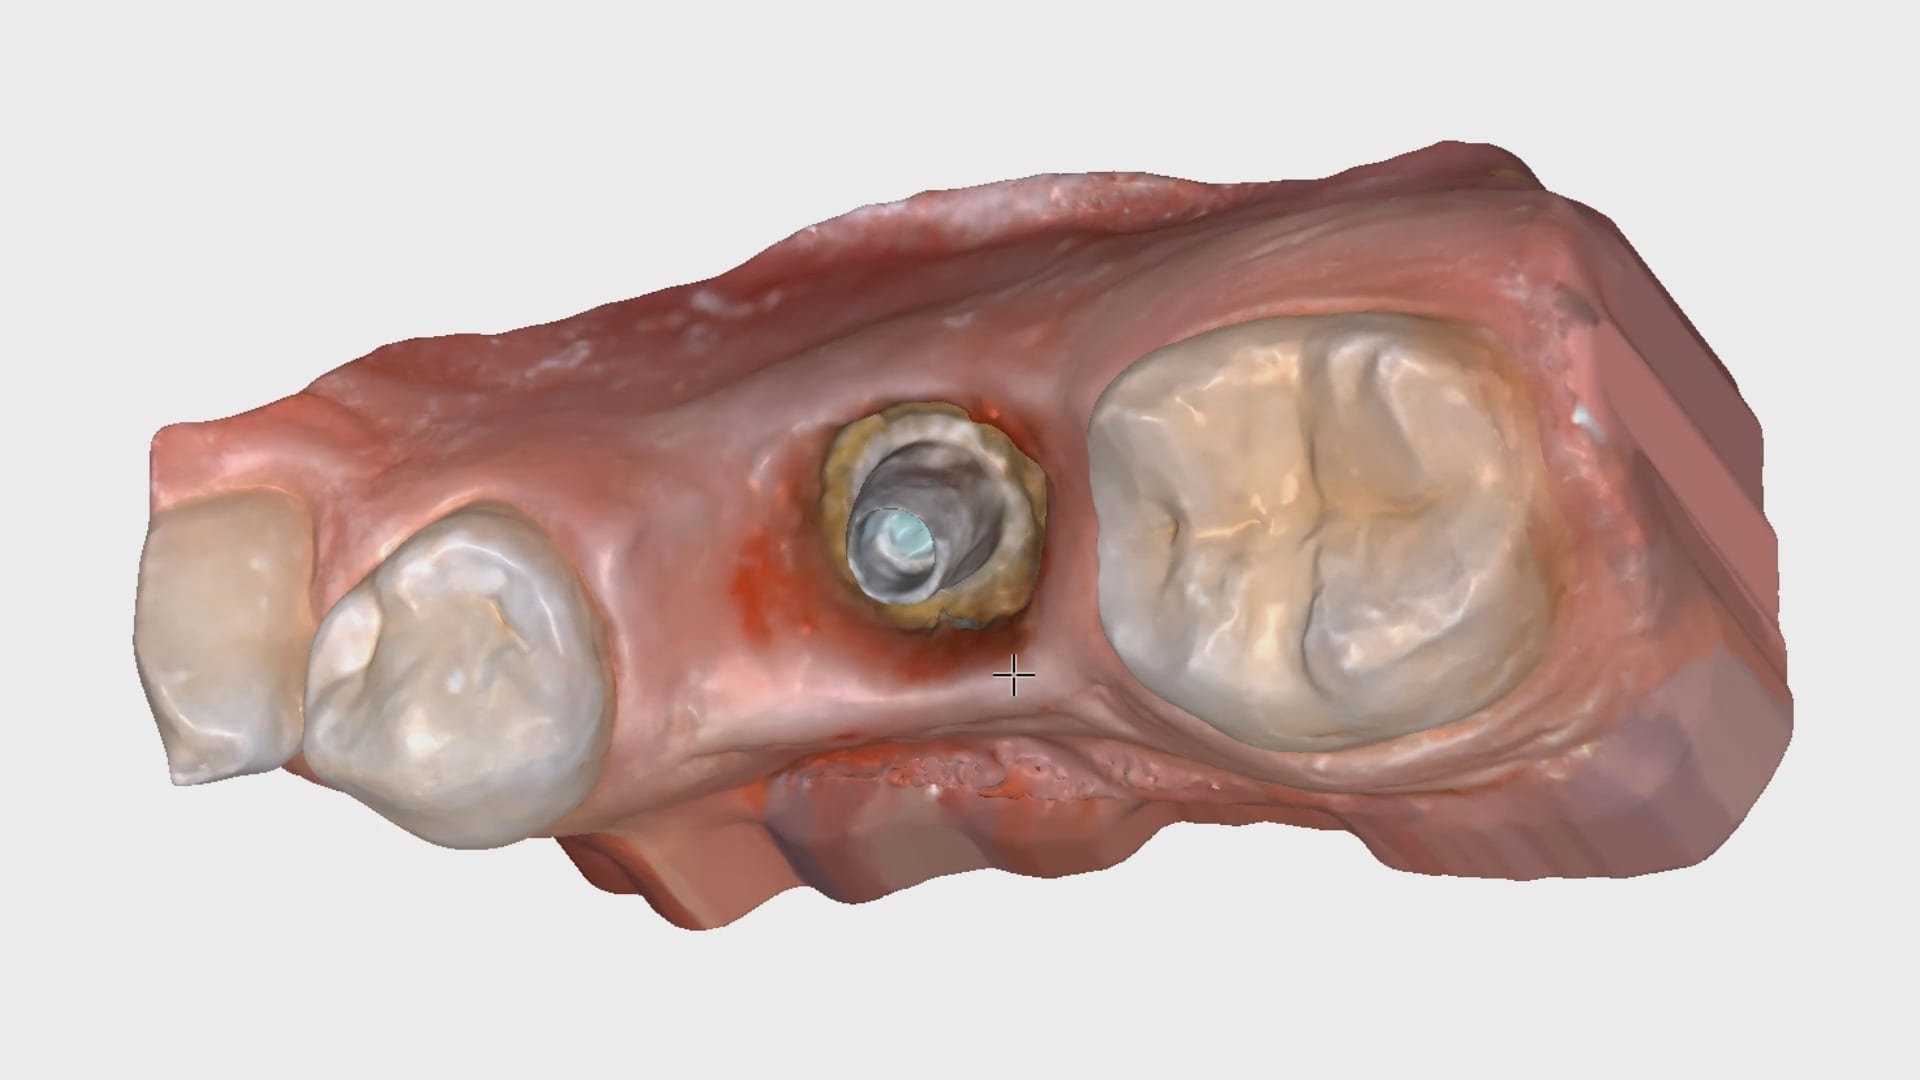
The Medit i500 has features that help you not only capture implant suprastructures, where you can bypass the scanbodies all together which impedes capturing the bite correctly for a lot of people, but you can identify their location and margins, even if they are hampered by bleeding. Most importantly you can use them as landmarks to accurately capture very accurate full arch impressions.
Medit’s reliability map, implant suprastructure identification system, and matching histogram colors can help you drastically reduce or eliminate steps and errors in full arch digital implantology
Using Medit’s Artificial Intelligent Implant Suprastructure Identification System to assess the accuracy of a cross arch digital impression! long title but it had to be to do it justice
here we put all the pieces of a puzzle together to answer how you can capture full arch impressions for implants accurately (or inaccurately). As the user, you are completely responsible for not introducing errors or capturing the data correctly
The Medit i500 has features that help you not only capture implant suprastructures, where you can bypass the scanbodies all together which impedes capturing the bite correctly for a lot of people, but you can identify their location and margins, even if they are hampered by bleeding. Most importantly you can use them as landmarks to accurately capture very accurate full arch impressions.
Medit’s reliability map, implant suprastructure identification system, and matching histogram colors can help you drastically reduce or eliminate steps and errors in full arch digital implantology
Posted by Armen Mirzayan on Wednesday, September 25, 2019
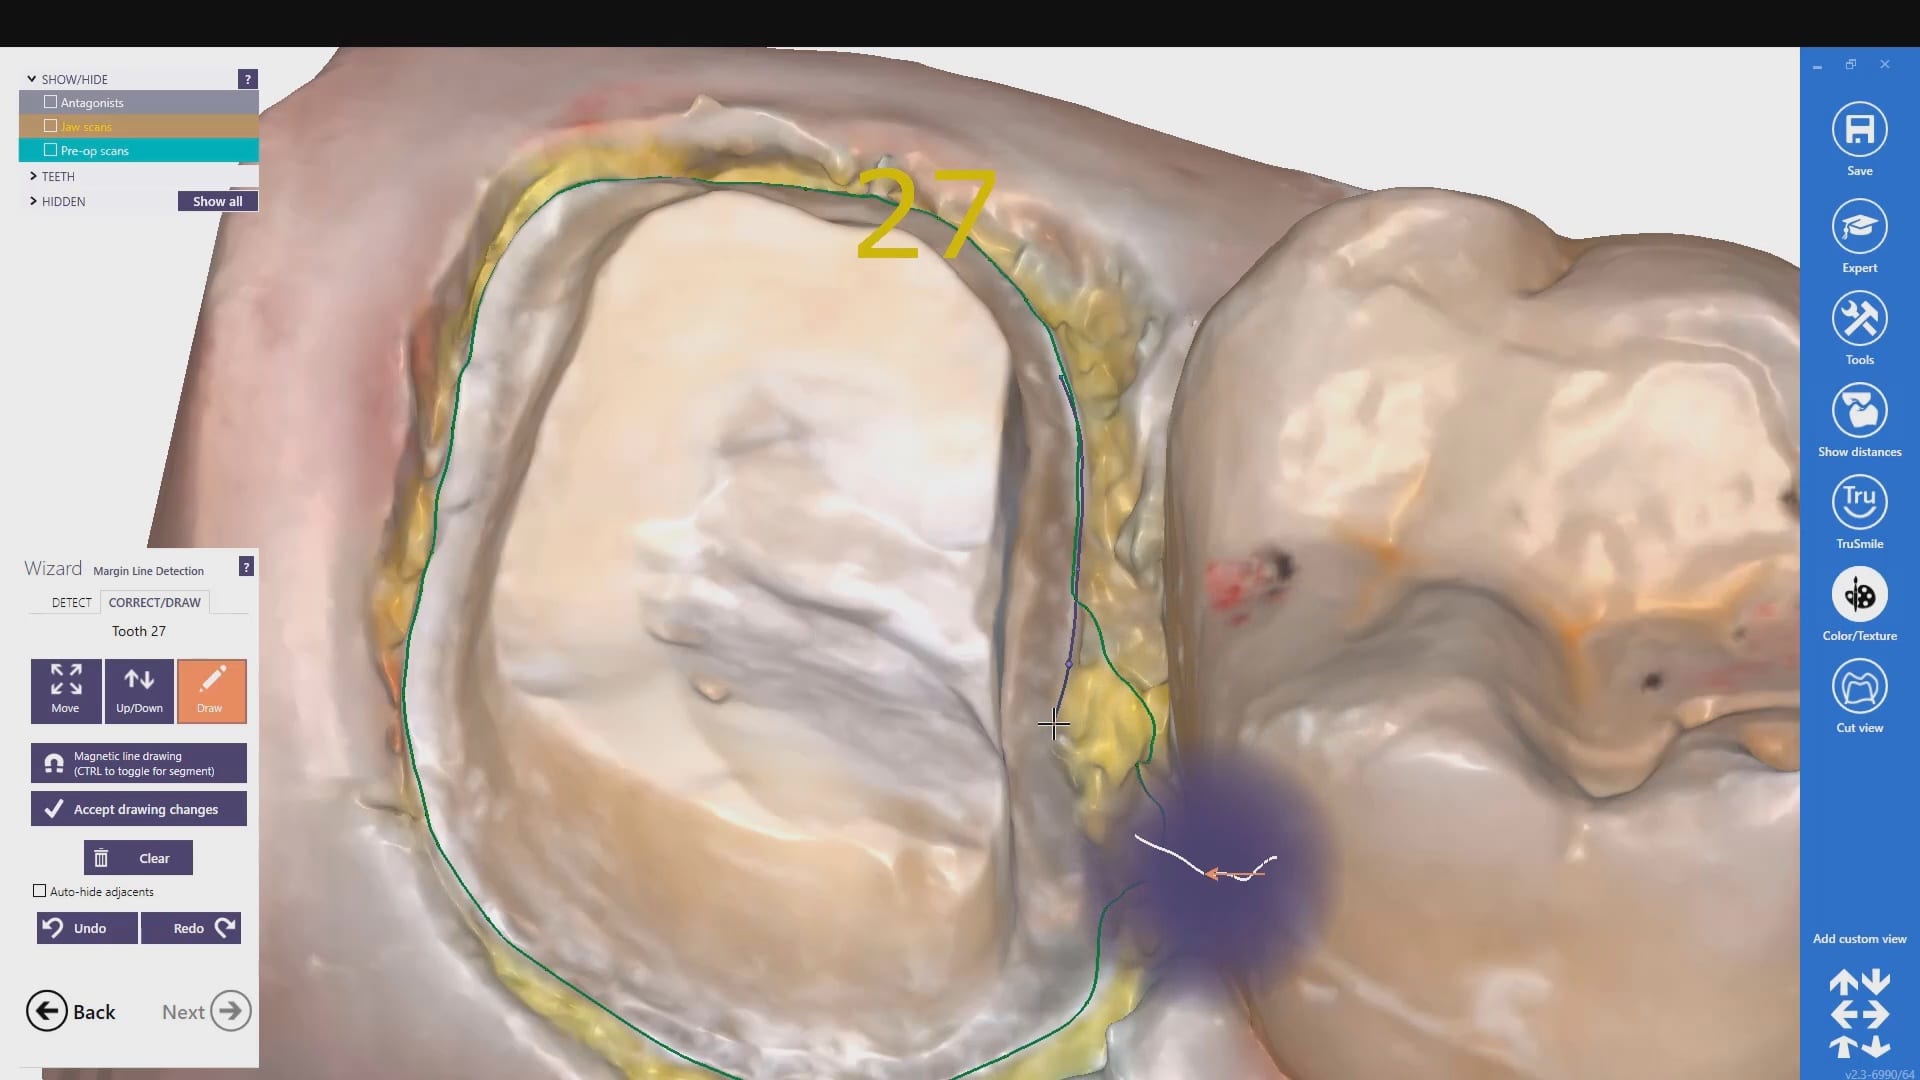
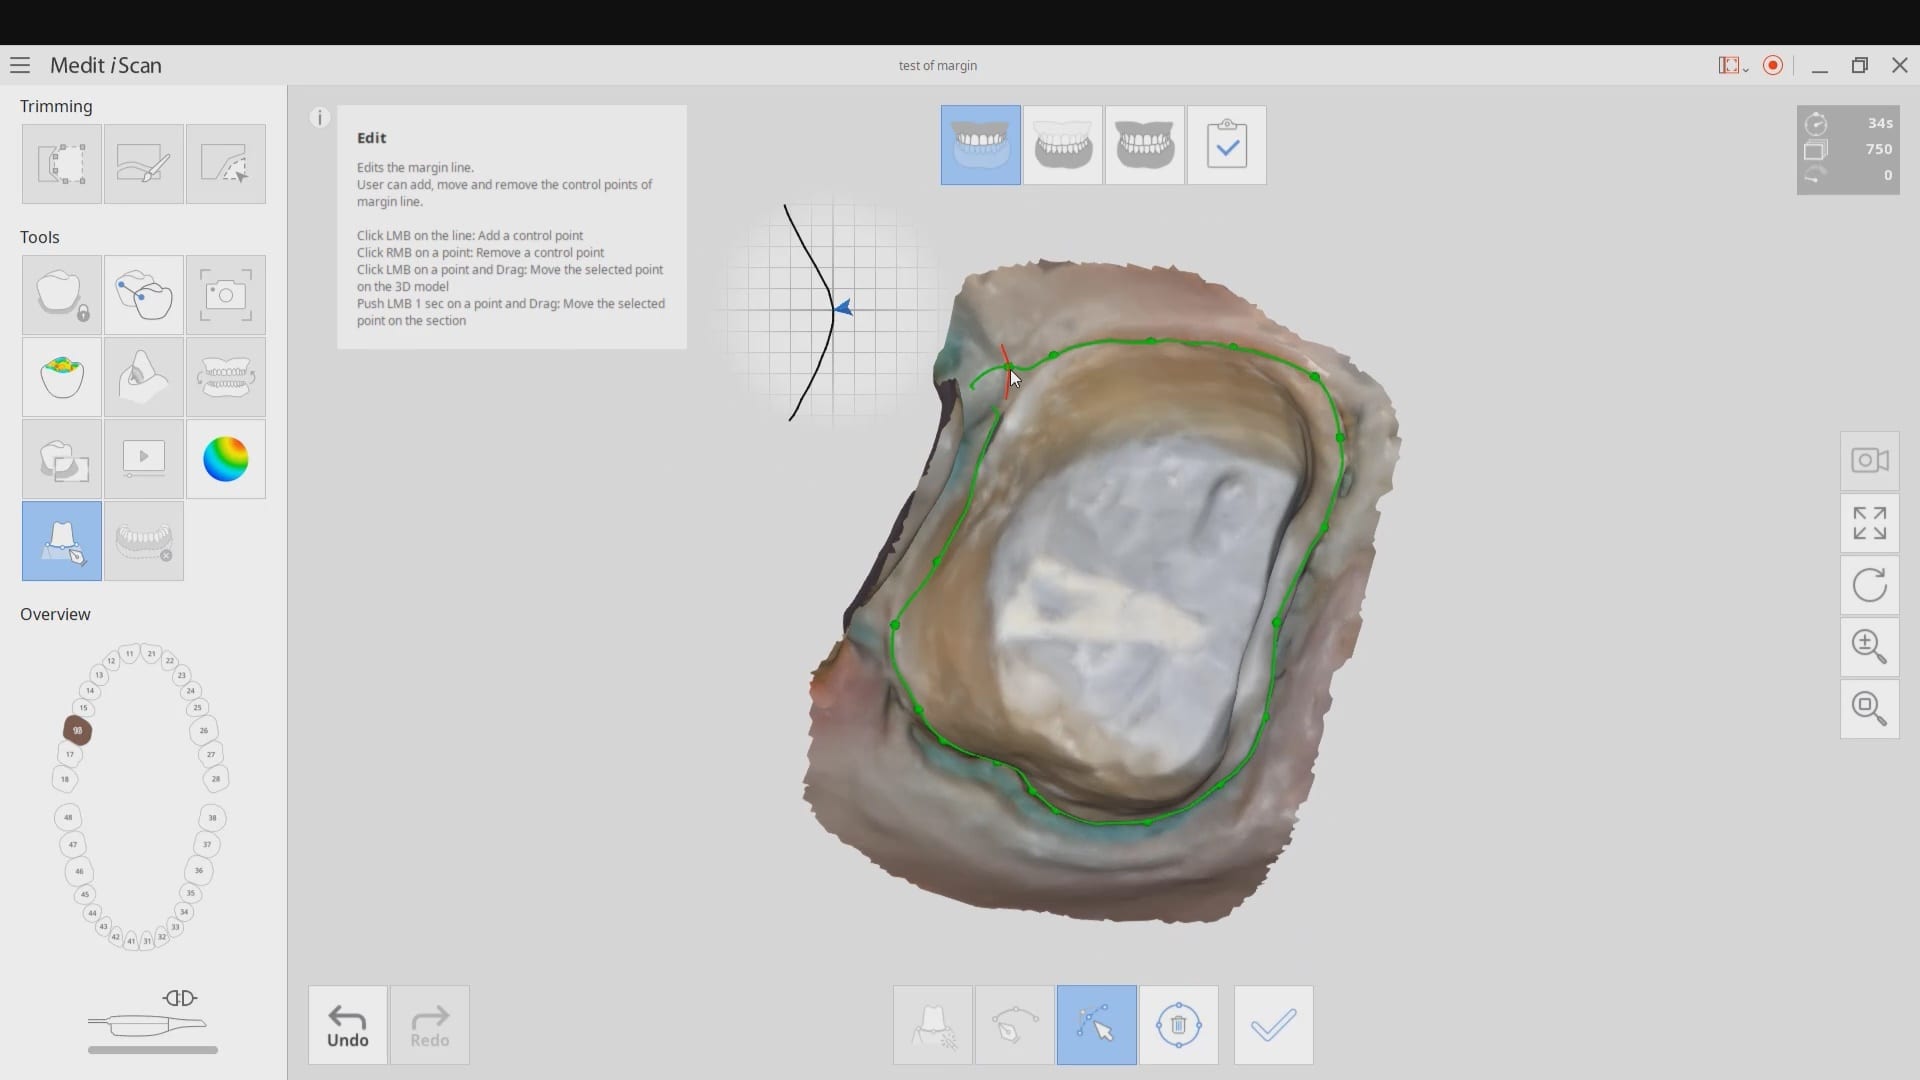
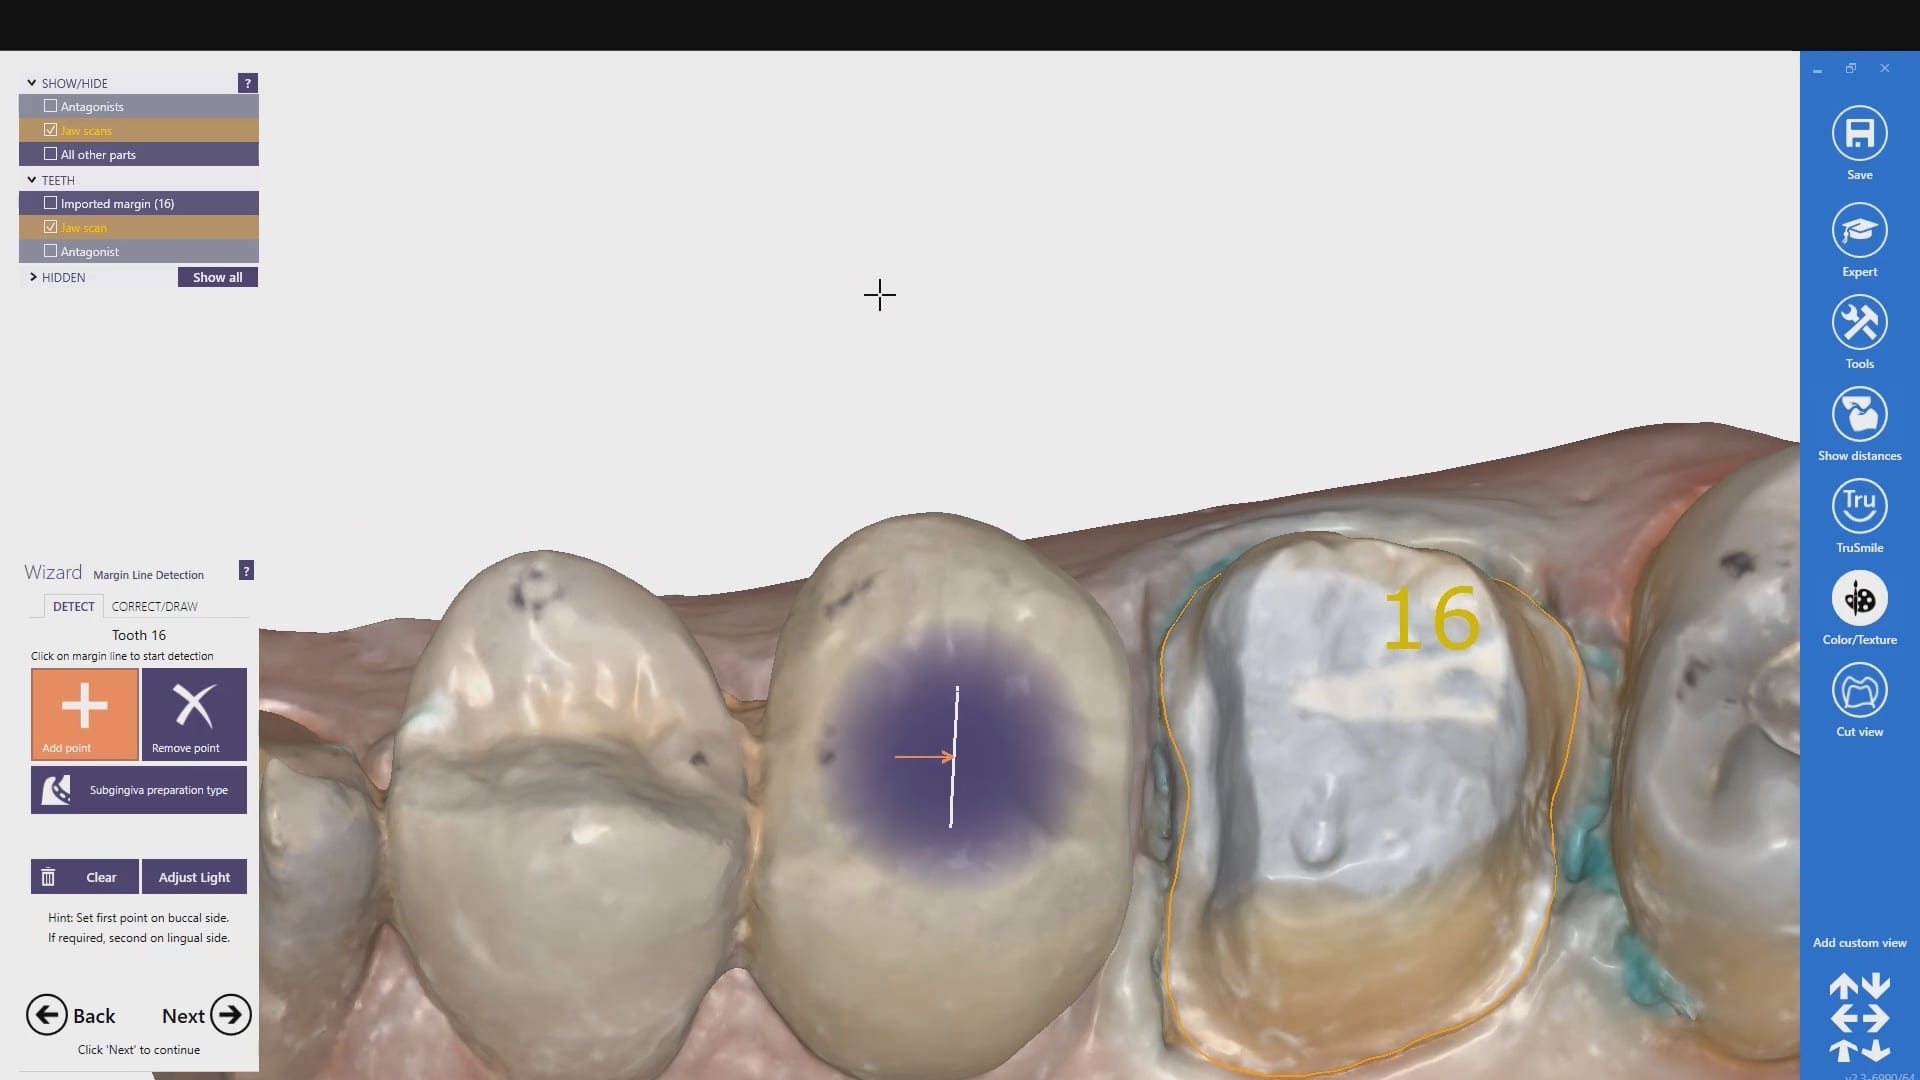
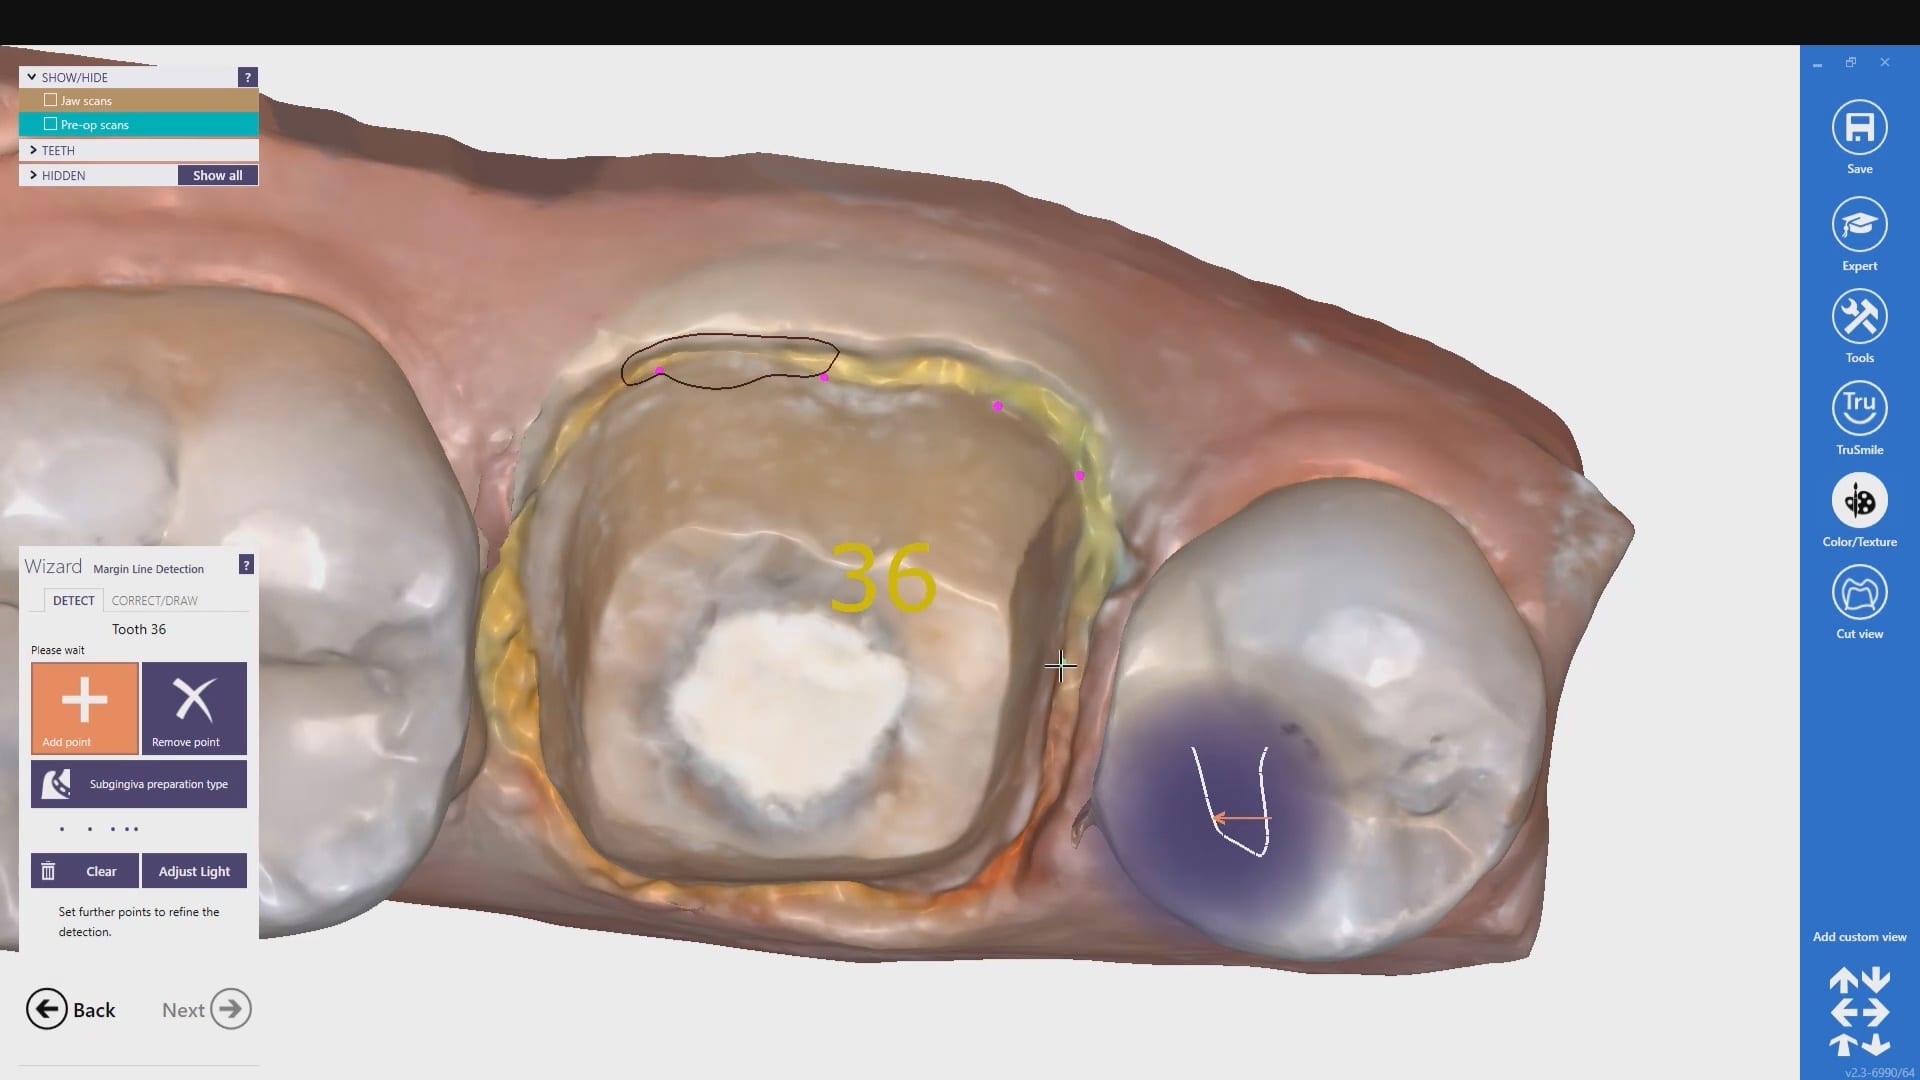
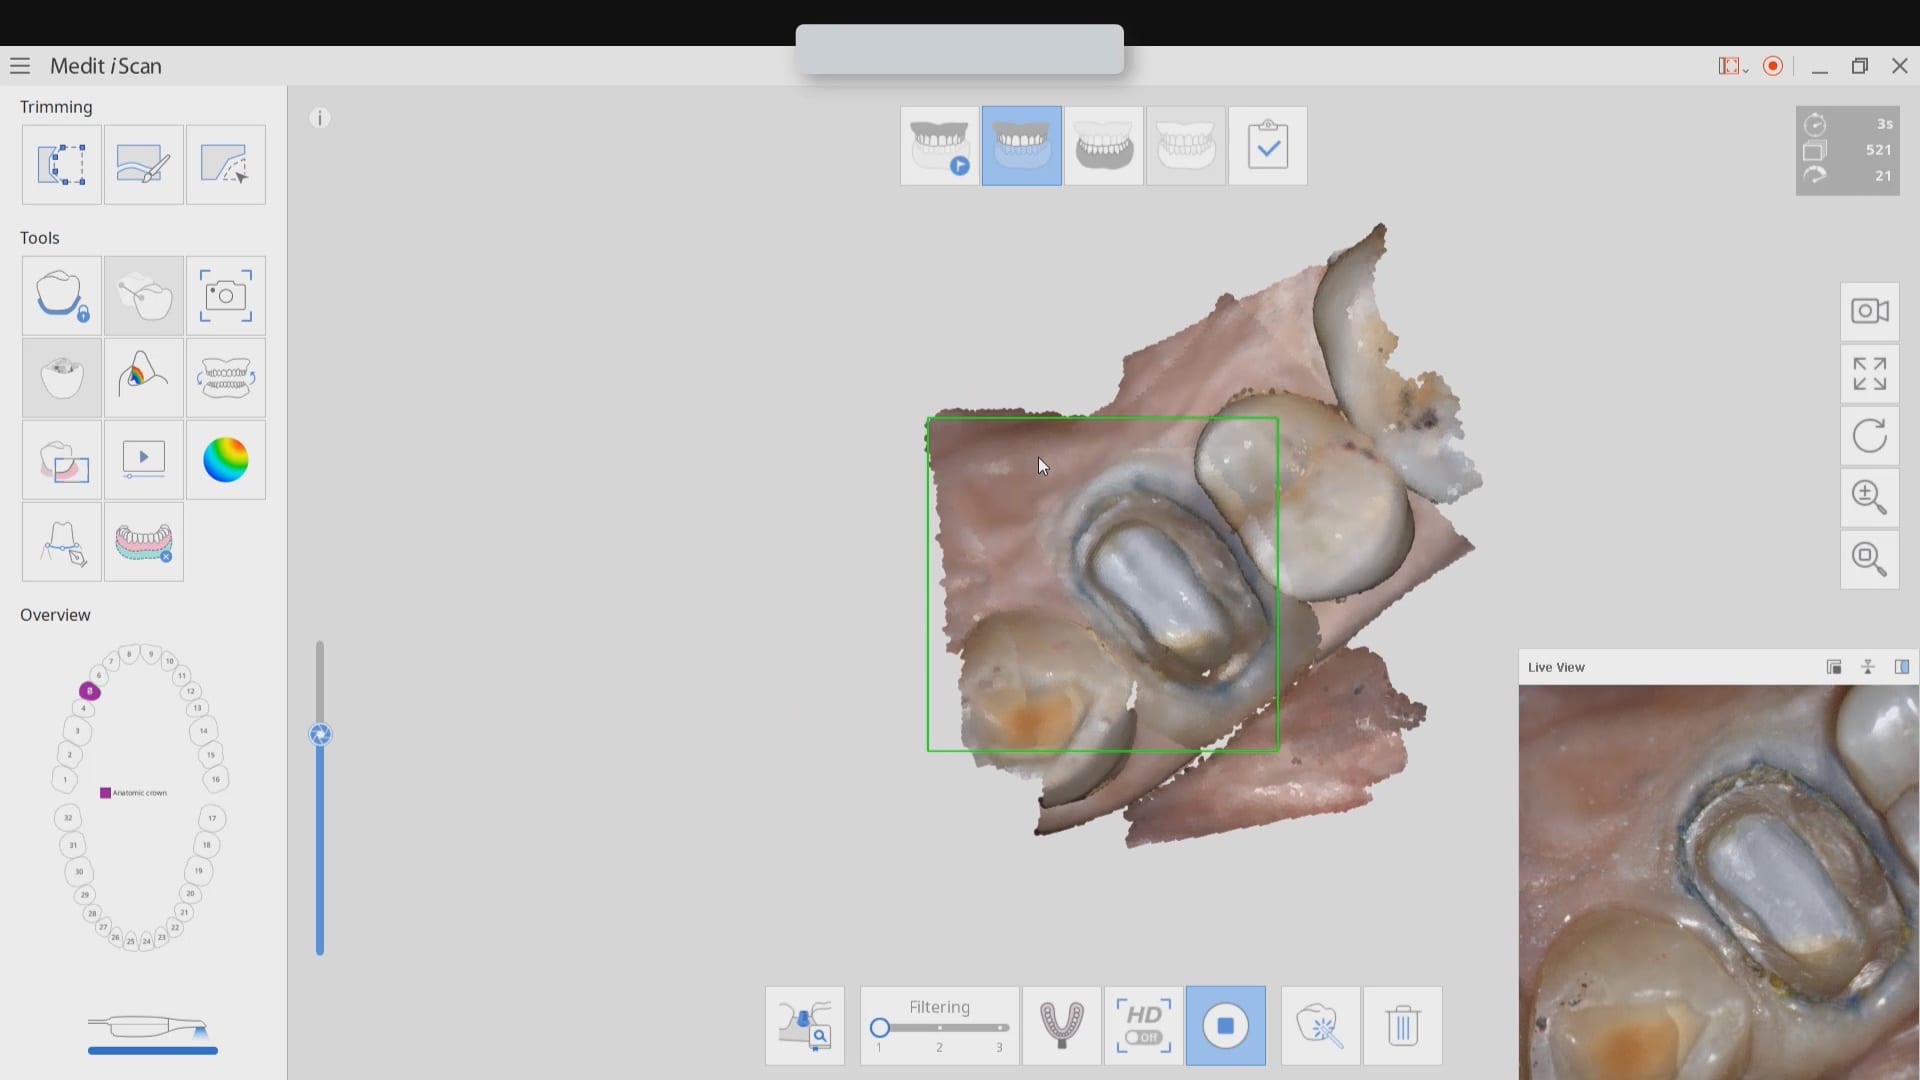
This first video details how you can mark your margins in meditlink with your medit iscan software. The very first step that you must do is properly identify the job definition. If you choose orthodontic modules or bite splints for example, you will not have the opportunity to transfer the marked margins because they are not part of the equation. So the best practice is to always properly label the tooth and the prescription
margin placement to transfer from dentist to lab with meditlink
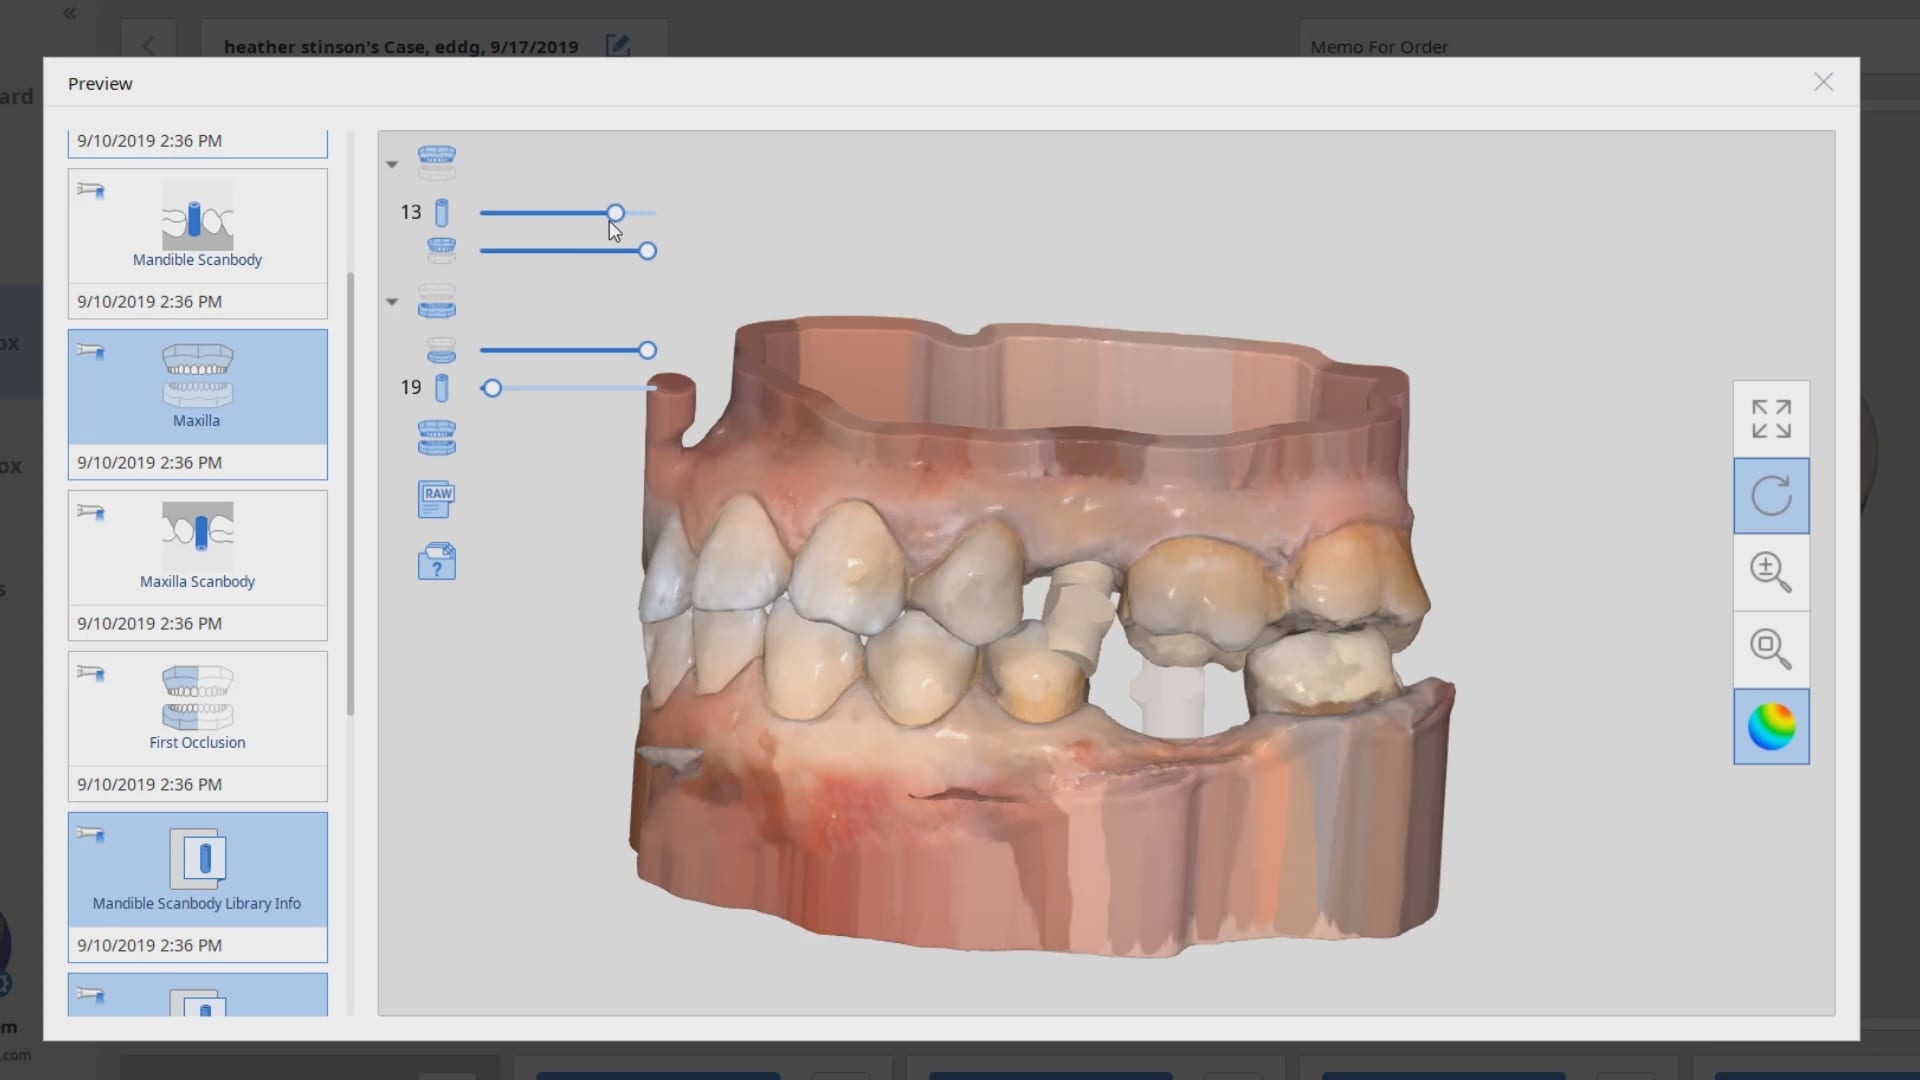
Once you have processed the case and it is in the preview mode you have one last chance to review the order and submit it to your lab of choice. In this next video we show what happens to your data once your lab receives it and particularly how your drawn margin line accompanies the upper and lower arches and the prepared upper right molar
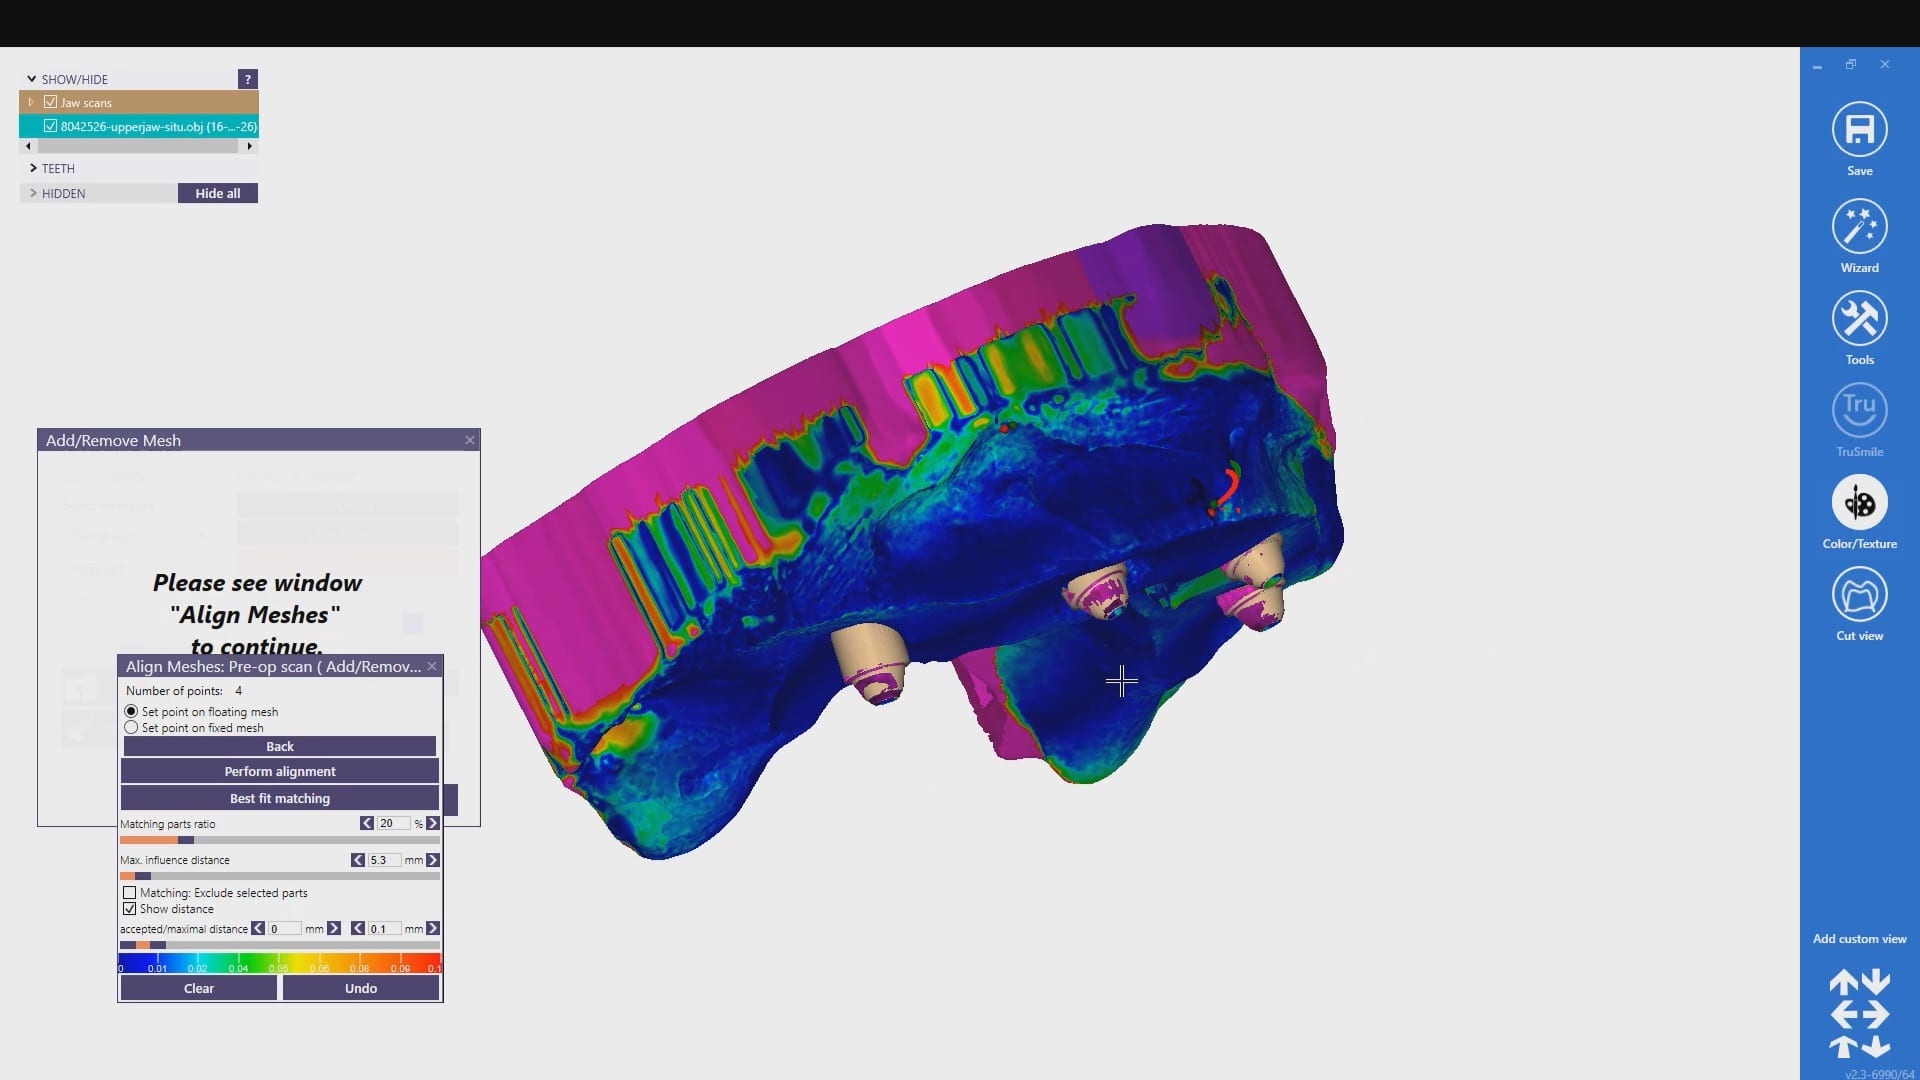
When you have preops that you are trying to stitch to preps in medit, and this could also include relating scanbodies to arches as well, you need enough data that is redundant in both catalog boxes
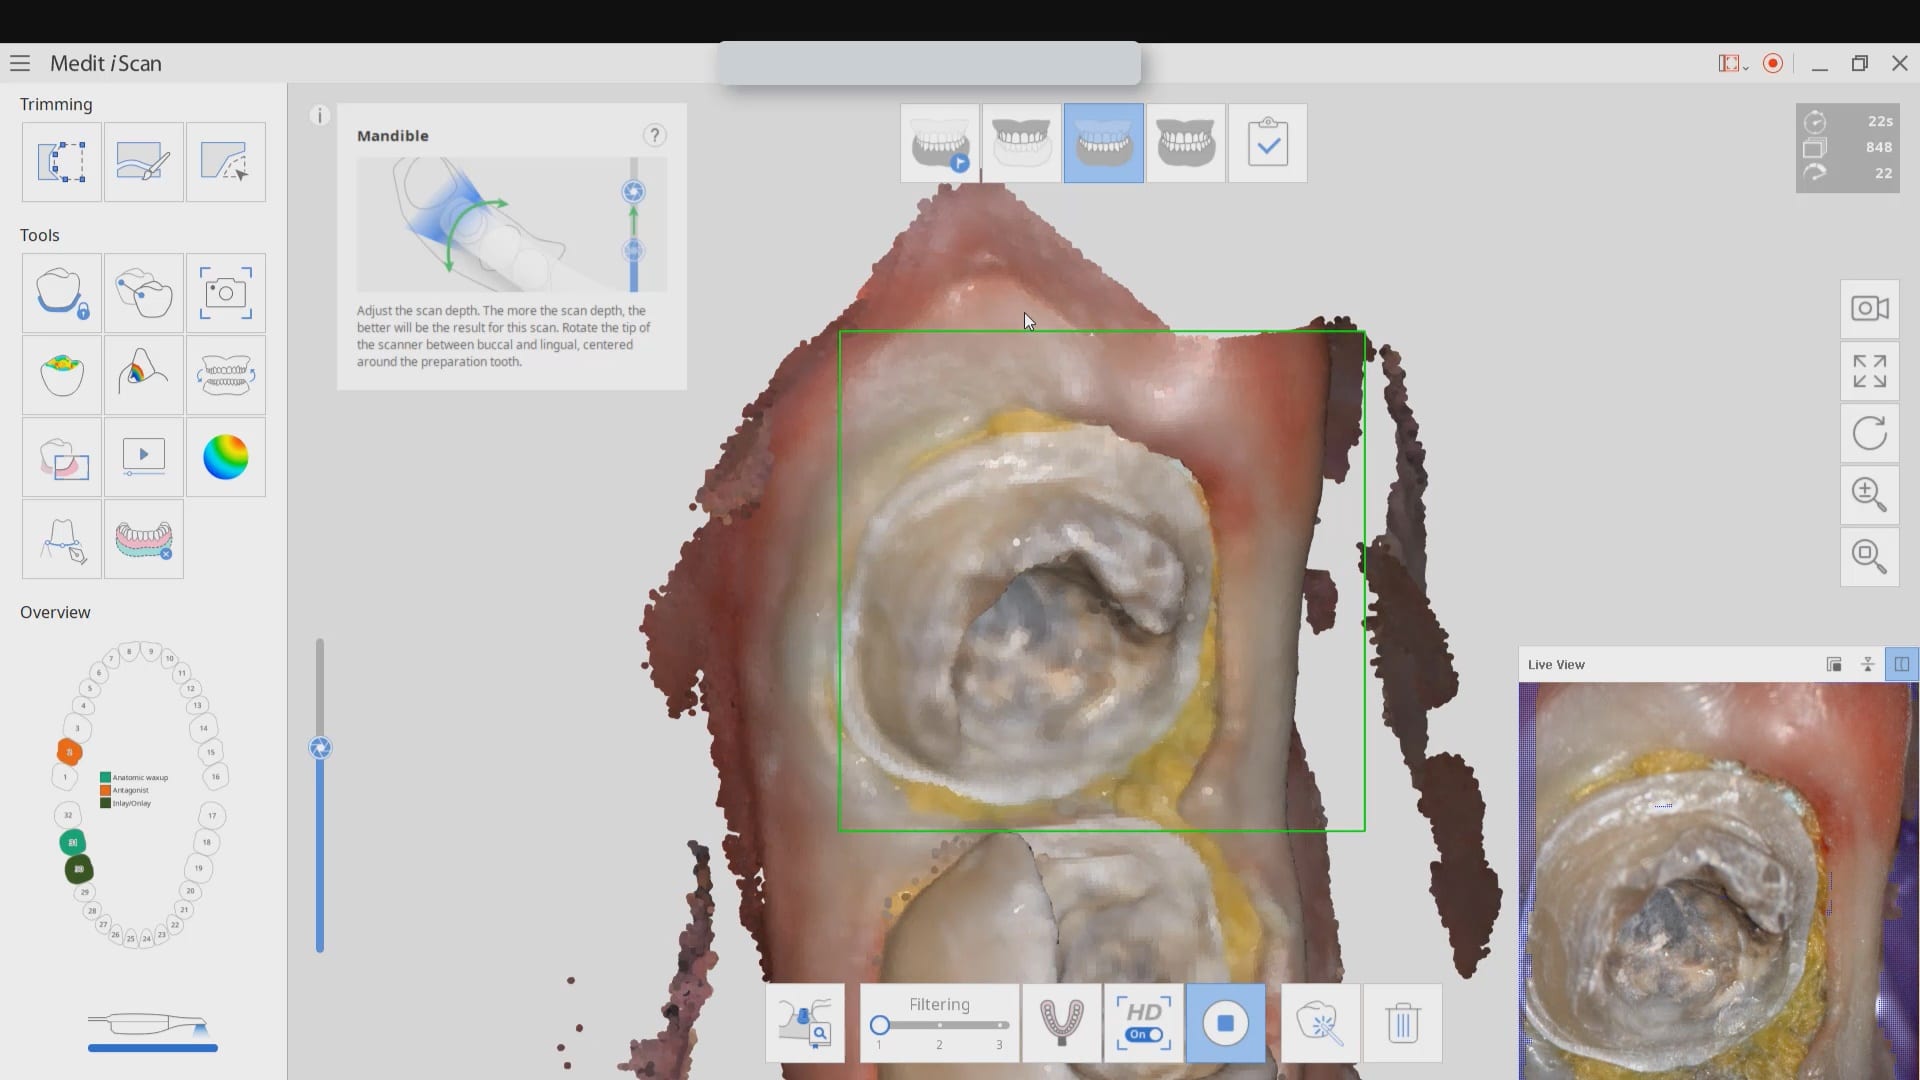
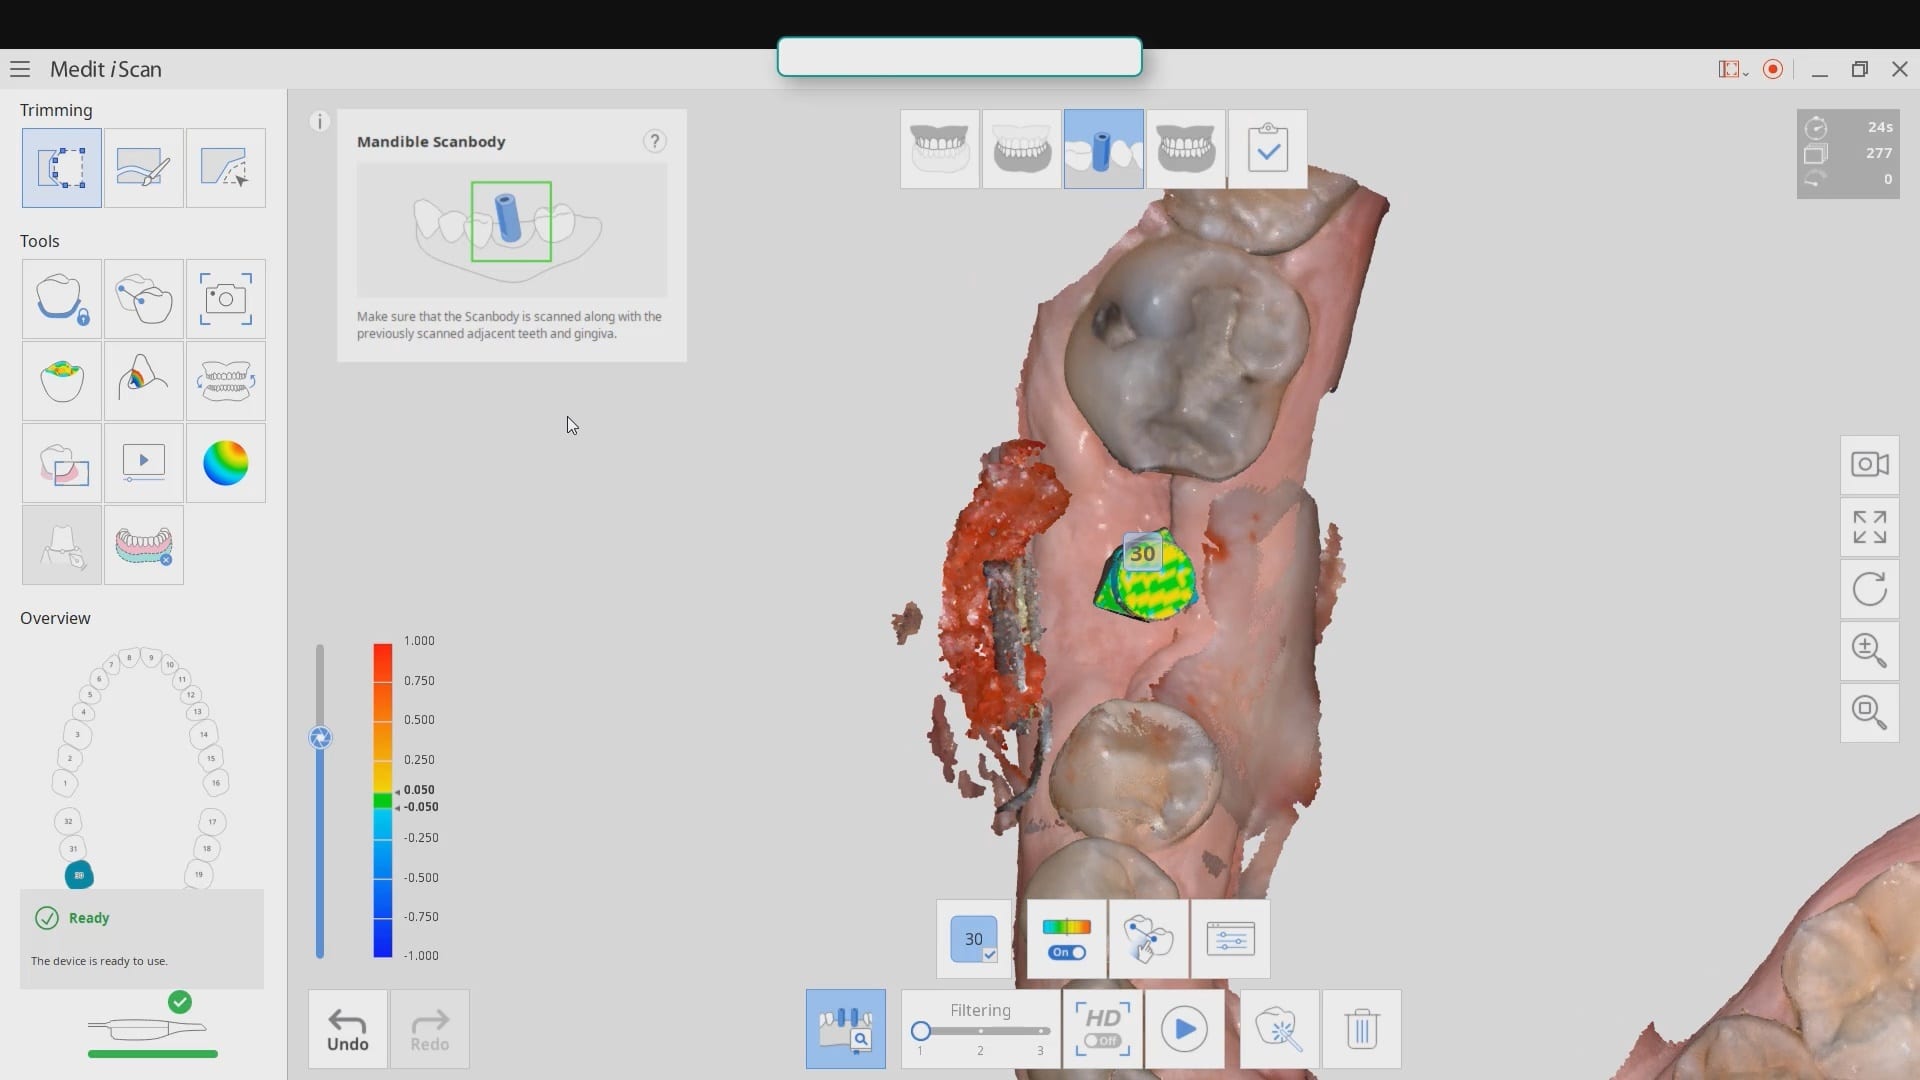
if you watch this video carefully, you can see how i over trimmed the mesial part of the equation and even though the camera is active, it is not acquiring images. you can see the red box.
once i move the camera to the distal molar, the acquisition starts because the molar has more data points than the premolar and the software / camera recognized the area and started to acquire images.
understanding this will unlock a lot of complicated cases and make the easier for you
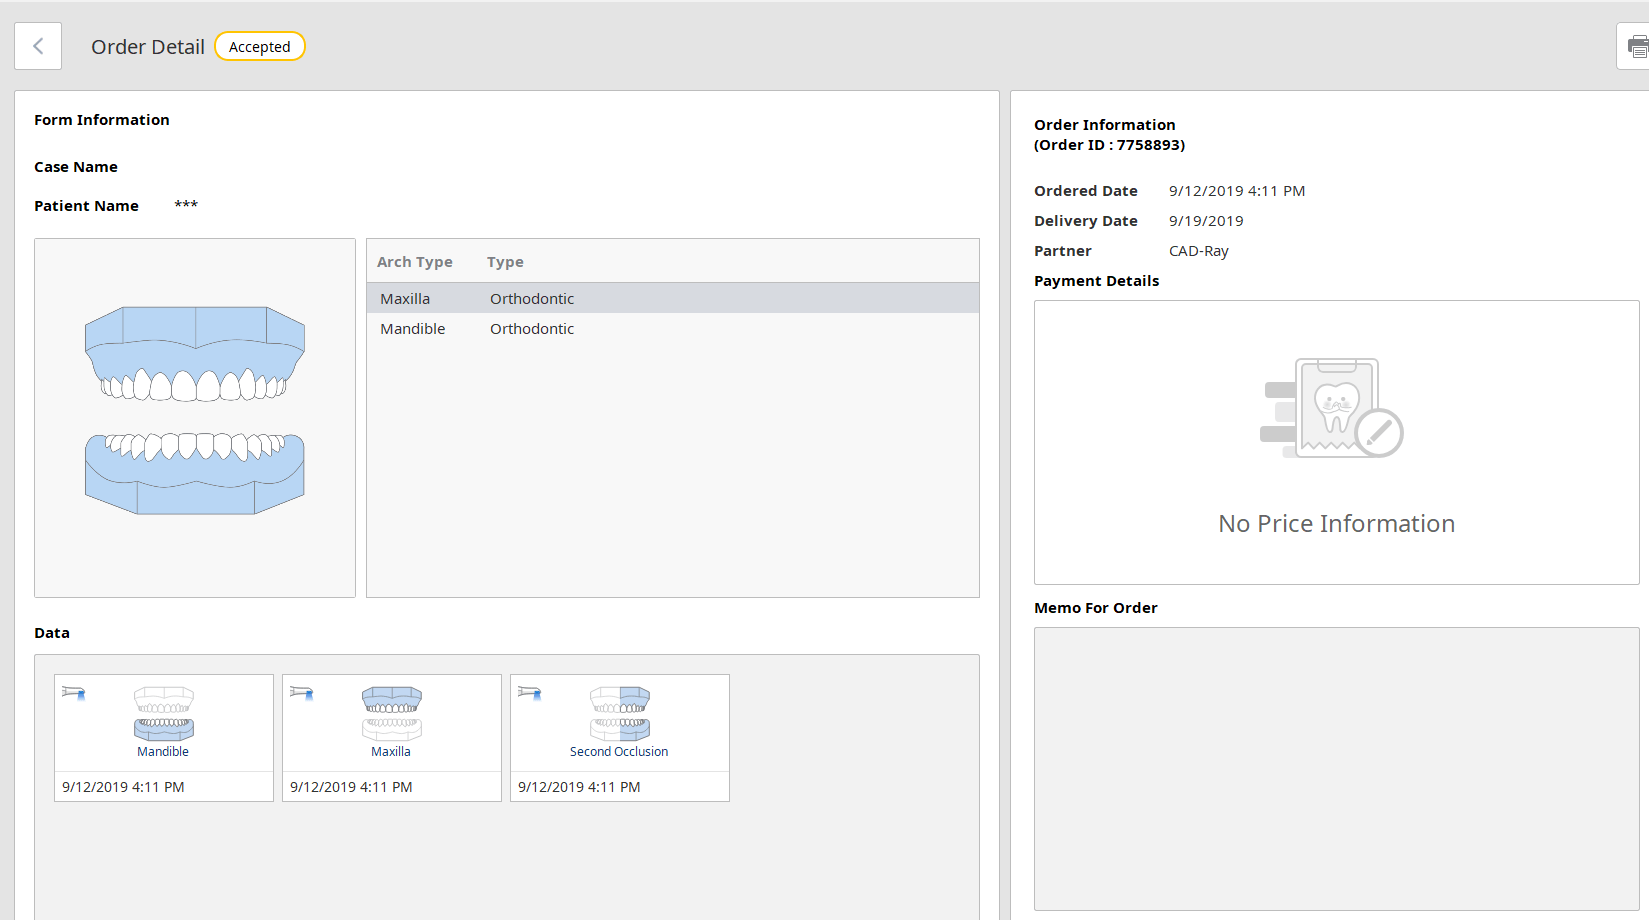
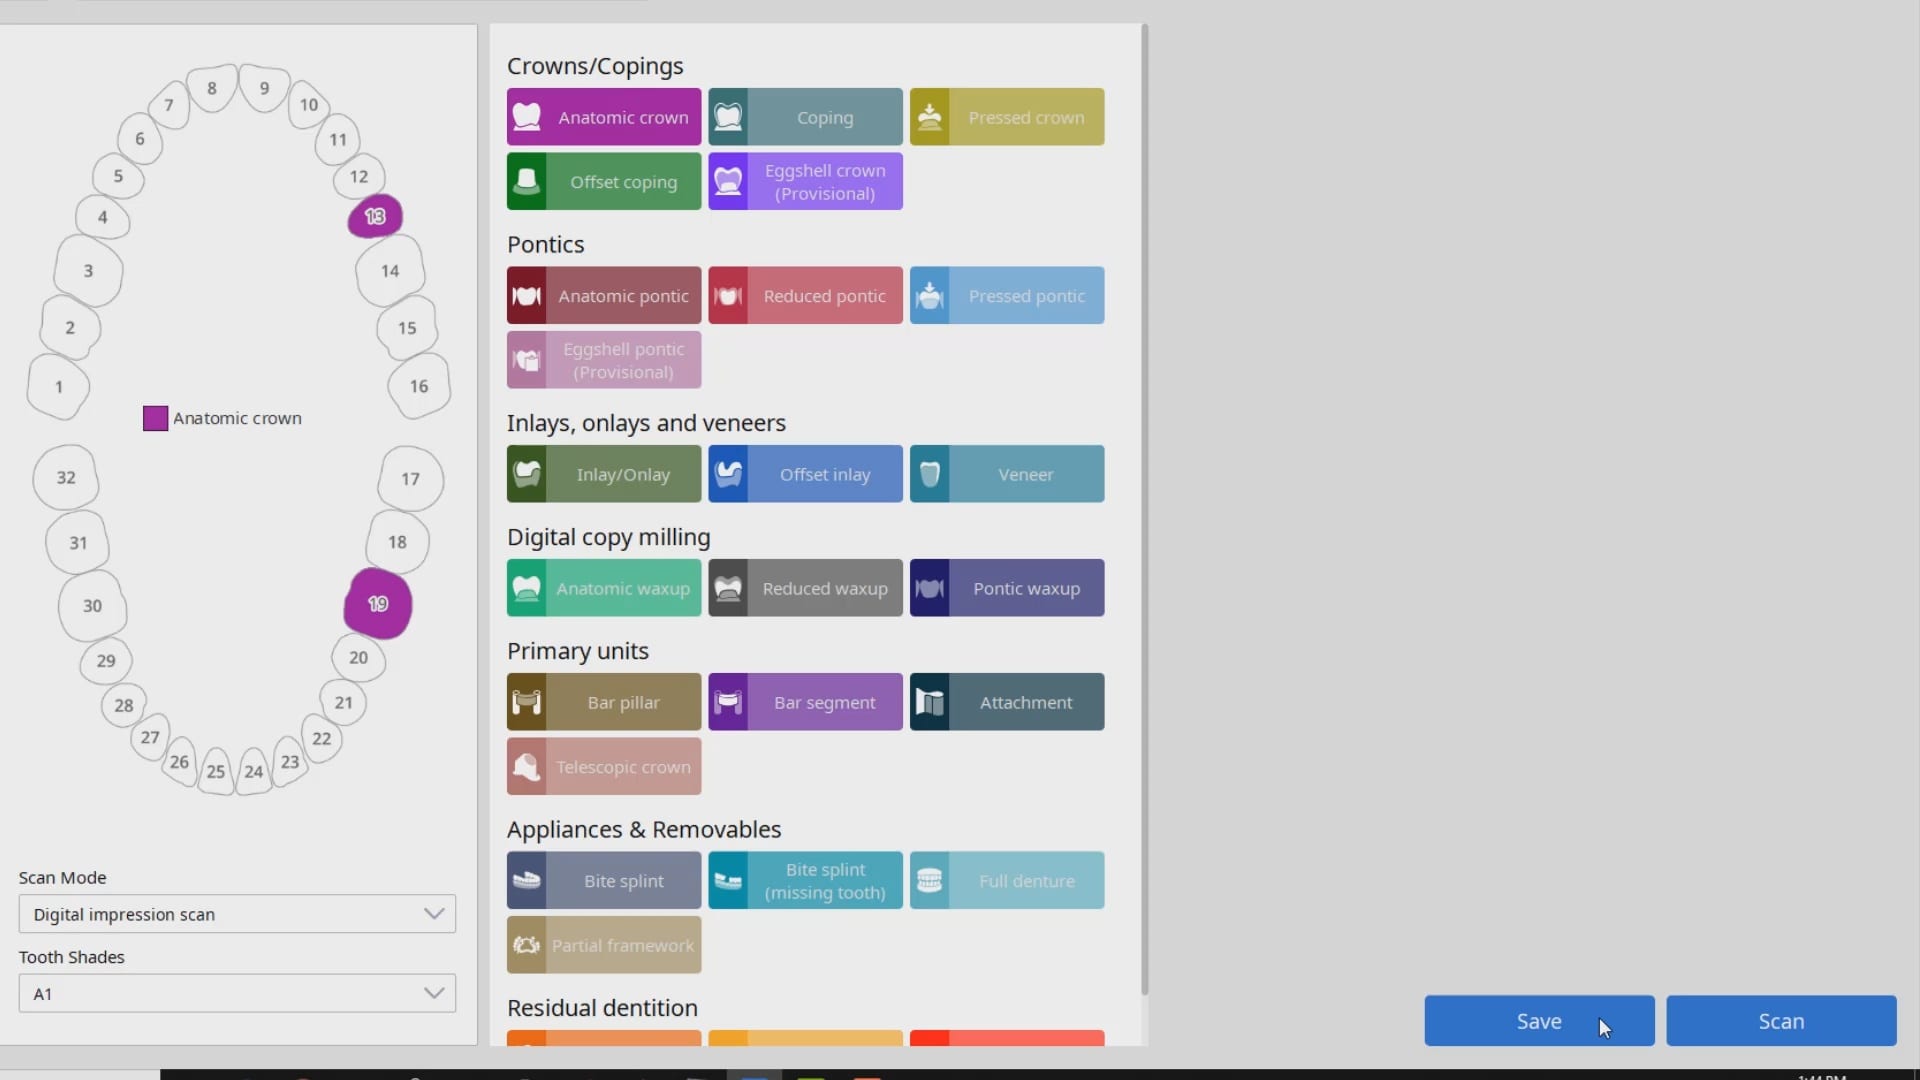
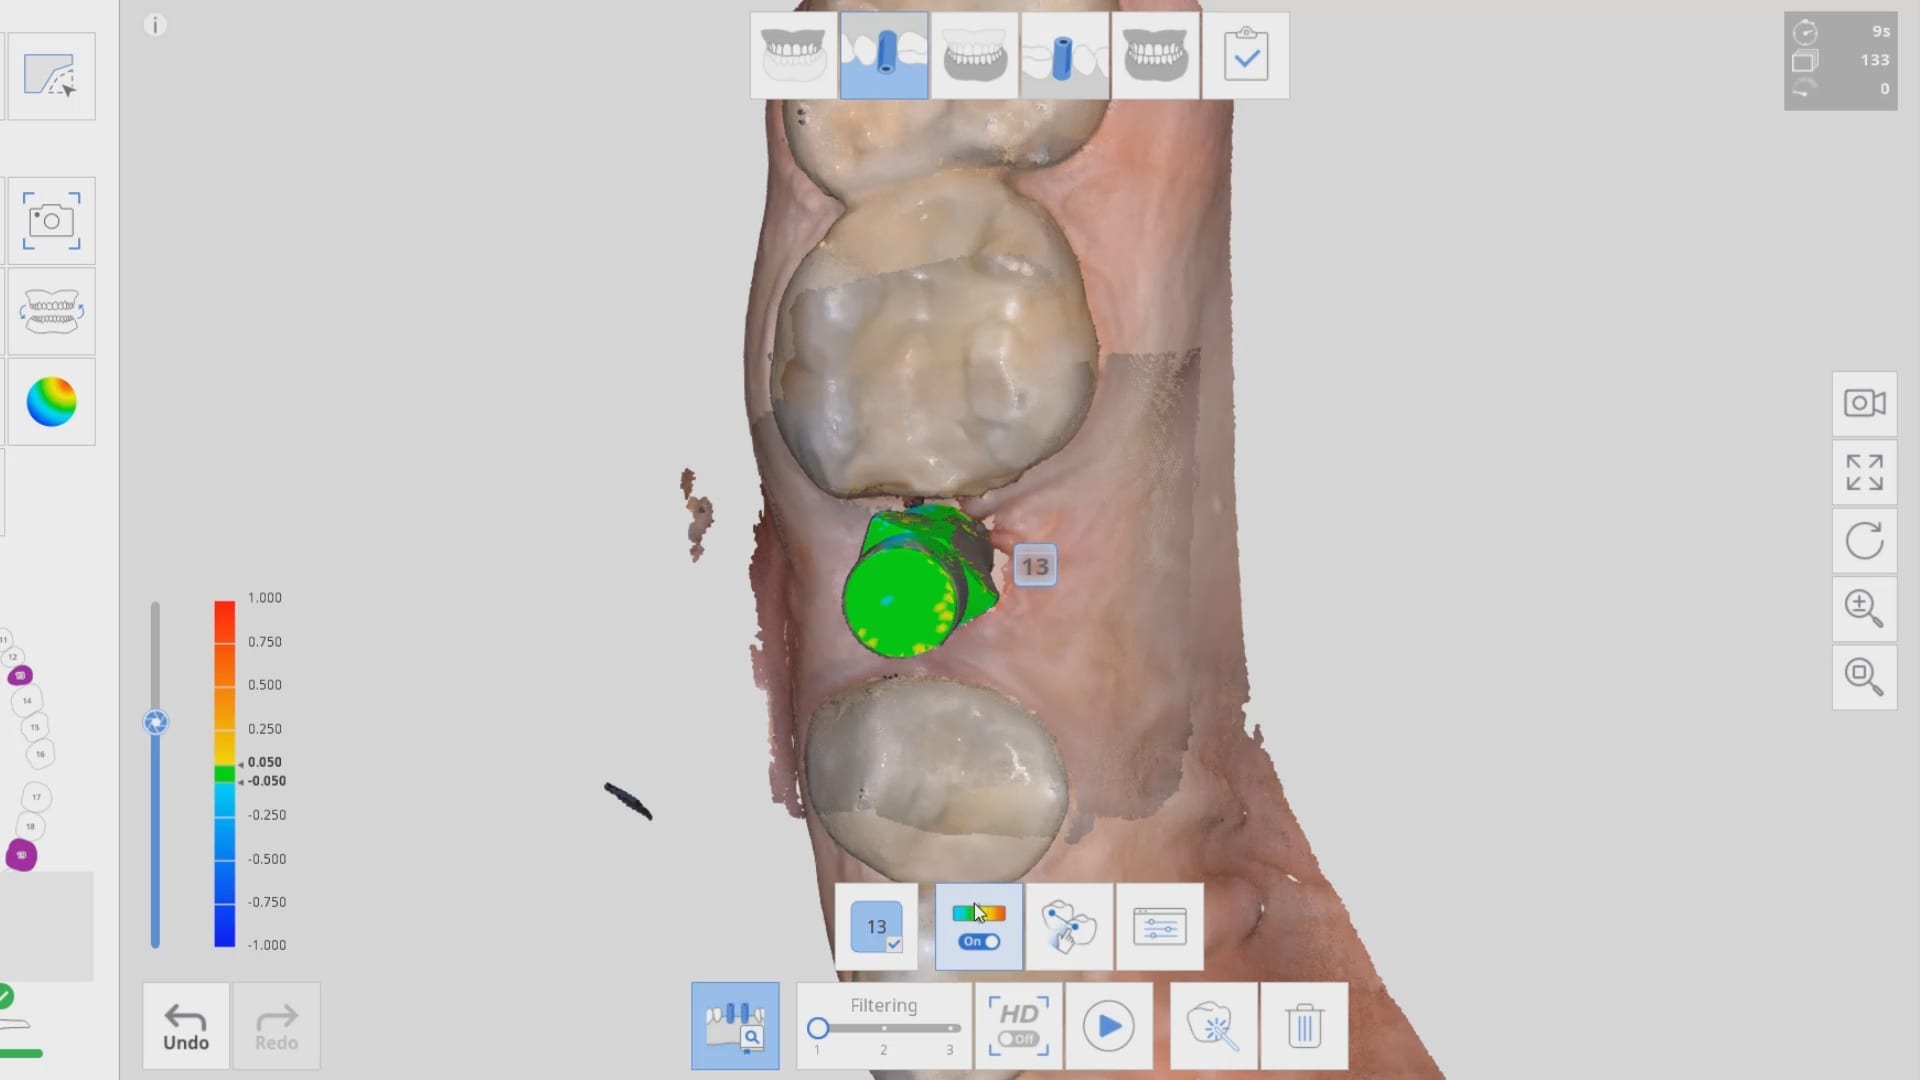
A common question we get at cad-ray.com is how a case cannot be submitted to a lab. Most of the time, it is because the job has not been created. You must identify the teeth or the arches that you will be working on define the restorative material of choice or the type of appliance you will be submitting. Once you have done so, the order box will appear for you to submit the case
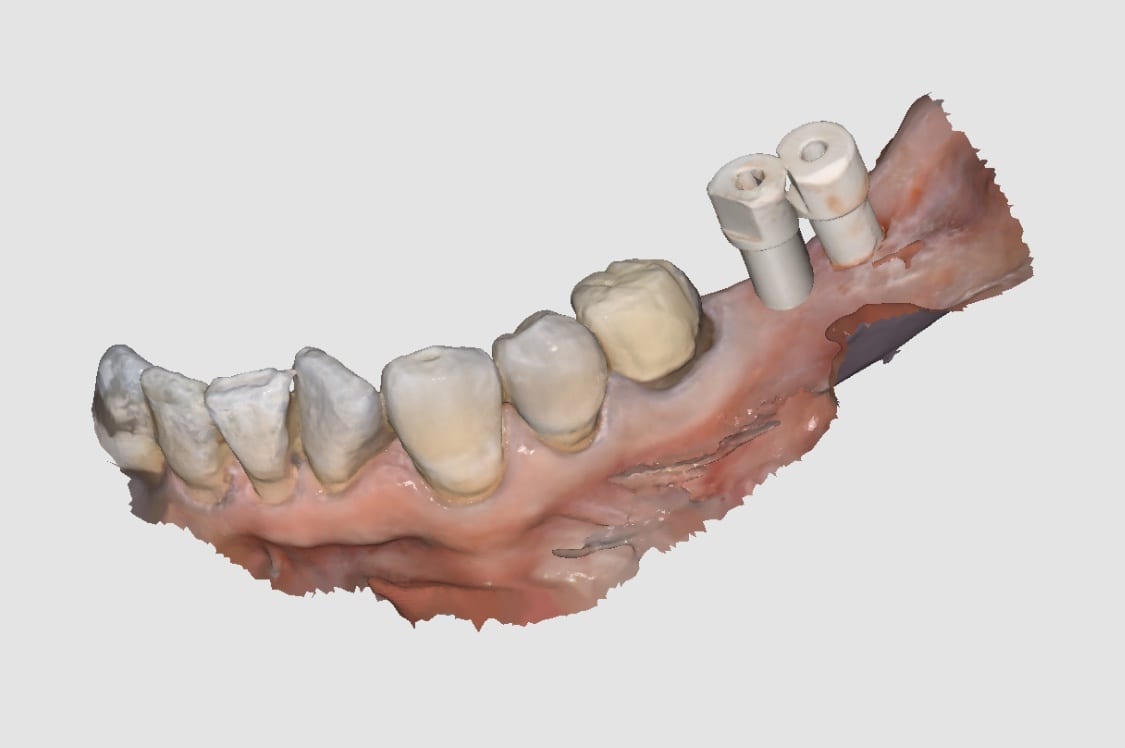
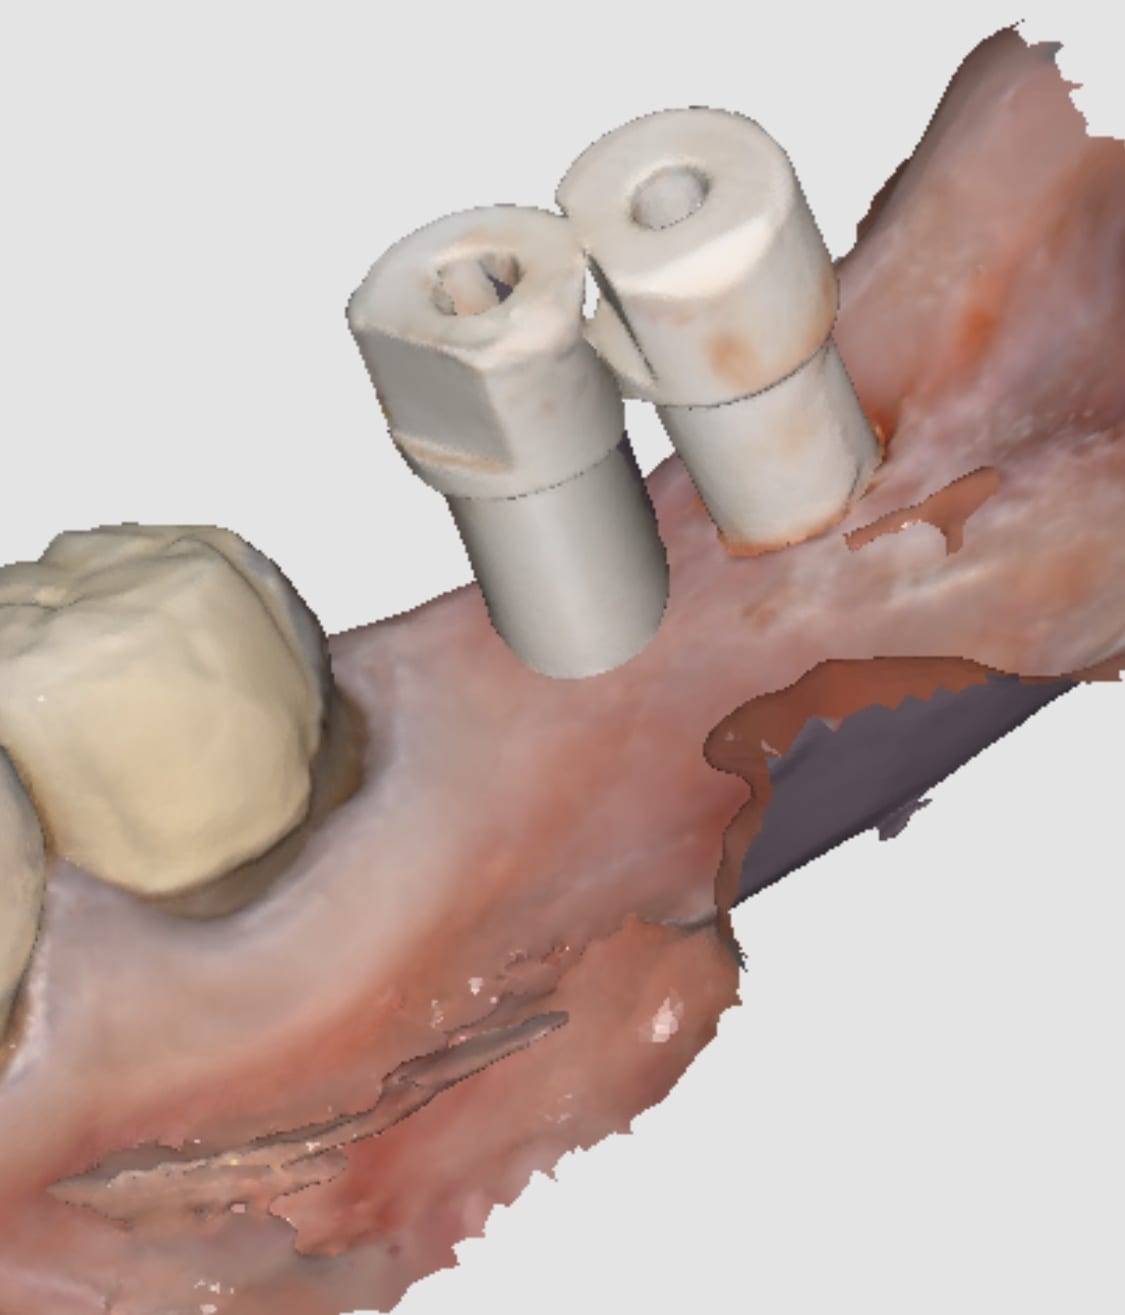
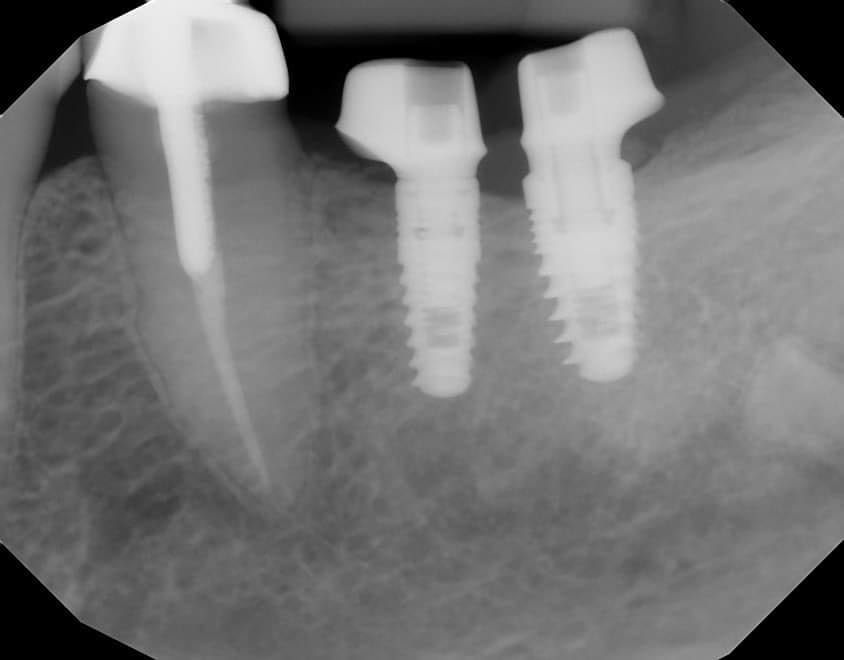
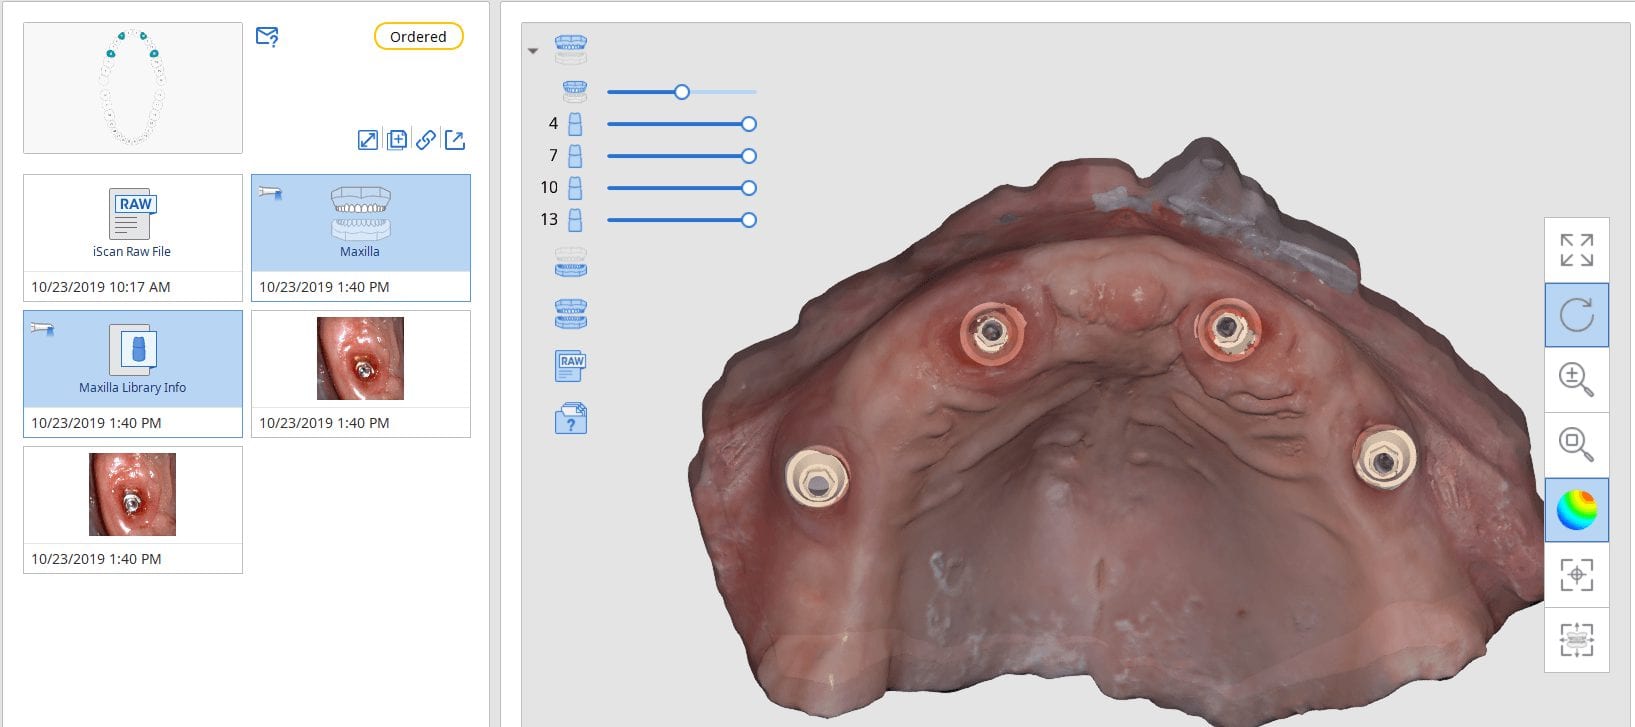
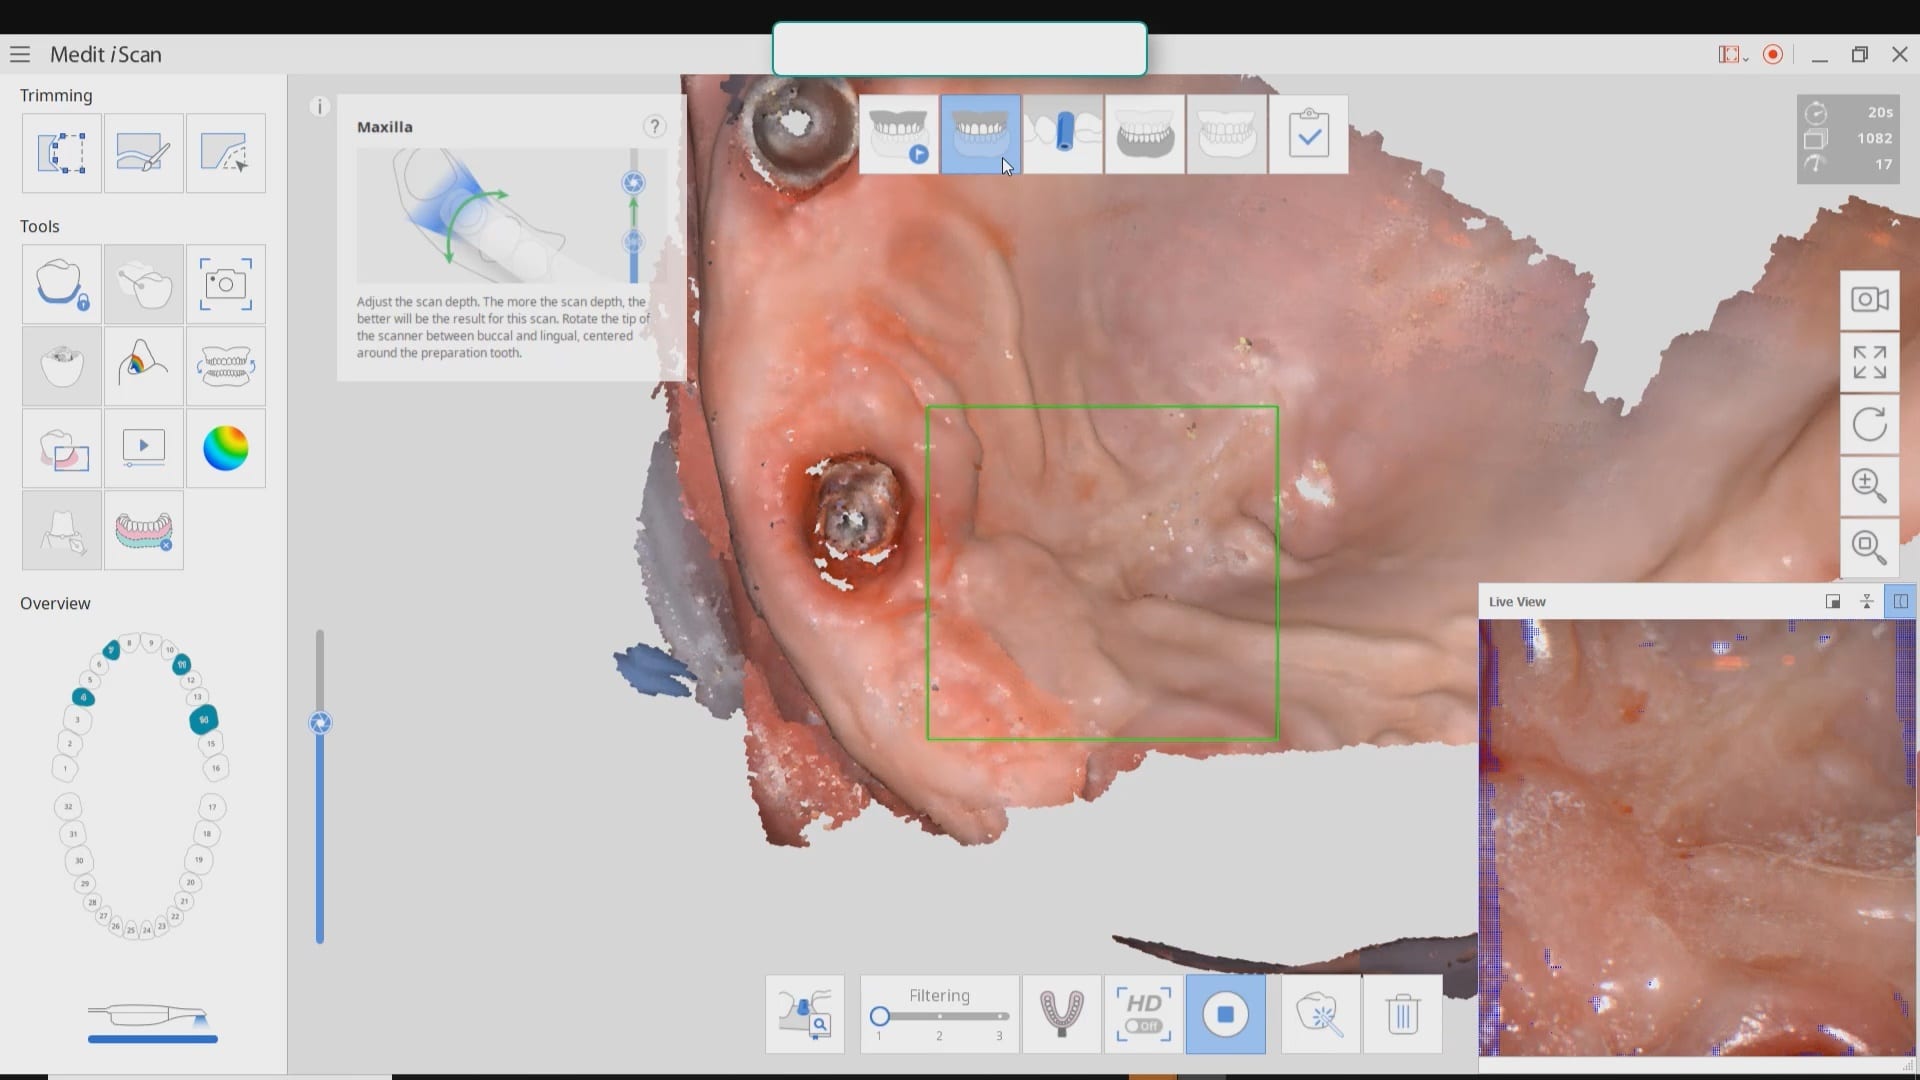
In this article we demonstrate how two separate implants are placed with guided surgery and then scanbodies are used immediately after placement to capture the location of the fixtures. While the patient is healing for the next 4-5 months, an upper tibase restoration will be fabricated with a lower custom titanium abutment. Digital impressions were taken with the Medit i500 for implant planning and Blueskybio software was used for the two surgical stents. Two 4.3 mm biomax implants were placed
To start the case, the job is defined for an upper tibase and a lower implant restoration. Proper labeling here is important so that the cad software, exocad, can launch the appropriate design components
While the patient was anesthetized, the edentulous arches on the patient’s left side were imaged. The bite was also taken, which ignores any information that is present in the scanbody catalogs. It is important to understand this as a new user because usually, the scanbodies are taller than the occlusal heights of the adjacent teeth. If these were captured in the wrong catalog boxes, the upper and lower jaw alignment could be mal-aligned
After sufficient anesthesia is achieved, the two surgical stents were seated and verified for fit. It is up to the clinician’s discretion to either lay a flap to access the area or to do the surgery flapless. Since the implant designs showed ample bone, and the fixtures were going to be placed sub-crestal, a tissue punch technique was used here as the area will granulate in. At uncovery, a flap can be used to advance the tissue to the buccal to enhance keratinized tissue appearance
One of the greatest benefits of digital dentistry is that you can capture parts of a model independent of time and sequence. In this particular situation, we opted to capture the scanbody for the upper arch even before the lower arch received the implant.
We utilized Medit i500’s Artificial Intelligence to spot and mark the scanbodies. Once these data points are plotted and synchronize with what appears intra-oral, you no longer have to worry about distortion or artifact in the scanbody itself. Color coding is a good indication of an accurate identification of the DESS scanbodies.
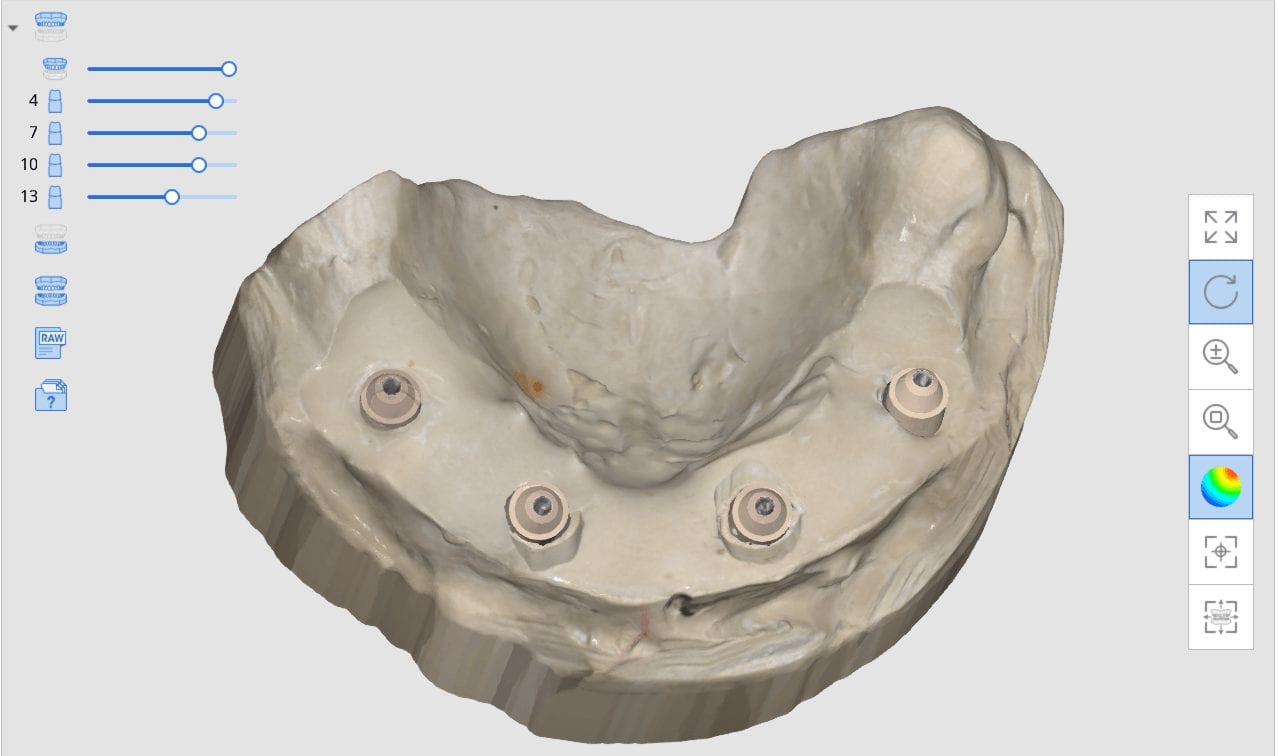
The significance of these identified scanbodies is that you can directly import them into the cad software and the fixture locations are readily identified and the design process can proceed.
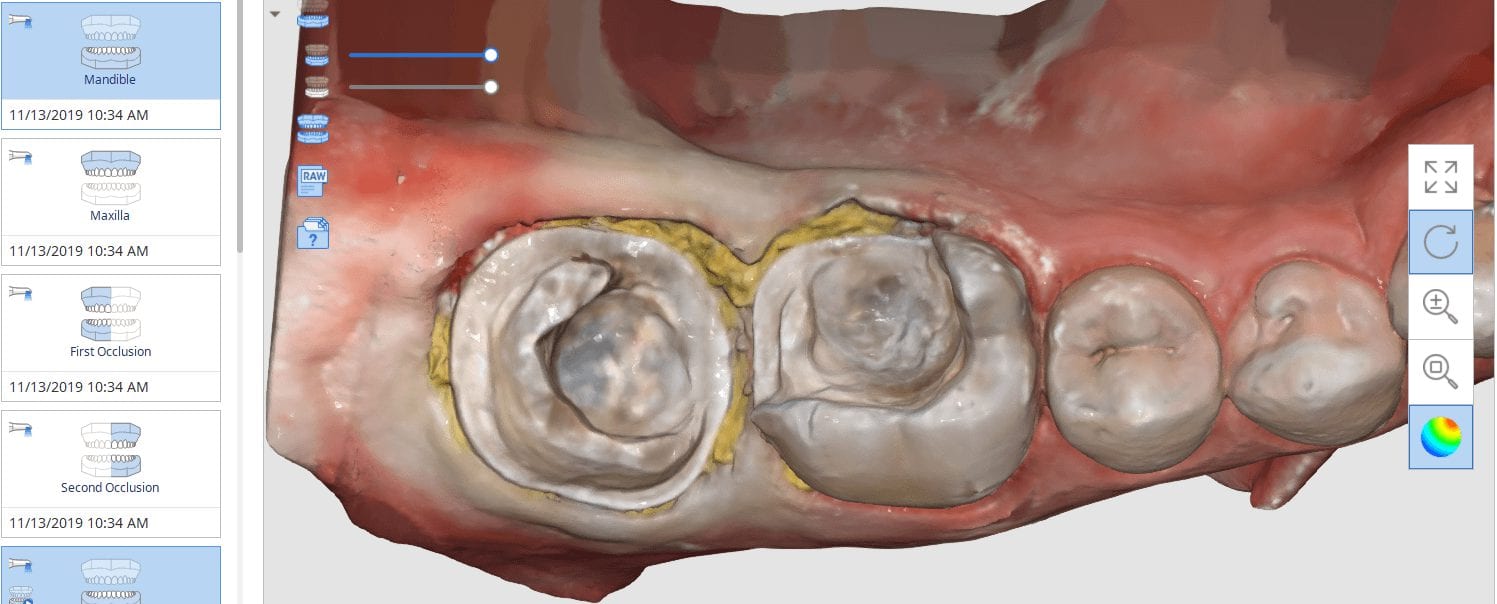
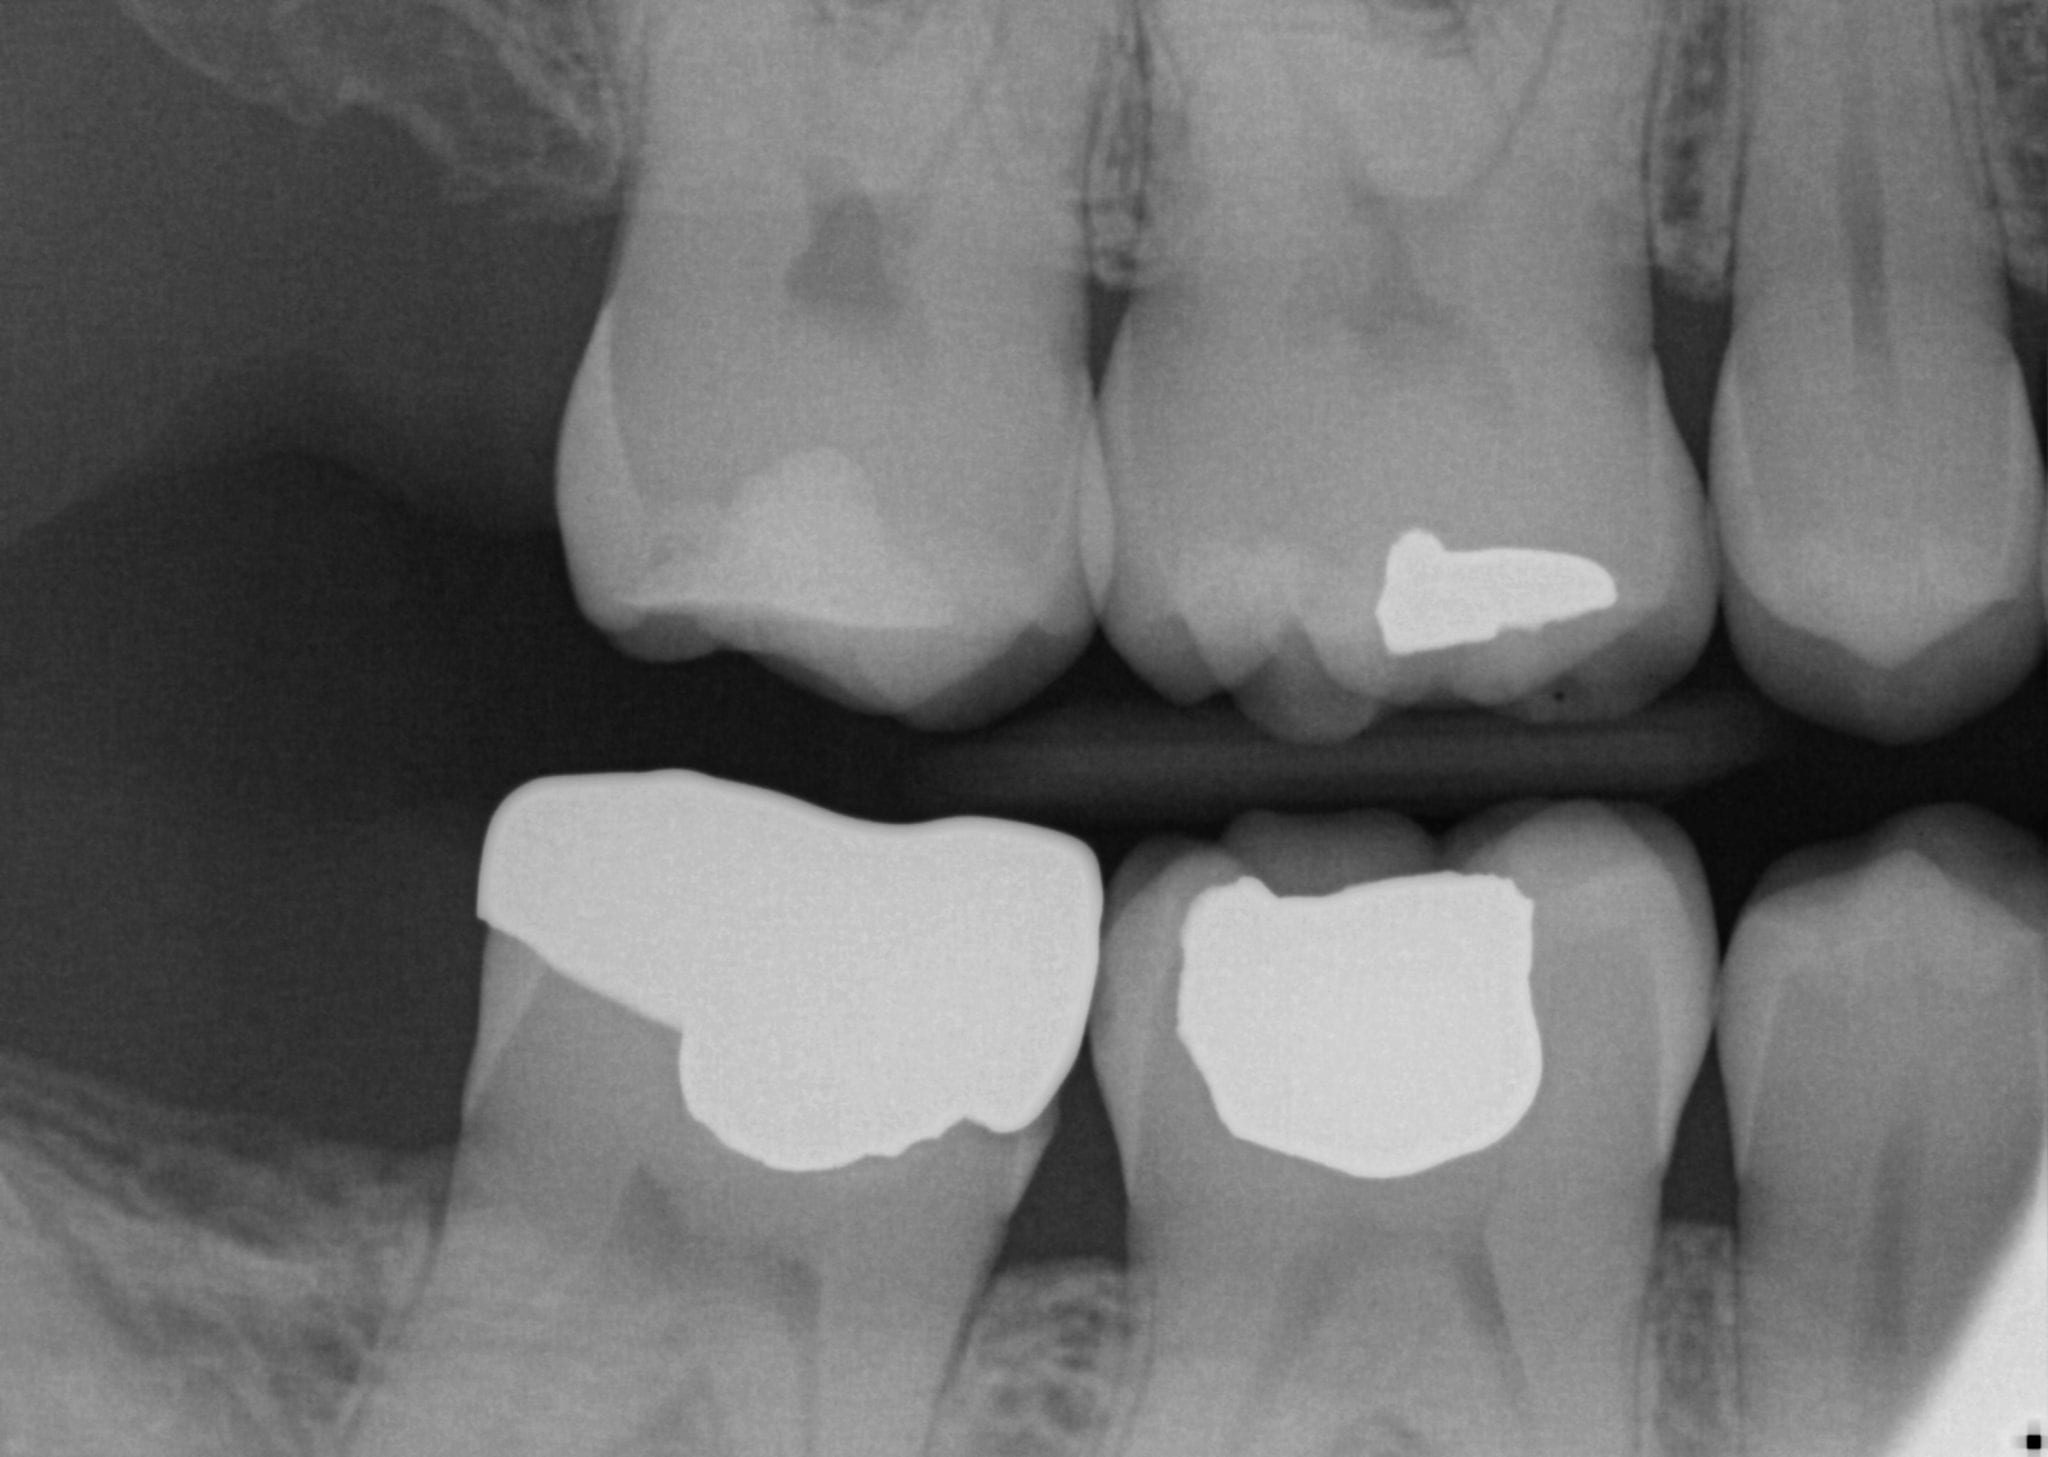
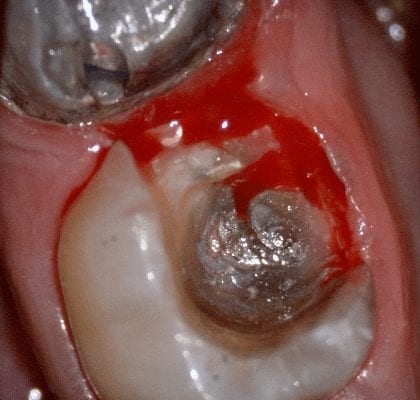
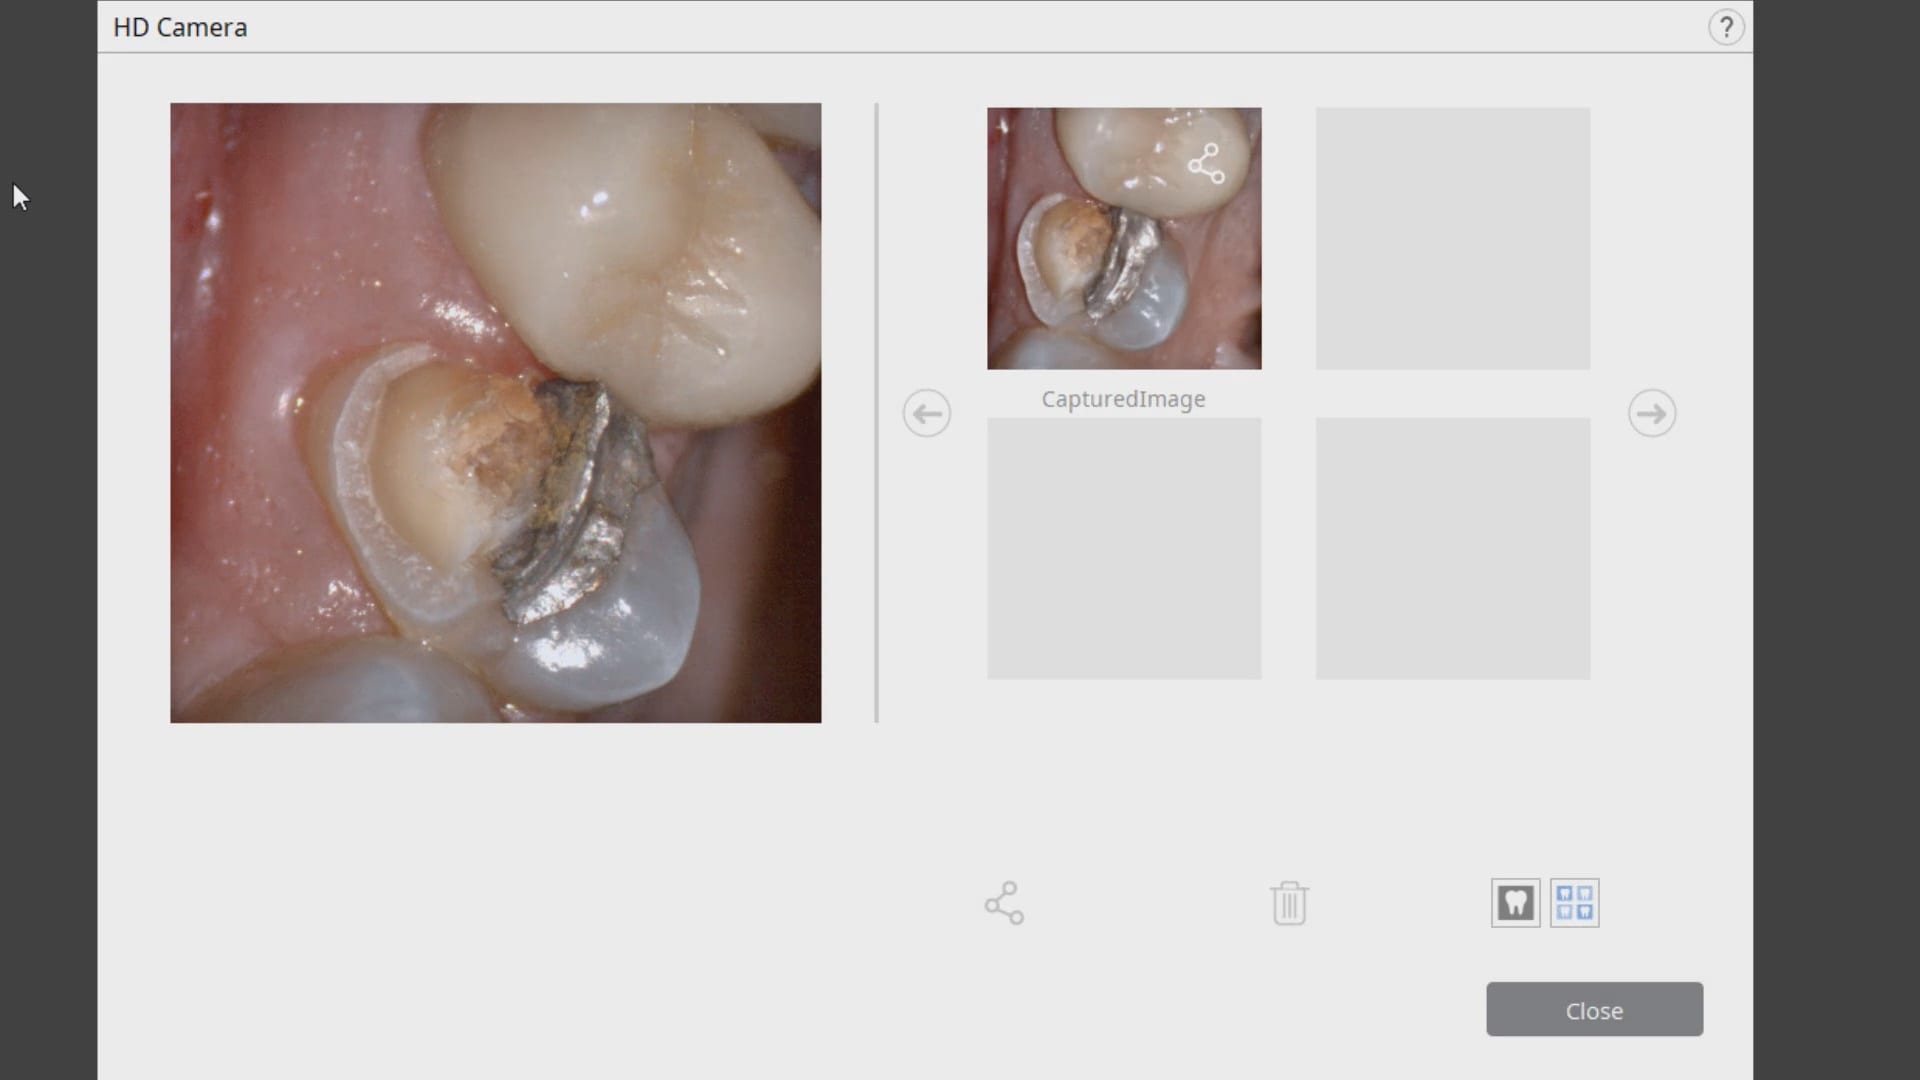
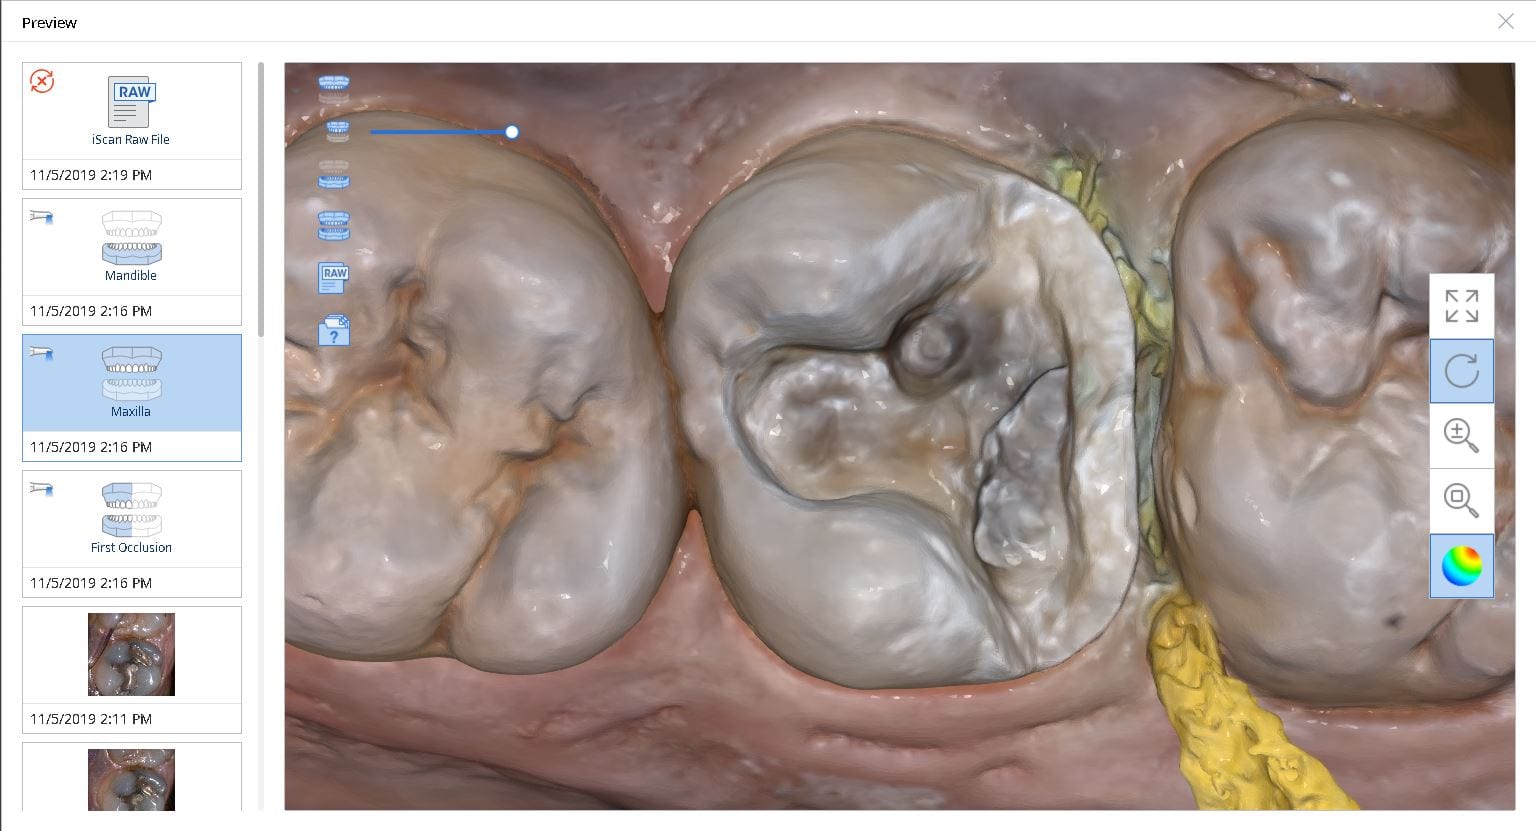
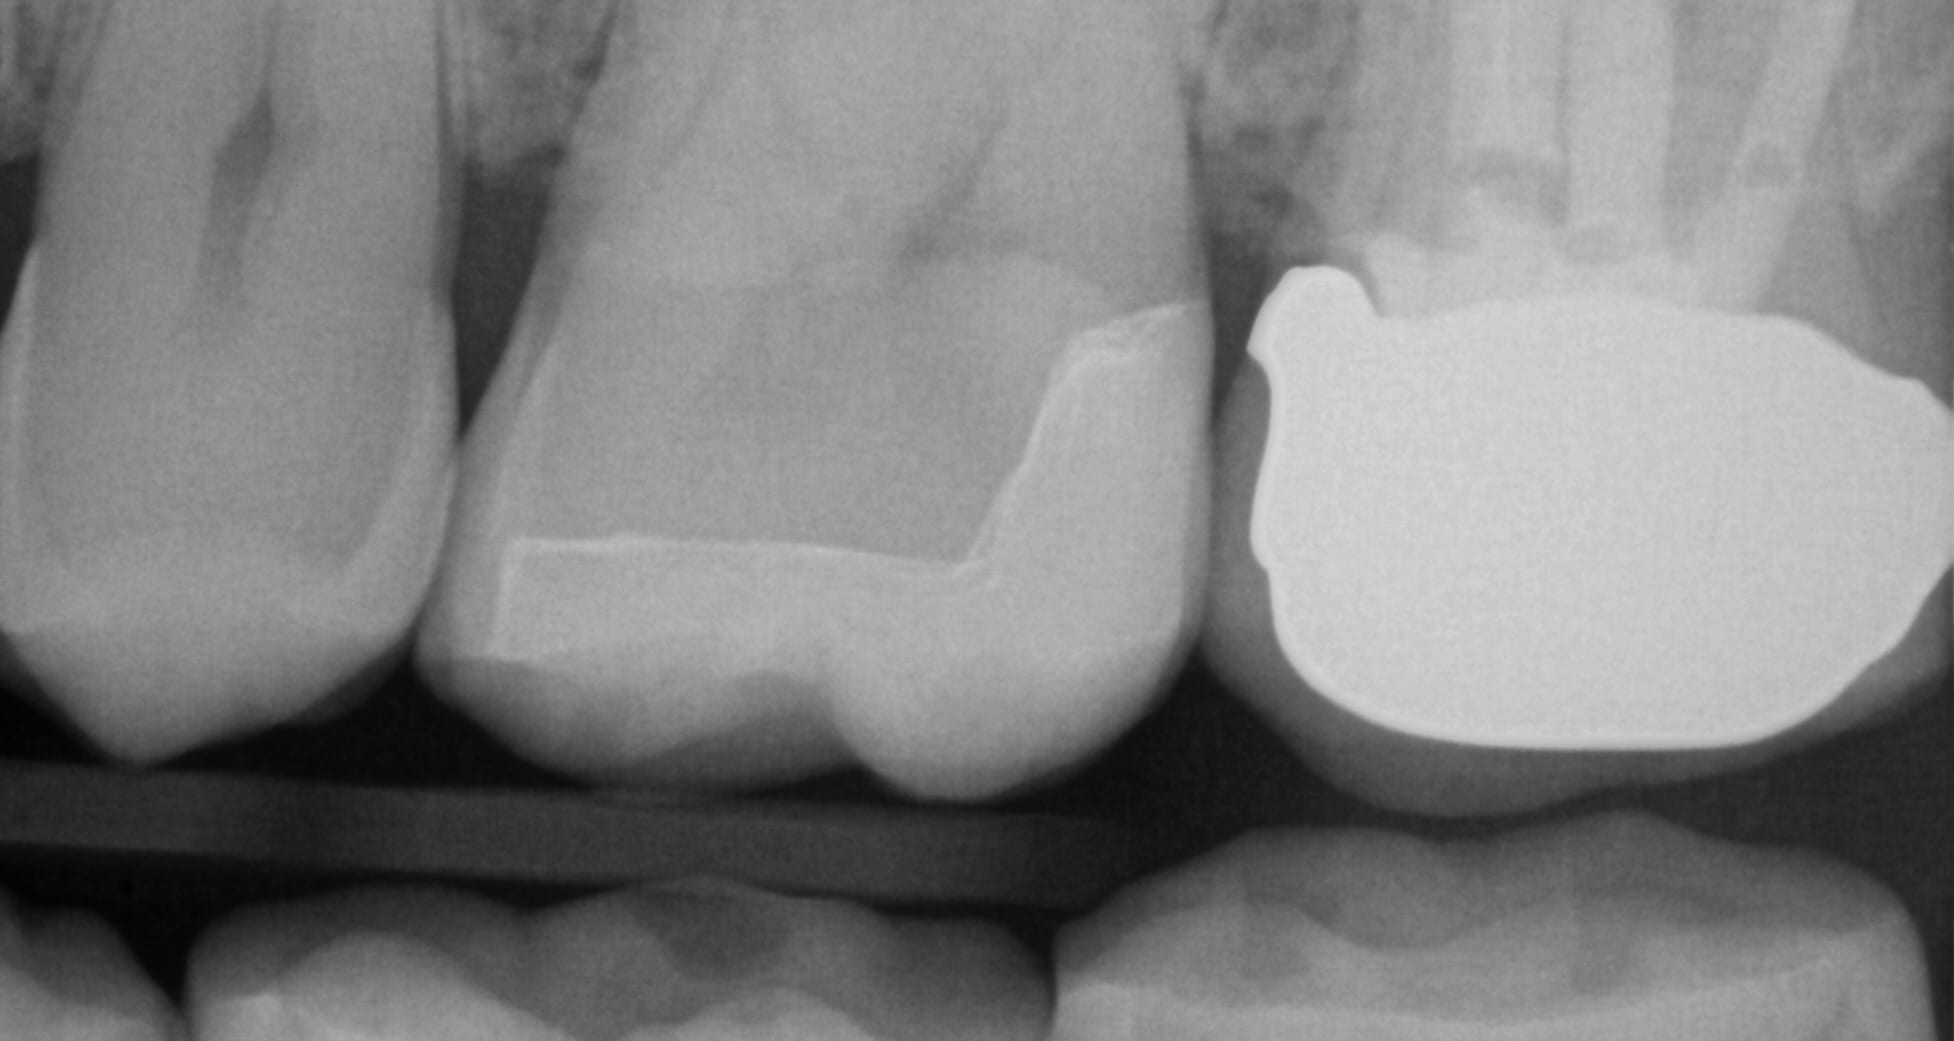
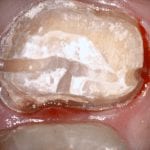
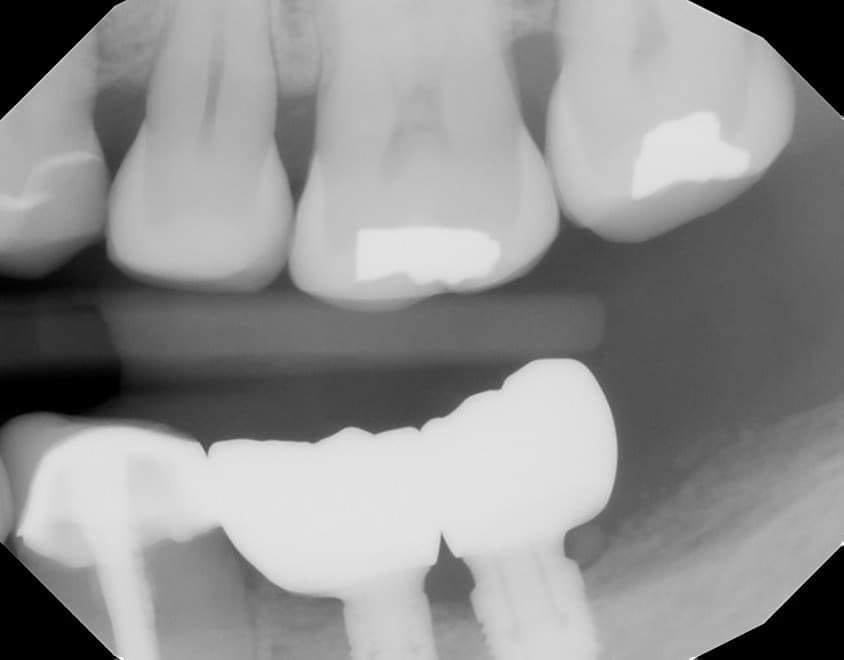
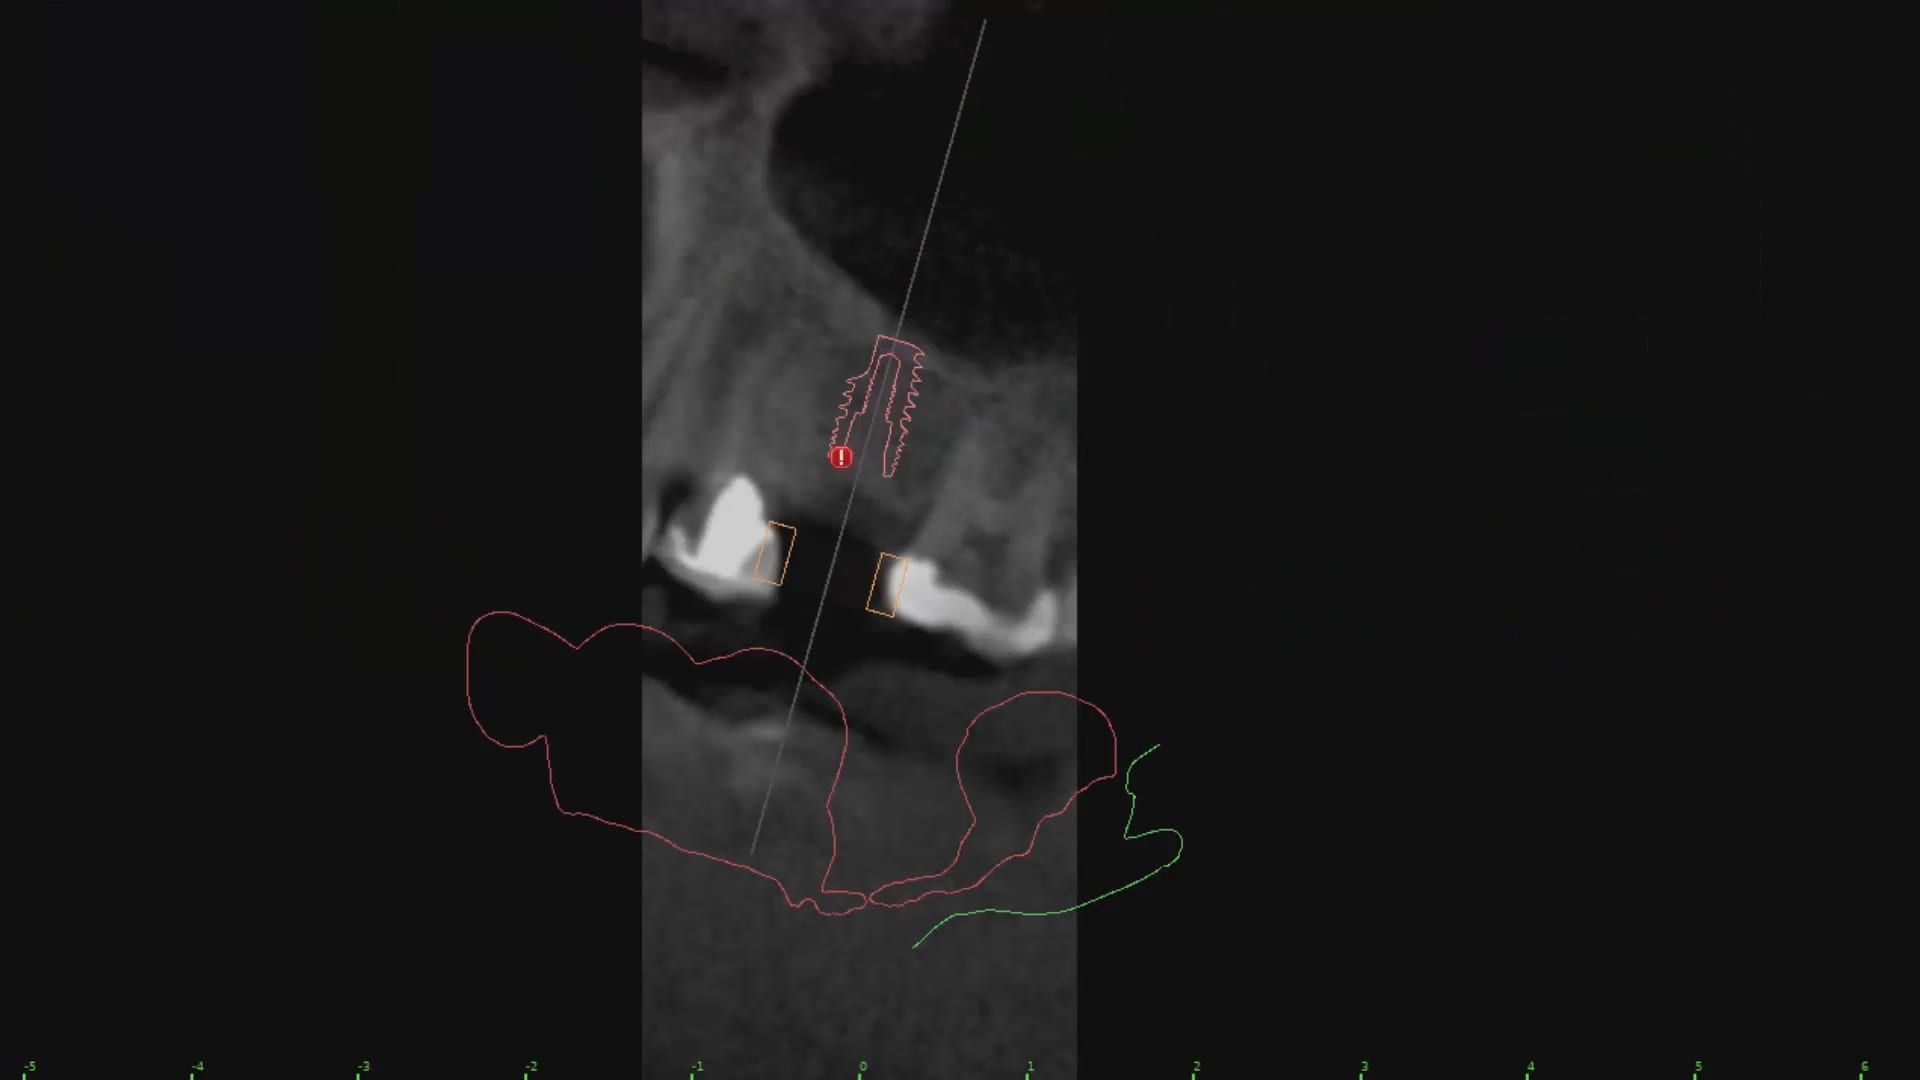
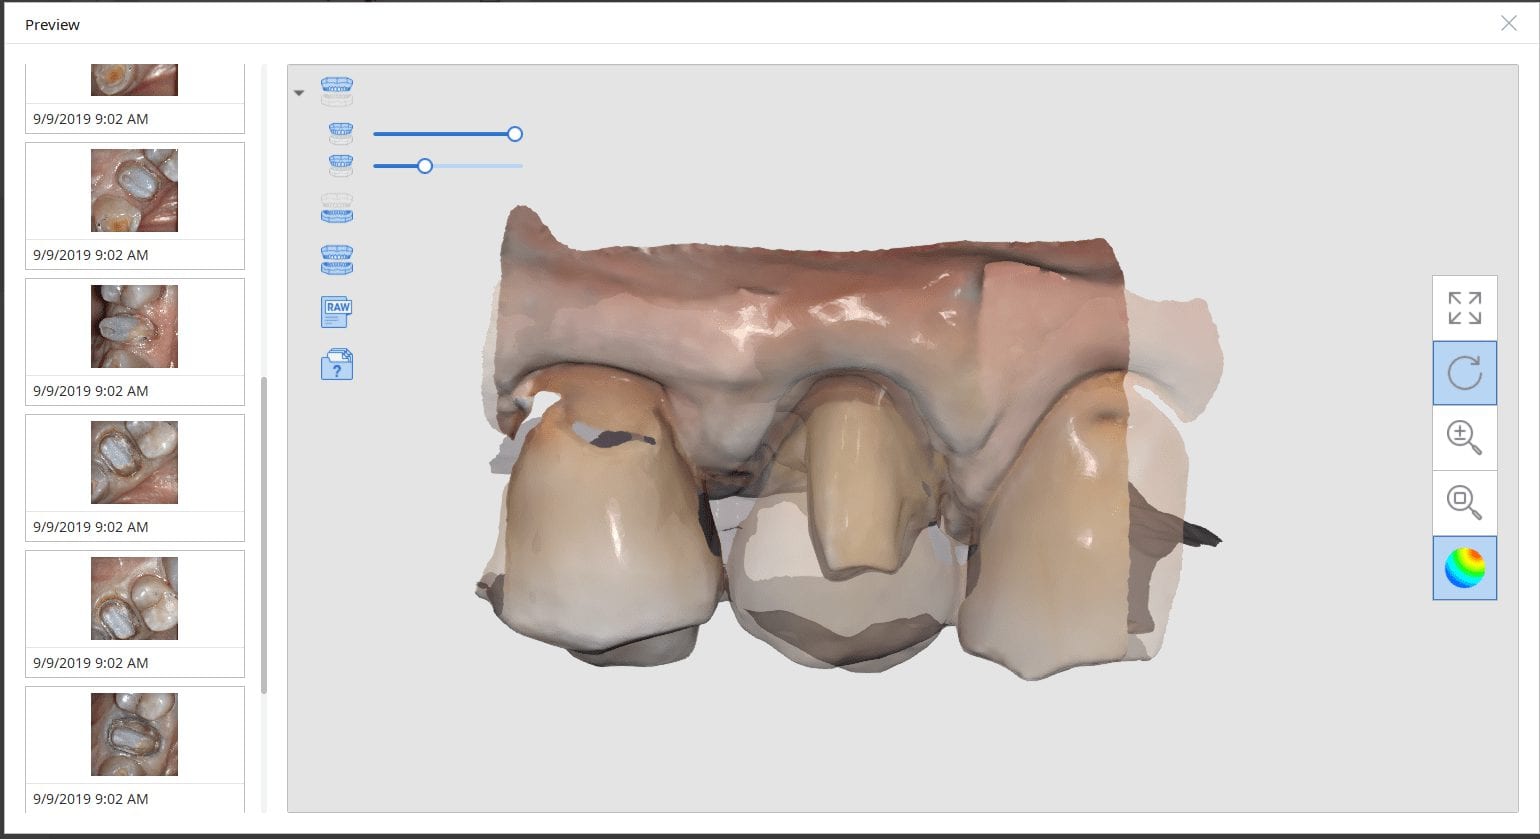
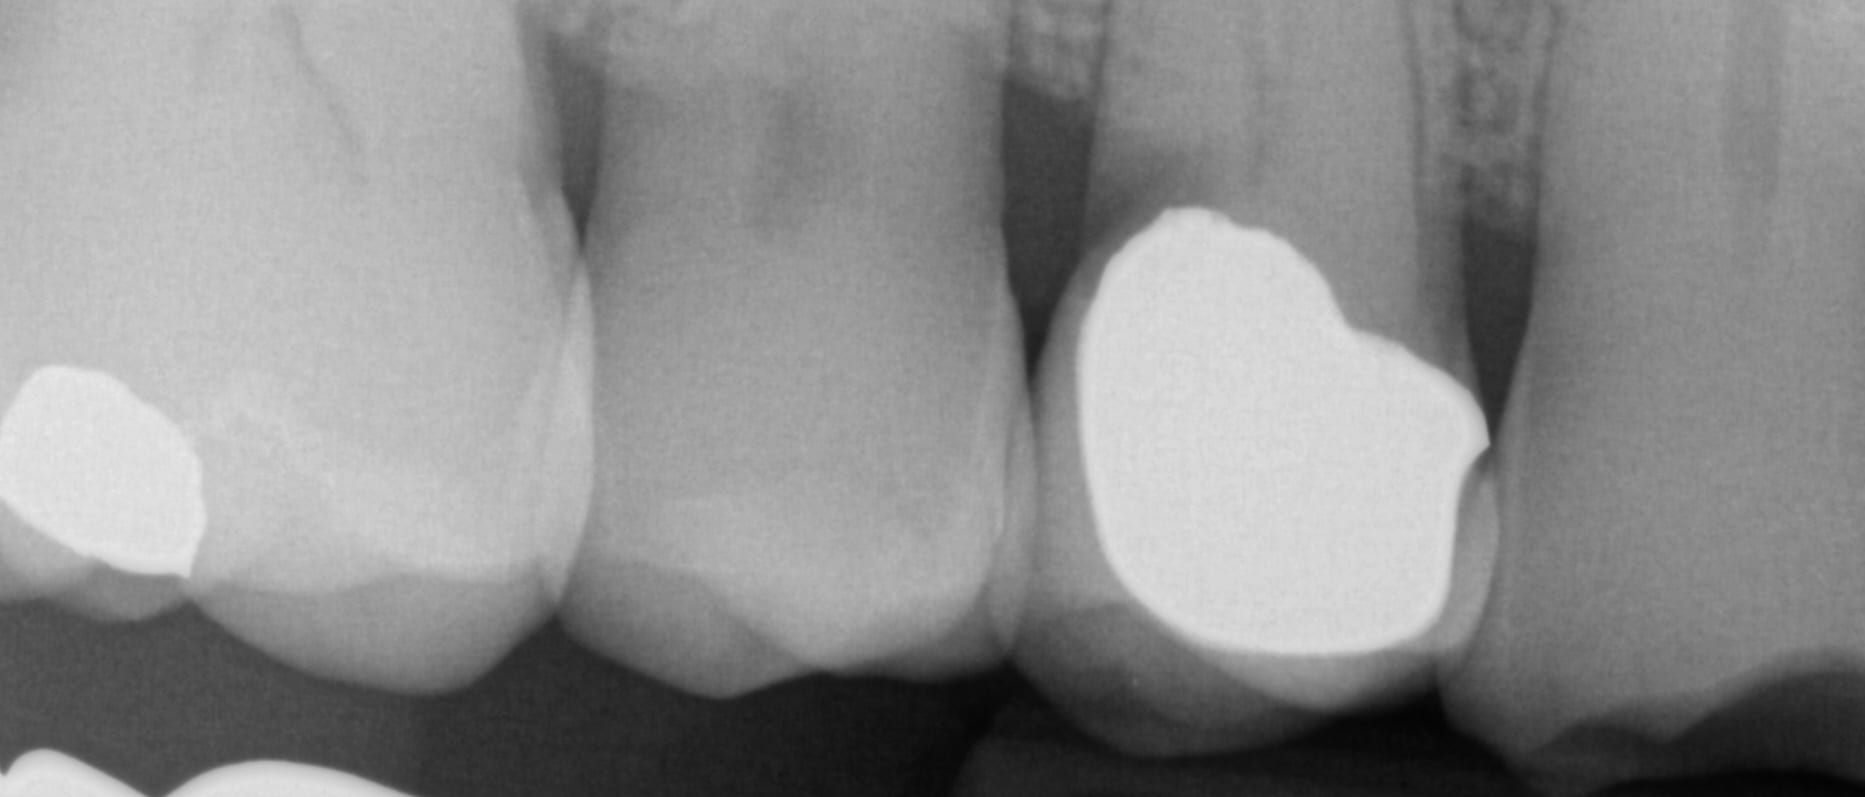
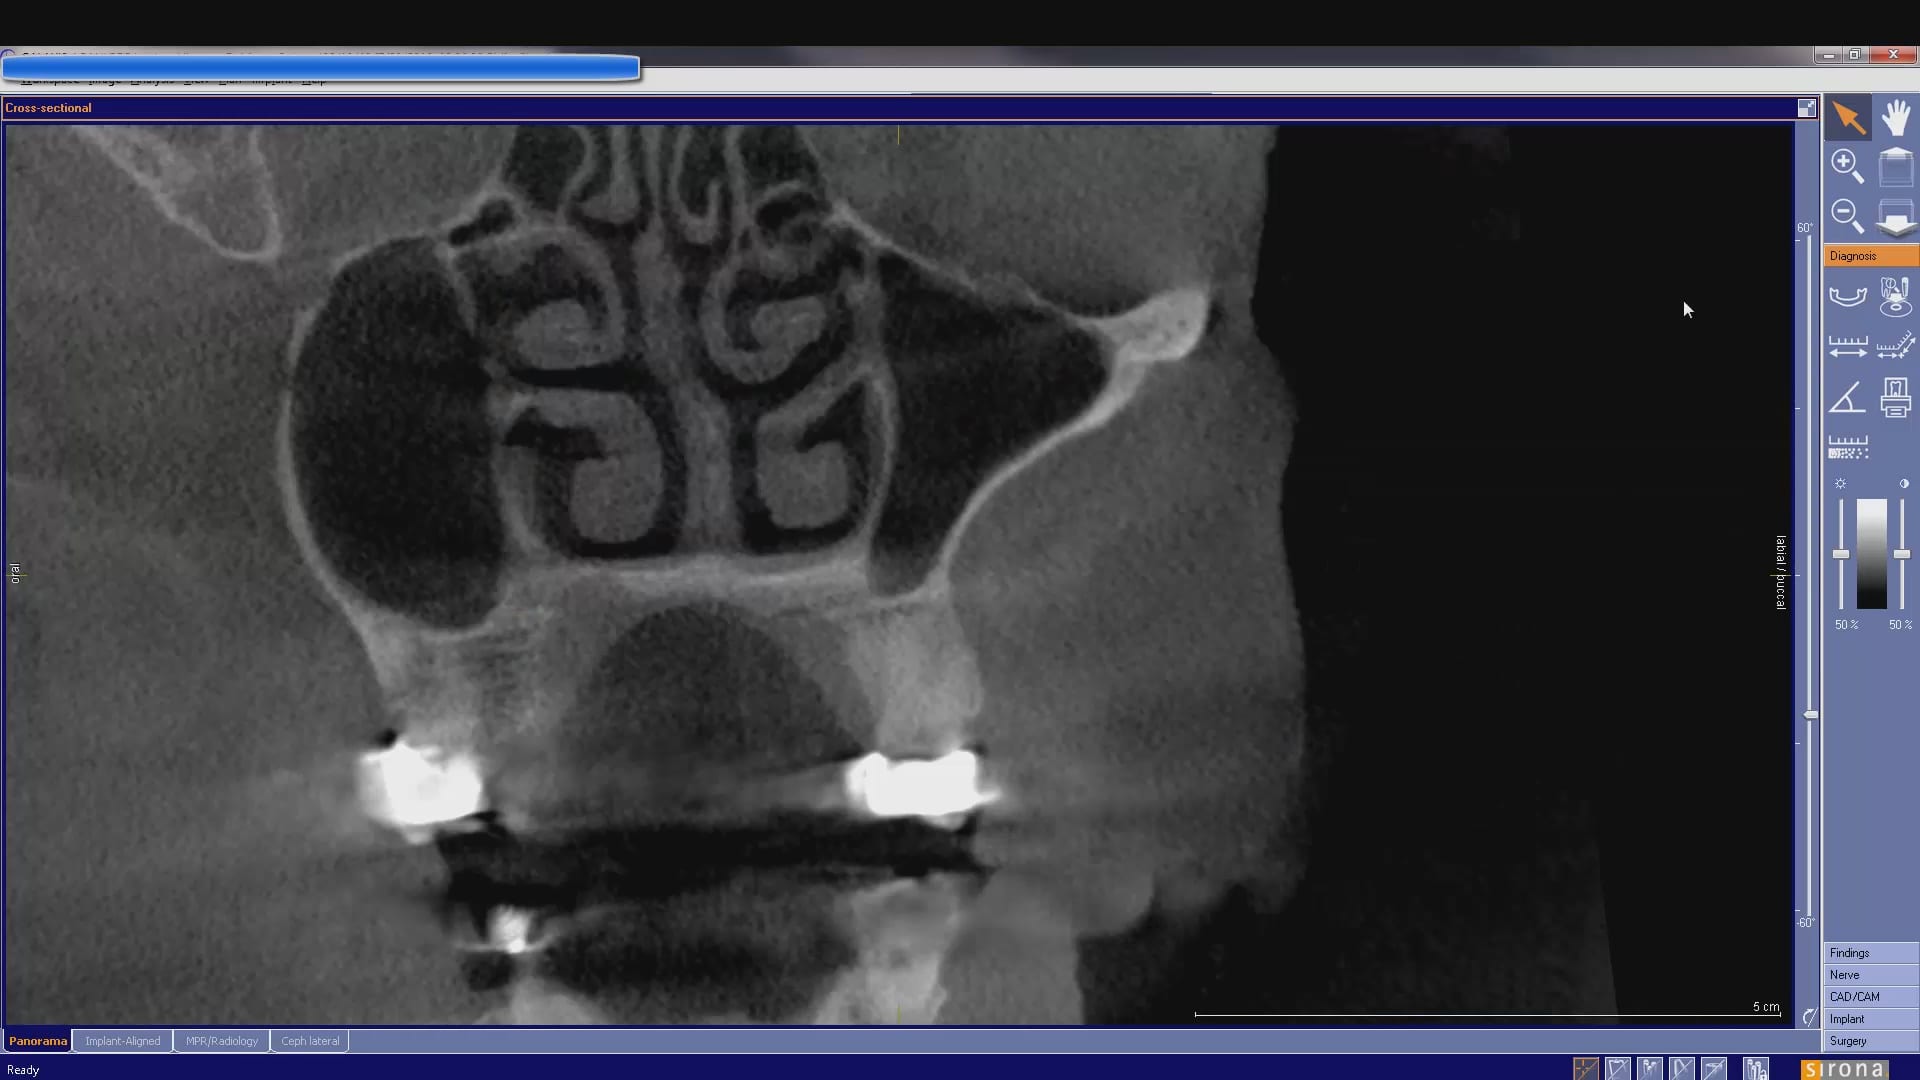
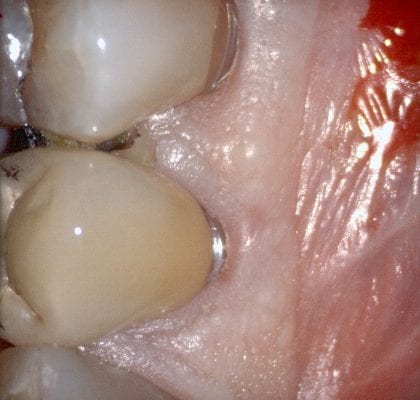
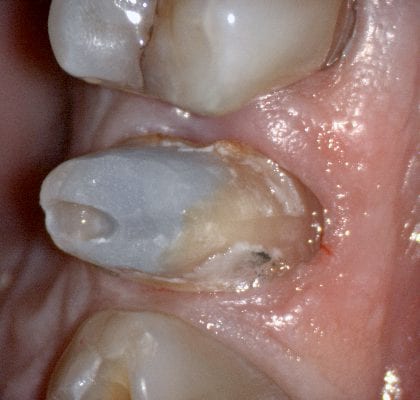
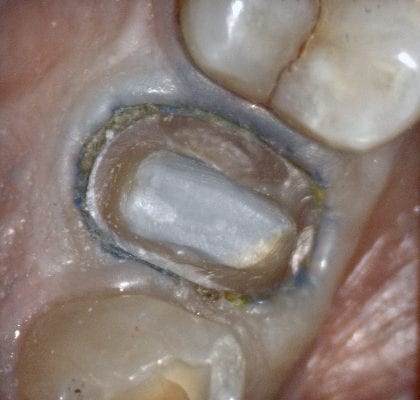
In this case presentation, we utilize the medit i500 to image the pre-existing crown and to fabricate a restoration that is a replica of the pre-existing condition. The patient was advised that the recurrent decay was in close proximity to the canal space and that endodontic treatment may be a possibility. The CBCT showed no evidence of any peri-apical radiolucency and the premolar tested vital prior to treatment
CT used to evaluate apex of premolar for crown replacement
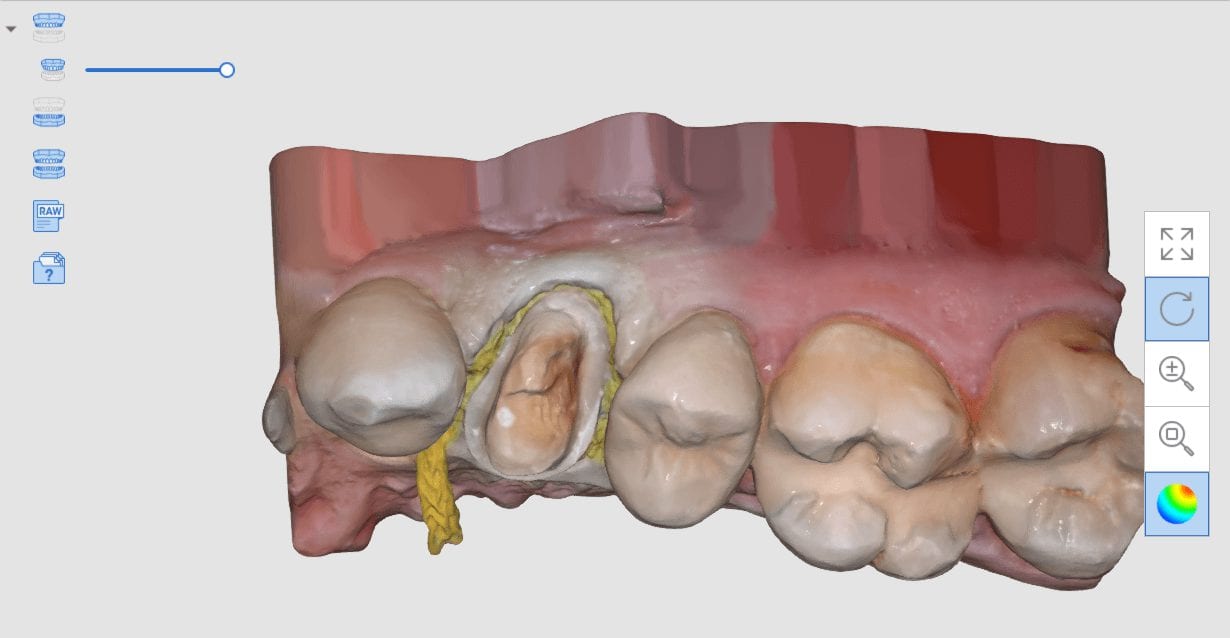
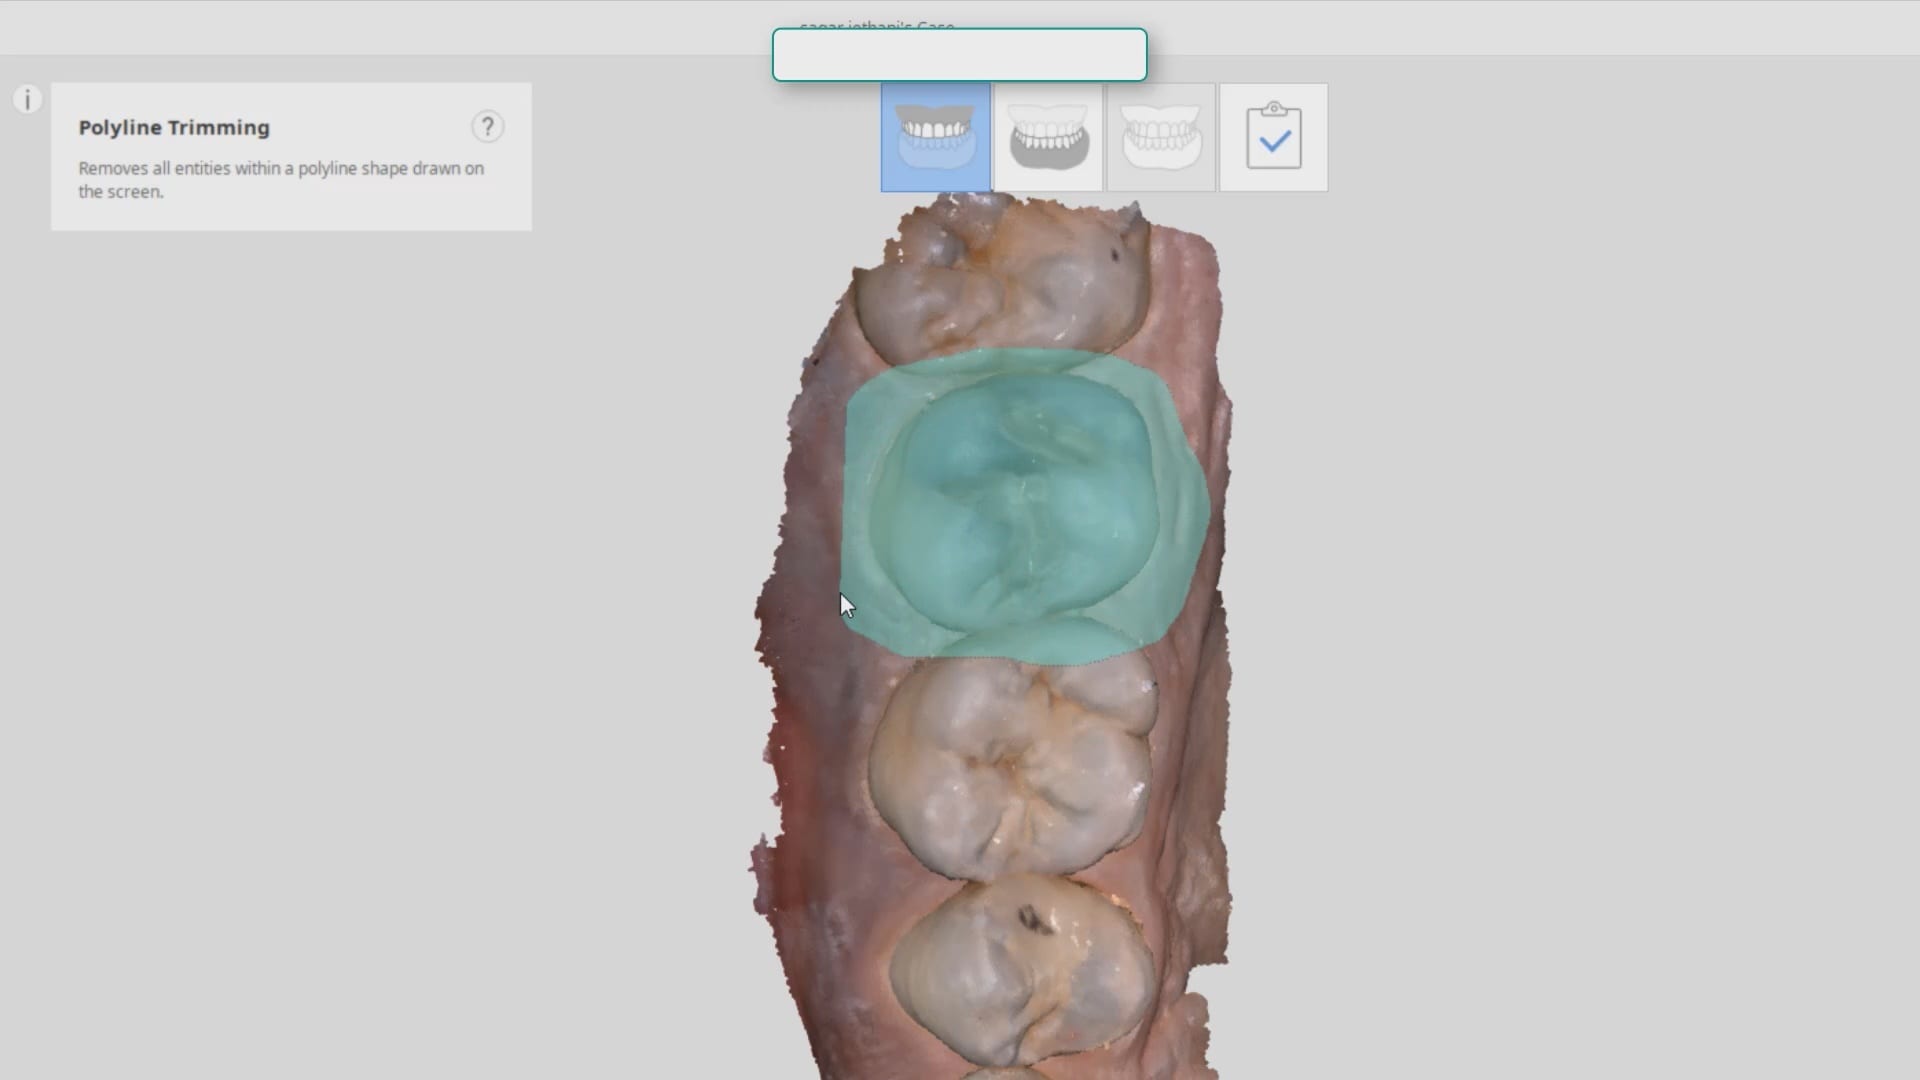
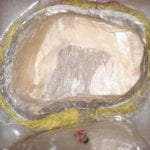
Case set up involved imaging the pre-existing condition in the pre-op catalog box. Excess information was cropped to reduce file size. The data was then copied to the maxillary arch catalog box and the area to prepared was edited out in preparation for final optical impressions.
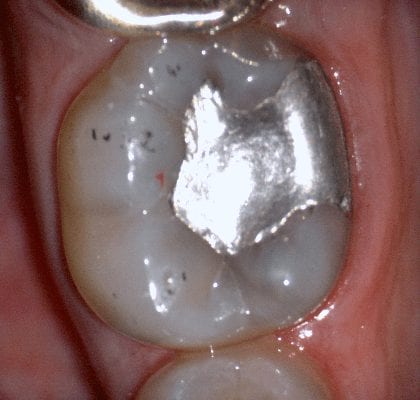
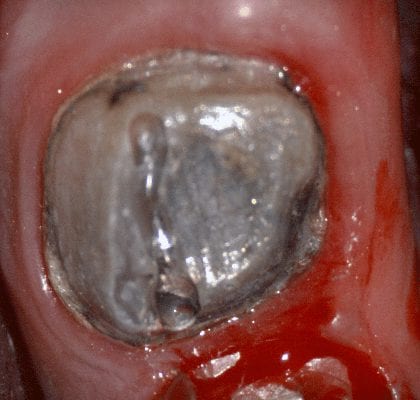
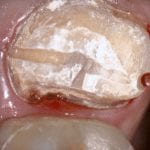
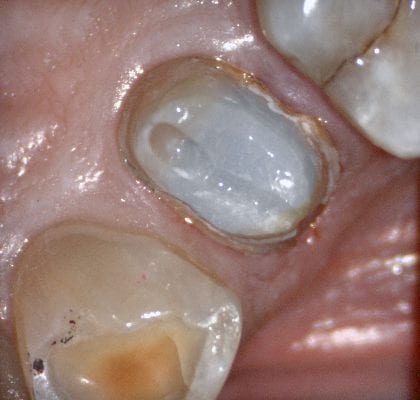
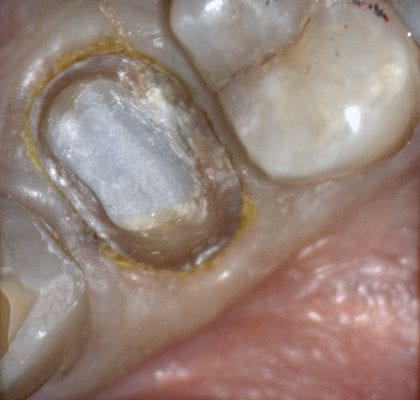
Immediate Post Op
The remaining decay and previous build up material was removed just prior to bonding the restoration with NX3 dual cure resin cement so the dentin was exposed for the least amount of time possible.