I purchased a SprintRay through them. I'm new to the 3D printer realm and they've been great with answering my questions and getting me set up. I've just really have been impressed with the quick responses, its much appreciated, thank you! - 4/20/2022
Miller Loriaux
Absolutely love dealing with this company. Purchased two intraoral scanners from them over the last 3 years and the support has been beyond exceptional. Frank patiently walked me through all the basics with many a phone call (to his personal cell p...read moreAbsolutely love dealing with this company. Purchased two intraoral scanners from them over the last 3 years and the support has been beyond exceptional. Frank patiently walked me through all the basics with many a phone call (to his personal cell phone, no less) on the first go round. Whenever we've even had a hint of technical difficulty there is ALWAYS a knowledgeable voice on the other end of the line. After 3 years of use a significant issue came up with the scanner and they went above and beyond to get it back up and running. Was so impressed (and I realized how dependent we've become on a scanner) that I purchased another one.Needed some assistance submitting a Valplast RPD design digitally this week. Damien worked me through it in literally 5 minutes and took the time to optimize my graphics card performance while he was there. Top shelf service.Certainly, the first place I go with any dental tech purchase.read less - 6/04/2022
David Stall
These guys are great. Always available and helpful. My scanning issues were dealt with quickly and courteously. - 10/01/2021
michael kim
Great scanner, even better customer support. I text John everyday and he always gets back to me in a timely manner with all my questions. - 7/09/2020
After weeks of research I purchased the i700 through Nick at cad-ray. My office has never used a scanner before and despite the great pricing, this was still a major purchase for me. Nick was incredibly helpful guiding me through the process while an...read moreAfter weeks of research I purchased the i700 through Nick at cad-ray. My office has never used a scanner before and despite the great pricing, this was still a major purchase for me. Nick was incredibly helpful guiding me through the process while answering my many questions. The customer service was very responsive and my friends who have purchased medit scanner were correct that this is the way to go. 5 Stars!read less - 5/08/2021
Suzanne Stock
Excellent experience, customer service has been stupendous! - 11/20/2023
Evan Bedell
Laura has always been so helpful with the medit when we needed assistance or resources. The training she provided the office was invaluable! She is quick to respond whenever we reach out. 13/10 - would recommend her to anyone looking to get a medit ...read moreLaura has always been so helpful with the medit when we needed assistance or resources. The training she provided the office was invaluable! She is quick to respond whenever we reach out. 13/10 - would recommend her to anyone looking to get a medit scanner.read less - 12/16/2021
Chirag Vaid
I ordered my Medit scanner from them in Feb 2020, so far no issues with support or the product. They are a great company with great support. Disclosure: they did promise me a scanner tip for this review, but in all honestly I was meaning to give it t...read moreI ordered my Medit scanner from them in Feb 2020, so far no issues with support or the product. They are a great company with great support. Disclosure: they did promise me a scanner tip for this review, but in all honestly I was meaning to give it to them anyway.... if you are looking to buy, this is a great way to go about it.read less - 7/19/2020
Andrea Sleep
Thank you guys so much. You guys have the absolute best customer service! - 5/05/2025
Tiffany Lee
Update to CAD-Ray as this company has morphed into something even better and grander than it was previously. This is the company where you go to when you need a scanner or 3d printer. Their customer service is second to none and their training on sca...read moreUpdate to CAD-Ray as this company has morphed into something even better and grander than it was previously. This is the company where you go to when you need a scanner or 3d printer. Their customer service is second to none and their training on scanners is top level. Don't buy your scanners anywhere else because Cad-Ray is the only company who knows how to solve any of your problems and provides the best technical support. I recently had purchased a software to mill crowns from my medit to my MCXL. No body could get it to work.12 months in and I was resigned to it not working and not being able to mill in house. With Cad-Ray's tremendous hard work, we were able to get the milling unit synchronized to the inlab and inlab synchronized to clinux and clinux meshed to medit. I am now milling scanned crowns for the first time in about 12 months. Yay Cad-Ray, Thank you!!!!!read less - 3/06/2024
Jeff Muszynski
Fantastic customer service - 6/19/2020
Mayoor Patel
Kaila is awesome with training and her customer service skills. Enjoy learning from her... Product (scanner) so far loving it. - 12/02/2021
blakesherrick-q6S
The Medit i700 is a game changer in speed and overall comfort for patients. I find it much smaller than other brands and have done almost 50 appliances/aligner cases the past 2 months with no fit issues from my lab. Love this scanner!
Dr. Sherric...read moreThe Medit i700 is a game changer in speed and overall comfort for patients. I find it much smaller than other brands and have done almost 50 appliances/aligner cases the past 2 months with no fit issues from my lab. Love this scanner!
Dr. Sherrick
Auburn Lakes Orthodonticsread less - 8/24/2021
Nicely done Cad-Ray- Thanks for helping me get back to work! The new i700 is our tech fav! - 3/03/2022
Paul Crespo
Cad-Ray has been instrumental in implementing and supporting our experience with scanning. Having scanned previously with other services I can truly say that Cad-Ray takes their clients very seriously and will not leave you hanging. They set the ba...read moreCad-Ray has been instrumental in implementing and supporting our experience with scanning. Having scanned previously with other services I can truly say that Cad-Ray takes their clients very seriously and will not leave you hanging. They set the bar very high. Cad-Ray all the way!read less - 12/09/2021
Minh Van
I was referred to CAD-Ray by Medit Instagram help service. I have purchased Medit i700 from Laura, I was please to work with her and the whole team. They offered the best customer service and the fast responses, especially Laura. I look forward for t...read moreI was referred to CAD-Ray by Medit Instagram help service. I have purchased Medit i700 from Laura, I was please to work with her and the whole team. They offered the best customer service and the fast responses, especially Laura. I look forward for the next purchase.read less - 12/07/2021
Eric Reum
I bought a i500 almost a year and a half ago. Sadly it ran into an issue with the cord after over a years use. Cad-ray was extremely quick to diagnose the issue and also send a replacement scanner. The quality and ease of scanning has been great! Als...read moreI bought a i500 almost a year and a half ago. Sadly it ran into an issue with the cord after over a years use. Cad-ray was extremely quick to diagnose the issue and also send a replacement scanner. The quality and ease of scanning has been great! Also very happy with the customer service.read less - 6/02/2022
Kenneth Gould
A most helpful, detailed, easy to follow, personal primer via Zoom on integrating the i700 scanner into our practice. Well done! Thank you Kaila! - 5/03/2022
Jennifer Goodale
Fantastic class. Amazing scanner.Cad Ray has been helpful not only with my purchase of the Medit i500, but every step of the way.Level 2 seminar with Armen and Damien was extremely informative, useful and practical! ⭐️⭐️⭐️⭐️⭐️ - 8/08/2021
Franco Picofazzi
Great product at an affordable price, not to mention Andy's help at customer service. Highly recommended. - 6/23/2022
Kaila Larson is the support specialist for our office and has been outstanding. She gets back to us quickly with any questions we have, and will log into the computer and fix issues so we don't even have to worry about them. She is extremely knowled...read moreKaila Larson is the support specialist for our office and has been outstanding. She gets back to us quickly with any questions we have, and will log into the computer and fix issues so we don't even have to worry about them. She is extremely knowledgeable about the MEDIT scanner and the supporting software. She responds to calls and texts or emails and will communicate with us in whatever way is most convenient for our office. She has saved us hours of time and headache by always being available to help.read less - 5/25/2022
Shefali Pilar
Our office has been using the Medit scanner for a few months now and are loving it! CAD-Ray was super easy to work with in purchasing the scanner and providing support as needed. Their Facebook forum with the updates and video tutorials are incredibl...read moreOur office has been using the Medit scanner for a few months now and are loving it! CAD-Ray was super easy to work with in purchasing the scanner and providing support as needed. Their Facebook forum with the updates and video tutorials are incredibly helpful.read less - 6/16/2020
Micah Bickel
Great support services and training from Cad-Ray, they are always very helpful and responsive. I have been using the I500 in my offices for the last two years and loving it. - 11/01/2021
fantastic support, I always ask random, specific to me, could be found on a training video, questions and they always quickly tell me how to fix my problem. - 6/16/2020
David Weber
Much like dentistry is not a commodity, CAD-RAY's service is not a commodity. What CAD-RAY does so well is not just sell pieces of technology affordably and smoothly, but provides service, training, and insight so these tools can be used meaningfully...read moreMuch like dentistry is not a commodity, CAD-RAY's service is not a commodity. What CAD-RAY does so well is not just sell pieces of technology affordably and smoothly, but provides service, training, and insight so these tools can be used meaningfully and profitably.read less - 12/12/2022
Matt Stratman
only dental company that I have no complaints about - 11/03/2022
Marc Prince
We’ve been using the Medit i700 in our office for approximately a year now. It has been a game changer and hard to remember what it’s like without using the intra-oral scanner. The Cad-Ray support team has been remarkable as well! - 9/11/2022
Benjamin Polan
A while ago I became interested in an intra oral scanner for my office especially for dental sleep medicine and TMJ appliances. I searched online for Medit and found cad ray. Laura from Cad-ray quickly responded and set up a zoom meeting so she could...read moreA while ago I became interested in an intra oral scanner for my office especially for dental sleep medicine and TMJ appliances. I searched online for Medit and found cad ray. Laura from Cad-ray quickly responded and set up a zoom meeting so she could demo the unit. Great job at helping me understand. She set up the financing and I got my unit. A few glitches with my internet speed and getting IT to help with my upload and download speeds and I was ready to go. Every time I had a question I texted Laura and almost like she was waiting for my call she responds. We it turned out my unit wasn't just right so she immediately responded we will replace you unit. Laura has been a joy to work with and the customer service given will only encourage me to do business with cad-ray again.
Benjamin Polan DMD, D,ABDSMread less - 8/27/2021
I bought my Medit from Cad-Ray a little over a year ago. The very few times I've needed any kind of help with it, Cad-Ray has been absolutely ON IT. Issues get completely resolved within minutes. It's great!! - 11/01/2021
Sonrisas Dental
Support was our main concern, and we chose very carefully. Frank is 100% every step of the way - 1/25/2023
Steven Hechtman
As important as the decision of which scanner to buy (I bought the Medit i500 - why is a separate review) is the decision of who to purchase it from. There is a Medit i500 distributor 5 miles from my office who agreed to lower their price to match C...read moreAs important as the decision of which scanner to buy (I bought the Medit i500 - why is a separate review) is the decision of who to purchase it from. There is a Medit i500 distributor 5 miles from my office who agreed to lower their price to match Cad-Ray. So why did I purchase it from Cad-Ray who is 2000 miles away from my office. Because I did my homework. Because the post purchase training and support offered by Cad-Ray was unmatched by any other dealer I spoke with. Their library of online training videos that came with the purchase is without equal. Bottom Line: I’m glad I purchased the Medit i500 and, with hindsight, I know I made the right choice to purchased it from Cad-Ray!read less - 5/12/2020
Roger Wilson
CAD-Ray provides the best support around. I started scanning with Medit i500 in 2018 and my dental practice immediately changed for the better.As a rookie, I had a lot of questions and I calledCAD-Ray a lot in the beginning. They were great!Jonathan...read moreCAD-Ray provides the best support around. I started scanning with Medit i500 in 2018 and my dental practice immediately changed for the better.As a rookie, I had a lot of questions and I calledCAD-Ray a lot in the beginning. They were great!Jonathan Acker helped me get set up. Frank Weinstein answered tons of questions. Laura Geney became an important source of information as I moved into scan bodies, AI library, and had hardware questions. I’ve attended classes in Dallas featuring Armen Mirzayan who is incredibly knowledgeable and will tell you the good, bad, and the ugly about digital workflow. The possibilities are endless with scanning technology. I also want to mention Nick Statly who has visited my Dallas office and is a wealth of information. I have to admit that I frequently view the CAD-Ray User Group Face Book page just to pick up a few pearls here and there.I highly recommend CAD-Ray because their support is by far the best in the IOS industry and because their people honestly care about the customer and are truly committed to your success.read less - 12/23/2021
Ramin Goshtasbi
Great service even if you own a Primescan. Company is built on customer service. Thanks for the help guys…. - 1/05/2022
Office NHFD
Frank DeLuca was very helpful even though i didn't buy Medit from Cad ray ! Had an issue and my original dealer was not helpful and i contacted Cad ray thinking it was direct Medit. Frank was extremely nice to log in and do what ever he could until ...read moreFrank DeLuca was very helpful even though i didn't buy Medit from Cad ray ! Had an issue and my original dealer was not helpful and i contacted Cad ray thinking it was direct Medit. Frank was extremely nice to log in and do what ever he could until Medit could take over. would give 7 stars if available.read less - 8/10/2022
Shilpa Jobanputra
New user and absolutely love my Medit i500 scanner. Easy to use, fast, affordable and so quick for a first timer IOS user like myself. Customer service is fantastic, as are the sales people. It’s good to know you have strong knowledgeable people beh...read moreNew user and absolutely love my Medit i500 scanner. Easy to use, fast, affordable and so quick for a first timer IOS user like myself. Customer service is fantastic, as are the sales people. It’s good to know you have strong knowledgeable people behind the scenes ready to help at every turn. I would recommend this product highly. Happy in PAread less - 9/09/2020
Luciana Bretz-Pavie
Wayne Glassoff is the go-to guy here! The BEST!!! He is always on it, he helps figuring out exactly what you need, the best way possible. And fast! Great working with CAD-Ray, they have pretty much everything when it comes to digital dentistry. And t...read moreWayne Glassoff is the go-to guy here! The BEST!!! He is always on it, he helps figuring out exactly what you need, the best way possible. And fast! Great working with CAD-Ray, they have pretty much everything when it comes to digital dentistry. And they give you a damn good support too. Jessica Knott is awesome… training and support, just the BEST! Very satisfied customer here!read less - 2/05/2023
John Pisacane
This is my second review. I posted the first after having Medit for about 9 months. Loved it then, had great success with using the scanner to take full arch scans for clear aligner therapy, study models, removable partials, and crown and bridge. ...read moreThis is my second review. I posted the first after having Medit for about 9 months. Loved it then, had great success with using the scanner to take full arch scans for clear aligner therapy, study models, removable partials, and crown and bridge. Have kept using it and am still very happy with the Medit and with Cad-Ray. The scanner takes care of so many things in a way that impresses patients and pleases lab techs. Whenever I hit a computer glitch, I call Armen, Frank or any other members of the gang and my problems are solved quickly and without drama.read less - 6/16/2020
I am a very happy customer, the team behind cad ray, is amazing. Ive had small issues, and tech support is always available. I always call for them to help me use new apps, or updates and they stay on the phone with me all thru out, until fixing the ...read moreI am a very happy customer, the team behind cad ray, is amazing. Ive had small issues, and tech support is always available. I always call for them to help me use new apps, or updates and they stay on the phone with me all thru out, until fixing the issue. Andy has helped me several times, and he's a really nice guy too, great attitude, doesn't make me feel dumb when I don't understand. Sometimes it feels like he's part of my office team! Thank you Cad Ray, thank you Andy!read less - 2/01/2023
Shant Aharonian
Cad-ray has to be the best company to work with when it comes to digital dentistry solutions. Here are the reasons why: 1. Experience. Everyone in the company has extensive experience in dentistry. They have used all digital platforms and offer custo...read moreCad-ray has to be the best company to work with when it comes to digital dentistry solutions. Here are the reasons why: 1. Experience. Everyone in the company has extensive experience in dentistry. They have used all digital platforms and offer customers first hand experience. 2. Honesty. Based on their experience they share all the good/bad of different systems. They work with you to find a solution that works best for you. Not sell you the piece of the equipment that gives them the biggest commission. 3. Support. Cad-ray offers the missing piece of the dentist/digital manufacturer puzzle. Many other distributors sell you a piece of equipment but don’t have true day-to-day experience with that equipment. Cad-ray’s team openly share their expertise to help customers optimize their workflows with great technology. 4. Passionate. The Cad-ray team is extremely passionate about their craft. They truly believe in what they have to offer. I took Armen Mirzayan’s course on intraoral scanning and it was truly mind blowing. Armen’s insights will help any dentist optimize their craft. I purchased the full sprintray 3d printing ecosystem the help of Frank. I plan to purchase more equipment from cad-ray. Also, Jesse is a genius in regards to all aspect of digital workflows. I’m truly grateful for this company and everyone who I’ve worked with so far.read less - 10/07/2022
SCOTT MEUSELBACH
I bought a Medit i700 and admittedly did not use it for a year or so. Once I got going on it, I now hate analog impressions (time, lab time, expense, questions of quality, etc). I had a cord go bad (fray) and could not scan. I called and spoke to Hea...read moreI bought a Medit i700 and admittedly did not use it for a year or so. Once I got going on it, I now hate analog impressions (time, lab time, expense, questions of quality, etc). I had a cord go bad (fray) and could not scan. I called and spoke to Heather, and she was outstanding in providing service. I texted a pic, she corresponded with Medit, and they got a new one to me the next day. Tracking, email correspondence, etc. all was provided there as well. I was back up and running in no time, and having to do some analog impressions made me realize how much we love the scanner. The service from Heather and Medit (Dane) verified it. I sent a text out to a pile of dental friends to let them know as well. Highly recommended!read less - 7/10/2024
Island Dental Lab
Just got my Medit IOS delivered last week and the service from Jon was great! I had a ton of questions before placing the order and he happily answered. This is the type of customer support many dental suppliers are missing. Great company to work wit...read moreJust got my Medit IOS delivered last week and the service from Jon was great! I had a ton of questions before placing the order and he happily answered. This is the type of customer support many dental suppliers are missing. Great company to work with.read less - 6/23/2020
Laveen Smiles
CAD-Ray has the best customer service and support that you will ever receive from any dental company anywhere. I had an issue with a sintering oven I purchased from them. I needed immediate assistance, because I was in the middle of a case. The perso...read moreCAD-Ray has the best customer service and support that you will ever receive from any dental company anywhere. I had an issue with a sintering oven I purchased from them. I needed immediate assistance, because I was in the middle of a case. The person at CAD-RAY who had the knowledge to help me had just gotten into a car accident and was at the ER. Now most companies and people would have said “Sorry, we can’t help right now due to extenuating circumstances.” Not CAD-RAY! That person called me from the ER, in the middle of his personal problems, and gave me the needed information to solve my problem. Exceptional customer service and support is what you will get from CAD-RAY, and it won’t be for a limited time after your purchase. You won’t go wrong with a purchase from CAD-RAY.read less - 1/29/2023
Michael White
Everyone I have dealt with during the process of buying my new N4 VHF mill (which by the way is fantastic) last year to buying a new iMedit 500 scanner. Having the open type system has been a God send. No more held hostage by the 2 main systems us ...read moreEveryone I have dealt with during the process of buying my new N4 VHF mill (which by the way is fantastic) last year to buying a new iMedit 500 scanner. Having the open type system has been a God send. No more held hostage by the 2 main systems us same day crown dentists have had to deal with for years. Cad-ray made the financing a snap and the post customer support is unbelievable. Thank you everyone at Cad-Rayread less - 5/12/2020
Todd Haskin
The medit is one of the best scanners on the market with the best price. Cad ray's support and training is phenomenal and they are very quick to respond. We work with Laura. Highly recommend. - 12/16/2021
Krystyna
I recently purchased Medit scanner and my assistant and I went through training with Andy. He was great, knowledgeable and patient with us. Customer service is great! - 2/05/2023
Russell Schafer
Overall great company to work with. They sell wondeful products and give stellar service for a much lower price than any of the supply houses. I can't recommend them enough. - 8/19/2022
Yoav Taub
I purchased my Medit from Cad-Ray just prior to Covid and they have been fantastic in getting me the proper training on the machine, both through there 2 day class as well as the many video's they post on the website. I recently purchased some acce...read moreI purchased my Medit from Cad-Ray just prior to Covid and they have been fantastic in getting me the proper training on the machine, both through there 2 day class as well as the many video's they post on the website. I recently purchased some accessories for a different office and they accidently sent it somewhere else. After a quick email they had my stuff at my door within 24 hrs and they threw in a box of tips which I was not expecting (around $300). It is a pleasure to deal with them!read less - 7/19/2021
Faisal Mir
Exceptional customer service! - 4/11/2025
Varghese George
The customer service has been top notch, every single time. I have only good things to say about them. - 4/05/2022
Nate Cherof
Excellent customer service and communication. Could not recommend them more - 2/14/2023
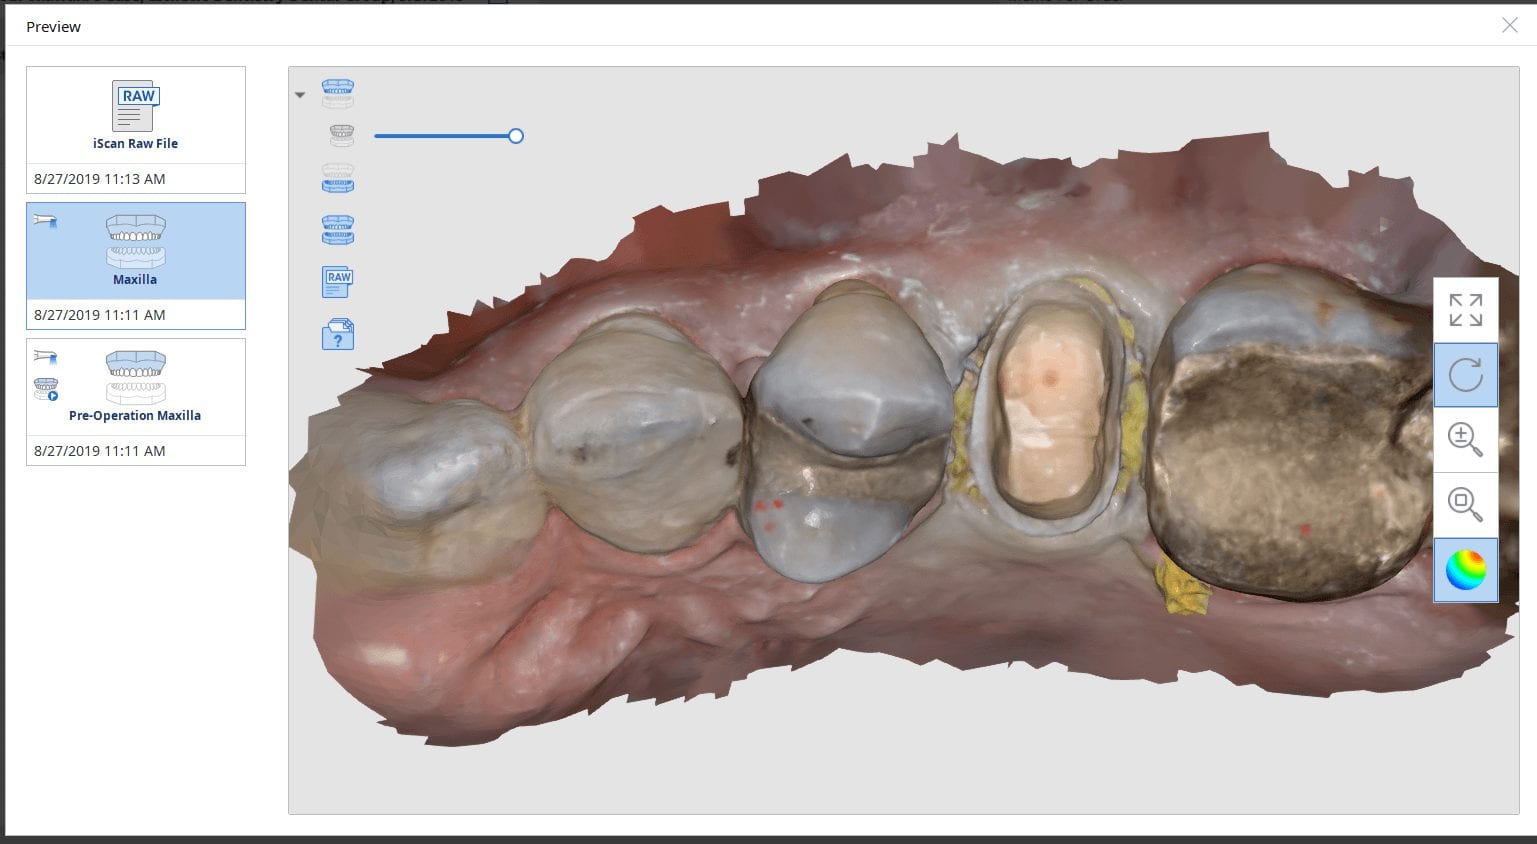
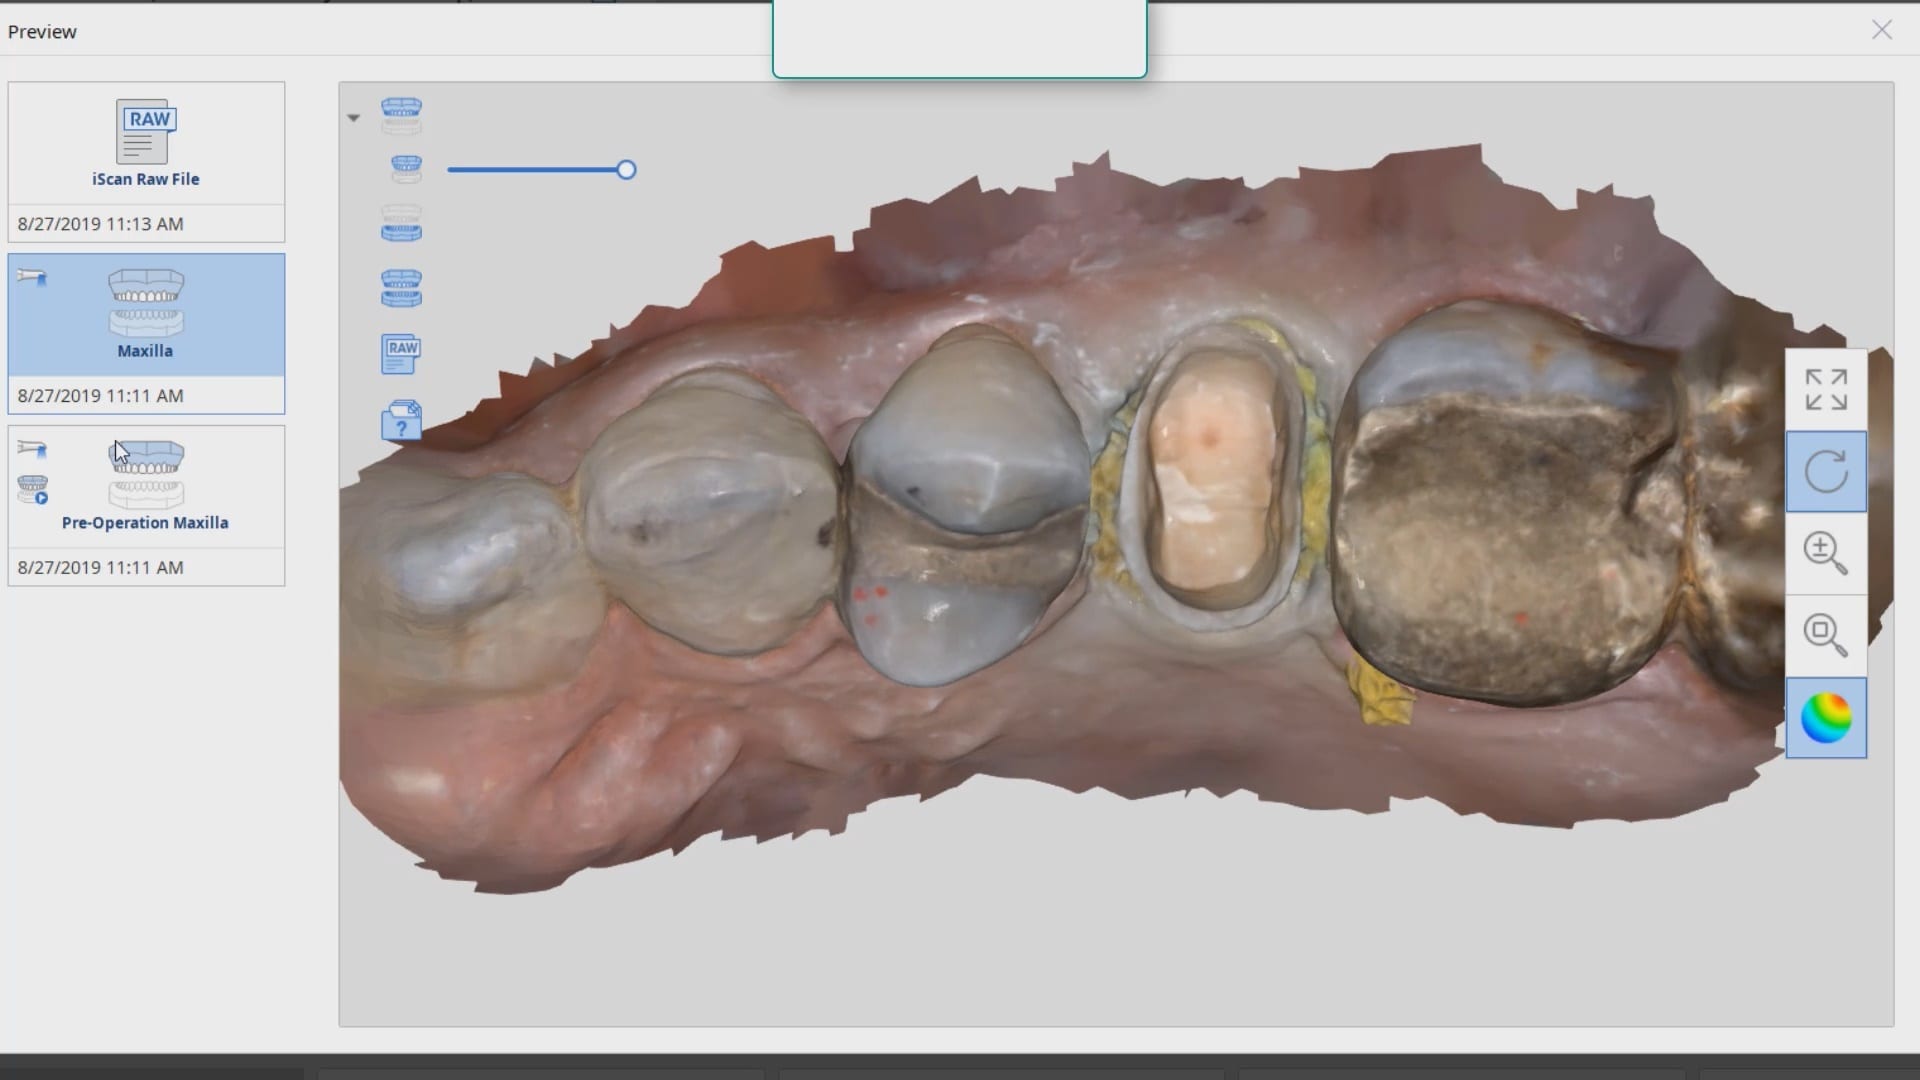
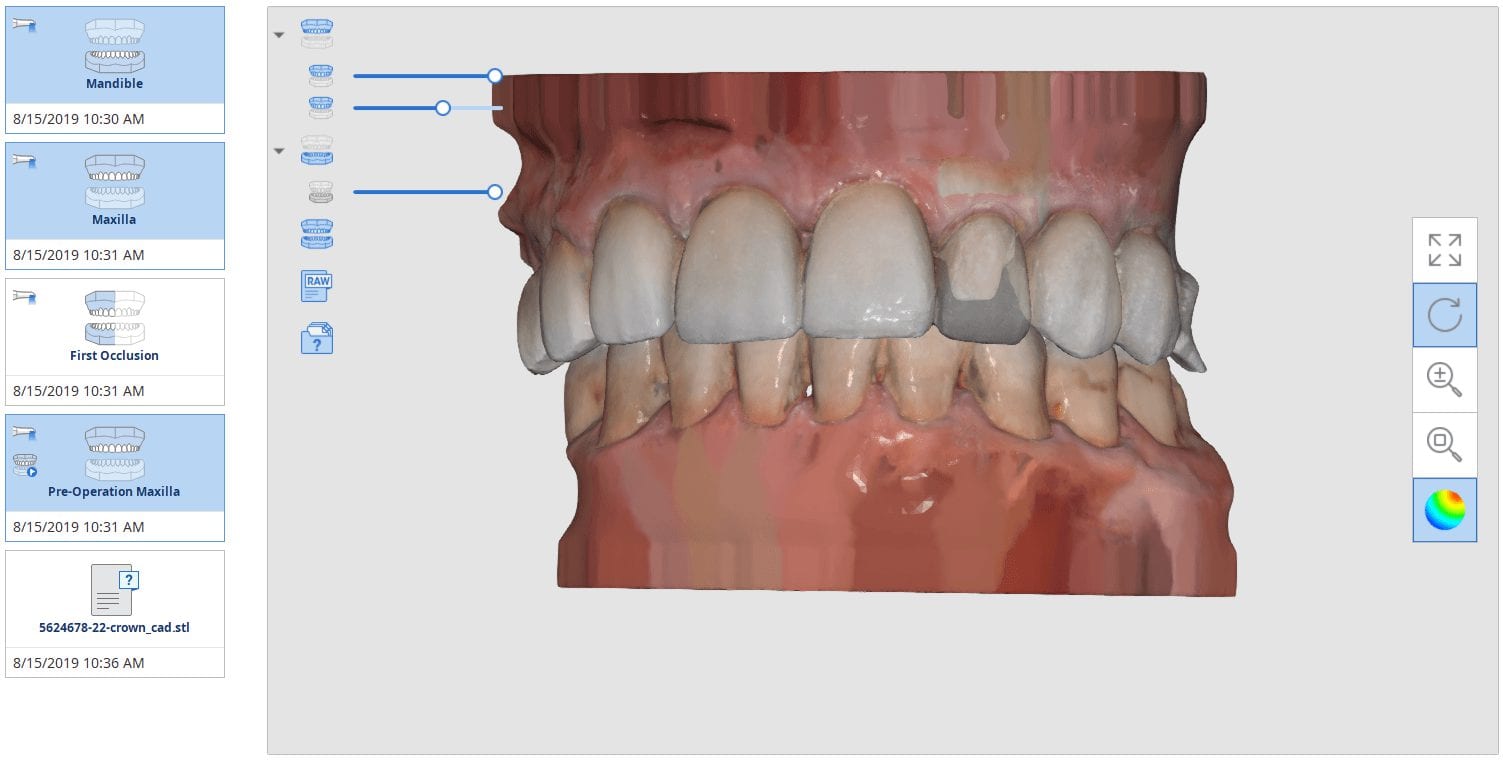
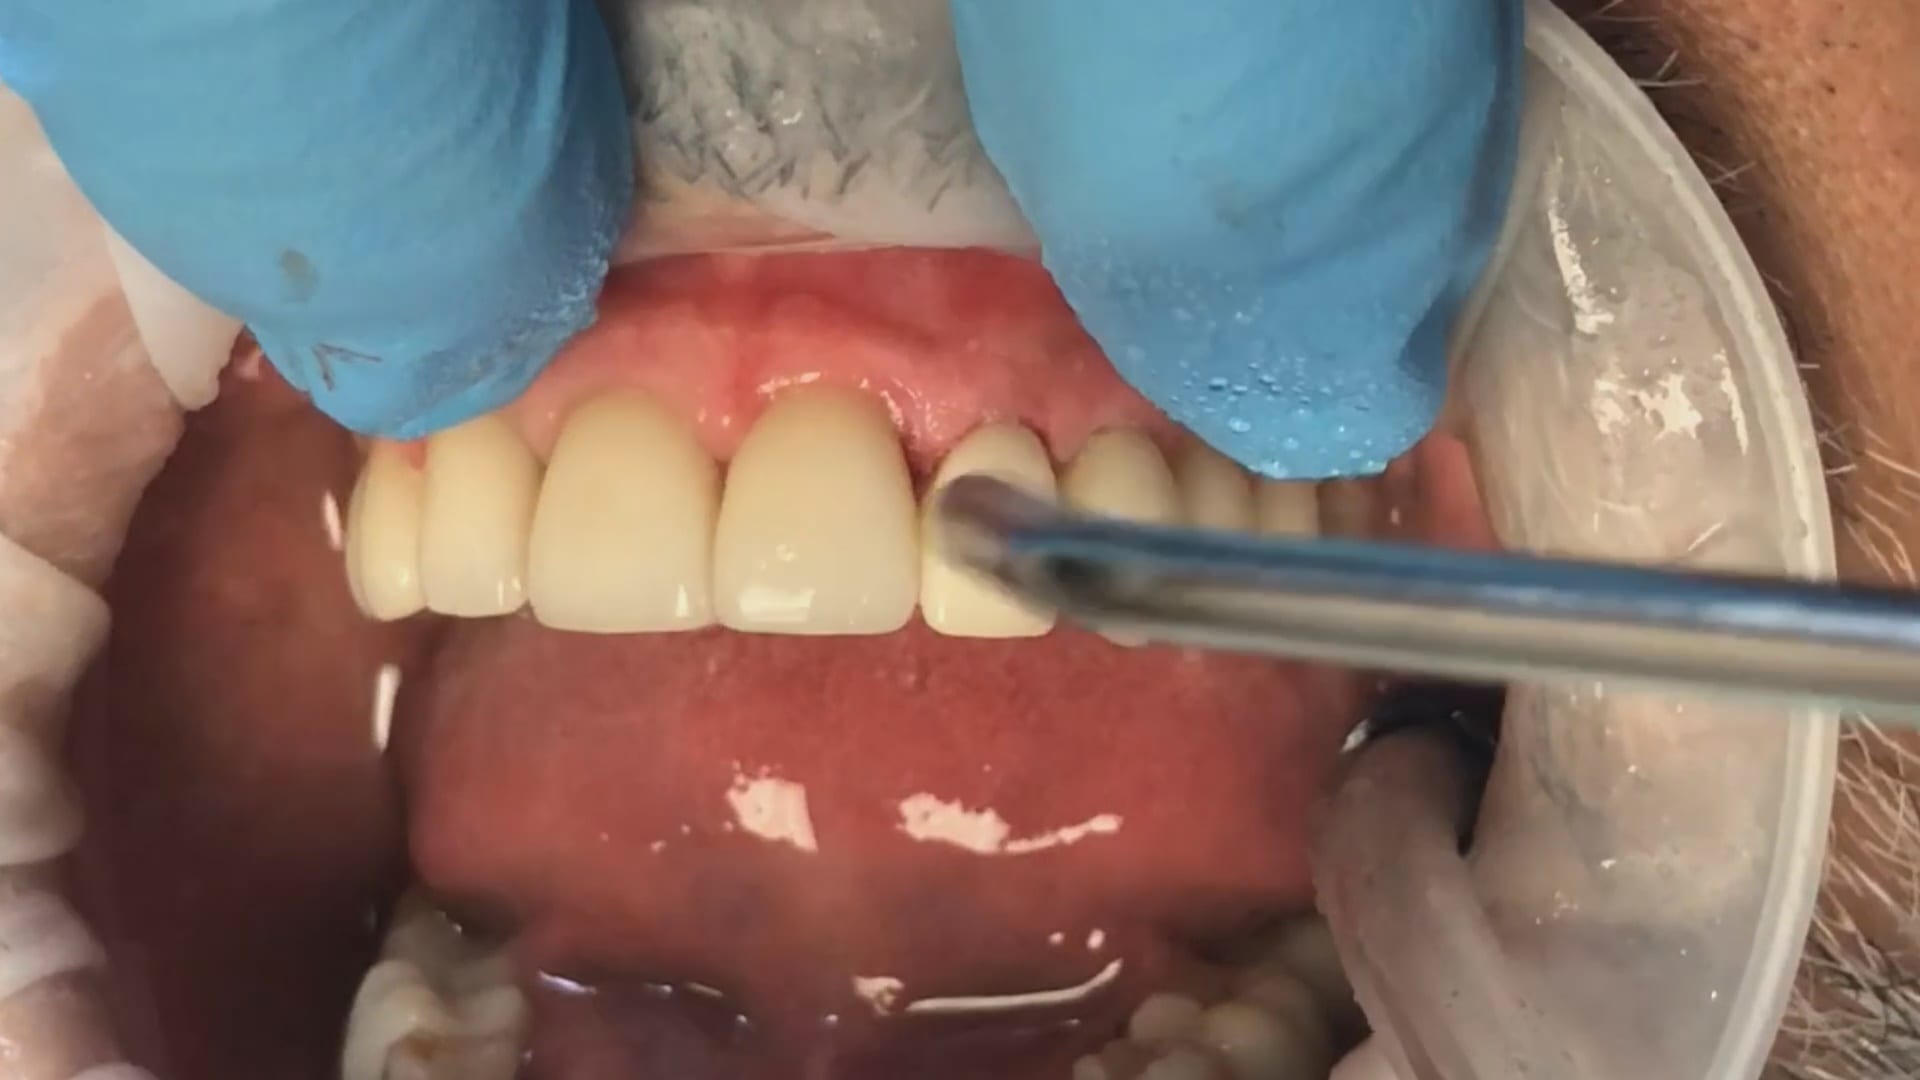
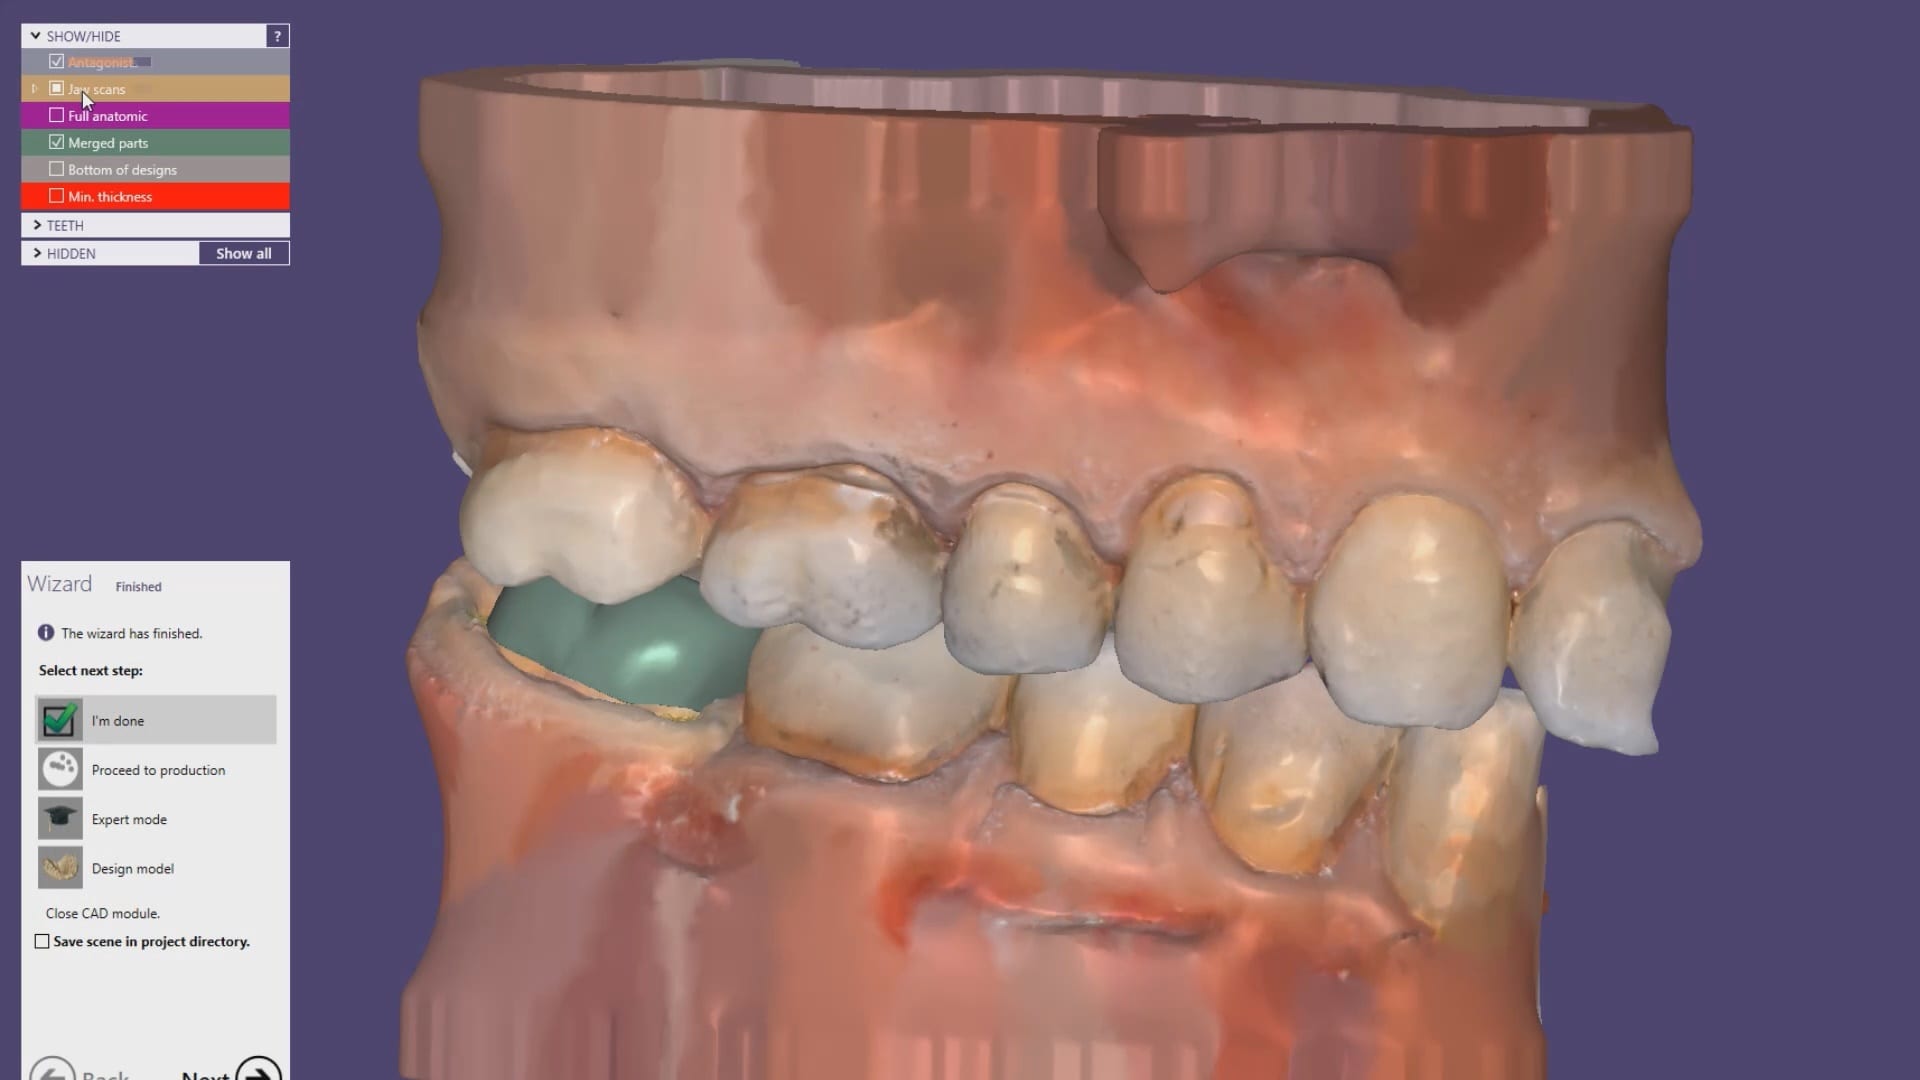
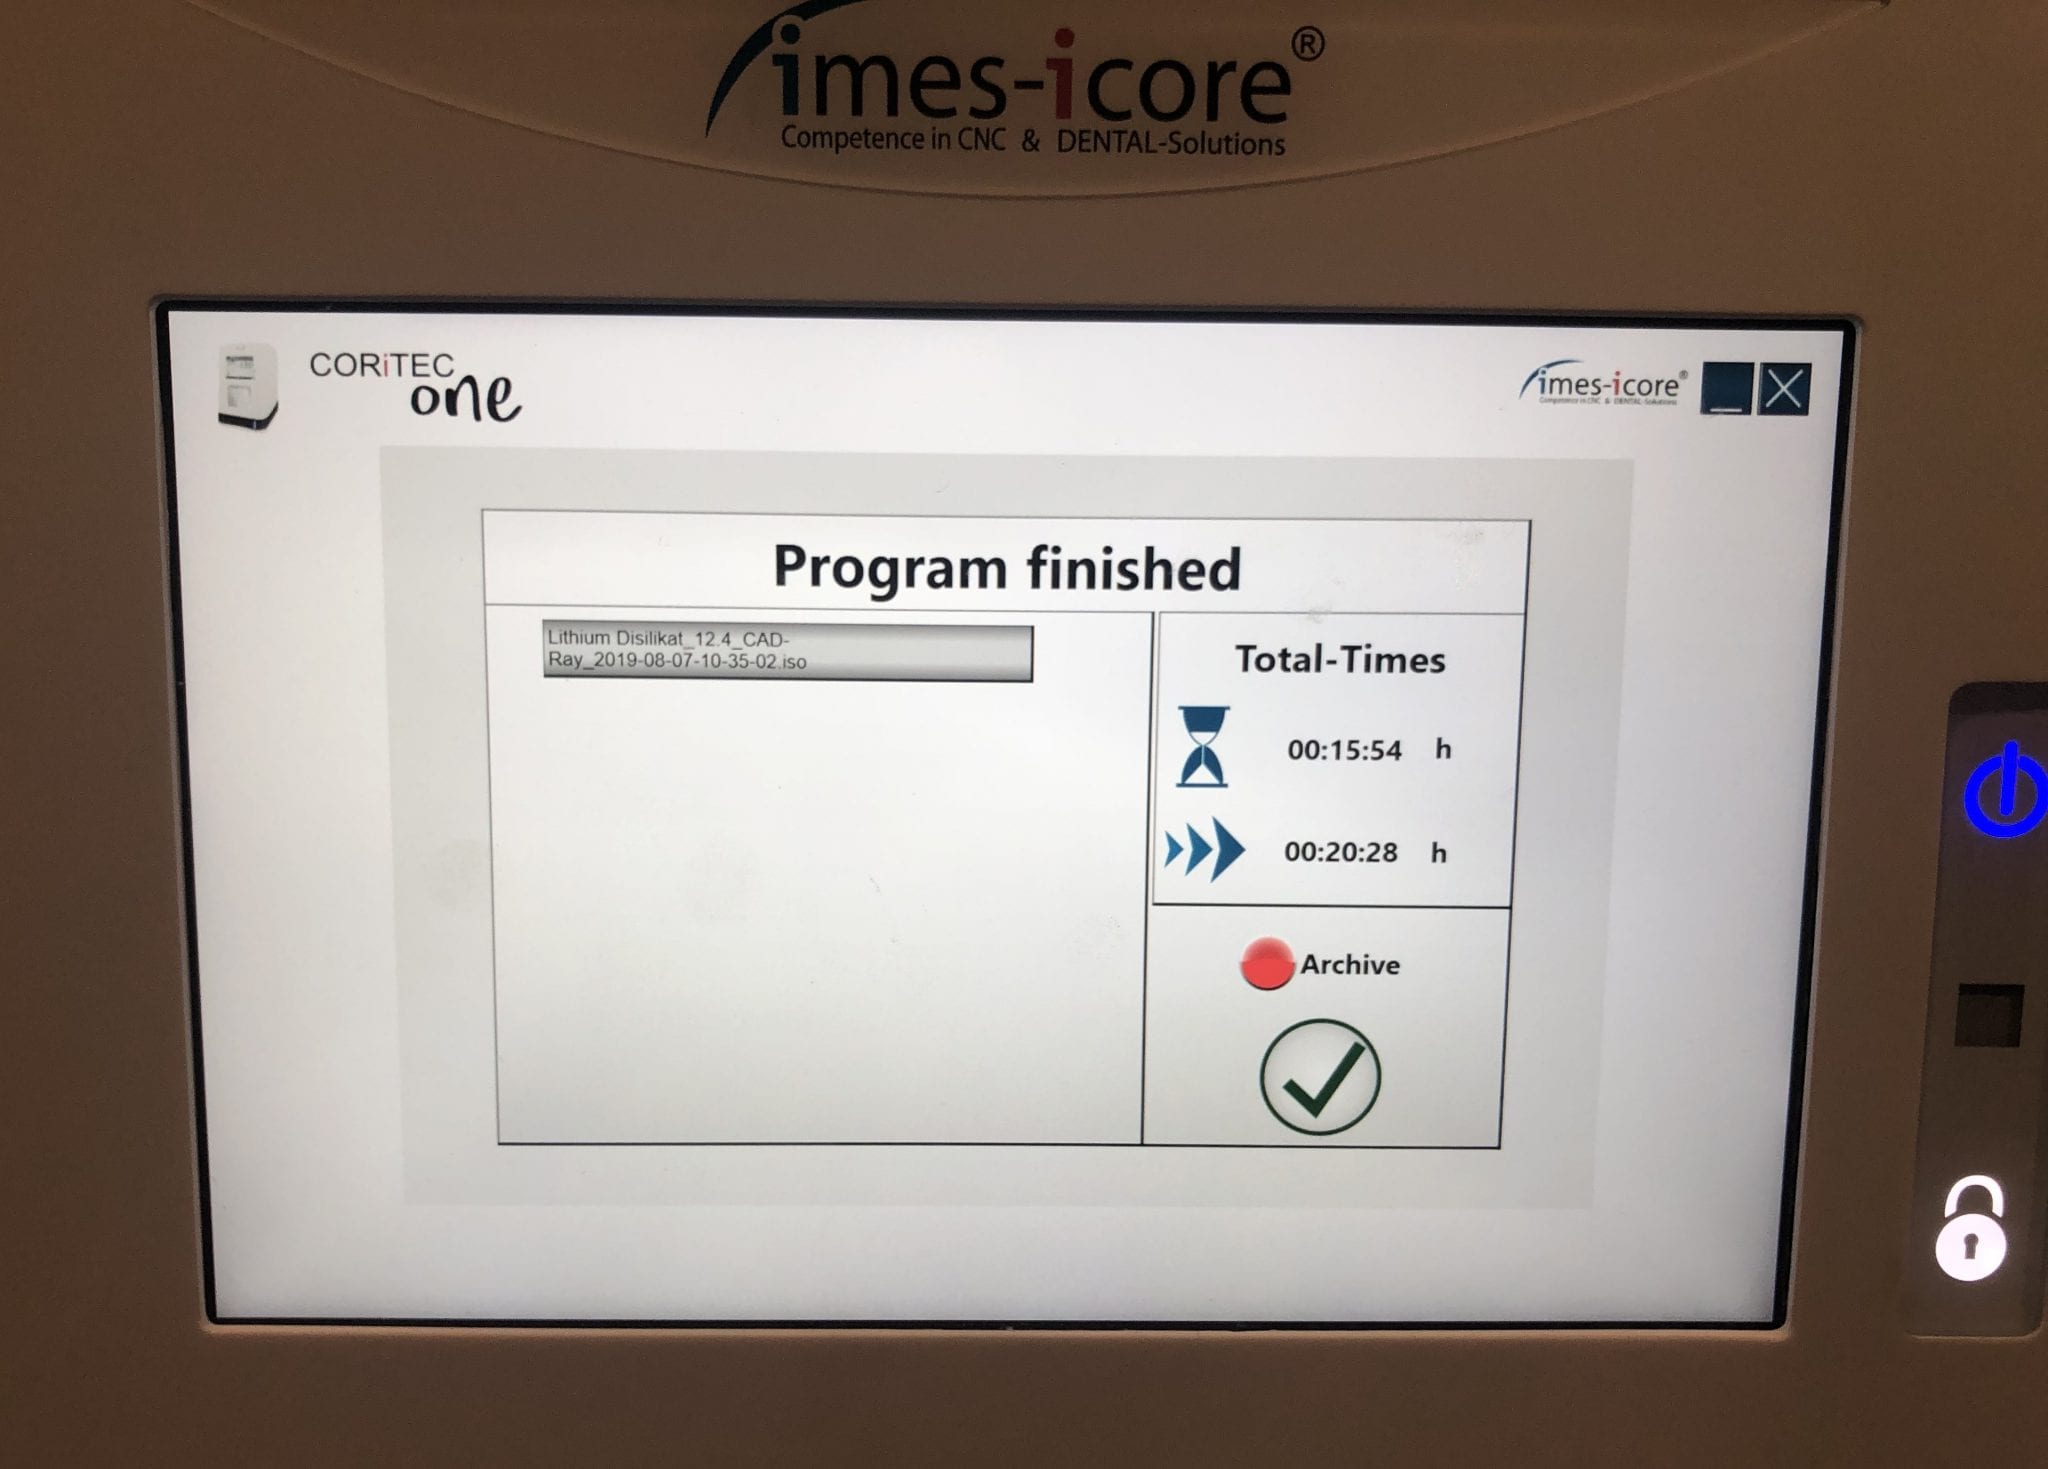
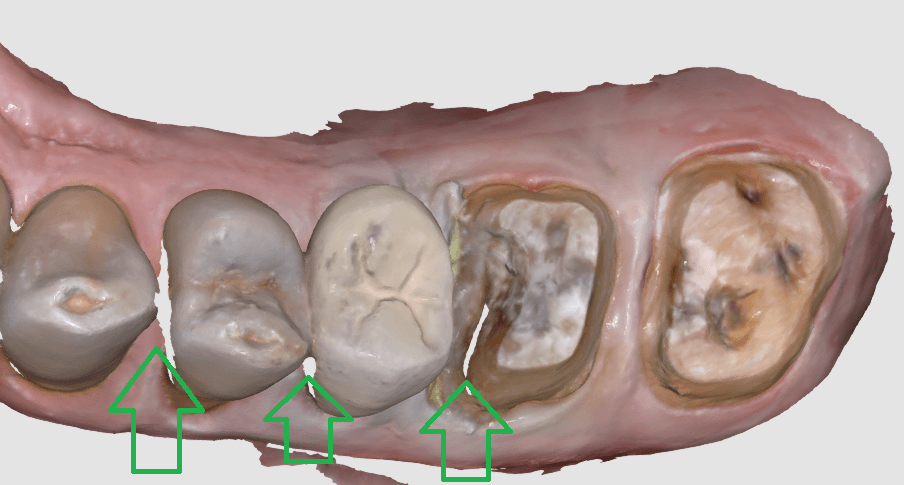
In this article, we demonstrate how to manage a crown replacement on a second upper premolar with the Medit i500, exocad, and the imes icore CORiTEC ONE milling machine. The pre-existing crown was over 2 decades old and the recession revealed a supra-gingival margin. Furthermore, there was no room to improve the anatomy or its outline form as it was in occlusion with the opposing dentition.
A powerful design technique is the copy of the pre-existing crown. Images of the pre-op are taken while the patient is numb and its contours are copied onto the final design of the restoration. This process usually takes a minute or so, after which we milled a size 12 emax block restoration.
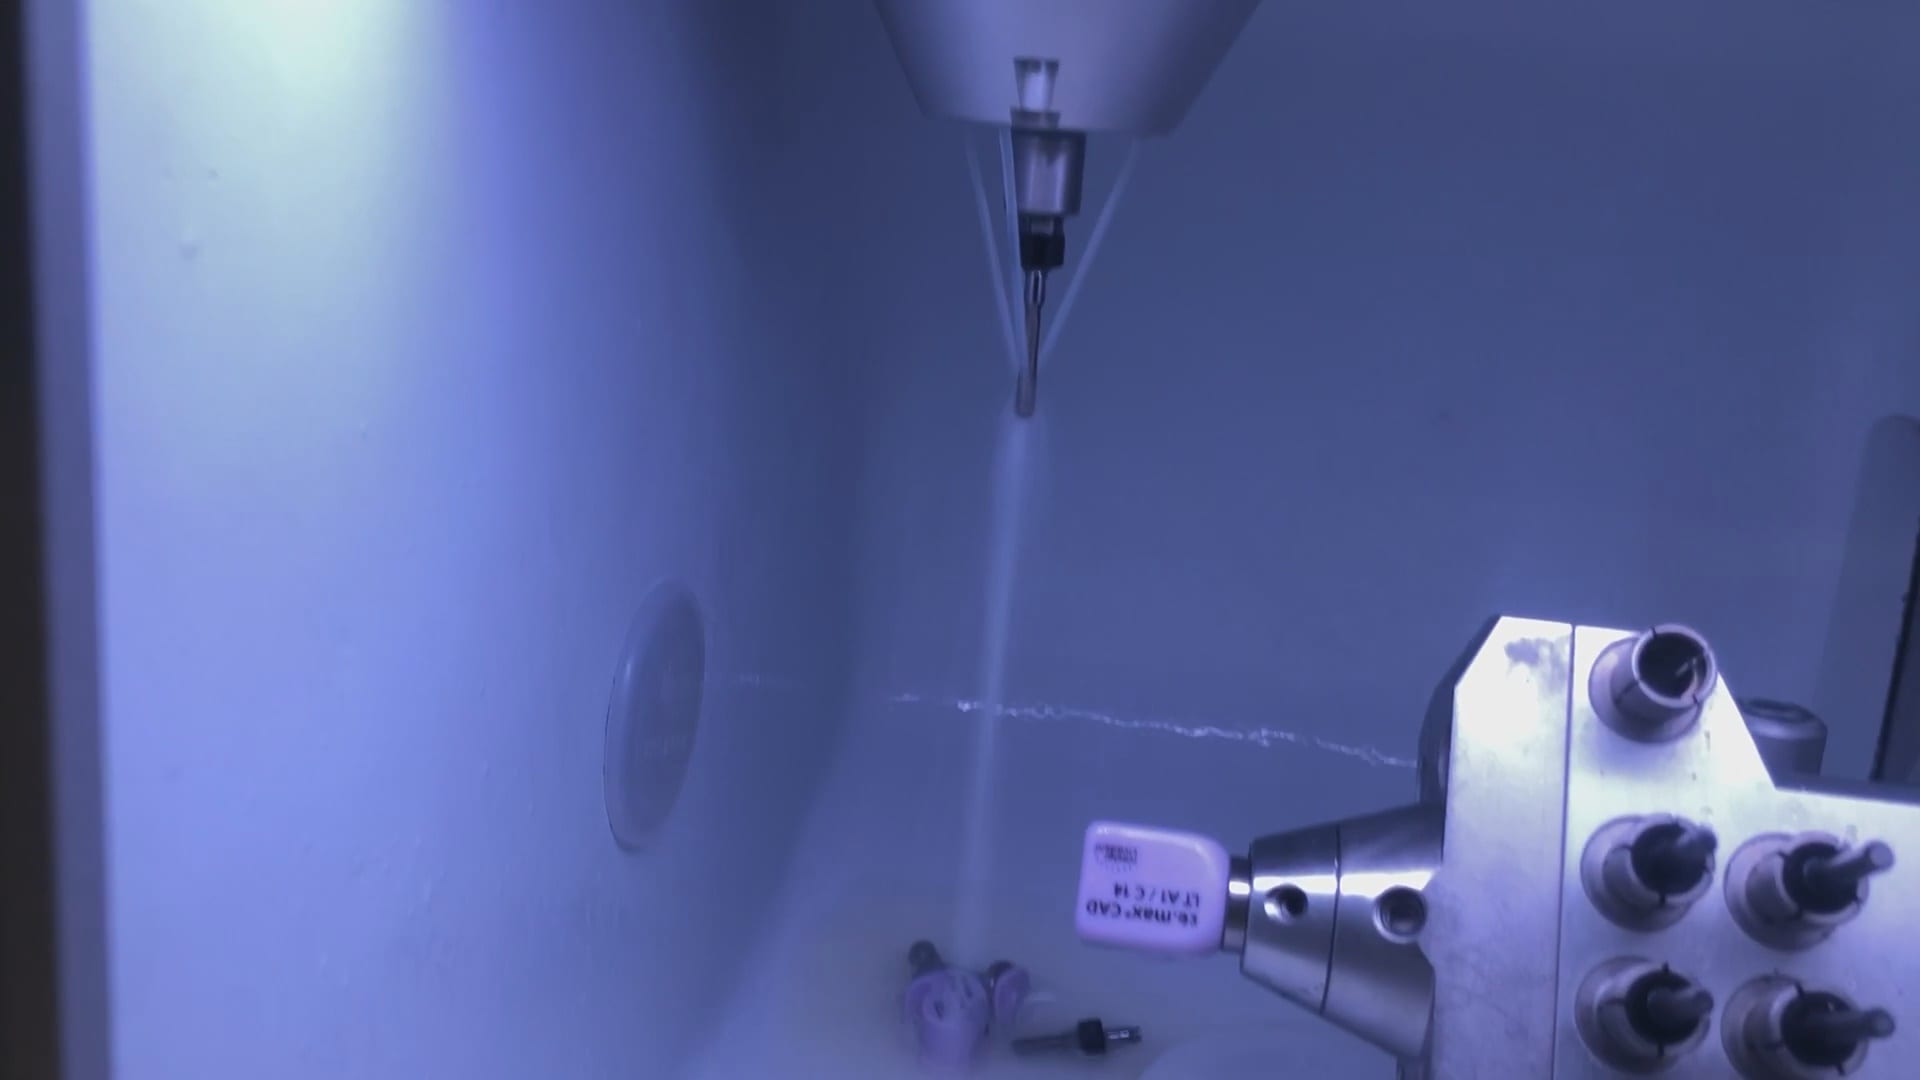
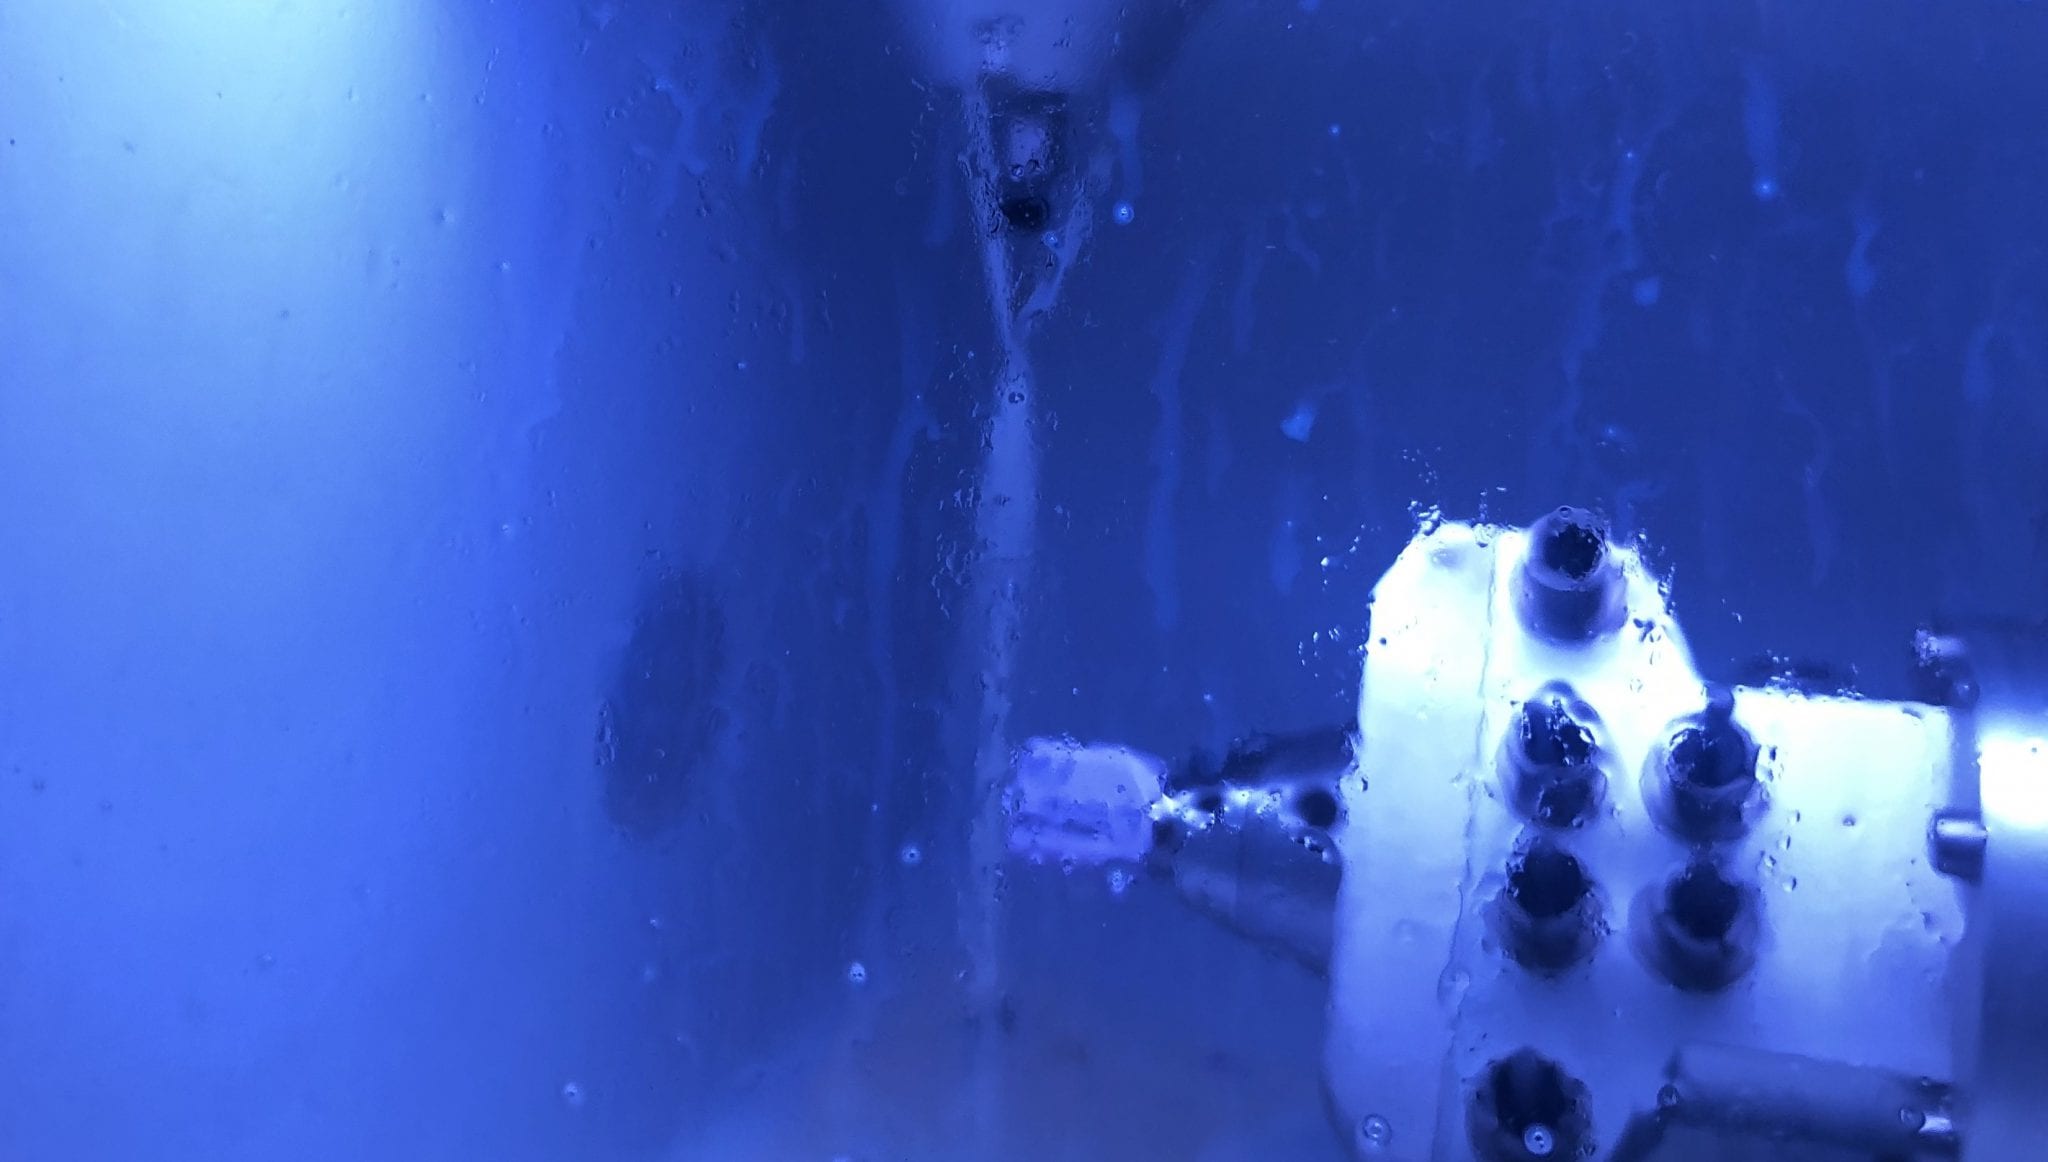
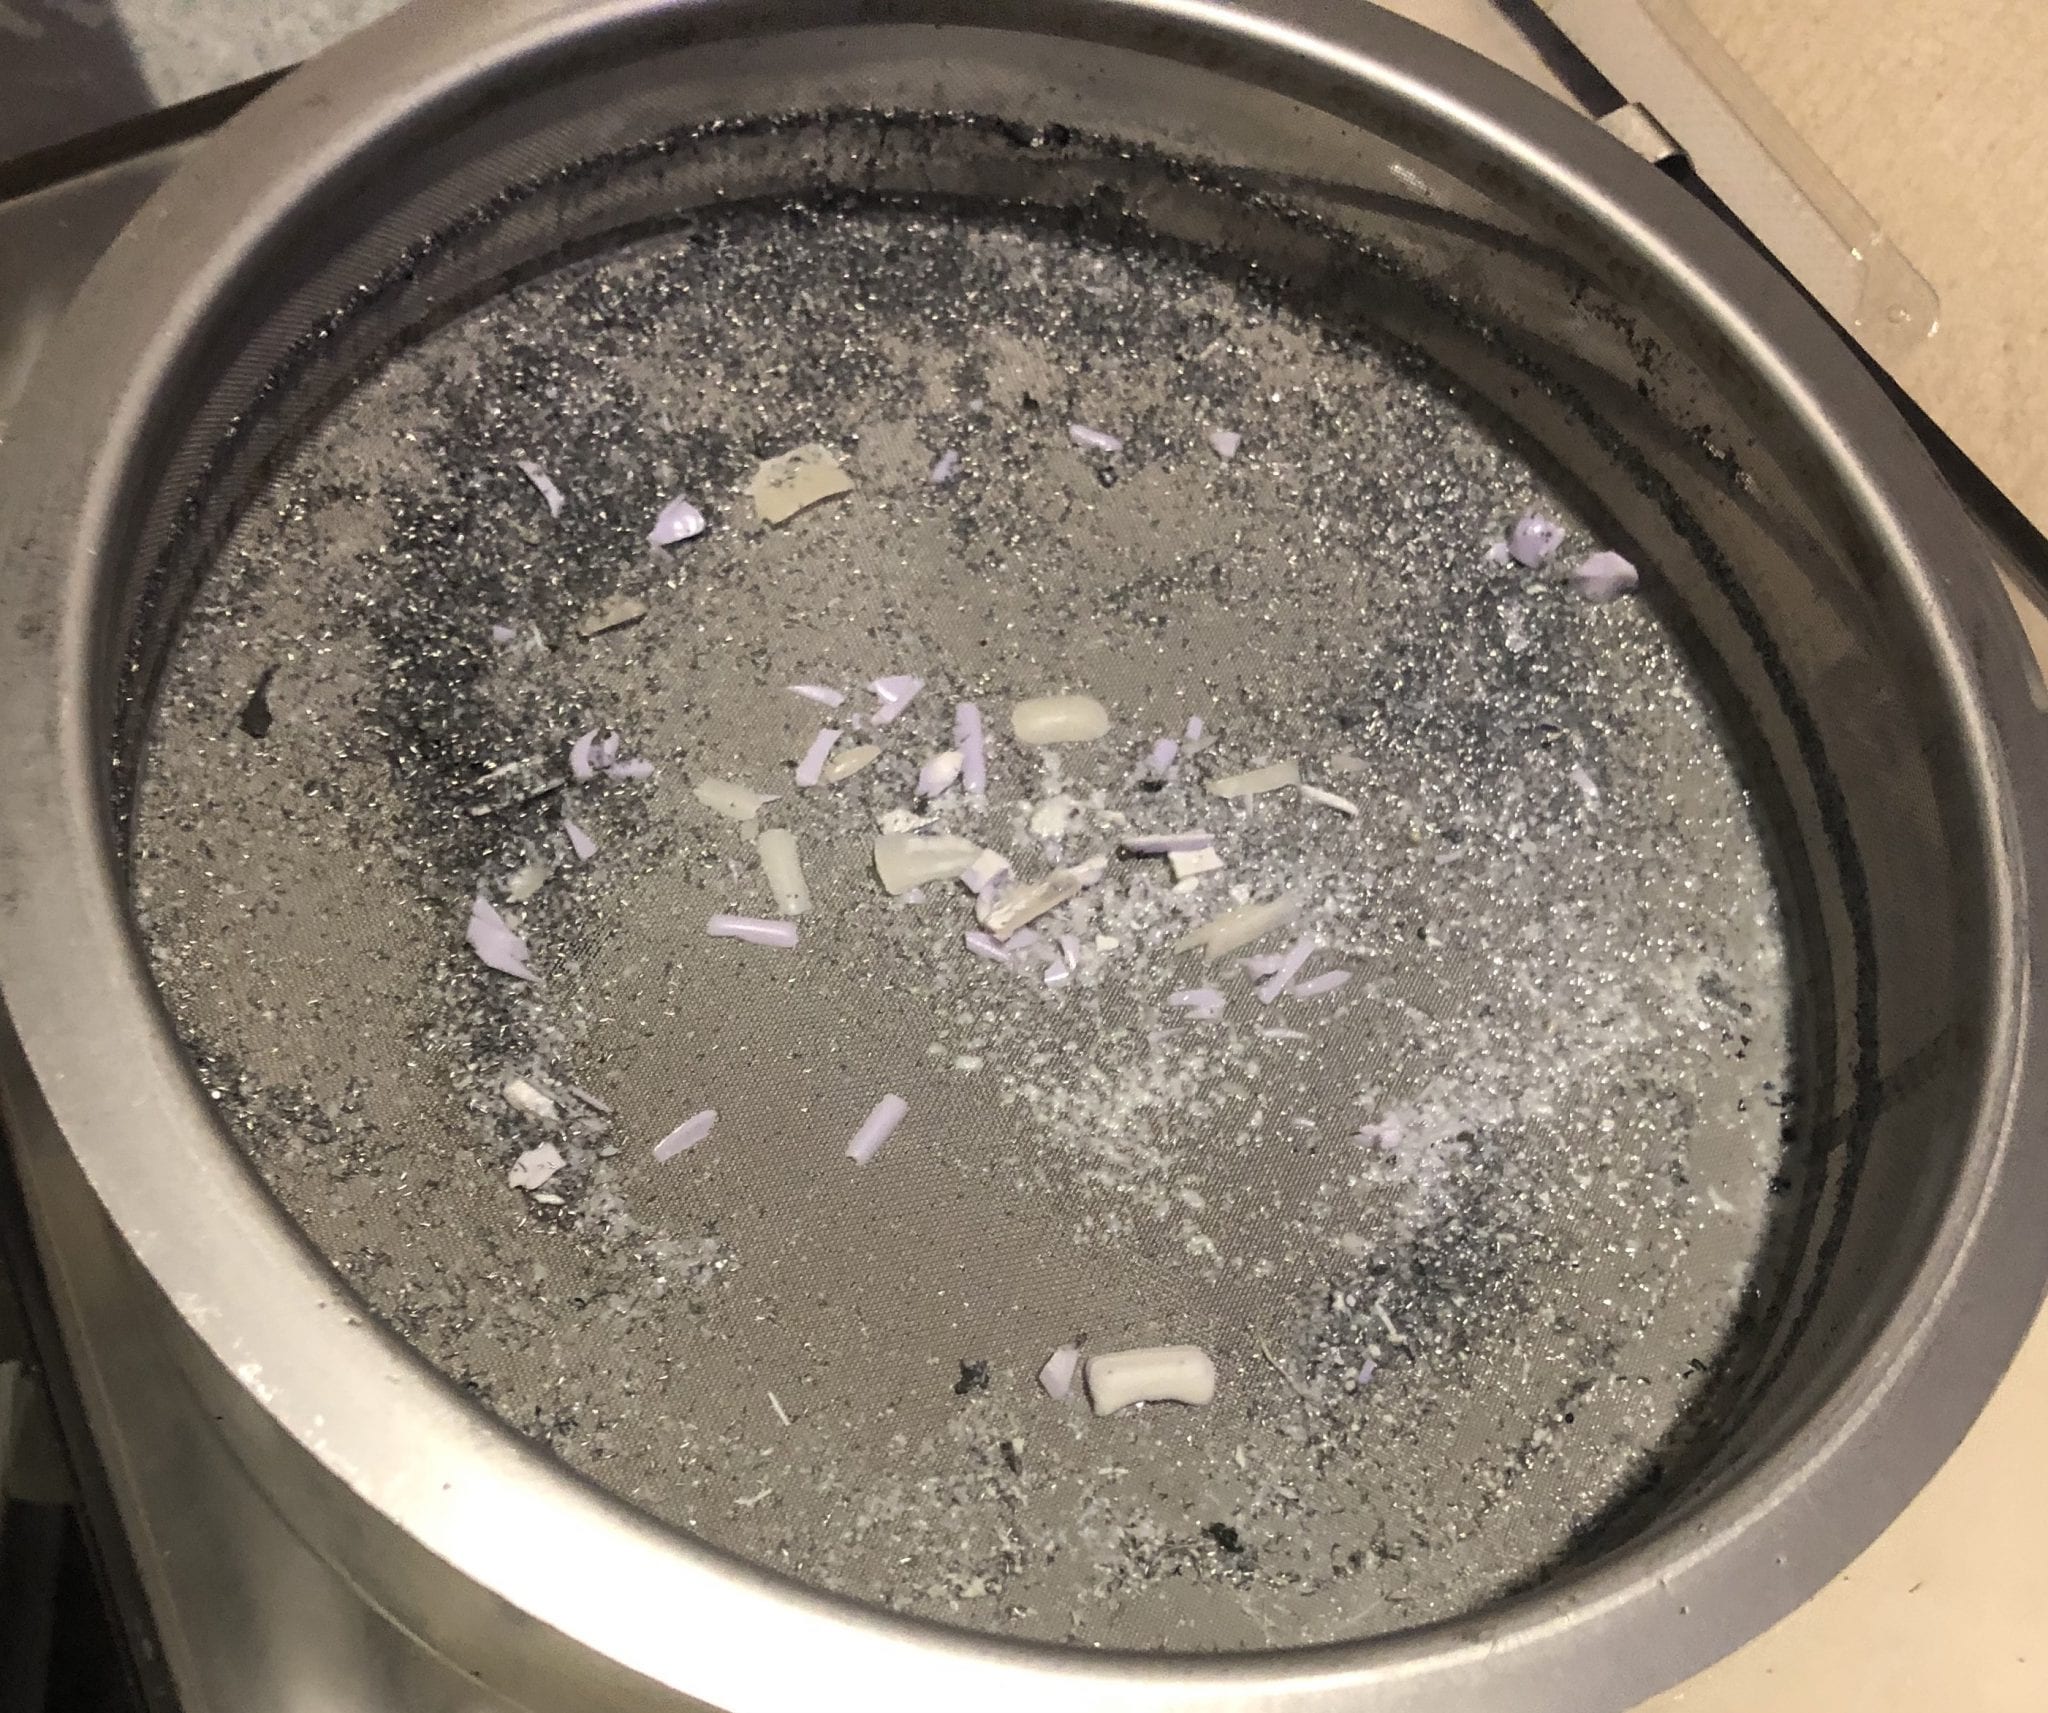
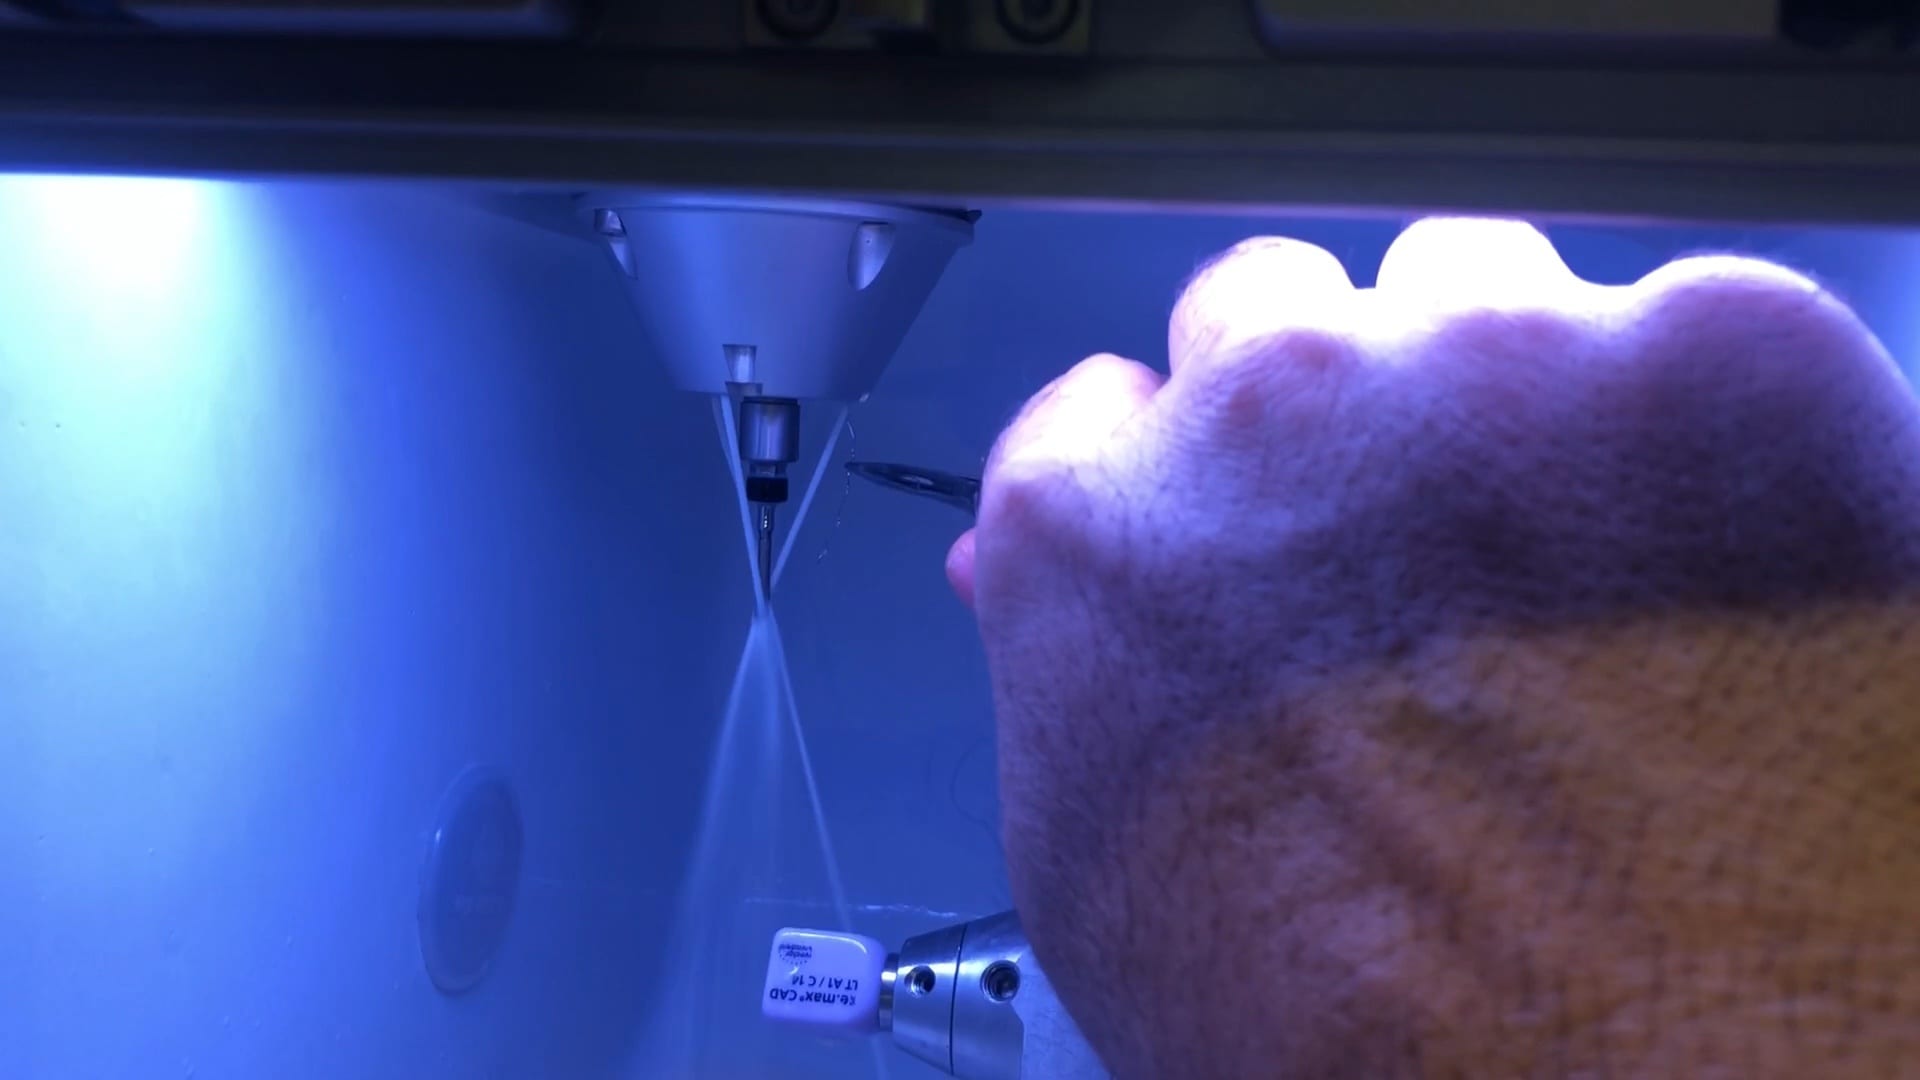
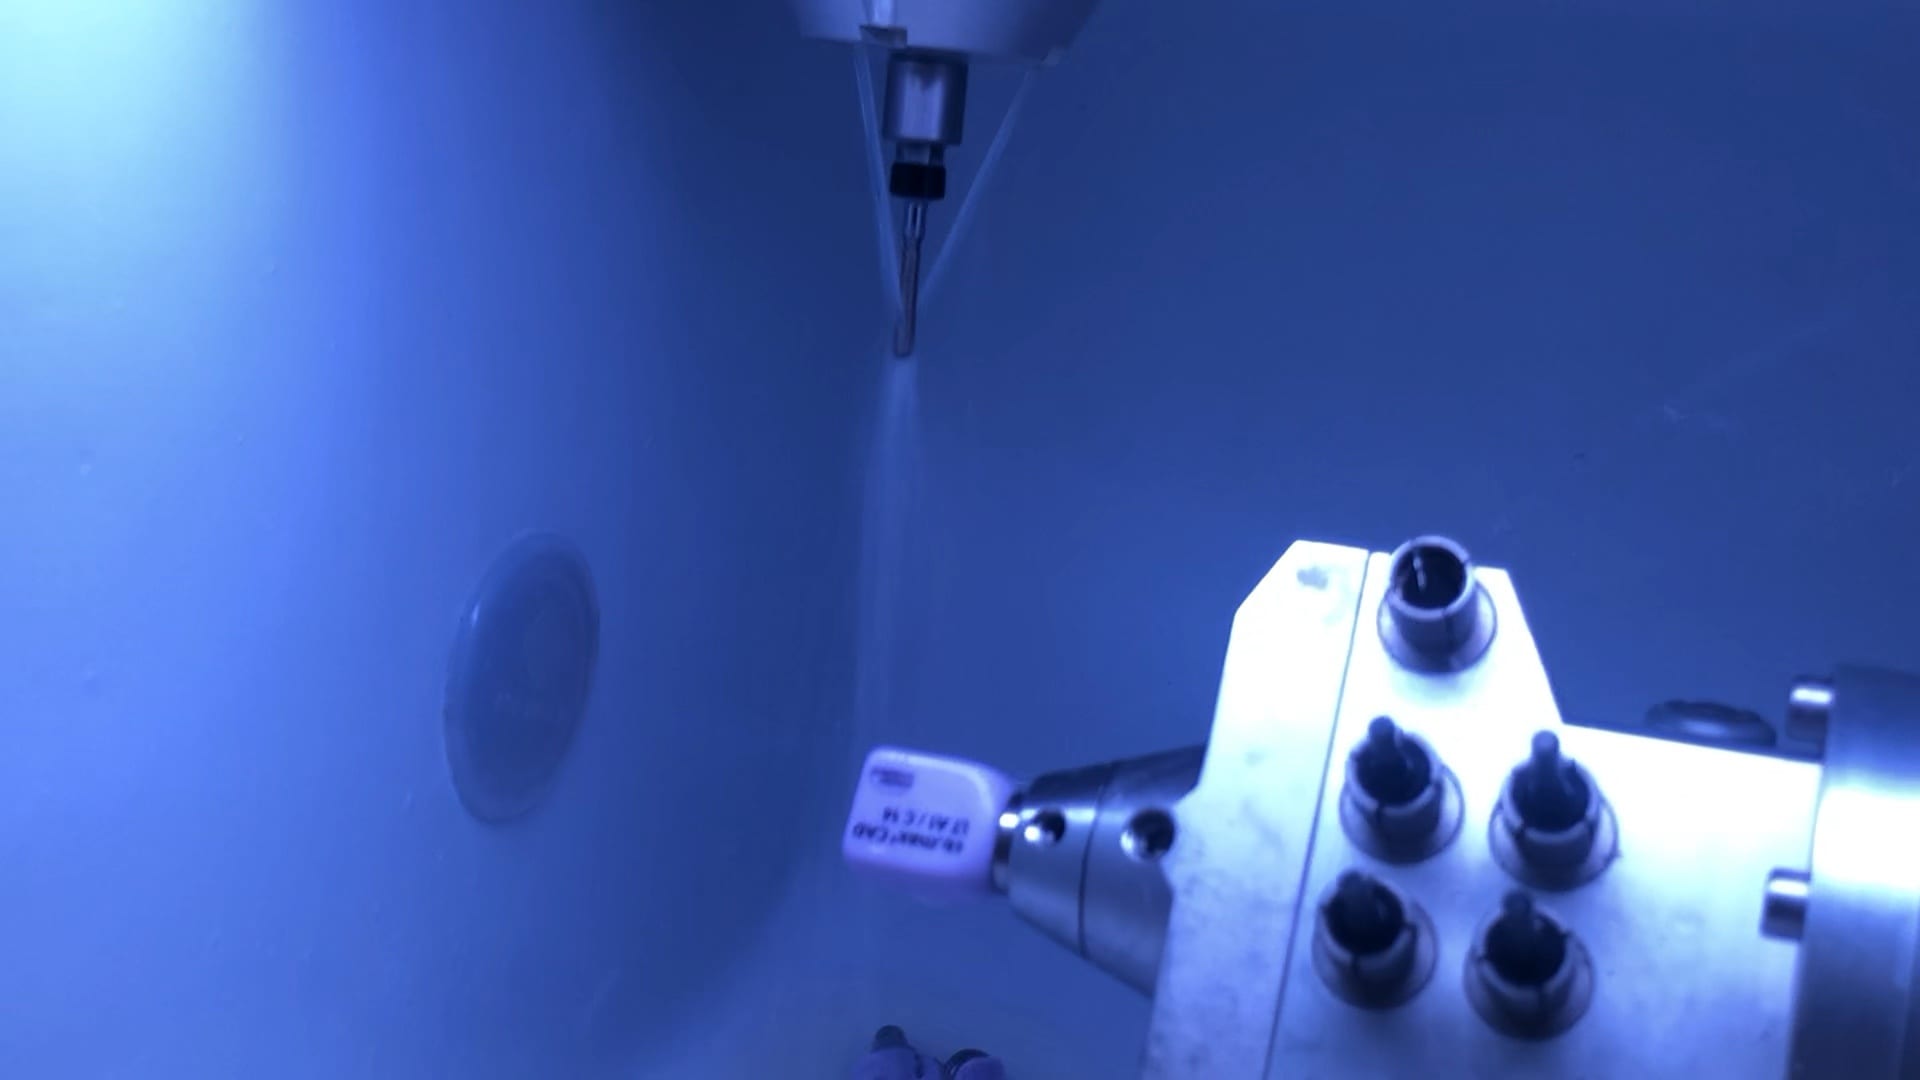
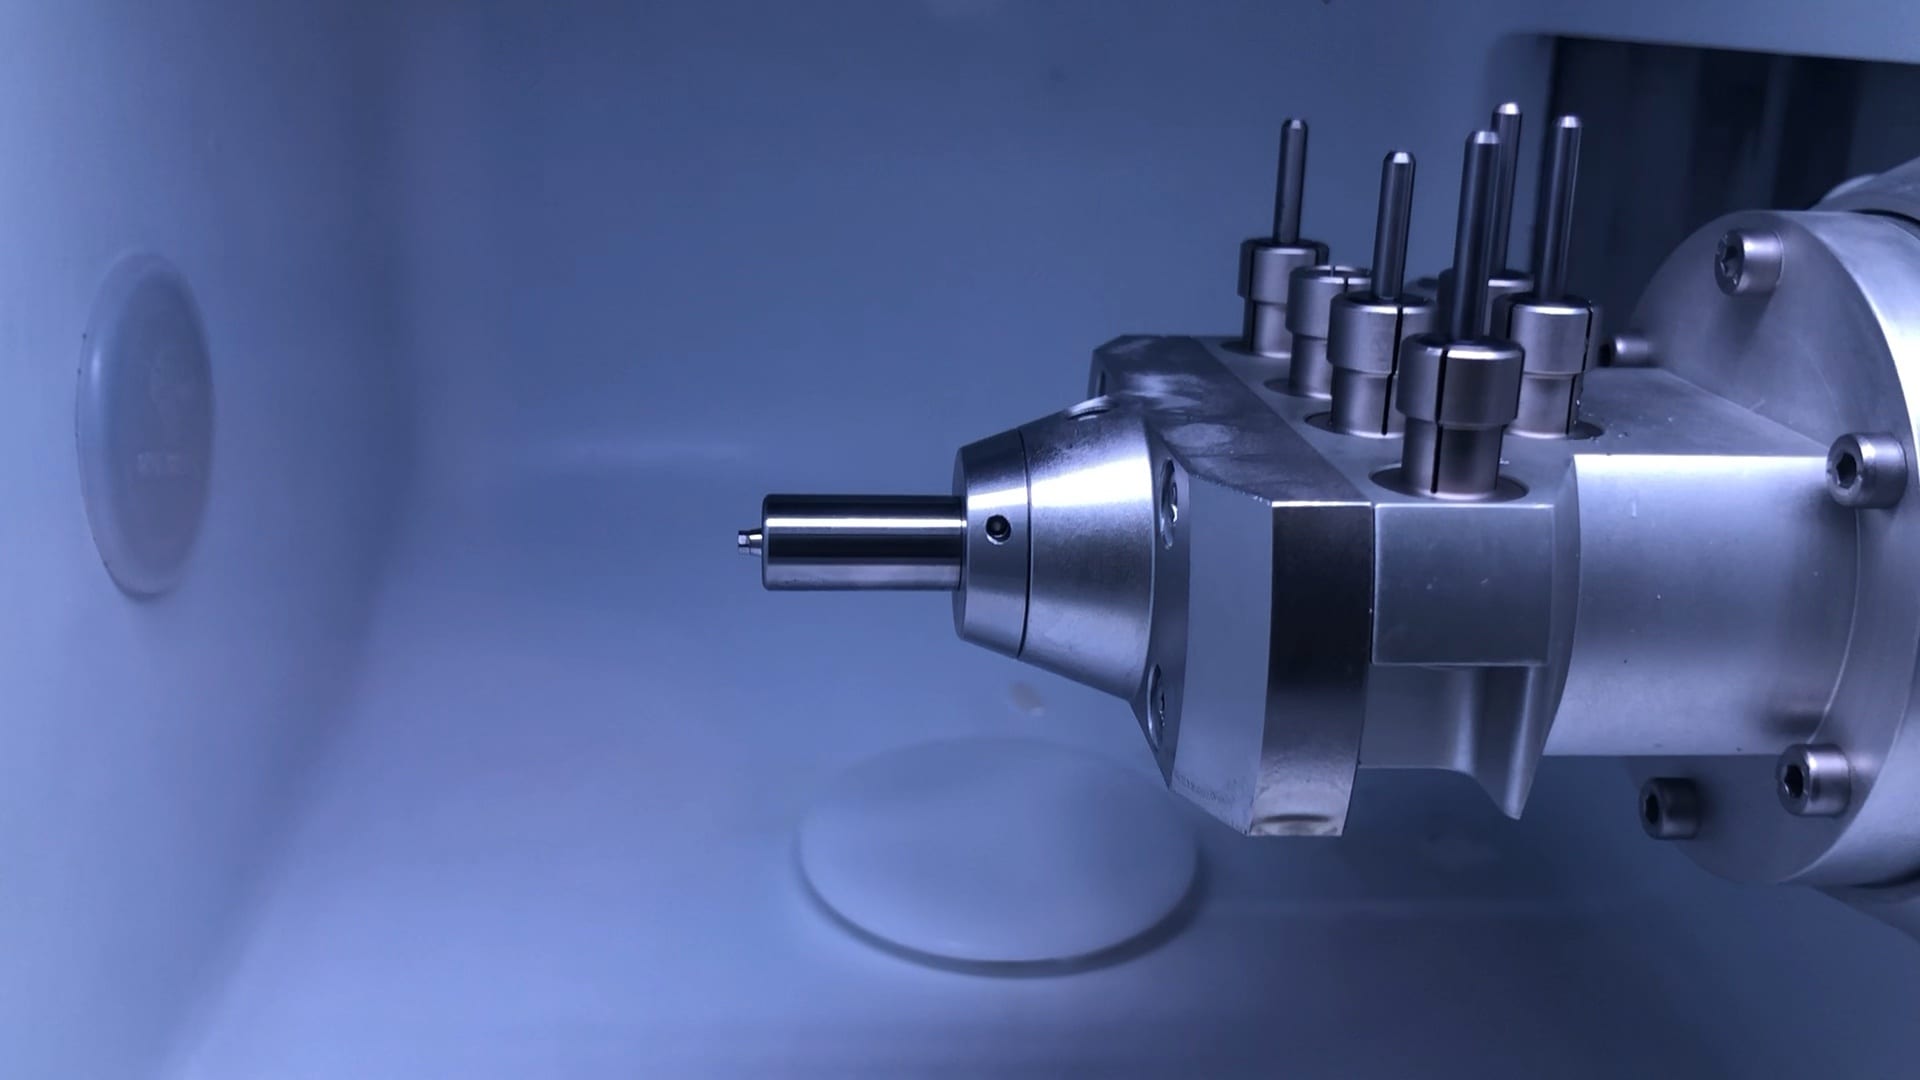
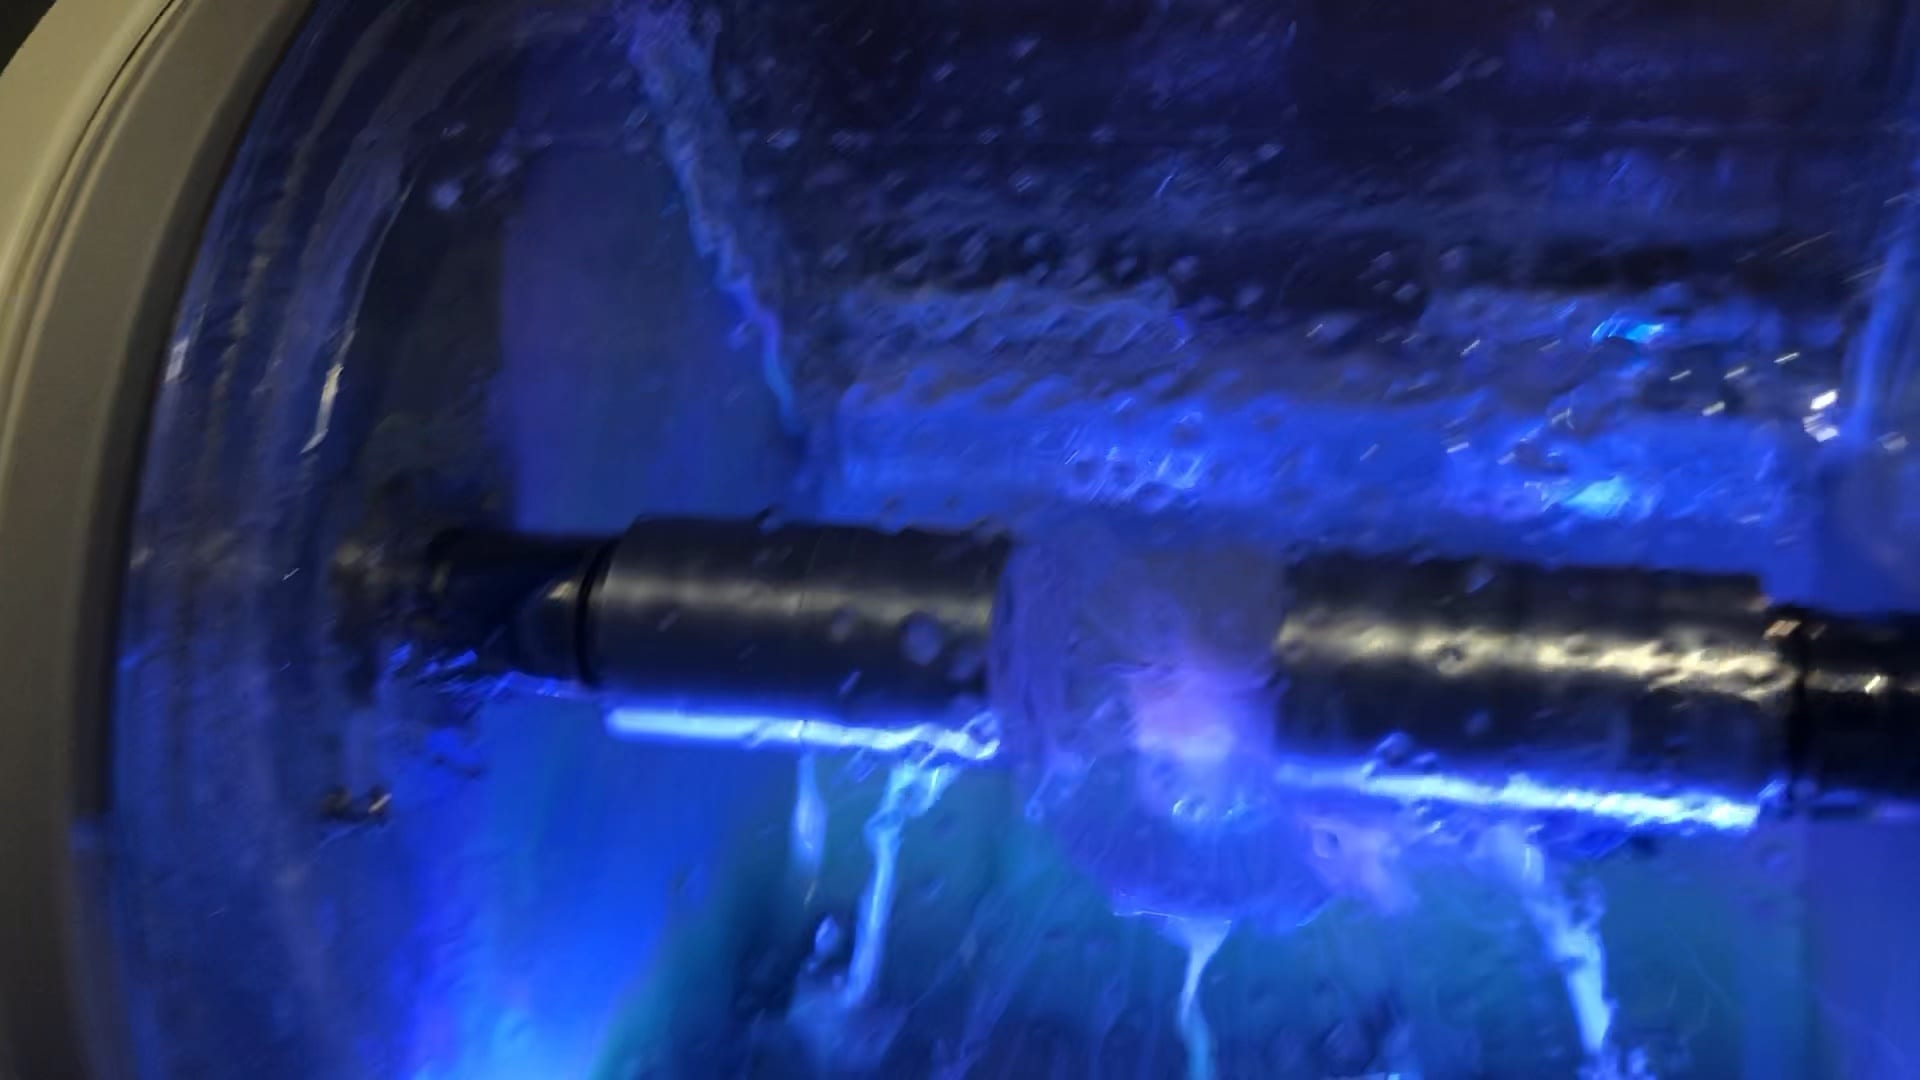
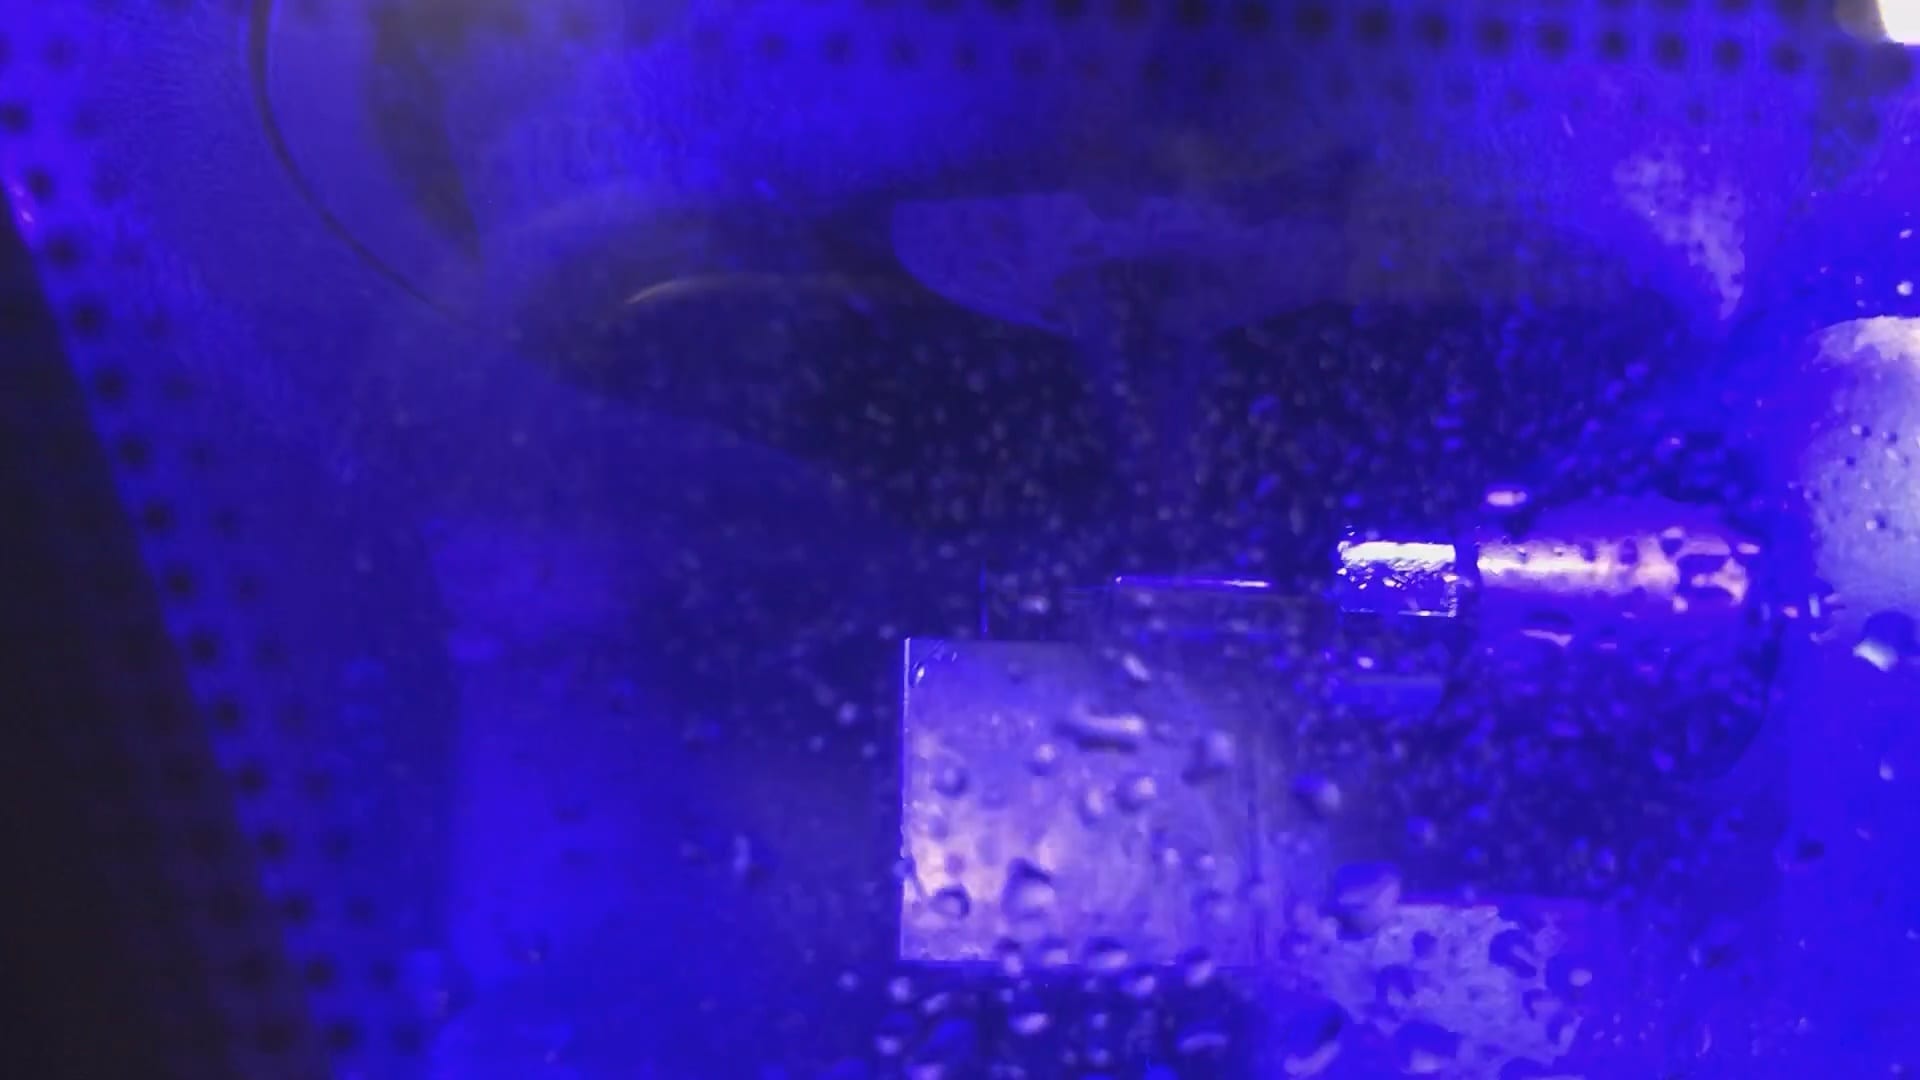
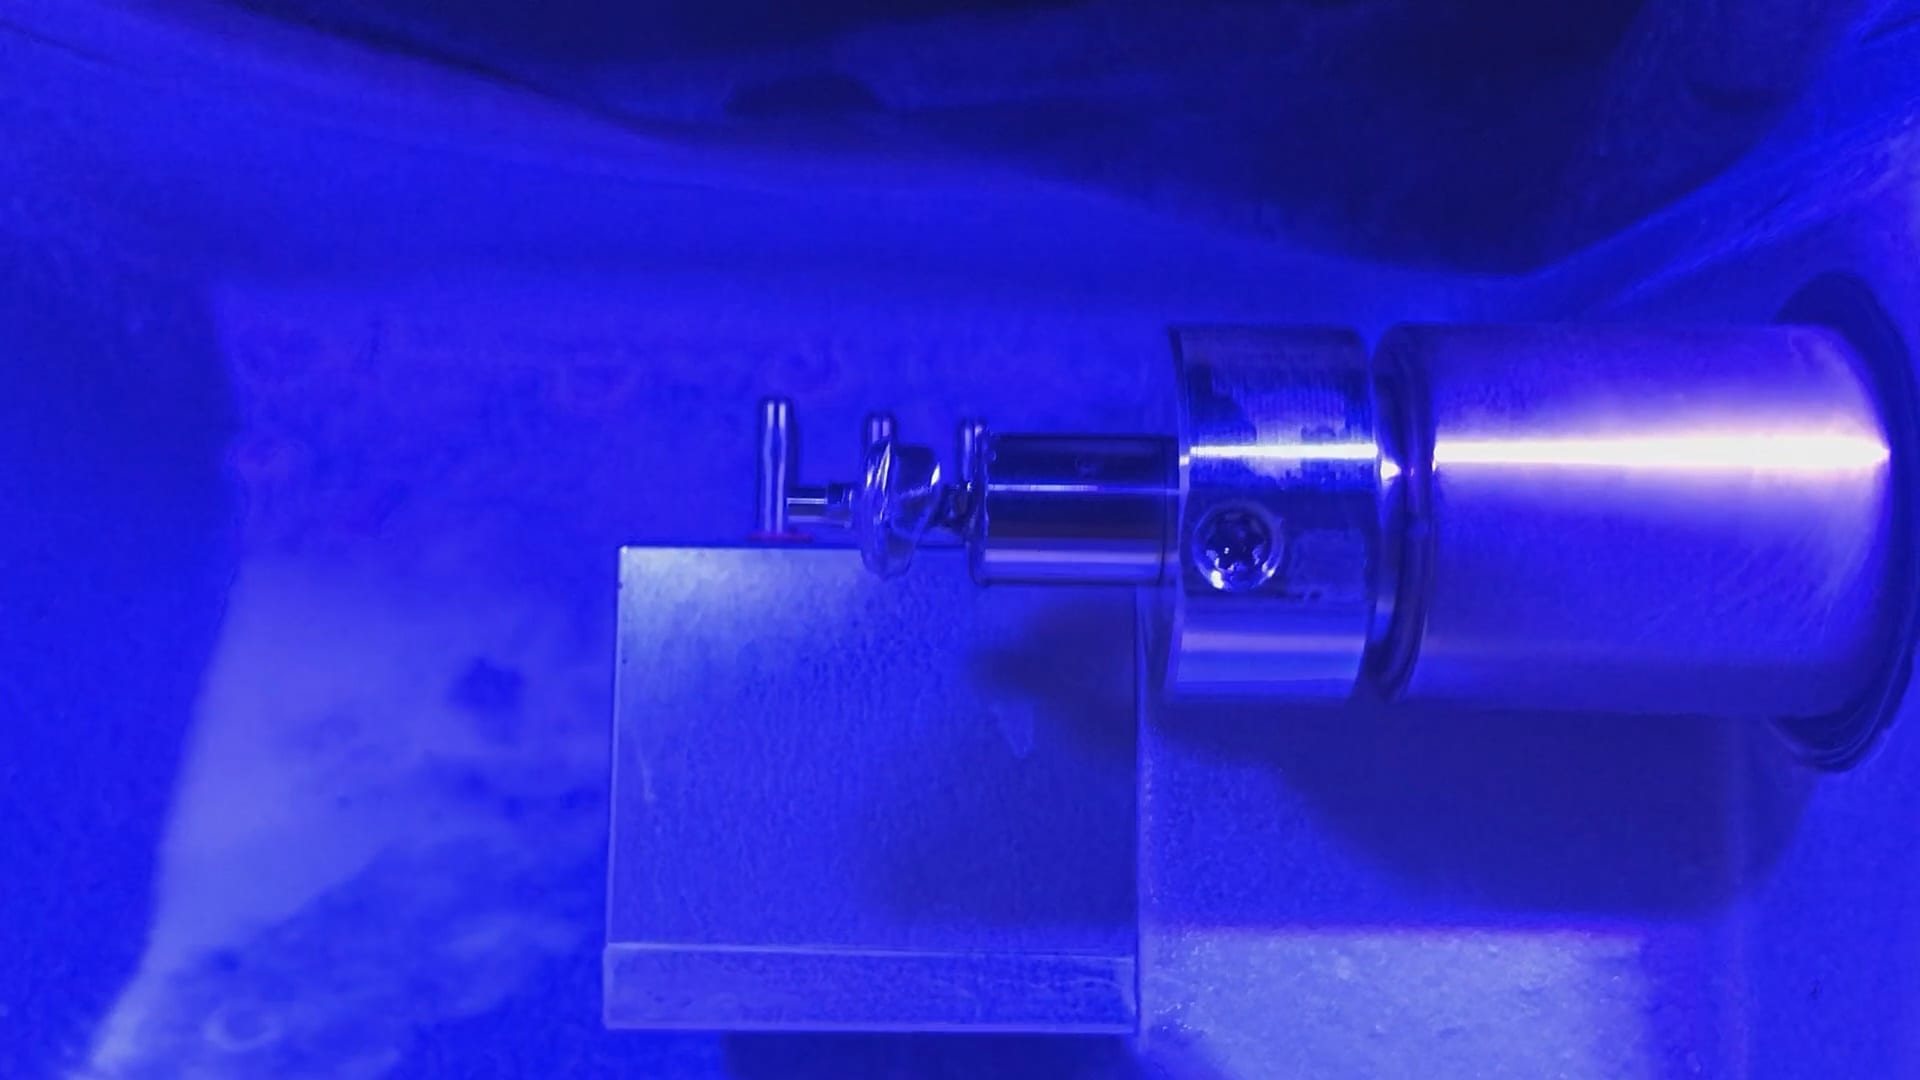
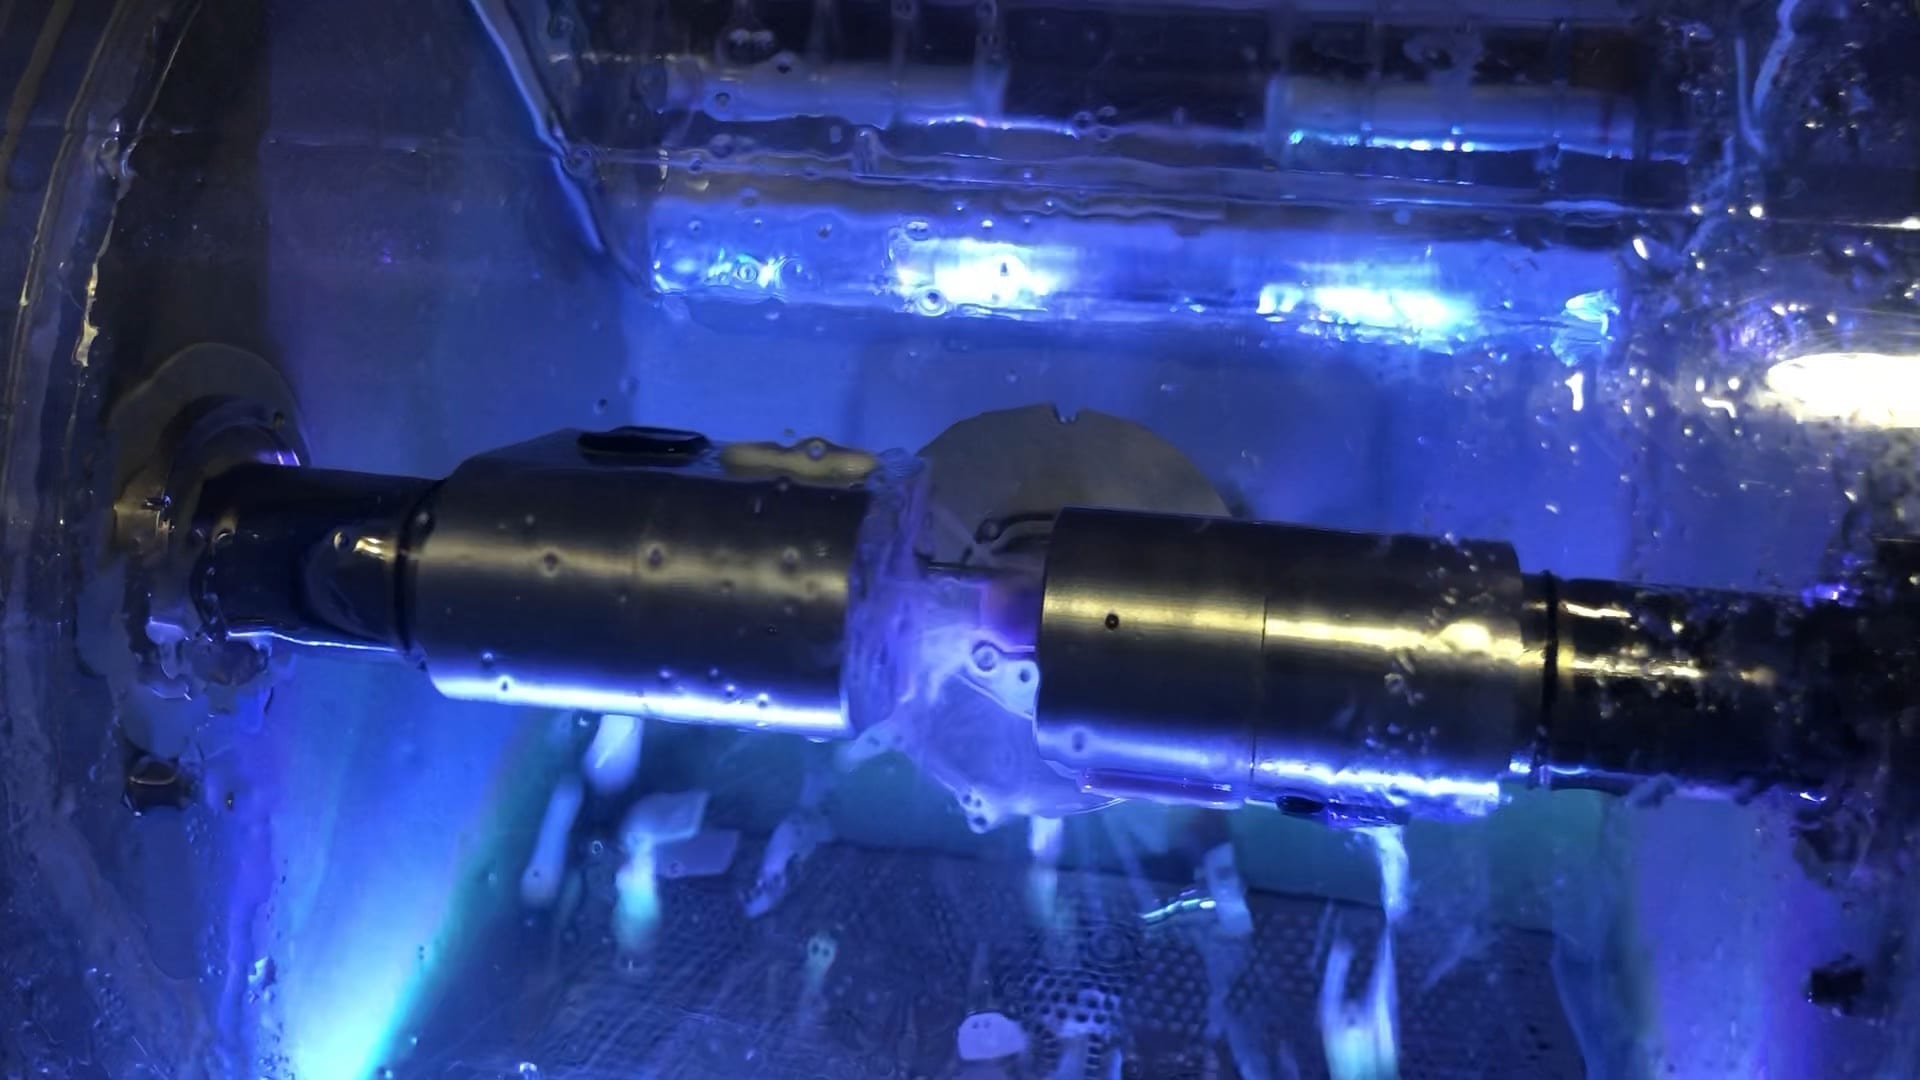
All milling machines have guidelines for proper cleaning and maintanance. The imes icore CORITEC ONE’s spray channels must be kept clean, otherwise they will spray off the target block materials. Essentially you will dry mill ceramic which will damage the material and break the drills very quickly.
You can see how little particles of ceramic and titanium dust can clog the lines.
Here we just used an ortho plier and orthowires to unclog the lines. It’s easiest to have the water spraying so you can identify the channels and see the immediate results.
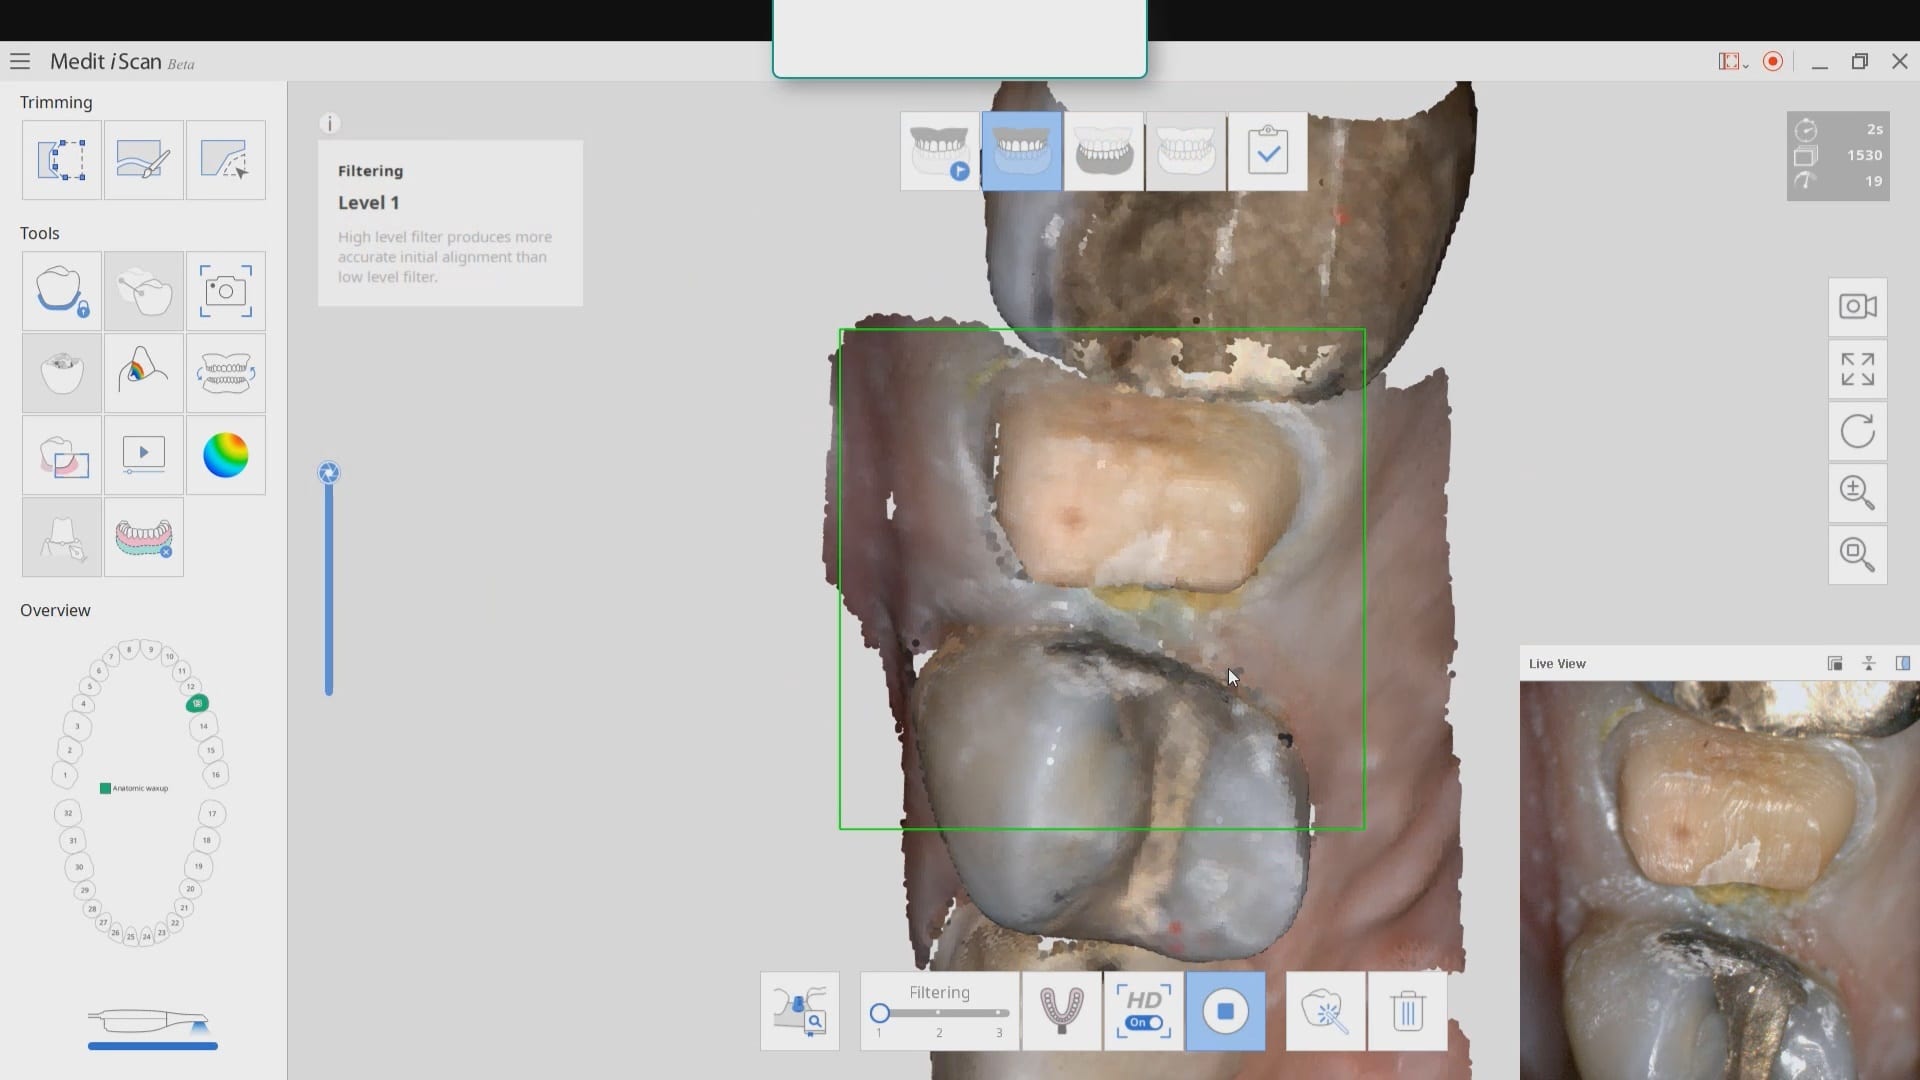
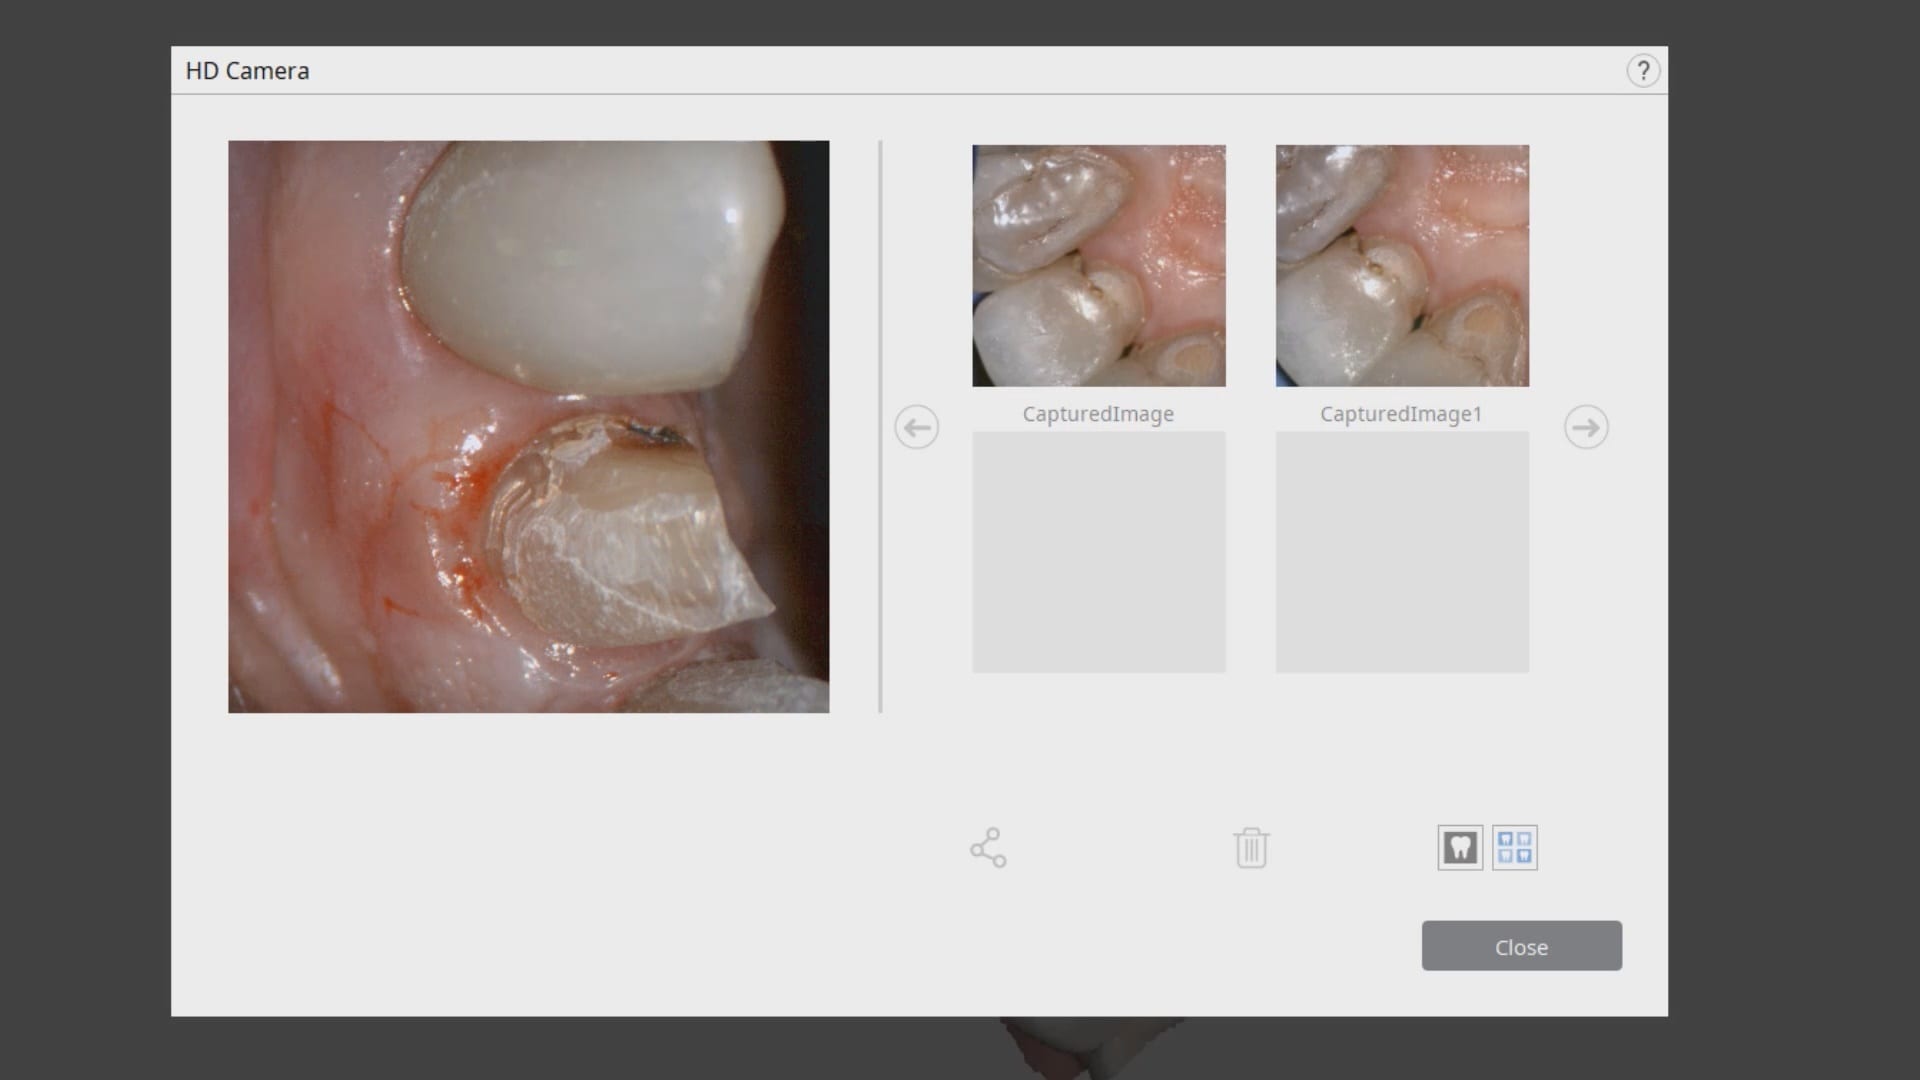
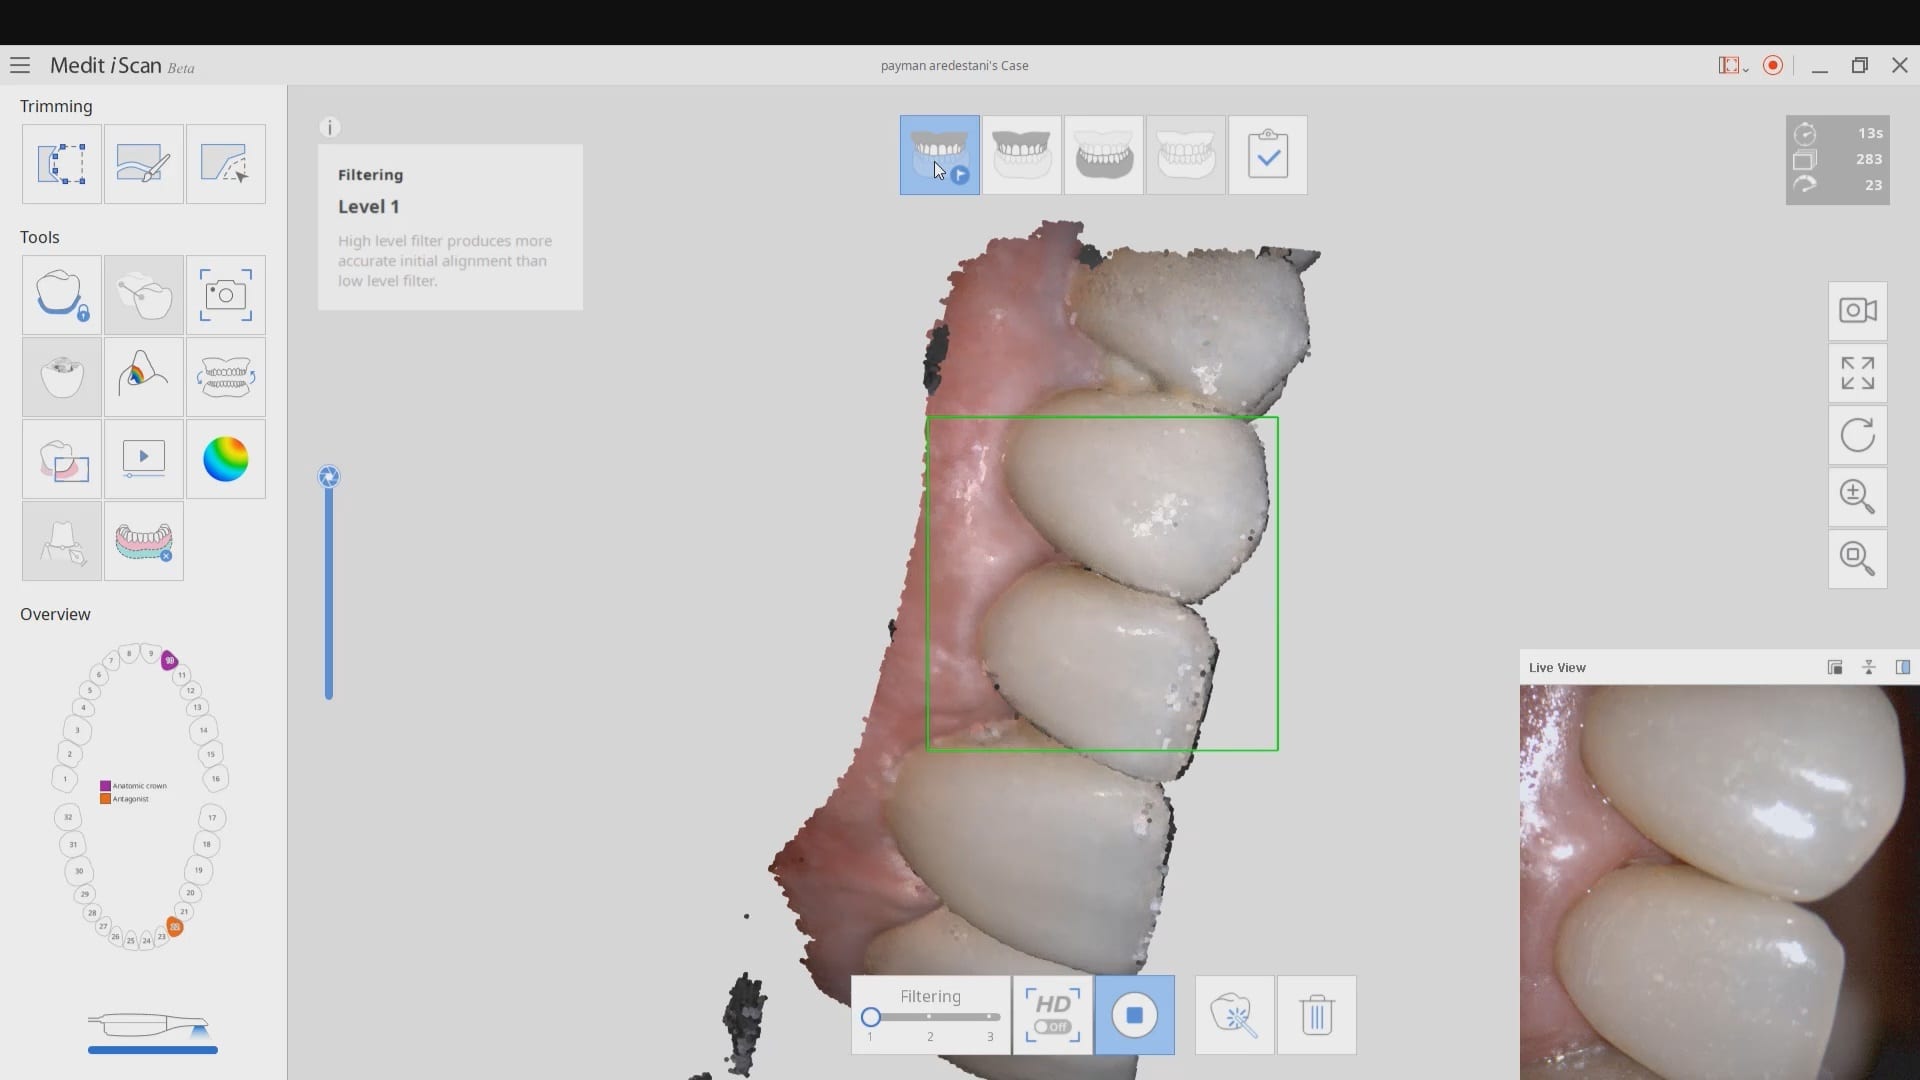
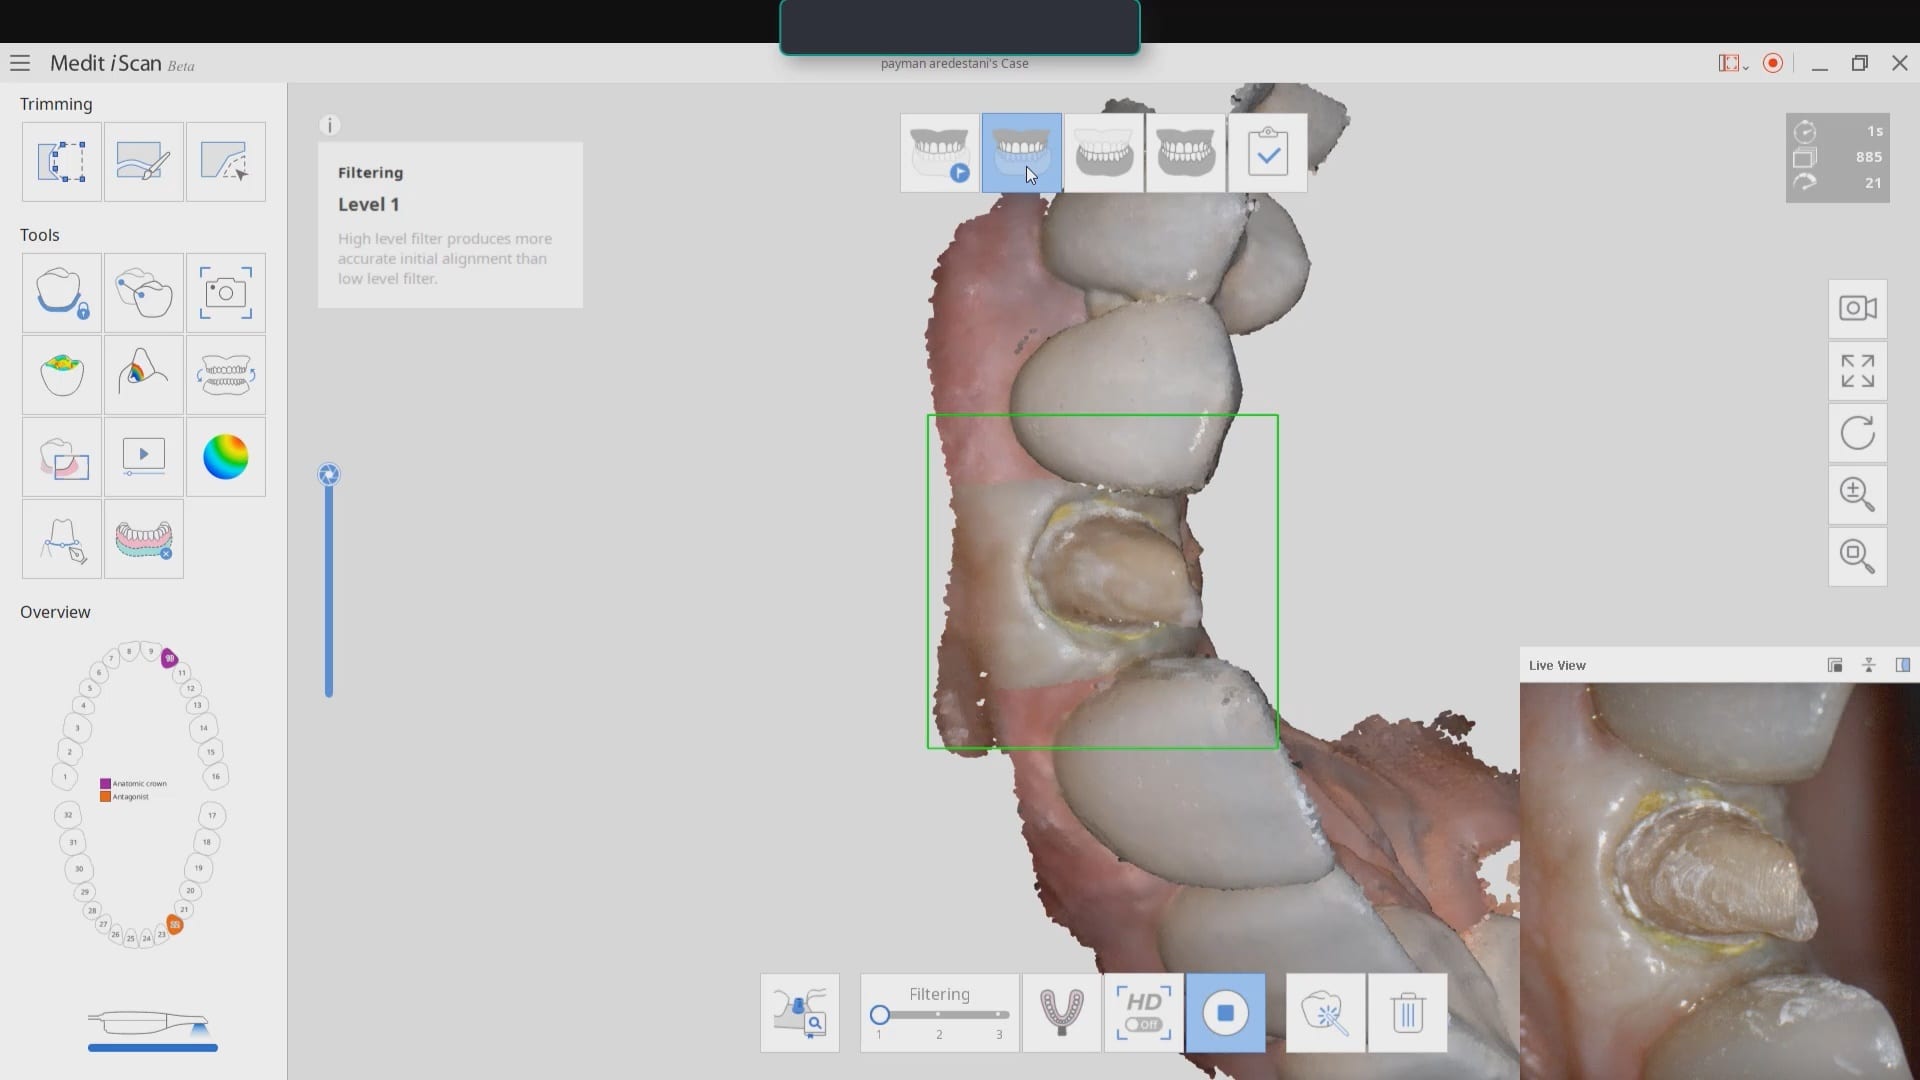
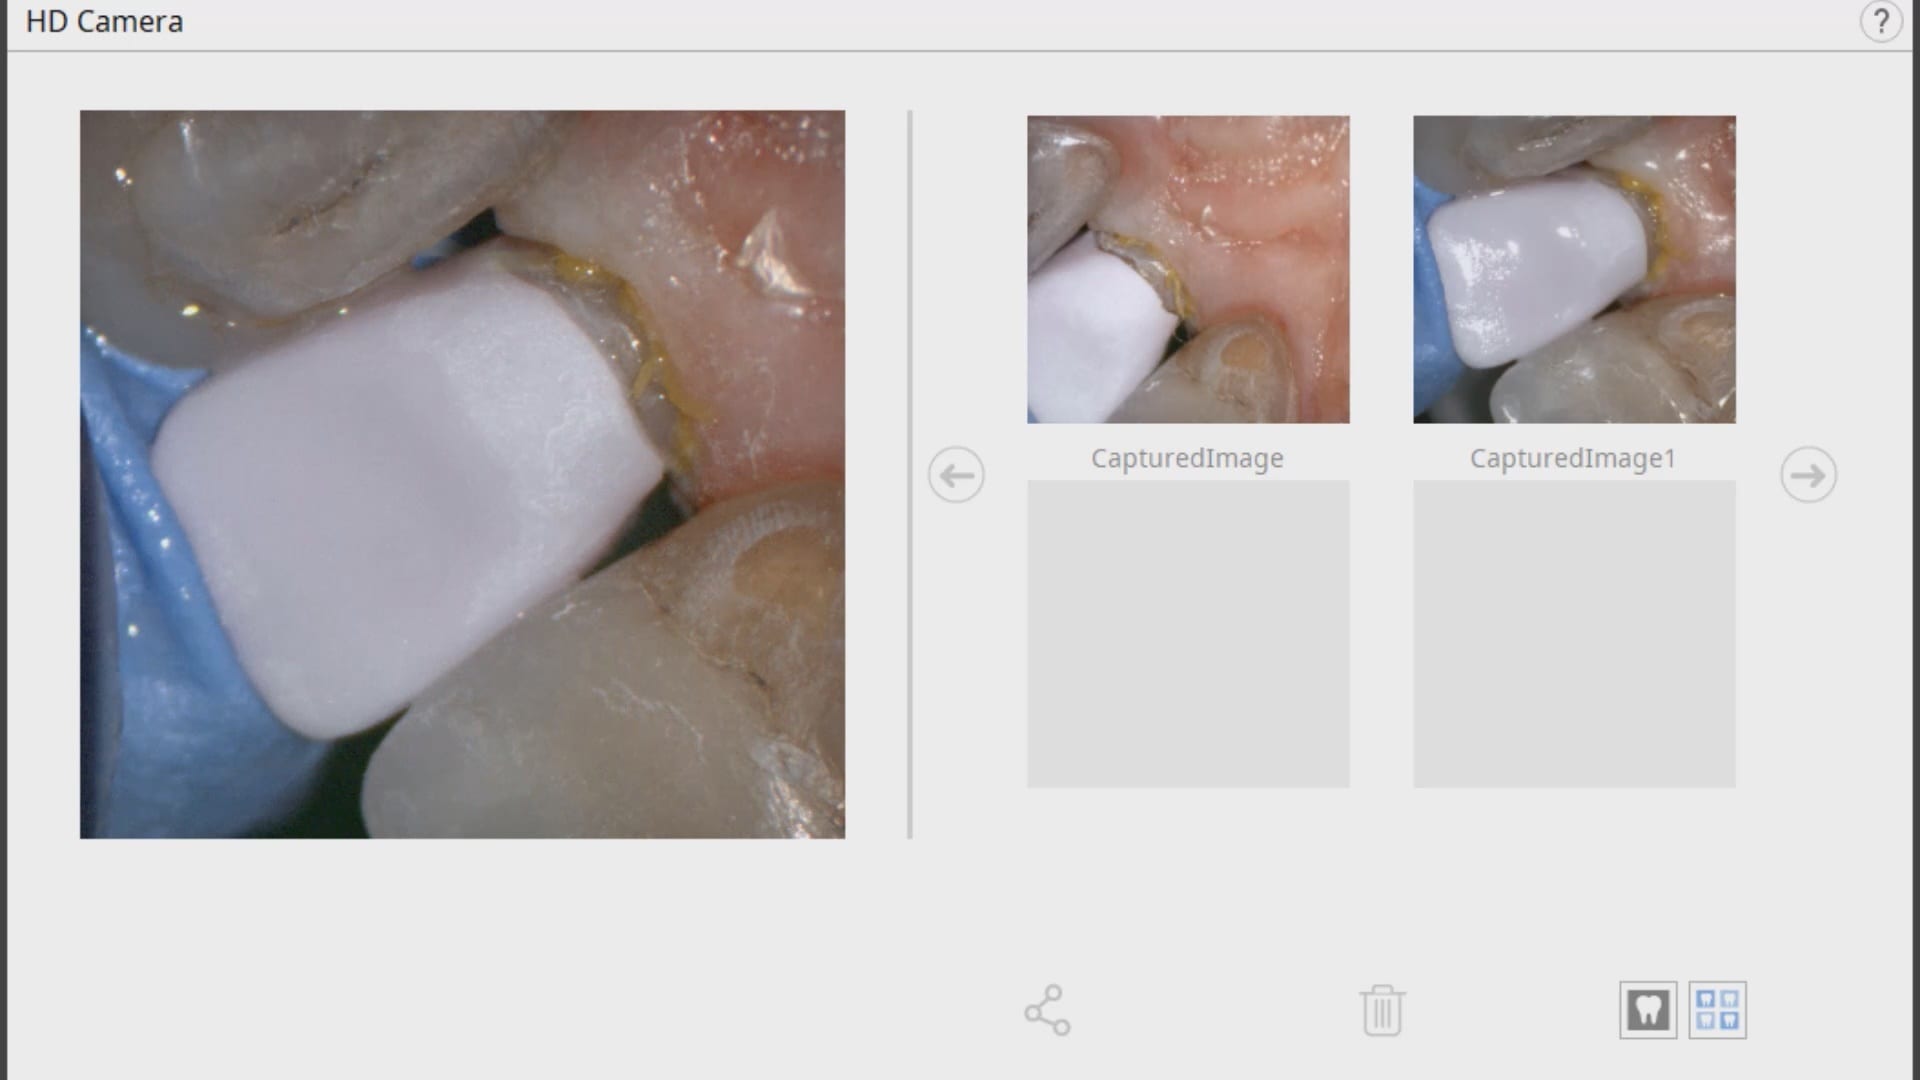
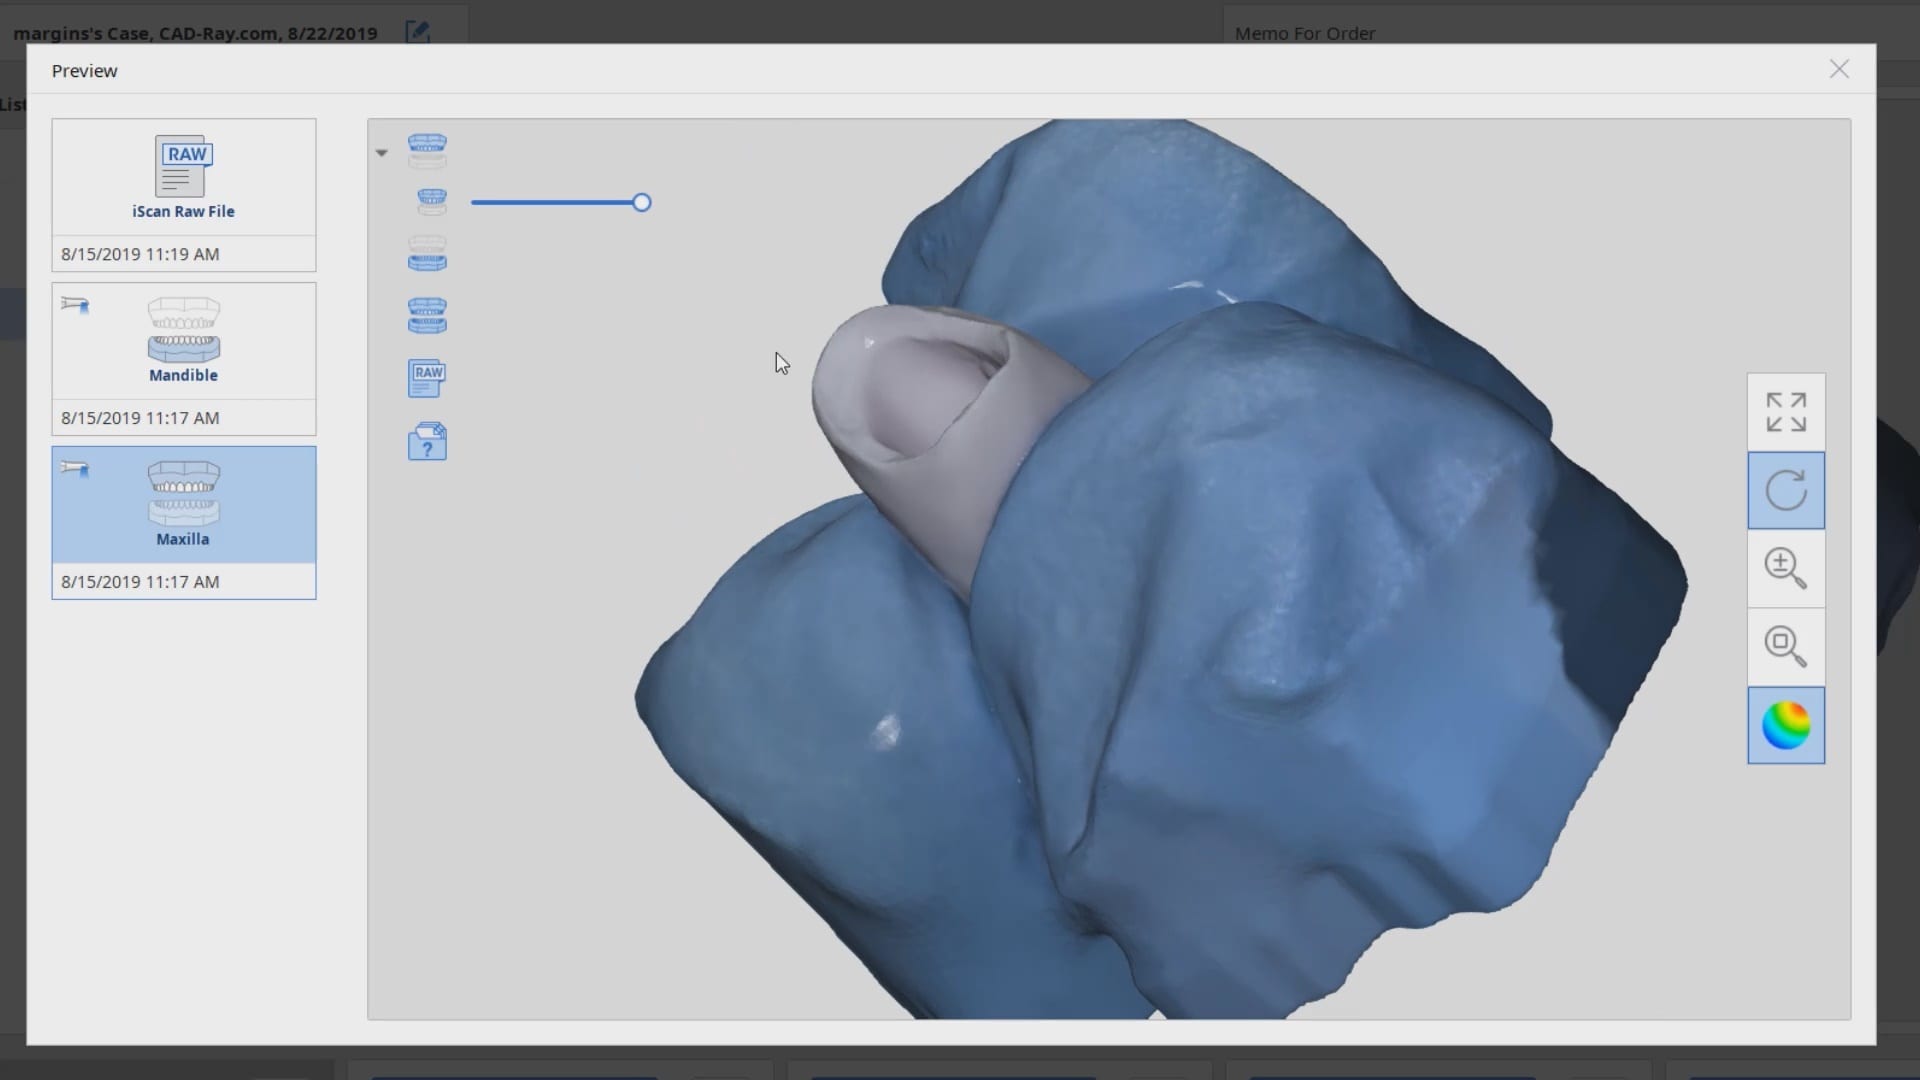
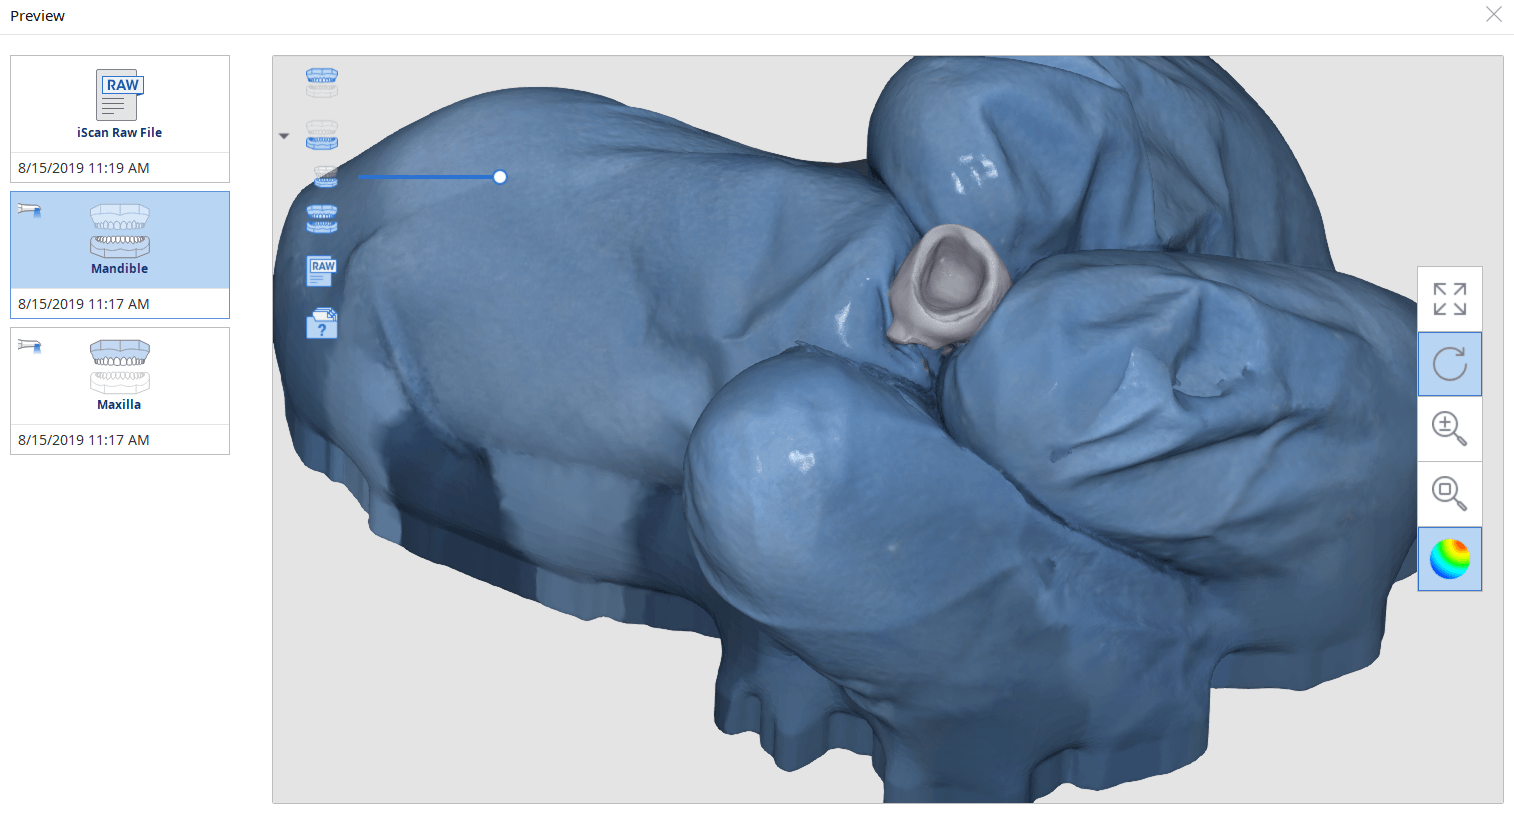
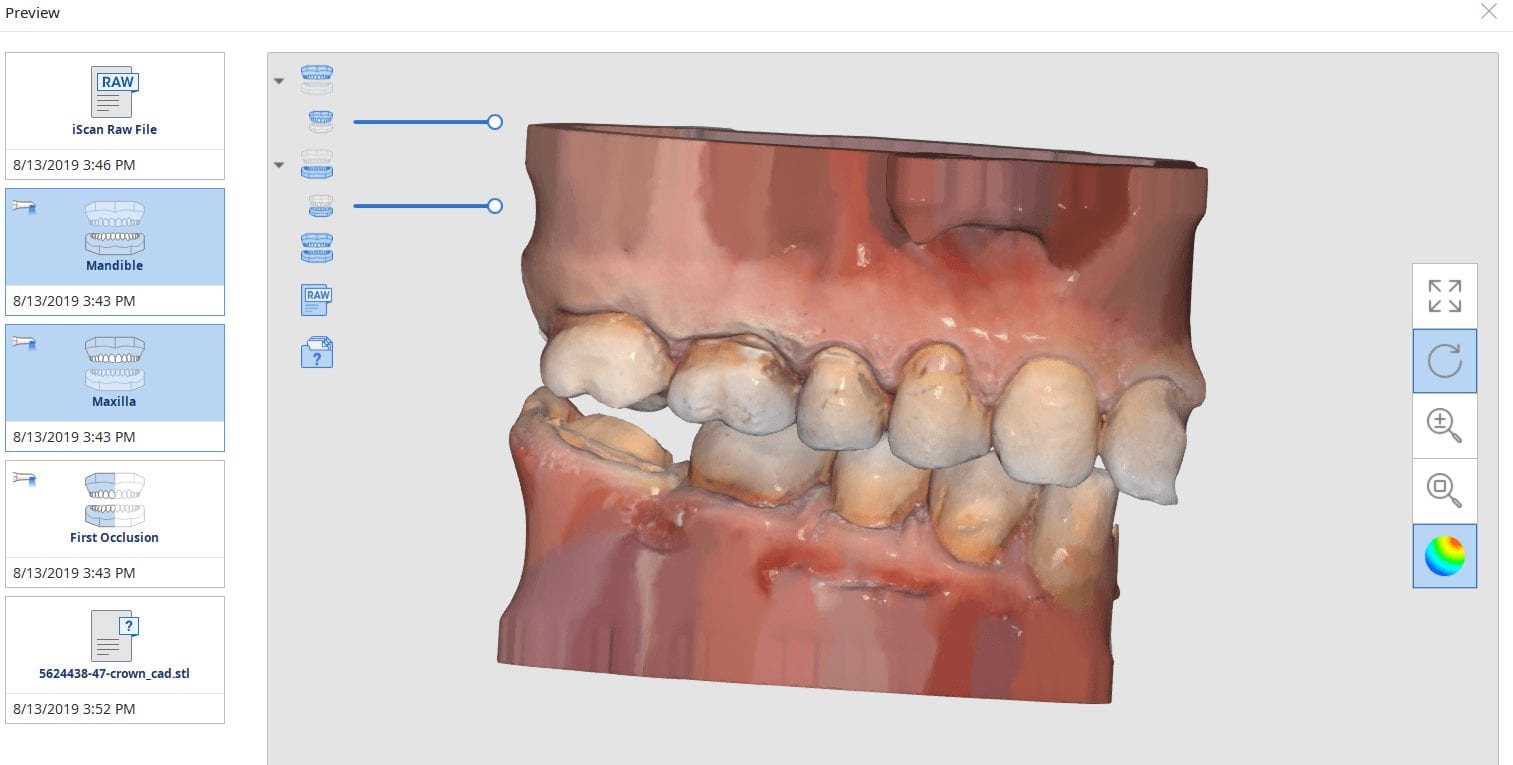
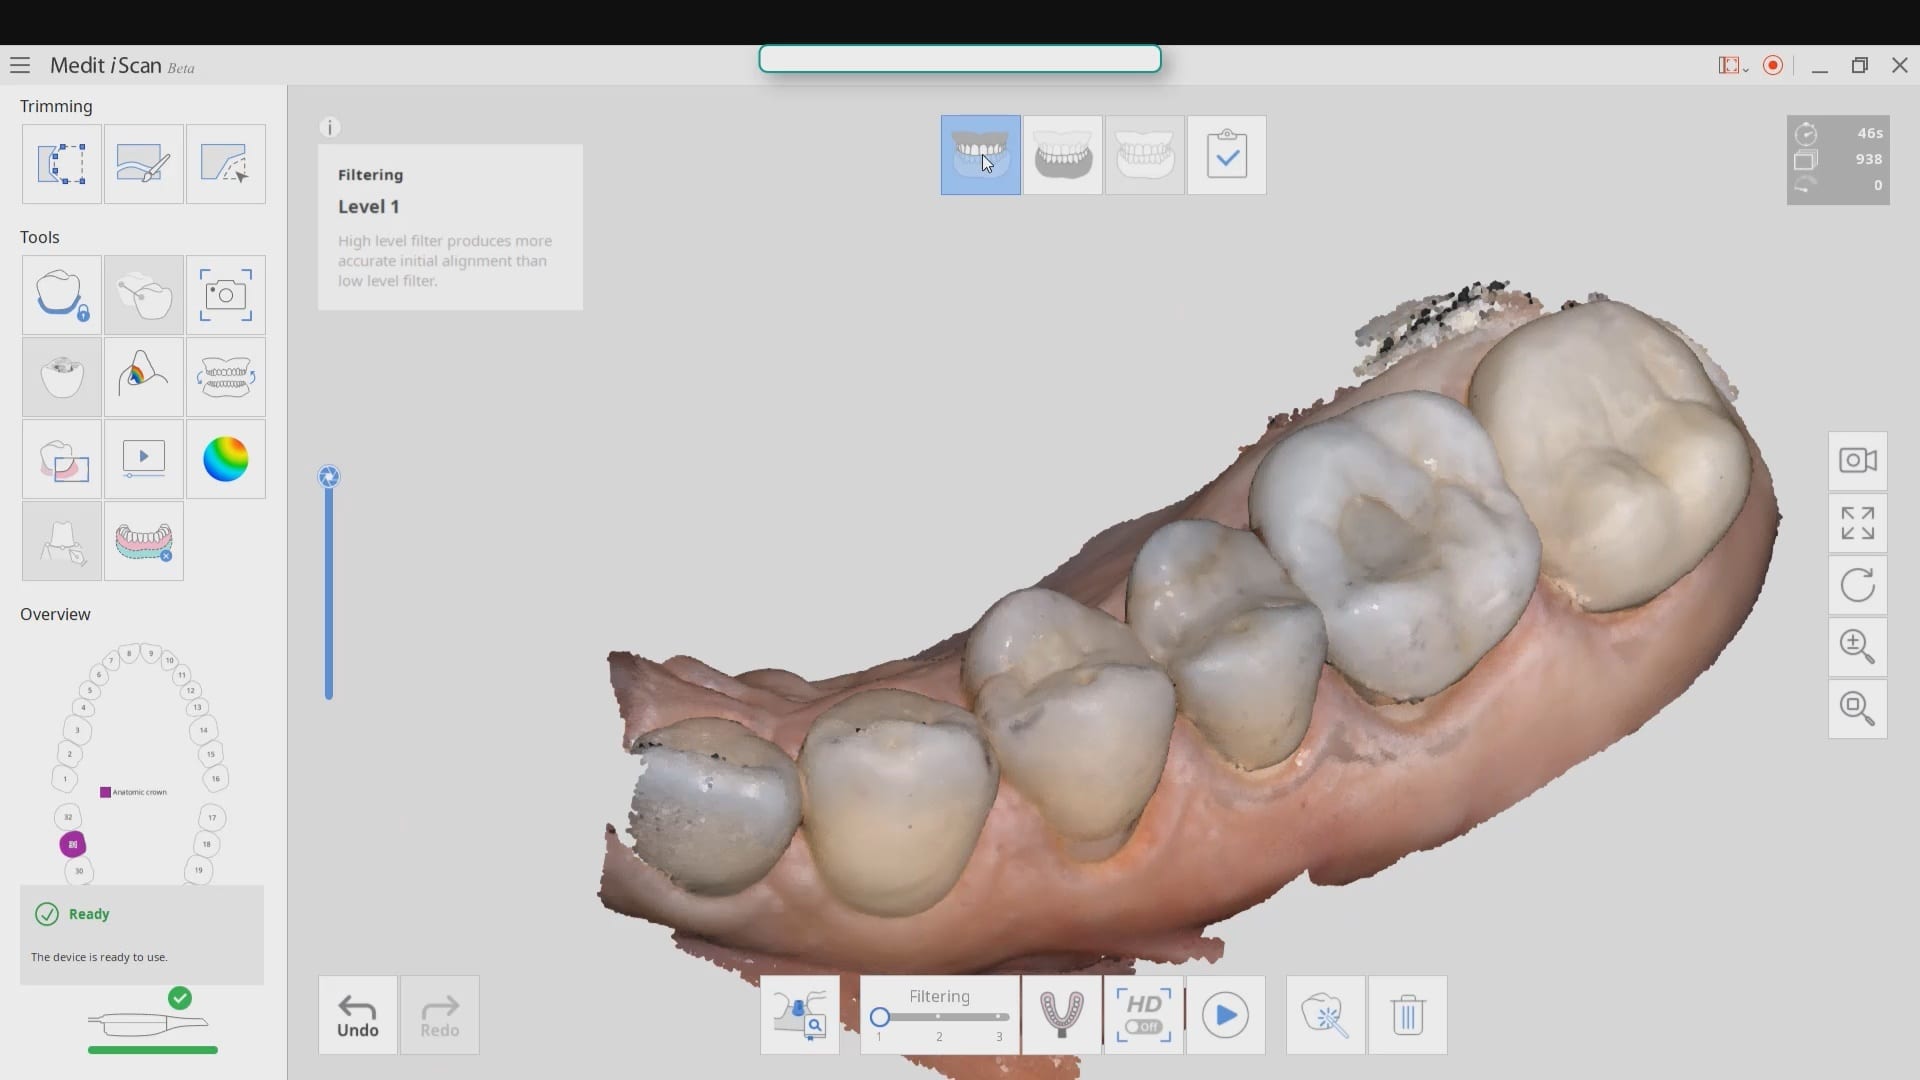
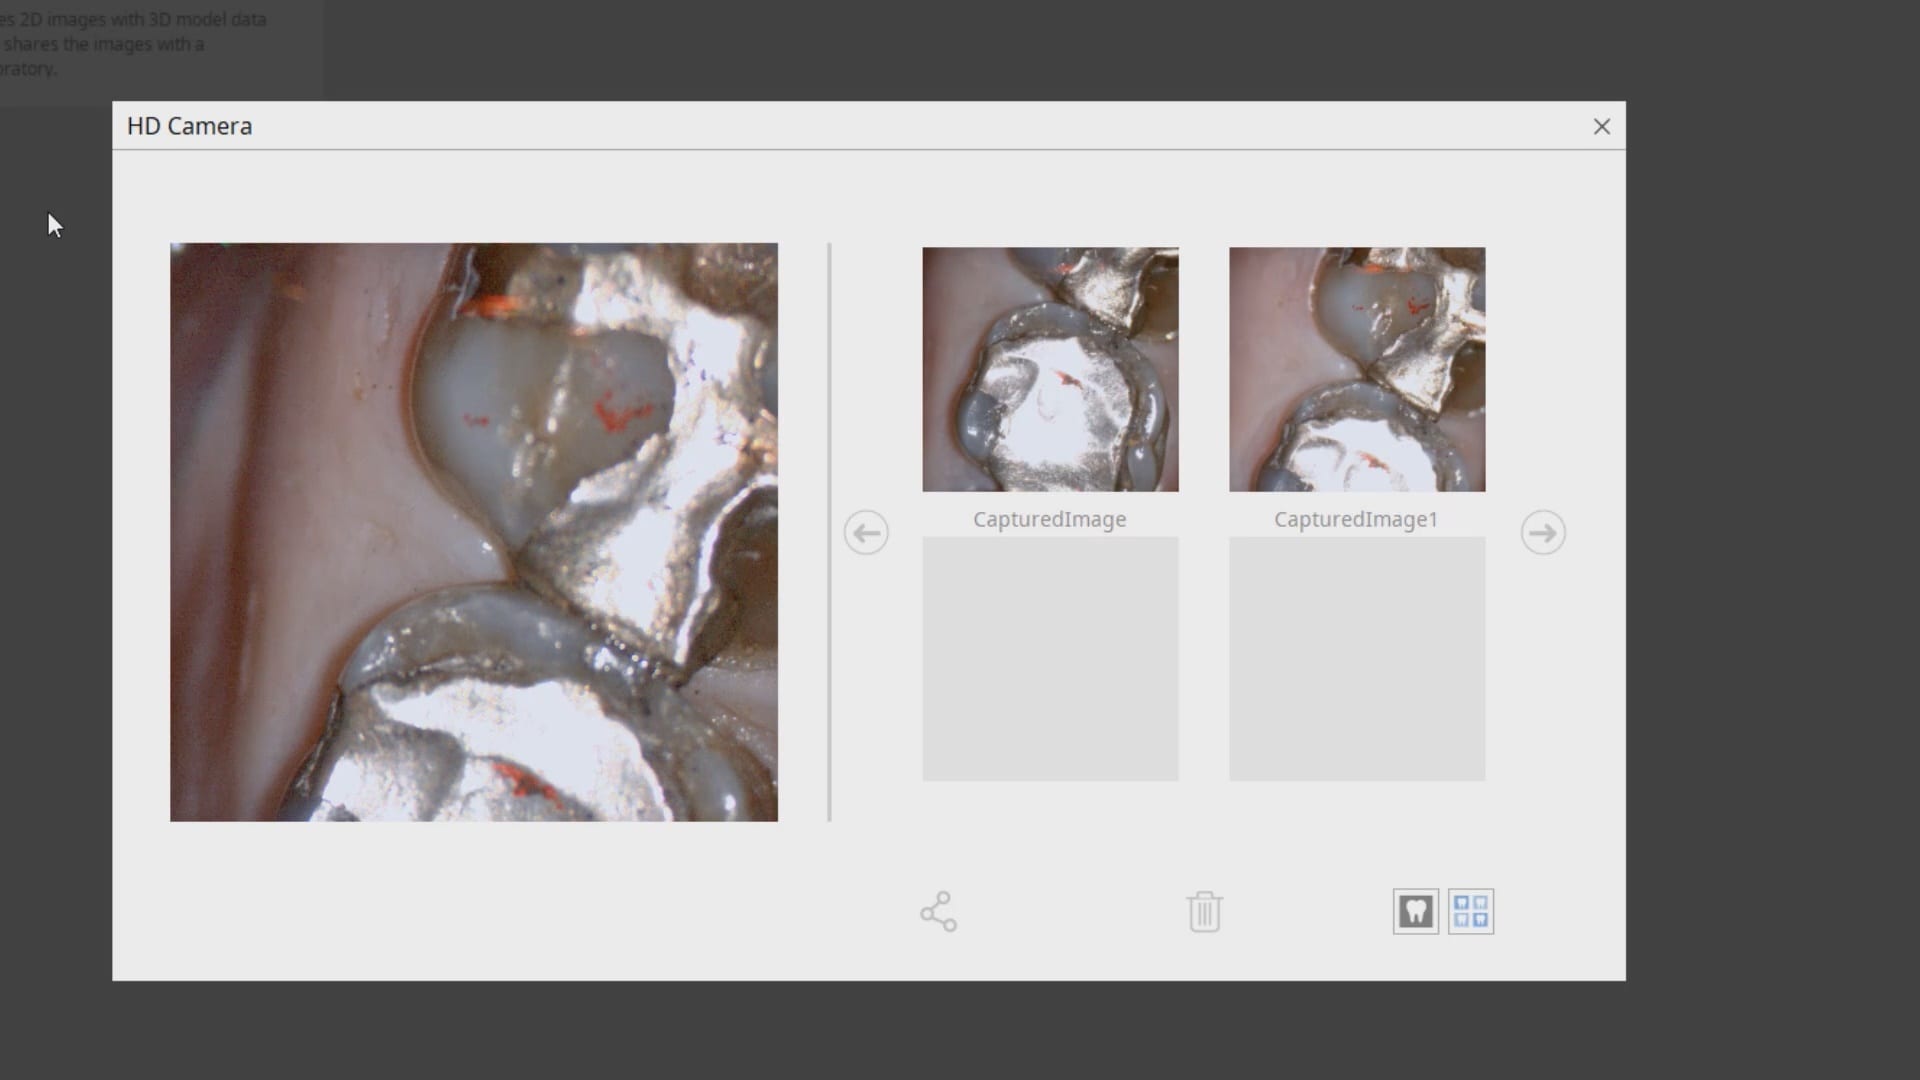
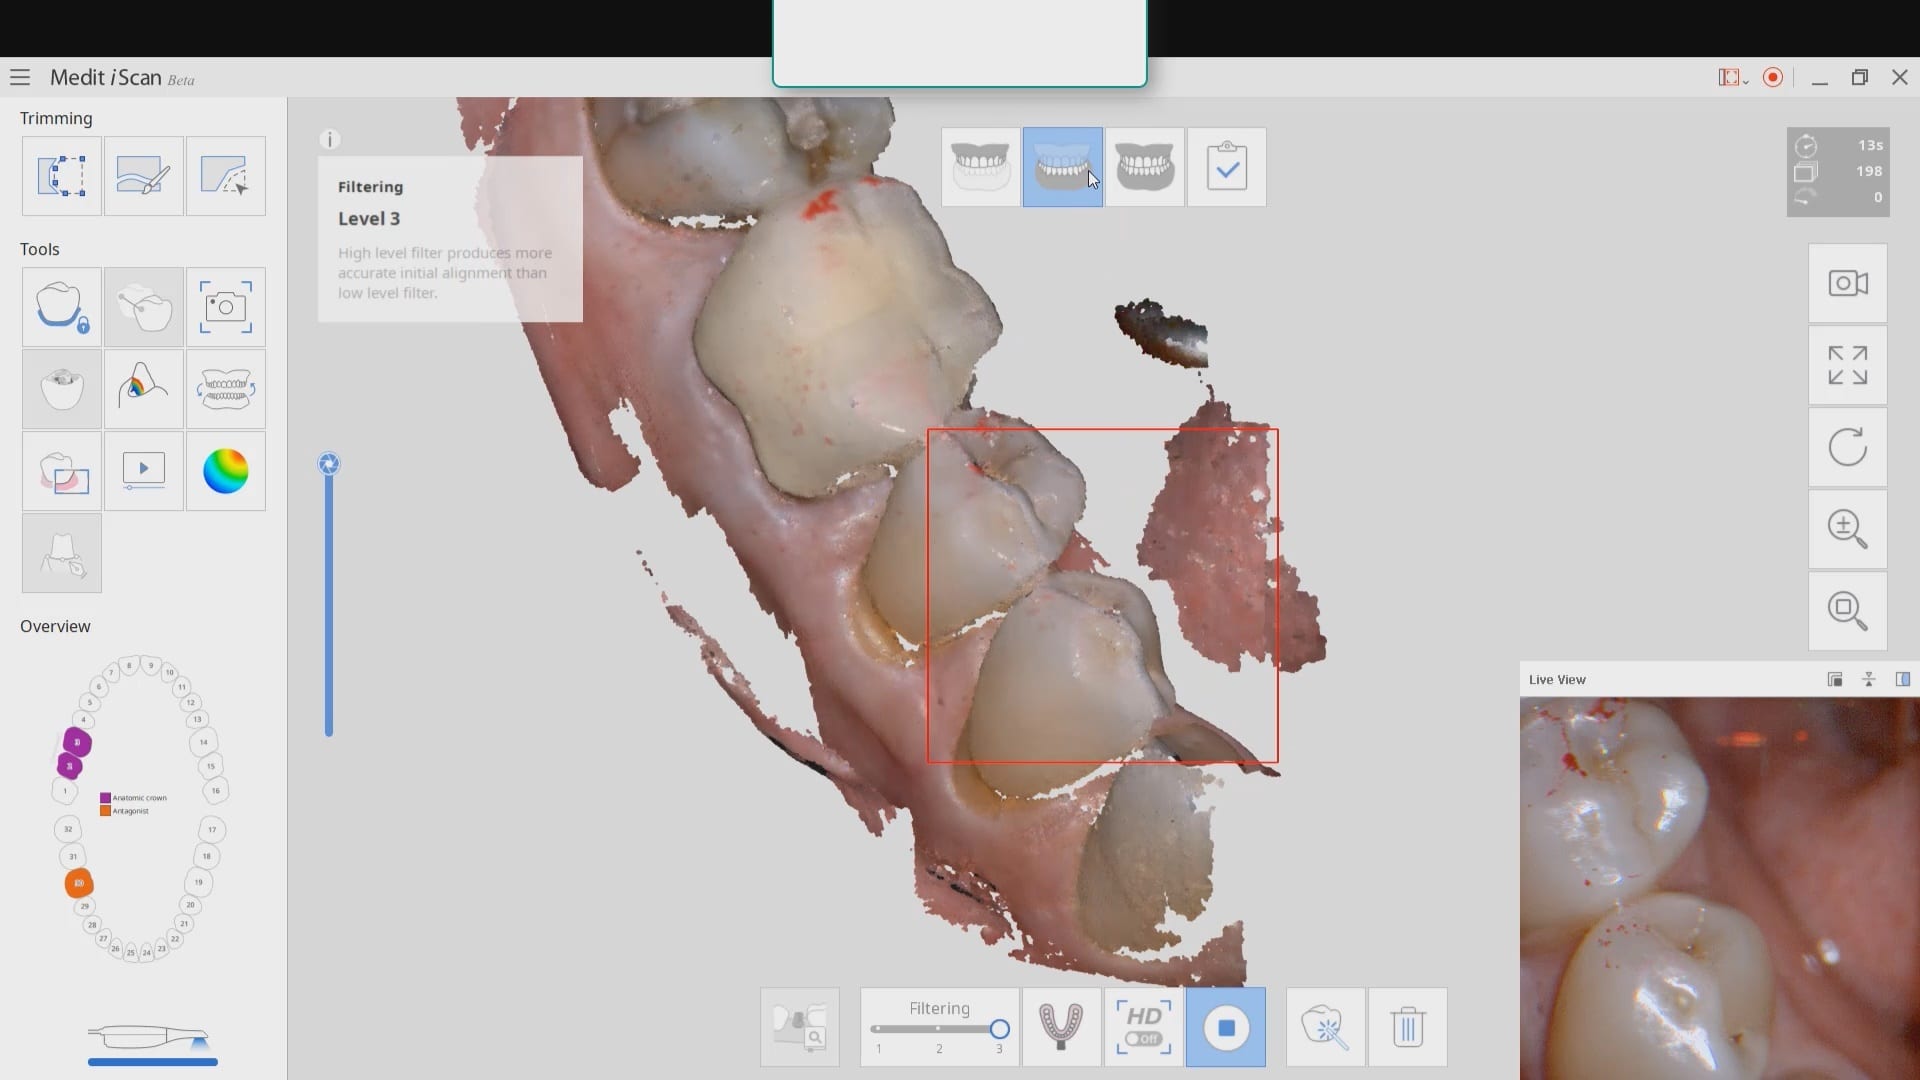
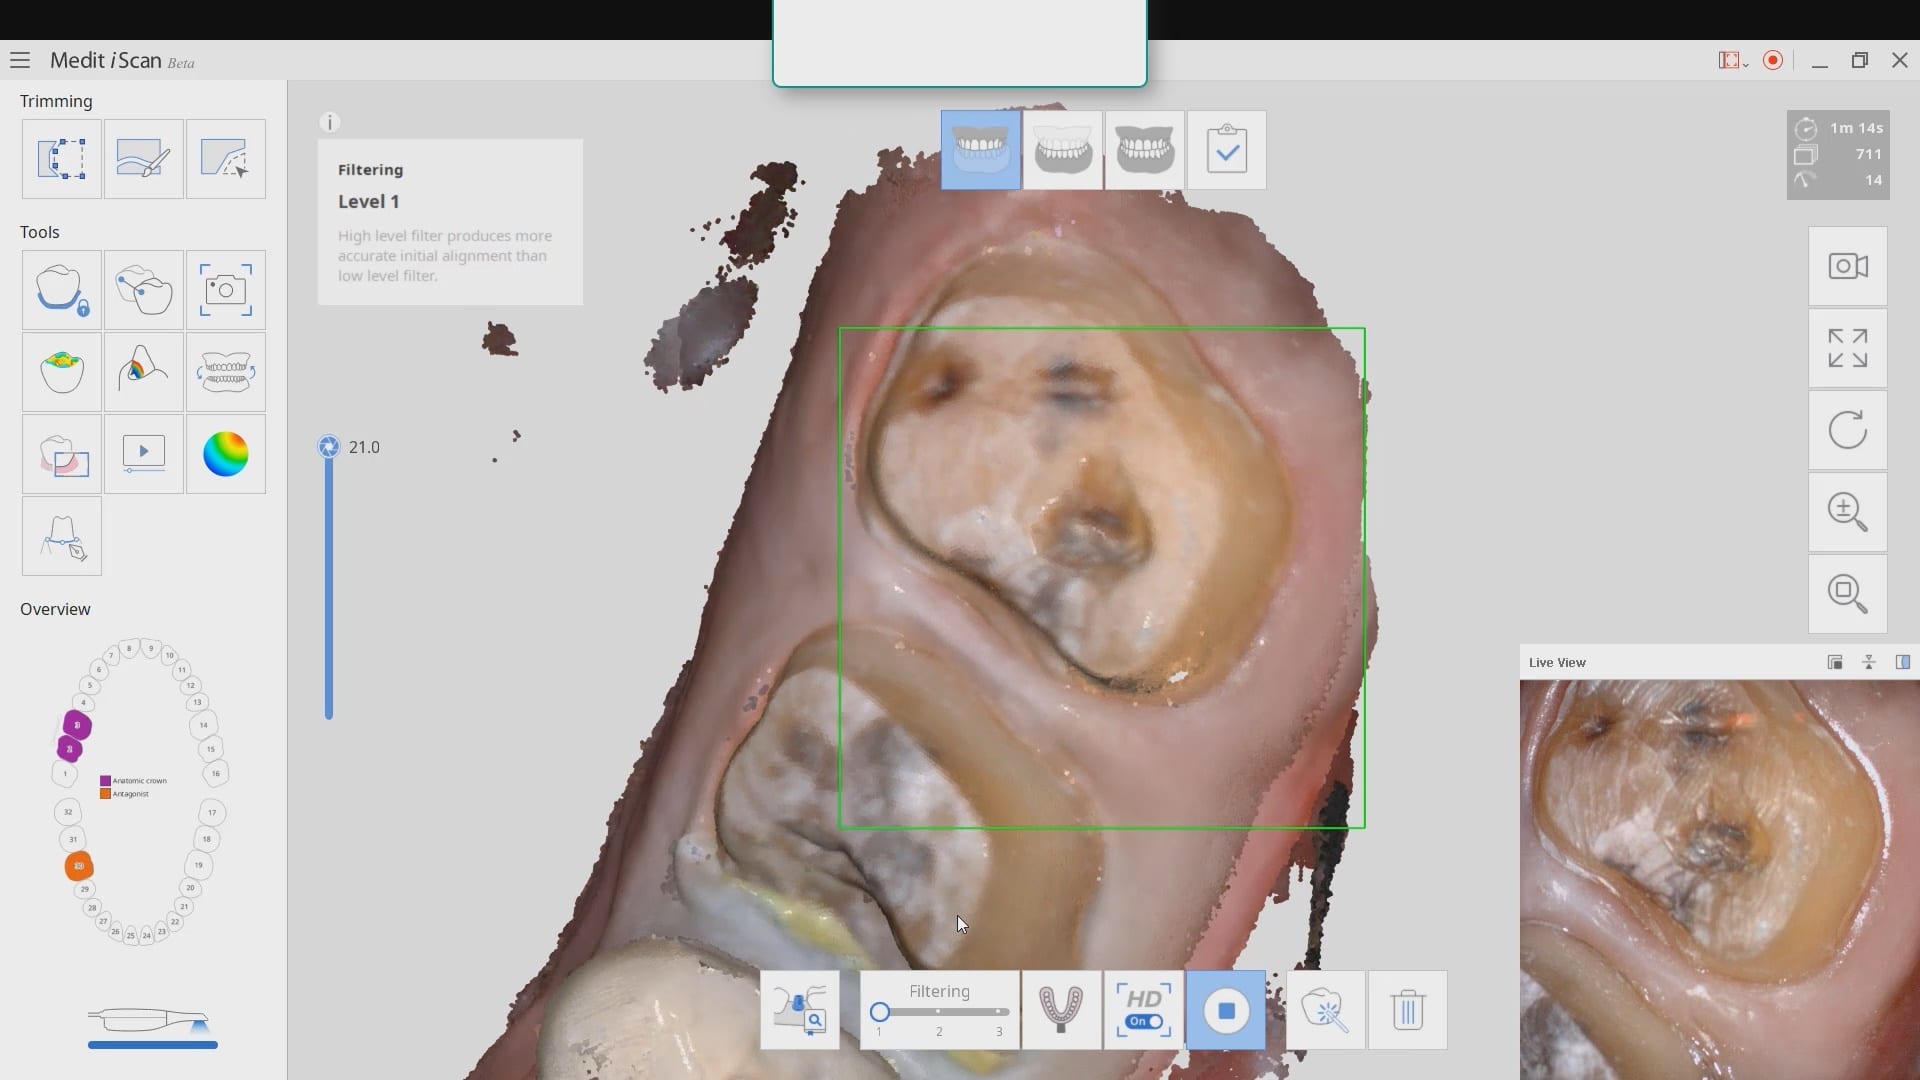
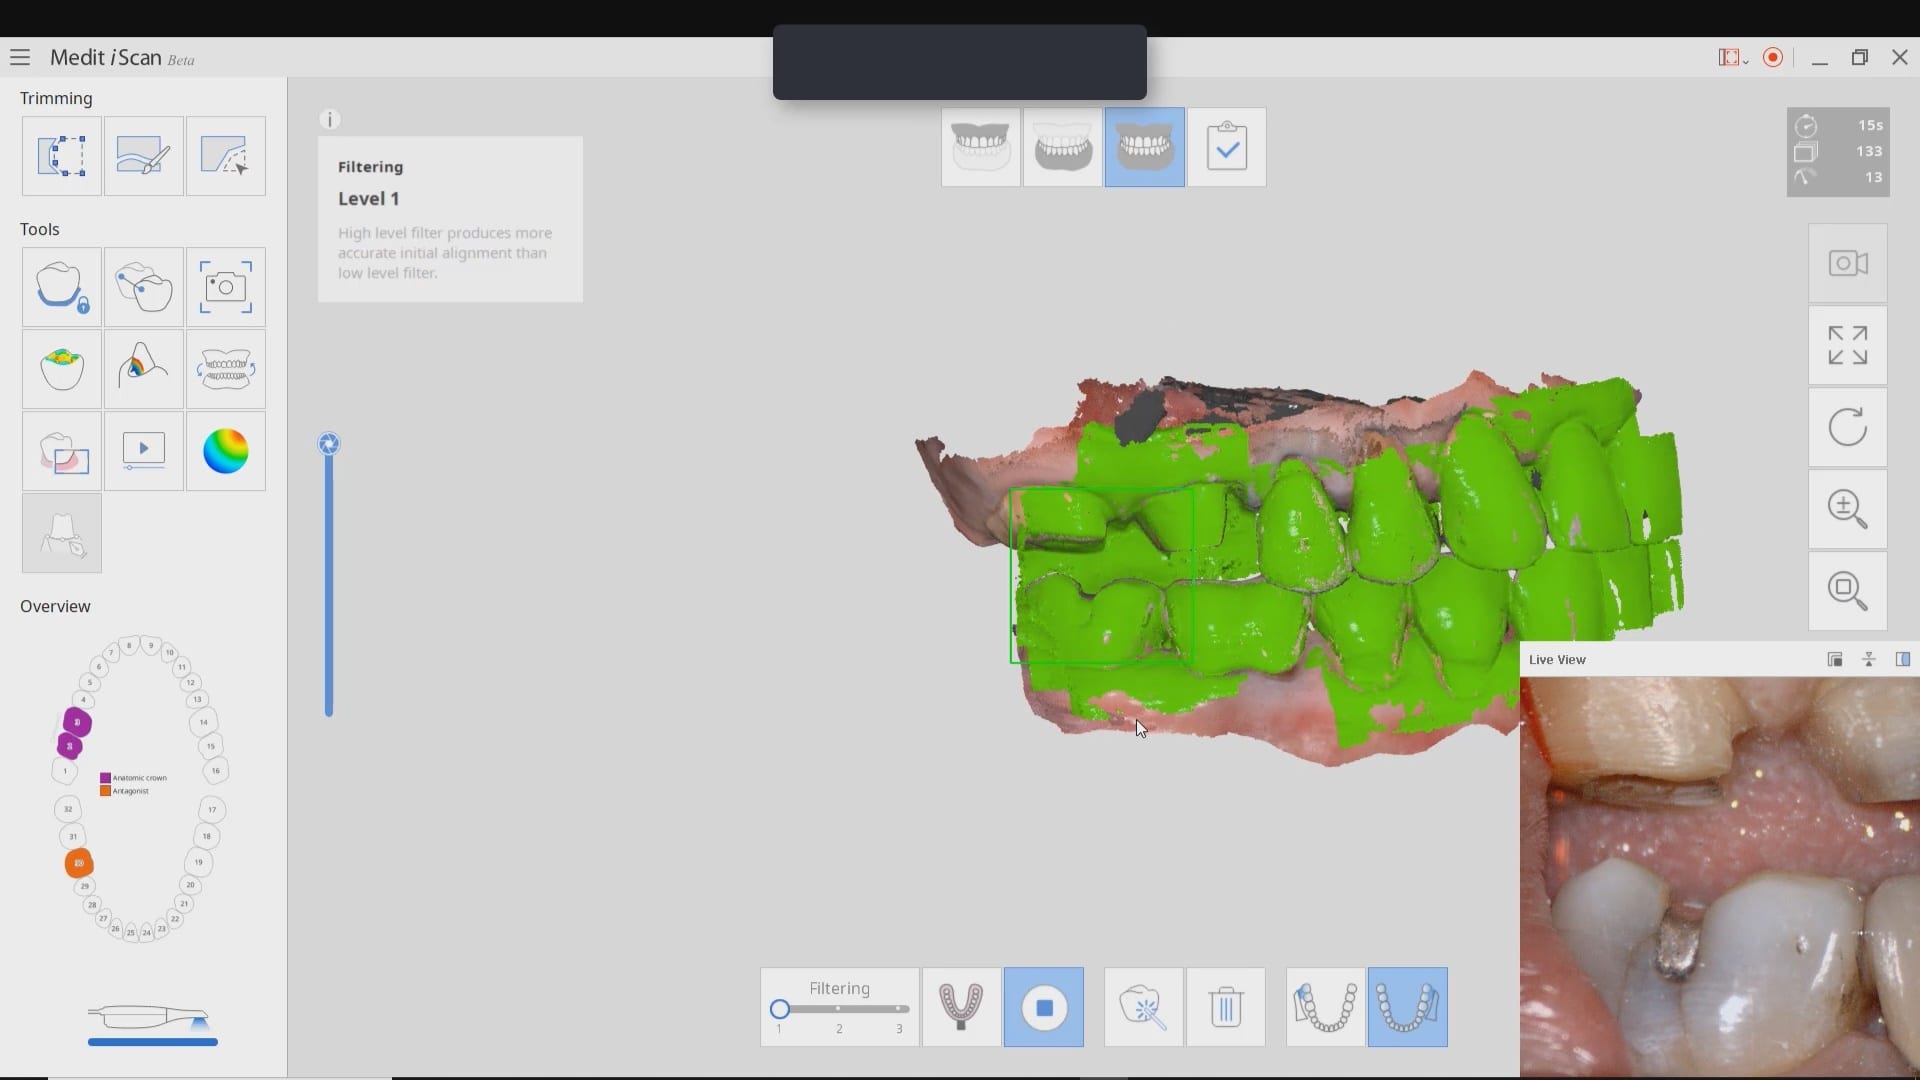
In this article, we feature an upper left lateral crown that needed to be replaced due to recurrent decay. While the patient was getting numb, we defined the job description in the Medit i500 software and imaged the pre-existing crown, the opposing and the bite. We digitally cropped out the tooth to be prepared and proceeded with crown removal. Once the margins were refined and the tissue was displaced, we imaged the preparation in HD mode and processed the case.
Once the digital models were rendered, we launched the integrated CAD software that automatically imported the pre-op, the opposing, the prep model, and the bite. Their relationship is preserved in the CAD software and no modifications were necessary. You have two ways to copy the pre-op; one way is to program the CAD software so it replicates the pre-op perfectly while the other gives you a raw proposal that you can then choose to adapt to pre-existing situation.
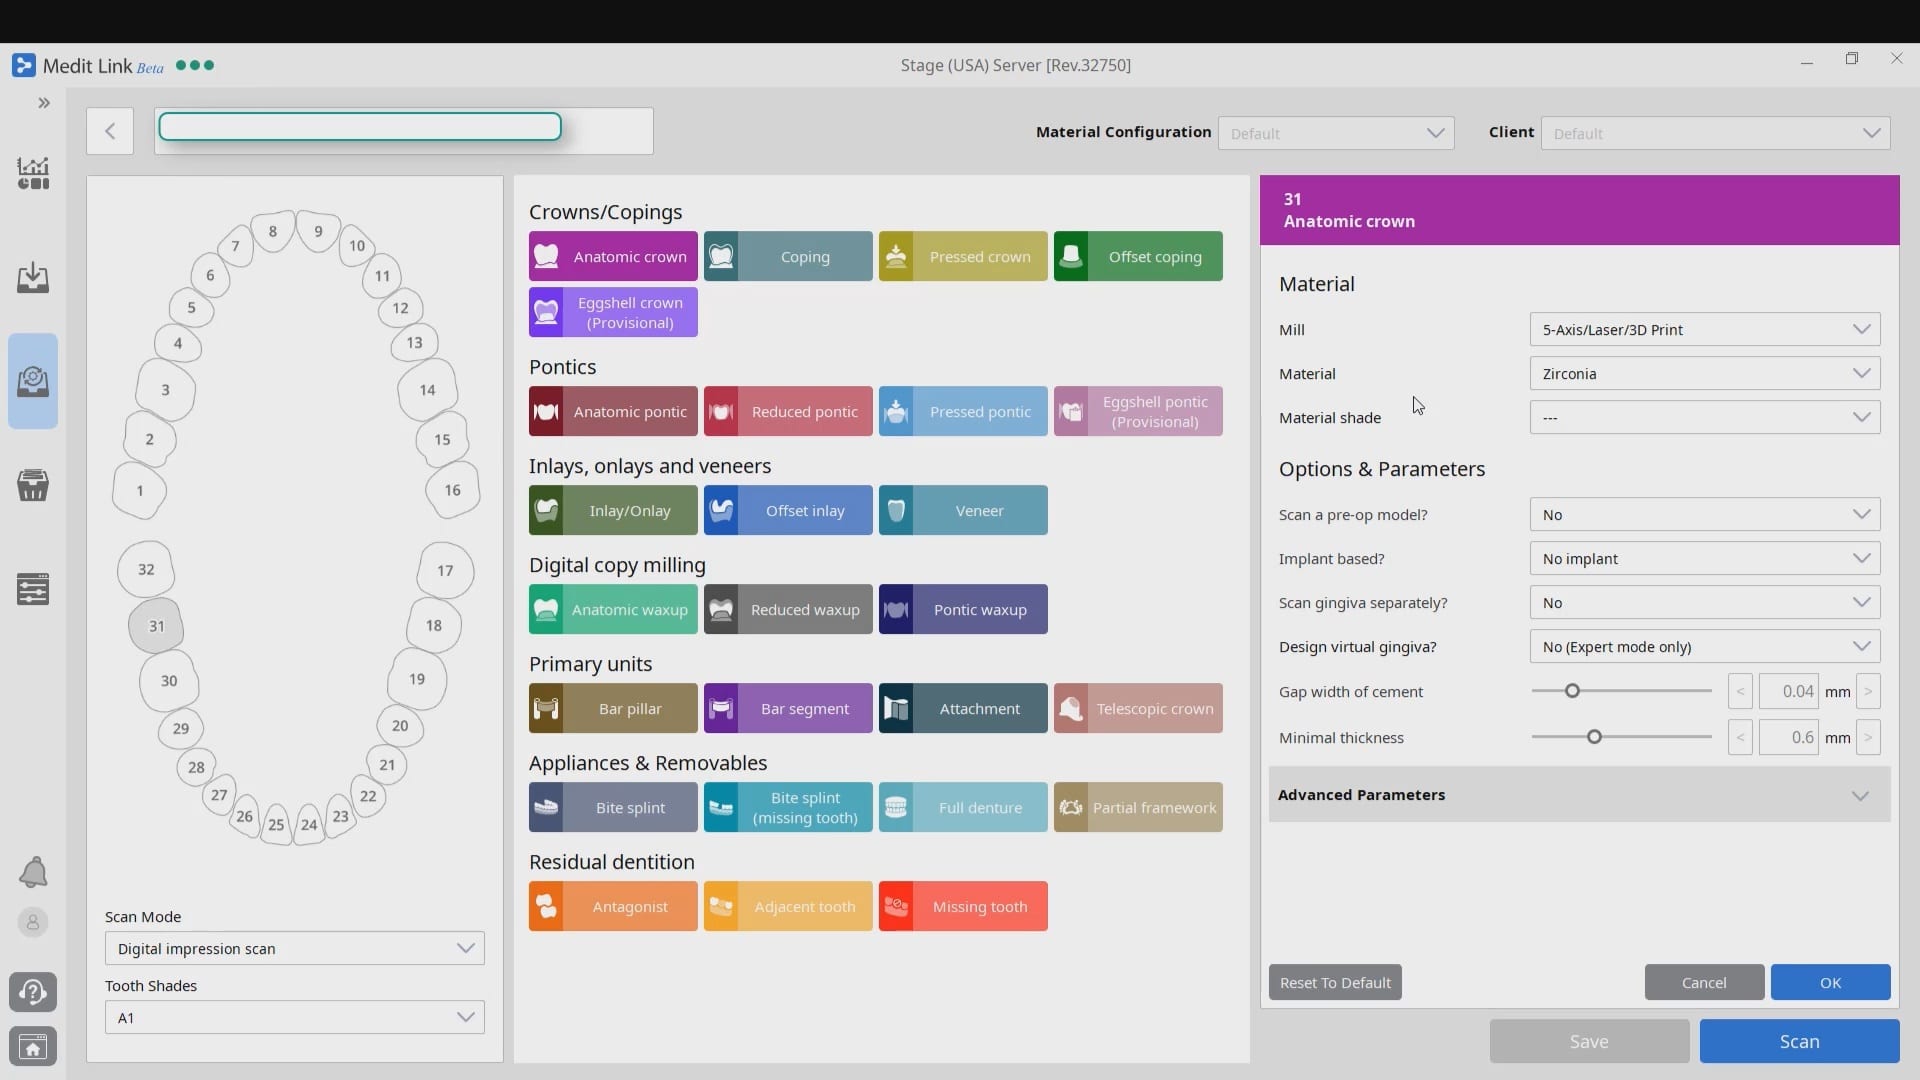
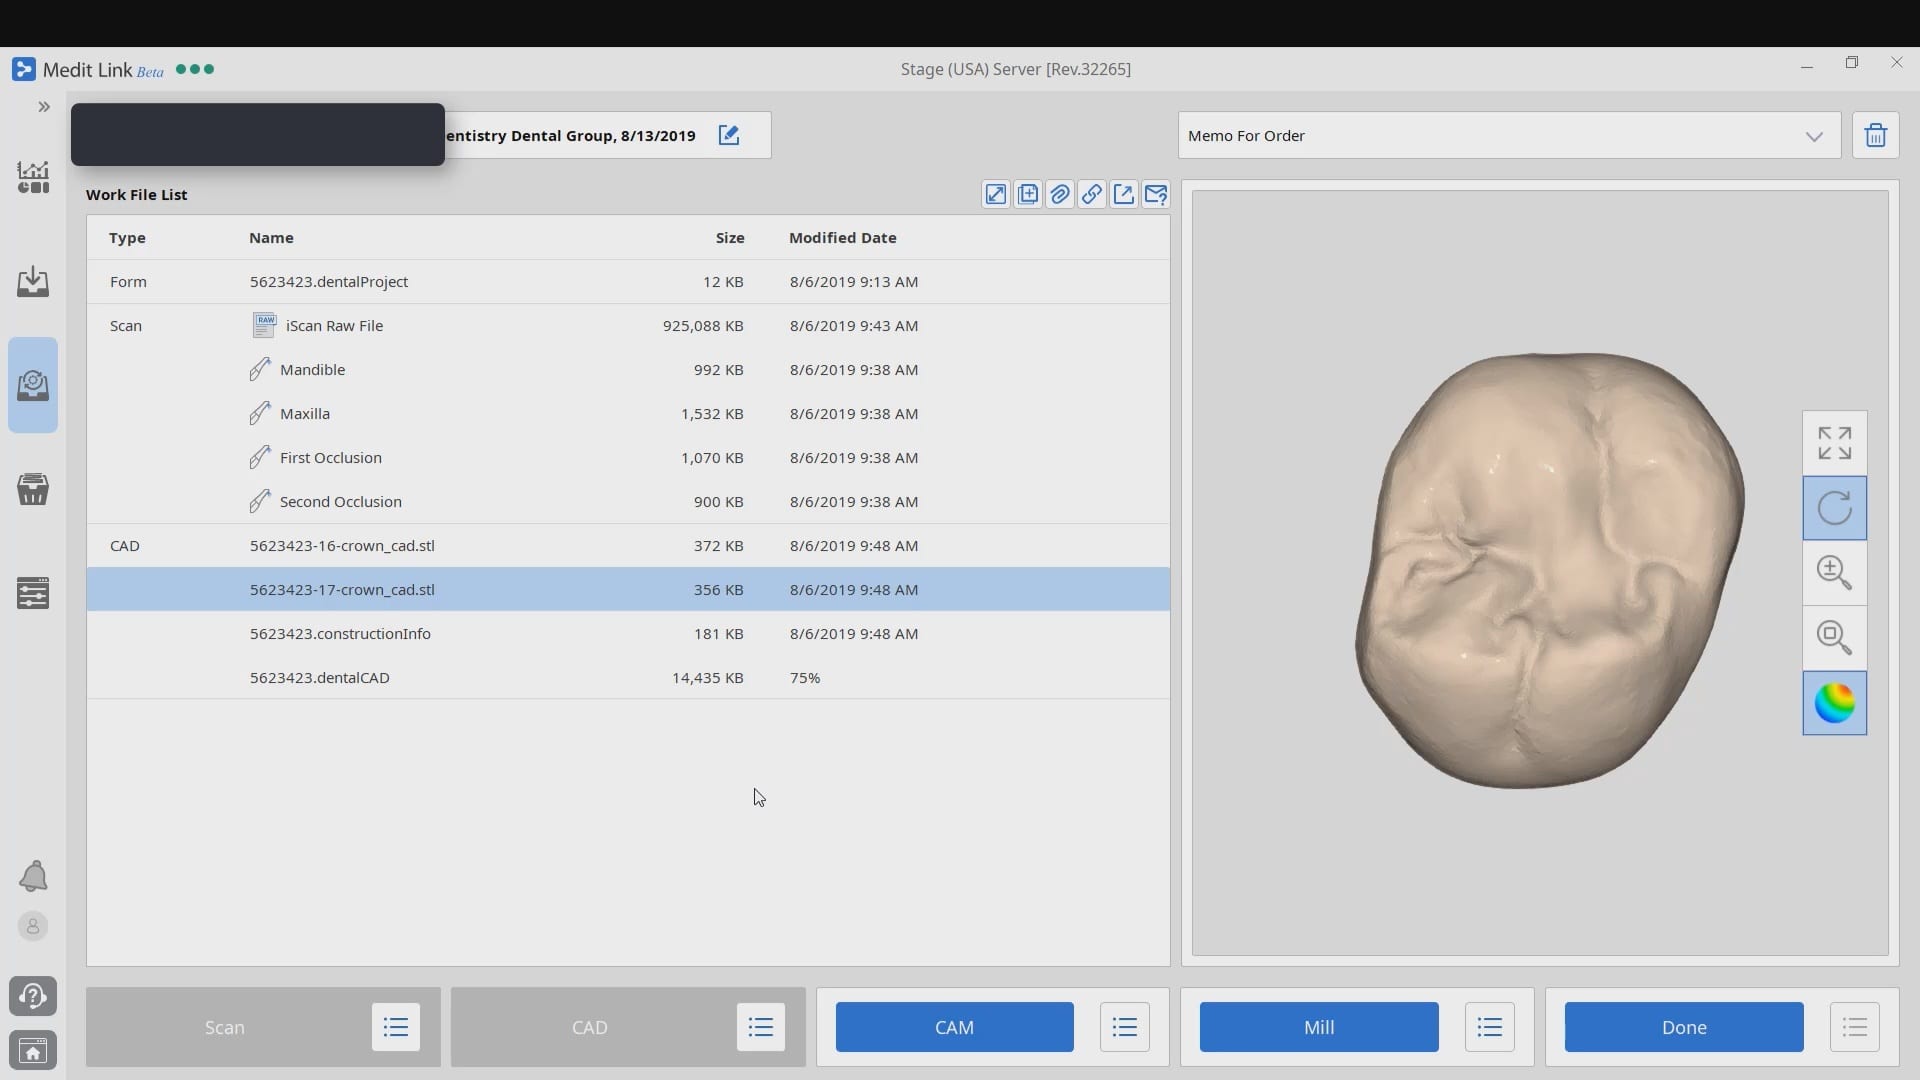
Direct Import of Models into CAD Software for Design and Mill
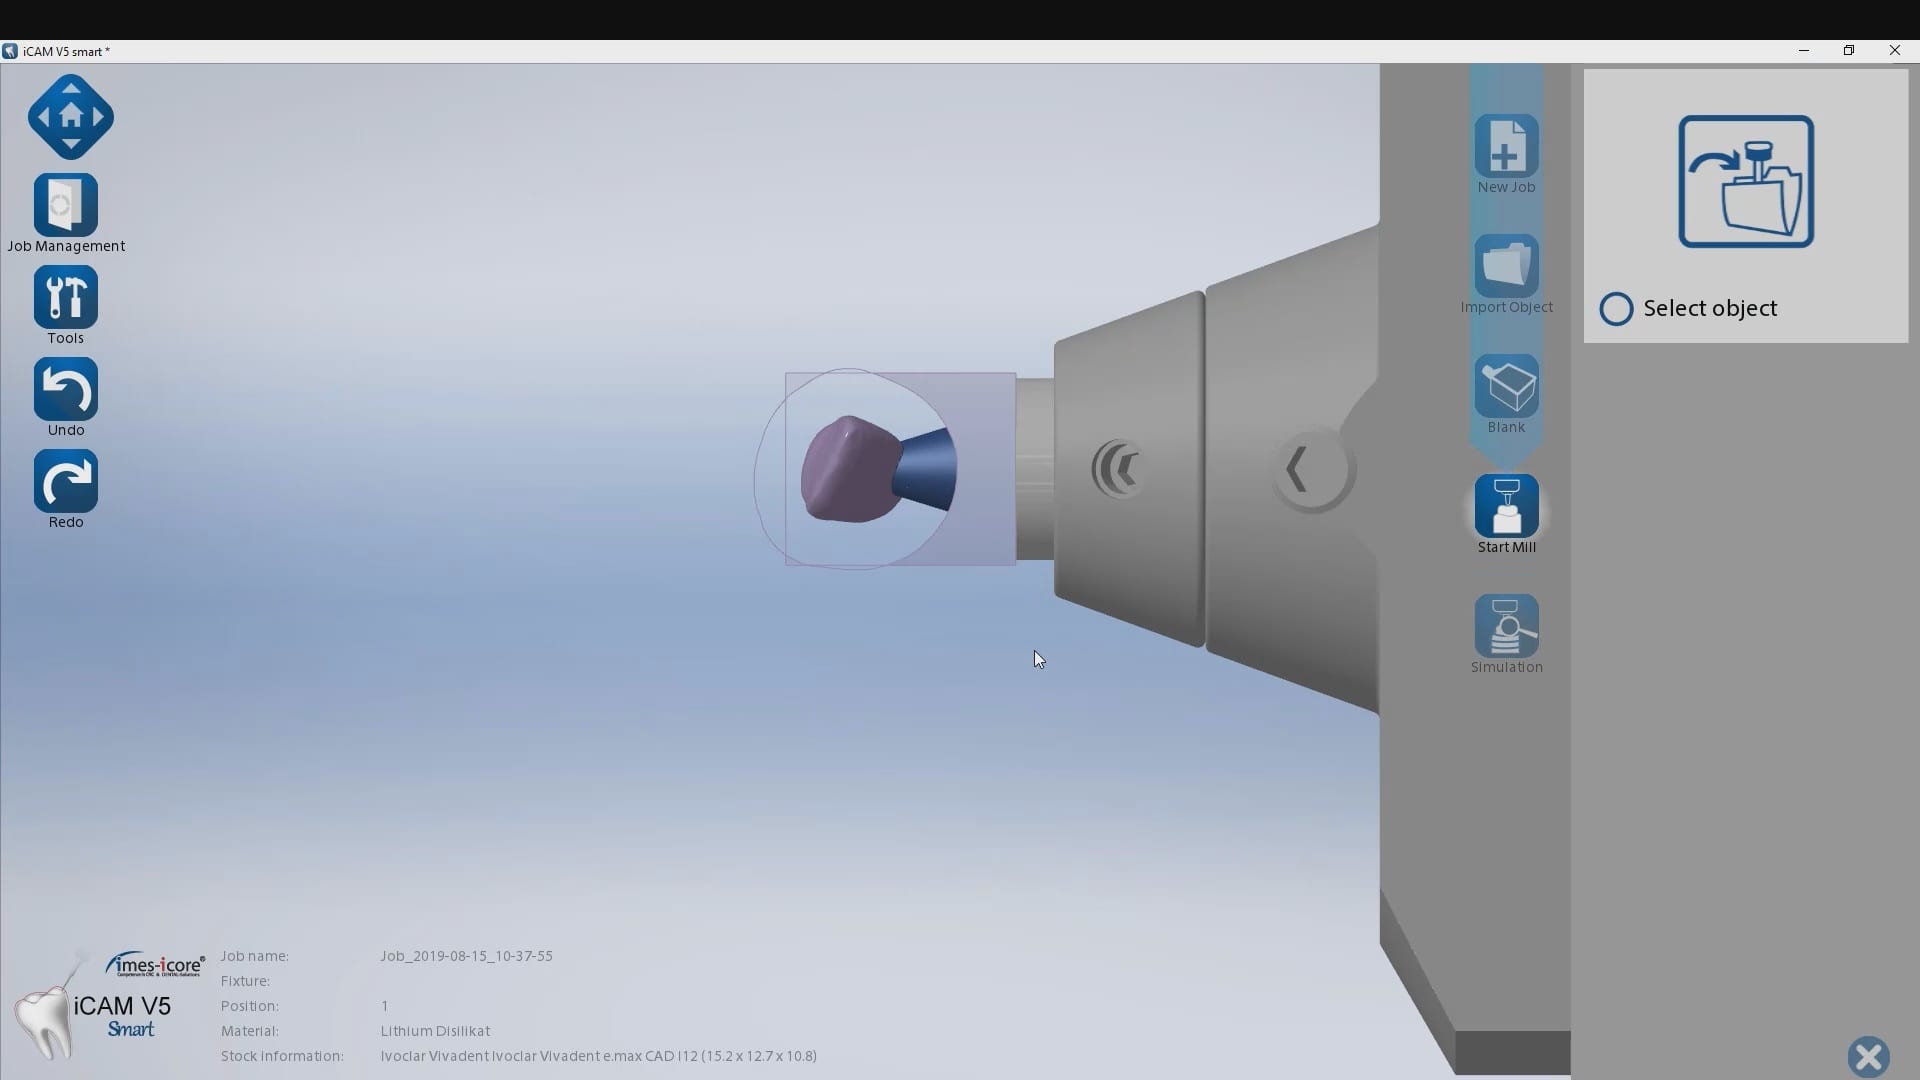
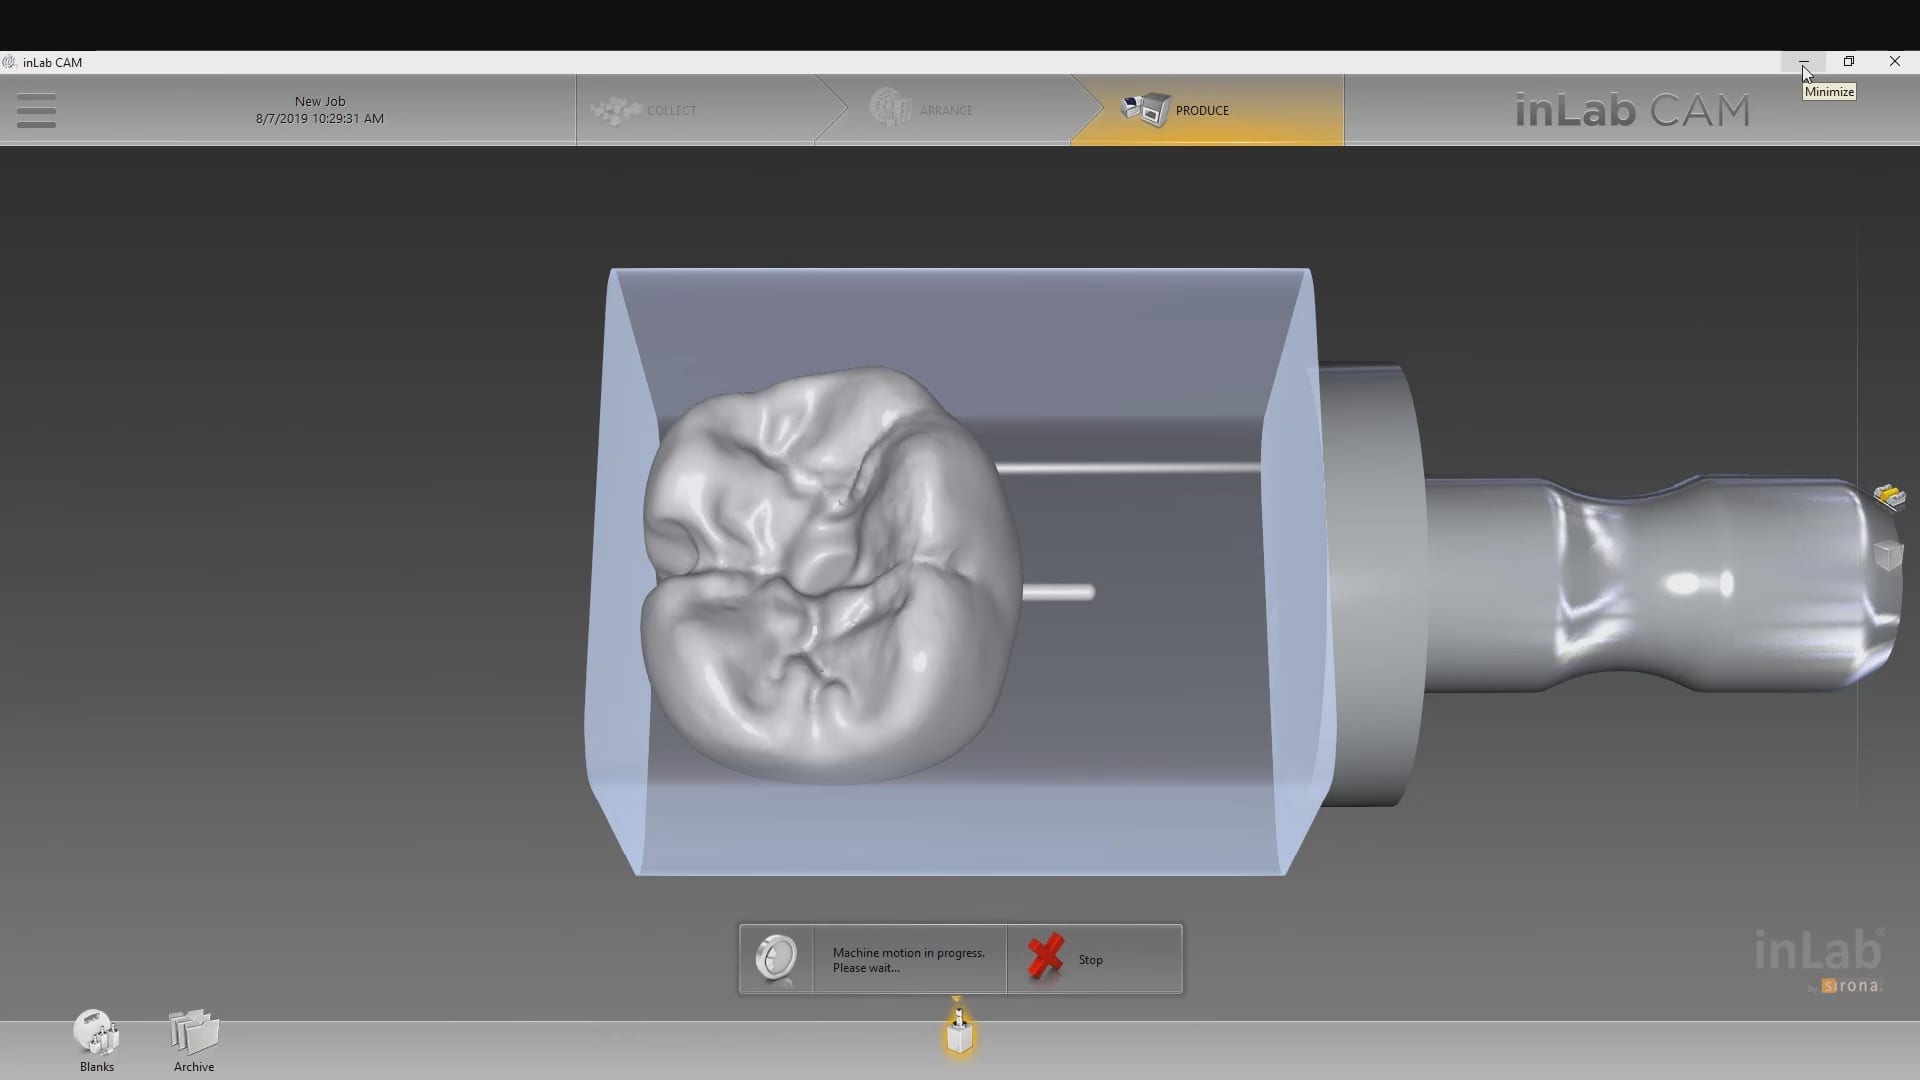
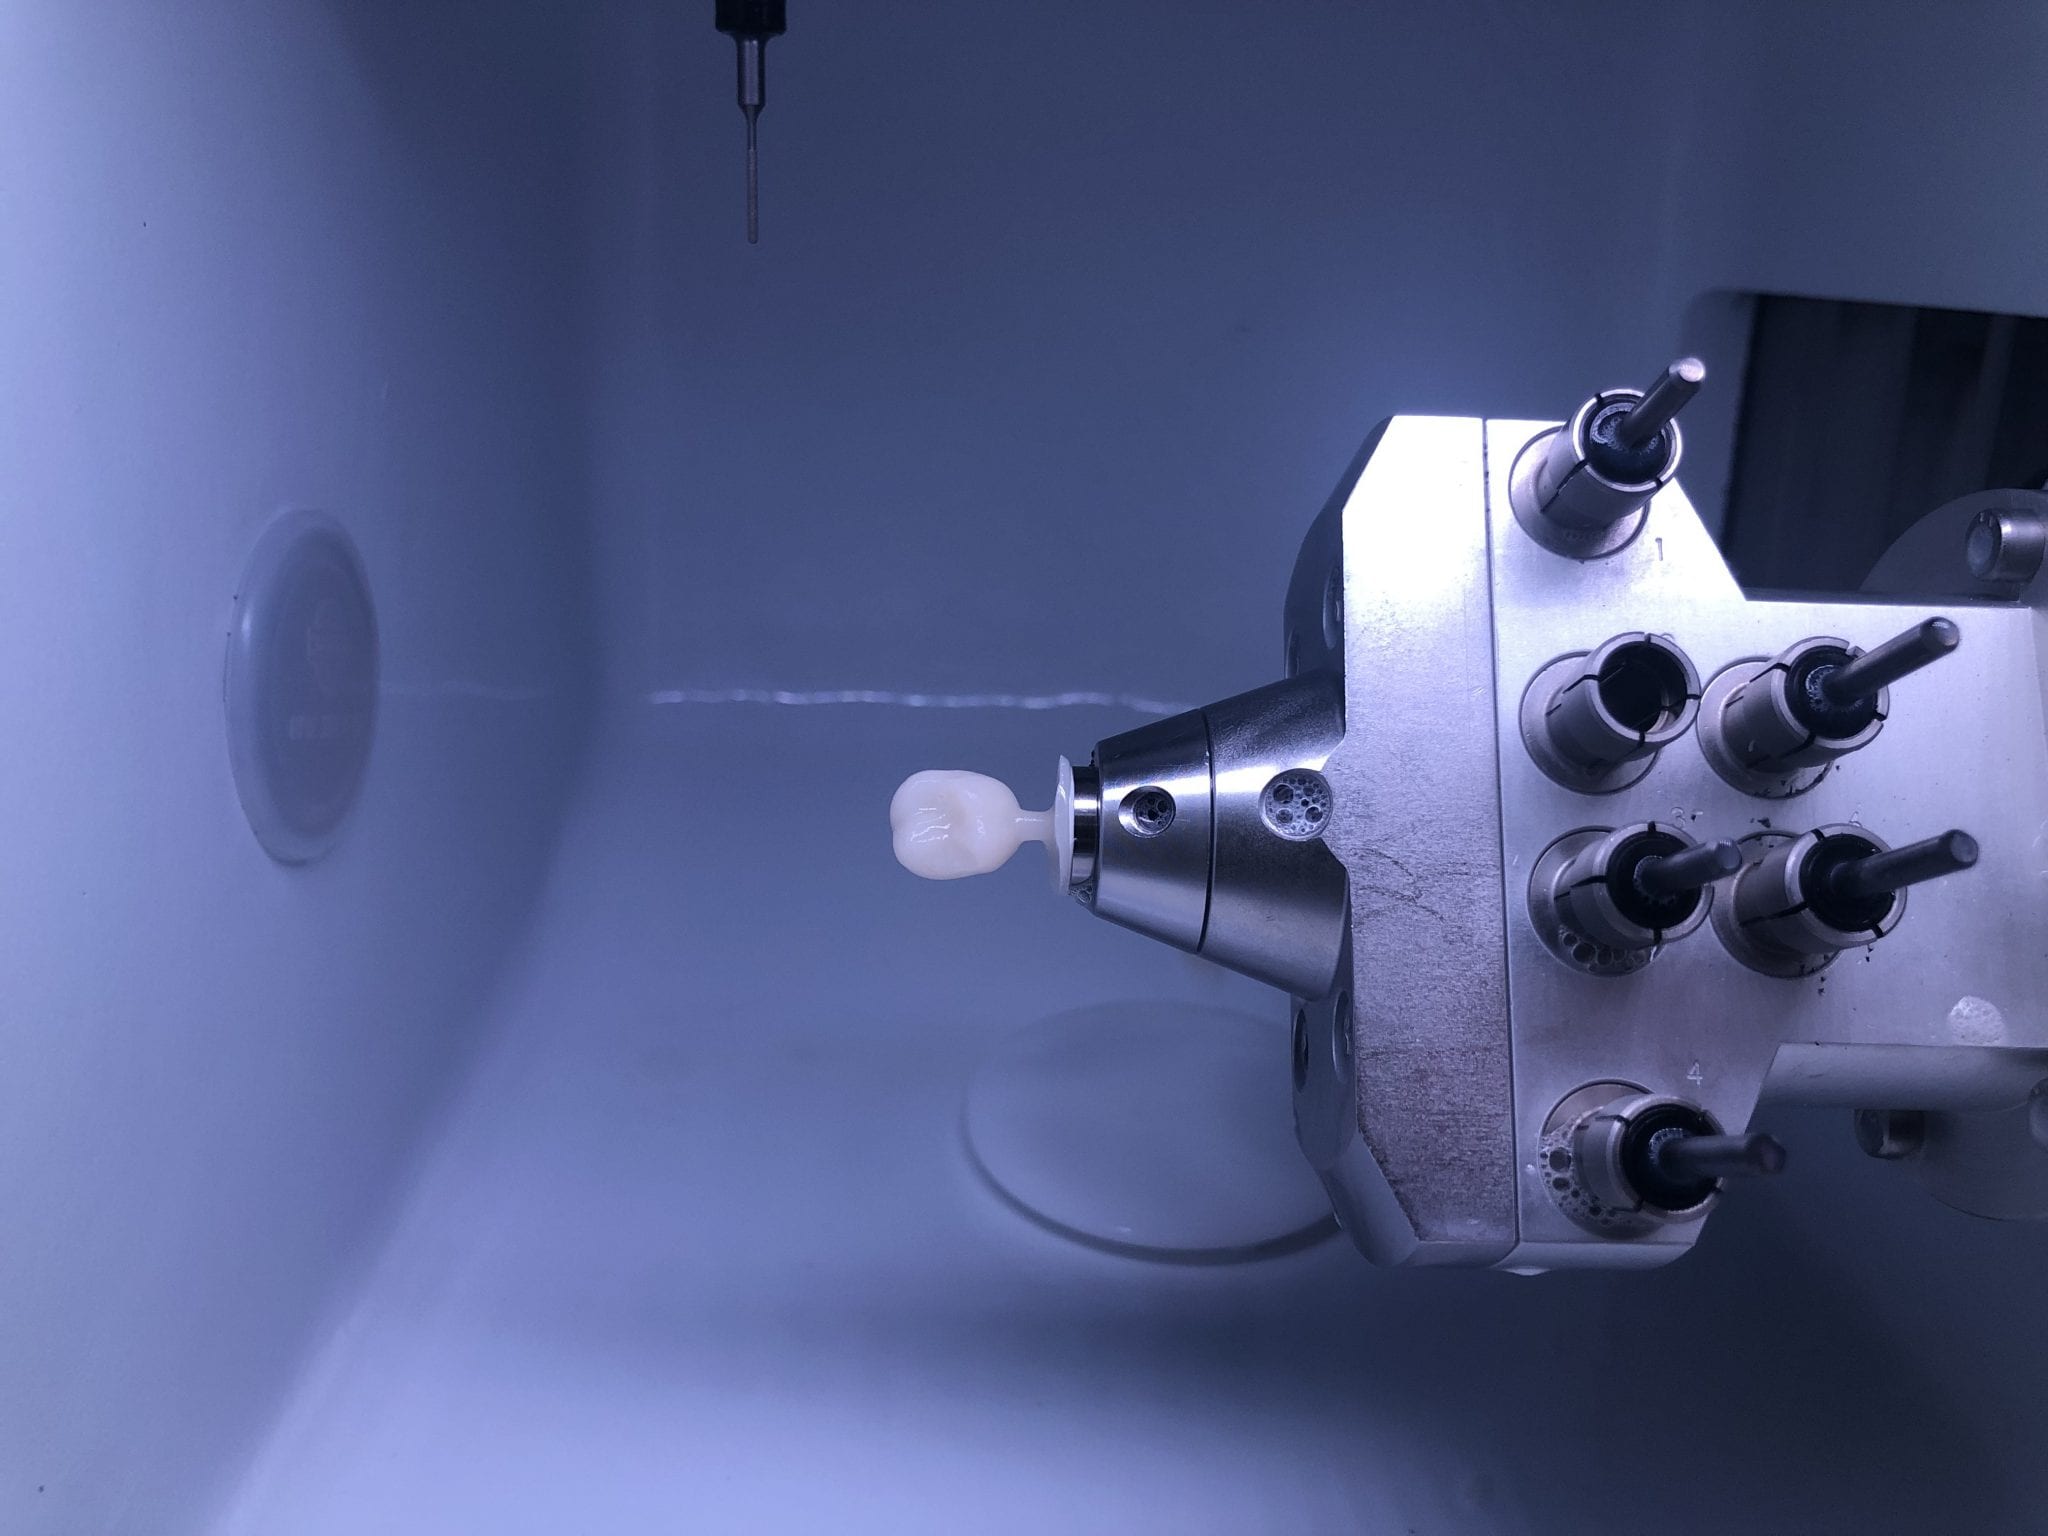
Once the case is designed in the CAD software, you can then take it to any CAM and Milling Machine to produce a restoration. Here we milled an emax restoration with the CEREC MCXL and the imes icore CORiTEC ONE at the same time so we can compare the final results. The CEREC milling machine produced a restoration faster by about 90 seconds but the final results of the margins by the CORiTEC Machine was far superior. Also, the CAM software, Millbox in this situation, allows us to choose a third drill that is 0.6 mm in diameter. This increases milling time but results in less overmilling than the 1.2 mm burrs that milll the intaglio of the CEREC Machine.
Please, take a seat, you should not be standing while you watch this.
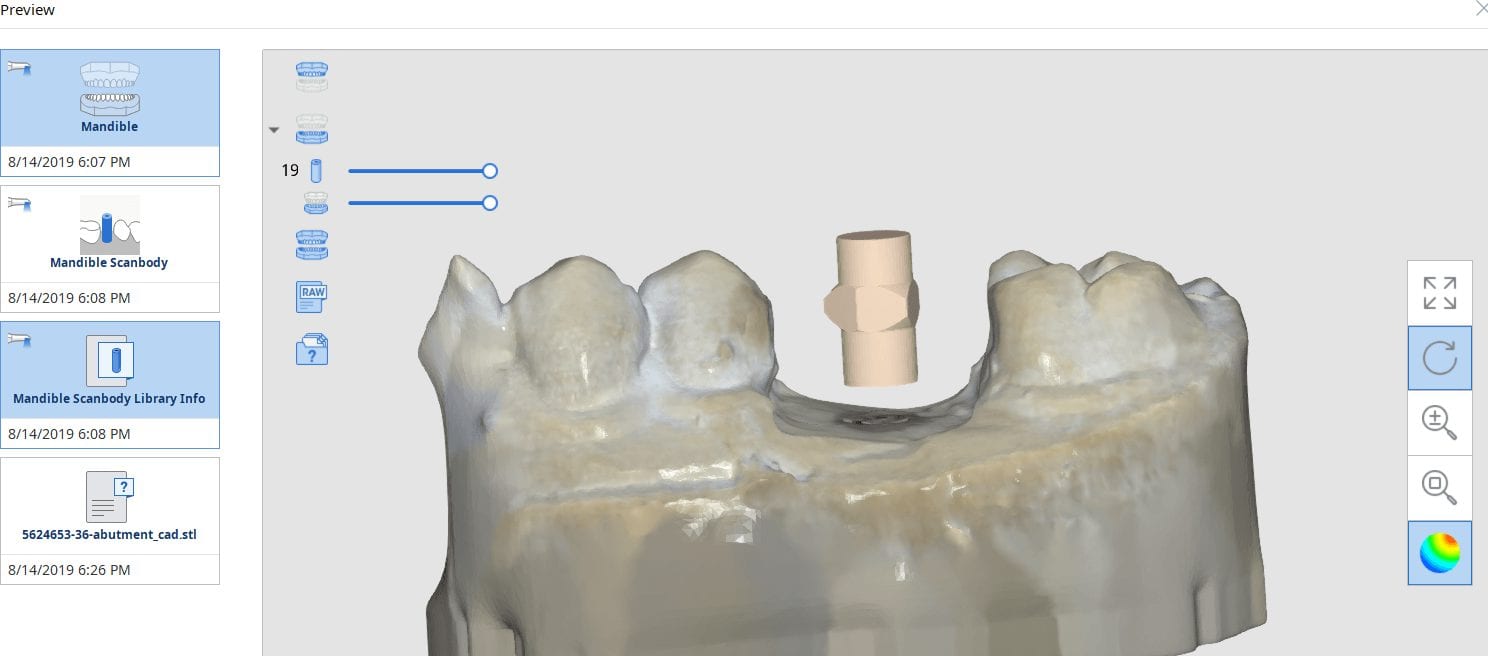
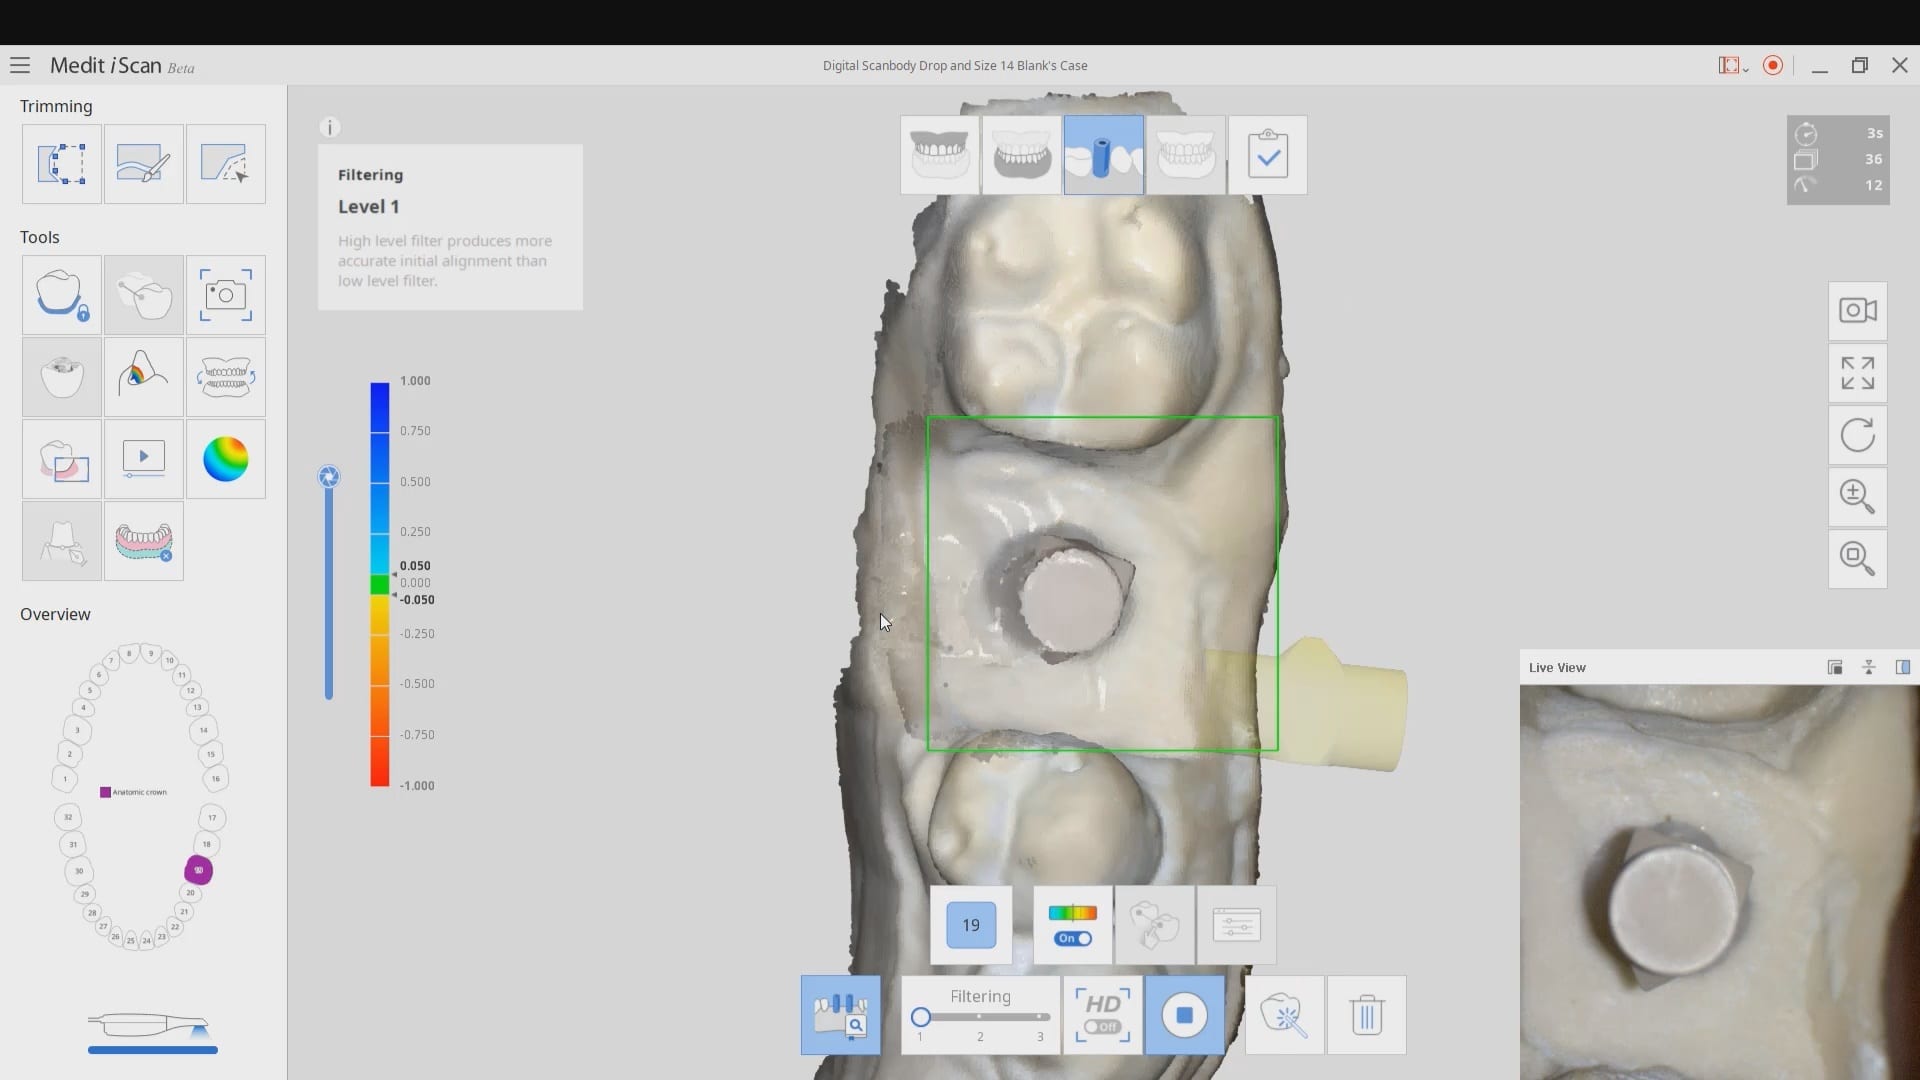
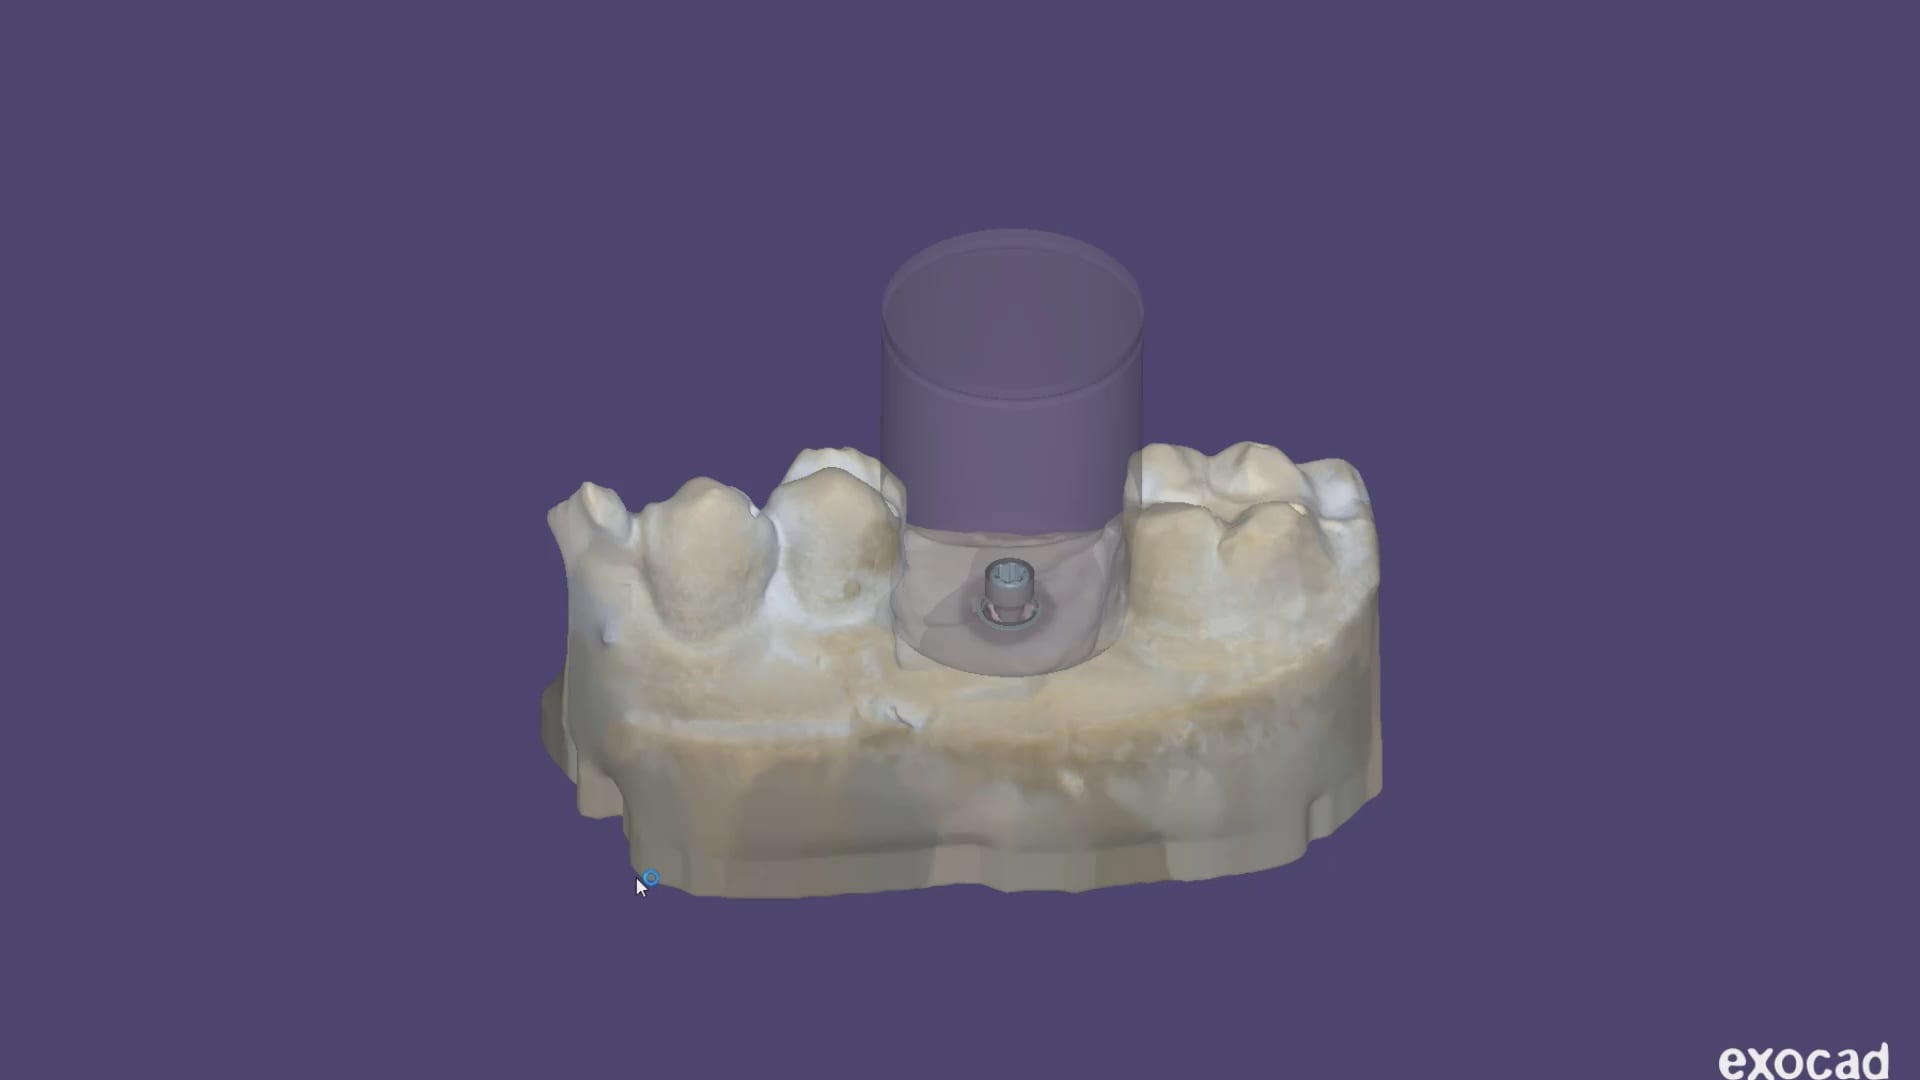
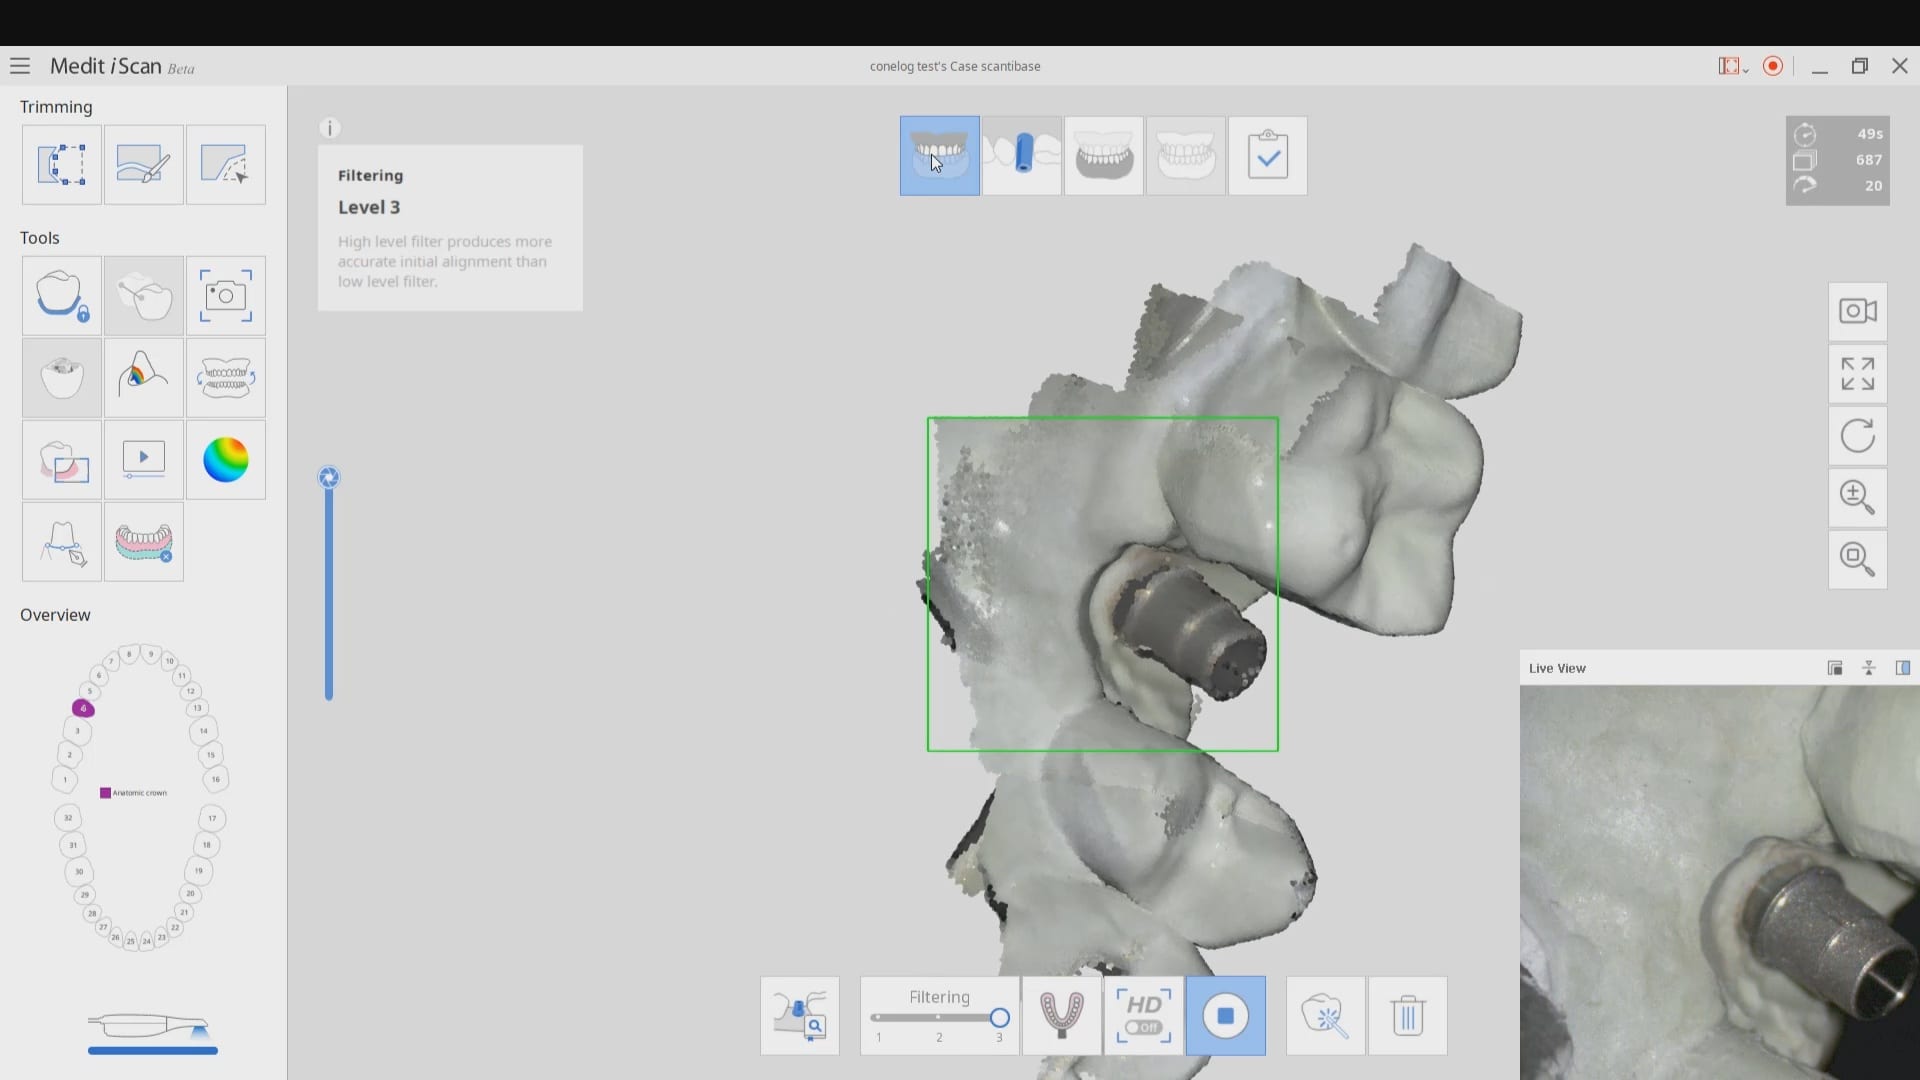
Artificial intelligence by Medit i500 now identifies the location of your scanbody but it also automatically launches all that proper information into CAD software for instant abutment designs. Make sure to watch both videos. Enjoy.
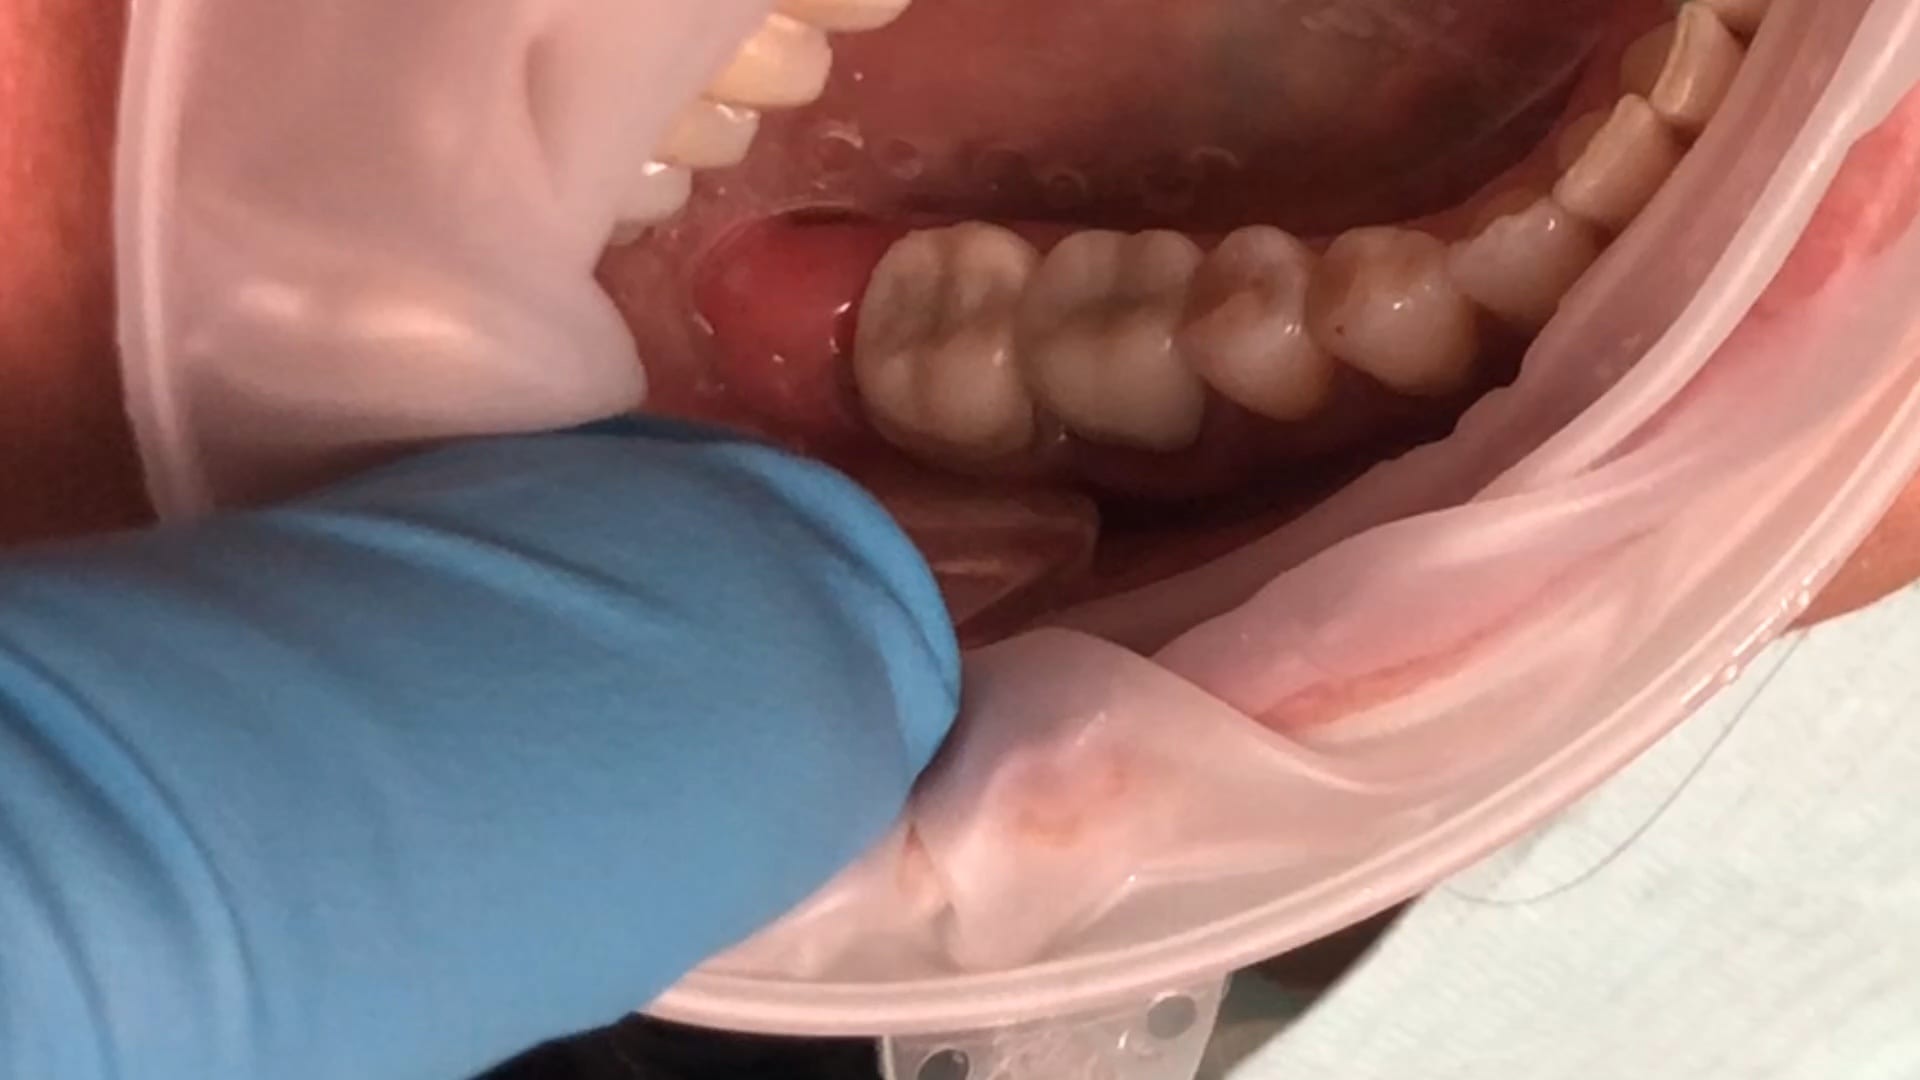
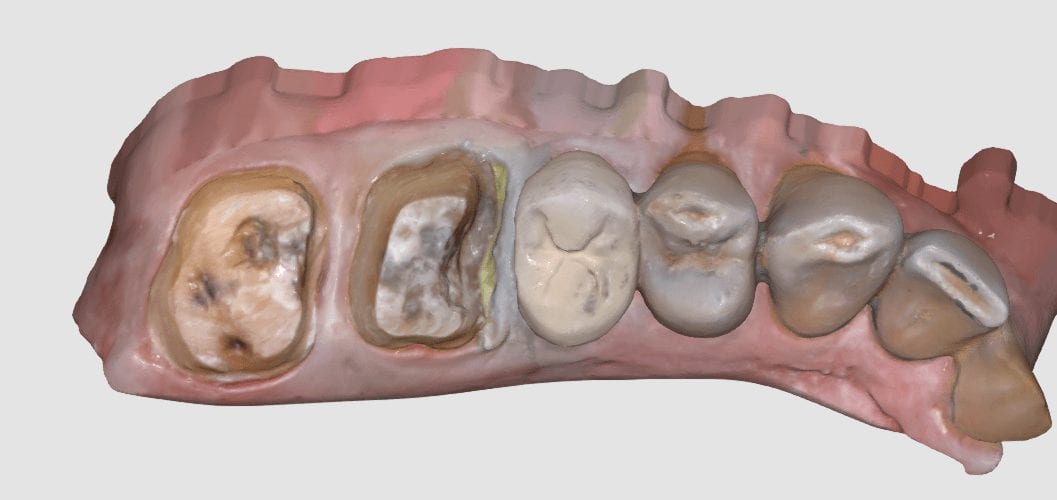
Few things in dentistry that can be as frustrating as seating a second molar restoration, whether you are doing same day dentistry or having a lab made prosthesis delivered. Here is a protocol we recommend that you follow to dramatically reduce surprises and post op adjustments. In this particular clinical case a zirconia crown debonded and we elected to fabricate an in-office emax restoration. The sequence is as follows:
While the patient is anesthetized and you are waiting for the onset of anesthesia, capture the opposing impression and the arch models. Trim away the prep digitally and then proceed to the buccal bite capture
Do NOT capture the bite until you verify clearance. In the sequences of videos that follow, watch how we use the Medit i500 to capture digital pictures of the clearance
Once we verify clearance, we image the bite. You have the option at this point to see how well your occlusal stamps match the digital stamps if you want to. A large deviation may mean the jaw settled or the patient moved during the bite capture. Note that unlike conventional dentistry, you capture the bite here BEFORE the prep is finalized
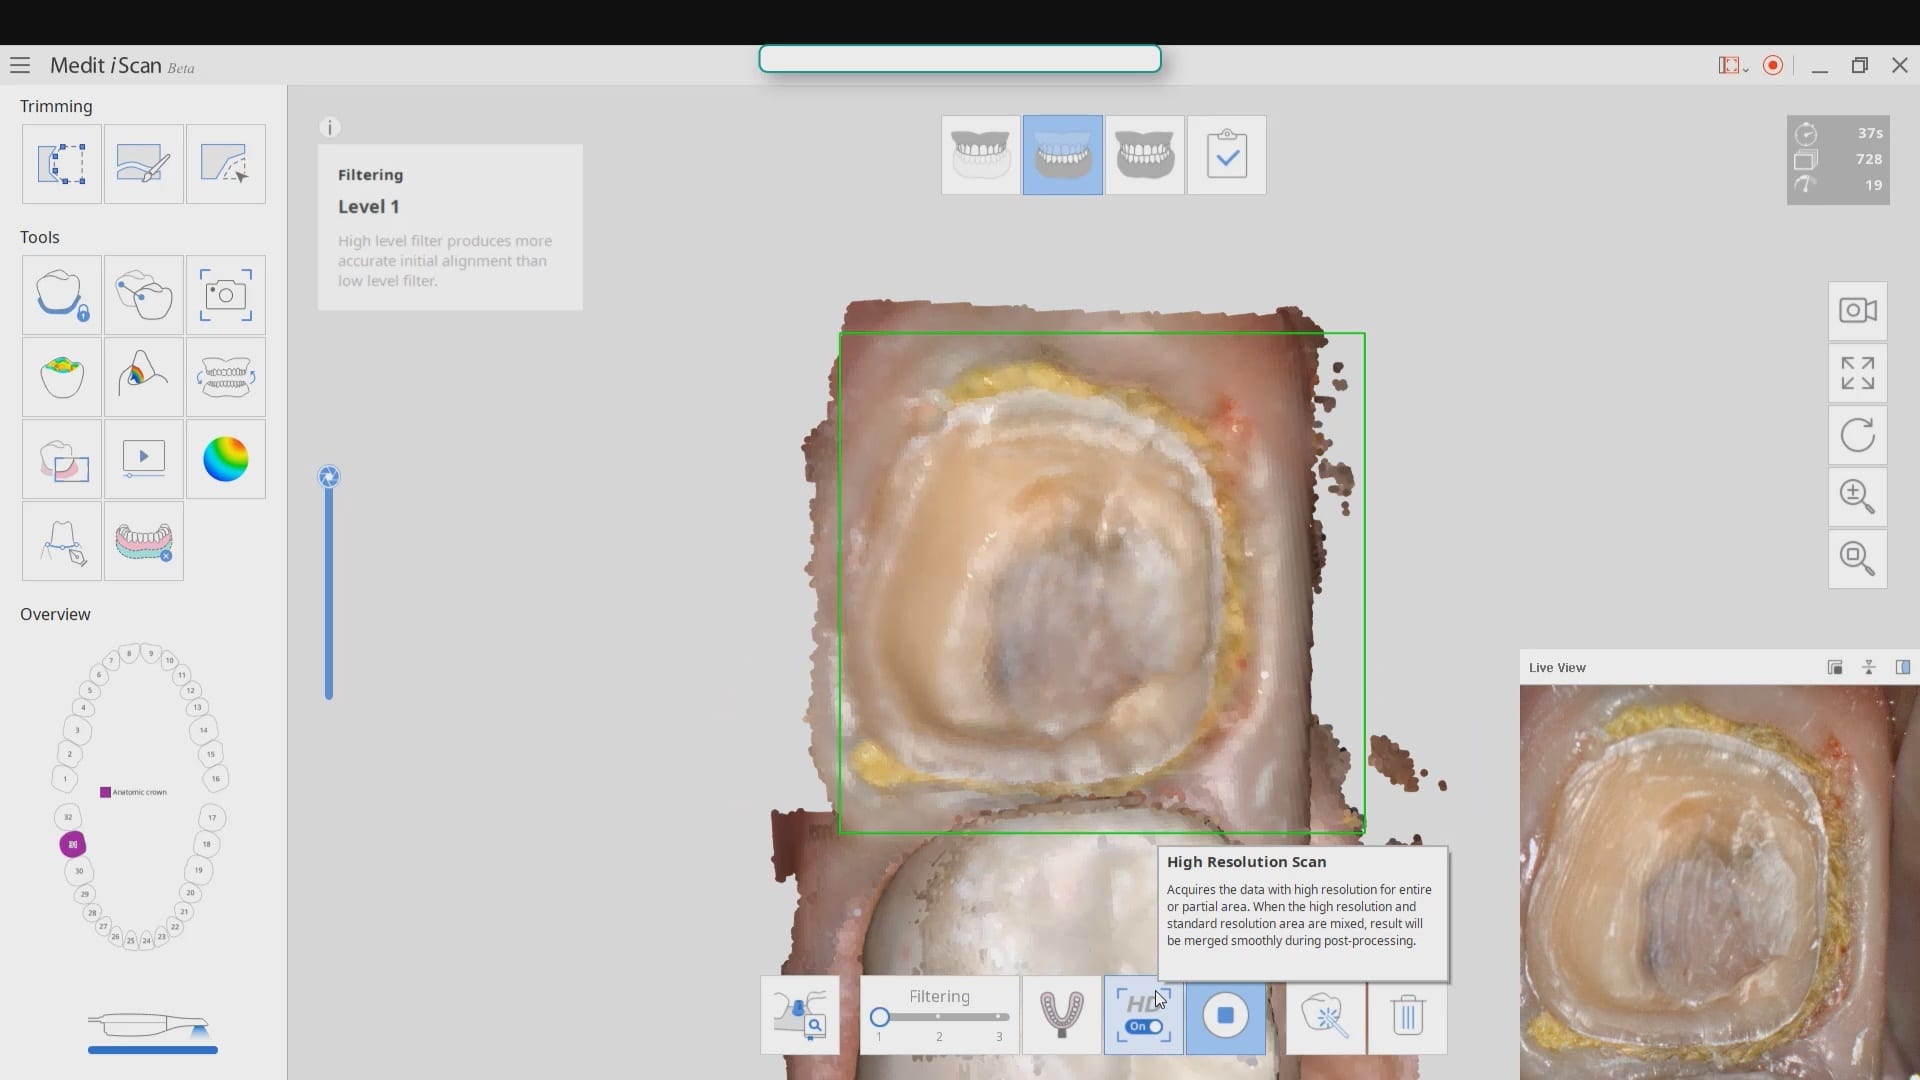
Once you achieve isolation you can finalize the prep and retract the tissue and capture the prep. We elected to capture the preparation in HD mode
The case is then immediately imported into the CAD software for design and fabrication
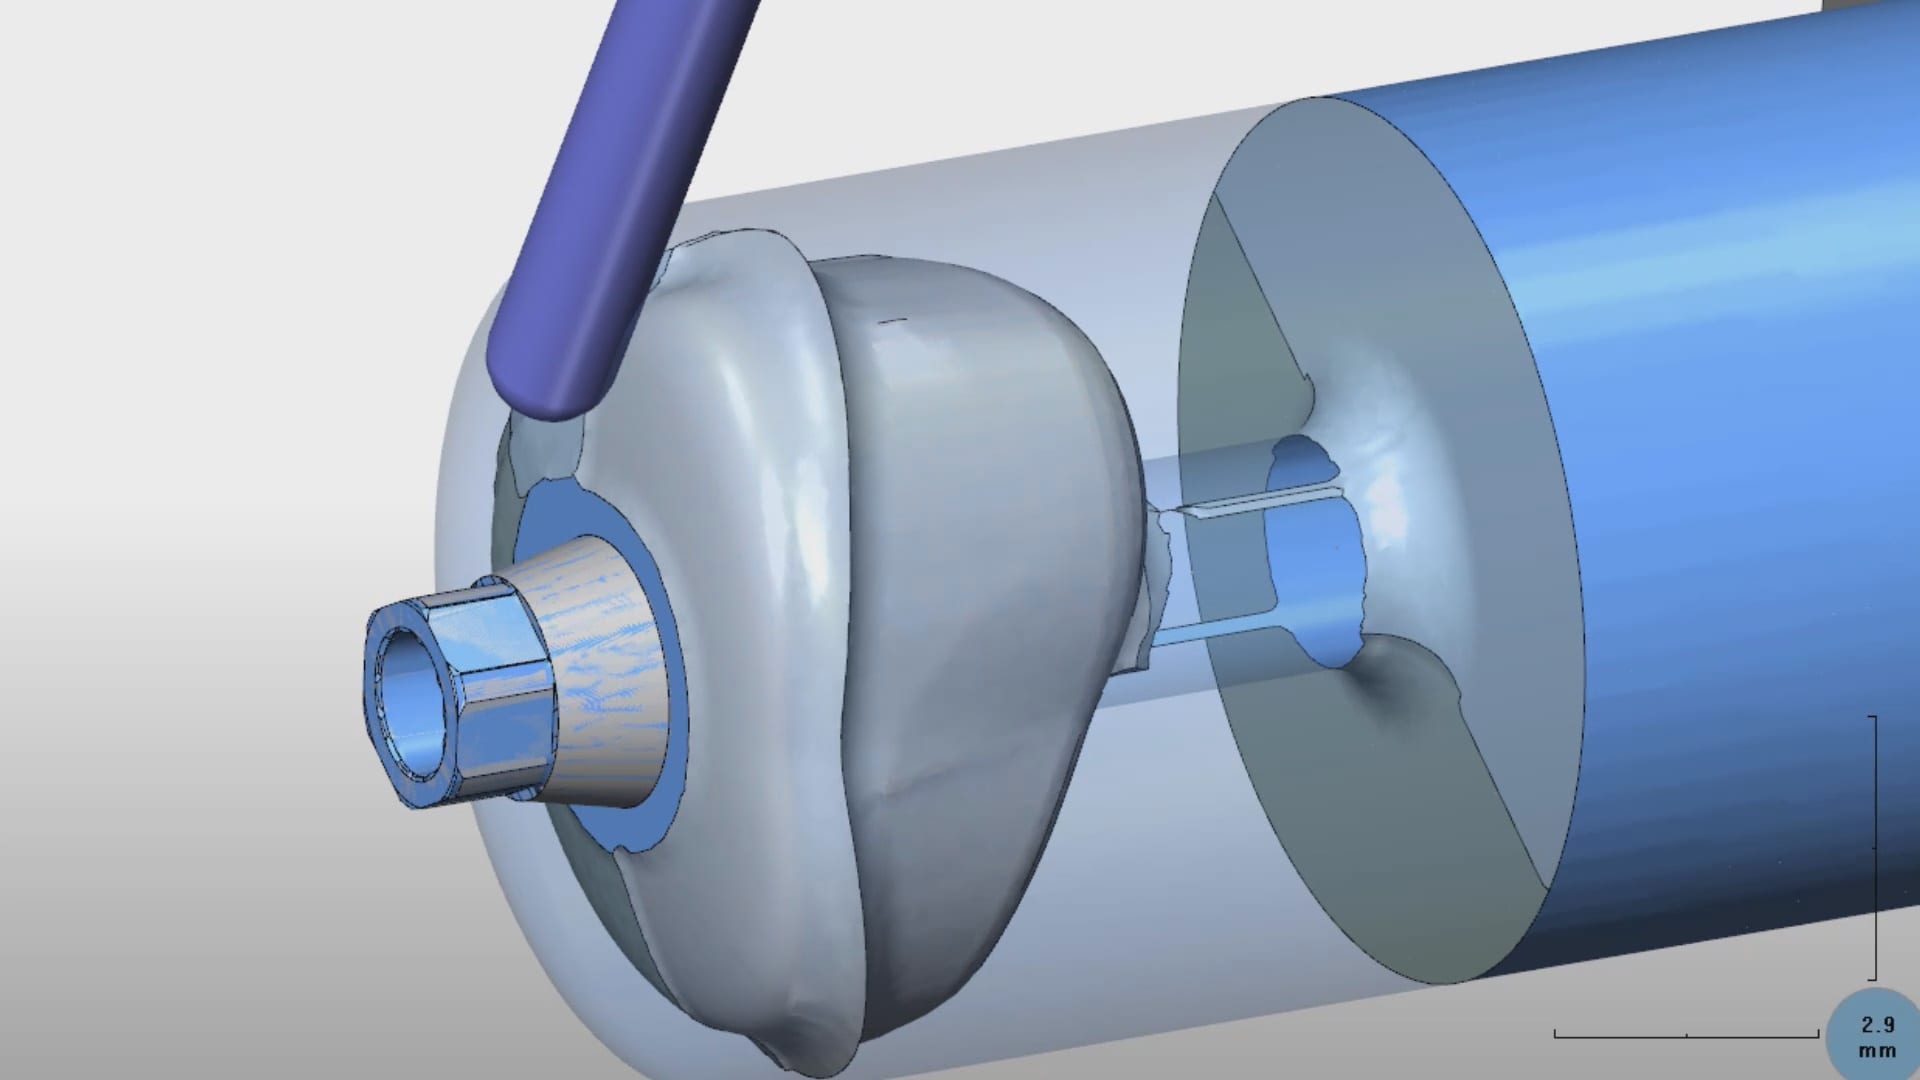
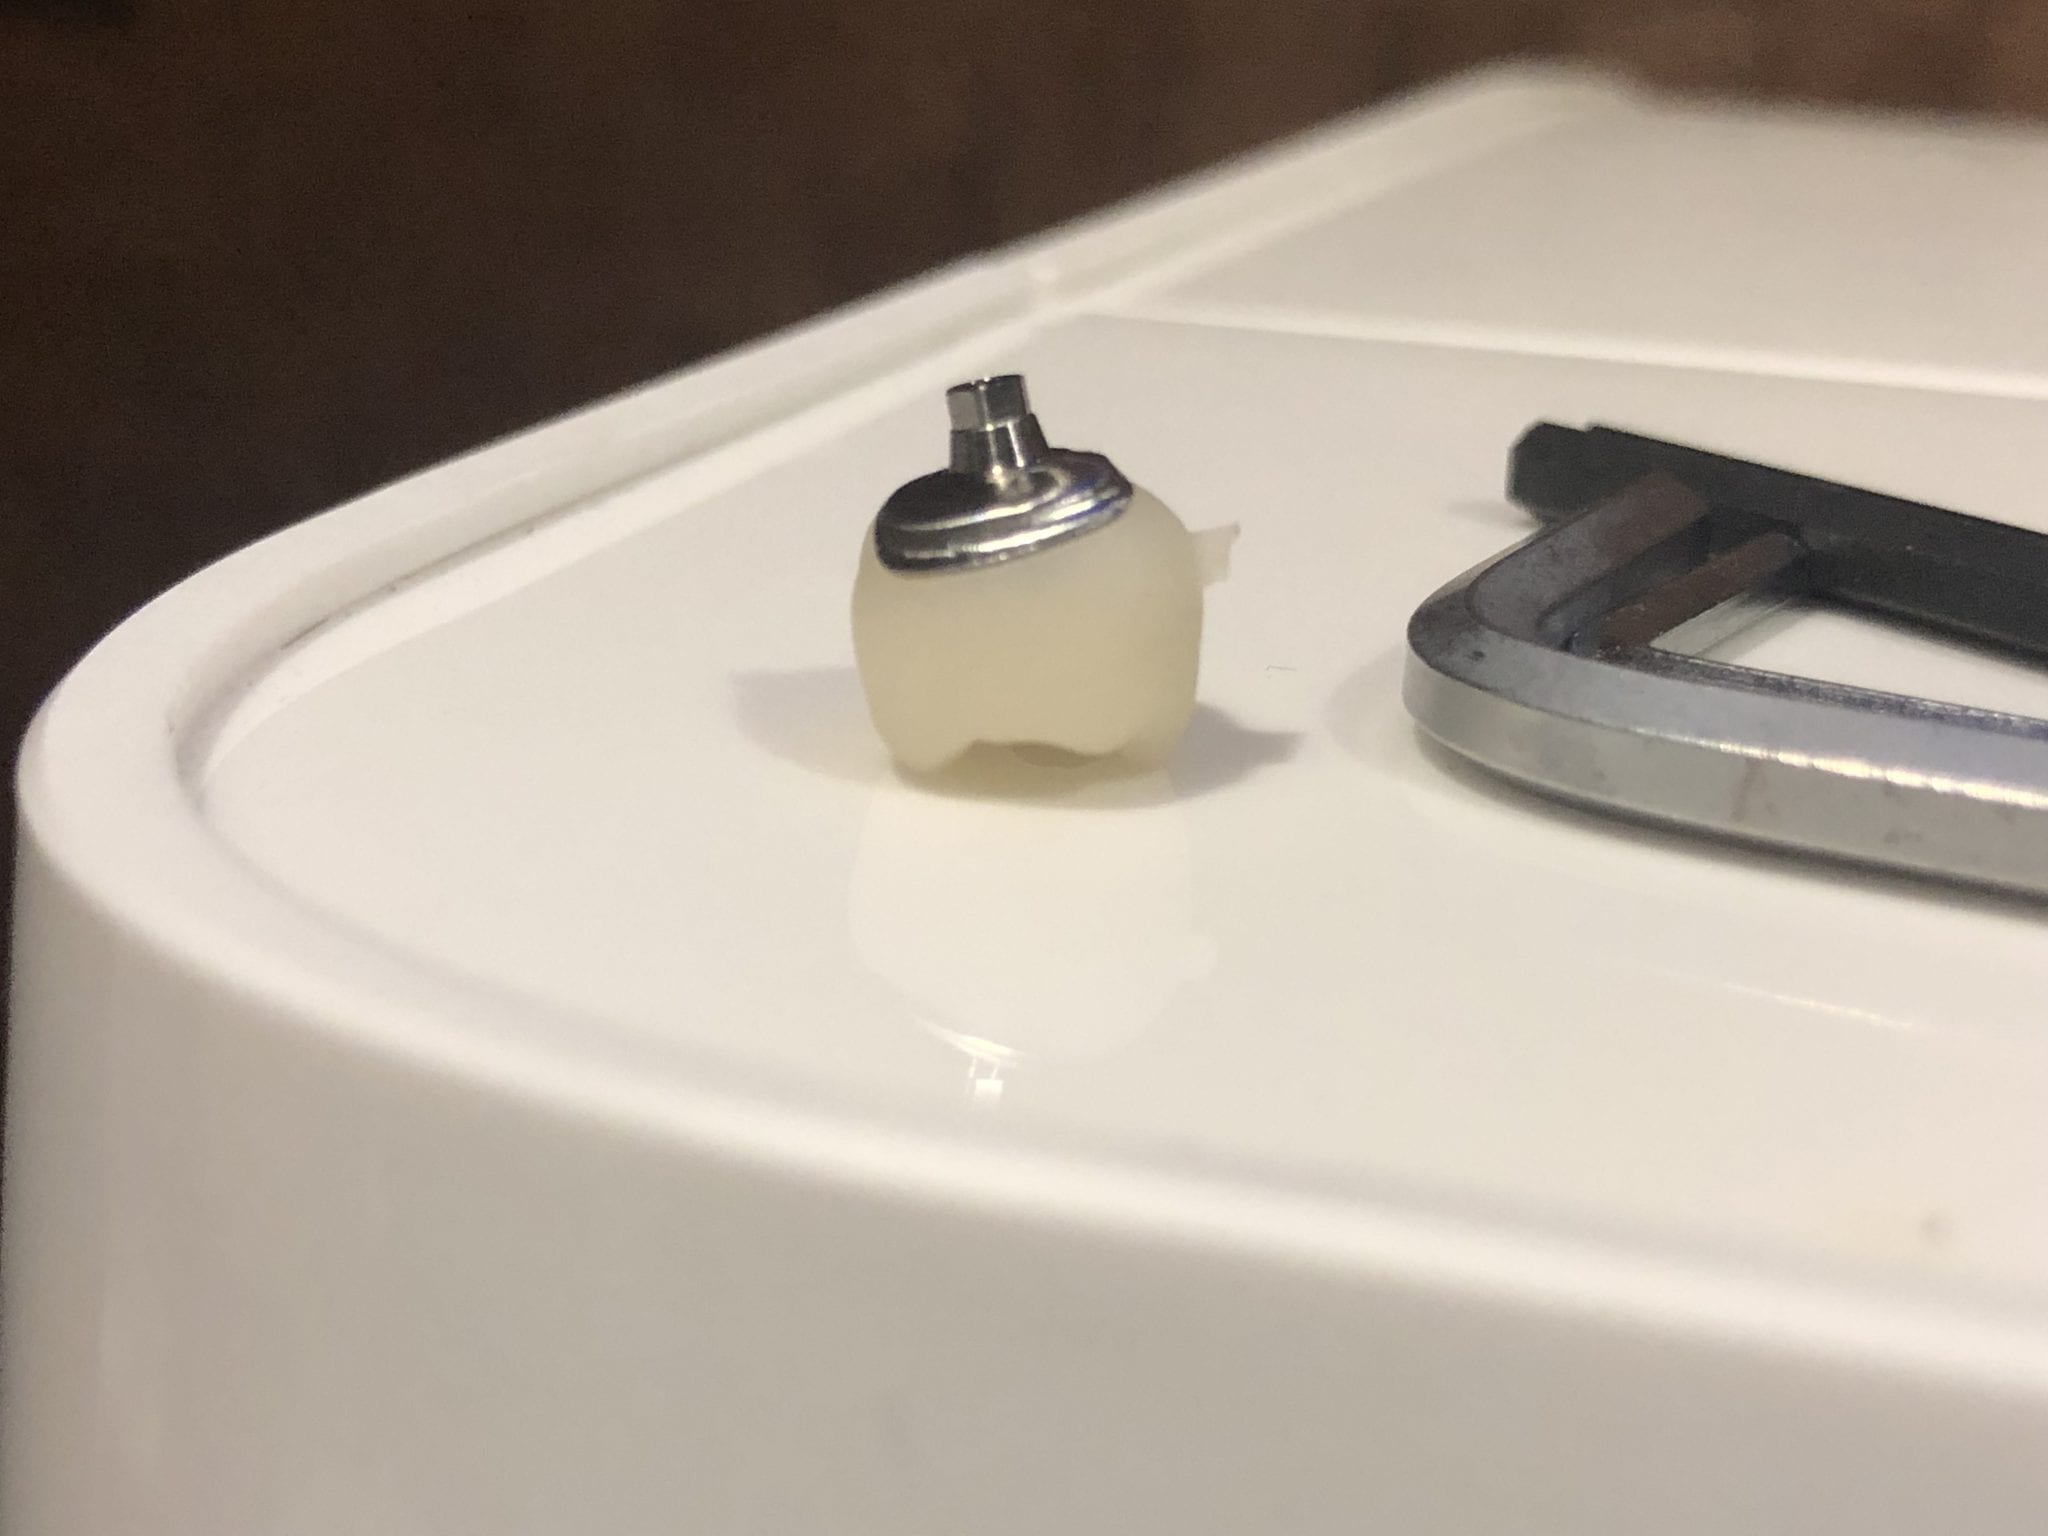
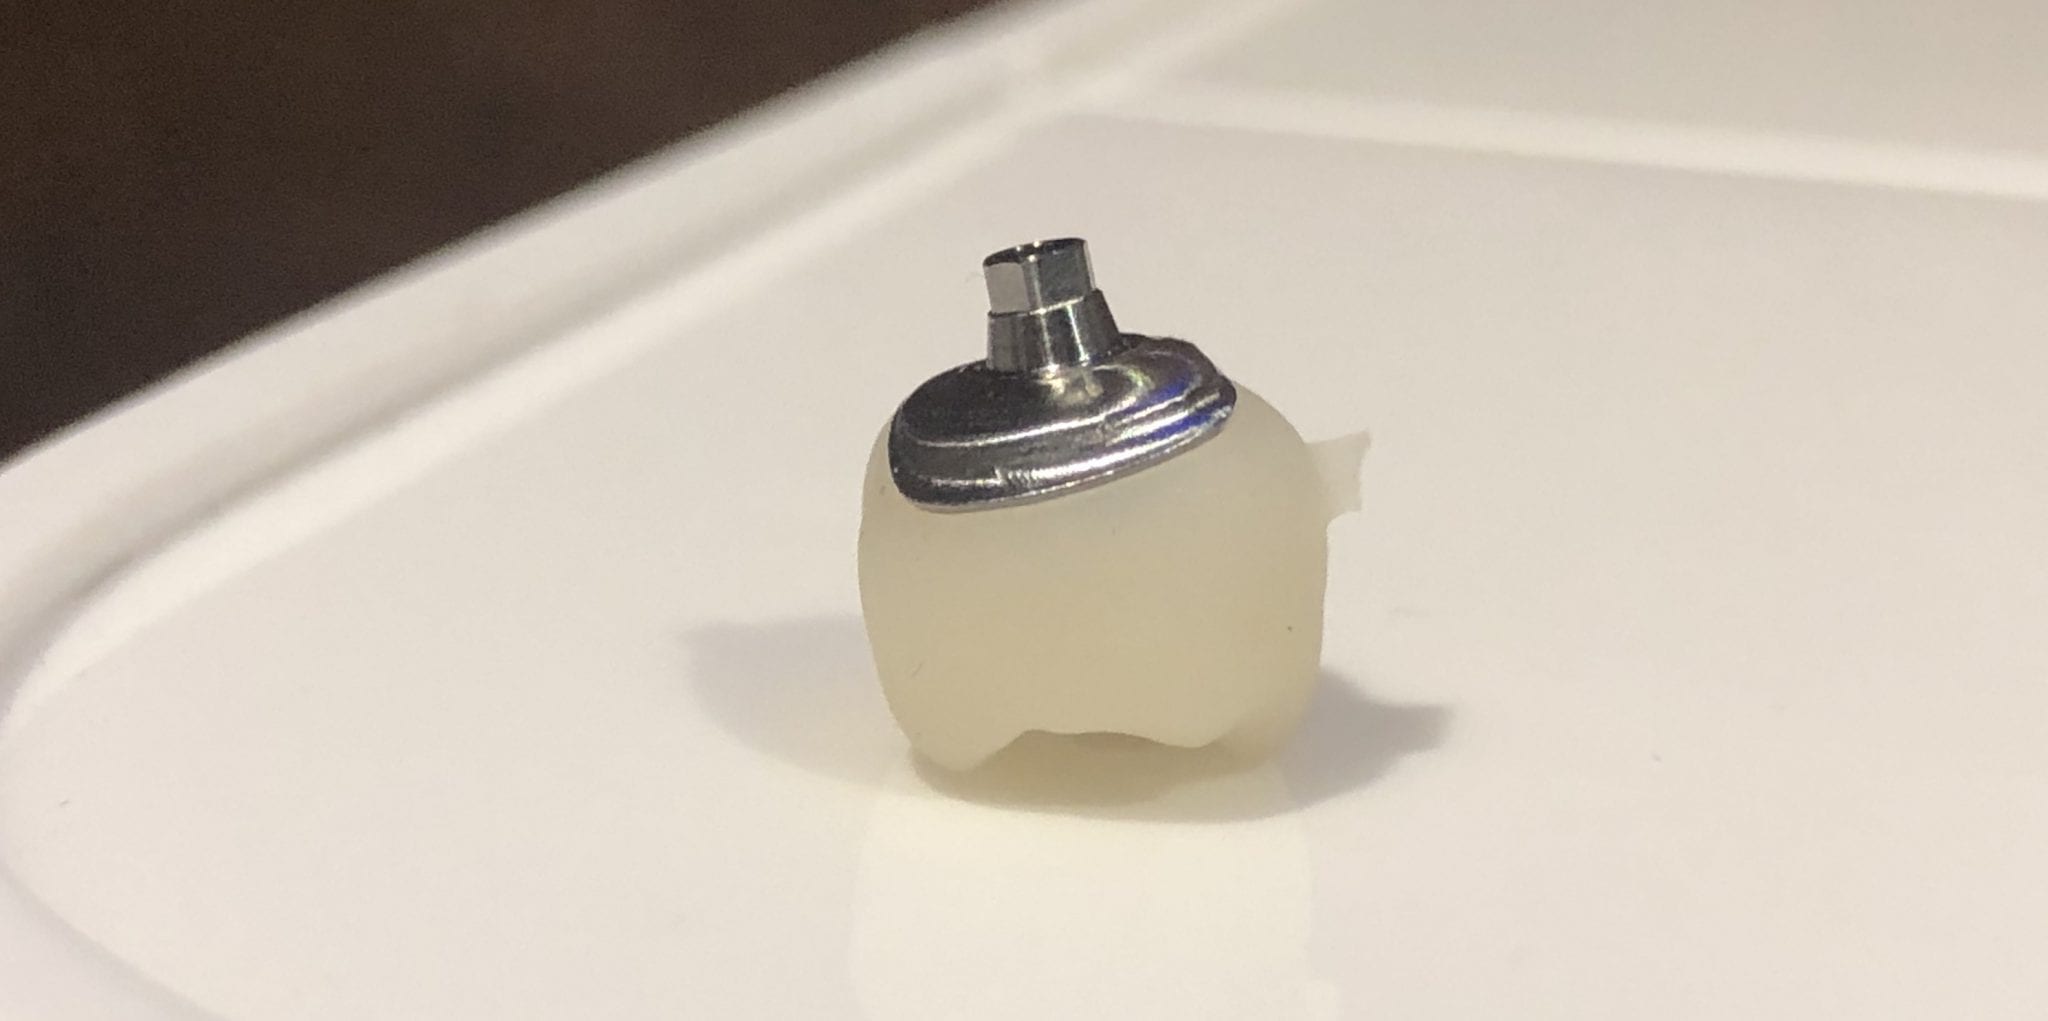
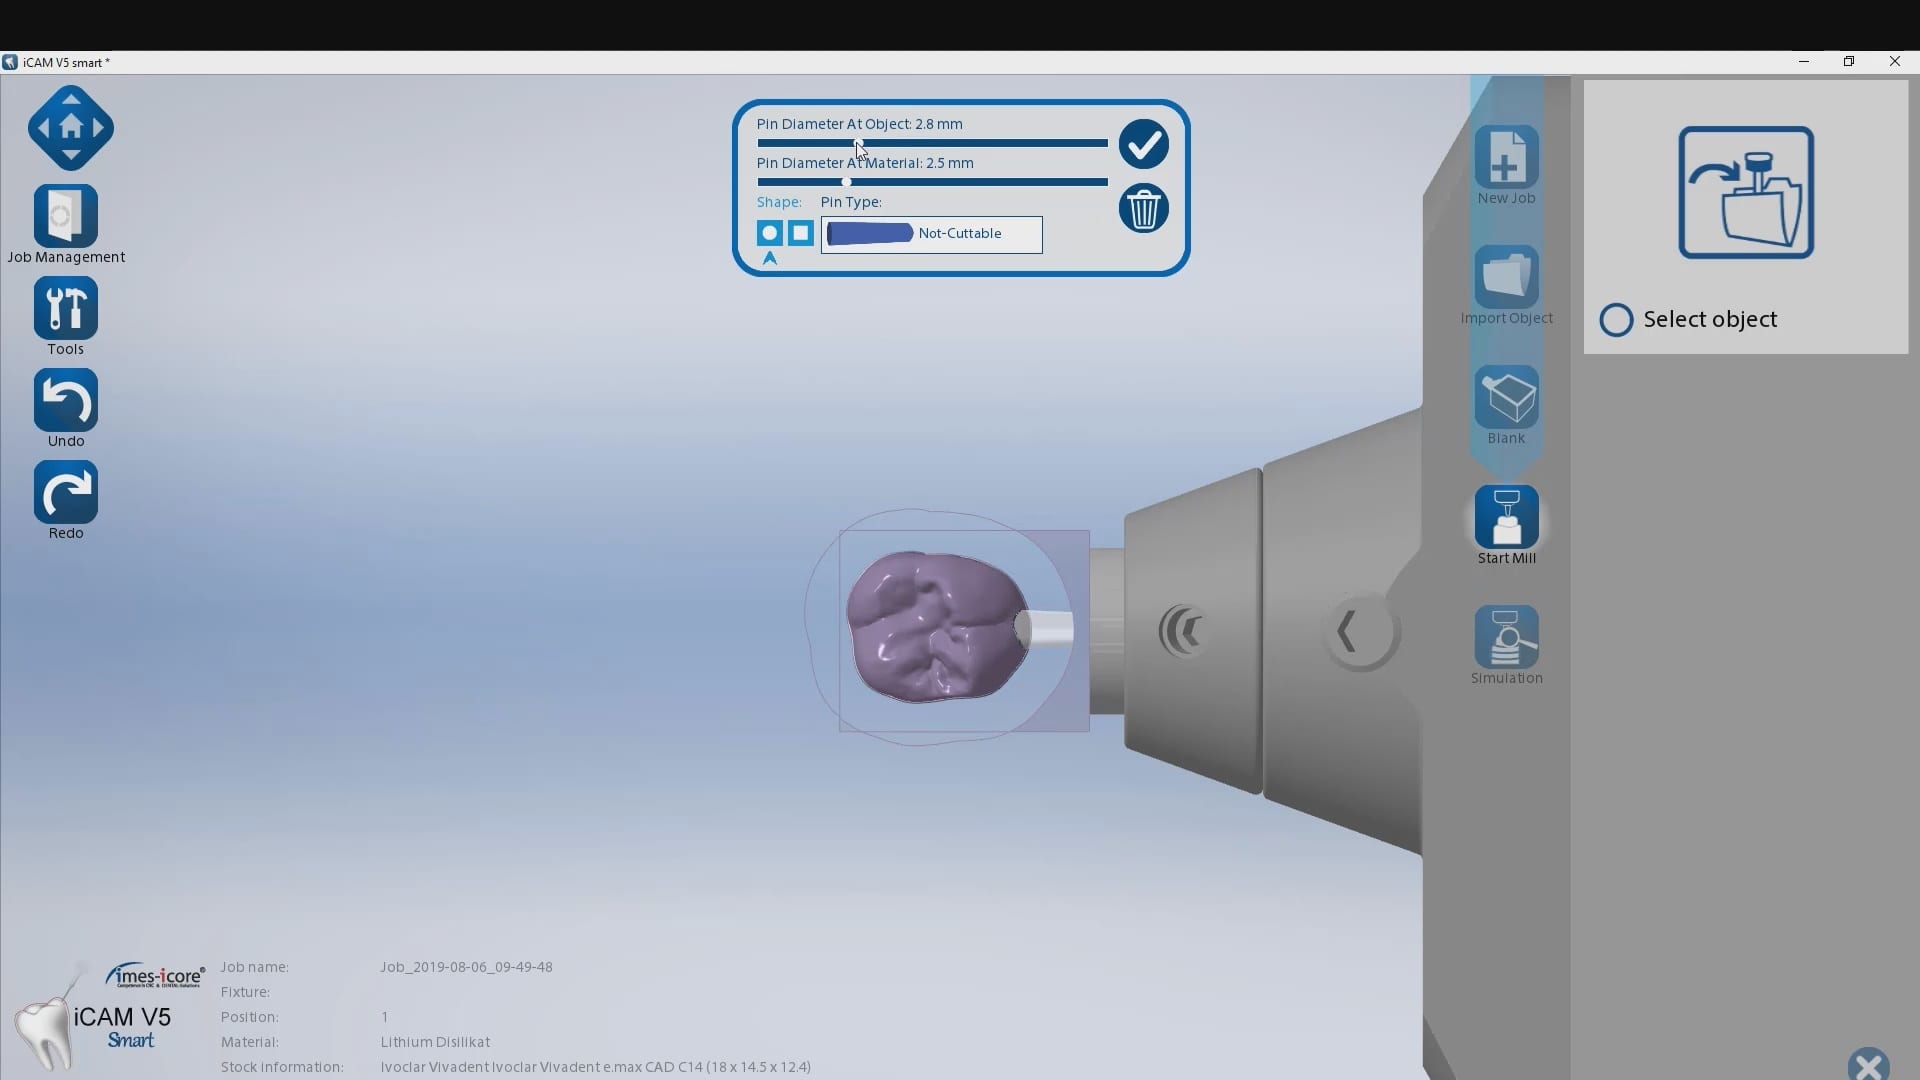
A custom titanium metal abutment is milled in such a manner where the drills DO NOT touch the connection. The type of connection is predetermined by the blank manufacturer and the cylindrical part of the abutment is milled out. This makes the symmetric geometry of the abutment a bit tricky for some to handle as indexing it properly to manage the timing of the connection is critical for easy delivery.
It is a good idea to know the exact dimension of the screw access hole. You want to set the diameter just outside the channel so that you don’t have to do a lot of post production adjustments. if it is made too thin however, you can have a mis-mill and have to repeat it. We’ve found 2.5 mm the perfect setting for the DESS titanium abutments.
With the Meditlink software you can design a case and then export the designs and take them to any milling machine of your choice. In this demonstration, we use the CORiTEC ONE to mill out the metal abutment in 45 minutes. This procedure is not intended to be a single appointment visit so timing is not critical and you don’t place undue wear and tear on the milling machine.
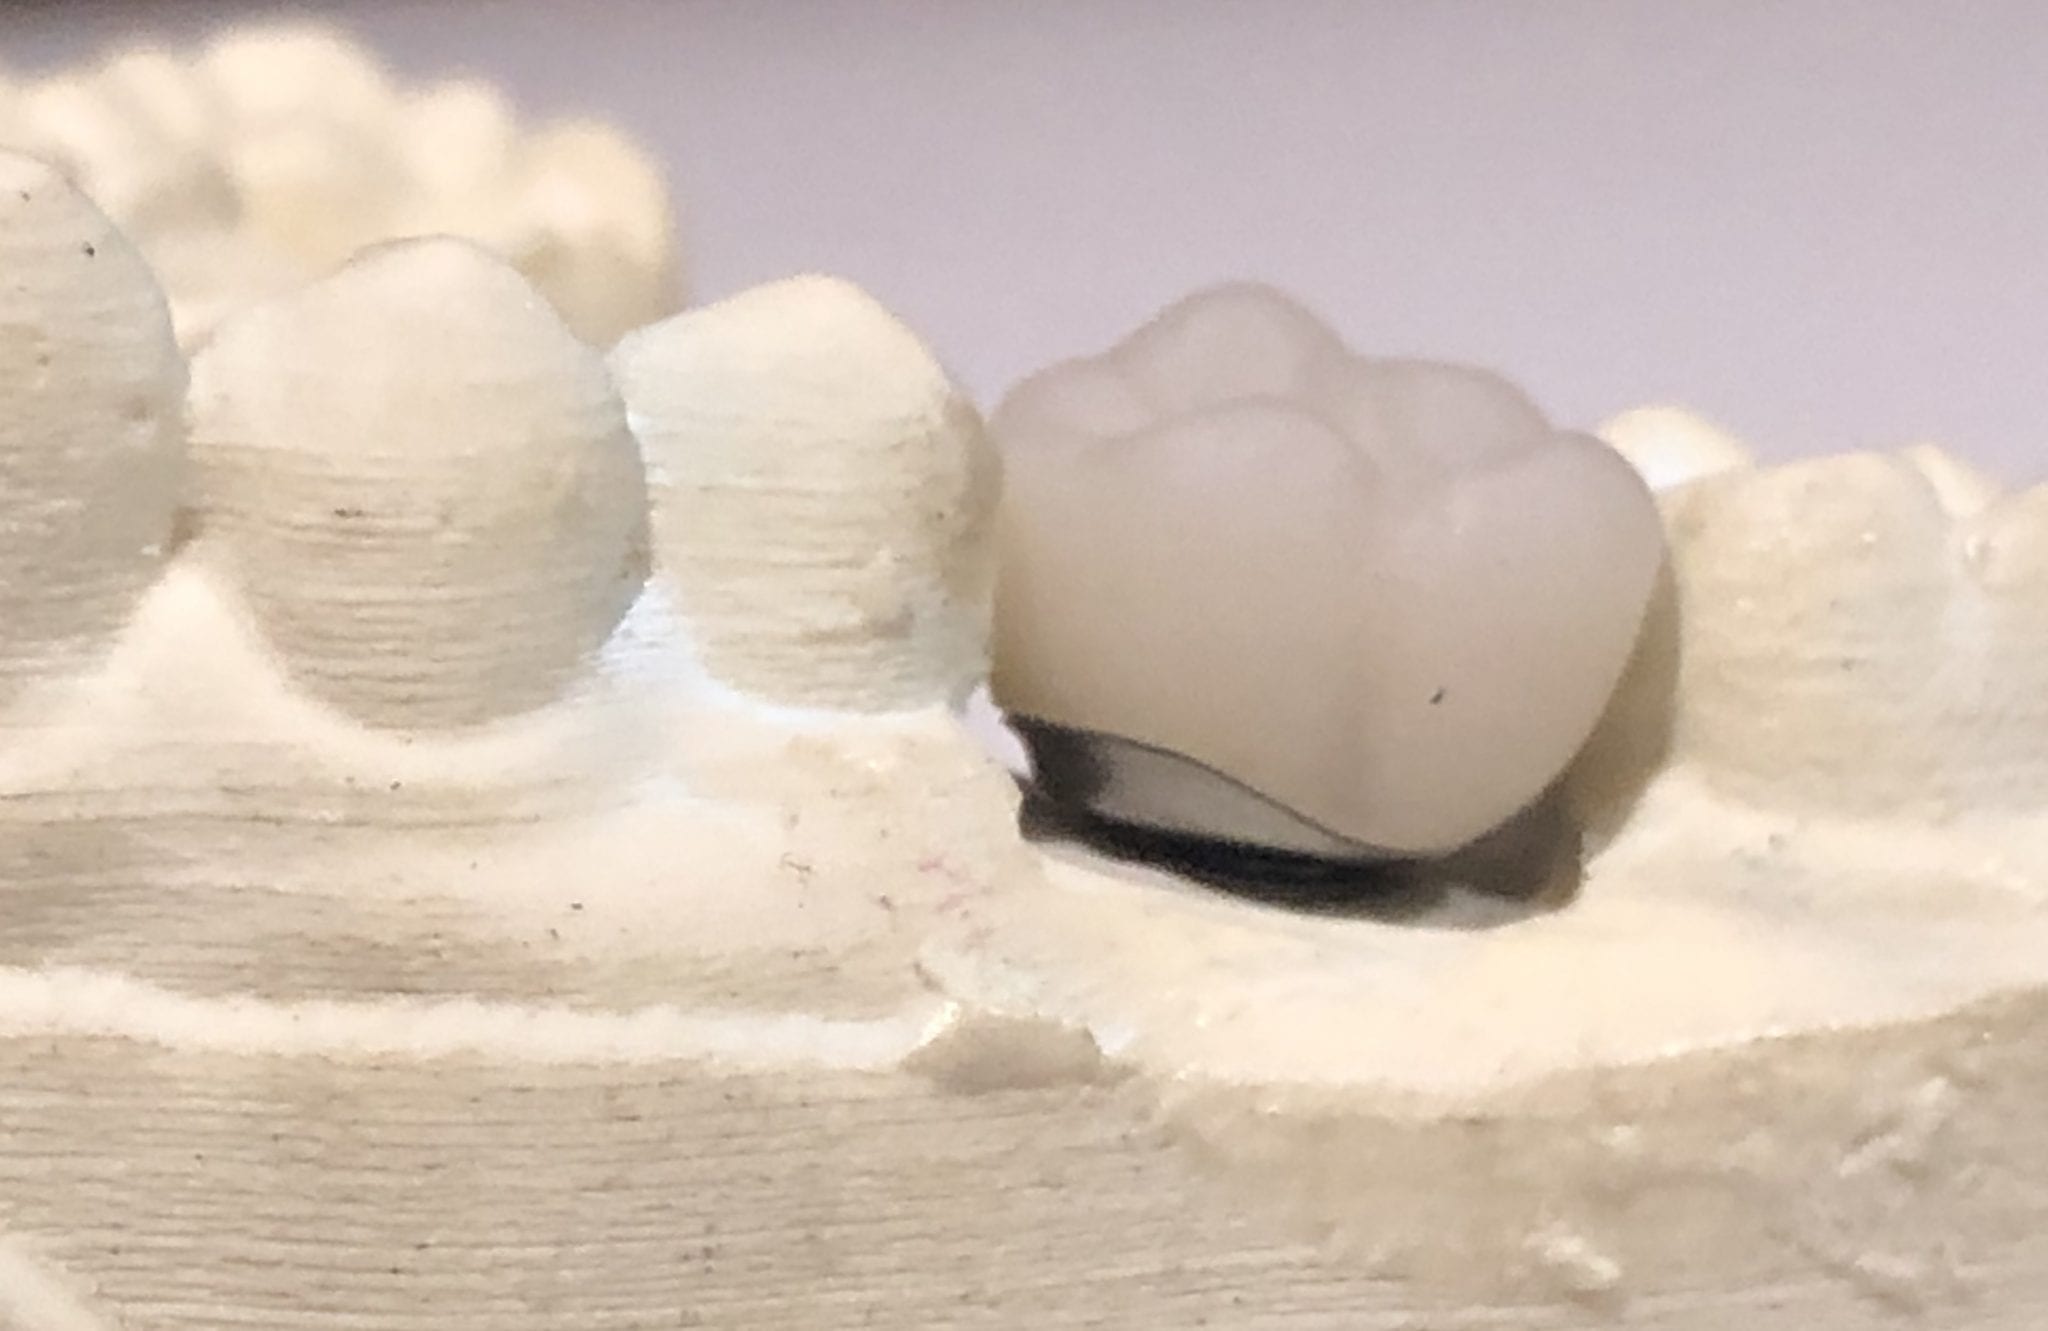
The crowns were milled with two different milling machines. A Celtra Duo block was used and milled with the CEREC MCXL and retrofitted to the abutment to verify the fit and accuracy. The same crown stl was milled out of Vita material in the imes icore machine. The whole point of the demonstration is that you can take scans from any intra-oral scan, take it to CAD software (in this case exocad) and then export the case and take it to any printer or milling machine of your choice. You must make sure critical information is accurately transferred from your CAD software to your CAM software, which is generally the construction / project file that accompanies the STL files of the prosthetic components
The same crown was milled out of Vita’s Suprinity material in 20 minutes with the imes-icore CORiTEC ONE. Take note of the internal adaptation of the metal abutment and the restoration and how when it is flipped upside down, the restoration does not fall out easily!
For our advanced users, we demonstrate how to plan and manage a two unit molar case so they can deliver multiple chairside restorations in a single visit. There are numerous short-cuts to this treatment protocol and we present them in great detail during our courses. The limiting factor for most doctors is that they have a single milling machine and we show our users how to balance prep and mill time so that they can complete 2 units in less than 90 minutes.
In this case however, we present two restorations that were prepared and delivered at the same time. The sequence of steps are:
Anesthetize the upper right first and second molar
While the patient is getting numb, image the arch to be prepped, image the opposing, and image the bite WITHOUT the teeth being prepared
Reduce the occlusal height of your preparation but do not image them
Check your reduction visually or with the camera function of the Medit i500
Reduce more tooth structure until you have the proper clearance for material strength
Finish refining your preparations, displace the tissue, reach hemostasis, and then crop out the area of the model that you have altered
Image the two preps into that equation. Most people turn on the HD mode for capturing the margins
For distal extension cases, we recommend that you take the second bite. While imaging the second bite (NOT the left vs right bite), if the occlusal model turns green, it is a clear Indication that the vertical has no changed from the pre-op to the prep situation and that you will have minimal post-op adjustments to make. If the second buccal bite does not register in green, it should serve as a warning to you that the vertical dimension has changed
As advanced users, you quickly recognize what areas in the model need to be closed either with imaging or with the “close hole” options during the processing step of the Meditlink software. If you are familiar with exocad or other CAD software programs you can just ignore these areas as they do not have any clinical significance whatsoever.
Once the case is designed you can mill them with your milling machine of choice. The testing of materials, fit, and milling machines are a constant at CAD-Ray.com so we milled the first molar with emax material and the MCXL and the second molar, a Celtra Duo material, was milled with the Imes Icore CORiTEC Once
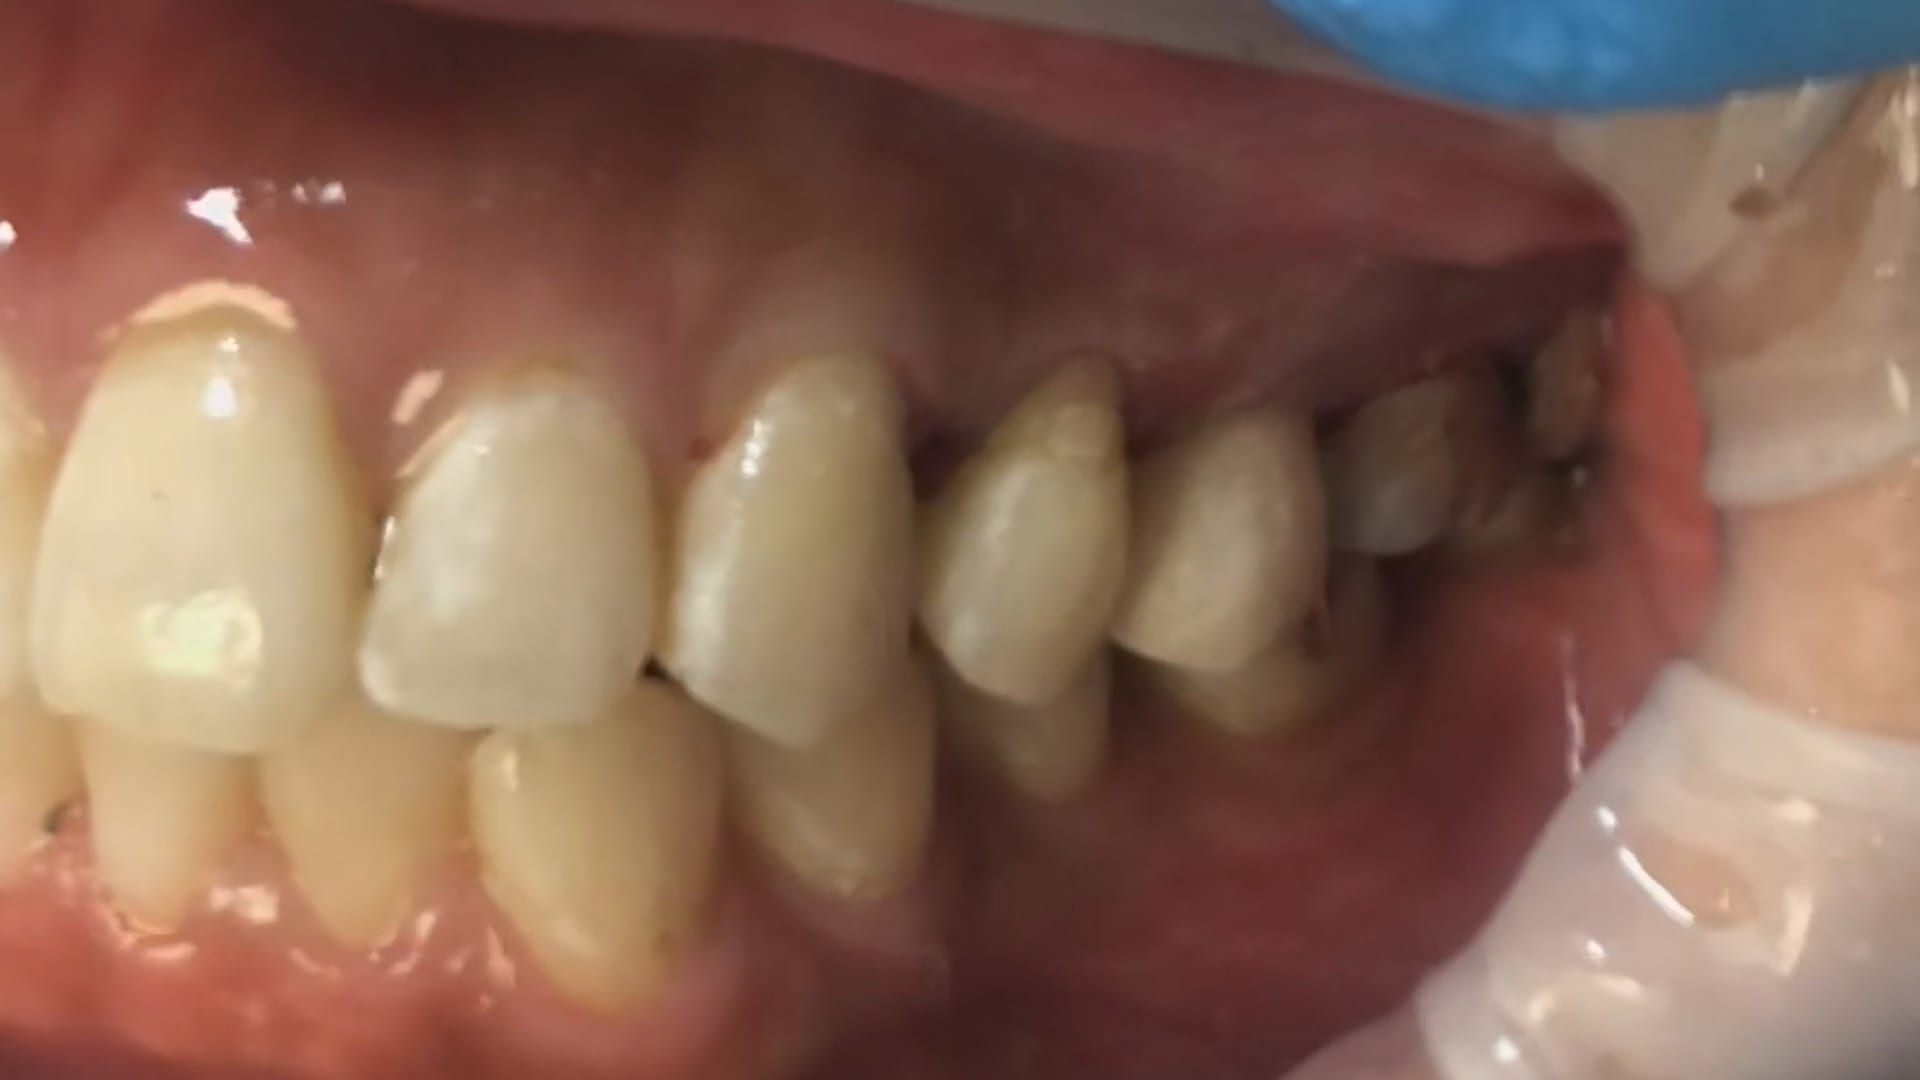
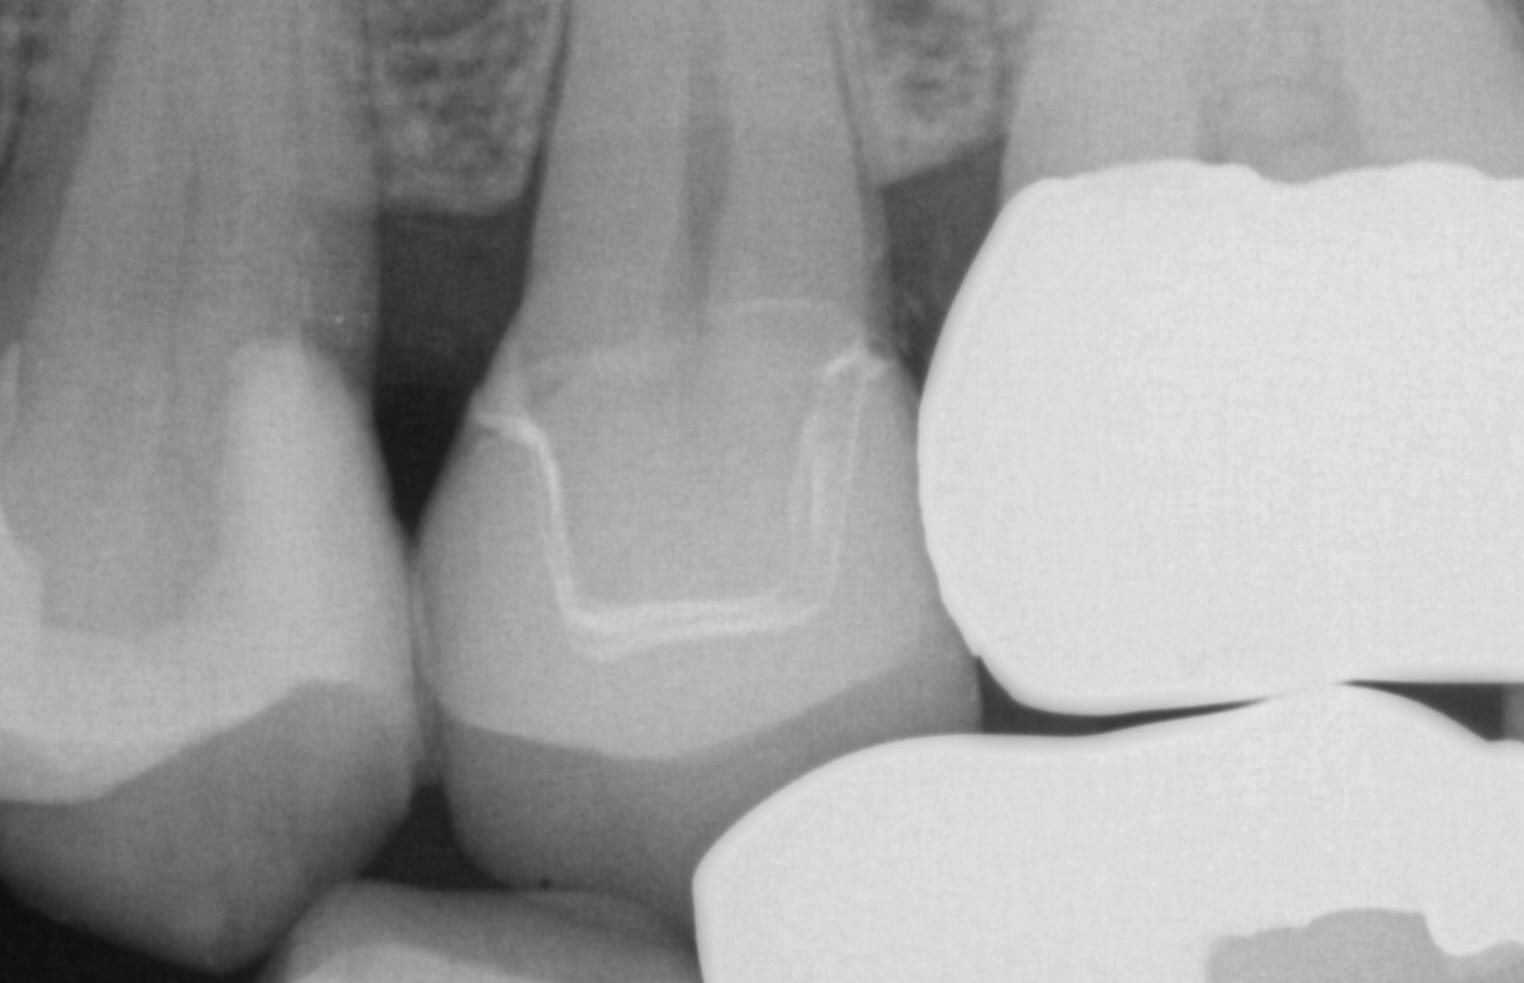
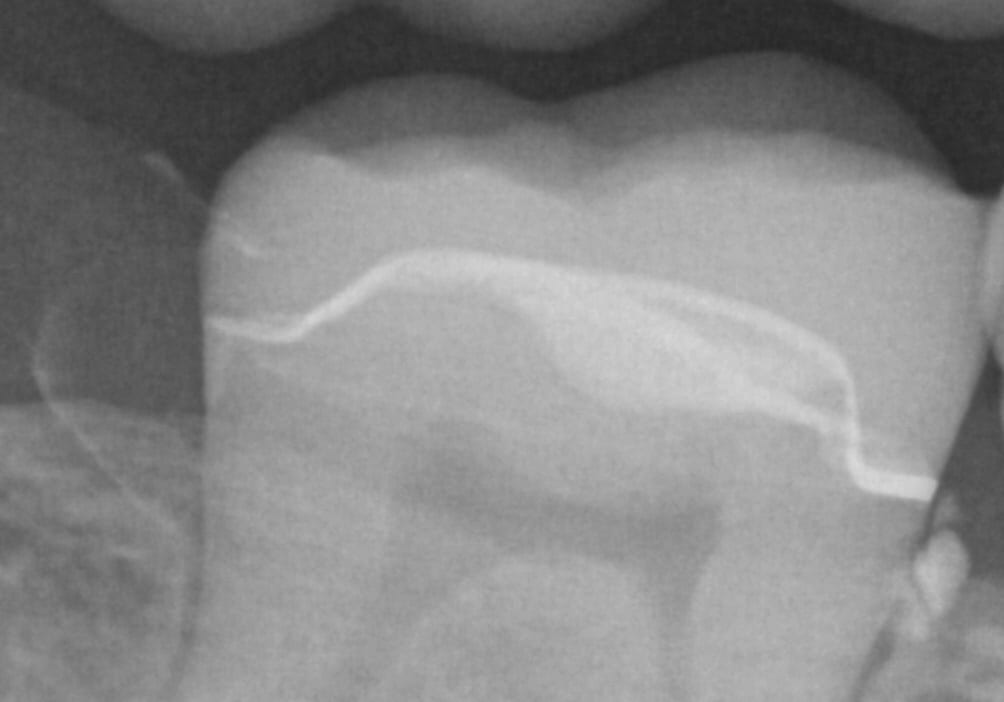
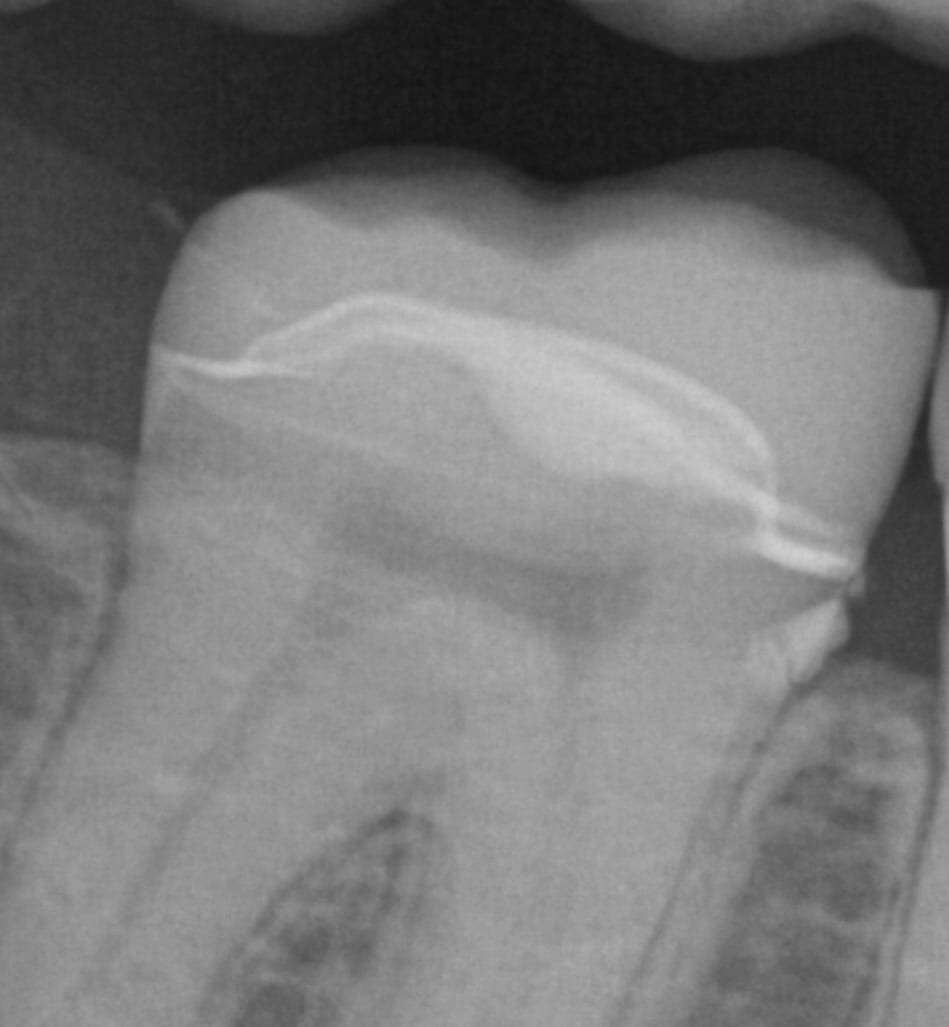
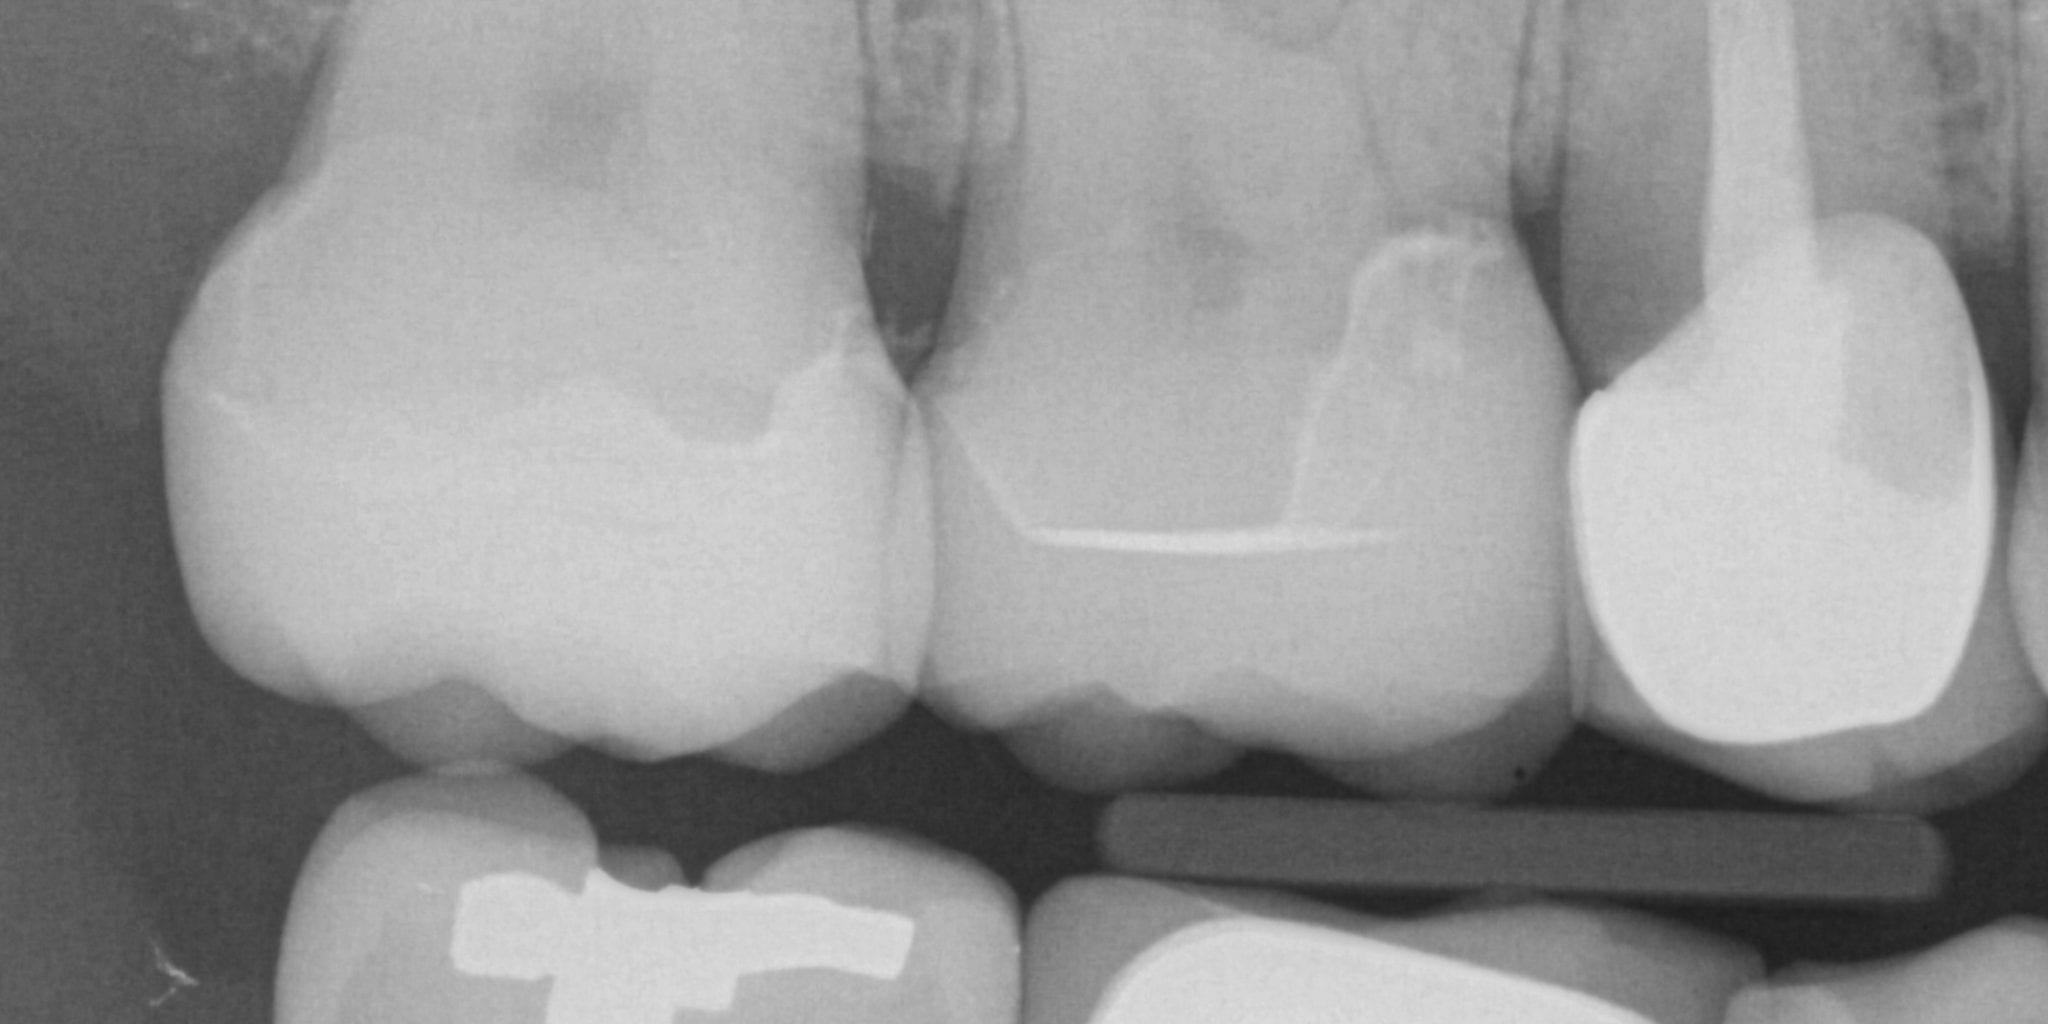
An immediate post-op bitewing X-ray was taken to verify fit and to make sure that there was no excess resin cement left behind in the interproximal area. The premolar mesial to the working field also needs to be replaced and will be in the near future
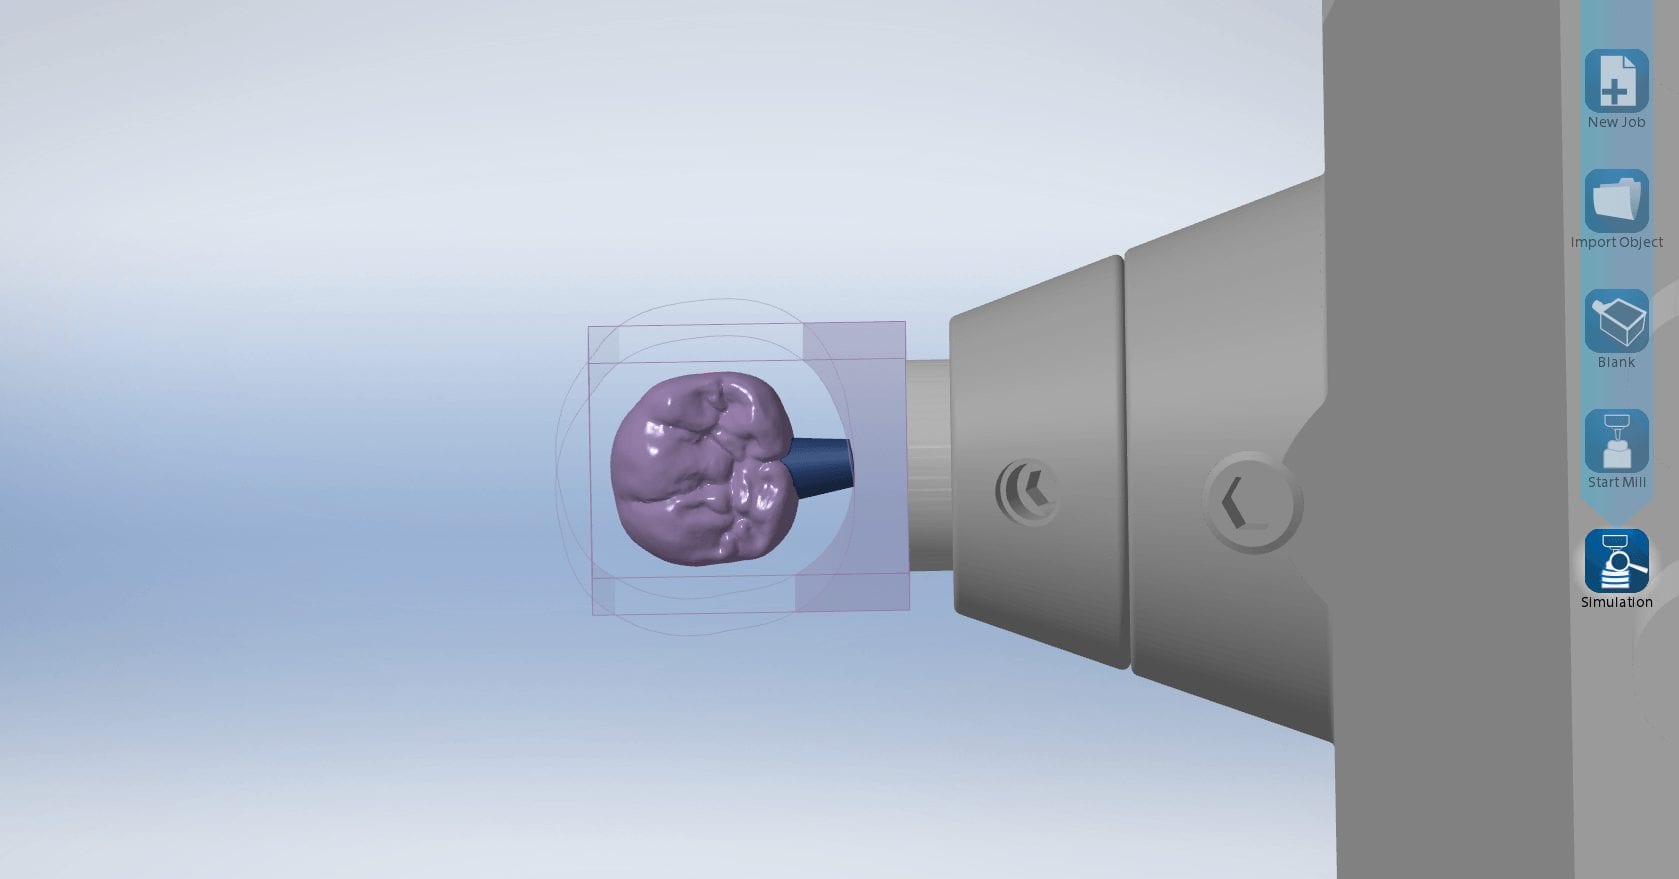
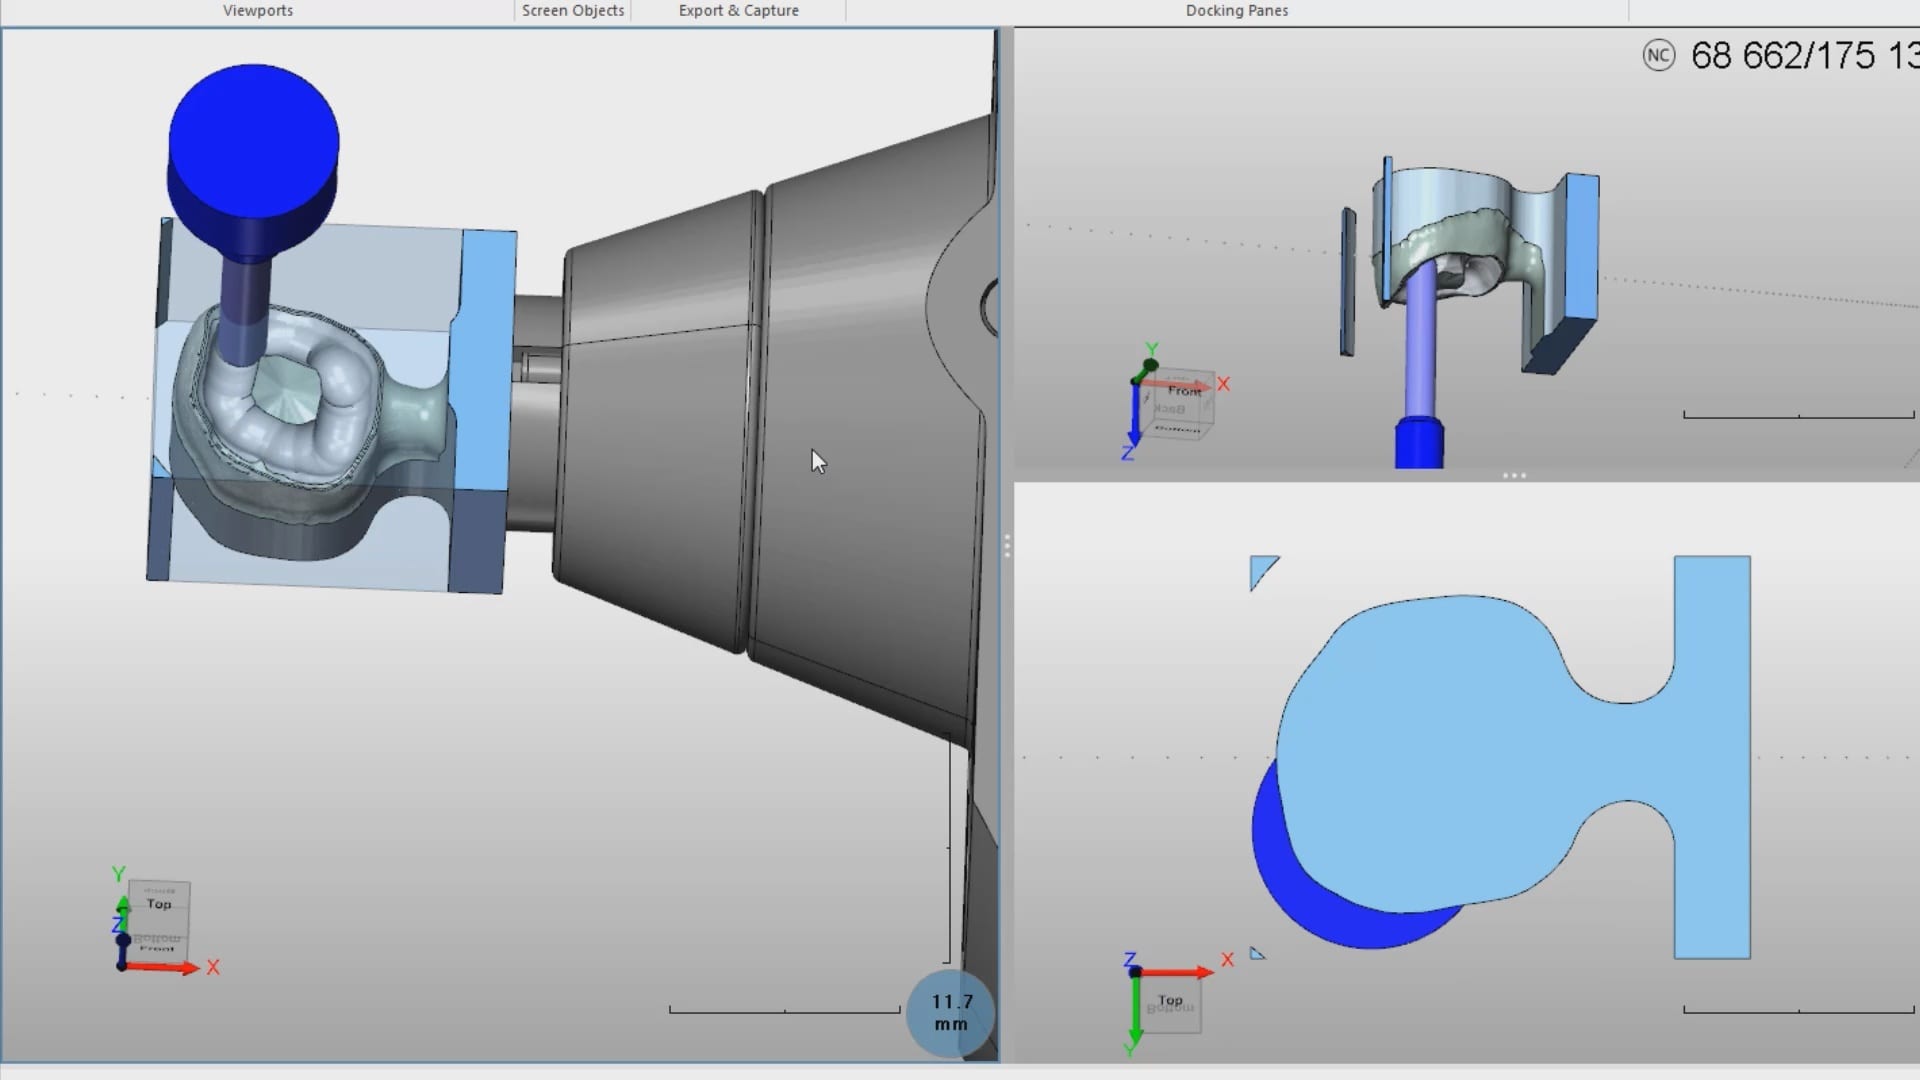
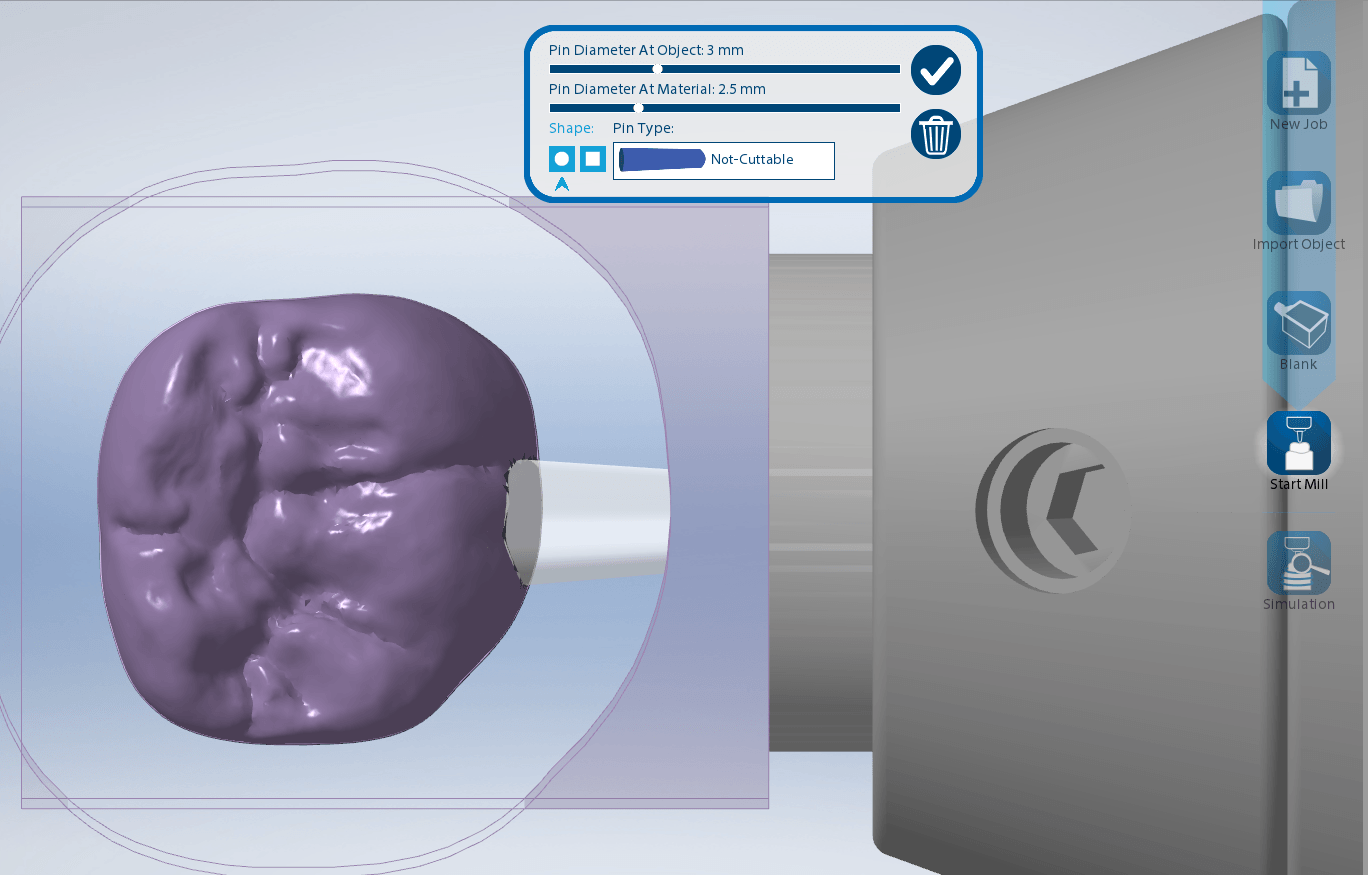
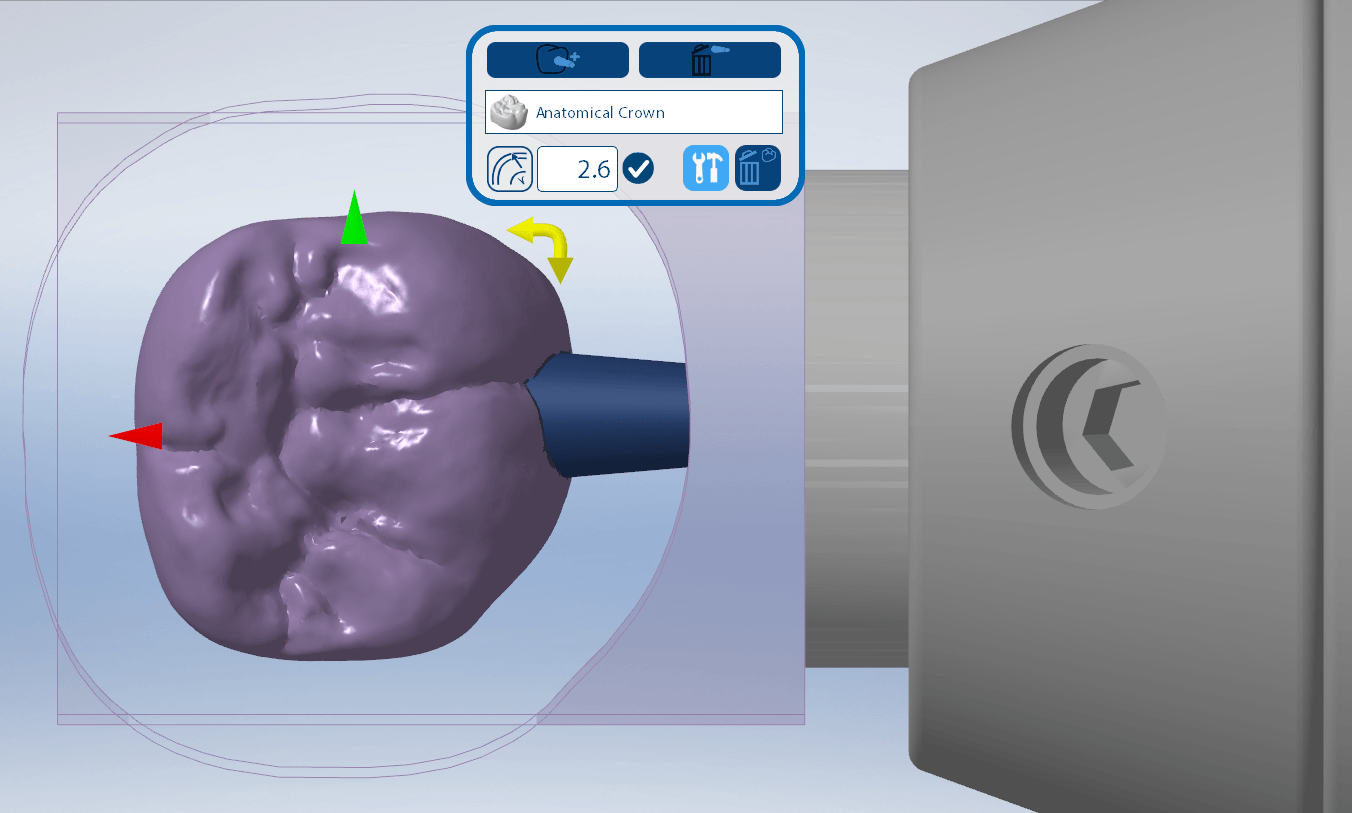
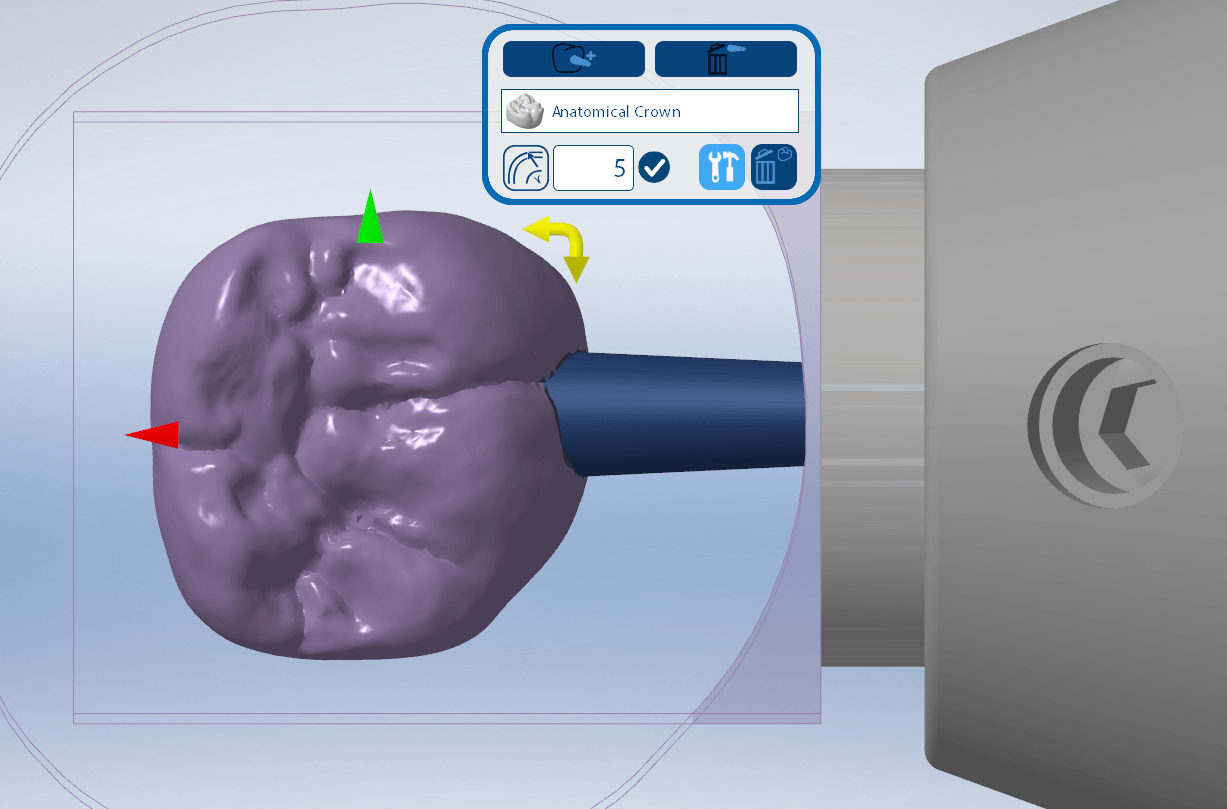
At CAD-Ray, we are constantly looking for solutions that will satisfy a clinician’s needs in a dental practice. For the better part of a full year, we have been developing milling strategies that can speed up the manufacturing process and increase the longevity of the drills and the instruments used in fabrication.
In this video, we demonstrate a sample crown milling simulation where we try and place the restoration in the block to render the fastest crown in the shortest amount of time possible, with little wear on the drills.