Every staff member has been very helpful and kind every time we call. Thank you! - 7/24/2024
Ashley Guarisco
Cad-Ray's customer service has been amazing since day one! From getting a quote to setting everything up and doing my first scan. Everyone has been super helpful! Heather Gramley has been awesome, it's like having a tech in my back pocket! They offer...read moreCad-Ray's customer service has been amazing since day one! From getting a quote to setting everything up and doing my first scan. Everyone has been super helpful! Heather Gramley has been awesome, it's like having a tech in my back pocket! They offer tons of training videos and offer one on one training. I would 10/10 recommend them for all of your scanning needs!read less - 11/21/2022
Aaron Olson
This product is the best out there. Do the math and your ROI makes more sense than most products we purchase as dentists. Get on the digital train or you’ll be left behind. This is the best product to make the jump with. - 6/16/2020
I purchased my medit i500 scanner about a year ago from CAD Ray, and I have been extremely happy with both the scanner and the service / support.
Armen and Frank consider your purchase to be the beginning of your relationship with them, not...read moreI purchased my medit i500 scanner about a year ago from CAD Ray, and I have been extremely happy with both the scanner and the service / support.
Armen and Frank consider your purchase to be the beginning of your relationship with them, not the end. They do their best to make sure you learn everything you need to know in order to get the best possible results .
They answer calls and messages promptly, and it never takes me very long to get my questions answered.
I am VERY glad I bought from them, and not from one of the "big box" Dental Mega retailers.read less - 10/09/2019
Frank DeLuca has been great since we bought the scanner! Always there for you and returns his calls asap. Thank you Frank! - 1/25/2023
Greg Stepka
Highly Recommend working with Cad-Ray. Just purchased a MeditI700. So easy to work with. Training with Destaney was awesome. - 3/19/2024
A Palmer
I'm a dentist in Maine and have been working remotely with CAD-RAY for about 5 years. They do all my implant planning and fabrication of surgical guides. I just send them a CBCT image and digital impressions and they take care of all the rest, it cou...read moreI'm a dentist in Maine and have been working remotely with CAD-RAY for about 5 years. They do all my implant planning and fabrication of surgical guides. I just send them a CBCT image and digital impressions and they take care of all the rest, it couldn't be smoother. I've only had good experiences with CAD-RAY, and am very grateful for this awesome service they offer.read less - 6/02/2019
Scott Chong
The i500 has been a game-changer for our orthodontic practice. Patients love not having to do alginate impressions. Records appointments and debands take much less time plus there's significantly less clean-up. And it's fast/easy enough to use tha...read moreThe i500 has been a game-changer for our orthodontic practice. Patients love not having to do alginate impressions. Records appointments and debands take much less time plus there's significantly less clean-up. And it's fast/easy enough to use that we've even been able to train summer interns to scans with zero prior dental experience. Our retainers, nightguards, and sleep apnea appliances all showed improved fit with less chair-side delivery time due to accuracy of the scans. Customer support is top-notch. Whenever we've had issues, we get someone immediately and they either talk us through a fix or login via screenshare to help us directly. They have a great loyalty program which gives significant discounts to upgrade to newer units. We recently took advantage and are excited to try out the new i700, especially since they're now Mac-compatible. Simple version: Great intra-oral scanner, easy to use/operate, intuitive software interface, fantastic support.read less - 8/16/2023
Shawn Van de Vyver
Most amazing customer service I've experienced with any dental office related company. It reminds me of the legend about the lady returning car tires to Nordstrom and getting a full refund, but with intraoral scanners. I've moved all my related purch...read moreMost amazing customer service I've experienced with any dental office related company. It reminds me of the legend about the lady returning car tires to Nordstrom and getting a full refund, but with intraoral scanners. I've moved all my related purchases (and all future equipment purchases) over to CAD-Ray. I couldn't ask for anything more.What else is there to say?read less - 6/02/2022
Nancy Hartrick
I am absolutely in love with my MEDIT i700, as is my entire staff. The Medit i700 is reliable, fast, easy to use and the software is incredibly intuitive. I couldn't be happier with the team at CAD-Ray. They are true professionals, and very hands and...read moreI am absolutely in love with my MEDIT i700, as is my entire staff. The Medit i700 is reliable, fast, easy to use and the software is incredibly intuitive. I couldn't be happier with the team at CAD-Ray. They are true professionals, and very hands and responsive in terms of their support and training. Thank you to the entire team.read less - 8/24/2021
I bought a scanner from Nick Statly at Cad-ray a few months back and have nothing but good things to say about them. They were very helpful with setting up my computer that's linked to the scanner and since then have been very eager to help with ques...read moreI bought a scanner from Nick Statly at Cad-ray a few months back and have nothing but good things to say about them. They were very helpful with setting up my computer that's linked to the scanner and since then have been very eager to help with questions that I had regarding the system.read less - 12/08/2021
Dr Grace Simco
I bought I500 scanner two years ago. The scanner is great and the service is excellent. I have contacted Heather Gramley and Andy Nova about the updates of my scanner recently. They are absolutely amazing people. They go above and beyond. They repres...read moreI bought I500 scanner two years ago. The scanner is great and the service is excellent. I have contacted Heather Gramley and Andy Nova about the updates of my scanner recently. They are absolutely amazing people. They go above and beyond. They represent the company very well.read less - 7/05/2022
It's rare to find a company that actually has its customer's best interests in mind. They took all the intimidation out of the equation for me as I took the leap into the "digital dentistry." Frank Weinstein is the right person to know if you are try...read moreIt's rare to find a company that actually has its customer's best interests in mind. They took all the intimidation out of the equation for me as I took the leap into the "digital dentistry." Frank Weinstein is the right person to know if you are trying to learn about and buy and use digital tools in your office. It's so mush easier when you have knowledgeable people who are really on your side.read less - 7/07/2021
Jonathan Mason
I bought a Medit 3 years ago and have had amazing success with both the scanner and the support from Cad-Ray. My scanner recently broke and They were on the phone with my assistant trying to fix the problem, and when it was unfixable, they overnight...read moreI bought a Medit 3 years ago and have had amazing success with both the scanner and the support from Cad-Ray. My scanner recently broke and They were on the phone with my assistant trying to fix the problem, and when it was unfixable, they overnighted a new scanner and helped us set it up. Medit is now available through many dealers, but I would only buy next one from Cad-Ray.read less - 11/03/2022
Levy Do
I'm a repeat customer because Cad-Ray's customer service is fast, efficient, and no nonsense. The classes offered for training for particularly for the Medit is awesome and it comes included which is phenomenal. All the classes that I've gotten to at...read moreI'm a repeat customer because Cad-Ray's customer service is fast, efficient, and no nonsense. The classes offered for training for particularly for the Medit is awesome and it comes included which is phenomenal. All the classes that I've gotten to attend so far has been well organized and I left learning very practical things. Remote support team solves my problem right then and there. Recently I had an issue, and instead of me talking to a sales rep who doesn't know what to do, Kaila remoted in and got it fixed just like that. Thank you and great job guys!read less - 4/19/2022
Bob D
Just got my Medit i700 from CAD-Ray and experienced what everyone raves about, the level of customer service by CAD-Ray. As you know you can buy this scanner from a lot of places but they won't offer you help and support. They called my cell and conn...read moreJust got my Medit i700 from CAD-Ray and experienced what everyone raves about, the level of customer service by CAD-Ray. As you know you can buy this scanner from a lot of places but they won't offer you help and support. They called my cell and connected to my laptop and configured everything at 7 PM.. Great great experience.read less - 12/08/2021
Dr. Terry Zervos, DDS,PA.
Today I had to order new tips and Laura was EXTREMELY helpful, Cad-Ray has all the products you need for digital dentistry and they do Education, if you buy Medit scanner from them they include 12 CE training course. Cant just buy a Lamborghini you h...read moreToday I had to order new tips and Laura was EXTREMELY helpful, Cad-Ray has all the products you need for digital dentistry and they do Education, if you buy Medit scanner from them they include 12 CE training course. Cant just buy a Lamborghini you have to learn how to drive it!read less - 7/02/2020
Dan Malloy
Extremely good customer service. From start to finish buying my Medit was flawless and they were very helpful in offering me information. When I got my scanner I had questions and my phone calls were returned immediately. They knew my name and guided...read moreExtremely good customer service. From start to finish buying my Medit was flawless and they were very helpful in offering me information. When I got my scanner I had questions and my phone calls were returned immediately. They knew my name and guided me through what I would need. Very impressed. Would recommend!read less - 2/02/2020
Matt v
Matt Newman was excellent solving a cable problem.! Quick response and good follow up! - 9/11/2024
Dixie Jernigan
The customer service we have received while working with Frank DeLuca is second to none! He is incredibly knowledgeable and enthusiastic, as well as always available to help with any issues. We are very pleased with CAD-RAY and relationship that they...read moreThe customer service we have received while working with Frank DeLuca is second to none! He is incredibly knowledgeable and enthusiastic, as well as always available to help with any issues. We are very pleased with CAD-RAY and relationship that they have with their clients.read less - 1/25/2023
Michael Pagano (CPT Pagano)
I bought a Medit i500 from Cad-Ray. The service was fantastic. This group also does ongoing training to keep you up to date on how to use the technology.I had a minor issue with hardware and Cad-Ray resolved the issues no questions asked!They have a ...read moreI bought a Medit i500 from Cad-Ray. The service was fantastic. This group also does ongoing training to keep you up to date on how to use the technology.I had a minor issue with hardware and Cad-Ray resolved the issues no questions asked!They have a very active online forum that is supportive. I wouldn’t hesitate to purchase more equipment from them!read less - 10/23/2020
Franco Picofazzi
Great product at an affordable price, not to mention Andy's help at customer service. Highly recommended. - 6/23/2022
Laura has always been so helpful with the medit when we needed assistance or resources. The training she provided the office was invaluable! She is quick to respond whenever we reach out. 13/10 - would recommend her to anyone looking to get a medit ...read moreLaura has always been so helpful with the medit when we needed assistance or resources. The training she provided the office was invaluable! She is quick to respond whenever we reach out. 13/10 - would recommend her to anyone looking to get a medit scanner.read less - 12/16/2021
Suzanne Stock
Excellent experience, customer service has been stupendous! - 11/20/2023
Eric Reum
I bought a i500 almost a year and a half ago. Sadly it ran into an issue with the cord after over a years use. Cad-ray was extremely quick to diagnose the issue and also send a replacement scanner. The quality and ease of scanning has been great! Als...read moreI bought a i500 almost a year and a half ago. Sadly it ran into an issue with the cord after over a years use. Cad-ray was extremely quick to diagnose the issue and also send a replacement scanner. The quality and ease of scanning has been great! Also very happy with the customer service.read less - 6/02/2022
Oleg Eisenstein
Great products and services. Highly recommended - 6/16/2020
I do not know if it is okay to use the F word on this page. But I F@#KING LOVE MY MEDIT with the new filters now.
Scan the teeth with the middle filter, then go to the first 1 and get the palate in less than 1 minute. AMAZING
I have since s...read moreI do not know if it is okay to use the F word on this page. But I F@#KING LOVE MY MEDIT with the new filters now.
Scan the teeth with the middle filter, then go to the first 1 and get the palate in less than 1 minute. AMAZING
I have since sold my ITERO and JUST HATE my OMNICAM EVERYDAY.read less - 3/01/2020
I had a great experience with CAD RAY. I was lucky enough to have Frank DeLuca come down to my office to demo the Medit I700. Needless to say, we were in love with the technology and the great hands on demo. CAD RAY overnighted me the scanner and we ...read moreI had a great experience with CAD RAY. I was lucky enough to have Frank DeLuca come down to my office to demo the Medit I700. Needless to say, we were in love with the technology and the great hands on demo. CAD RAY overnighted me the scanner and we were off to the races. Any time we have had a technical question, Frank has personal helped me or put me in touch with one of his colleagues if he wasn’t available. All around, it was as 5 star experience!read less - 12/16/2021
Abhinav Bhatnagar
We have been using the scanner for a few weeks now. It’s been a blast to use and they have made it easy to learn with video tutorials. We have yet to go to the training, but we are excited to continue learning and expanding our digital dentistry. - 6/19/2020
Harrison MacKenzie
Purchased Medit i700 from Frank/CAD-Ray and everything has been absolutely top-notch! Great service, quick responses, great training. Very happy with CAD-Ray and our i700! - 10/20/2022
Sean Landgraf
Truly Great Service. Glad I purchased my scanner here. - 8/03/2023
Jeffrey Martins
Service at CAD-Ray has been really great. About 6 months ago I purchased a Medit i700 scanner from them and have been really happy with it. Fortunately, I haven’t run into many problems, but if I need help they are so easy and friendly to work with. ...read moreService at CAD-Ray has been really great. About 6 months ago I purchased a Medit i700 scanner from them and have been really happy with it. Fortunately, I haven’t run into many problems, but if I need help they are so easy and friendly to work with. When my scanner did stop working, they quickly got me set up with a new one. If I have a computer question, they offer to log in and look at the computer with you. If you’re in the market for an intraoral scanner or any of their other products, I encourage you to talk with them to meet your goals. Thanks CAD-Ray!read less - 11/04/2022
Diana Teverbaugh
What can I say ! I have been extremely pleased with my scanner ! I recommend it to all my colleagues ! The support is the best , I bought the extended warranty and my scanner hada small crack and within one day they shipped my a new one ! I can’t wo...read moreWhat can I say ! I have been extremely pleased with my scanner ! I recommend it to all my colleagues ! The support is the best , I bought the extended warranty and my scanner hada small crack and within one day they shipped my a new one ! I can’t work without it ! Thank you !read less - 2/09/2022
Samir Rana
Ive had the medit since 2018. One of the best decisions in dentistry ive made. I met some of the great trend setters in digital dentistry(armen, jonathan ab and others through social media platforms). Medit Has changed The way i practice, live and ...read moreIve had the medit since 2018. One of the best decisions in dentistry ive made. I met some of the great trend setters in digital dentistry(armen, jonathan ab and others through social media platforms). Medit Has changed The way i practice, live and think! Happy not to have a monthly fee as i did for years. Support is always a message or call away. Would be glad
To further share my experience with you if u need.read less - 6/16/2020
David Blanco
Cad-Ray is great! Great customer service and they are consistent with their followthrough . Always helpful when you need questions answered and helping to lower the learning curve with newly purchased equipment. I’m very satisfied with my medit i-...read moreCad-Ray is great! Great customer service and they are consistent with their followthrough . Always helpful when you need questions answered and helping to lower the learning curve with newly purchased equipment. I’m very satisfied with my medit i-500 intraoral scanner. Armen and Frank are solid!read less - 6/16/2020
Benjamin Polan
A while ago I became interested in an intra oral scanner for my office especially for dental sleep medicine and TMJ appliances. I searched online for Medit and found cad ray. Laura from Cad-ray quickly responded and set up a zoom meeting so she could...read moreA while ago I became interested in an intra oral scanner for my office especially for dental sleep medicine and TMJ appliances. I searched online for Medit and found cad ray. Laura from Cad-ray quickly responded and set up a zoom meeting so she could demo the unit. Great job at helping me understand. She set up the financing and I got my unit. A few glitches with my internet speed and getting IT to help with my upload and download speeds and I was ready to go. Every time I had a question I texted Laura and almost like she was waiting for my call she responds. We it turned out my unit wasn't just right so she immediately responded we will replace you unit. Laura has been a joy to work with and the customer service given will only encourage me to do business with cad-ray again.
Benjamin Polan DMD, D,ABDSMread less - 8/27/2021
Honestly the best service that I've received in dental tech support. I had originally purchased a scanner with another supplier and was underwhelmed with the support I received. I switched over to CAD-Ray for my second scanner and have never been let...read moreHonestly the best service that I've received in dental tech support. I had originally purchased a scanner with another supplier and was underwhelmed with the support I received. I switched over to CAD-Ray for my second scanner and have never been let down. They are prompt and exceptionally knowledgeable about the products they support. Thank you CAD-Ray for keeping my practice moving smoothly!read less - 8/27/2021
Otto Herod
I received my Medit scanner a couple months ago from Cad-ray, and I can't express enough how awesome it is. I have done a ton of research and used the latest IOS from one of the big guys, and due to many software issues I was able to return that mach...read moreI received my Medit scanner a couple months ago from Cad-ray, and I can't express enough how awesome it is. I have done a ton of research and used the latest IOS from one of the big guys, and due to many software issues I was able to return that machine. And thank God, because it was so over priced and came with a $300/month support fee forever! The Medit scanner is as good or better than that one when it was working properly, and for the price it's a no brainier.read less - 9/17/2020
Kenneth Gould
A most helpful, detailed, easy to follow, personal primer via Zoom on integrating the i700 scanner into our practice. Well done! Thank you Kaila! - 5/03/2022
Michael Dickerson
Great experience purchasing my Medit through them. Always there if I have questions too. Thanks again! - 6/16/2020
Dwayne Bodie
Very happy with my Sprint Ray 3D printer. Frank D. went above and beyond with training my team on how to use it. He offered remote training as a courtesy and followed up to make sure we were ok. Highly recommend! - 1/25/2023
John Eum
Love all the staff there. Great support and instruction from Armen, Laura, Damien. We are very grateful for Kaila who has been incredible in getting us going - very friendly, professional and responsive. Thank you! - 7/03/2024
Christopher Chin
This was my intro into intraoral scanning and I did research for quite awhile. The i500 and the team at Cad Ray are top notch. The company has done such a great job putting this scanner in the ranks of the premier ones. With constant updates it gets...read moreThis was my intro into intraoral scanning and I did research for quite awhile. The i500 and the team at Cad Ray are top notch. The company has done such a great job putting this scanner in the ranks of the premier ones. With constant updates it gets better and better (though I’m still behind on updates). My crowns have never been better. They drop right in with no models. I didn’t believe it but I’m loving digital dentistry. I can’t wait to go to the class after COVID calms down!read less - 6/16/2020
Nothing but great things to say about Cad-Ray! Excellent customer support from Laura after the purchase of our Medit i500 and the cart from Damien. I’ve been very impressed with the Medit in restoring crown and bridge, as well as fixed hybrids, and...read moreNothing but great things to say about Cad-Ray! Excellent customer support from Laura after the purchase of our Medit i500 and the cart from Damien. I’ve been very impressed with the Medit in restoring crown and bridge, as well as fixed hybrids, and learning more of its capabilities each day. We have intentions to buy a second Medit shortly and will definitely be using Cad-ray again.read less - 12/13/2021
Micah Bickel
Great support services and training from Cad-Ray, they are always very helpful and responsive. I have been using the I500 in my offices for the last two years and loving it. - 11/01/2021
We had an outstanding experience purchasing two Medit scanners. The delivery was timely . The onboarding clean. Laura was dazzling with her acumen and quick solutions . We highly recommend the investment in Cad Ray .Pobanz Orthodontics , Ogden Utah :...read moreWe had an outstanding experience purchasing two Medit scanners. The delivery was timely . The onboarding clean. Laura was dazzling with her acumen and quick solutions . We highly recommend the investment in Cad Ray .Pobanz Orthodontics , Ogden Utah :)read less - 12/10/2021
Aaron Sipos
CAD-RAY has the best customer service. They go above and beyond to make sure you have a good experience with your medit scanner. With most tech companies, the person that answers the phone has to put you on hold for who knows how long before getting ...read moreCAD-RAY has the best customer service. They go above and beyond to make sure you have a good experience with your medit scanner. With most tech companies, the person that answers the phone has to put you on hold for who knows how long before getting you in touch with someone to fix the issue. With CAD-RAY, I called and Heather answered the phone. Heather was able to remotely fix my issue within 30 minutes and have me back up and running. No holds, no waiting!!! I highly recommend.read less - 9/01/2022
Ellen Huang
Armen created series of these very helpful videos. They helped us tremendously in breaking into the new scanner we purchased. No matter you just got into digital dentistry or you are quite experienced with different fields of data acquiring or treatm...read moreArmen created series of these very helpful videos. They helped us tremendously in breaking into the new scanner we purchased. No matter you just got into digital dentistry or you are quite experienced with different fields of data acquiring or treatment planning, you will find those being tremendous help.read less - 5/24/2020
I purchased the Medit i500 from Cad-Ray December 2018. I couldn’t be happier with the scanner. The improvements Medit has made over the last 10 months are nothing short of astounding! I can’t imaging what they’ll come up with next.
As for Cad-Ray...read moreI purchased the Medit i500 from Cad-Ray December 2018. I couldn’t be happier with the scanner. The improvements Medit has made over the last 10 months are nothing short of astounding! I can’t imaging what they’ll come up with next.
As for Cad-Ray, their support has been second to none. Never have I experienced the kind of attention and help from any other company. Wether it’s with help installing, computer hardware issues or technical help they respond IMMEDIATELY!
Armen is also a huge reason why I chose Cad-Ray. No one selling a product has helped me more evolve my scanning technique. He’s quick to respond to questions and issues I feel his service is a huge reason why to buy from CAD-RAY.read less - 10/09/2019
I had 3 Cerec machines and switched to medit. It’s awesome and do not regret the switch one bit. This is the place to buy it bc Armen and Frank are a wealth of knowledge and Frank is awesome with support. He’s always there whenever I need him! - 10/10/2019
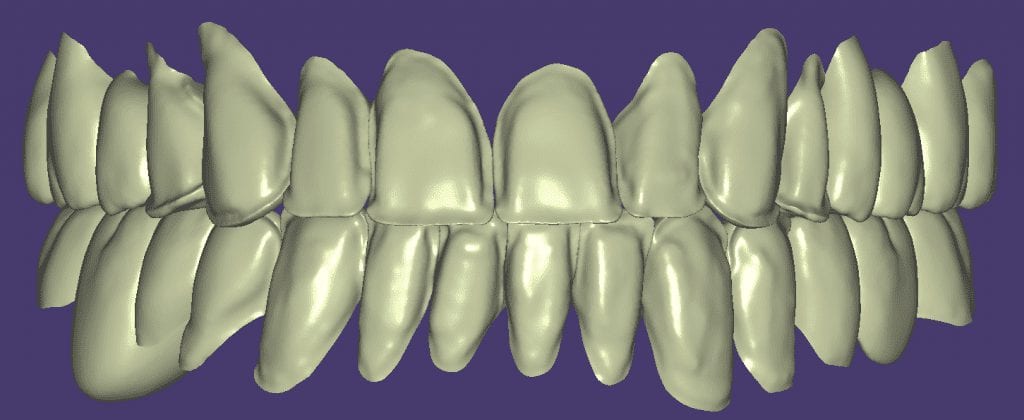
This is a lesson in chairside efficiency for all CAD/CAM users. Traditionally, you would be forced to prep two teeth and impress them both at same time, but with digital dentistry, you can break the case up and do it in segments, as if they are two separate patients involved.
In this particular case, the restorations were designed, milled, and seated in a single appointment. To speed things along, only the second premolar was addressed; it was prepared, imaged, designed and milled. While milling, the second molar was prepared.
After the tryin, they were chrystalized and seated at the same time. Leveraging preparation time with mill time of multiple units can greatly increase efficiency at chairside. See the following videos to pick up on all the details of the case.
One of the greatest advantages of digital impressions is the ability to copy a pre-existing condition. This has a lot of benefits, one of which is that the patient will not notice a difference in the new restoration vs. the old one. For this to happen with the medit i500, you need an extra image catalog box. Rumor is that this will be available in the near future. Since we only have the upper and lower jaws, and the buccal bite to imagine into (and scanbody catalog boxes), what you can simply do is treat the case as if they are two separate patients.
Create a new patient, and scan the preop condition and save the case. Once processed, you can export the case file in OBJ, PLY, or STL format.
You can then launch a second case, where you take the opposing, the prepared arch, and the buccal bite images. You can download the Korolation OBJ case files and design along. Just remember, in exocad, the upper and lower arches from “patient #2″ will automatically articulate with each other, but you will have to manual import the preop scan and merge the prepped model and the pre-op models.
[videopress RkqfM9CJ permalink=”false” hd=”true”]
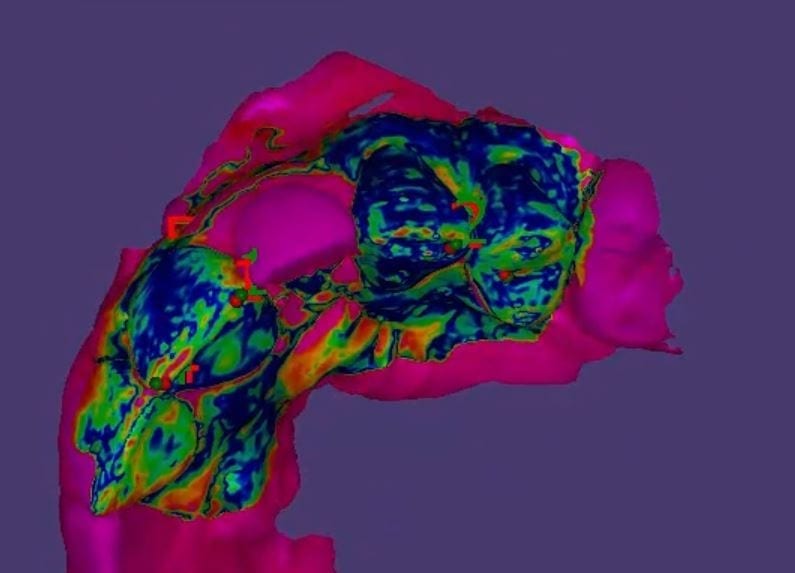
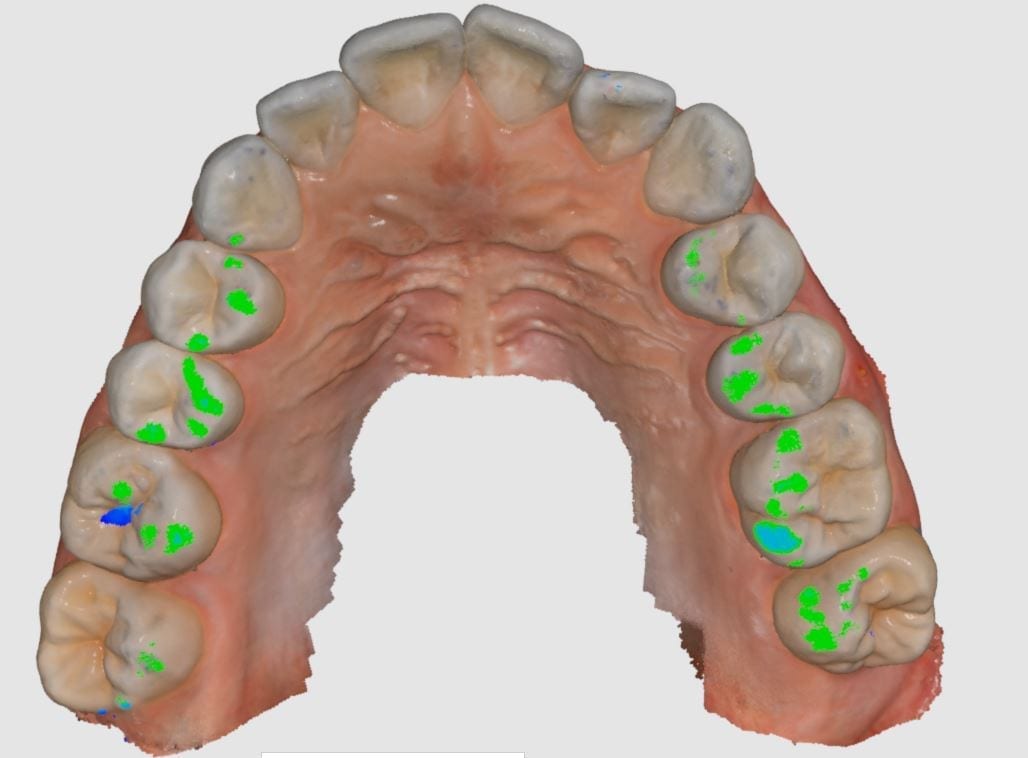
Once you import in the pre-op condition, you can manually relate the models to each other by identifying common landmarks between the two models. After you perform alignment, you can then click on “Best fit matching”. The color scheme in exocad is a great guide in letting you know how well you have articulated the models together.
[videopress U5aJCxQ3]
The more blue you see in the Korolated models, the more reliable your stitch is and you can be assured of greater accuracy in your final restoration.
Happy Hump Day! We might be in your area! It’s going to be a crazy month! Here’s the 411! WE ARE SHOWING THE WORLD HOW MUCH WE LOVE DIGITAL DENTISTRY! C2 will be traveling to Utah this weekend for a show on Saturday….
North Carolina & South Carolina Sunday & Monday!
Send us a PM if would like a demo! #mediti500 #c2style #welovedigitaldentistry
Grady Dix Armen Mirzayan Frank Weinstein Carol BarberLamb
There are many clinical advantages to taking digital impressions over traditional ones. Some of these concepts you may not appreciate until you are a user.
We break these down into the following categories:
digital impressions / models can be edited
digital impressions can be captured independent of time comstraints
Sequencing of image acquisition is irrelevant
Occlusion and contacts require minimal effort and give predictable results
EDITING IMPRESSIONS AND MODELS
INDEPENDENT OF TIME
SEQUENCING FREEDOM
PREDICATABLE CONTACTS AND OCCLUSION
For single unit restorations, all you need to really capture, besides the margins, are the contacts of the adjacent teeth and the occlusal surface of the opposing teeth that will make contact with the restoration.
With traditional impressions, to get predictable results, you should capture both arches completely so when the lab pours up the models, they can properly tripod the casts for accurate relationships between upper and lower arches. With digital impressions, you can just capture the immediate teeth adjacent to your prep and the opposing and get a very predictable result. Now, the more data you capture with the digital impressions, the more it will help with designing the restorations. For example, you can better align the cusp tips in relation to the arch form.
In this video, you can see how there are some “holes” in the model, but they play no role in the final result and its is unnecessary to capture them. You certainly can if you wish, but the point is that capturing the bite is so much easier for single units with digital than it is for traditional impressions
This a very common question we get at CAD-Ray.com and it reflects on how little dentists understand about digital impressions and CAD/CAM in general.
“Digital Ready”
It reminds me of a dental conference I want to, fresh out of school, placing orders for our start-up practice. As we went to the X-Ray equipment section, one of the first things the representative said to us was that their machines are “Digital Ready”! We all had good laugh explaining to the rep that the machine had nothing to do with digital X-Rays, the sensors did!
We feel the same way with digital impressions and CAD/CAM platforms when people talk about integration and making sure one “product talks to the another ” and how it all needs to be developed by the same single manufacturer. It’s loaded with a lot of inaccuracies and misrepresentations.
The reality is that every system has its flaws and can have just as much trouble talking to a machine manufactured by the same company! As dentists, we are much smarter with our decision processes now, but it is still a buyer-be-ware landscape.
Here are some basics you should appreciate before committing to a high ticket item. It’s imperative to understand that imaging has little to no impact on milling. These are completely independent processes- let us explain:
You can image (take an intra-oral scan) with system A. Then you can take the data from system A and take it to CAD software of system B. A lot can go wrong here at this step alone. Simple examples include;
The patient name doesn’t come along with the data.
Incorrect data may come across with incorrect information- you can have the occlusal relationship look perfect in system A but when it goes to CAD, the bite can be off.
You mark your margins in A, but they are distorted in cad software. So you have to make sure this works.
Keep in mind that this can even happen if you stay within a “System A” or “complete system”. Luckily a lot of this is ironed out already with legacy and legitimate products and competent practitioners. Now comes the design step. You have a few choices; exocad and 3shape being the leaders. If exocad does the margin placement and the final restoration from start to finish, a lot of errors are eliminated.
After the design process, comes the nesting and manufacturing. At this step, the milling machine has NO idea what iOS you have used. It’s just data for a restoration that it needs to process. Ar this most vulnerable step, we need to make sure the CAM software for a particular machine can interpret the design software that did the nesting. A lot happens here;
Then comes the consideration for your milling needs.
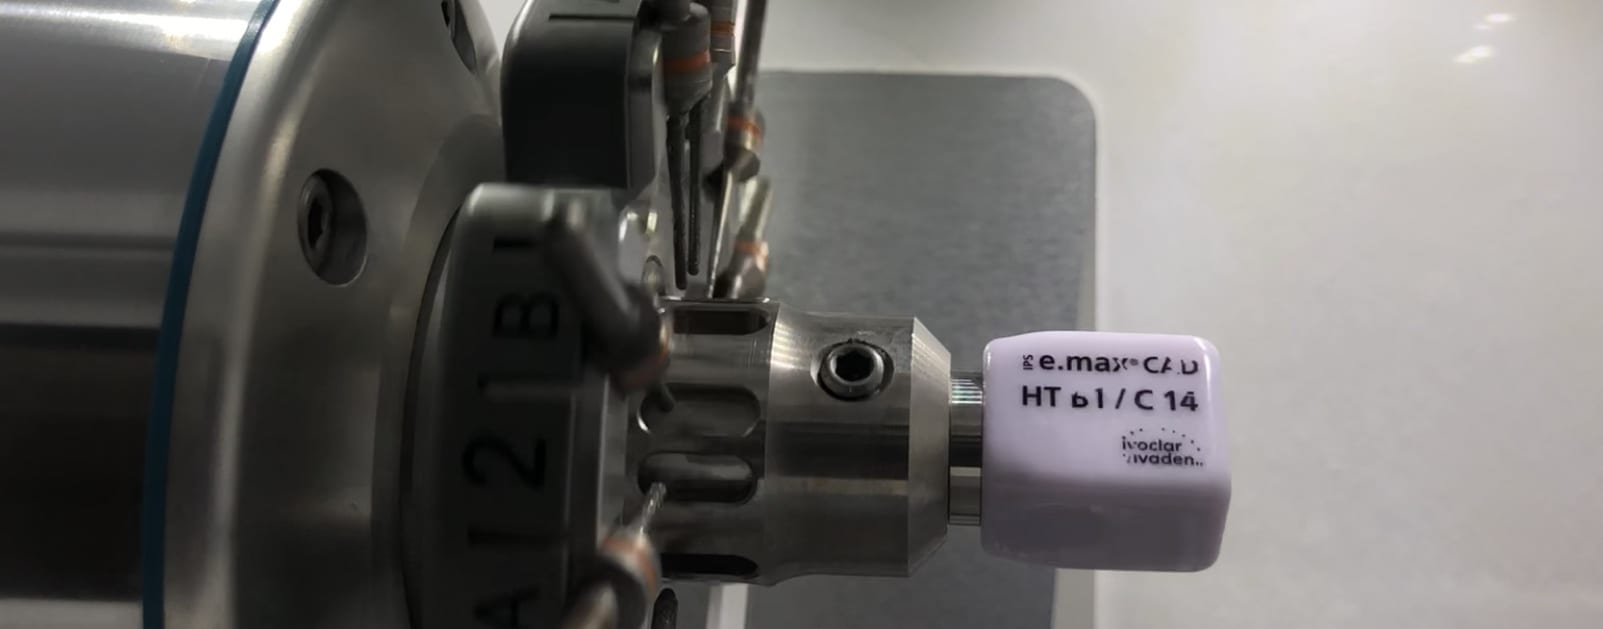
You can mill soft ceramics for 15,000$
For a little more, you can wet mill emax
Cross the 30k barrier with and you can cut zirconia (we do NOT recommend in office zirconia- dumbest thing you can do)
Closer to 40k and you can do in house metal custom abutments.
Over 40k you can mill roundhouse bridges and you are as much a labtech as a dentist.
The trickiest part of all this is the last step. Making sure the mill has the right cam to talk to design software. This can be a nightmare if you don’t do your homework.
So, with the Medit iOS you can mill to any machine. You can even take it to cerec inlab software and Jump through a lot of hoops to mill with CEREC chair side milling machine. Not worth the headache!
The CEREC chairside mill remains the fastest carver of emax restorations, but it can come at a cost – you need to bulk out the margins so they don’t break off at mill.
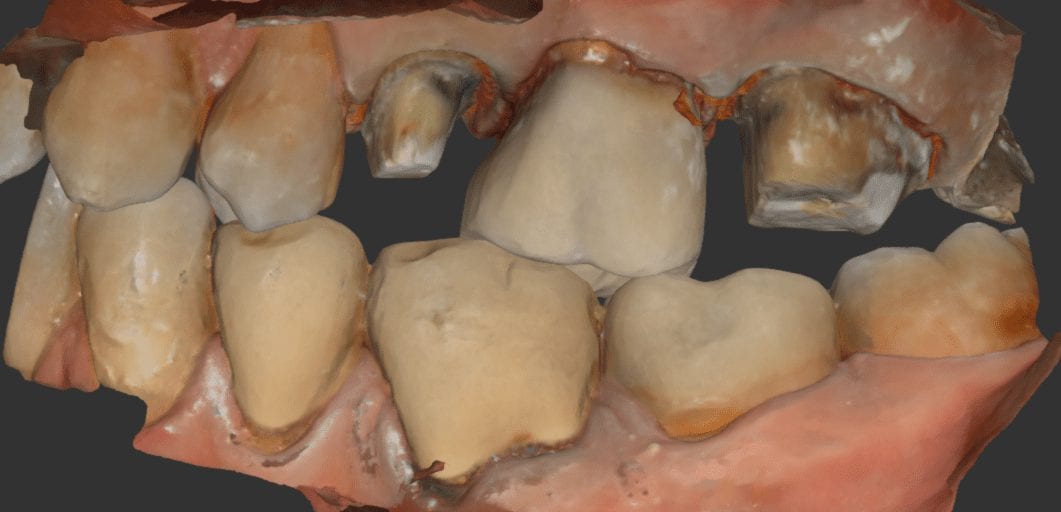
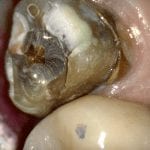
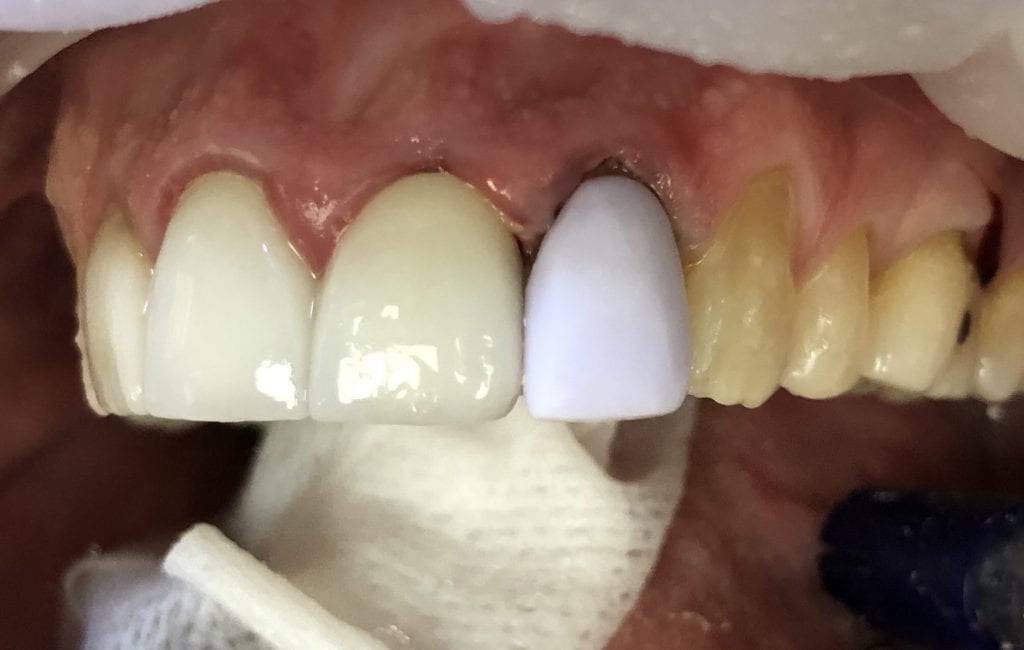
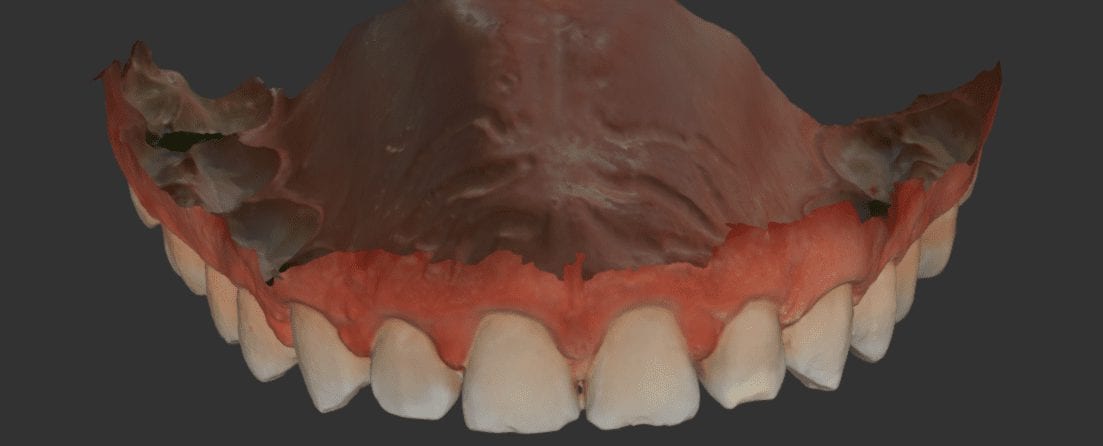
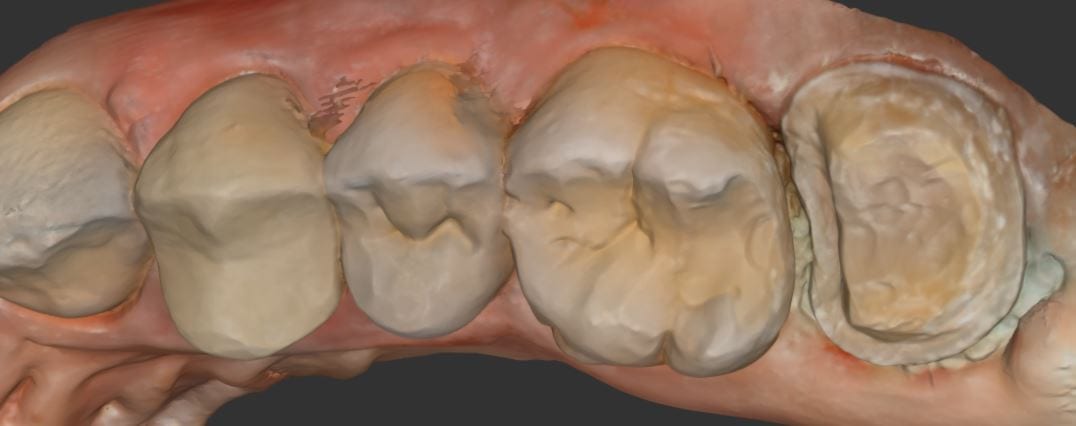
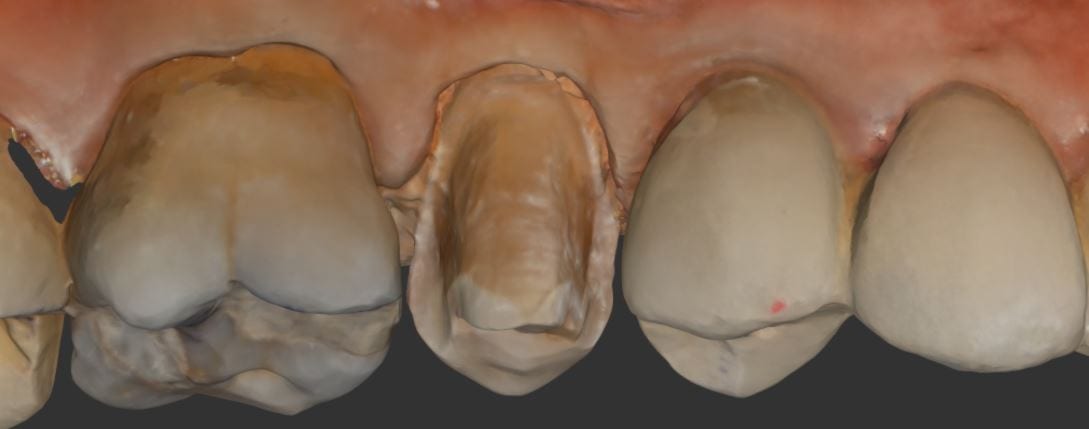
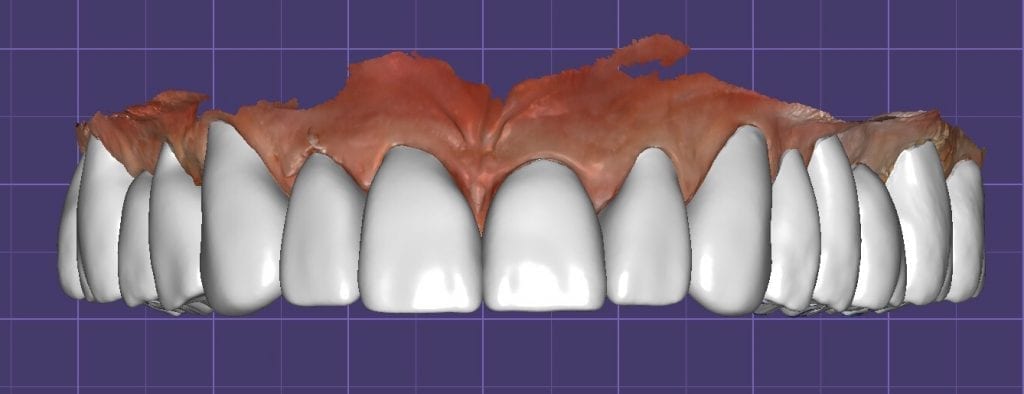
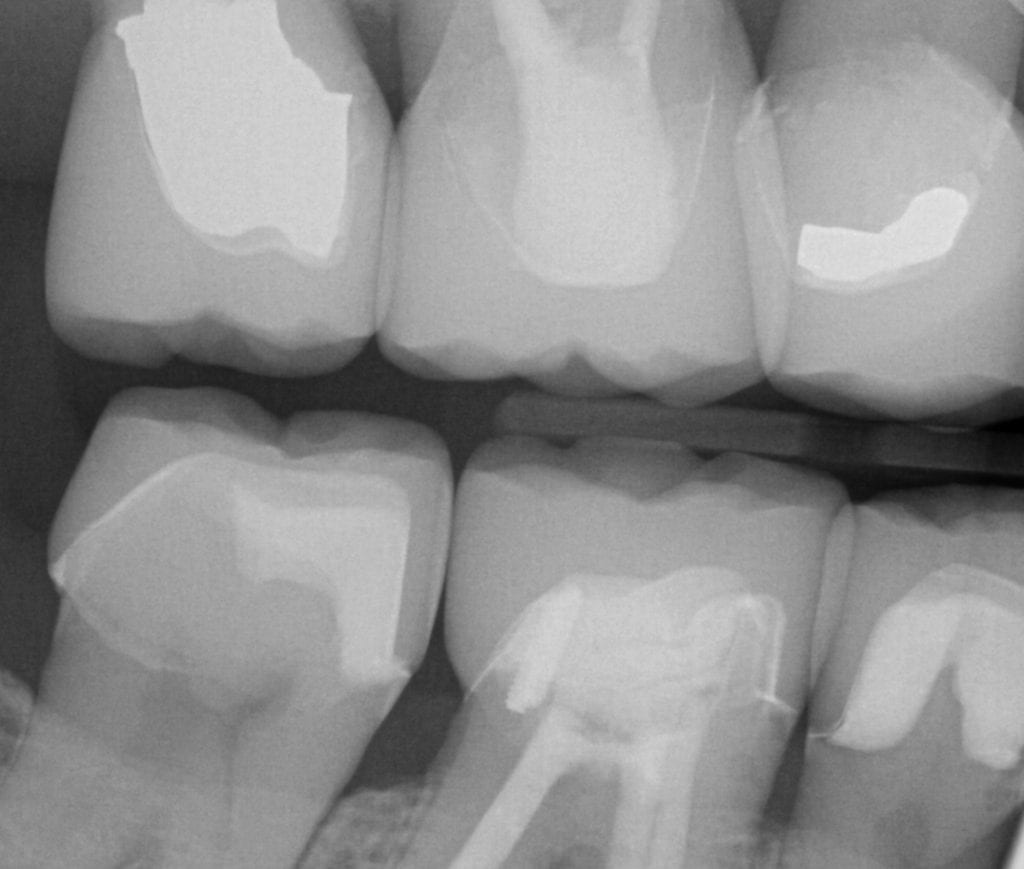
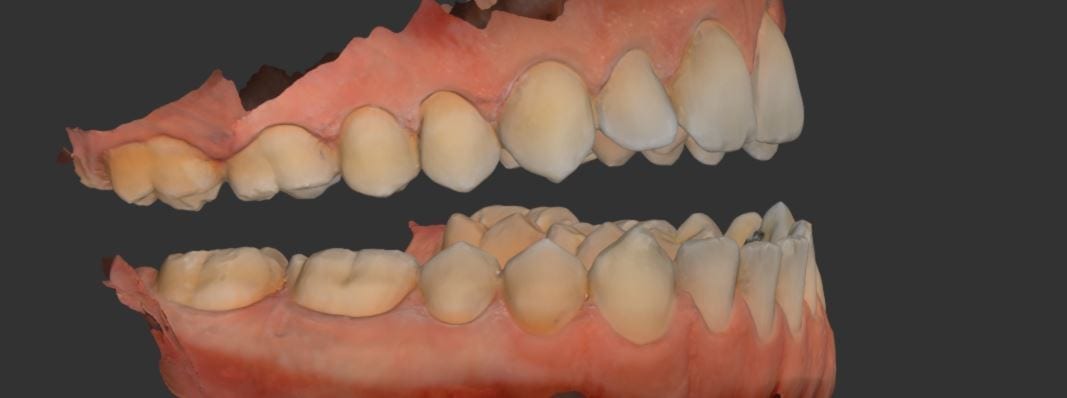
Upon preparing the second molar for full cuspal coverage, the lack of clearance necessitated a refining the preparation. The great part of digital dentistry is that you don’t have to take a whole new impression.
You can just selectively crop out the area that needs refinement, protect the areas you are satisfied with, and fill in the areas that are missing data. You can see how this case was managed in this video and how the final buccal bite was captured. We always recommend that you capture the bite at the last step so that you can verify clearance through the camera itself.
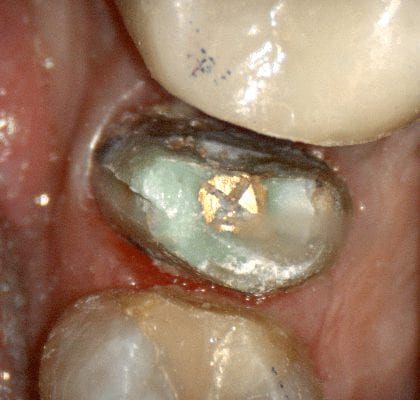
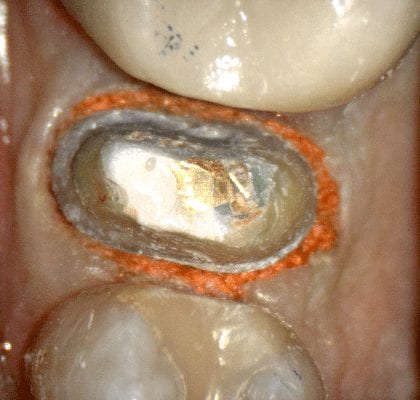
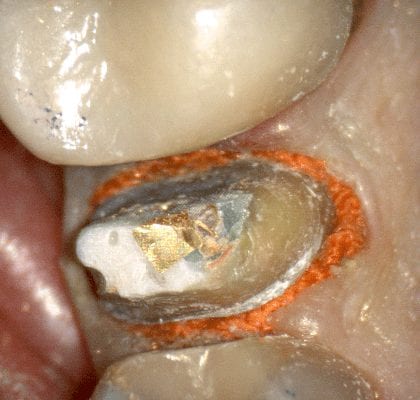
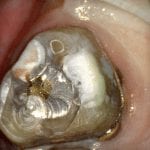
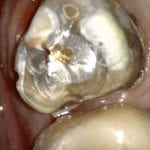
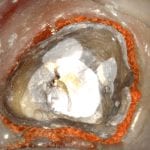
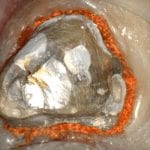
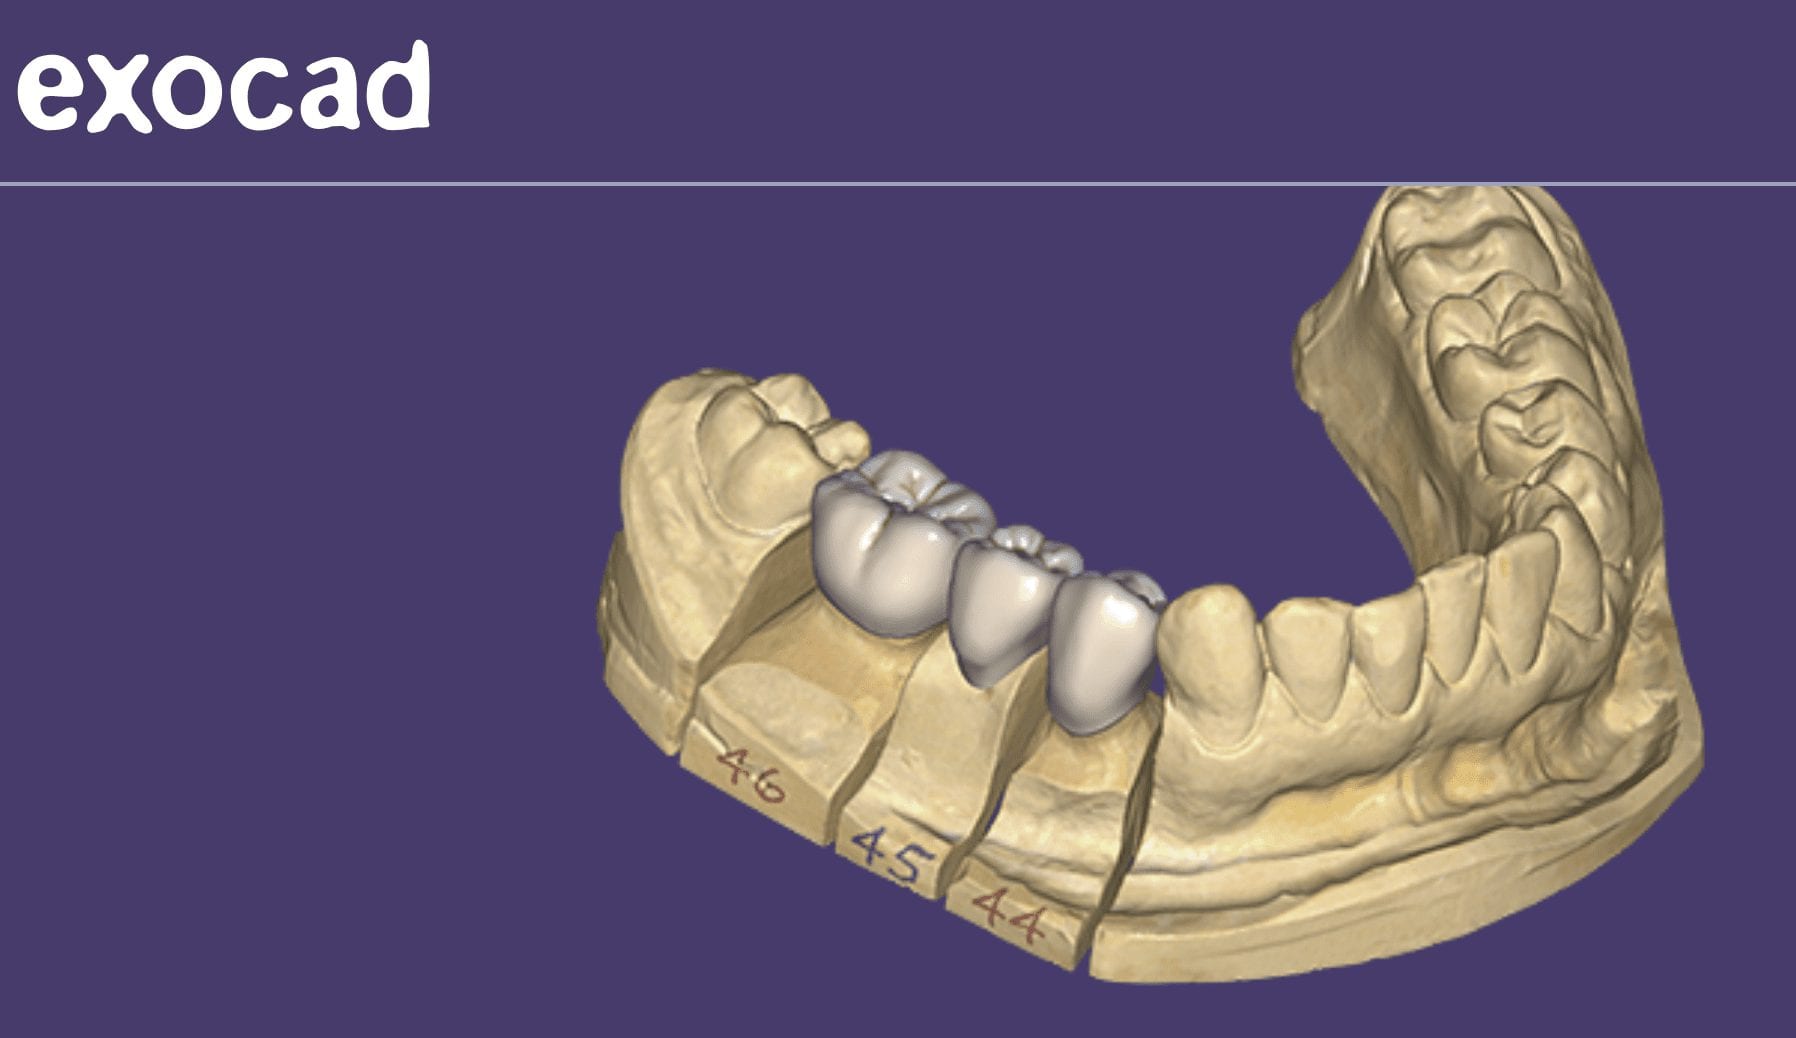
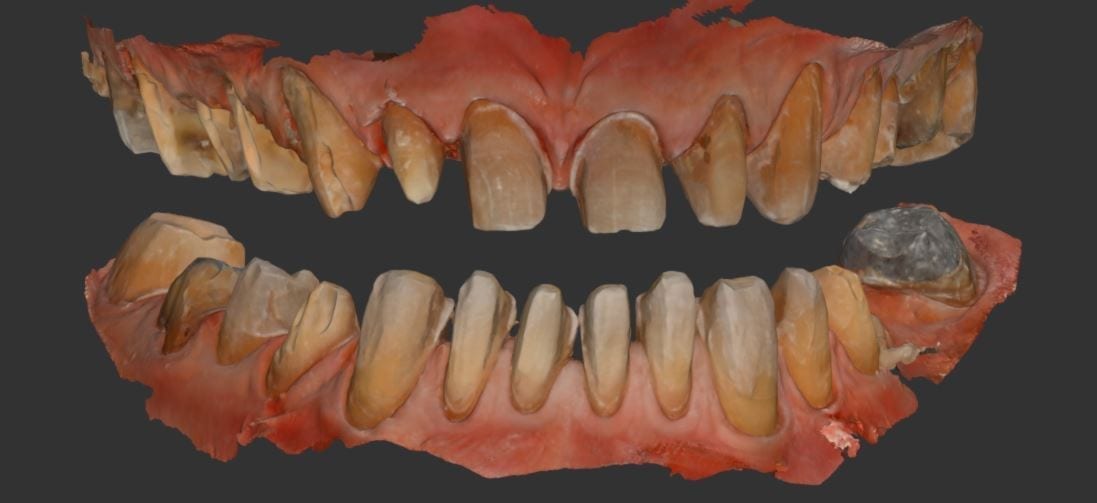
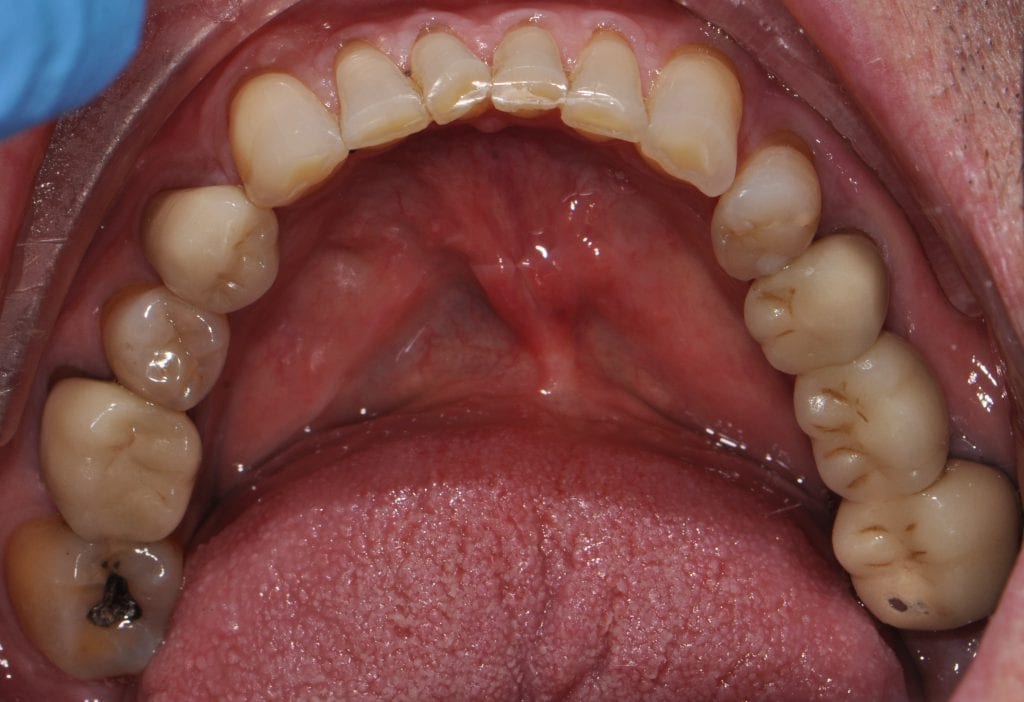
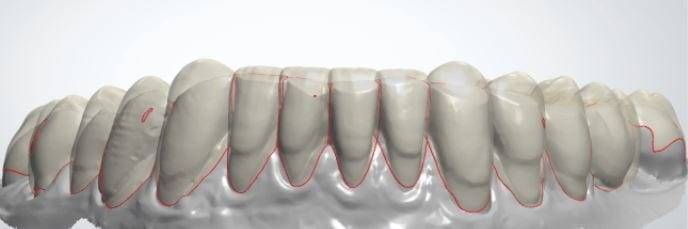
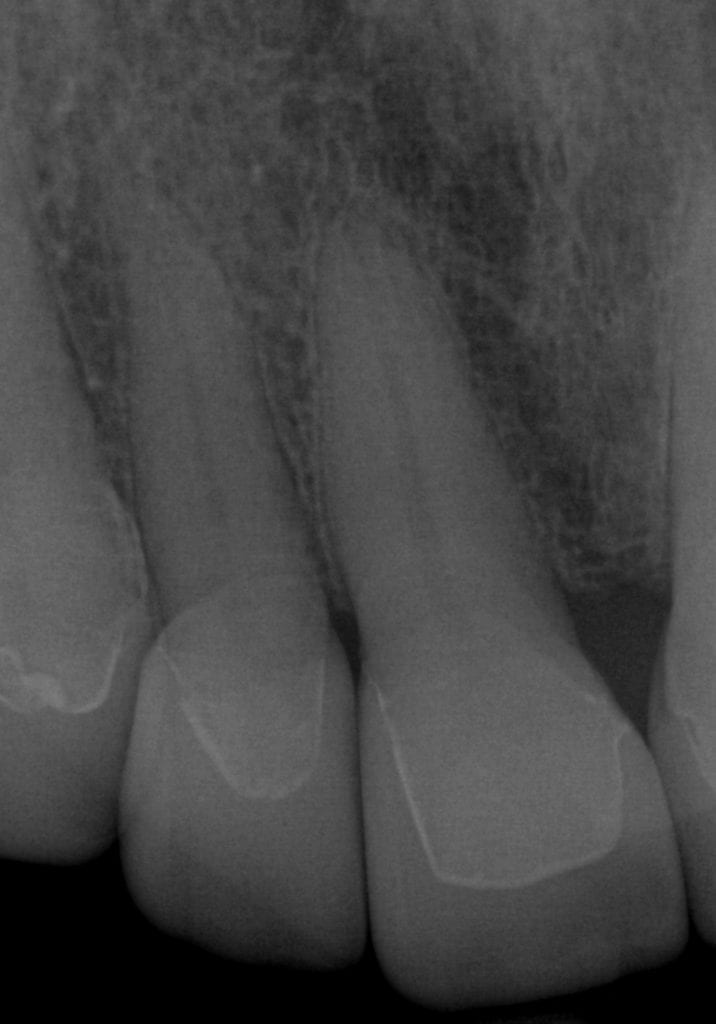
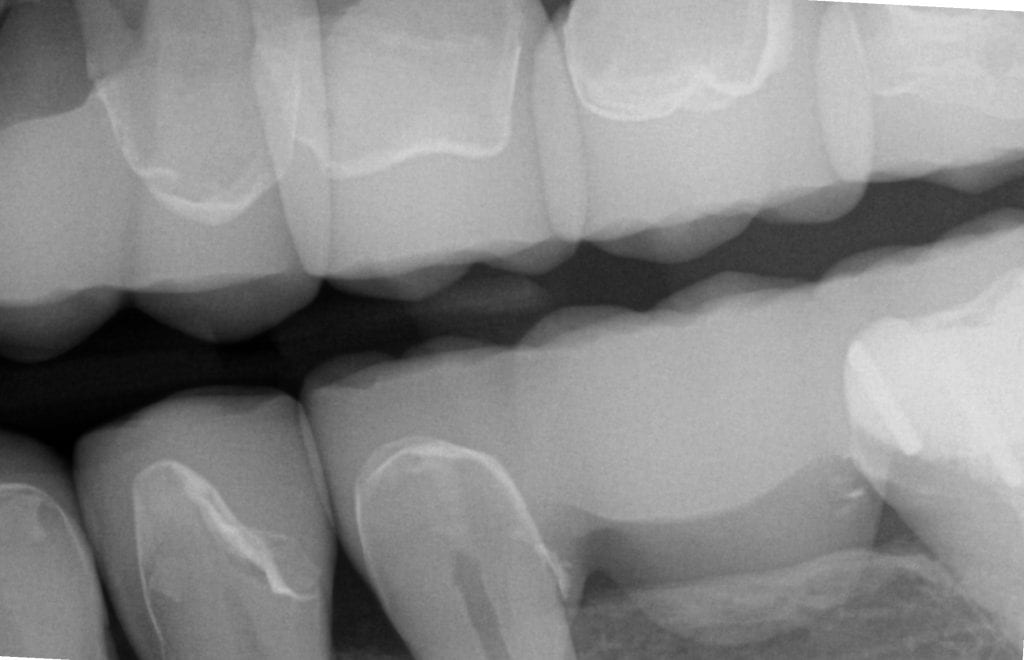
It was a long struggle to find margins with the Omnicam and after 4 years it was sold. The margin definition and resolution never reached an acceptable level. After seeing margins from high resolution scans by the Medit and defining them in exocad, it completely validated that we shouldn’t settle for anything less than the highest standard. This is an scan performed on a upper second molar with tough access, replacing a failing crown.
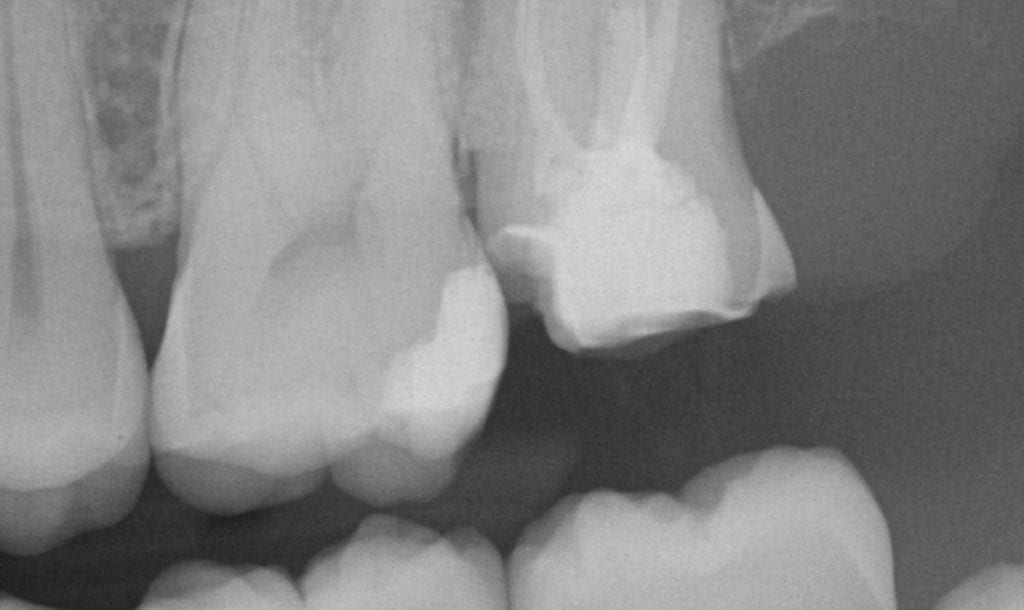
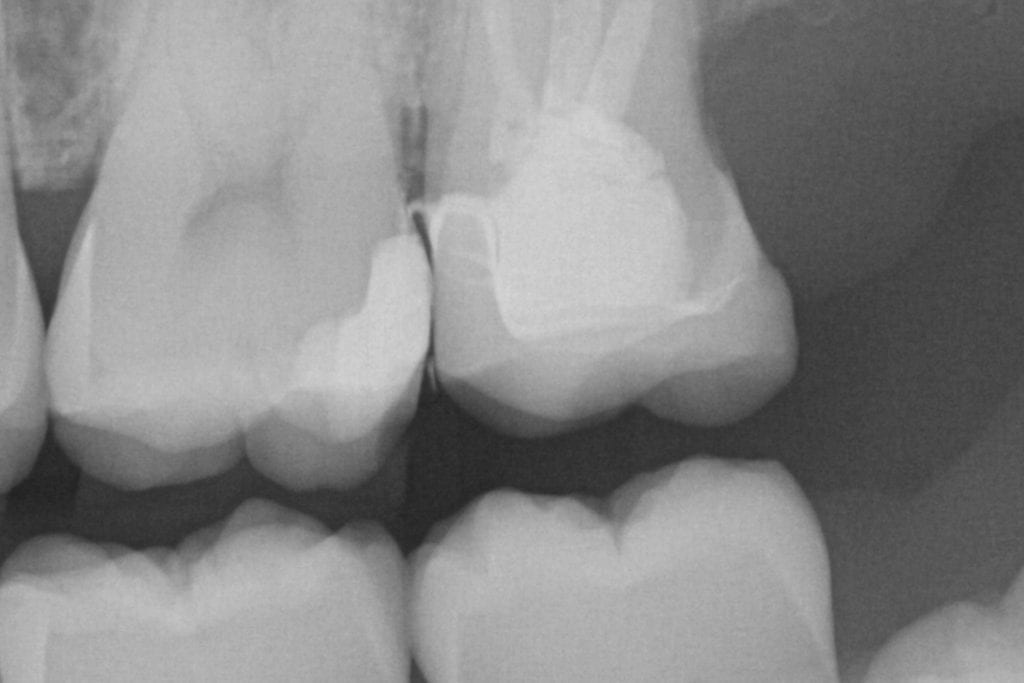
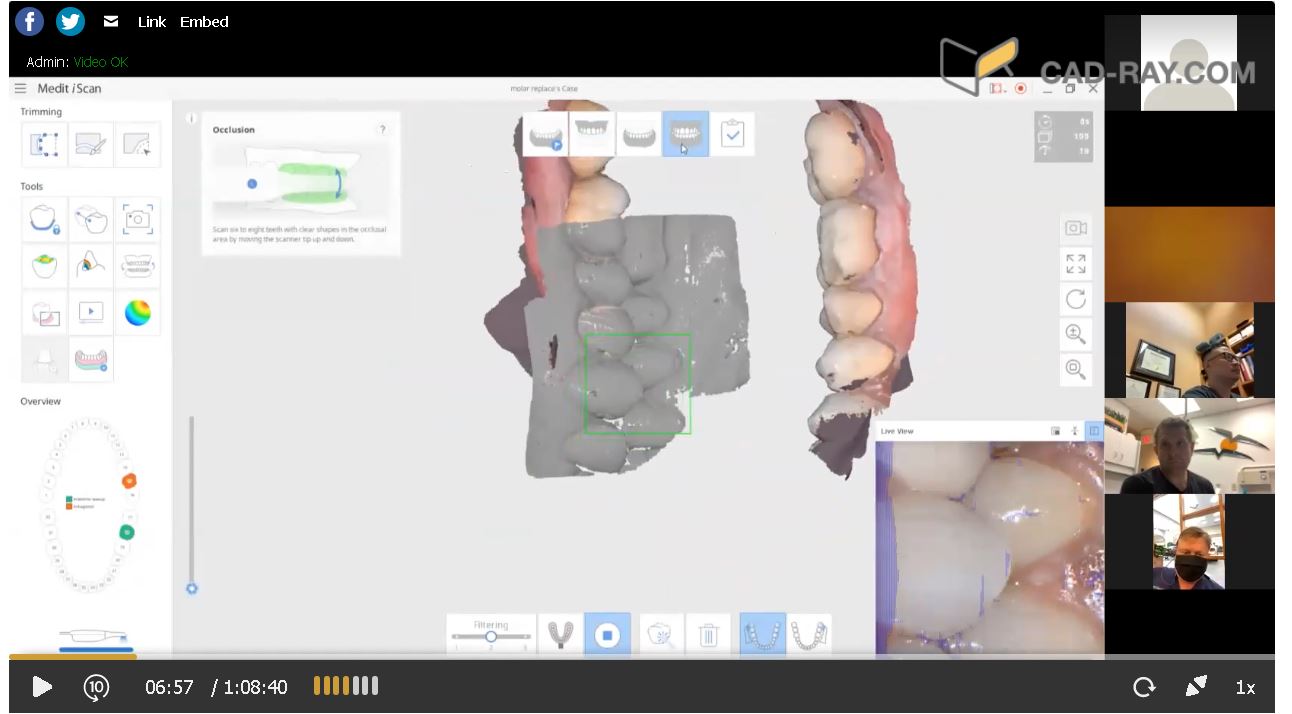
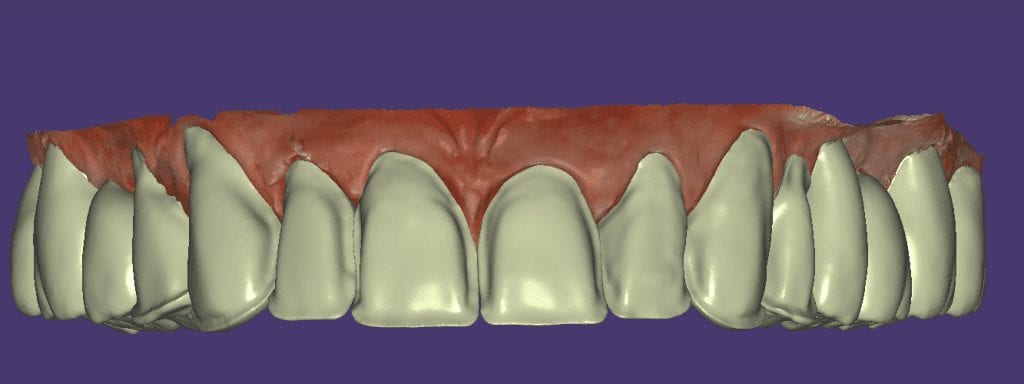
This article demonstrate how a case be set up while the patient is being anesthetized. While waiting for it to take effect, your team can scan the opposing arch, the arch to be prepared, and even the buccal bite. You can see how that is set up in first video. Notice how we crop out the tooth to be prepared so that the software doesn’t get confused between the preop and prep stages.
[videopress ZvGLVAM6 permalink=”false” hd=”true”]
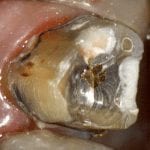
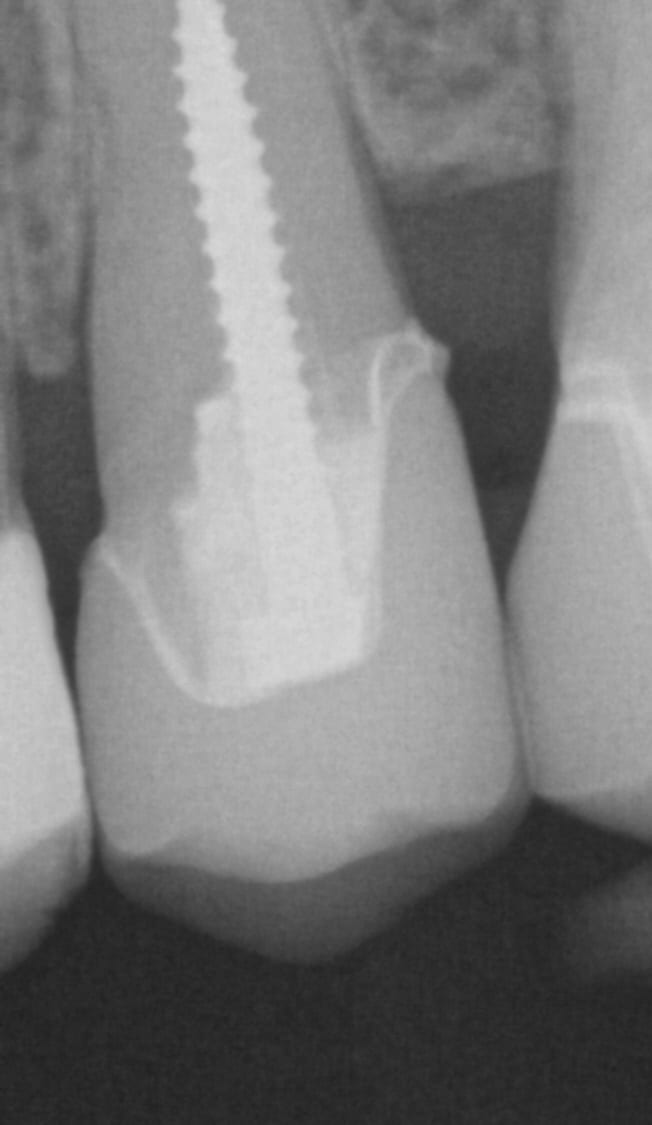
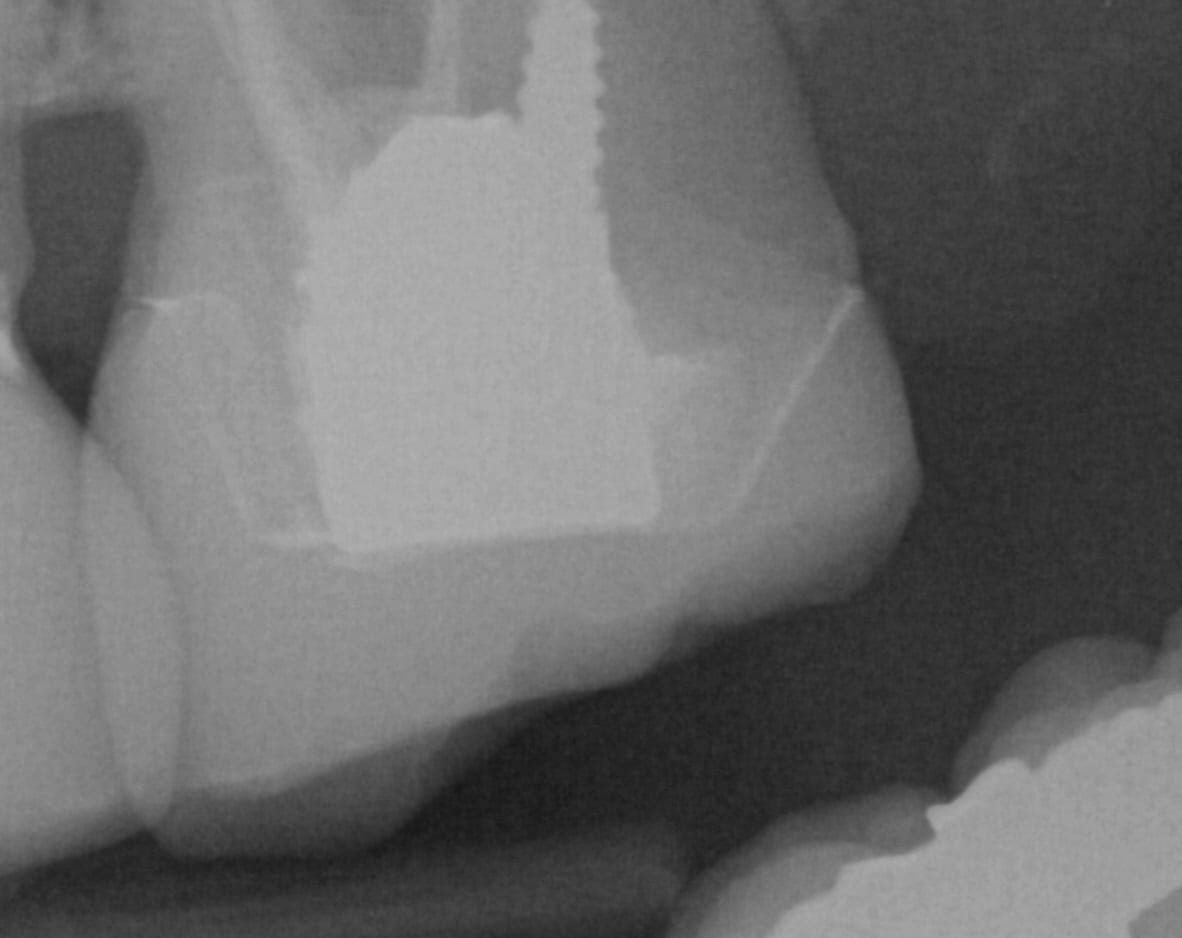
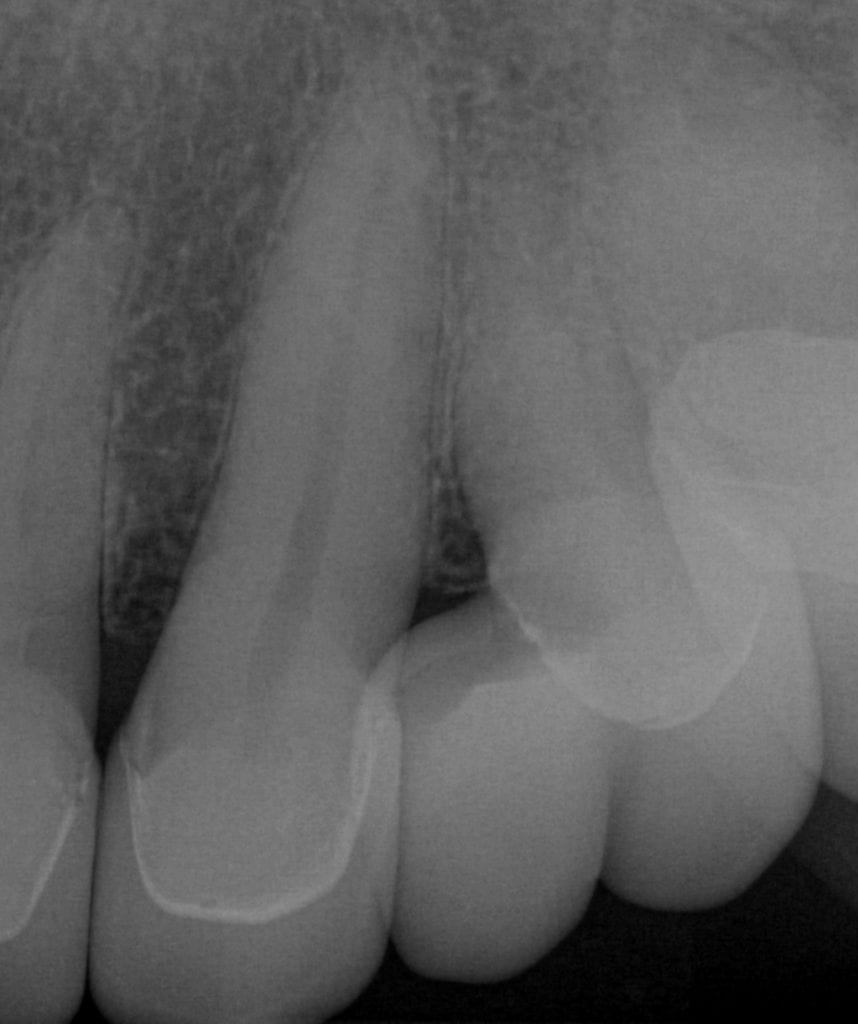
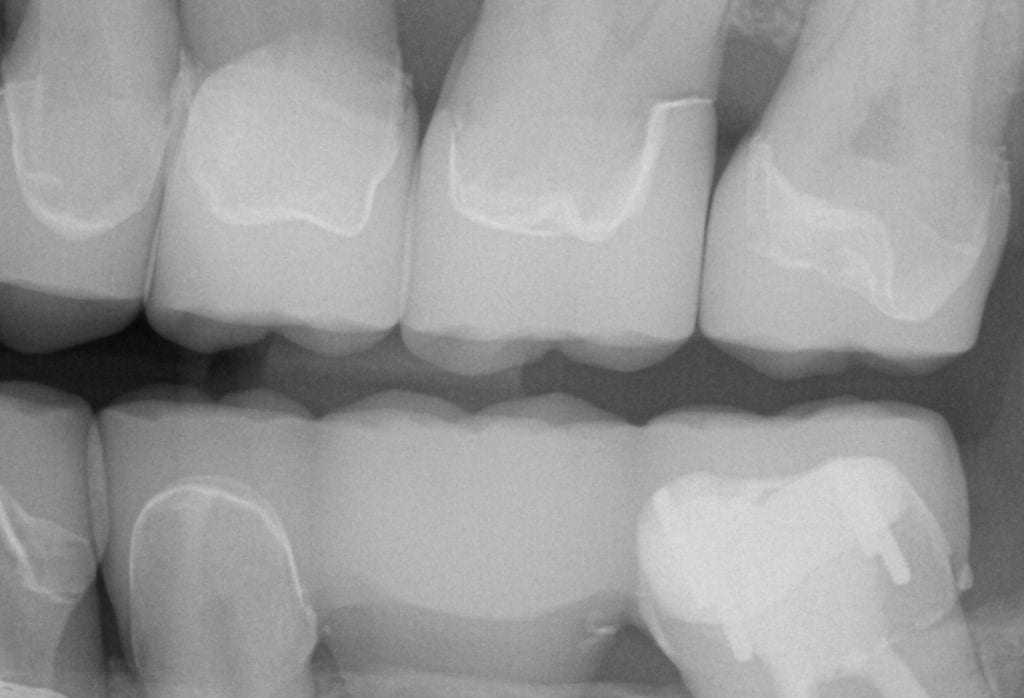
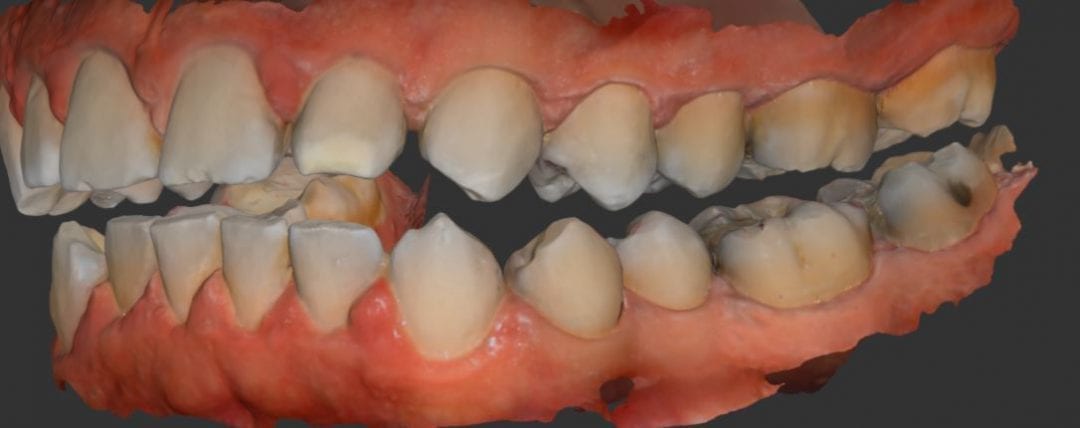
Once the tooth is prepared, the premolar is imaged back into the arch form in high resolution mode. This mode comes in handy for picking up the enamel that is exposed at the cavosurface margins. Some intra-oral imaging systems struggle with picking up the detail in these situations.
You can see how clearly discernible the margins are in this preview. Feel free to download the case data at the end of the article. Please note that areas that are not critical for the restoration design were essentially ignore as they play no significant role in the desired outcome.
Exocad is a powerful software that can import any STL, OBJ, or PLY file from any digital impression system, design a restoration, and fabricate it by outputting to either a milling or printing machine. This is a very simplified explanation and CAD-Ray will guide you through the process.
What is the difference between Exocad DentalCAD and Exocad Chairside (C.S) ?
Exocad DentalCAD is utilized by over 35,000 users worldwide and is a very powerful software that allows you to design and fabricate a wide range of restorations, ranging from single units to bars and removable dentures. It may be overkill or intimidating to a dentist or for chair-side, so the alternative is the C.S. platform. Be aware that the DentalCAD system has many add-on modules that the C.S. version does not, as you can see in the attached table
Add-On Module
Exocad DentalCAD
Exocad Chairside (C.S.)
Bite Splint Module
Yes
Yes
Provisional Module
Yes
Yes
TruSmile Technology
Yes
Yes
Custom abutments
Yes
Coming Soon
Screw-retained bridges
Yes
No
Standard bars
Yes
No
Complex bars
Yes
No
Create physical models
Yes
No
Bite Splint Module
Yes
No
Full dentures
Yes
No
Partial framework design
Yes
No
Virtual Articulator
Yes
No
Smile Design
Yes
No
Jaw Motion Import
Yes
No
DICOM Viewer
Yes
NO
What are the pricing and software options for Exocad DentalCAD?
SOFTWARE
CAD-FLEX
CAD-PERMANENT
Price
$2600
$5000
PERPETUAL Yearly Maintenance Fee
$1500
N/A
Software still functions if you opt out, but no new features will be added
OPTIONAL Yearly Fee for Updates
N/A
Software stops functioning without yearly fee.
$1200
For continuous software updates
Implant Restorative Module
$500 / Year (Perpetual)
FDA regulations mandate yearly updates
$ 1200 one time purchase with yearly optional $450 updates
Provisional Module
$250 / year (Perpetual)
$600 one time purchase with yearly optional $150 updates
Bite Splint Module
$350 / year (Perpetual)
$ 1200 one time purchase with yearly optional $450 updates
Implant Planning
Coming Soon
Coming Soon
What are the pricing and software options for Exocad Chairside C.S.?
To see this case presented in webinar fashion click on the image and enter the members area for much greater detail and information
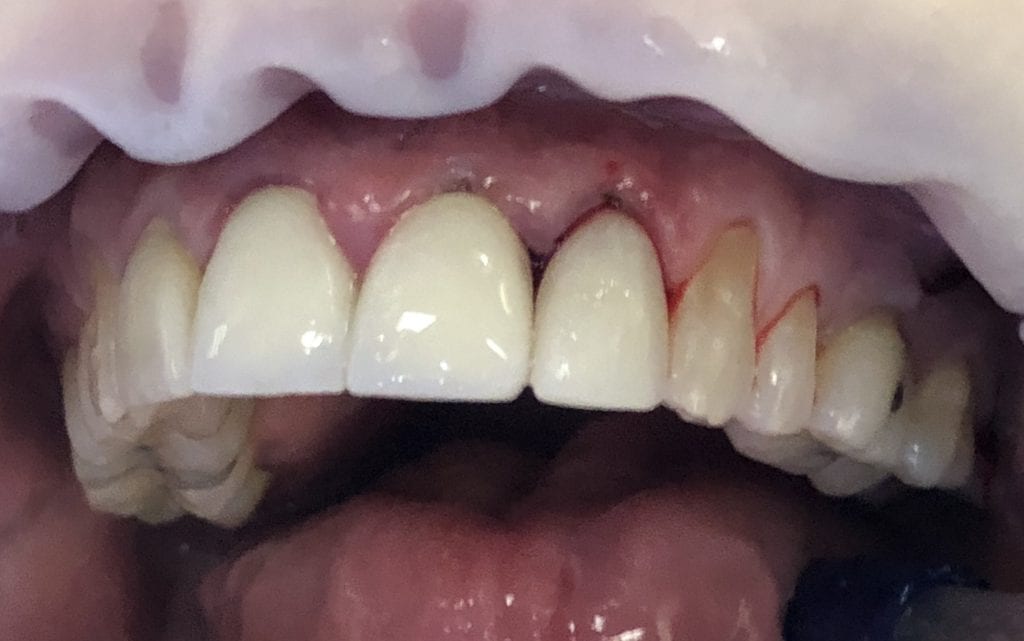
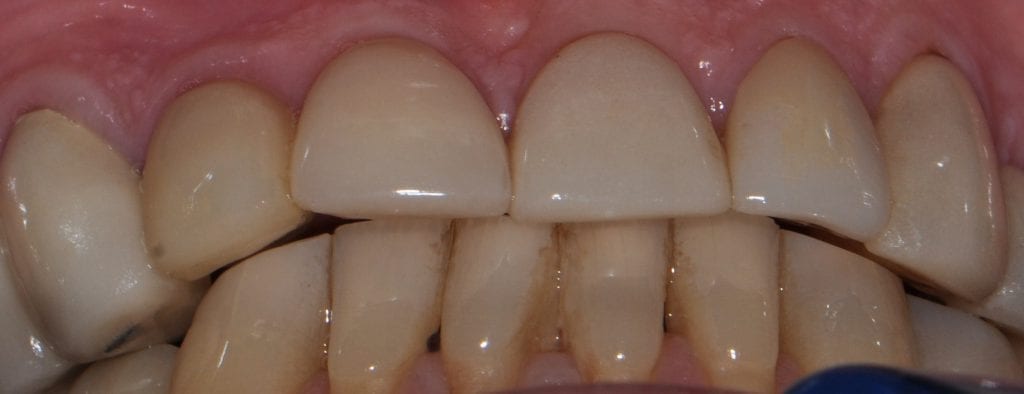
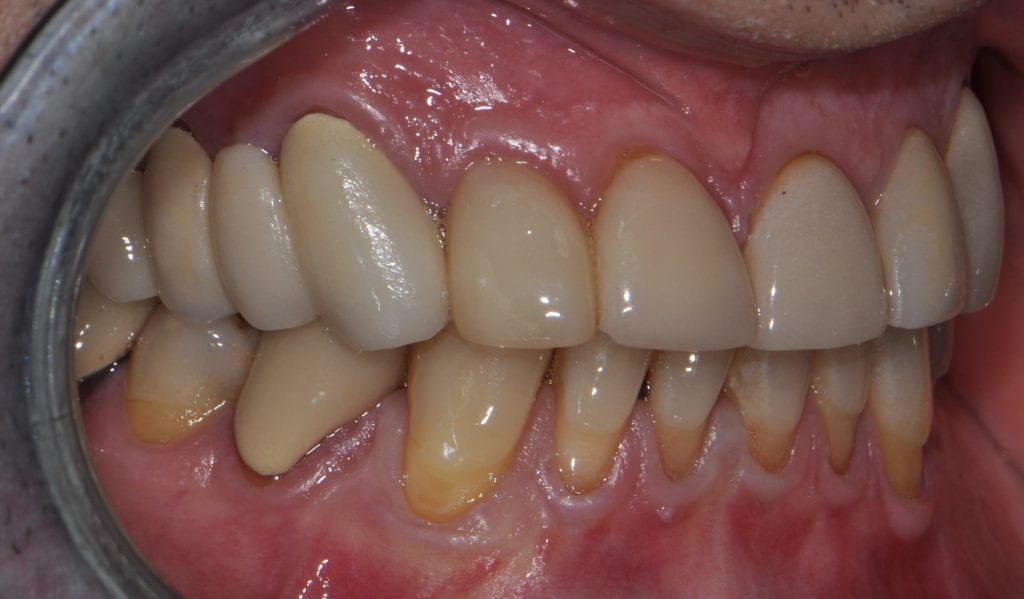
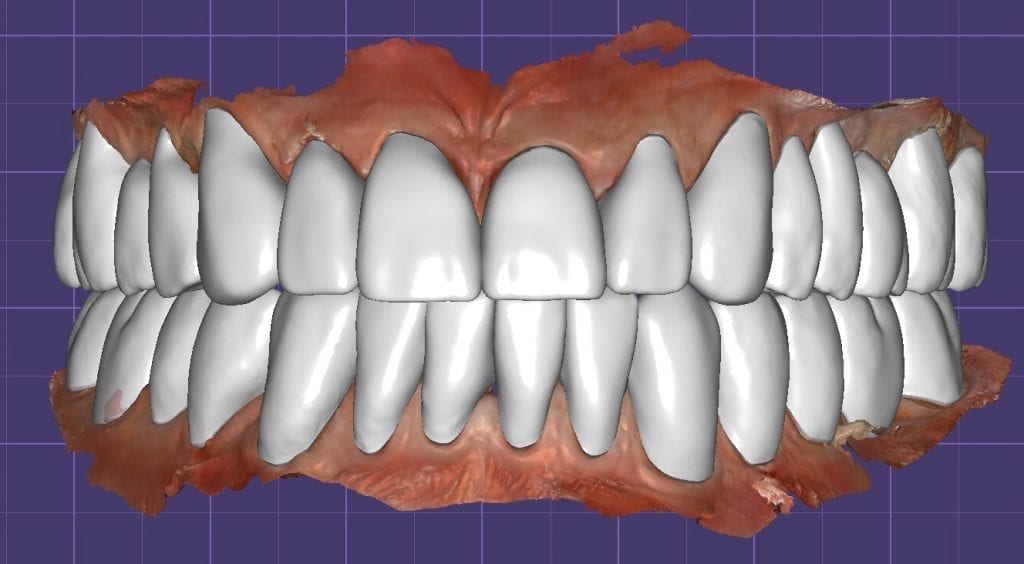
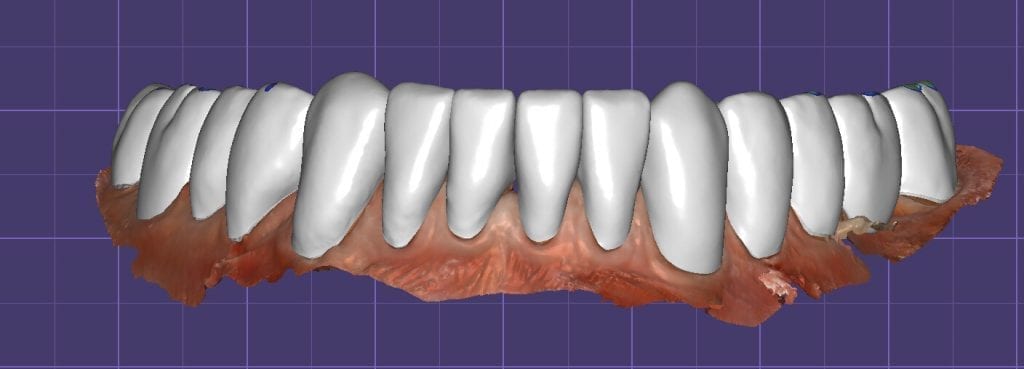
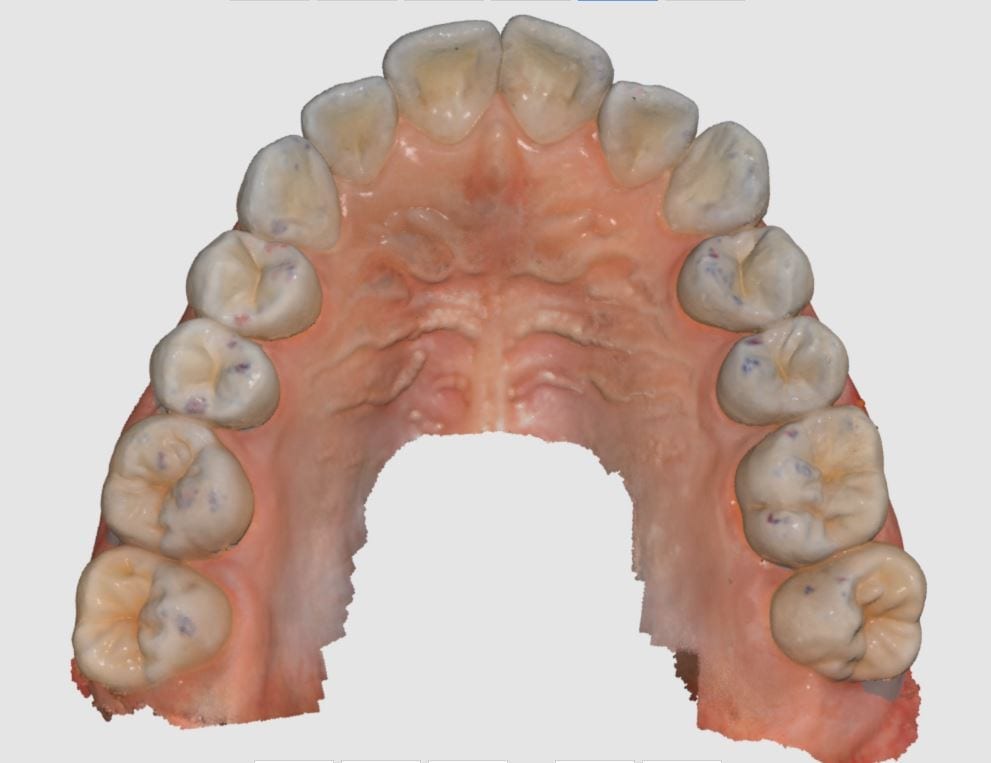
Pre-existing restorations that warranted replacement with an increase in vertical dimension.
Pre-existing restorations that warranted replacement with an increase in vertical dimension. The upper and lower arch were captured with the medit I500 and articulated together with enough clearance to accommodate new restorations and to restore the patient to an ideal tooth position.
This video shows how the vertical dimension was captured with cotton rolls blocking out the tongue and the dark oro-pharynx, which usually spell trouble for an IOS
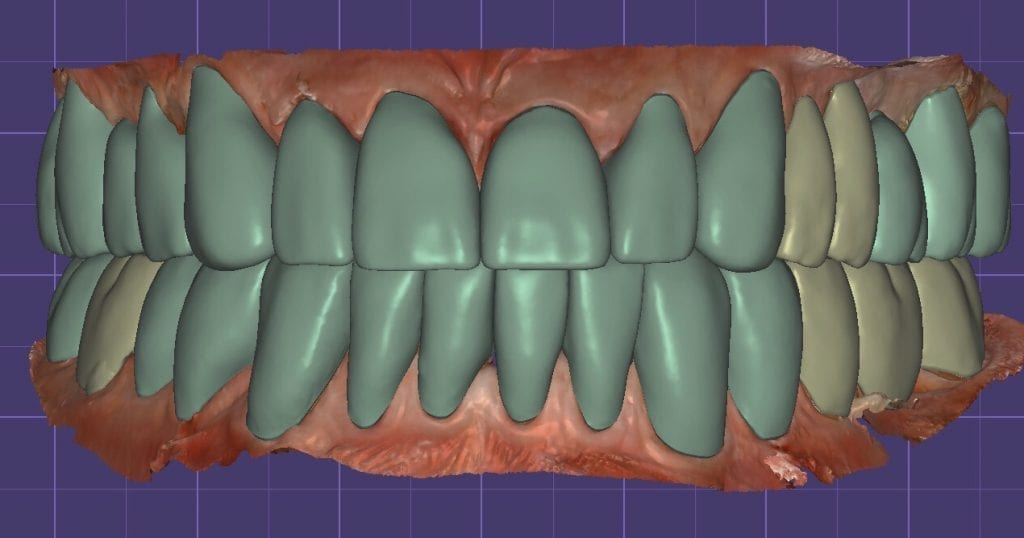
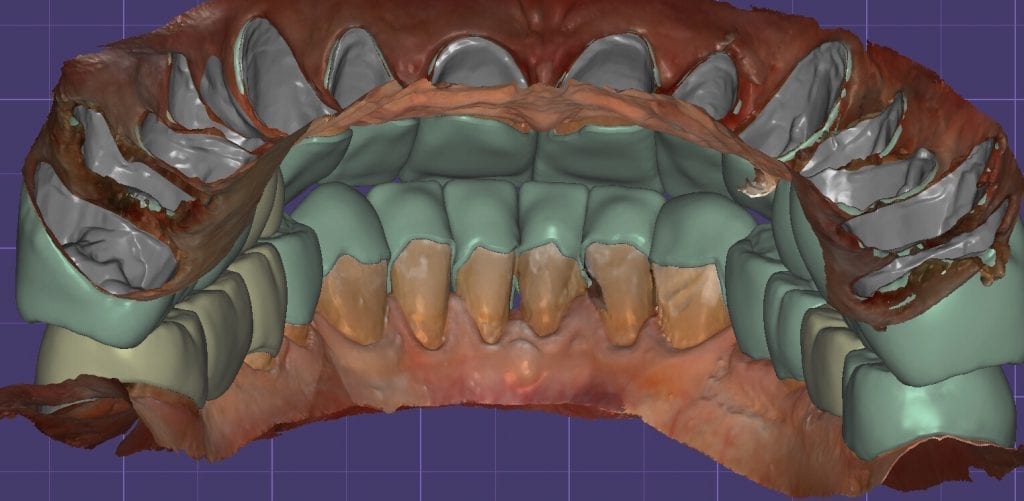
The digital models were then imported into a third party software where a library of tooth morphologies are available for the clinician to choose from.
Once the appropriate library is chosen, the digital wax ups are performed. In the subsequent photos you can see the transparent overlay of the wax-ups to the original position of the existing dentition
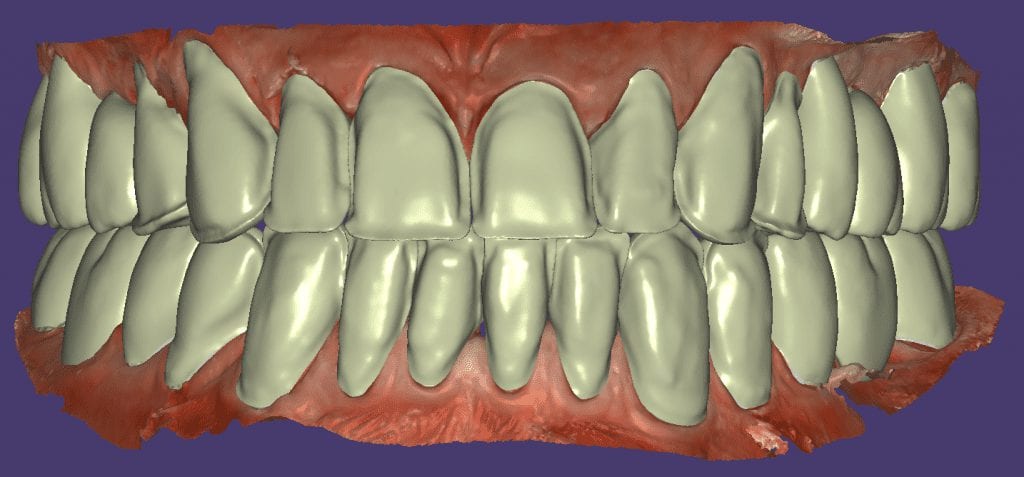
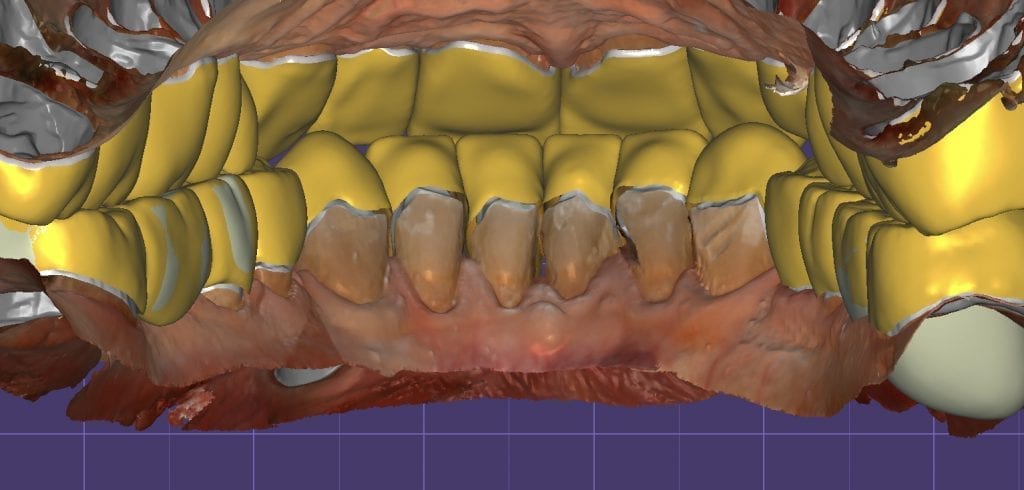
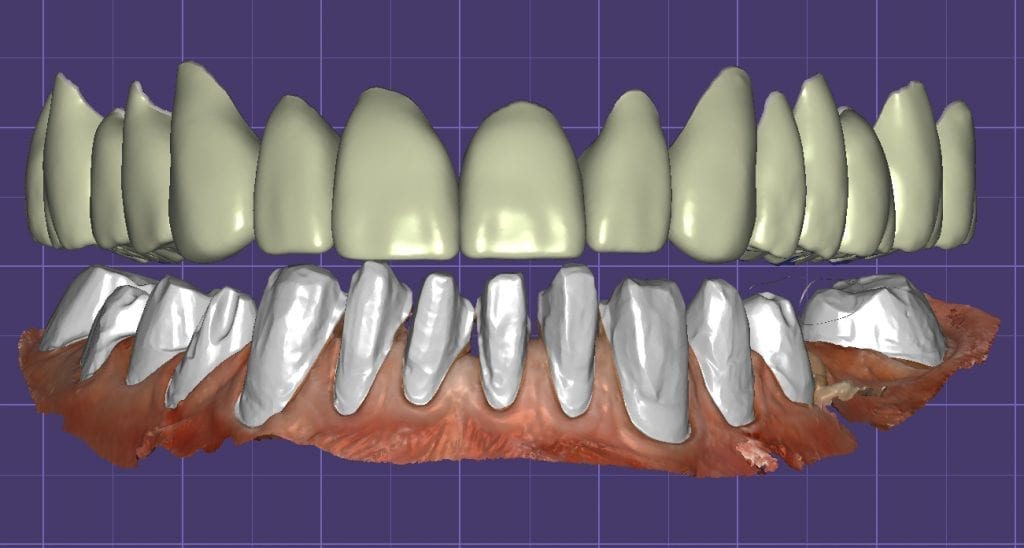
Once the case is designed to the ideal vertical dimension then multiple shells can be fabricated for treatment. The wax up model can be uniformly reduced by .5mmm’s circumferentially and a temporary shell can be designed. Once the teeth are prepared, these shells can be relined and seated onto the preps.
FIRST VERTICAL DIMENSION
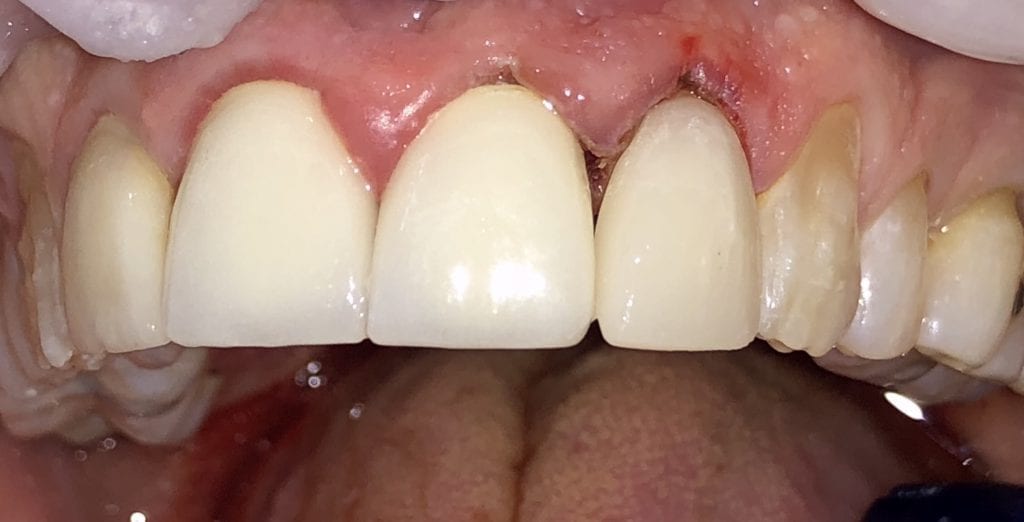
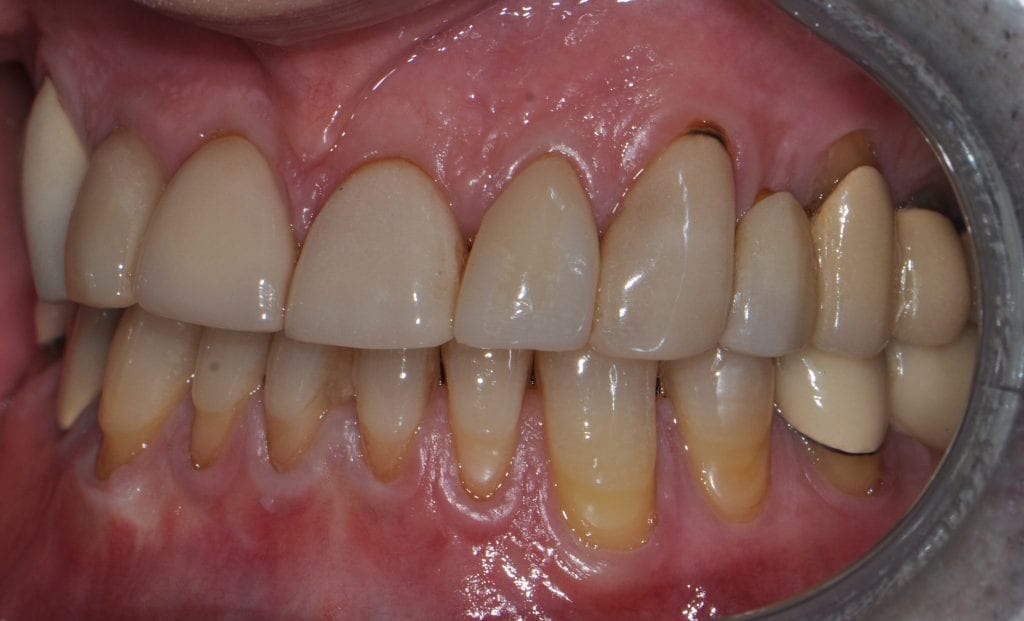
The initial vertical dimension was greater than desired and the tooth shape was too bulky in appearance.
[videopress C0MfqBiS]
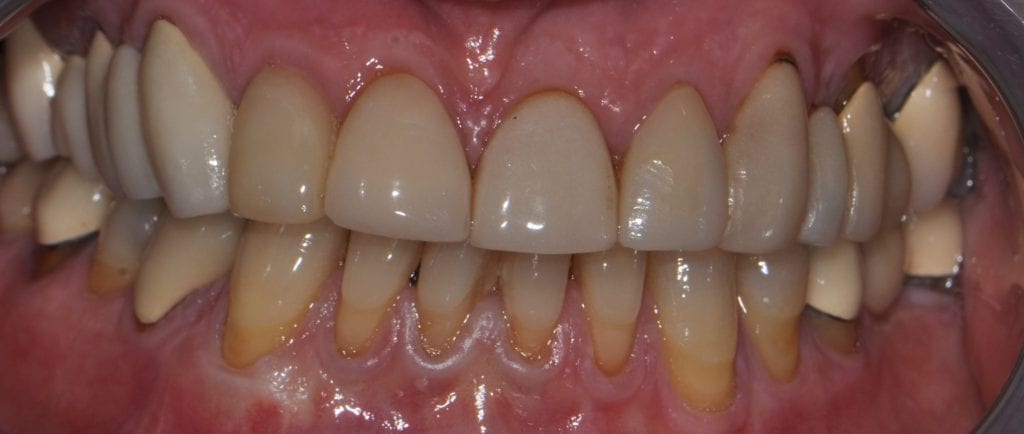
ADJUSTED TEMPORARIES AND NEW VERTICAL DIMENSION
Over the course of a few appointments, the vertical dimension was reduced and the temporaries were adjusted to the patient’s desires. The new upper and lower arch were captured with the Medit i500 and the jaws were related to each other.
This was then imported into exocad where the prepped arches from a few weeks prior were force matched to the new bite
[videopress Zj7XsYG4]
After the upper jaw was related to the temps, the same was done with the lower arch. Great care was taken to make sure the arches were properly related to each other throughout the process
[videopress ObPk1CAK]
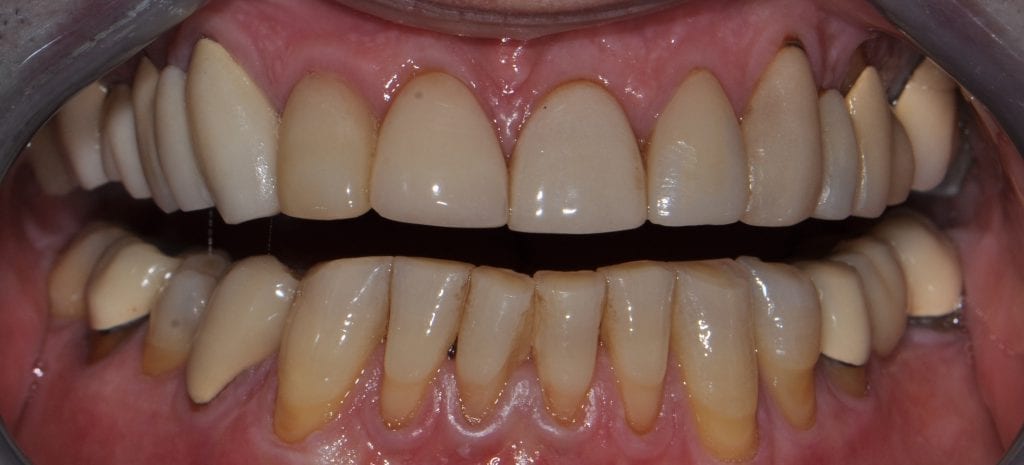
CASE DESIGNS
The case was designed by CADENT BESSA, and the models were printed by Burbank Dental Lab with Carbon Printers. There restorations were milled and cut back and layered by Burbank Dental Lab
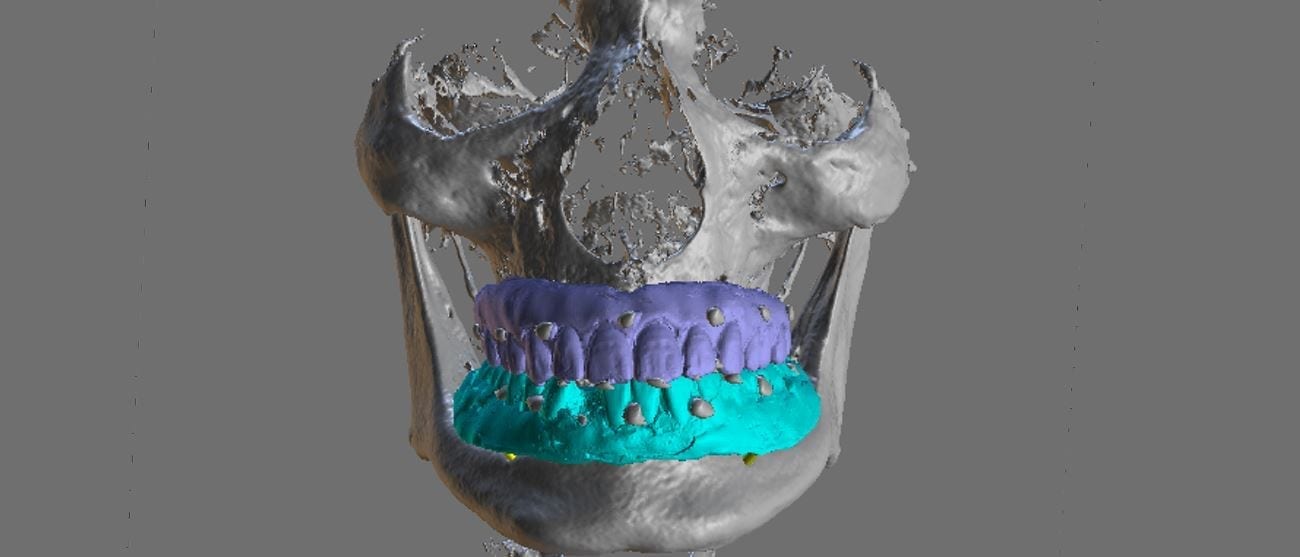
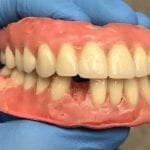
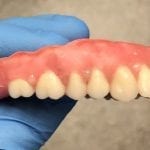
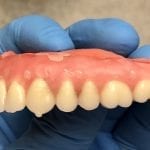
When planning for guided surgery in edentulous patients, it is important to have the final vertical dimension and tooth position determined. Ideally, a denture duplicate should be used with proper radiographic markers.
The traditional way was to embed radio-opaque material in the denture dupe, CT scan the patient with the denture dupes, and then CT scan the denture dupes themselves. Alternatively, you can scan the denture duplicates with a digital impression system. Here we used flowable composite and spread them through the wax set up and take a 3D X-ray of the patient. We then use those landmarks to merge the data sets between the digitize denture and the markers on the CT Scan
Once the dentures are digitized and merged with the CT data, the cases is analyzed to make sure there are no gaps in between the intaglio of the denture and the soft tissue of the palate and the lower / mandibular ridge
An important concept to keep in mind for these edentulous cases is that you actually need 2 models for each arch. One model is used for tooth positioning and implant design, and the other model is used for stent design. Essentially, you design the stent on the ridge, not the denture dupe
One of the biggest hassles in most software is to plan a guided surgery case when the tooth is still present in the arch. Some software will force you to part-take in pylon course handling, gymnastics maneuvers, musical chairs, and multiple imports and exports. The issue revolves around the placement of the sleeve / ring in the design step. Usually you are forced to manipulate the data in 3rd party software and then bring it back with the tooth virtually extracted.
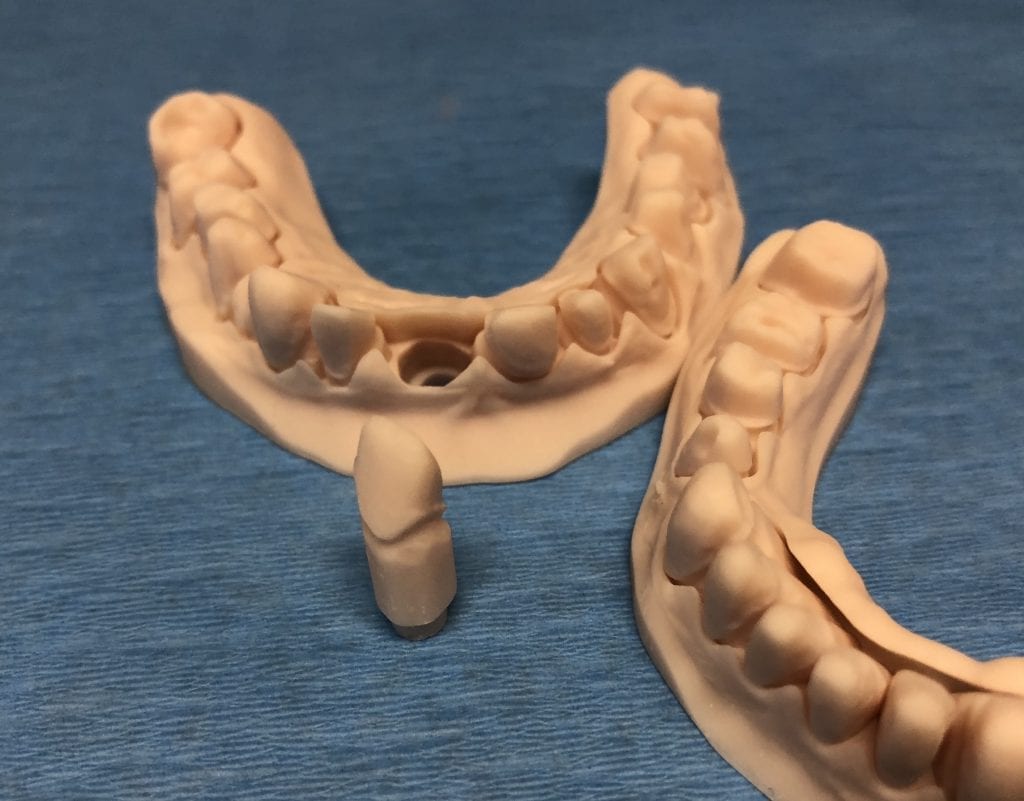
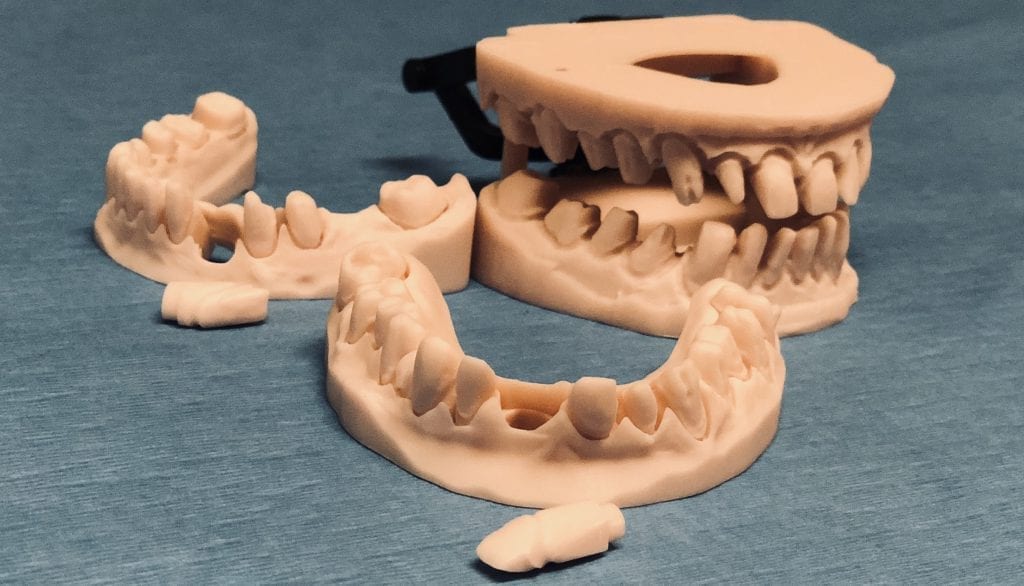
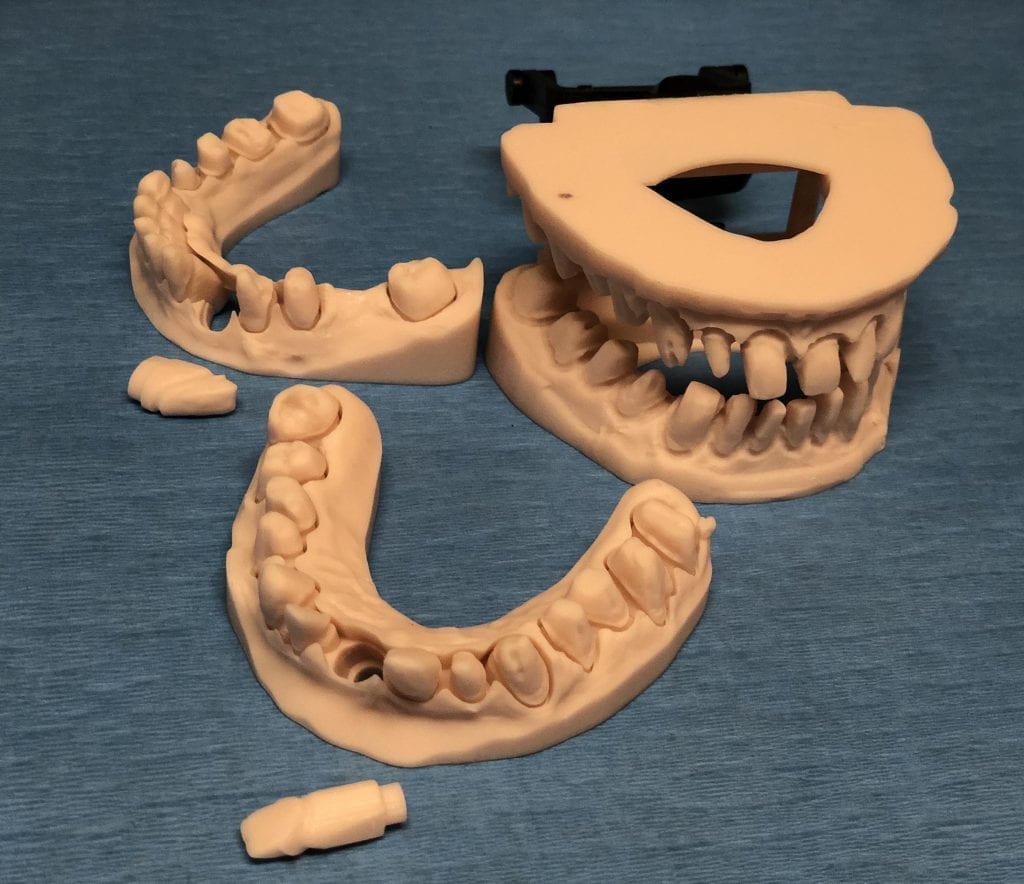
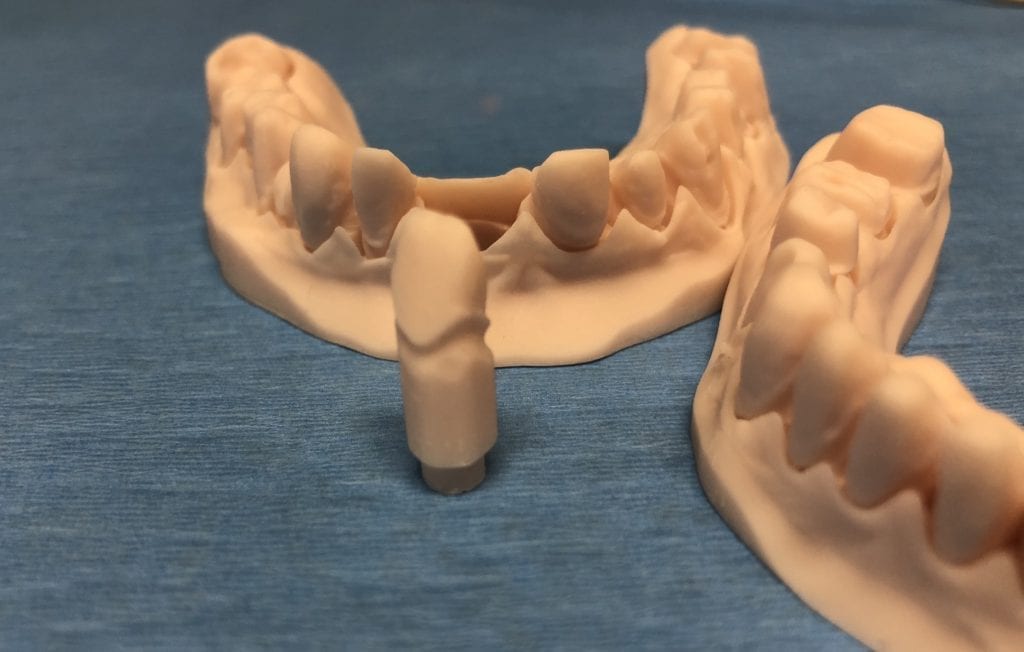
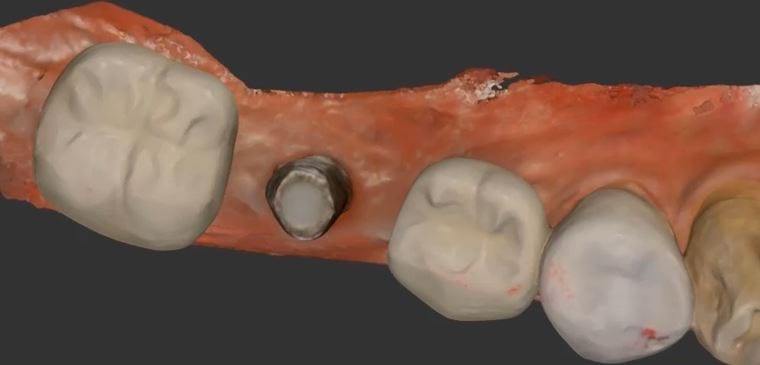
This article is about how you can scan the arches and export the STL, OBJ, or PLY data from the Medit i500 scanner. You can then clone the same case and alter it- namely, you can crop out the tooth that will be extracted in the future. This video shows you how the virtual extraction is performed.
The multiple data sets are then imported in BlueSkyBio software where there are no limits to the number of models you can bring in. In the following video, you can see how the complete upper arch, the virtually extracted lateral arch model, and the opposing are brought in an merged with the CT Data.
The implant is planned for fully guided procedure and a surgical stent is manufactured on the model that has the virtual extraction. You cannot design a stent correctly with the tooth present in the equation. Open architecture and speedy results are the name of the game now with CAD/CAM dentistry. As you can see, these steps are super fast and easy with the open licensed Medit Scanner
This article documents how to capture upper and lower scans for an oral appliance to treat obstructive sleep apnea. The patient was recently diagnosed with mild sleep apnea with a Home Study Test which revealed quite a lot about his sleeping habits and patterns.
The patient decided to pursue treatment with an oral appliance in lieu of CPAP therapy. Upper and lower impressions were taken, and the occlusal relationship was captured in protrusive and with the vertical dimension set a a tolerable distance. Cotton rolls were used to block out the movement of the tongue which usually interferes with capturing the bite.
Once the bite is captured, we recommend that you move back to the maxilla and mandible catalog box and take additional images to complete and remaining voids in the model. At the end of the article, you can download in multiple formats to see the meshwork and the data that is rendered from the Medit i500 scanner.
Once the patient adapts to the appliance, a titration study will be conducted to measure the effectiveness of the oral appliance
This is a case imaged for an occlusal guard, wehre the upper arch took only 43 seconds to capture. Afterwads, the lower arch is captured, and then ultimately we move to the dual buccal bite. To get enough clearance, we just have the patient bite down on two cotton rolls and hold that position.
One thing to keep in mind is that when you move from one image catalog to another, some processing is done. What we recommend you do is to actually go back to your upper and lower models and fill in any missing data or correct any artifact you may have captured inadvertently. You can see in the footage how the second molars are corrected and filled in with good information.
Here’s a clear aligner case where the upper and lower arches were scanned and the buccal bite was taken with the Medit i500 IOS system. Prior to the digital impressions, occlusal markings were made with articualting paper so we can verify the accuracy of the digital bite
In the video, which is sped up, the upper and lower models were corrected when parts of the tongue or cheek were inadvertently incorporated into the models. There are some cool features in the software that allow you to protect areas that you previously captured corrected and areas where you can fill in with new information.
After the models were articulated and the occlusion was verified, the case was exported to BlueSkyBio software for orthodontic planning. You can download the date and design along.