Purchased Medit i700 from Frank/CAD-Ray and everything has been absolutely top-notch! Great service, quick responses, great training. Very happy with CAD-Ray and our i700! - 10/20/2022
Dan Malloy
Extremely good customer service. From start to finish buying my Medit was flawless and they were very helpful in offering me information. When I got my scanner I had questions and my phone calls were returned immediately. They knew my name and guided...read moreExtremely good customer service. From start to finish buying my Medit was flawless and they were very helpful in offering me information. When I got my scanner I had questions and my phone calls were returned immediately. They knew my name and guided me through what I would need. Very impressed. Would recommend!read less - 2/02/2020
Iseoluwa Adedeji
Just got this scanner a few weeks ago. Has changed my workflow. Easy scanner to use. What's truly great is the support behind the product. Whether by call or fb messenger, I have never not been able to reach someone who solved the issue! Very pleas...read moreJust got this scanner a few weeks ago. Has changed my workflow. Easy scanner to use. What's truly great is the support behind the product. Whether by call or fb messenger, I have never not been able to reach someone who solved the issue! Very pleased so far.read less - 6/19/2020
lizette aguero
Highly recommended. Ericka help me through all the process when we were having some trouble with our scanner. The help was super fast and secure. She answered all our questions and made sure our scanner were working perfectly. - 4/29/2025
Yaqi Mu
I absolutely love using the Medit i500 Intra-oral scanner!!! The i500 scanner is small and easy to use on all patients. It is fast and gives a very clear image. I also think its very cool that you can change the music setting to whatever song you m...read moreI absolutely love using the Medit i500 Intra-oral scanner!!! The i500 scanner is small and easy to use on all patients. It is fast and gives a very clear image. I also think its very cool that you can change the music setting to whatever song you may like! I have used a few different scanners since i have been a dental assistant and have had several complications as far as: how long the scanner would take to load the image, The scanner not catching the image and even the system constantly kicking me out. With the i500 intra-oral scanner i have the BEST experience. I am happy and my patients are happier! I recommend the Medit i500 Intra-oral scanner to anyone who has never used it before! You wont be disappointed! 5 Stars for sure!!!!
- Samantha Brown @ Southern Oak Dental in Conway SC.read less - 6/17/2020
I bought the Medit i500 and self installed to save $$$. The web site provided great step by step instructions. The Facebook group filled in the gaps. The software has been continuously upgraded and works great for scanning and tracking cases sent and...read moreI bought the Medit i500 and self installed to save $$$. The web site provided great step by step instructions. The Facebook group filled in the gaps. The software has been continuously upgraded and works great for scanning and tracking cases sent and received. My tip for scanning single crowns: While waiting for anesthesia, Scan the upper and lower quadrants and record the bite. Then i delete the tooth to be scanned. That saves time later after tooth preparation. At that time, switch to HD and scan the prep, done!read less - 6/16/2020
Ryan Anardi
Just ordered my i700 yesterday and it ships today. Customer support has been amazing in answering all my questions completely. Looking forward to my delivery day like a kid at Christmas. - 11/03/2021
Cad-Ray is the absolute best if you're in the market for digital dental tools. I have purchased two Medit scanners through them. There will be hiccups with any complex piece of machinery, but every time I have needed Cad-Ray, they have been there. I ...read moreCad-Ray is the absolute best if you're in the market for digital dental tools. I have purchased two Medit scanners through them. There will be hiccups with any complex piece of machinery, but every time I have needed Cad-Ray, they have been there. I recently had a scanner go down. I called Cad-Ray tech support and they got me on the phone with Medit immediately. Within a day, a replacement scanner was sitting on my desk. It doesn't get much better than that.read less - 10/03/2024
dr sheth
It was very powerful and enlightening experience today to do 2 day sessions with Dr. Armen and Damien. I learned a lot, quite amazed by how much we can do with knowledge and Medit scanner. As usual great support by CAD-RAY always. I absolutely love M...read moreIt was very powerful and enlightening experience today to do 2 day sessions with Dr. Armen and Damien. I learned a lot, quite amazed by how much we can do with knowledge and Medit scanner. As usual great support by CAD-RAY always. I absolutely love Medit scanner.read less - 8/08/2021
Micah Bickel
Great products, training and support - 11/01/2021
Kip Covington
Customer support! I've had handfuls of scanners over the years and support has always been the biggest variable. We recently had a scanner bought through and implant company and received limited to no support. Through recommendations from several fri...read moreCustomer support! I've had handfuls of scanners over the years and support has always been the biggest variable. We recently had a scanner bought through and implant company and received limited to no support. Through recommendations from several friends, I purchased a second scanner through cad-ray and had them transfer over our support for the first. I wish I would have done this years ago. Destaney, has been incredible helping us troubleshoot a hardware issue that came up. It was on 3-shapes side but not only did she run it up the ladder there and get us back up and running quickly, but she promptly answered all questions and continuously checked in to make sure things were moving along. I won't purchase from anyone else going forward.read less - 8/14/2024
Ernesto Carmona
When I decided to purchase a digital scanner I decided on user experience. They have provided the best experience I could have asked for, from online support, Facebook support, and in person courses. There is no better team to buy Medit from period...read moreWhen I decided to purchase a digital scanner I decided on user experience. They have provided the best experience I could have asked for, from online support, Facebook support, and in person courses. There is no better team to buy Medit from period. Do yourself a favor and buy from them if you are in the market for an intraoral scanner.read less - 6/16/2020
David Paquette
Cad-Ray has been super-efficient and very easy to work with! Highly recommend them for Medit sales and support! - 11/09/2021
We received our i700 scanner from CAD-Ray yesterday. It was an upgrade from our i500. The scanner is amazing and Laura was amazing in helping us get up and running in no time. Their support, professionalism, and expertise is unmatched. Thanks CAD-Ray...read moreWe received our i700 scanner from CAD-Ray yesterday. It was an upgrade from our i500. The scanner is amazing and Laura was amazing in helping us get up and running in no time. Their support, professionalism, and expertise is unmatched. Thanks CAD-Ray!- Helena from Elite Dentalread less - 12/23/2021
Dath Collins D.D.S.
We have worked with Cad-ray for over three years. There tech support should be modeled as the gold standard for tech support. Let me tell you why. When you call in someone answers the phone and even better than that they solve the problem. Lauren...read moreWe have worked with Cad-ray for over three years. There tech support should be modeled as the gold standard for tech support. Let me tell you why. When you call in someone answers the phone and even better than that they solve the problem. Lauren solved my tech problem in less than 5 minutes! Thank you Cad-ray!!read less - 1/24/2023
Robert Mabry
I don't scan in my practice my assist does. She says it's awesome. Better than the trios or cerecs we have had in the past. The image quality while designing cases is amazing. Haven't seated a restoration from it yet but expect it to be great as well...read moreI don't scan in my practice my assist does. She says it's awesome. Better than the trios or cerecs we have had in the past. The image quality while designing cases is amazing. Haven't seated a restoration from it yet but expect it to be great as well.read less - 6/16/2020
I have had excellent , prompt , customer service and support from the entire team . Especially from Frank DeLuca as I move along the learning curve. His patients and expertise is much appreciated - 1/24/2023
Alderman Dental
Frank DeLuca from CAD-Ray has been absolutely awesome from day one. Readily available and very knowledgeable to provide support when needed. - 1/25/2023
Robert Loughlin
I Love it !!! I needed to replace my Omnicam because the computer hardware was old and not able to keep up with the software upgrades. The computer upgrade costs from Sirona were cost-prohibitive (another reason why the Medit is so good) and I wasn...read moreI Love it !!! I needed to replace my Omnicam because the computer hardware was old and not able to keep up with the software upgrades. The computer upgrade costs from Sirona were cost-prohibitive (another reason why the Medit is so good) and I wasn't about to make the same mistake twice and replace it with another system from Sirona. I was a bit unsure about making a big switch but after speaking with Nick Statly at Cad-Ray, he eliminated all of my reservations and I ordered it. I've used it for the past week and love it. Setting it up and getting it running was simple. I would not describe this as a do it yourself process, it's much easier. If you can make a cup of coffee you can set the scanner up and start making excellent scans. All one needs to do is watch the very well laid out and easy to follow videos and save a lot of money. The image quality and ease of use hands down beats the Omnicam. Also during the current pandemic, I really feel better about being able to cold sterlize the tips vs the omnicam's just "wiping down." I almost hope my desktop scanner craps out so I can get the Medit desktop. I'm glad I listened to you Nick!!!read less - 6/04/2020
Andy was wonderful with setting everything up and explaining everything. The Medit i700 has been great thus far, easy set up! The only "issue" is that it can be occasionally glitchy. - 1/11/2022
So glad we used Cad-Ray. They absolutely helped set everything up and even helped us tremendously when we needed a replacement. We are using the i700 and are thrilled with it! - 11/03/2022
Stuart Adam
Amazing team!
Andy was amazing with explaining everything needed to be successful with the medit i700 and encouraged me to give CADRAY a call if I have any questions in the future. I have some colleagues that have regarded CADRAY as the gold stand...read moreAmazing team!
Andy was amazing with explaining everything needed to be successful with the medit i700 and encouraged me to give CADRAY a call if I have any questions in the future. I have some colleagues that have regarded CADRAY as the gold standard for service and I can now say that I completely agree. Thank you!read less - 12/27/2021
Absolutely love Laura. She was my initial contact and is an amazing resource for any questions even months later. Would highly recommend buying from Cad Ray especially Laura! - 6/28/2022
Steven Hechtman
As important as the decision of which scanner to buy (I bought the Medit i500 - why is a separate review) is the decision of who to purchase it from. There is a Medit i500 distributor 5 miles from my office who agreed to lower their price to match C...read moreAs important as the decision of which scanner to buy (I bought the Medit i500 - why is a separate review) is the decision of who to purchase it from. There is a Medit i500 distributor 5 miles from my office who agreed to lower their price to match Cad-Ray. So why did I purchase it from Cad-Ray who is 2000 miles away from my office. Because I did my homework. Because the post purchase training and support offered by Cad-Ray was unmatched by any other dealer I spoke with. Their library of online training videos that came with the purchase is without equal. Bottom Line: I’m glad I purchased the Medit i500 and, with hindsight, I know I made the right choice to purchased it from Cad-Ray!read less - 5/12/2020
Aaron LaRock
Dentist here. Bought a scanner, mill and 3d printer with Cad-Ray. I don't know what I'd do if I bought these items without their support. They've helped me so much and are awesome. I felt I had to repay by writing them this nice review. You won't reg...read moreDentist here. Bought a scanner, mill and 3d printer with Cad-Ray. I don't know what I'd do if I bought these items without their support. They've helped me so much and are awesome. I felt I had to repay by writing them this nice review. You won't regret getting whatever you need through Cad Ray.read less - 3/15/2024
Chase Benson
New technology can be intimidating, but this i700 is user friendly and is everything you could ask for in regards to a great scanner. Cad-ray also made the transition easy and smooth. Customer support here is unreal. Telling all my dental buddies abo...read moreNew technology can be intimidating, but this i700 is user friendly and is everything you could ask for in regards to a great scanner. Cad-ray also made the transition easy and smooth. Customer support here is unreal. Telling all my dental buddies about these guys, and plan to make more purchases in the future.read less - 4/18/2022
I’ve been using Medit 500 since spring of 2021 and really like it. The support system has been very good so far. I just called yesterday and spoke with Frank Deluca, he was very informative and helpful. - 12/07/2021
Brent Hale
I bought a scanner from Nick Statly at Cad-ray a few months back and have nothing but good things to say about them. They were very helpful with setting up my computer that's linked to the scanner and since then have been very eager to help with ques...read moreI bought a scanner from Nick Statly at Cad-ray a few months back and have nothing but good things to say about them. They were very helpful with setting up my computer that's linked to the scanner and since then have been very eager to help with questions that I had regarding the system.read less - 12/08/2021
Dana Mallard
Heather Gramely provided excellent costumer support today. She went above and beyond the reason I even called to update our computer and software and aid in warranty information/repairs. - 2/08/2022
Ma. Teresa Santana
Best support and customer service ever! My scanner is long past warranty and they still answer all my questions. When it's time to upgrade I'll be buying from them again. A friend bought same scanner from another vendor and got zero support. I had to...read moreBest support and customer service ever! My scanner is long past warranty and they still answer all my questions. When it's time to upgrade I'll be buying from them again. A friend bought same scanner from another vendor and got zero support. I had to help them. Told her next time buy from Cad Rayread less - 5/10/2024
Kent Lysgaard
This company has the best customer support I have ever experienced. I purchased the I700 Intraoral scanner and the transition from impression material to io scanner has been so easy because of Cad-Ray. I highly recommend them. The response to questi...read moreThis company has the best customer support I have ever experienced. I purchased the I700 Intraoral scanner and the transition from impression material to io scanner has been so easy because of Cad-Ray. I highly recommend them. The response to questions/issues is instantaneous even with a patient in the chair they have the capability to go online and help. Absolutely first rate.read less - 4/13/2022
Michael White
Everyone I have dealt with during the process of buying my new N4 VHF mill (which by the way is fantastic) last year to buying a new iMedit 500 scanner. Having the open type system has been a God send. No more held hostage by the 2 main systems us ...read moreEveryone I have dealt with during the process of buying my new N4 VHF mill (which by the way is fantastic) last year to buying a new iMedit 500 scanner. Having the open type system has been a God send. No more held hostage by the 2 main systems us same day crown dentists have had to deal with for years. Cad-ray made the financing a snap and the post customer support is unbelievable. Thank you everyone at Cad-Rayread less - 5/12/2020
William Neurauter
As a small office, making the move to digital impression dentistry was a rather large commitment. After much research we settled on the Medit i500. We almost purchased from our implant supplier but were less than impressed with their training and...read moreAs a small office, making the move to digital impression dentistry was a rather large commitment. After much research we settled on the Medit i500. We almost purchased from our implant supplier but were less than impressed with their training and support options. After additional research we found Cad-Ray and couldn't be happier that we purchased from them. Their online tutorials and live support have been second to none. Having such a great support network behind the Medit made the transition and purchase so much better than it could have been had we gone a different route.read less - 11/30/2021
CAD-Ray's online resources and customer support has made my Medit scanner implementation possible without the need for any hands on training. They are full of resources and have expert knowledge. - 7/01/2021
Diana Teverbaugh
What can I say ! I have been extremely pleased with my scanner ! I recommend it to all my colleagues ! The support is the best , I bought the extended warranty and my scanner hada small crack and within one day they shipped my a new one ! I can’t wo...read moreWhat can I say ! I have been extremely pleased with my scanner ! I recommend it to all my colleagues ! The support is the best , I bought the extended warranty and my scanner hada small crack and within one day they shipped my a new one ! I can’t work without it ! Thank you !read less - 2/09/2022
George W
Frank DeLuca has been my rep for almost a year and has provided excellent, caring, professional service and with a great attitude. - 1/25/2023
jeremiah choi
Never had customer care like Cad-Ray, you can't go wrong purchasing through them. Trios is a great scanner. All the reps at Cad-Ray are very knowledgeable and helpful and will make sure you are up and running smoothly. Above and beyond customer serv...read moreNever had customer care like Cad-Ray, you can't go wrong purchasing through them. Trios is a great scanner. All the reps at Cad-Ray are very knowledgeable and helpful and will make sure you are up and running smoothly. Above and beyond customer service.read less - 8/27/2022
Absolutely the best customer service I have ever seen. I couldn't be happier with the service received. I won't be going anywhere else!! Thank you again. - 2/01/2022
Nisarg Parikh
Absolutely a phenomenal company. Everyone you engage with is extremely knowledgeable and helpful.I’m sure they get the same questions day in, day out but they are happy to help you without being condescending. The entire team has been helpful through...read moreAbsolutely a phenomenal company. Everyone you engage with is extremely knowledgeable and helpful.I’m sure they get the same questions day in, day out but they are happy to help you without being condescending. The entire team has been helpful through phone calls, the Cad-Ray FB group, and recorded webinars. Jonathan helped me get a great deal, Laura was awesome on the webinar, Damien is always answering questions on FB, and Armen had a great in-person presentation in Dallas. 100% recommend.read less - 4/22/2022
Michael Gagaoudakis
Awesome company. The video collection CAD-Ray has put together for their equipment is unparalleled. There is literally no other company that has a library of learning tools like Armen and his team have put together. I highly recommend this company if...read moreAwesome company. The video collection CAD-Ray has put together for their equipment is unparalleled. There is literally no other company that has a library of learning tools like Armen and his team have put together. I highly recommend this company if you are considering making a digital equipment investment. 5 stars!read less - 6/16/2020
Ramin Goshtasbi
Great service even if you own a Primescan. Company is built on customer service. Thanks for the help guys…. - 1/05/2022
Dong Lim
One of the best investments I’ve made for my office. A fraction of the cost compared to cerec. No monthly club fee. Easy maintenance. Saving a ton on lab costs. Milling and designing crowns is honestly my favorite things to do now. - 6/29/2020
Everyone at CAD Ray has been amazing. Glad I chose them for my Medit and Sprint Ray purchase. Our training with Kaila was awesome. Thank you - 1/04/2023
Aaron S
Great ongoing support and customer assistance. Been working with Frank for years, even before cad ray. Always there for any help i ever need. Cad ray support is like no other. - 1/26/2023
Gwen Giannina
CAD-Ray is an amazing company. I purchased my scanner 3 years ago. Any small issue immediately resolved by calling them for help. I originally scanned with Cerec. The ROI doesn't even compare. The Medit was by far the best technology purchase of my ...read moreCAD-Ray is an amazing company. I purchased my scanner 3 years ago. Any small issue immediately resolved by calling them for help. I originally scanned with Cerec. The ROI doesn't even compare. The Medit was by far the best technology purchase of my 20 plus years in dentistry. I will upgrade at some point and will buy again from CAD-RAY!read less - 2/04/2022
LoAn Huynh
Erika is one of a kind! She truly is patient with me. She has gone above and beyond to help me every time I call her. We have a few locations and she is always prompt in her responses and always manages to find a solution for me. I wish every rep was...read moreErika is one of a kind! She truly is patient with me. She has gone above and beyond to help me every time I call her. We have a few locations and she is always prompt in her responses and always manages to find a solution for me. I wish every rep was reachable ALL THE TIME and helpful! Thank you Erika! ❤️read less - 6/04/2025
John T
Frank and the CAD-Ray crew are awesome! They are always available for support with the technology you purchase from them. - 1/25/2023
Chirag Vaid
I ordered my Medit scanner from them in Feb 2020, so far no issues with support or the product. They are a great company with great support. Disclosure: they did promise me a scanner tip for this review, but in all honestly I was meaning to give it t...read moreI ordered my Medit scanner from them in Feb 2020, so far no issues with support or the product. They are a great company with great support. Disclosure: they did promise me a scanner tip for this review, but in all honestly I was meaning to give it to them anyway.... if you are looking to buy, this is a great way to go about it.read less - 7/19/2020
Barton Davis
Every time I need support for my scanner, the Cad-Ray team is there to help. I recently had a question on how to manipulate a scan and export it back to Medit Scan. Damien logged in and helped me out. Problem solved in under five minutes. Awesome ser...read moreEvery time I need support for my scanner, the Cad-Ray team is there to help. I recently had a question on how to manipulate a scan and export it back to Medit Scan. Damien logged in and helped me out. Problem solved in under five minutes. Awesome service. Thanks Cad-Ray support team!read less - 3/04/2022
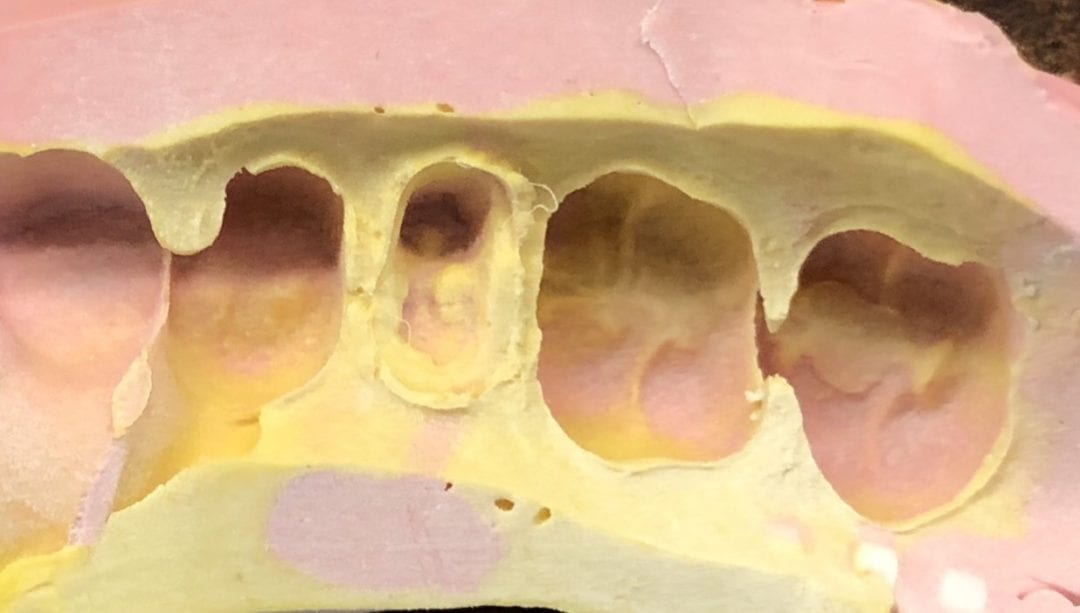
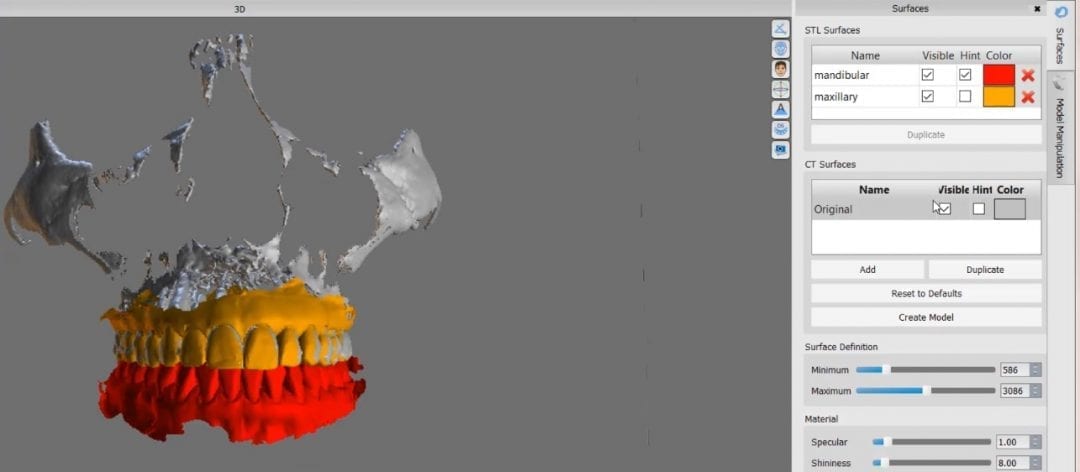
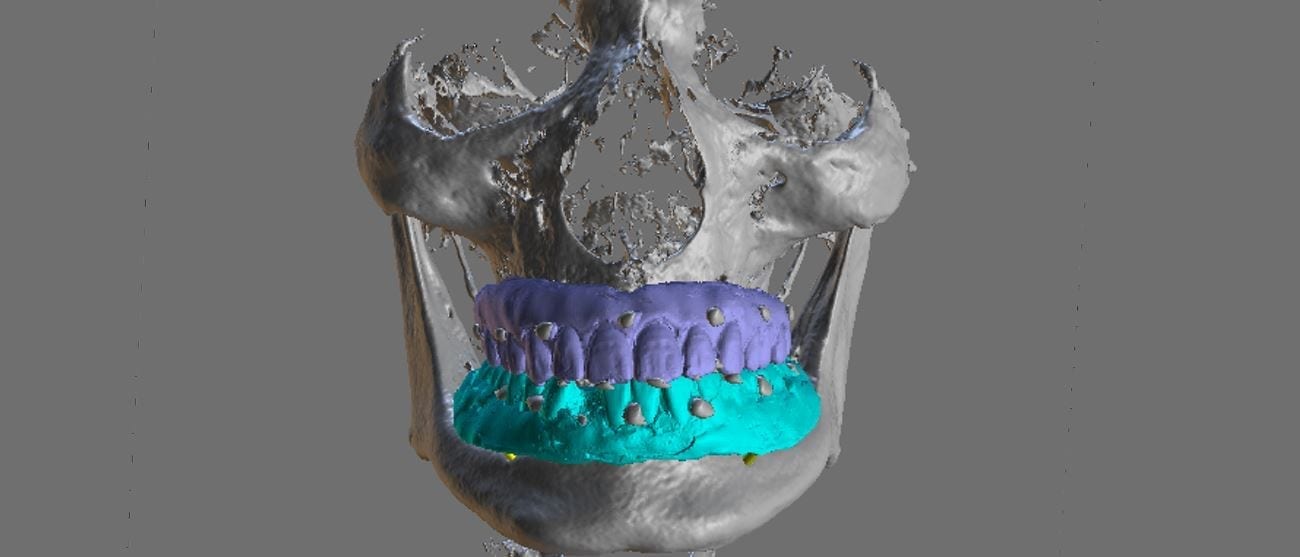
When planning for guided surgery in edentulous patients, it is important to have the final vertical dimension and tooth position determined. Ideally, a denture duplicate should be used with proper radiographic markers.
The traditional way was to embed radio-opaque material in the denture dupe, CT scan the patient with the denture dupes, and then CT scan the denture dupes themselves. Alternatively, you can scan the denture duplicates with a digital impression system. Here we used flowable composite and spread them through the wax set up and take a 3D X-ray of the patient. We then use those landmarks to merge the data sets between the digitize denture and the markers on the CT Scan
Once the dentures are digitized and merged with the CT data, the cases is analyzed to make sure there are no gaps in between the intaglio of the denture and the soft tissue of the palate and the lower / mandibular ridge
An important concept to keep in mind for these edentulous cases is that you actually need 2 models for each arch. One model is used for tooth positioning and implant design, and the other model is used for stent design. Essentially, you design the stent on the ridge, not the denture dupe
One of the biggest hassles in most software is to plan a guided surgery case when the tooth is still present in the arch. Some software will force you to part-take in pylon course handling, gymnastics maneuvers, musical chairs, and multiple imports and exports. The issue revolves around the placement of the sleeve / ring in the design step. Usually you are forced to manipulate the data in 3rd party software and then bring it back with the tooth virtually extracted.
This article is about how you can scan the arches and export the STL, OBJ, or PLY data from the Medit i500 scanner. You can then clone the same case and alter it- namely, you can crop out the tooth that will be extracted in the future. This video shows you how the virtual extraction is performed.
The multiple data sets are then imported in BlueSkyBio software where there are no limits to the number of models you can bring in. In the following video, you can see how the complete upper arch, the virtually extracted lateral arch model, and the opposing are brought in an merged with the CT Data.
The implant is planned for fully guided procedure and a surgical stent is manufactured on the model that has the virtual extraction. You cannot design a stent correctly with the tooth present in the equation. Open architecture and speedy results are the name of the game now with CAD/CAM dentistry. As you can see, these steps are super fast and easy with the open licensed Medit Scanner
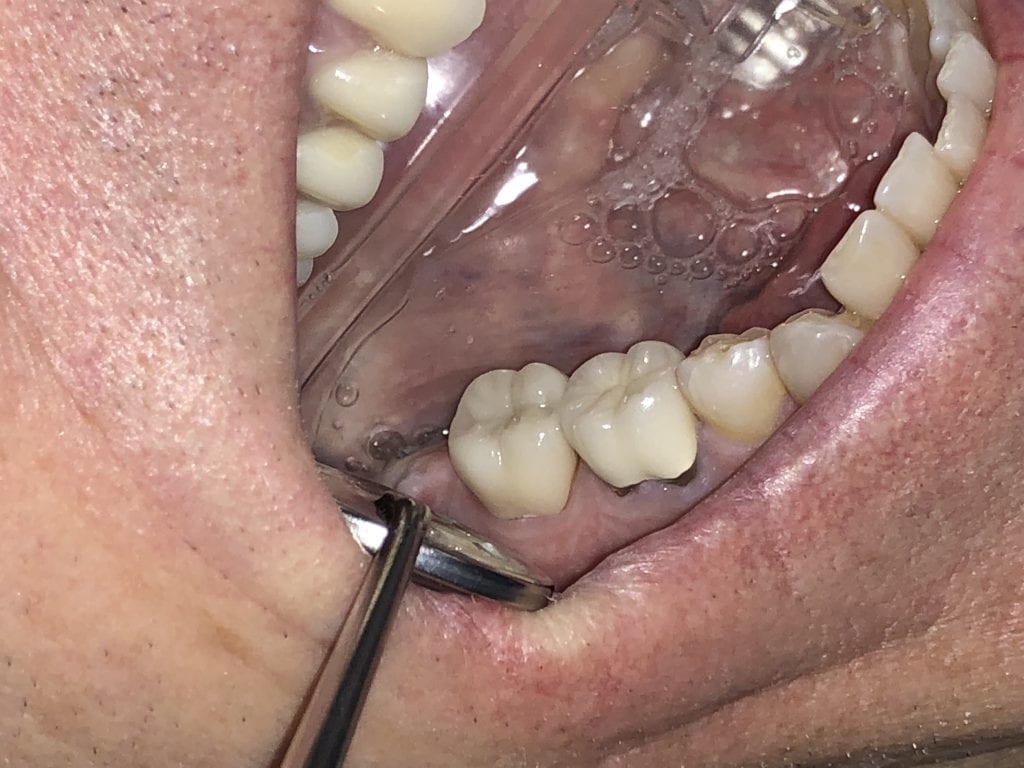
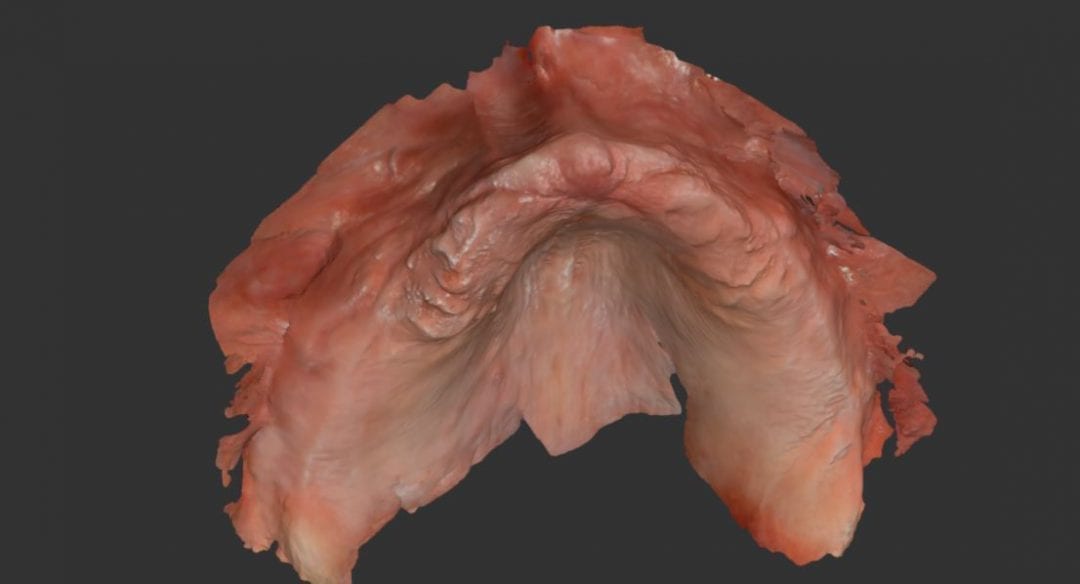
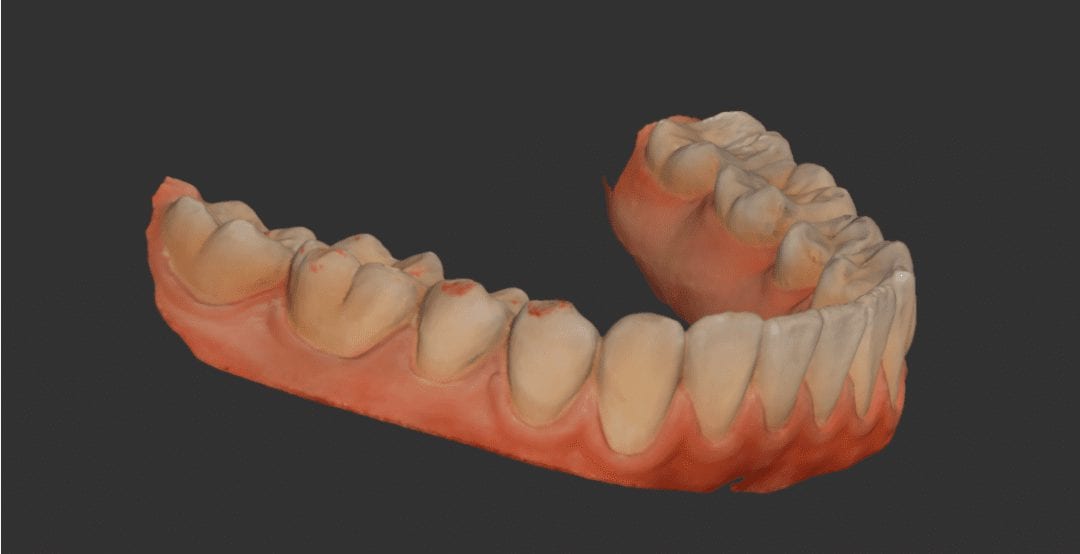
This article documents how to capture upper and lower scans for an oral appliance to treat obstructive sleep apnea. The patient was recently diagnosed with mild sleep apnea with a Home Study Test which revealed quite a lot about his sleeping habits and patterns.
The patient decided to pursue treatment with an oral appliance in lieu of CPAP therapy. Upper and lower impressions were taken, and the occlusal relationship was captured in protrusive and with the vertical dimension set a a tolerable distance. Cotton rolls were used to block out the movement of the tongue which usually interferes with capturing the bite.
Once the bite is captured, we recommend that you move back to the maxilla and mandible catalog box and take additional images to complete and remaining voids in the model. At the end of the article, you can download in multiple formats to see the meshwork and the data that is rendered from the Medit i500 scanner.
Once the patient adapts to the appliance, a titration study will be conducted to measure the effectiveness of the oral appliance
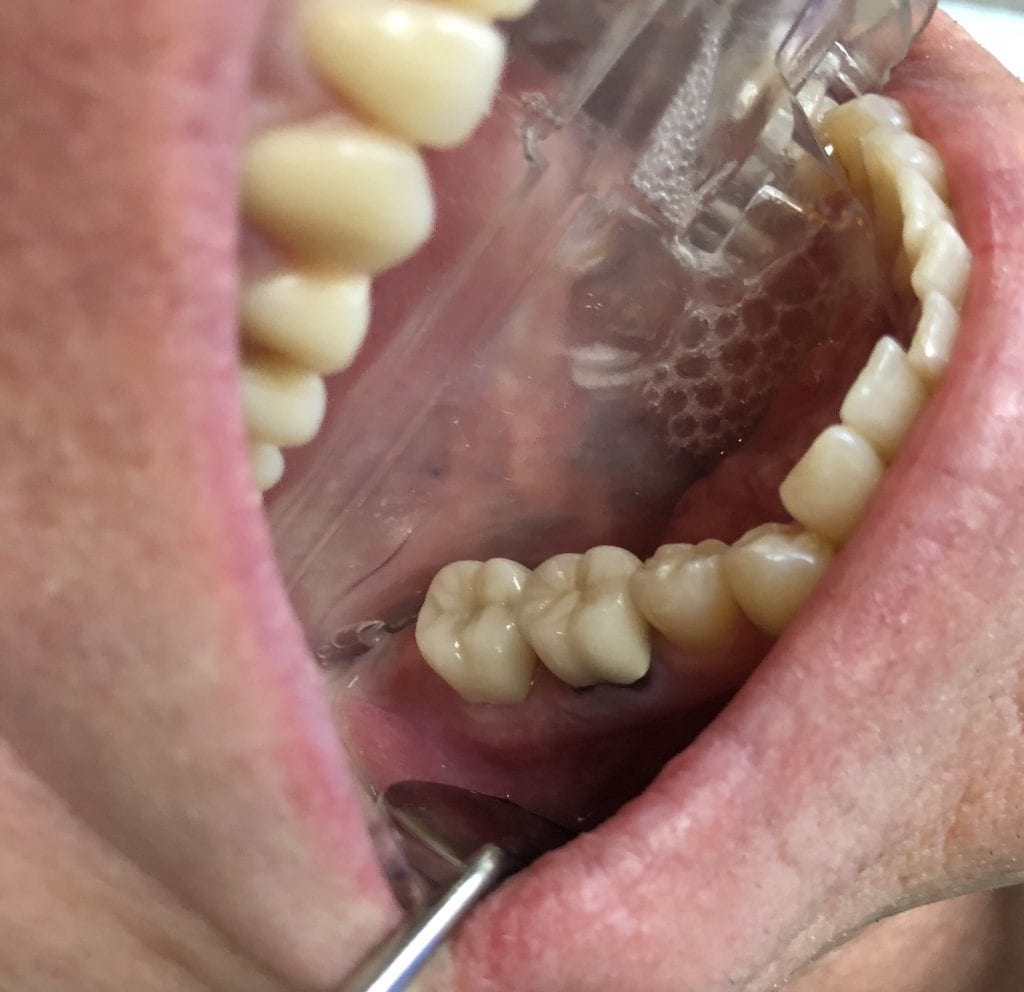
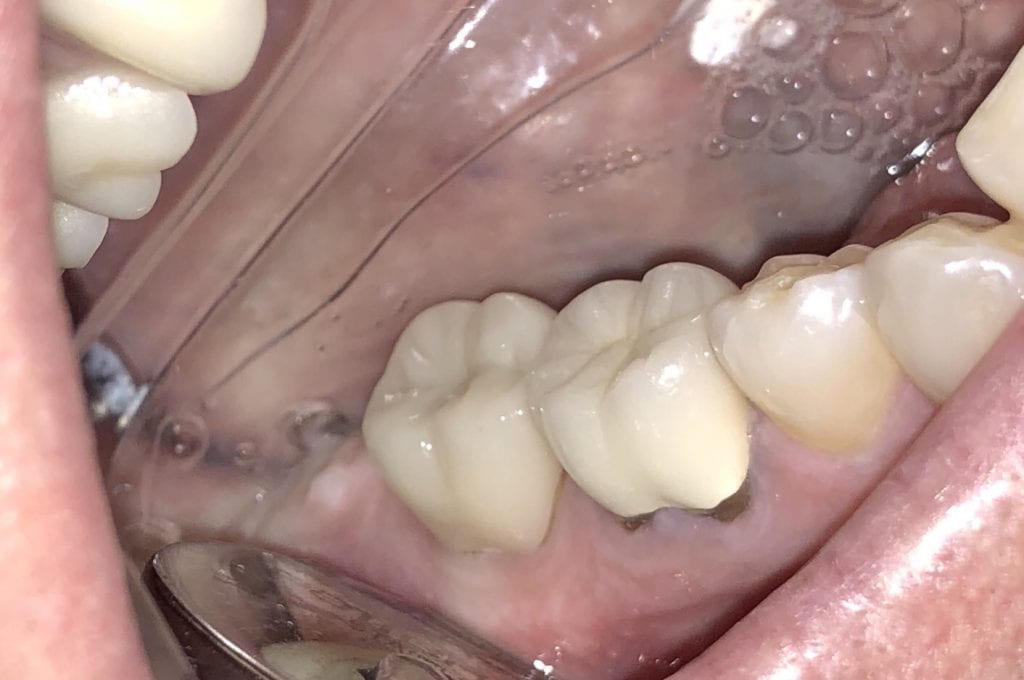
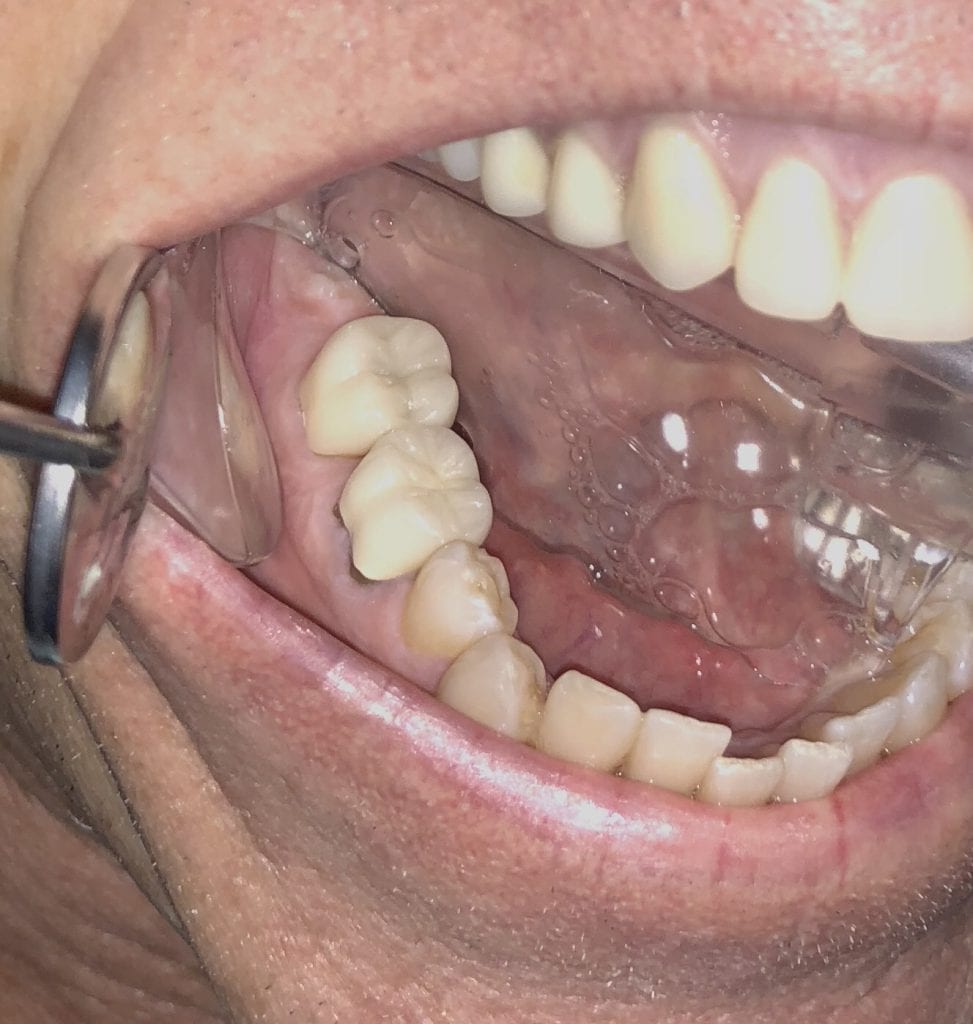
This is a case imaged for an occlusal guard, wehre the upper arch took only 43 seconds to capture. Afterwads, the lower arch is captured, and then ultimately we move to the dual buccal bite. To get enough clearance, we just have the patient bite down on two cotton rolls and hold that position.
One thing to keep in mind is that when you move from one image catalog to another, some processing is done. What we recommend you do is to actually go back to your upper and lower models and fill in any missing data or correct any artifact you may have captured inadvertently. You can see in the footage how the second molars are corrected and filled in with good information.
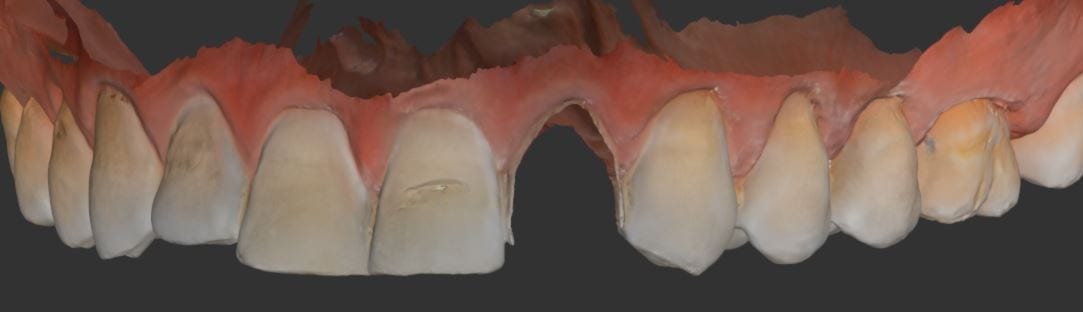
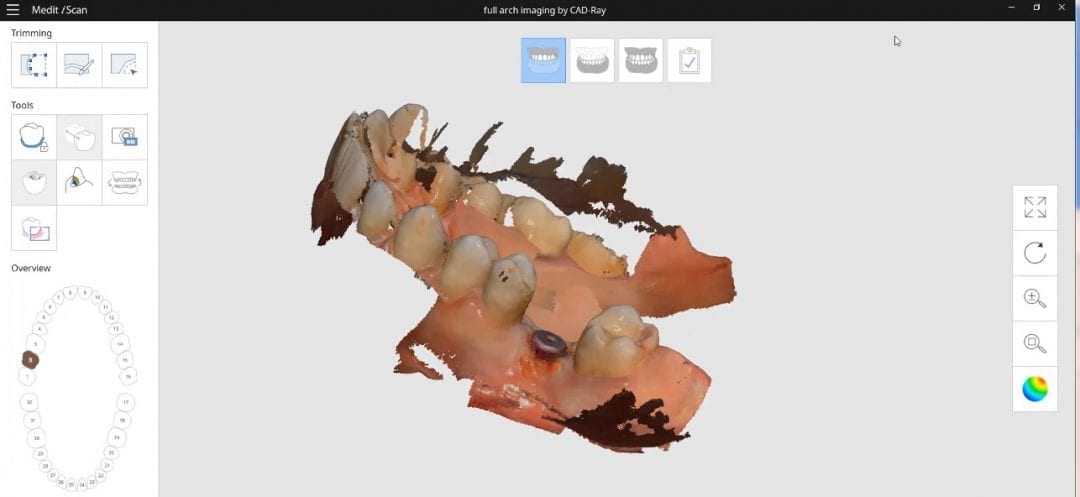
This case shows a full arch imaging where the model starts to go “off track”. To keep the explanation simple, the further away you get from multiple planes / heights of immobile structures, and the more you image in flat areas, you can inadvertently introduce errors in your models. You can see a sample case here in the video.
There is a very simple solution, as you can see in this video. It entails consistently moving back to reliable landmarks to stitch new information to exisitng correctly. If you notice how we start imaging on the occlusal of the premolars and the molars, then we roll to the facial of the molars and the back around to the palatal of the molars. Then we sweep over soft tissue on the palate. But we don’t continue in that direction. We immediately return to the molar area so the software has landmarks it can recognize.
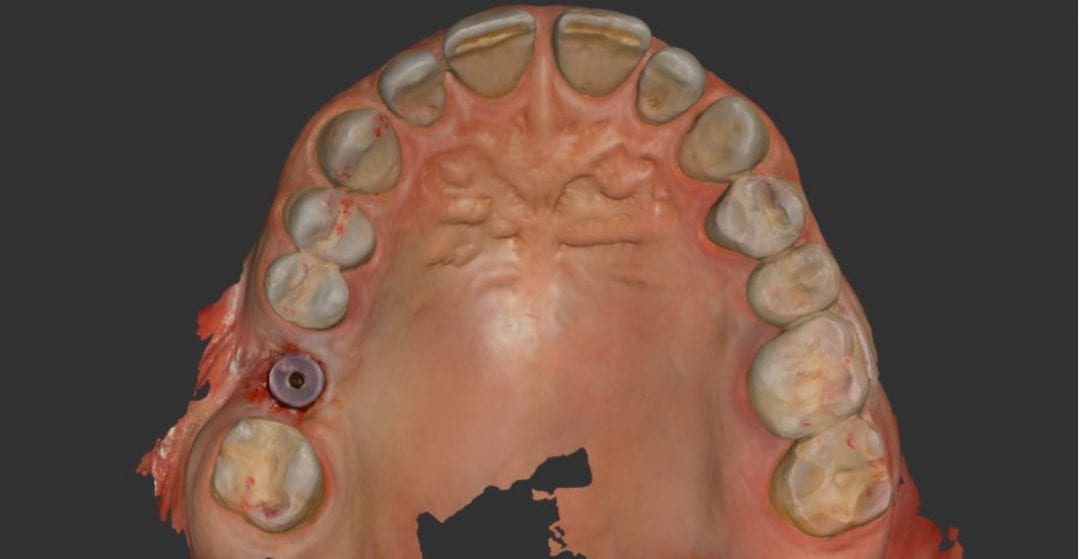
We then move the camera forward, image the palatal of the premolars, and then sweep back across the palatal midline. We repeat this back and forth movement to maintain a proper path for the software to recognize landmarks that do not move, in the equation. With this technique, you can scan a whole upper arch in just a couple of minutes and capture great details of the dentition and the soft tissue on the palate
[videopress VVEbeoWs permalink=”false” hd=”true”]
Here, you can see how the software rendered a perfectly accurate and detailed upper arch with the palatal vault captured without any errors.
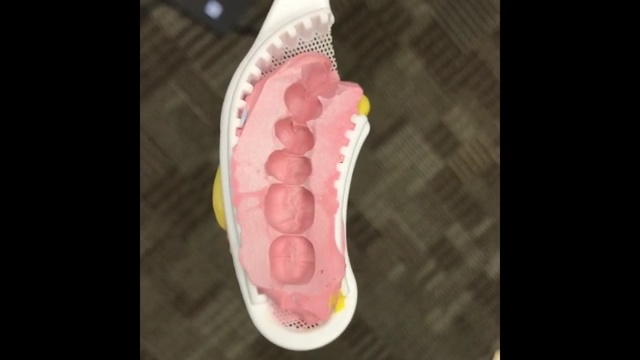
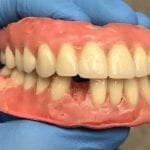
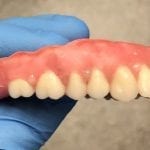
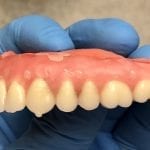
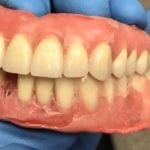
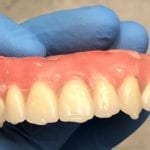
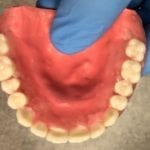
A common question we get at CAD-Ray is if we can duplicate a denture with the Medit i500. It works, and takes about 5 minutes. You can then instantly export the STL, OBJ, or PLY file and take it to any software you want and design cases, print denture duplicates, or use it to set the vertical dimension of a case you are working on. If you capture the lower arch in occlusion with the upper arch wit the buccal bite, you an very accurate articulate edentulous arches to each other, get the right vertical dimension, and start your case planning. This denture dupe can also aid you with setting the teeth and their incisal edges in the correct position
You have to be aware of the fact that you may introduce errors in the process so you have to image properly to reduce those errors. Here is some footage on imaging the denture. We do think scanning this with the desktop scanner, the Medit T500 is a more practical approach.
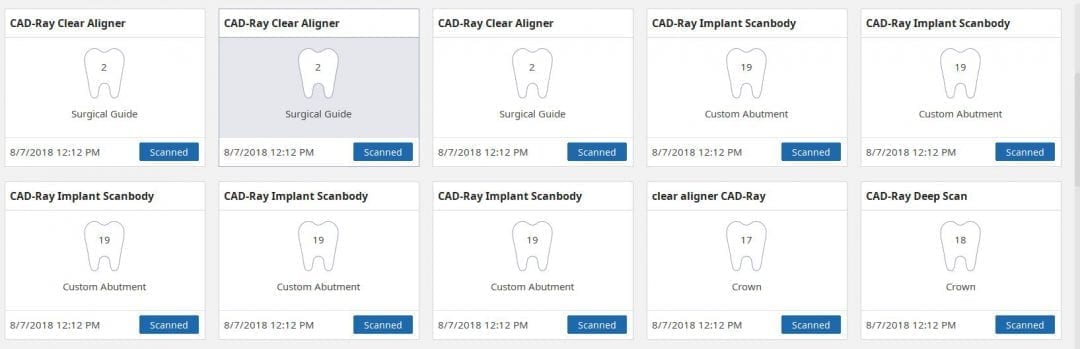
Once an case is captured and processed, it is stored in the MeditLink Box of the software. You can open the same case file and apply different functions to it. You can clone the case, so that nothing is altered from the last step. You can delete it and rescan, or you can add new data to the equation.
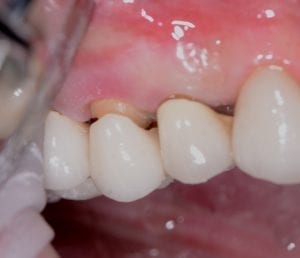
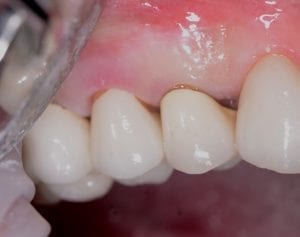
This simple second molar restoration was imaged with the Medit i500. There was no retraction used and the lab worked with the OBJ file to render an eMax restoration. The fit to the margins was perfect and the occlusion and contacts were not adjusted. The benefit of digital impressions is the dramatic reduction in redos!
A frequent question we receive at CAD-Ray is if the Medit i500 can scan edentulous arches. You can certainly introduce errors in the process, but if you follow proper guidelines, you can easily render accurate models. The trouble starts with long span areas that are flat and edentulous and the mesh from one image to the next doesn’t quite line up properly and you veer off track. There are a lot of remedies for this and we detail it in our hands-on courses.
Here is a quick video on how to manage these large cases.
Most Intra-Oral Scanners take time to process the models after you capture them. We highly recommend that you take advantage of the time it takes the patient to get numb. In the first video, you will see how the upper arch, the lower arch, and the buccal bite are taken in real time. There is no editing done and you can see the scan time in the upper left corner. Once you hit save, the software will “clean up” the data and remove artifact and render clean models. As it is saving, you can start your preparation after proper isolation and retraction. Here, the optragate was used in conjunction with the Isolite.
[videopress nAf3CNq6 permalink=”false” hd=”true”]
Once the preparation is finished and the tissue is retracted, you can bring the model back to the appropriate scan stage, edit out the area that was modified and the rescan just the area that has been altered. In this video, you can see how just the prepared tooth fills the cropped model. Once finished, when you hit save, there is little processing left for the software to do.
[videopress 40J5lqGx permalink=”false” hd=”true”]
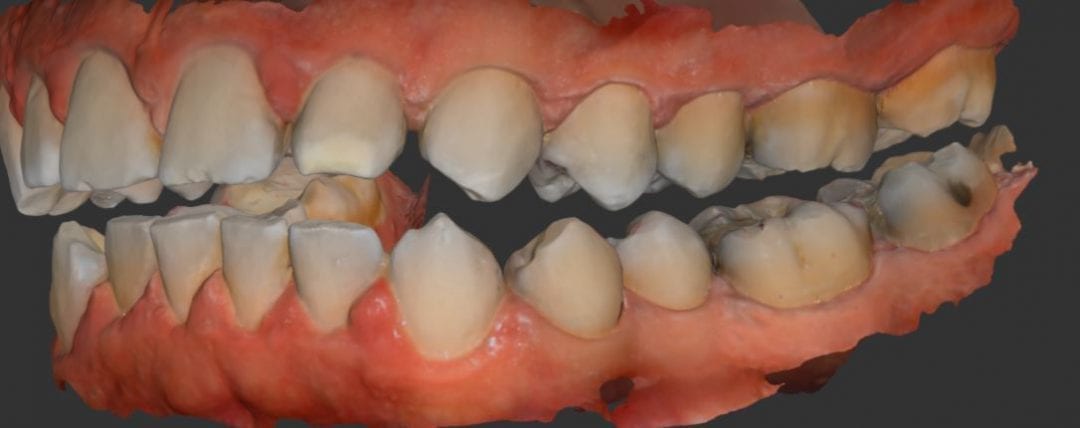
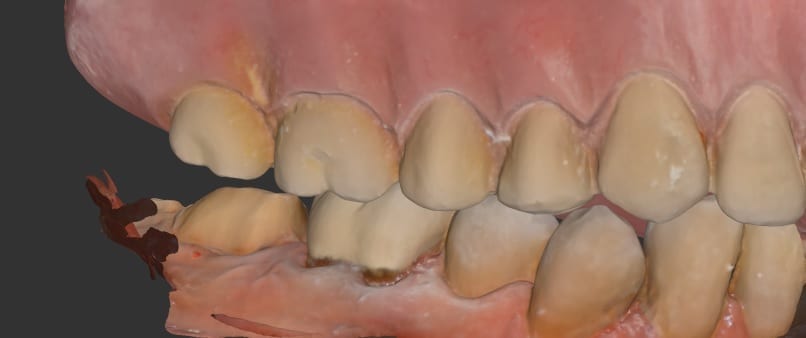
Another example of how well the i500 from Medit can scan with a deep focal length. This is impossible to do with any other IOS system on the market. Don’t misunderstand, this is not an easy impression to capture, but if you are well trained and know what you are doing, it’s very accurate and simple.
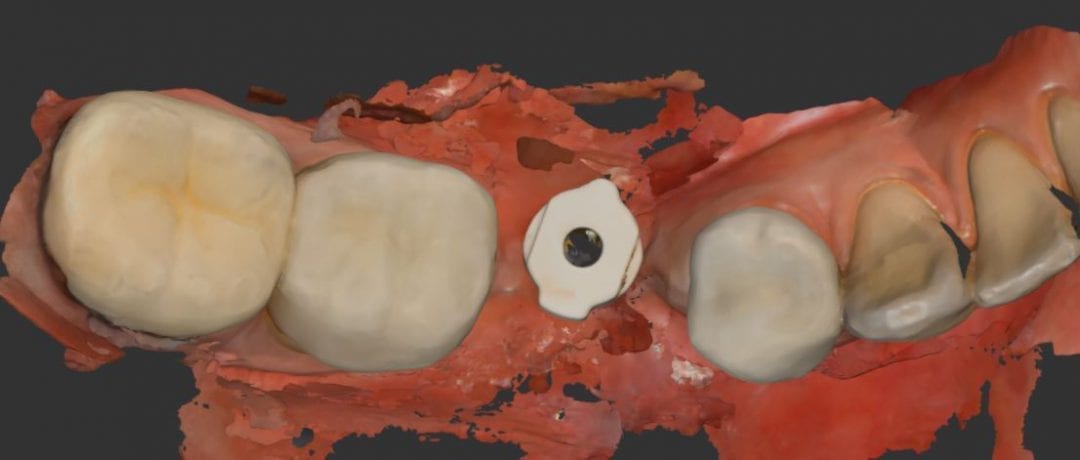
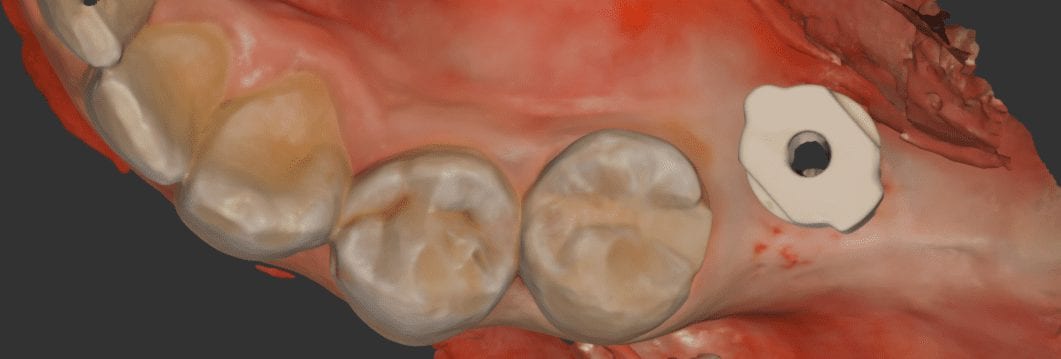
In this video you will see how the upper arch is captured in under a minute. Then the lower arch is capture with the healing abutment removed. Watch carefully how there is a lot of effort made to capture the distal wall / contact area of the bicuspid. You can also see the effort made to capture information below the height of contour of the distal molar. The mesial information is critical for designing the emergence profile of the abutment and restoration
[videopress 2Di5fUxy permalink=”false” hd=”true”]
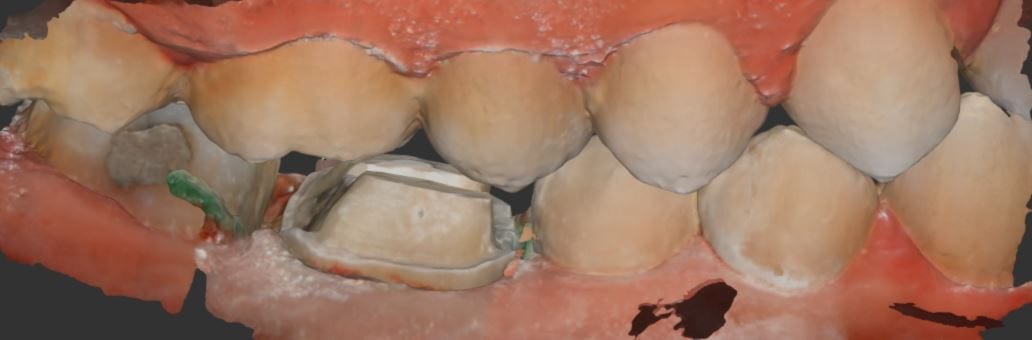
After both arches are captured, the software leads you to the step where you capture the peek impression post. It is seated completely and an X-ray was taken to verify the accuracy. The edentulous area where the abutment would be positioned is cropped on the Meditlink software, and the impression post is scanned. It is imperative to make sure the adjacent teeth are imaged so the software can properly line up the landmark of this scan with the previous scan of the edentulous mandible.
After the Peek Scan Body for a Narrow Platform is imaged, it is removed, and the patient bites down into maximum intercuspation. The camera then captures the data so that it can articulated the models together. The buccal bite scan turns green once a positive adaptation is made.
[videopress LF2bvJPR permalink=”false” hd=”true”]
Once the relationship of the upper arch and the lower arch are confirmed, the case can be submitted to a lab for the manufacturing of a custom abutment. You also have the choice of fabricating chairside abutments with a milling machine, if you choose to.
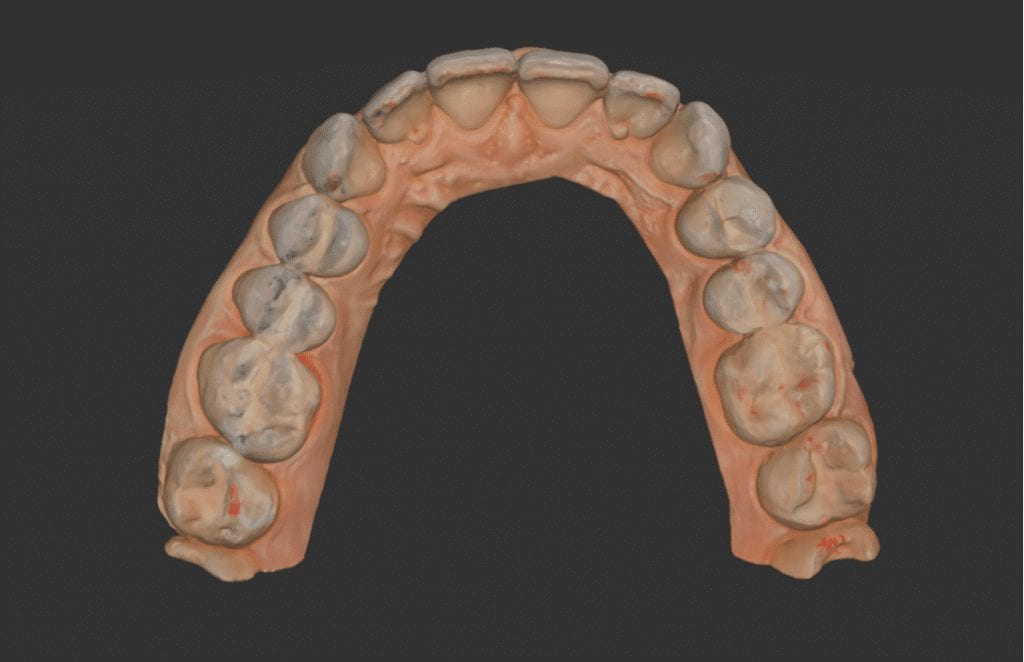
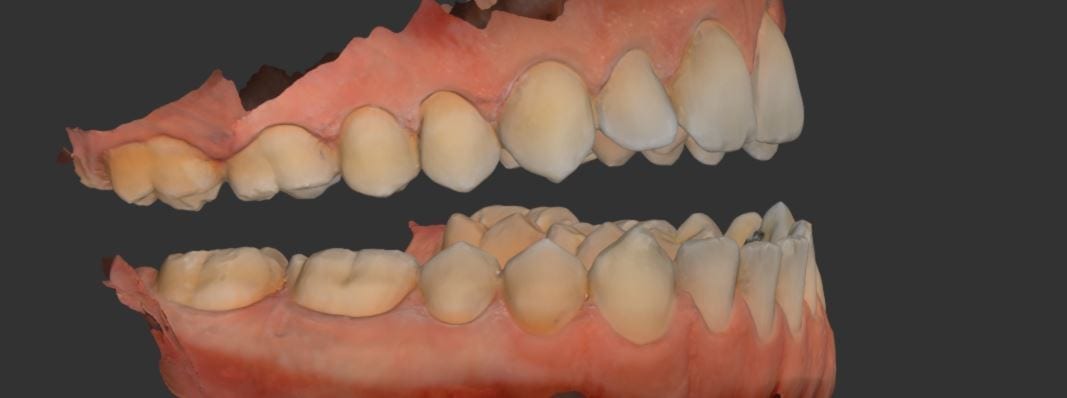
This is a case that demonstrates how a full arch scan is taken with the Medit i500. We generally recommend that you establish a good “purchase point” where you can always come back to if you get “lost during scanning”. It is very easy to start with the second premolar / first molar area by scanning the occlusal area. Migrate towards the last molar and then image both the buccal and lingual of the last molar.
These landmarks will help you get re-oriented if the patient moves or you need to stop for whatever reason. You will notice how fast the camera scans once it has these solid landmarks to recognize, and you can see it image from the palatal of the second molar from one side of the arch to the next.
After the upper arch is imaged, scans of the lower arch are taken, and then the buccal bite is captured. You will notice areas where some data is missing on both arches. It is really easy to go back in the process and fill in those areas. You can see that at the tail end of the video.
Once the case is captured, you can export the file and take it to third party software like BlueSkyBio Ortho Plan and start your clear retainer designs.
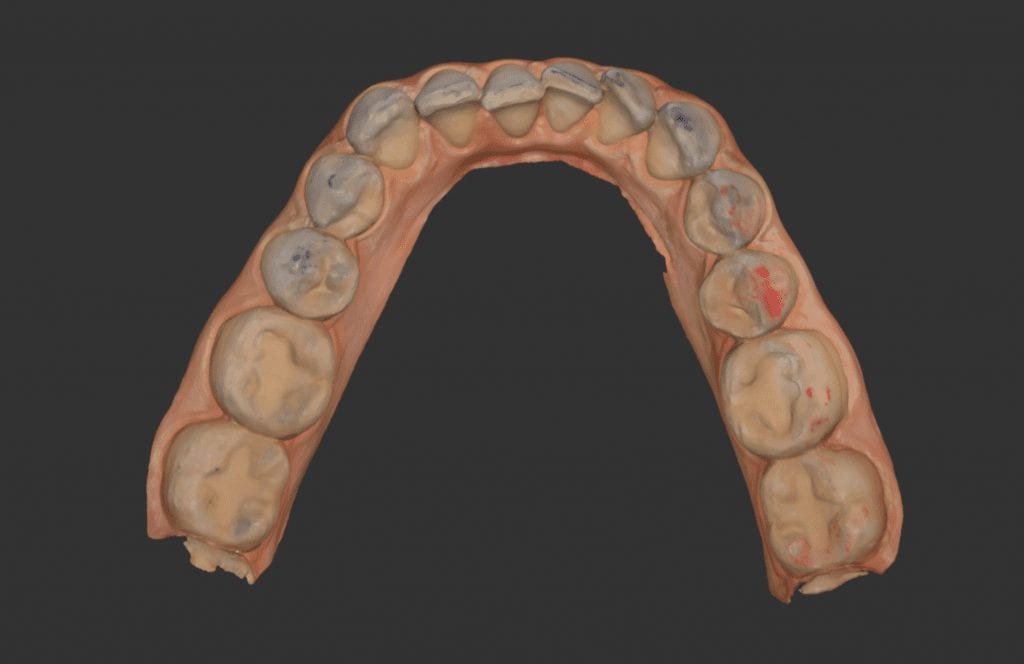
In this particular clinical case, the patient has opted to utilize clear aligners to straighten some anterior crowding. The Medit i500 was used to capture both the upper and lower jaws, and articulating paper was used to marked the clinical contact points.
The data was then taken to BlueSkyBio’s Orthoplan for design
[videopress R4wUvdiI]
In this video, you can see how we verify the accuracy of the occlusal contacts. In the software, you can open the articulated arches and look for contact points made digitally and you can compare those to the clinical marks left with articulating paper.
Once you are satisfied with the models and the correct occlusal scheme, you can export those models in STL, OBJ, or PLY formats and import them into a third party software. Here, we have them imported into BlueSKyBio Ortho Planning software. Download the case files and design along
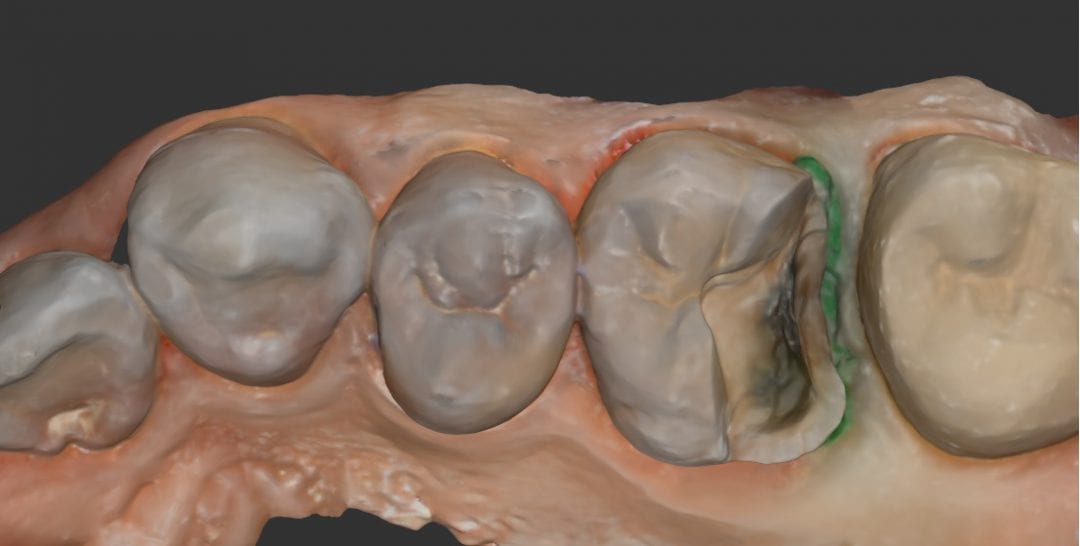
This is a case presentation of a onlay preparation on an upper first molar. The area was isolated with the optragate and the isolite after anesthesia. After a little refinement, a green colored retraction cord was placed to displace the tissue from the gingival margin.
The attached video is unedited to show you exactly how long it takes to image a quadrant with the Medit i500 intra-oral scanner. You see an image counter and a clock in the upper left corner. First the prepared arch was captured. Notice how the camera is angled to capture all of the contact area on the second molar, below the height of contour. There are some areas that are not clinically relevant and less time was spent imaging those landmarks (palatal and lingual areas that will not have an impact on the restoration design).
After the upper arch was captured, the lower arch setting was selected and the camera was activate to image the mandible. The isolite allows you to image both arches with great ease. Once the lower arch was imaged, the isolite was removed and the buccal bite was captured and the case was processed
Another case delivered with the triple tray technique and the MeditT500 desktop scanner. The H&H technique was used to capture the margins and bite and there were no adjustments made to the contacts or the occlusion after delivery of the crown.
The scan, design, and fabrication was done by Burbank Dental Lab
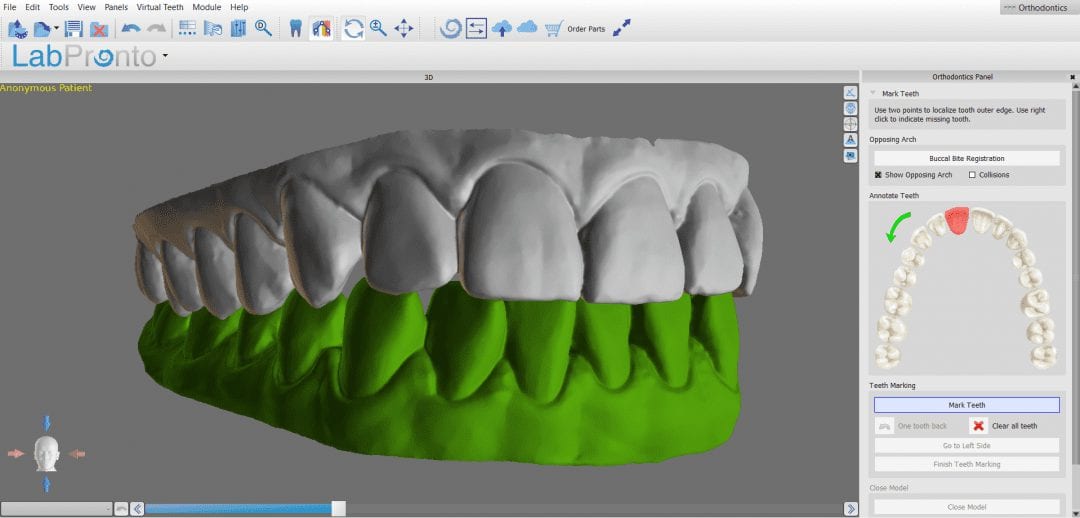
When you scan an upper arch and a lower arch with an intra-oral scanner and then export that case, usually the software places coordinates on the upper and lower models, so when you import them into another software, they properly articulate.
In this video, you can see how the upper arch is stitched to the CT image of the maxilla, an then how one can easily related the mandible stl file to articulate to the upper arch. This comes in handy in software like BlueSkyBio where you could add teeth to the equation and design implants so that they are prosthetically driven during the design phase.
In this video, you can see how a quadrant of the lower arch and the upper arch can be imported into a third party software for design. Note that in this particular demonstration, there is not edentulous area and this video just demonstrates how you can place a digital tooth in your case and design the digital wax up to your liking. Advanced users generally just use the sleeve of the surgical stent to aid them in visualizing the occlusal table of the final prosthesis. A complete design lets you know where the contacts are and how much space you need to create the proper emergence profile.
There are multiple ways to adjust a model with refined tools like the Polyline Trimming, the Brush Trimming, and the Quick Trim feature. You can see all of them in action in the video.
PolyLine Trimming allow you to circumscribe an area that you want to remove. You start with a left click, delineate the area you want removed, and then right click to get rid of the data you don’t want included in your models.
Brush Trimming has three separate settings and it is a very effective way of removing data in incremental steps. it allows for real fine adjustments.
Quick Trimming removes data that is not part of the model, like an island of floating data. This usually happens when the tongue gets in the way of imaging, and if it happens enough times, the software starts to thing it is part of the equation. if you click on data points that are indeed attached to the rest of the model, you will delete the whole model. You can see that happening in the video attached.
It’s not a big deal if you inadvertently trim areas away as you can undo each step and get back to your point of origin


 [videopress SYc88hMJ]