The Medit i700 is a game changer in speed and overall comfort for patients. I find it much smaller than other brands and have done almost 50 appliances/aligner cases the past 2 months with no fit issues from my lab. Love this scanner!
Dr. Sherric...read moreThe Medit i700 is a game changer in speed and overall comfort for patients. I find it much smaller than other brands and have done almost 50 appliances/aligner cases the past 2 months with no fit issues from my lab. Love this scanner!
Dr. Sherrick
Auburn Lakes Orthodonticsread less - 8/24/2021
Fantastic Scanner. Has changed the way I practice dentistry. Opens up more time in my schedule and opens up new methods to allow for more consistent, satisfactory results. Customer service is fantastic. Feels like friends are on the other side of the...read moreFantastic Scanner. Has changed the way I practice dentistry. Opens up more time in my schedule and opens up new methods to allow for more consistent, satisfactory results. Customer service is fantastic. Feels like friends are on the other side of the phone. Good work CAD-Ray!read less - 12/08/2021
jeremiah choi
Never had customer care like Cad-Ray, you can't go wrong purchasing through them. Trios is a great scanner. All the reps at Cad-Ray are very knowledgeable and helpful and will make sure you are up and running smoothly. Above and beyond customer serv...read moreNever had customer care like Cad-Ray, you can't go wrong purchasing through them. Trios is a great scanner. All the reps at Cad-Ray are very knowledgeable and helpful and will make sure you are up and running smoothly. Above and beyond customer service.read less - 8/27/2022
W are an Oral Surgery practice. We started treating TMD patients with the Urbanek TMJ device and decided to switch from impressions to a scanner. We have no past experience with using a scanner. Ryan was very nurturing and patient. Though we are no...read moreW are an Oral Surgery practice. We started treating TMD patients with the Urbanek TMJ device and decided to switch from impressions to a scanner. We have no past experience with using a scanner. Ryan was very nurturing and patient. Though we are not ready to make the switch, we are well on our way. Looking forward to our next session.read less - 11/21/2022
Artin Sakhaee
The support is even better then the camera itself. I used many other scanners and this is by far the best one. Recommended to many people. Looking to purchase a second one for my practice. The use and results are amazing. No adjustments to the p...read moreThe support is even better then the camera itself. I used many other scanners and this is by far the best one. Recommended to many people. Looking to purchase a second one for my practice. The use and results are amazing. No adjustments to the prosthetics at all.read less - 7/15/2020
Lance Timmerman
Implant Planning Services Review I Am VERY experienced with "another system" but thought I would give CAD-Ray a try. At at LEAST 1/3 the fee, why not?
VERY happy. Fit GREAT, surgery was uneventful (the best kind) and I am a believer! This is a great company and great PEOPLE to...read moreI Am VERY experienced with "another system" but thought I would give CAD-Ray a try. At at LEAST 1/3 the fee, why not?
VERY happy. Fit GREAT, surgery was uneventful (the best kind) and I am a believer! This is a great company and great PEOPLE too! 5 stars aren't enough. Just like the Burj Al Arab, this is 7 star!read less - 3/03/2015
Daniel Hwang
Fantastic scanner and best company to buy from. They make sure you are happy with your product. Armen, Frank, and team are the best. High recommendations for CADRAY and the i500. - 7/18/2020
STOP SEARCHING NOW!
Best bang for your buck scanner on the market. we have been using out medit for 8 months now. love our crowns, margins are fantastic. almost no adjustments needed at all. maybe one in ten crowns might have to adjust mesial or...read moreSTOP SEARCHING NOW!
Best bang for your buck scanner on the market. we have been using out medit for 8 months now. love our crowns, margins are fantastic. almost no adjustments needed at all. maybe one in ten crowns might have to adjust mesial or distal to get crown to drop in. occlusion is always spot on. patients love the technology and WOW factor -"SOOO COOOLLL." customer service is great also! dont waste your money on anythign else. our lab even comments on how easy it is to deal with medit and how good the scans are. they recommend it to their other doctors now as well.read less - 10/09/2019
Our orthodontic office is new to scanning and printing, but CAD-Ray, Laura, Medit, and SprintRay have made the whole transition a huge win. Our first scan and print was cleaner than any traditional impression/pour up we've ever produced. On our first...read moreOur orthodontic office is new to scanning and printing, but CAD-Ray, Laura, Medit, and SprintRay have made the whole transition a huge win. Our first scan and print was cleaner than any traditional impression/pour up we've ever produced. On our first full clinic day, we scanned 14 arches and managed to stay on schedule! We were waiting for this technology to be affordable, fast, accurate, and reliable, and we can now say we are there. Thanks for all your help and ongoing support.read less - 6/25/2021
These guys are ALWAYS there to help if you get stuck. I’ve been happy with the mill (coritec one) and scanner (i500) I bought from them 2 years ago. I’d do business with them again. - 7/01/2021
Nolan Andrews
They all go absolutely above and beyond in all aspects. Whether it's tech support, products, CE, everything. Everyone I have dealt with has been wonderful. Love these guys! - 6/19/2020
Alexandra Lentz
Cad-Ray has been awesome to work with, very knowledgeable and quick to respond. Nick has been answering all my questions since day 1 and made the entire process of purchasing the Medit i700 a breeze. Can't believe how quick the product shipped and ca...read moreCad-Ray has been awesome to work with, very knowledgeable and quick to respond. Nick has been answering all my questions since day 1 and made the entire process of purchasing the Medit i700 a breeze. Can't believe how quick the product shipped and cannot wait to start scanning with it!read less - 12/15/2021
I purchased Medit scanner few weeks ago . Frank and Nick have been really excellent answering my questions promptly. The scanner itself is wonderful with no back fees , customer service is top notch. The entire team works fast and helps you out. I st...read moreI purchased Medit scanner few weeks ago . Frank and Nick have been really excellent answering my questions promptly. The scanner itself is wonderful with no back fees , customer service is top notch. The entire team works fast and helps you out. I strongly recommend this scanner!read less - 6/17/2020
I purchased my Medit i500 scanner almost a year ago from CAD-Ray. Laura and the team there have been so responsive and ready to help. It is so nice to have a person answer the phone and be willing and able to assist! - 12/09/2021
Paul Crespo
Cad-Ray has been instrumental in implementing and supporting our experience with scanning. Having scanned previously with other services I can truly say that Cad-Ray takes their clients very seriously and will not leave you hanging. They set the ba...read moreCad-Ray has been instrumental in implementing and supporting our experience with scanning. Having scanned previously with other services I can truly say that Cad-Ray takes their clients very seriously and will not leave you hanging. They set the bar very high. Cad-Ray all the way!read less - 12/09/2021
Ed Borio
I was dragging my feet before purchasing my first scanner because I was apprehensive of the effort required to change to a digital workflow. Laura assured me my fears were overblown and because of her patience and exceptional training abilities it h...read moreI was dragging my feet before purchasing my first scanner because I was apprehensive of the effort required to change to a digital workflow. Laura assured me my fears were overblown and because of her patience and exceptional training abilities it has been a rewarding and relatively seamless transition to the world of scanning. I never dreamed implementation would have been this easy and its attributed to Laura's skillful training ability. The scanner is wonderful and powerful, but we would have never been able to unlock its potential without her assistance.read less - 5/07/2021
Cody Kriegel
Frank and the Cad Ray team have been nothing short of amazing. I continue to purchase digital equipment from Cad Ray because their support is unlike any in the dental industry. Frank has been instrumental in helping my team get the most out of our pr...read moreFrank and the Cad Ray team have been nothing short of amazing. I continue to purchase digital equipment from Cad Ray because their support is unlike any in the dental industry. Frank has been instrumental in helping my team get the most out of our products.read less - 1/25/2023
Jamal
I recently made a purchase from Cad-Ray and the experience was truly outstanding. From my initial enquiry, Nick was incredibly supportive and knowledgeable, answering all of my questions thoroughly and guiding me to the product that would best meet m...read moreI recently made a purchase from Cad-Ray and the experience was truly outstanding. From my initial enquiry, Nick was incredibly supportive and knowledgeable, answering all of my questions thoroughly and guiding me to the product that would best meet my needs. What really set this experience apart was his non-pushy approach. Nick showed genuine interest in understanding my specific requirements, ensuring that I would be fully satisfied with my choice. This type of customer service is rare and it made the whole process much more enjoyable. I can confidently recommend Cad-Ray to others not just for their high-quality products, but for their exceptional customer service. A big thank you to Nick and the entire Cad-Ray team for their professionalism and dedication.read less - 5/17/2023
Eric Turner
I bought my Medit from Cad-Ray a little over a year ago. The very few times I've needed any kind of help with it, Cad-Ray has been absolutely ON IT. Issues get completely resolved within minutes. It's great!! - 11/01/2021
Cole Smith
These guys are great. My favorite part about them is they set you up for success with your products. A lot of dental companies will be happy to sell you big ticket tech item but don't have much to set you up for success. I bought the Medit i500 and t...read moreThese guys are great. My favorite part about them is they set you up for success with your products. A lot of dental companies will be happy to sell you big ticket tech item but don't have much to set you up for success. I bought the Medit i500 and they have tons of videos on how to get it working and working well for you in your office. If you need a much of hand holding they have that our if you are like me and like the do it yourself videos they have that. I am sure you can buy these products all over but it is there service that sets them apart. If to are looking to buy some dental tech use these guys!read less - 6/05/2020
Jeff Keh
I love my medit i-500. Cad-Ray has wonderful customer support, I can not imagine getting a scanner from anyone else. Armen and Frank are great! Thanks again. Will recommend cad-ray to all my friends. - 6/16/2020
Rusty Fitton
Super happy with our purchase of the Medit i500 from Cad Ray. Overall its a work horse scanner that has handled anything weve thrown at it. The key to success with it is definitely taking the time to actually learn how to use it after purchase. Ca...read moreSuper happy with our purchase of the Medit i500 from Cad Ray. Overall its a work horse scanner that has handled anything weve thrown at it. The key to success with it is definitely taking the time to actually learn how to use it after purchase. Cad Ray has an immense library of straight forward education videos that are updated basically daily. I havent done the 2 day course but that is also included in the purchase. You really cant find that sort of service and education with any of the other scanners on the market. Id recommend them to anyone.read less - 6/26/2020
Chris Kleist
Cad-Ray is the absolute best if you're in the market for digital dental tools. I have purchased two Medit scanners through them. There will be hiccups with any complex piece of machinery, but every time I have needed Cad-Ray, they have been there. I ...read moreCad-Ray is the absolute best if you're in the market for digital dental tools. I have purchased two Medit scanners through them. There will be hiccups with any complex piece of machinery, but every time I have needed Cad-Ray, they have been there. I recently had a scanner go down. I called Cad-Ray tech support and they got me on the phone with Medit immediately. Within a day, a replacement scanner was sitting on my desk. It doesn't get much better than that.read less - 10/03/2024
Kristian Dietz
My wife and I practice together and bought our first i500 in August of 2018. This was very early on before Armen had a vast number of technique and online support articles in his blog! Little was publicly known at the time about this new scanner bu...read moreMy wife and I practice together and bought our first i500 in August of 2018. This was very early on before Armen had a vast number of technique and online support articles in his blog! Little was publicly known at the time about this new scanner but I felt confident in my purchase for a few reasons: 1) Armen had validated the product and was standing behind it... I knew of Armen from DentalTown and had many years of public posts to evaluate his character; 2) Limited demos available at the time; 3) some clinical accuracy data out of Europe that required zooming in on a powerpoint presentation that was recorded second-hand via camera phone ha! SO needless to say, I put a lot of eggs in the "Armen is standing behind this product" basket. We have NOT been disappointed. From personalized service from both Frank and Armen, to our vast success and joy using the product and deciding in late 2018 to buy a second Medit i500, I have nothing but good things to say about the product and Cad-Ray. What a bunch of self-less individuals. Armen has offered to remote in and I even took him up on the offer once and he remoted in immediately to take a look at something. Good luck getting service like this from ANYONE else in the industry. Cheers to digital dentistry with the RIGHT partner. Kristian C. Dietz, DDSread less - 3/08/2020
When I decided to purchase a digital scanner I decided on user experience. They have provided the best experience I could have asked for, from online support, Facebook support, and in person courses. There is no better team to buy Medit from period...read moreWhen I decided to purchase a digital scanner I decided on user experience. They have provided the best experience I could have asked for, from online support, Facebook support, and in person courses. There is no better team to buy Medit from period. Do yourself a favor and buy from them if you are in the market for an intraoral scanner.read less - 6/16/2020
Mital Patel
Cad-ray has been awesome with support and training! I got the medit in 2018 and couldn’t imagine practicing without it! Armen and frank somehow seem to be available at all hours of the day, and I can typically have them remote in same day if I need a...read moreCad-ray has been awesome with support and training! I got the medit in 2018 and couldn’t imagine practicing without it! Armen and frank somehow seem to be available at all hours of the day, and I can typically have them remote in same day if I need any help.read less - 6/16/2020
Robert Mabry
I don't scan in my practice my assist does. She says it's awesome. Better than the trios or cerecs we have had in the past. The image quality while designing cases is amazing. Haven't seated a restoration from it yet but expect it to be great as well...read moreI don't scan in my practice my assist does. She says it's awesome. Better than the trios or cerecs we have had in the past. The image quality while designing cases is amazing. Haven't seated a restoration from it yet but expect it to be great as well.read less - 6/16/2020
I have strong feelings about how great CAD-Ray has been. I purchased a medit i500 scanner from my lap, they wanted to use it for courses which aren't happening now so he didn't want to be sitting with this expensive piece of technology sitting aroun...read moreI have strong feelings about how great CAD-Ray has been. I purchased a medit i500 scanner from my lap, they wanted to use it for courses which aren't happening now so he didn't want to be sitting with this expensive piece of technology sitting around. Before purchasing he and I both talked to the Nobel sales rep who assured me that everything would transfer over just fine. I was concerned about the learning curve and wanted to be sure that I would have tech support. I asked the rep directly and he assured me again that everything would be great and he would come do an in-depth training with me. Long story short, the sales rep had no clue what he was doing and put very little effort in to helping me once the purchase was complete. I asked him over the phone how to do a few things and his response was to call CAD-Ray. They explained that this happens, they would love to help me but asked that I purchase the service package. That was a game changer. Now all of my questions getting answered, their response time is amazing and their understanding of the machine is by far better then the Nobel reps. The scanner is great but combine that with their tech support and I feel like I'm set up for success. If I were to do this again, I would skip the headache of trying to save a little bit of money and purchase it through CAD-Ray. But even with making the mistake, I feel like they have programs and support set up to point me in the right direction.read less - 10/15/2020
Francois Dillinger
These guys are the best. They provide so much help and insight with the Medit. I can't say enough great things about them and their continued support. I truly appreciate everything!! - 6/16/2020
Brent Hale
Been using my i700 for a month now and it's been great. The tutorials that Cad-ray provides have been very helpful. This scanner with a fast computer turns out great results. - 11/01/2021
Last year when I started looking into the Medit i500 I had my front desk call 3 sellers to get preliminary information. She told me hands down call CAD-RAY and don’t bother with the others. Boy was she right! Frank got us going with all our hardware ...read moreLast year when I started looking into the Medit i500 I had my front desk call 3 sellers to get preliminary information. She told me hands down call CAD-RAY and don’t bother with the others. Boy was she right! Frank got us going with all our hardware needs and trained us until all our questions were answered. Then Jonathon and Armen jumped in at our 2 day live training in Baltimore. I still review my notes to implement all the great ideas. When I get myself in a jam time to time CAD-RAY responds immediately and fixes my problem. Best decision I have made in the practice in a long time - Thank you everyone at CAD-RAY!read less - 10/09/2019
I purchased a SprintRay through them. I'm new to the 3D printer realm and they've been great with answering my questions and getting me set up. I've just really have been impressed with the quick responses, its much appreciated, thank you! - 4/20/2022
Steven Oshins
I've been fortunate to have had the opportunity to work with Frank DeLuca this past year. He is always pleasant, willing to help, responsive to my questions and extremely knowledgeable. I highly recommend Frank!! - 12/16/2021
We have been using the Medit i700 for about a year now. Frank and his customer service team has made it a smooth transition. He is always quick to reply and is friendly and professional! - 1/26/2023
Northwest Orthodontics
Every staff member has been very helpful and kind every time we call. Thank you! - 7/24/2024
Faisal Mir
Exceptional customer service! - 4/11/2025
Peipei Yu
I purchased a Medit scanner in August and I am very happy with the scanner. I was trained on an Omnicam in dental school and used Omnicam for 4 years in my associateship. The speed and quality of the Medit scanner is comparable to a CEREC scanner but...read moreI purchased a Medit scanner in August and I am very happy with the scanner. I was trained on an Omnicam in dental school and used Omnicam for 4 years in my associateship. The speed and quality of the Medit scanner is comparable to a CEREC scanner but you can’t beat the price of the Medit! I would highly recommend this if you are a beginner or pro in digital dentistry!read less - 9/22/2020
Anthony Vu
If you are looking to buy a Medit, you shouldn't look anywhere else to buy it. My Medit i700 was having issues on a Friday and I was able to get Heather from Cad-Ray to troubleshoot the issue. She remoted into my computer to try and troubleshoot the ...read moreIf you are looking to buy a Medit, you shouldn't look anywhere else to buy it. My Medit i700 was having issues on a Friday and I was able to get Heather from Cad-Ray to troubleshoot the issue. She remoted into my computer to try and troubleshoot the issue and helped with getting Medit on board as well. Once it was confirmed it was a hardware issue, I got sent a BRAND NEW Medit i700 OVERNIGHT.Can you believe that? Service and warranty that Cad-Ray offers is really TOP NOTCH.Highly Recommend Cad-Ray for all things MEDIT. Thank you Heather from Cad-Ray for all your help!!!read less - 2/02/2022
Steven Polasek
The cad ray team is the best! Jon and Nick offer first class service! I ordered a medit i500 from another supplier and had to cancel my order after it had not arrived within 3 weeks. Placed my order with Jon and Nick, had the scanner to me within 24 ...read moreThe cad ray team is the best! Jon and Nick offer first class service! I ordered a medit i500 from another supplier and had to cancel my order after it had not arrived within 3 weeks. Placed my order with Jon and Nick, had the scanner to me within 24 hours of purchase. I love my medit! Best scanner on the market!read less - 6/15/2020
Kaila Larson is absolutely the best support person I have ever used. She knows her stuff and is a pleasure to work with. Medit is only as good as the support and SHE MAKES CadRay and Medit an amazing experience! - 1/05/2023
Roger Wilson
CAD-Ray provides the best support around. I started scanning with Medit i500 in 2018 and my dental practice immediately changed for the better.As a rookie, I had a lot of questions and I calledCAD-Ray a lot in the beginning. They were great!Jonathan...read moreCAD-Ray provides the best support around. I started scanning with Medit i500 in 2018 and my dental practice immediately changed for the better.As a rookie, I had a lot of questions and I calledCAD-Ray a lot in the beginning. They were great!Jonathan Acker helped me get set up. Frank Weinstein answered tons of questions. Laura Geney became an important source of information as I moved into scan bodies, AI library, and had hardware questions. I’ve attended classes in Dallas featuring Armen Mirzayan who is incredibly knowledgeable and will tell you the good, bad, and the ugly about digital workflow. The possibilities are endless with scanning technology. I also want to mention Nick Statly who has visited my Dallas office and is a wealth of information. I have to admit that I frequently view the CAD-Ray User Group Face Book page just to pick up a few pearls here and there.I highly recommend CAD-Ray because their support is by far the best in the IOS industry and because their people honestly care about the customer and are truly committed to your success.read less - 12/23/2021
George W
Frank DeLuca has been my rep for almost a year and has provided excellent, caring, professional service and with a great attitude. - 1/25/2023
Samir Rana
Ive had the medit since 2018. One of the best decisions in dentistry ive made. I met some of the great trend setters in digital dentistry(armen, jonathan ab and others through social media platforms). Medit Has changed The way i practice, live and ...read moreIve had the medit since 2018. One of the best decisions in dentistry ive made. I met some of the great trend setters in digital dentistry(armen, jonathan ab and others through social media platforms). Medit Has changed The way i practice, live and think! Happy not to have a monthly fee as i did for years. Support is always a message or call away. Would be glad
To further share my experience with you if u need.read less - 6/16/2020
Kent Lysgaard
This company has the best customer support I have ever experienced. I purchased the I700 Intraoral scanner and the transition from impression material to io scanner has been so easy because of Cad-Ray. I highly recommend them. The response to questi...read moreThis company has the best customer support I have ever experienced. I purchased the I700 Intraoral scanner and the transition from impression material to io scanner has been so easy because of Cad-Ray. I highly recommend them. The response to questions/issues is instantaneous even with a patient in the chair they have the capability to go online and help. Absolutely first rate.read less - 4/13/2022
Amazing customer service. I haven’t ever worked with a company where there is an issue, you can immediately get help and assistance and so far have not had an issue that CADRAY wasn’t able to fix. They made the process buy buying and maintaining a sc...read moreAmazing customer service. I haven’t ever worked with a company where there is an issue, you can immediately get help and assistance and so far have not had an issue that CADRAY wasn’t able to fix. They made the process buy buying and maintaining a scanner seamless. Highly recommend!read less - 2/23/2024
Debra Haselton DDS PLC
I had a training session with Laila this morning and she was fantastic! Very organized training, easy to follow and was able to get my scanner up and running. Thank you Kaila! - 1/06/2022
North Bakersfield Dental
Excellent customer service and product!! - 3/16/2022
Dong Lim
One of the best investments I’ve made for my office. A fraction of the cost compared to cerec. No monthly club fee. Easy maintenance. Saving a ton on lab costs. Milling and designing crowns is honestly my favorite things to do now. - 6/29/2020
The CORiTEC one can handle multiple types of blocks. It is also upgradable to pucks to mill round house prosthetics.
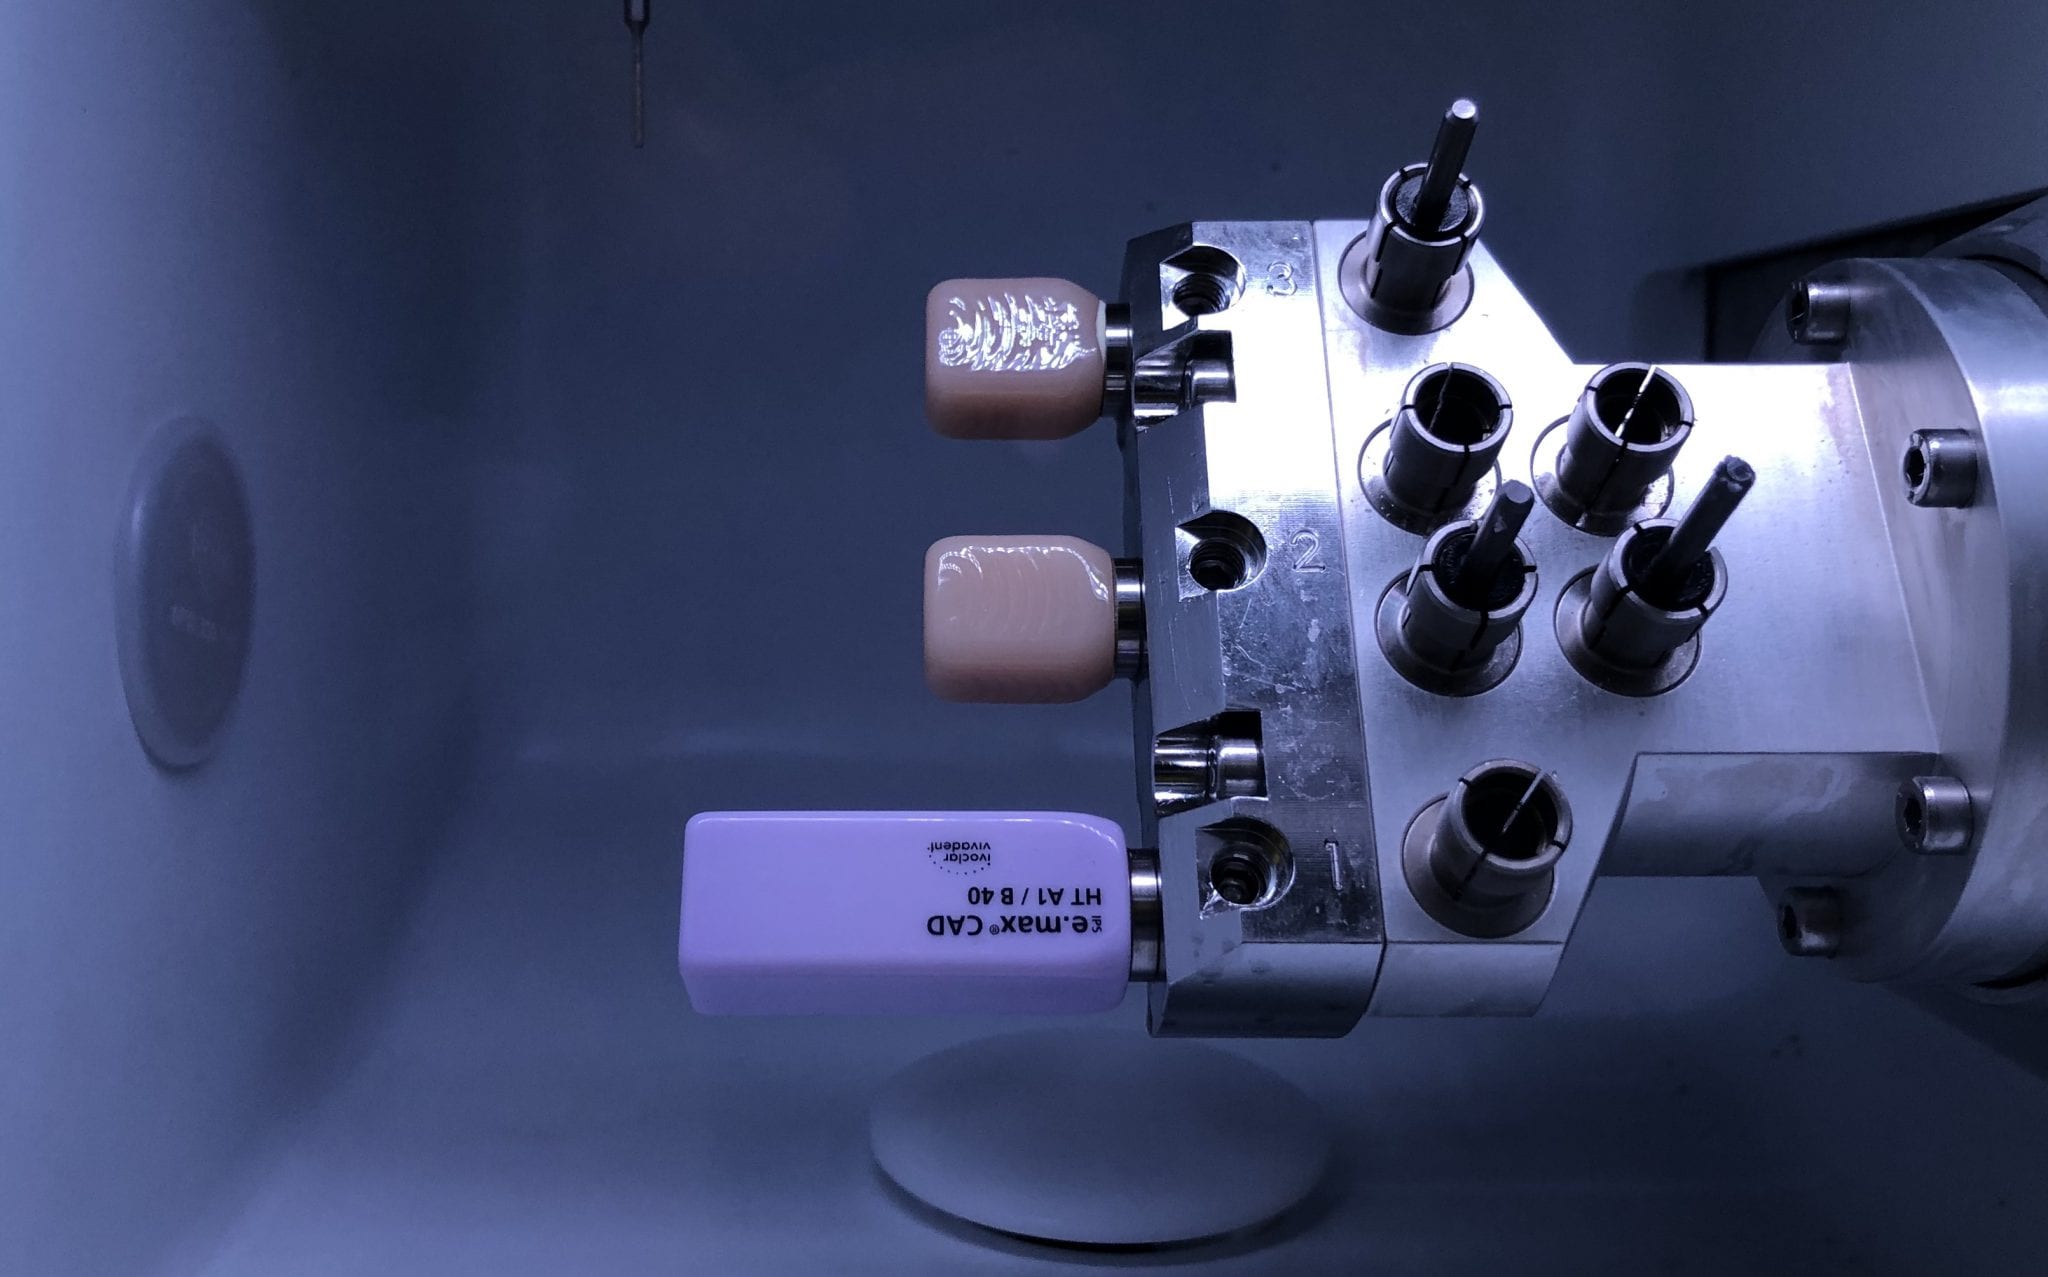
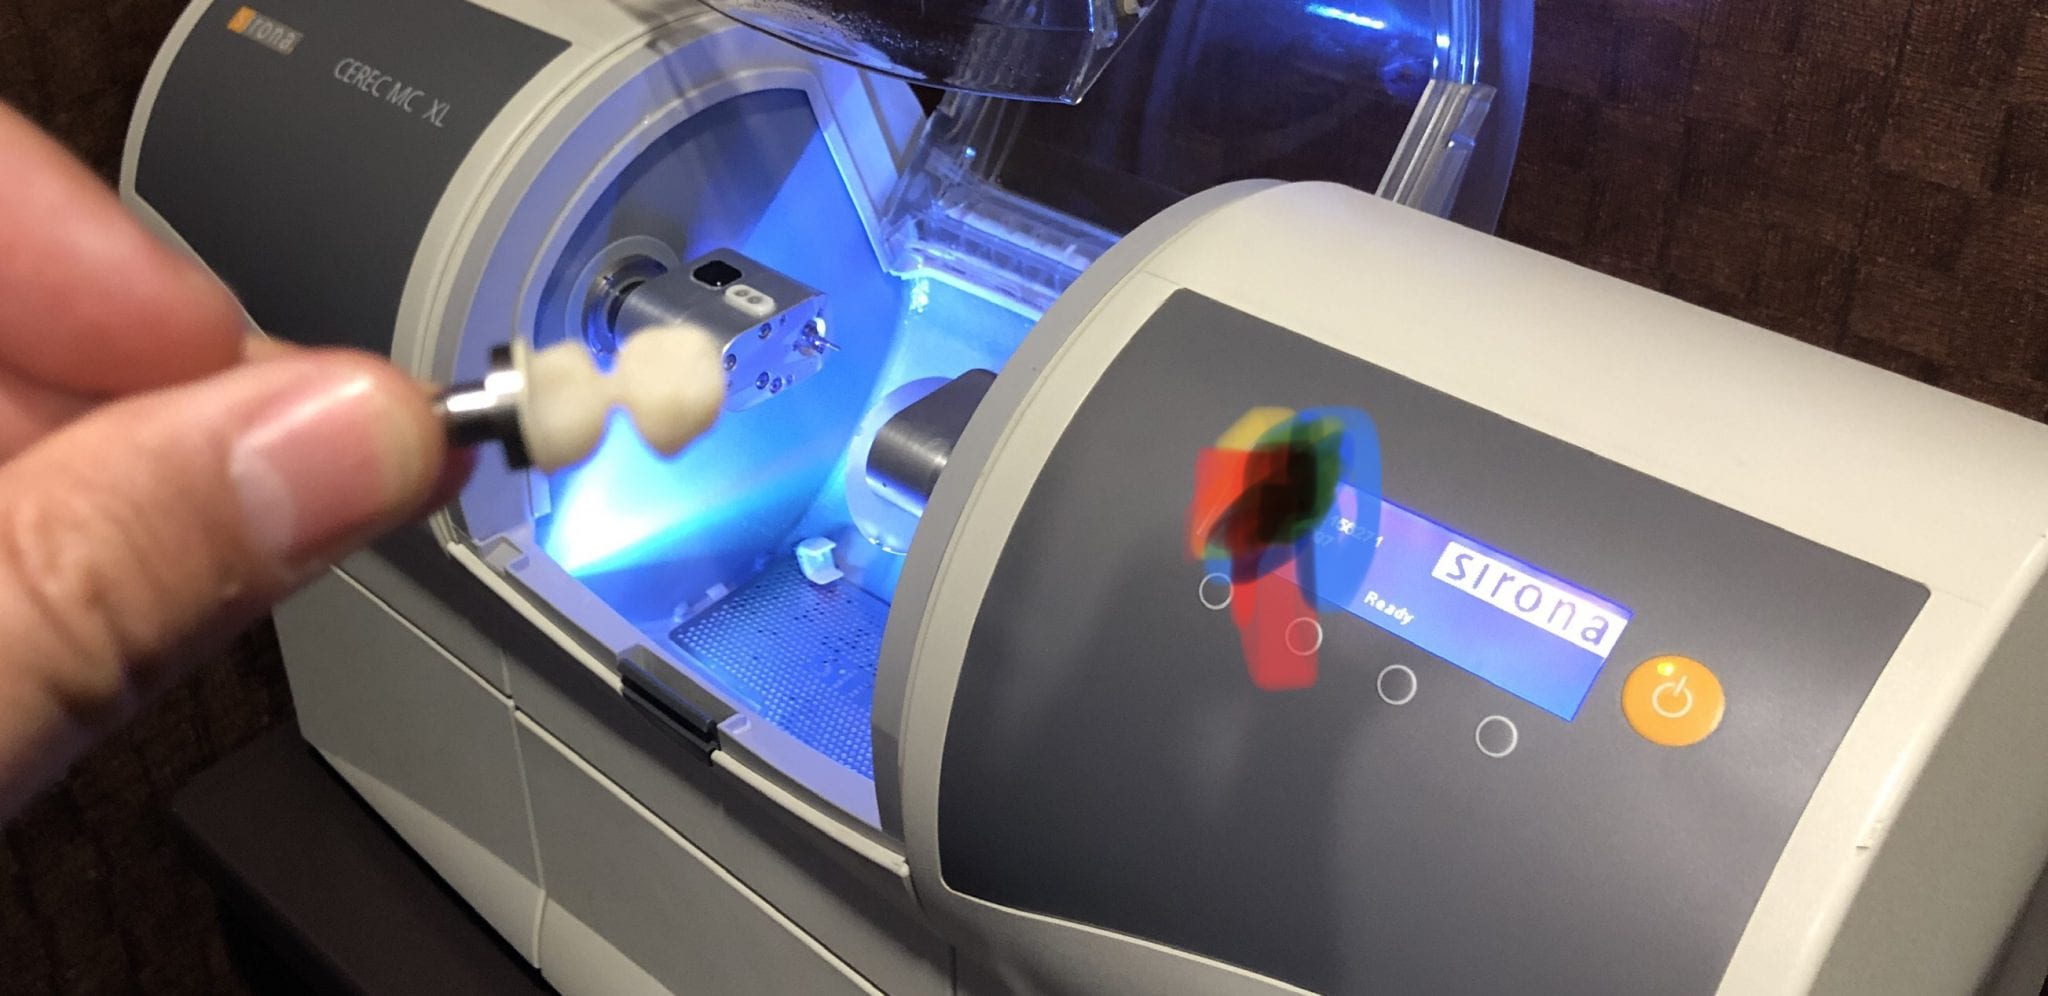
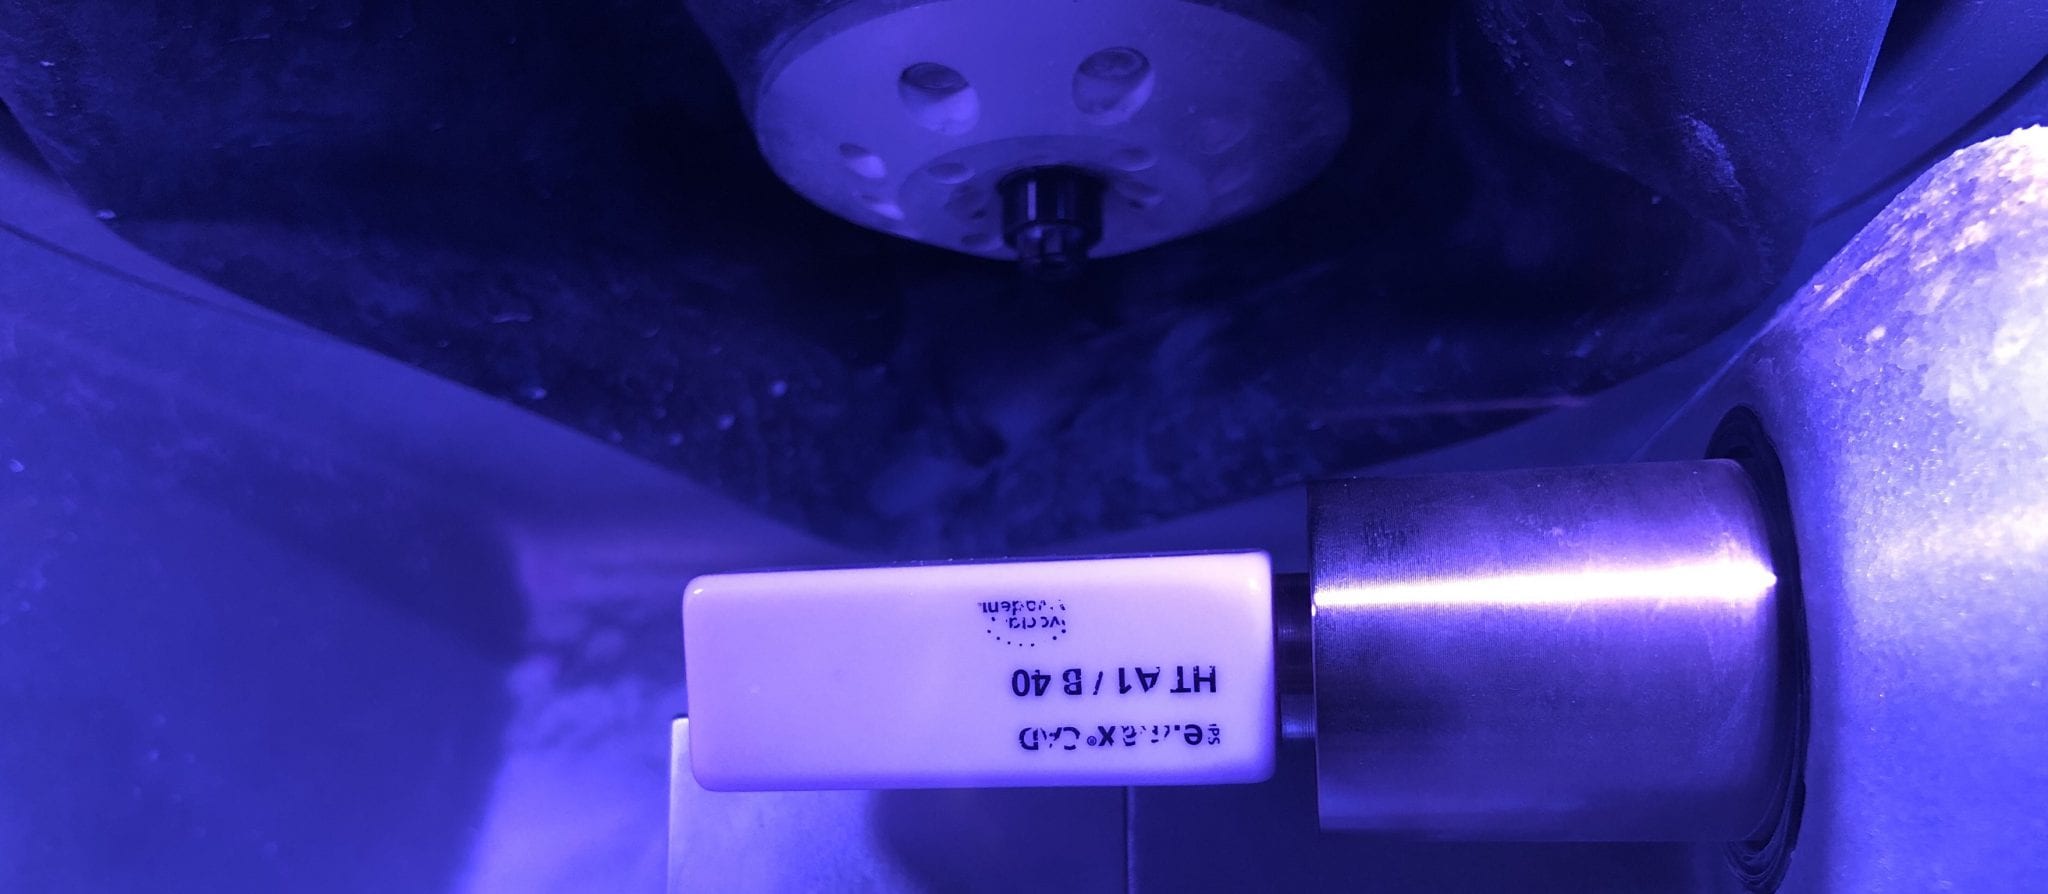
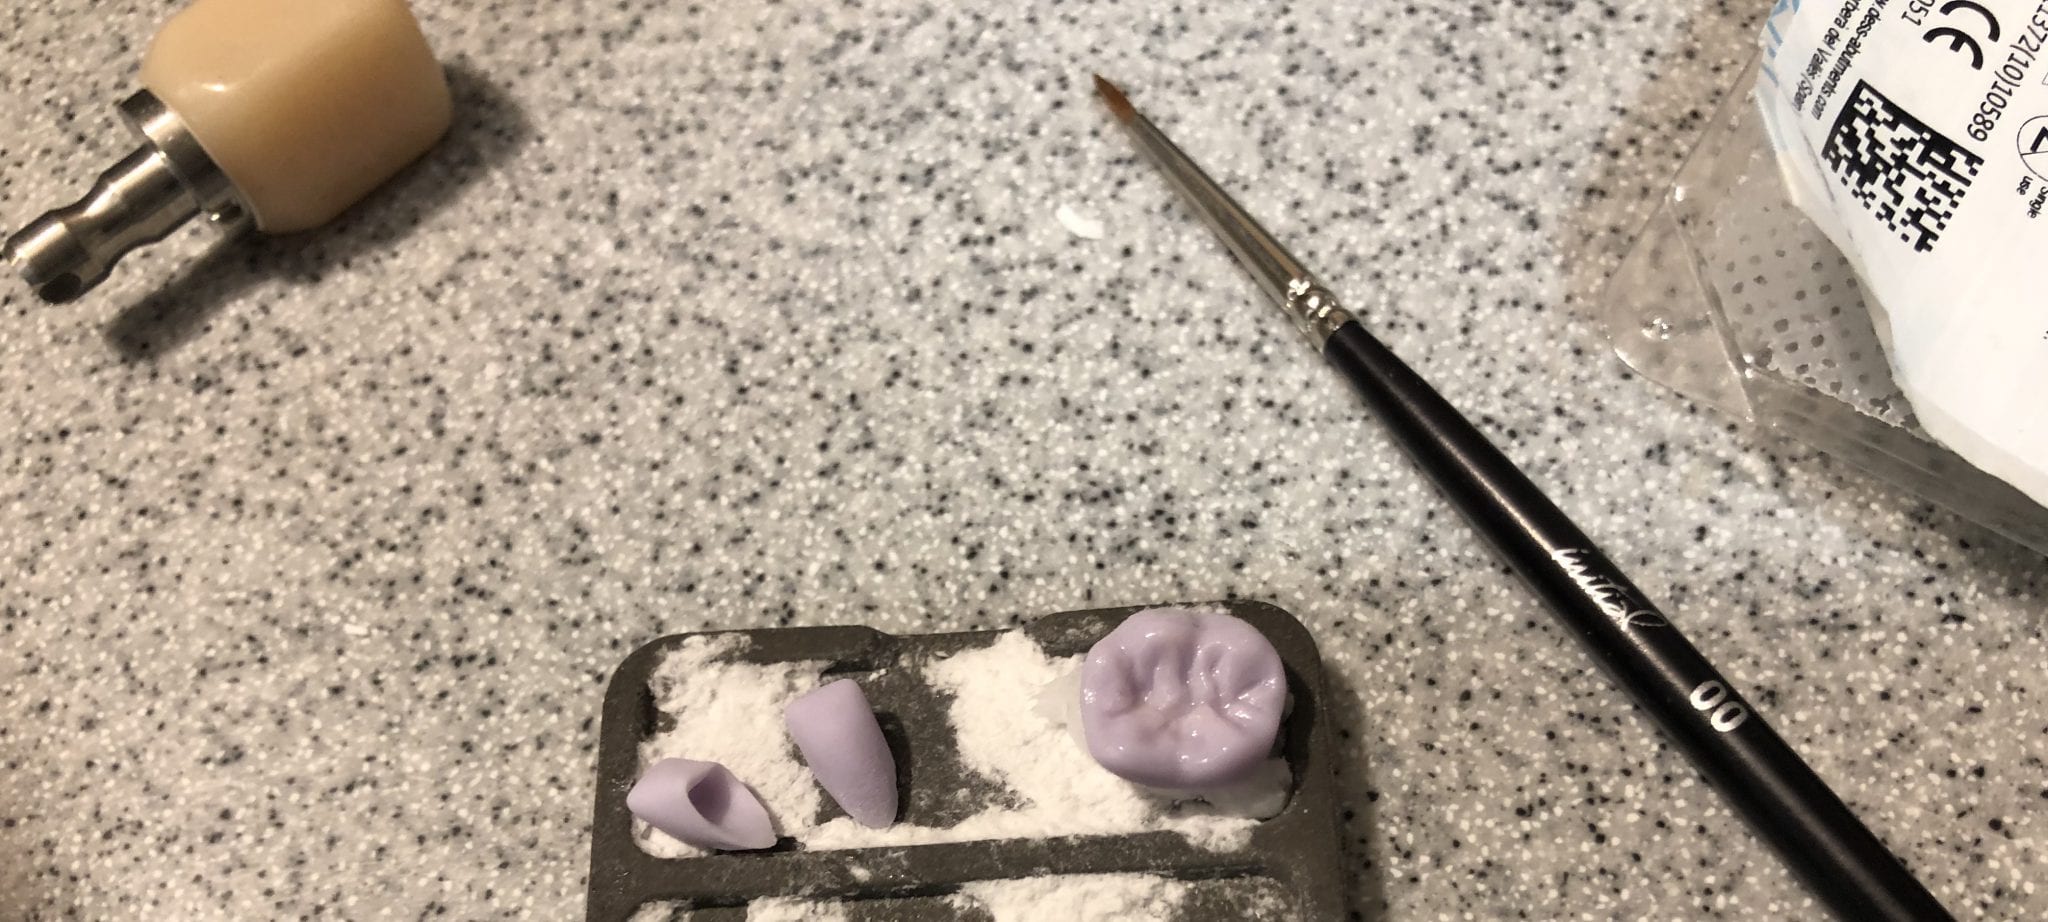
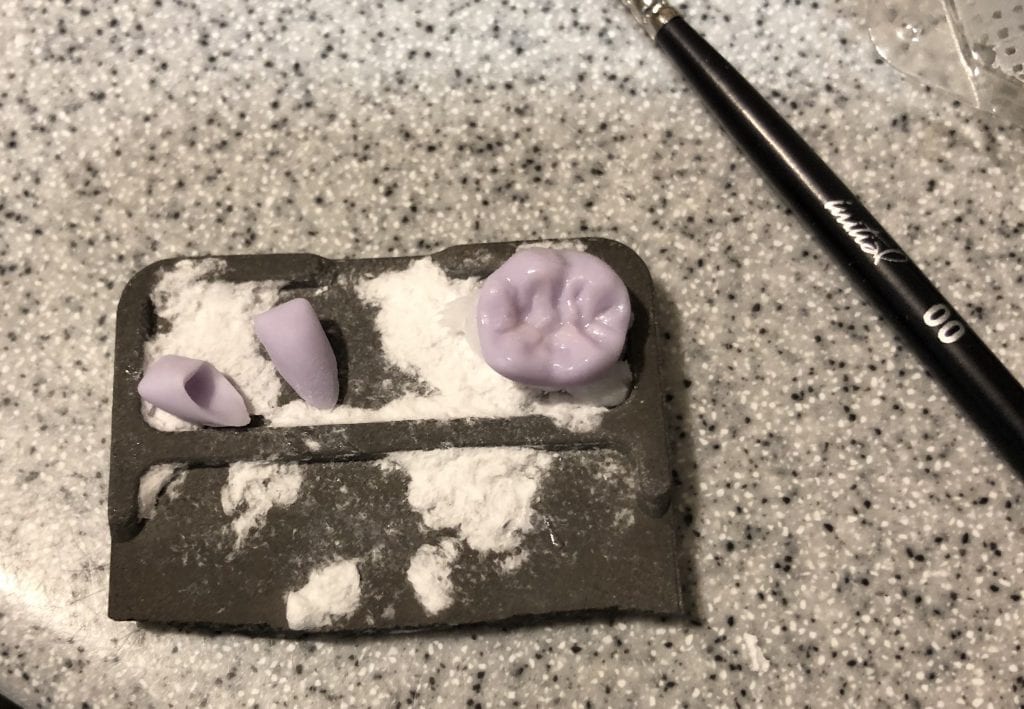
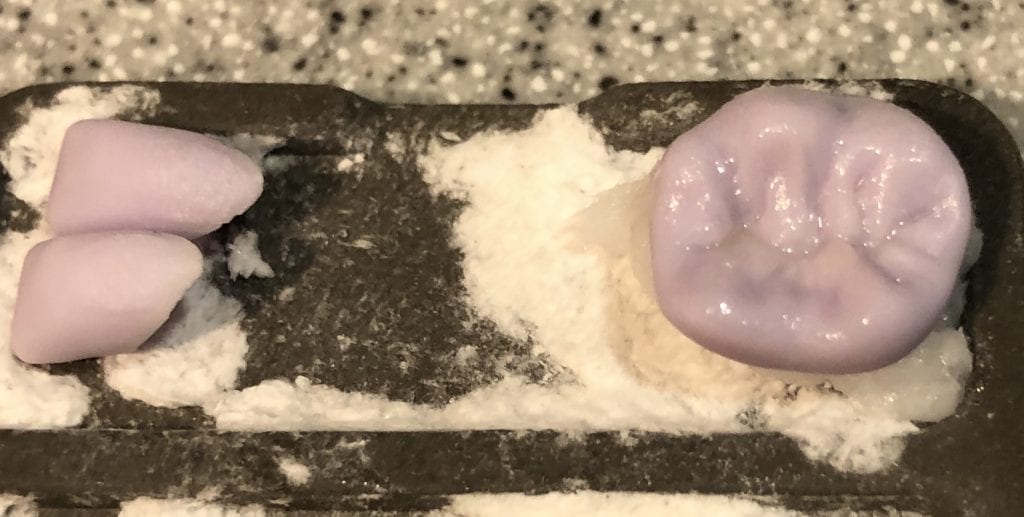
In this video, we demonstrate the milling of a 40 mm emax block. The machine can also handle 60 mm emax material. The height of the block is also important. In this particular case the Incisal edge would not fit in the confinement of the block dimensions. The margins were milled and then a little bit of layering material was added to the block
In this video we demonstrate how to capture implant impressions of scan bodies intra-orally with the medit i500 scanner and then design a screw retained crown with our customized CAD-Ray software.
The sequence of steps for a new user are critical. Although it doesn’t matter if you image the opposing arch first or after the arch that is being restored, the steps to capturing the scanbody must be followed in chronological order. You must capture the arch and then the scanbody impression. You should not return to the arch catalog box and add any more data. This can introduce a lot of error in the processing steps
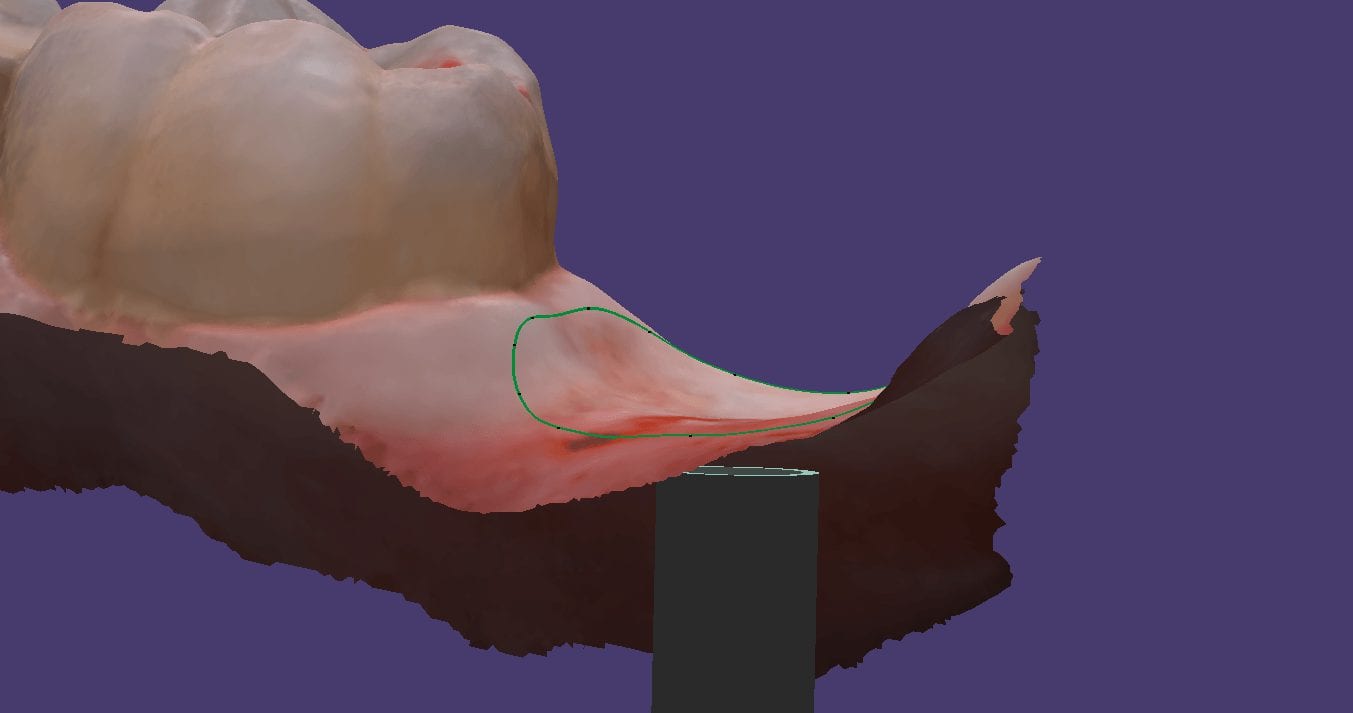
In this video you can appreciate the distinct advantage you have tissue training on a digital model. You can contour to the soft tissue very easily. It is best to do so after you have identified the scanbody, which will pinpoint the location of the fixture. Once you have that in the equation, you can sculpt your tissue to your liking, making sure your abutment margins never drop apically below the head of the fixture
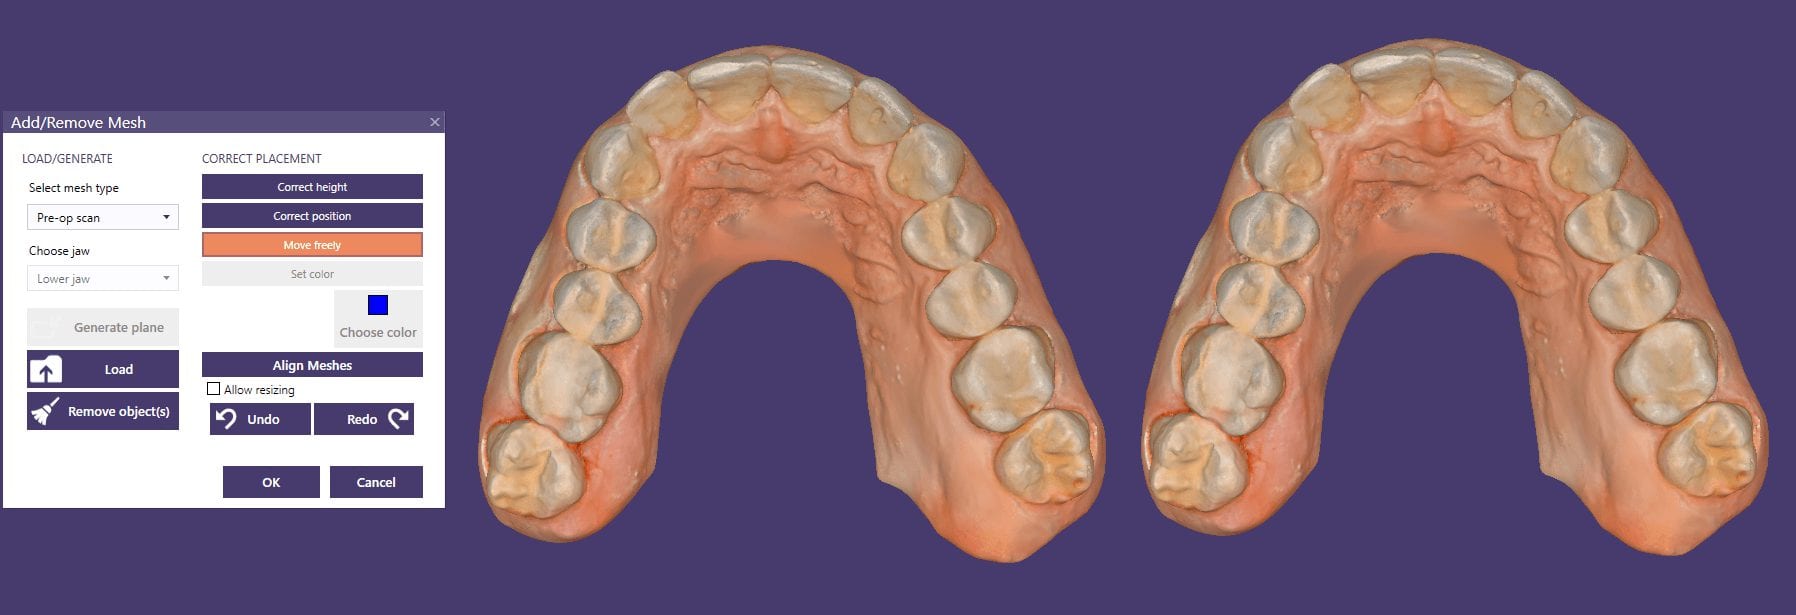
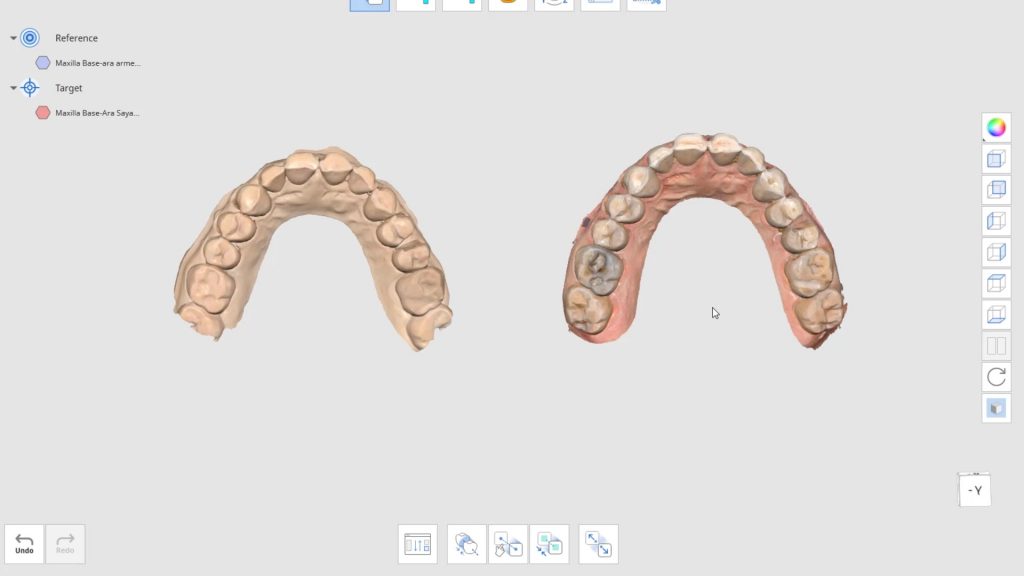
If you are new to digital dentistry, this introductory video will show you how to judge if digital models are related to each other. As a simple exercise, we opened one digital model and then imported the exact same model as a pre-op scan into the equation.
Once the models are in the design software, they are manually related to each other with at least 3 common points. After the merge, we performed “best fit matching” and then demonstrate how the color histogram in exocad has the both models painted completely blue.
We then slightly altered one model by adding material to one cusp tip, reduce the adjacent cusp tip, and then smoothing the third cusp tip. We then re-aligned both models to each other again and you can see how the software lets you know the range of discrepancy in those areas. Notice that all three areas have the same histogram color but all three have distinct meshwork areas from the original.
Once you understand this concept, it opens up many avenues for you that you can never achieve with traditional impressions.
One thing that I highly recommend is to take the bite before imaging the prep itself. It forces you to check for clearance and to keep reducing until you have the appropriate space for a ceramic restoration
You have to be comfortable with different workflows you may be accustomed to
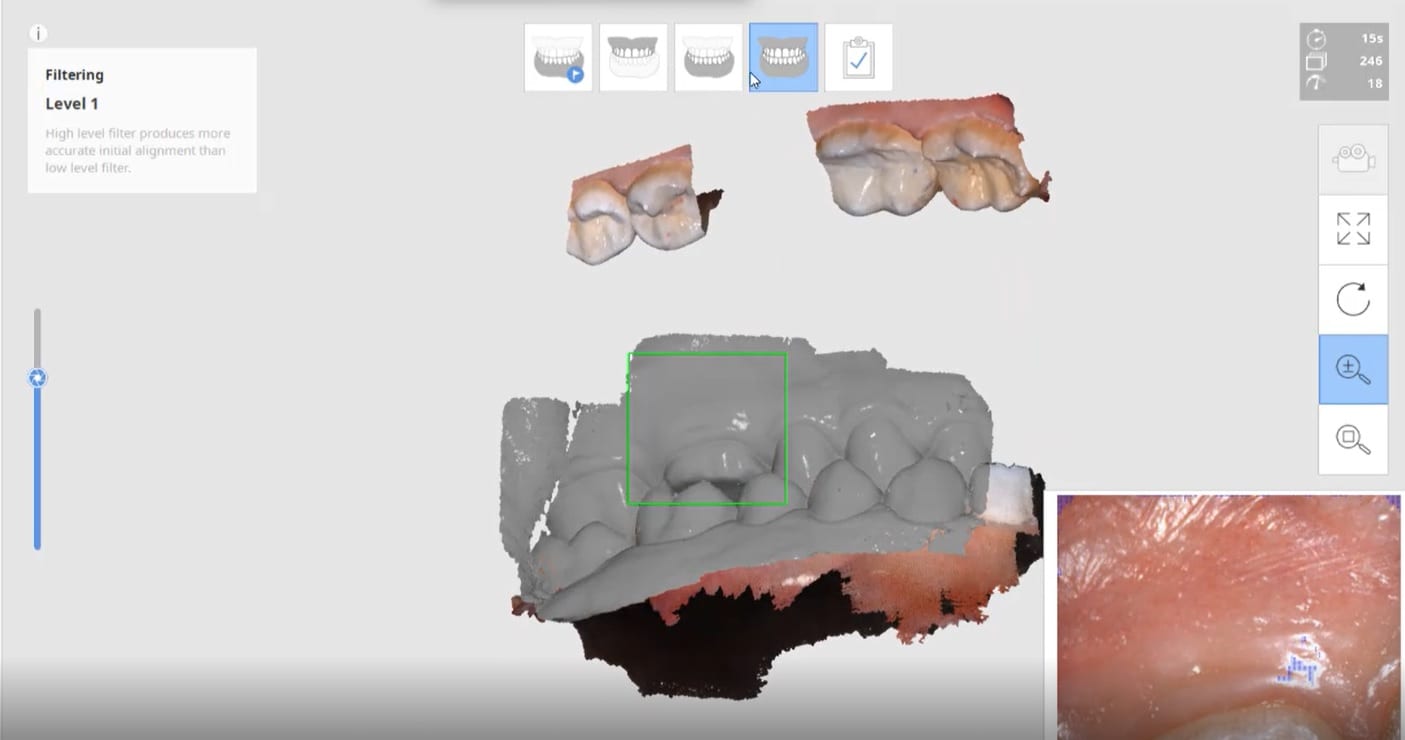
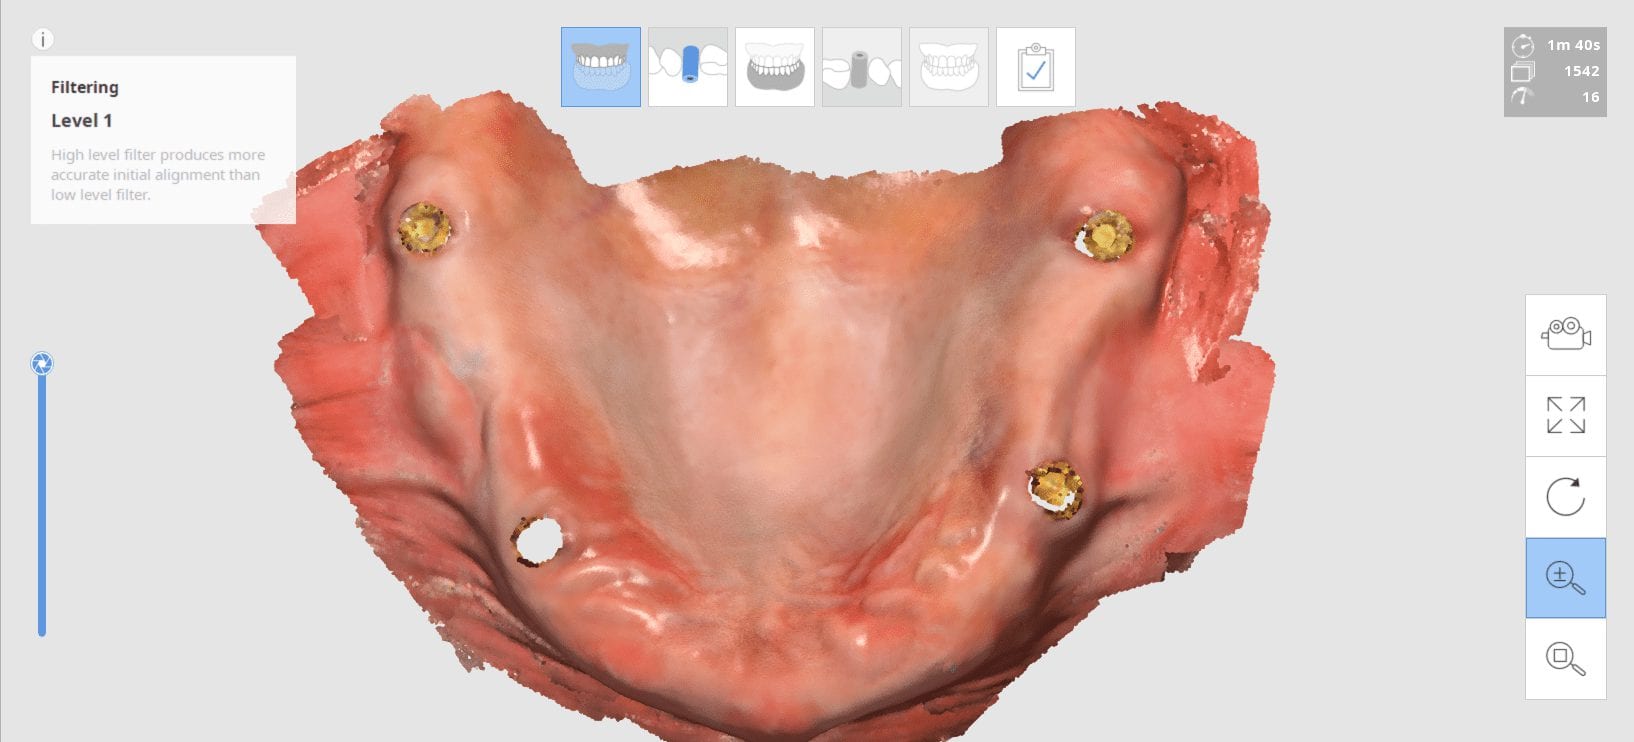
Don’t be mislead; it is much easier to scan the upper edentulous jaw than the lower, as you don’t have to deal with the tongue or saliva. With the Medit i500 we have a feature called the model display mode, where you can see how the meshwork is being formed by turning red areas to green. When scanning, you can image at the rate of “red colors turning green” so you can produce global accuracy across the arch without distortion or double images forming like you see with all intra oral scanners when they try and scan edentulous ridges on a flat plane
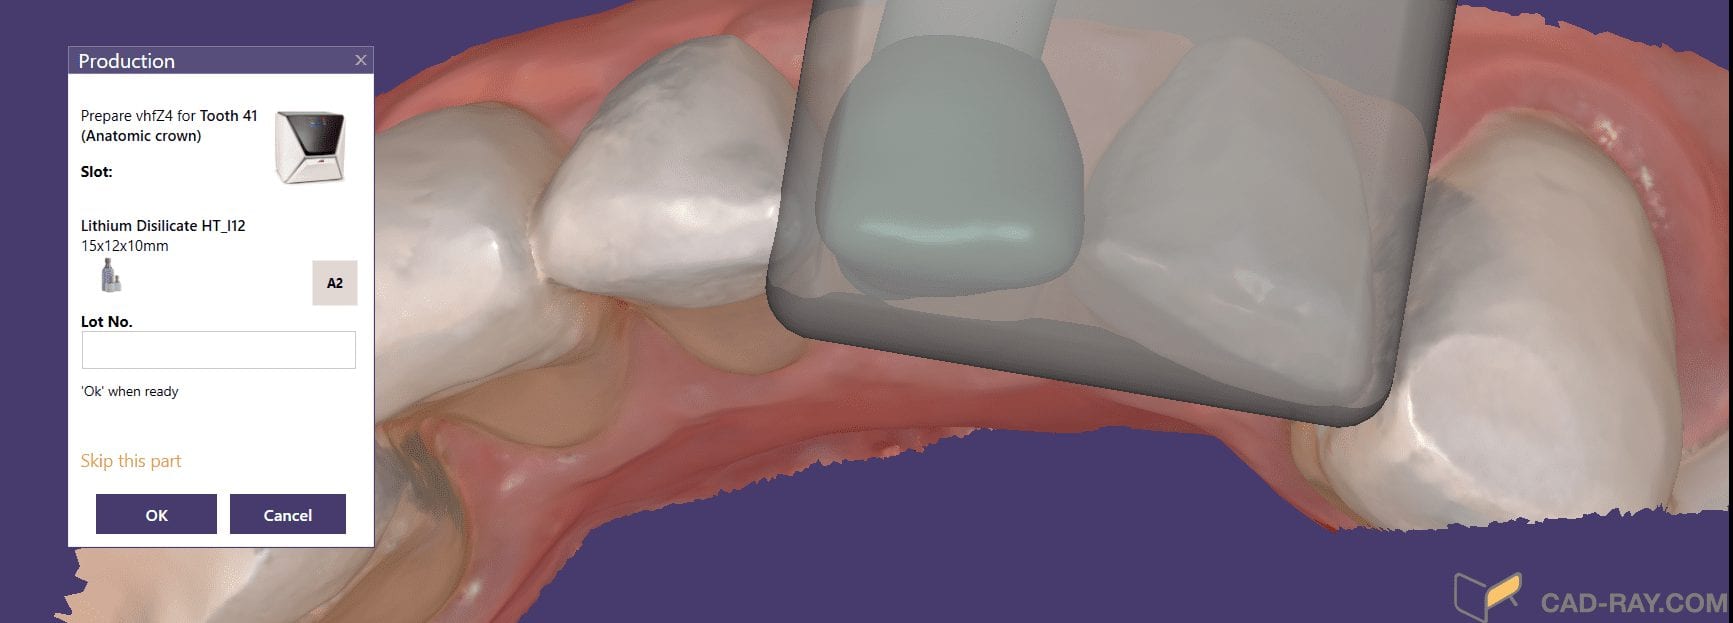
In this particular case, we demonstrate an emax restoration fabricated with the Z4 milling machine by VHF. In the first video, you can see how the case was set up initially within the software. You will notice how we image the preop, image the opposing and can even image the bite out of sequence, all while the patient is being anesthetized.
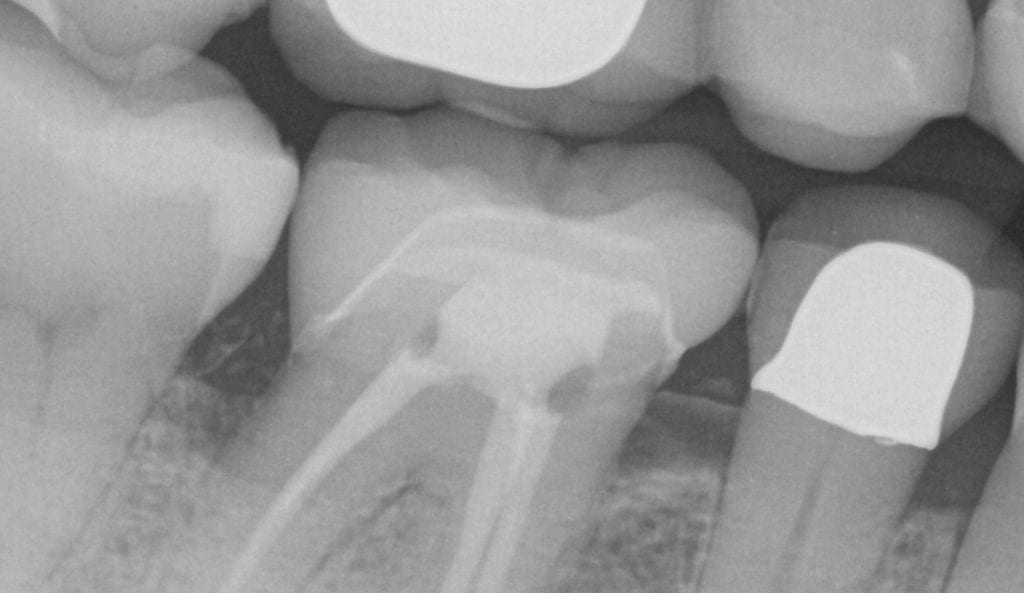
Once the preparation is captured, we place the margins and design a crown in exocad. The emax is milled, tried in, and them placed in the oven for crystallization. It is then delivered to the patient. Note how the decay at the contacts of the adjacent teeth was drilled out and restored, while the crown was milling / crystalizing. An immediate post op x-ray was taken to make sure there was no resin left behin
The Z4 Milling Machine can drill emax, zirconia and metal abutments. You can use a scanbody, identify the location of the fixture, design the abutment and mill our either ceramic or metal as the abutment.
Metal abutments in the posterior molar areas, tibases in canine and premolar regions, and angled abutments in incisor area is the general consensus for restoration of choice
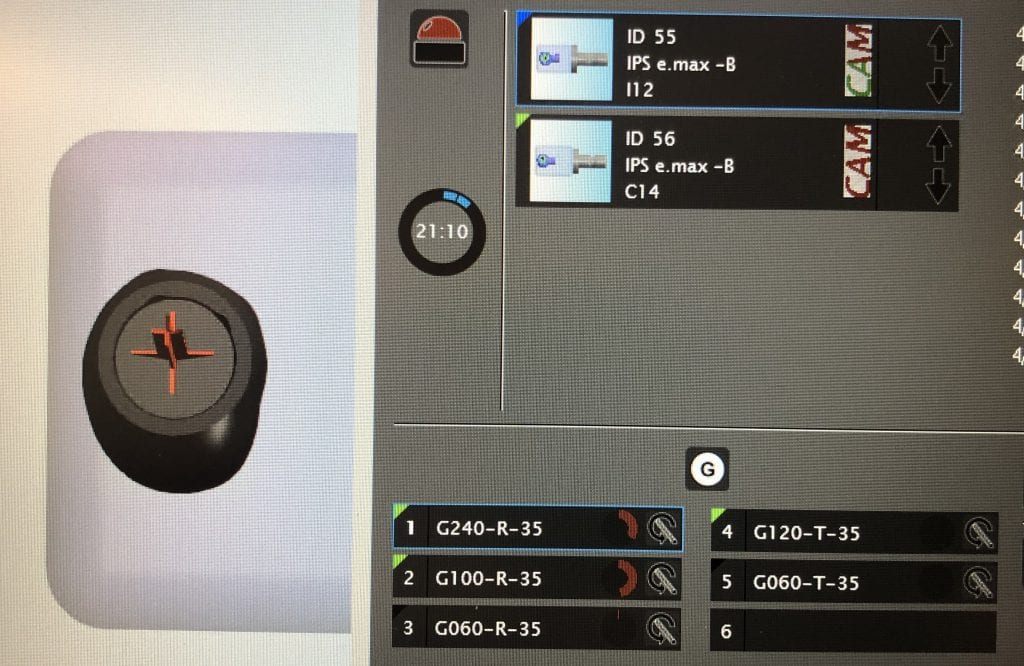
One of the greatest advantages of the Z4 is that it can start milling while it is doing the calculation for milling. Furthermore, you can load multiple designs in preparation of continuous milling. In the picture attached, the CAM software is shown which operates in the background. Most users don’t usually see this interface.
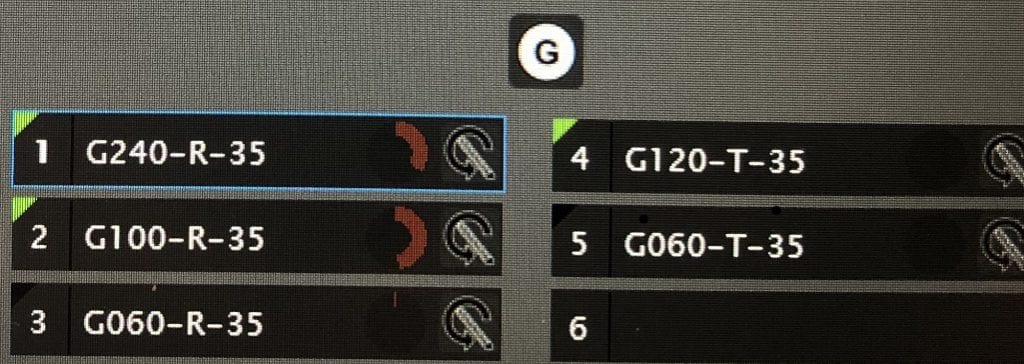
Here you can see how there are 5 drills for the machine. The top tier, consisting of 3 drills, labeled G240, G100, and G060 are all labeled as R. The G120-T and G060-T are used only for a screw access holes
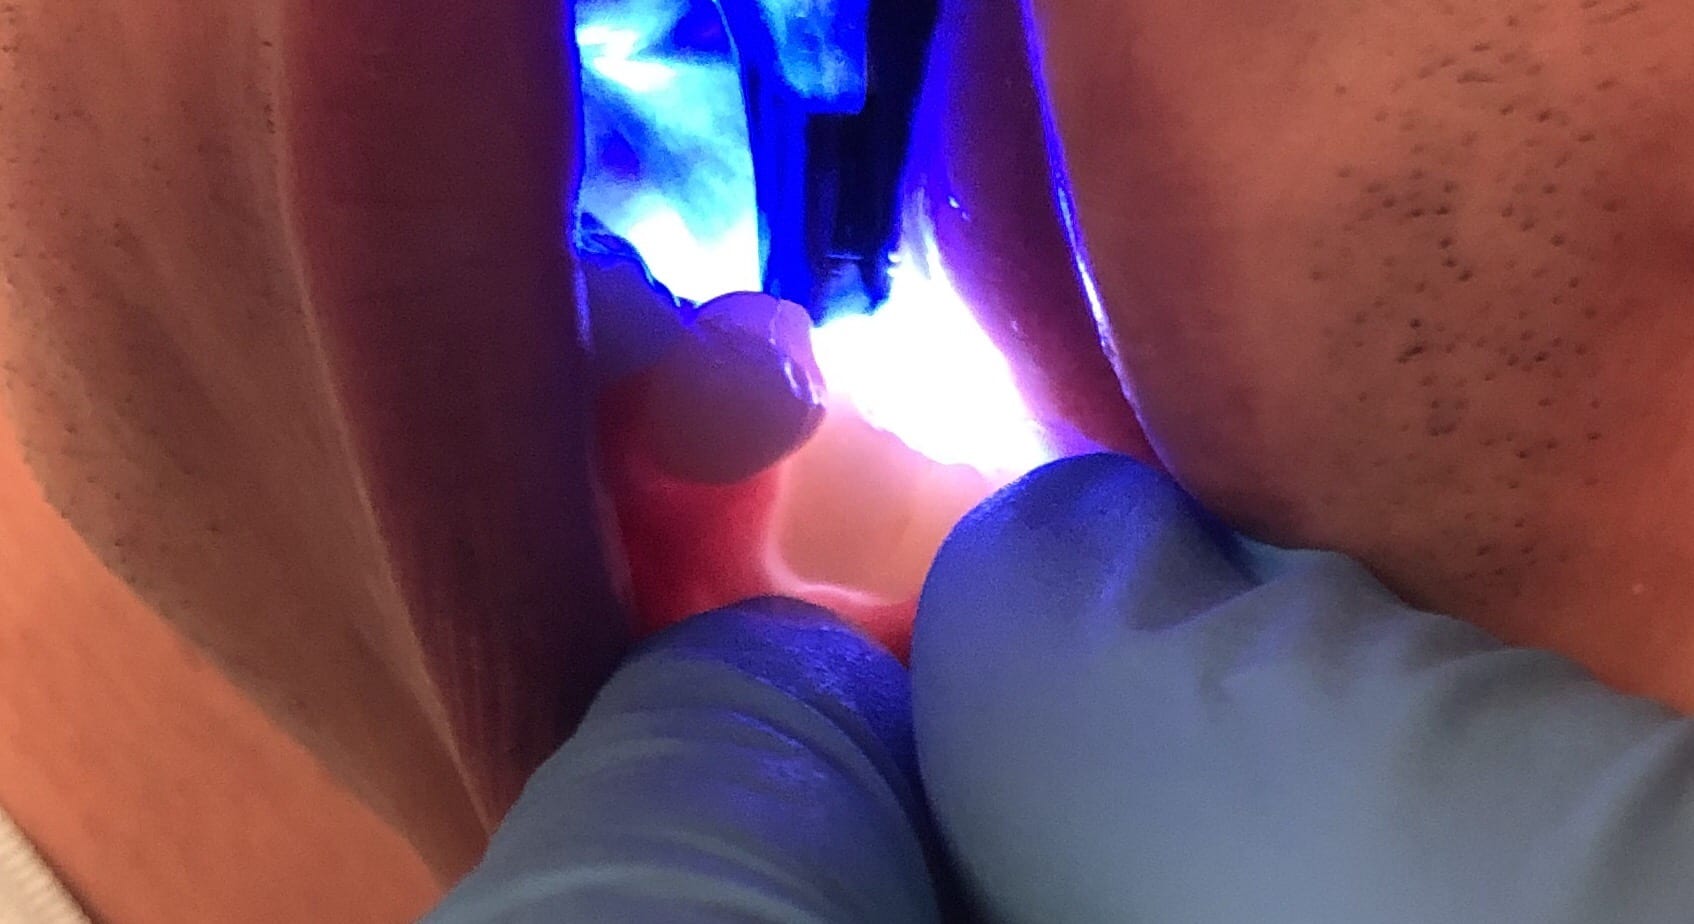
The following case demonstrates how a symptomatic cracked tooth was treated with an emax restoration that was fabricated / seated during the same appointment as it was prepared. The patient had a heavy gag reflex and the preparation and access were difficult. The medit i500 was utilized and the restoration was designed with CAD-Ray’s design software, powered by exocad, and then milled with the Z4 milling machine by VHF
In this pre-op of video, trans-illumination was utilized to highlight the lack of light propagation at the crack line. Moreover, the patient was percussion sensitive on the lingual cusps for over 5 days where he initially developed symptoms
The Medit i500 software was launched while the patient was anesthetized. The appropriate job definition was defined where we identified that a pre-op scan would be taken. We also identified the spacer parameters and the marked the opposing dentition. All of these items define the image catalog that will be launched when we capture the optical impression (there will be a preparation model, a pre-op model, the opposing, and minimally one bite registration)
While anesthetic was taking affect, salt on the tongue was used to suppress the gag reflex, and the opposing arch was imaged. Then the lower arch was scanned and the bite was captured. The software then was set to the mandibular arch where the tooth in question was cropped out of the equation.
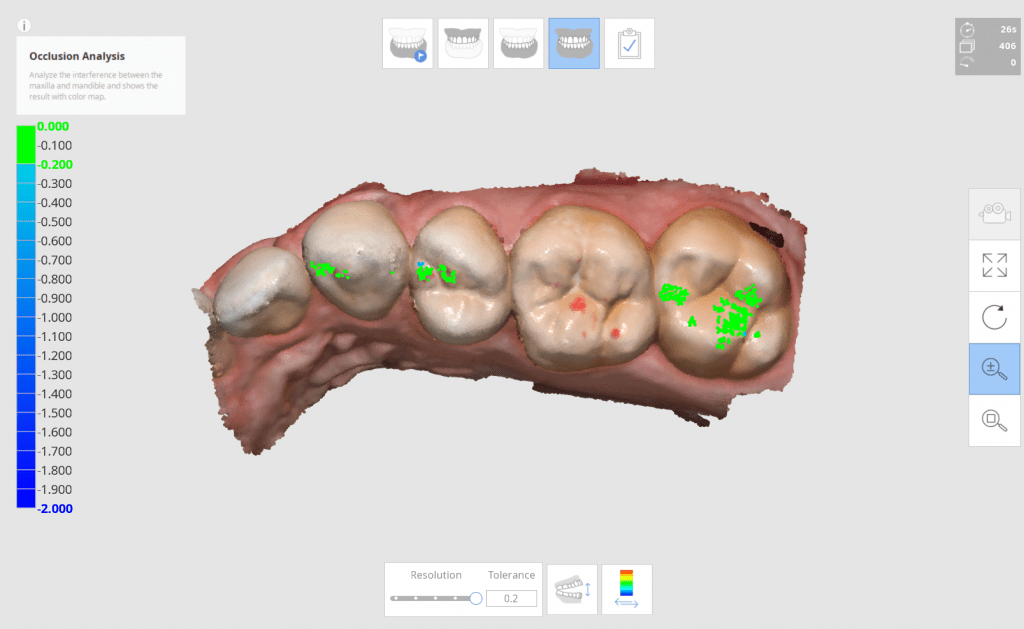
A great benefit to this approach is that you can analyze if you have taken the bite registration correctly before you even image the preparation. Sine the medit i500 can capture color, you can can the patient bite down on articulating paper and pick up the color renderings while imaging. You can then compare the digital occlusal stamps to the ones left behind by articulating paper. This is a great way to gauge if you or the patient has introduced errors in the capturing the correct occlusal relationship between the upper arch and the lower arch
Since the patient was very sensitive while taking impressions of the tongue, the model of the preparation was built in multiple segments and steps. With the medit i500, the initial part of the preparation was imaged, certain areas were cropped out, then the tip of the camera was used to displace the tongue so the lingual margins could be captured. The image itself was capture in the local HD mode. The attached video demonstrates how areas were protected with the software so that we did not inadvertently introduce errors to areas that already had accurate data captured
Once the image was captured, it was processed and directly launched into CAD software. the pre-existing condition was replicated in the design of the crown and minor adjustments were made to its morphology while taking the opposing dentition into consideration
Once the restoration was designed it was automatically transmitted to the milling machine for fabrication. After it was milled, the restoration was checked for fit and contacts while in its blue stage and then crystalized in an oven. Once cooled it was seated with resin cement.
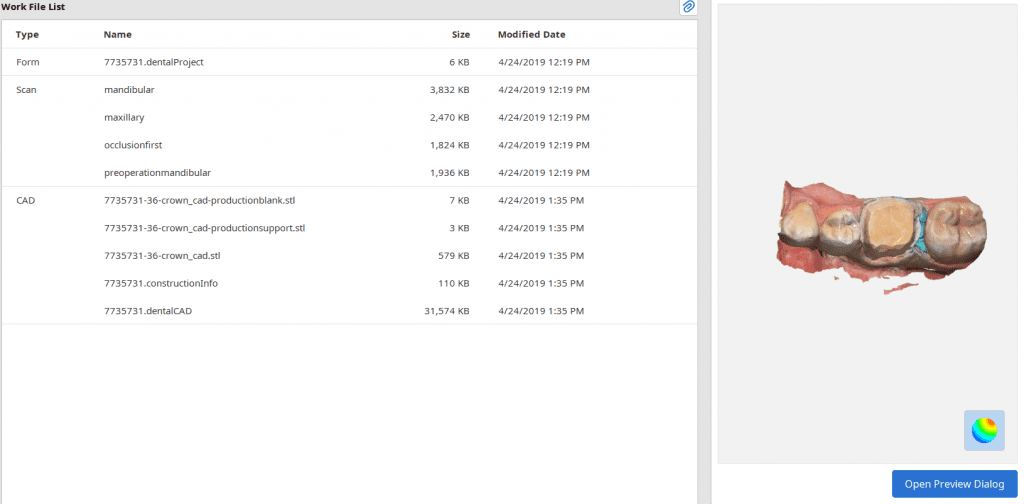
The Meditlink software has a Work File List that is maintained after you have finished your design. It hold the arches, the occlusion, the restoration stil file and the dentalCAD file that you can relaunch to either continue with a previous design or launch a whole new design
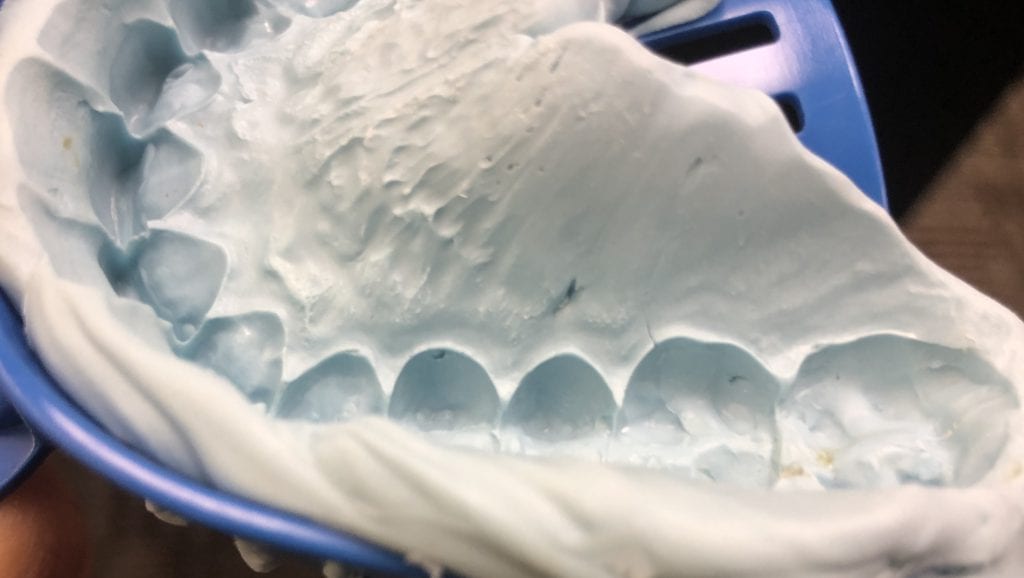
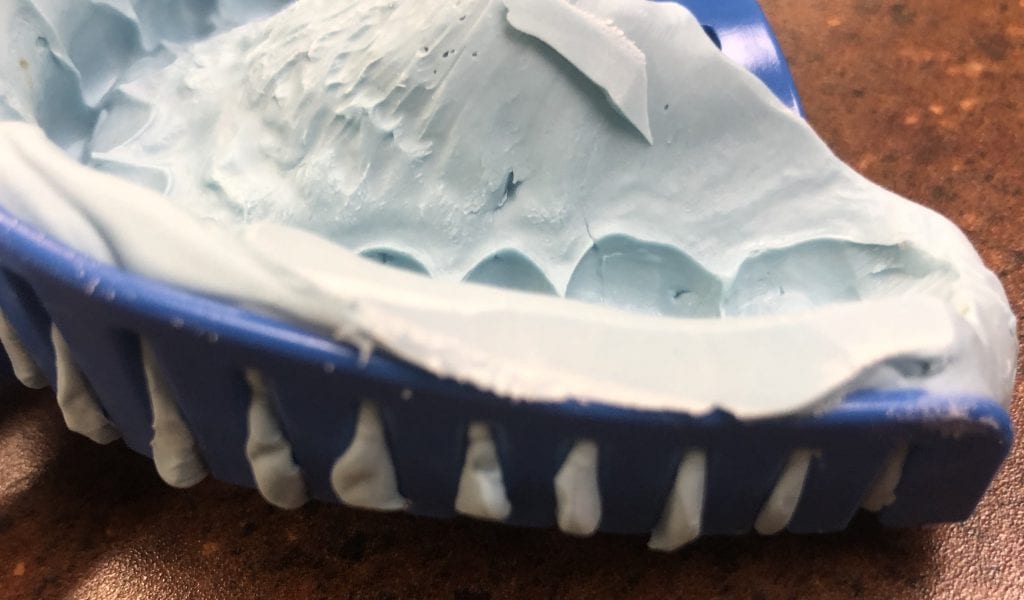
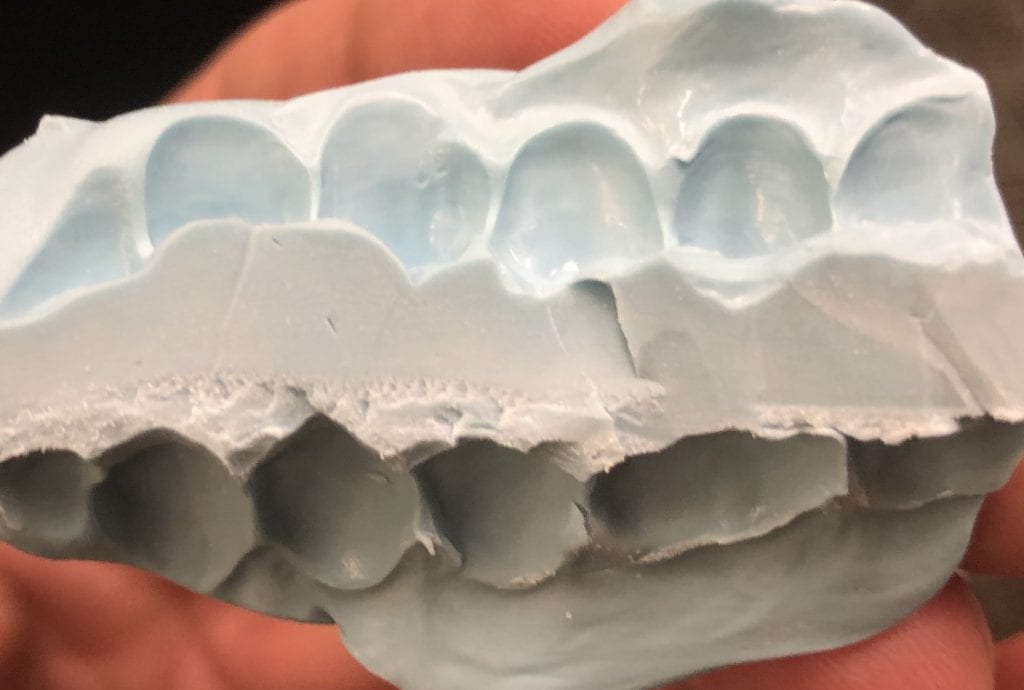
There are many ways to capture the upper and lower jaw digitally and mount them correctly in a protrusive and open bite for obstructive sleep apnea devices. In this videos, we feature how to digitize conventional impressions with the Medit i500 and mount them with a model creator so that that you order printed models and/or oral appliances.
Desktop scanners accomplish this much more readily, but it is a snap with intra-oral scanners. The key is to know how to pick up hidden and deep areas, which you can often correct by trimming away excess flash of impression material with a scalpel
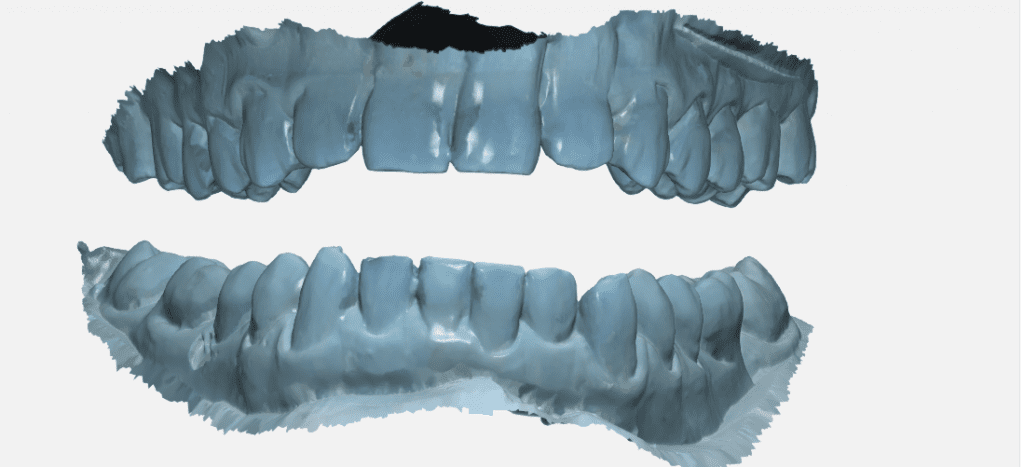
One of the greatest challenges in oral appliances for obstructive sleep apnea therapy is to capture the bite in the protrusive and open position in such a fashion so that you reduce or eliminate any adjustments after delivery
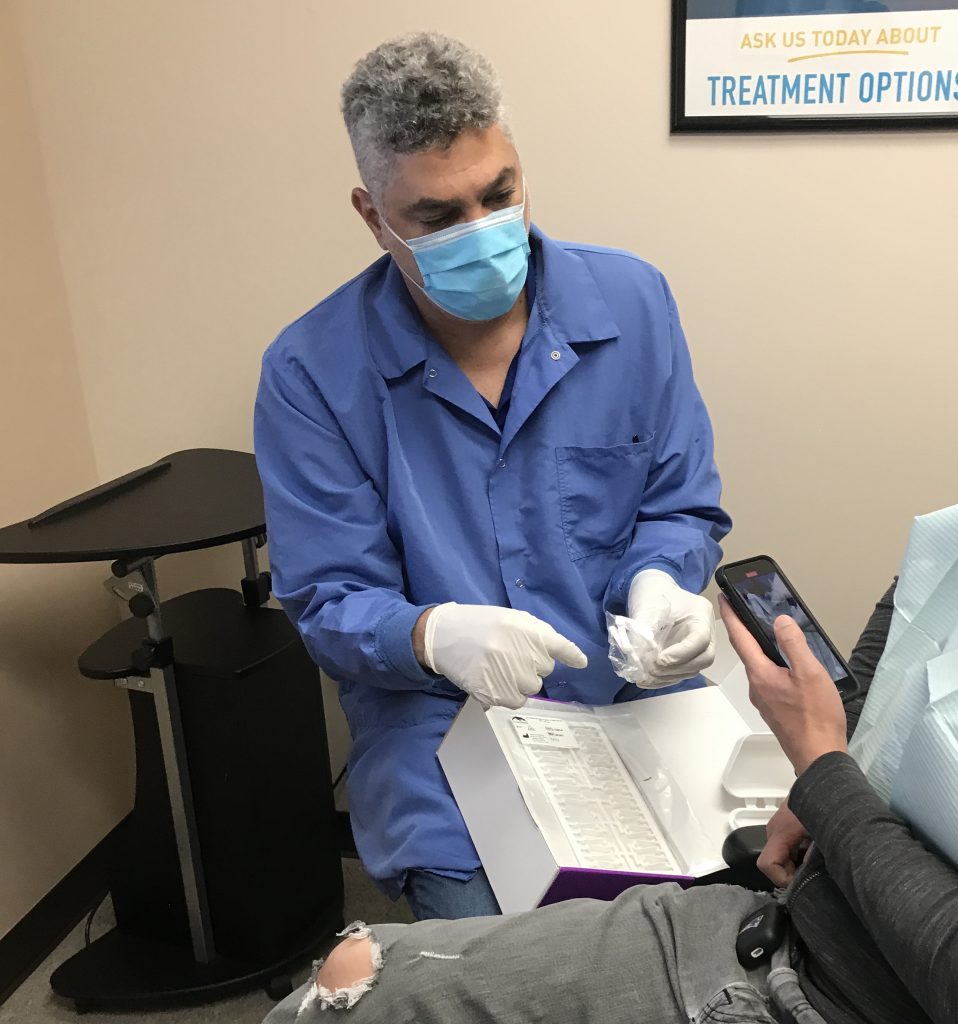
One of the greatest benefits to capturing the arches digitally and relating to each other before production is that you eliminate most of these adjustments. Proper scans and proper prints of model for appliance manufacturing make delivery appointments just a few minutes long. We hardly ever open the exam kit anymore
A very important principle to keep in mind with intra-oral scanners is how that data is printed. There are too many reasons to list what can constitute a mis-print. One method to verify accuracy of your printed models is to scan them and take that digital model and merge them with your intra-oral scan model. You pick some common data points and manually align them.
Once that is performed, you can do “best fit matching” and the more green and blue you see in the color profile, the more accurately your meshwork or data points match each other. Once you do that you can take your slice tool and look at the contours of the data and see how well they relate to each other. In this case, we scanned the upper printed model and then merged it with the intra-oral scan used to fabricate the device. There was not a single adjustment made to the appliance for occlusion or for fit
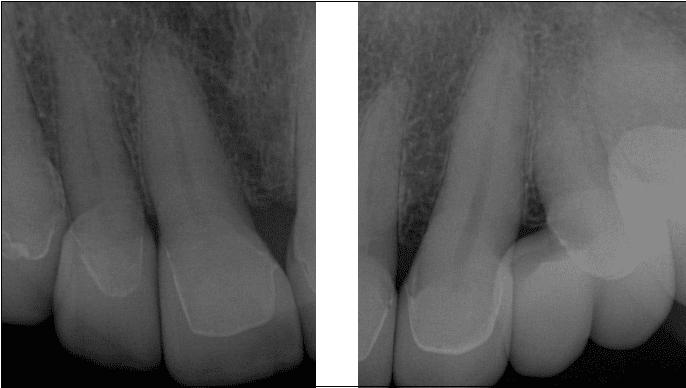
The following case is a 4 unit splinted bridge where the upper central incisors where root canal treated. The laterals remained vital after trauma to the upper maxilla fracture a pre-existing bridge. In this single appointment procedure, the case was set up by imaging the pre-existing temporaries, the opposing and the bite.
After the preparation were made, the tissue was retracted and hemostasis was achieved. The preps were imaged in HD mode with the Medit i500 intra-oral scanner. The restorations were designed in exocad and the final prosthesis was milled with the Z4 VHF Milling Machine. A size 40 block was used to mill the splinted units of eMax.
The fixed bridge was seated with NX3 resin cement and the excess was removed. Cord, packed in the sulcus, allowed for easy identification of the margins in the design step and aided in cement clean up. The patient will return for post op photos once the tissue has healed. The following video depict the steps the milling machine goes through as it carves out the four unit bridge, starting with the 2.4 mm drill, then the 1 mm drill, and the 0.6 diameter drill. Milling time was under 40 minutes
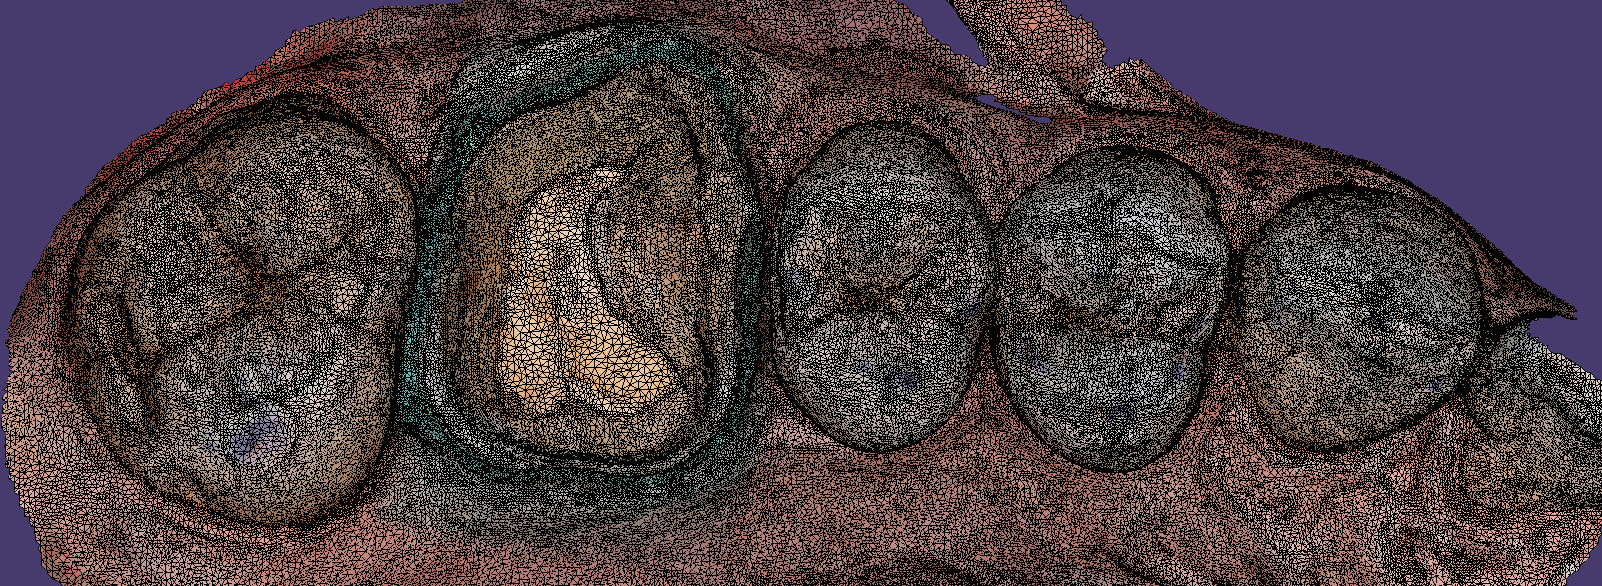
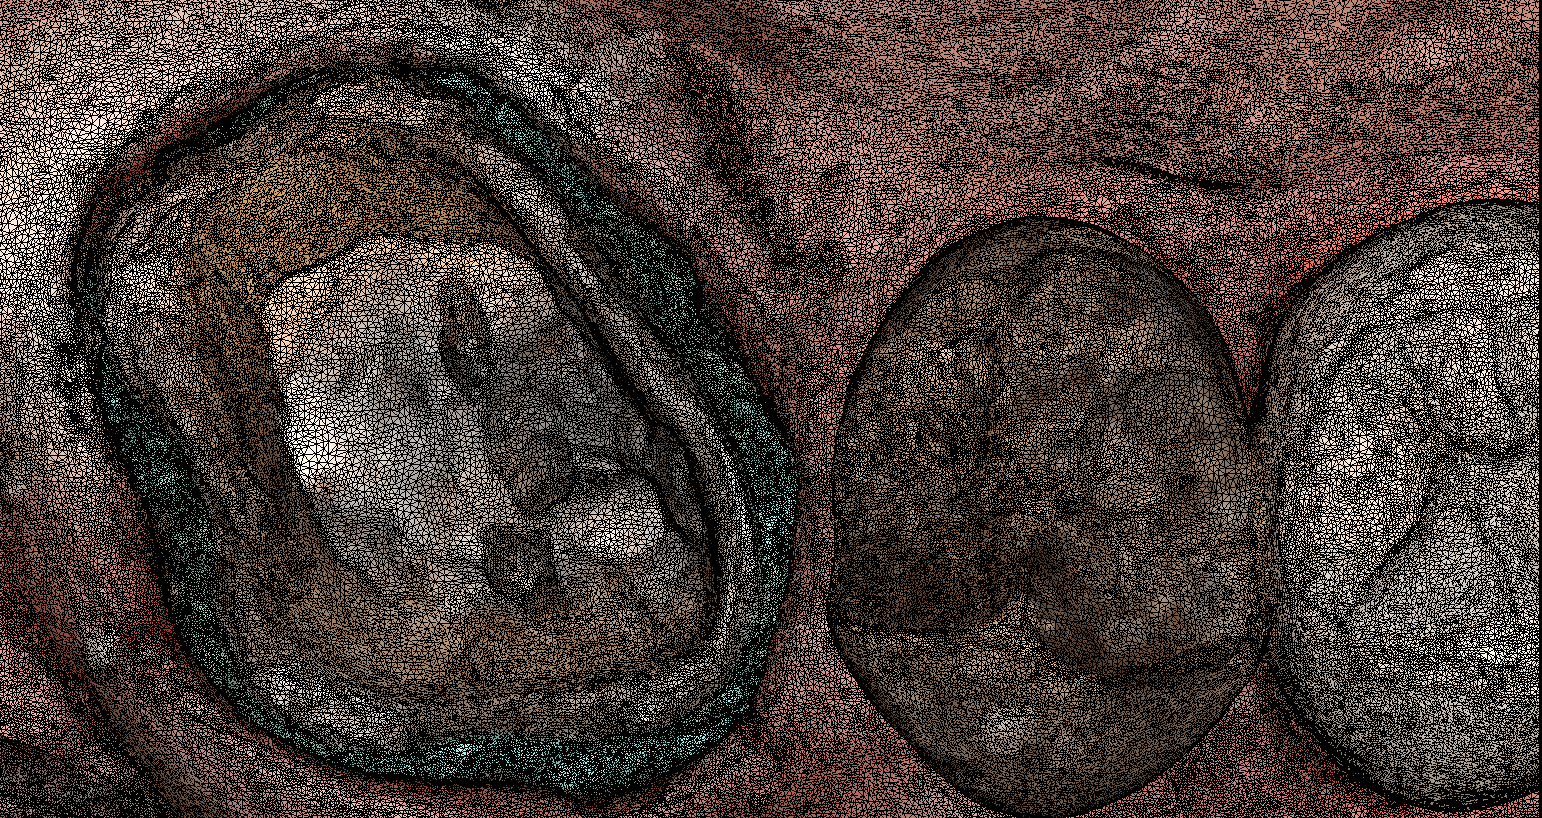
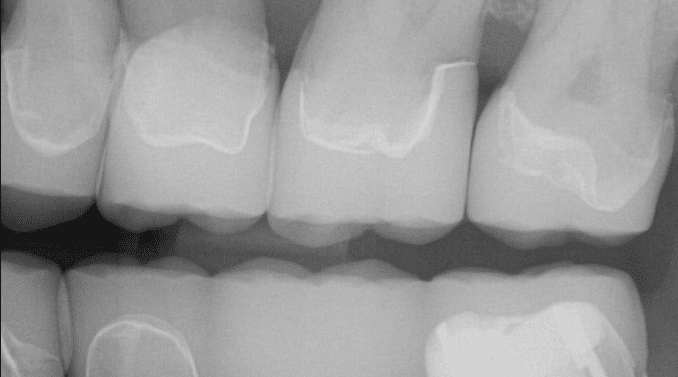
Look at that contact area! A dentist’s and lab tech’s dream, but you still get some crowns that are way too tight and you adjust like crazy until it seats and if you were too aggressive, you likely blew right through the contact. Here is what is happening:
When you image what is happening is that you are imaging below the height of contours of the adjacent teeth / contacts. A designer just sees a big contact area with lots of colors and s/he is happy, not realizing that they actually made contact with material BELOW the height of contour of the adjacent teeth. This is a VERY common error. It will sound strange, but if you are an advanced user, consider NOT taking scans below the HOC and let the software drop a straight wall down to the gumline and your seat issues will disappear! You can also recognize this issue and communicate it to the lab so they can address it
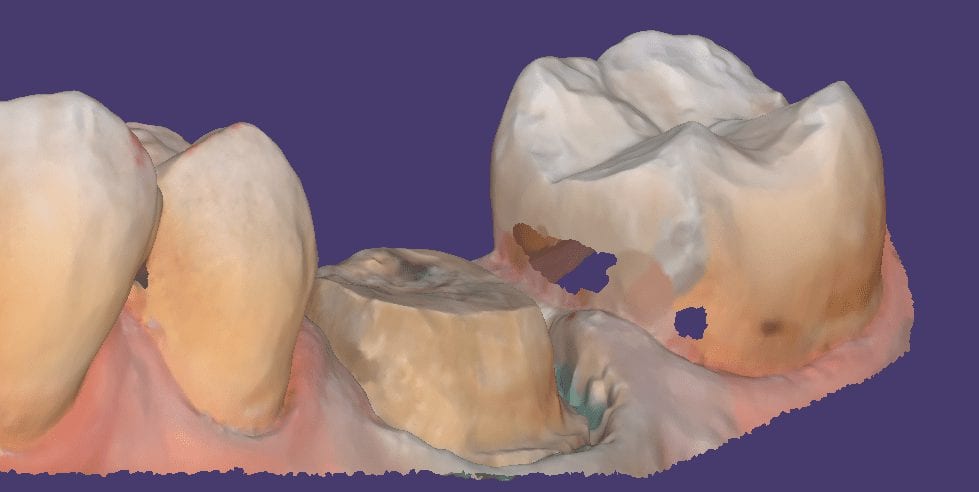
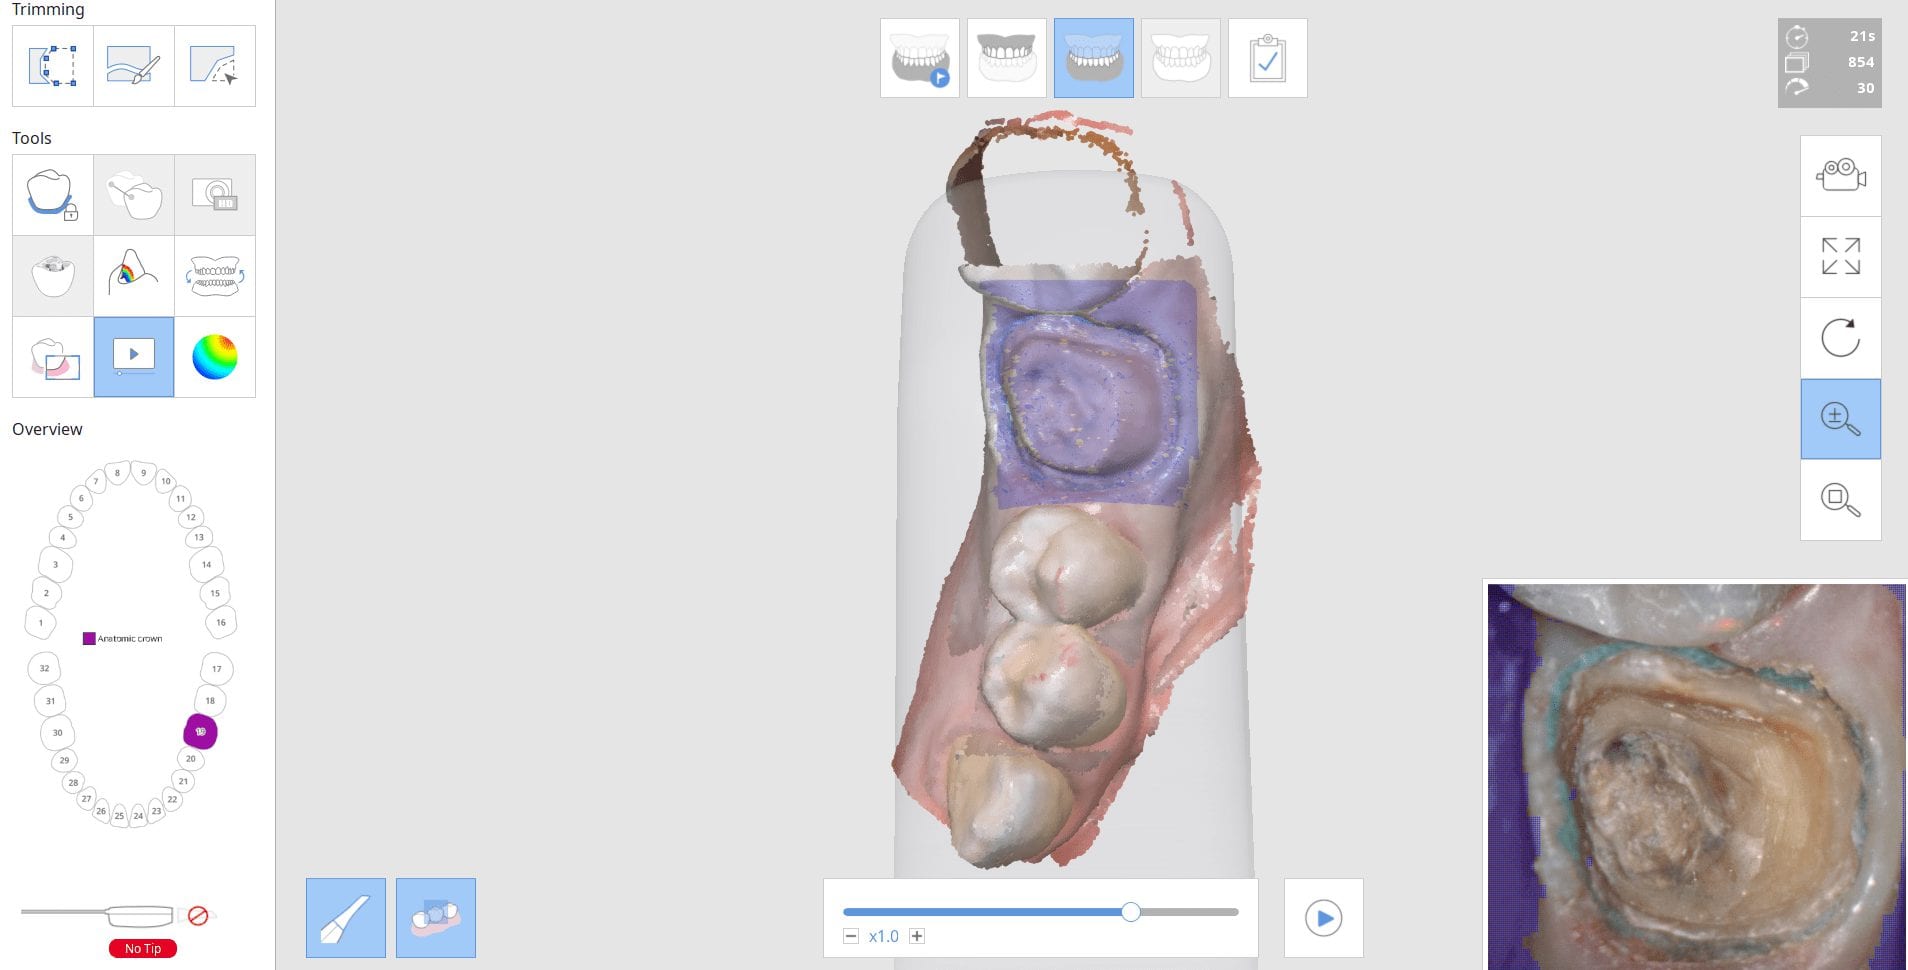
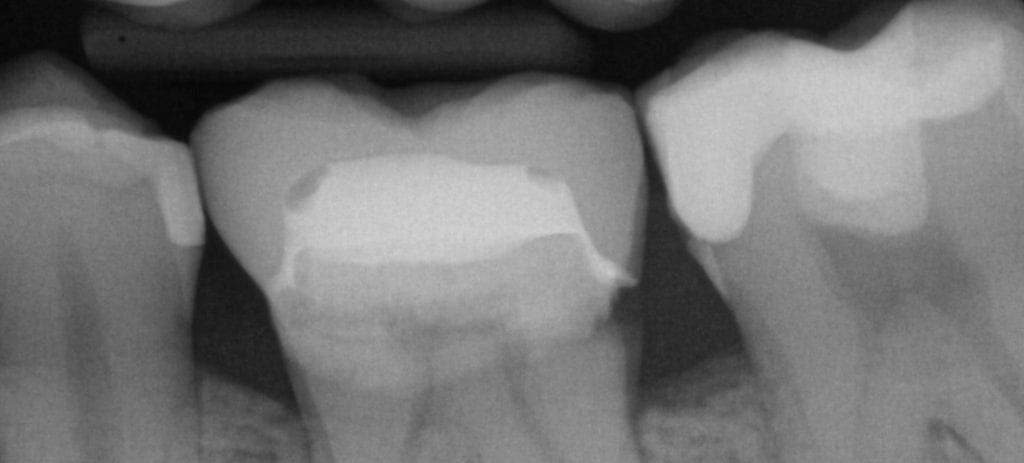
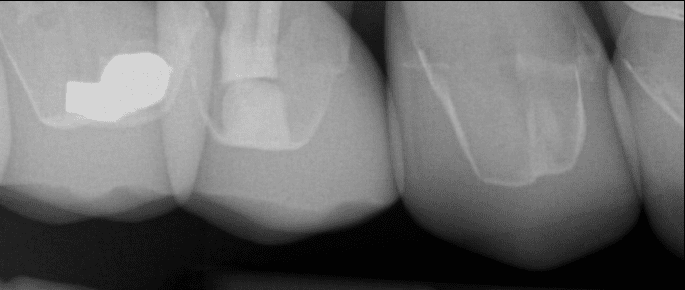
This a case that was done in a single appointment, where the second molar was restored with a class 2 composite restoration and the first molar was replaced using the copy mode in exocad. An initial scan was taken copying capturing the outline form of the pre-existing restoration, the crown was then removed, the tissue was retracted and the preparation was modified
After the decay was removed the Medit i500 was used to capture the prep and the restoration was designed in our CAD software. The eMax restoration was milled and crystallized and then delivered with NX3 resin cement
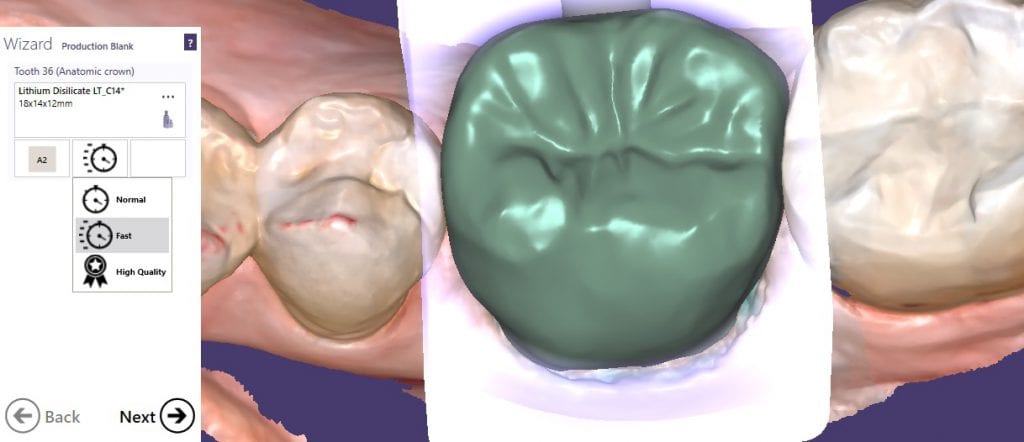
This restoration was milled in the regular mode without using the 060 drill. This speeds up milling but does not provide for detailed anatomy, which you can accentuate with a handpiece. It is your decision to select fine mode, regular, or fast mode.
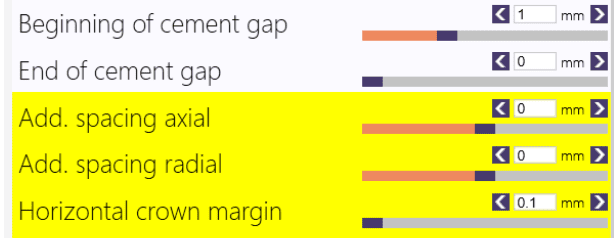
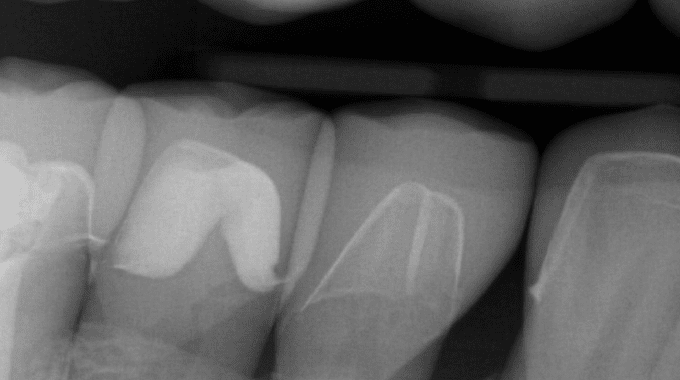
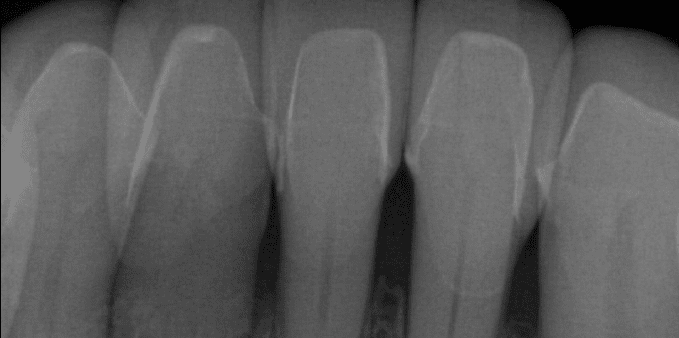
Since July, we have imaged and milled many restorations with at least 4 different milling machines, including lab fabricated restorations. The margins and fit have been impeccable even with my terrible preps :). I love seeing the post op bitewings and the adaptation of the restorations. One thing I love having control over is the spacer settings; both the amount of space and also the distance I want the gap to end from my margins.
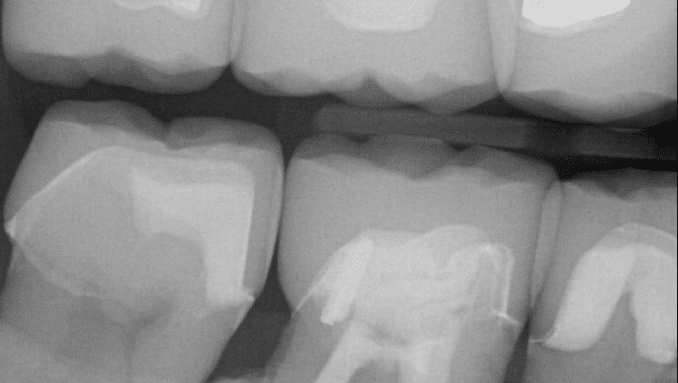
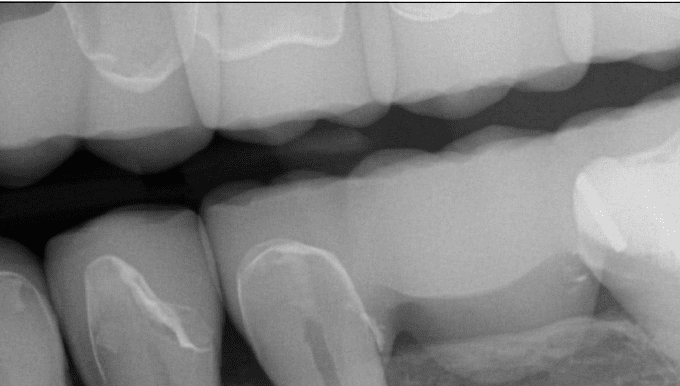
The following case is a lower first molar with the distobuccal cusp fractured and recurrent decay underneath the pre-existing composite restoration, warranting full cuspal coverage. The case was managed with the CAD-Ray workflow, where the medit software is launched and all the imaging is done in that platform.
Directly from meditlink, exocad software is launched and the margins are placed. Once the restoration designed, it nested in the block and sent off to the milling machine. The total time from final design to end of mill was about 18 minutes, and the last 4 or so minutes, the milling machine refined the sprue size and location. One can easily stop the milling process and remove the sprue manually.
Once the restoration was assessed for fit and proper contours, it was chrystalized and then bonded in with Kerr NX3 material. A final post op bitewing was taken to assess if any excess cement was left behind.
This video is sped up at some points, but from the time the design was finished and it was sent to production, it tool less than 90 seconds for the milling machine to start milling. It took a total of 9 minutes and 20 seconds from the time the first water is sprayed to the time the water stops.
The Meditlink software allows you to log in as a clinician or a laboratory. There are quite a few benefits to logging in as a lab, one of them is to have control over the whole process from imaging to design to fabrication
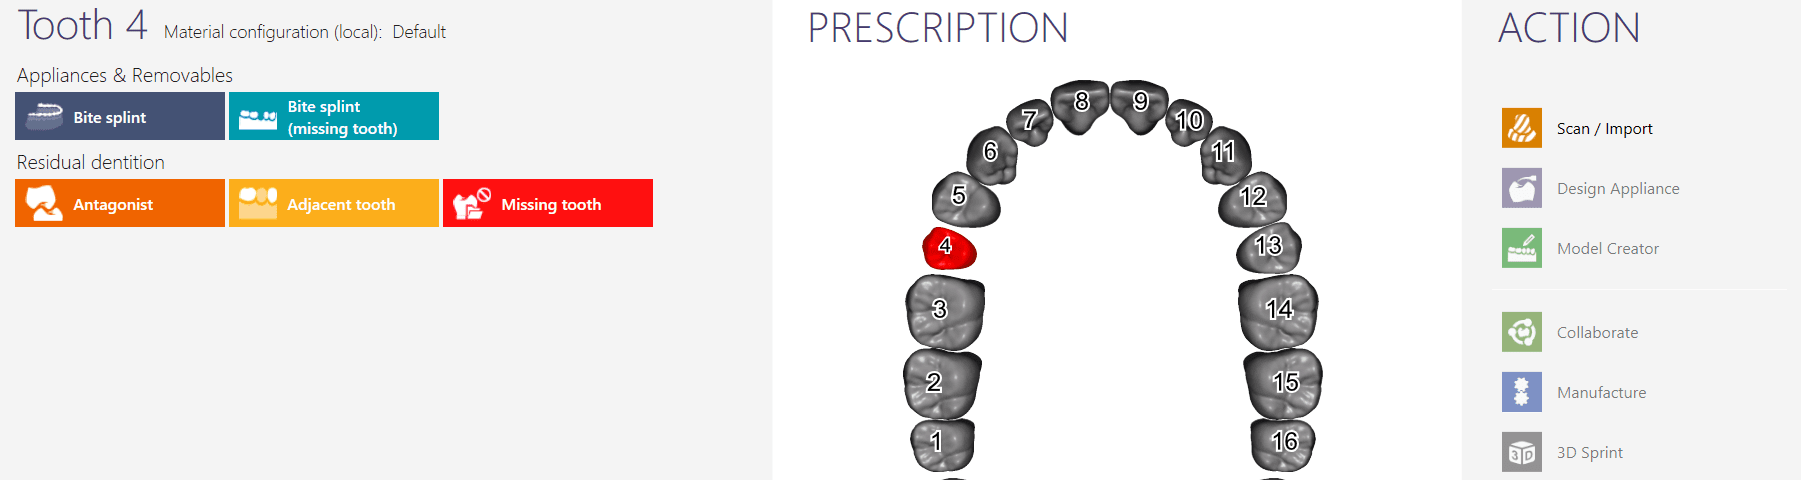
Here, we demonstrate how the case is set up in the job definition. We have linked the exocad CS CADapp as the design software of choice. You have many other options including manually exporting the models.
Once you define the job, you can directly launch the Medit scanner and start imaging. Once you are finished with imaging, you can start marking margins and complete the design of the restoration in the CAD software.
Once designed completely, you have a number of ways to submit it tofabrication. One big advantage here is how you can start milling as soon the calculations start, with the VHF Z4 milling machine. As opposed to milling machines that must have the calculation completed before they start milling, which oftentimes puts the procedure outside the realm of single visit dentistry
Much like conventional impressions, digital impressions can render ill-fitting restorations. It is imperative to figure out the source of the problem and to understand if it is a scanning or...
Until recently, when you submitted a case to Panthera Dental for a Obstructive Sleep Apnea Device, they would manufacture it and send it to one of their partner labs. This...
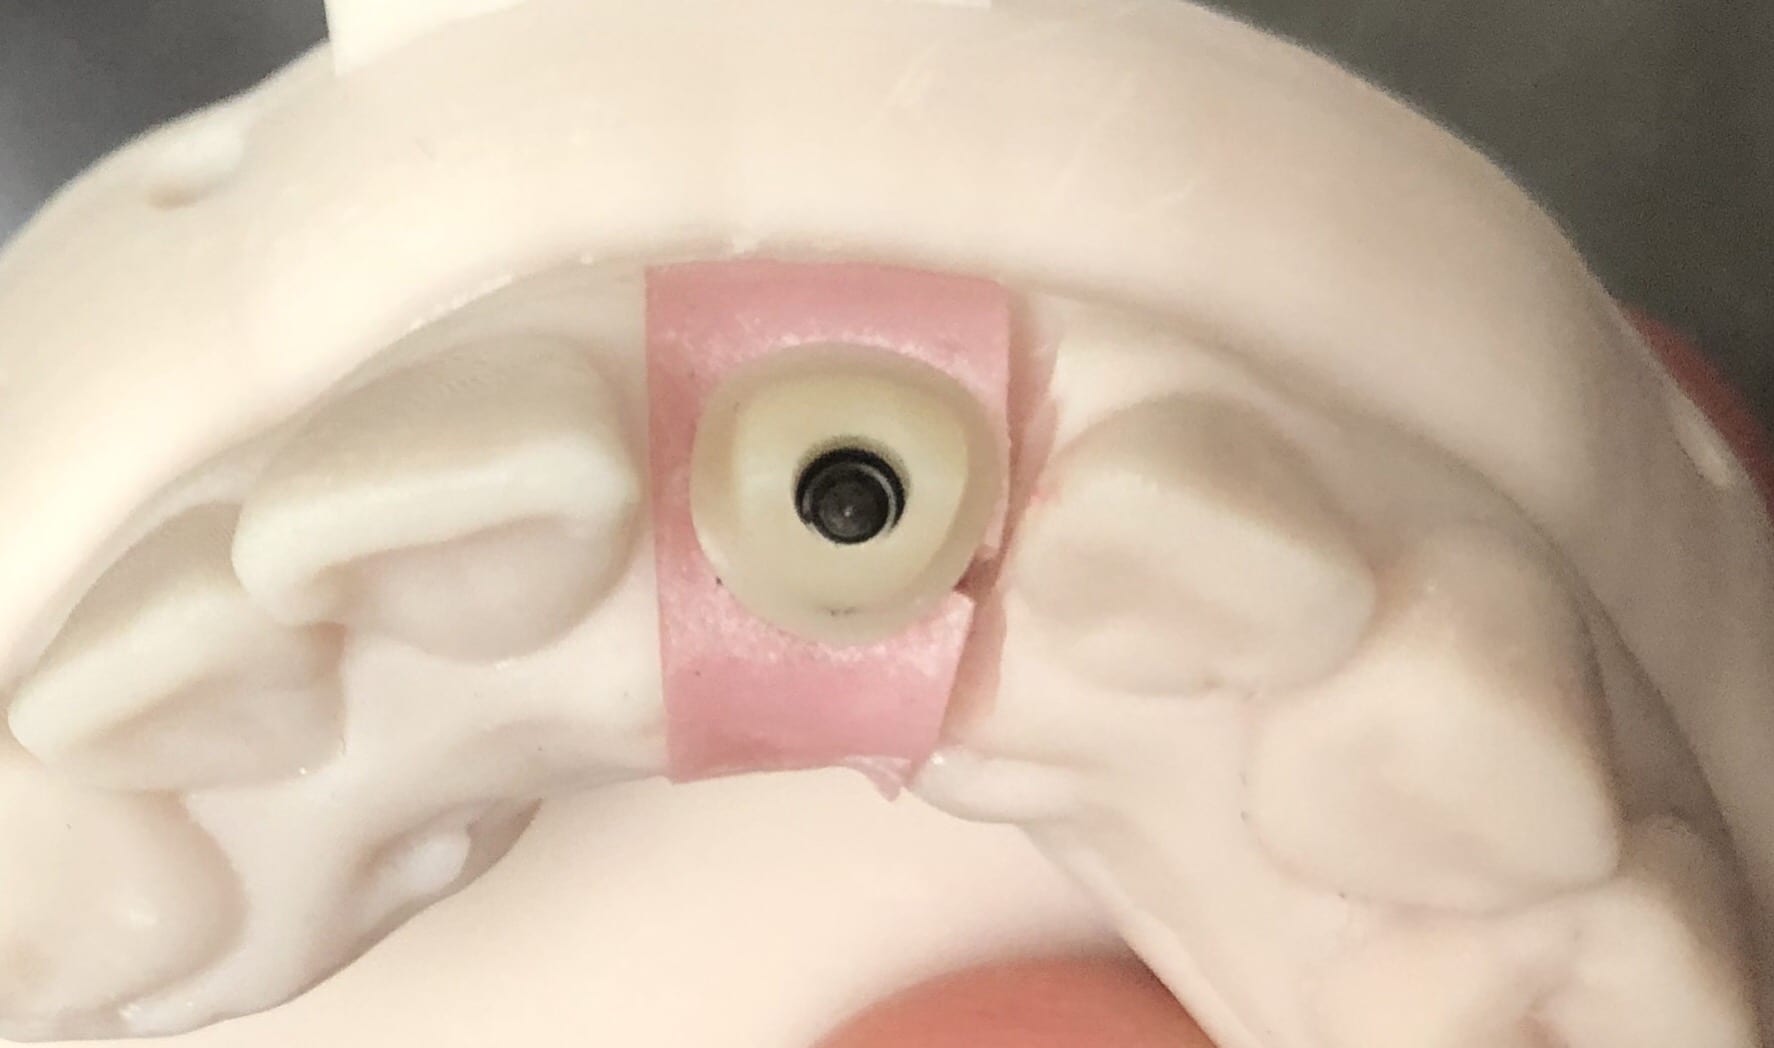
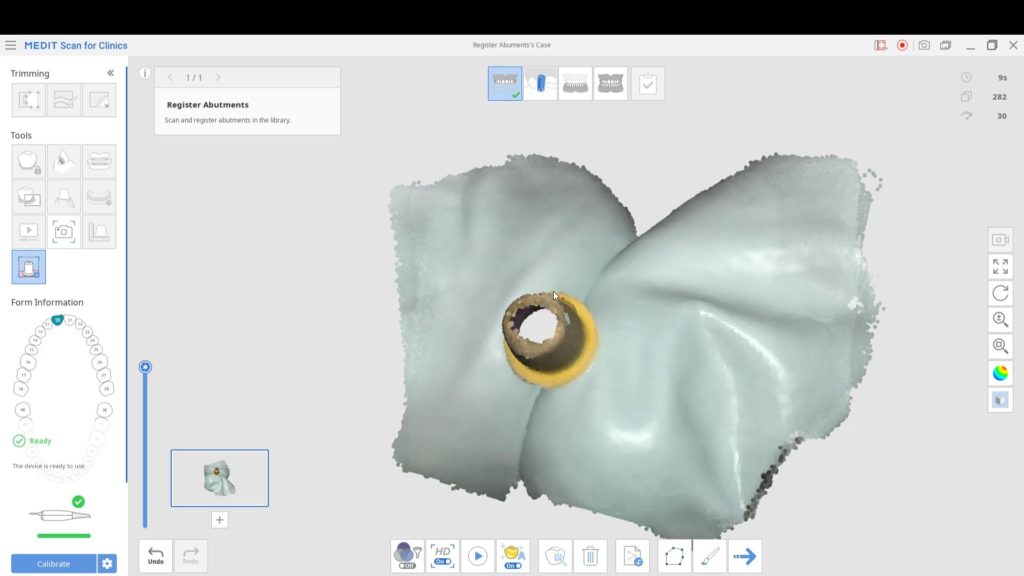
Medit’s software allows you to remove and pre-existing abutment and scan it outside the mouth. This allows you to find your margins without ever having to displace the tissue or...
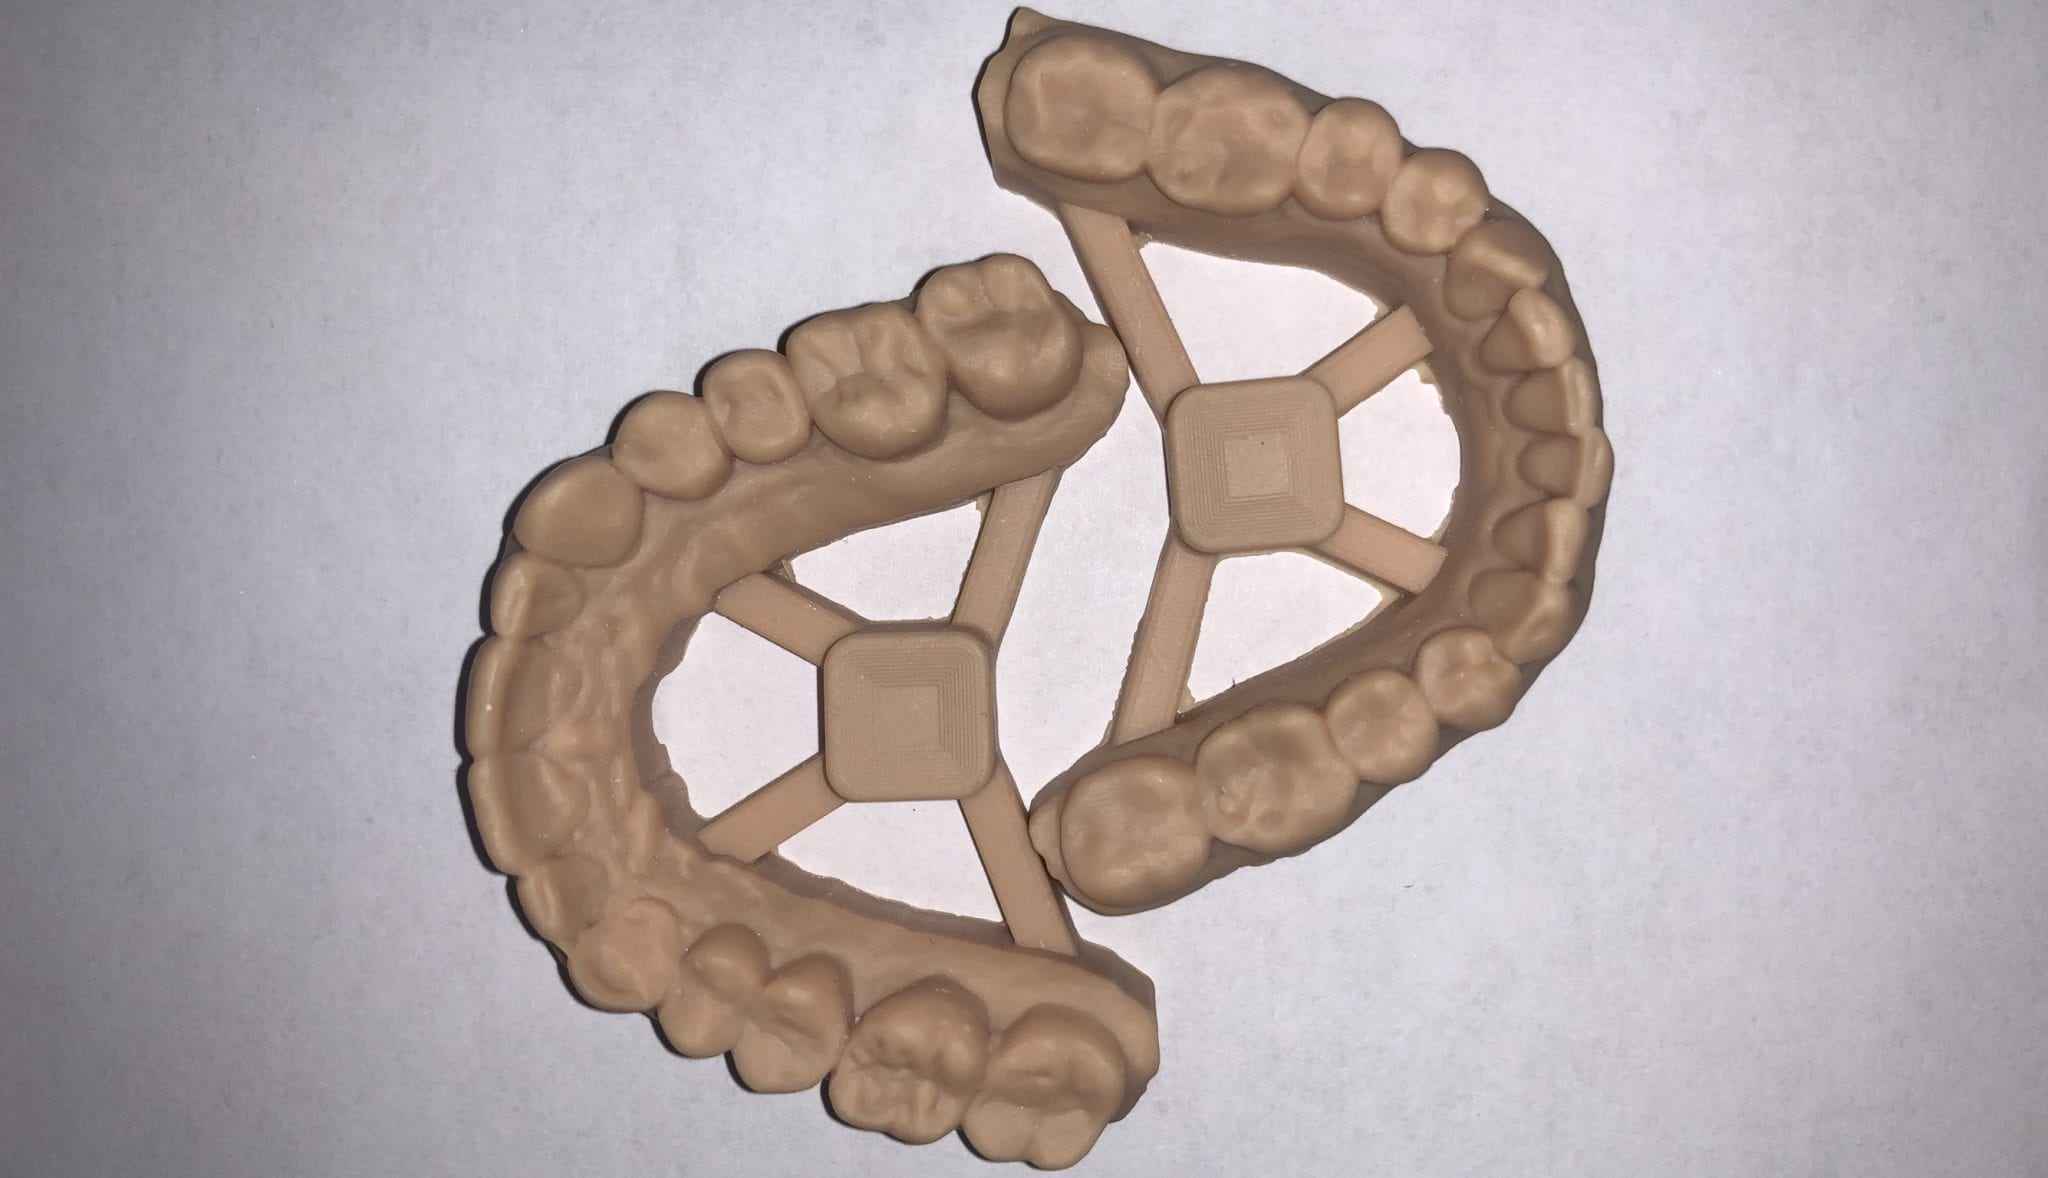
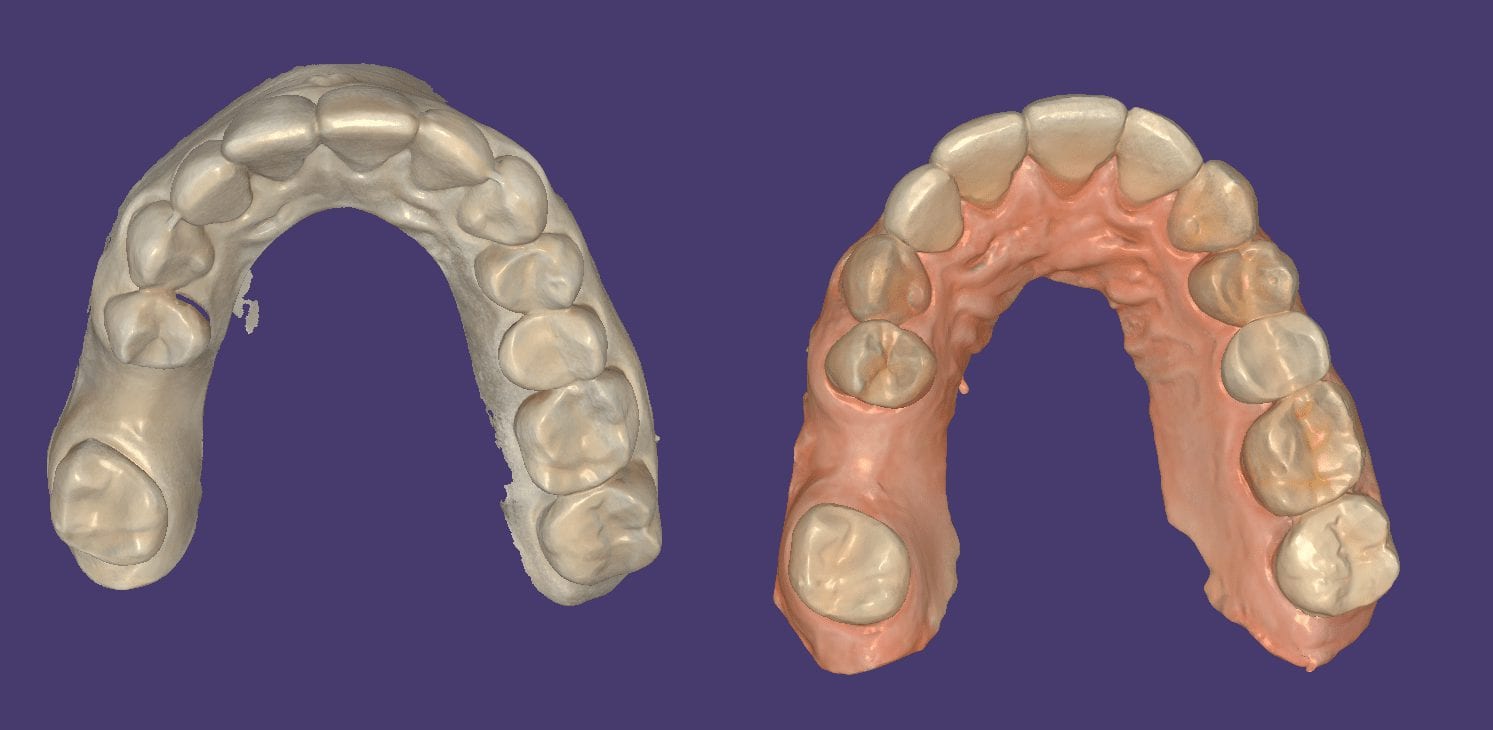
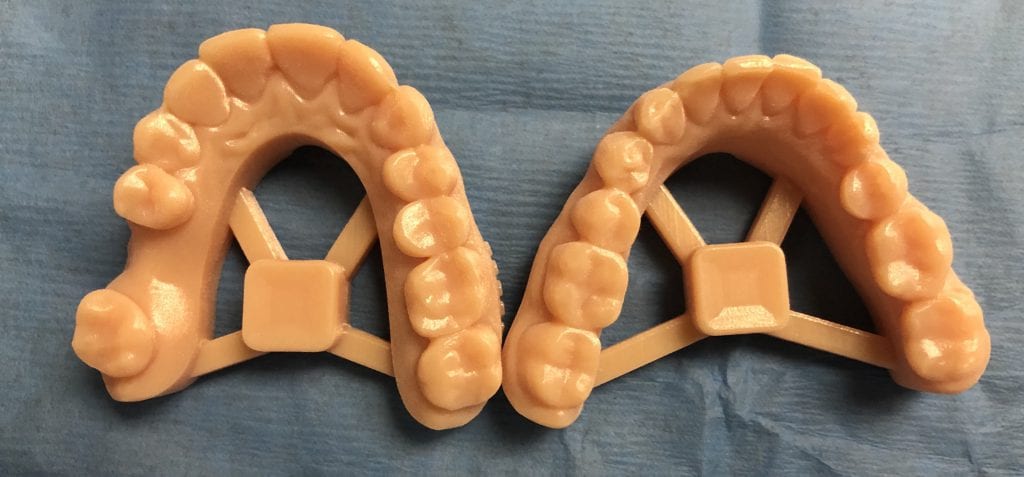
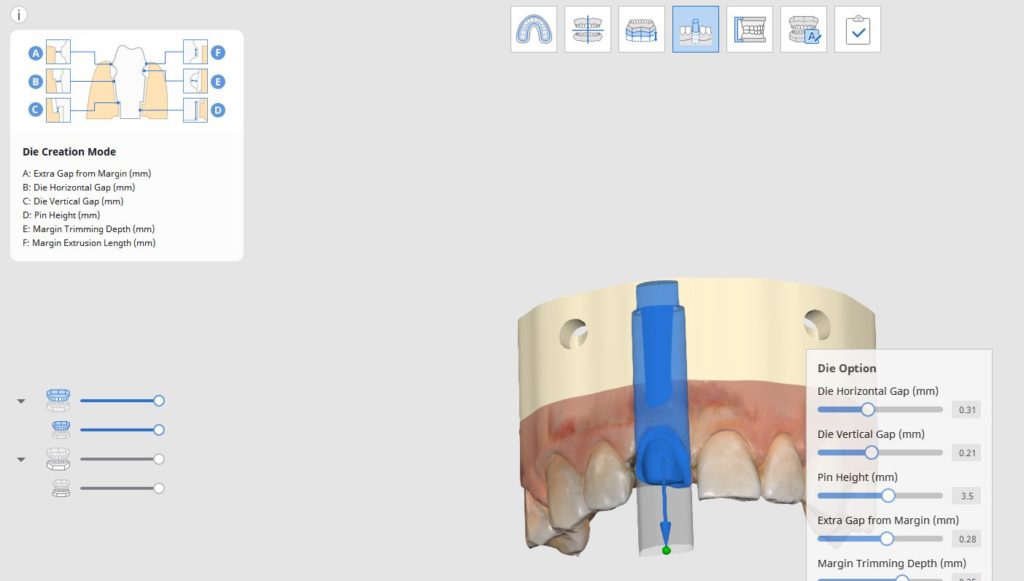
Here is a preview of the new Medit Model Builder with Ditched Dies where you can print the arches with support pins and separate dies Download the case and...


You must be logged in to post a comment.