Couldn't have had a better experience. The training was excellent, and they've been great to work with. I recently had an issue that required a warranty claim. The process was super easy, and completely hassle free. In fact, I'm still in shock at...read moreCouldn't have had a better experience. The training was excellent, and they've been great to work with. I recently had an issue that required a warranty claim. The process was super easy, and completely hassle free. In fact, I'm still in shock at how great they were about the whole thing. I would (and do) highly recommend this company.read less - 2/09/2021
Daniel Thrall
I have owned this scanner for six months now. I have experience with other scanners including Trios and Carestream. The Medit scanner can stand with the big names. The scanned images are good. The ease of communication through the software with the l...read moreI have owned this scanner for six months now. I have experience with other scanners including Trios and Carestream. The Medit scanner can stand with the big names. The scanned images are good. The ease of communication through the software with the lab is probably my favorite part. Another thing I like is that the company is very open to improvements and listens to what its customers are wanting.
Cad Ray has a great team working alongside this product and continually updates all of the users on new features or new ways to use existing features. They are extremely responsive to questions and provide fast and competent support to the product that they sell.
I would recommend both the scanner and the company to anyone looking to get into the digital scanning world.read less - 10/09/2019
Couldn't be happier with the support I've gotten from these guys. Trouble-shooting a problem real time so you can call a patient and get them right back in with a solution is extremely hard customer service to match. Thanks a ton and no question wher...read moreCouldn't be happier with the support I've gotten from these guys. Trouble-shooting a problem real time so you can call a patient and get them right back in with a solution is extremely hard customer service to match. Thanks a ton and no question where I'll be going for any more purchases!read less - 10/06/2021
Great ongoing support and customer assistance. Been working with Frank for years, even before cad ray. Always there for any help i ever need. Cad ray support is like no other. - 1/26/2023
Dr Grace Simco
I bought I500 scanner two years ago. The scanner is great and the service is excellent. I have contacted Heather Gramley and Andy Nova about the updates of my scanner recently. They are absolutely amazing people. They go above and beyond. They repres...read moreI bought I500 scanner two years ago. The scanner is great and the service is excellent. I have contacted Heather Gramley and Andy Nova about the updates of my scanner recently. They are absolutely amazing people. They go above and beyond. They represent the company very well.read less - 7/05/2022
It was very powerful and enlightening experience today to do 2 day sessions with Dr. Armen and Damien. I learned a lot, quite amazed by how much we can do with knowledge and Medit scanner. As usual great support by CAD-RAY always. I absolutely love M...read moreIt was very powerful and enlightening experience today to do 2 day sessions with Dr. Armen and Damien. I learned a lot, quite amazed by how much we can do with knowledge and Medit scanner. As usual great support by CAD-RAY always. I absolutely love Medit scanner.read less - 8/08/2021
Lake Shore Dental of Tempe
Absolutely the best customer service I have ever seen. I couldn't be happier with the service received. I won't be going anywhere else!! Thank you again. - 2/01/2022
Michael Conte
Needed help with scanner updates and Frank is the man! Once he was done the scanner was operating in hyper-drive!!thanks frankoffice of Glenmont Dental - 2/15/2022
David Chong
Digital dentistry has changed my work flow for the better and could not imagine going back. So important that I have the support when things don't work as expected. CAD-Ray has been there every step and trust their expertise and knowledge! - 4/20/2022
John Pisacane
I purchased my Medit scanner after the ADA meeting in 2018. I did it primarily on the personal recommendation of Armen Mirzayan, the owner of Cad-Ray. I have known Armen for over 15 years (we both were CEREC trainers) and he has always been unbeli...read moreI purchased my Medit scanner after the ADA meeting in 2018. I did it primarily on the personal recommendation of Armen Mirzayan, the owner of Cad-Ray. I have known Armen for over 15 years (we both were CEREC trainers) and he has always been unbelievably knowledgeable about dental technology and was always moving on the cutting edge.
When you see Armen's daily FB posts, it’s obvious that he is constantly pushing the envelope and exploring the limits of the Medit and the processes we use to idealize our push towards completely digital dentistry. Medit owners are fortunate to have Armen finding glitches and pushing for improvements in our scanner.
As far as after sale service, I can’t find a flaw with Cad-Ray. You won’t find a more supportive and dentist-centered company. Armen and Frank do everything to make purchasers happy and back up their sales.
I’ve heard of horror stories when people shopped elsewhere and only positive comments about Cad-Ray.
In summary, buy your Medit and other high tech equipment from Cad-Ray, you will be totally satisfied.
.read less - 10/08/2019
Cad-Ray has provided a great product! They have been super helpful with getting all of our questions answered and products to us in a timely matter! - 3/01/2022
Brandon Erickson
I have strong feelings about how great CAD-Ray has been. I purchased a medit i500 scanner from my lap, they wanted to use it for courses which aren't happening now so he didn't want to be sitting with this expensive piece of technology sitting aroun...read moreI have strong feelings about how great CAD-Ray has been. I purchased a medit i500 scanner from my lap, they wanted to use it for courses which aren't happening now so he didn't want to be sitting with this expensive piece of technology sitting around. Before purchasing he and I both talked to the Nobel sales rep who assured me that everything would transfer over just fine. I was concerned about the learning curve and wanted to be sure that I would have tech support. I asked the rep directly and he assured me again that everything would be great and he would come do an in-depth training with me. Long story short, the sales rep had no clue what he was doing and put very little effort in to helping me once the purchase was complete. I asked him over the phone how to do a few things and his response was to call CAD-Ray. They explained that this happens, they would love to help me but asked that I purchase the service package. That was a game changer. Now all of my questions getting answered, their response time is amazing and their understanding of the machine is by far better then the Nobel reps. The scanner is great but combine that with their tech support and I feel like I'm set up for success. If I were to do this again, I would skip the headache of trying to save a little bit of money and purchase it through CAD-Ray. But even with making the mistake, I feel like they have programs and support set up to point me in the right direction.read less - 10/15/2020
Dong Lim
I’ve been using Medit for close to 2 years. It’s a must for any practice. No evil monthly subscription and great support from CAD ray - 6/16/2020
John T
Frank and the CAD-Ray crew are awesome! They are always available for support with the technology you purchase from them. - 1/25/2023
Micah Bickel
Great products, training and support - 11/01/2021
John Eum
Love all the staff there. Great support and instruction from Armen, Laura, Damien. We are very grateful for Kaila who has been incredible in getting us going - very friendly, professional and responsive. Thank you! - 7/03/2024
Robert Loughlin
I Love it !!! I needed to replace my Omnicam because the computer hardware was old and not able to keep up with the software upgrades. The computer upgrade costs from Sirona were cost-prohibitive (another reason why the Medit is so good) and I wasn...read moreI Love it !!! I needed to replace my Omnicam because the computer hardware was old and not able to keep up with the software upgrades. The computer upgrade costs from Sirona were cost-prohibitive (another reason why the Medit is so good) and I wasn't about to make the same mistake twice and replace it with another system from Sirona. I was a bit unsure about making a big switch but after speaking with Nick Statly at Cad-Ray, he eliminated all of my reservations and I ordered it. I've used it for the past week and love it. Setting it up and getting it running was simple. I would not describe this as a do it yourself process, it's much easier. If you can make a cup of coffee you can set the scanner up and start making excellent scans. All one needs to do is watch the very well laid out and easy to follow videos and save a lot of money. The image quality and ease of use hands down beats the Omnicam. Also during the current pandemic, I really feel better about being able to cold sterlize the tips vs the omnicam's just "wiping down." I almost hope my desktop scanner craps out so I can get the Medit desktop. I'm glad I listened to you Nick!!!read less - 6/04/2020
I got the Medit scanner last fall and I have been nothing but impressed by it and the support by CAD-Ray. The level of support, training videos, and continuously upgraded software is really impressive. If you are on the fence, you should feel confide...read moreI got the Medit scanner last fall and I have been nothing but impressed by it and the support by CAD-Ray. The level of support, training videos, and continuously upgraded software is really impressive. If you are on the fence, you should feel confident in moving forward with CAD-Ray.read less - 6/16/2020
Barton Davis
Every time I need support for my scanner, the Cad-Ray team is there to help. I recently had a question on how to manipulate a scan and export it back to Medit Scan. Damien logged in and helped me out. Problem solved in under five minutes. Awesome ser...read moreEvery time I need support for my scanner, the Cad-Ray team is there to help. I recently had a question on how to manipulate a scan and export it back to Medit Scan. Damien logged in and helped me out. Problem solved in under five minutes. Awesome service. Thanks Cad-Ray support team!read less - 3/04/2022
Matt Stratman
only dental company that I have no complaints about - 11/03/2022
Steven Acker
The i700 provides amazing ease of use and versatility for any digital restorative application. It’s been game changing for our practice. CAD-Ray’s amazing support and Medit’s constant improvement of the software are revolutionary. I’ve been taking di...read moreThe i700 provides amazing ease of use and versatility for any digital restorative application. It’s been game changing for our practice. CAD-Ray’s amazing support and Medit’s constant improvement of the software are revolutionary. I’ve been taking digital impressions for over 15 years with other systems and nothing comes close to the Medit.read less - 8/27/2021
I can't even find the words to express how incredible CAD-Ray has been with their customer service. I've never worked with a company in ANY industry that has been as helpful and responsive at they have been. Based on their customer service alone I ...read moreI can't even find the words to express how incredible CAD-Ray has been with their customer service. I've never worked with a company in ANY industry that has been as helpful and responsive at they have been. Based on their customer service alone I would buy every piece of equipment I ever needed from them if they sold it. Truly a unique experience! Oh, and the medit i500 has been fantastic, super accurate and patients are blown away by digital impressions. Love it, great product and incredible customer serviceread less - 12/09/2021
Cody Boseman
Cad-ray has been amazing, not to mention they have an amazing product in the medit i500. Their training is great, customer service is quick and thorough, and follow up is consistent. I highly recommend using cad-ray for anything that you may need. - 6/19/2020
Nick Boyd
Great people. Very helpful with anything you need. - 6/16/2020
Mathew Rosinsky
Amazing support. Great product. Thoroughly happy with all that this organization offers and provides to our team. Looking forward to doing more business with them in the future. - 12/13/2021
Yoav Taub
I purchased my Medit from Cad-Ray just prior to Covid and they have been fantastic in getting me the proper training on the machine, both through there 2 day class as well as the many video's they post on the website. I recently purchased some acce...read moreI purchased my Medit from Cad-Ray just prior to Covid and they have been fantastic in getting me the proper training on the machine, both through there 2 day class as well as the many video's they post on the website. I recently purchased some accessories for a different office and they accidently sent it somewhere else. After a quick email they had my stuff at my door within 24 hrs and they threw in a box of tips which I was not expecting (around $300). It is a pleasure to deal with them!read less - 7/19/2021
Steve Blank
I bought the Medit i500 and self installed to save $$$. The web site provided great step by step instructions. The Facebook group filled in the gaps. The software has been continuously upgraded and works great for scanning and tracking cases sent and...read moreI bought the Medit i500 and self installed to save $$$. The web site provided great step by step instructions. The Facebook group filled in the gaps. The software has been continuously upgraded and works great for scanning and tracking cases sent and received. My tip for scanning single crowns: While waiting for anesthesia, Scan the upper and lower quadrants and record the bite. Then i delete the tooth to be scanned. That saves time later after tooth preparation. At that time, switch to HD and scan the prep, done!read less - 6/16/2020
Chris Kleist
Cad-Ray is the absolute best if you're in the market for digital dental tools. I have purchased two Medit scanners through them. There will be hiccups with any complex piece of machinery, but every time I have needed Cad-Ray, they have been there. I ...read moreCad-Ray is the absolute best if you're in the market for digital dental tools. I have purchased two Medit scanners through them. There will be hiccups with any complex piece of machinery, but every time I have needed Cad-Ray, they have been there. I recently had a scanner go down. I called Cad-Ray tech support and they got me on the phone with Medit immediately. Within a day, a replacement scanner was sitting on my desk. It doesn't get much better than that.read less - 10/03/2024
Tara Ericson
Very pleased with the EXCELLENT support we have received from Frank DeLuca! Loving our new Medit so far, definitely more user friendly than our previous one. - 6/02/2022
Rebecca Booth
Great scanner easy to use with the software. Definitely recommend the i700 scanner. Great customer service from Laura. - 12/09/2021
Suzanne Stock
Excellent experience, customer service has been stupendous! - 11/20/2023
Harrison MacKenzie
Purchased Medit i700 from Frank/CAD-Ray and everything has been absolutely top-notch! Great service, quick responses, great training. Very happy with CAD-Ray and our i700! - 10/20/2022
Bob D
Just got my Medit i700 from CAD-Ray and experienced what everyone raves about, the level of customer service by CAD-Ray. As you know you can buy this scanner from a lot of places but they won't offer you help and support. They called my cell and conn...read moreJust got my Medit i700 from CAD-Ray and experienced what everyone raves about, the level of customer service by CAD-Ray. As you know you can buy this scanner from a lot of places but they won't offer you help and support. They called my cell and connected to my laptop and configured everything at 7 PM.. Great great experience.read less - 12/08/2021
Varghese George
The customer service has been top notch, every single time. I have only good things to say about them. - 4/05/2022
LoAn Huynh
Erika is one of a kind! She truly is patient with me. She has gone above and beyond to help me every time I call her. We have a few locations and she is always prompt in her responses and always manages to find a solution for me. I wish every rep was...read moreErika is one of a kind! She truly is patient with me. She has gone above and beyond to help me every time I call her. We have a few locations and she is always prompt in her responses and always manages to find a solution for me. I wish every rep was reachable ALL THE TIME and helpful! Thank you Erika! ❤️read less - 6/04/2025
Lauri Ann
I am about the worst person when it comes to technology. I decided to get a scanner and chose the Medit due to all the positive comments users had. I haven't used it much-the pandemic started right as I received it, however, the customer service has ...read moreI am about the worst person when it comes to technology. I decided to get a scanner and chose the Medit due to all the positive comments users had. I haven't used it much-the pandemic started right as I received it, however, the customer service has truly been amazing! I had an online training and a rep checked in with me several times to see if I needed help. I am going to do another online training soon as a refresher. I wouldn't hesitate to recommend this company and scanner to anyone!read less - 6/16/2020
Matt v
Matt Newman was excellent solving a cable problem.! Quick response and good follow up! - 9/11/2024
Archstone Weatherford
Medit i700 intraoral scanner is the first scanner that I actually used on my patients. Before I put my hands on it, I had some prejudices against all scanners. They were bulky, laggy in capturing the images, etc. When I finally had the chance to use ...read moreMedit i700 intraoral scanner is the first scanner that I actually used on my patients. Before I put my hands on it, I had some prejudices against all scanners. They were bulky, laggy in capturing the images, etc. When I finally had the chance to use an intraoral scanner and get introductory training with Laura from CAD-RAY a few weeks ago, I totally changed my view of this product. Very soon, I was able to scan crown, bridge, and even denture cases. Of course, I have had some knowledge about the digital scanner from CEs provided in the past, but being able to apply it in the daily practice in such a short time was beyond my expectations. I would highly recommend MEDIT i700 and training from CAD-RAY.
Big thanks to Laura!
-Lei Fu, D.D.S.read less - 9/12/2021
Great costumer service. I needed a part for my i700 and they were able to ship overnight. No down time. - 5/06/2022
Donghyun Noh
Just purchased i700 and had training with Andy.
Andy was very patient and informative . He went through everything and made sure I was comfortable with my equipment before leaving. I am really excited about this new technology. - 1/05/2023
As a small office, making the move to digital impression dentistry was a rather large commitment. After much research we settled on the Medit i500. We almost purchased from our implant supplier but were less than impressed with their training and...read moreAs a small office, making the move to digital impression dentistry was a rather large commitment. After much research we settled on the Medit i500. We almost purchased from our implant supplier but were less than impressed with their training and support options. After additional research we found Cad-Ray and couldn't be happier that we purchased from them. Their online tutorials and live support have been second to none. Having such a great support network behind the Medit made the transition and purchase so much better than it could have been had we gone a different route.read less - 11/30/2021
Ordered some scanner parts. Laura was super helpful and replied very quickly. Great customer service! - 6/02/2022
Michael Martinsen
Honestly the best service that I've received in dental tech support. I had originally purchased a scanner with another supplier and was underwhelmed with the support I received. I switched over to CAD-Ray for my second scanner and have never been let...read moreHonestly the best service that I've received in dental tech support. I had originally purchased a scanner with another supplier and was underwhelmed with the support I received. I switched over to CAD-Ray for my second scanner and have never been let down. They are prompt and exceptionally knowledgeable about the products they support. Thank you CAD-Ray for keeping my practice moving smoothly!read less - 8/27/2021
Jay Arnold DMD
Loving my Medit i700. My crowns have never fit better, and scanning is SOO easy. I started with cad-ray with the i500. The training and support have been second to none. I upgraded to the i700 shortly after it came out, and recently had a warranty is...read moreLoving my Medit i700. My crowns have never fit better, and scanning is SOO easy. I started with cad-ray with the i500. The training and support have been second to none. I upgraded to the i700 shortly after it came out, and recently had a warranty issue with the new scanner. immediately after calling them with my problem. A new scanner was overnighted to my office, I was very pleased, and had minimal down time.read less - 4/05/2022
Stephen S
Choosing an digital intraoral scanner these days can be quite a daunting task. When I reached out to CAD-Ray, as was recommended by many colleagues, I was connected to Frank DeLuca, and he made my decision-making process very simple. Upon receiving...read moreChoosing an digital intraoral scanner these days can be quite a daunting task. When I reached out to CAD-Ray, as was recommended by many colleagues, I was connected to Frank DeLuca, and he made my decision-making process very simple. Upon receiving my 3shape Trios 4 scanner, Frank and the entire tech support team/customer service were very helpful every step of the way. Frank makes himself available when he can in order to address all of the questions I have regarding the digital workflow. I highly recommend CAD-Ray. It will make your transition to digital scanning a positive experience.read less - 1/24/2023
Brian Wilkinson
This company is genuinely amazing. Amazingly good products, but the thing that sets them apart is the support. Frank and Sean have answered any questions I have unbelievably fast. And I LOVE the DOF Craft 5x milling unit. Learning the flow of same da...read moreThis company is genuinely amazing. Amazingly good products, but the thing that sets them apart is the support. Frank and Sean have answered any questions I have unbelievably fast. And I LOVE the DOF Craft 5x milling unit. Learning the flow of same day milling was tricky for me, but they held my hand the whole way. Can’t go wrong here.read less - 1/06/2024
Kenneth Gould
A most helpful, detailed, easy to follow, personal primer via Zoom on integrating the i700 scanner into our practice. Well done! Thank you Kaila! - 5/03/2022
Arielle Forbes
Just got my Medit IOS delivered last week and the service from Jon was great! I had a ton of questions before placing the order and he happily answered. This is the type of customer support many dental suppliers are missing. Great company to work wit...read moreJust got my Medit IOS delivered last week and the service from Jon was great! I had a ton of questions before placing the order and he happily answered. This is the type of customer support many dental suppliers are missing. Great company to work with.read less - 6/19/2020
Mark Geddes
Love my medit! Cad-ray has been awesome to work with and very educational in learning all things digital . Was doing a study club with 4 other dr's showing off the medit and the cerec dr who had just bought the newest kept saying, "mine doesn't do...read moreLove my medit! Cad-ray has been awesome to work with and very educational in learning all things digital . Was doing a study club with 4 other dr's showing off the medit and the cerec dr who had just bought the newest kept saying, "mine doesn't do that. No way! I wish mine could do that. For real? I paid 4 times as much."
Needless to say the medit is awesome.read less - 6/18/2020
New user and absolutely love my Medit i500 scanner. Easy to use, fast, affordable and so quick for a first timer IOS user like myself. Customer service is fantastic, as are the sales people. It’s good to know you have strong knowledgeable people beh...read moreNew user and absolutely love my Medit i500 scanner. Easy to use, fast, affordable and so quick for a first timer IOS user like myself. Customer service is fantastic, as are the sales people. It’s good to know you have strong knowledgeable people behind the scenes ready to help at every turn. I would recommend this product highly. Happy in PAread less - 9/09/2020
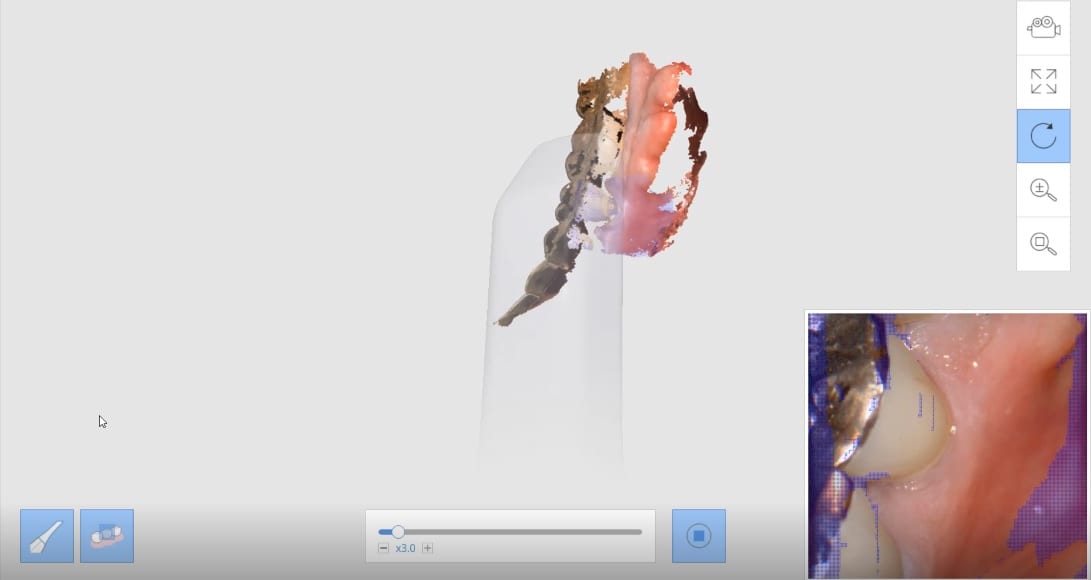
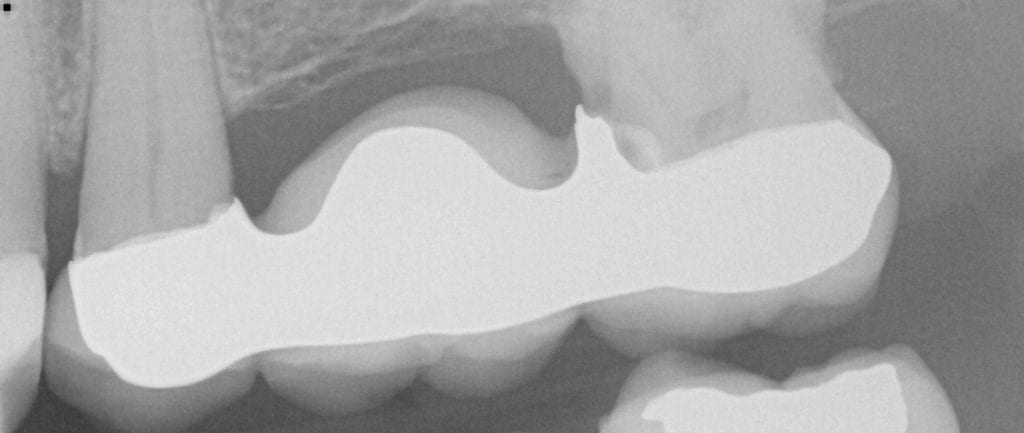
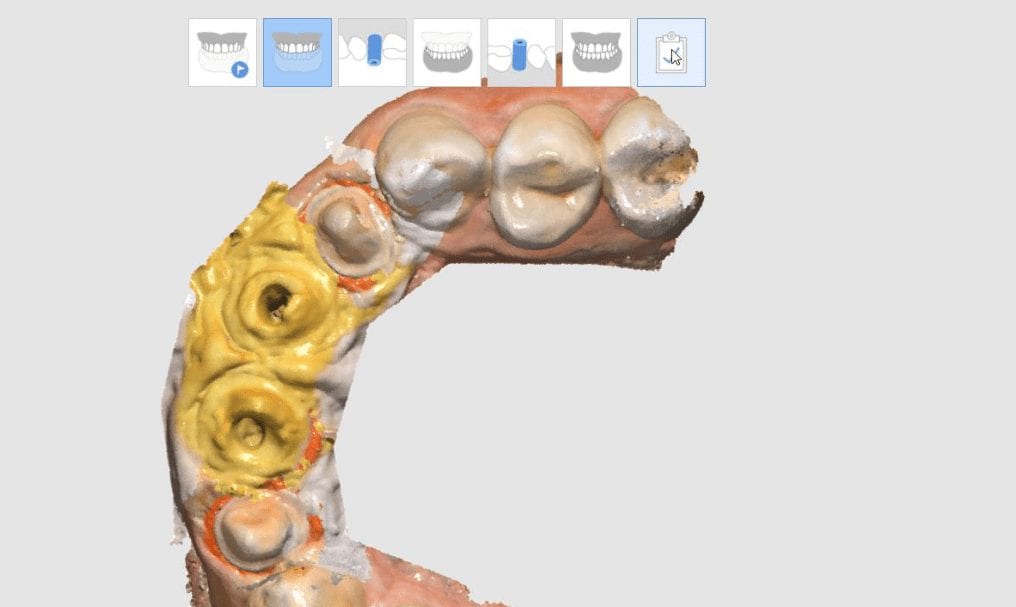
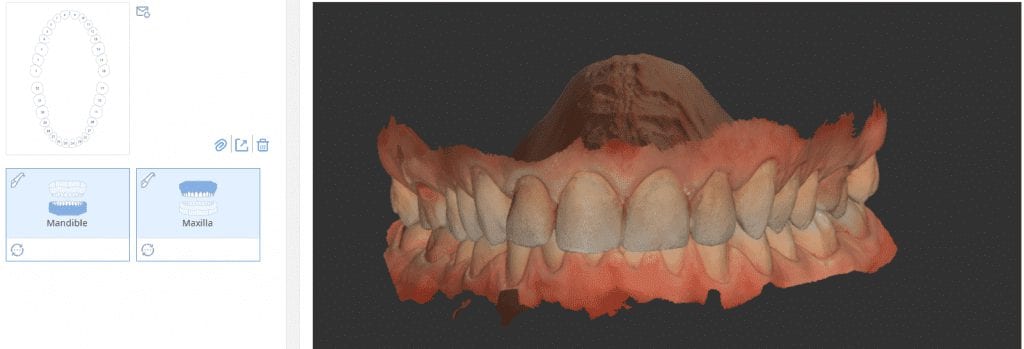
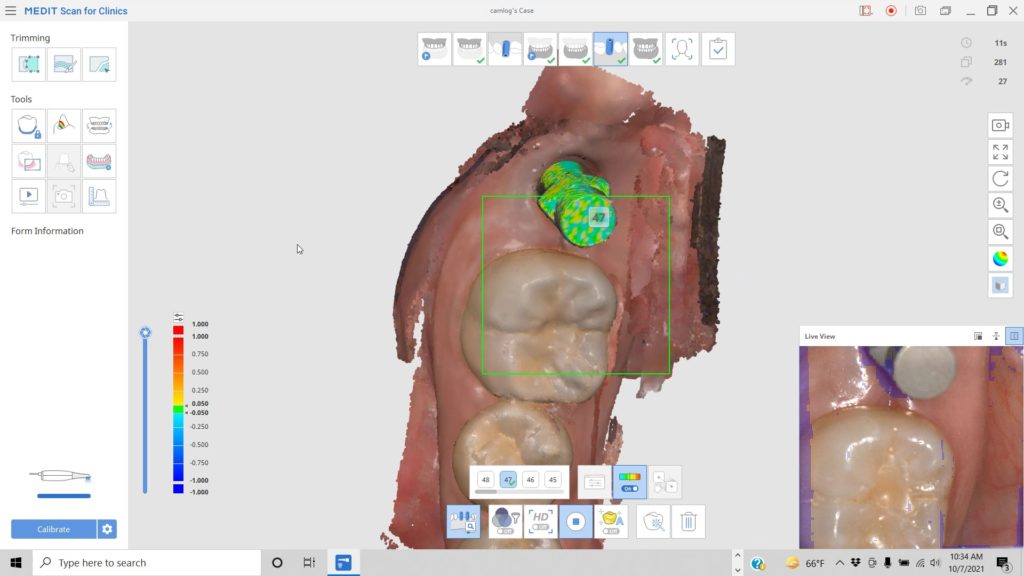
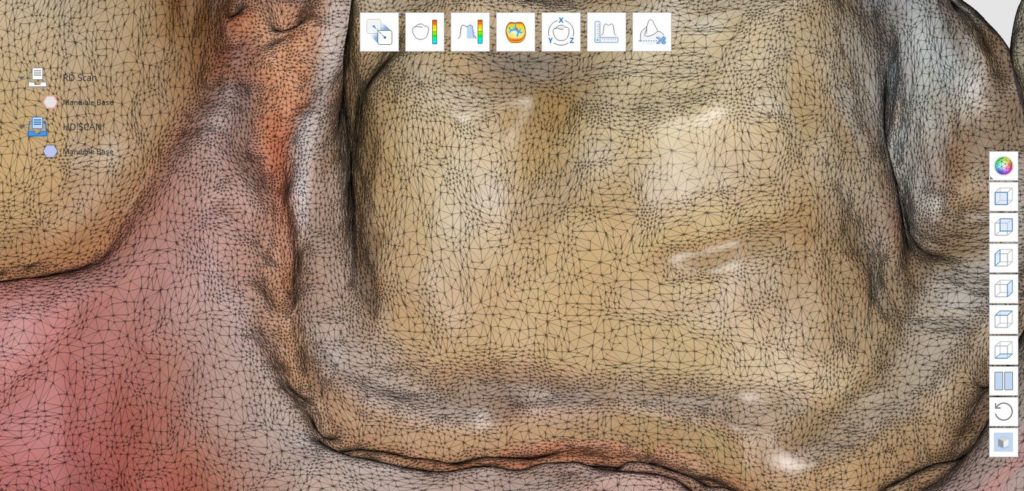
Imaging highly reflective surfaces can be challenging. In this particular situation, every tooth had either a pfm or a gold crown restoration. The video playback feature of the medit software allows you to see exactly how these areas are managed and captured. in the live preview box in the lower right corner, you can see the purple silhouette which shows areas that cannot be seen. Just angle the camera and moving its focal length and angulation allows all the areas to be captured. Not retraction besides a mirror was used. No isolation, air, or suction was used. Both arches were captured for an obstructive sleep apnea device with the Medit i500
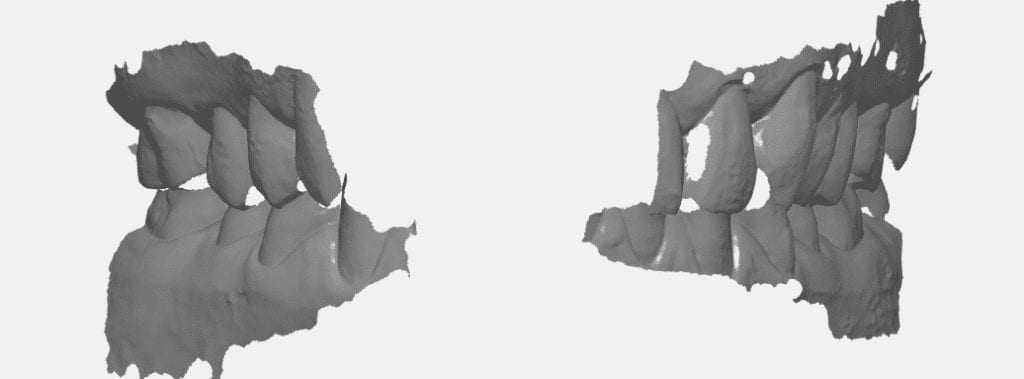
Scanning highly reflective surfaces can be a challenge with every intra-oral scanner. Here’s a pointer that can help: don’t start by trying to scan the metal or highly reflective surface. Get your purchase point on material that is easy to scan, like gum tissue or tooth structure. Once the model starts to form, you can then build on your desired material.
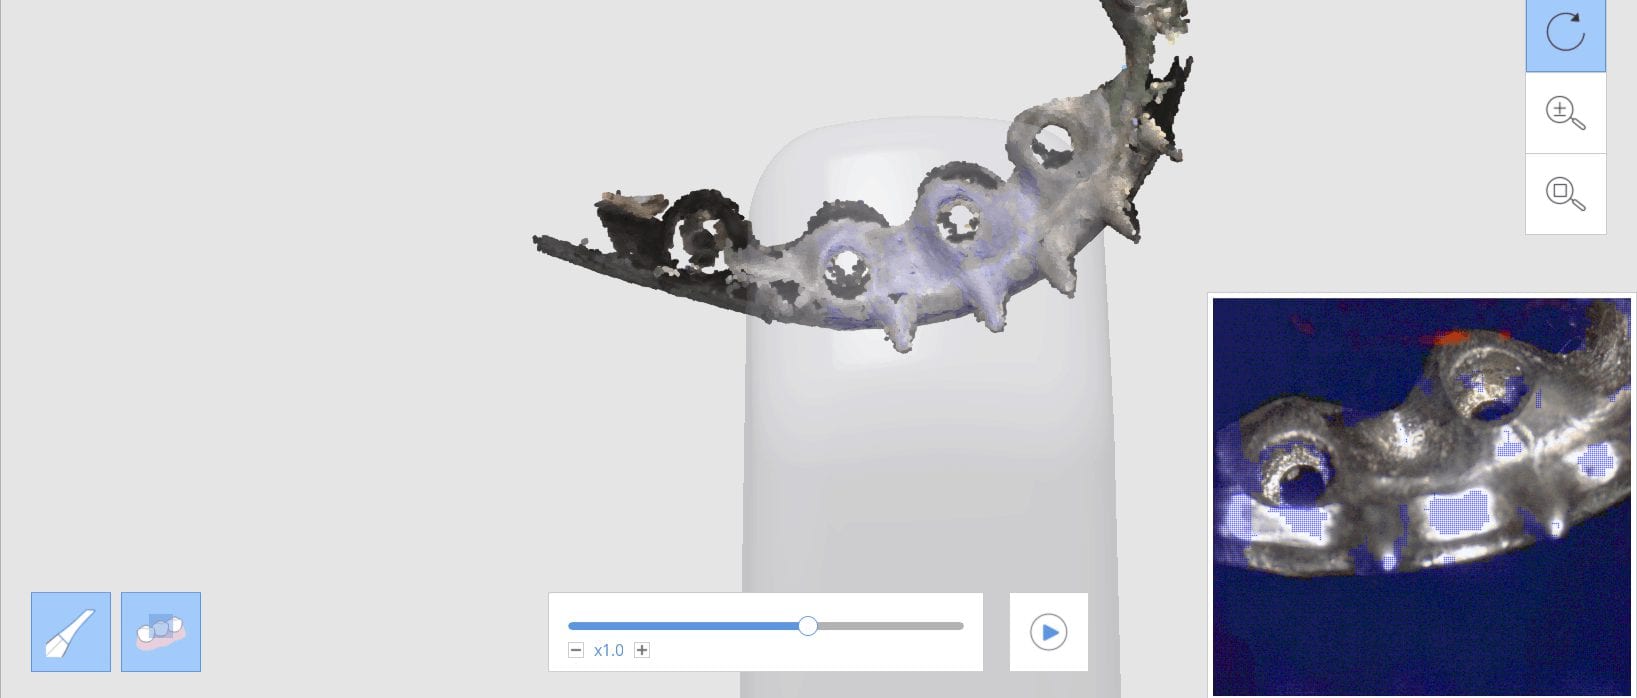
In this example, we are scanning a metal framework for a hybrid. Notice how the scanner does not recognize the metal at first, until it starts to image the thumb holding it. Once you start building the metal model and then remove the thumb and image over that area, the fingers are removed from the equation
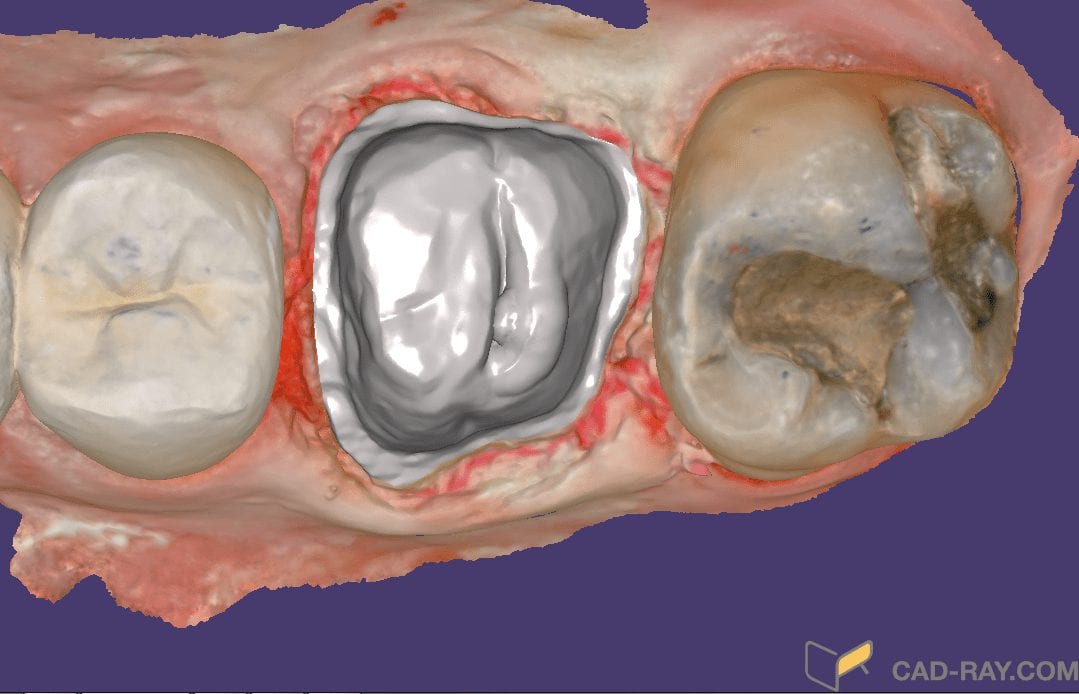
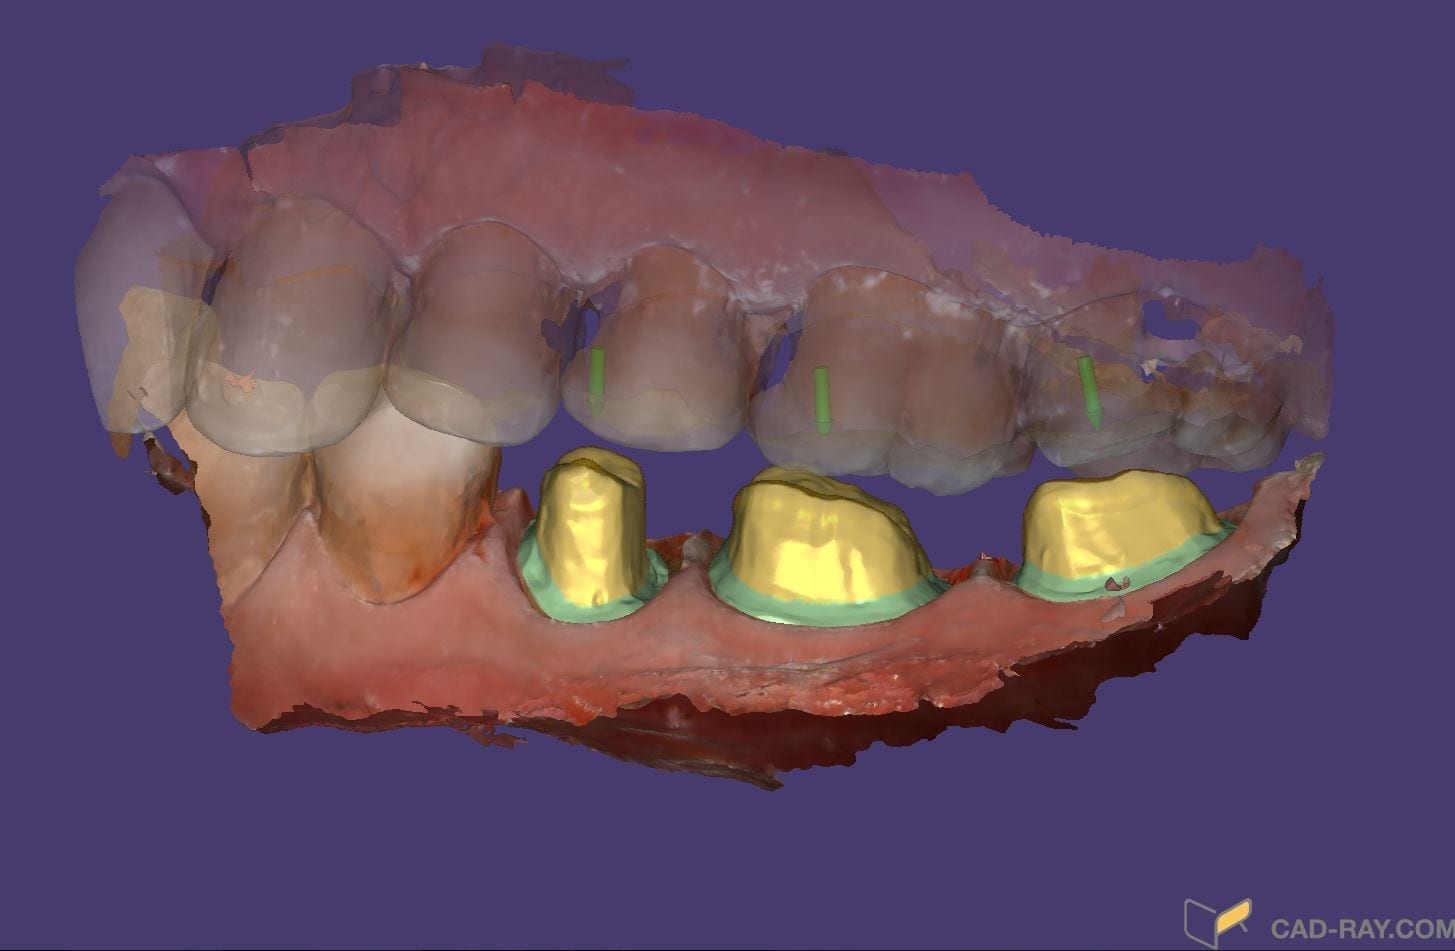
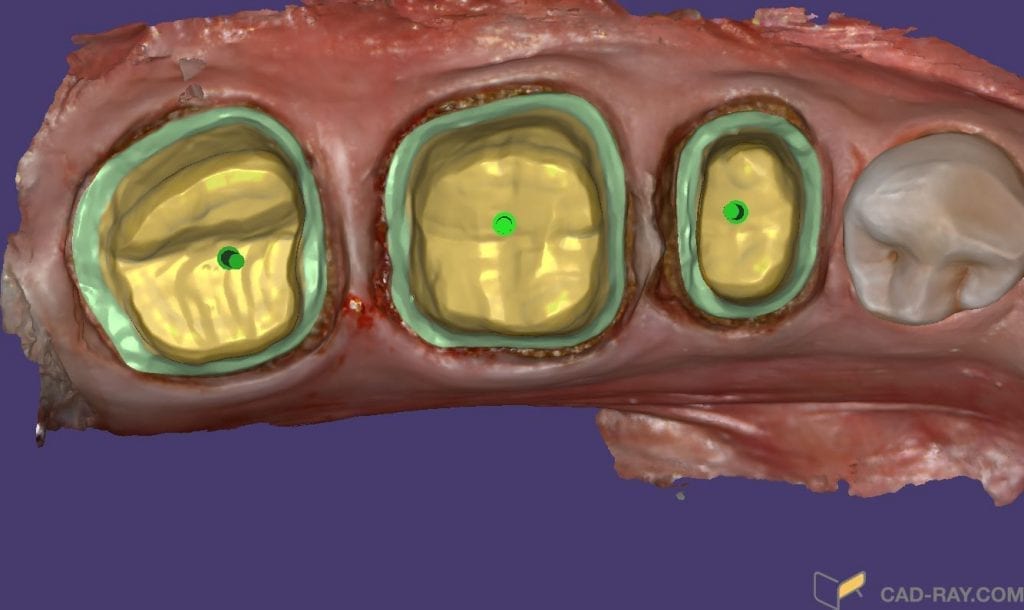
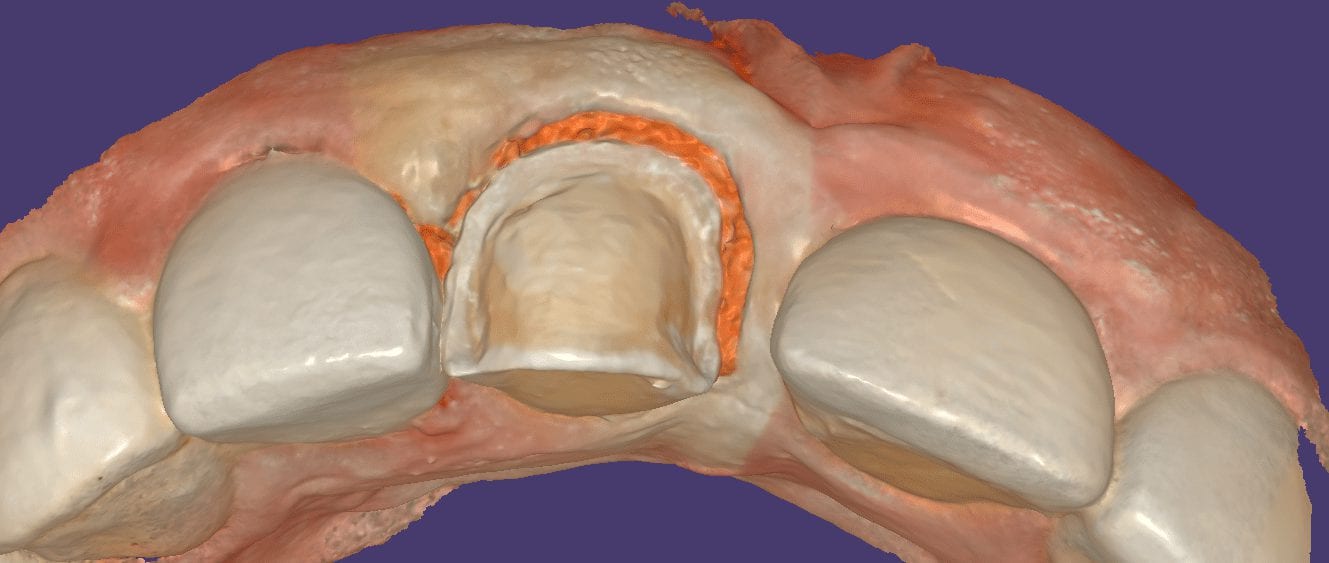
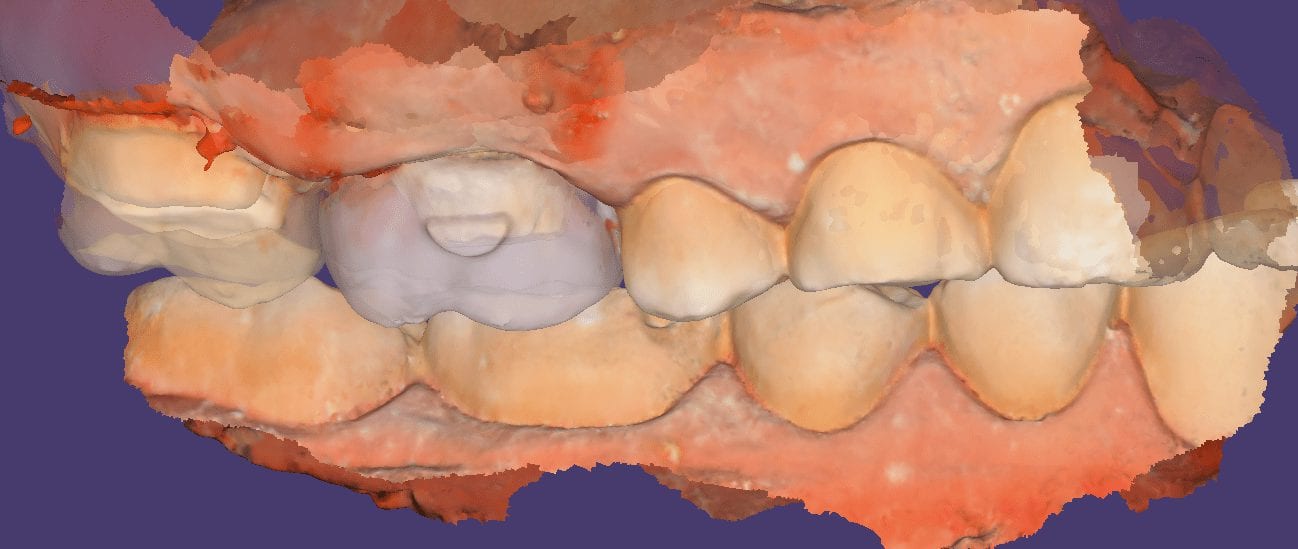
One of the most popular design techniques in digital dentistry is copying the pre-existing morphology of a restoration. When it is in occlusion and has desirable contours, you can image the pre-op condition before removing the crown.
Once the crown is removed, the preparation can be modified and new images can be taken. Placing margins is immediately followed by a great proposal that takes very little effort to finalize.
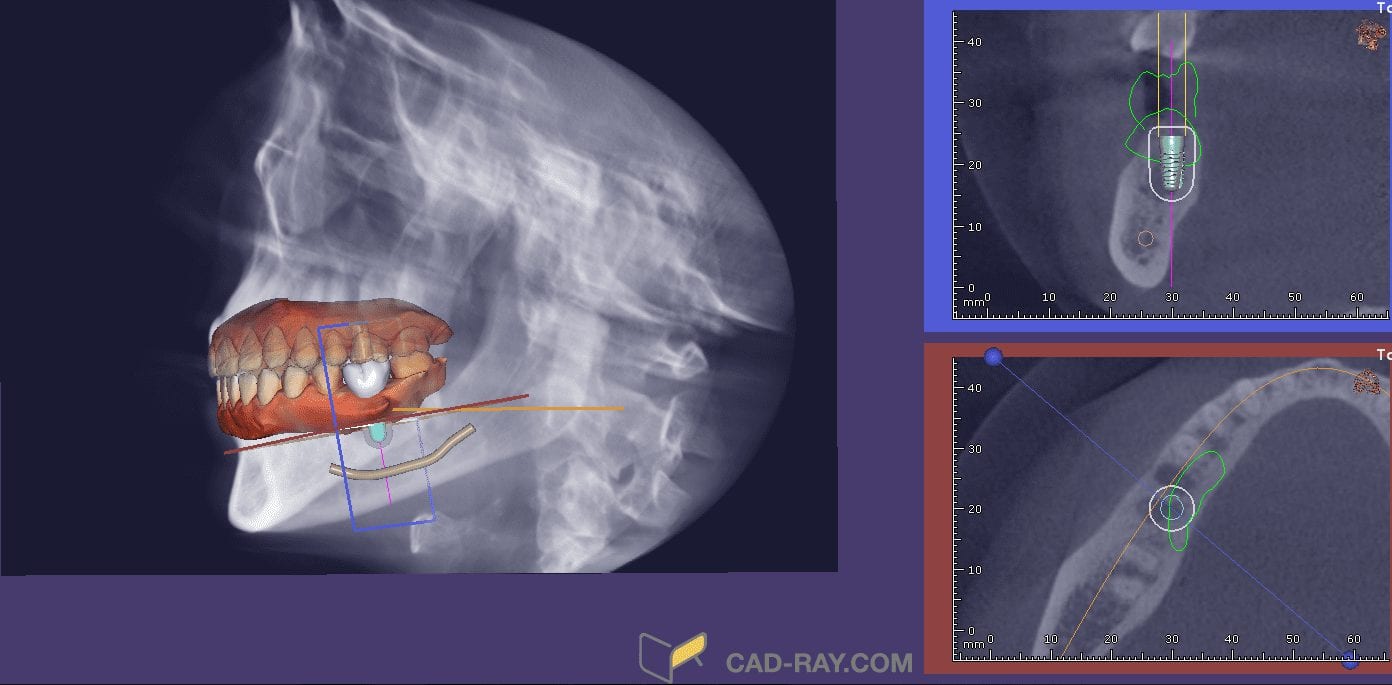
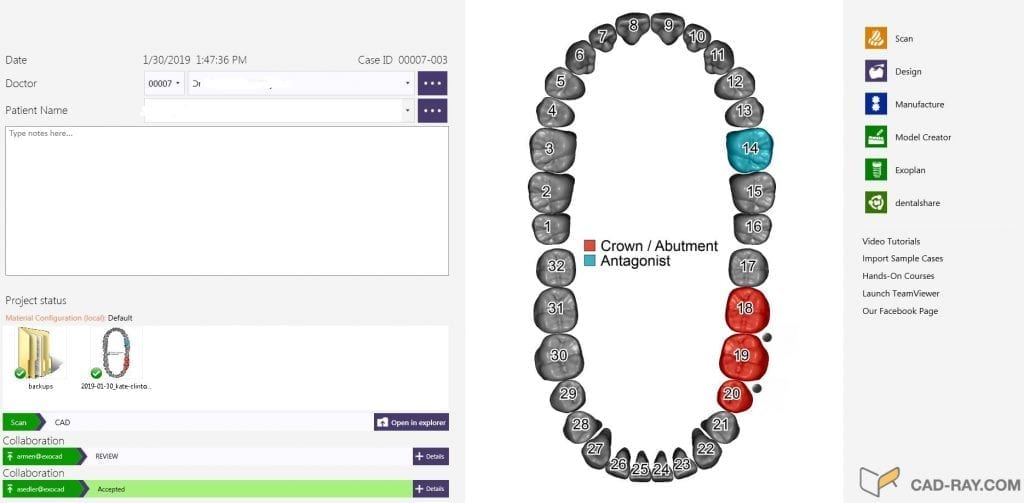
Our CAD-Ray software, powered by exocad and exoplan (pending 510k clearance) allows you to import your intra-oral scans and merge them with dcm files from ANY CT machine.
All CBCT machines can export the 3D x-rays into our software where you can merge the data with your intra-oral scans, design implants, and fabricate surgical stents for fully guided surgery. Here’s a preview of what’s coming up soon.
The Medit I500 is powered by a software called Meditlink. Within the program, you have workboxes where you can scan, design, nest, and mill a restoration, when you utilize the software as a laboratory, instead of a clinic. The feature is not available when you log in as a dentist, but all you have to do is register as a lab, and you have access to all these features.
You can can manage a case all within the meditlink software in a
seamless workflow. More importantly, you can utilize whatever CAD
software you want, nest and mill with your CAM software of choice, or
just export the case to someone else to collaborate with
In this video, you can see how you can launch the scanner and capture the data, then you can choose to utilize exocad, 3shape, Maestro design software. You can even export the data to another platform or launch your CAD of choice. Here, we utilize the CAD-Ray software which is a private label program powered by exocad.
The following pdf files document all the changes and updates to the Medit i500 intra-oral scanner. Some of the new features include taking pre-operative images, localized high definition scanning, a variable and custom scan depth field, scanning of impressions and much more
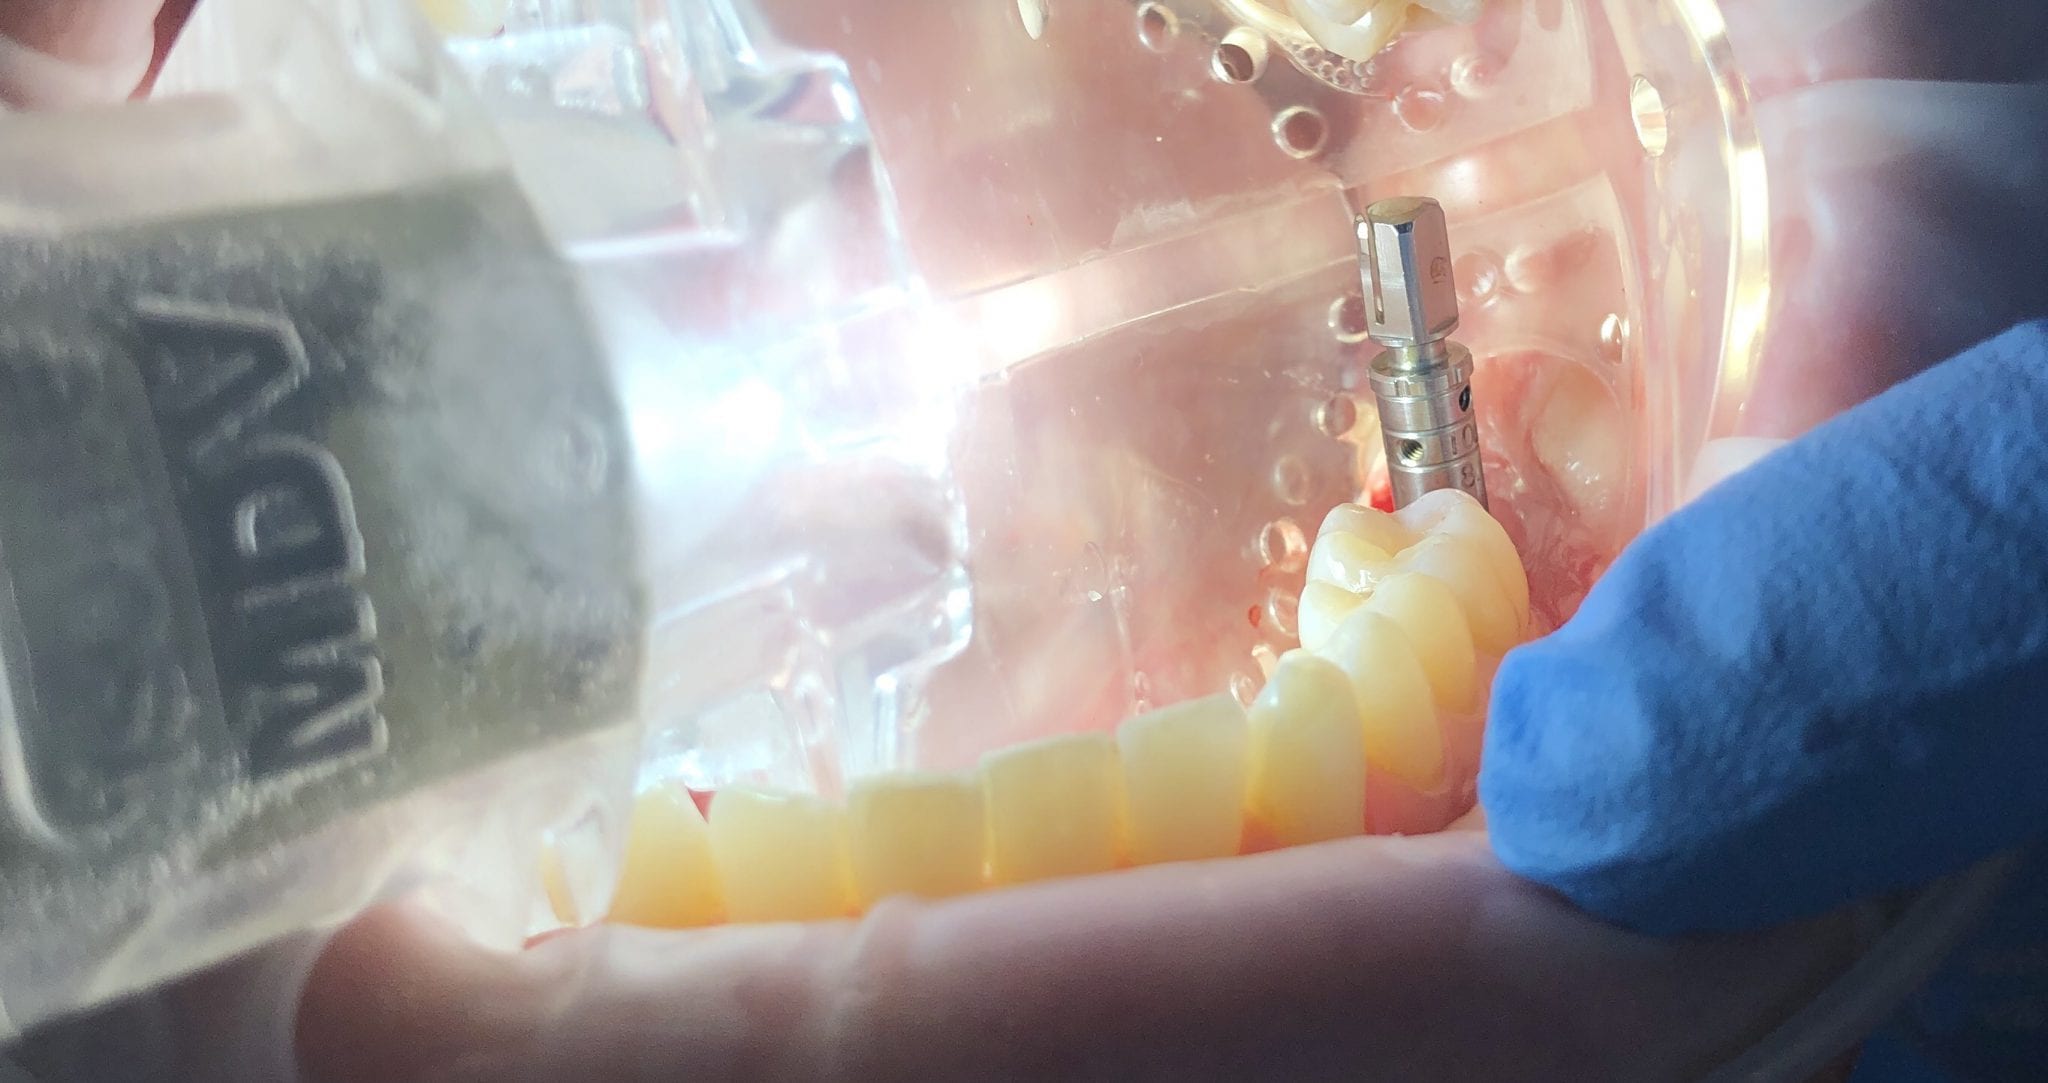
A well fitting surgical stent makes guided surgery very easy. You can CT scan a stone model or an impression to get a digital model to design the surgical stent
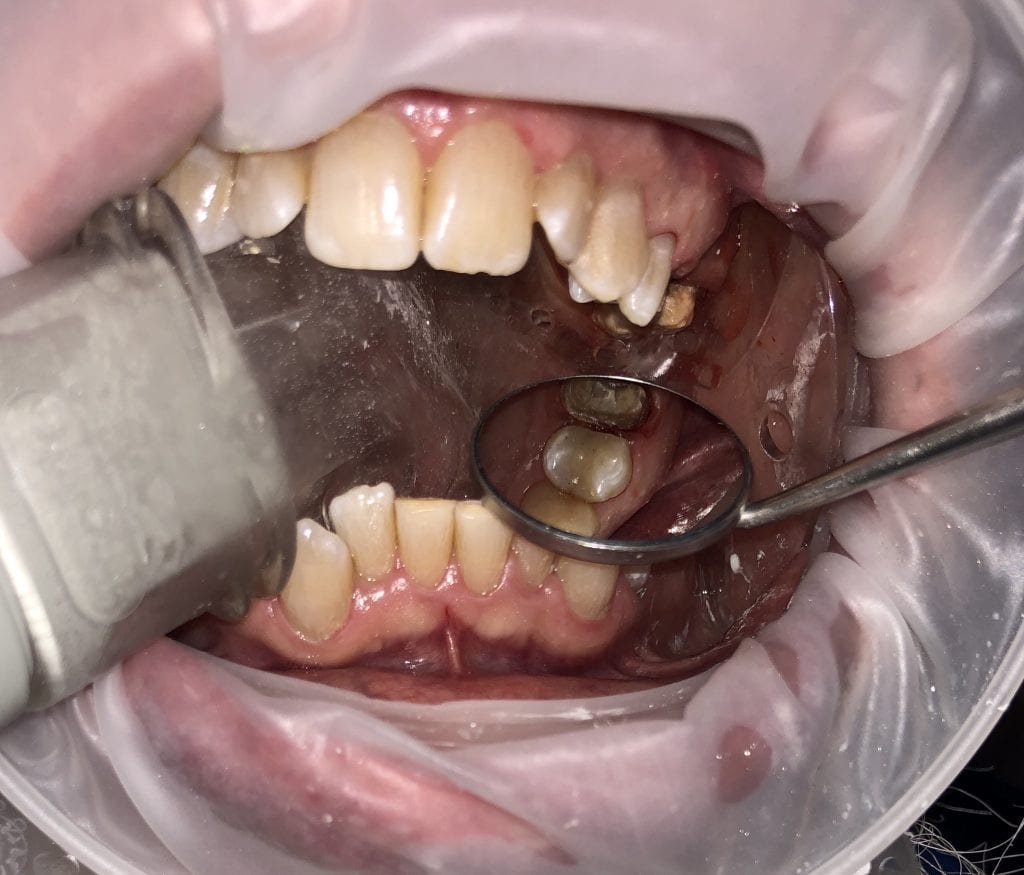
This failing three unit fixed partial denture was replaced with the Medit i500 and the CAD-Ray Design Software. While the patient was getting numb, a physical quadrant impression was made to fabricate a temporary after the removal of the existing bridge
With distal extension case, we advocate that you take a the pre-op scans, the maxillan and mandibular scans, and the first of the buccal bites. After the preparations are done and imaged, we advocate that you take the second bite IN THE SAME area so that you can judge if the jaw has settled once your distal stops were prepared.
This preview shows how the two bites can aid with aligning the arches accurately and to determine if the jaw settled after the lateral pterygoid muscles releases.
For the sequence of events, you can see how the pre-op scan of the bridge was taken. The same model was then trimmed in the maxillar folder, the lower arch was scanned and the first buccal bite was taken.
After the bridge was removed, the premolar preparation was modified and the margins were exposed with expasyl and cord retraction. The premolar prep was imaged with the medit i500 and the pontic area was also captured
Proper isolation and retraction greatly contribute to ease of access and imaging. Here you can see how the isolite and the optragate are used in conjunction to control the clinical environment
Notice how the red soft tissue is harder to pick up in the scan and the camera mode was changed to white light, as opposed to blue light scanning. Blue light is great at picking up tooth structure, white light is great at picking up red- blood and soft tissue.
Once the premolar area was captured, the imaging was stopped and then the molar crown prep was modified and the model was extended to include the new prepration. The difficult access was address by breaking up the model into sections that are much easier to maintain. The protect mode was used to not “ruin a good impression” elsewhere on the preparation
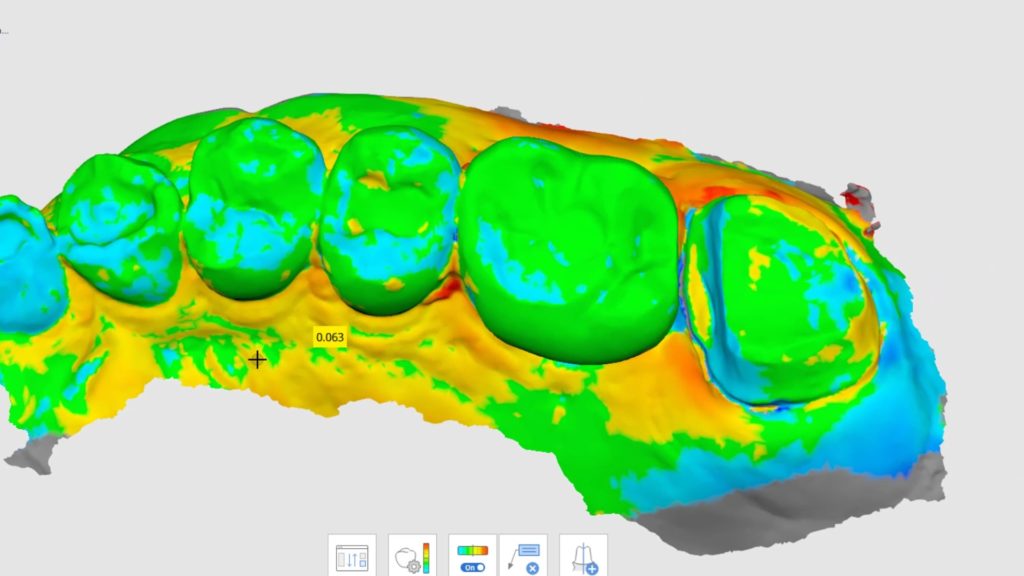
A common question we get about the Medit i500 is about its cross arch accuracy. There are dozens of ways one can introduce errors with digital impressions and the user must be able to recognize the potential pitfalls. Once you adhere to strict scanning protocols, you can achieve very accurate scans.
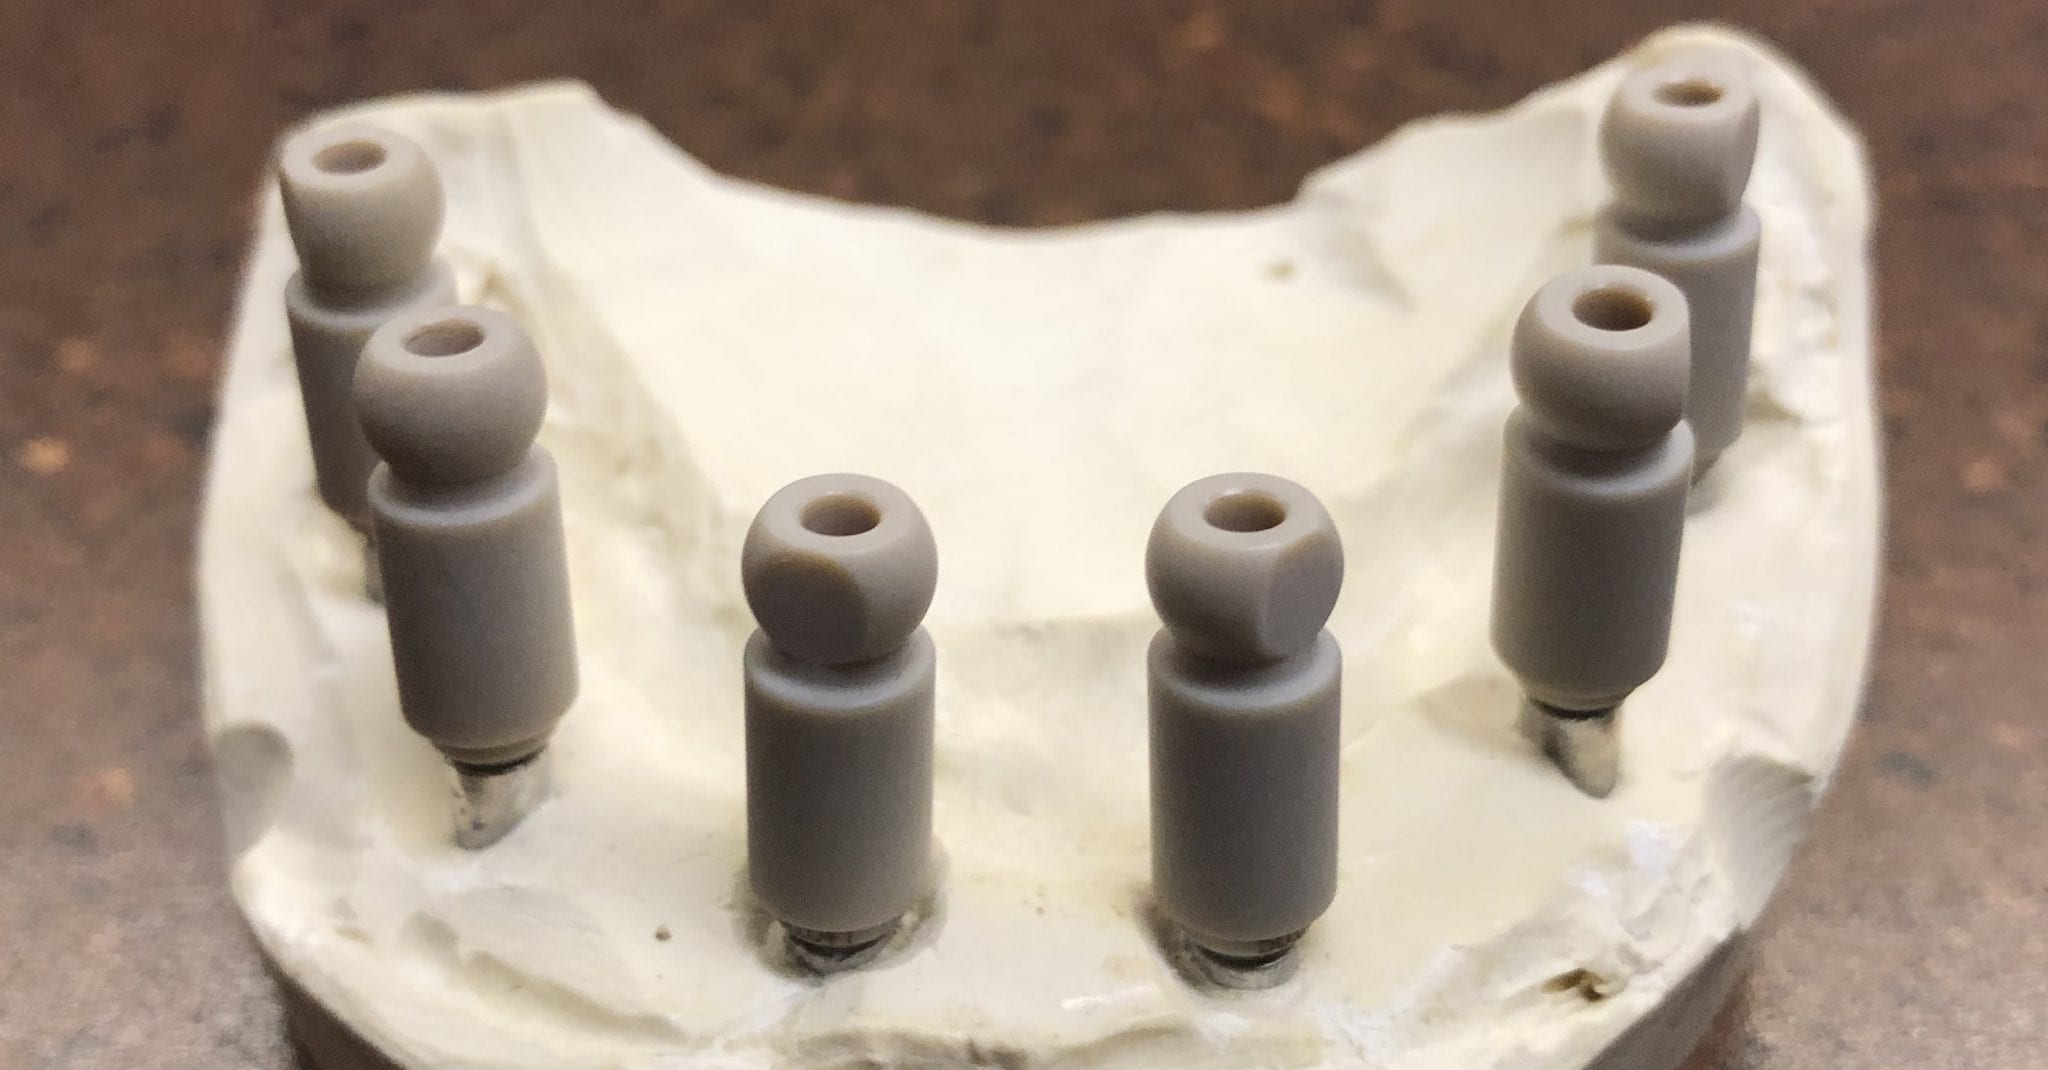
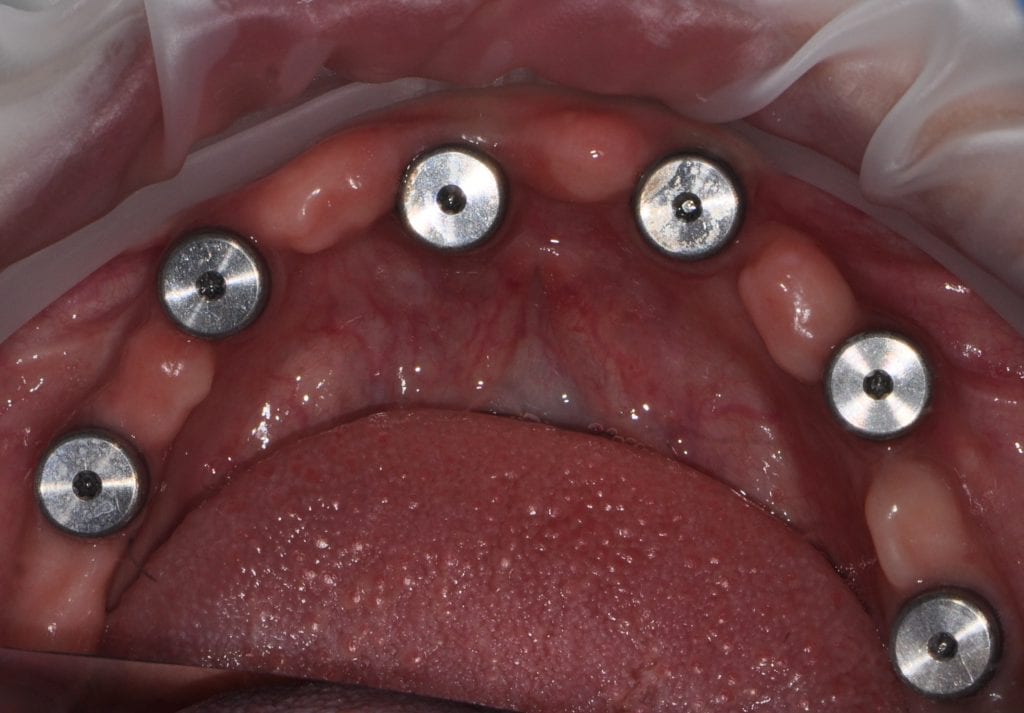
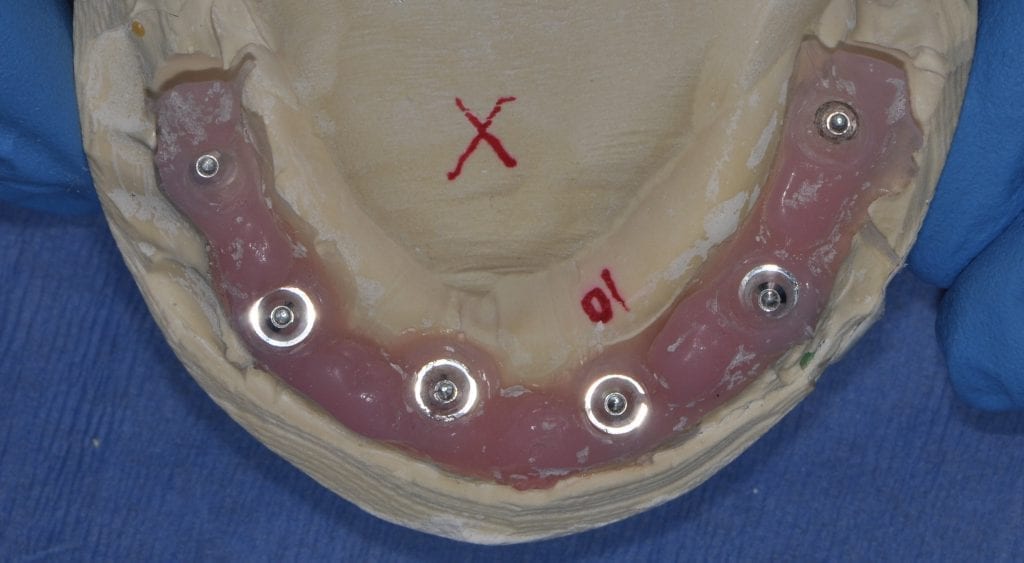
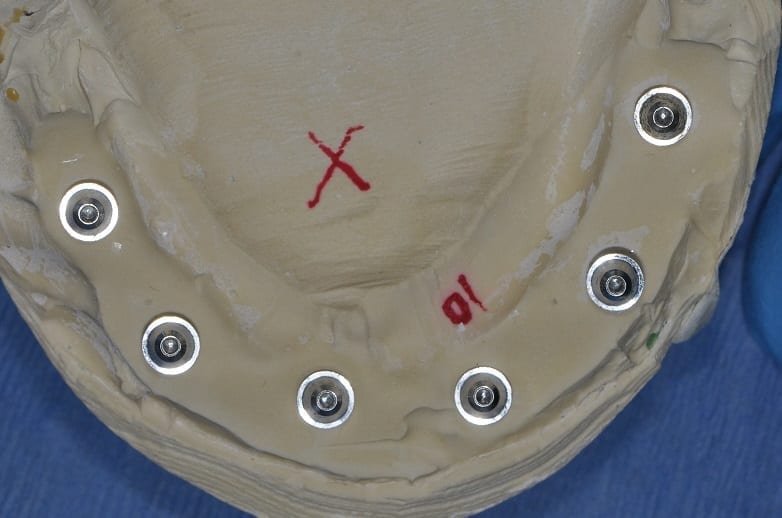
To demonstrate the accuracy of intra-oral scanning vs physical impressions, we place 6 DESS Desktop Scanning Scanbodies (REF: 5041) on a stone model that contained six implant analogs.
The original impressions were taken using traditional impression abutments on BioMax Implants from BlueSkyBio Narrow Platform Fixtures. The surgical stent was used to capture the impression duralay pattern resin was used to secure the relationship of the impression abutments to each other and the tray.
The model was poured and a stone cast with analogs were fabricated. The stone models were desktop scanned with the Medit T500 and the rendered models were exported to exocad software to analyze the precision of the intra-oral scan with the traditional method.
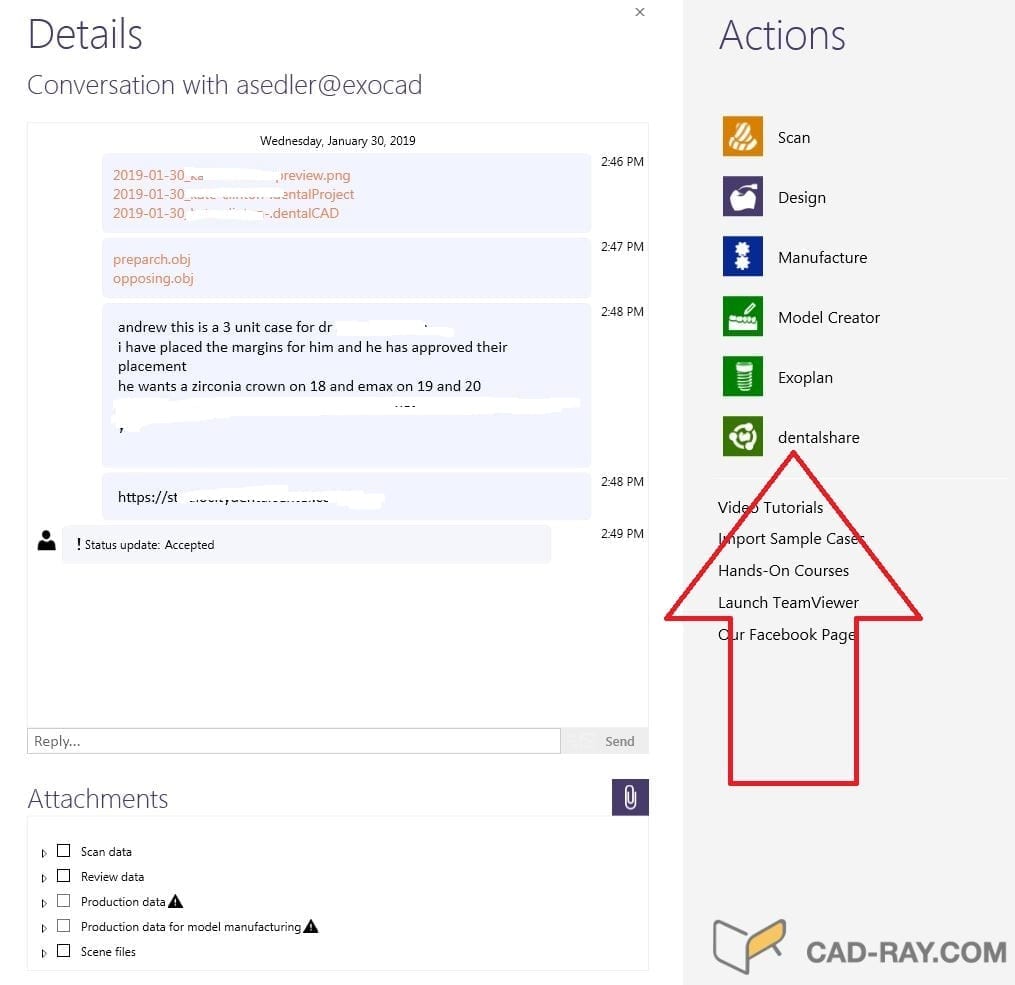
At CAD-Ray, we have a tough job balancing the interests of patients, dentists, and labs. The hand-off or delegation from dentist to the lab in a digital workflow is difficult to identify because of various habits all parties are accustomed to.
We think the sweet spot is for the dentist to mark the margins, verify that the case is mounted corrected for the proper vertical dimension, and then submit the case to the lab. A great tool is the DentalShare feature from exocad that allows collaboration between dentists and labs.
This eliminates so many obstacles, reduces cost for labs dramatically, and expedites the fabrication of the restorations. There are no phone calls that need to be made and it allows collaboration at the highest level where you can pass files and images back and forth to your technician at your and their convenience.
With the products we distribute and the number of clients we have managed over the years, we identify this segment of digital dentistry as the largest growth potential in our profession.
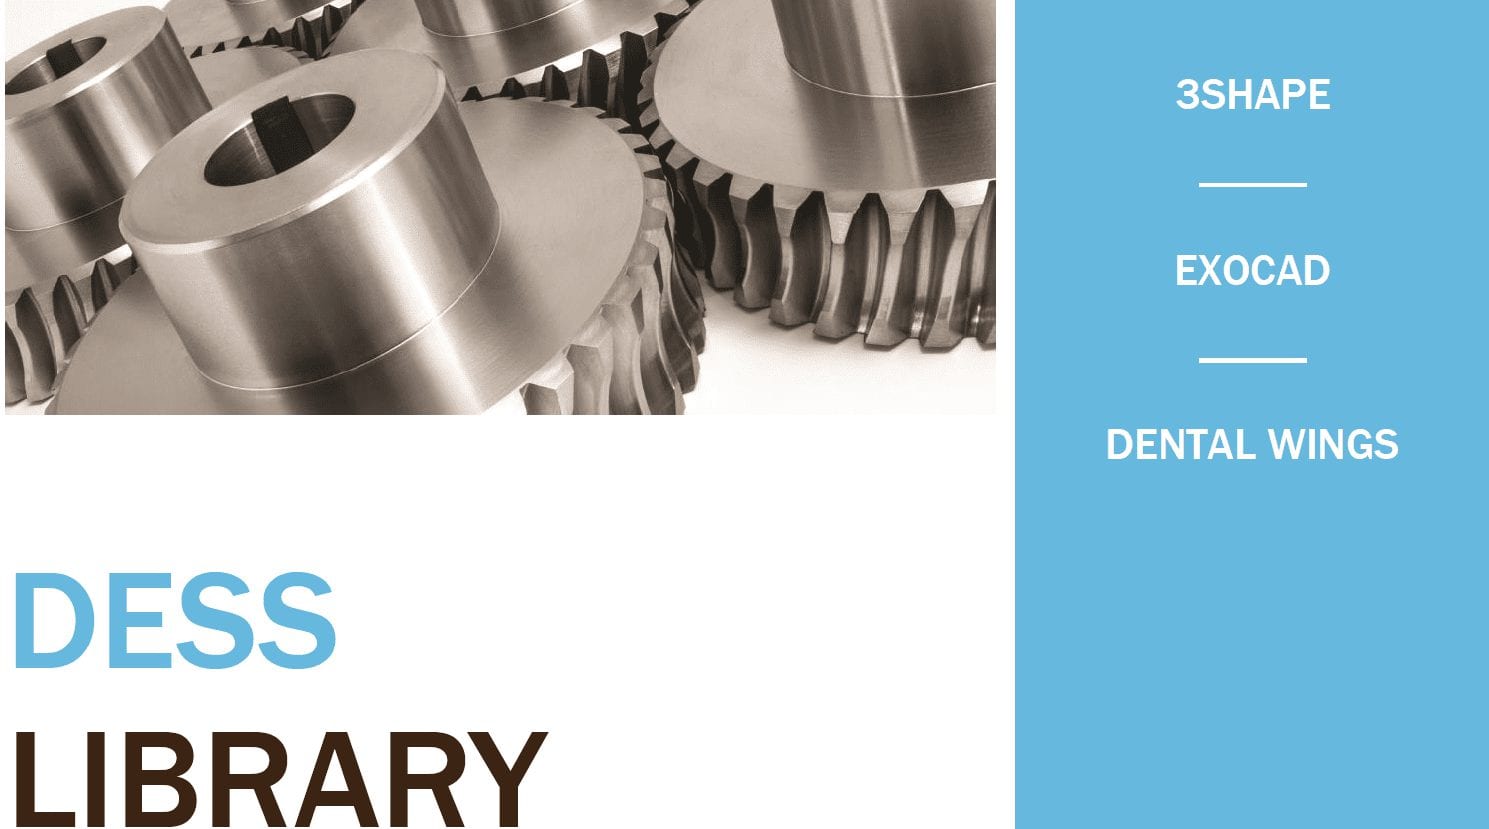
Click here to download the DESS library for exocad. It gets tricky making sure you have the right parts for both the scanbody identification and the tibases that would go with the zirconia substructures you will be ordering and/or manufacturing.
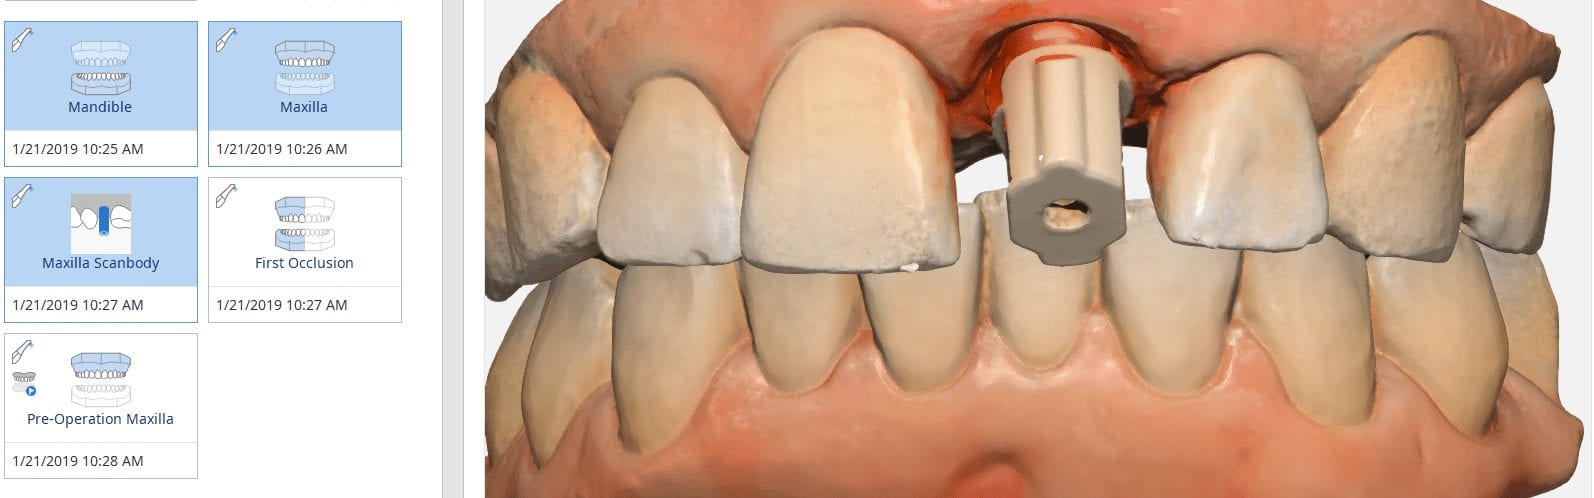
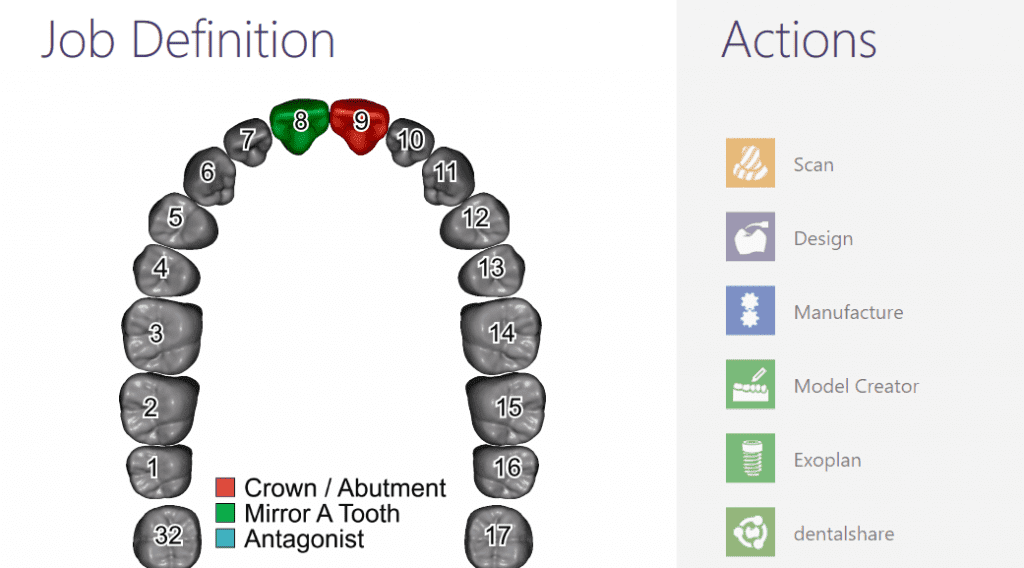
There are some great new features coming to Version 2.0 by the Medit i500. We now have the option to image the pre-operative condition, the upper and lower jaws, and the buccal bite, along with the catalog boxes for scan bodies.
In this particular case, we are restoring a left Central Incisor that has been temporized for approximately 4 months
To set up the case, the pre-op arch was imaged, then the mandible was scanned, and the buccal bite was taken. After the occlusal relationship was registered, we moved back to the maxillary catalog box.
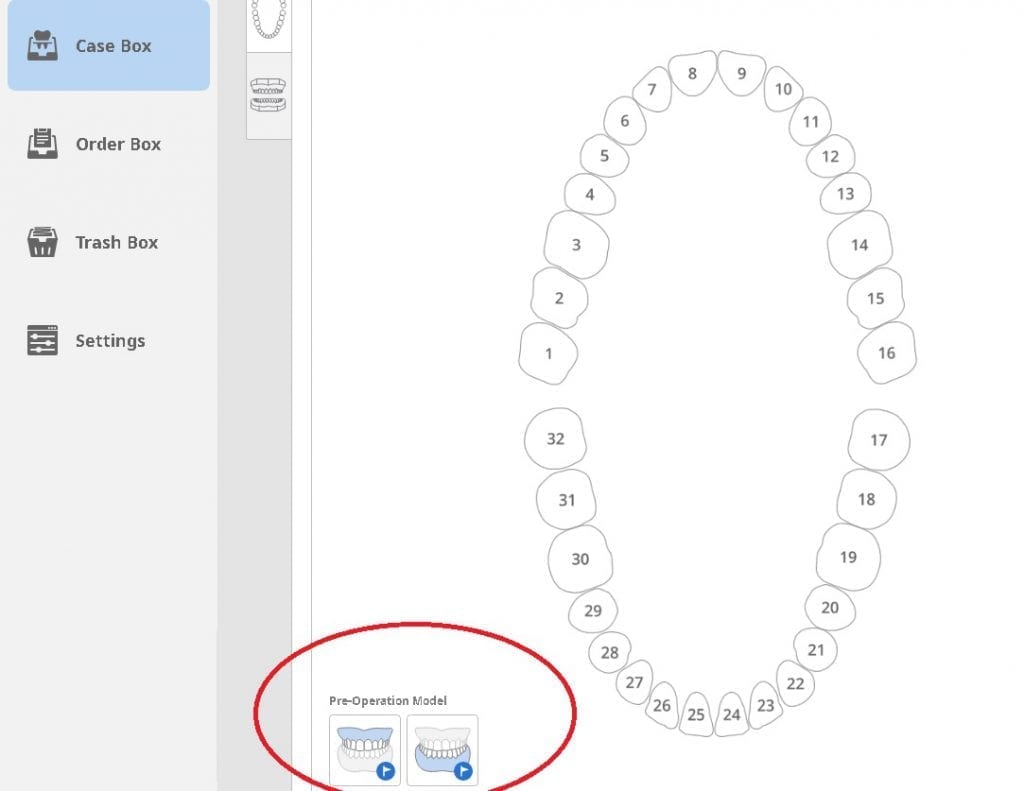
You must choose the Pre-Operation Model for each arch before you proceed to scanning
[videopress Qa5Lf3zb]
The screw retained temporary was removed and the contact areas and the gingiva was captured with the Medit i500. Then we moved to the scanbody catalog box, inserted a NT-Trading scan body, made sure it was completely seated and imaged that as well.
Once the case is processed, the relationship of the upper jaw to the lower jaw is preserved, as is the relationship of the pre-op condition to the maxilla as well as the scanbody relationship to the same arch. This is critical when you bring it into design software as the steps to relate the jaws to each other is dramatically reduced
A cool new feature in the upcoming Medit i500 is the opportunity to capture deep areas that are out of the camera’s focal length (-1.5 to 17mm). This usually happens in complex implant cases, or in this case where the anterior four teeth were traumatized.
With very little tooth structure remaining, a custom post and core was required to restored the dentition with a very guarded prognosis. After root canal therapy, the chamber was accessed and a conventional impression was taken.
Separate from this, a clinical digital impression was taken of the temporaries, the opposing and the buccal bite. The margins of the preps were protected and the chamber was deleted / cropped. As you can see, there are hollow areas in the depth of the chambers where the topography was outside the focal length. Scanning the impression as a negative gives easy access to the depths of the chamber, allowing you to form a model that is well outside the imagine range of the neighboring teeth.
The software allows you to image intra-orally and then allows you to fill in the voids by imaging the impression instead.
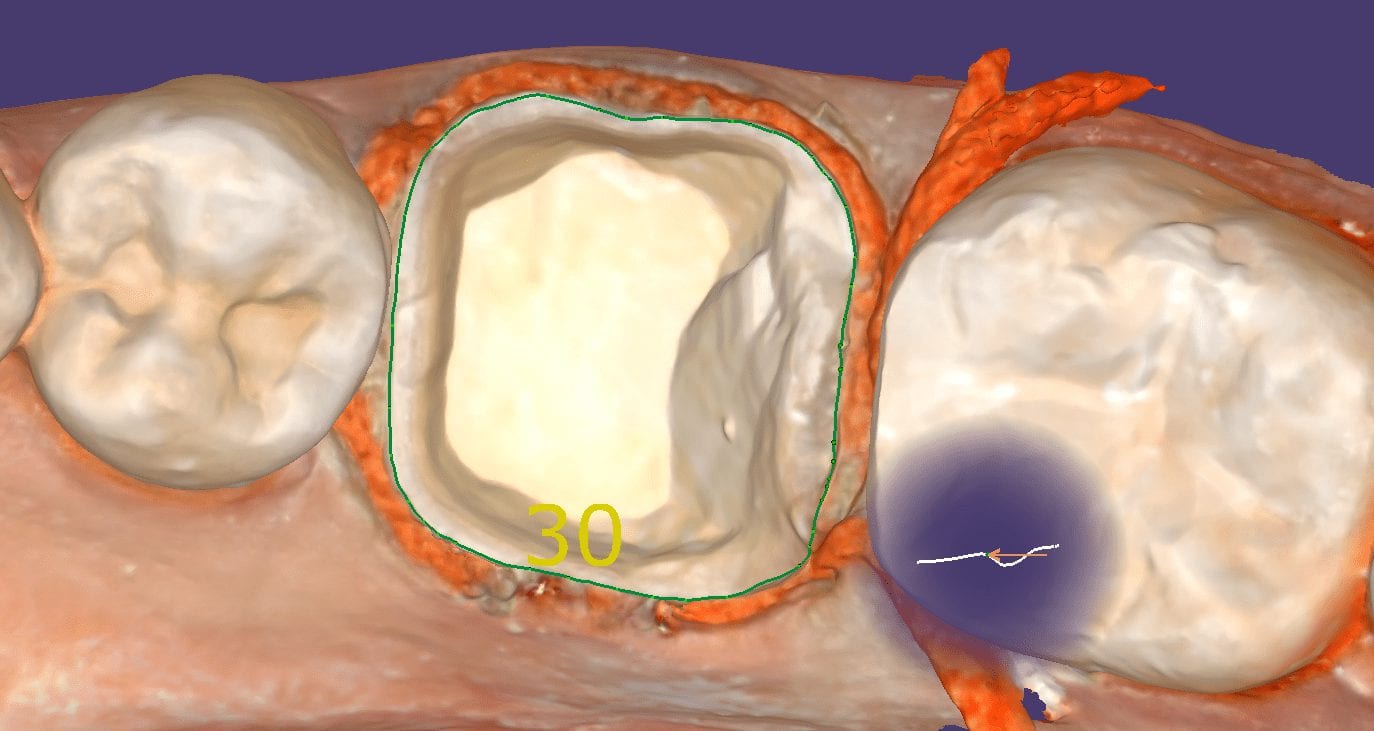
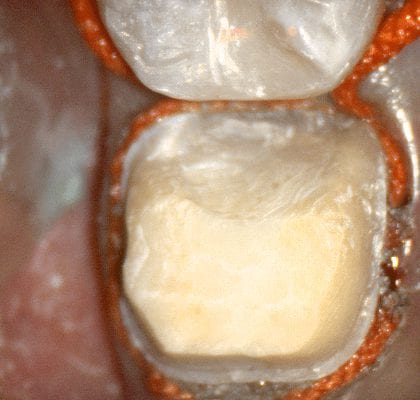
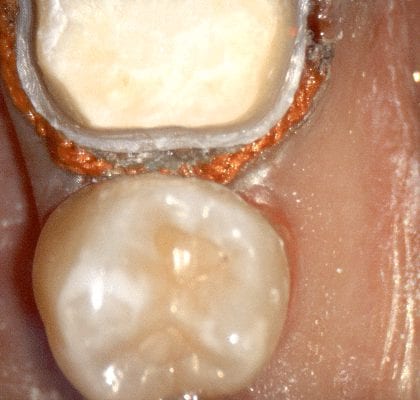
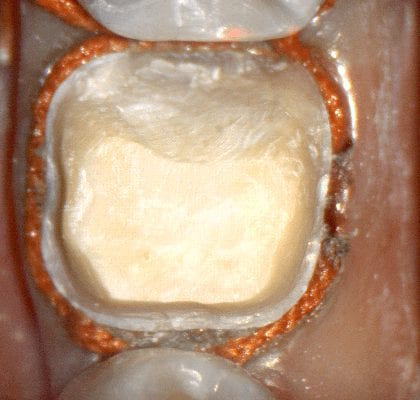
A new feature coming soon to Medit I500 is localized High Definition Scanning. There are two modes you can scan and save the models in; Normal and High Definition. In previous versions, either the whole arch model was process in regular or HD mode. Although of little clinical significance, if any, the visual properties provided by the High Definition mode resonate with all clinicians.
The processing times for HD mode was 4-5 times longer than regular mode. Now, you an just scan local areas in High Definition, greatly reducing processing time and provided you sharp details of the preparation.
In this video you can see clinically how the upper arch was imaged in regular mode. The whole lower arch was then imaged while expasyl was applied as a hemostatic agent. Once bleeding stopped, the area was irrigated and dried. In the software, the molar area was trimmed away and the local HD feature was turned on. The topography of the preparation was captured in the new Local HD mode.
As a clinician, you will appreciate the depth of the margin and the quality of the scan when designing the restoration in exocad
[videopress jxz9c27l]
Here, you can see the design process in our software powered by exocad.
A very common issue for a new user of Intra-Oral Scanners is to appreciate that, generally, the cameras nor the software, can tell the difference between tooth structure and soft tissue.
Furthermore, once soft or hard tissue is captured by a scanner, it assumes that the data is part of the model and part of the “equation”. What this means for automation is that this data, if you don’t take it into consideration, can actually hinder the automatic stitching of arches to each other via the buccal bite.
In the attached video, you can see how some excess data in the lower arch, namely the cheek, prevented the automatic stitching of the buccal bite with the upper and lower arches. Simply trimming away data sets that are in the line of sight for your camera can greatly speed up the process.
In the original version 1.0 of Medit Software, you would capture the upper jaw and lower jaw, then the buccal bite on either one side or both sides. Once you capture the arches and their occlusal relationships, you then process the case.
In the preview box, you will then find two models that you can export. The mandibular and maxillary files are readily visible, but the buccal bite, or the occlusion models are not present. This can be confusing to some new users or people used to other programs / software. Rest assured that when you import the case into another software, the relationship of the upper arch is maintained with the lower arch.
The above case is imported into another software and you can see how it automatically relates the arches to each other as there embedded coordinates in the two arches and they know their positions on the X,Y,Z planes
Now imagine if you actually wanted or needed the buccal bite models too. Once thing you could do is to start a new case, and take the right side buccal bite in one of the catalogs, and the left side buccal bite in the opposing arch catalog box.
You could then export both of those models to third party software to utilize them for their intended uses. In this video, you can see how this is managed- all you have to do is label them properly when exporting them because the software will label them as maxillary and mandibular files.
In the new software version 2.0, the buccal bite models can be exported along with the upper and lower arches. So can the preop models or wax ups if you wanted to utilize them in a particular design
Advanced users will like this feature as they can manipulate the models with the two bite models. For example, in the video attached, there are 4 models being utilized to establish the current bite. You can bring multiple other models to set the arches at differing vertical dimensions and tooth positions for more complex cases.
A couple of great new features are coming to Medit V2.0 really soon. One is the ability to capture the pre-existing situation in one catalog box and the prepped arch in the other.
In this video you can see how the initial maxilla is captured in the first catalog box. Once that is done, the appropriate arch is selected and the model appears in the respective arch. You simple crop out the area where the preparation belongs and start imaging to fill in the space with the prepped arch.
The great part of this program is that the imaging of the preparation does not start until the software recognizes the adjacent landmarks. It is imperative that the same “stitching abutments” exist in both models. As a bonus, you can click on localized HD mode for the preparation where the detail is captured in high-resolution.
When you capture both the pre-op and the preparation model in this manner, it is an easy workflow in the CAD software to render the restoration. Since the models are related to each other, you can command the program to adapt the restoration to the teeth (or pre-op condition). For best results, you must trim the pre-existing condition in manner so that the only remaining area is above the margin circumferentially.
To achieve that, simple trim the pre-existing condition with the edit tool in the software. If the pre-op is in great condition, you will not have to do any adjustments. One over-riding feature that always prevails is the minimum thickness around the margins.
With the localized High Resolution mode in Medit v2.0 you can speed up processing time but not compromise resolution that allows for great fitting restorations, as you can see in the try-in step of this emax 3/4 crown
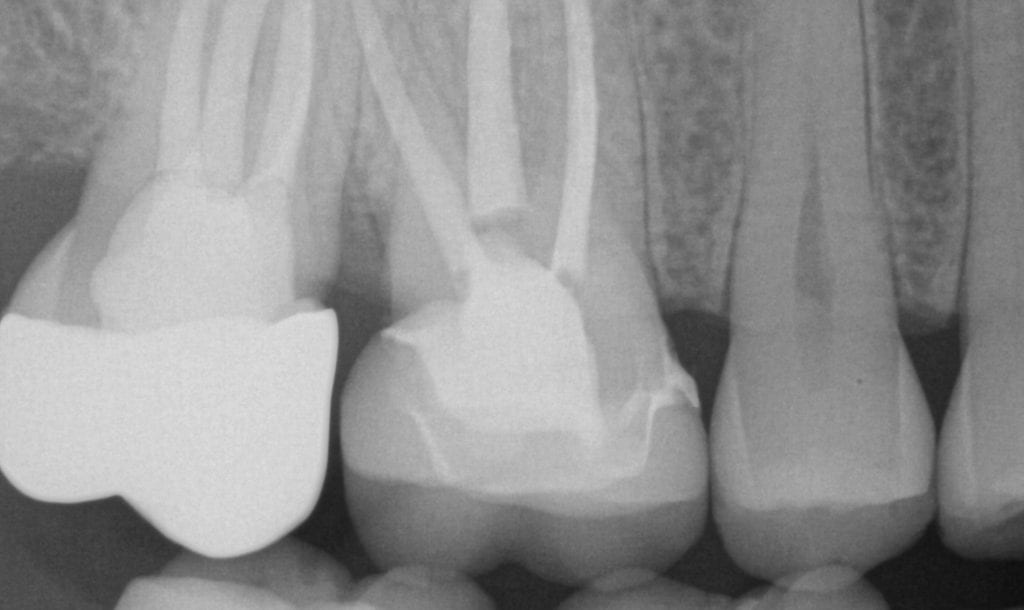
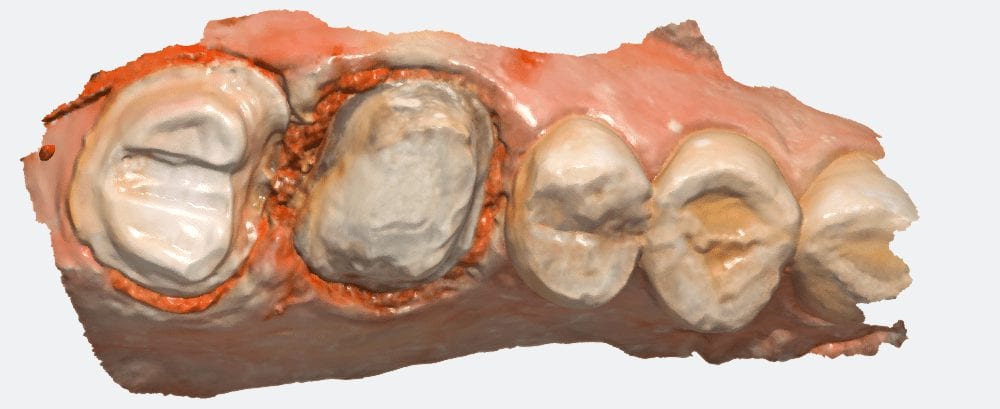
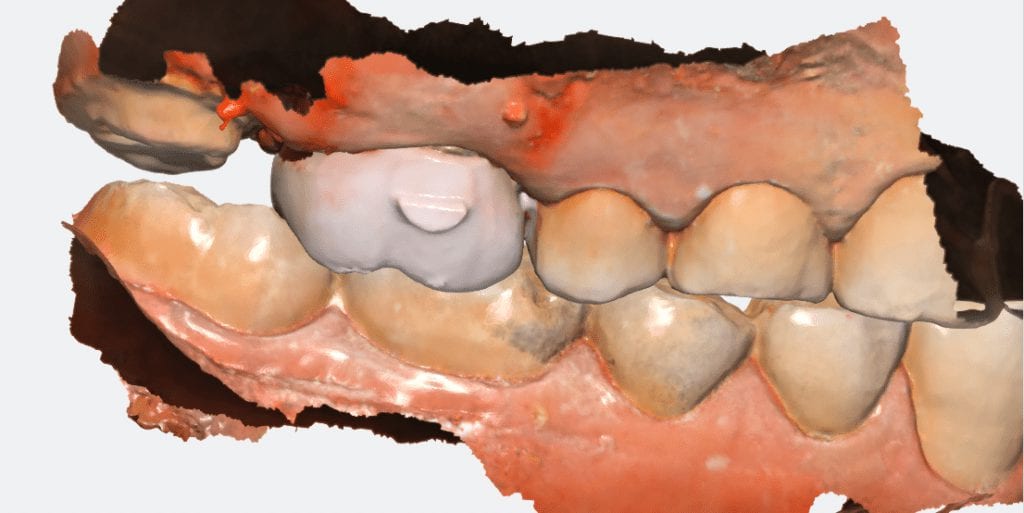
With digital dentistry, you can approach complex cases with ease. For example, when you look at these two crowns that need to be replaced, your inclination is to prep them both, get hemostasis and retraction at the same time, and then take the impression.
Whether you only image with your 3Shape scanner or design within Design Studio, you can export the stl file into our milling machine’s native CAM software and start producing restorations in your office.
If you don’t have a computer aided design software, we can package our milling machine with our privately labeled CAD-Ray Software (exocad) and you design crowns, inlays/onlays, partial crowns, custom abutments and a lot more! If you already have the design software, all you have to do is export it and take the VHF milling machine
Both the N4 and the Z4 can nest your restoration and mill your desired product.
In this video, we show how you to capture the healing abutment, the tissue profile after the abutment is removed, and then we image the scanbody while utilizing the AI...
With second molars, you should always be on the look out for not just the jaw settling, if you remove the first point of contact, but also with the temporary...
The Medit scanner has a feature where you can locally capture a preparation in HD mode. This allows for more crisp visualization of tooth anatomy and morphology but most deem...
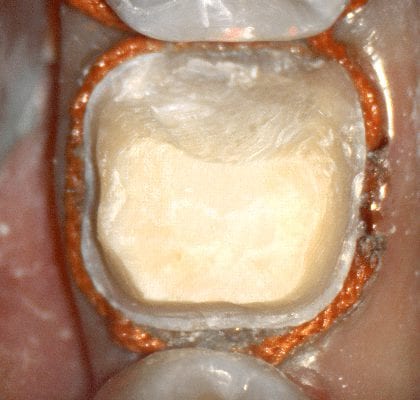
The overhead light source can distort your models and impressions. This particular doctor had excellent preparations and retraction but the light source kept flooding the dentition resulting in ill-fitting restorations...


You must be logged in to post a comment.