We found the digital training very informative - 8/20/2021
Infinite Smiles
Can not say enough great things about Cad-Ray. Purchase an intraoral scanner from them and have had to have their support team help out a couple of times. They are top notch! I will be purchasing all of my tech they offer through them - 7/07/2022
Steven Cisternas
The future of digital dentistry is here now. Cad-ray provides all the tools needed to make it possible for us to provide digital care to our patients. Thanks Damien and Armen for a great course. - 8/07/2021
Trident Dental
Great help when you need it. Frank, Armen and team will take care of you. - 12/10/2021
Greg Stepka
Highly Recommend working with Cad-Ray. Just purchased a MeditI700. So easy to work with. Training with Destaney was awesome. - 3/19/2024
Madhavi Chavda
Still beginner to use IO scanner. best customer service. Live training was very useful. Andy Nova was great in improving my skill for scanning and showing me all features. Thank you. - 5/19/2022
Cad-Ray's customer service has been amazing since day one! From getting a quote to setting everything up and doing my first scan. Everyone has been super helpful! Heather Gramley has been awesome, it's like having a tech in my back pocket! They offer...read moreCad-Ray's customer service has been amazing since day one! From getting a quote to setting everything up and doing my first scan. Everyone has been super helpful! Heather Gramley has been awesome, it's like having a tech in my back pocket! They offer tons of training videos and offer one on one training. I would 10/10 recommend them for all of your scanning needs!read less - 11/21/2022
Jonathan Acker
Awesome people who care about their clients. - 7/09/2021
Rodney Baier
Cad ray has been very nice to work with. Excellence service and support since I bought my Medit scanner - 6/16/2020
Chris Kleist
Cad-Ray is the absolute best if you're in the market for digital dental tools. I have purchased two Medit scanners through them. There will be hiccups with any complex piece of machinery, but every time I have needed Cad-Ray, they have been there. I ...read moreCad-Ray is the absolute best if you're in the market for digital dental tools. I have purchased two Medit scanners through them. There will be hiccups with any complex piece of machinery, but every time I have needed Cad-Ray, they have been there. I recently had a scanner go down. I called Cad-Ray tech support and they got me on the phone with Medit immediately. Within a day, a replacement scanner was sitting on my desk. It doesn't get much better than that.read less - 10/03/2024
Anthony Vu
If you are looking to buy a Medit, you shouldn't look anywhere else to buy it. My Medit i700 was having issues on a Friday and I was able to get Heather from Cad-Ray to troubleshoot the issue. She remoted into my computer to try and troubleshoot the ...read moreIf you are looking to buy a Medit, you shouldn't look anywhere else to buy it. My Medit i700 was having issues on a Friday and I was able to get Heather from Cad-Ray to troubleshoot the issue. She remoted into my computer to try and troubleshoot the issue and helped with getting Medit on board as well. Once it was confirmed it was a hardware issue, I got sent a BRAND NEW Medit i700 OVERNIGHT.Can you believe that? Service and warranty that Cad-Ray offers is really TOP NOTCH.Highly Recommend Cad-Ray for all things MEDIT. Thank you Heather from Cad-Ray for all your help!!!read less - 2/02/2022
Russell Schafer
Overall great company to work with. They sell wondeful products and give stellar service for a much lower price than any of the supply houses. I can't recommend them enough. - 8/19/2022
Iggy “Iggy” Deleon
There’s a reason why all cardray reviews are 5 stars only. They have the best people on their team. Jesse is the best trainer and provides above and beyond support. I can’t count the number of times that he’s saved me in the clinic with his designs. ...read moreThere’s a reason why all cardray reviews are 5 stars only. They have the best people on their team. Jesse is the best trainer and provides above and beyond support. I can’t count the number of times that he’s saved me in the clinic with his designs. He’s truly a master at his craft and one of the best assets to the cad ray team!read less - 2/02/2023
Jorge Gonzalez
Armen is a dentist and knows what a dentist need, on other words cad ray sells technology that works for dentists! - 6/16/2020
Andrew Cole
The D.I.Y. Medit i500 package was right for me. I bought a nice gaming PC for my 2 operative rooms, downloaded the software, watched some videos, and started scanning. It's really easy to use, my crowns fit better with fewer adjustments, and they cos...read moreThe D.I.Y. Medit i500 package was right for me. I bought a nice gaming PC for my 2 operative rooms, downloaded the software, watched some videos, and started scanning. It's really easy to use, my crowns fit better with fewer adjustments, and they cost less because they are made model-less and without impression materials. I will start to see a return on investment in less than 2 years and it makes my work more fun, and I can deliver better results. Armen puts on a 2 day course which is very helpful to refine your technique. Start with watching the videos, scan your employees, and then use it on patients. I considered buying an iTero Element 2 and I'm so glad I didn't. The Medit is smaller, as good or better, and it costs ~$25,000 less over the course of 5 years. Ongoing fees for other scanners are a joke. Medit keeps providing updates that make the software even better and there are no additional charges.read less - 3/29/2020
I bought a Medit i500 from Cad-Ray. The service was fantastic. This group also does ongoing training to keep you up to date on how to use the technology.I had a minor issue with hardware and Cad-Ray resolved the issues no questions asked!They have a ...read moreI bought a Medit i500 from Cad-Ray. The service was fantastic. This group also does ongoing training to keep you up to date on how to use the technology.I had a minor issue with hardware and Cad-Ray resolved the issues no questions asked!They have a very active online forum that is supportive. I wouldn’t hesitate to purchase more equipment from them!read less - 10/13/2020
John Pisacane
This is my second review. I posted the first after having Medit for about 9 months. Loved it then, had great success with using the scanner to take full arch scans for clear aligner therapy, study models, removable partials, and crown and bridge. ...read moreThis is my second review. I posted the first after having Medit for about 9 months. Loved it then, had great success with using the scanner to take full arch scans for clear aligner therapy, study models, removable partials, and crown and bridge. Have kept using it and am still very happy with the Medit and with Cad-Ray. The scanner takes care of so many things in a way that impresses patients and pleases lab techs. Whenever I hit a computer glitch, I call Armen, Frank or any other members of the gang and my problems are solved quickly and without drama.read less - 6/16/2020
I bought a scanner from Nick Statly at Cad-ray a few months back and have nothing but good things to say about them. They were very helpful with setting up my computer that's linked to the scanner and since then have been very eager to help with ques...read moreI bought a scanner from Nick Statly at Cad-ray a few months back and have nothing but good things to say about them. They were very helpful with setting up my computer that's linked to the scanner and since then have been very eager to help with questions that I had regarding the system.read less - 12/08/2021
Mark Evans
I’d like to tell you a story about CAD-Ray.com.
I ordered a VHF N4+ from CadRay. About two weeks after the order was placed, they called me up and said, “VHF just got an exclusive with “The Big Boys” so they are cutting ties with all the little ind...read moreI’d like to tell you a story about CAD-Ray.com.
I ordered a VHF N4+ from CadRay. About two weeks after the order was placed, they called me up and said, “VHF just got an exclusive with “The Big Boys” so they are cutting ties with all the little independent distributors. They just called us, and we just found out. What this means is that we won’t be able to provide you service after purchasing the VHF mill that you just bought.”
Now, they could have just left it at that. They could have said, “Sorry, it’s out of our hands.” They could have said, “We appreciate your business, but it’s not our fault.” They could have said, “That’s the way the cookie crumbles.”
But they didn’t.
Frank Weinstein calls me up and tells me that they want to make this right, so they are going to hook me up with a brand new Imes Coritec One+ for the same price as the VHF. The Coritec One+ is like the Mercedes of mills for in-office. This is the new model that just barely came out. It is a 5 axis mill. It does wet and dry milling. It does blocks and pucks. It mills all materials know to man, including Vibranium. It can also fly the space shuttle, and make all your wishes and dreams come true. It’s that good. It came with the laptop, Exocad, all the tools, and all the bells and whistles. It came fully loaded. It came white glove delivered to my office. It came with in office training. It came with the extra bur package. It came with everything and the kitchen sink.
So, I paid 36k for a mill, and because of something that was not Cad-Rays fault, they ended up giving me a 60k mill for the same price.
In the words of the great Tony Stark: “That’s how Dad did it. That’s how Cad-Ray does it. And it’s worked out pretty well so far.”
Thank you Frank Weinstein and Armen Mirzayan for having outstanding customer service and going the extra mile every time.read less - 4/02/2021
Dong Lim
One of the best investments I’ve made for my office. A fraction of the cost compared to cerec. No monthly club fee. Easy maintenance. Saving a ton on lab costs. Milling and designing crowns is honestly my favorite things to do now. - 6/29/2020
Fantastic scanner and best company to buy from. They make sure you are happy with your product. Armen, Frank, and team are the best. High recommendations for CADRAY and the i500. - 7/18/2020
I had an issue that was due to the Medit settings. Damien logged on remotely to my laptop, and resolved the issue in a couple of minutes. Fantastic service. Thank you. - 8/27/2021
Dino Mantis
I purchased the Medit700 a couple of months ago. I have the Cerec Primescan and what a difference!!! The Medit is easy to use and efficient!!! They have a great support system> Laura Geney is amazing. She is almost like being on call anytime I have a...read moreI purchased the Medit700 a couple of months ago. I have the Cerec Primescan and what a difference!!! The Medit is easy to use and efficient!!! They have a great support system> Laura Geney is amazing. She is almost like being on call anytime I have a question. If she is not available (which was only once) the person that helped me logged in and took care of my problem!! I highly recommend this scanner!!!read less - 12/30/2021
kenneth kim
Purchased Medit in 2019. Bang for the buck best investment and will get you started in digital dentistry with ease. No monthly subscriptions and Cad-Ray support is amazing. No regrets. - 6/16/2020
For me, getting this scanner was not a choice between Medit vs Itero or Medit vs Trios. Those companies have already eliminated themselves from consideration based on ridiculous cost, ridiculous ongoing fees, and greater concern for petty proprieta...read moreFor me, getting this scanner was not a choice between Medit vs Itero or Medit vs Trios. Those companies have already eliminated themselves from consideration based on ridiculous cost, ridiculous ongoing fees, and greater concern for petty proprietary posturing than for ensuring full functionality of their products to their usership. Typical dental tech company stuff.
The real decision was between Medit vs continuing life in analog dentistry. Medit through Cad-ray was really the only choice. Awesome packages , awesome access to free training videos, awesome software updates, awesome access to live support, awesome support staff.
There's just nothing better in dentistry than to get a great product AND a chance to stick it to the man.read less - 6/16/2020
Used CAD-Ray for my Medit scanner purchase, training, and assistance and have had zero problems. They are so quick to respond to inquiries and helping with any minor issues (which have been very minimal). Highly recommend working with this company - 8/27/2021
Cody Boseman
Cad-ray has been amazing, not to mention they have an amazing product in the medit i500. Their training is great, customer service is quick and thorough, and follow up is consistent. I highly recommend using cad-ray for anything that you may need. - 6/19/2020
Tiffany Lee
This is a unique place because it serves both dentists and patients. For patients, this is an imaging center only. There are no diagnostics done here. There is a dentist on staff, but he is only there for imaging purposes, no diagnosis. As a dentist,...read moreThis is a unique place because it serves both dentists and patients. For patients, this is an imaging center only. There are no diagnostics done here. There is a dentist on staff, but he is only there for imaging purposes, no diagnosis. As a dentist, I would say that to be fair a niche place like this couldn't be expected to bill insurances. They would have to hire an entire separate staff to deal with all the thousands of types of insurances you have. For dentists: This is a great service to your patients because if you do not own a 3d x ray machine, you don't have to invest the $200,000.00, you can refer your patients here and cad ray will send you the digital files. You can also send them files to have custom surgical guides made. The folks who work here go out of their way to explain how things work. If you don't have a doctor, they can refer you to a dentist who can diagnose your problems. I always call ahead to make an appointment.read less - 6/02/2018
Carter Weber
I had a great experience with CAD RAY. I was lucky enough to have Frank DeLuca come down to my office to demo the Medit I700. Needless to say, we were in love with the technology and the great hands on demo. CAD RAY overnighted me the scanner and we ...read moreI had a great experience with CAD RAY. I was lucky enough to have Frank DeLuca come down to my office to demo the Medit I700. Needless to say, we were in love with the technology and the great hands on demo. CAD RAY overnighted me the scanner and we were off to the races. Any time we have had a technical question, Frank has personal helped me or put me in touch with one of his colleagues if he wasn’t available. All around, it was as 5 star experience!read less - 12/16/2021
Otto Herod
I received my Medit scanner a couple months ago from Cad-ray, and I can't express enough how awesome it is. I have done a ton of research and used the latest IOS from one of the big guys, and due to many software issues I was able to return that mach...read moreI received my Medit scanner a couple months ago from Cad-ray, and I can't express enough how awesome it is. I have done a ton of research and used the latest IOS from one of the big guys, and due to many software issues I was able to return that machine. And thank God, because it was so over priced and came with a $300/month support fee forever! The Medit scanner is as good or better than that one when it was working properly, and for the price it's a no brainier.read less - 9/17/2020
Asi Cohen
Armen Mirzayan's knowledge base sets CAD-RAY.COM apart from all other digital dental-equipment dealers. Not content with linking manufacturer support content, Armen's team provide instant feedback to any equipment queries, in-depth video tutorials, a...read moreArmen Mirzayan's knowledge base sets CAD-RAY.COM apart from all other digital dental-equipment dealers. Not content with linking manufacturer support content, Armen's team provide instant feedback to any equipment queries, in-depth video tutorials, and regular product testing, streamlining, and pushing the boundaries of their products - be it software, hardware, or connectivity between various brands. I highly recommend this team if you want to fully utilise your equipment and have the backup needed going forward!read less - 11/05/2019
I'm a dentist in Maine and have been working remotely with CAD-RAY for about 5 years. They do all my implant planning and fabrication of surgical guides. I just send them a CBCT image and digital impressions and they take care of all the rest, it cou...read moreI'm a dentist in Maine and have been working remotely with CAD-RAY for about 5 years. They do all my implant planning and fabrication of surgical guides. I just send them a CBCT image and digital impressions and they take care of all the rest, it couldn't be smoother. I've only had good experiences with CAD-RAY, and am very grateful for this awesome service they offer.read less - 6/02/2019
John Pisacane
I purchased my Medit scanner after the ADA meeting in 2018. I did it primarily on the personal recommendation of Armen Mirzayan, the owner of Cad-Ray. I have known Armen for over 15 years (we both were CEREC trainers) and he has always been unbeli...read moreI purchased my Medit scanner after the ADA meeting in 2018. I did it primarily on the personal recommendation of Armen Mirzayan, the owner of Cad-Ray. I have known Armen for over 15 years (we both were CEREC trainers) and he has always been unbelievably knowledgeable about dental technology and was always moving on the cutting edge.
When you see Armen's daily FB posts, it’s obvious that he is constantly pushing the envelope and exploring the limits of the Medit and the processes we use to idealize our push towards completely digital dentistry. Medit owners are fortunate to have Armen finding glitches and pushing for improvements in our scanner.
As far as after sale service, I can’t find a flaw with Cad-Ray. You won’t find a more supportive and dentist-centered company. Armen and Frank do everything to make purchasers happy and back up their sales.
I’ve heard of horror stories when people shopped elsewhere and only positive comments about Cad-Ray.
In summary, buy your Medit and other high tech equipment from Cad-Ray, you will be totally satisfied.
.read less - 10/08/2019
Implant Planning Services Review I Am VERY experienced with "another system" but thought I would give CAD-Ray a try. At at LEAST 1/3 the fee, why not?
VERY happy. Fit GREAT, surgery was uneventful (the best kind) and I am a believer! This is a great company and great PEOPLE to...read moreI Am VERY experienced with "another system" but thought I would give CAD-Ray a try. At at LEAST 1/3 the fee, why not?
VERY happy. Fit GREAT, surgery was uneventful (the best kind) and I am a believer! This is a great company and great PEOPLE too! 5 stars aren't enough. Just like the Burj Al Arab, this is 7 star!read less - 3/03/2015
Frank Gibbons
I just bought my first Intra-oral scanner (Medit I-700). I have demoed scanners from various companies in the past but have been less then thrilled with the applications, scanner ability, ease of use and overall user experience. I feel that now the...read moreI just bought my first Intra-oral scanner (Medit I-700). I have demoed scanners from various companies in the past but have been less then thrilled with the applications, scanner ability, ease of use and overall user experience. I feel that now the technology has caught up to where it should be and after reviewing many scanners on the market have decided to go with Medit. The Medit i-700 gives me all the functionality I could want, has an affordable price and works for all the procedures I need it for (scanning for ortho, dentures, partials, crowns, bridges, implants ect.). I love that they continually update their software and most importantly that those upgrades are free to the end users. Another huge plus is that when I have a question I get actually get someone on the phone!! For all these reasons I finally jumped in. I would recommend anyone else to do so as well!read less - 5/06/2021
Blake Holt
Best place to buy a medit i500 from. Great support and an even better community. - 6/16/2020
Matt St George
I had 3 Cerec machines and switched to medit. It’s awesome and do not regret the switch one bit. This is the place to buy it bc Armen and Frank are a wealth of knowledge and Frank is awesome with support. He’s always there whenever I need him! - 10/10/2019
Last year when I started looking into the Medit i500 I had my front desk call 3 sellers to get preliminary information. She told me hands down call CAD-RAY and don’t bother with the others. Boy was she right! Frank got us going with all our hardware ...read moreLast year when I started looking into the Medit i500 I had my front desk call 3 sellers to get preliminary information. She told me hands down call CAD-RAY and don’t bother with the others. Boy was she right! Frank got us going with all our hardware needs and trained us until all our questions were answered. Then Jonathon and Armen jumped in at our 2 day live training in Baltimore. I still review my notes to implement all the great ideas. When I get myself in a jam time to time CAD-RAY responds immediately and fixes my problem. Best decision I have made in the practice in a long time - Thank you everyone at CAD-RAY!read less - 10/09/2019
I’d like to tell you a story about CAD-Ray.com.I ordered a VHF N4+ from CadRay. About two weeks after the order was placed, they called me up and said, “VHF just got an exclusive with “The Big Boys” so they are cutting ties with all the little indepe...read moreI’d like to tell you a story about CAD-Ray.com.I ordered a VHF N4+ from CadRay. About two weeks after the order was placed, they called me up and said, “VHF just got an exclusive with “The Big Boys” so they are cutting ties with all the little independent distributors. They just called us, and we just found out. What this means is that we won’t be able to provide you service after purchasing the VHF mill that you just bought.”Now, they could have just left it at that. They could have said, “Sorry, it’s out of our hands.” They could have said, “We appreciate your business, but it’s not our fault.” They could have said, “That’s the way the cookie crumbles.”But they didn’t.Frank Weinstein calls me up and tells me that they want to make this right, so they are going to hook me up with a brand new Imes Coritec One+ for the same price as the VHF. The Coritec One+ is like the Mercedes of mills for in-office. This is the new model that just barely came out. It is a 5 axis mill. It does wet and dry milling. It does blocks and pucks. It mills all materials know to man, including Vibranium. It can also fly the space shuttle, and make all your wishes and dreams come true. It’s that good. It came with the laptop, Exocad, all the tools, and all the bells and whistles. It came fully loaded. It came white glove delivered to my office. It came with in office training. It came with the extra bur package. It came with everything and the kitchen sink.So, I paid 36k for a mill, and because of something that was not Cad-Rays fault, they ended up giving me a 60k mill for the same price.In the words of the great Tony Stark: “That’s how Dad did it. That’s how Cad-Ray does it. And it’s worked out pretty well so far.”Thank you Frank Weinstein and Armen Mirzayan for having outstanding customer service and going the extra mile every time.read less - 4/09/2021
Suresh Goel
I have enjoyed using the Medit i500 scanner. Previously I had two 3Shape scanners, however, the yearly fees were adding up and there are no ongoing fees with the Medit. Quality is great, and support has also been solid. Overall very happy with thi...read moreI have enjoyed using the Medit i500 scanner. Previously I had two 3Shape scanners, however, the yearly fees were adding up and there are no ongoing fees with the Medit. Quality is great, and support has also been solid. Overall very happy with this purchase.read less - 2/16/2020
The medit is one of the best scanners on the market with the best price. Cad ray's support and training is phenomenal and they are very quick to respond. We work with Laura. Highly recommend. - 12/16/2021
Nolan Andrews
They all go absolutely above and beyond in all aspects. Whether it's tech support, products, CE, everything. Everyone I have dealt with has been wonderful. Love these guys! - 6/19/2020
Rusty Fitton
Super happy with our purchase of the Medit i500 from Cad Ray. Overall its a work horse scanner that has handled anything weve thrown at it. The key to success with it is definitely taking the time to actually learn how to use it after purchase. Ca...read moreSuper happy with our purchase of the Medit i500 from Cad Ray. Overall its a work horse scanner that has handled anything weve thrown at it. The key to success with it is definitely taking the time to actually learn how to use it after purchase. Cad Ray has an immense library of straight forward education videos that are updated basically daily. I havent done the 2 day course but that is also included in the purchase. You really cant find that sort of service and education with any of the other scanners on the market. Id recommend them to anyone.read less - 6/26/2020
Chirag Vaid
I ordered my Medit scanner from them in Feb 2020, so far no issues with support or the product. They are a great company with great support. Disclosure: they did promise me a scanner tip for this review, but in all honestly I was meaning to give it t...read moreI ordered my Medit scanner from them in Feb 2020, so far no issues with support or the product. They are a great company with great support. Disclosure: they did promise me a scanner tip for this review, but in all honestly I was meaning to give it to them anyway.... if you are looking to buy, this is a great way to go about it.read less - 7/19/2020
jeff-J65
You guys are great! I have been a Cerec user for about a decade and wanted to expand my horizons. I bought the I700 and have just loved it. We don't do impressions any more, only scanning, even for the full arch. The customer service has been excelle...read moreYou guys are great! I have been a Cerec user for about a decade and wanted to expand my horizons. I bought the I700 and have just loved it. We don't do impressions any more, only scanning, even for the full arch. The customer service has been excellent, even though I haven't had any problems with the scanner. I really like the online learning modules, they have been awesome getting me up to speed with the scanner quickly. I am looking forward to some of the in person courses to maximize the usefulness of this scanner. -- Jeff Allred, DDS FAGD DABOI FAAIDread less - 9/28/2021
Shout out to Nick, Frank and Armen ! Cheers . Great customer service by Nick and Frank. Too early to make a comment about the scanner but these guys are awesome. - 9/19/2020
Dath Collins D.D.S.
We have worked with Cad-ray for over three years. There tech support should be modeled as the gold standard for tech support. Let me tell you why. When you call in someone answers the phone and even better than that they solve the problem. Lauren...read moreWe have worked with Cad-ray for over three years. There tech support should be modeled as the gold standard for tech support. Let me tell you why. When you call in someone answers the phone and even better than that they solve the problem. Lauren solved my tech problem in less than 5 minutes! Thank you Cad-ray!!read less - 1/24/2023
Benjamin Polan
A while ago I became interested in an intra oral scanner for my office especially for dental sleep medicine and TMJ appliances. I searched online for Medit and found cad ray. Laura from Cad-ray quickly responded and set up a zoom meeting so she could...read moreA while ago I became interested in an intra oral scanner for my office especially for dental sleep medicine and TMJ appliances. I searched online for Medit and found cad ray. Laura from Cad-ray quickly responded and set up a zoom meeting so she could demo the unit. Great job at helping me understand. She set up the financing and I got my unit. A few glitches with my internet speed and getting IT to help with my upload and download speeds and I was ready to go. Every time I had a question I texted Laura and almost like she was waiting for my call she responds. We it turned out my unit wasn't just right so she immediately responded we will replace you unit. Laura has been a joy to work with and the customer service given will only encourage me to do business with cad-ray again.
Benjamin Polan DMD, D,ABDSMread less - 8/27/2021
I bought a Medit i500 from Cad-Ray. The service was fantastic. This group also does ongoing training to keep you up to date on how to use the technology.I had a minor issue with hardware and Cad-Ray resolved the issues no questions asked!They have a ...read moreI bought a Medit i500 from Cad-Ray. The service was fantastic. This group also does ongoing training to keep you up to date on how to use the technology.I had a minor issue with hardware and Cad-Ray resolved the issues no questions asked!They have a very active online forum that is supportive. I wouldn’t hesitate to purchase more equipment from them!read less - 10/23/2020
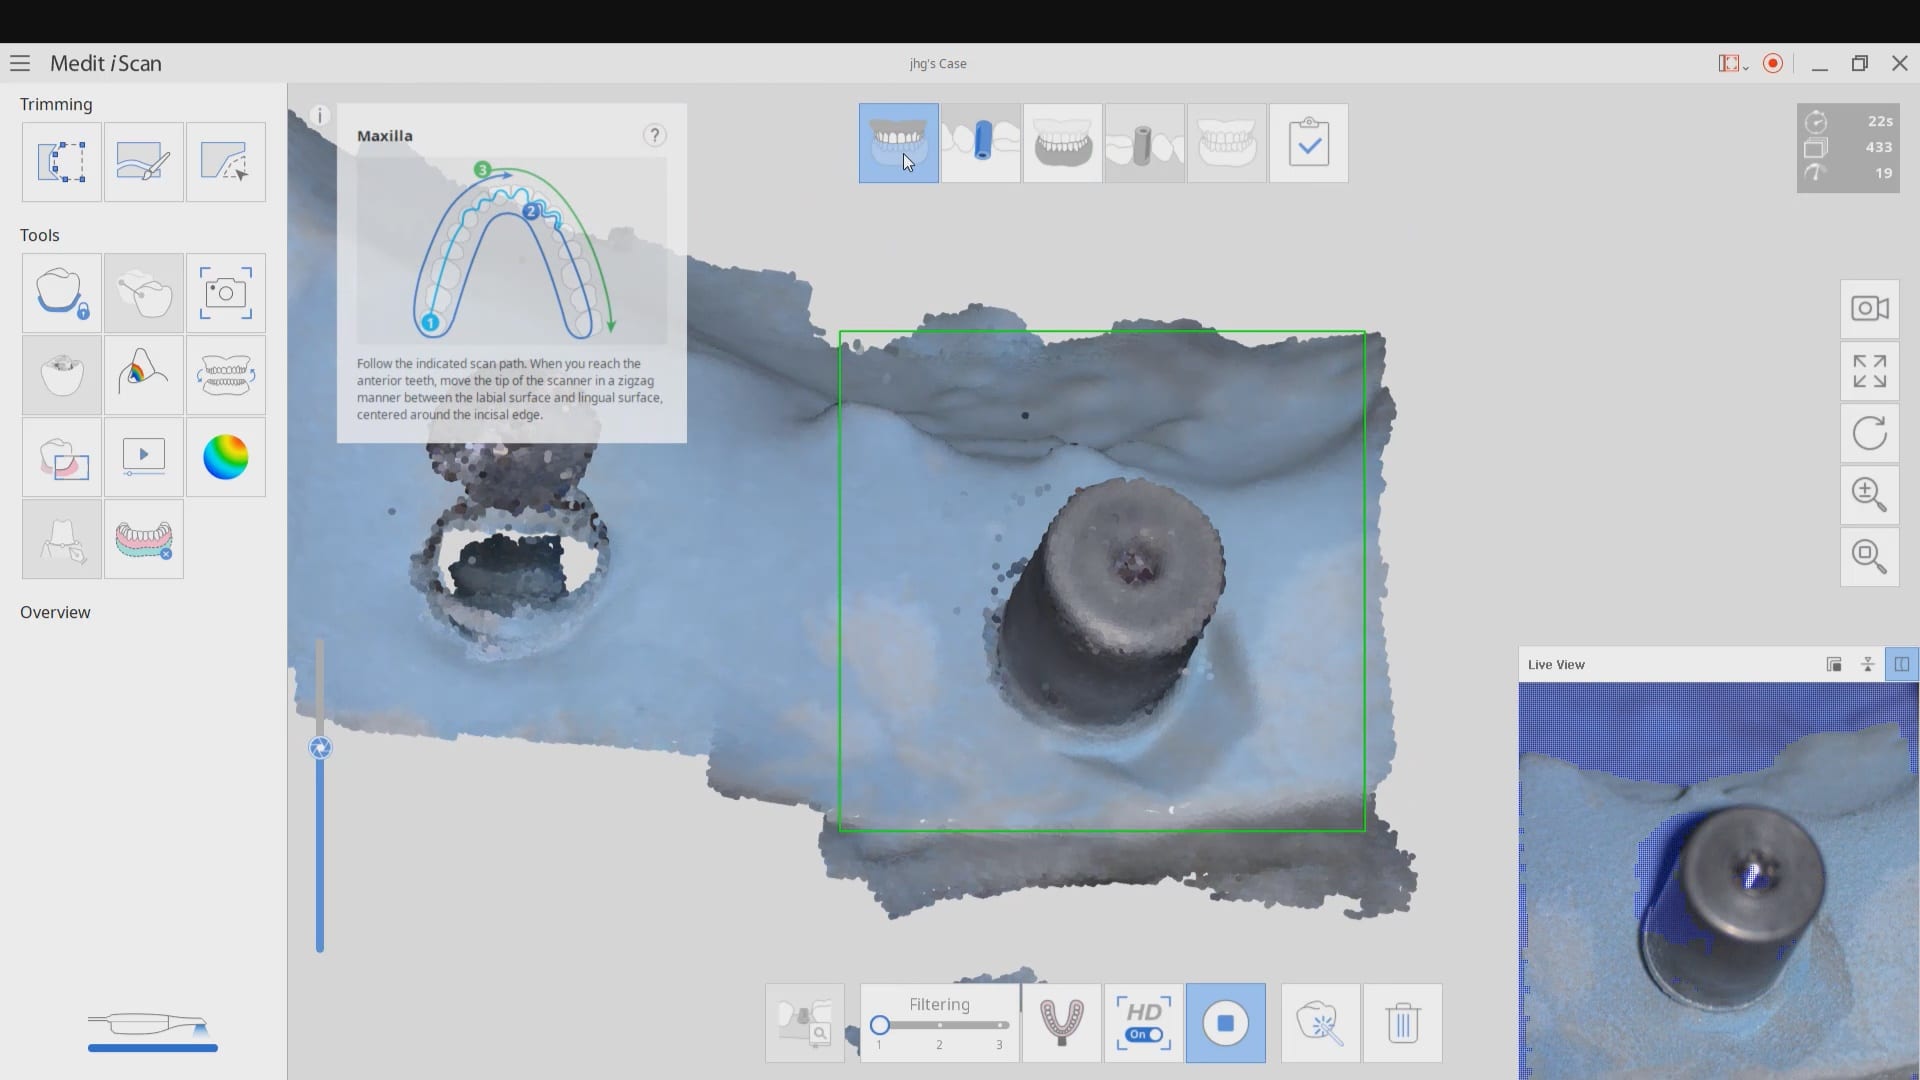
Most manufacturers recommend that you start your imaging at the second molar area, which is the least practical area to start with. The tongue and the lip and saliva are a quick distraction as the scanner does not know what you are trying to image. The incisal edges of lower anterior are also a tough place to start as the incisal translucency lets the light transmit through the enamel instead of reflecting to the cameras.
A good place to start is the second premolar first molar area where you can use the tip of the scanner to displace the tongue. Reducing the focal length to 12 mm’s allows the user to hide hard and soft tissue that can impede the rate of image capture. Watch the deliberate movement of the camera that helps the user manage the area to be captured with relative ease
When scanning for an oral appliance with an intra-oral scanner, you can capture the upper jaw and the lower jaw and the Verical Dimension in protrusive, but if you don’t transfer that information to the lab, there is a good chance they will not properly mount them
There are a lot of software available to you where you can mount and pin the models together so when they are printed, they can use male and female components to align them properly
Every type of user should watch this carefully and appreciate where we recommend you start scanning the lower arch. In our courses we go in to great detail on why you should not start in the anterior or the second molars. you instantly set yourself up for trouble. here’s the easiest place to start and to build and accurate model with Also, as new user, if you are working alone, you can use the optragate to retract the lip and the tip of the camera to displace the tongue. We recommend that you use a focal setting of 12 mm’s. This may slow advanced users down, but for new users, it helps hide distractions for the camera and software and speed you along. If you look in the bottom right corner, anything in purple is what the camera ignores. There are certain elements you want the camera not to see so it doesn’t slow you down
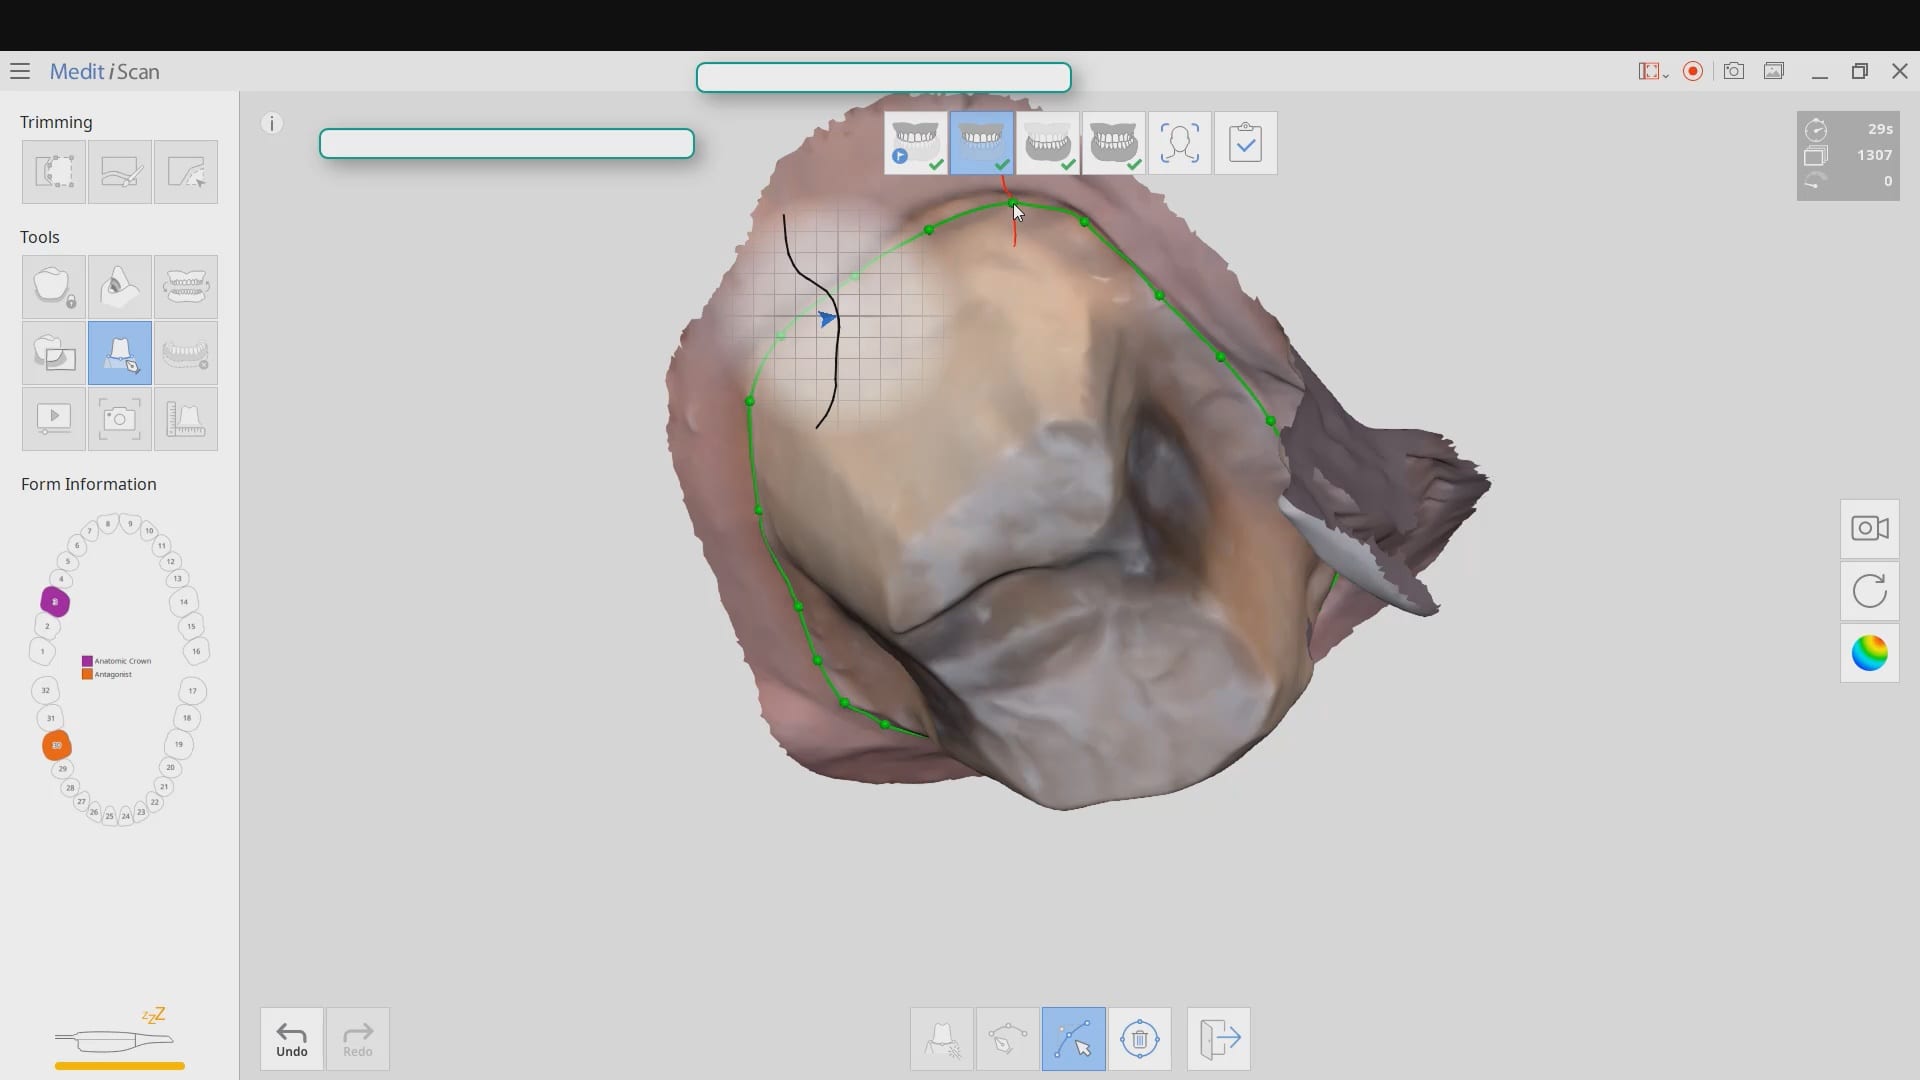
quick little pointer for a new user that shows how to protect areas so that you don’t introduce errors like the tongue getting in your way. the blue models areas that are protected so any future data that lands on it is automatically deleted
With every 3D software, there are times where the data sets are too large for the software to recognize and merge models to. Once in a while, you may have to help in manual mode. In this case, you can see how the open bite prohibited the models from being articulated properly and we had to use the manual mode to pin the left and right bites
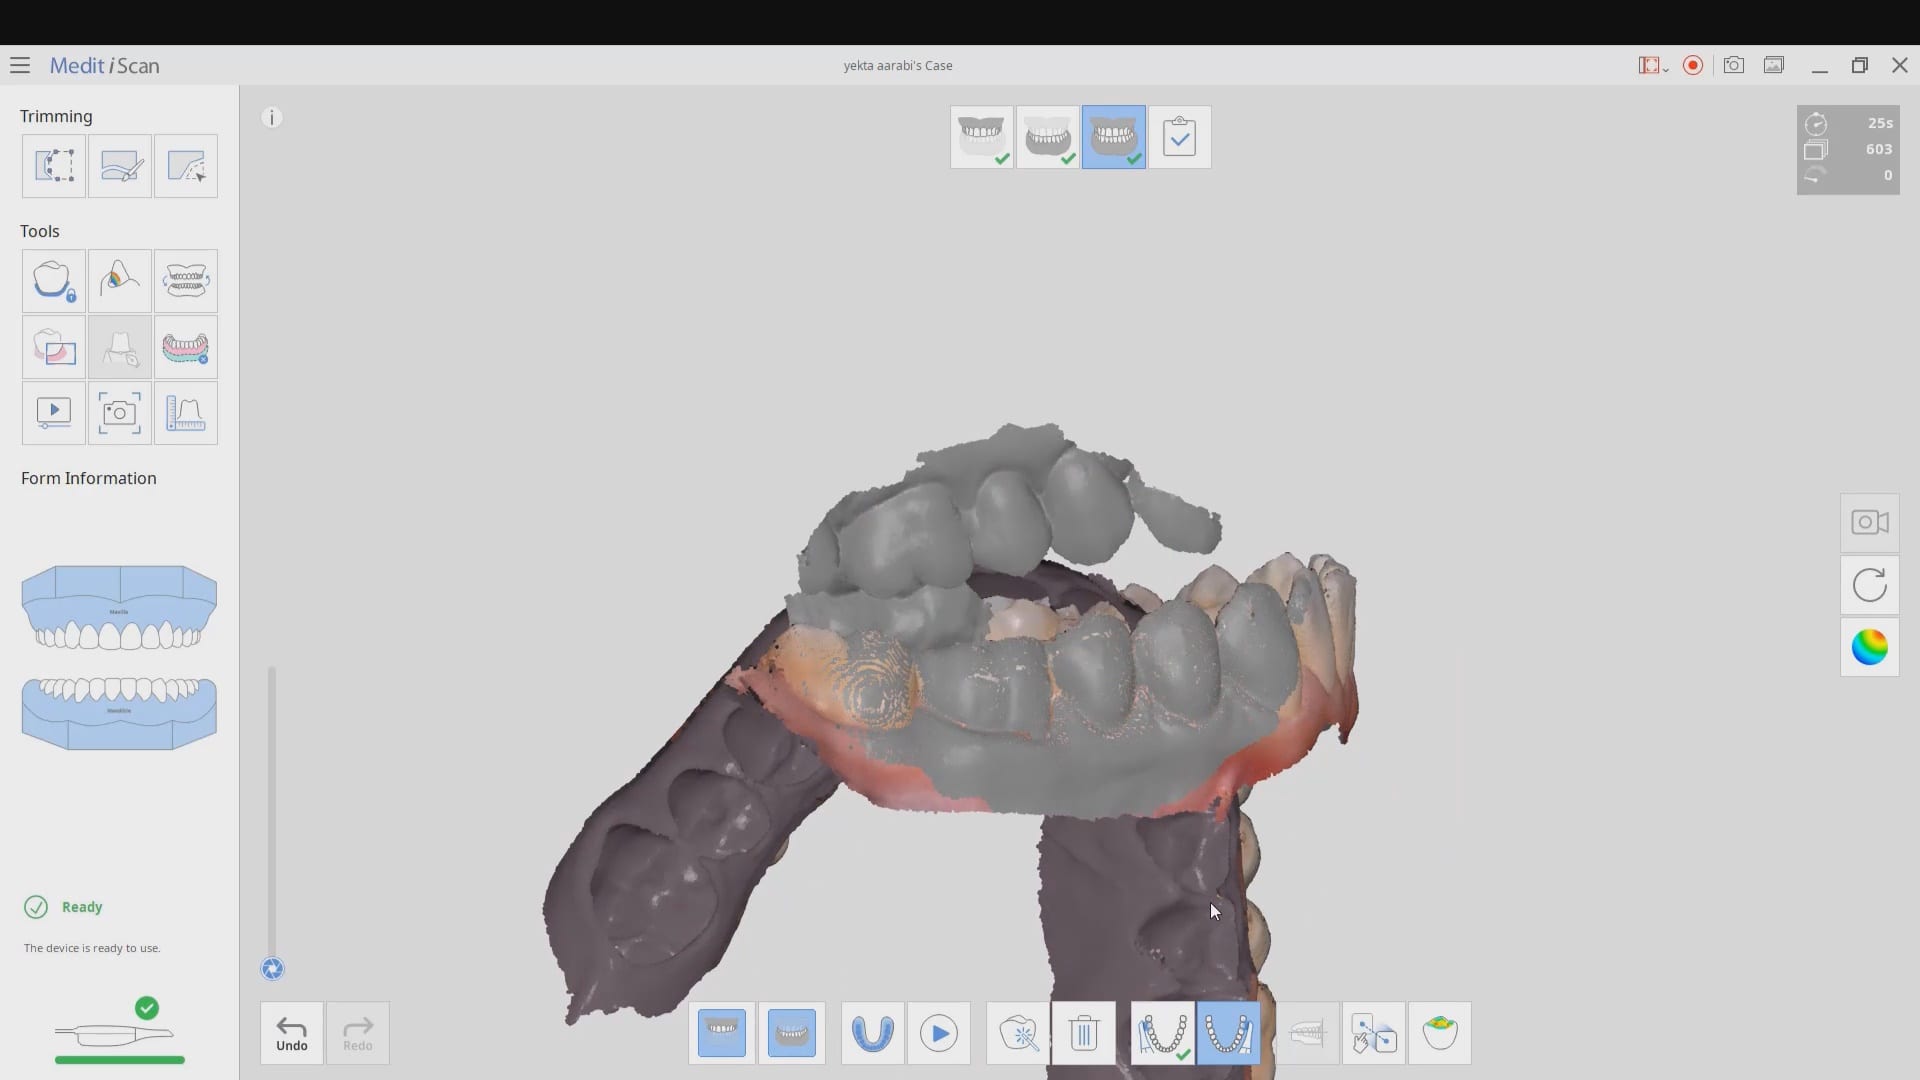
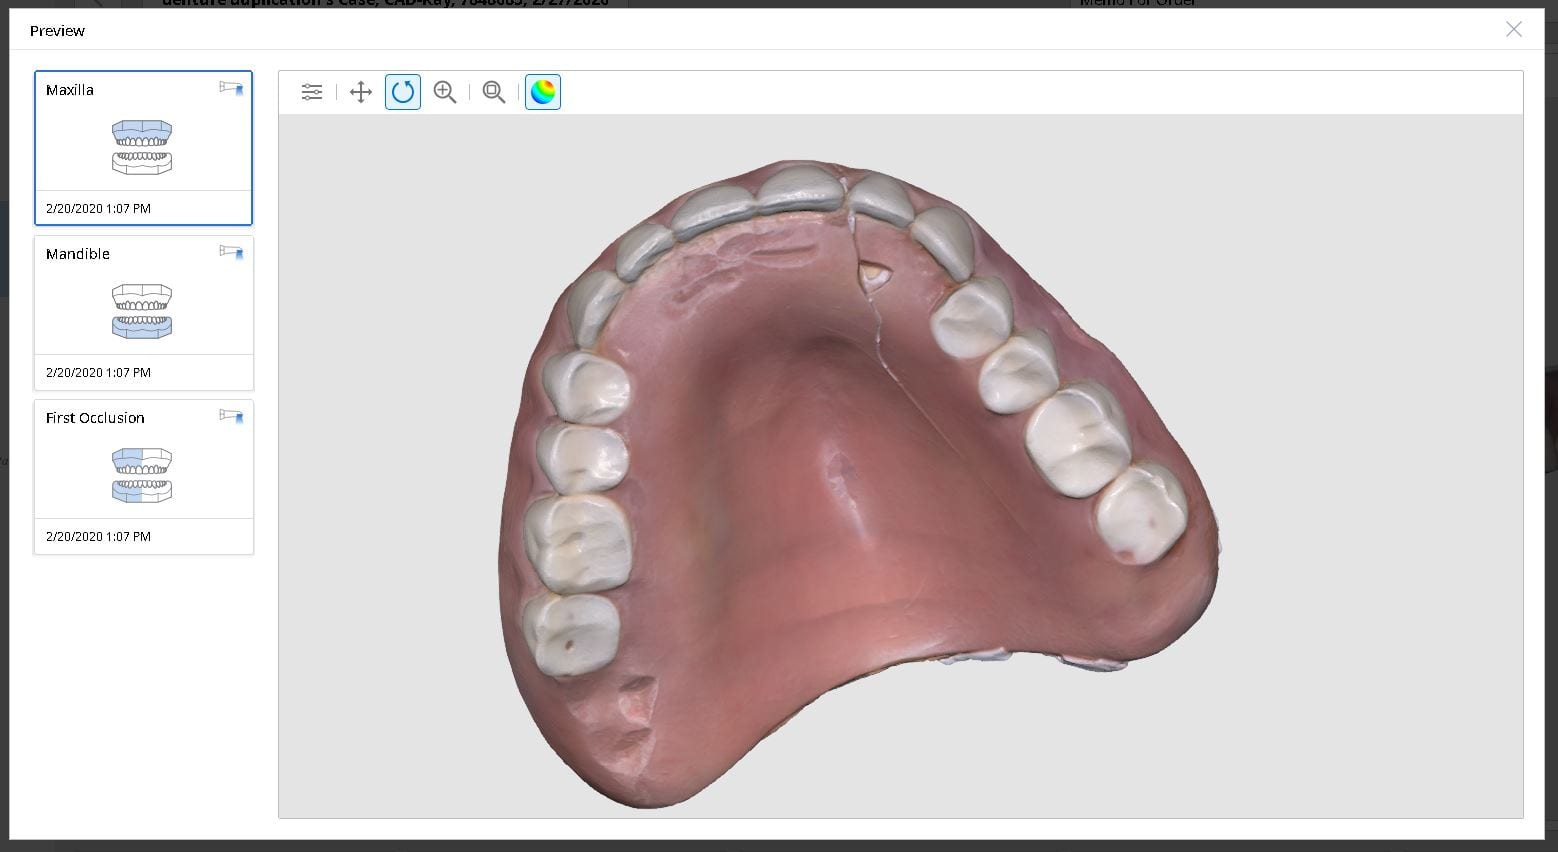
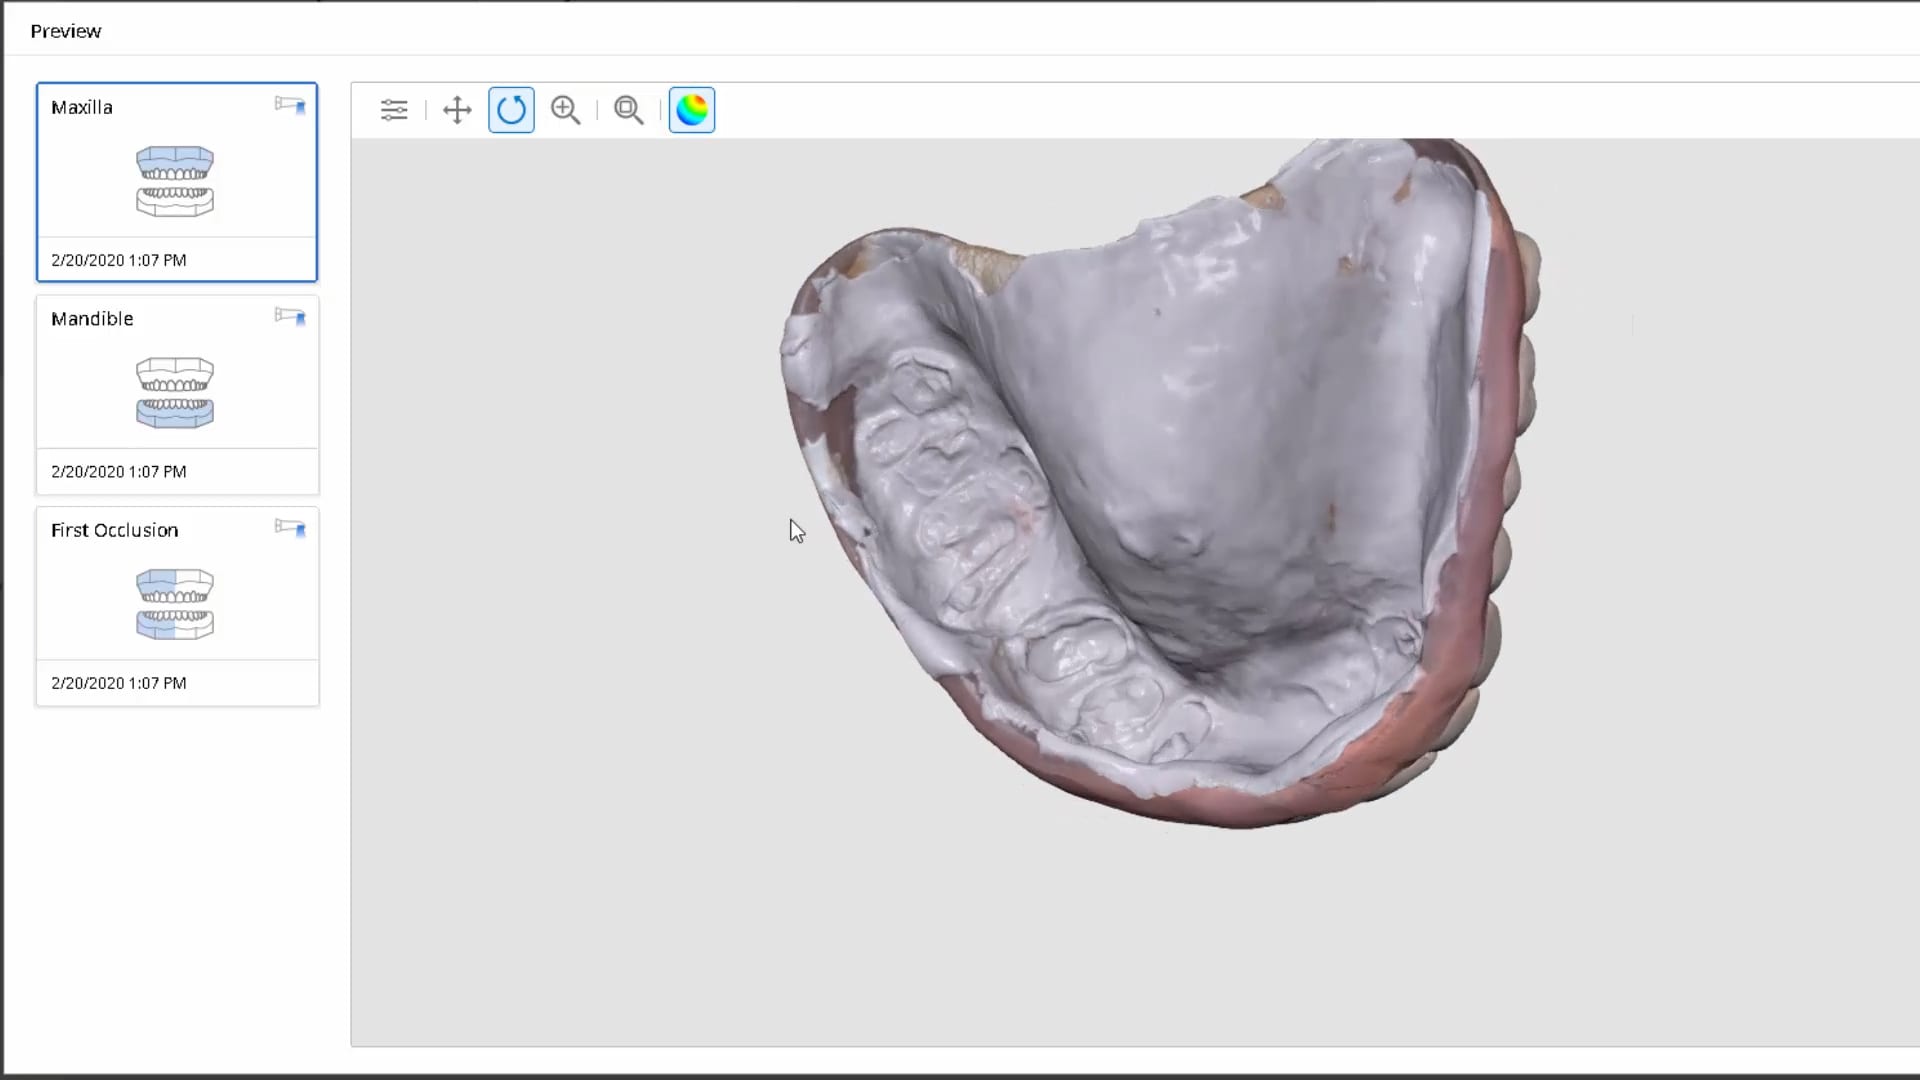
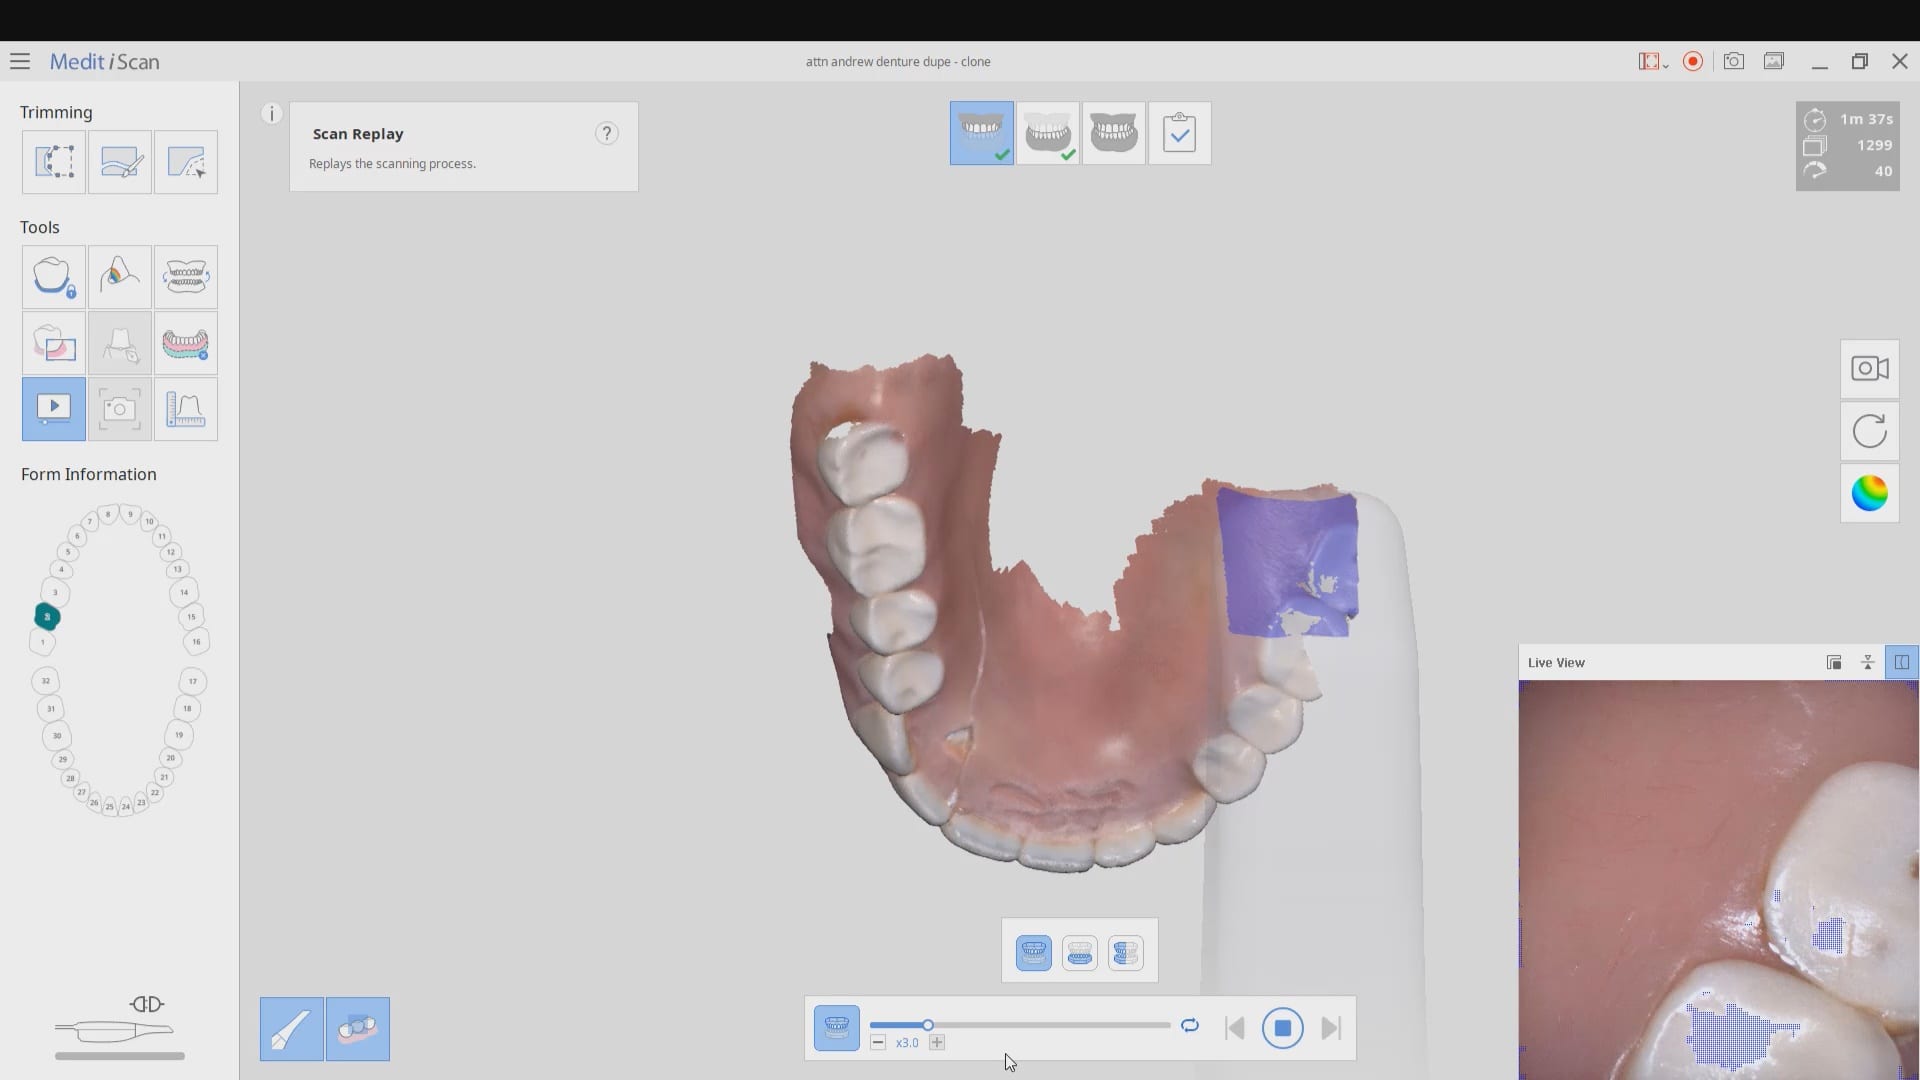
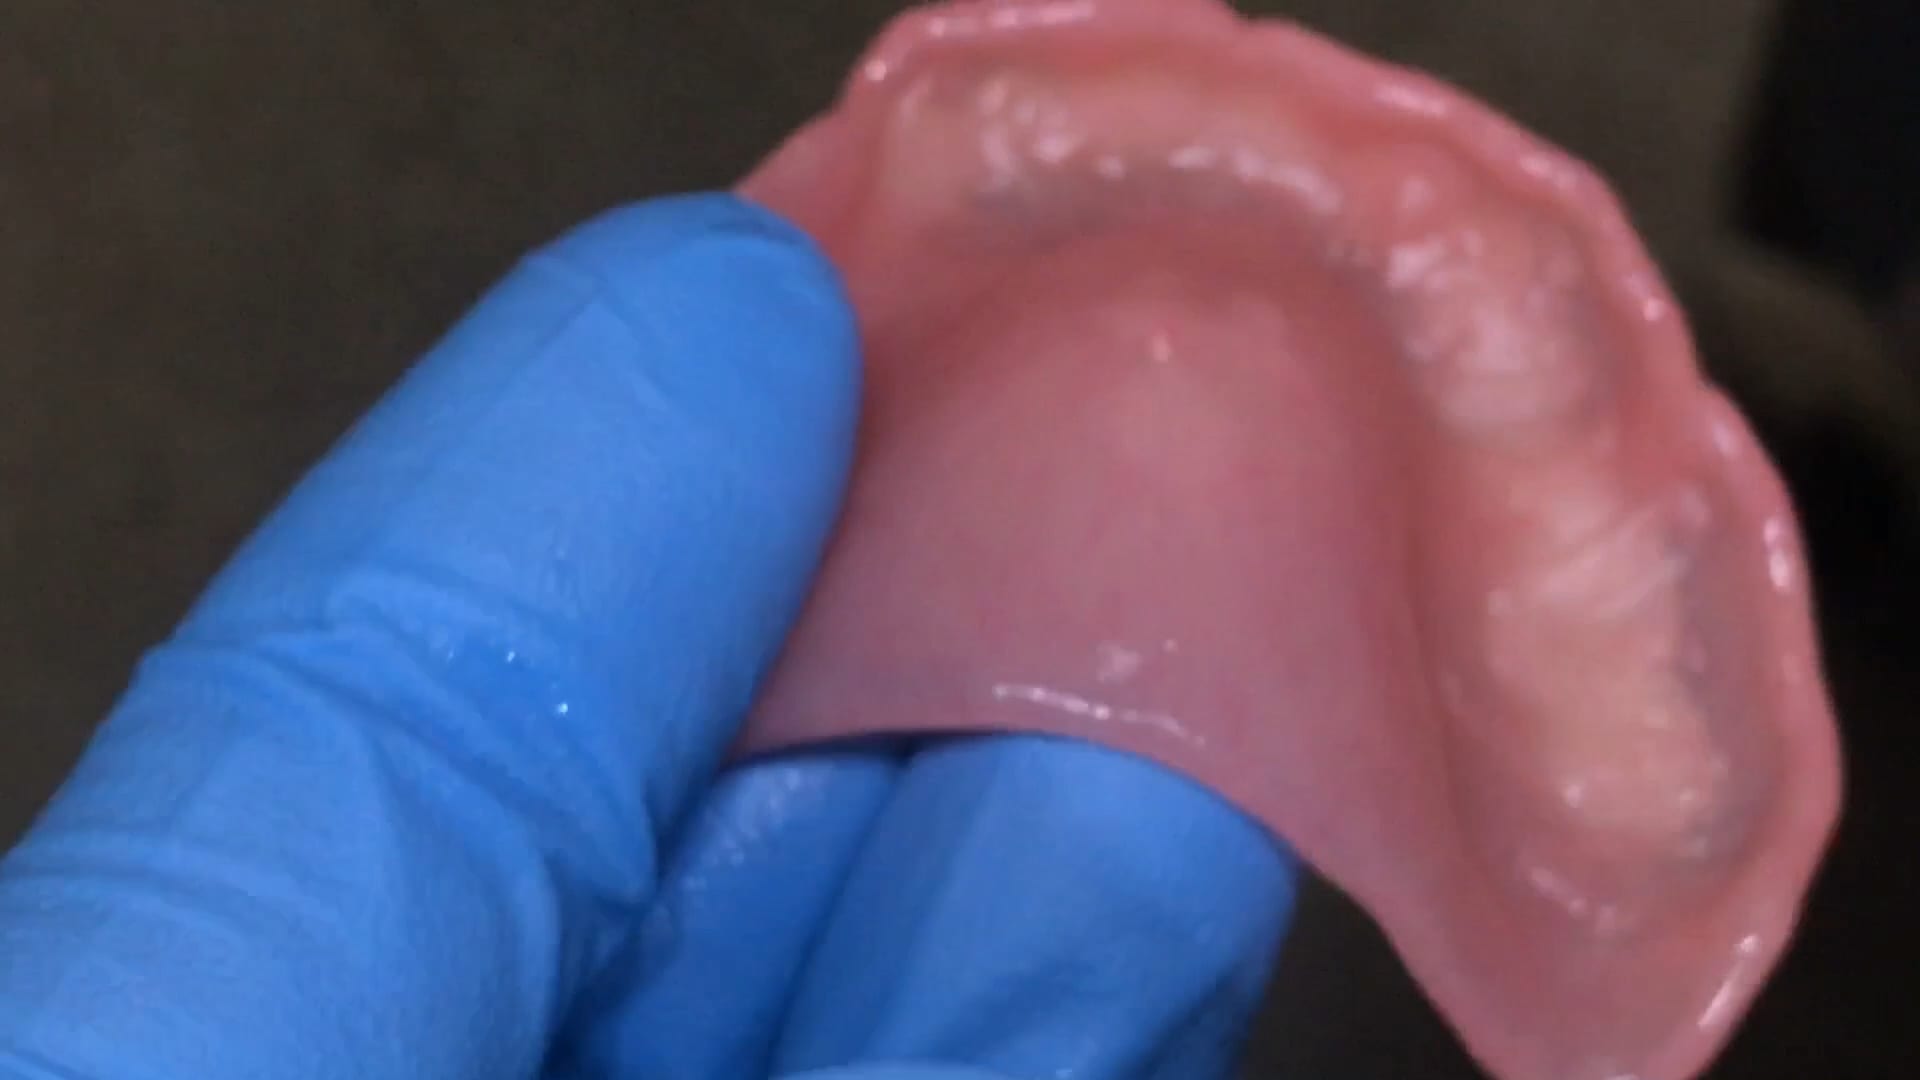
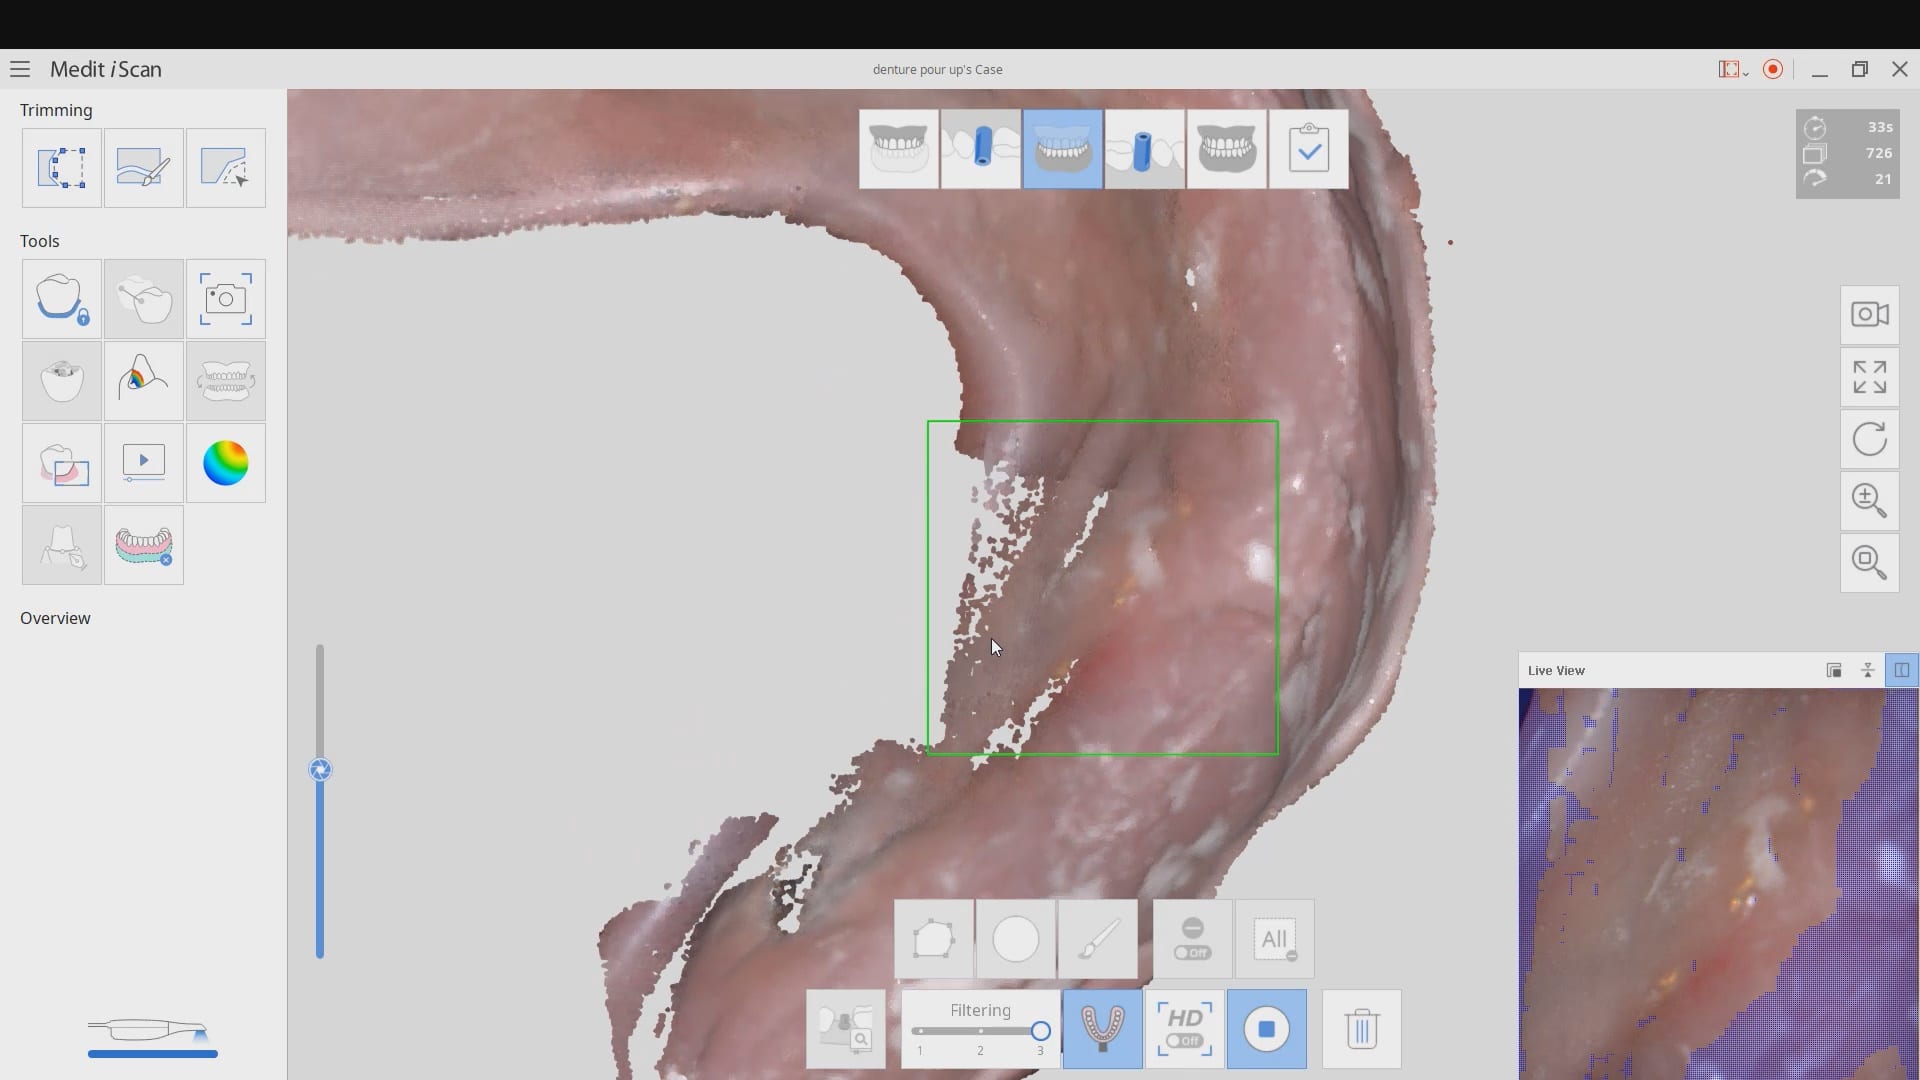
Medit i500 was used to scan and duplicated a fractured denture. It was originally scanned in the patient’s mouth to capture the opposing and the bite and then submitted to the lab for fabrication
In this video we review with the instant replay feature of the medit i500 on how to scan a denture and not introduce double images or errors in the model. We first scan the occlusale surfaces of the denture intra-orally (this does not really matter as the software doesn’t know any differently), we then image the opposing, and then bite. We then remove the relined upper broken denture and continue the imaging to capture the intaglio
In this case presentation, we introduce the Shining Aoralscan for beginner doctors who want to get into digital impressions. Proper isolation and retraction is a key element of scanning. In this demonstration we showcase how a new user can easily control the operating field to deliver high quality restorations
Proper isolation and retraction is key for all intra-oral scanners. In this video, you can appreciate how the upper and lower arches were isolated, the margins were exposed with retraction cord and imaged with the shining 3d aoralscan
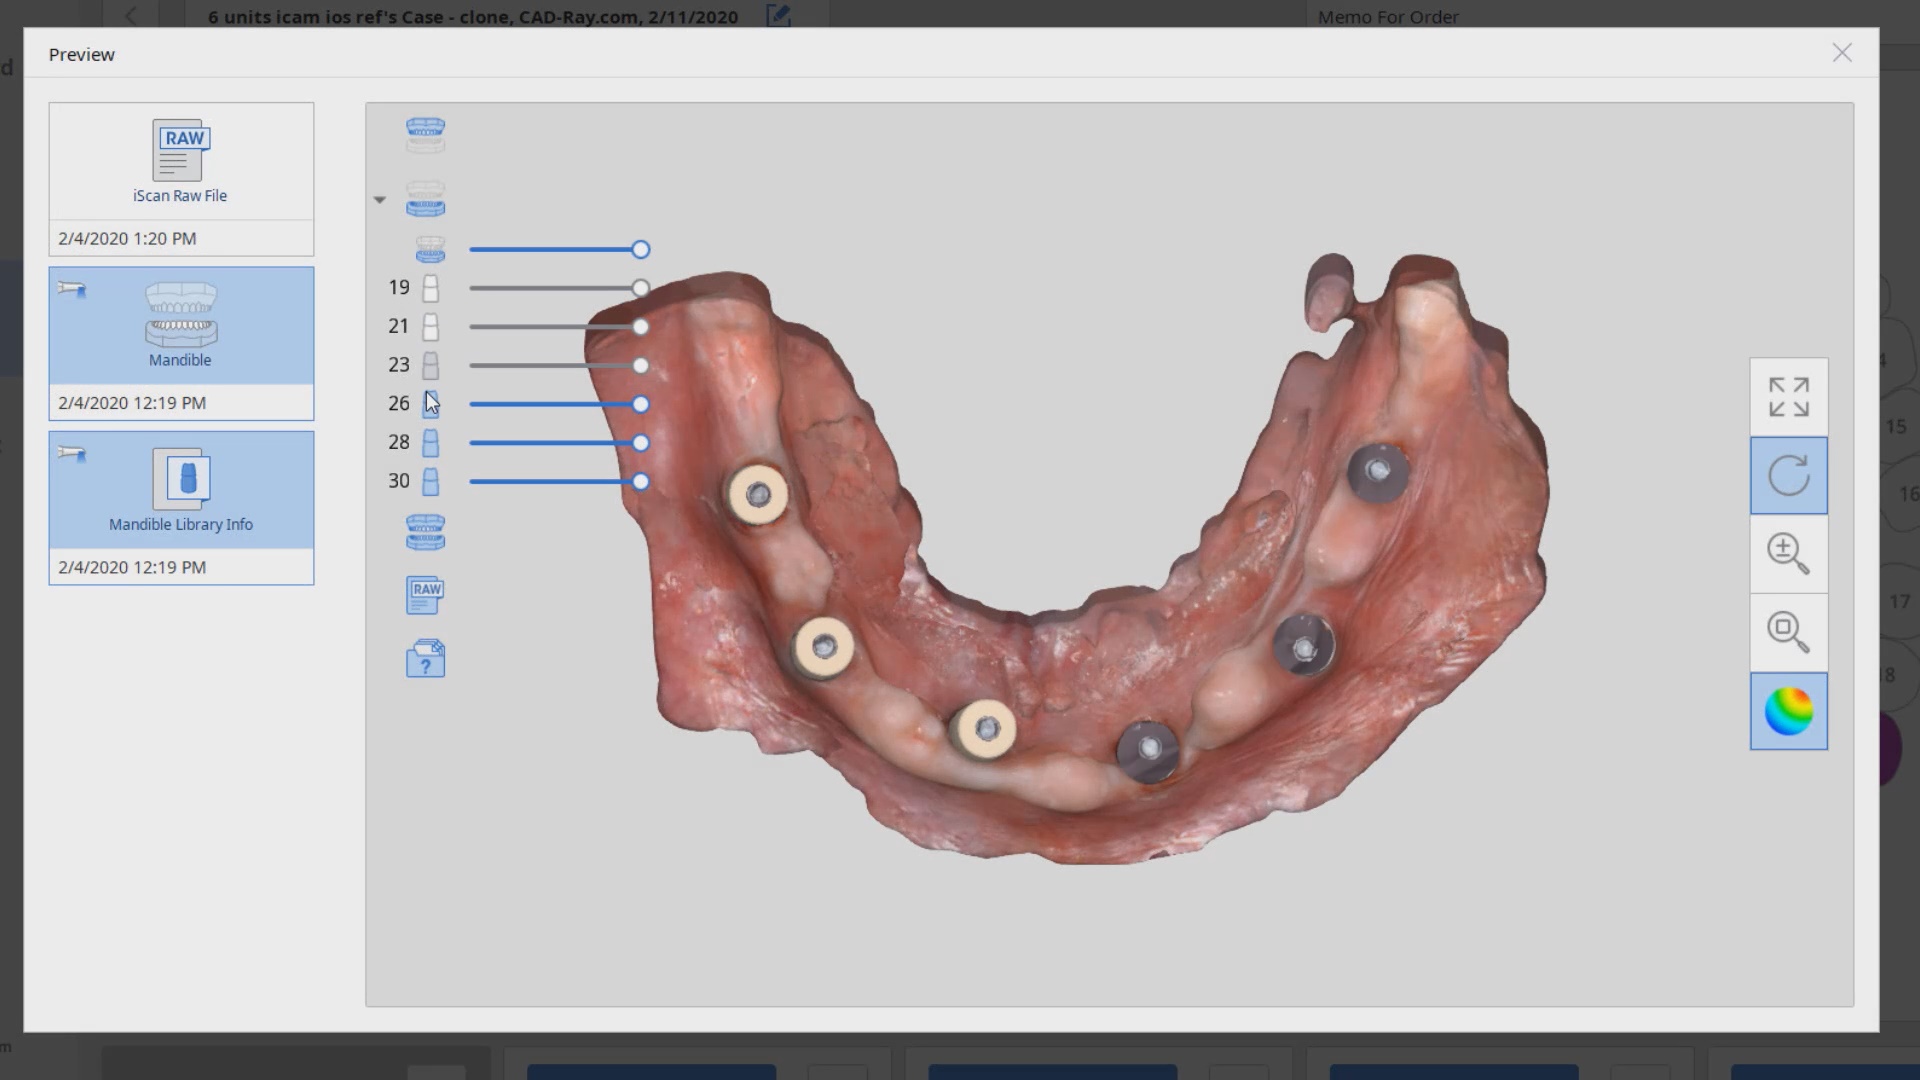
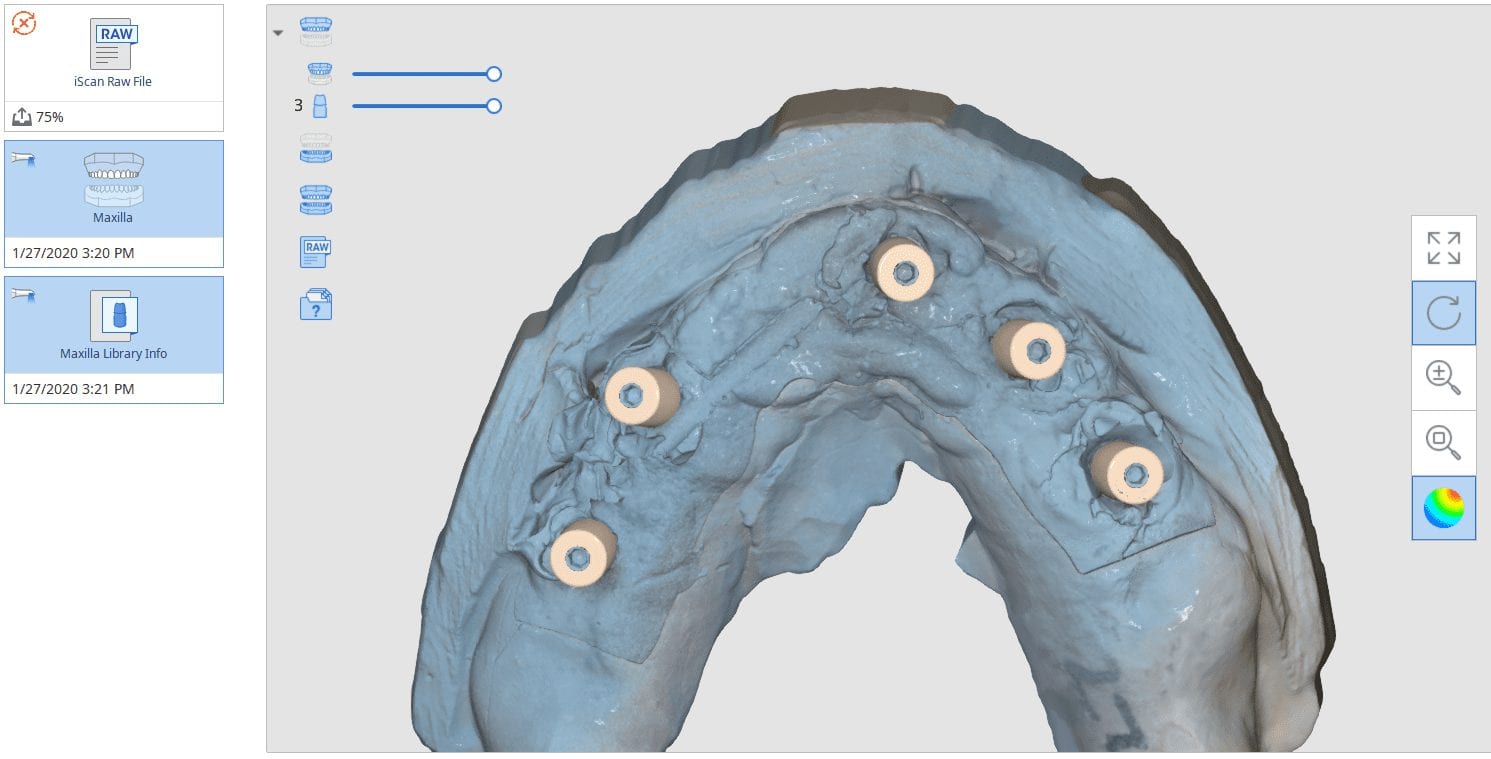
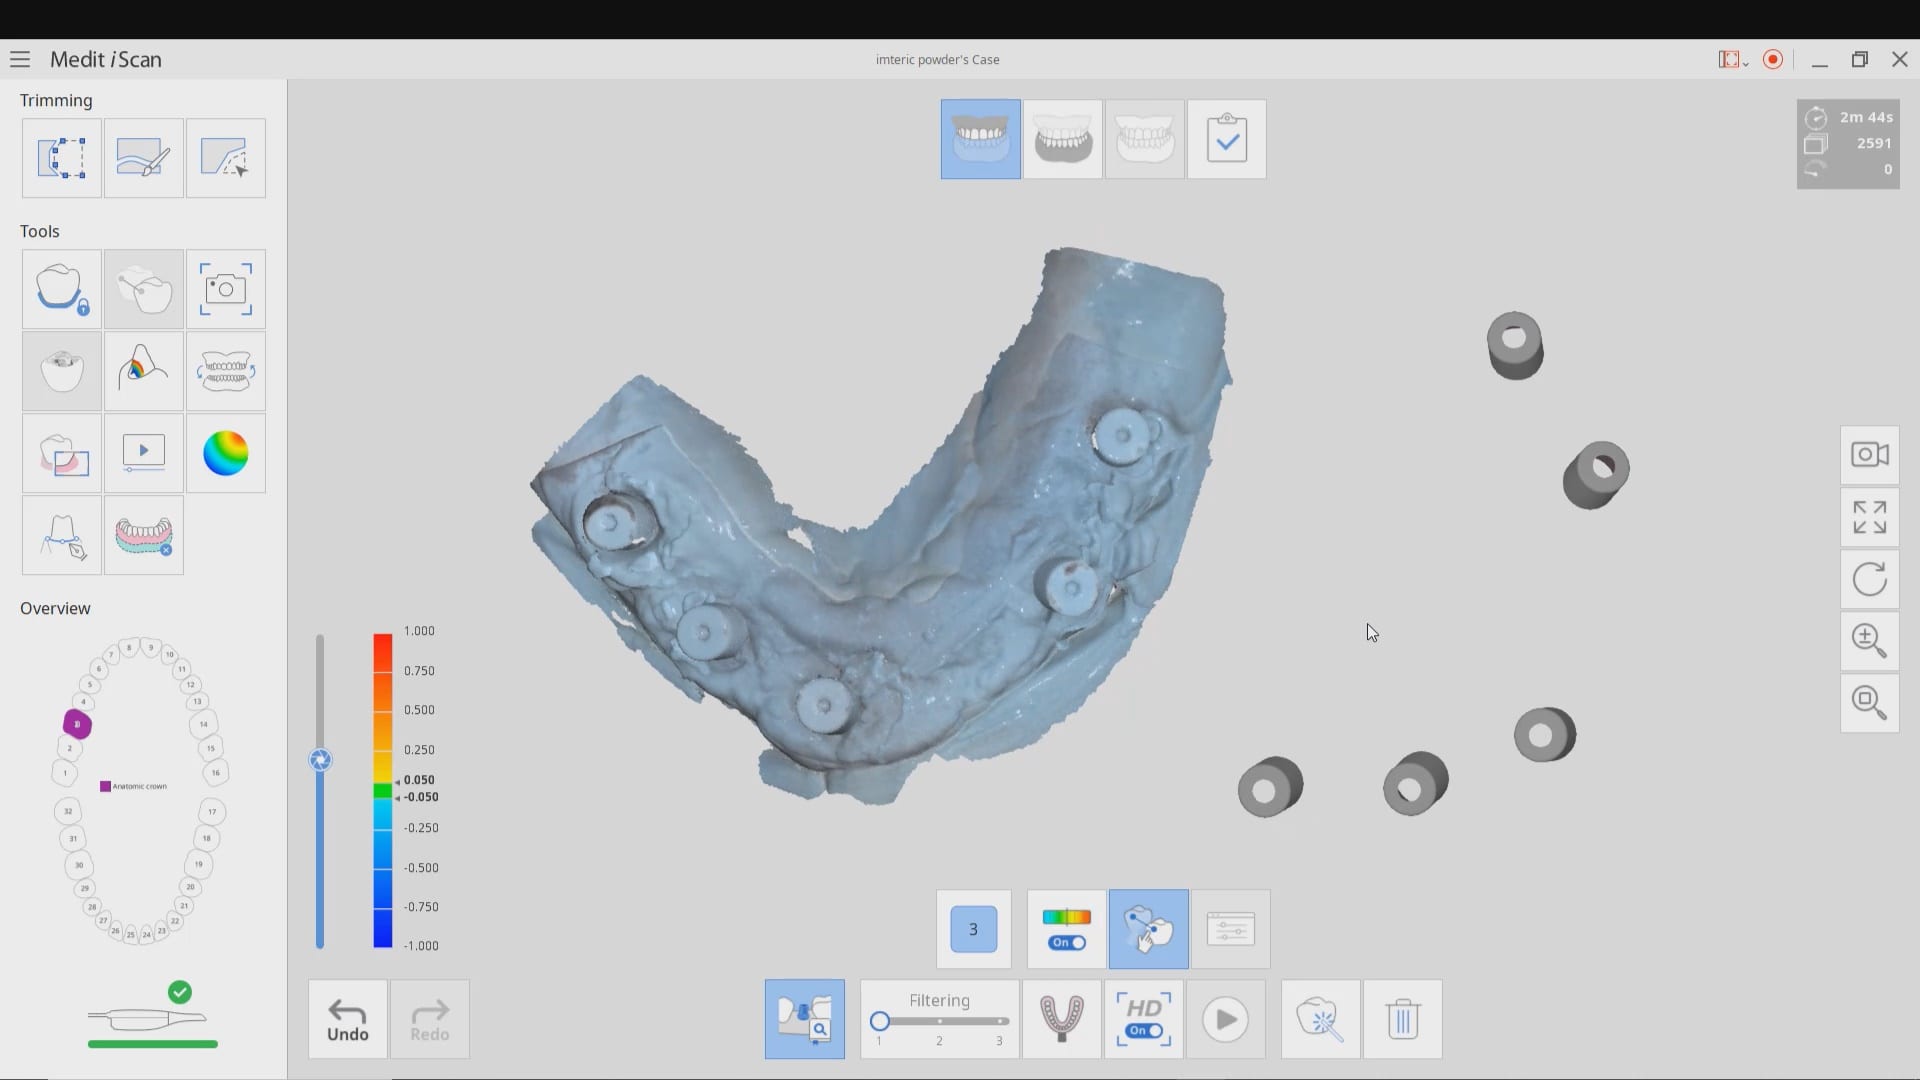
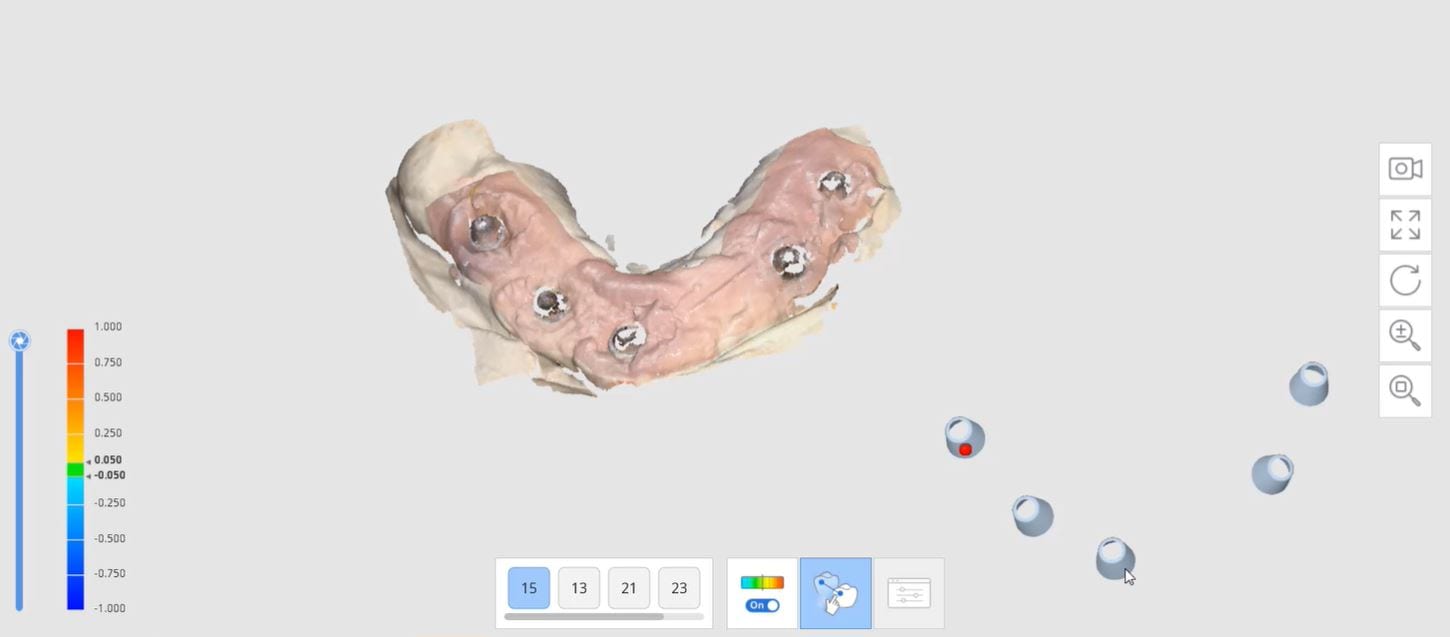
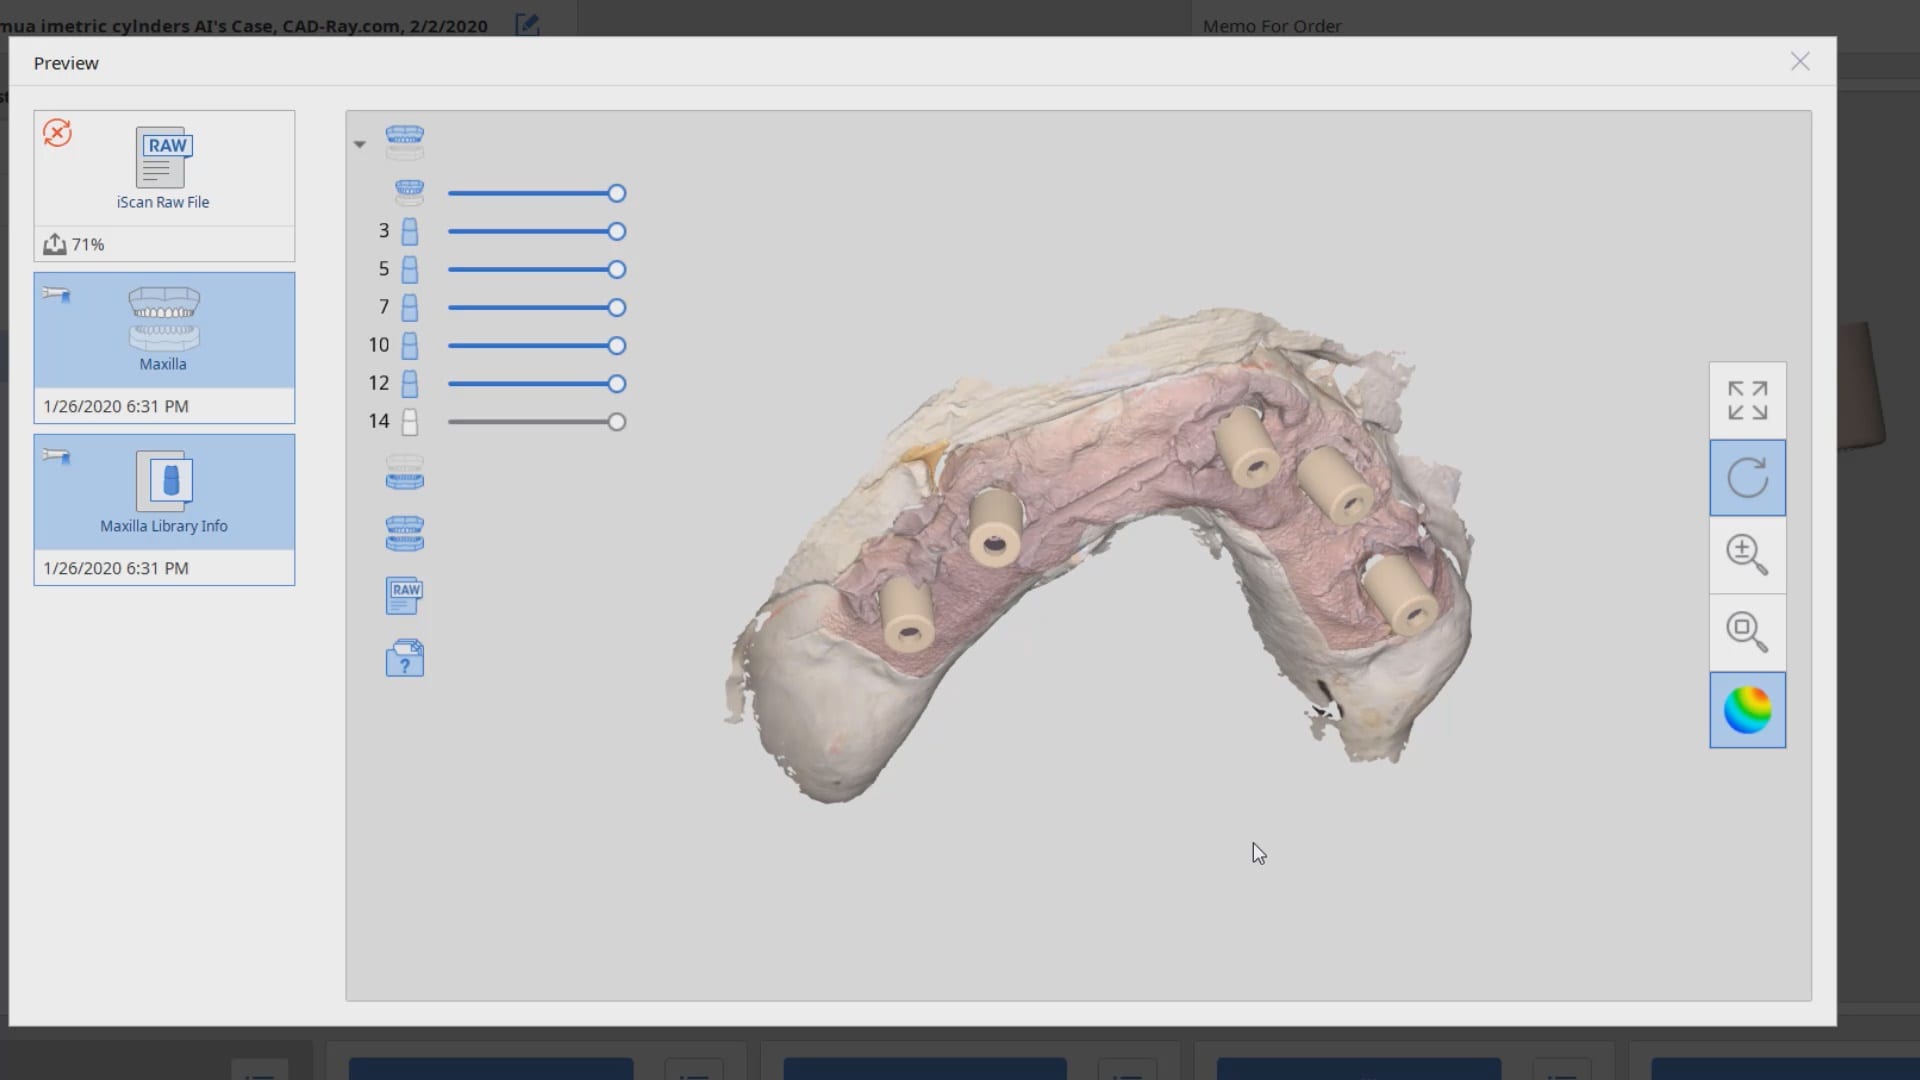
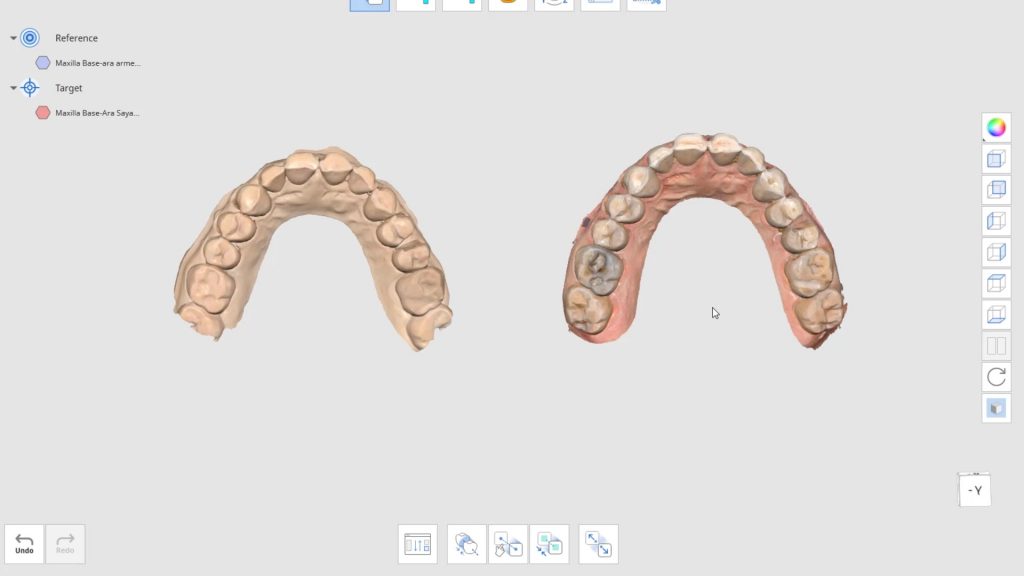
To date, the literature and research clearly points out that full arch scans with edentulous arches are prone to inaccuracies. That’s because we have never had a way to measure and verify models while scanning. There are two features unique to the Medit i500, namely the reliability map and the artificial intelligent implant suprastructure identification system. Individually, they do not provide much information with regards to accuracy, but if you understand how they work, you can utilize them to assess accuracy while you are scanning edentulous arches.
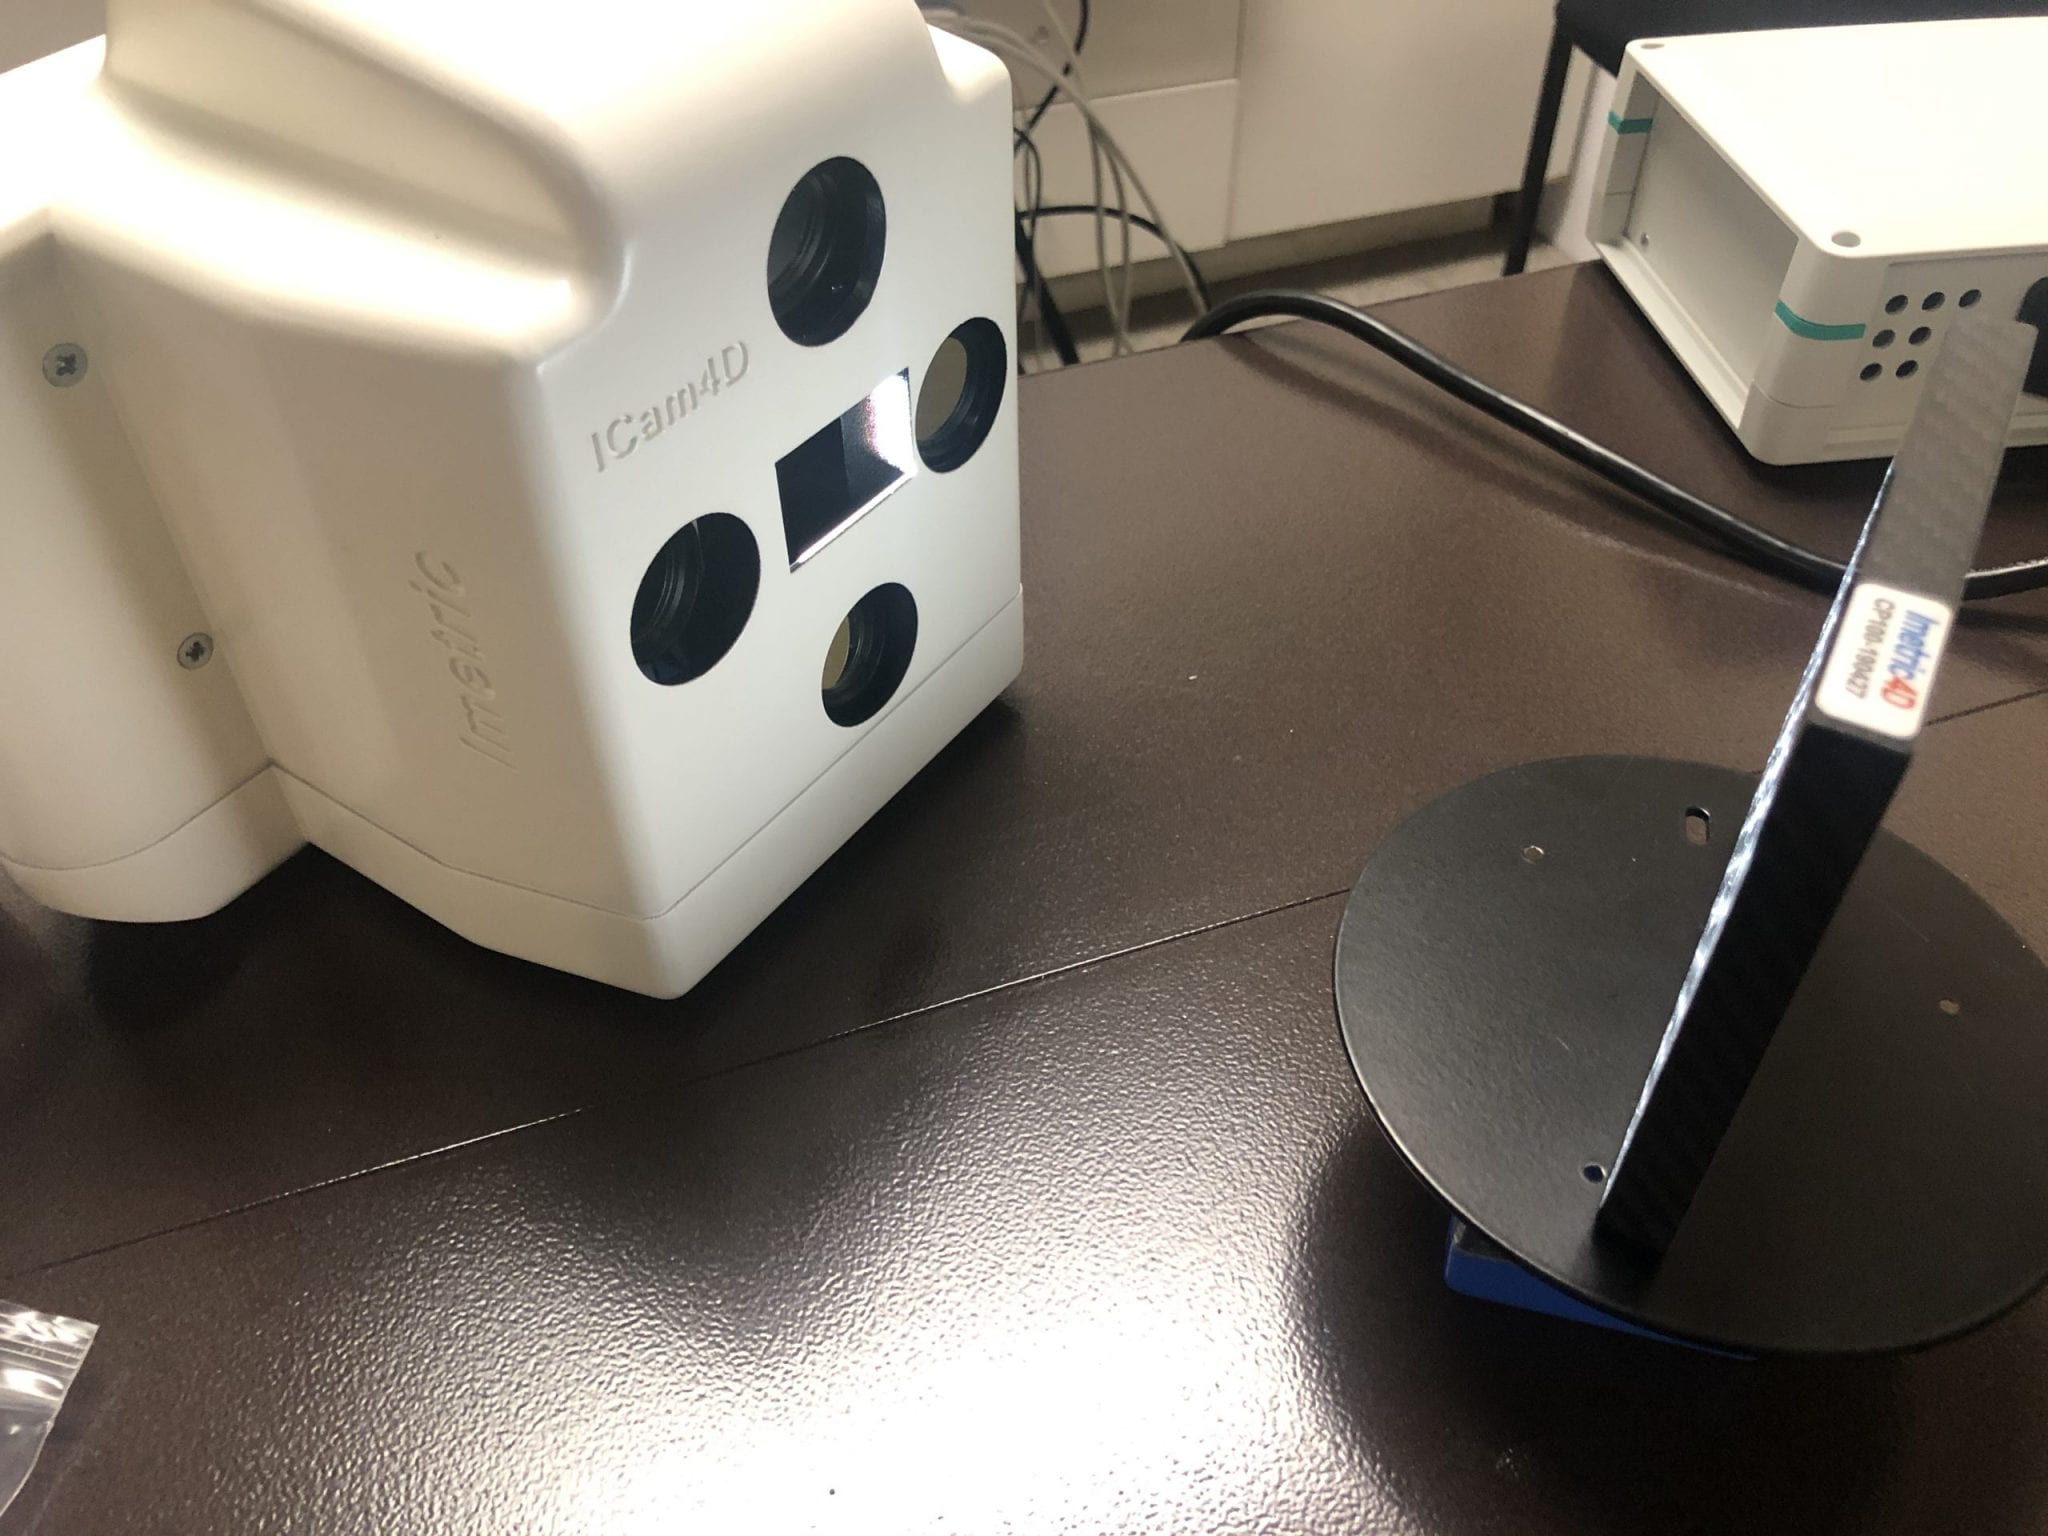
We proved the validity of this concept by utilizing these two features by incorporating a scan from the imetric Icam4D scanner and merging its data with the IOS to render a perfect match. Details are posted for our users in the Imaging Implants Section of our tutorial liabrary
This is a preview of a single unit case that was scanned using the Artificial Implant Suprastructure Identification System of the Medit Software. To see the full case follow this link
Hydroflouric Acid Etched Treated Scanbody Surface makes Intra-Oral Scanning much easier for all dental scanners. Apply a coat of HF for a mere 10 seconds and rinse off.
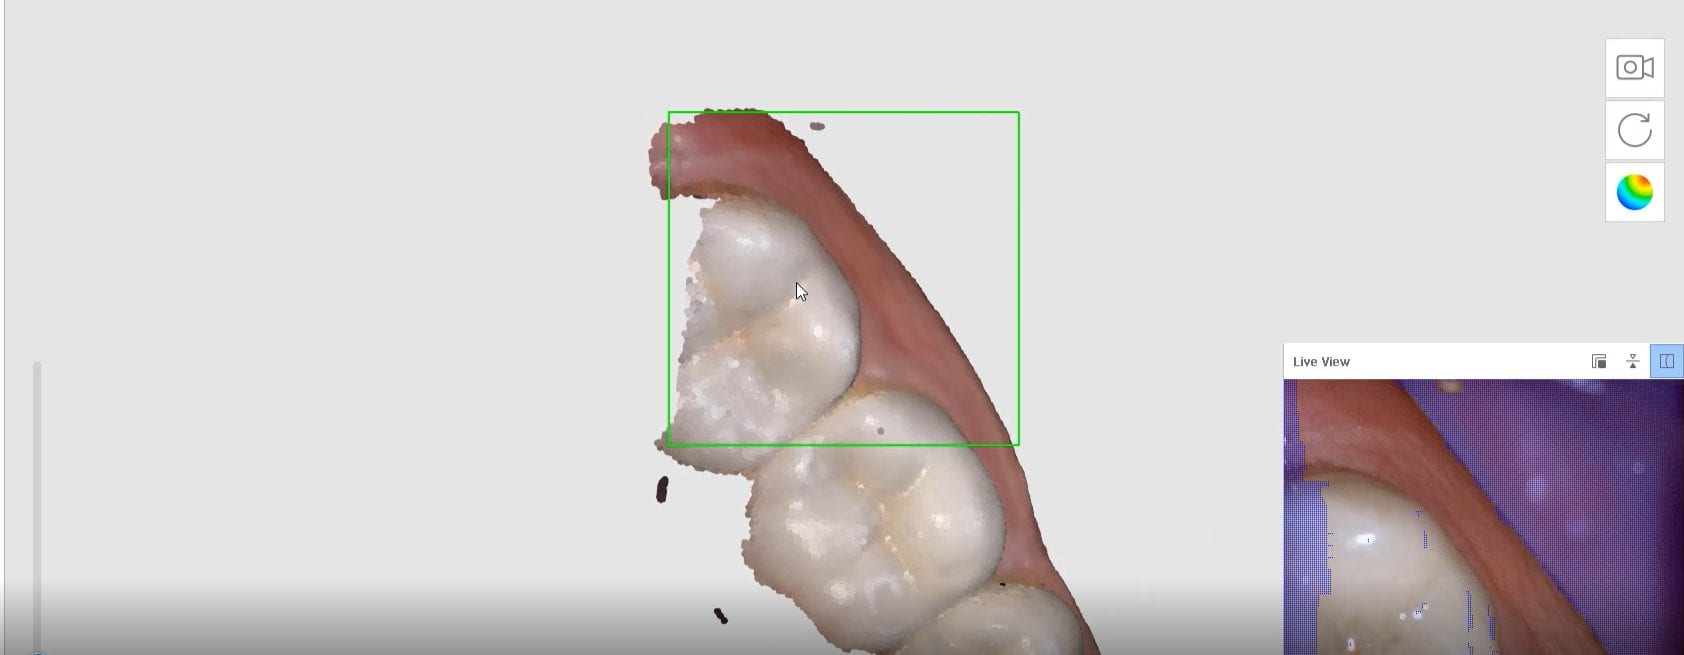
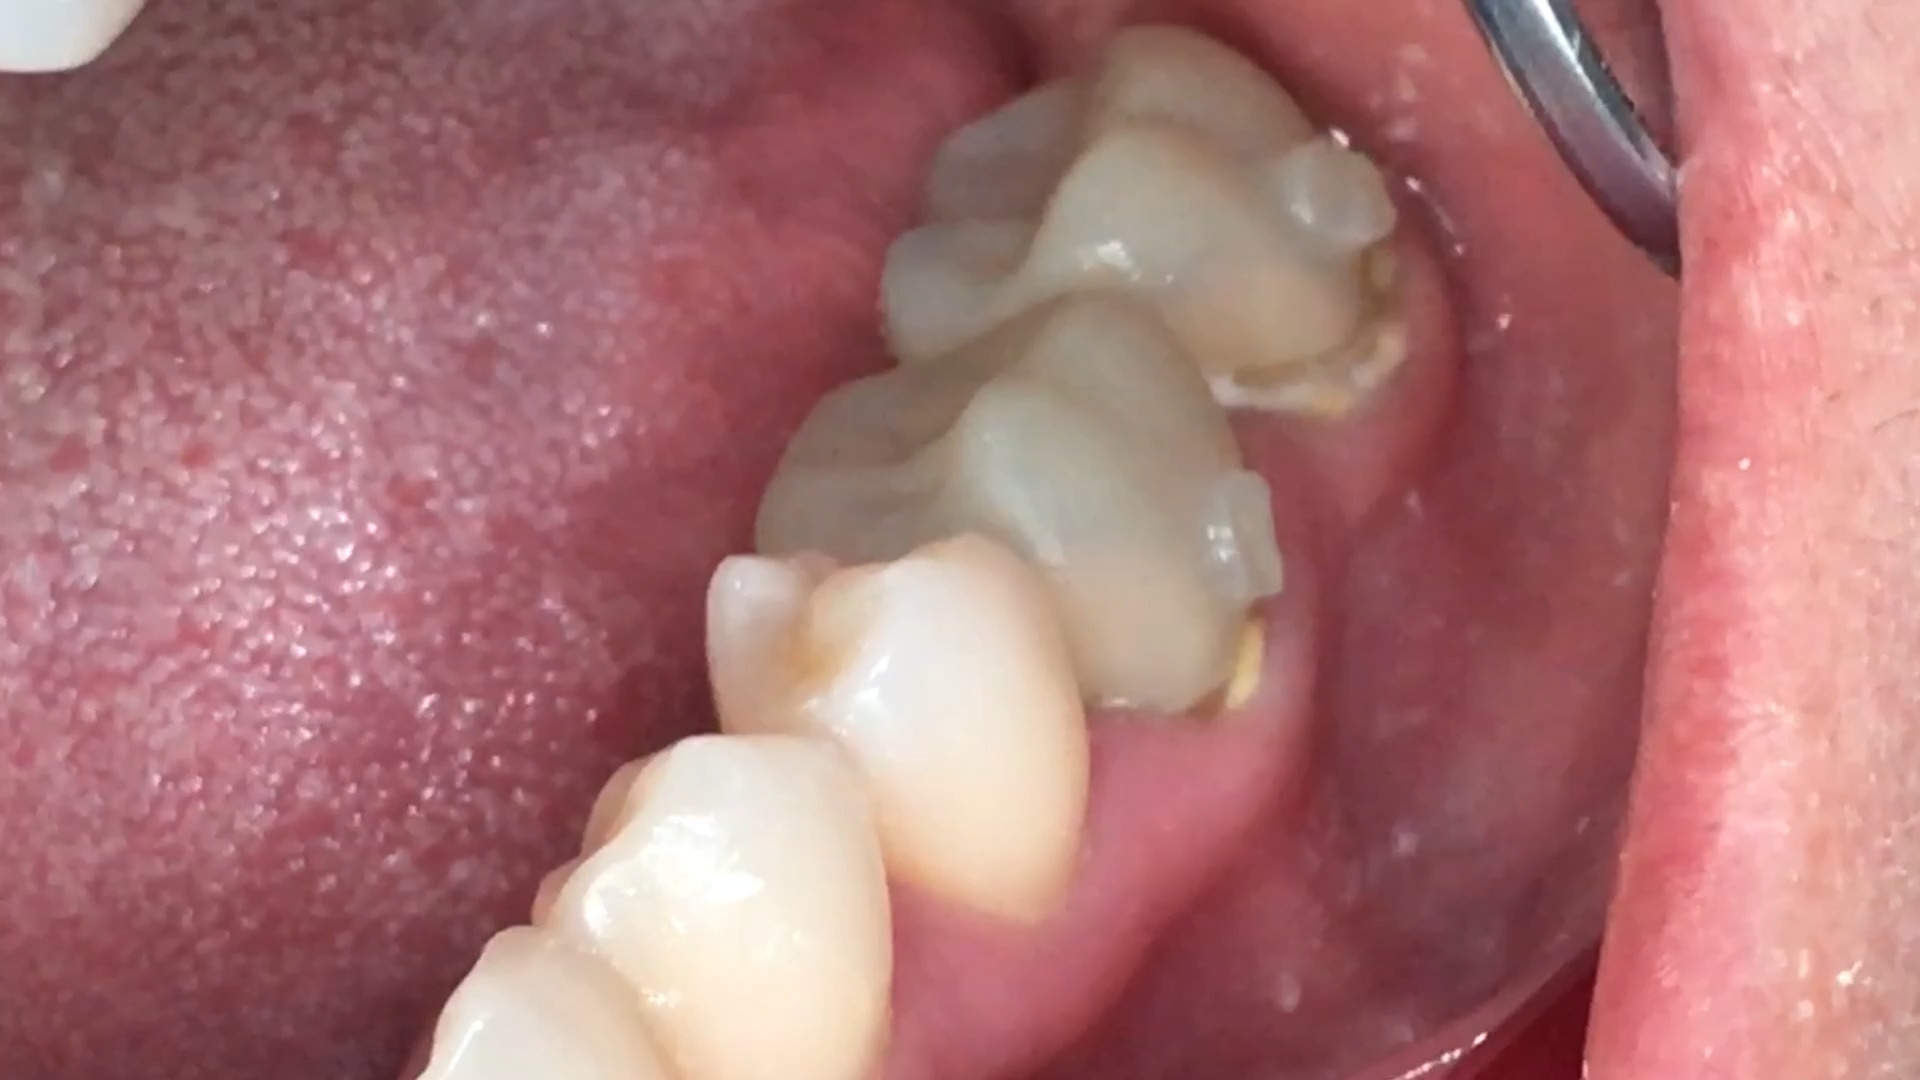
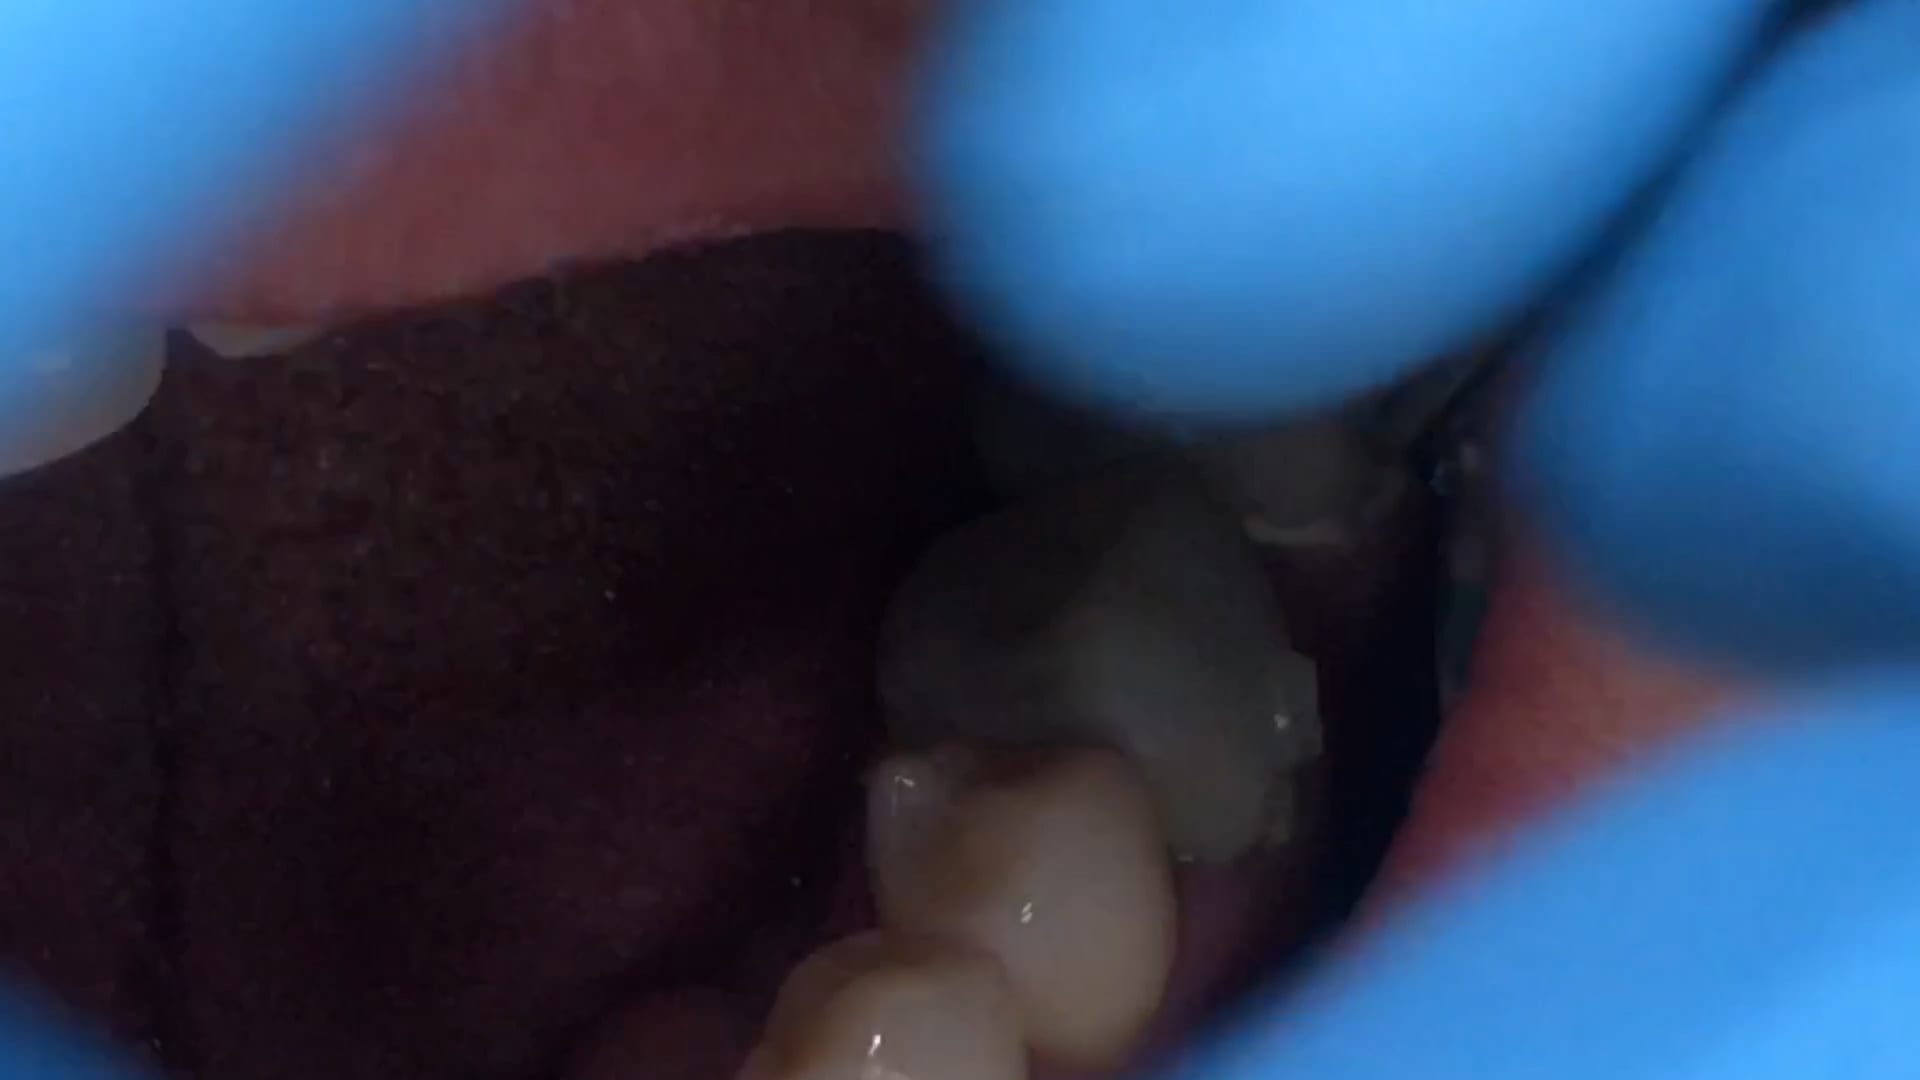
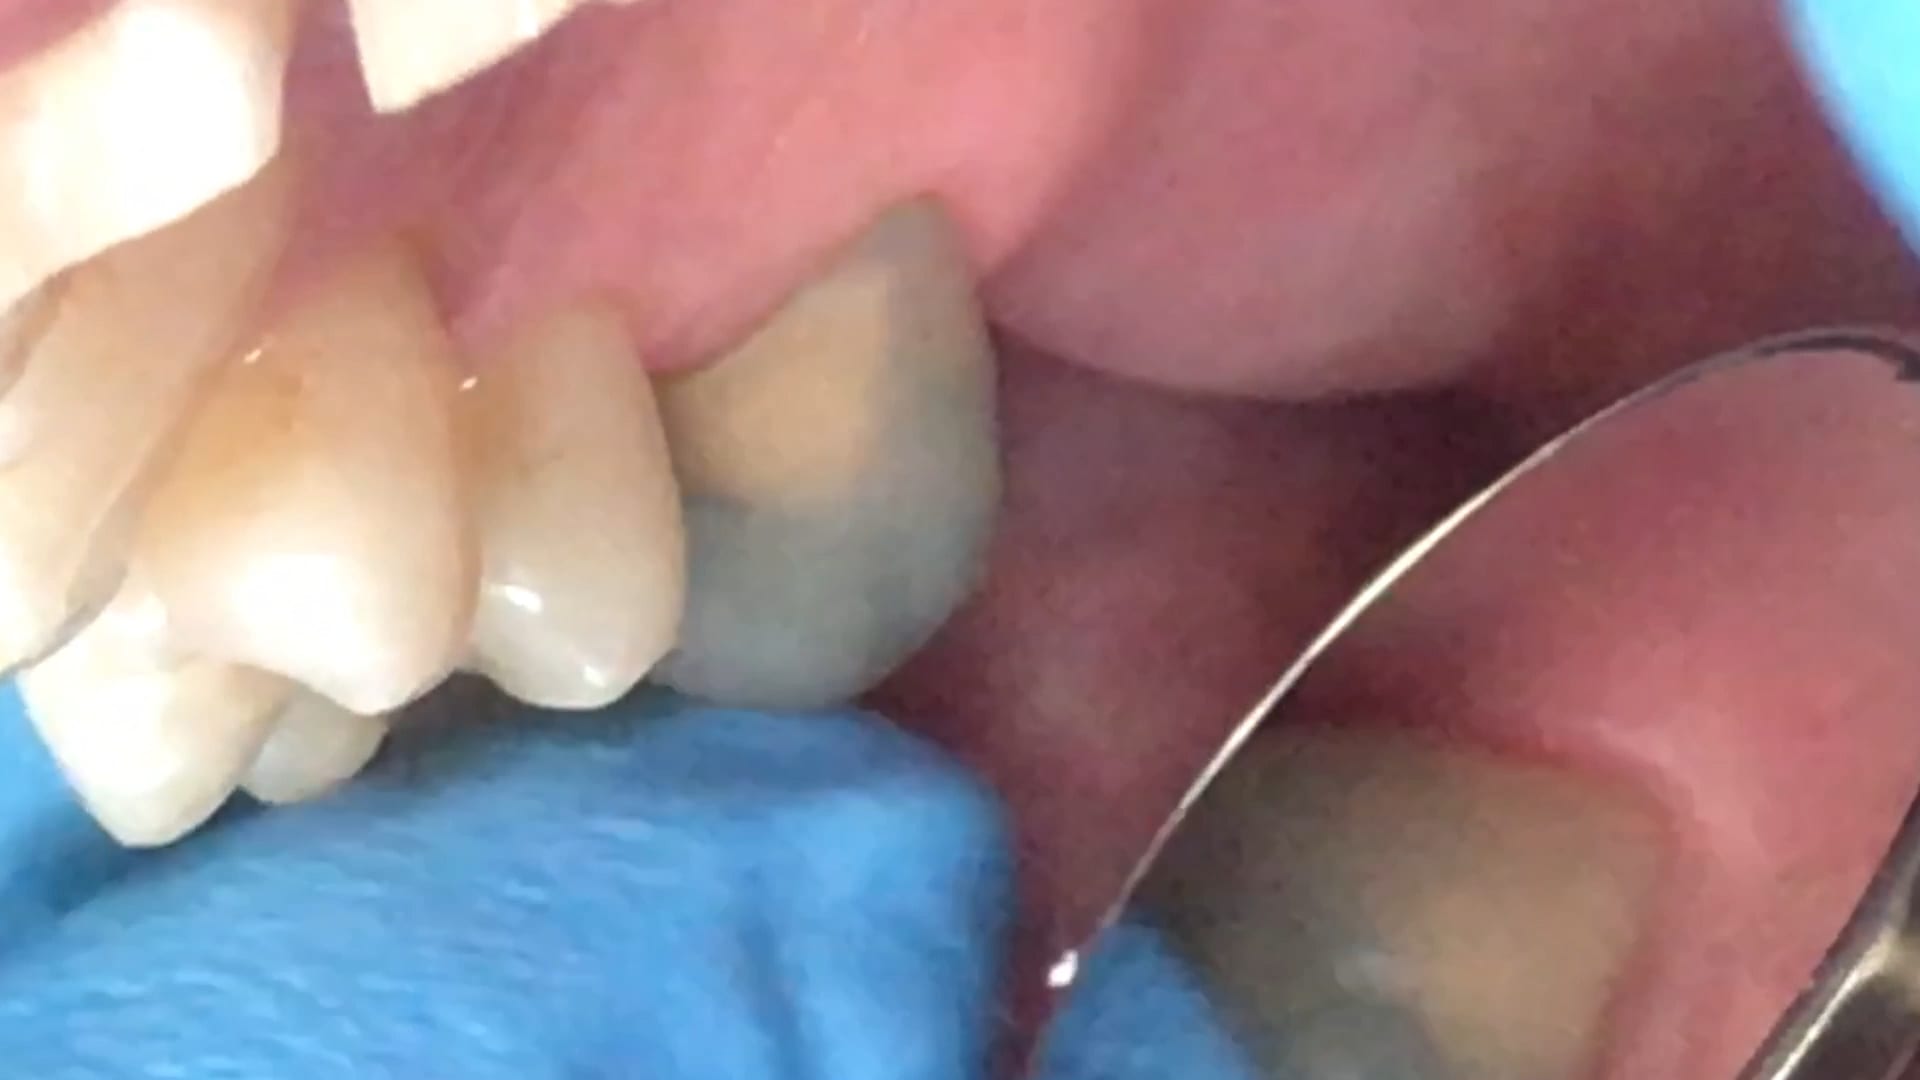
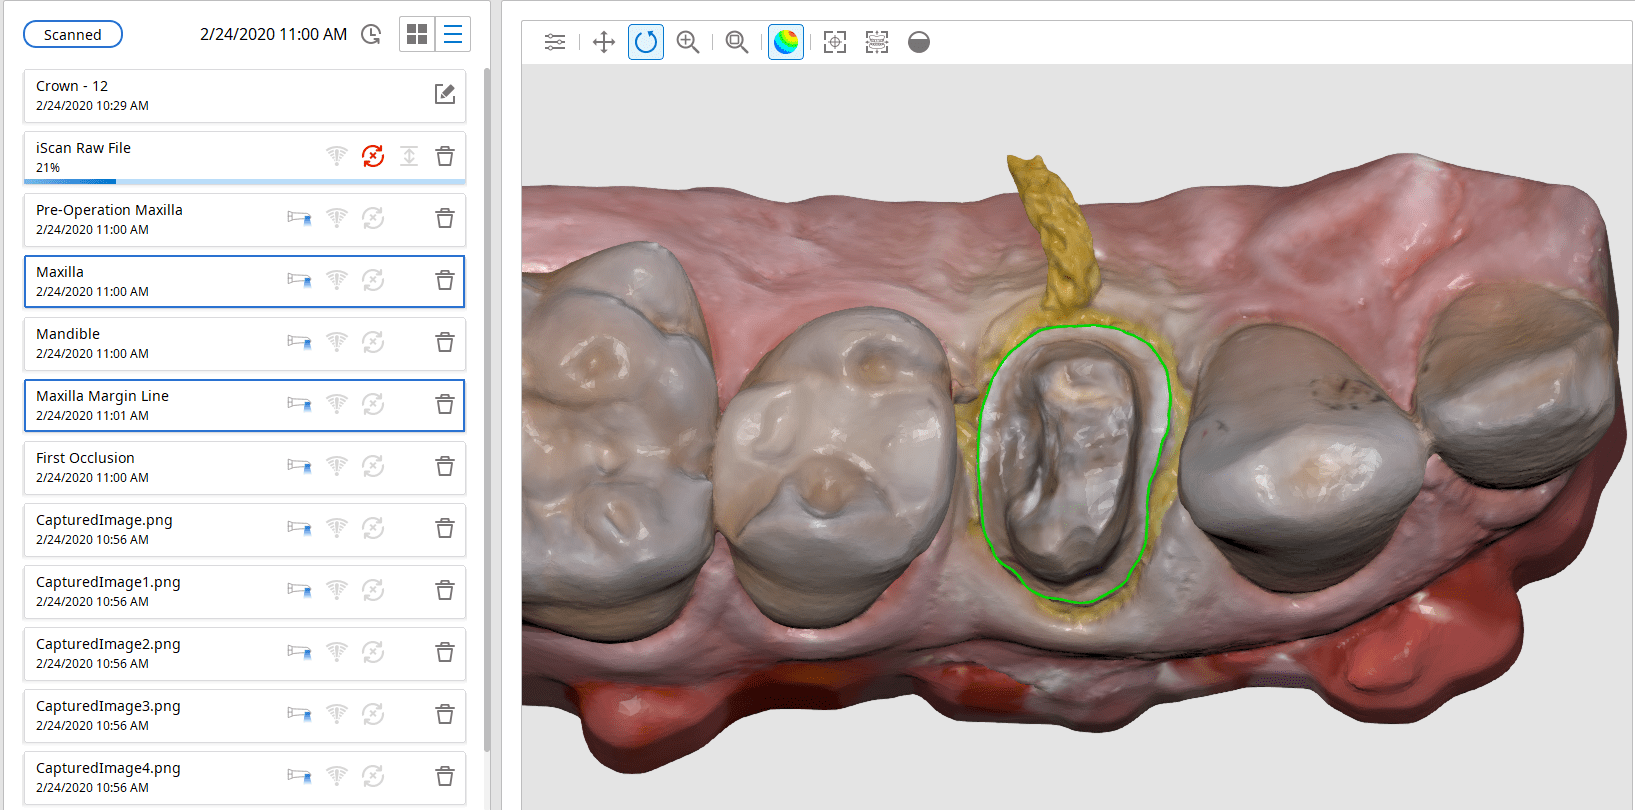
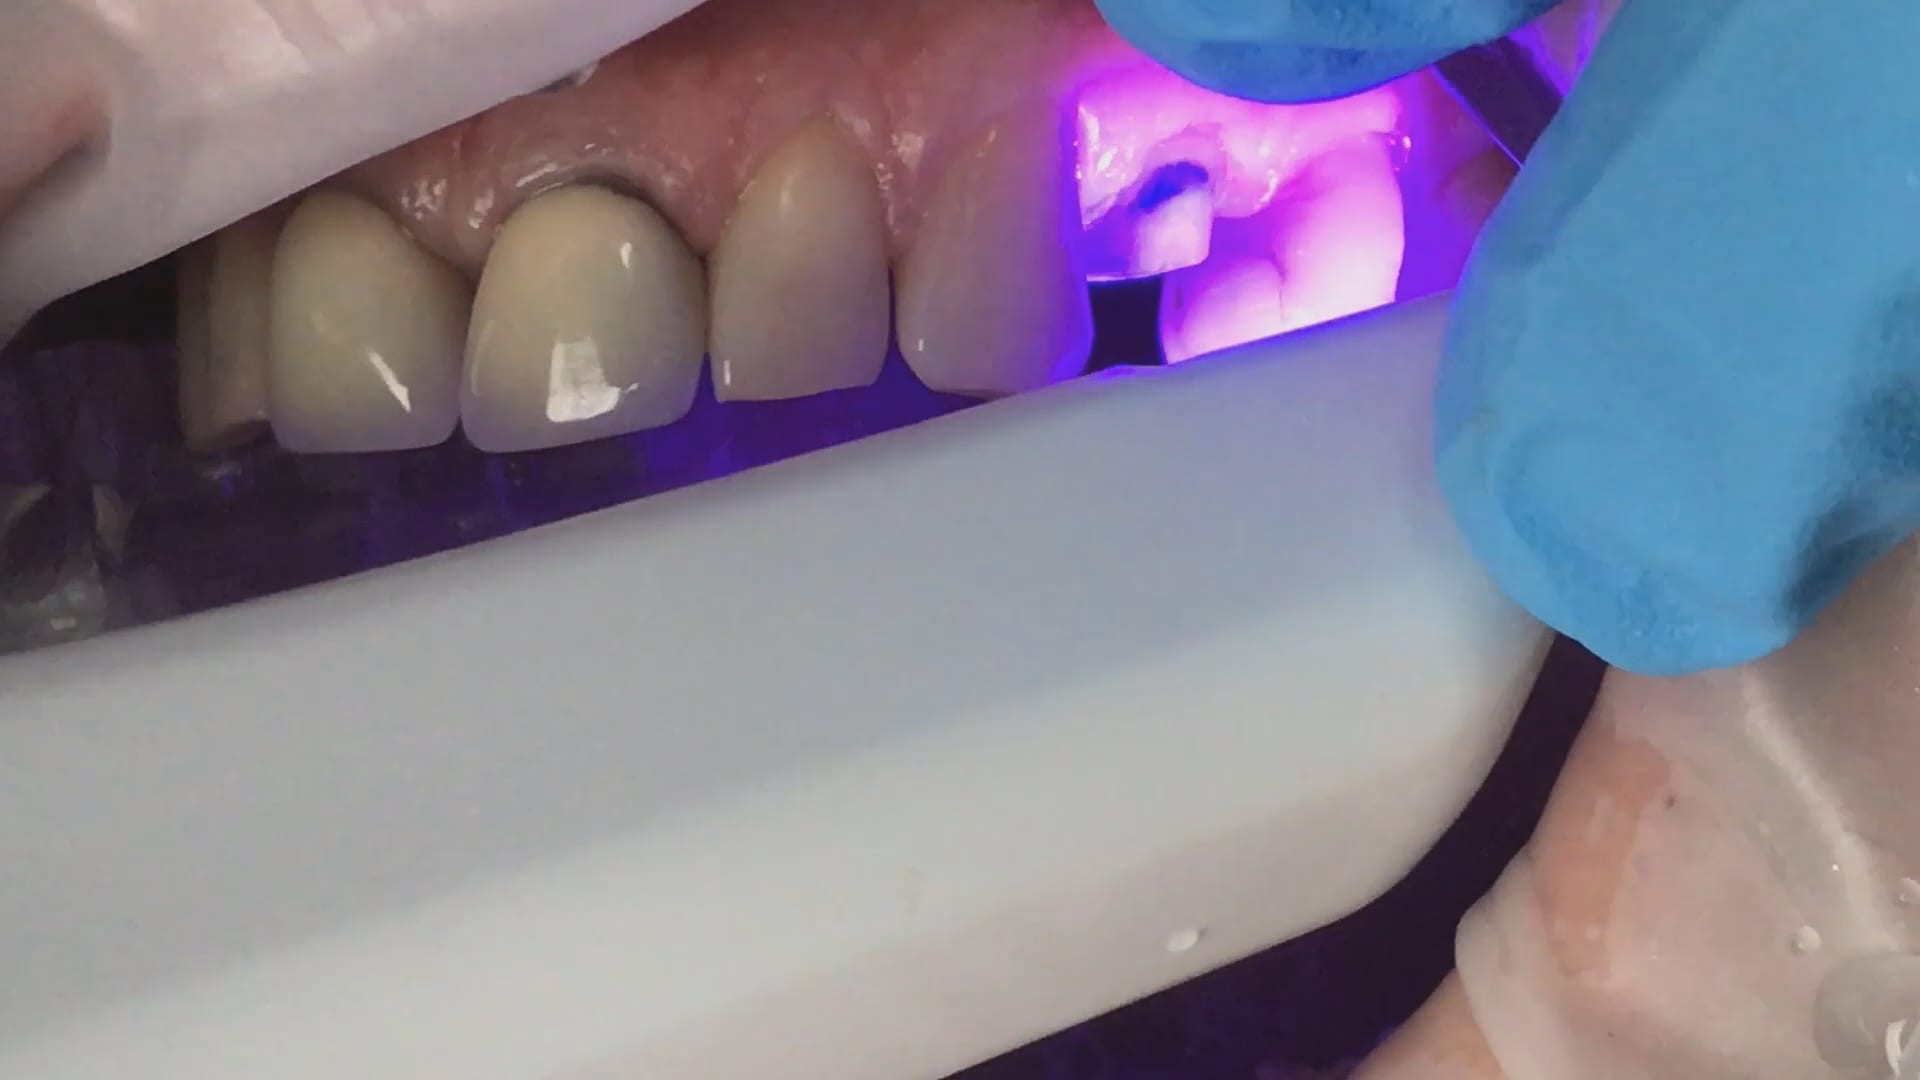
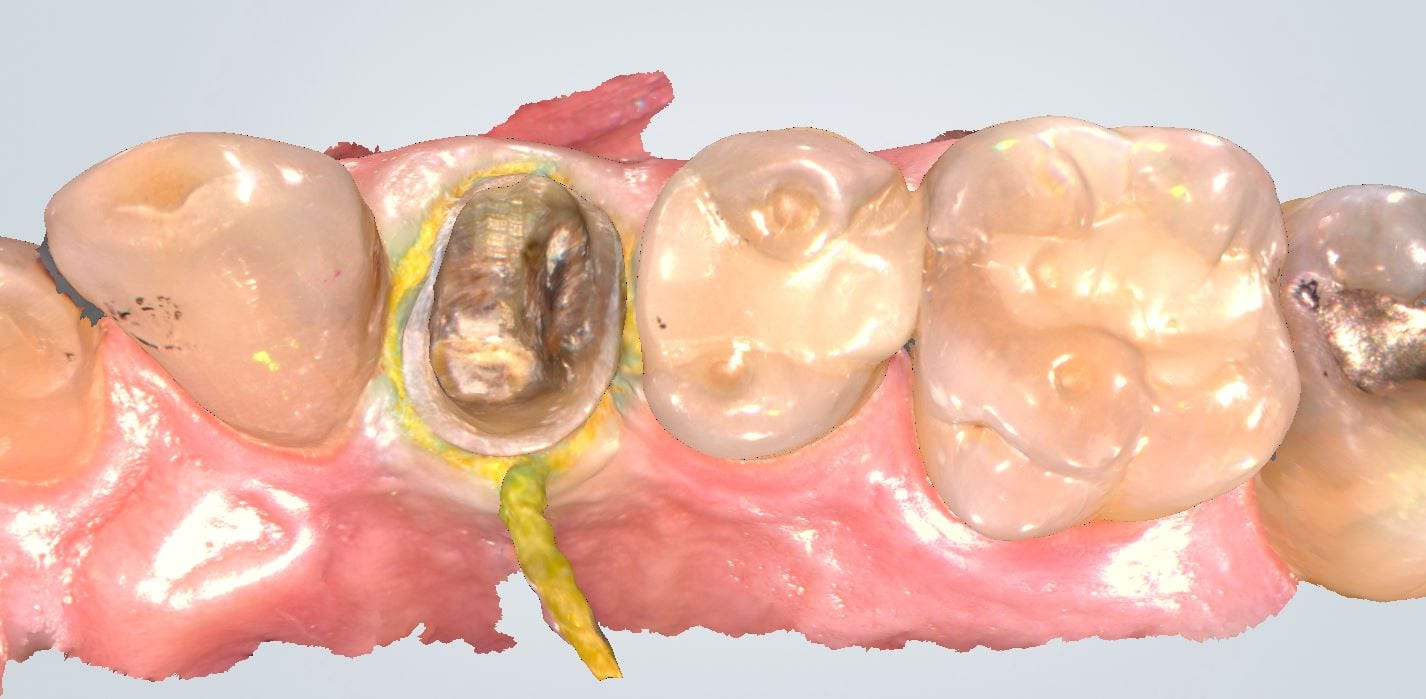
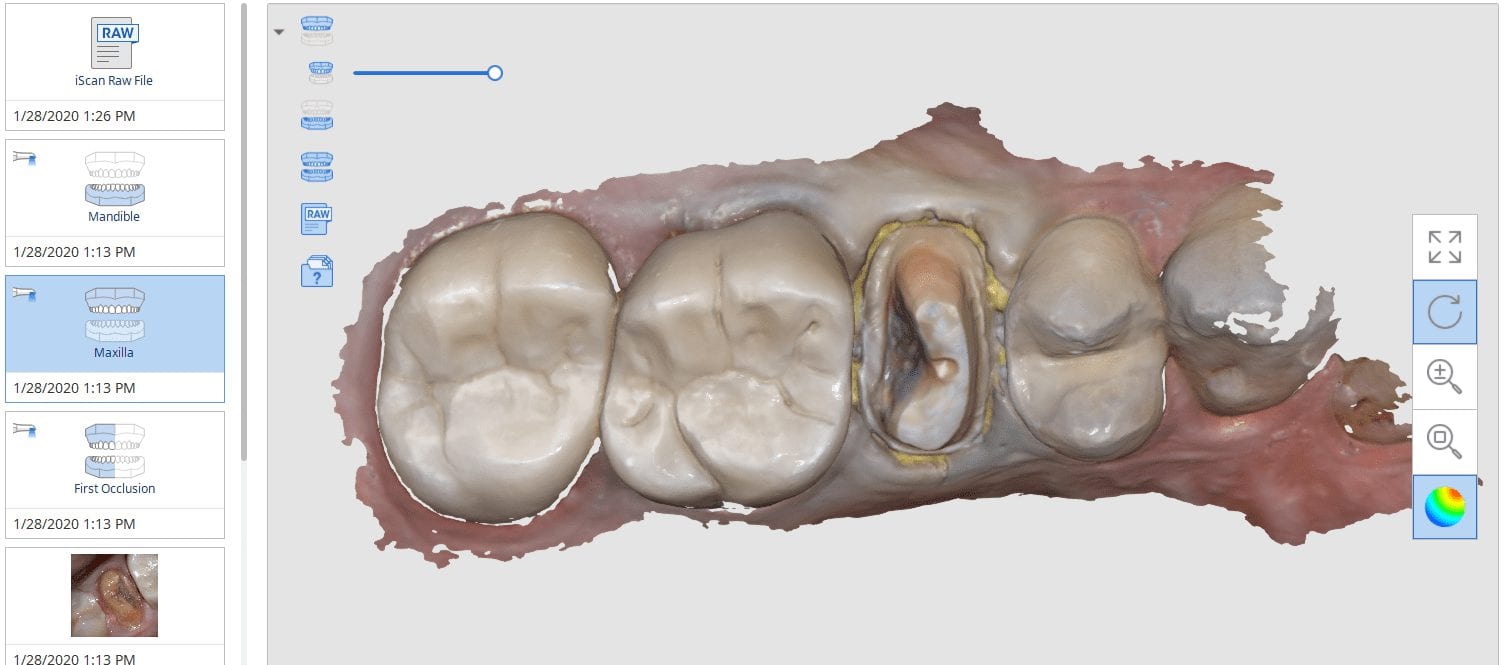
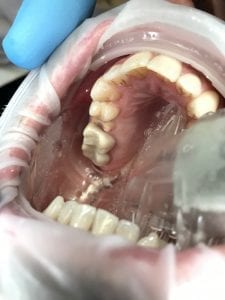
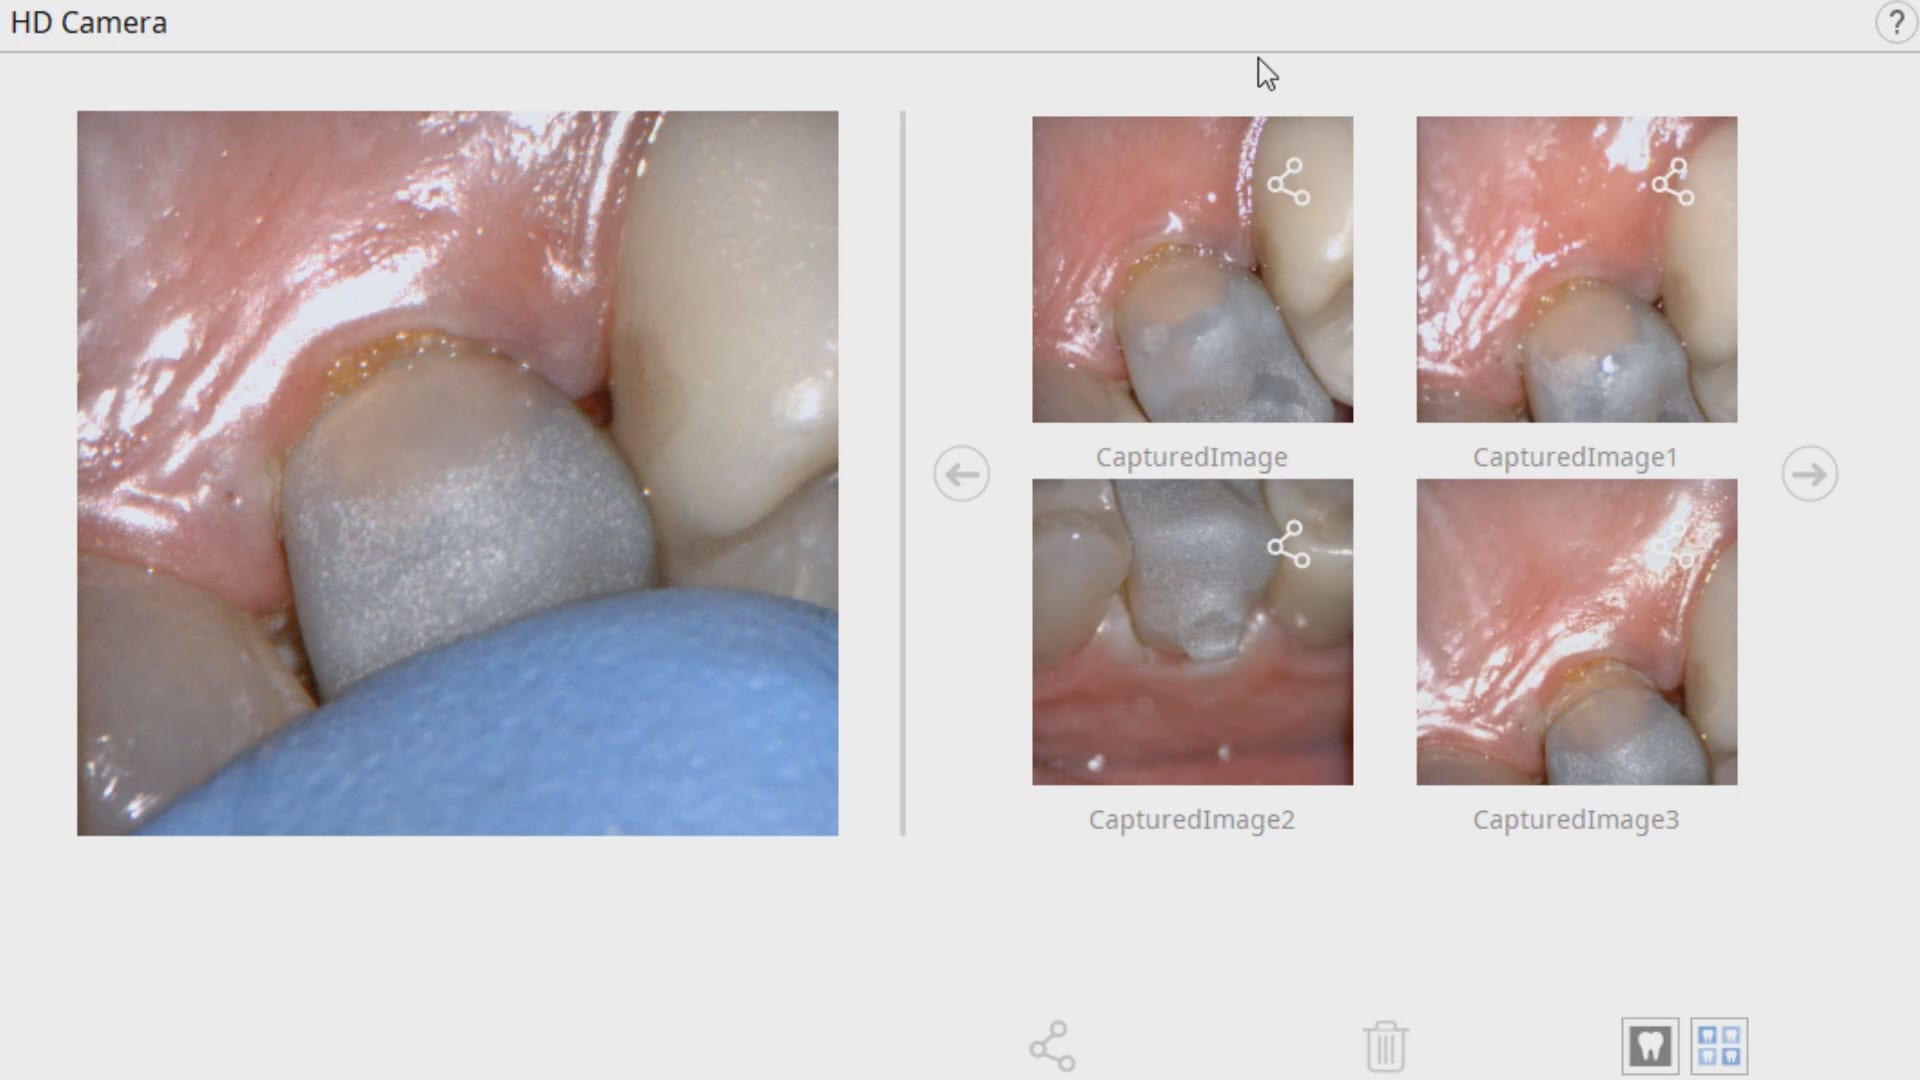
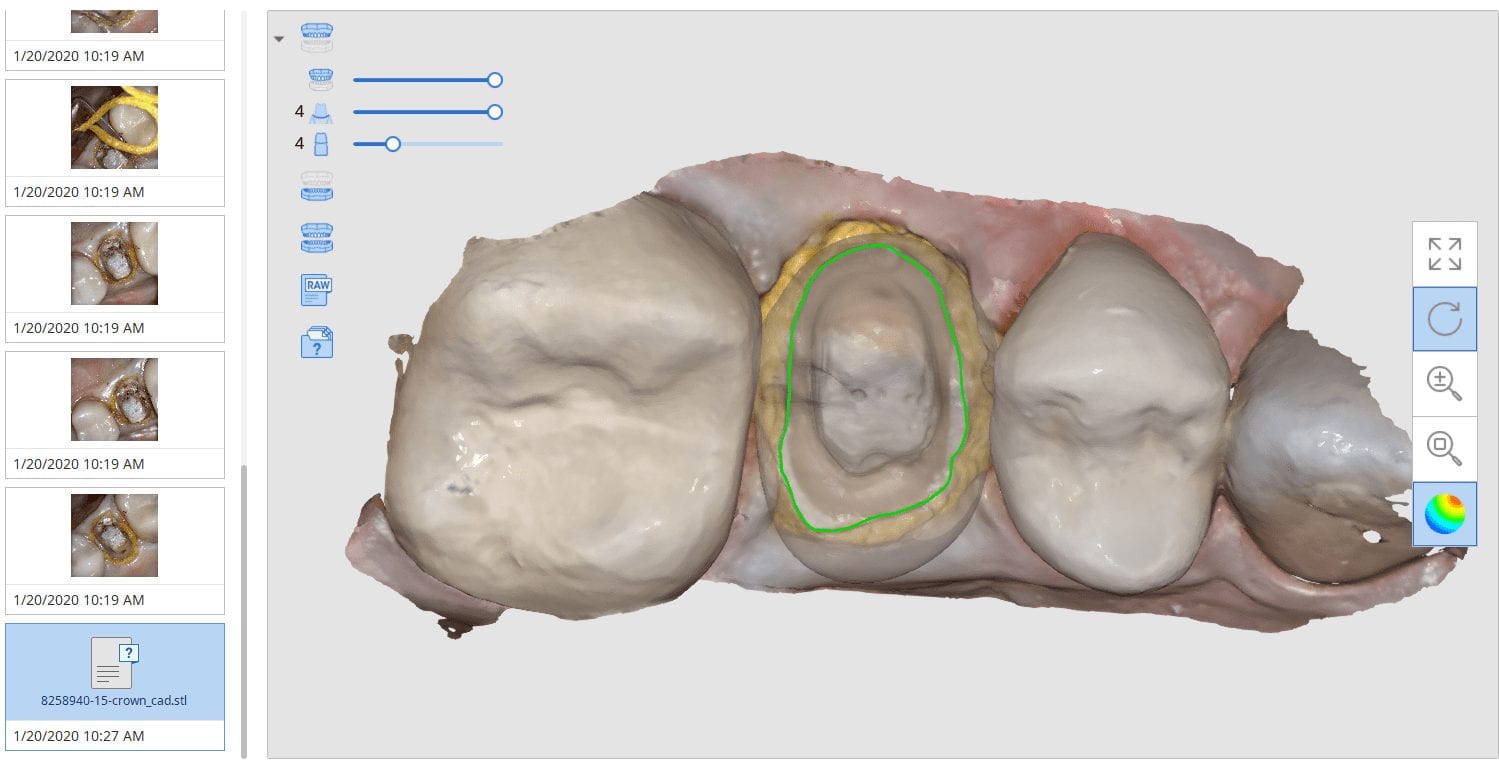
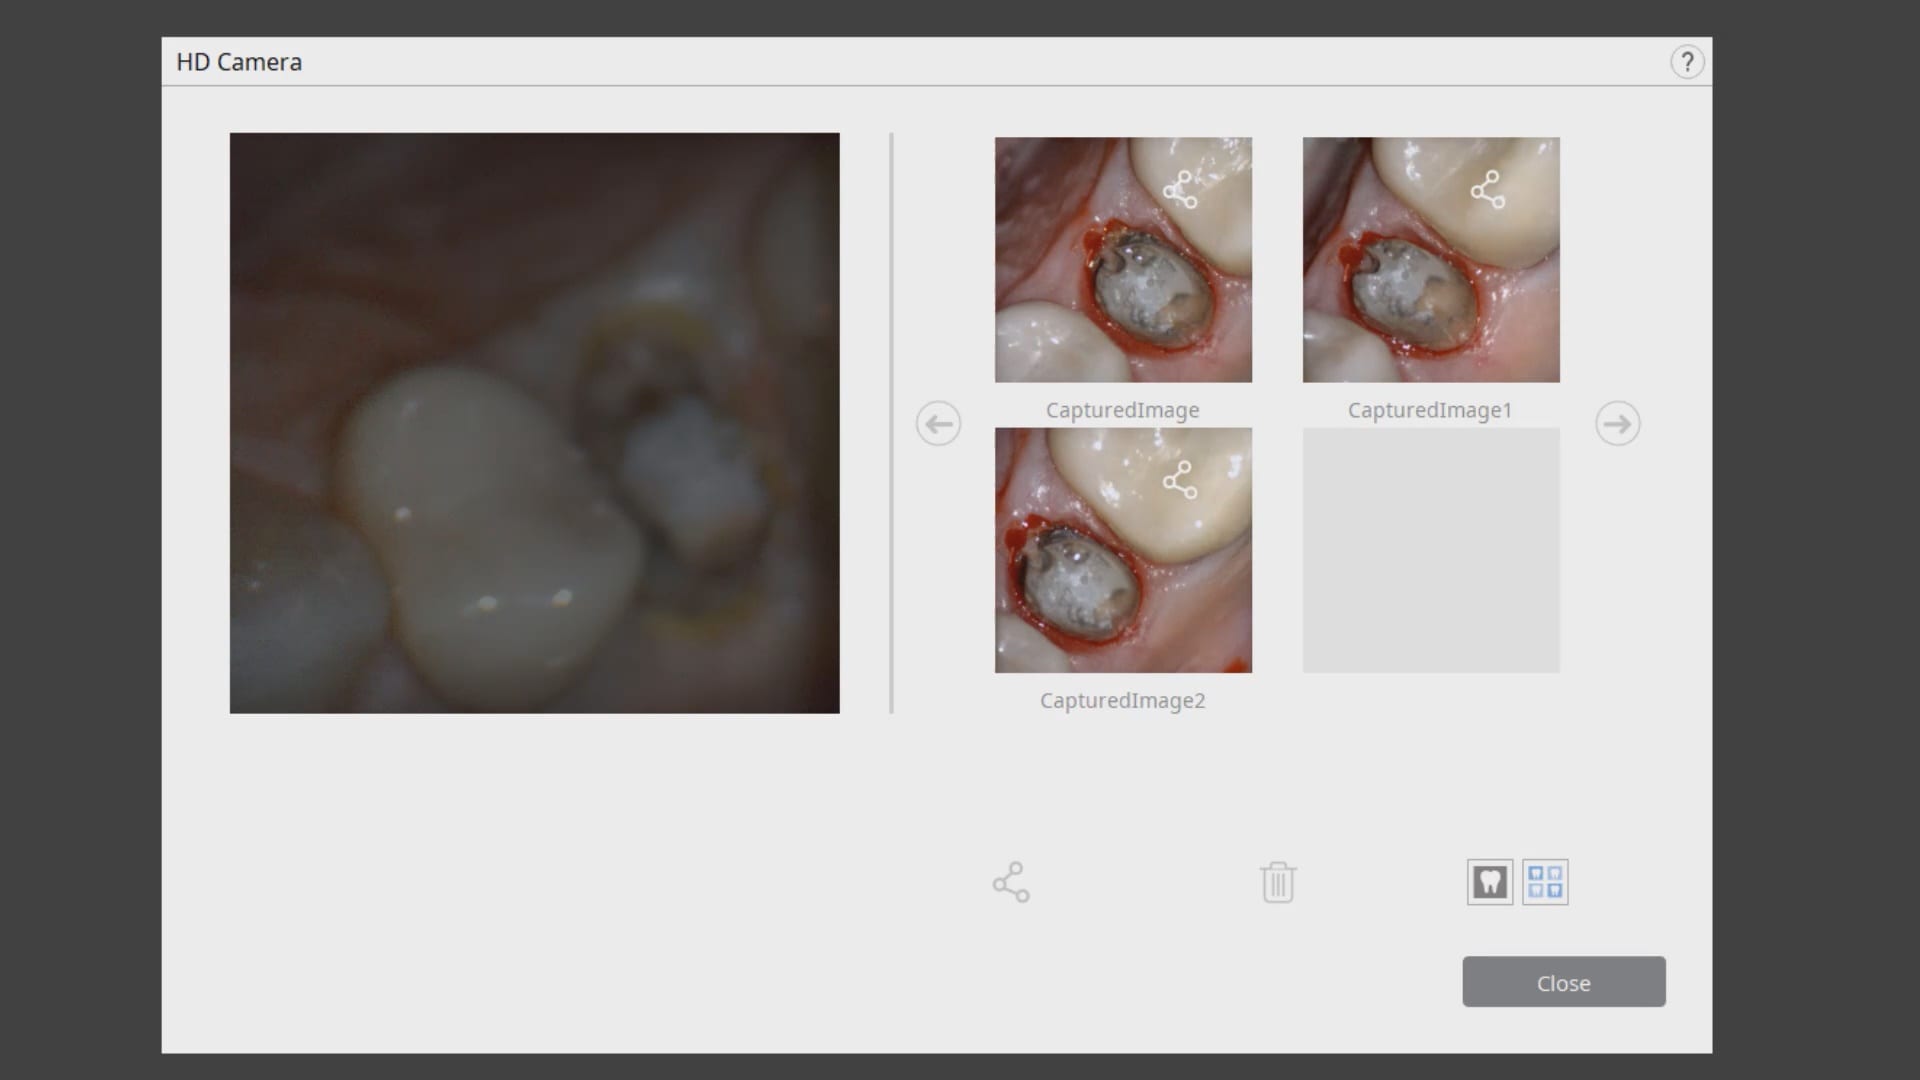
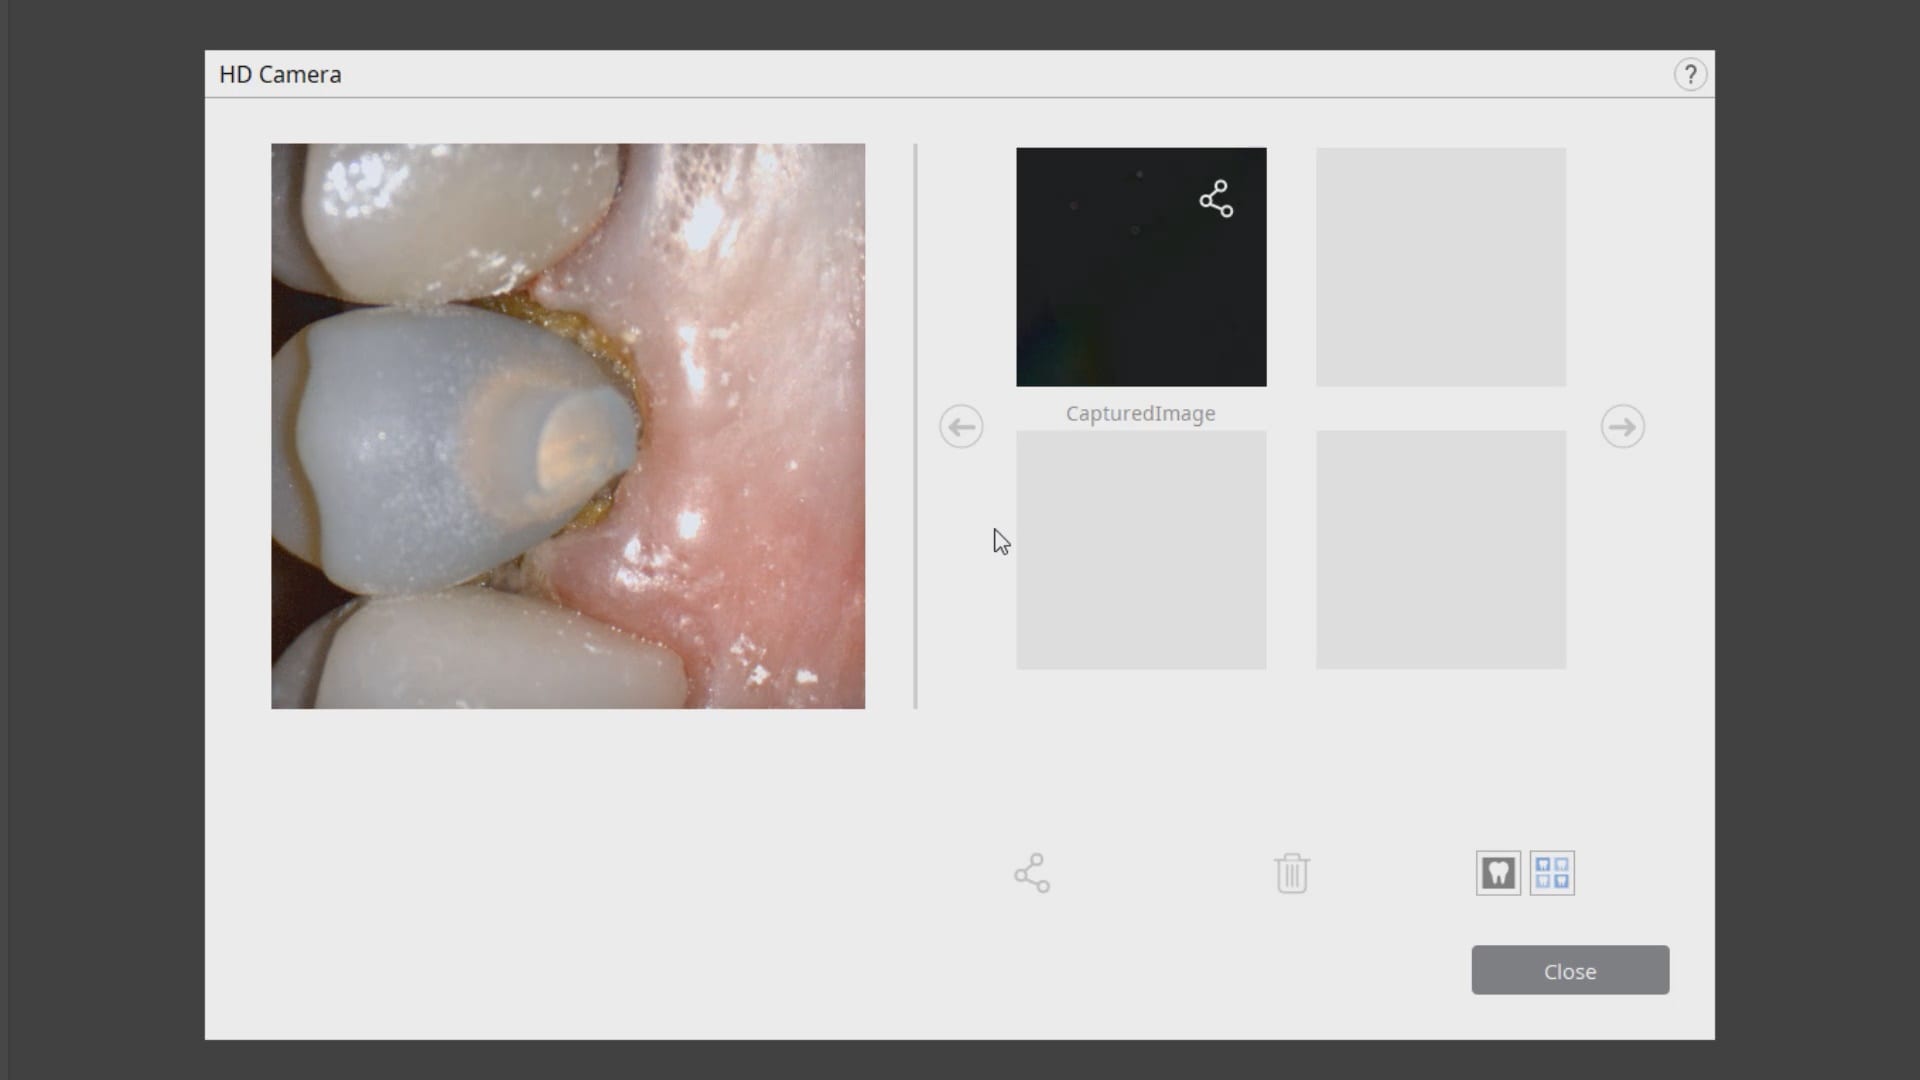
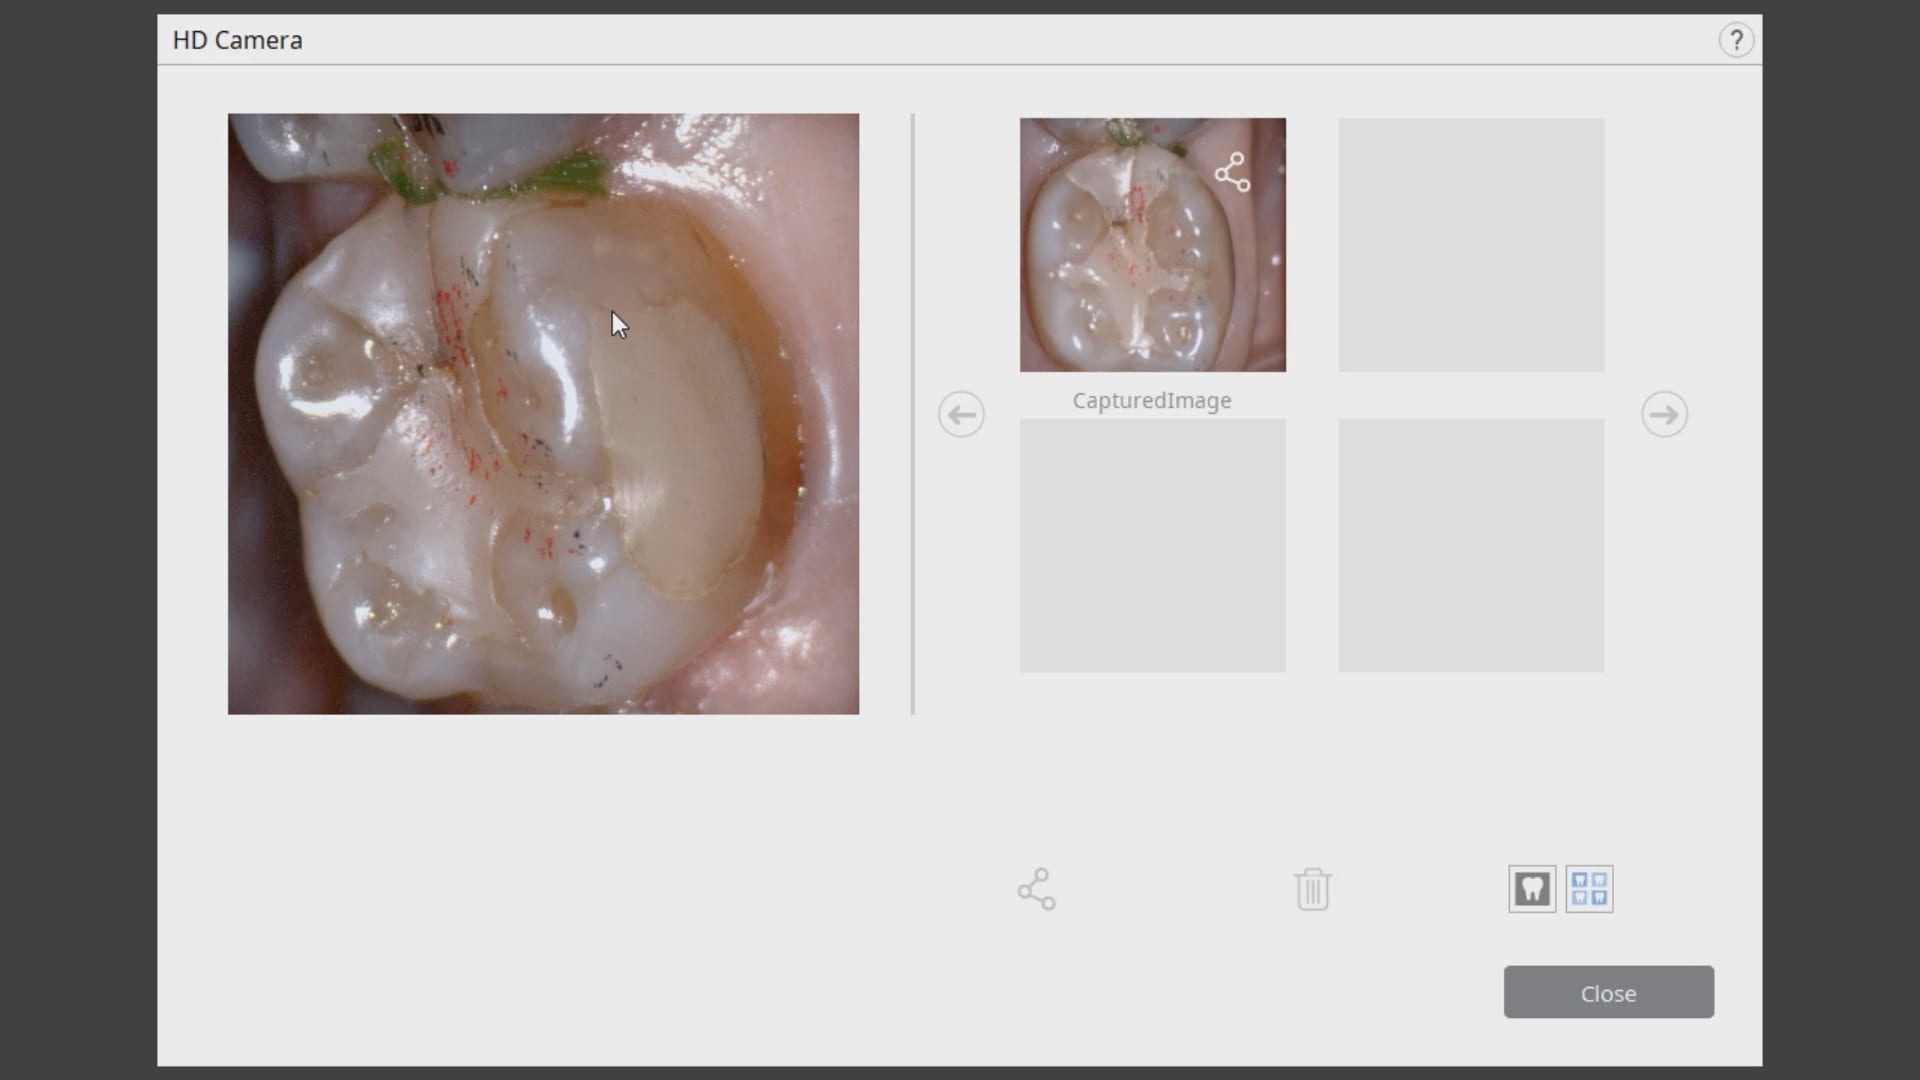
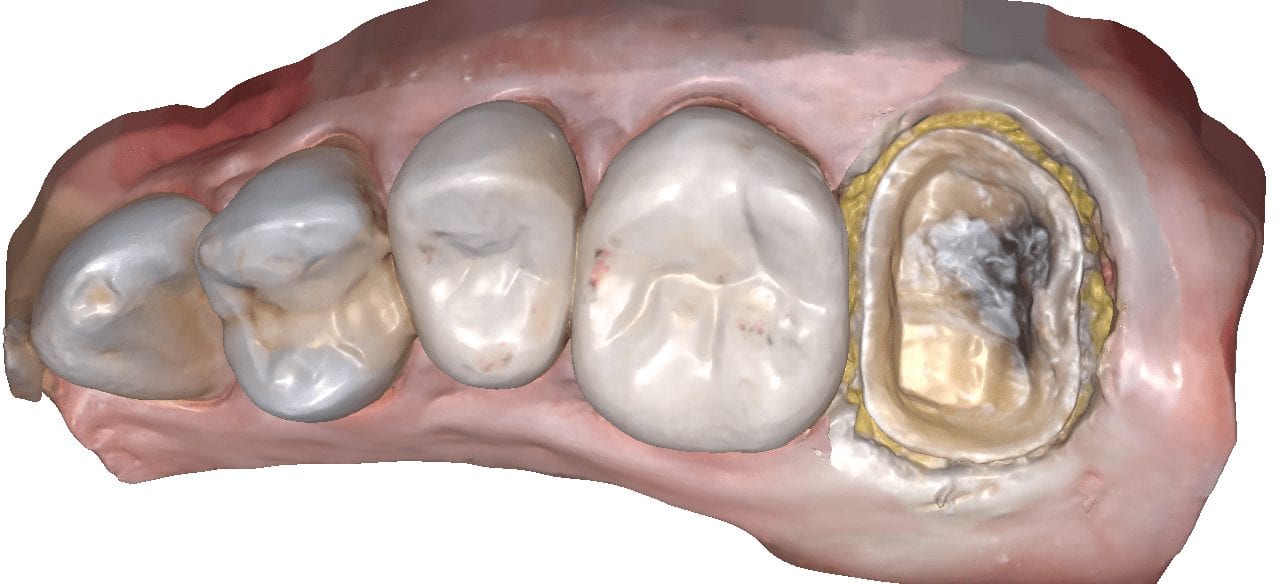
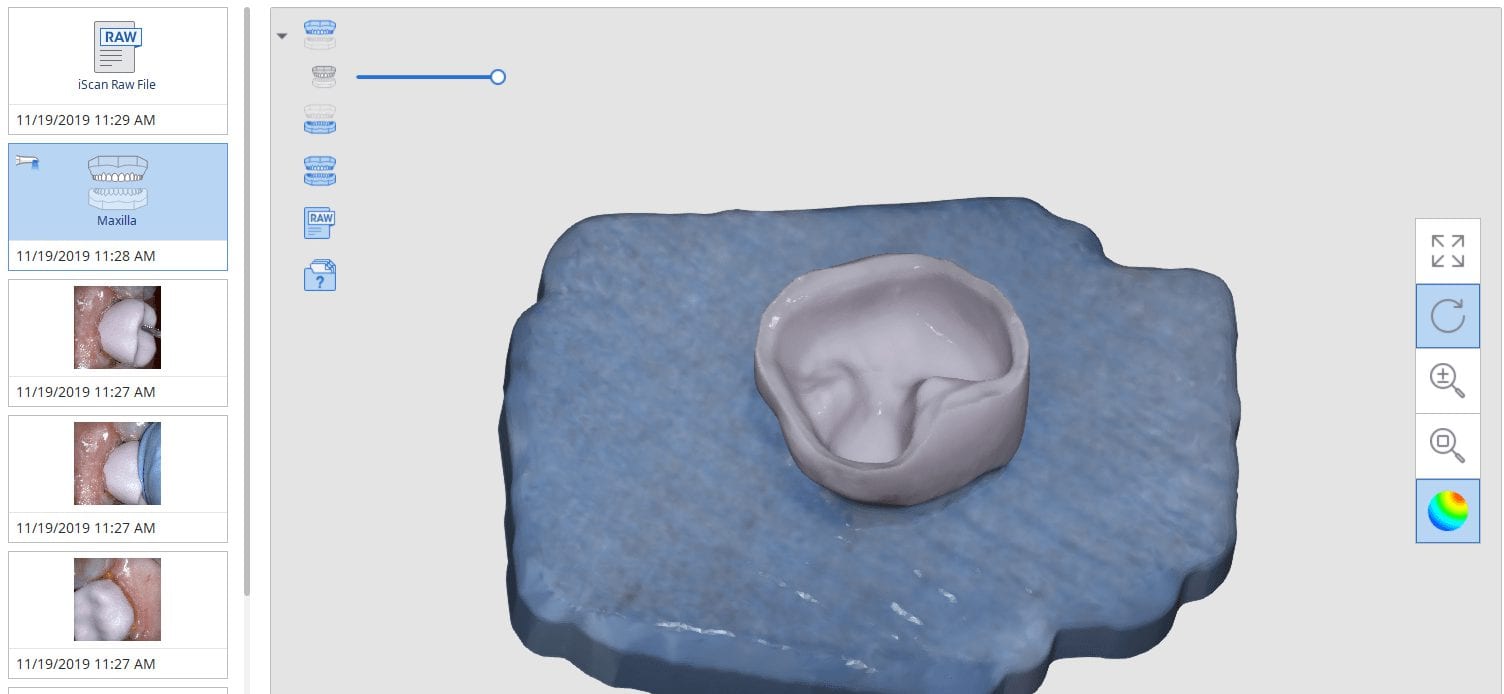
In this clinical case a patient lost a pre-existing crown. The remaining tooth structure had recurrent decay and a new crown was warranted.
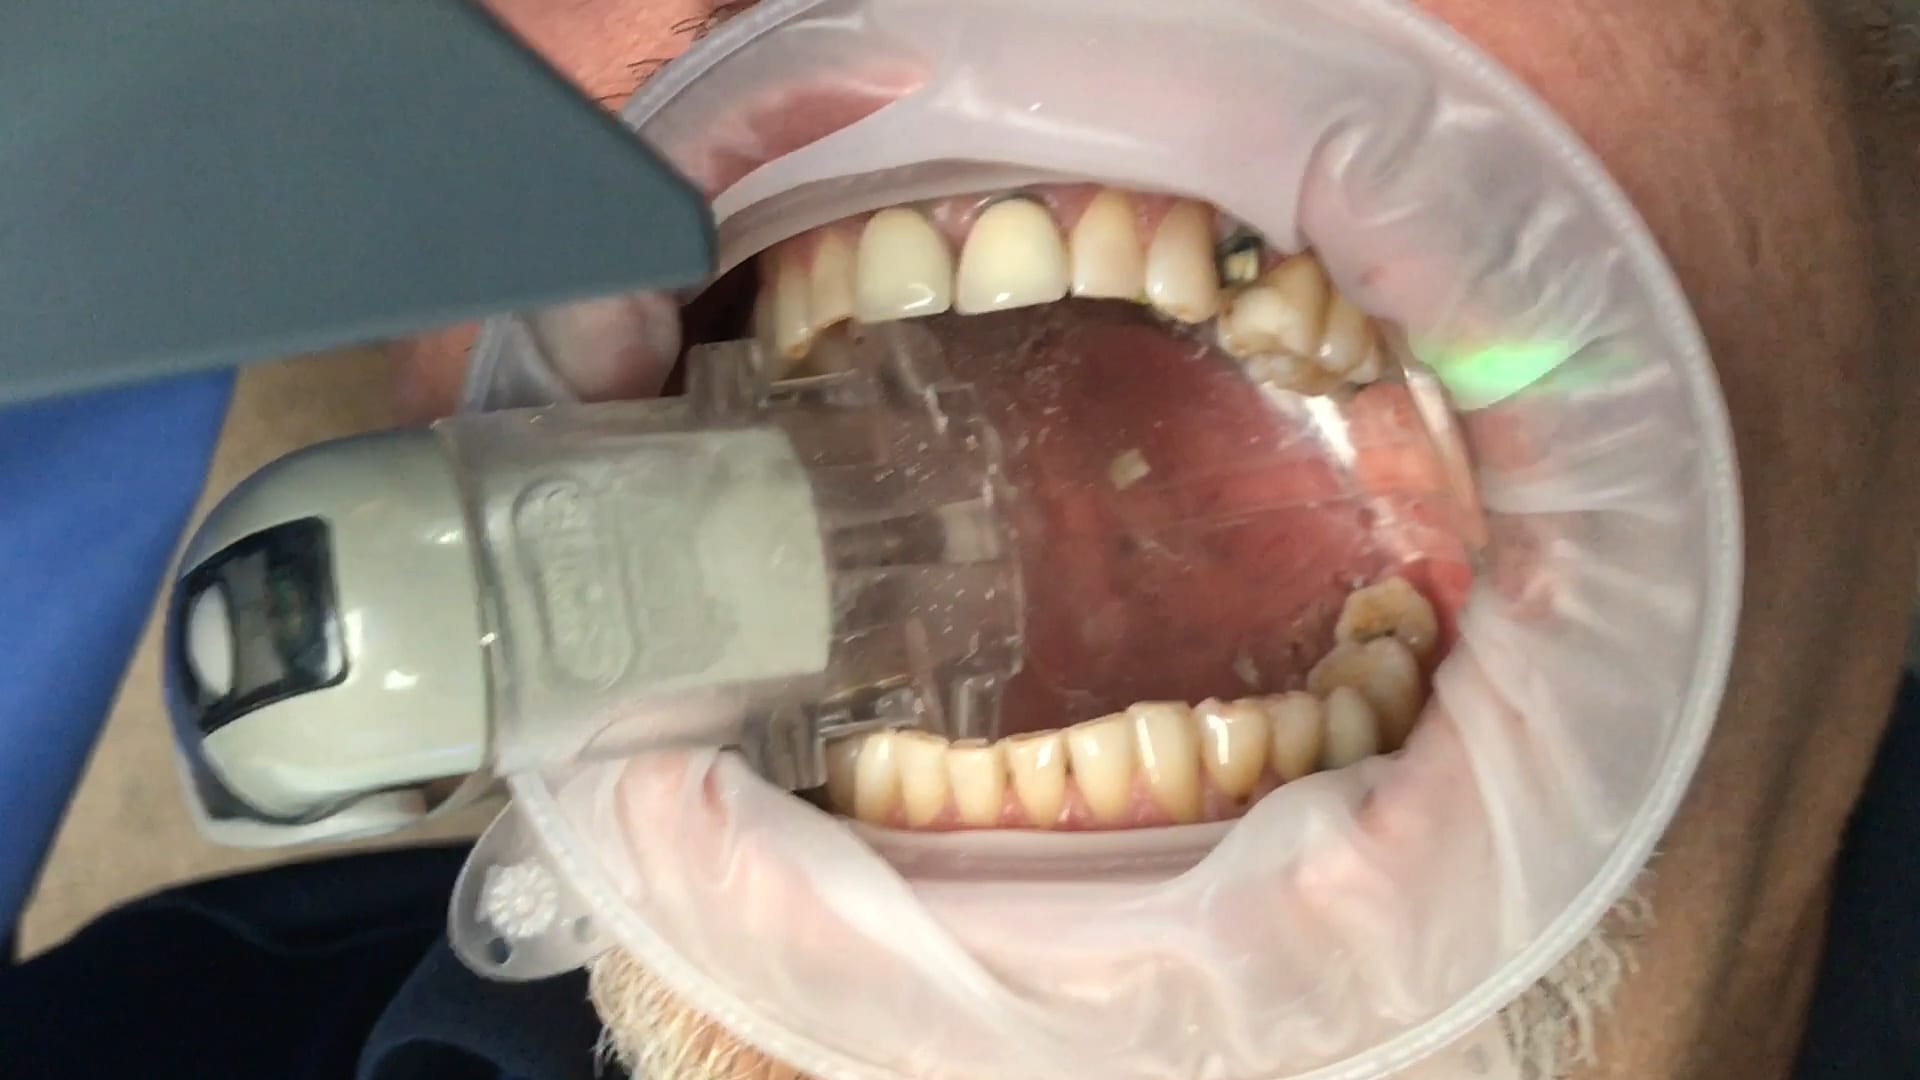
After anesthesia was administered, the clearance from opposing dentition was assessed. The preparation was reduced to accommodate the necessary thickness of the material.
Once adequate clearance was achieved an Optragate was placed and an isolite was used to isolate the area. The preparation was scanned and then the lower arch was captured. The buccal bite was then taken to along the arches together
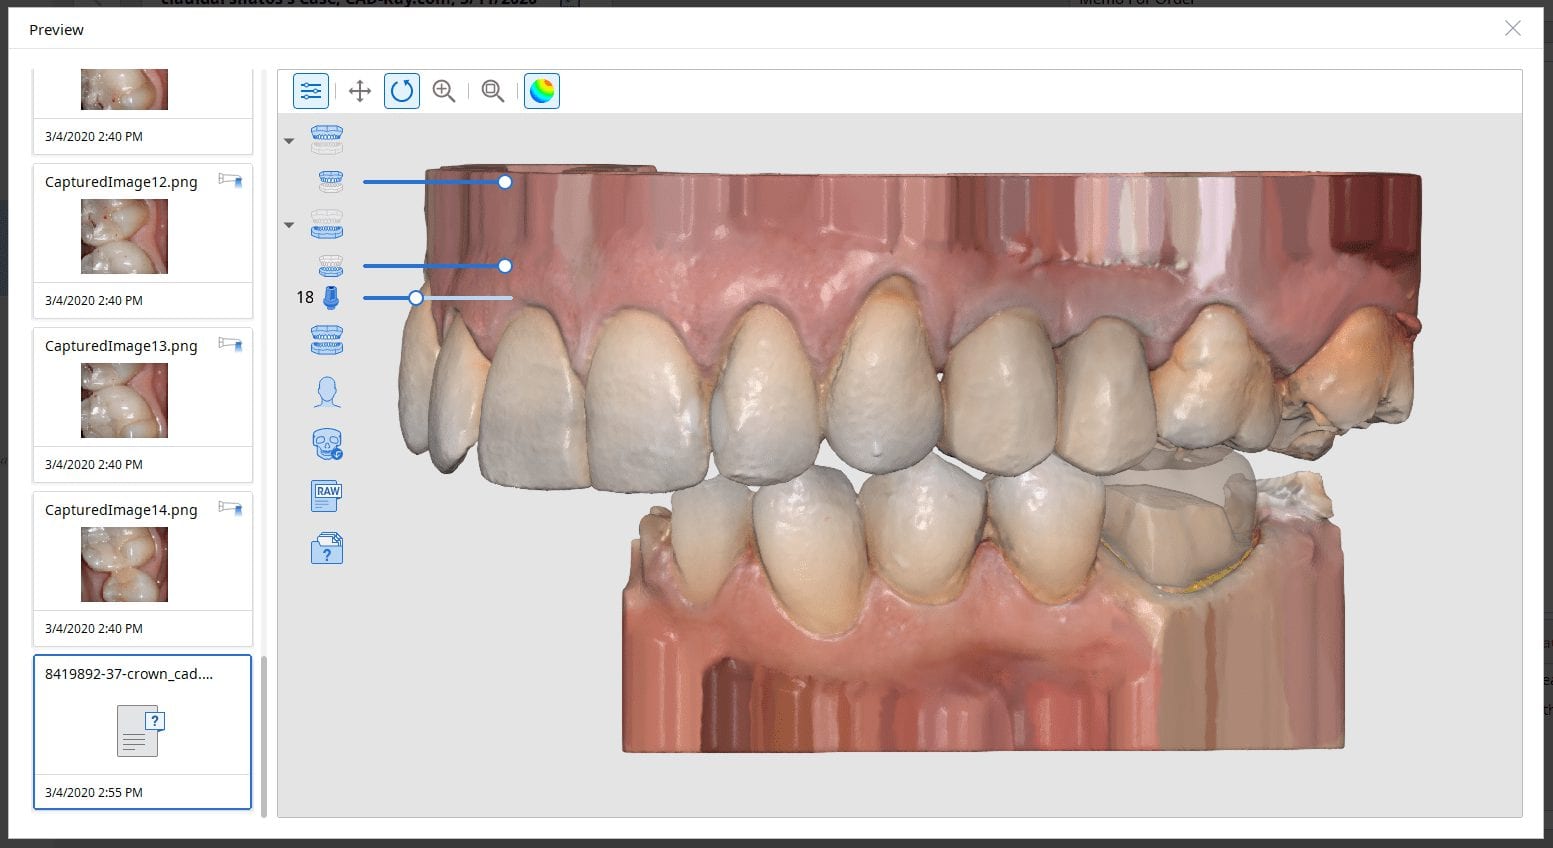
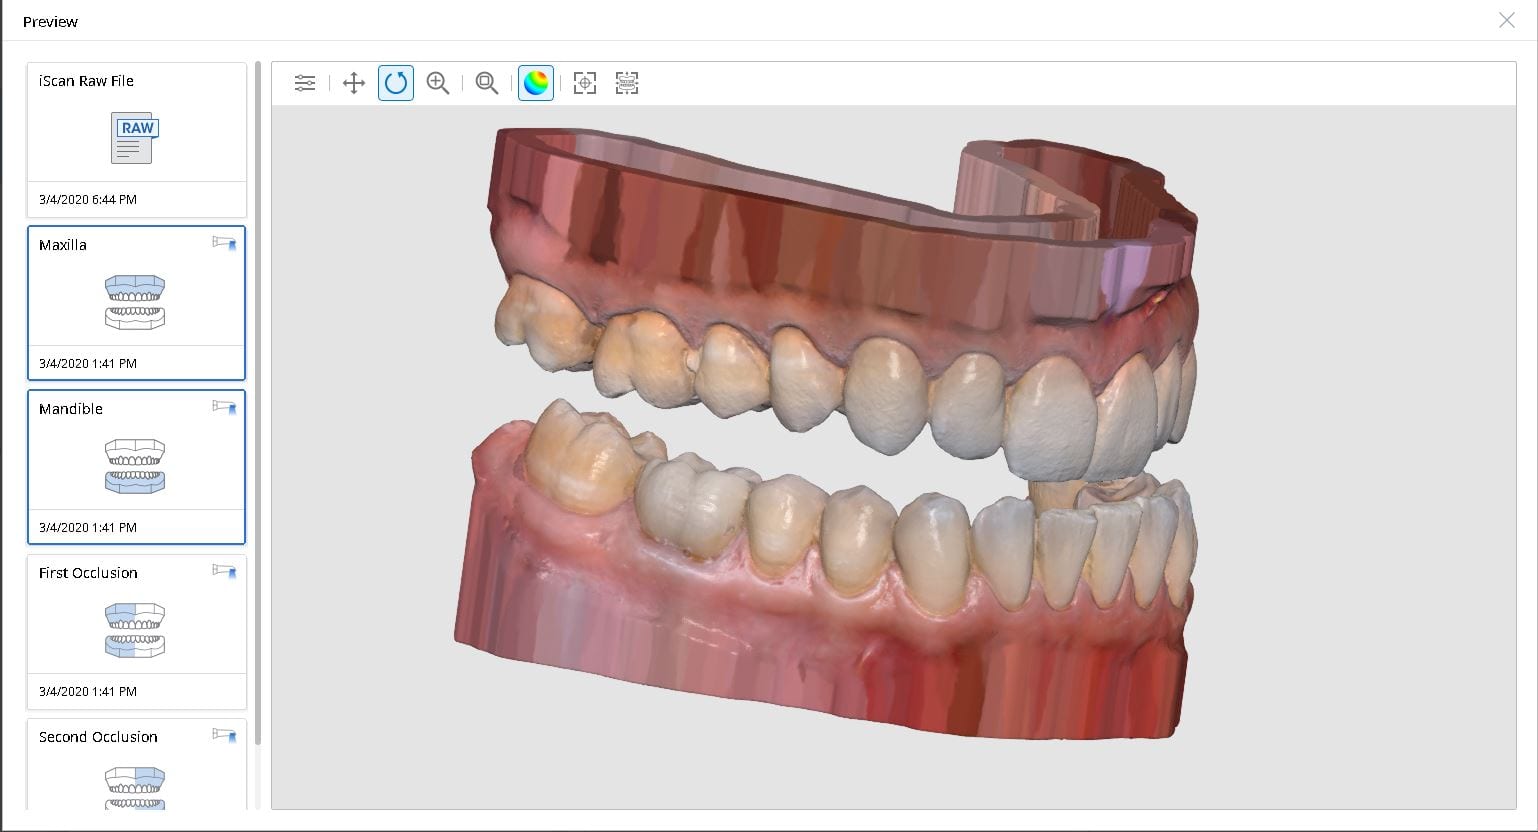
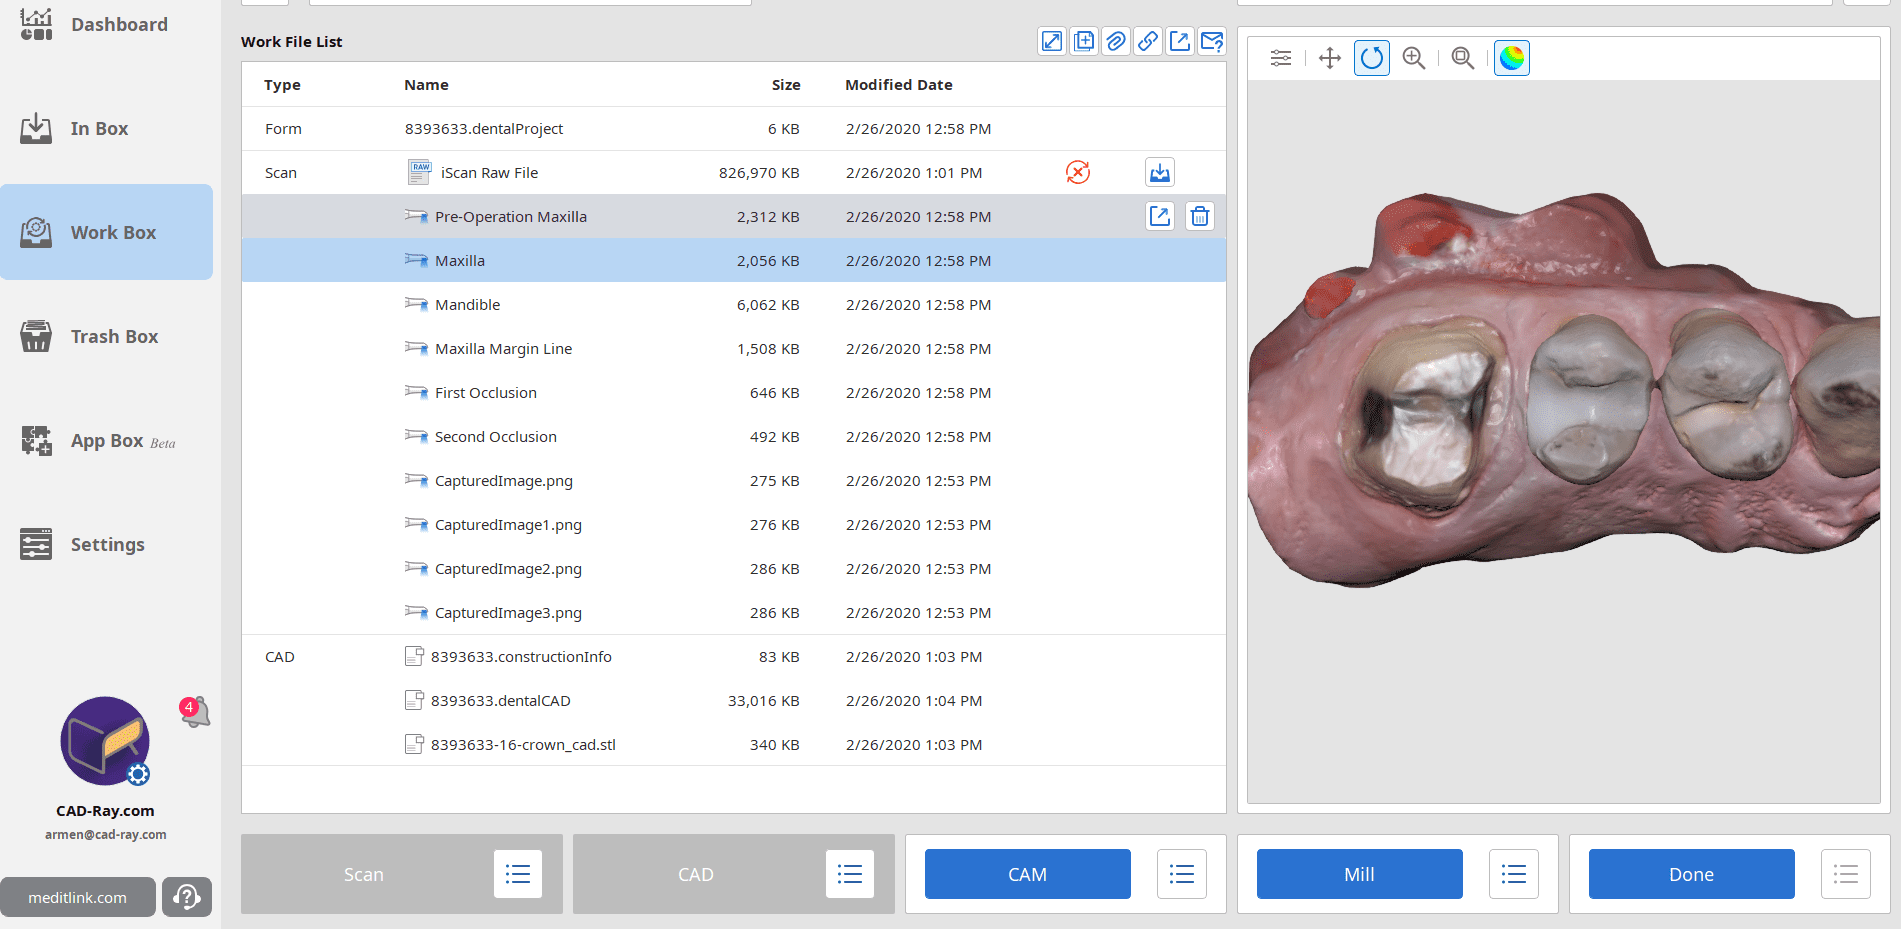
With Meditlink software, you have the option of designing the case yourself or sending it off to your partnered lab. The following video shows what happens to your case once the lab downloads the case
In this particular case, we designed our own crown and milled it with the coritec one milling machine
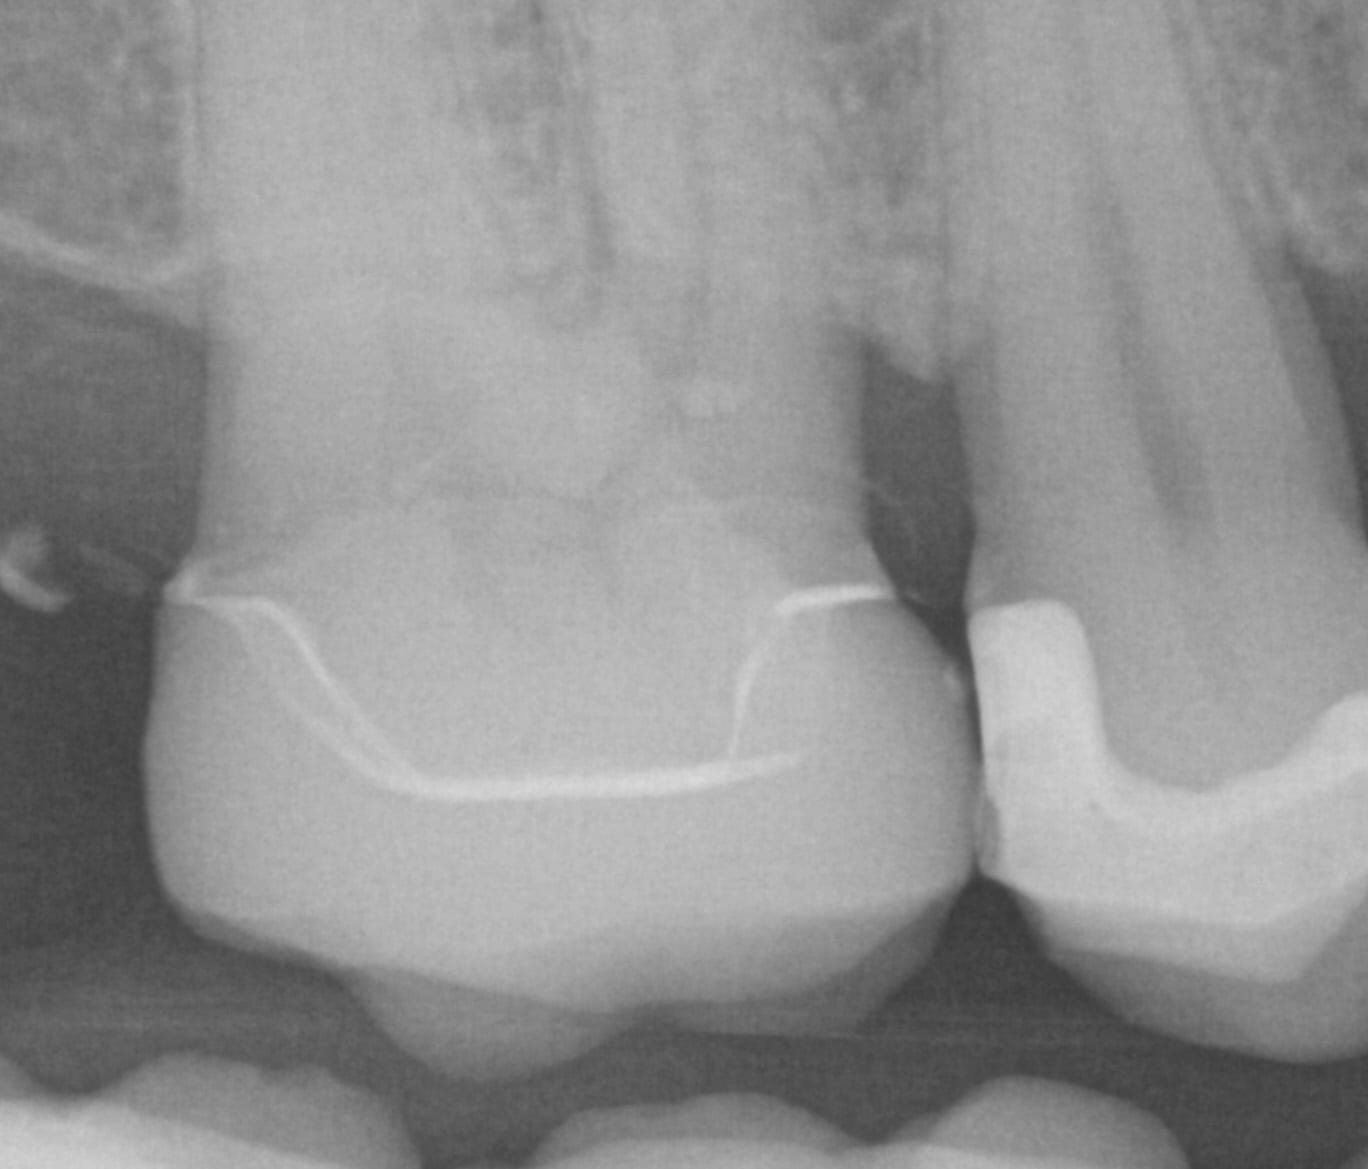
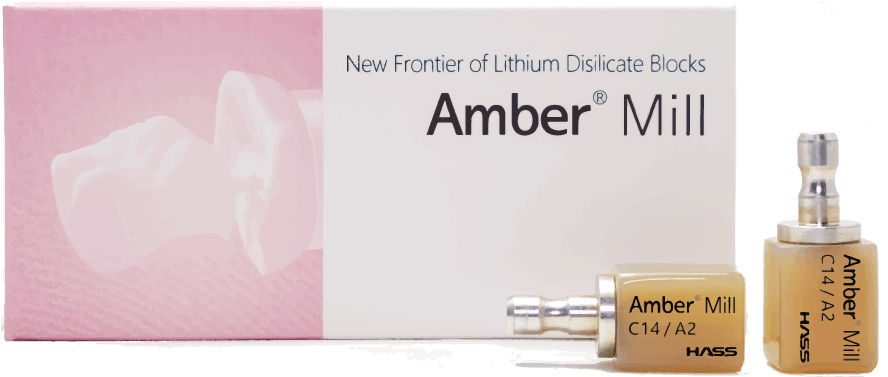
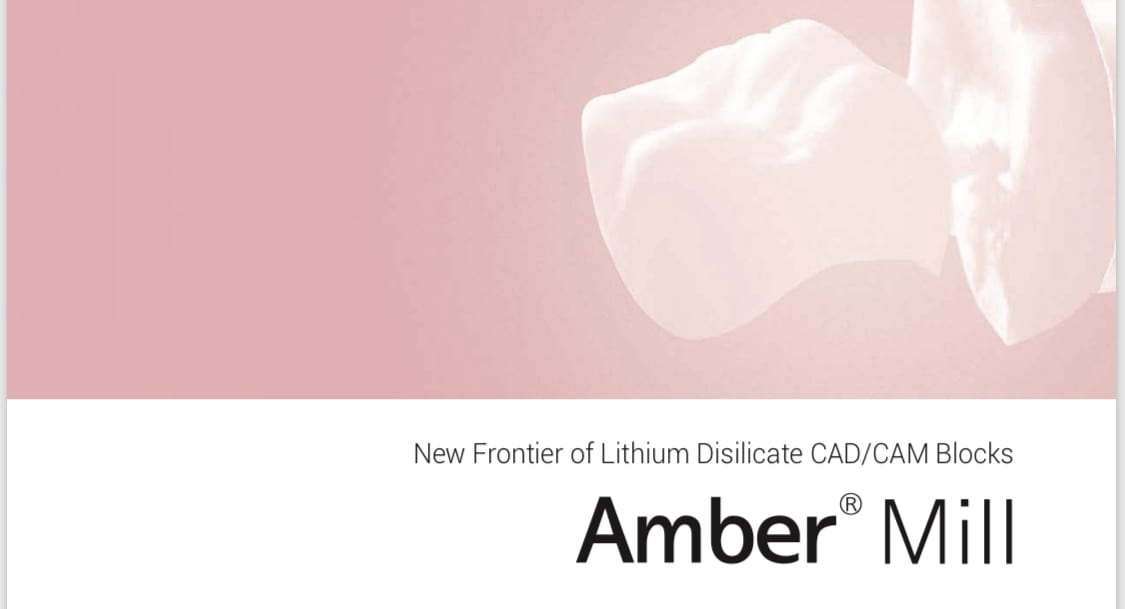
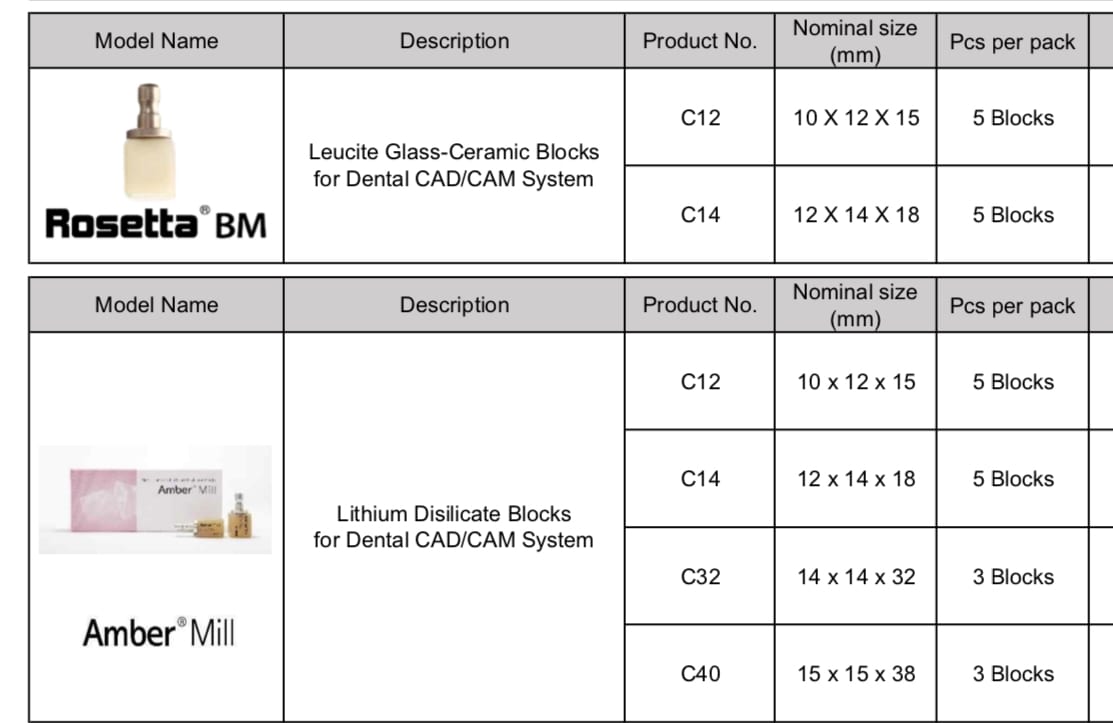
Once the amber lithium disilicate material was milled, its for was verified clinically. The crown was then crystallized and seated with NX3 resin cement
Photogammetry has set the highest standard for full arch accuracy in digital dentistry for edentulous patients with multiple implant fixtures. An easy scan in under 15 seconds captures enough detail on scanbodies that help the software capture the location of the fixtures. Conversely, Intra-Oral Scanners (IOS) do not garner support for most of the literature that is currently published in dental journals. Scan paths can dictate the outcome of 3D model and determine how correctly it replicates the intra-oral condition. The same scan can render a variety of results and models based on the user and the direction the scans are taken. Simply stated, the user is control over the final product.
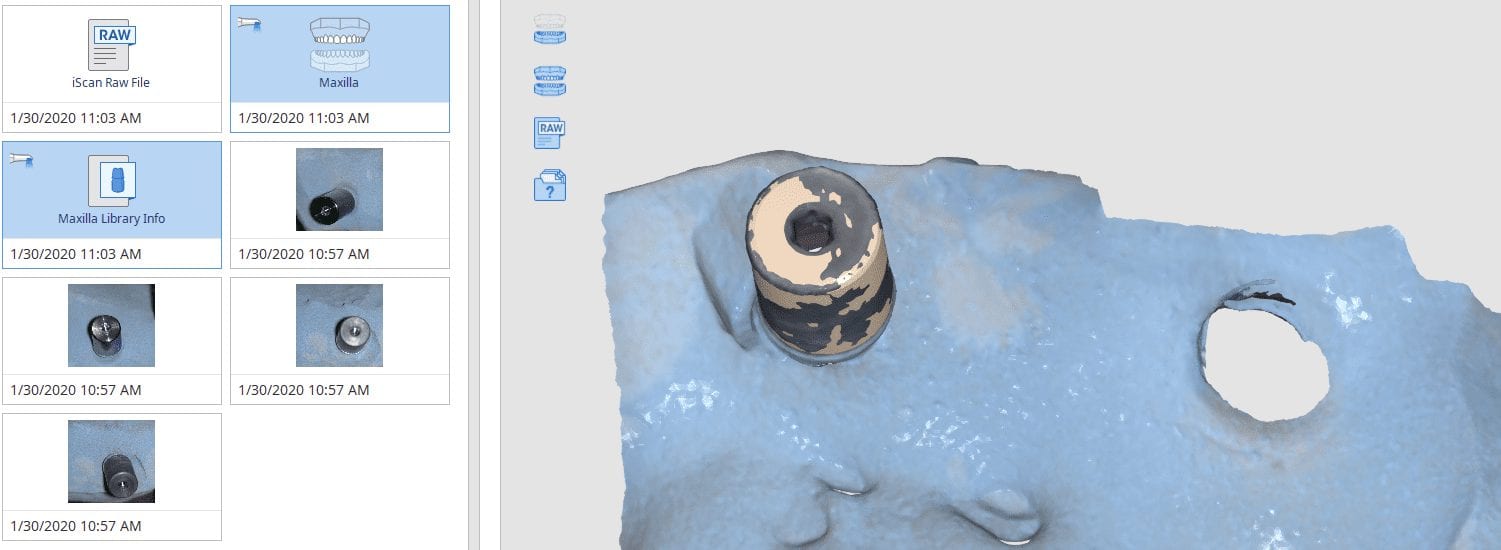
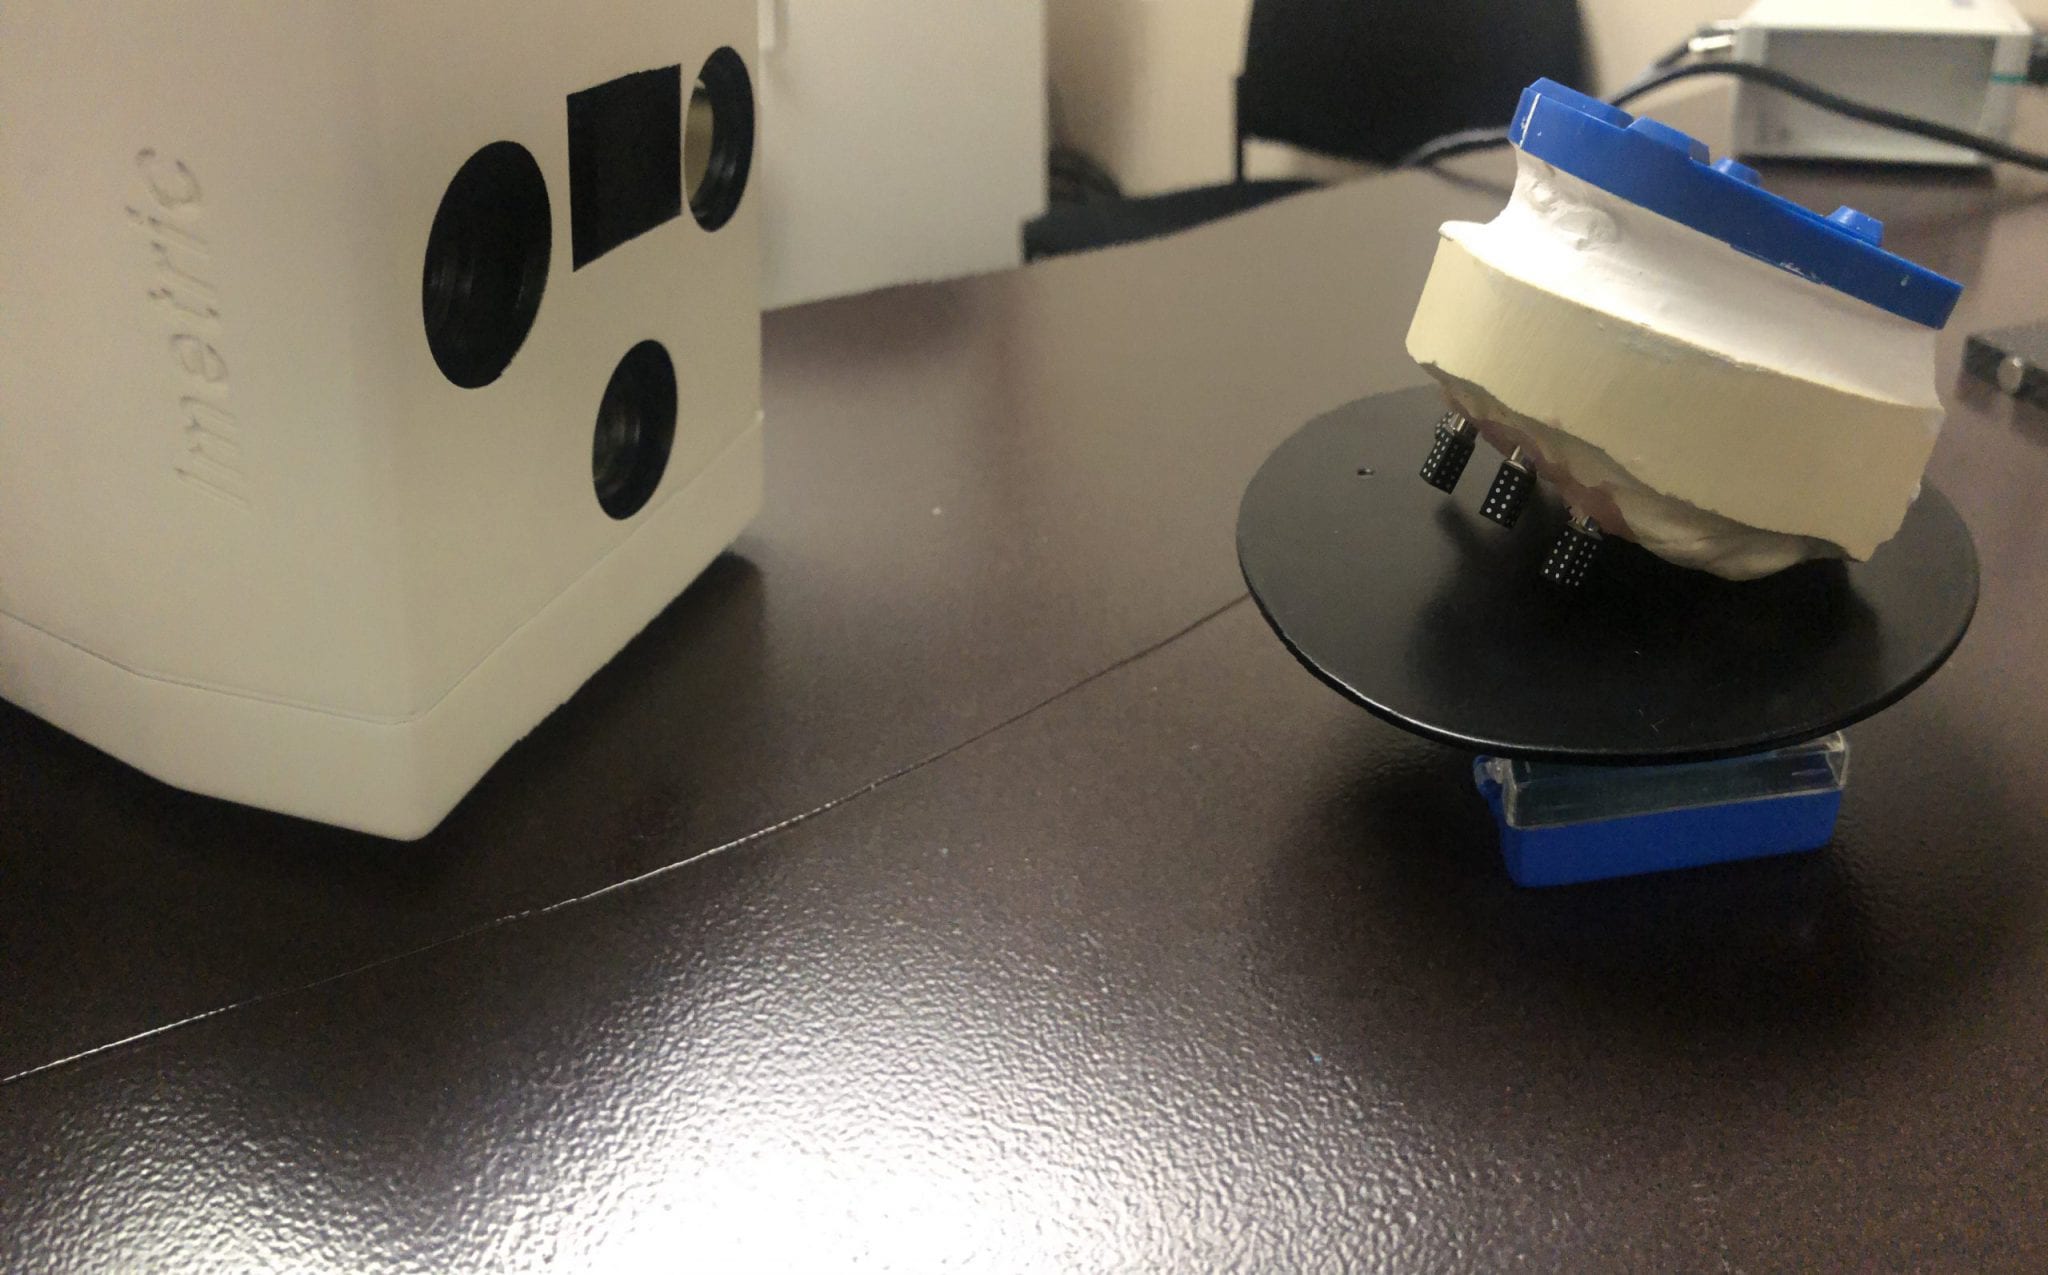
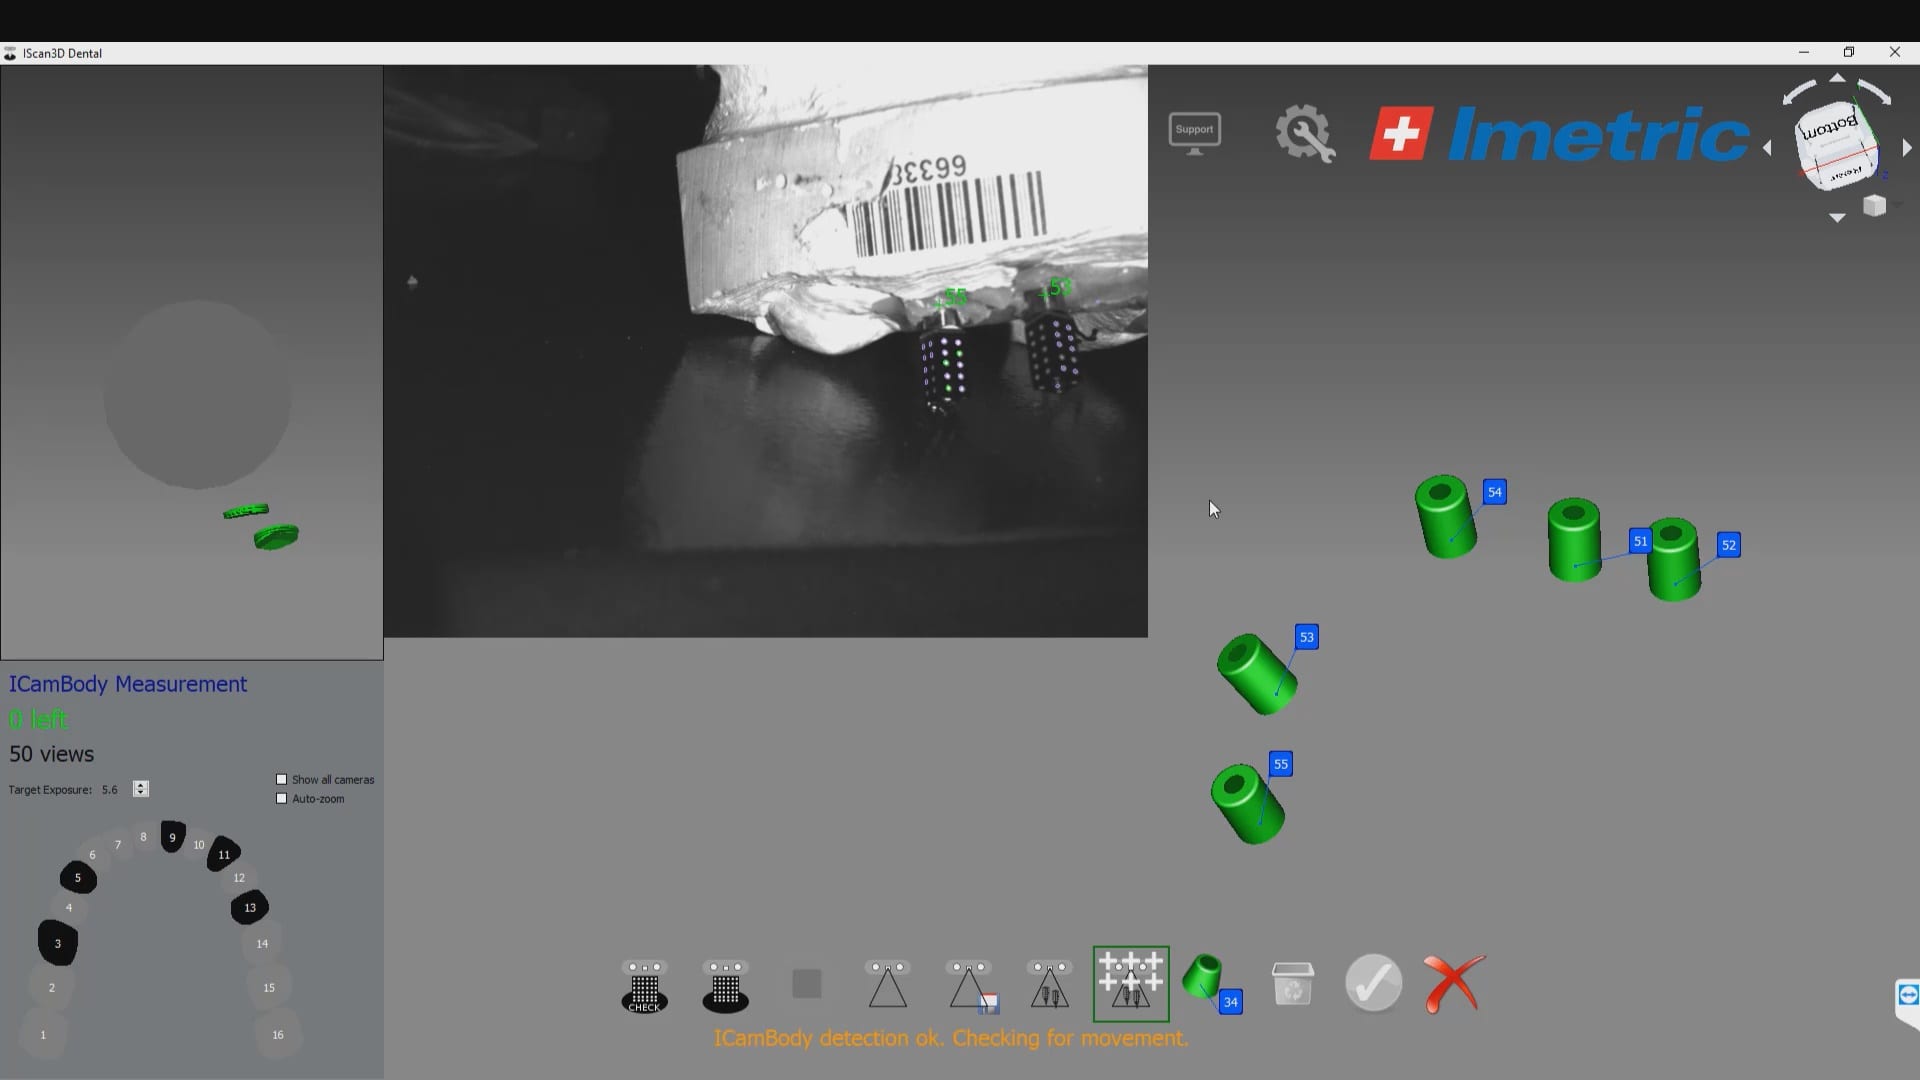
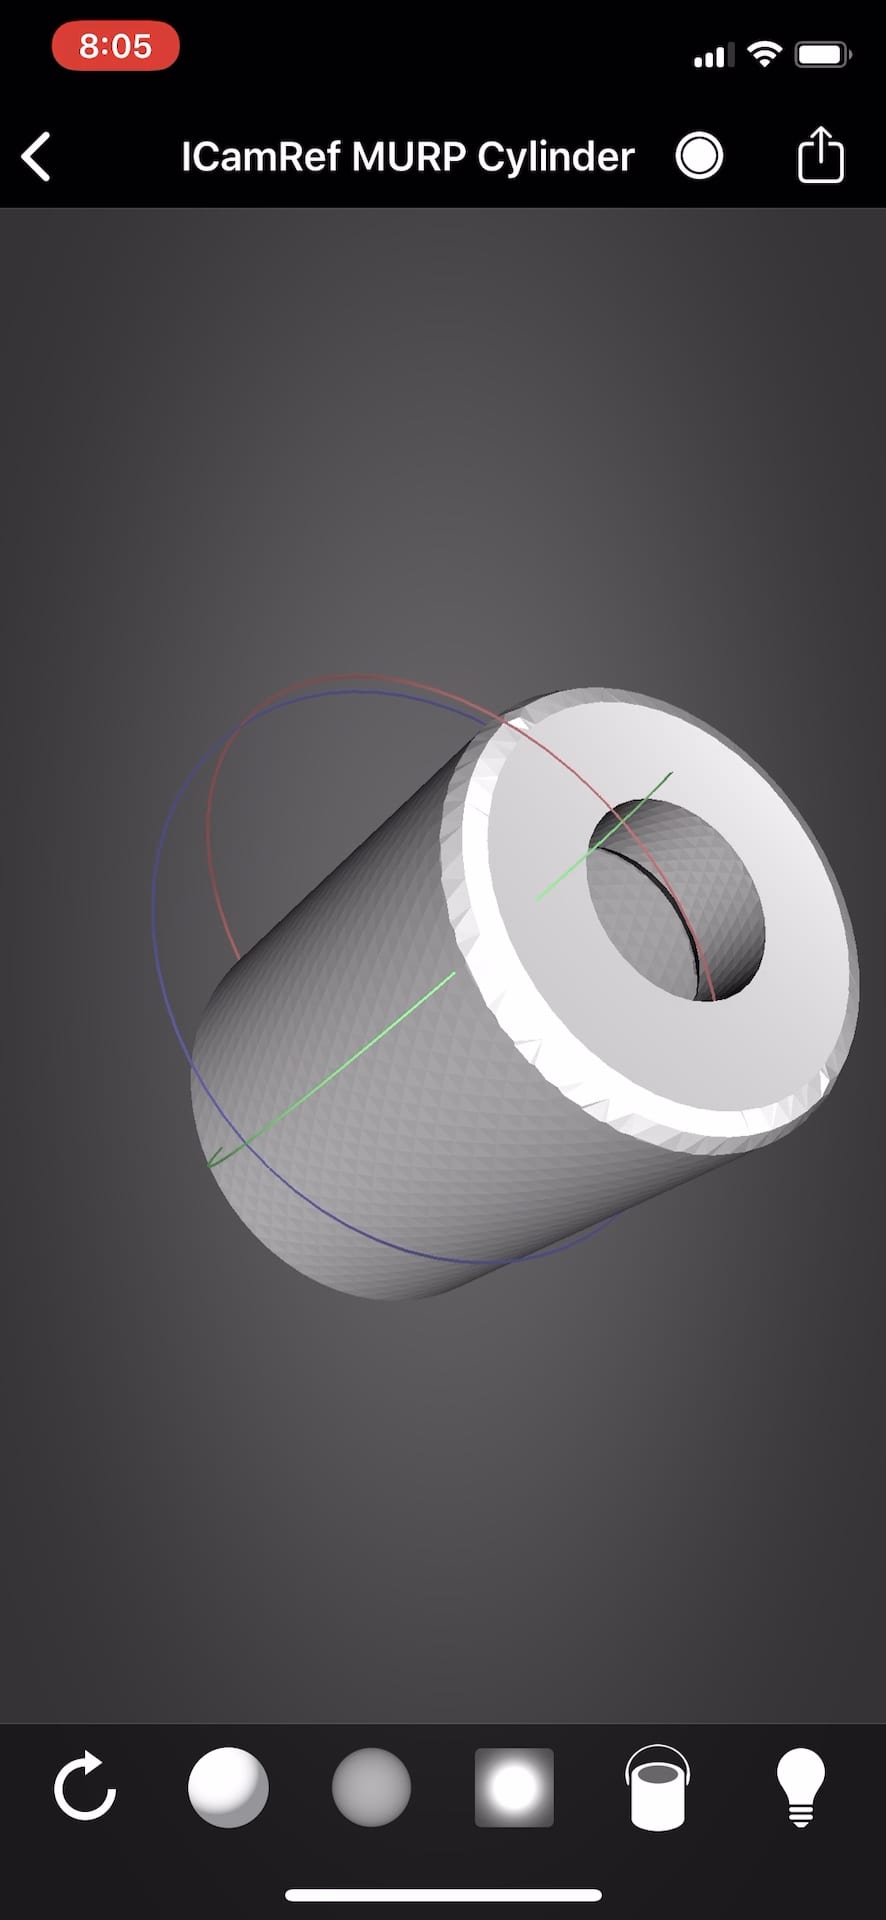
To use the ICam 4D scanner you must first calibrate the machine with a plate immediately prior to the intra-oral scan capture. There are specific reference points that the camera and software recognizes and after you capture about a dozen landmarks, you are ready for an intra-oral scan
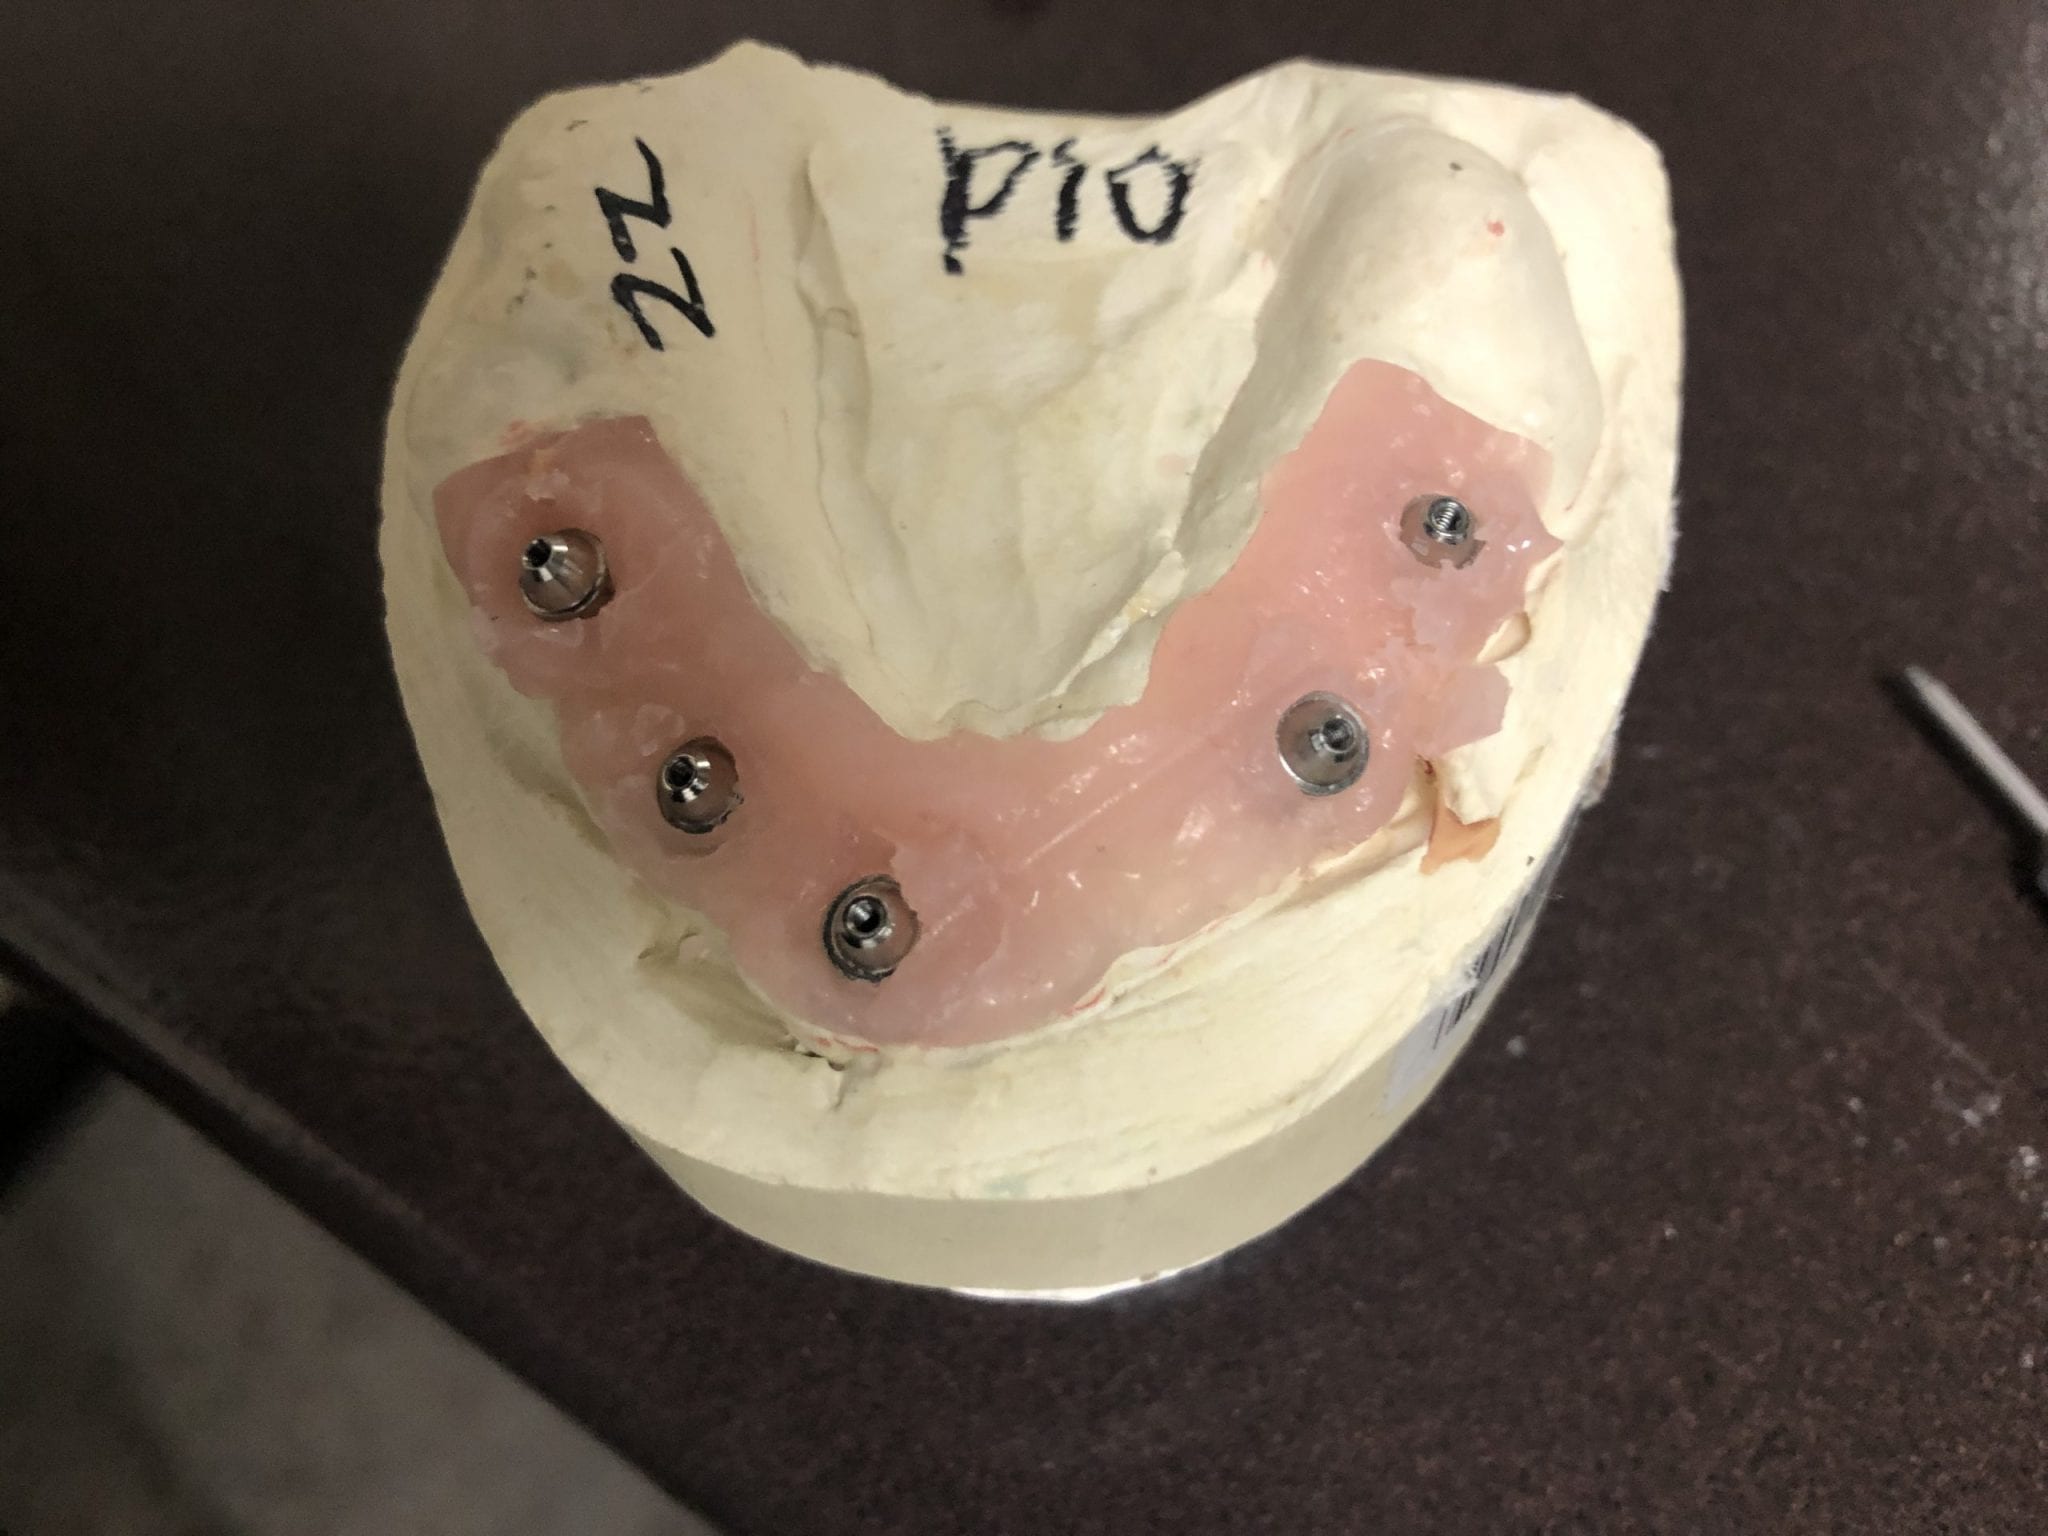
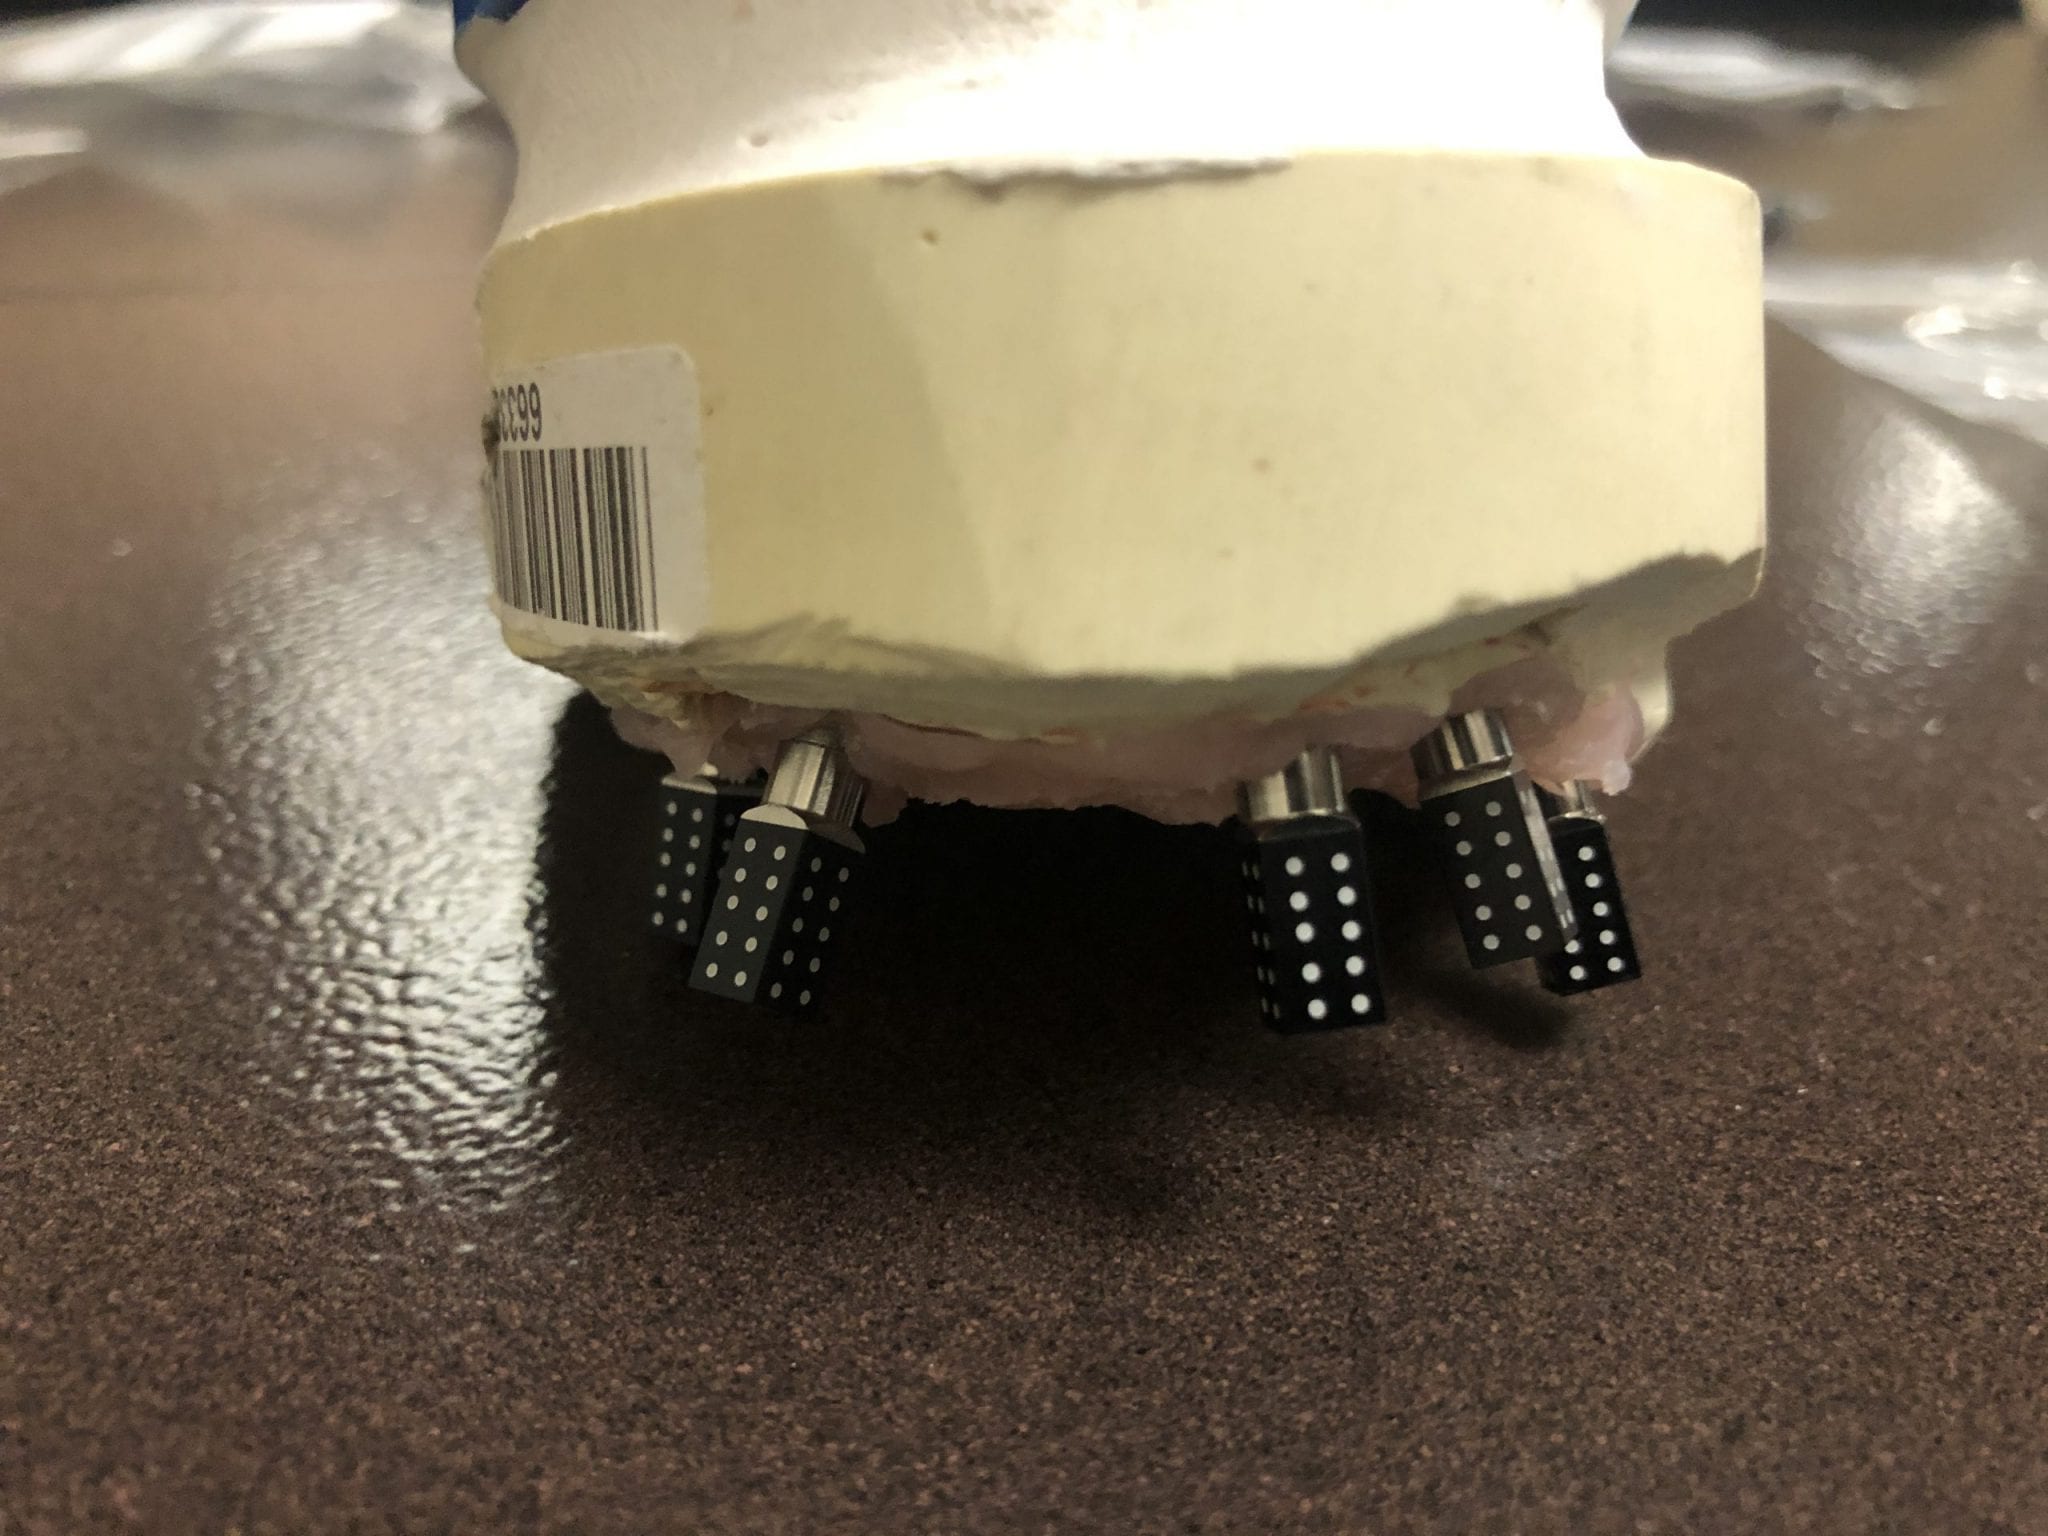
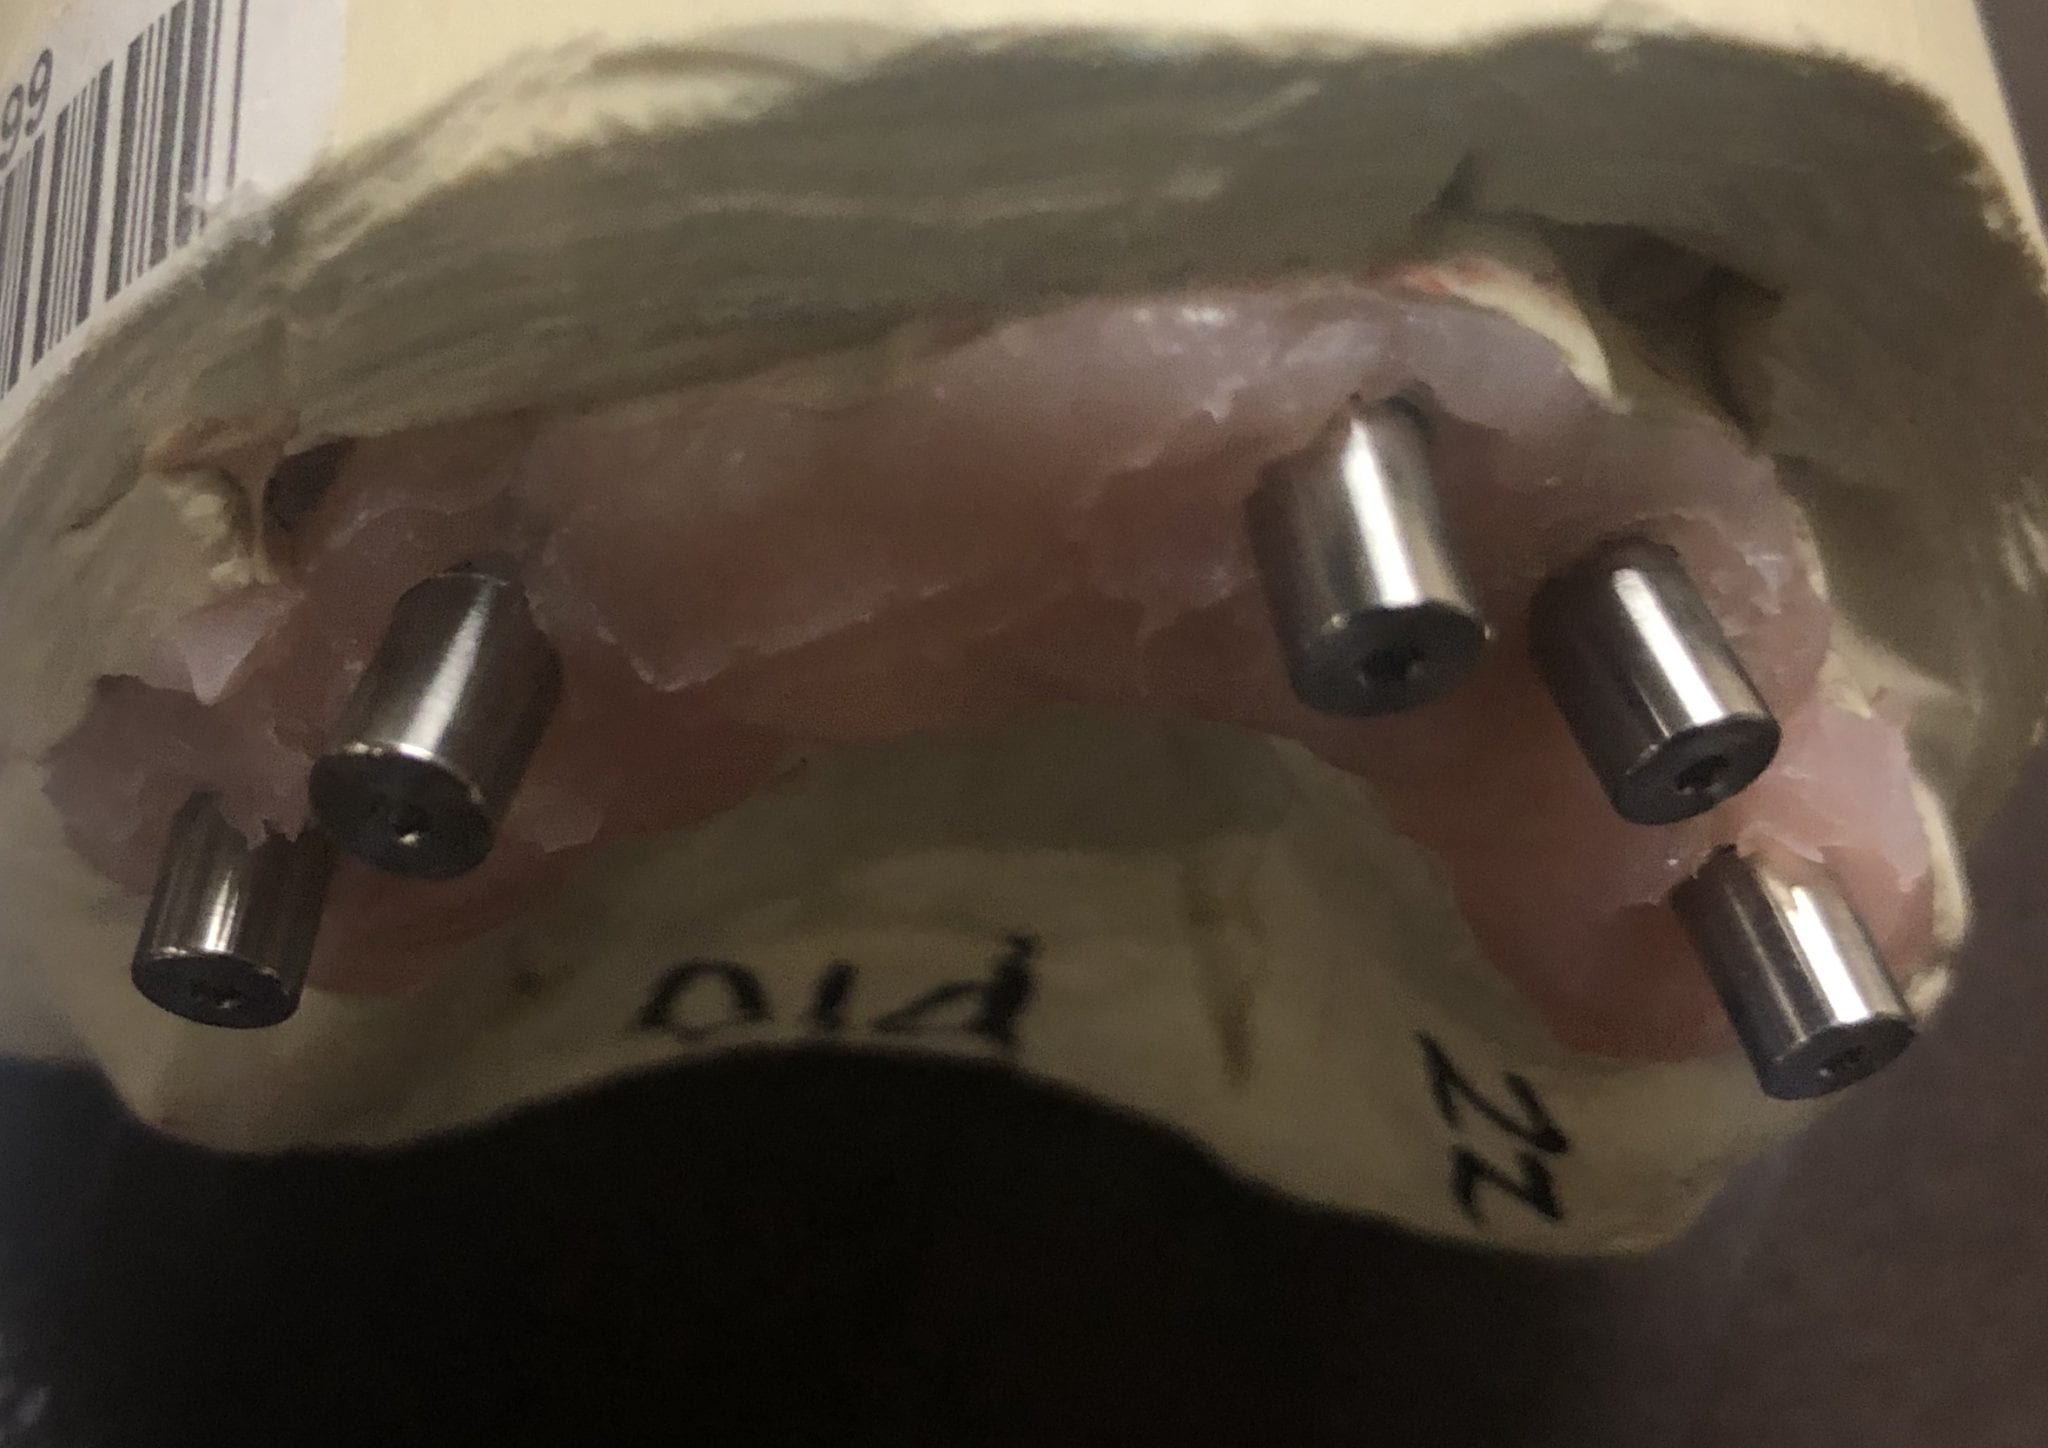
After the camera is calibrated, the patient, or in this demonstration case, the model with Multi-Unit Abutment analogs is mounted with ICam Reference Bodies that are shaped like dominos. They can attach to the multiunit abutment or directly to the implant fixture (available soon in the USA).
The markers are captured by the device in the software with multiple identification marks, ideally 10 marks on each scan post. This data is then exported as an stl file that has all the locations of each cylinder preserved. This whole process just takes minutes. Most people just utilize this device for full arch impressions so they can bypass the verification jig for large cases. Here, we use it to assess the accuracy of the medit i500 ios to provide cross arch accuracy if doctors follow our protocols for imaging, which utilizes the reliability map as a guide for imaging. When then utilize the Artificial Intelligent Implant Suprastructure Identification Software to merge and evaluate the accuracy of the ios scan.
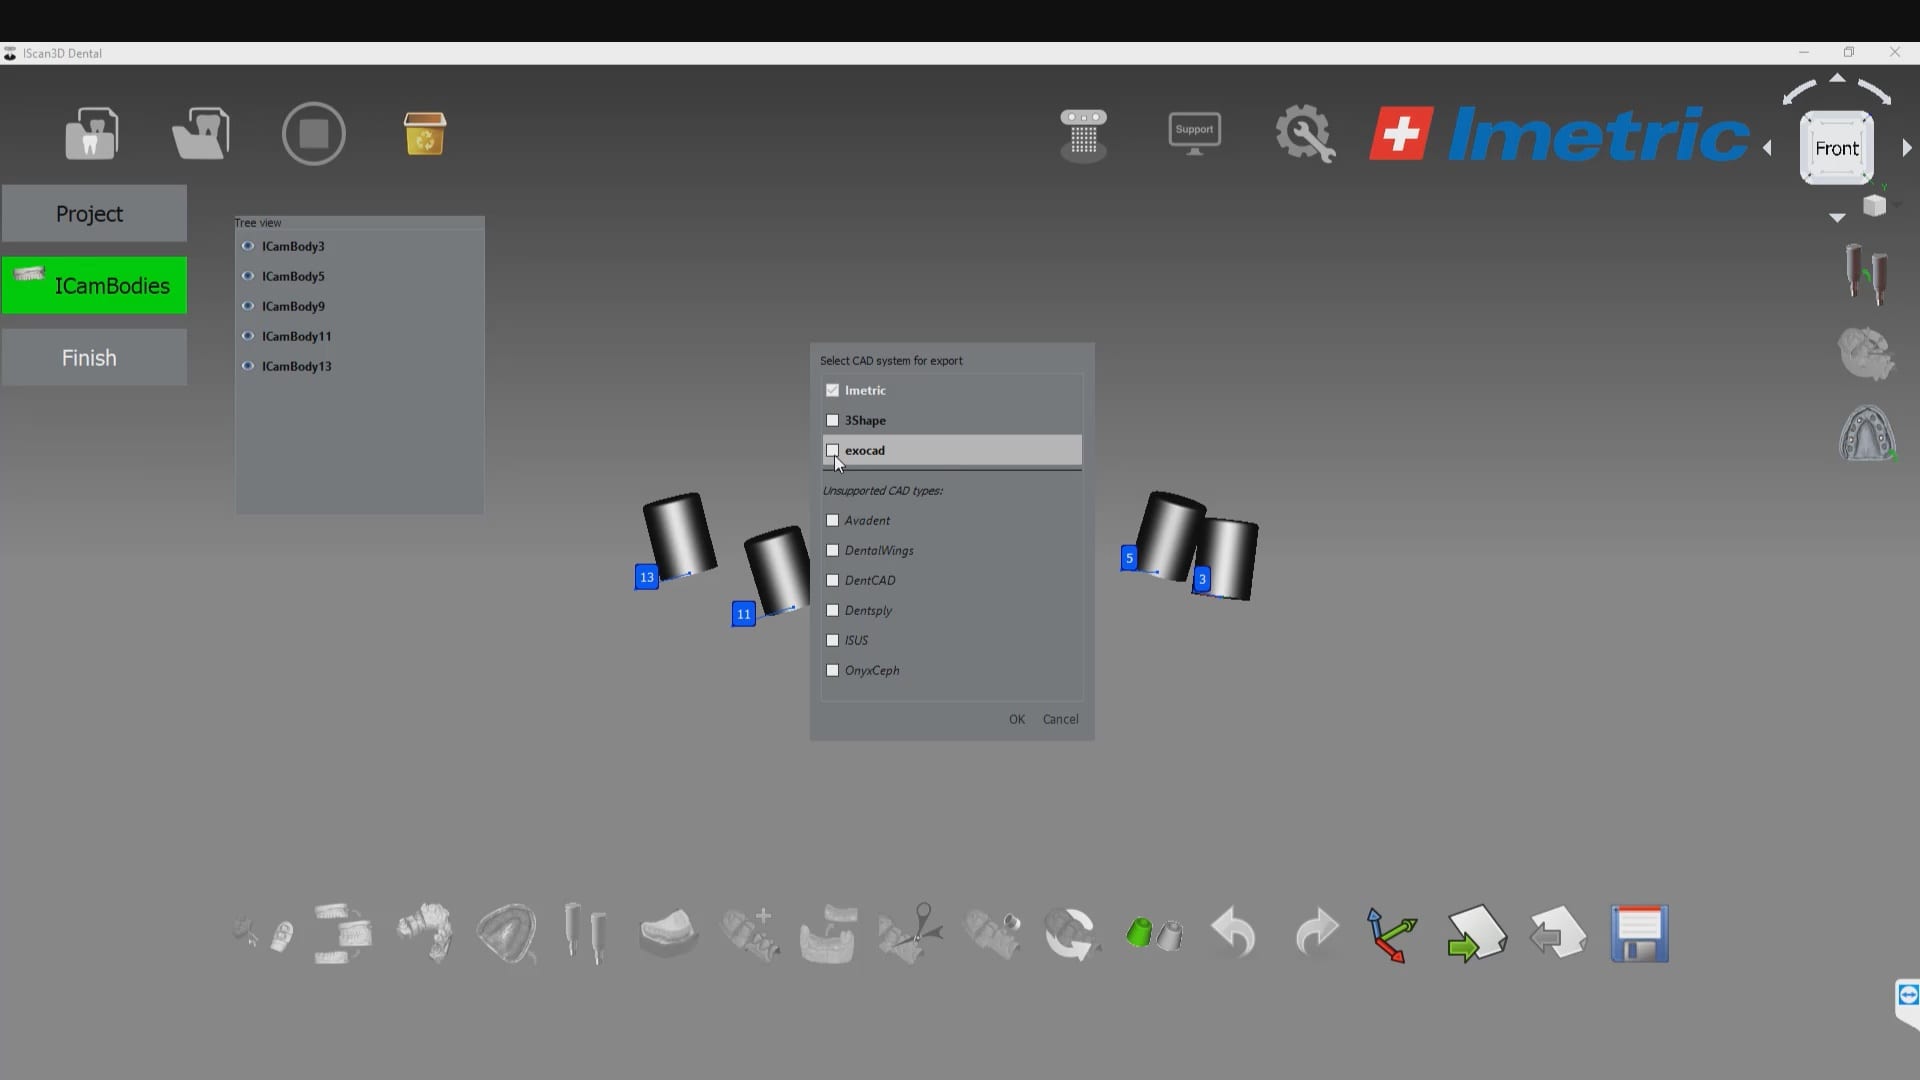
save the implant scanbody cyliners and their coordinates
There are a lot of ways one can introduce errors into a full arch scan with any ios, but the medit’s powerful features that include the reliability map and the AI tool separate it from all other scans that do not allow you to assess the accuracy of your scan while you are imaging. You can only do so with the fabrication of a verification jig
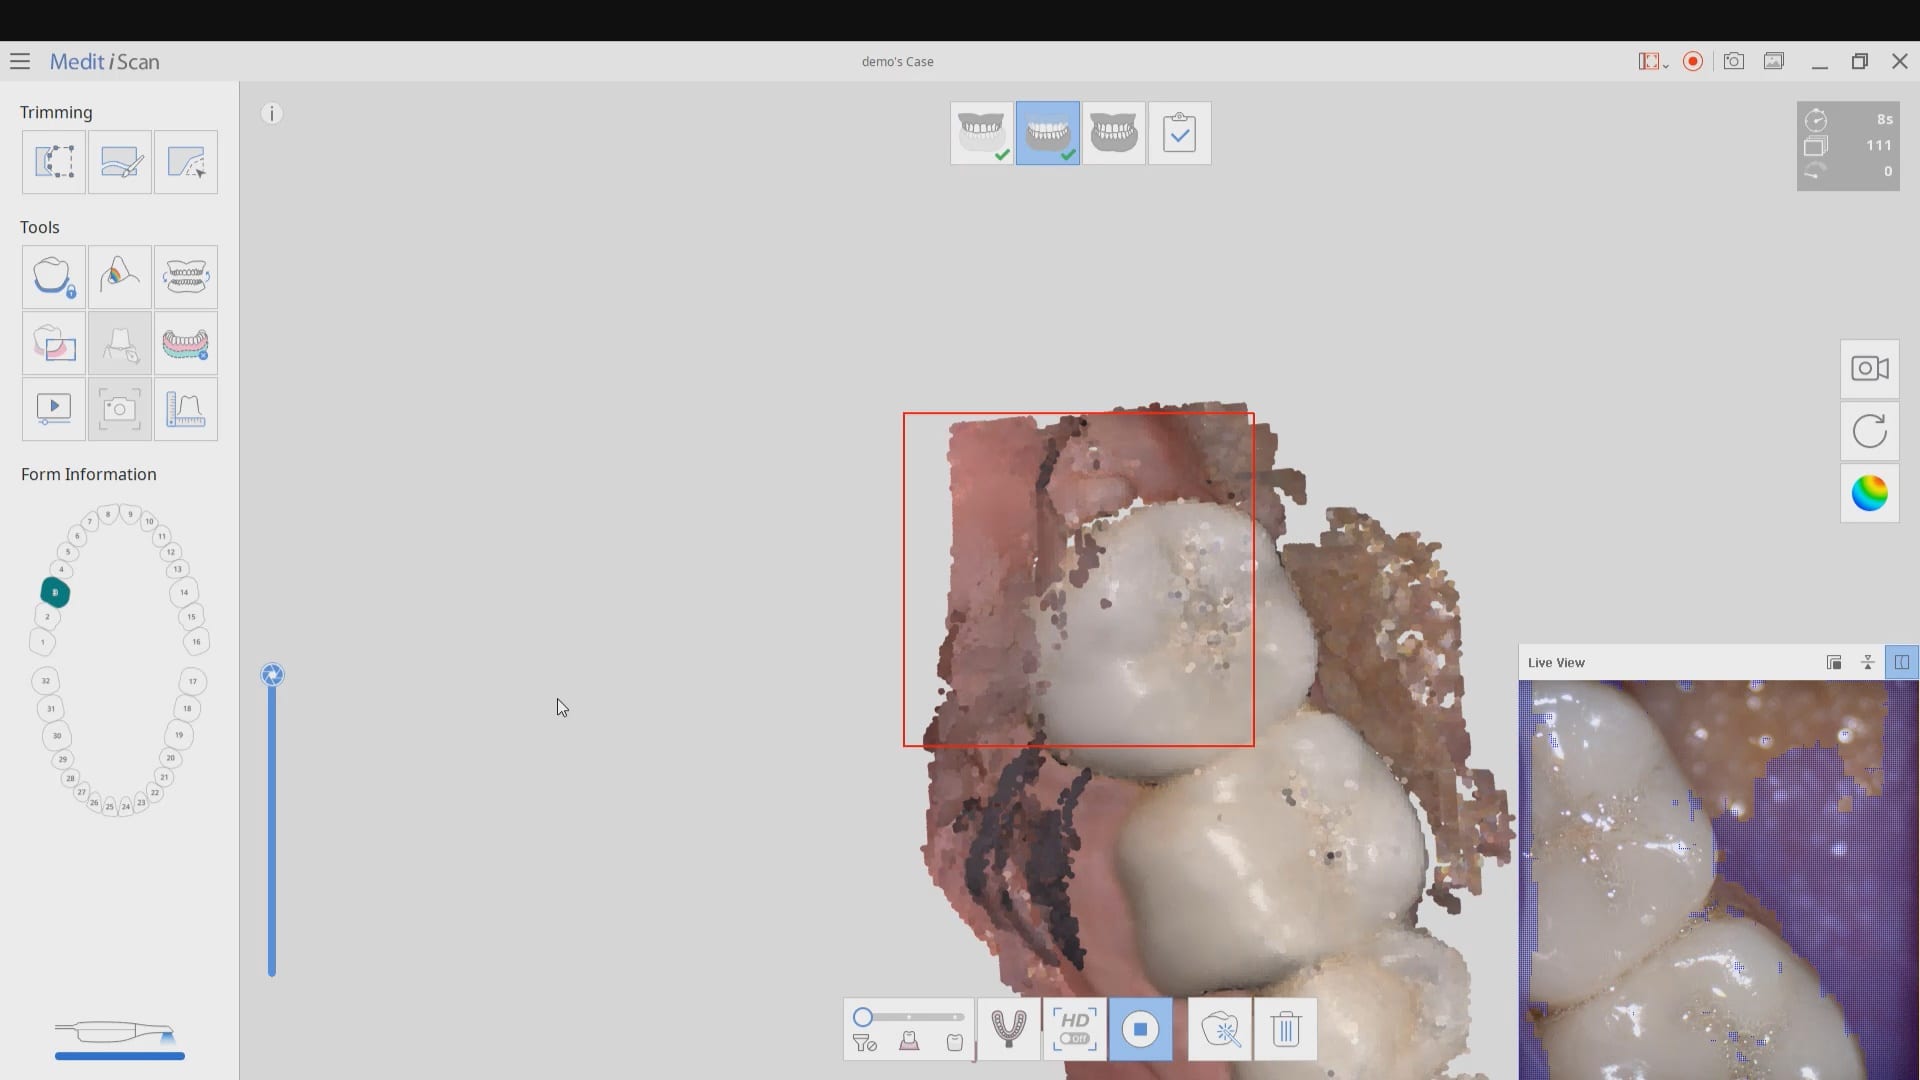
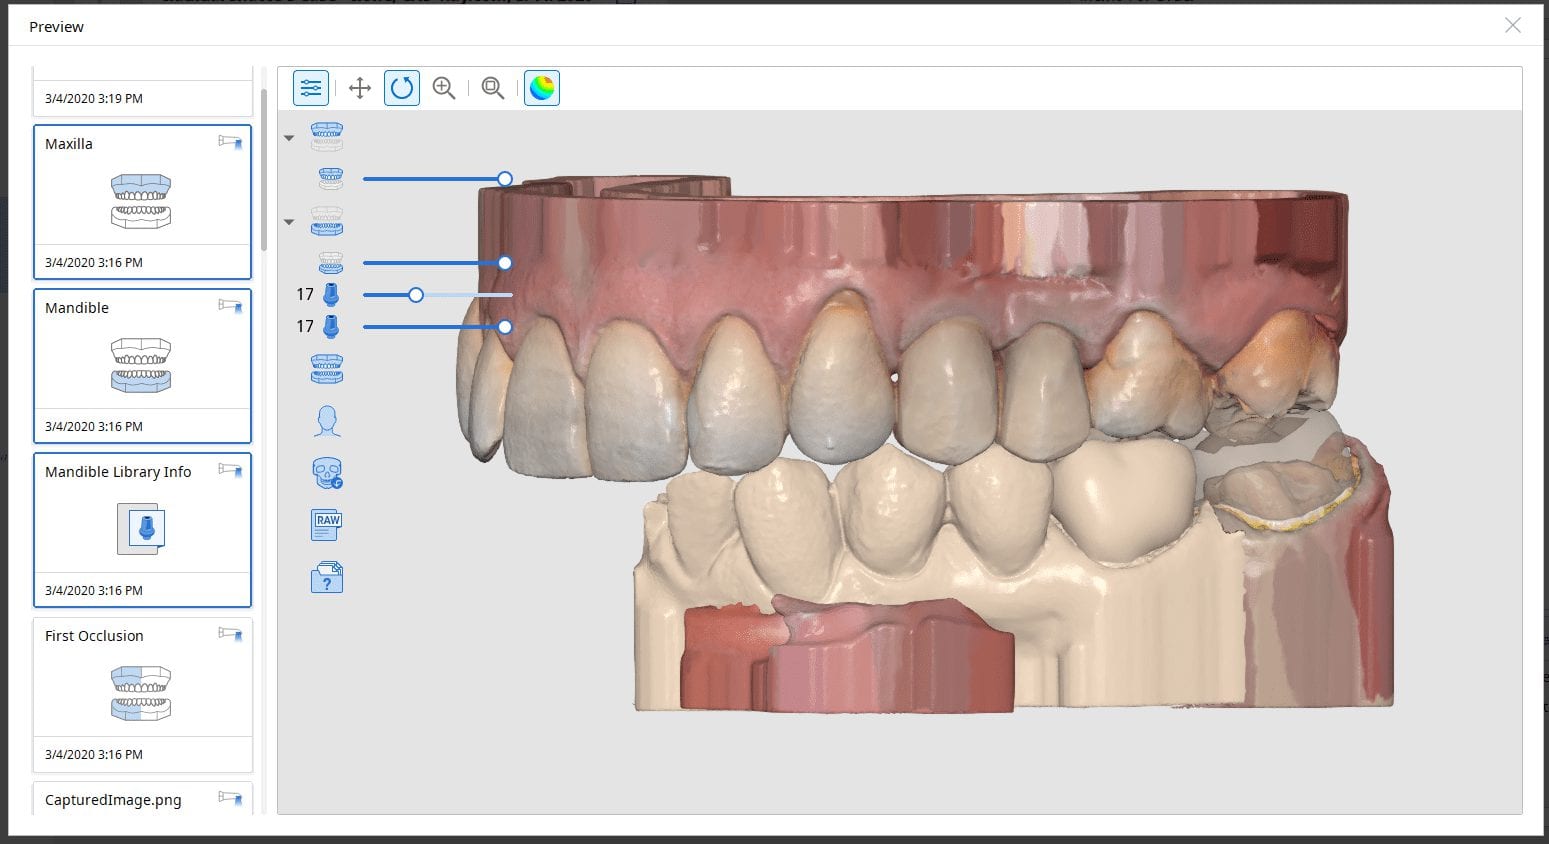
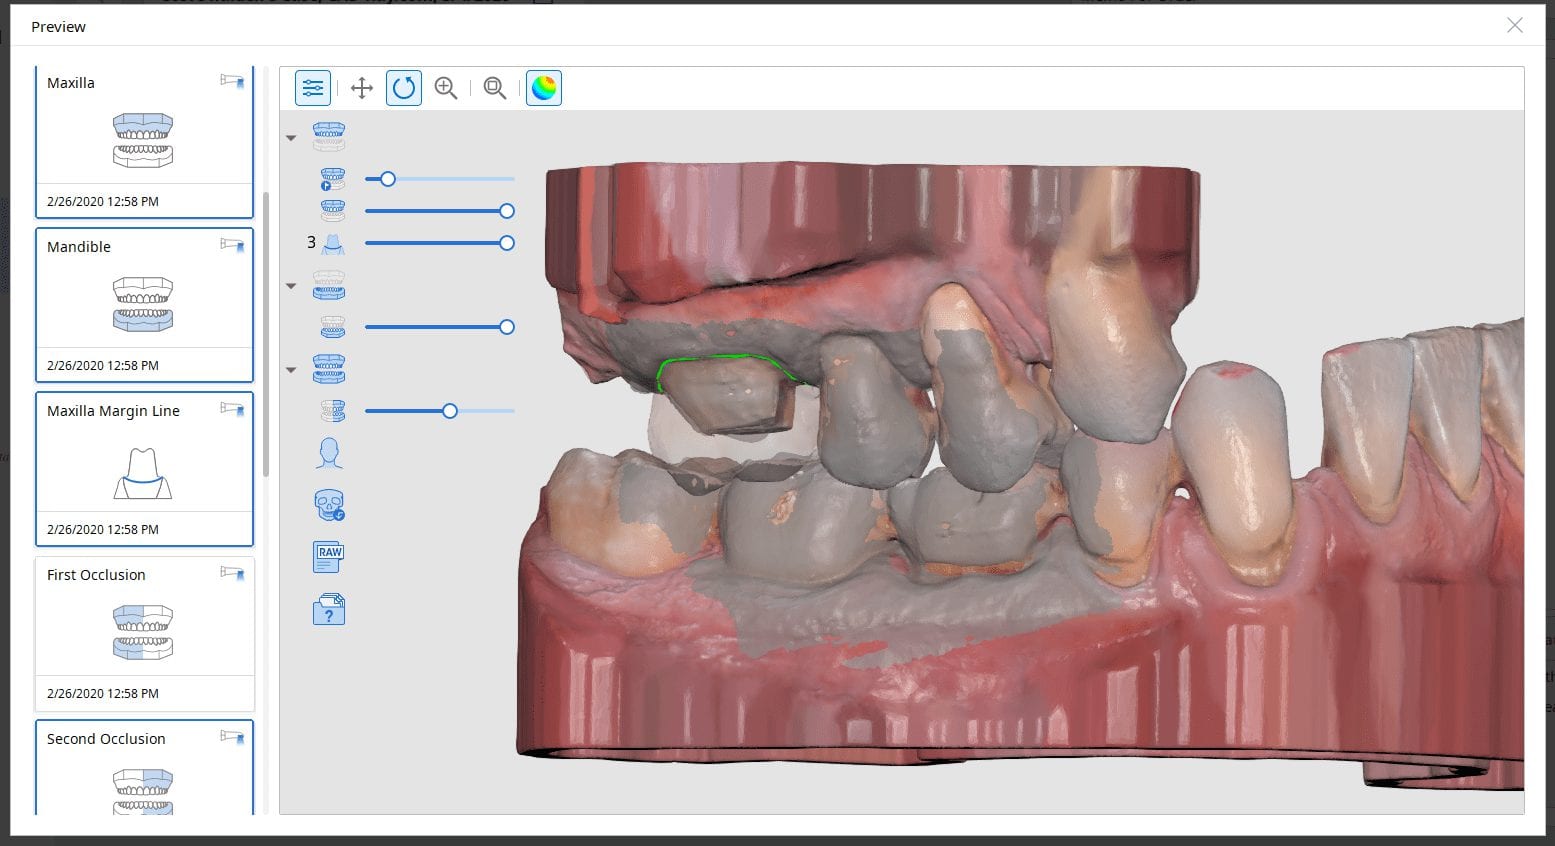
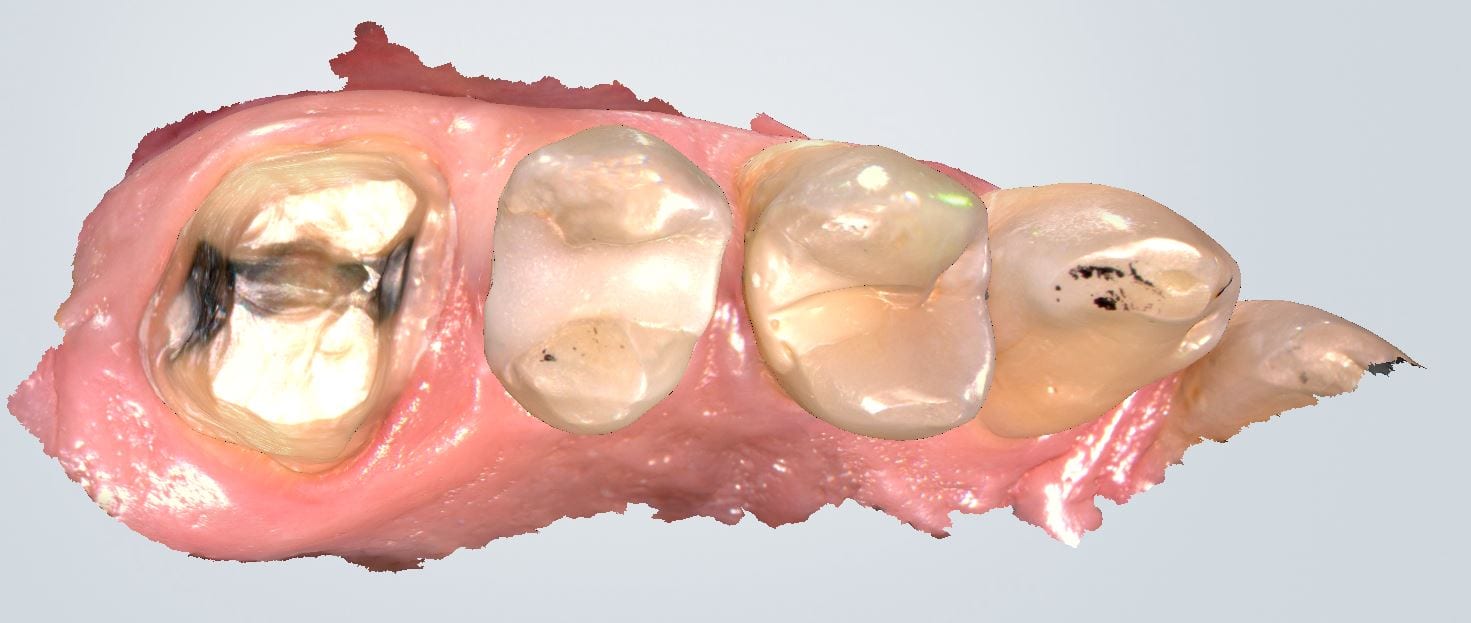
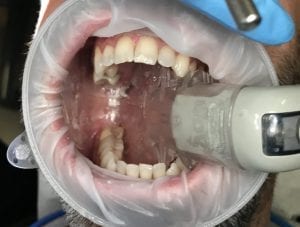
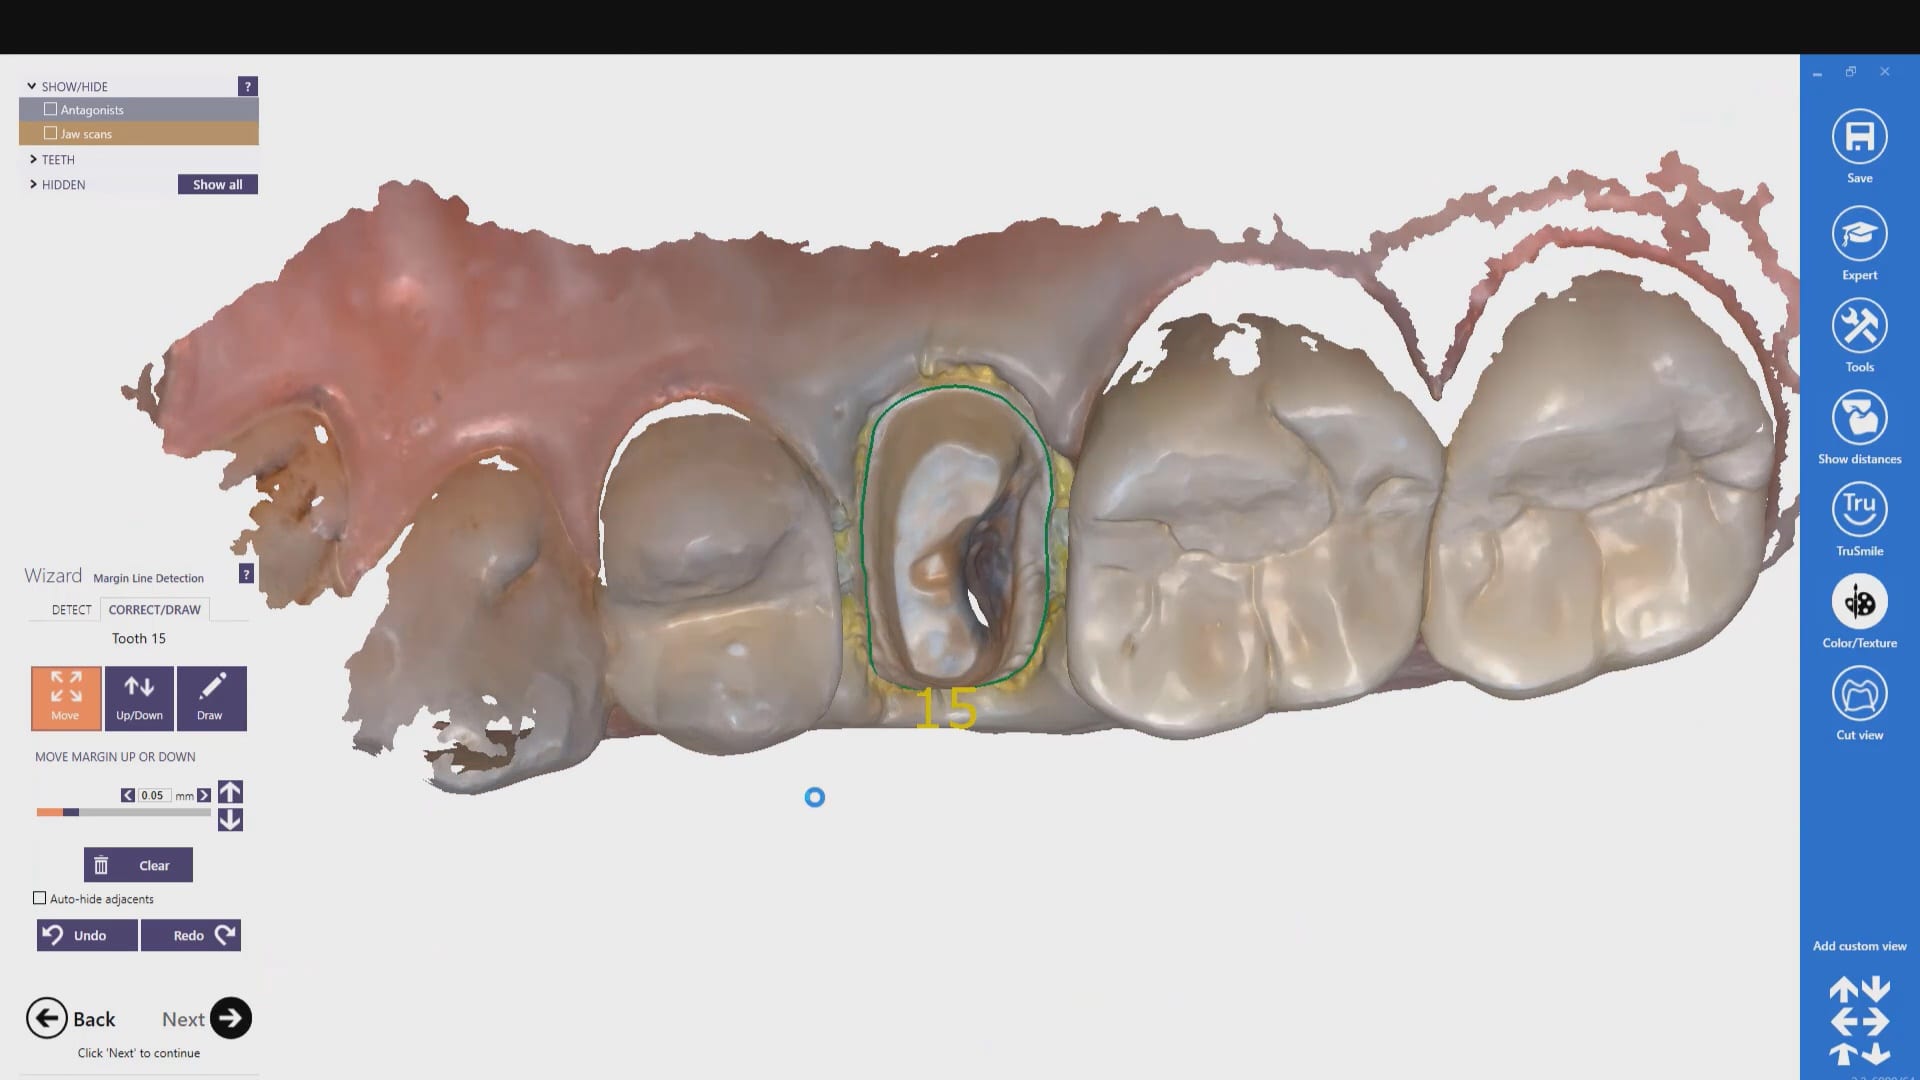
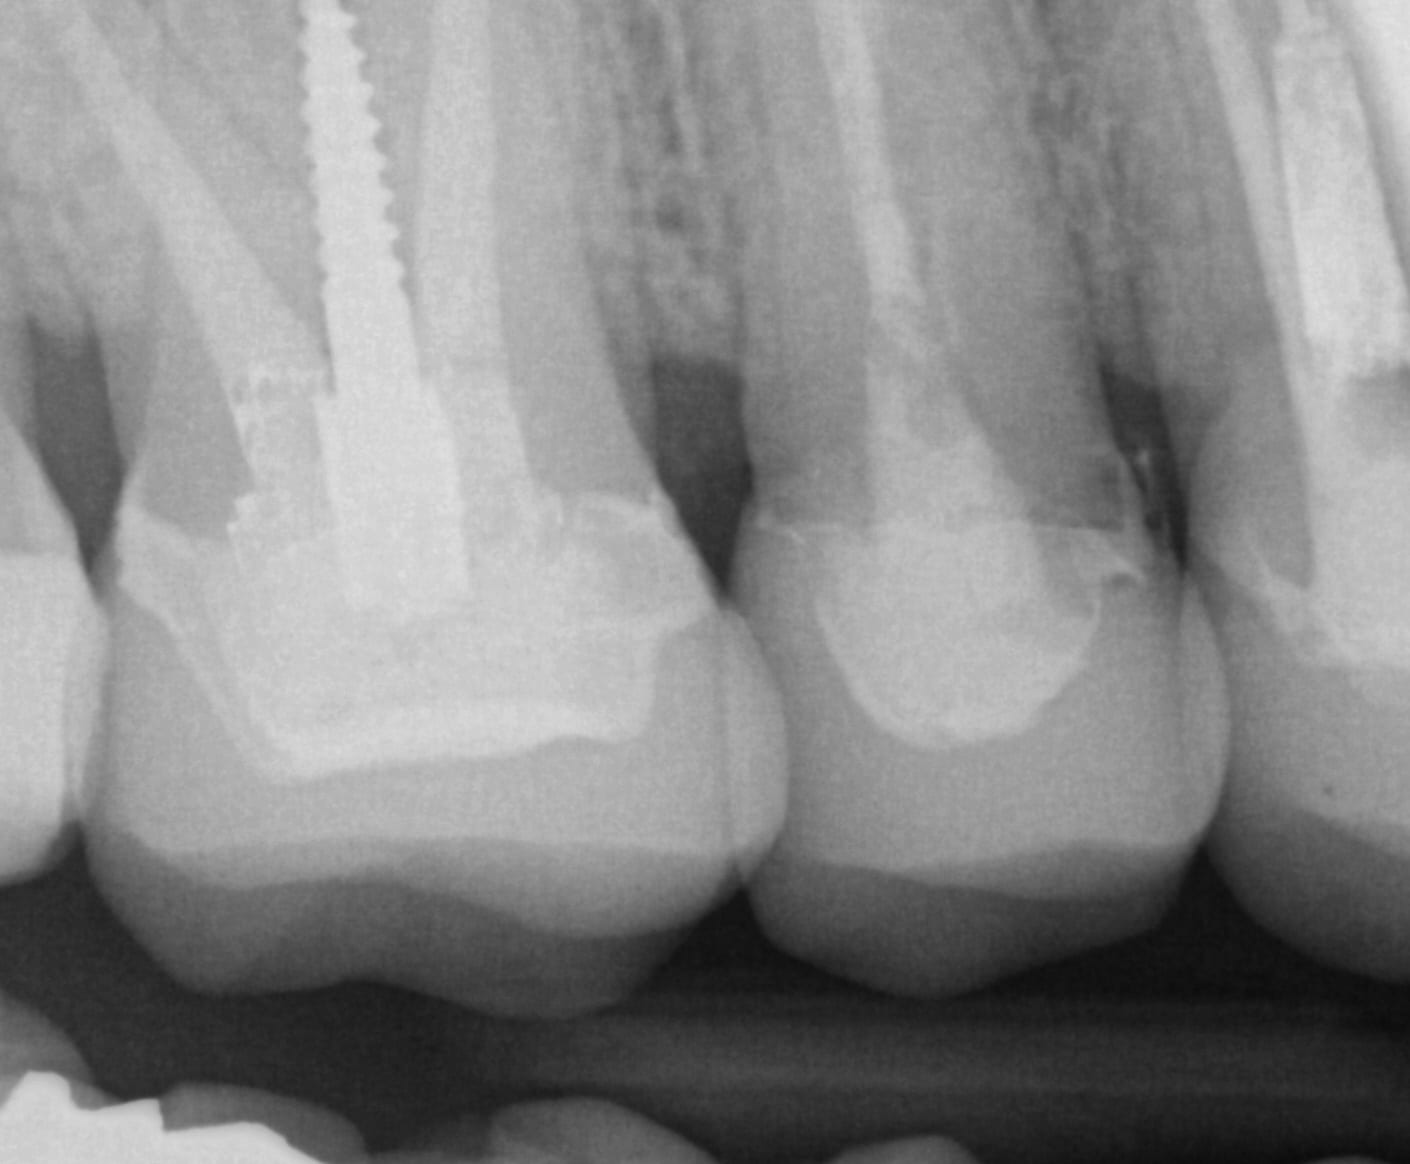
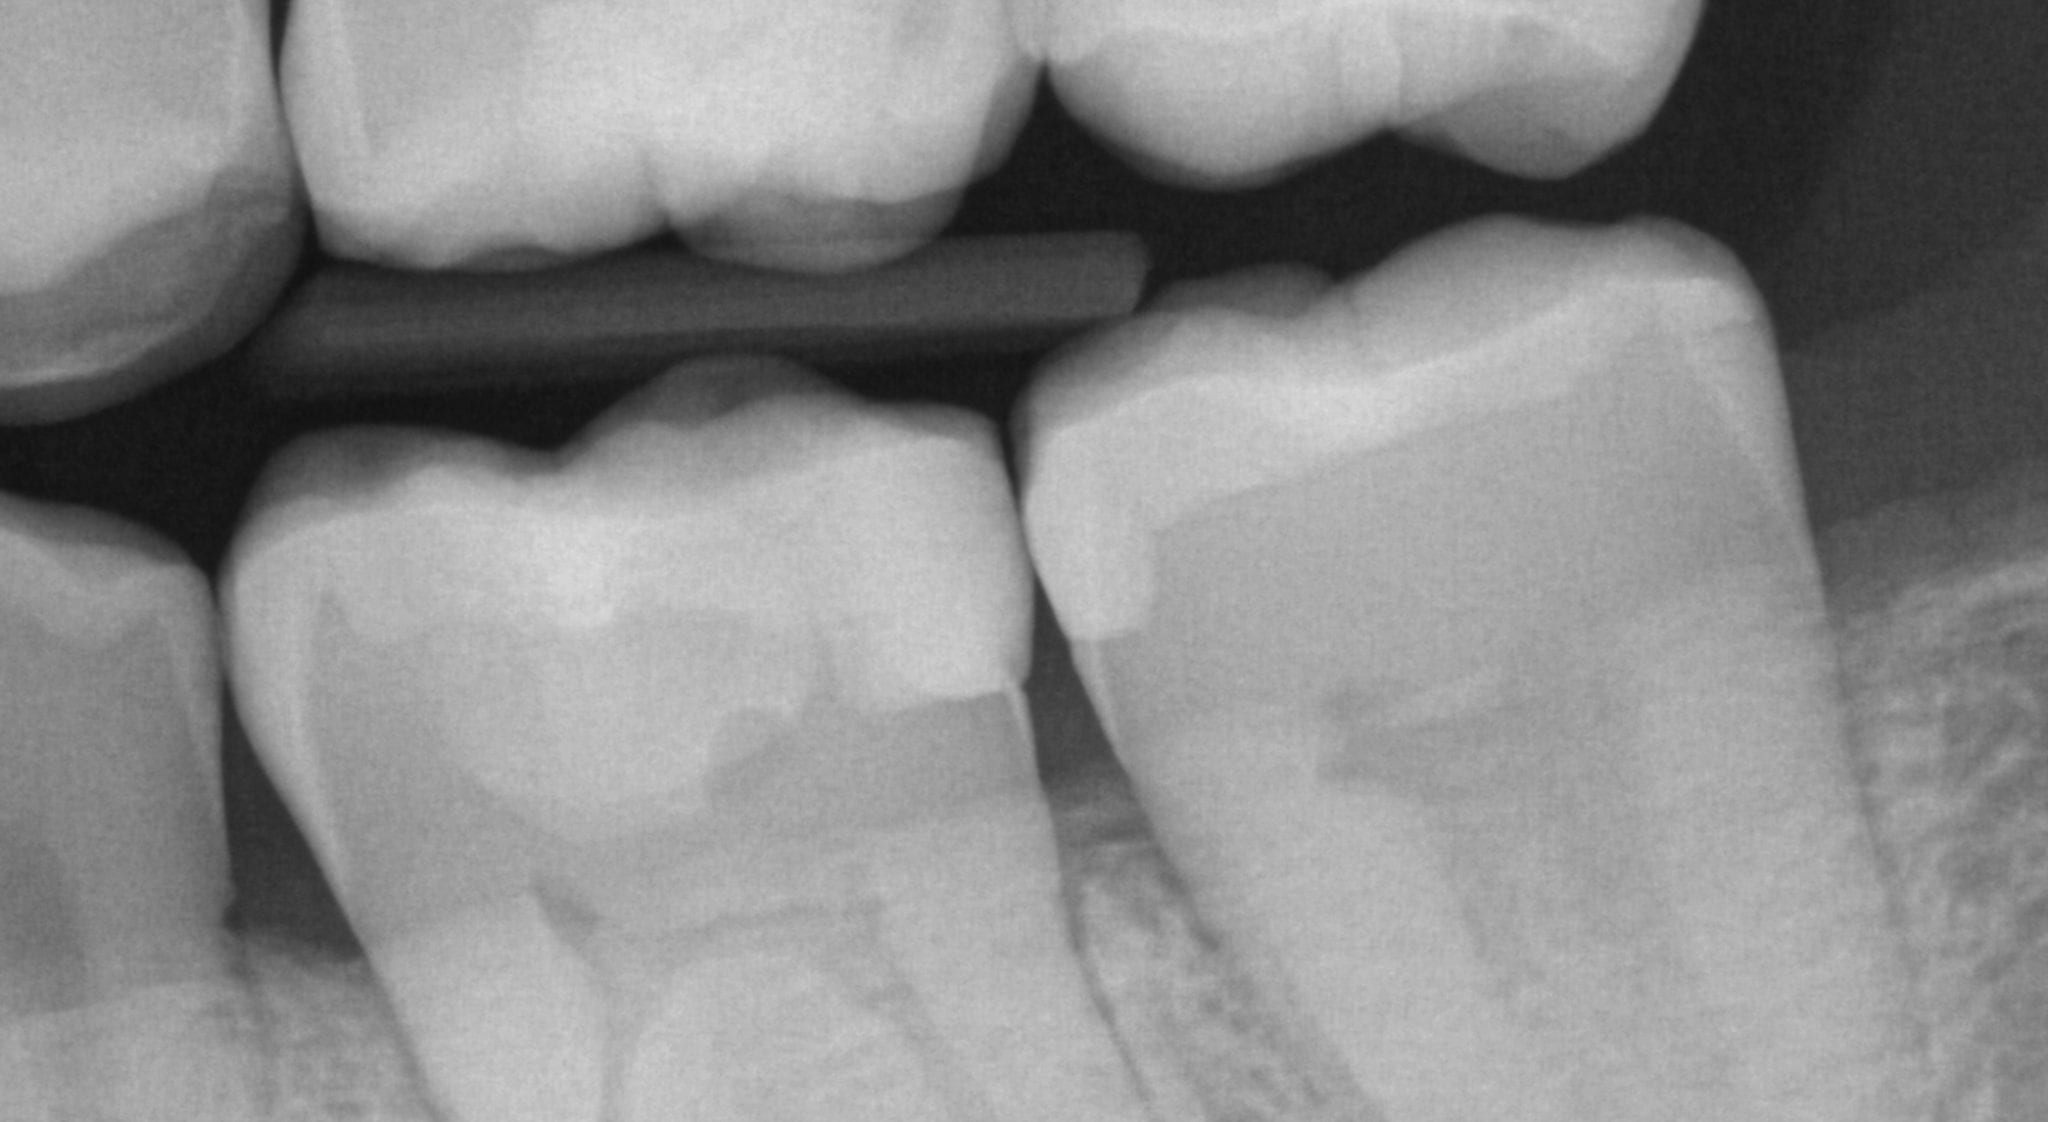
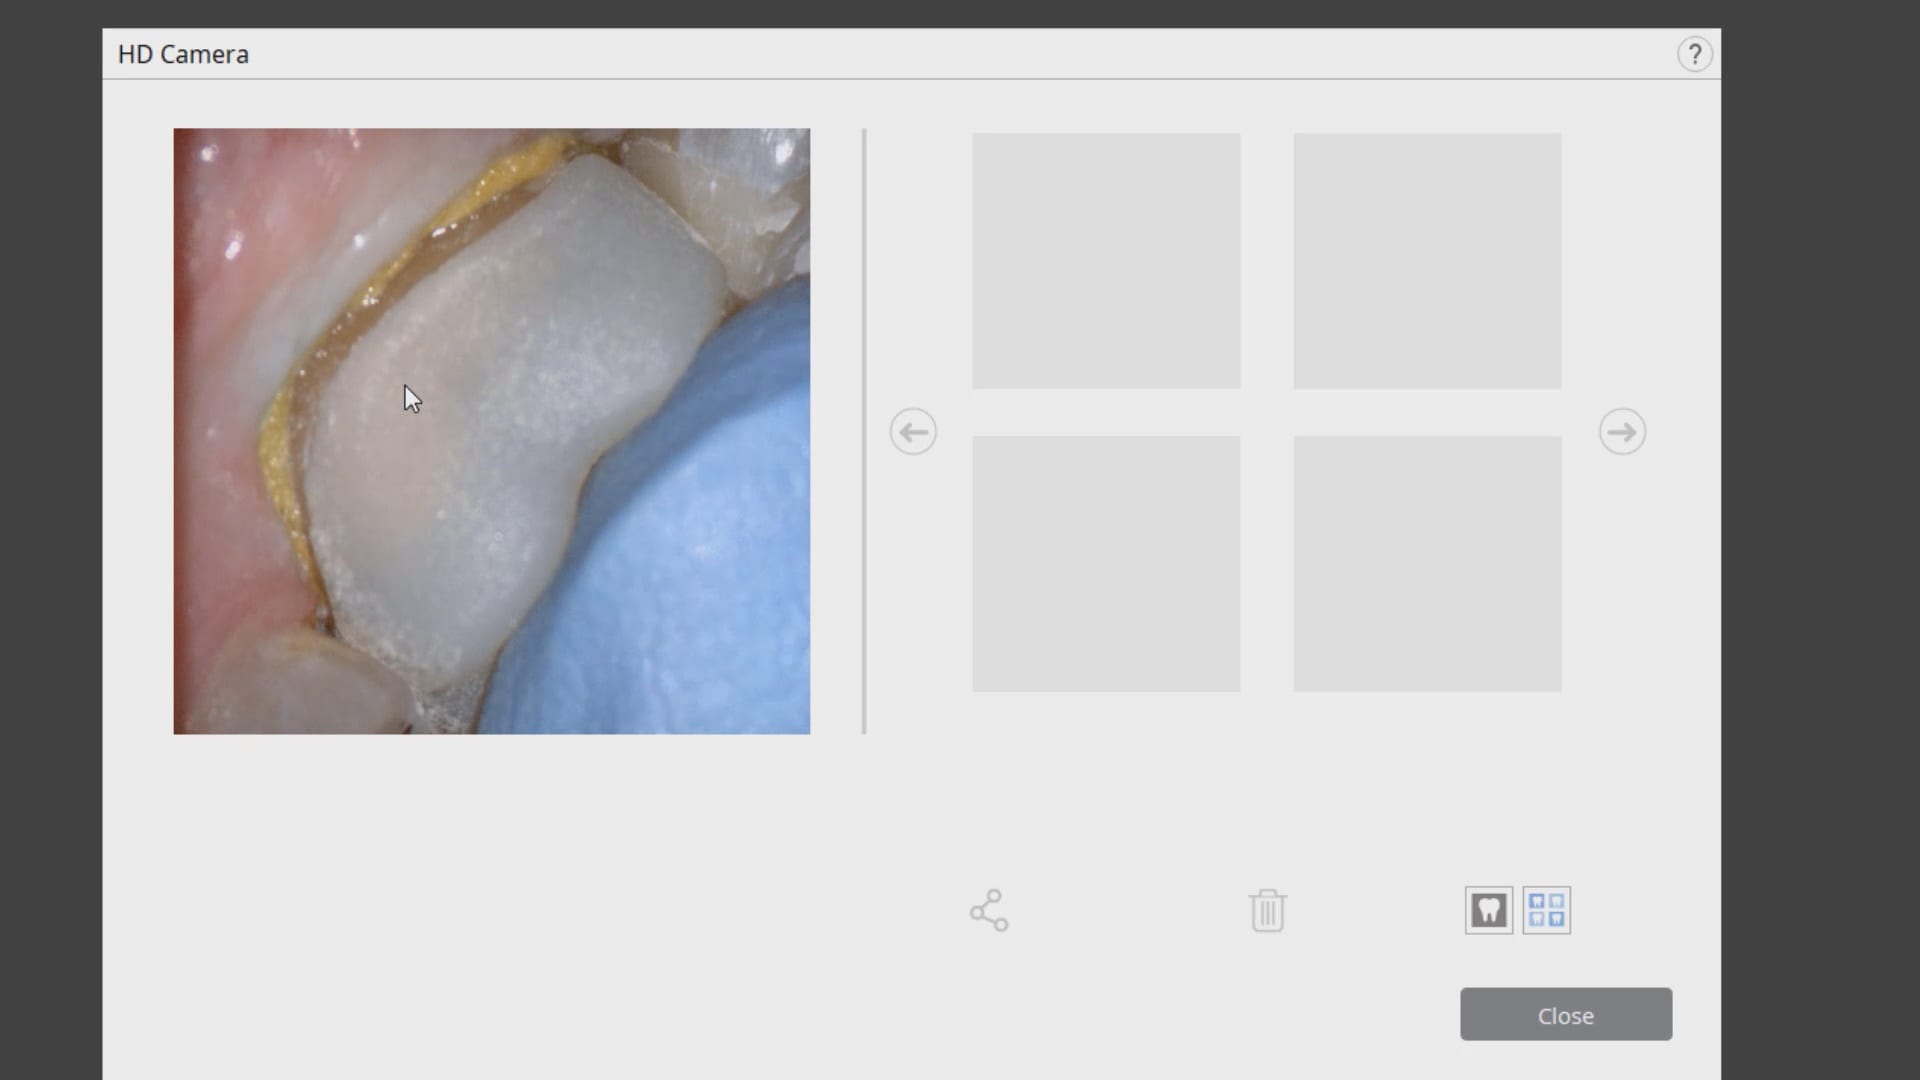
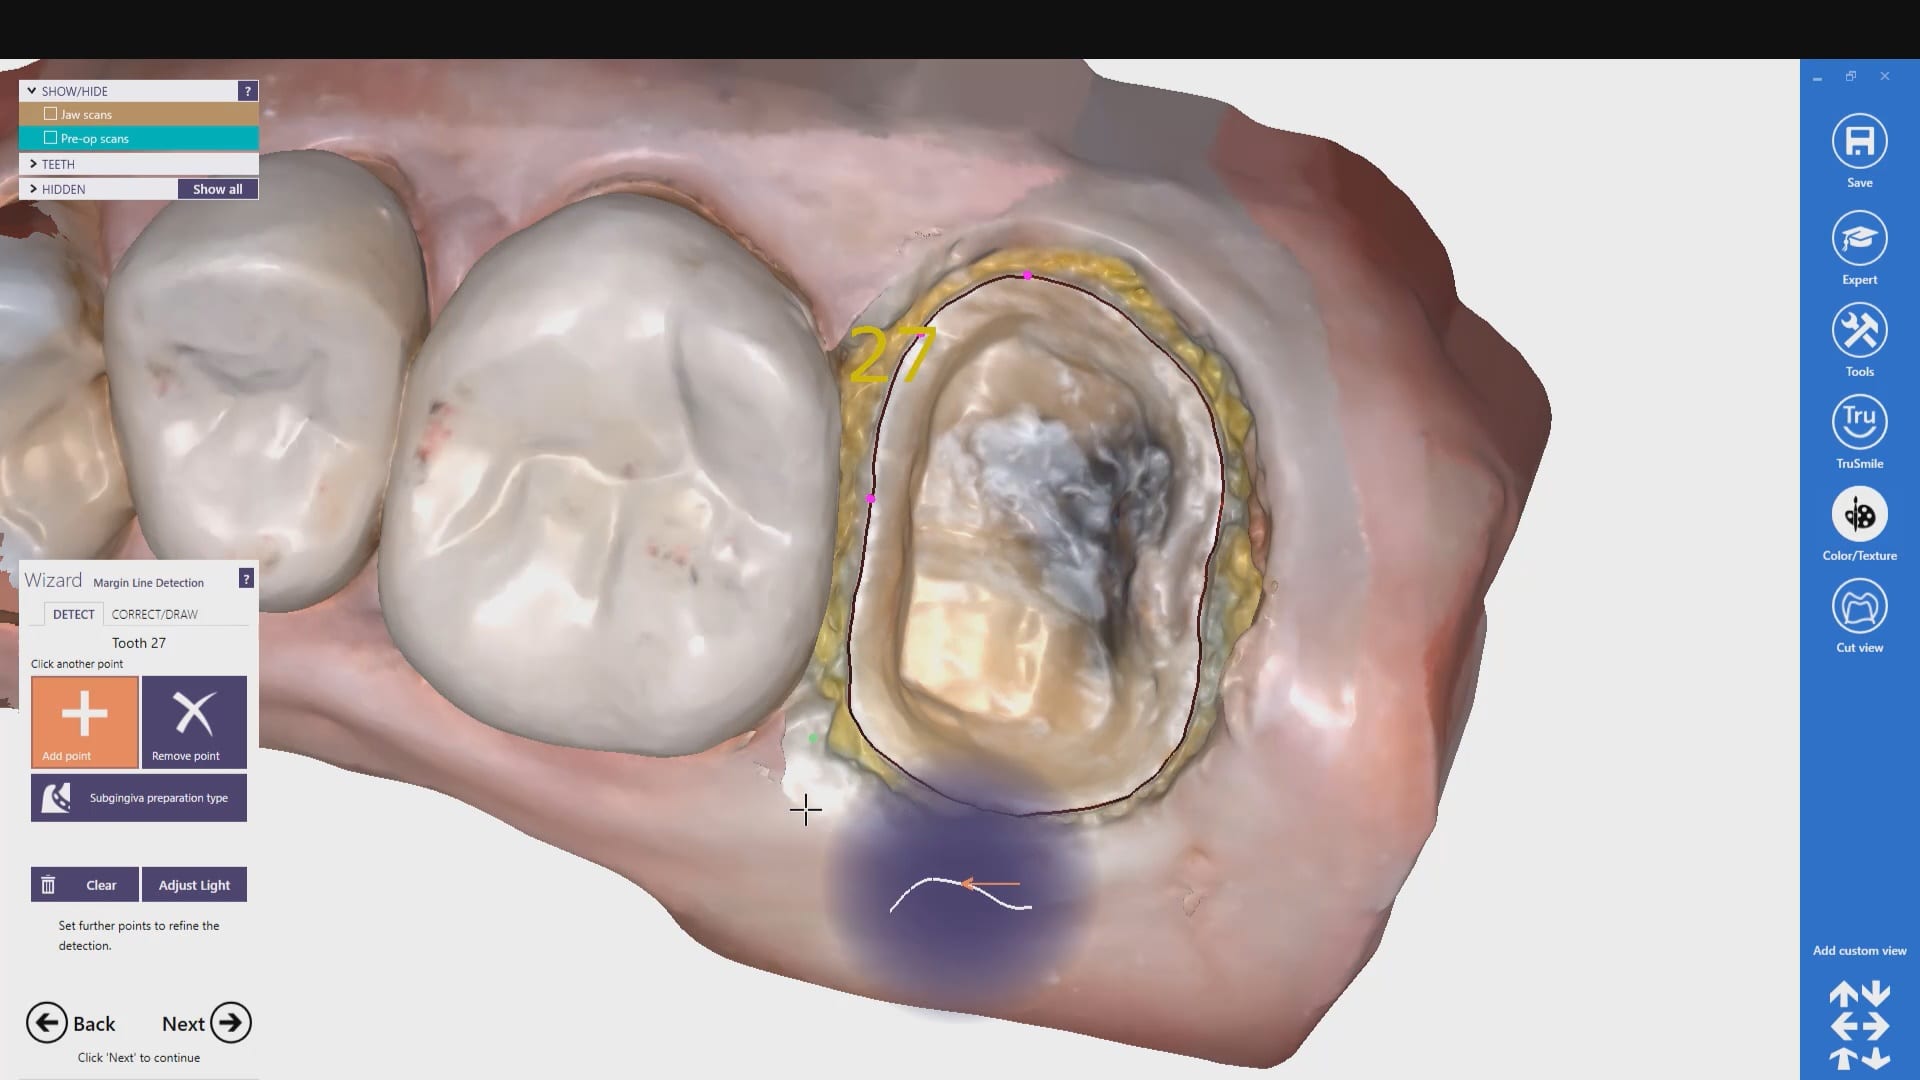
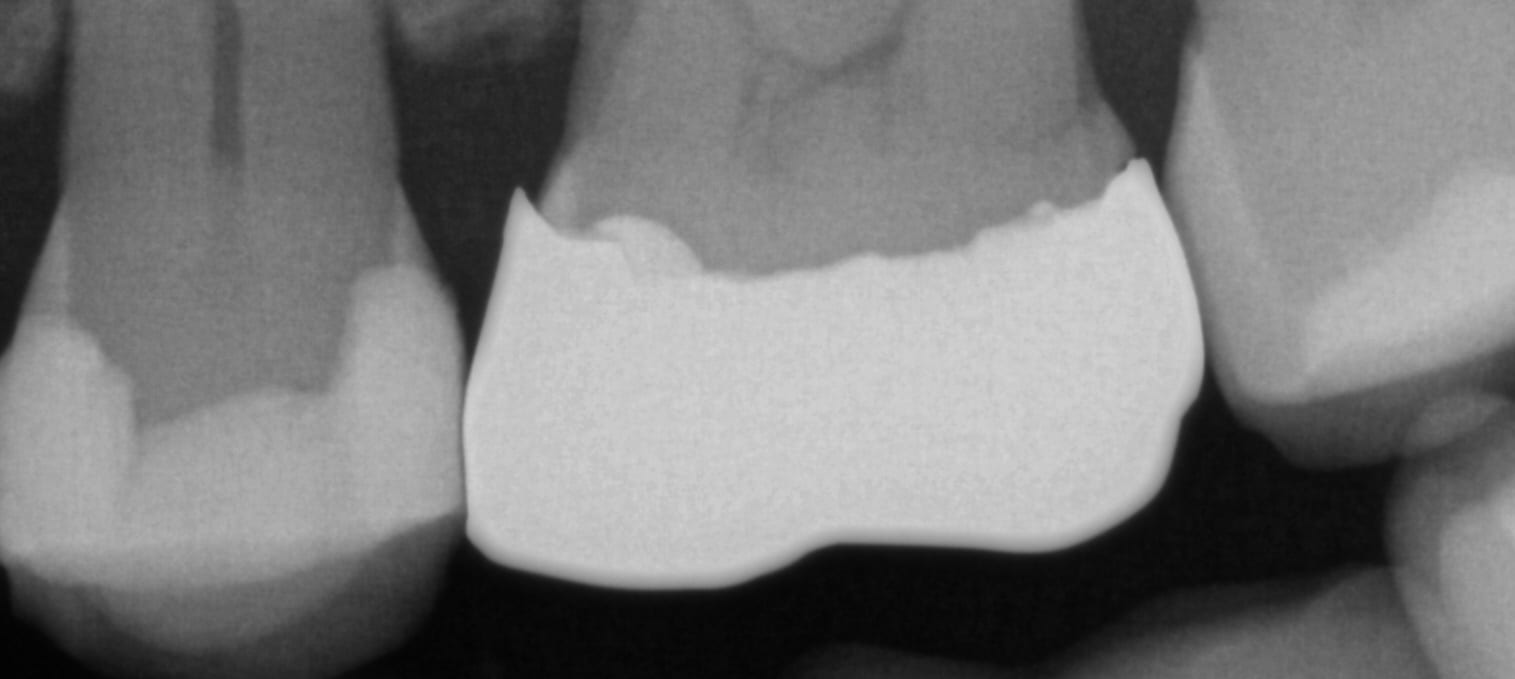
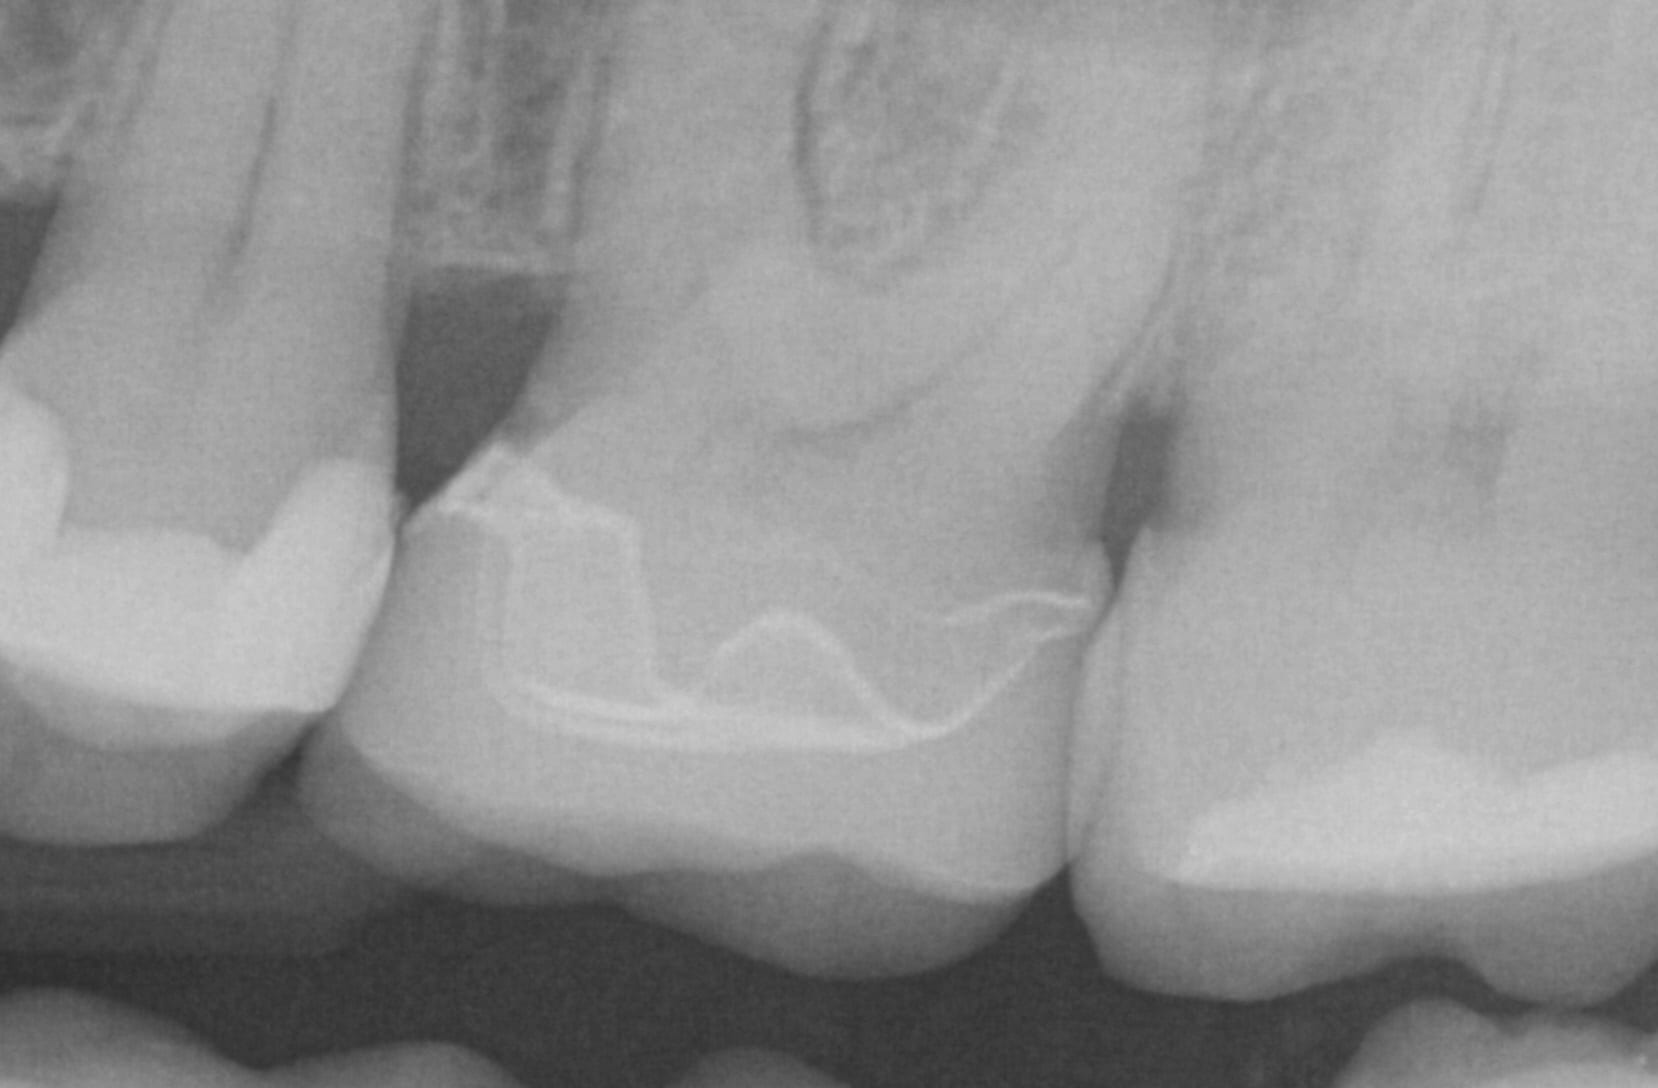
In this clinical presentation, we demonstrate the removal of a crown that has recurrent decay. The bleeding tissue was managed with a double cord technique and expasyl and the margin was captured with the medit i500. The margin was also defined in the native imaging software which allows the user to visualize the detail before designing it or send it off to the lab. Once the case is transferred to cad software, the designed margins carry through and there is an opportunity to modify it
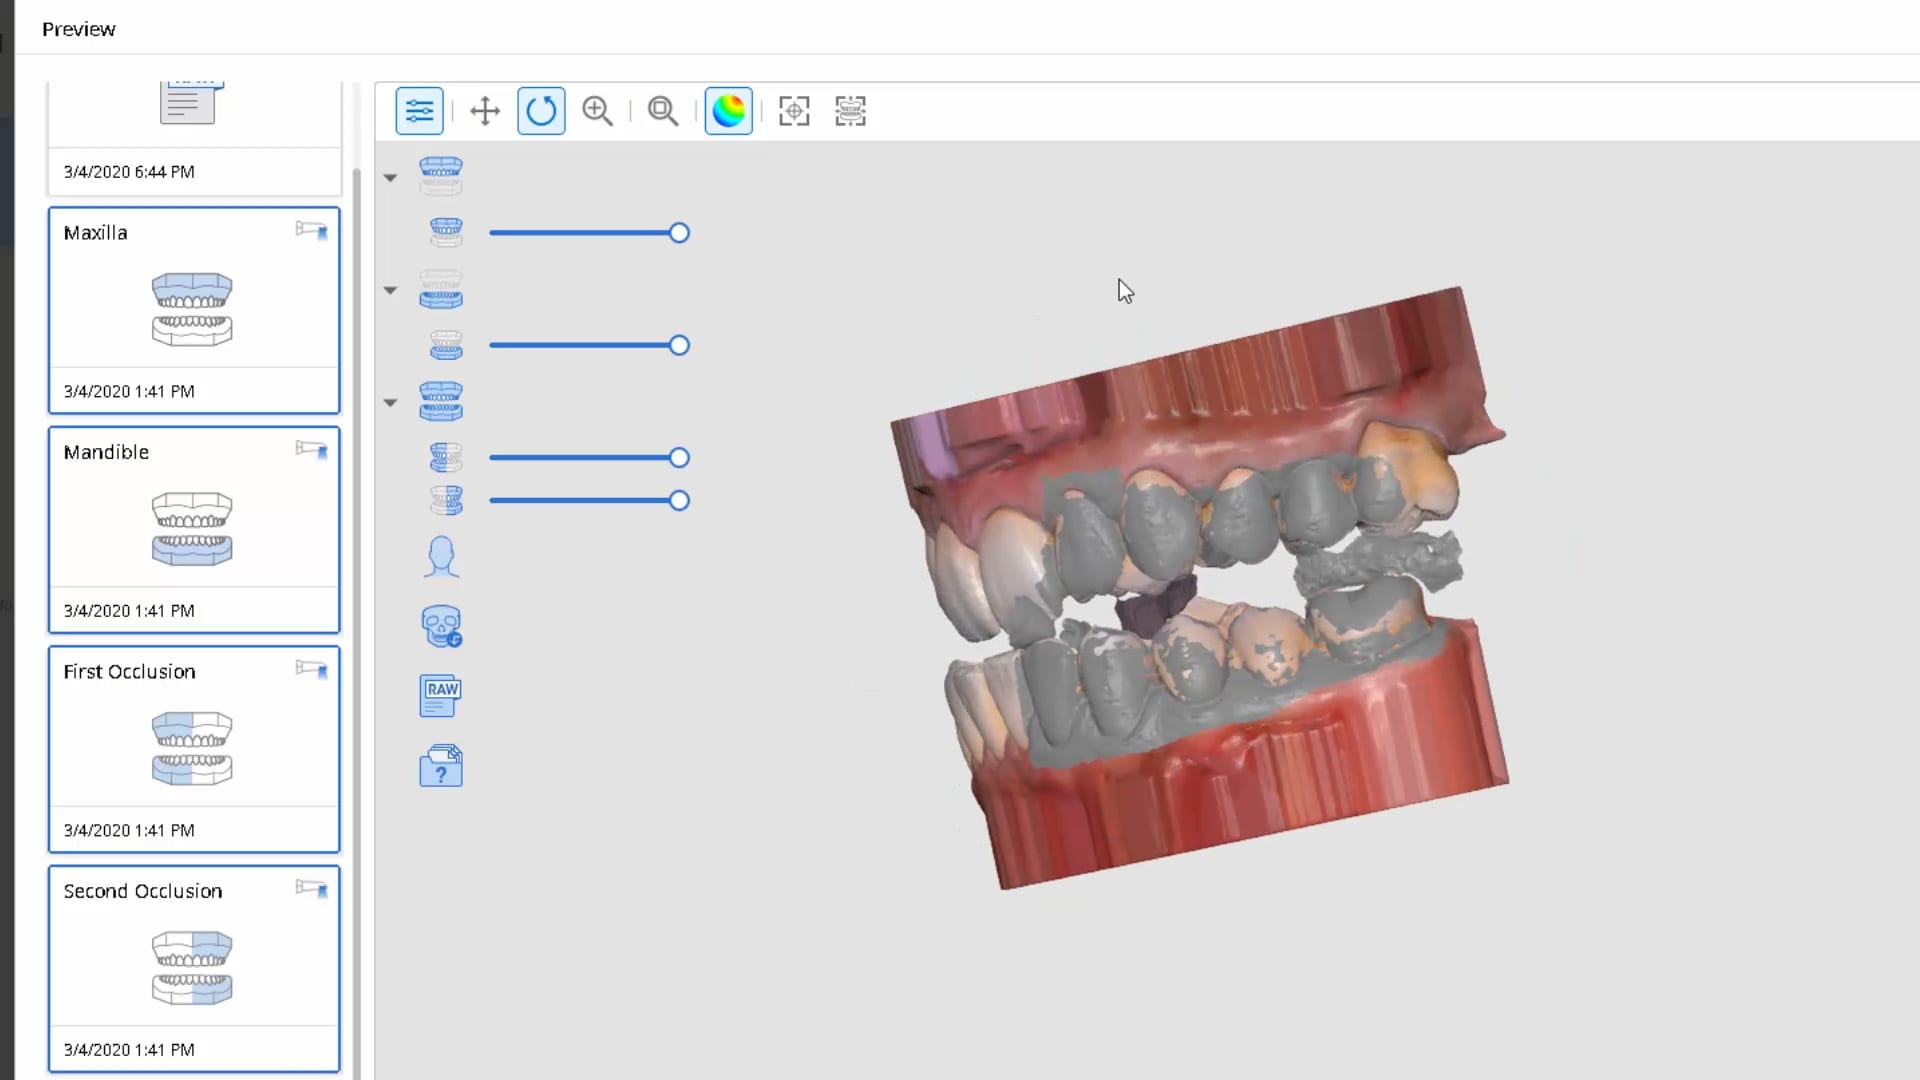
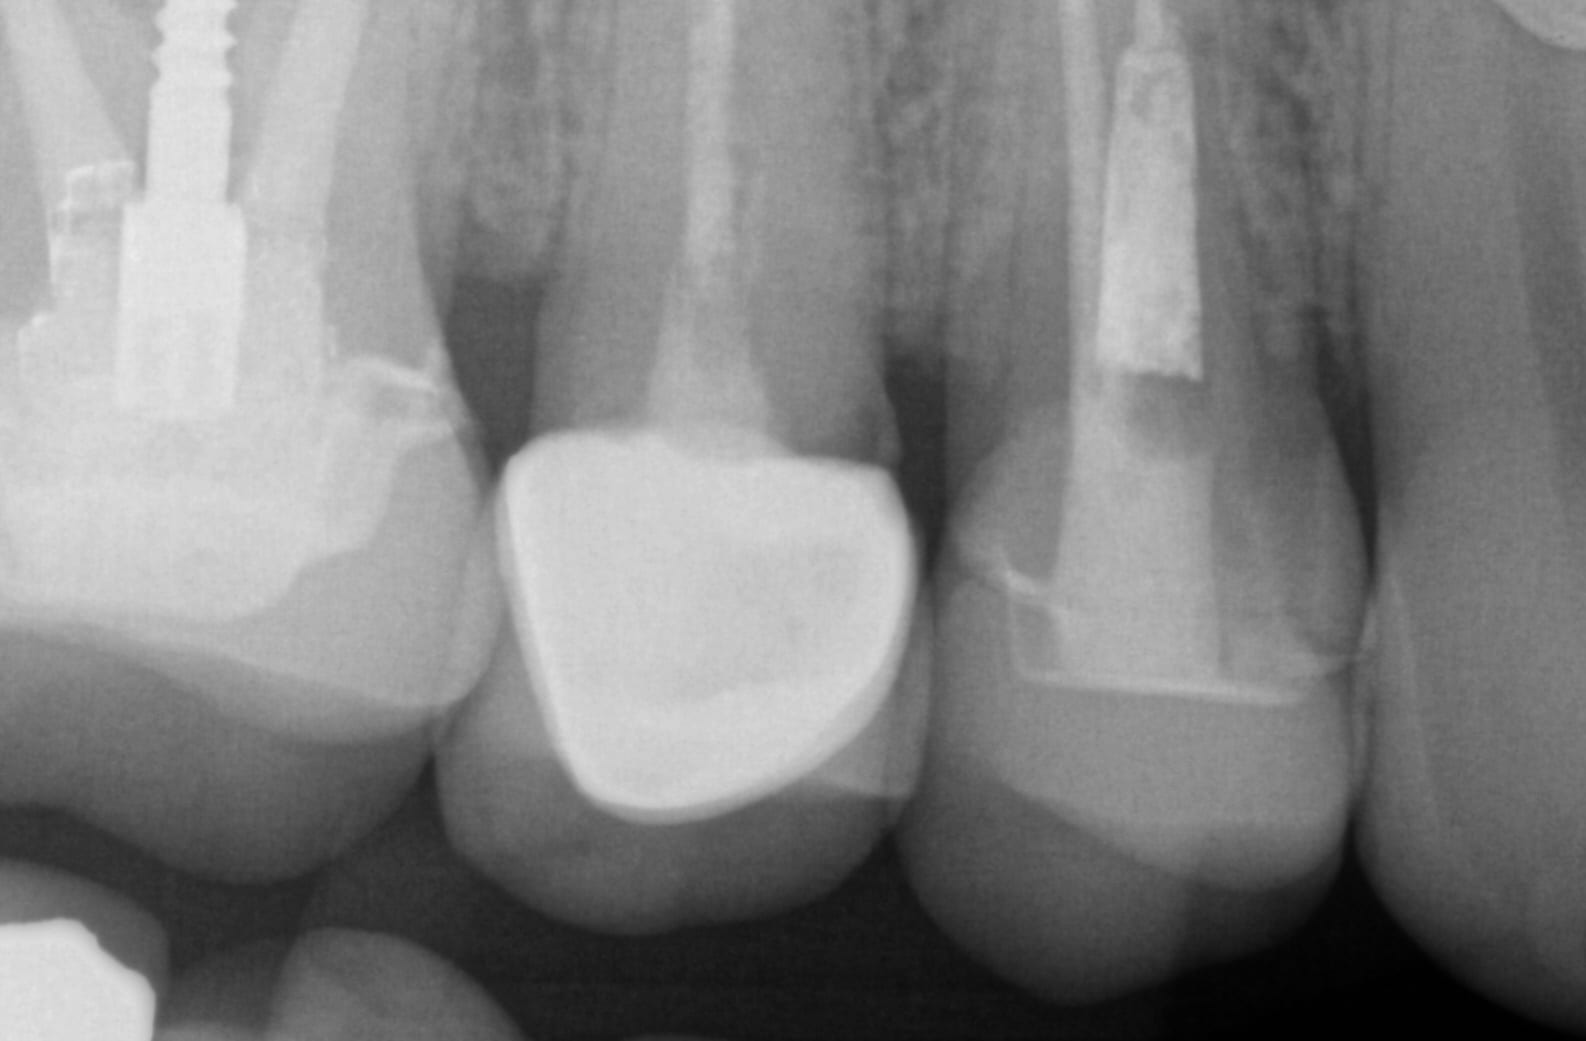
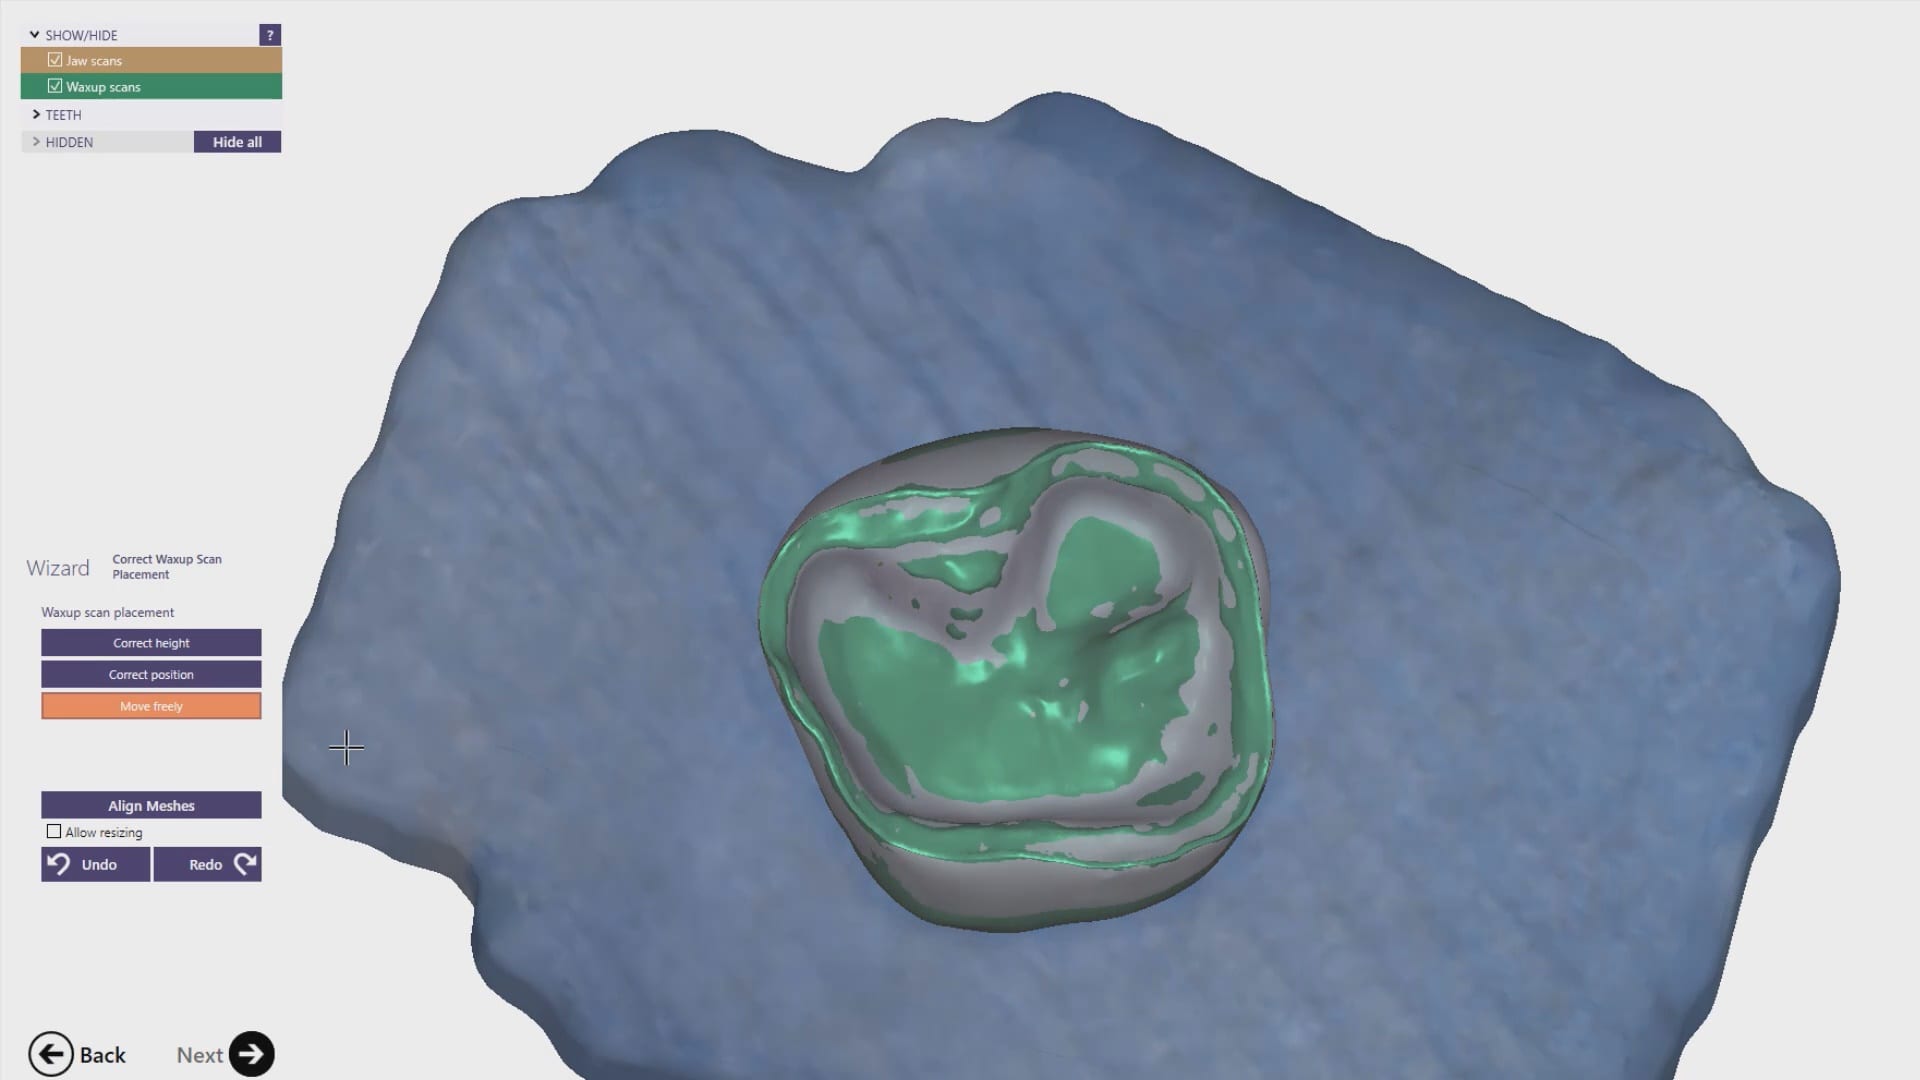
Have you ever compared the milled product with the designed restoration?
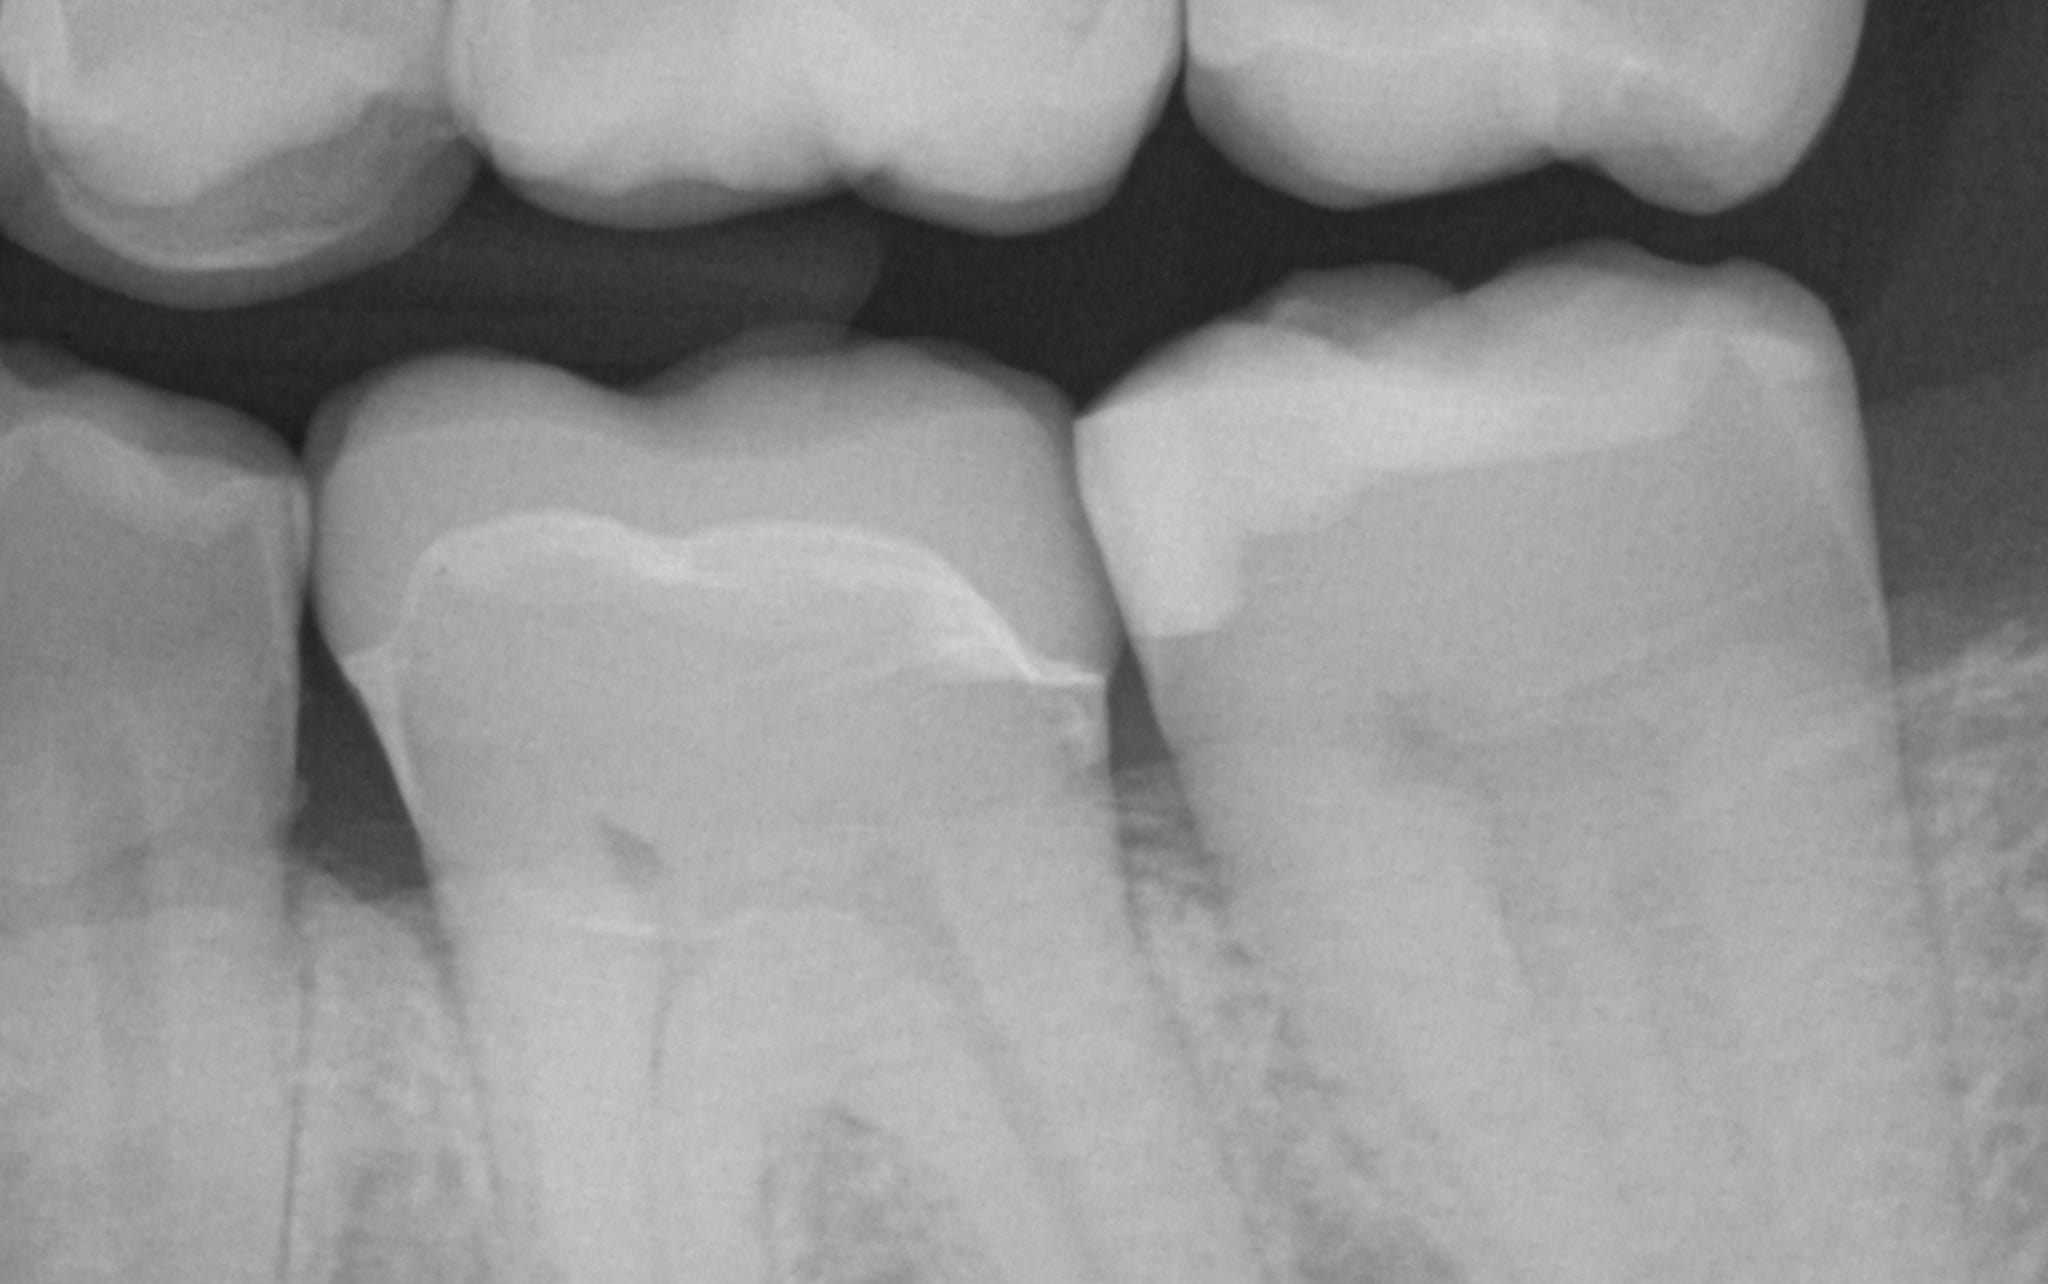
We scanned with the medit i500, designed with exocad and milled with coritec. after try-in, we scanned the restoration in the bluephase and then merged it with the design in exocad to see how well our material, or design, and our margins measured up against the proposal. we also documented the fit clinically and with radiographs. you can download the 3d models of the case and compared them yourself
In this video we show how to you can digitally pour up the intaglio of a denture scan with the medit software where you scan in the impression mode, “reverse normal”, process the case and the add a base to it. You can then immediately send it to a printer
Much like conventional impressions, digital impressions can render ill-fitting restorations. It is imperative to figure out the source of the problem and to understand if it is a scanning or...
Until recently, when you submitted a case to Panthera Dental for a Obstructive Sleep Apnea Device, they would manufacture it and send it to one of their partner labs. This...
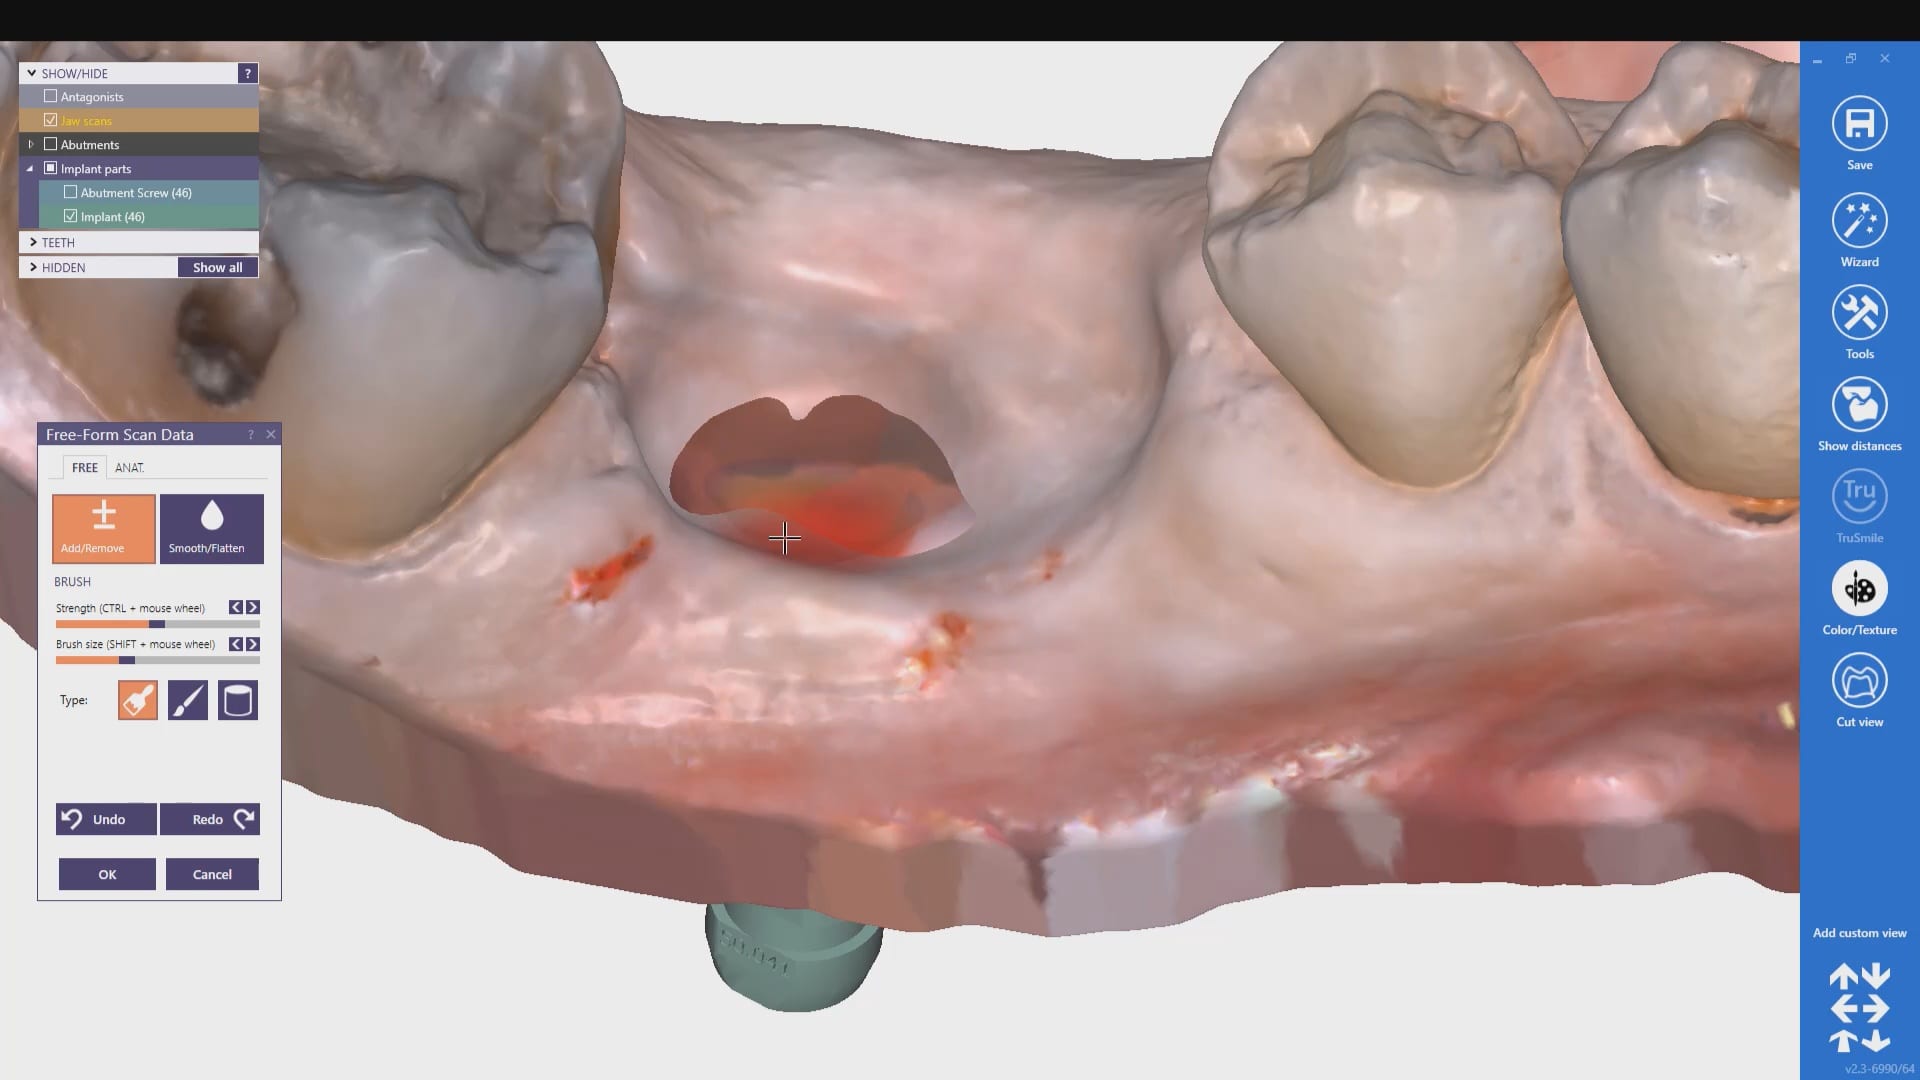
Medit’s software allows you to remove and pre-existing abutment and scan it outside the mouth. This allows you to find your margins without ever having to displace the tissue or...
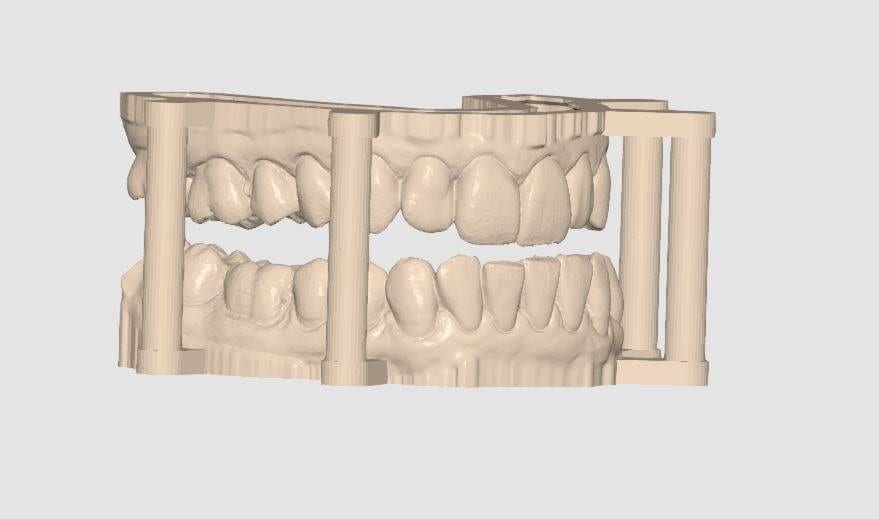
Here is a preview of the new Medit Model Builder with Ditched Dies where you can print the arches with support pins and separate dies Download the case and...


You must be logged in to post a comment.