Great scanner easy to use with the software. Definitely recommend the i700 scanner. Great customer service from Laura. - 12/09/2021
Chase Benson
New technology can be intimidating, but this i700 is user friendly and is everything you could ask for in regards to a great scanner. Cad-ray also made the transition easy and smooth. Customer support here is unreal. Telling all my dental buddies abo...read moreNew technology can be intimidating, but this i700 is user friendly and is everything you could ask for in regards to a great scanner. Cad-ray also made the transition easy and smooth. Customer support here is unreal. Telling all my dental buddies about these guys, and plan to make more purchases in the future.read less - 4/18/2022
Great ongoing support and customer assistance. Been working with Frank for years, even before cad ray. Always there for any help i ever need. Cad ray support is like no other. - 1/26/2023
John Pisacane
This is my second review. I posted the first after having Medit for about 9 months. Loved it then, had great success with using the scanner to take full arch scans for clear aligner therapy, study models, removable partials, and crown and bridge. ...read moreThis is my second review. I posted the first after having Medit for about 9 months. Loved it then, had great success with using the scanner to take full arch scans for clear aligner therapy, study models, removable partials, and crown and bridge. Have kept using it and am still very happy with the Medit and with Cad-Ray. The scanner takes care of so many things in a way that impresses patients and pleases lab techs. Whenever I hit a computer glitch, I call Armen, Frank or any other members of the gang and my problems are solved quickly and without drama.read less - 6/16/2020
I'm a repeat customer because Cad-Ray's customer service is fast, efficient, and no nonsense. The classes offered for training for particularly for the Medit is awesome and it comes included which is phenomenal. All the classes that I've gotten to at...read moreI'm a repeat customer because Cad-Ray's customer service is fast, efficient, and no nonsense. The classes offered for training for particularly for the Medit is awesome and it comes included which is phenomenal. All the classes that I've gotten to attend so far has been well organized and I left learning very practical things. Remote support team solves my problem right then and there. Recently I had an issue, and instead of me talking to a sales rep who doesn't know what to do, Kaila remoted in and got it fixed just like that. Thank you and great job guys!read less - 4/19/2022
David Blanco
Cad-Ray is great! Great customer service and they are consistent with their followthrough . Always helpful when you need questions answered and helping to lower the learning curve with newly purchased equipment. I’m very satisfied with my medit i-...read moreCad-Ray is great! Great customer service and they are consistent with their followthrough . Always helpful when you need questions answered and helping to lower the learning curve with newly purchased equipment. I’m very satisfied with my medit i-500 intraoral scanner. Armen and Frank are solid!read less - 6/16/2020
Eric Reum
I bought a i500 almost a year and a half ago. Sadly it ran into an issue with the cord after over a years use. Cad-ray was extremely quick to diagnose the issue and also send a replacement scanner. The quality and ease of scanning has been great! Als...read moreI bought a i500 almost a year and a half ago. Sadly it ran into an issue with the cord after over a years use. Cad-ray was extremely quick to diagnose the issue and also send a replacement scanner. The quality and ease of scanning has been great! Also very happy with the customer service.read less - 6/02/2022
AMISH DESAI
Awesome! Great support. If you are planning on getting a scanner, make sure you have Cad-Ray on your side ! - 4/20/2022
Jared Gustafson
One of the best companies to work with for dental tech needs. They have a vast video training library that makes the transition easy to digital dentistry. I’ve recommended a few of my colleagues purchase the medit through them. It’s been a great year...read moreOne of the best companies to work with for dental tech needs. They have a vast video training library that makes the transition easy to digital dentistry. I’ve recommended a few of my colleagues purchase the medit through them. It’s been a great year!read less - 6/16/2020
Suzanne Stock
Excellent experience, customer service has been stupendous! - 11/20/2023
Esther Quintana
Se ve muy bien, aunque yo le tengo, pánico, a los Dentistas, Sorry, pero tengo que ir, Ni modo - 2/25/2015
Dr. Steven E. Hollister
Had a training session for use of my Medit scanner this afternoon, and Heather G. was simply the best.....knowledgeable, patient and a great trainer. She had a wealth of knowledge regarding my scanner and she was so very patient with my computer glit...read moreHad a training session for use of my Medit scanner this afternoon, and Heather G. was simply the best.....knowledgeable, patient and a great trainer. She had a wealth of knowledge regarding my scanner and she was so very patient with my computer glitches! CAD-Ray is number one in my book! Thanks Heather, your time was much appreciated! Dr. Steve Hollisterread less - 5/14/2025
Stuart Adam
Amazing team!
Andy was amazing with explaining everything needed to be successful with the medit i700 and encouraged me to give CADRAY a call if I have any questions in the future. I have some colleagues that have regarded CADRAY as the gold stand...read moreAmazing team!
Andy was amazing with explaining everything needed to be successful with the medit i700 and encouraged me to give CADRAY a call if I have any questions in the future. I have some colleagues that have regarded CADRAY as the gold standard for service and I can now say that I completely agree. Thank you!read less - 12/27/2021
Just got my Medit IOS delivered last week and the service from Jon was great! I had a ton of questions before placing the order and he happily answered. This is the type of customer support many dental suppliers are missing. Great company to work wit...read moreJust got my Medit IOS delivered last week and the service from Jon was great! I had a ton of questions before placing the order and he happily answered. This is the type of customer support many dental suppliers are missing. Great company to work with.read less - 6/19/2020
Reid Stone
I cannot say enough good things about Cad-Ray and the people involved with this organization. I have purchased equipment over the past few years from them and always been amazed at the non-pushy before the sale help and the after the sale support. ...read moreI cannot say enough good things about Cad-Ray and the people involved with this organization. I have purchased equipment over the past few years from them and always been amazed at the non-pushy before the sale help and the after the sale support. I have been deciding for the last 2 years to make a big purchase of a mill and sintering furnace and Jon has never made me feel like I was bothering him and never pushed me just to try to get a sale. It really is different from other sales experiences I've had with other companies/sales people.Jesse came out and installed and provided training for our new mill and sintering furnace. He went above and beyond what I was expecting to make sure myself and my team knew how everything works during the training. He has also been great with questions we have had since the installation. I just cannot say enough good things about my experience all around and will definitely be a Cad-Ray customer for many years to come. Thank you Cad-Ray!read less - 6/15/2022
Dath Collins D.D.S.
We have worked with Cad-ray for over three years. There tech support should be modeled as the gold standard for tech support. Let me tell you why. When you call in someone answers the phone and even better than that they solve the problem. Lauren...read moreWe have worked with Cad-ray for over three years. There tech support should be modeled as the gold standard for tech support. Let me tell you why. When you call in someone answers the phone and even better than that they solve the problem. Lauren solved my tech problem in less than 5 minutes! Thank you Cad-ray!!read less - 1/24/2023
H C
I got my 3Dshape scanner, great support , my training with Destany was excellent. Great team!! - 2/15/2024
Dino Mantis
I purchased the Medit700 a couple of months ago. I have the Cerec Primescan and what a difference!!! The Medit is easy to use and efficient!!! They have a great support system> Laura Geney is amazing. She is almost like being on call anytime I have a...read moreI purchased the Medit700 a couple of months ago. I have the Cerec Primescan and what a difference!!! The Medit is easy to use and efficient!!! They have a great support system> Laura Geney is amazing. She is almost like being on call anytime I have a question. If she is not available (which was only once) the person that helped me logged in and took care of my problem!! I highly recommend this scanner!!!read less - 12/30/2021
Mayoor Patel
Kaila is awesome with training and her customer service skills. Enjoy learning from her... Product (scanner) so far loving it. - 12/02/2021
Mostafa Koperly
I love my medit scanner. I purchase many dental equipments each year and by far it’s the best thing I got for the bucks I spent ( beating my 6 digits equipments ).
We have omnicam and I hated it, multiple crushes, expensive monthly service fee, hor...read moreI love my medit scanner. I purchase many dental equipments each year and by far it’s the best thing I got for the bucks I spent ( beating my 6 digits equipments ).
We have omnicam and I hated it, multiple crushes, expensive monthly service fee, horrible support, etc. I was so frustrated and had to look for an alternative. Many mentioned itero to me and I was about to purchase it and suck another monthly fee until I came by Armen’s video about medit on one of the Facebook group in 2018. I was surprised with the image and the speed and started digging more and contacted Frank to explain the scanner more. Ended purchasing it late 2018 and I’m a happy user Since after. The support is excellent, Frank is there when you need any help plus the Facebook community is there to answer anything. Recently, I attended Armen’s course to learn how to mill from the medit and I got shocked by the AI and the options that the software has. This machine is a beast and you won’t regret it getting it from Armen and Frank. They go beyond and not like other salesman or equipments where you are left behind after they sale you and finish their training. We are in 2020 and I still get the same support as I bought it in 2018.read less - 1/09/2020
Cadray has great support and service! They are very responsive to questions. Love the new medit scanner! - 5/06/2021
Anita Madhav
Absolutely love Laura. She was my initial contact and is an amazing resource for any questions even months later. Would highly recommend buying from Cad Ray especially Laura! - 6/28/2022
David Christensen
I purchased the Medit i500 from Cad-Ray December 2018. I couldn’t be happier with the scanner. The improvements Medit has made over the last 10 months are nothing short of astounding! I can’t imaging what they’ll come up with next.
As for Cad-Ray...read moreI purchased the Medit i500 from Cad-Ray December 2018. I couldn’t be happier with the scanner. The improvements Medit has made over the last 10 months are nothing short of astounding! I can’t imaging what they’ll come up with next.
As for Cad-Ray, their support has been second to none. Never have I experienced the kind of attention and help from any other company. Wether it’s with help installing, computer hardware issues or technical help they respond IMMEDIATELY!
Armen is also a huge reason why I chose Cad-Ray. No one selling a product has helped me more evolve my scanning technique. He’s quick to respond to questions and issues I feel his service is a huge reason why to buy from CAD-RAY.read less - 10/09/2019
The customer service has been top notch, every single time. I have only good things to say about them. - 4/05/2022
Frank Gibbons
I just bought my first Intra-oral scanner (Medit I-700). I have demoed scanners from various companies in the past but have been less then thrilled with the applications, scanner ability, ease of use and overall user experience. I feel that now the...read moreI just bought my first Intra-oral scanner (Medit I-700). I have demoed scanners from various companies in the past but have been less then thrilled with the applications, scanner ability, ease of use and overall user experience. I feel that now the technology has caught up to where it should be and after reviewing many scanners on the market have decided to go with Medit. The Medit i-700 gives me all the functionality I could want, has an affordable price and works for all the procedures I need it for (scanning for ortho, dentures, partials, crowns, bridges, implants ect.). I love that they continually update their software and most importantly that those upgrades are free to the end users. Another huge plus is that when I have a question I get actually get someone on the phone!! For all these reasons I finally jumped in. I would recommend anyone else to do so as well!read less - 5/06/2021
Matt v
Matt Newman was excellent solving a cable problem.! Quick response and good follow up! - 9/11/2024
Donghyun Noh
Just purchased i700 and had training with Andy.
Andy was very patient and informative . He went through everything and made sure I was comfortable with my equipment before leaving. I am really excited about this new technology. - 1/05/2023
Today I had to order new tips and Laura was EXTREMELY helpful, Cad-Ray has all the products you need for digital dentistry and they do Education, if you buy Medit scanner from them they include 12 CE training course. Cant just buy a Lamborghini you h...read moreToday I had to order new tips and Laura was EXTREMELY helpful, Cad-Ray has all the products you need for digital dentistry and they do Education, if you buy Medit scanner from them they include 12 CE training course. Cant just buy a Lamborghini you have to learn how to drive it!read less - 7/02/2020
Oleg Eisenstein
Great products and services. Highly recommended - 6/16/2020
After using the medit i500 scanner at an office as an employee, I purchased it from Cad-ray,com specifically because of their good reviews and their large, concise training library of videos. I've used CEREC as an instructor at a dental school and bo...read moreAfter using the medit i500 scanner at an office as an employee, I purchased it from Cad-ray,com specifically because of their good reviews and their large, concise training library of videos. I've used CEREC as an instructor at a dental school and bought a used Planscan, Planmill for my private office. Both were hard to learn and the fees and cost associated with training were a bitter pill to swallow after the costs to purchase. The ease of seating restoration was instant. The scanning learning curve is quick. I have easily added occlusal guard scanning, and implant scanning and will be trying a digital denture soon.
The purchase was easy, the product came quickly and the set-up videos guided me through very necessary adjustments to my Laptop I never knew I needed. Learning the new features with each FREE update is a treat. The DIY option was an extra bonus as the $2000 rebate came without having to ask for it. Cad-ray has delivered more than I expected with the purchase of the fantastic Mediti500 scanner.
I've included my cart set up. purchased from Amazon for $68. Its stable, has room for the necessities. I've taken it home and back to the office half a dozen times and it transports the scanner safely. It also keeps the cords from being run over. I haven't taken the included 2 day course but look forward too it after Social Distancing mandates are lifted.read less - 4/25/2020
Purchasing my medit i700 from Cad-Ray was a great decision. I did my first training with Kaila and she was fantastic! Super knowledgeable, patient and truly helpful in making sure I was ready to hit the ground running with patient care. I put a call ...read morePurchasing my medit i700 from Cad-Ray was a great decision. I did my first training with Kaila and she was fantastic! Super knowledgeable, patient and truly helpful in making sure I was ready to hit the ground running with patient care. I put a call into cad-ray support in the middle of a case and sure enough Kaila was also the one to answer and handle the situation. She jumped right on my computer and had things fixed in a matter of a few minutes. Awesome support, great staff and overall super positive experience with Cad-ray thus far!read less - 5/06/2022
Victoria Rinando
Danielle was super helpful and kind trouble shooting to get us back up and going very quickly this morning. We appreciate it! - 4/15/2025
Michael Martinsen
Honestly the best service that I've received in dental tech support. I had originally purchased a scanner with another supplier and was underwhelmed with the support I received. I switched over to CAD-Ray for my second scanner and have never been let...read moreHonestly the best service that I've received in dental tech support. I had originally purchased a scanner with another supplier and was underwhelmed with the support I received. I switched over to CAD-Ray for my second scanner and have never been let down. They are prompt and exceptionally knowledgeable about the products they support. Thank you CAD-Ray for keeping my practice moving smoothly!read less - 8/27/2021
Aaron Olson
This product is the best out there. Do the math and your ROI makes more sense than most products we purchase as dentists. Get on the digital train or you’ll be left behind. This is the best product to make the jump with. - 6/16/2020
Our office has been using the Medit scanner for a few months now and are loving it! CAD-Ray was super easy to work with in purchasing the scanner and providing support as needed. Their Facebook forum with the updates and video tutorials are incredibl...read moreOur office has been using the Medit scanner for a few months now and are loving it! CAD-Ray was super easy to work with in purchasing the scanner and providing support as needed. Their Facebook forum with the updates and video tutorials are incredibly helpful.read less - 6/16/2020
Mary Oliverie
Last year when I started looking into the Medit i500 I had my front desk call 3 sellers to get preliminary information. She told me hands down call CAD-RAY and don’t bother with the others. Boy was she right! Frank got us going with all our hardware ...read moreLast year when I started looking into the Medit i500 I had my front desk call 3 sellers to get preliminary information. She told me hands down call CAD-RAY and don’t bother with the others. Boy was she right! Frank got us going with all our hardware needs and trained us until all our questions were answered. Then Jonathon and Armen jumped in at our 2 day live training in Baltimore. I still review my notes to implement all the great ideas. When I get myself in a jam time to time CAD-RAY responds immediately and fixes my problem. Best decision I have made in the practice in a long time - Thank you everyone at CAD-RAY!read less - 10/09/2019
STOP SEARCHING NOW!
Best bang for your buck scanner on the market. we have been using out medit for 8 months now. love our crowns, margins are fantastic. almost no adjustments needed at all. maybe one in ten crowns might have to adjust mesial or...read moreSTOP SEARCHING NOW!
Best bang for your buck scanner on the market. we have been using out medit for 8 months now. love our crowns, margins are fantastic. almost no adjustments needed at all. maybe one in ten crowns might have to adjust mesial or distal to get crown to drop in. occlusion is always spot on. patients love the technology and WOW factor -"SOOO COOOLLL." customer service is great also! dont waste your money on anythign else. our lab even comments on how easy it is to deal with medit and how good the scans are. they recommend it to their other doctors now as well.read less - 10/09/2019
I just bought the new Medit i700. I placed the order on Friday, it shipped on Monday, and it arrived on Tuesday. So far it has been a great experience. They also provide a lot of quality videos for learning to use the scanner. - 5/05/2021
Mike Capio
Nothing but good things to say about CAD-Ray. All of the education, recommendations, and products they provide are truly the best in digital dentistry at the time. - 6/20/2020
Micah Bickel
Great products, training and support - 11/01/2021
Gary Benson
Our orthodontic office is new to scanning and printing, but CAD-Ray, Laura, Medit, and SprintRay have made the whole transition a huge win. Our first scan and print was cleaner than any traditional impression/pour up we've ever produced. On our first...read moreOur orthodontic office is new to scanning and printing, but CAD-Ray, Laura, Medit, and SprintRay have made the whole transition a huge win. Our first scan and print was cleaner than any traditional impression/pour up we've ever produced. On our first full clinic day, we scanned 14 arches and managed to stay on schedule! We were waiting for this technology to be affordable, fast, accurate, and reliable, and we can now say we are there. Thanks for all your help and ongoing support.read less - 6/25/2021
I purchased a SprintRay through them. I'm new to the 3D printer realm and they've been great with answering my questions and getting me set up. I've just really have been impressed with the quick responses, its much appreciated, thank you! - 4/20/2022
Laura
Very helpful and attentive when setting up my new Medit scanner. Seamless process from start to finish - 10/28/2024
Mark Sperling
Got a great deal in the medit i700 and the training was top notch. I had about 3 one hour sessions with Ryan at cadray and he was clear, concise and knowledgeable in both the software and hardware components of the computer/scanner and the detailed a...read moreGot a great deal in the medit i700 and the training was top notch. I had about 3 one hour sessions with Ryan at cadray and he was clear, concise and knowledgeable in both the software and hardware components of the computer/scanner and the detailed aspects of the dentistry itself. Got a direct line going forward and would recommend cad ray to anyoneread less - 8/17/2022
ryan ku
I've been using this for almost 2 months now and I just love it. At this price point, ROI is a no-brainer. The convenience factor is amazing. I only did the DIY online training and I'm pretty confident doing the scan. I've signed up for the actual ...read moreI've been using this for almost 2 months now and I just love it. At this price point, ROI is a no-brainer. The convenience factor is amazing. I only did the DIY online training and I'm pretty confident doing the scan. I've signed up for the actual course so looking forward to seeing it's greater potentials.read less - 10/14/2019
We started our journey with CAD-Ray 3 years ago them helping us find a digital scanner that fits our practice needs and have relied on them for our 3D printing needs. They are an excellent company and I highly recommend them for their knowledge and s...read moreWe started our journey with CAD-Ray 3 years ago them helping us find a digital scanner that fits our practice needs and have relied on them for our 3D printing needs. They are an excellent company and I highly recommend them for their knowledge and service they provide. I would buy and dental tech needs from them!read less - 9/07/2022
Mitchell Rubinstein
I purchased my medit i500 scanner about a year ago from CAD Ray, and I have been extremely happy with both the scanner and the service / support.
Armen and Frank consider your purchase to be the beginning of your relationship with them, not...read moreI purchased my medit i500 scanner about a year ago from CAD Ray, and I have been extremely happy with both the scanner and the service / support.
Armen and Frank consider your purchase to be the beginning of your relationship with them, not the end. They do their best to make sure you learn everything you need to know in order to get the best possible results .
They answer calls and messages promptly, and it never takes me very long to get my questions answered.
I am VERY glad I bought from them, and not from one of the "big box" Dental Mega retailers.read less - 10/09/2019
I cannot say enough about the support I have received from the beginning. I chose CadRay ultimately because of the support reviews...I can attest first hand...they are all right on...though I have been practicing for more than 35 years, this old dog ...read moreI cannot say enough about the support I have received from the beginning. I chose CadRay ultimately because of the support reviews...I can attest first hand...they are all right on...though I have been practicing for more than 35 years, this old dog has been taught a lot of new tricks from the support staff at Cad Ray...Truly impressed with every interaction so far! Thanks 10/4/2023 And they did it again today with ten minutes before the pt came in 3Shpe server would not connect with the computer and Andy got to 3Shape directly and had us up and running...thankfully I didn't have to call anyone but CadRay...thanks again....read less - 10/05/2023
STAR DENTAL CLINIC
This has changed my way of doing things forever. I can’t live without my Medit scanner. I promote it to all my friends like crazy. Support with Cad ray is awesome. They return calls within seconds. The price for scanner is ridiculously good and the ...read moreThis has changed my way of doing things forever. I can’t live without my Medit scanner. I promote it to all my friends like crazy. Support with Cad ray is awesome. They return calls within seconds. The price for scanner is ridiculously good and the quality of images is amazing. Their website has soo many educational videos. It doesn’t end. I love the ability to mobilize it from one off to another until I buy a second one. I’m can’t wait u til I have the time to learn all the other cool technology cad ray has. It’s amazing.read less - 7/24/2020
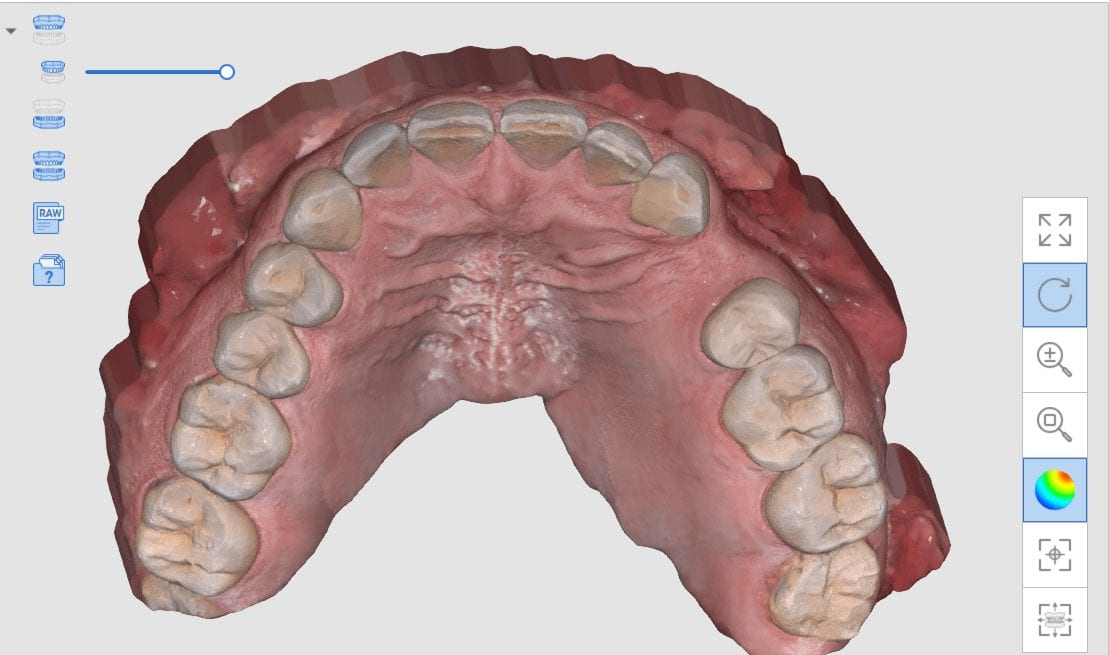
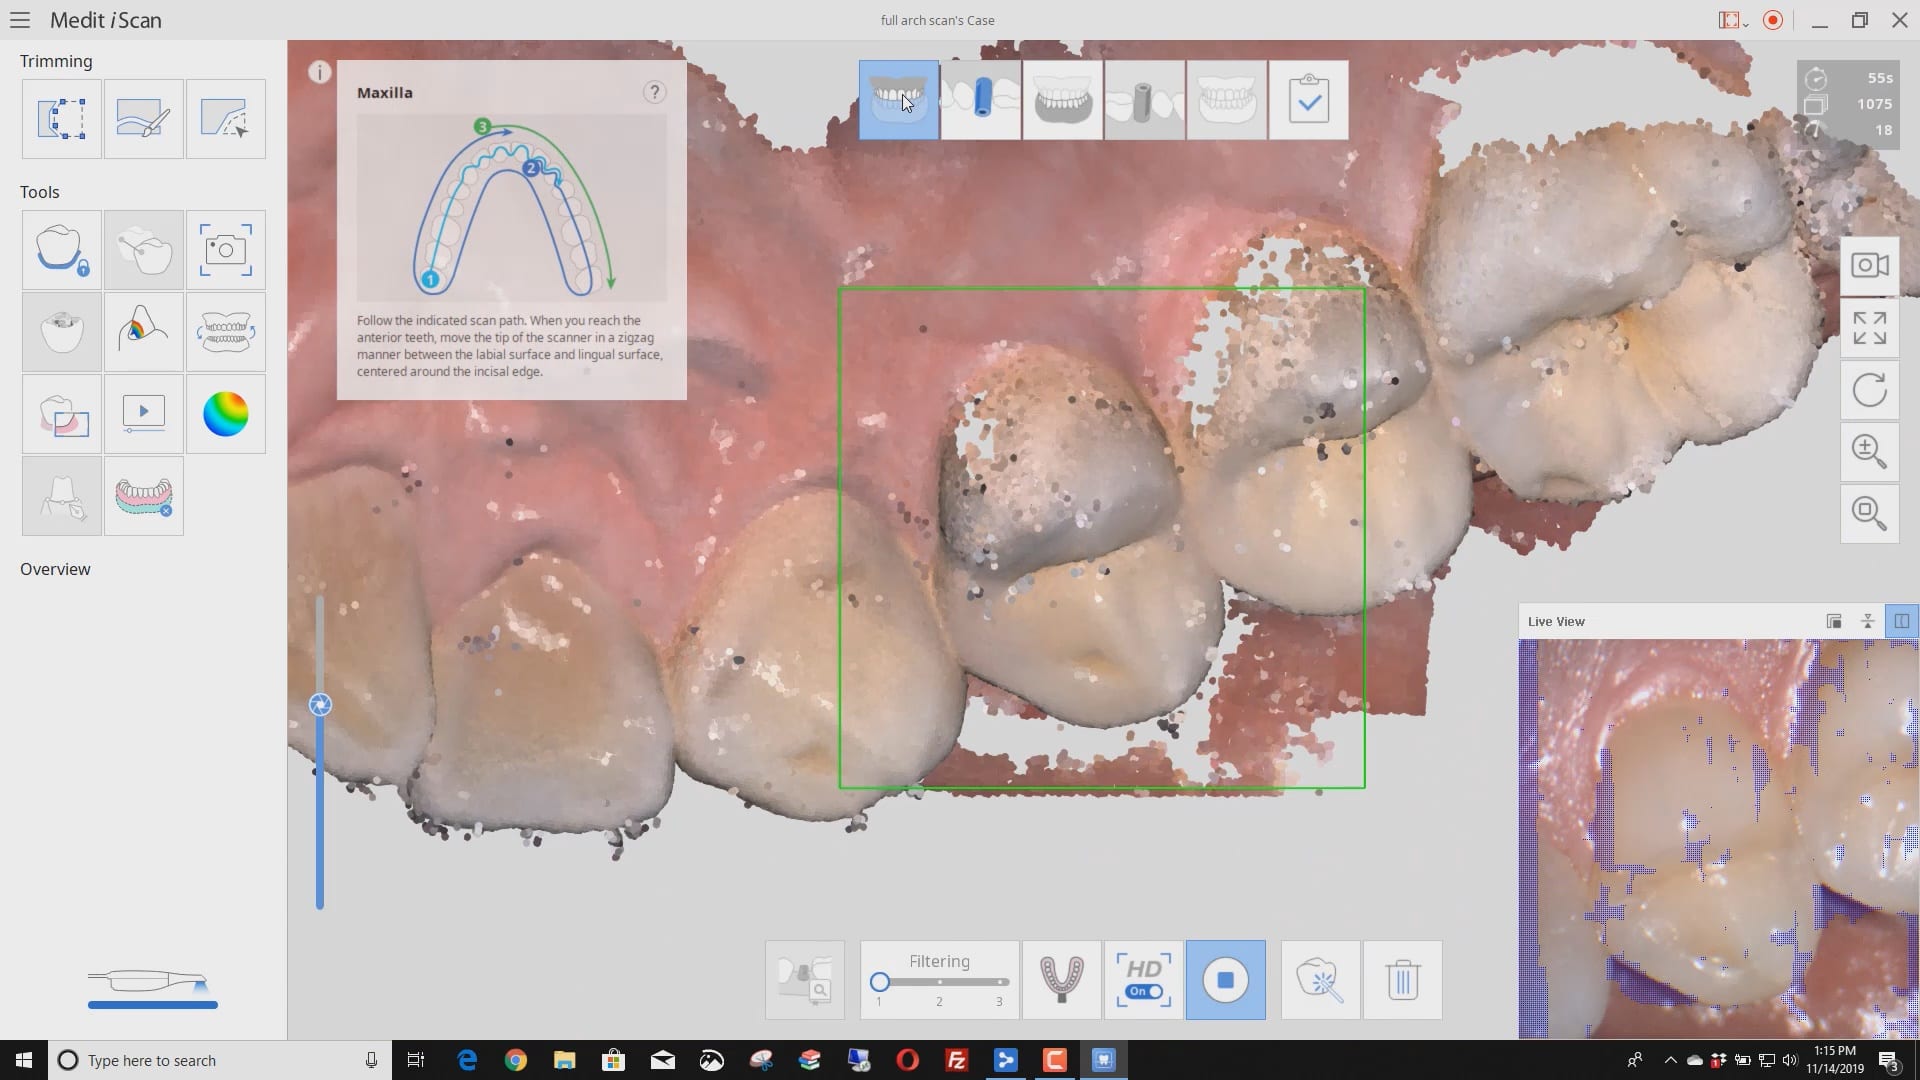
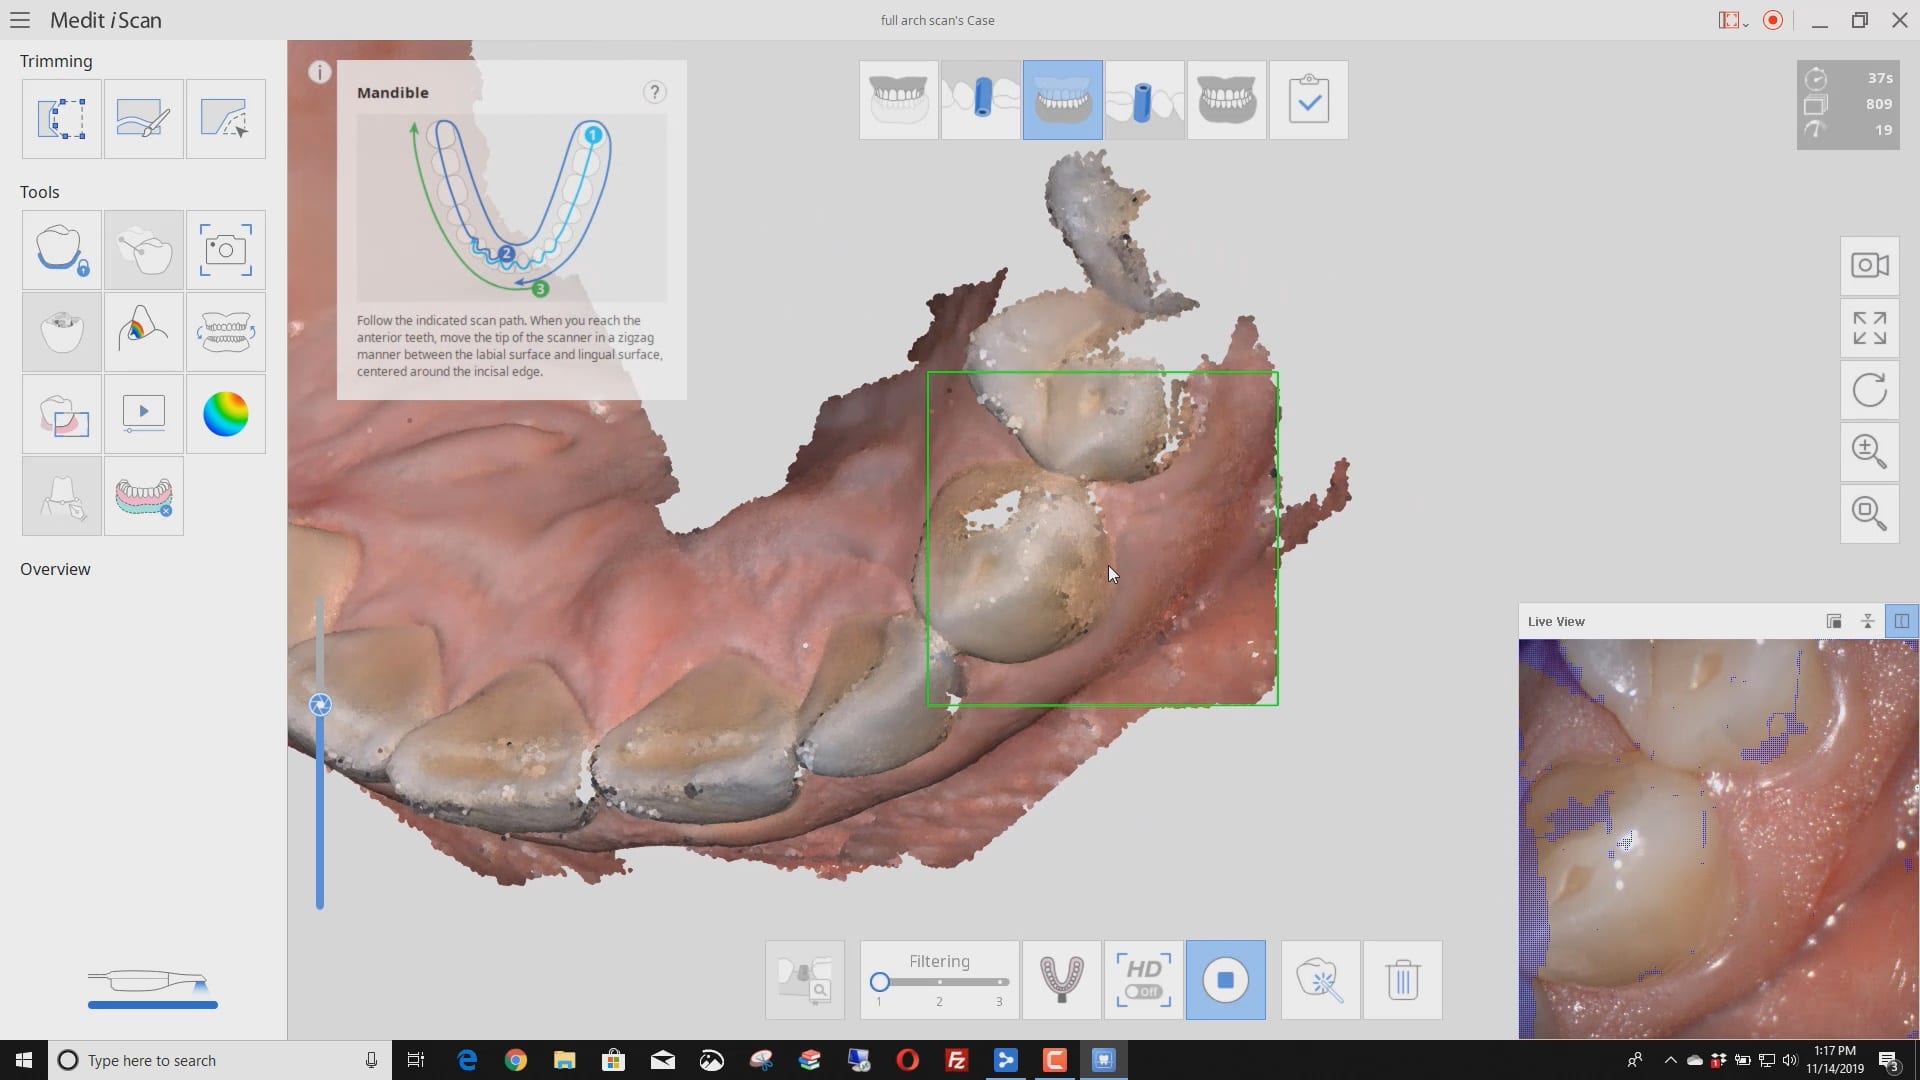
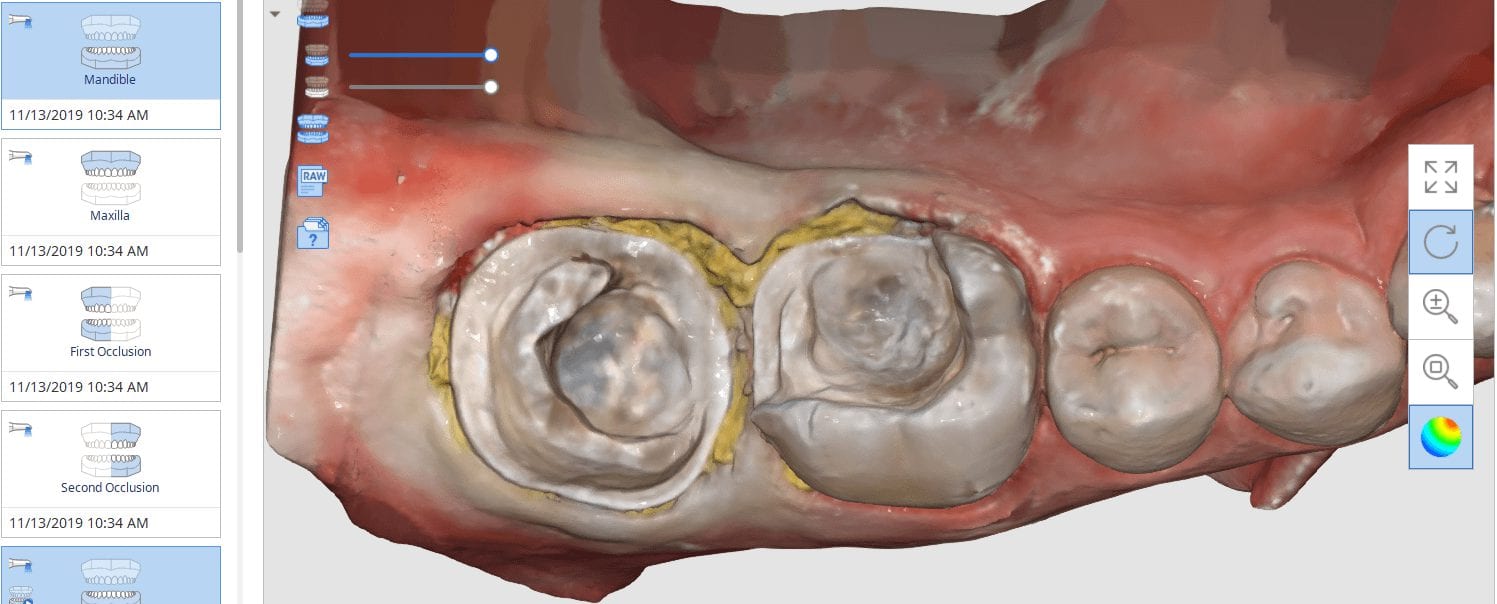
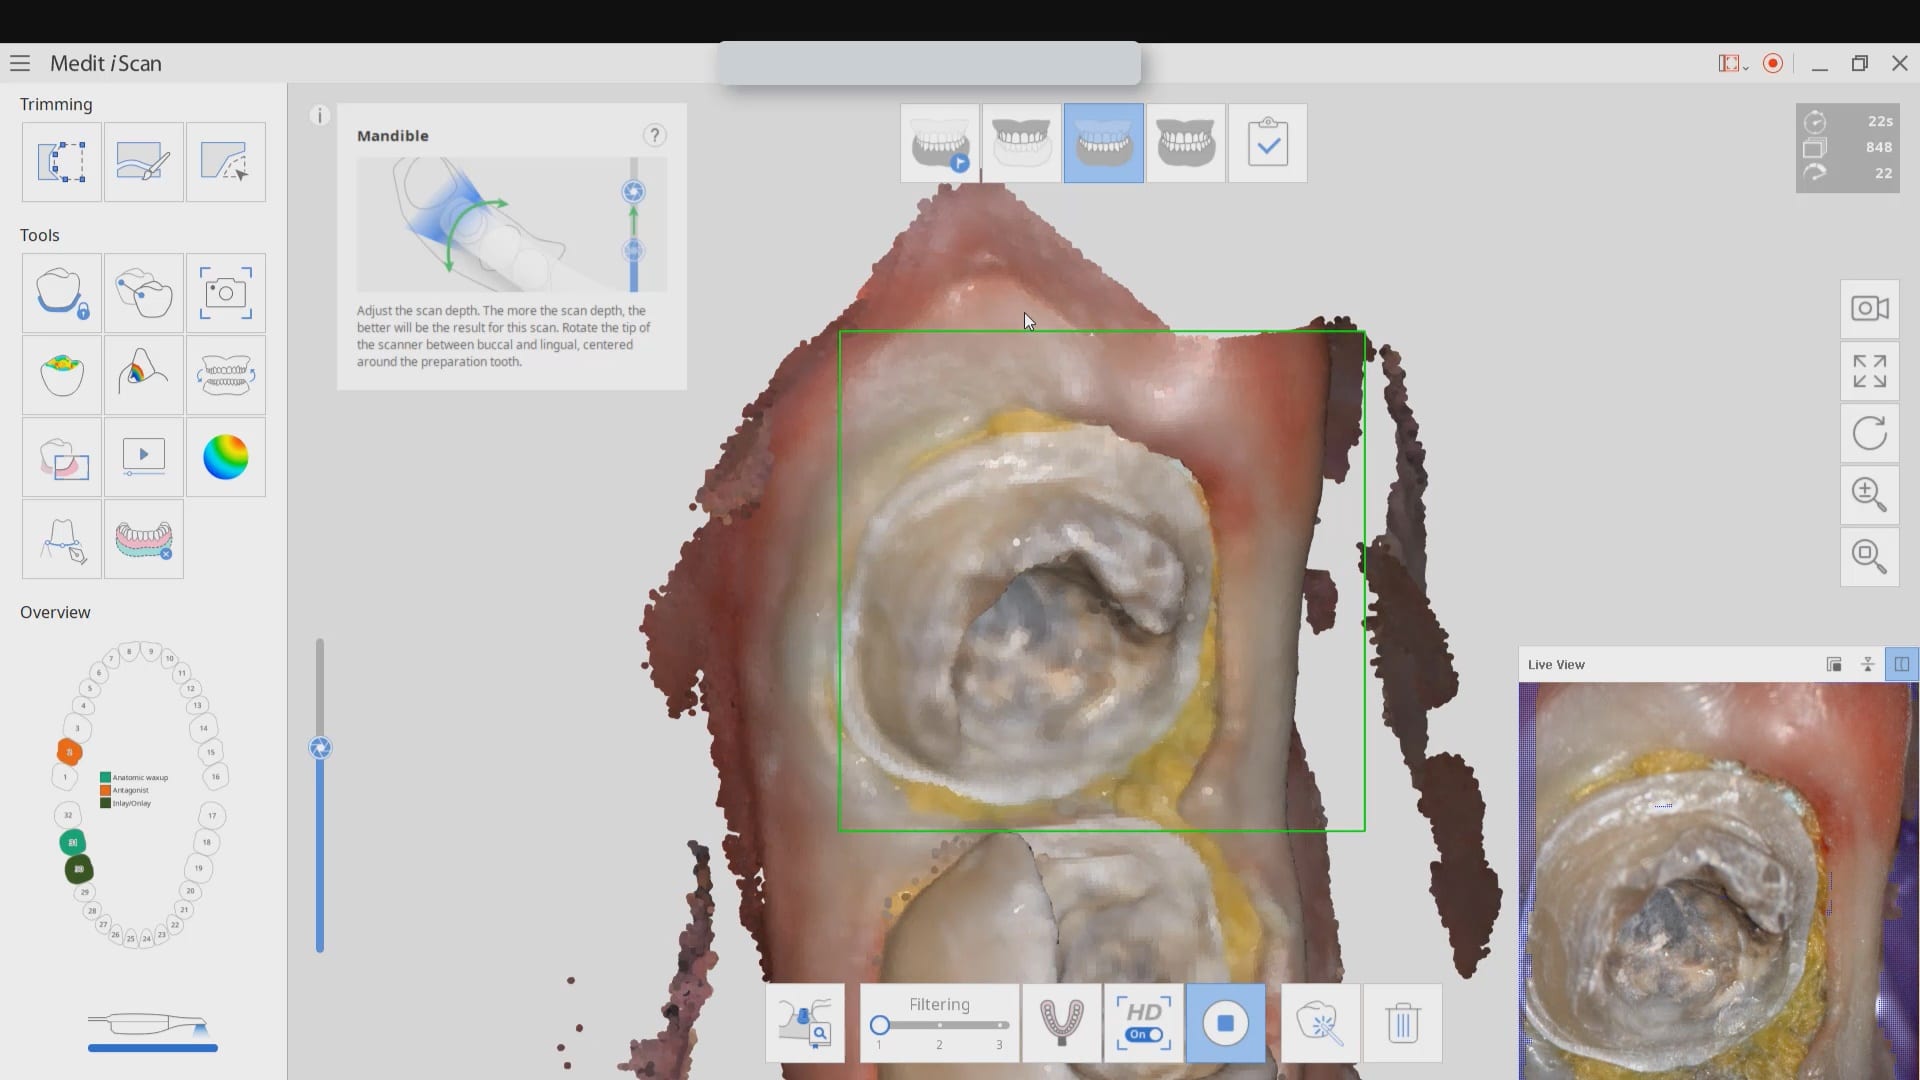
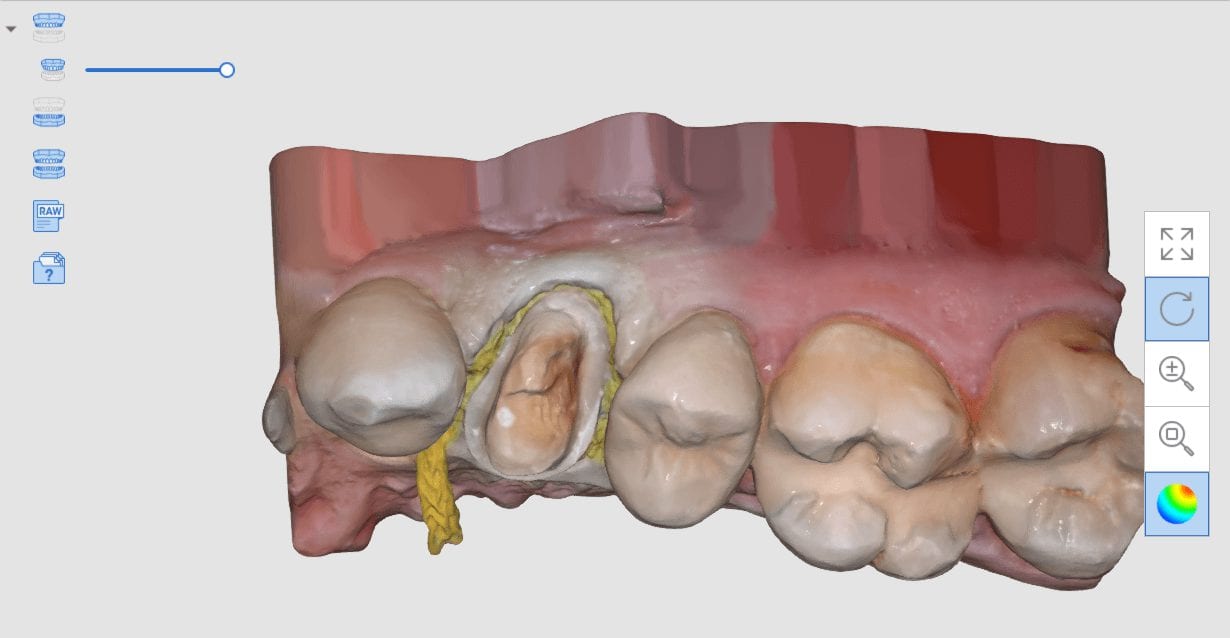
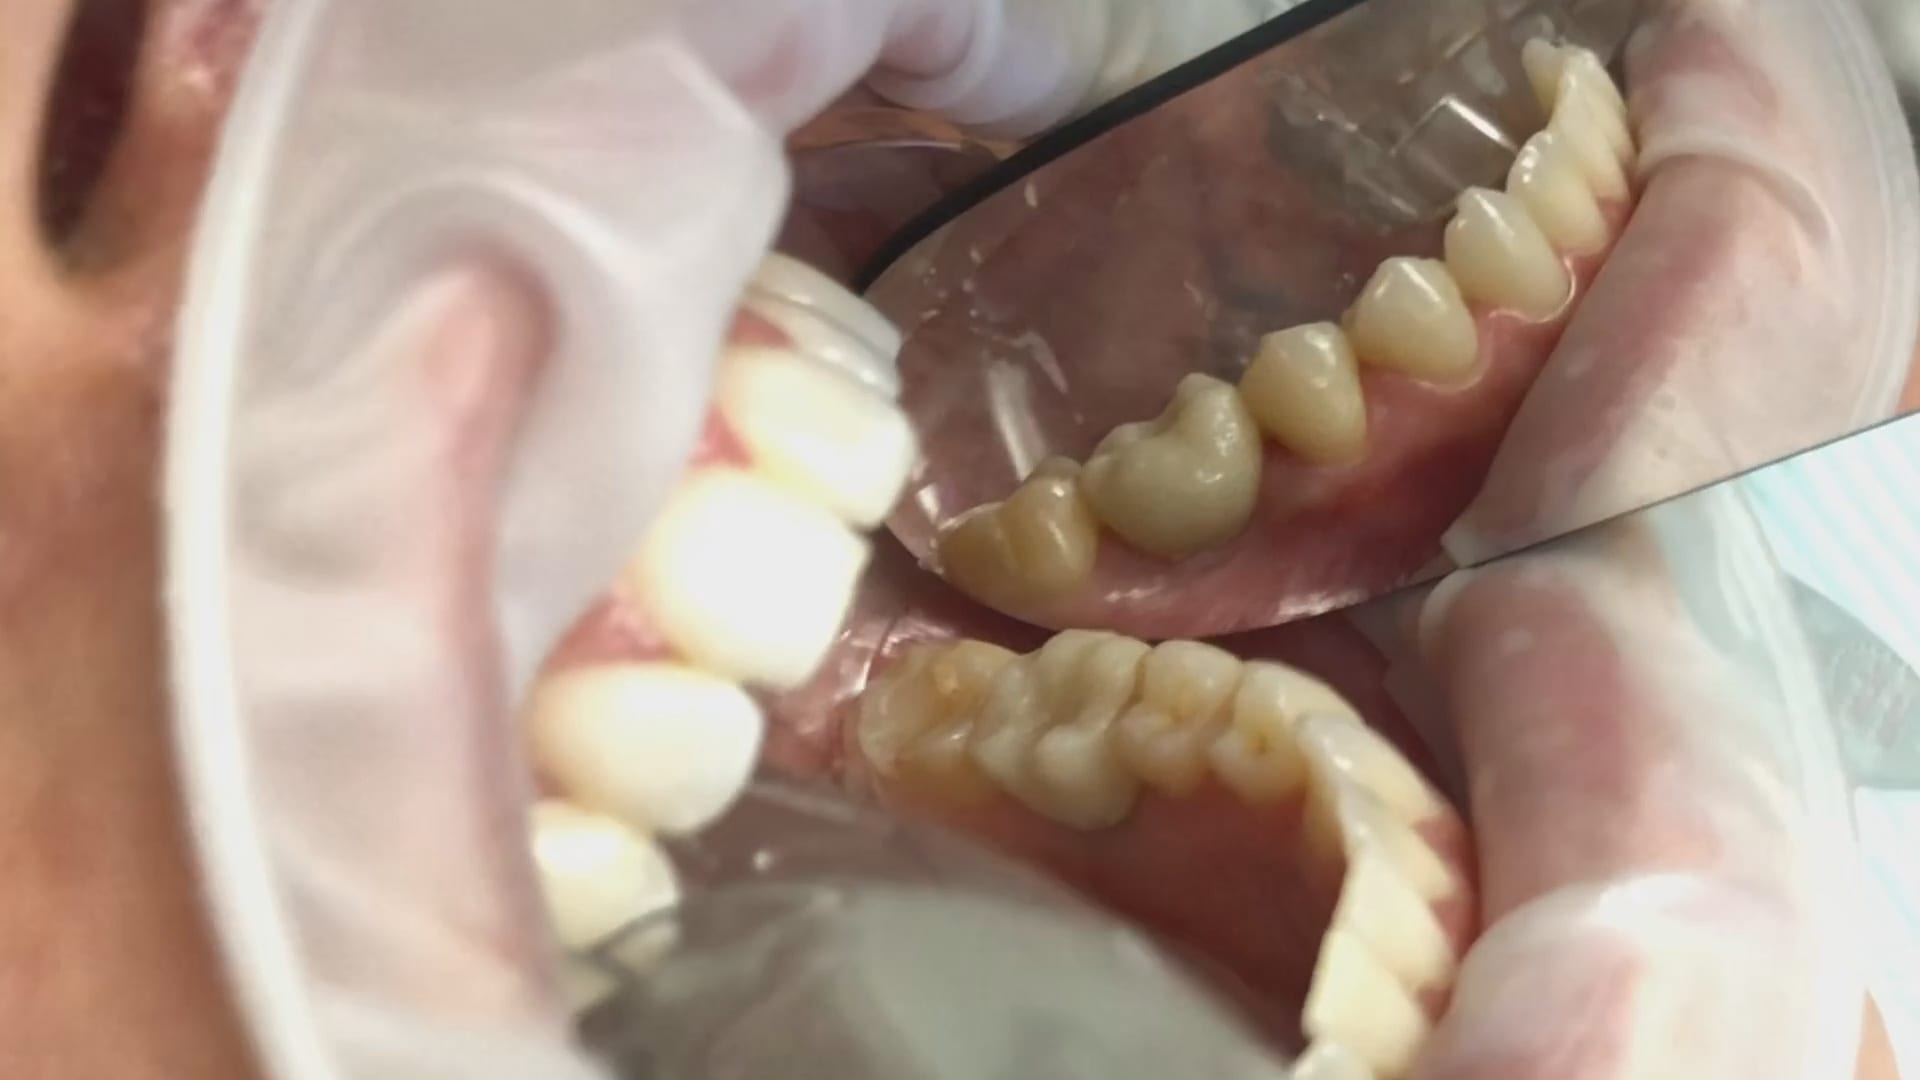
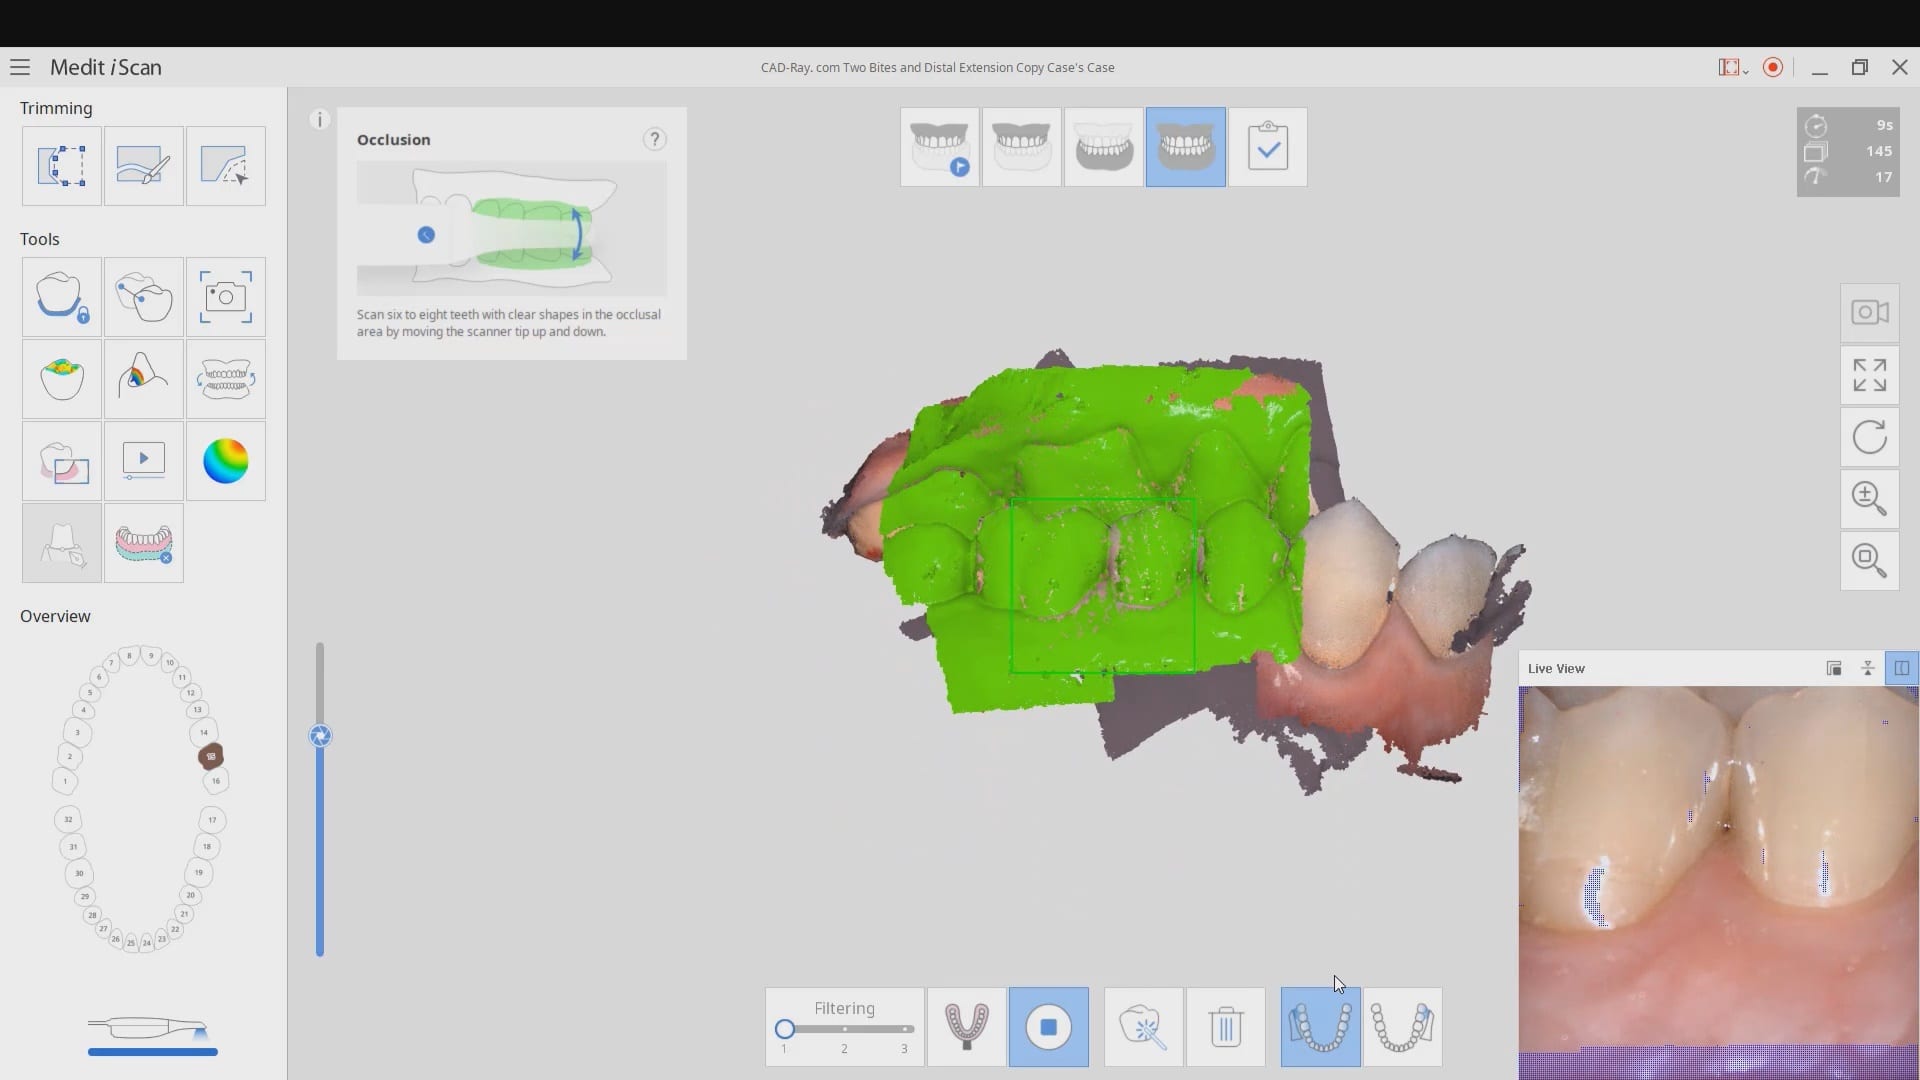
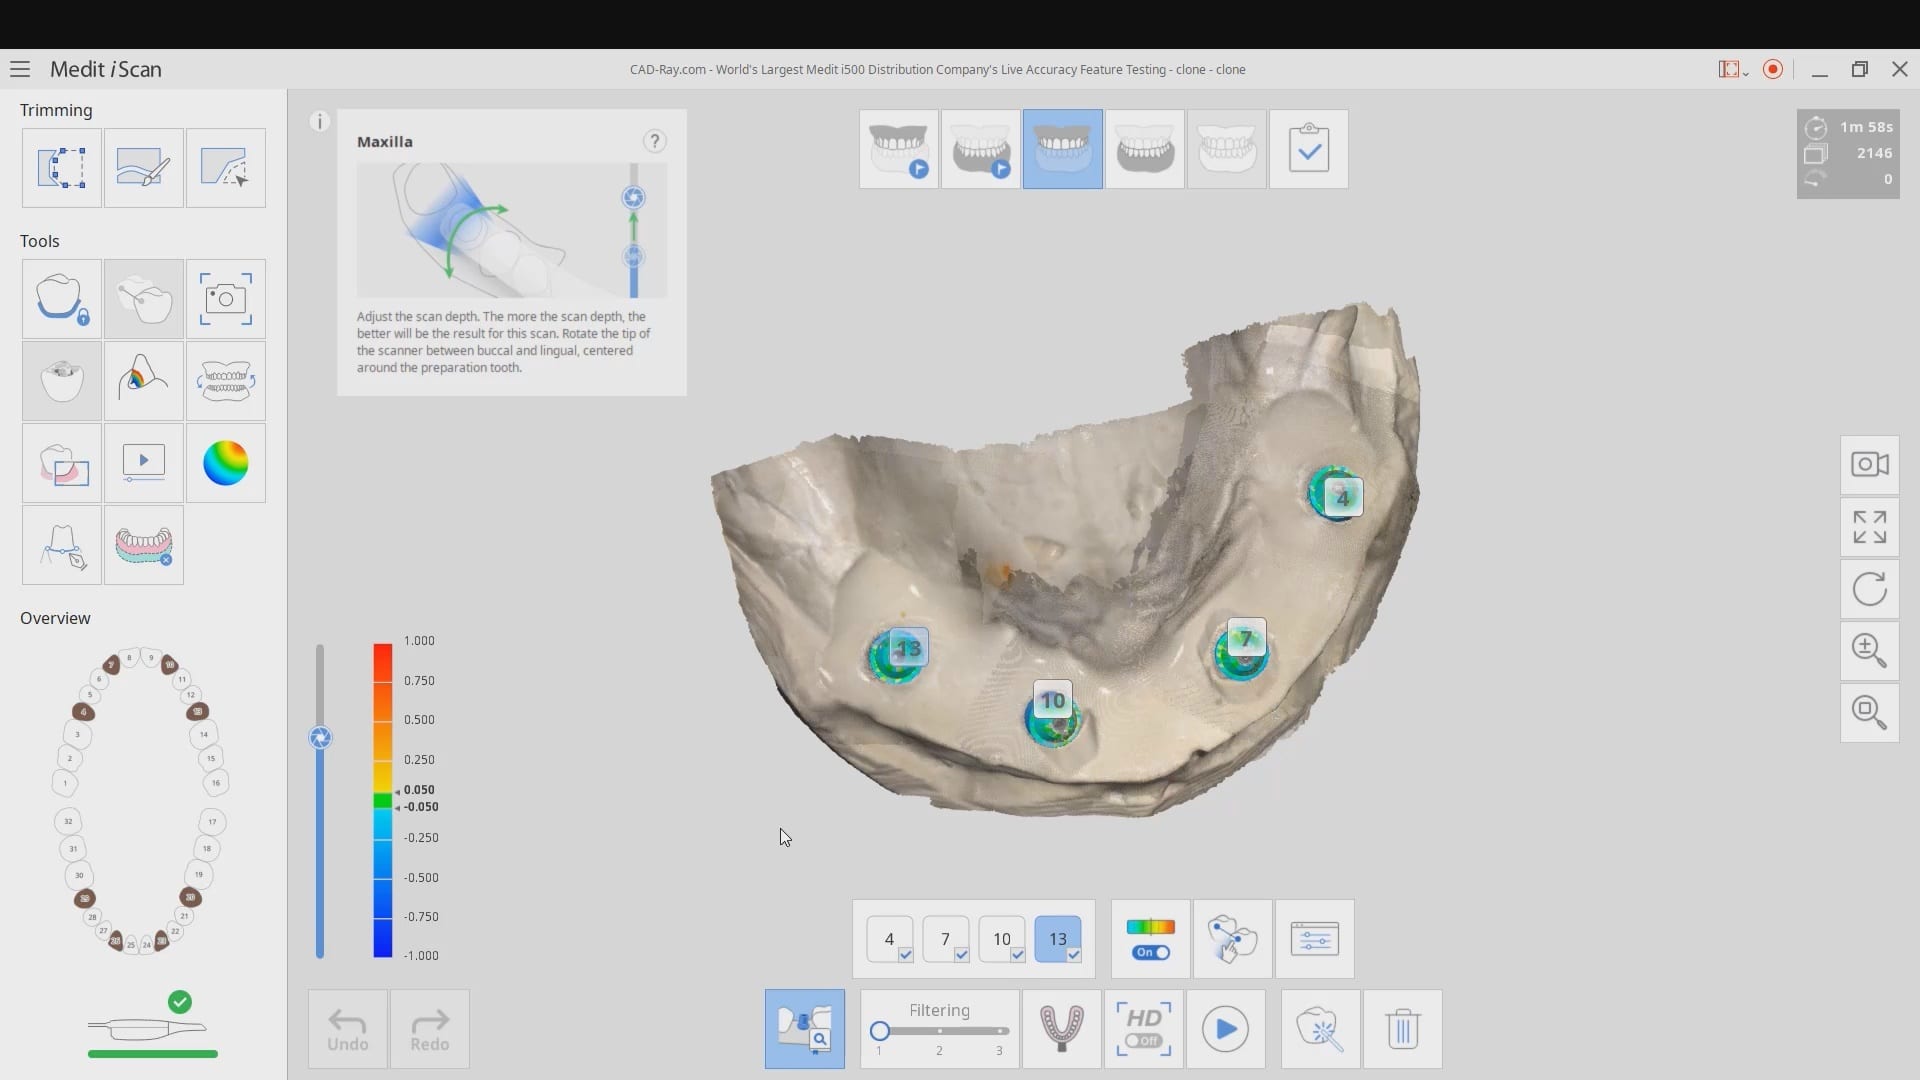
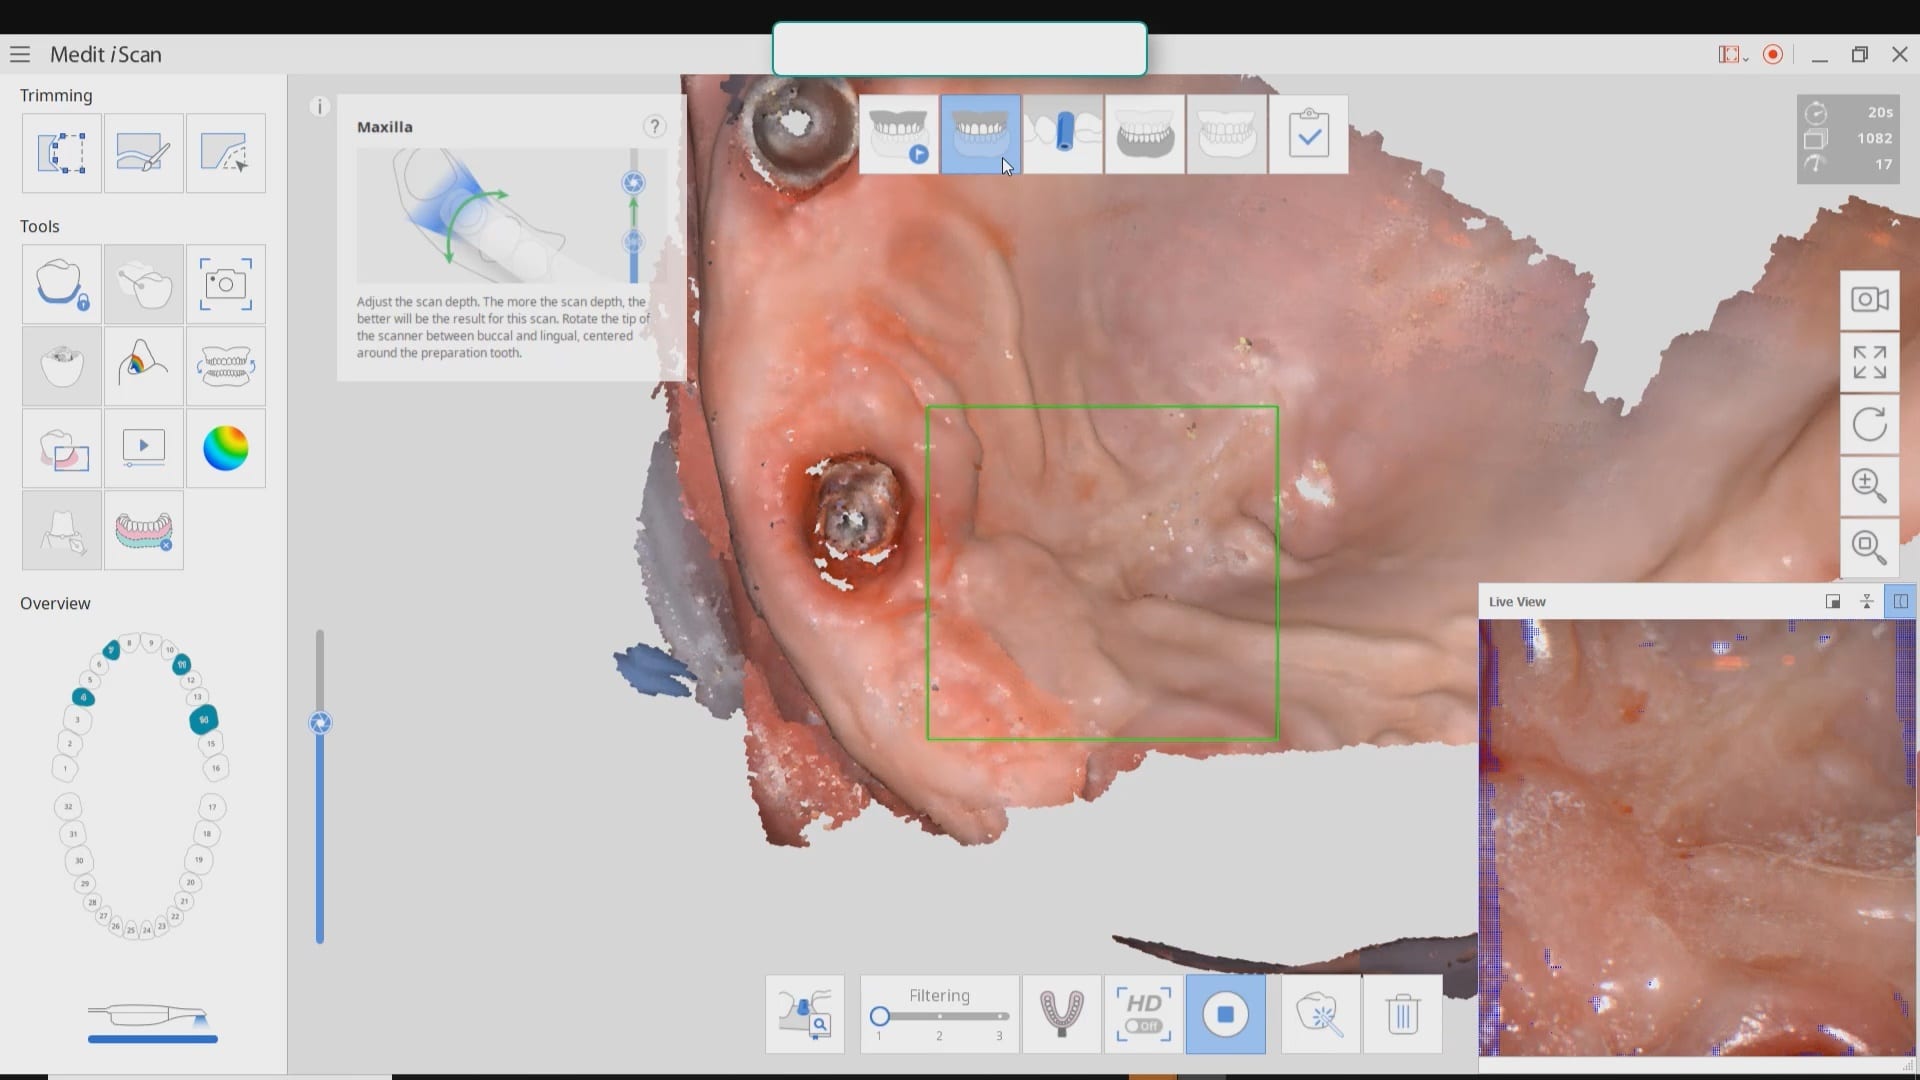
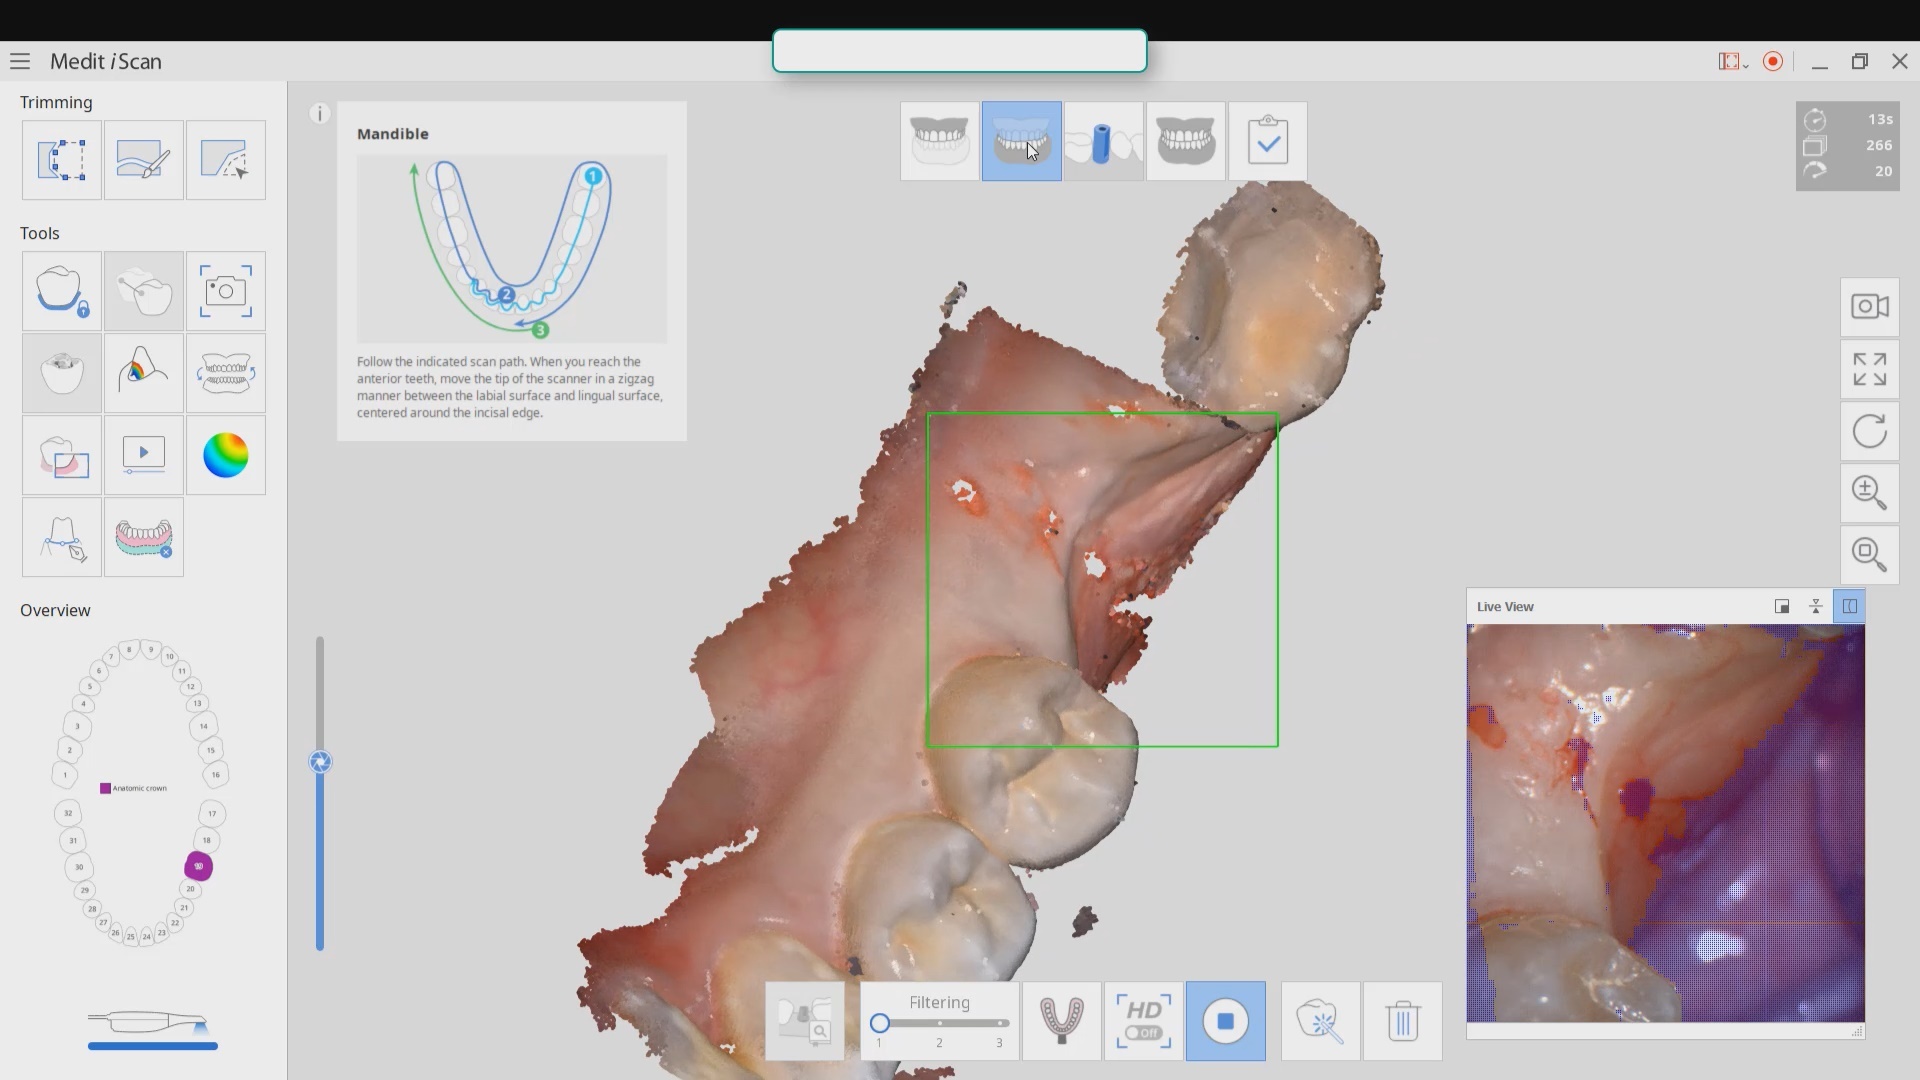
We scanned patient 4 different ways. HD and regular D and different filters and focal lengths. HD leaves the glitter free floating that scares new comers but builds nice models. really though if you retract everything well your imaging speed doesn’t change that much at all between filter 1 or 3. you can see how the mirror fogs up and slows me down just when i’m under patients nose. no big deal. just retract the lips and tongue and follow our imaging principles and you can take full arch scans in under a minute no problem
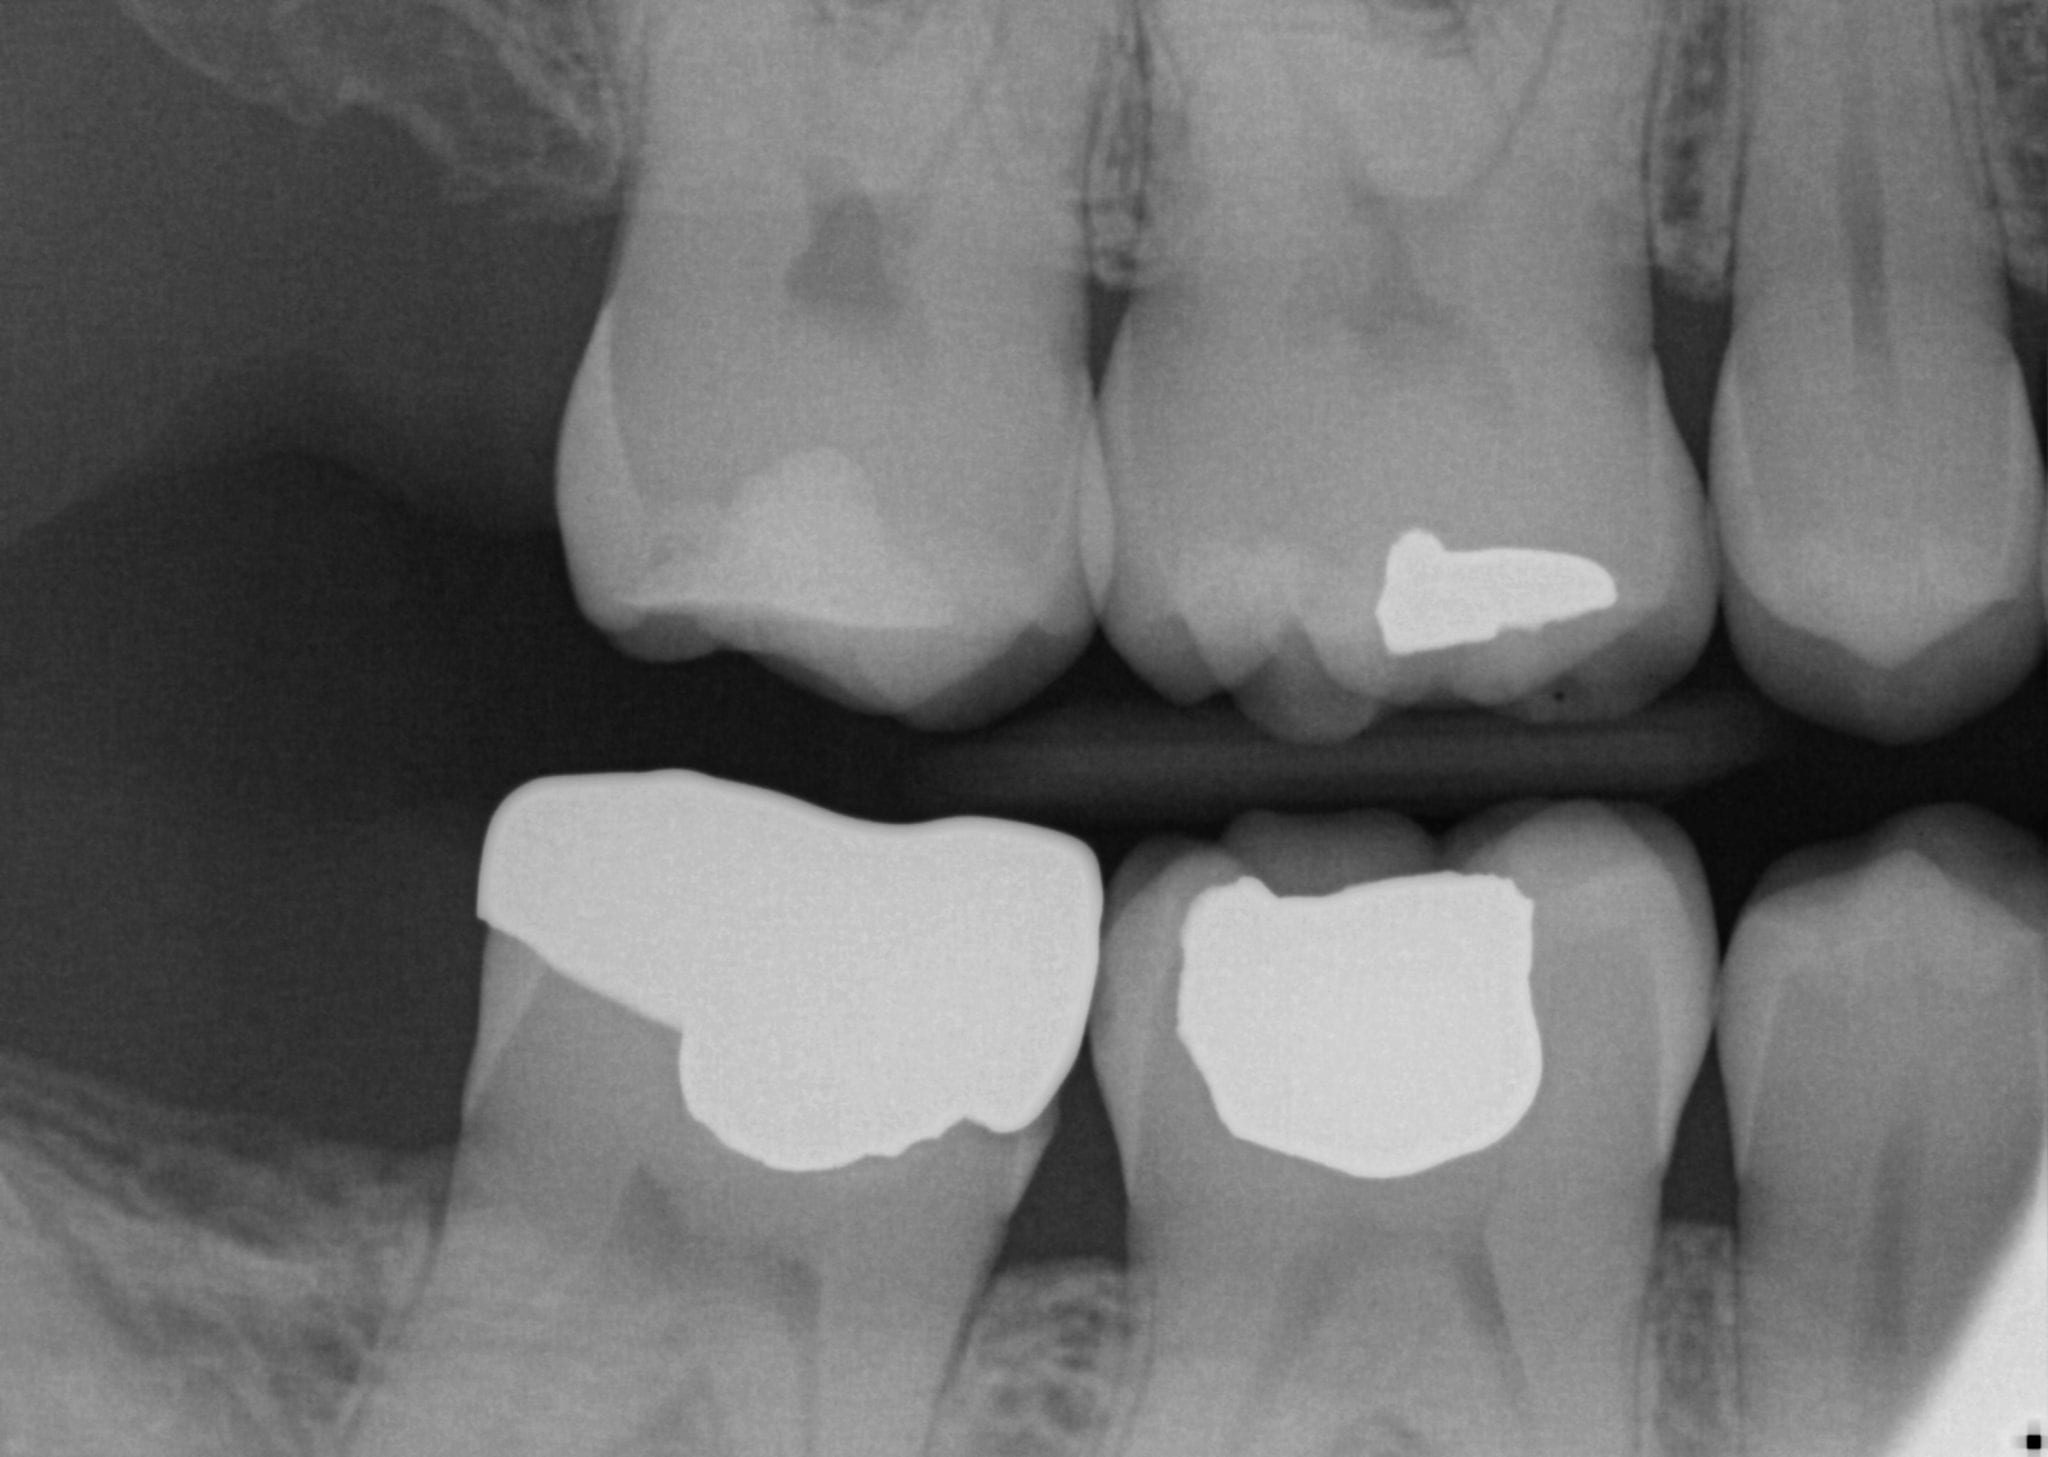
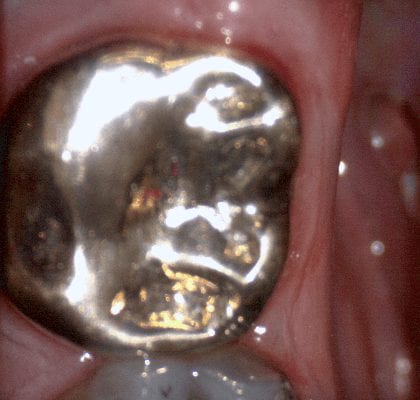
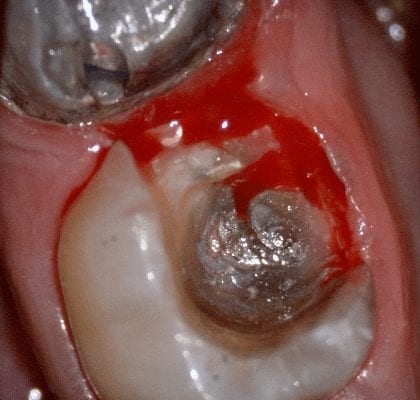
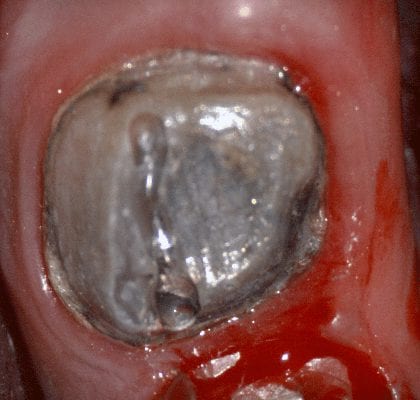
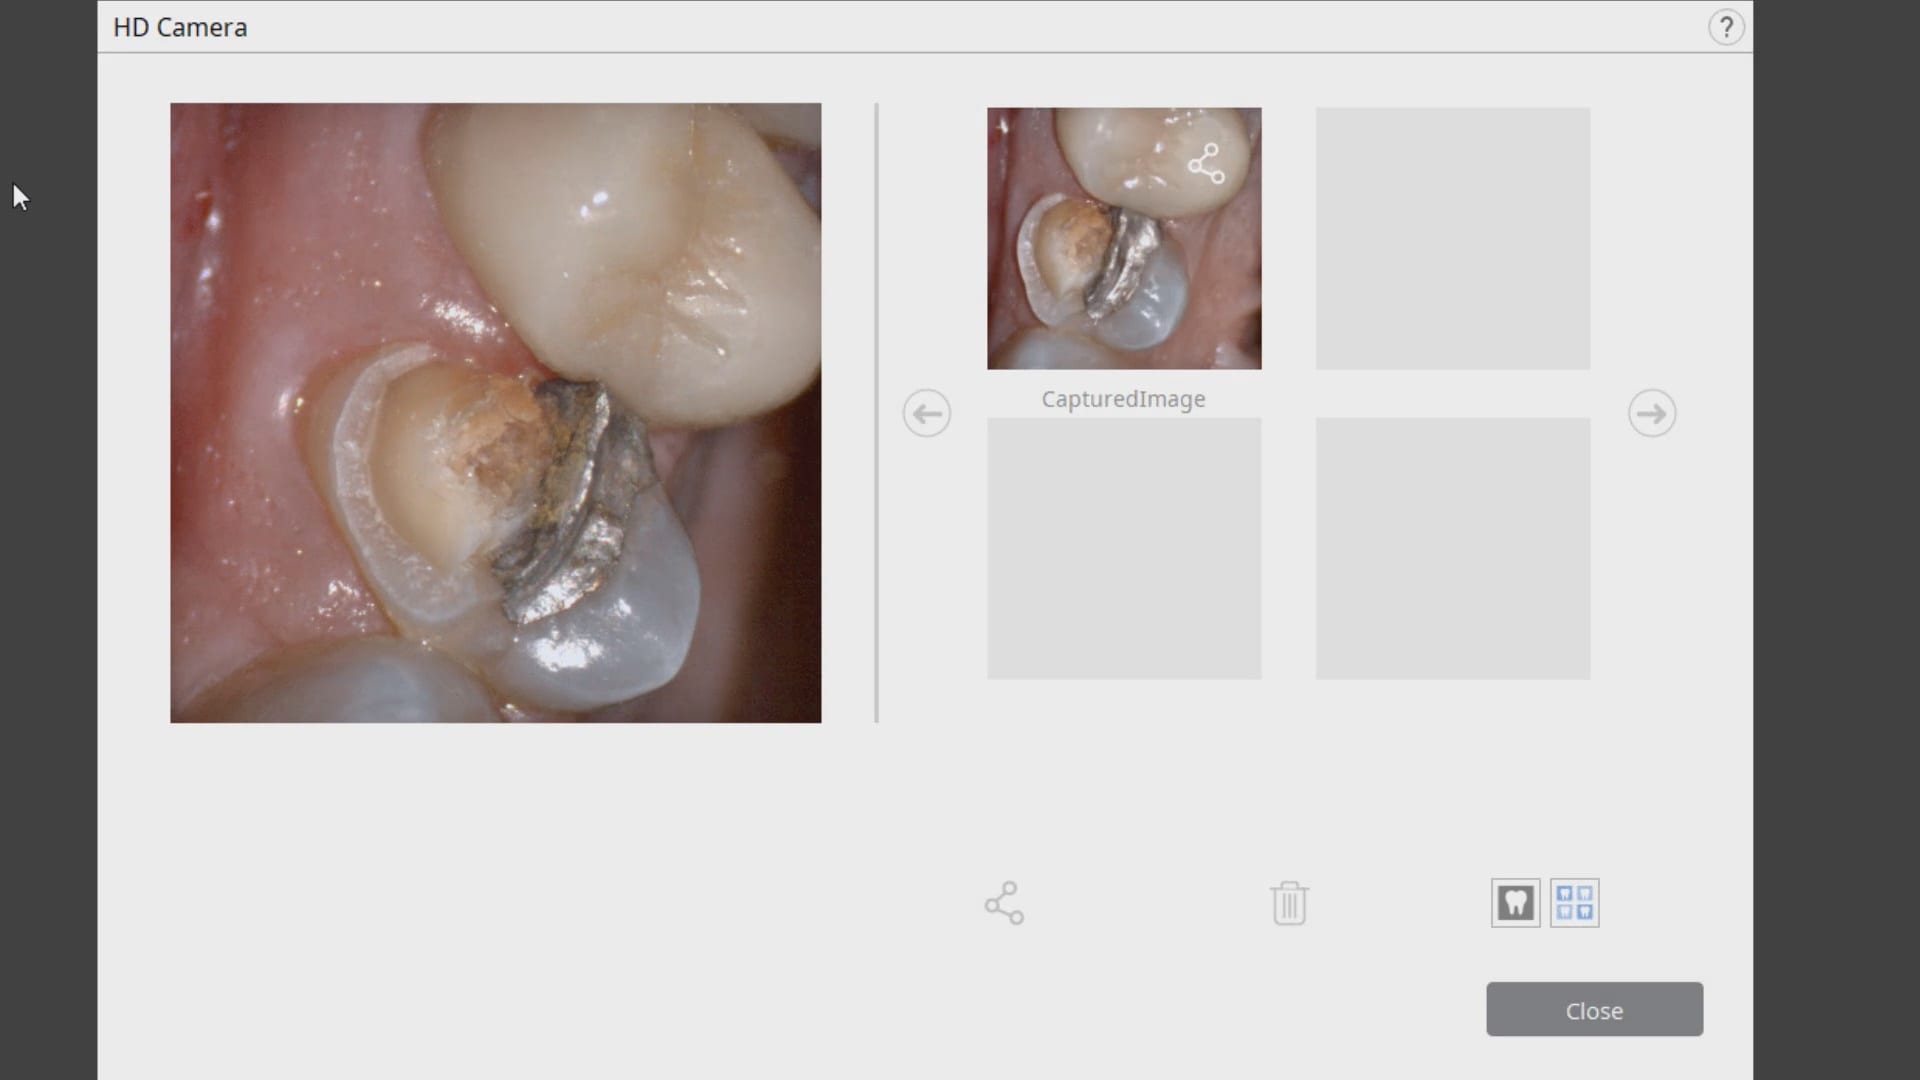
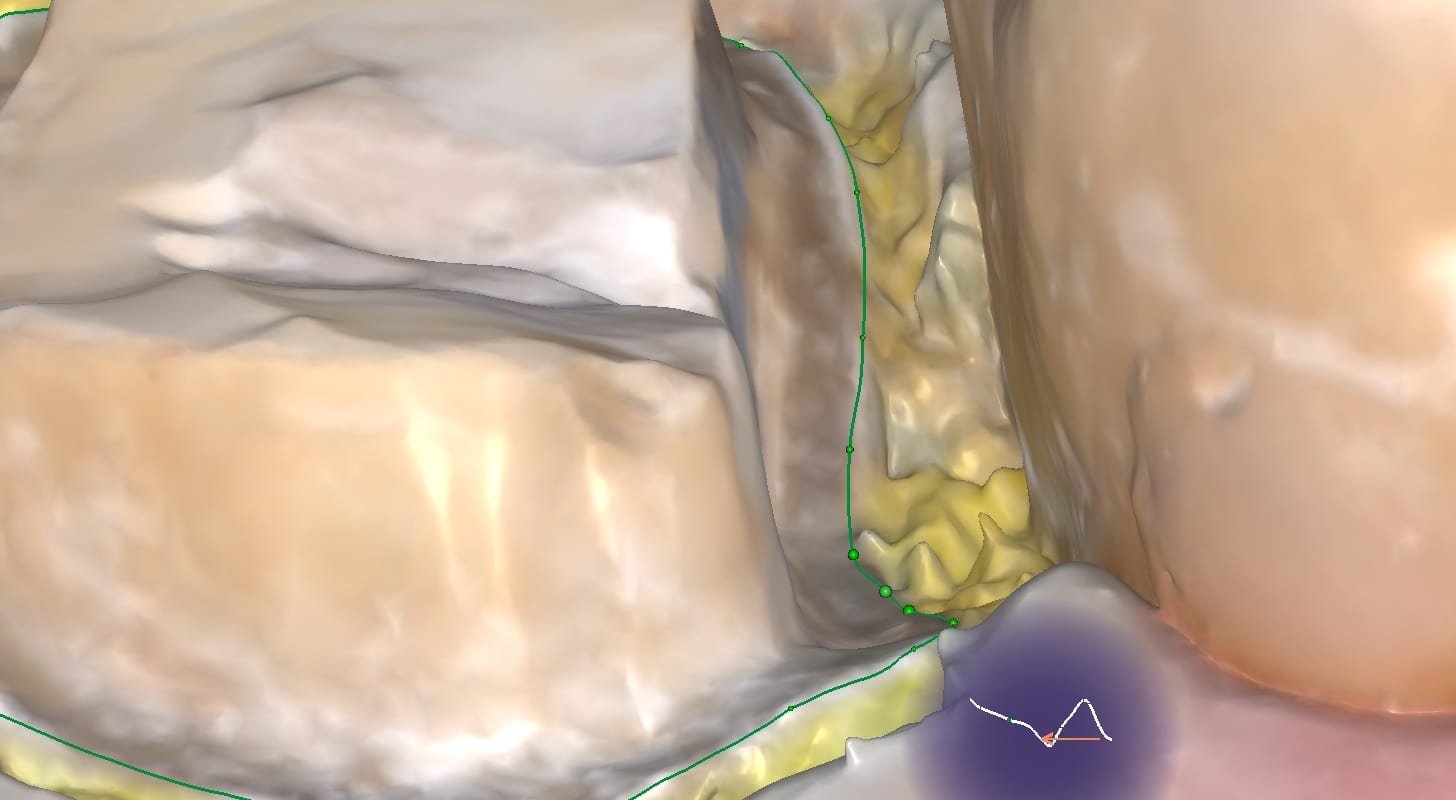
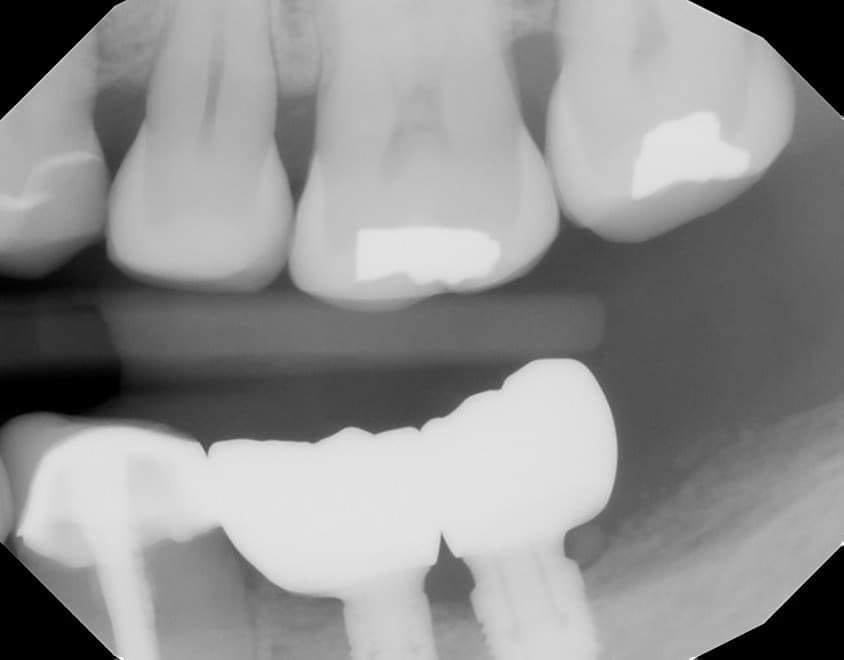
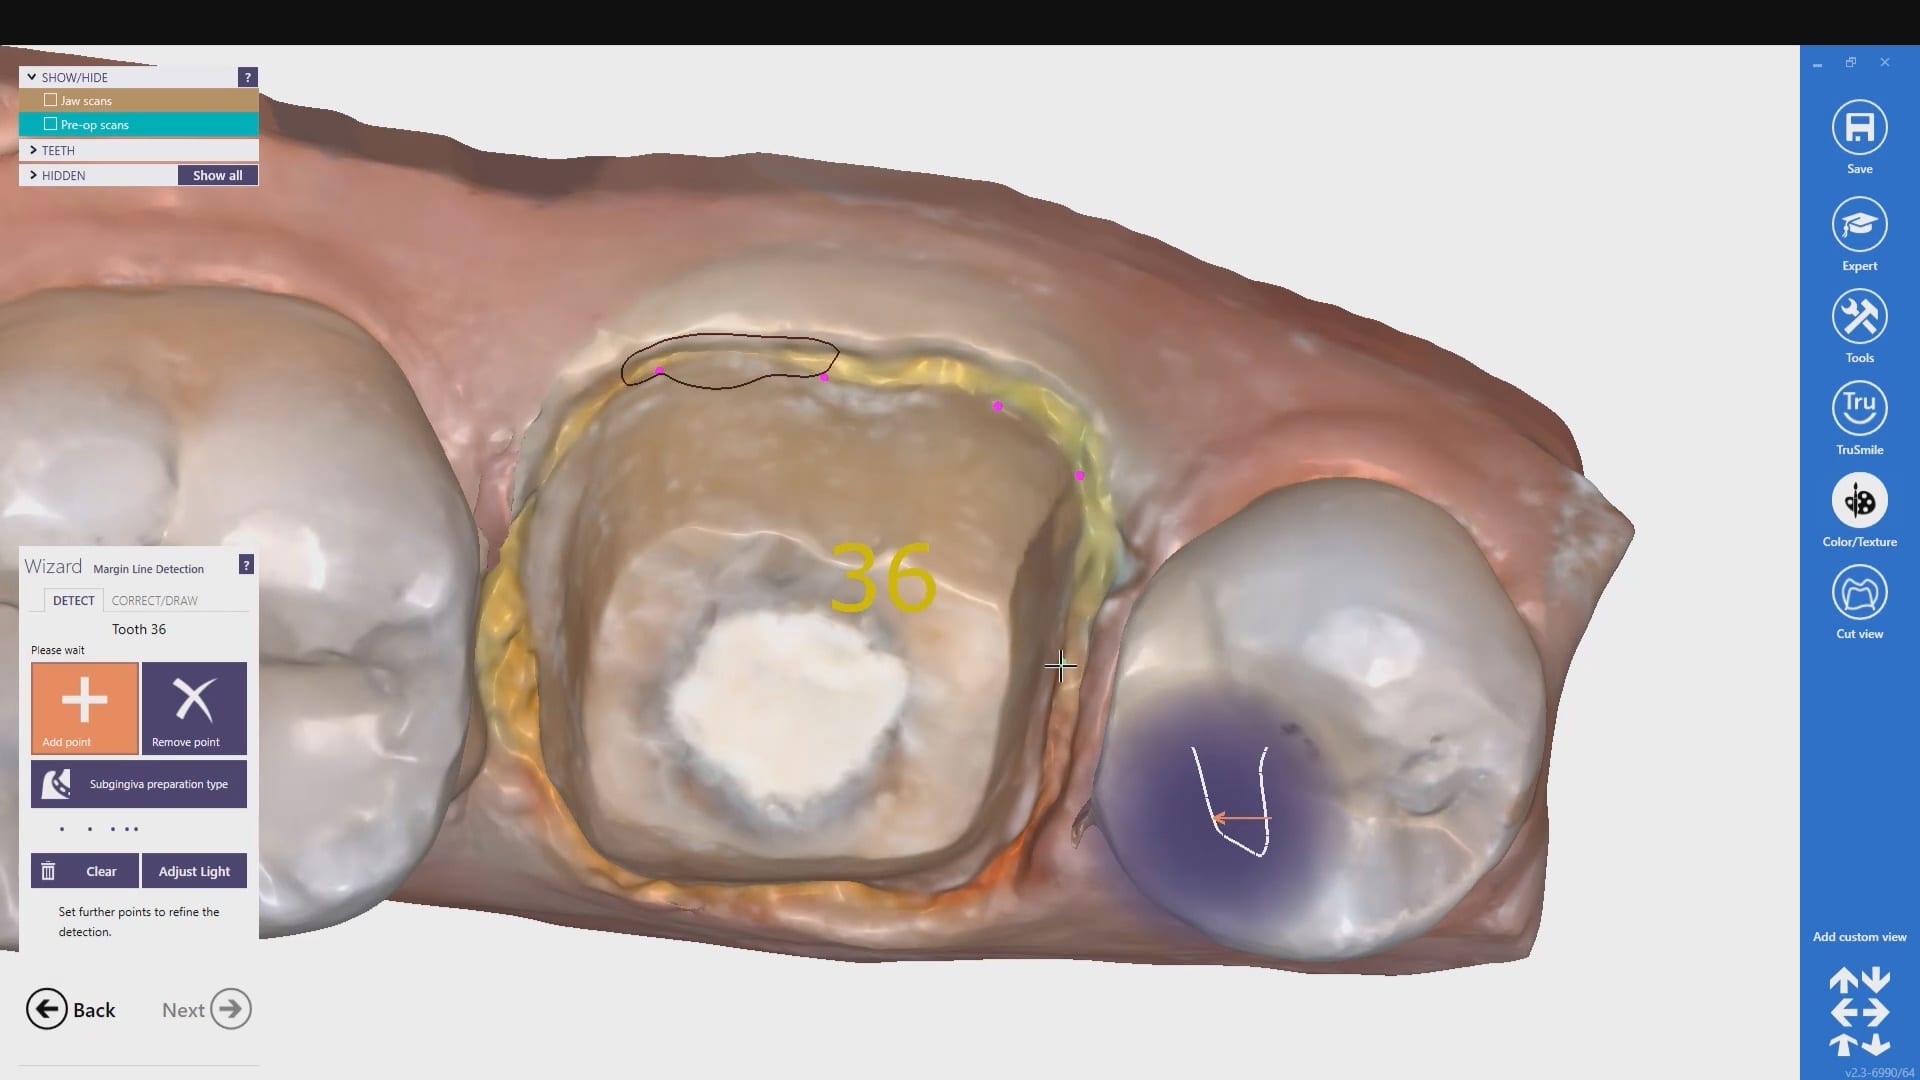
In this video we demonstrate some of the most common problems associated with second molar impressions. Usually the distal margins can be blurred by the presence of hemorrhaging or soft tissue. In this particular case, we use the tip of the camera to displace the tissue and digitall correct an area for better accuracy. The isolite systemisolite systemisolite system does a great job controlling the tongue and the lips and with proper retraction you can image a quadrant in very little time
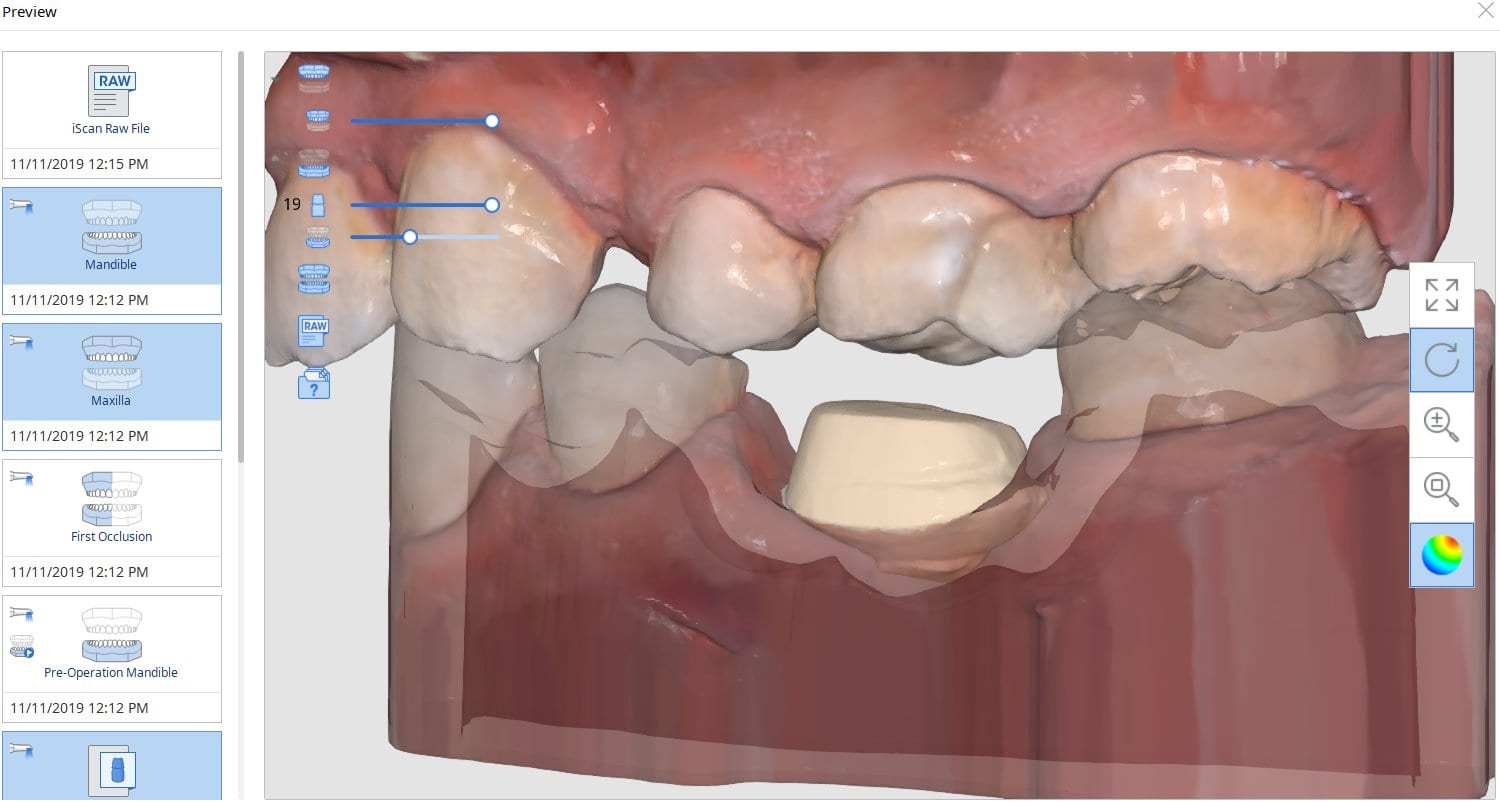
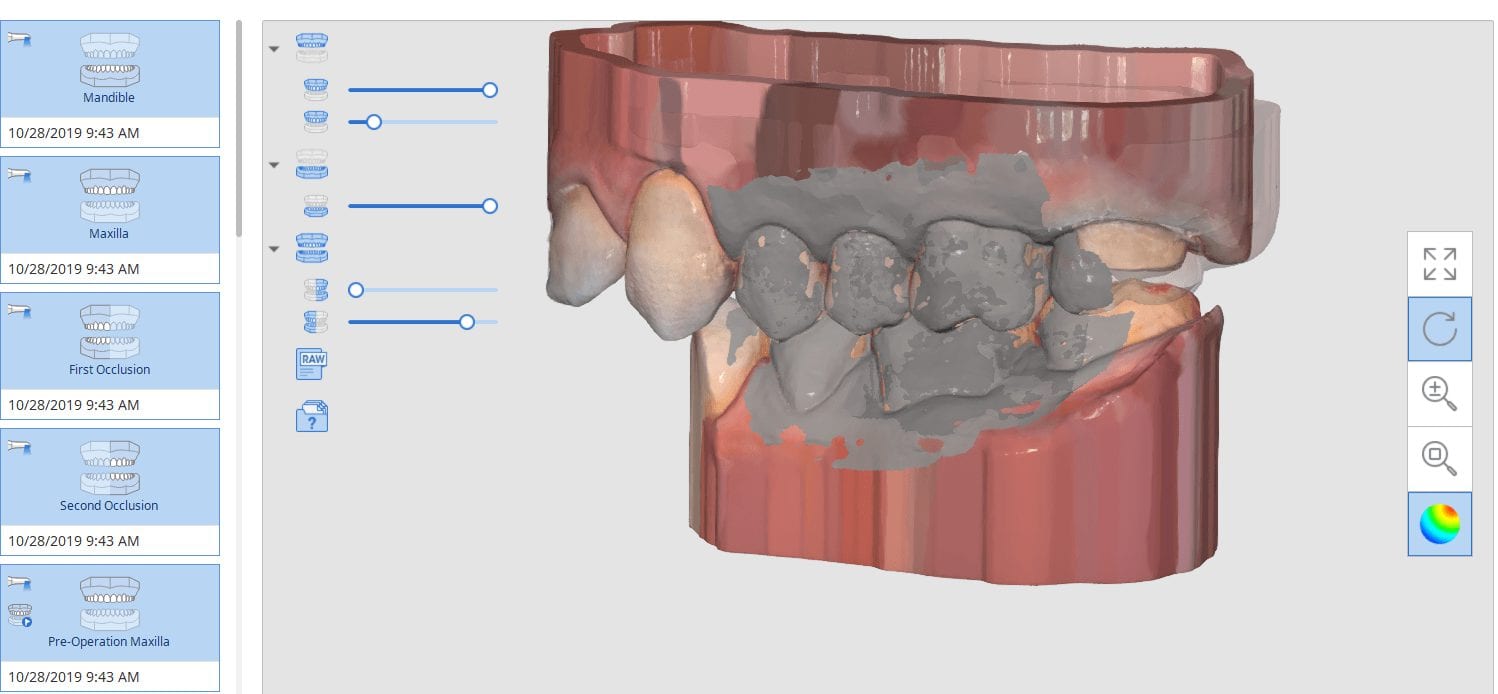
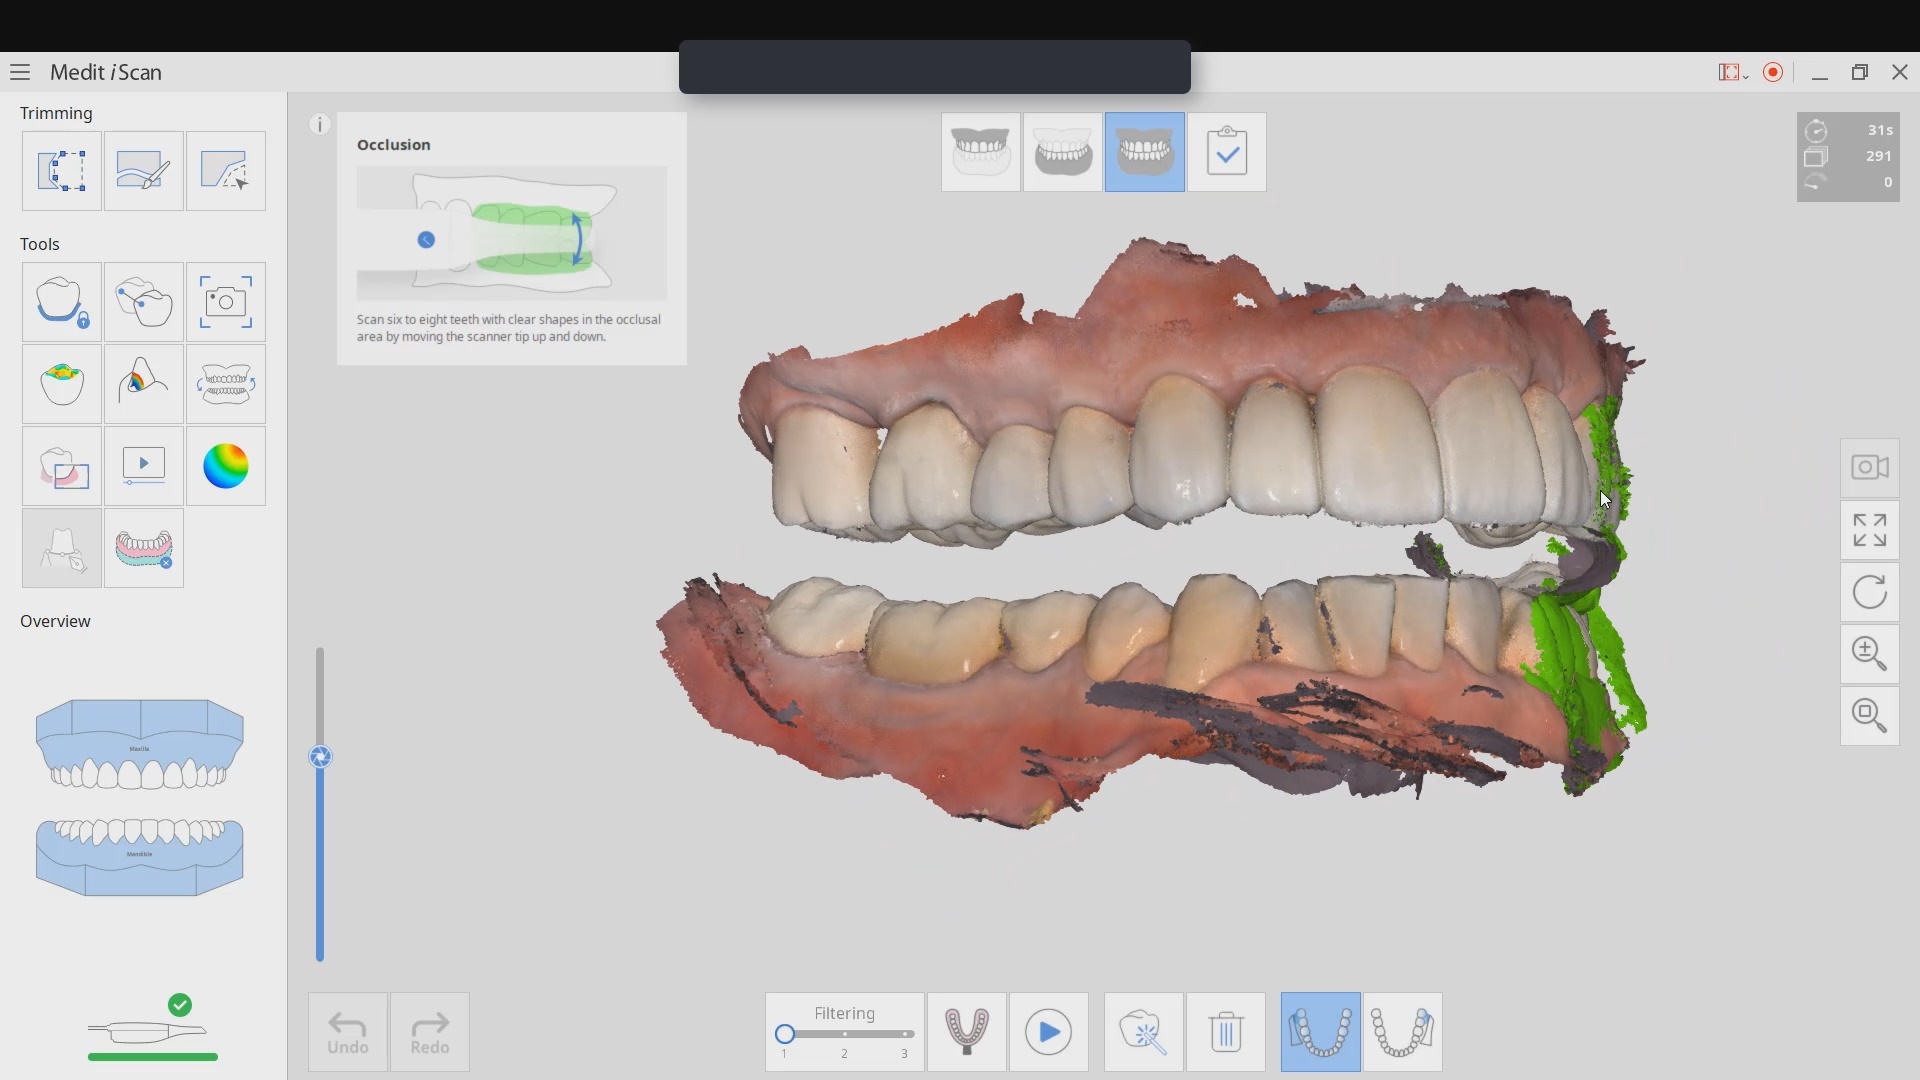
The second most commong problem is a change in the vertical dimension before and after we prepare the last vertical stop in the arch. We advocate that you take two bites; one before preparing the distal extension and one after you prepare it. Comparing the two buccal bites will let you know if you will have issue with your vertical dimension and allow you to reduce the post op adjustments
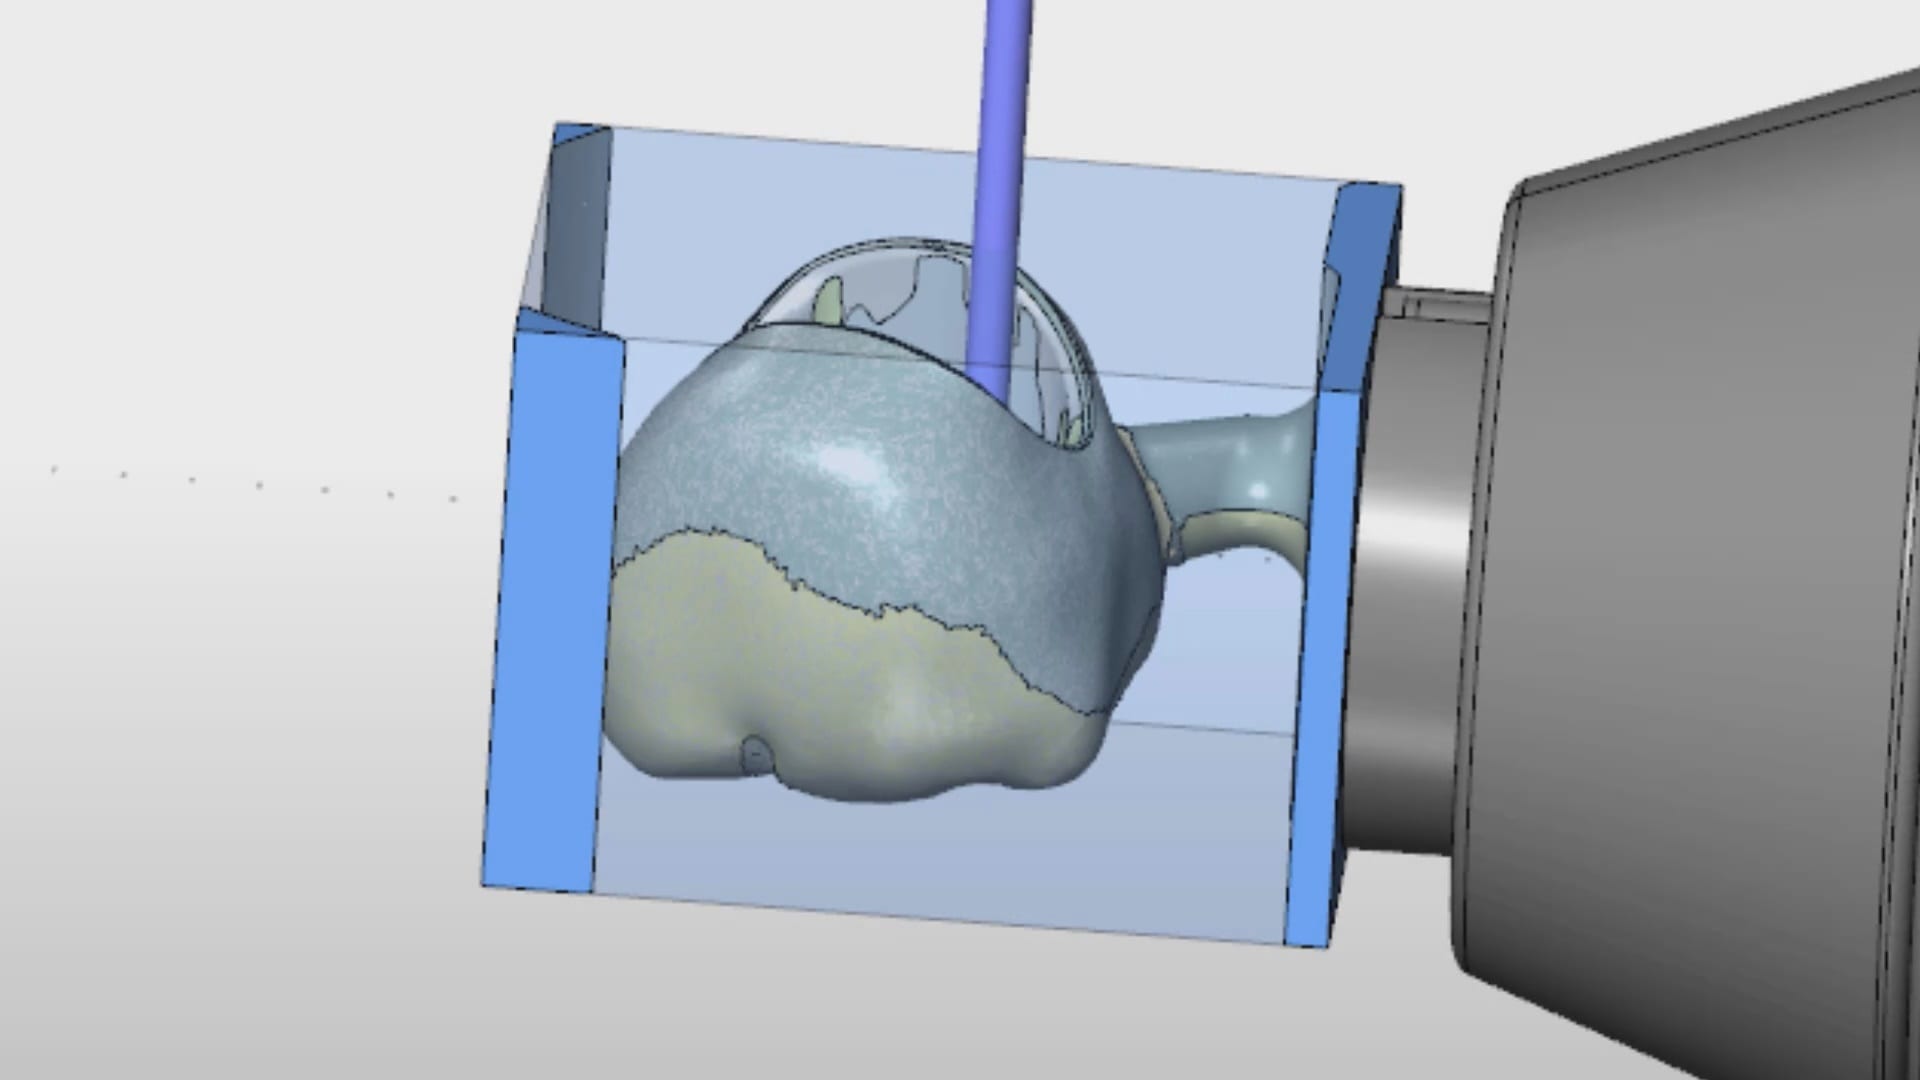
In this video we demonstrate a simple premolar case that is prepared and imaged with the Medit i500, designed in the cad software named exocad and then milled with the imes icor coritec one machine. Pay attention to the order and sequence of events and how we leverage anesthesia time with scanning time.
We have a large library of instructional videos on our site that can be found on our support page that can help you learn everything there is to know about the Medit i500
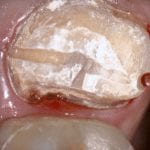
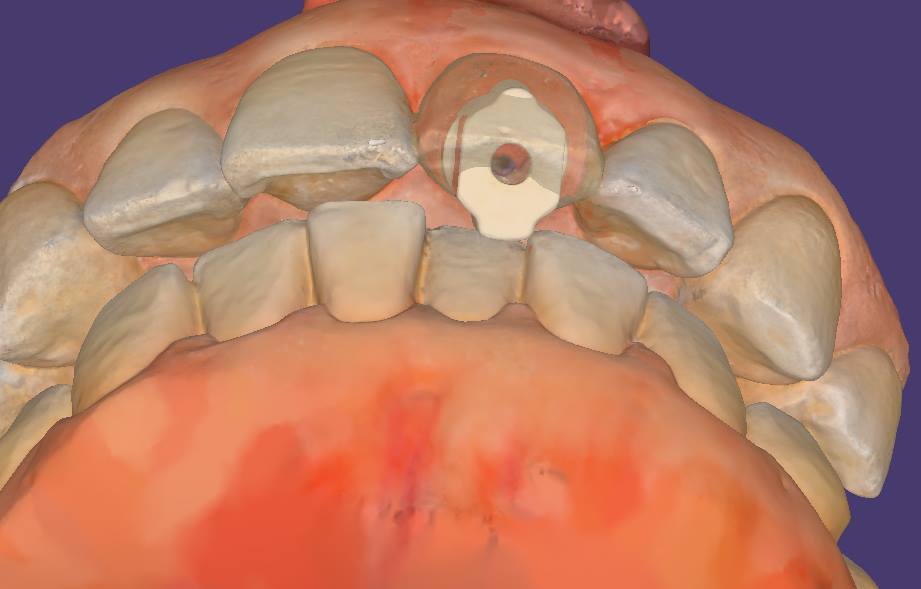
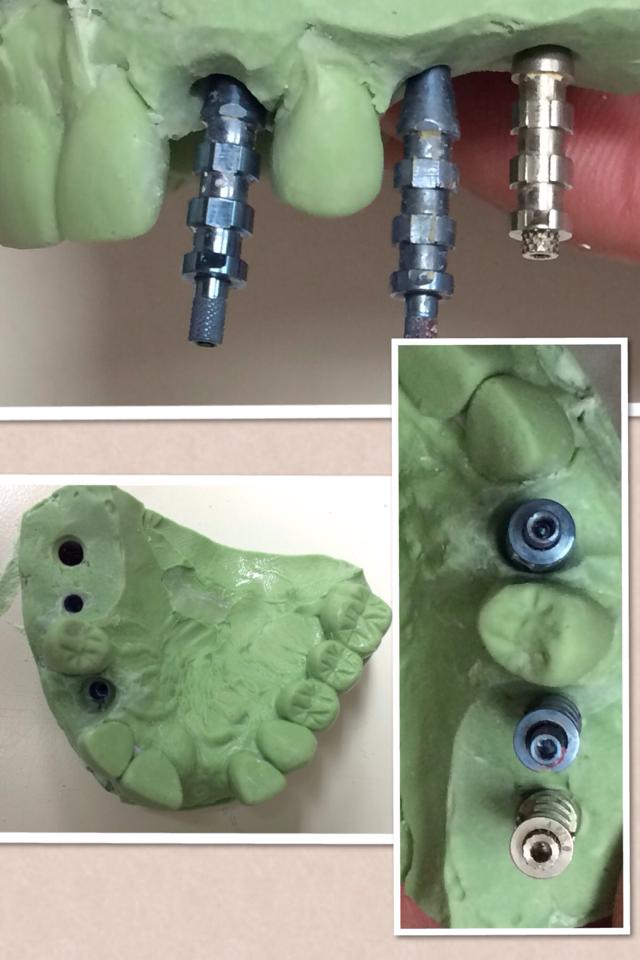
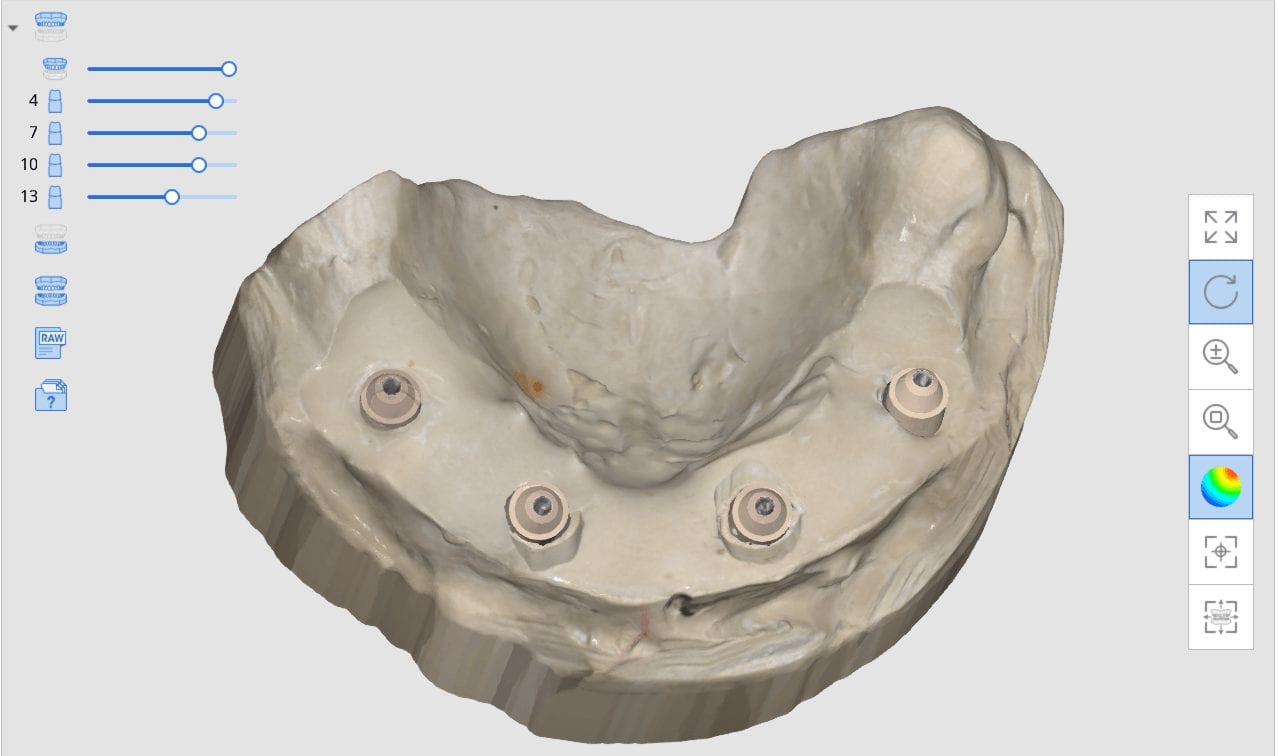
Taking impressions, digital or analog way, was one of the greatest hassles in implant dentistry. we can now image the margins of the implant suprastrucure OUTSIDE the mouth, merge it with the intra-oral condition, and mark the margins on the digital file as opposed to getting hemostasis and tissue retraction in difficult situations..
medit i500 takes one of the most complex and error prone situations and simplifies it, whether you send the case to the lab or do in office restorations.
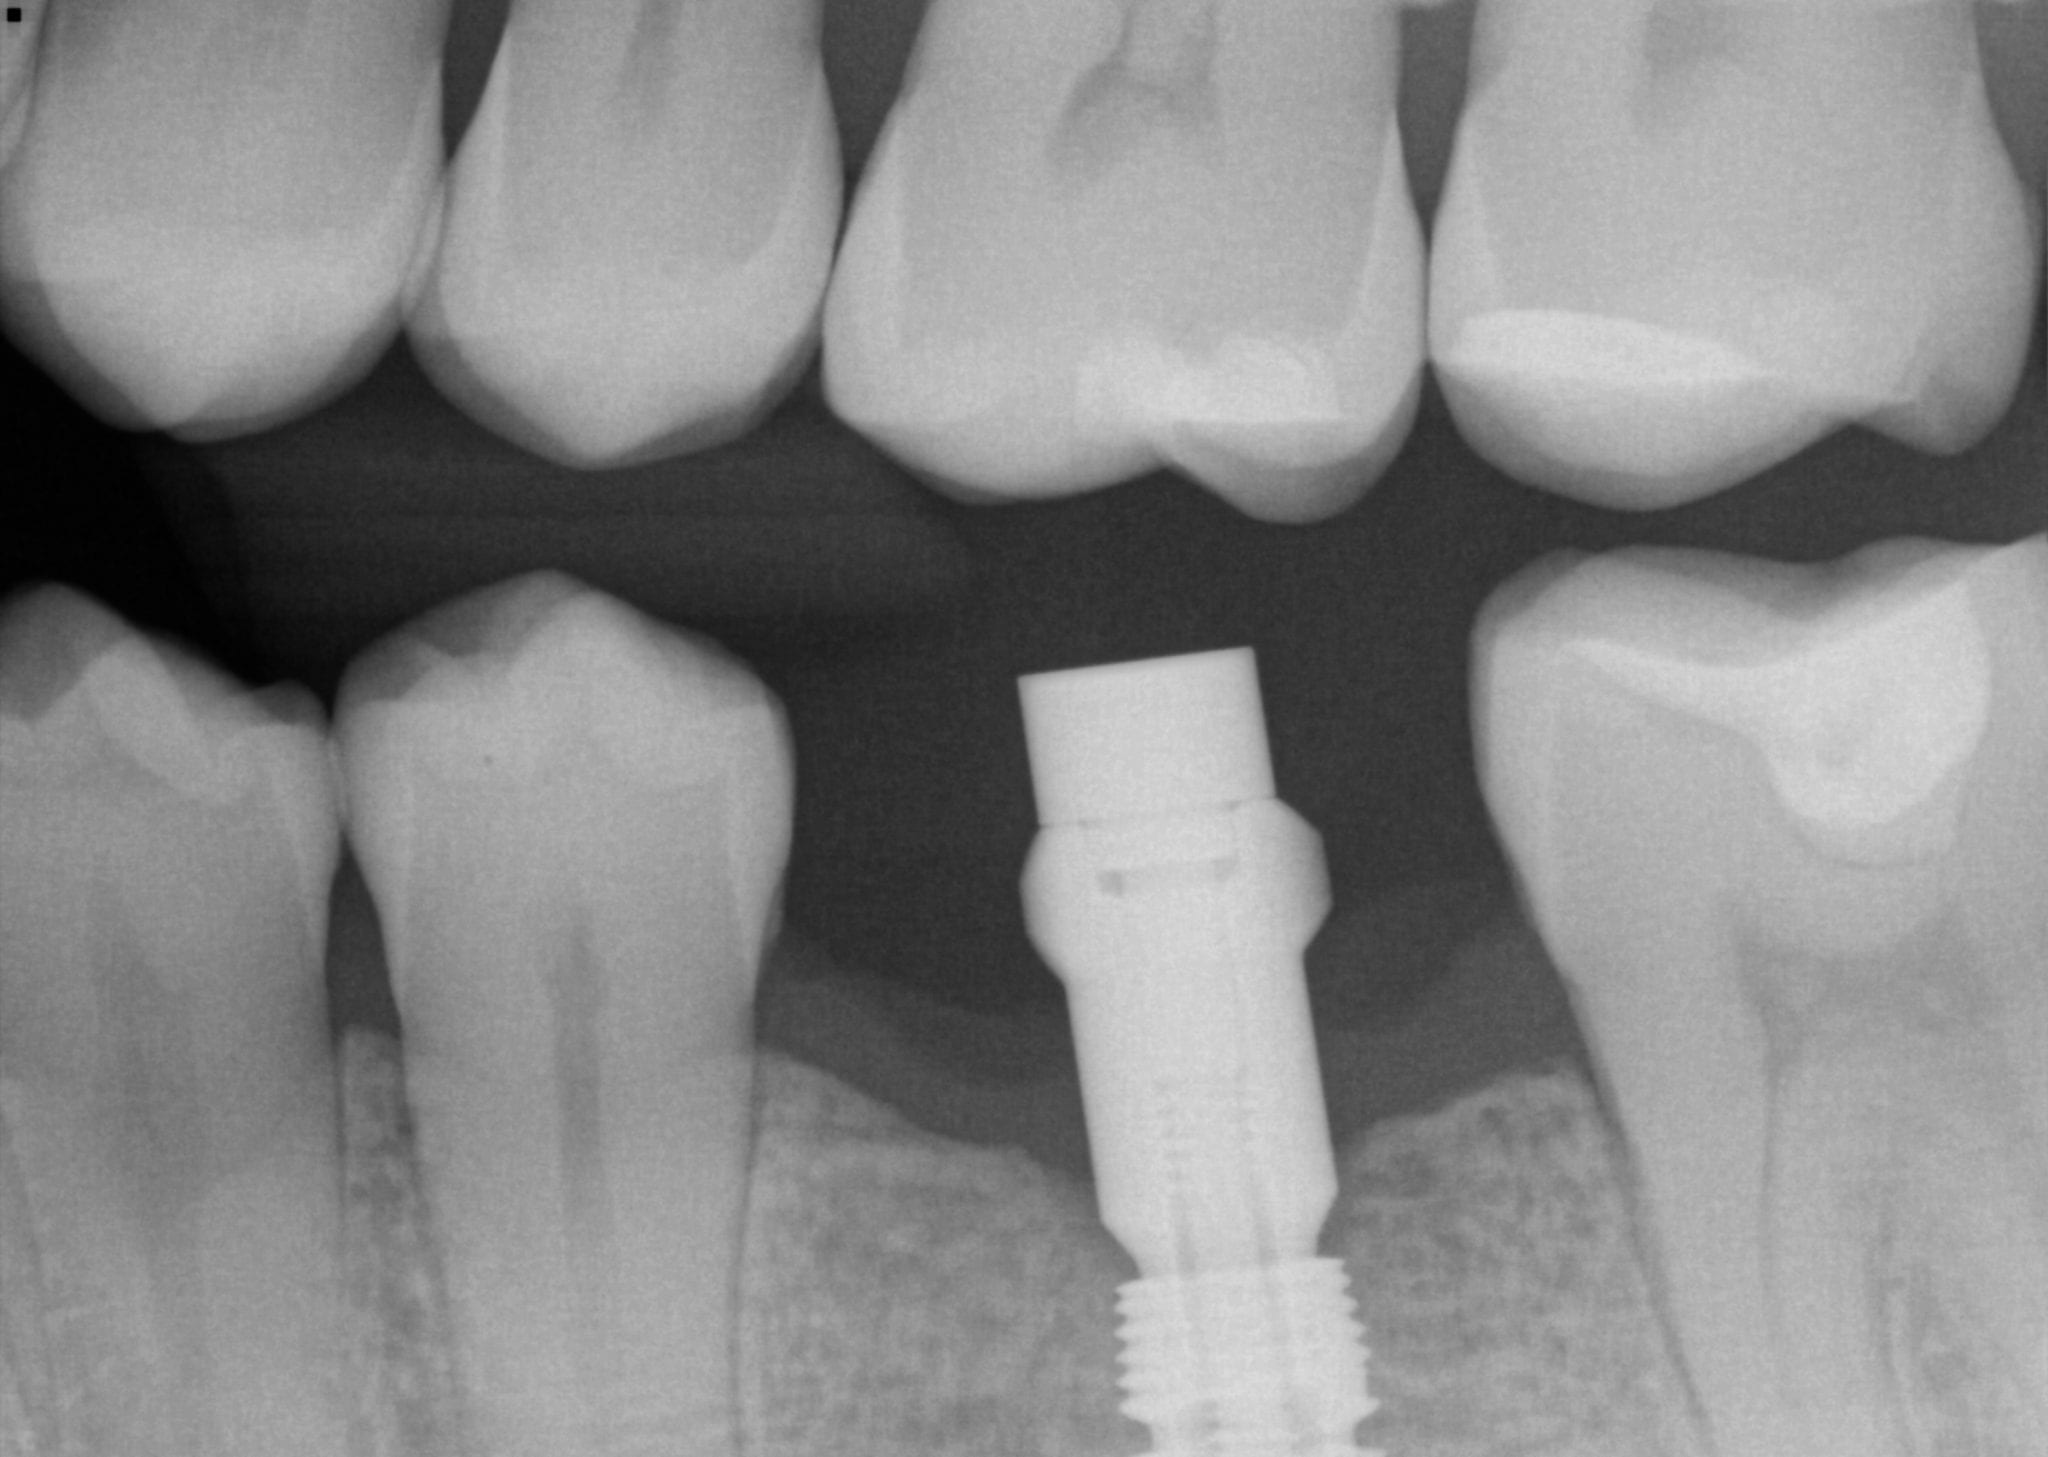
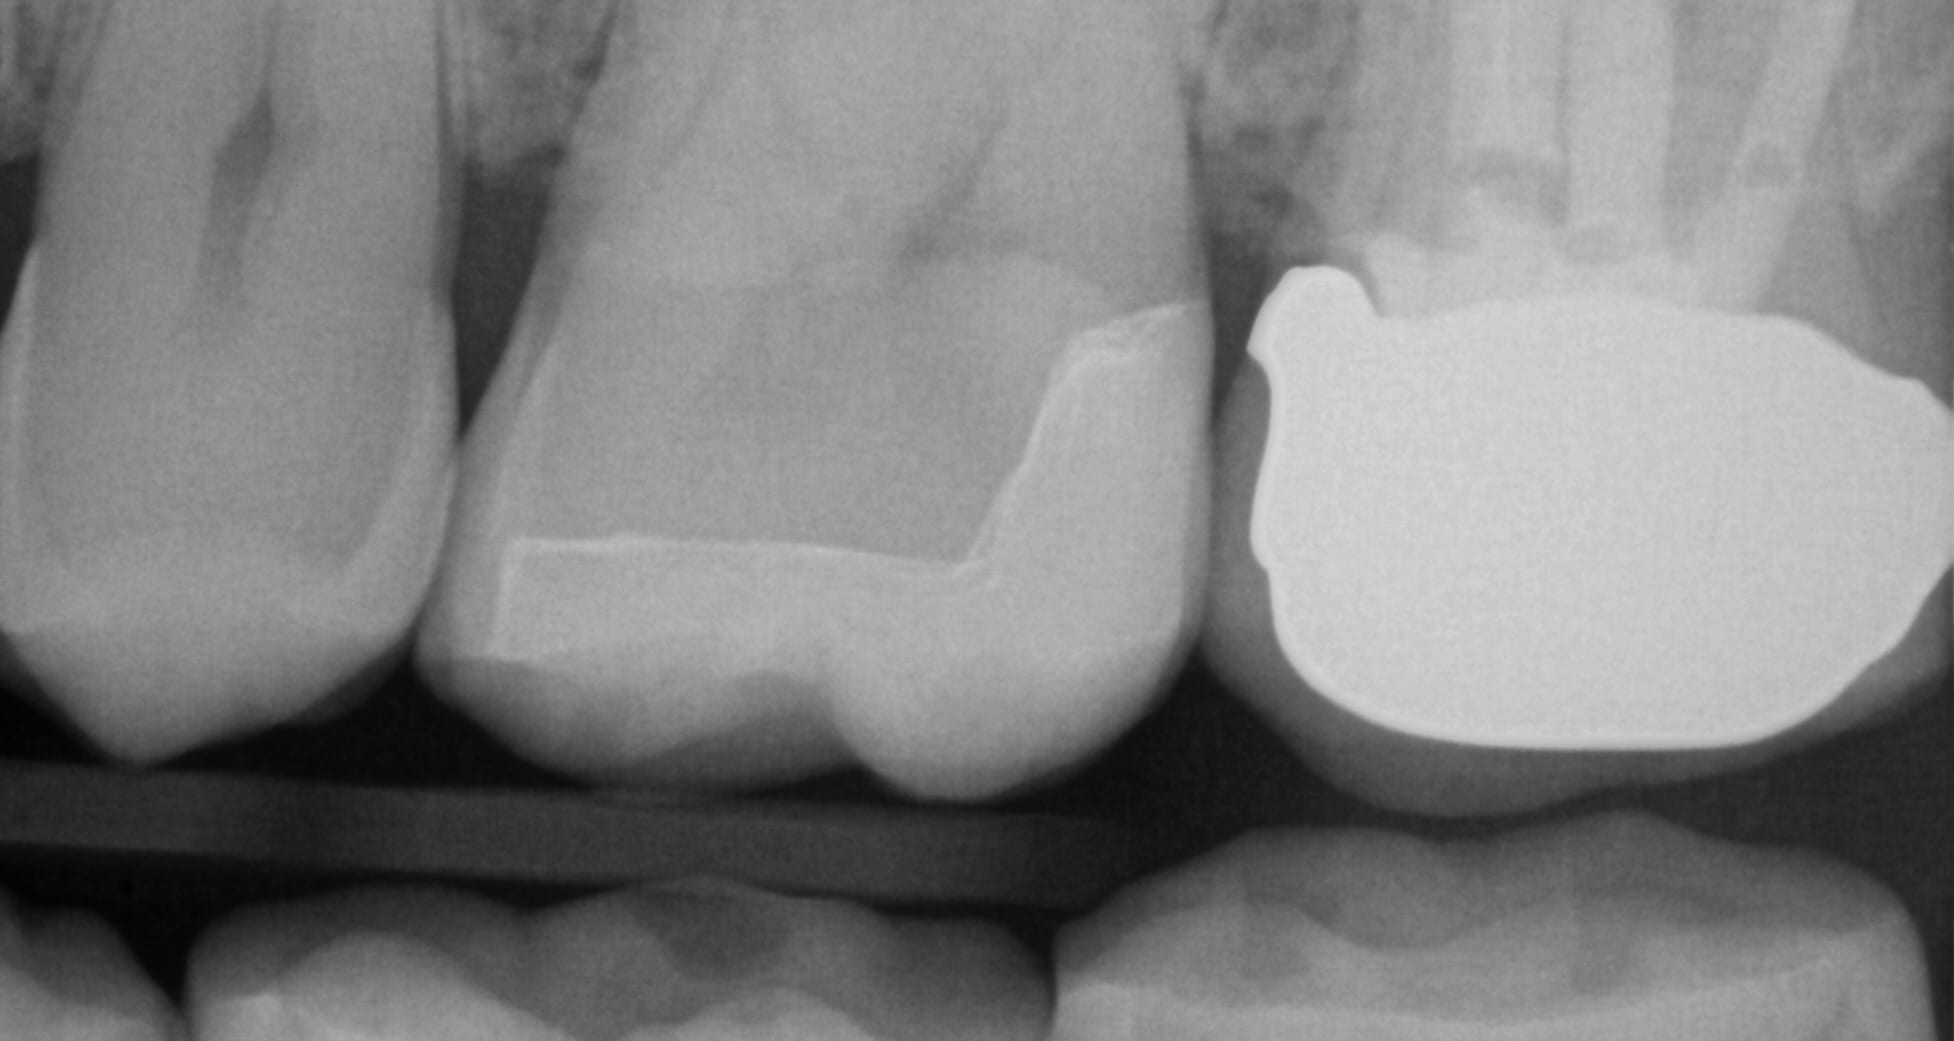
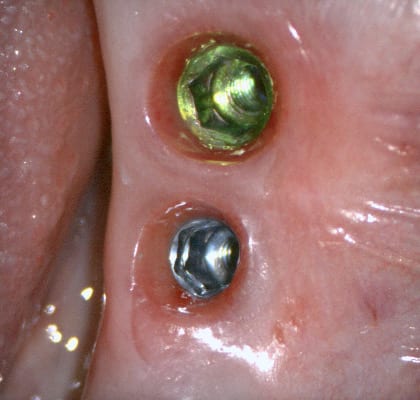
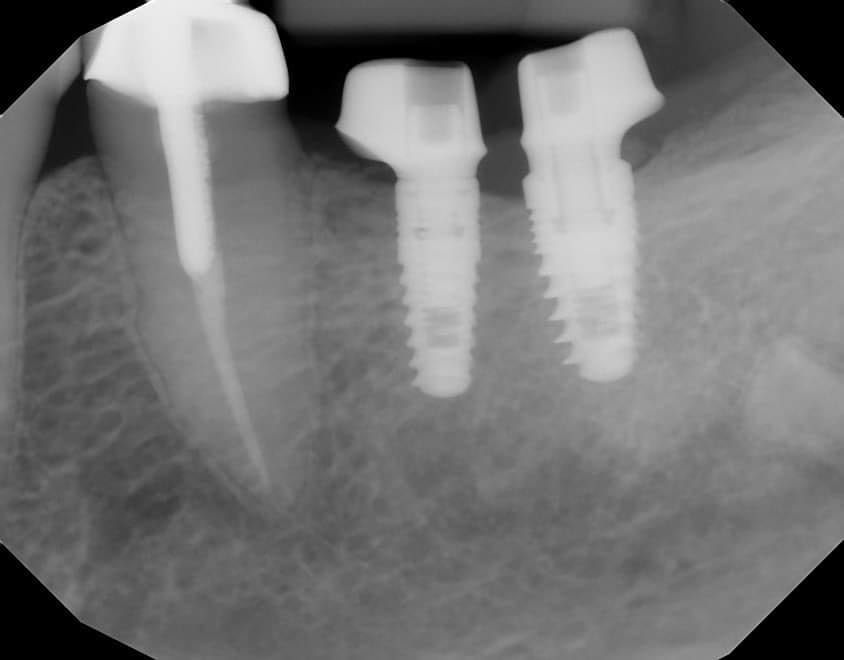
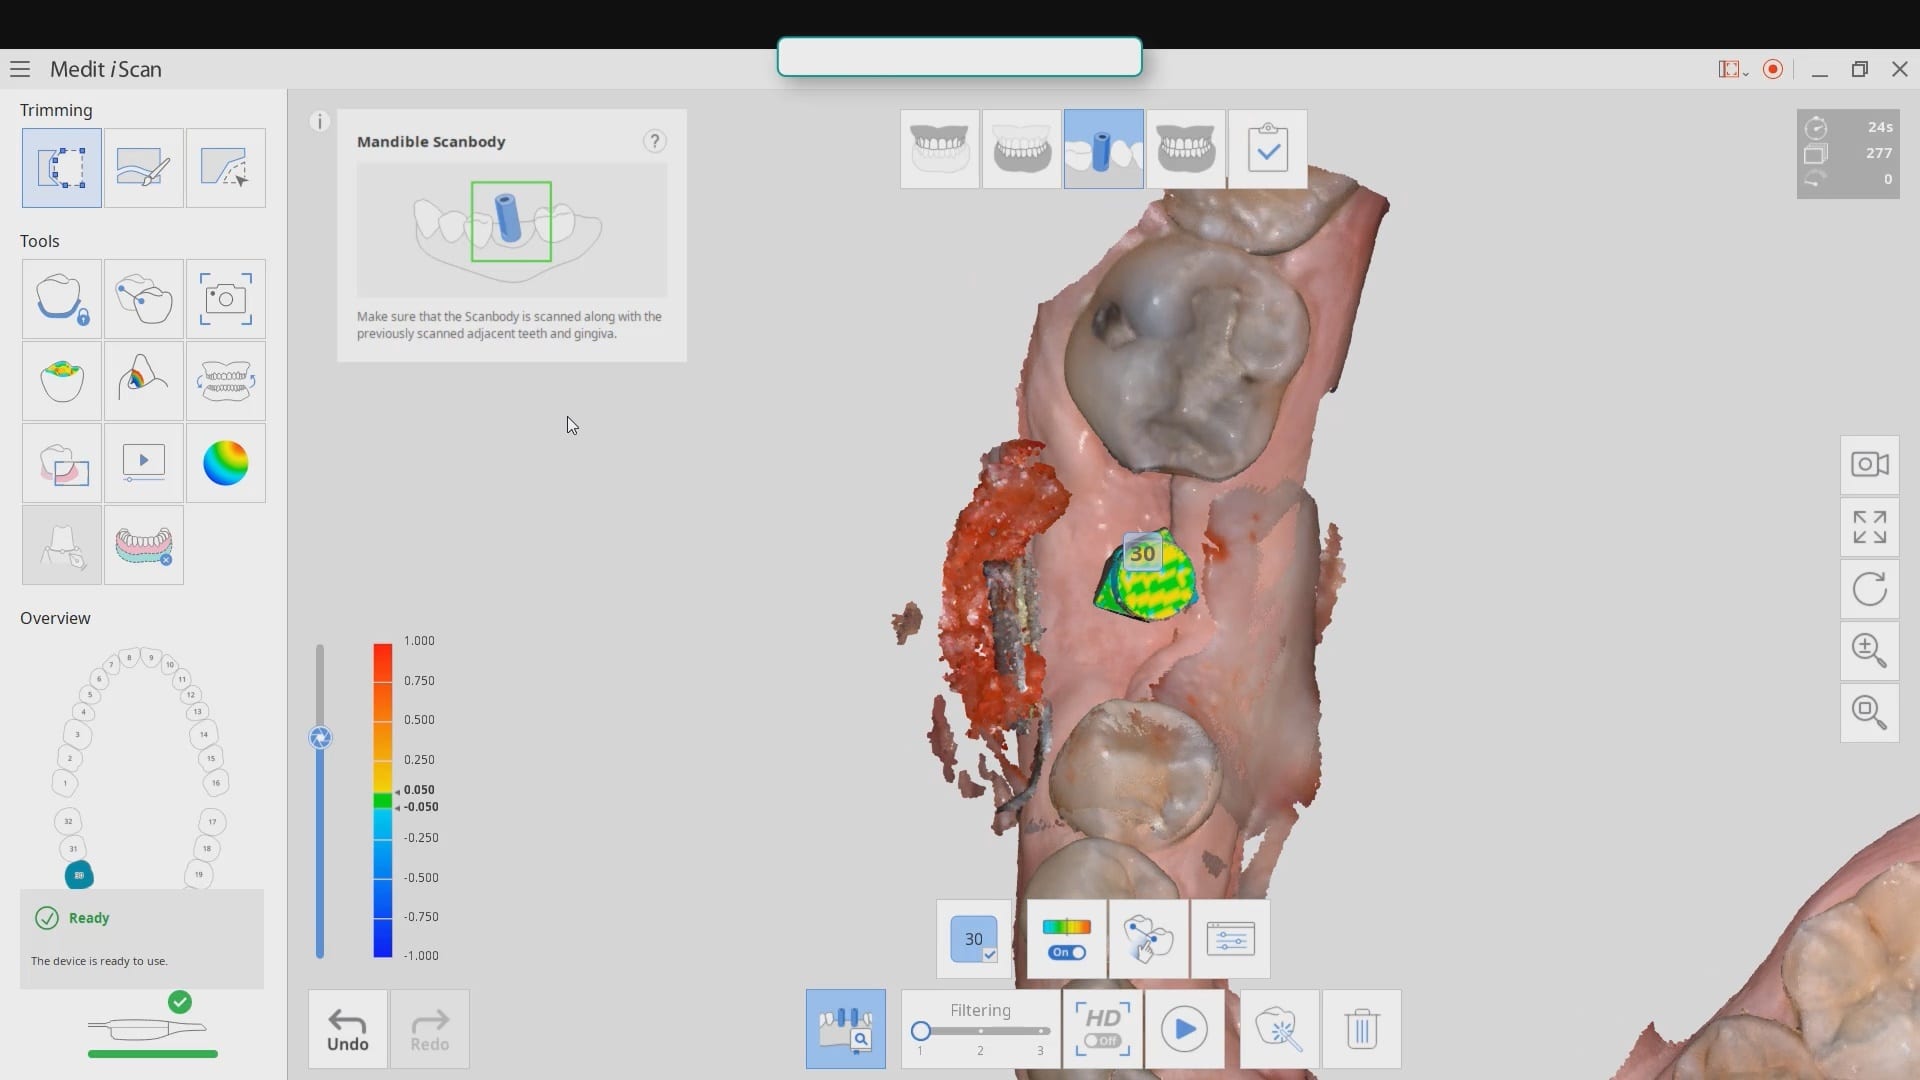
In this video, we show a recall of an implant restored with a scanbody. When the implant was initially placed, a scanbody was seated and an X-ray was taken to verify that it was seated. The titanium scanbody allows for visualization of seat. A peek scanbody does have a metal carrier but it is confusing to some users to verify that it is engaged with the fixture.
The proper placement of this biomax implant, followed by ideal contouring of tissue and bone around the head of the fixture, allowed for enough “running room” to create the desired emergence profile
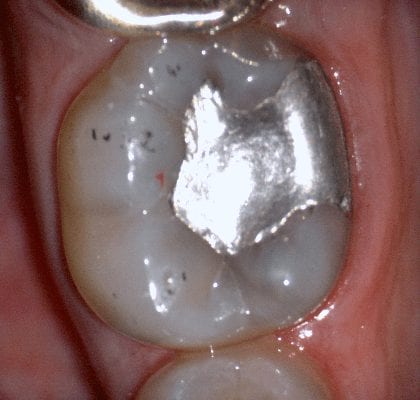
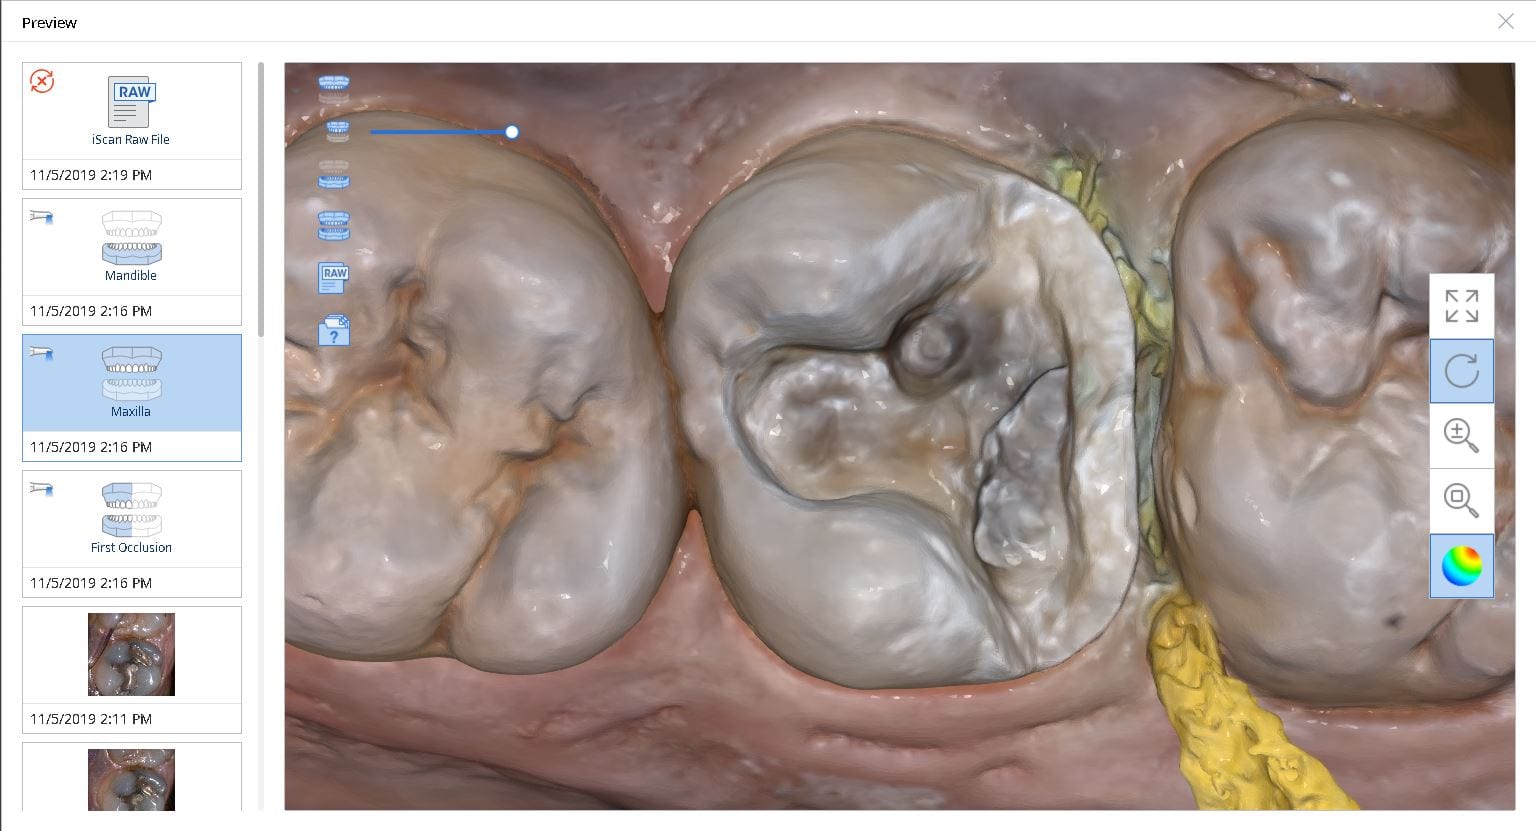
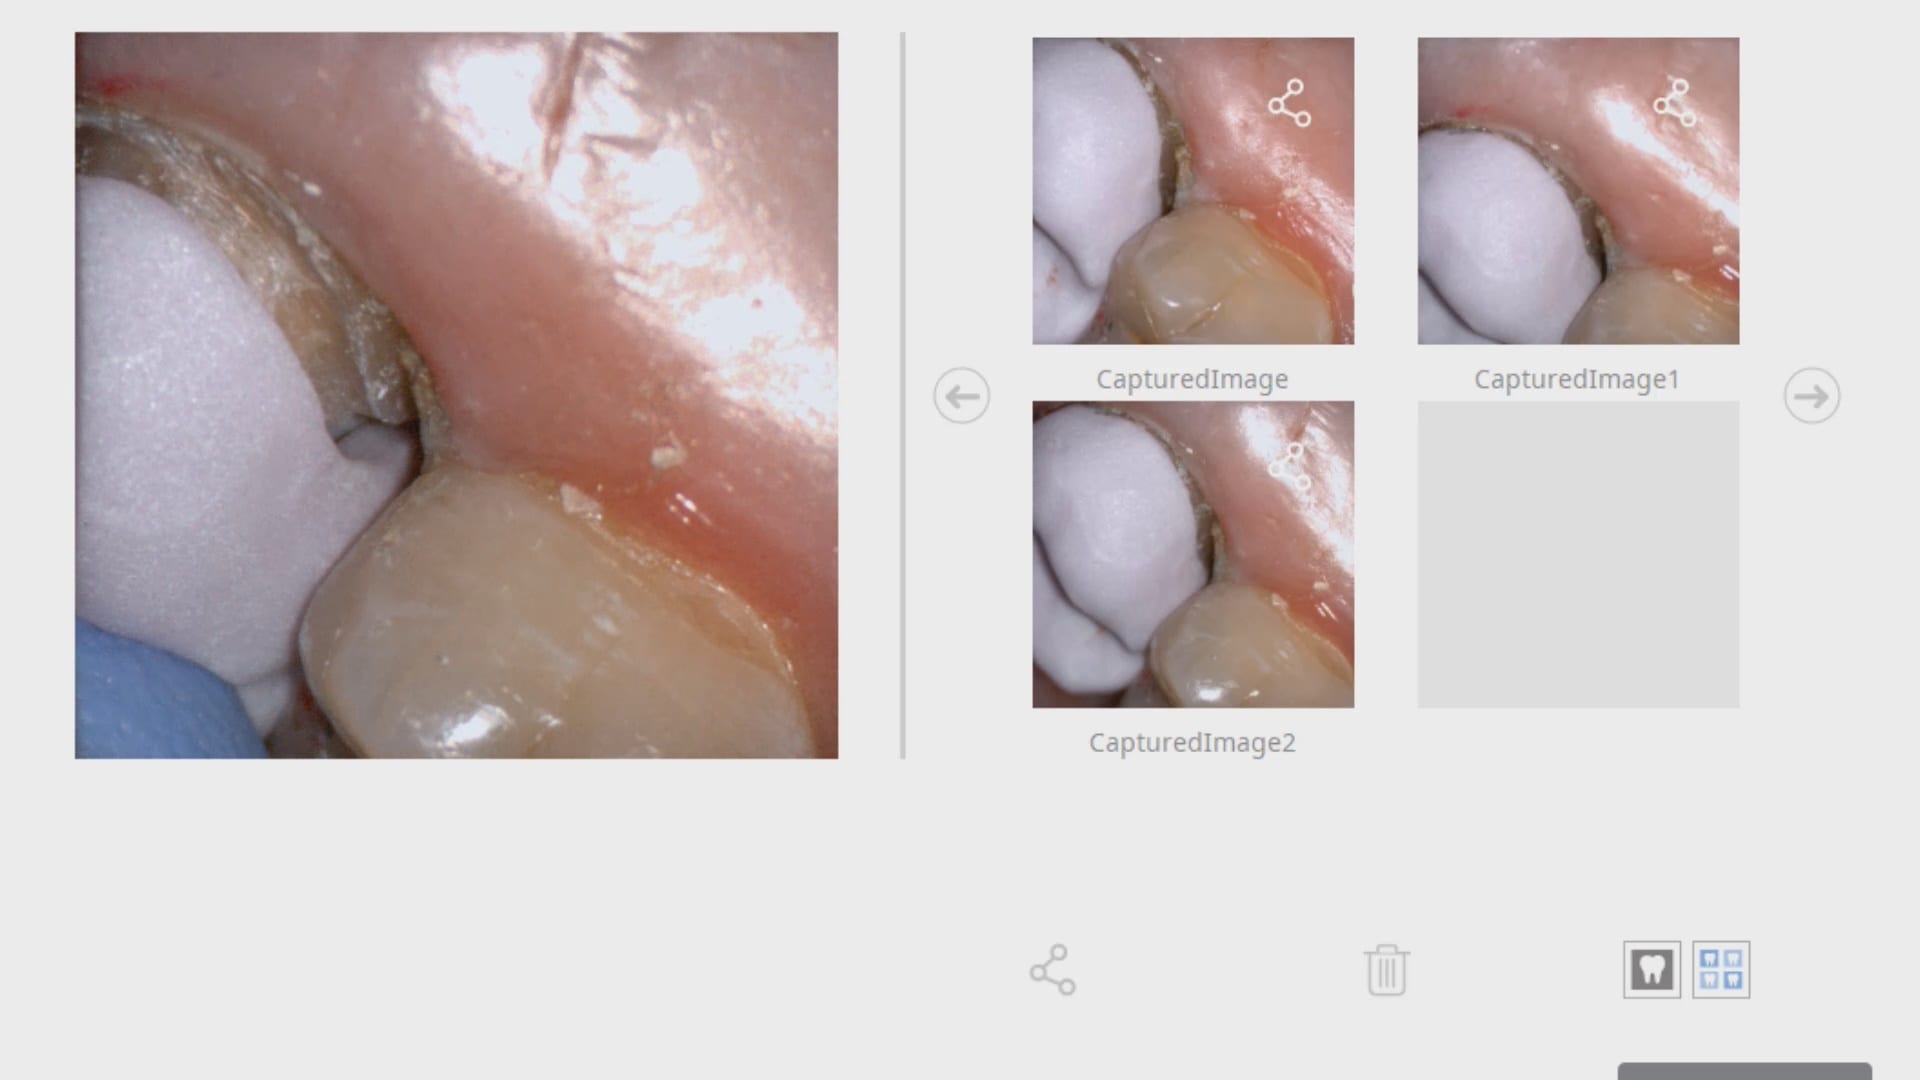
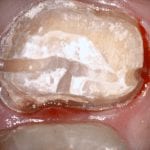
With digital dentistry and designing cases in color, you do not need flash like you do for analog impressions. The purpose of flash is so that you can discern the separation of the margin from the tissue in stone. You still need to displace the tissue to expose the line of sight to your margins, but you don’t necessarily need the flash. But if you get both, it certainly helps! You can see an example of this with the margins scanned in HD mode with the Medit i500.
flash and flush help expose the margins for the Medit i500 ios
In the following video we demonstrate how we set up the case and image the prep. With digital dentistry, you can image the opposing, the arch, and the bite in any sequence you want. This has great implications clinically where team members can scan most of the data needed and the dentist can step, prepare the tooth, and just image the prep and the contacts of the neighboring teeth. Advanced users who are looking for speed can process the case even before the prep is imaged, and then just image the prep and only process that arch and merge them in the cad software, greatly speeding up the process
Every distal extension case I have to accomplish the following:
take two bites to make sure my vertical dimension does not change with pre-op and prep images
make sure I have proper clearance
We usually take the bites and all other images BEFORE I have even imaged the prep- I usually grab the prep images last
most of this you can delegate to your team and just take the prep images and make it simple for yourself
this video shows the clinical steps. to see what the lab does with your case, click in the link to see the subsequent steps. you can also choose to design and mill it, which is what I did
With analog dental impressions, it is imparative to separate the gum tissue from tooth structure and to create a trough for flash for dye work. This is not the case with the intra-oral scanner by Medit. All you need to do is displace the tissue so you have a clear line of site to the margins, and you just need to be flush. You don’t need flash like you do with stone work
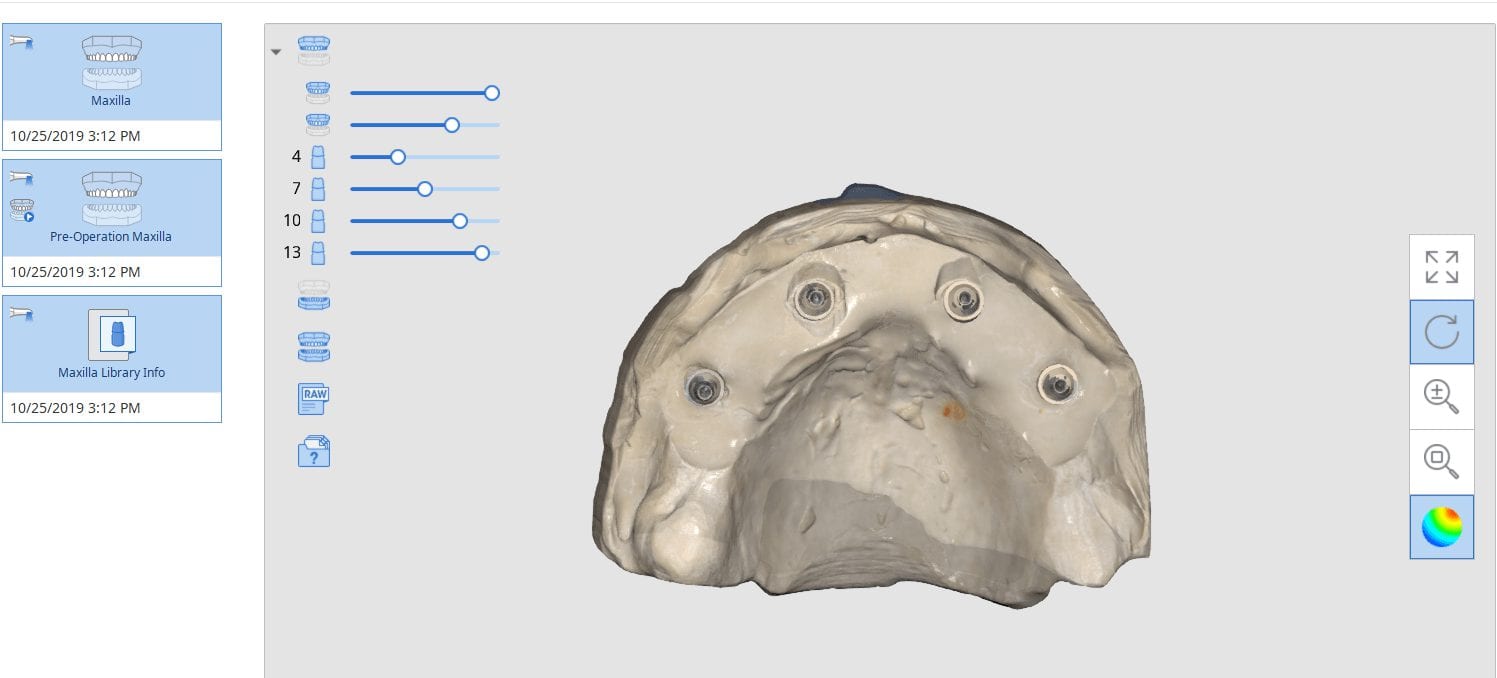
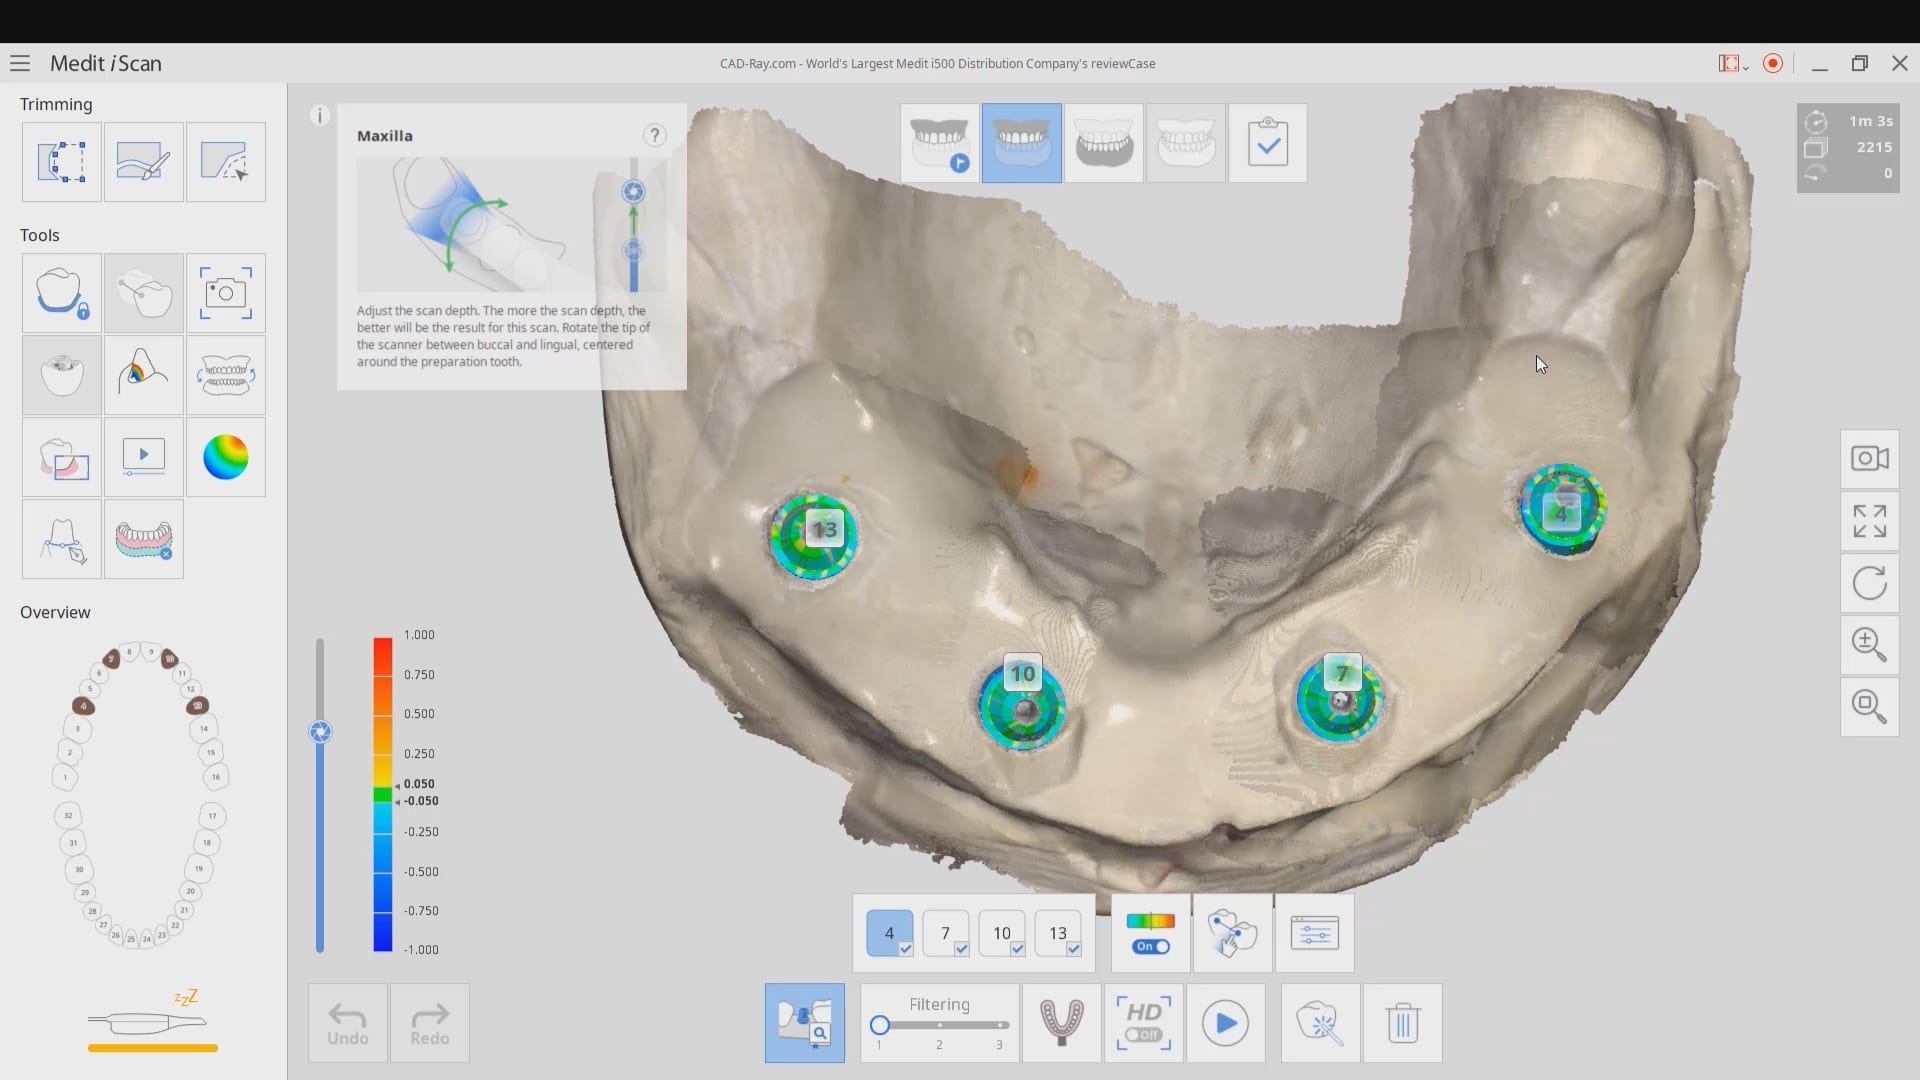
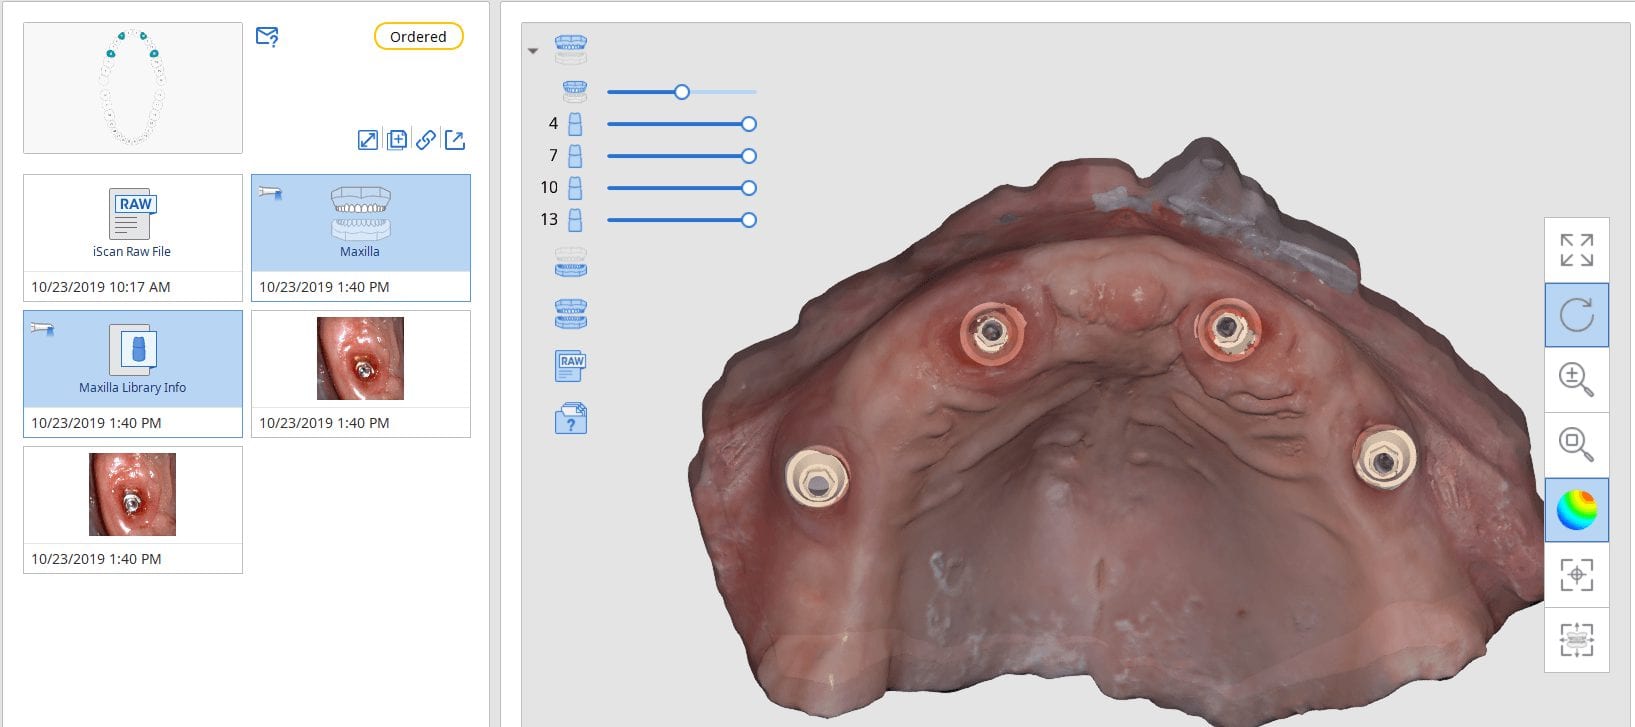
This is a detailed video demonstration that shows you how to capture full arch scans for multi unit implant cases in edentulous jaws and, more importantly, how to assess its accuracy.
this is a very controversial topic and most aspire to capture intra-oral scans without the need for a verification jig. to date, this has been impossible to measure during live intra-oral scans. you can only do so with trueness and precision studies on benchtops, with known reference frames.
All that changed this month with the launch of Medit’s AI (artifical intelligent implant suprastructure automatic identification) system. it is meant to primarily identify a scanbody and the location of the fixture. But we can use it to our advantage to give us a LIVE verification jig.
this is not comparing telegammetry to ios scans. it is showing how you can assess the accuracy of your live global scan, which was impossible a month ago. it should be readily apparent to you that every scanner on the market can produce accurate or inaccurate models, and the end result is completely up to the operator.
this invalidates most if not all studies to date that assess trueness and precision of intra-oral scanners because none of them can measure those values intra-orally. this is a new benchmark that all manufacturers should try to achieve now
Medit i500 Artificial Intelligent Implant Suprastructure Identfication System not only simplifies advanced implant prosthetics but can be used for immediate assessment of cross arch accuracy.
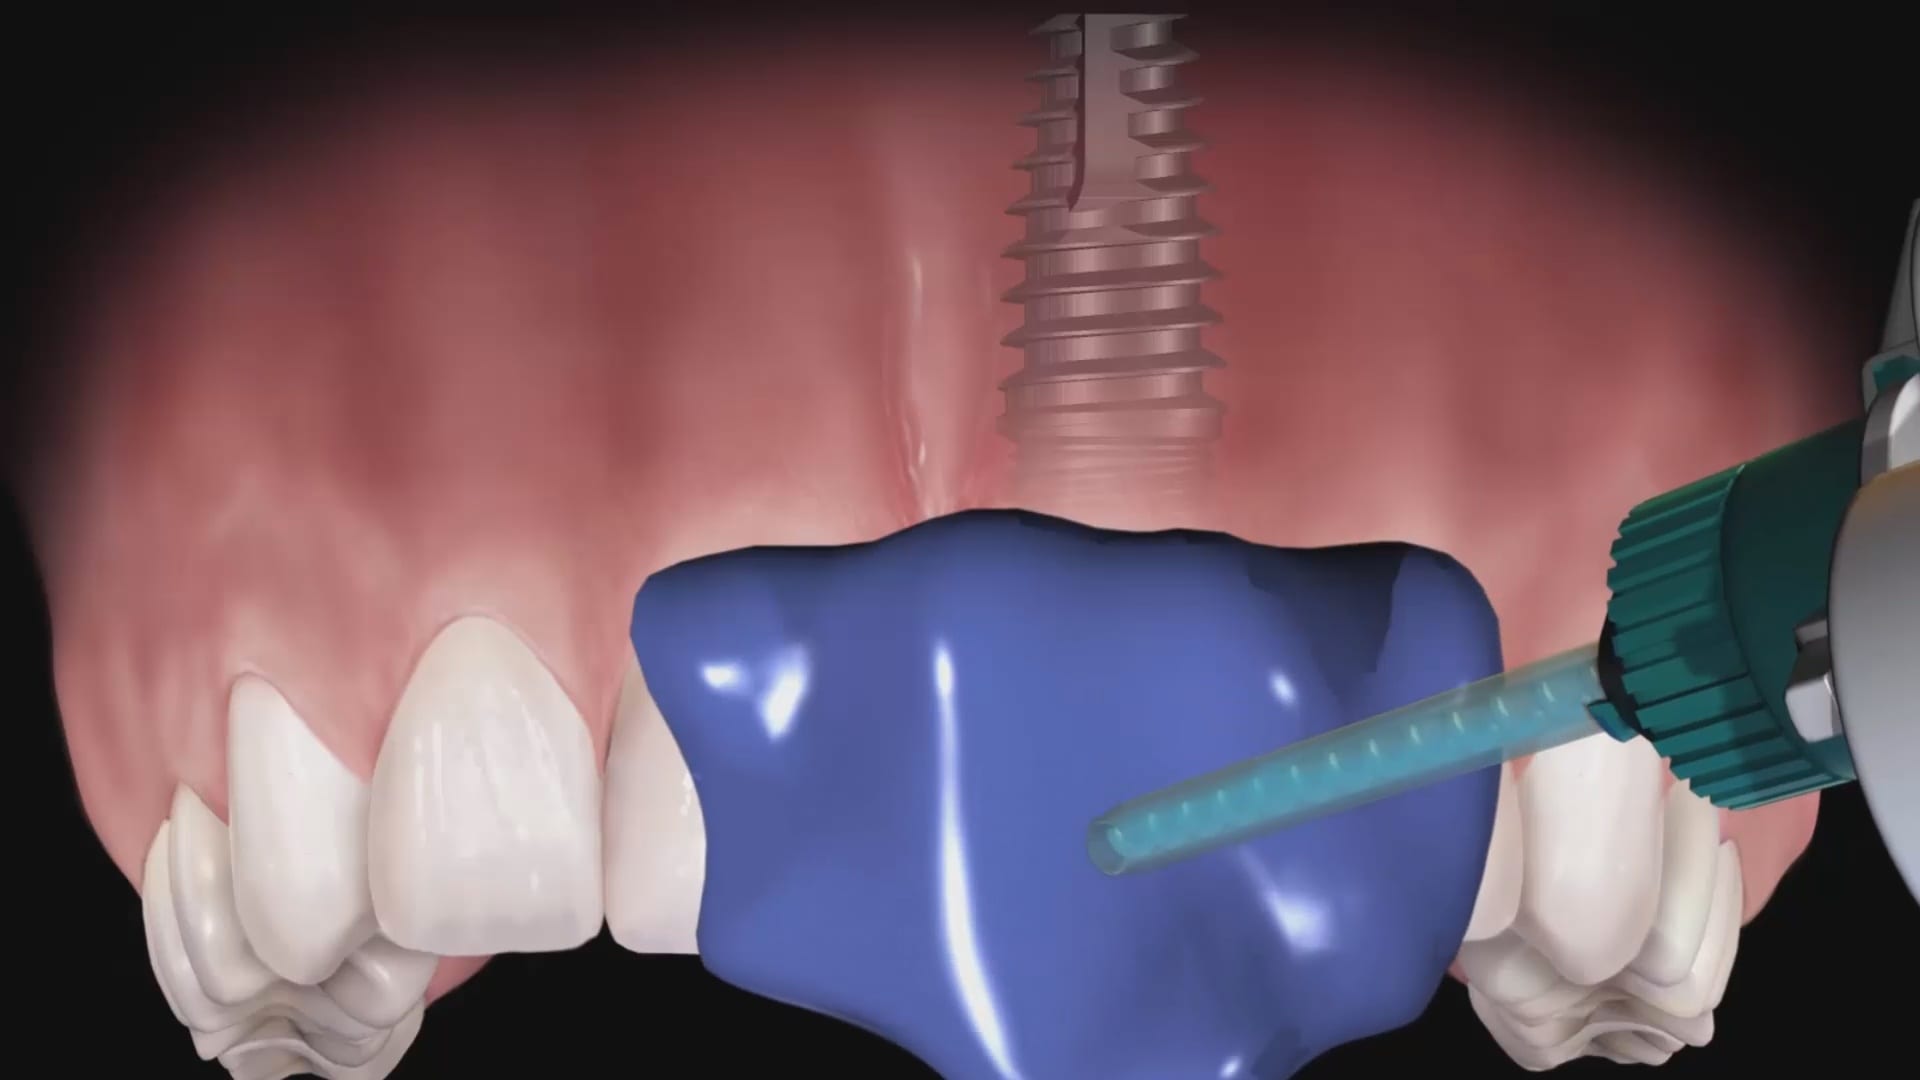
Dental implant surgery and restorations were the most risky procedures just 10 years ago. They were also the most profitable, but also carried the largest liability and the most significant surgical and restorative lab costs. A simple error introduced in the restorative process could easily eliminate the profit margin and a more significant mishap can create an undesirable outcome
We have seen dramatic changes in implant surgery where both the cost of the surgical stent and the fixture placement have reduced to the point where fully guided surgery is now the norm as they speed up the surgery and normalize the accuracy of placement across a broad range of practitioners with varying levels of experience. We are now seeing the same type of effect on the restorative side of the implant treatment, where digital dentistry is greatly reducing costs and errors.
With permission from blueskybio.com, we captured some key elements with analog impressions to highlight potential errors that can be introduced. The full video can be seen here:
The common sources of errors that someone can introduce are:
The inherent nature of impression material that can distort during the impression step
The angulation of the impression abutment may prevent it from seating all the way or may bind on the adjacent teeth making it difficult to capture an accurate impression
The size of the impression abutment can usually block access to the contours of the adjacent teeth where the pvs material does not capture the detail needed to generate good contacts and emergence profiles
Not securing the implant analog with the abutment in the impression material so that it does not distort or vibrate out of its position while pouring stone into the PVS material
With multiple implant, the problems can compound exponentially if the implants do not draw well together with complications ranging from locking the tray in the patient’s mouth accidentally or distorting the impression material enough when removing it where you decrease the accuracy. Some practitioners prefer to do this in multiple steps, correcting angulation and collisions with custom abutments and several impressions
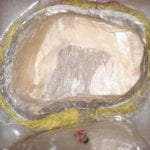
Fortunately, in this impression of 3 implants that were placed with a guided, the impression abutments are parallel to each other but just a few degrees in either direction, you can have multiple collisions of the abutments with the adjacent teeth or in between the abutment themselves. What a scanbody does is it allows for the optical scan of a geometric shape that helps CAD software identify the exact location of an implant fixture, its timing, and its relationship to the arch form.
It has significant advantages as there is no distortion of the impression material. Moreover, you can capture all the detail of the adjacent teeth before you place the scanbody in the mouth. This dramatically reduces the errors and adjustments you will need to make during the seat appointment.
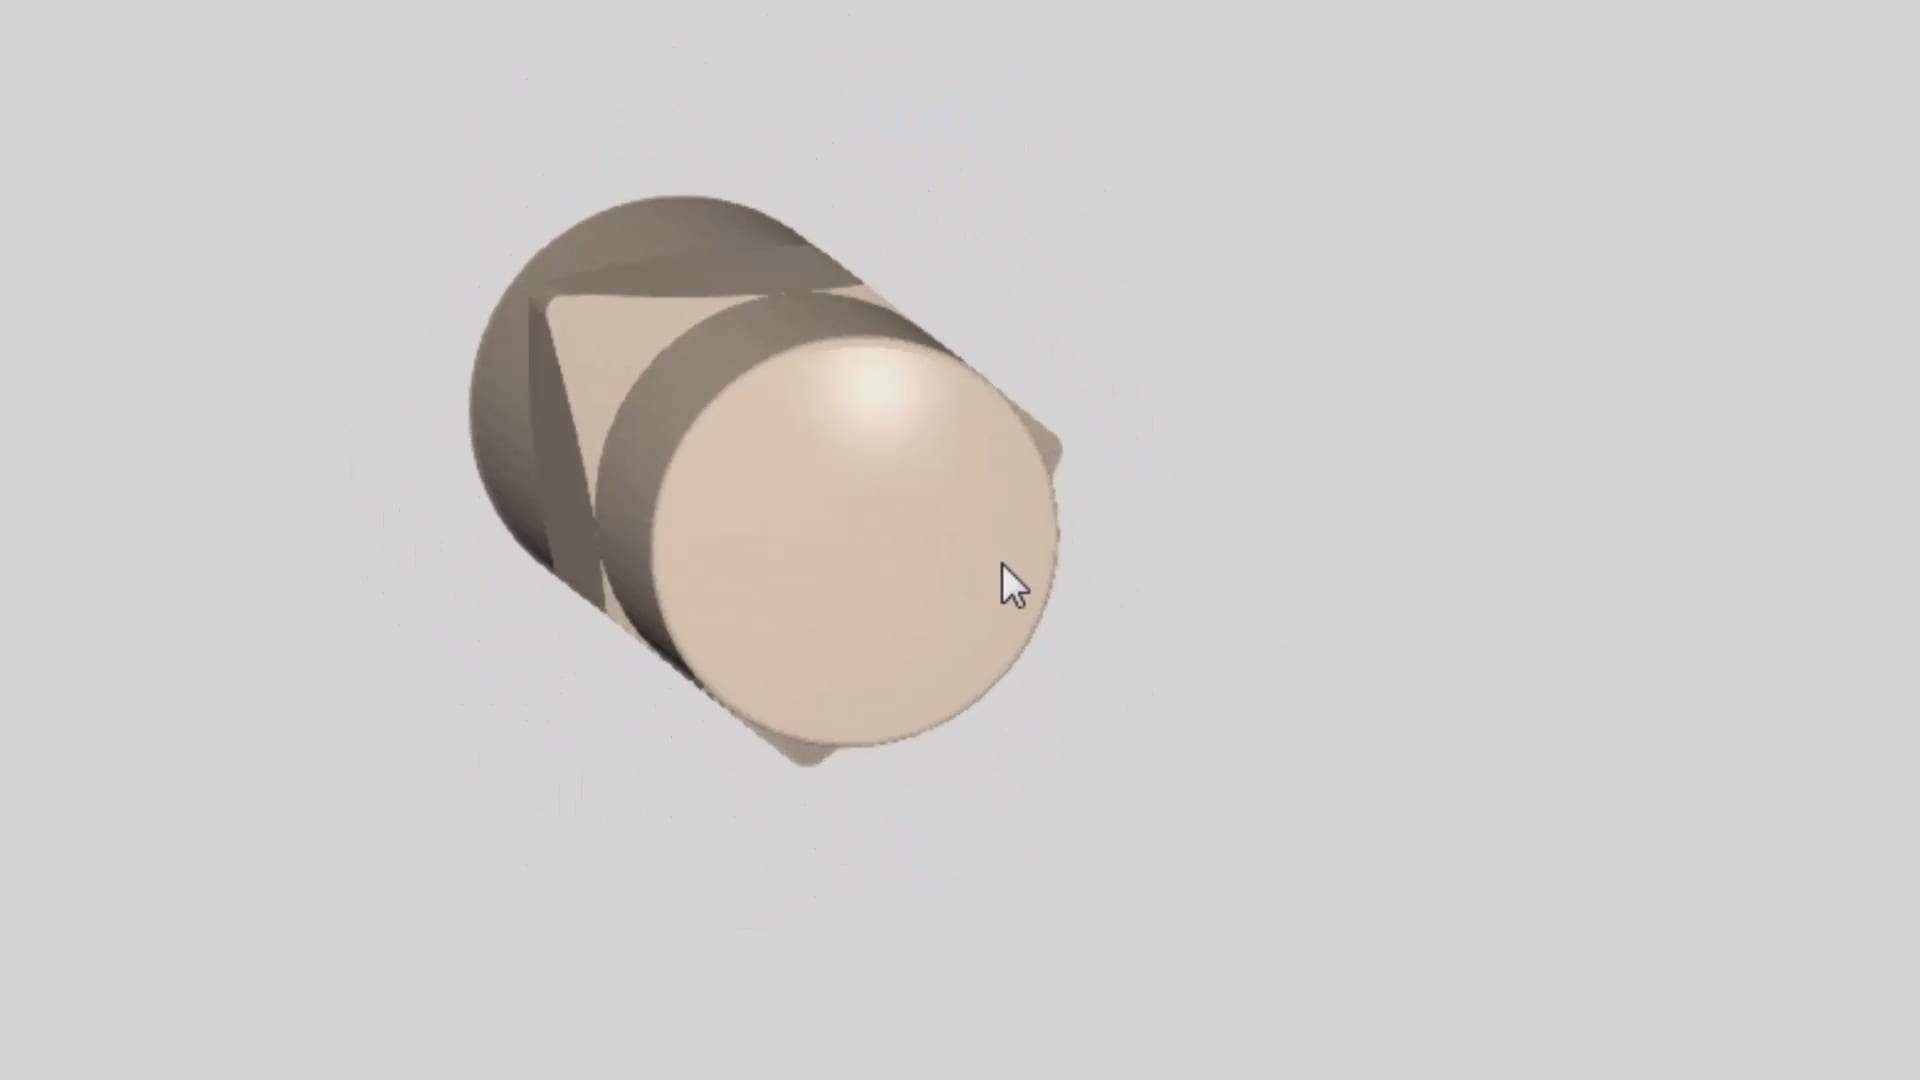
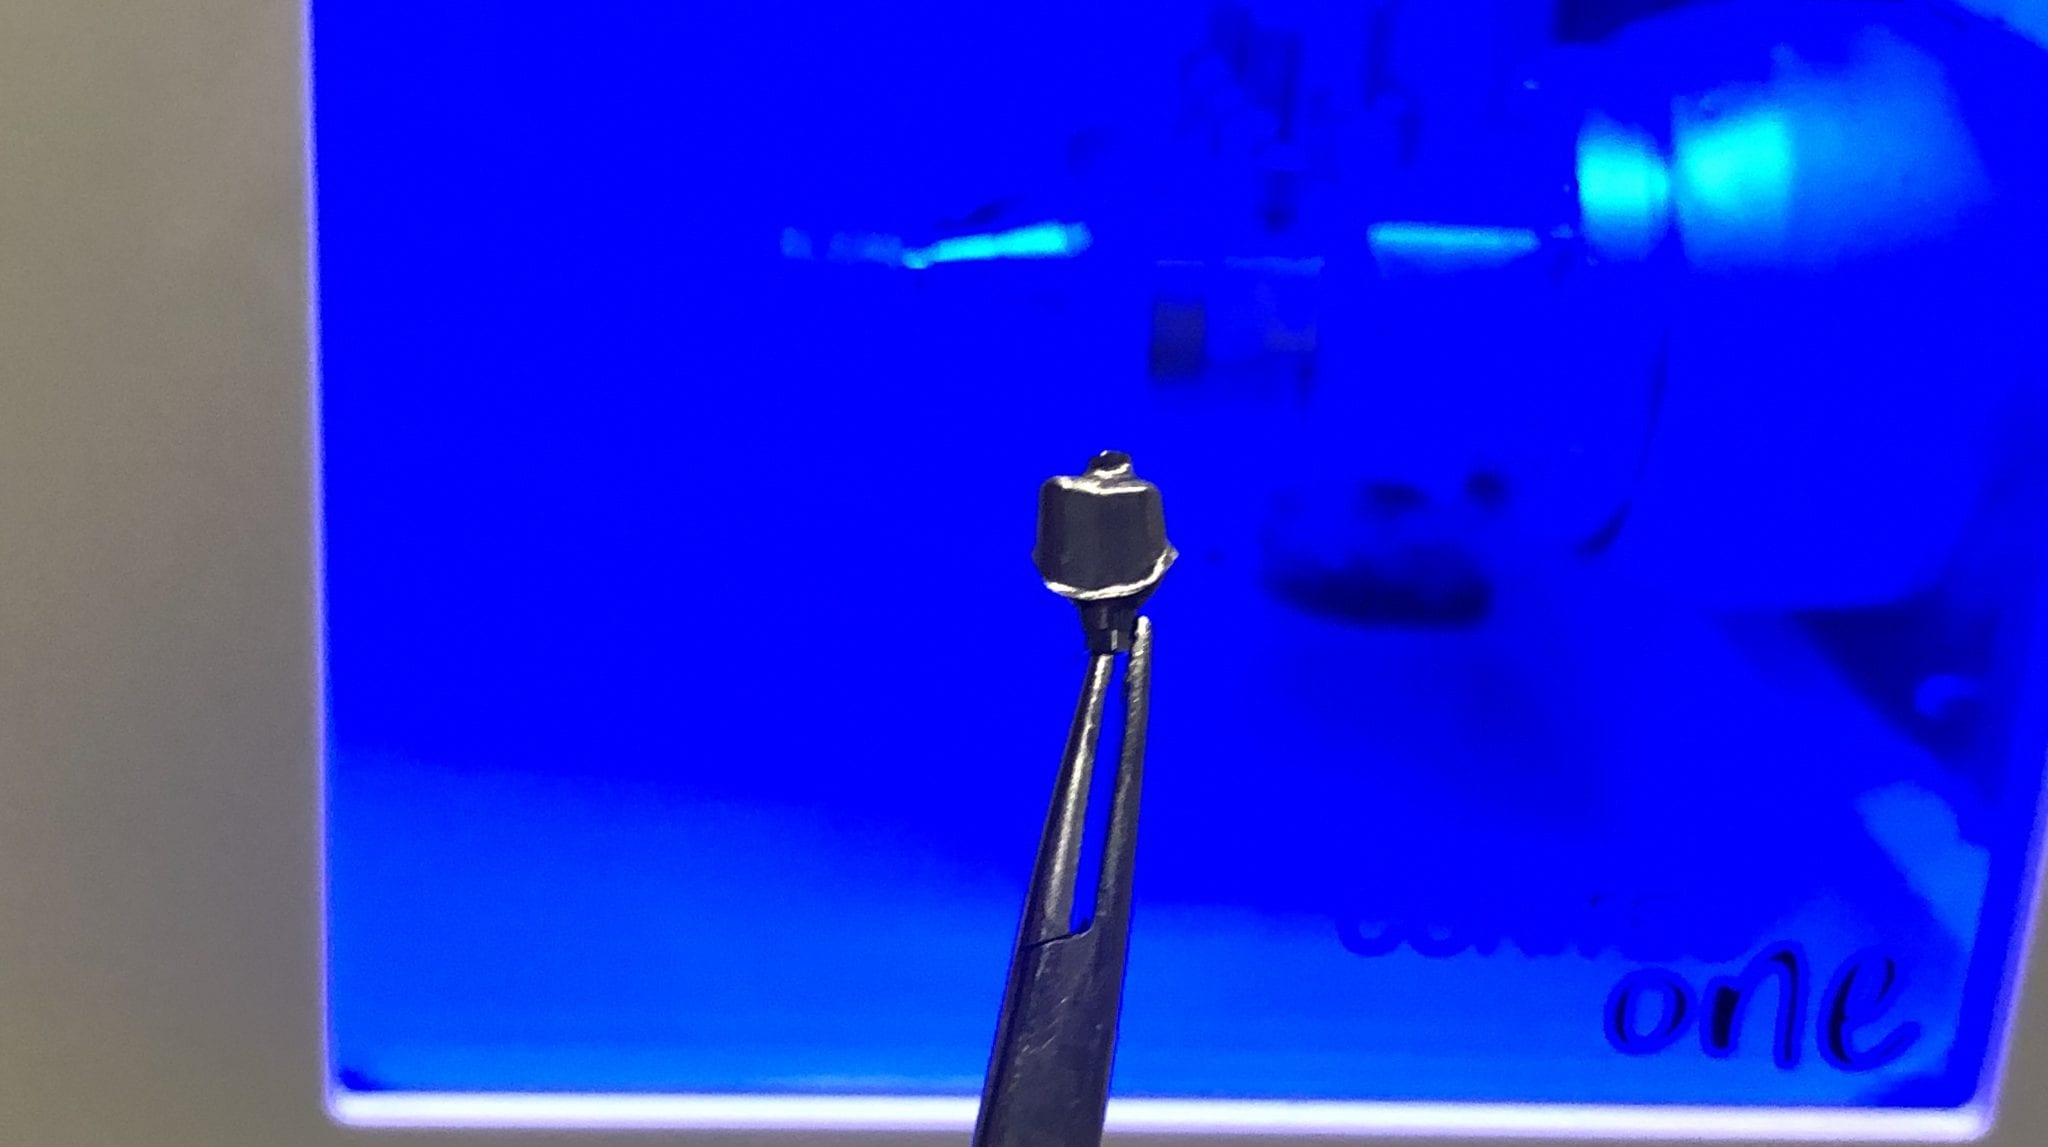
This video shows you the contour or the shape of a specific scanbdoy. There are many manufacturers that produce the scanbodies for a variety of fixtures with different geometries. Ideally, you use a titanium based one so that you can take an x-ray to make sure it is seated all the way. A frequent cause for error with digital impression is that you bind on tissue of bone which block you form seating all the way.
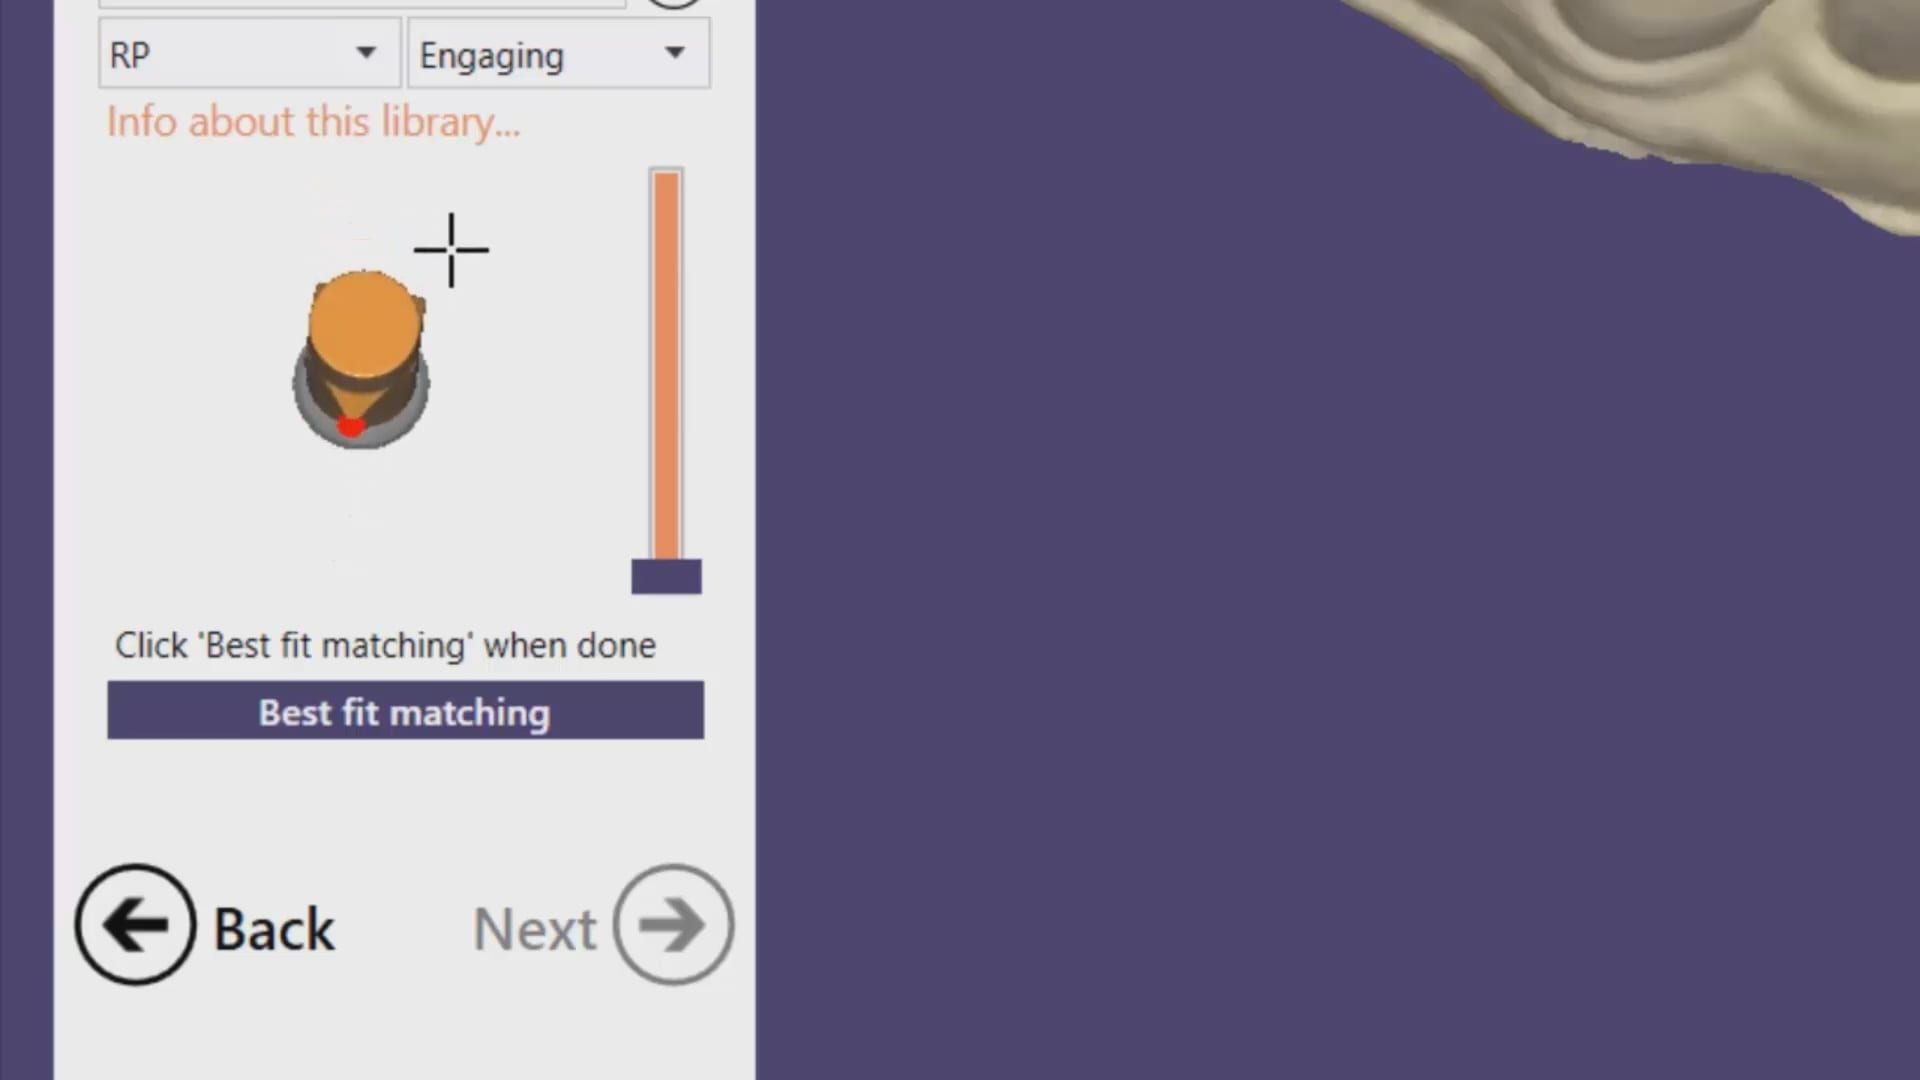
Once you have scanned the pertinent information, you can then take the digital models to CAD software where the location of the fixture is identified digitally and you can design the restoration of your choice. This can be titanium abutment or a tibase that retrofits ceramic material like emax or zirconia. The following video demonstrates how you identify the scanbody in exocad and proceed with a sample design.
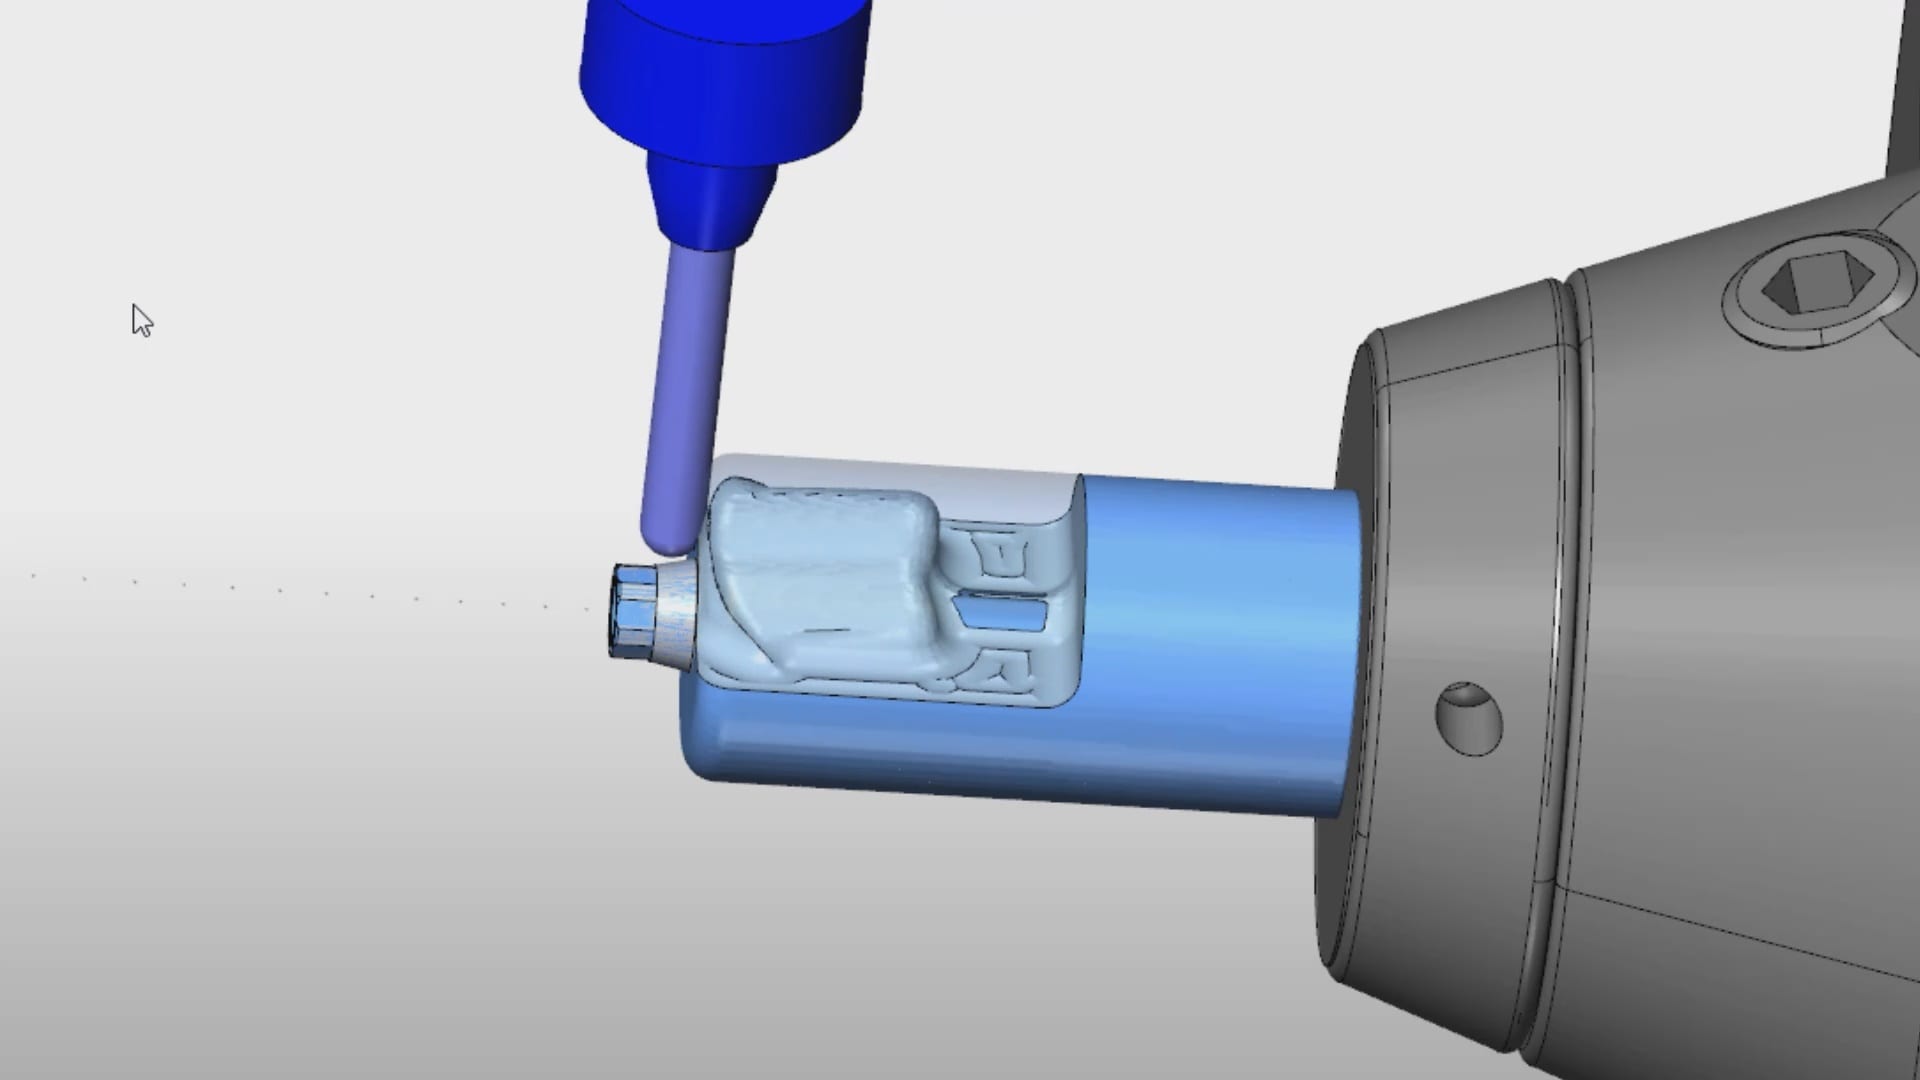
Once the design is completed, you can outsource the fabrication of the abutment and/or the crown. There are many machines that you can use to fabricate the titanium abutment. Please note that the milling machines do not mill the connection. The connection to the implant comes pre-manufactured. The cylindrical block is milled to shape. The cad software also maintains the relationship of the abutment to the crown so that they retrofit to each other.
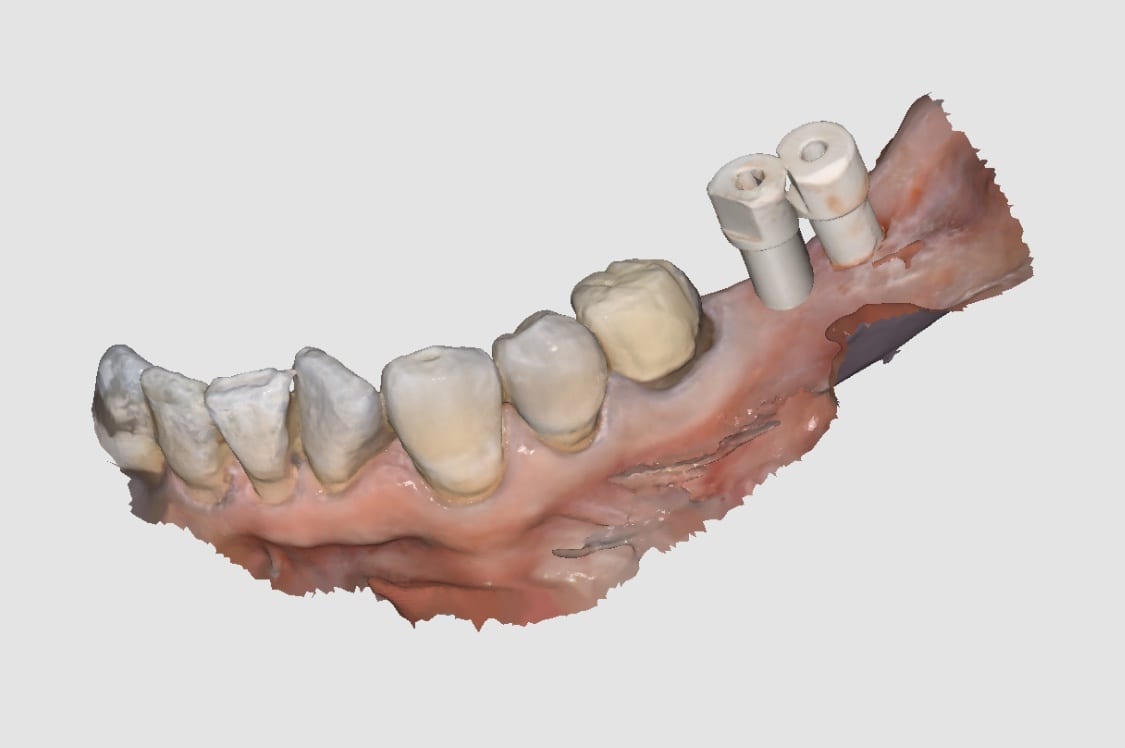
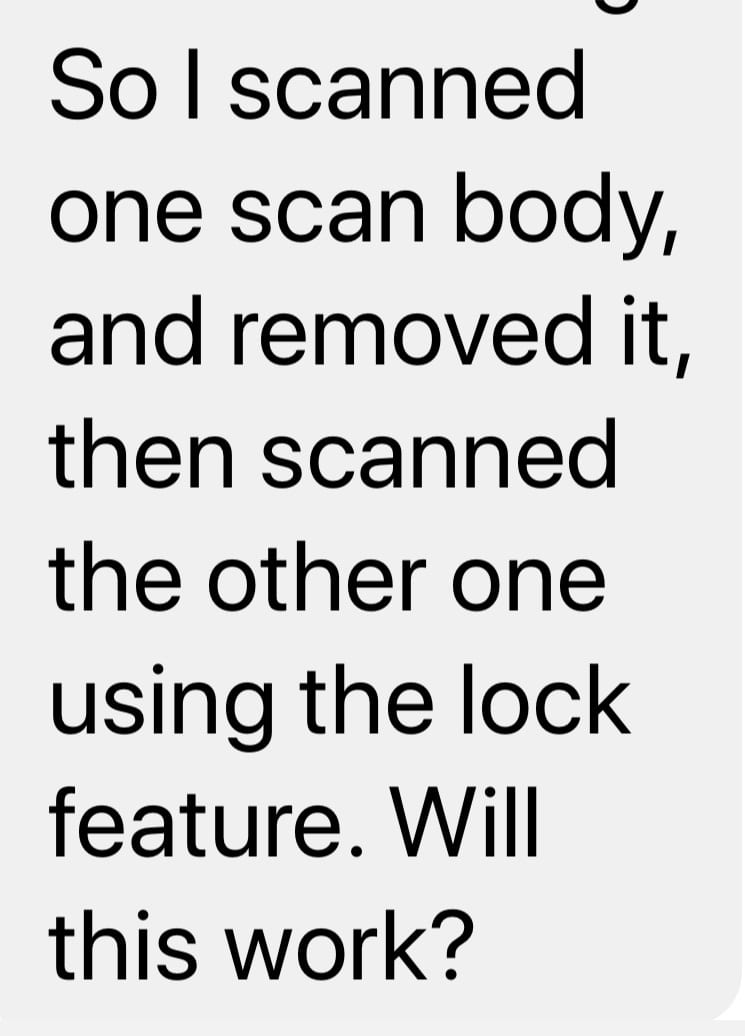
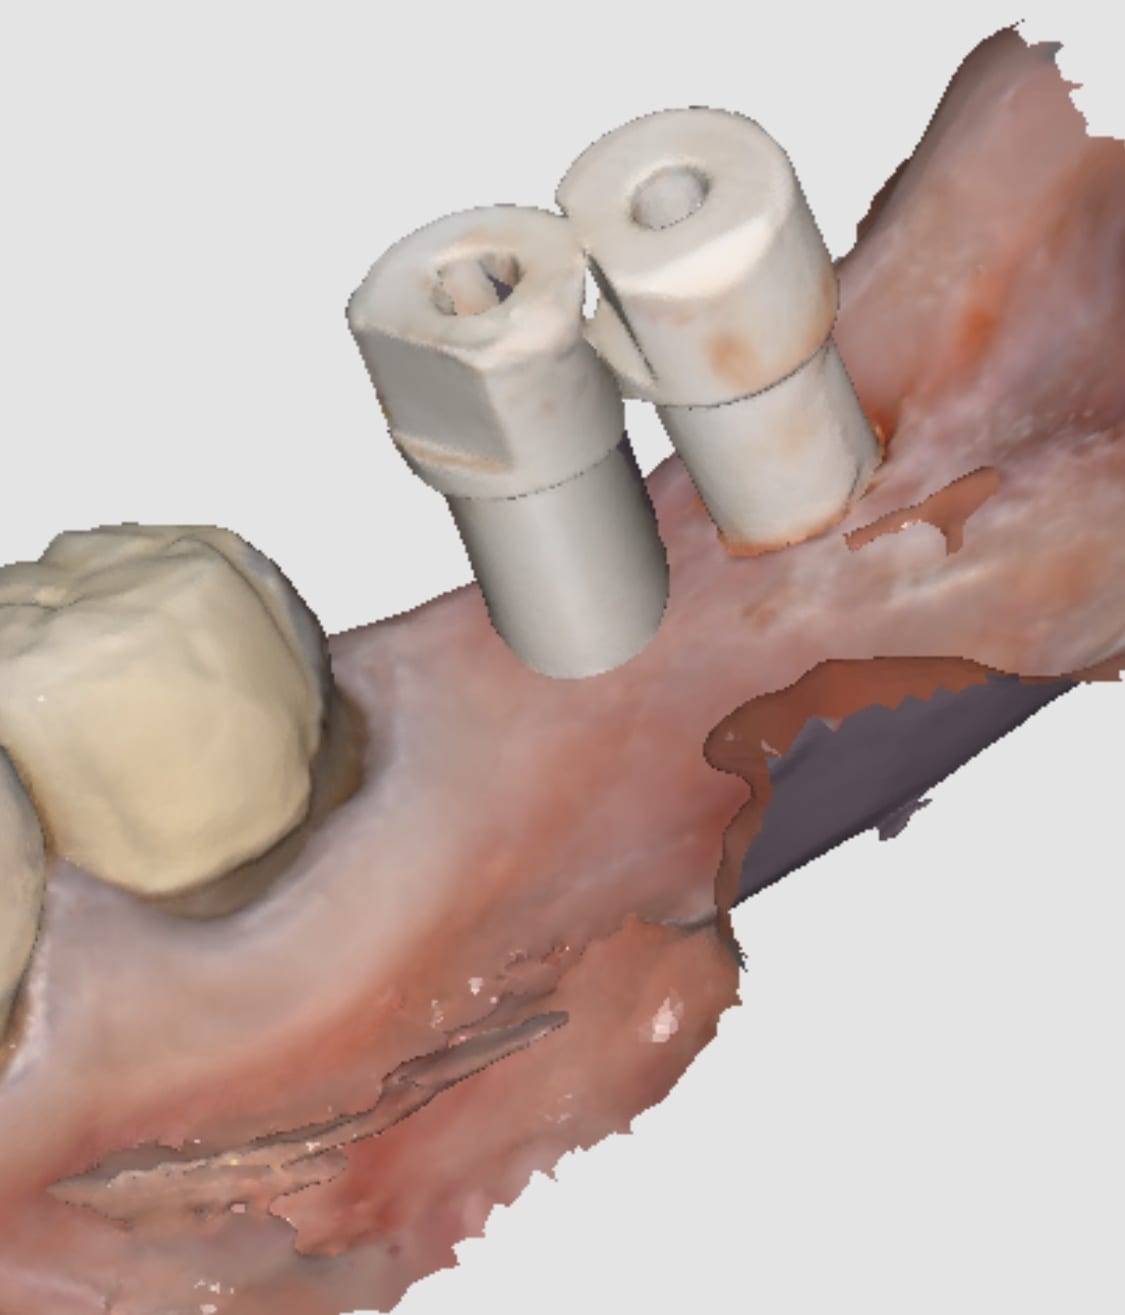
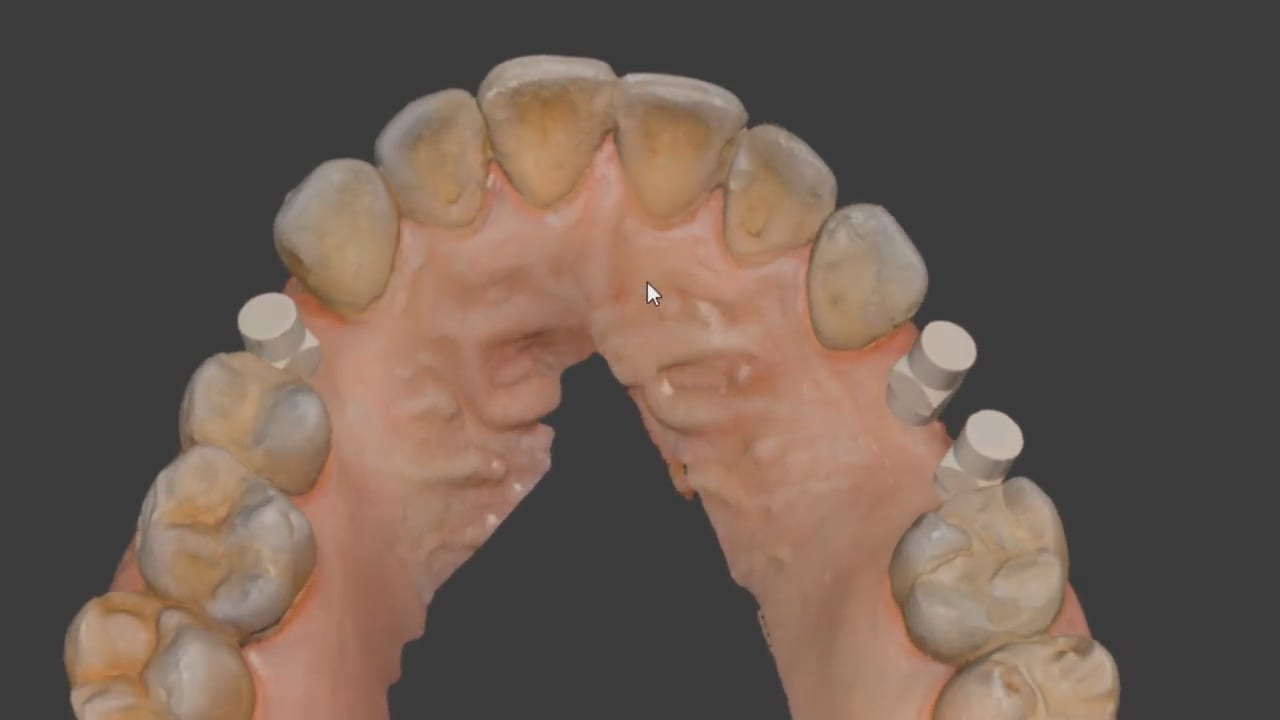
Now imagine if you had multiple implants that did not draw together? What’s great about digital dentistry and how we use the Medit i500 here is how we utilize a single scanbody to capture the location of 3 fixtures. One thing we emphasize at CAD-Ray is how digital impression allow you to create models over time and out of sequence. They are also editable and additive. In the subsequent video we demonstrate how you can capture segments at a time, which can greatly help when you have implant abutments colliding into each other.
You can place the scanbdoy in one location, scan it, digitally protect the area, remove the scanbody, place it into another location and image it at the new location, dramatically overcoming all the obstacles described above
Now for the greatest news and the largest advancement in digital dentistry in a decade! Medit i500 has launched the Artificial Intelligent Implant Identification System where the software automatically recognizes these scanbody and lets you skip dozens of steps to get to the immediate design steps of the restoration. The algorithm utilized to match the digital scanbody to the physical one is proprietary to Medit and is unparalleled in its accuracy. A lot of the guess work and inherent errors in the digital platforms are reduced with this software which is a contrasting as the difference between analog and digital impressions.
Using Medit’s Artificial Intelligent Implant Suprastructure Identification System to assess the accuracy of a cross arch digital impression! long title but it had to be to do it justice. For a primer, we highly recommend that you watch all of our videos on imaging fundamentals
here we put all the pieces of a puzzle together to answer how you can capture full arch impressions for implants accurately (or inaccurately). As the user, you are completely responsible for not introducing errors or capturing the data correctly
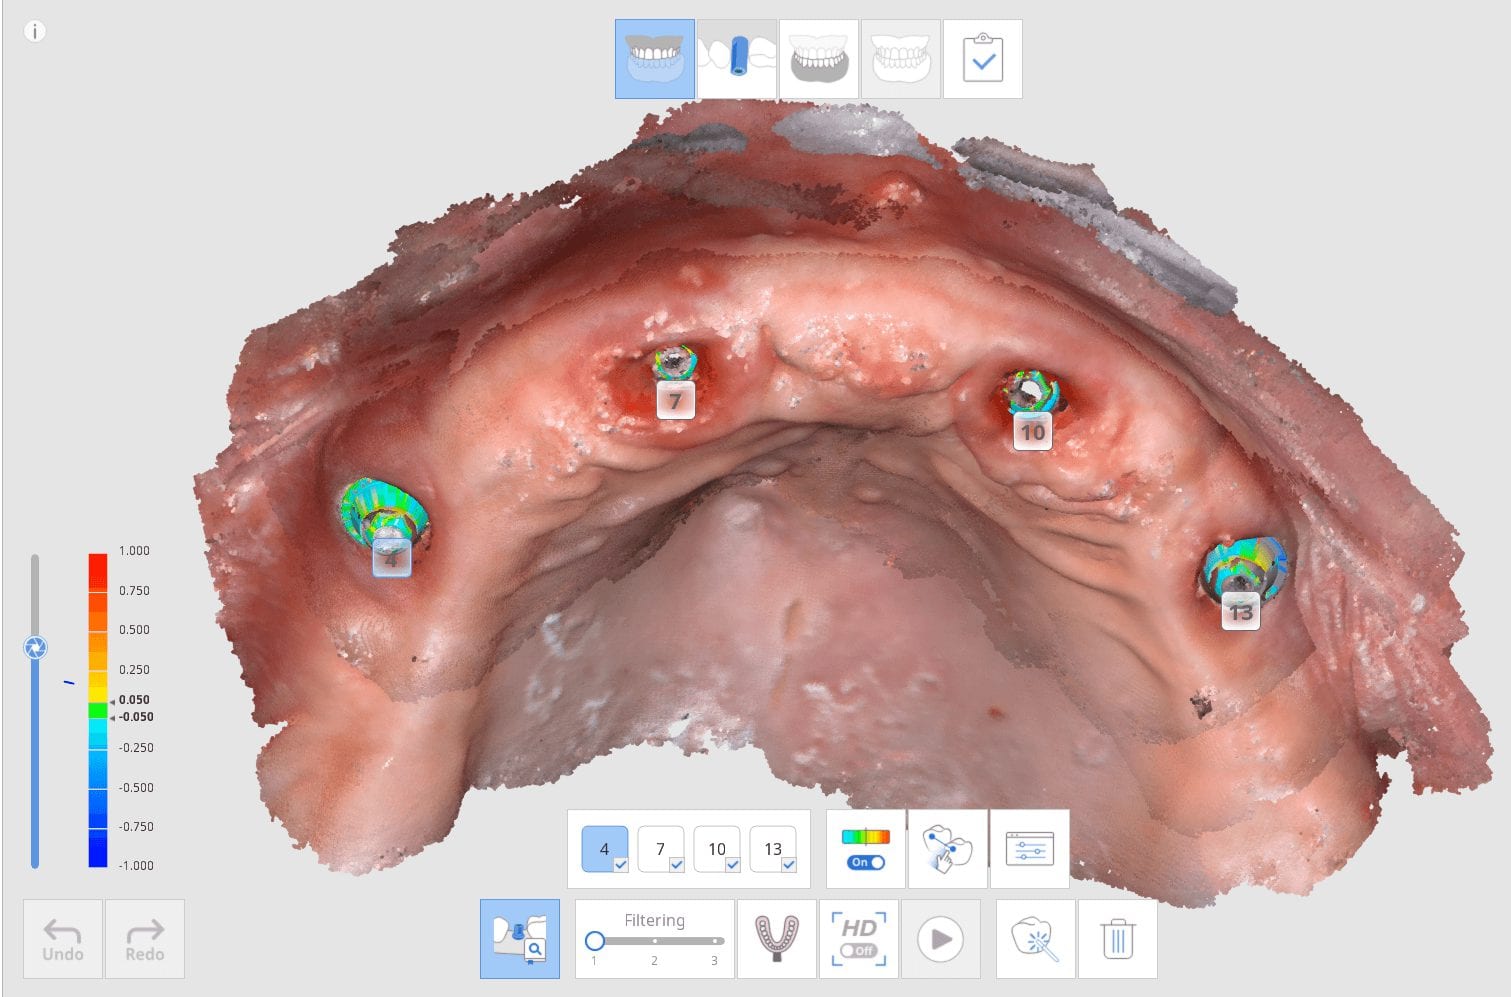
The Medit i500 has features that help you not only capture implant suprastructures, where you can bypass the scanbodies all together which impedes capturing the bite correctly for a lot of people, but you can identify their location and margins, even if they are hampered by bleeding. Most importantly you can use them as landmarks to accurately capture very accurate full arch impressions.
Medit’s reliability map, implant suprastructure identification system, and matching histogram colors can help you drastically reduce or eliminate steps and errors in full arch digital implantology
Using Medit’s Artificial Intelligent Implant Suprastructure Identification System to assess the accuracy of a cross arch digital impression! long title but it had to be to do it justice
here we put all the pieces of a puzzle together to answer how you can capture full arch impressions for implants accurately (or inaccurately). As the user, you are completely responsible for not introducing errors or capturing the data correctly
The Medit i500 has features that help you not only capture implant suprastructures, where you can bypass the scanbodies all together which impedes capturing the bite correctly for a lot of people, but you can identify their location and margins, even if they are hampered by bleeding. Most importantly you can use them as landmarks to accurately capture very accurate full arch impressions.
Medit’s reliability map, implant suprastructure identification system, and matching histogram colors can help you drastically reduce or eliminate steps and errors in full arch digital implantology
Posted by Armen Mirzayan on Wednesday, September 25, 2019
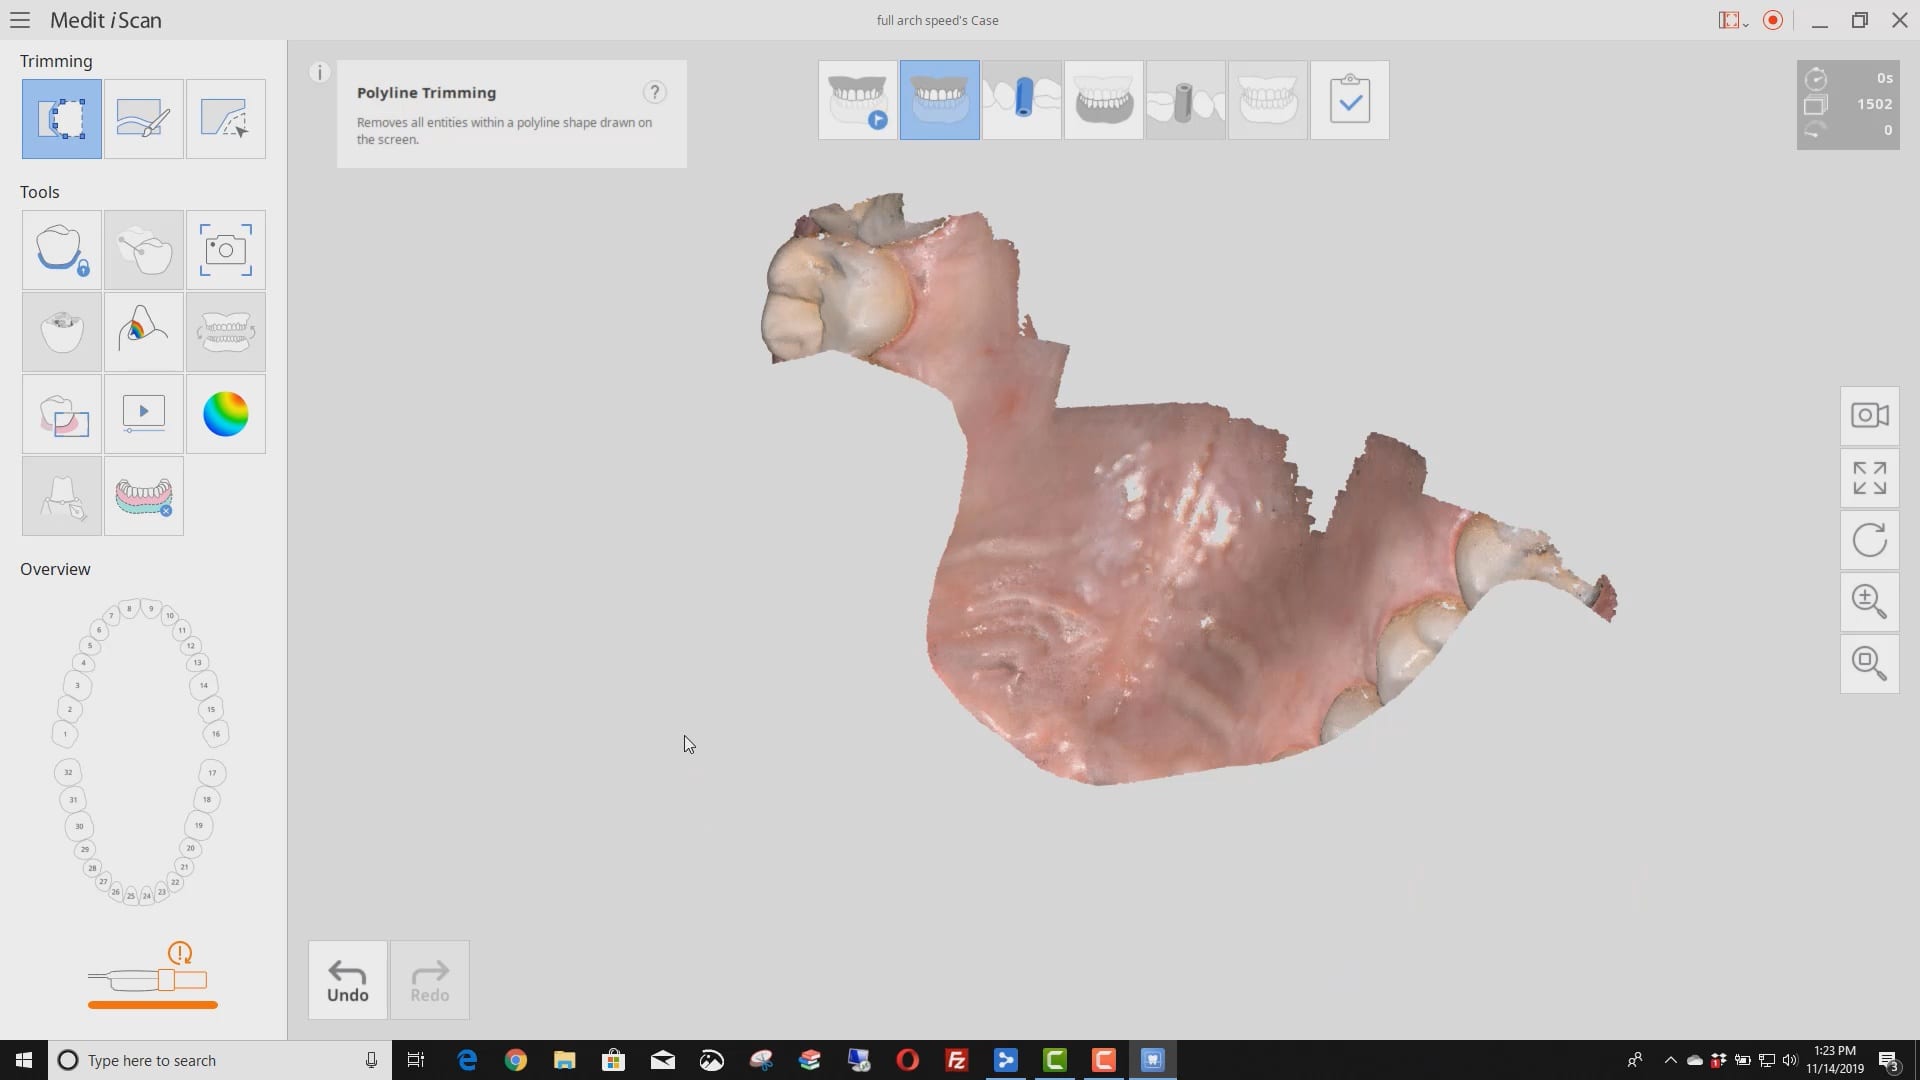
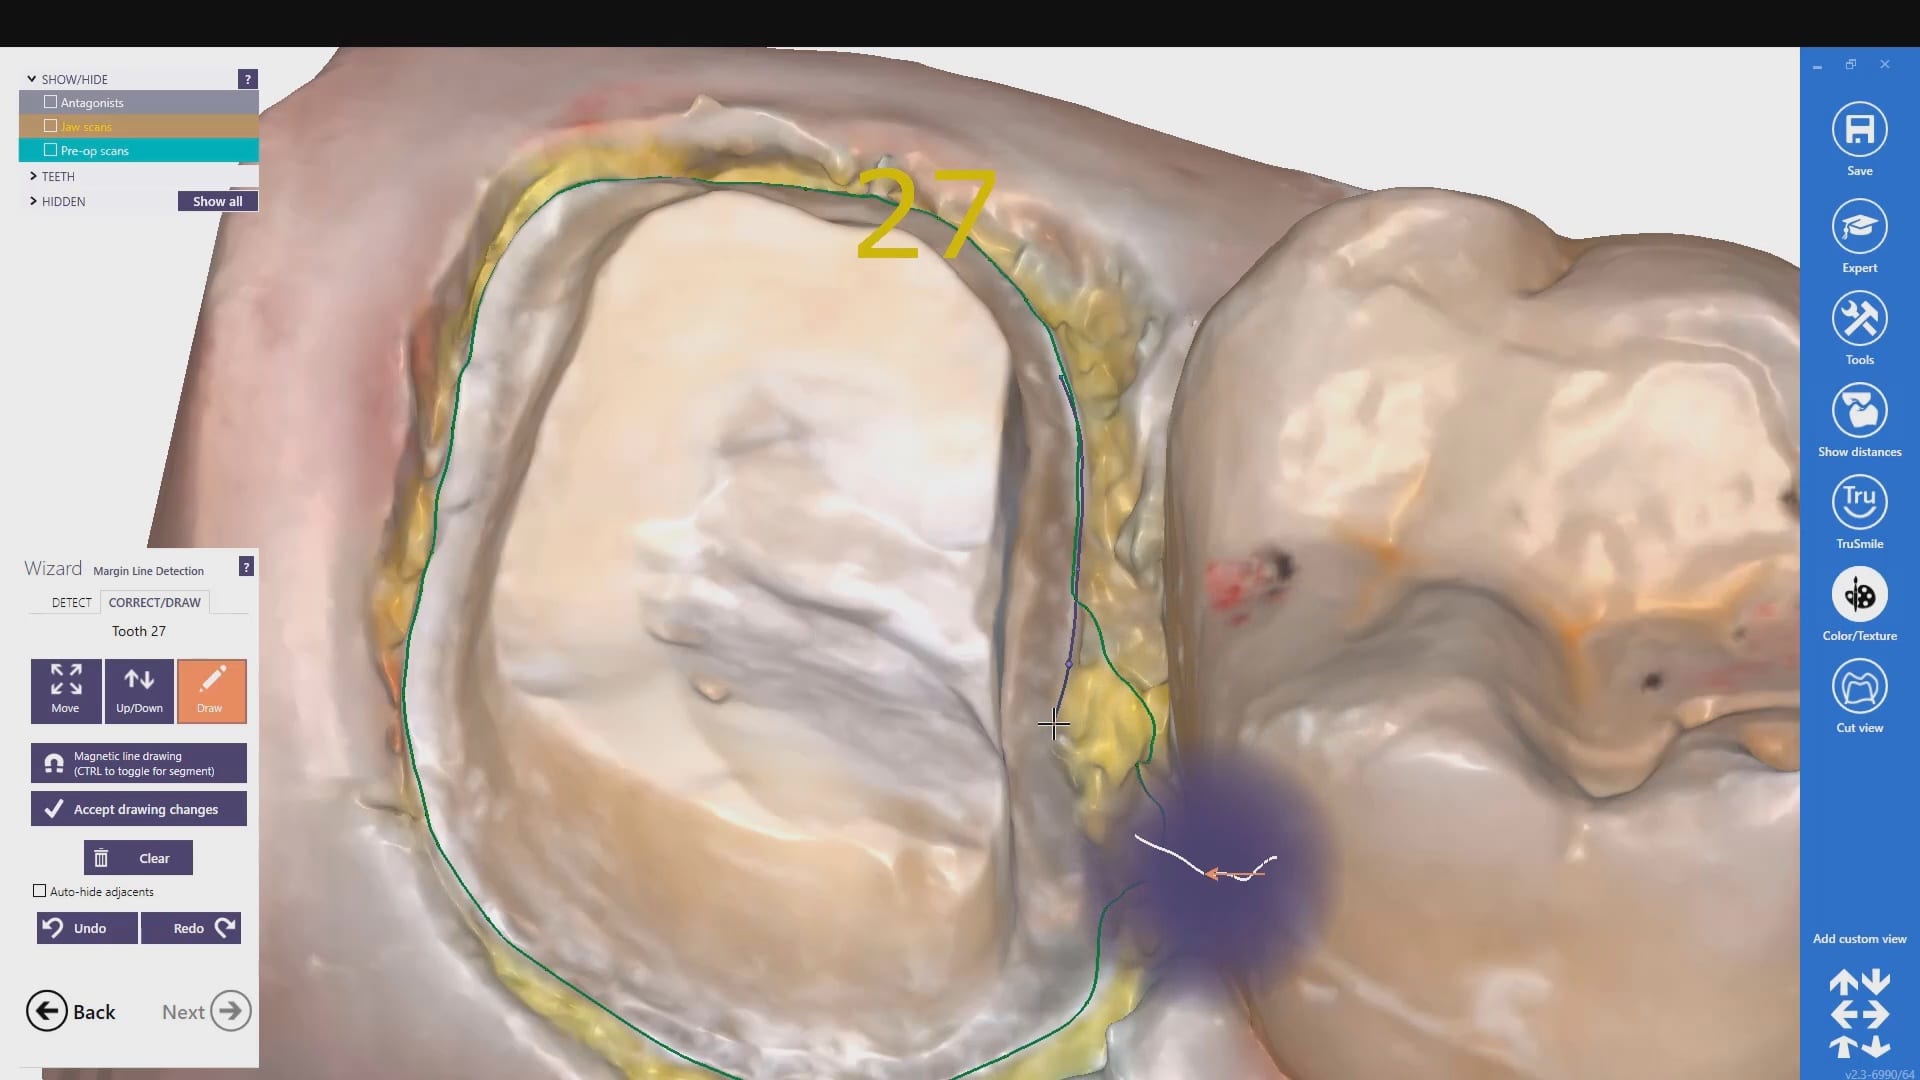
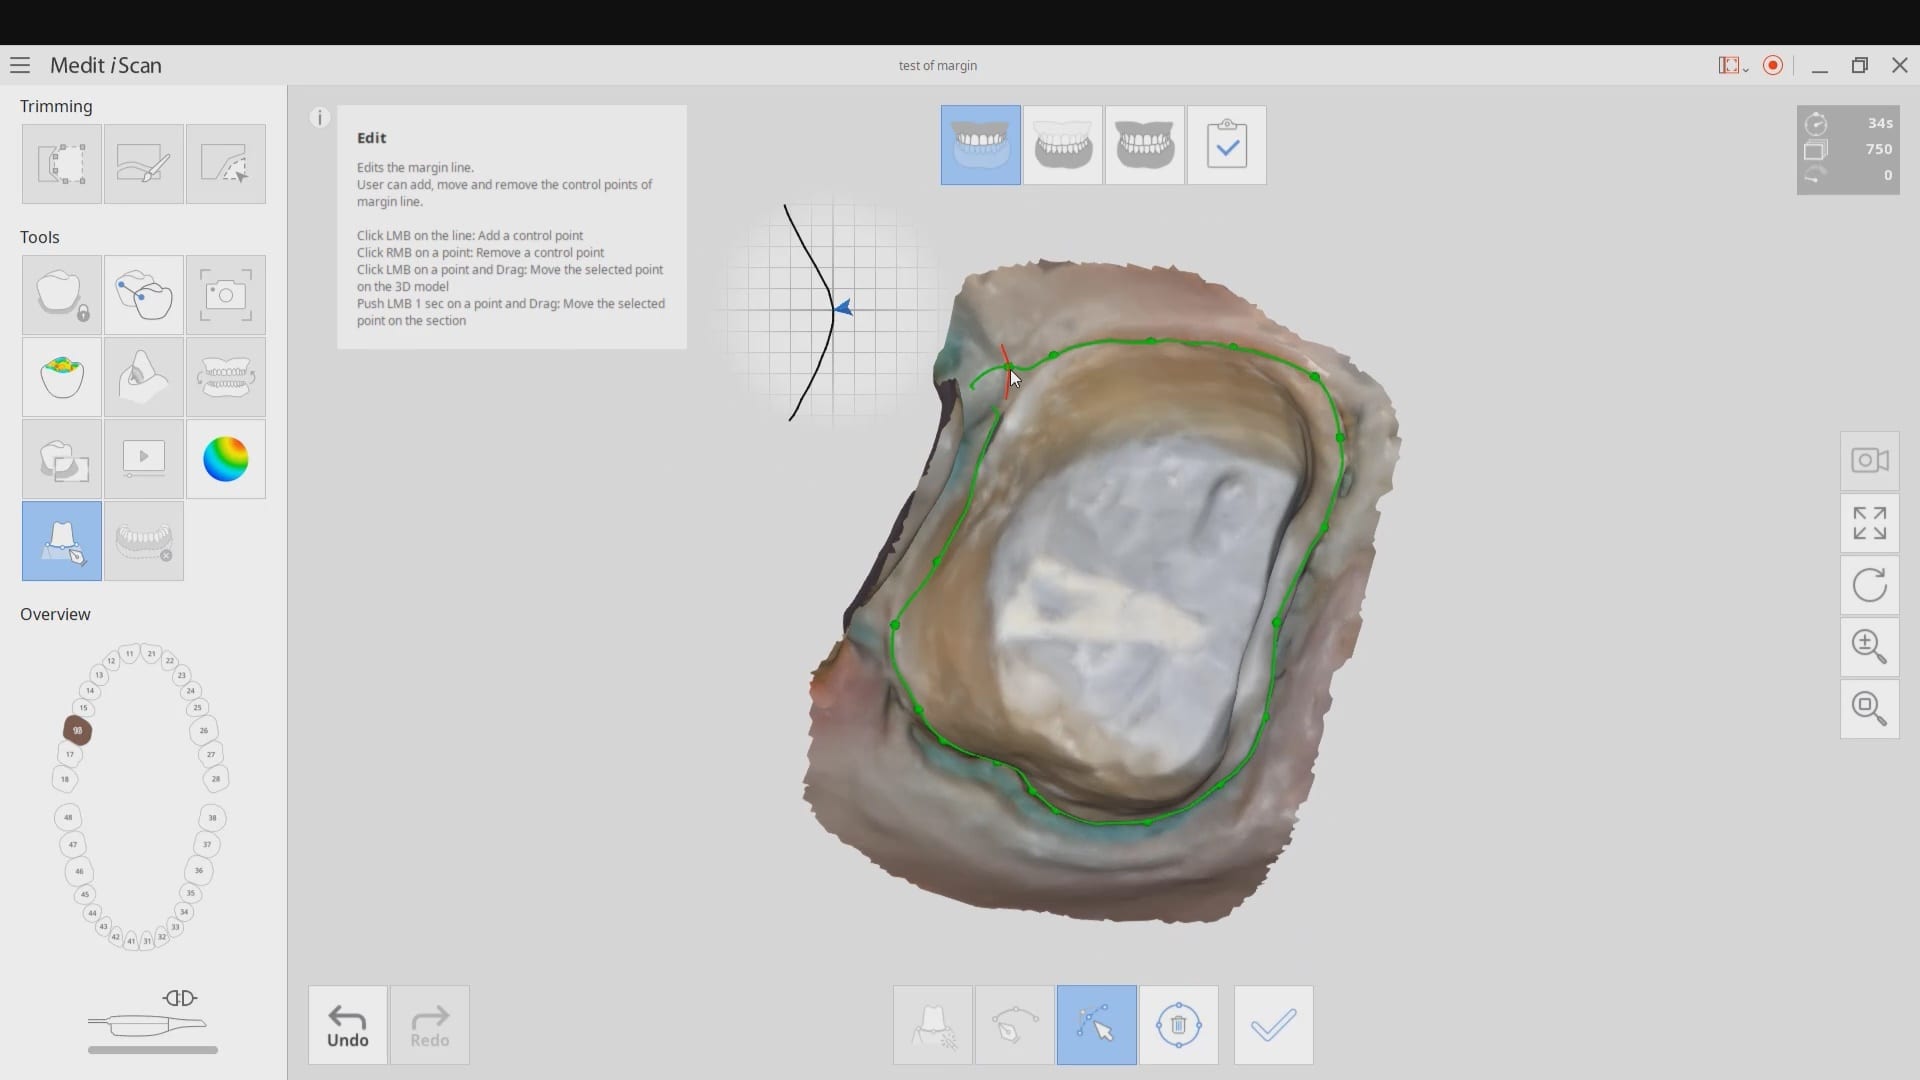
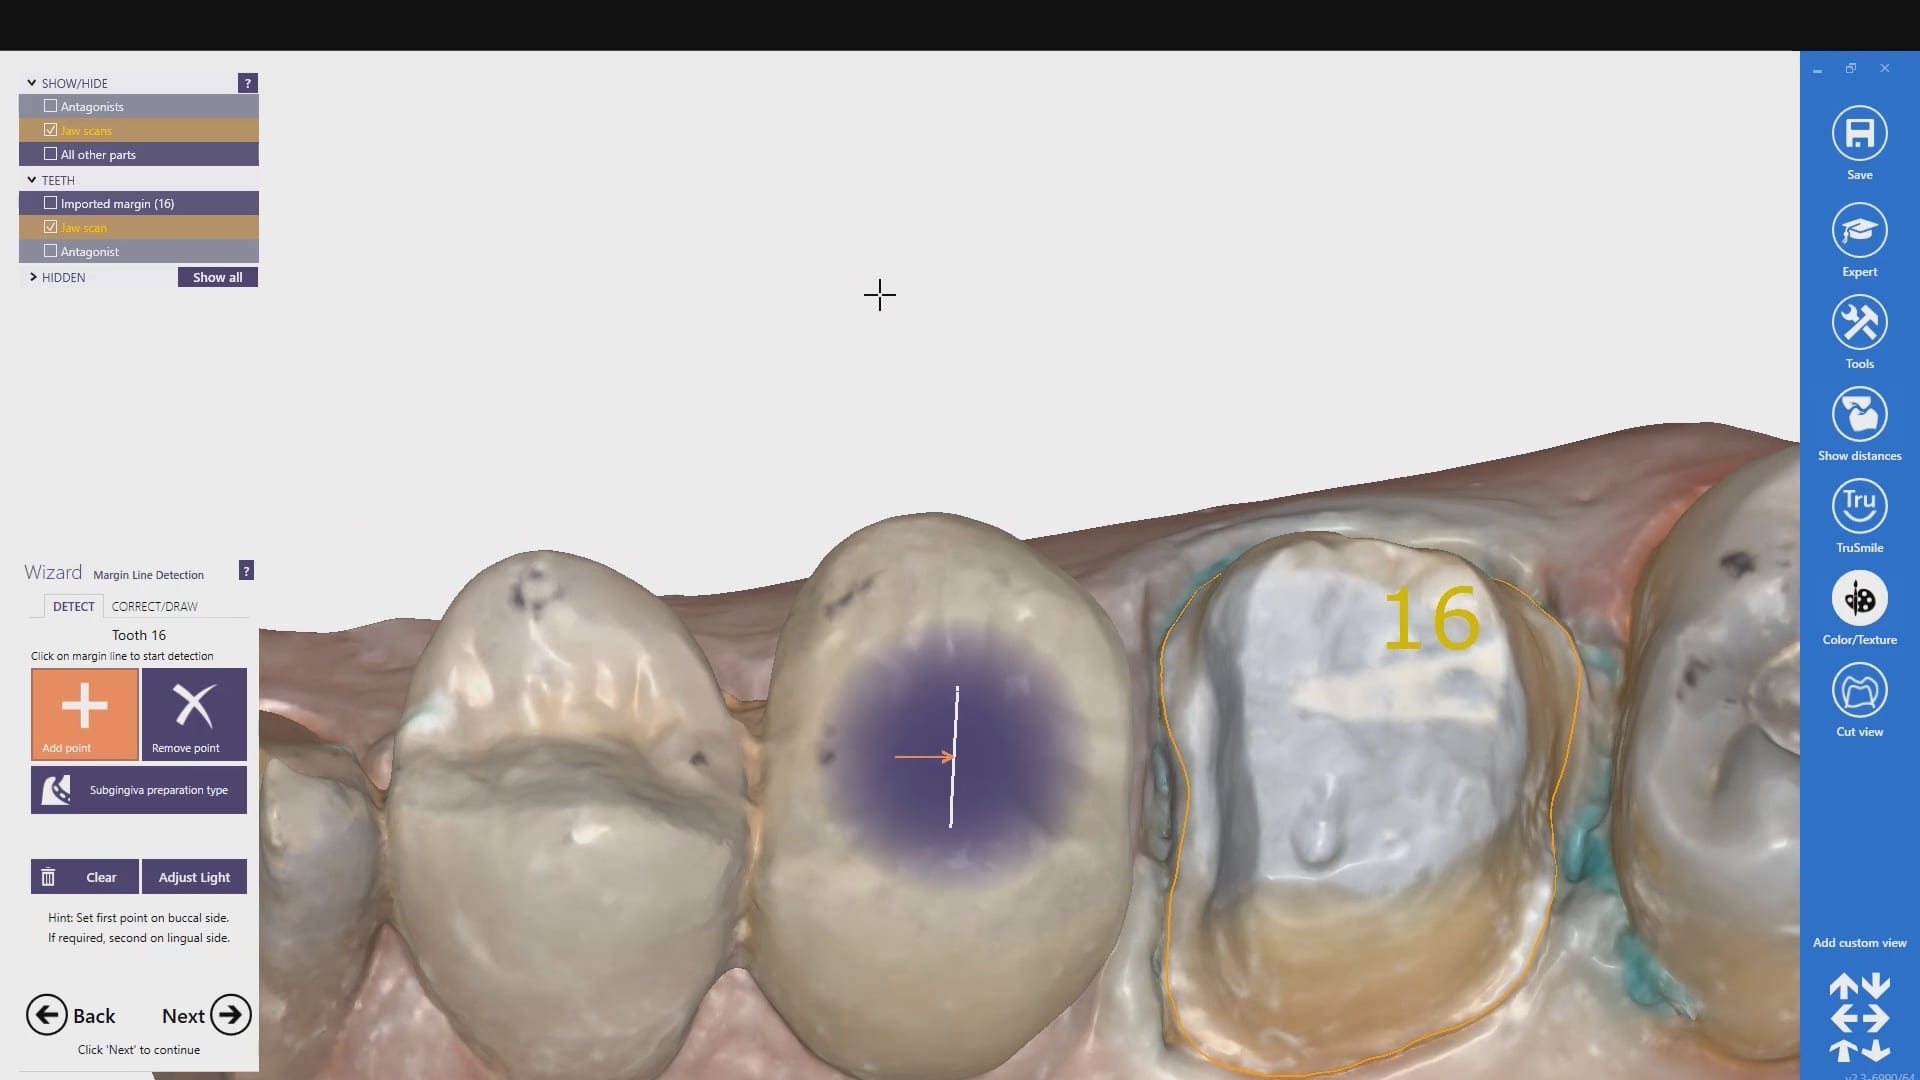
This first video details how you can mark your margins in meditlink with your medit iscan software. The very first step that you must do is properly identify the job definition. If you choose orthodontic modules or bite splints for example, you will not have the opportunity to transfer the marked margins because they are not part of the equation. So the best practice is to always properly label the tooth and the prescription
margin placement to transfer from dentist to lab with meditlink
Once you have processed the case and it is in the preview mode you have one last chance to review the order and submit it to your lab of choice. In this next video we show what happens to your data once your lab receives it and particularly how your drawn margin line accompanies the upper and lower arches and the prepared upper right molar
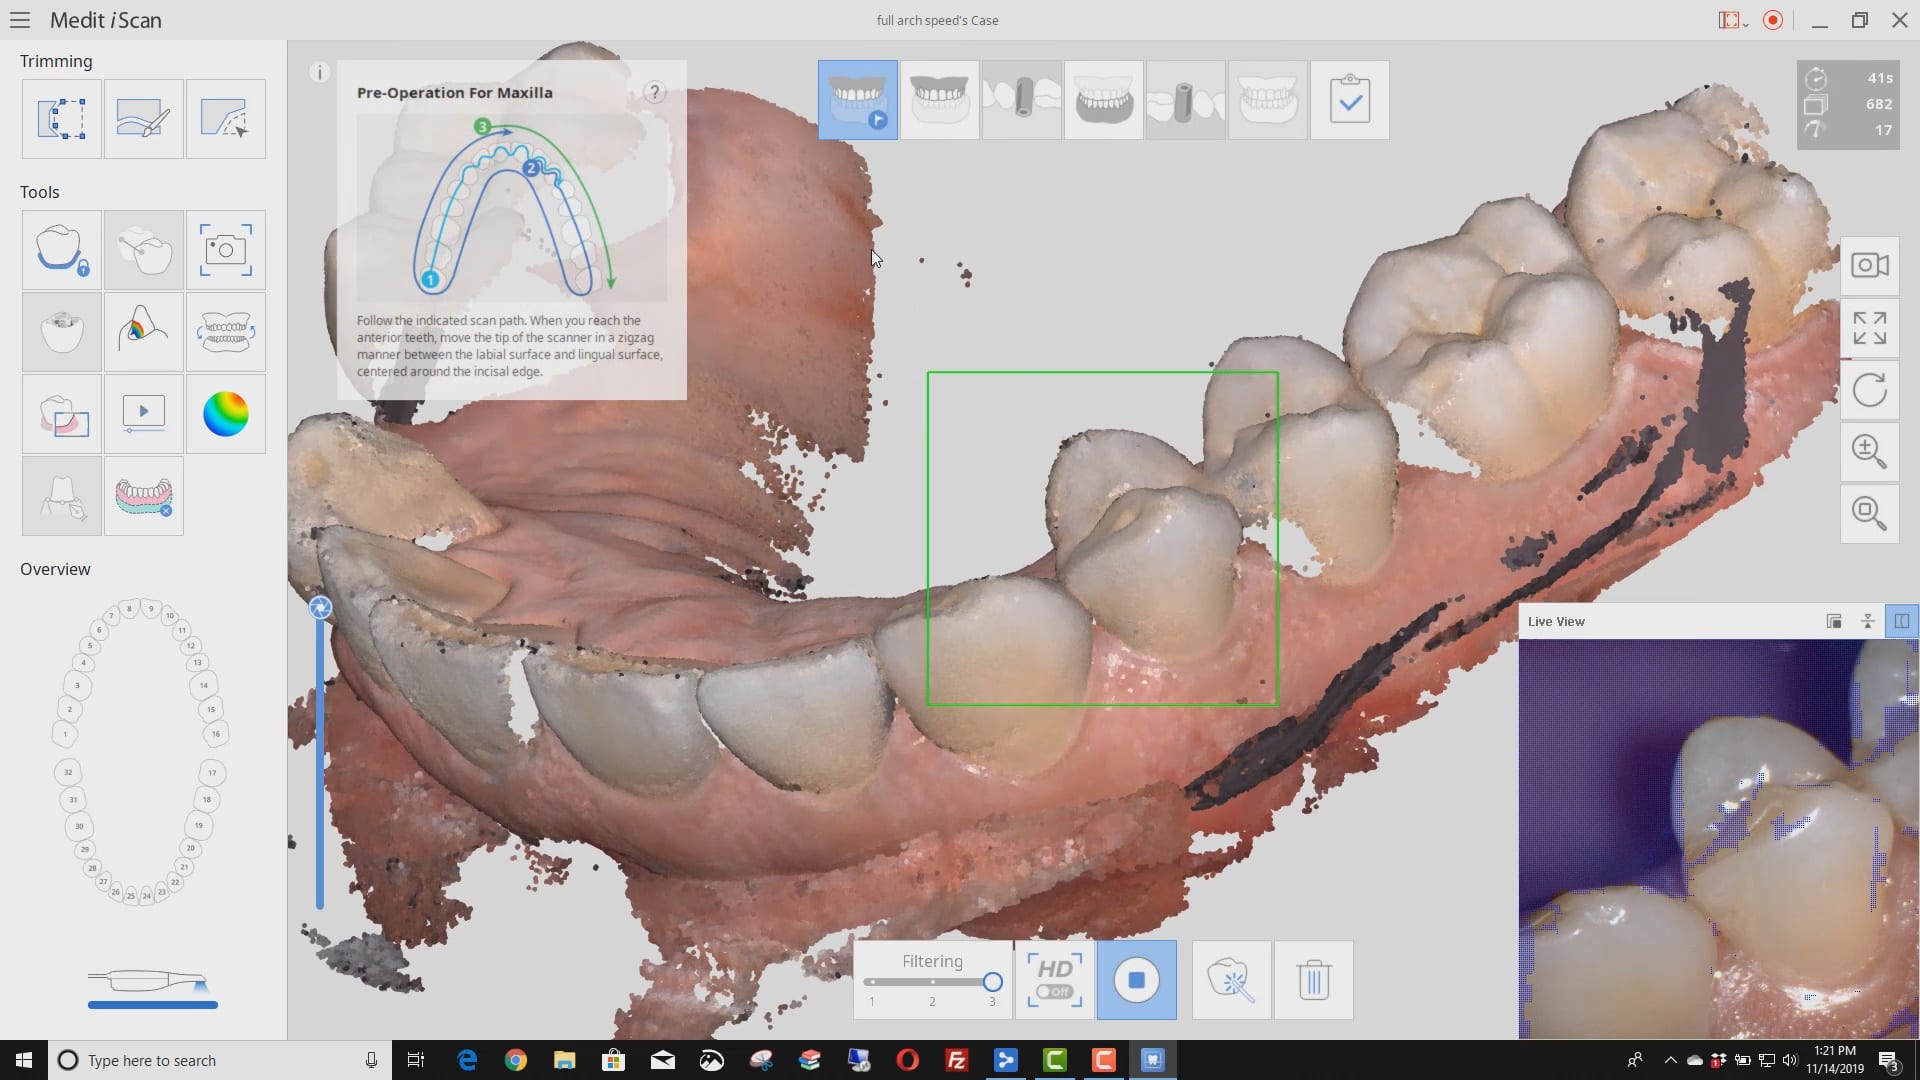
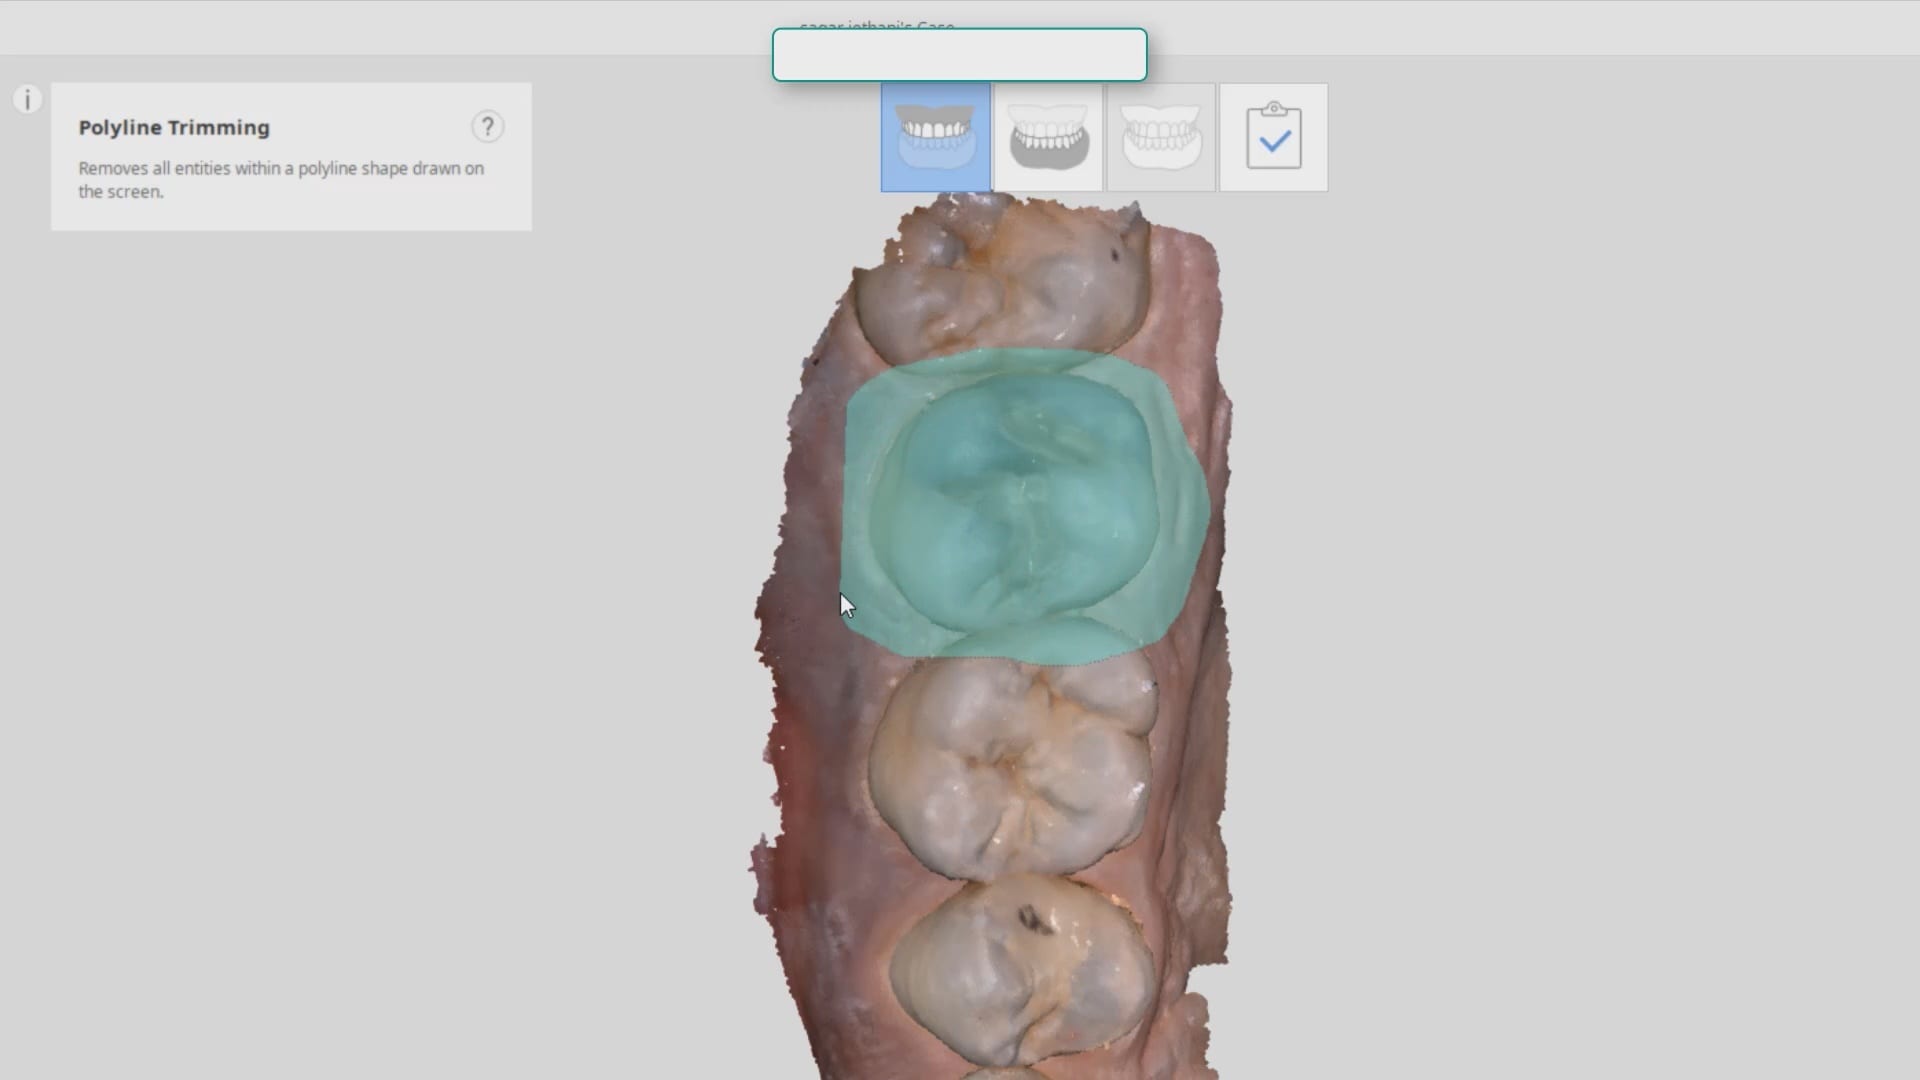
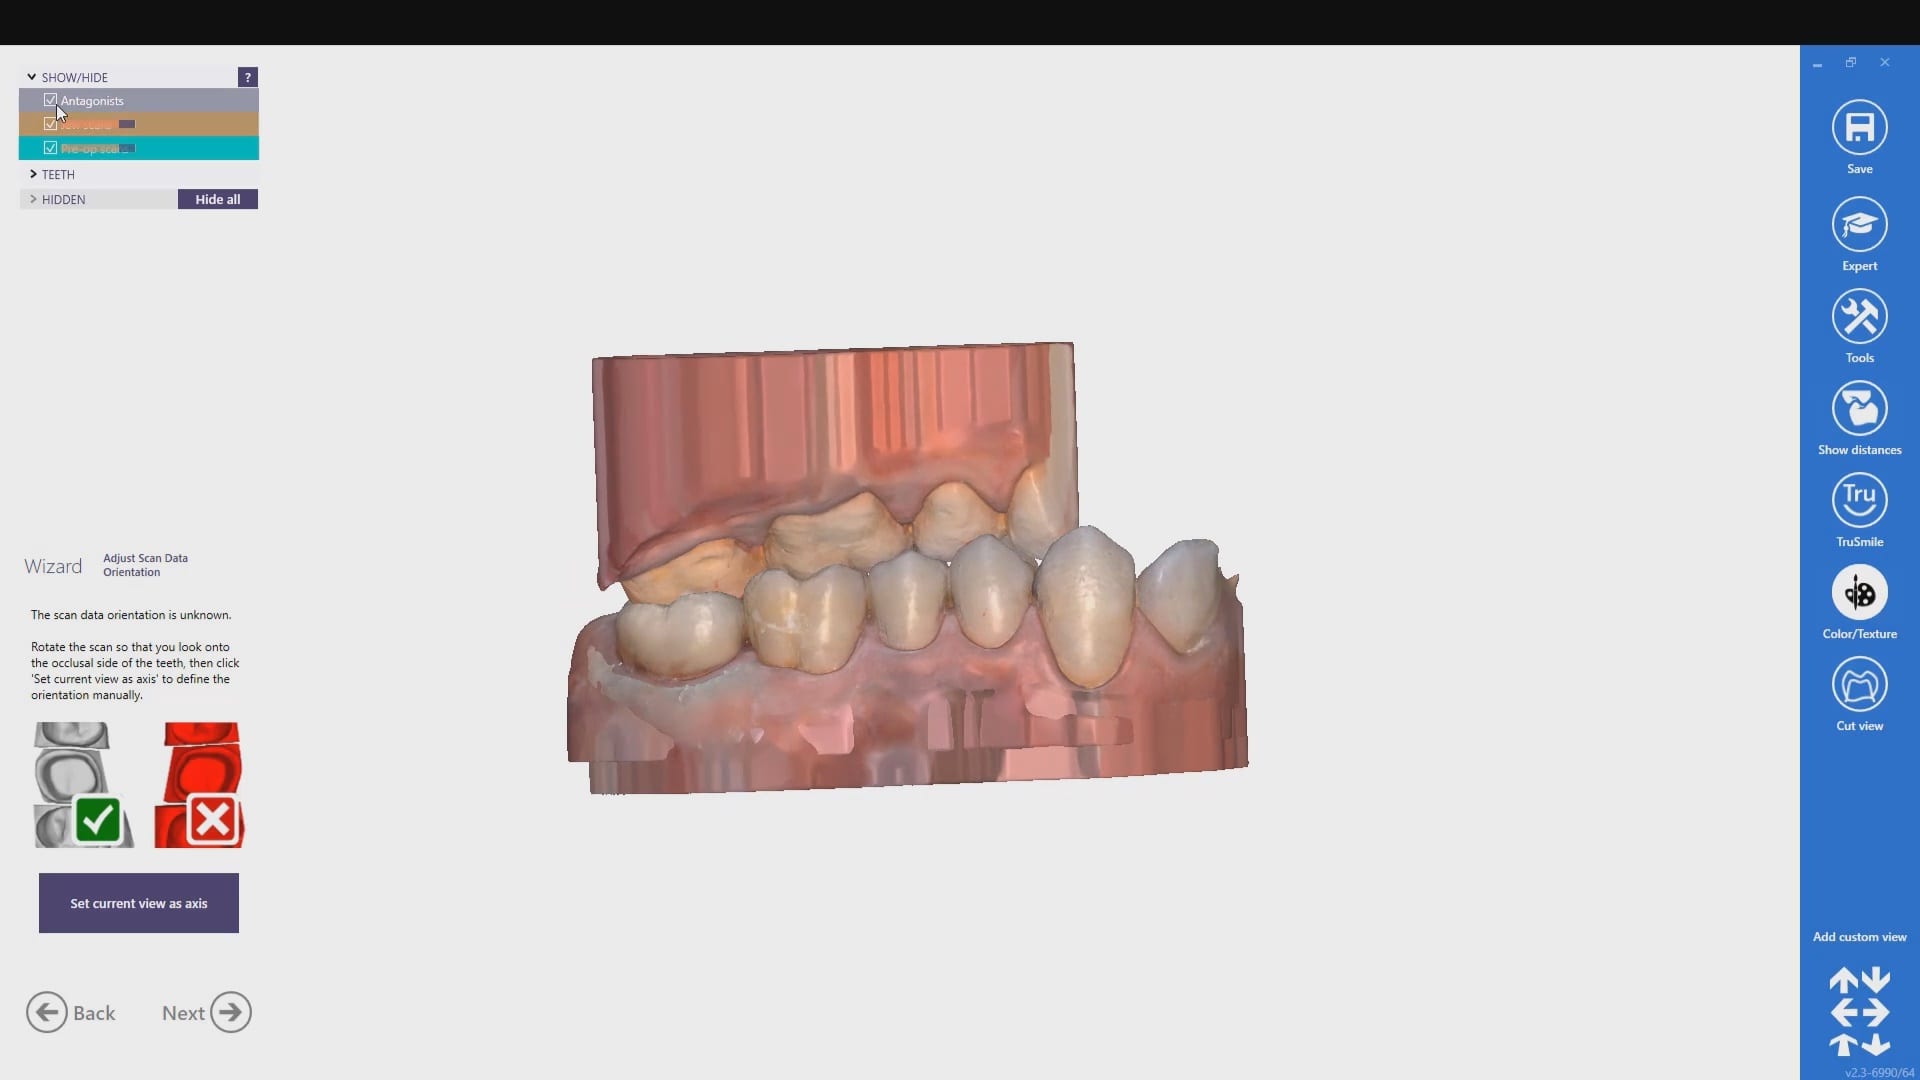
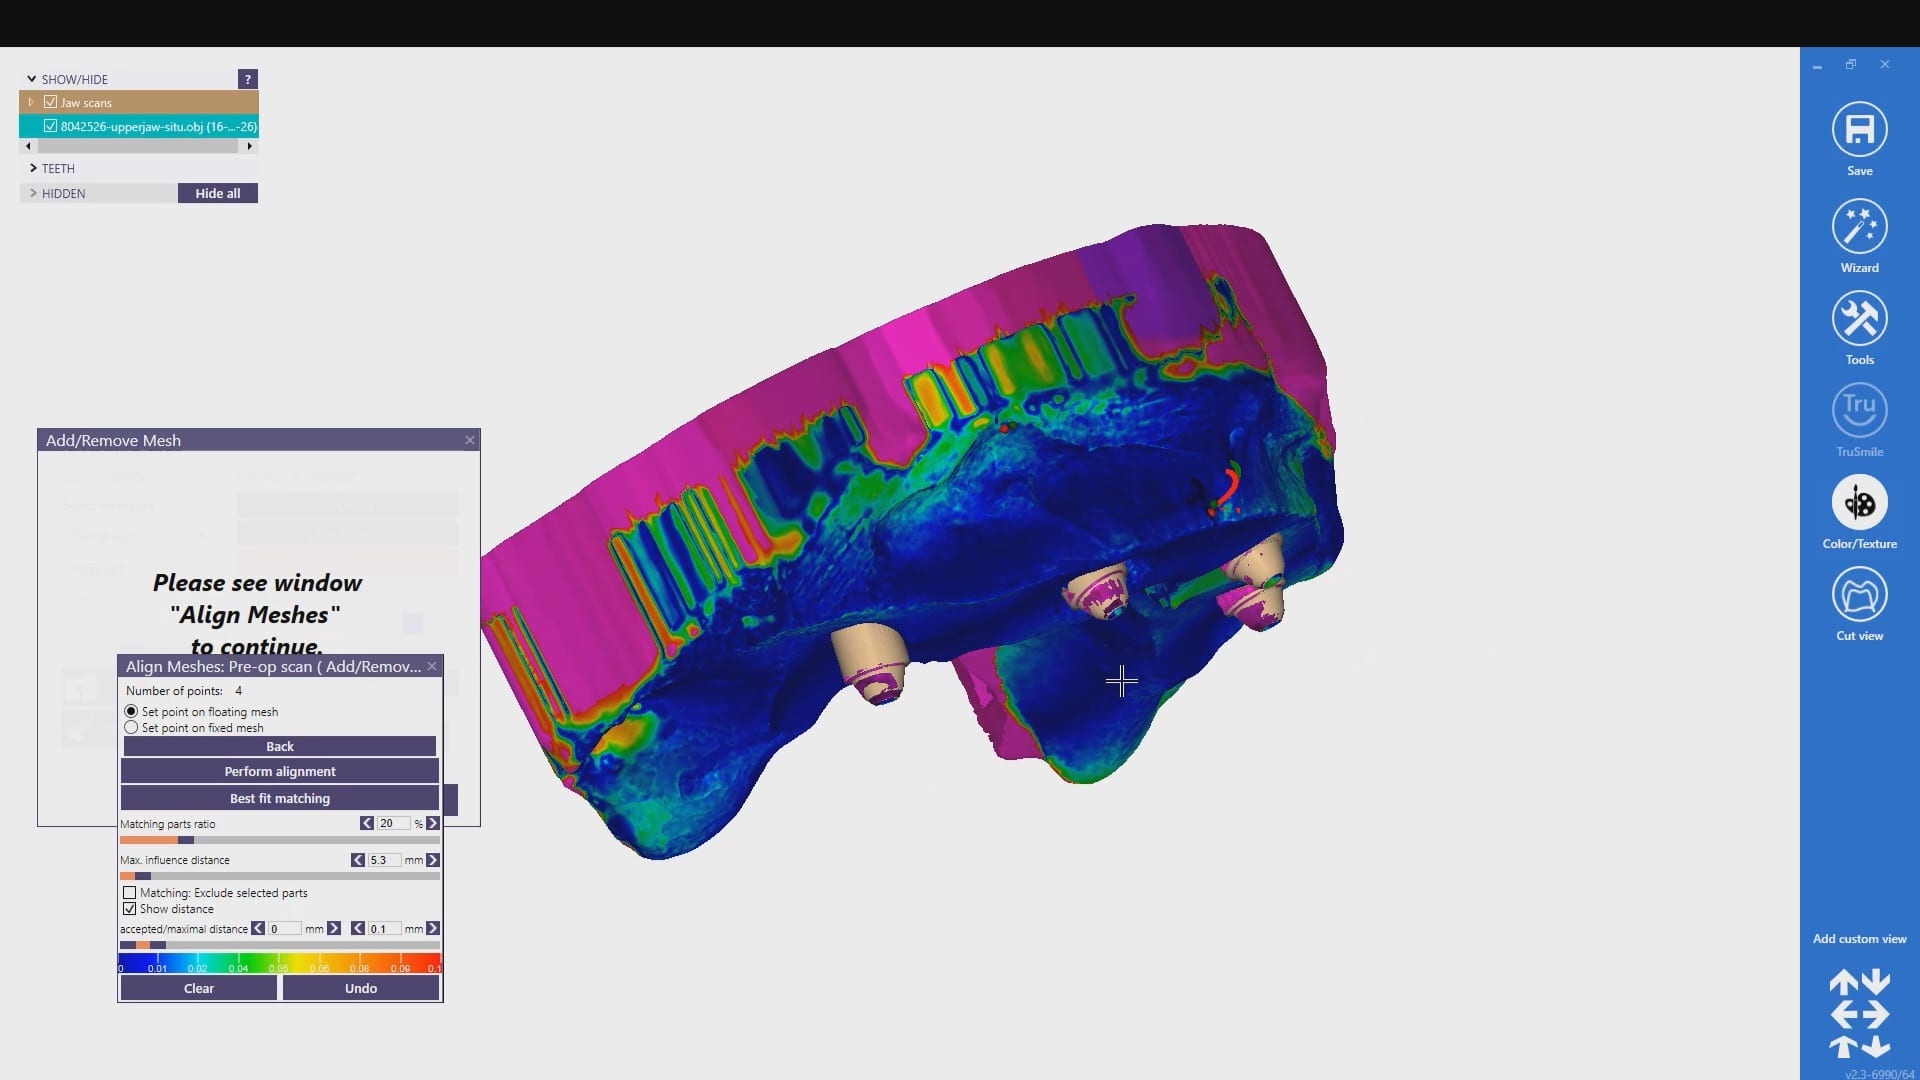
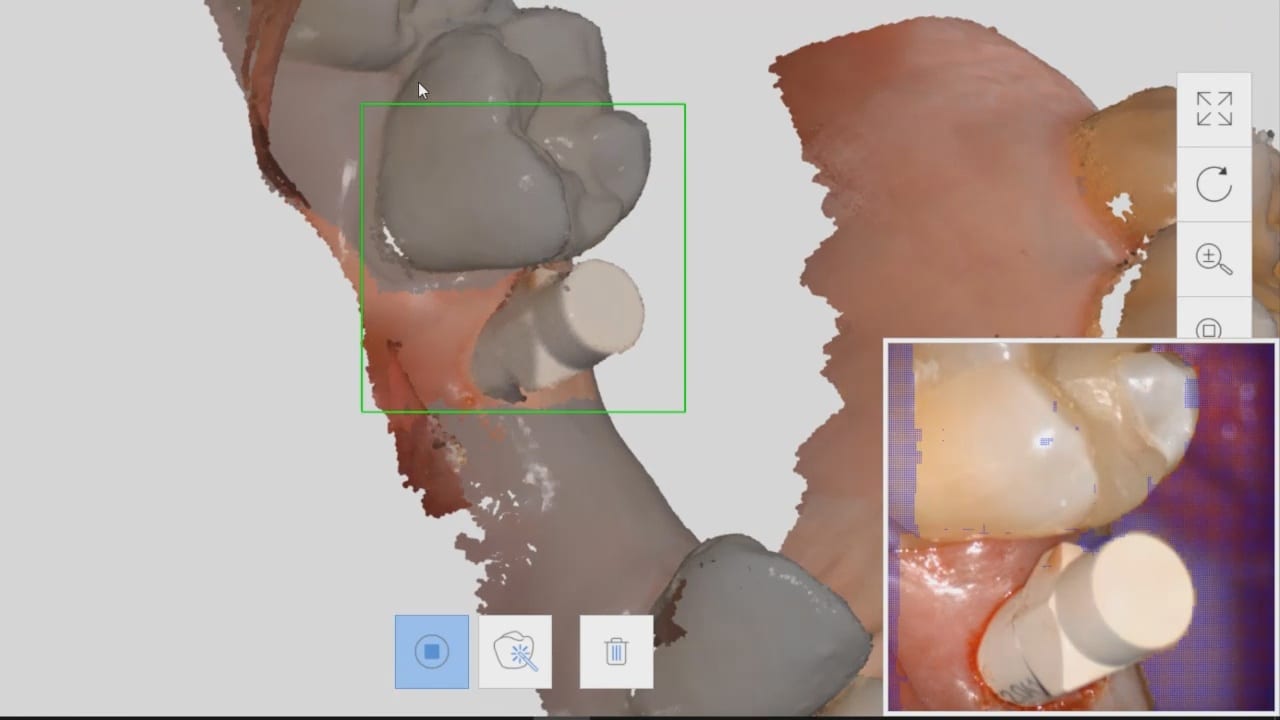
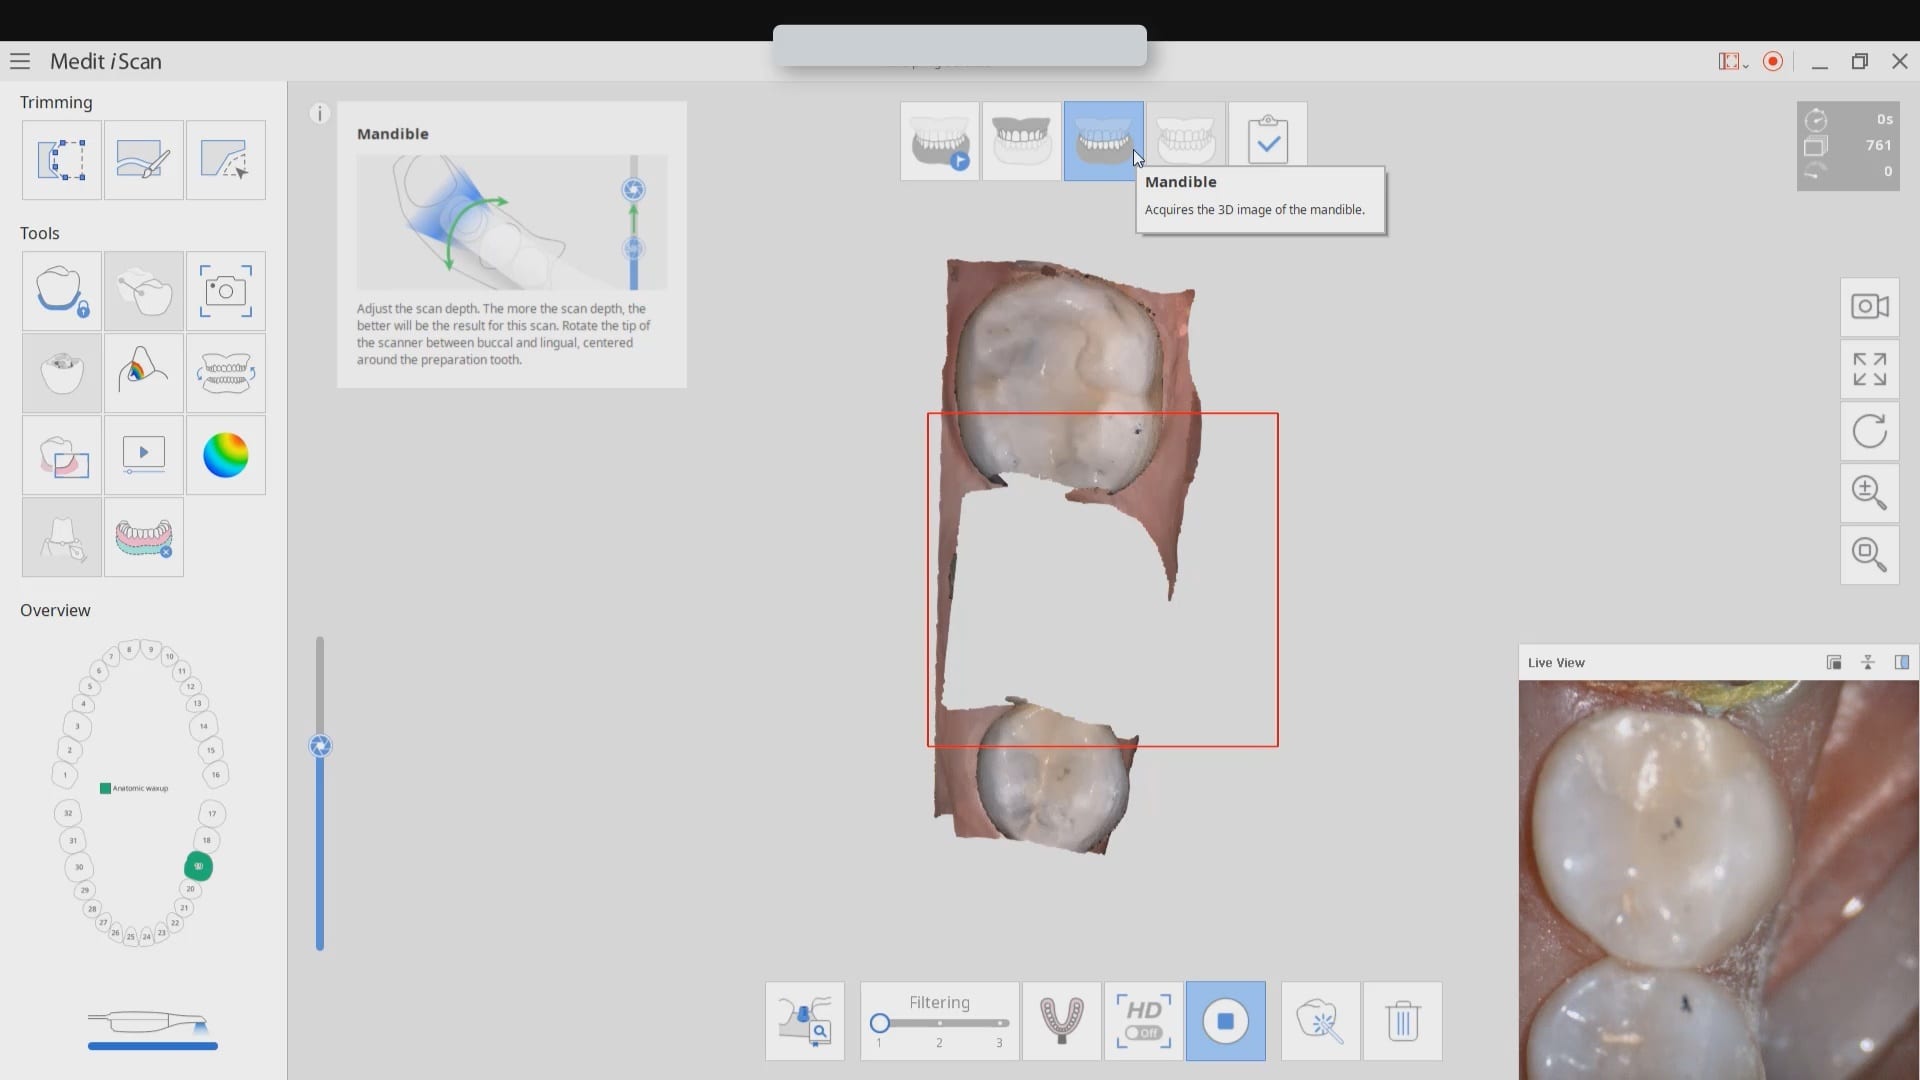
When you have preops that you are trying to stitch to preps in medit, and this could also include relating scanbodies to arches as well, you need enough data that is redundant in both catalog boxes
if you watch this video carefully, you can see how i over trimmed the mesial part of the equation and even though the camera is active, it is not acquiring images. you can see the red box.
once i move the camera to the distal molar, the acquisition starts because the molar has more data points than the premolar and the software / camera recognized the area and started to acquire images.
understanding this will unlock a lot of complicated cases and make the easier for you