Truly Great Service. Glad I purchased my scanner here. - 8/03/2023
Aram Grigoryan
I'm really grateful with the service CAD-Ray has provided! I'm also very happy with Laura's presentation with the Medit i700, and overall help in choosing the right scanner for my practice. I'm really happy with the scanner and the SprintRay Pro 95 P...read moreI'm really grateful with the service CAD-Ray has provided! I'm also very happy with Laura's presentation with the Medit i700, and overall help in choosing the right scanner for my practice. I'm really happy with the scanner and the SprintRay Pro 95 Printer as well. Thank you.read less - 8/31/2021
Cadray has great support and service! They are very responsive to questions. Love the new medit scanner! - 5/06/2021
Aaron - Cooleysmiles
fantastic experience with this company for over 7 years! Top customer service and support! Its great having them as part of our team! Highly recommend! - 3/22/2022
Krupal Chhotu
Finally going digital and Cad-Ray was the place to start. Got the Medit i500 and began scanning right away. Now I am doing digital dentures, making my own surgical stents, etc. The support available is the best. "Frank" is always available! :) - 10/09/2019
I am absolutely in love with my MEDIT i700, as is my entire staff. The Medit i700 is reliable, fast, easy to use and the software is incredibly intuitive. I couldn't be happier with the team at CAD-Ray. They are true professionals, and very hands and...read moreI am absolutely in love with my MEDIT i700, as is my entire staff. The Medit i700 is reliable, fast, easy to use and the software is incredibly intuitive. I couldn't be happier with the team at CAD-Ray. They are true professionals, and very hands and responsive in terms of their support and training. Thank you to the entire team.read less - 8/24/2021
Frank was fantastic in helping me obtain my medit scanner. He answered all of my questions in detail. After the purchase of the scanner, he continued to follow up with me and presently remains a tremendous support with any concerns that may arise. Wa...read moreFrank was fantastic in helping me obtain my medit scanner. He answered all of my questions in detail. After the purchase of the scanner, he continued to follow up with me and presently remains a tremendous support with any concerns that may arise. Was a great experience overall from transitioning my practice into a digital world!read less - 1/25/2023
Michelle Duong
We are a new user of Medit i600. My rep Andy was very good with the training & very detailed & patient with the whole process. The online support is one of the best. Installation was also easy and straightforward. Our staff is really happy...read moreWe are a new user of Medit i600. My rep Andy was very good with the training & very detailed & patient with the whole process. The online support is one of the best. Installation was also easy and straightforward. Our staff is really happy with this new addition to our office. Thank youread less - 9/23/2022
I just bought the new Medit i700. I placed the order on Friday, it shipped on Monday, and it arrived on Tuesday. So far it has been a great experience. They also provide a lot of quality videos for learning to use the scanner. - 5/05/2021
John Eum
Love all the staff there. Great support and instruction from Armen, Laura, Damien. We are very grateful for Kaila who has been incredible in getting us going - very friendly, professional and responsive. Thank you! - 7/03/2024
Luciana Bretz-Pavie
Wayne Glassoff is the go-to guy here! The BEST!!! He is always on it, he helps figuring out exactly what you need, the best way possible. And fast! Great working with CAD-Ray, they have pretty much everything when it comes to digital dentistry. And t...read moreWayne Glassoff is the go-to guy here! The BEST!!! He is always on it, he helps figuring out exactly what you need, the best way possible. And fast! Great working with CAD-Ray, they have pretty much everything when it comes to digital dentistry. And they give you a damn good support too. Jessica Knott is awesome… training and support, just the BEST! Very satisfied customer here!read less - 2/05/2023
Steve Blank
I bought the Medit i500 and self installed to save $$$. The web site provided great step by step instructions. The Facebook group filled in the gaps. The software has been continuously upgraded and works great for scanning and tracking cases sent and...read moreI bought the Medit i500 and self installed to save $$$. The web site provided great step by step instructions. The Facebook group filled in the gaps. The software has been continuously upgraded and works great for scanning and tracking cases sent and received. My tip for scanning single crowns: While waiting for anesthesia, Scan the upper and lower quadrants and record the bite. Then i delete the tooth to be scanned. That saves time later after tooth preparation. At that time, switch to HD and scan the prep, done!read less - 6/16/2020
Logan Riggs
I always rely on Frank to help with any questions or concerns regarding our printer. The best in tampa. - 1/25/2023
Jeff Johnston
Very Helpful, good company to work with. Always been there for me - 3/10/2017
Madhavi Chavda
Still beginner to use IO scanner. best customer service. Live training was very useful. Andy Nova was great in improving my skill for scanning and showing me all features. Thank you. - 5/19/2022
We purchased Medit i-500 with CAD ray last December and customer support is great.One of best thing for our practice is having intra oral scanner ,works great . Laura was very patient with our learning curve. - 12/10/2021
Cody Boseman
Cad-ray has been amazing, not to mention they have an amazing product in the medit i500. Their training is great, customer service is quick and thorough, and follow up is consistent. I highly recommend using cad-ray for anything that you may need. - 6/19/2020
carlos Santos
I would like to let you know that Kaila Larson is excellent communicator, personable, professional and knowledgeableI have had the opportunity to talk to her 3 times and it has always been awesome.Regards,Dr Carlos santos - 4/08/2022
Mark Evans
I’d like to tell you a story about CAD-Ray.com.
I ordered a VHF N4+ from CadRay. About two weeks after the order was placed, they called me up and said, “VHF just got an exclusive with “The Big Boys” so they are cutting ties with all the little ind...read moreI’d like to tell you a story about CAD-Ray.com.
I ordered a VHF N4+ from CadRay. About two weeks after the order was placed, they called me up and said, “VHF just got an exclusive with “The Big Boys” so they are cutting ties with all the little independent distributors. They just called us, and we just found out. What this means is that we won’t be able to provide you service after purchasing the VHF mill that you just bought.”
Now, they could have just left it at that. They could have said, “Sorry, it’s out of our hands.” They could have said, “We appreciate your business, but it’s not our fault.” They could have said, “That’s the way the cookie crumbles.”
But they didn’t.
Frank Weinstein calls me up and tells me that they want to make this right, so they are going to hook me up with a brand new Imes Coritec One+ for the same price as the VHF. The Coritec One+ is like the Mercedes of mills for in-office. This is the new model that just barely came out. It is a 5 axis mill. It does wet and dry milling. It does blocks and pucks. It mills all materials know to man, including Vibranium. It can also fly the space shuttle, and make all your wishes and dreams come true. It’s that good. It came with the laptop, Exocad, all the tools, and all the bells and whistles. It came fully loaded. It came white glove delivered to my office. It came with in office training. It came with the extra bur package. It came with everything and the kitchen sink.
So, I paid 36k for a mill, and because of something that was not Cad-Rays fault, they ended up giving me a 60k mill for the same price.
In the words of the great Tony Stark: “That’s how Dad did it. That’s how Cad-Ray does it. And it’s worked out pretty well so far.”
Thank you Frank Weinstein and Armen Mirzayan for having outstanding customer service and going the extra mile every time.read less - 4/02/2021
William Neurauter
As a small office, making the move to digital impression dentistry was a rather large commitment. After much research we settled on the Medit i500. We almost purchased from our implant supplier but were less than impressed with their training and...read moreAs a small office, making the move to digital impression dentistry was a rather large commitment. After much research we settled on the Medit i500. We almost purchased from our implant supplier but were less than impressed with their training and support options. After additional research we found Cad-Ray and couldn't be happier that we purchased from them. Their online tutorials and live support have been second to none. Having such a great support network behind the Medit made the transition and purchase so much better than it could have been had we gone a different route.read less - 11/30/2021
I purchased a Medit scanner in August and I am very happy with the scanner. I was trained on an Omnicam in dental school and used Omnicam for 4 years in my associateship. The speed and quality of the Medit scanner is comparable to a CEREC scanner but...read moreI purchased a Medit scanner in August and I am very happy with the scanner. I was trained on an Omnicam in dental school and used Omnicam for 4 years in my associateship. The speed and quality of the Medit scanner is comparable to a CEREC scanner but you can’t beat the price of the Medit! I would highly recommend this if you are a beginner or pro in digital dentistry!read less - 9/22/2020
Jose Morales
Service is extremely quick and on point. Highly recommended to join the Cad Ray facebook group! - 6/01/2022
Mike Capio
Nothing but good things to say about CAD-Ray. All of the education, recommendations, and products they provide are truly the best in digital dentistry at the time. - 6/20/2020
Andy M
It has been great to work with Laura and Heather. The purchase, financing, shipping, and training process has been smooth. The training was very comprehensive and not rushed at all. I love my Medit i-600 scanner, and I recommend CAD-RAY 100%! - 5/22/2024
Iggy “Iggy” Deleon
There’s a reason why all cardray reviews are 5 stars only. They have the best people on their team. Jesse is the best trainer and provides above and beyond support. I can’t count the number of times that he’s saved me in the clinic with his designs. ...read moreThere’s a reason why all cardray reviews are 5 stars only. They have the best people on their team. Jesse is the best trainer and provides above and beyond support. I can’t count the number of times that he’s saved me in the clinic with his designs. He’s truly a master at his craft and one of the best assets to the cad ray team!read less - 2/02/2023
Jared H
Purchasing my medit i700 from Cad-Ray was a great decision. I did my first training with Kaila and she was fantastic! Super knowledgeable, patient and truly helpful in making sure I was ready to hit the ground running with patient care. I put a call ...read morePurchasing my medit i700 from Cad-Ray was a great decision. I did my first training with Kaila and she was fantastic! Super knowledgeable, patient and truly helpful in making sure I was ready to hit the ground running with patient care. I put a call into cad-ray support in the middle of a case and sure enough Kaila was also the one to answer and handle the situation. She jumped right on my computer and had things fixed in a matter of a few minutes. Awesome support, great staff and overall super positive experience with Cad-ray thus far!read less - 5/06/2022
Mark Gaches
Excellent company to work with. Best customer service and technology available. Can't recommend enough! - 5/05/2021
AMISH DESAI
Awesome! Great support. If you are planning on getting a scanner, make sure you have Cad-Ray on your side ! - 4/20/2022
Todd Haskin
The medit is one of the best scanners on the market with the best price. Cad ray's support and training is phenomenal and they are very quick to respond. We work with Laura. Highly recommend. - 12/16/2021
Nolan Andrews
They all go absolutely above and beyond in all aspects. Whether it's tech support, products, CE, everything. Everyone I have dealt with has been wonderful. Love these guys! - 6/19/2020
Kip Covington
Customer support! I've had handfuls of scanners over the years and support has always been the biggest variable. We recently had a scanner bought through and implant company and received limited to no support. Through recommendations from several fri...read moreCustomer support! I've had handfuls of scanners over the years and support has always been the biggest variable. We recently had a scanner bought through and implant company and received limited to no support. Through recommendations from several friends, I purchased a second scanner through cad-ray and had them transfer over our support for the first. I wish I would have done this years ago. Destaney, has been incredible helping us troubleshoot a hardware issue that came up. It was on 3-shapes side but not only did she run it up the ladder there and get us back up and running quickly, but she promptly answered all questions and continuously checked in to make sure things were moving along. I won't purchase from anyone else going forward.read less - 8/14/2024
Stephen S
Choosing an digital intraoral scanner these days can be quite a daunting task. When I reached out to CAD-Ray, as was recommended by many colleagues, I was connected to Frank DeLuca, and he made my decision-making process very simple. Upon receiving...read moreChoosing an digital intraoral scanner these days can be quite a daunting task. When I reached out to CAD-Ray, as was recommended by many colleagues, I was connected to Frank DeLuca, and he made my decision-making process very simple. Upon receiving my 3shape Trios 4 scanner, Frank and the entire tech support team/customer service were very helpful every step of the way. Frank makes himself available when he can in order to address all of the questions I have regarding the digital workflow. I highly recommend CAD-Ray. It will make your transition to digital scanning a positive experience.read less - 1/24/2023
Micah Bickel
Great support services and training from Cad-Ray, they are always very helpful and responsive. I have been using the I500 in my offices for the last two years and loving it. - 11/01/2021
Excellent customer service and product!! - 3/16/2022
Kelly Betts
Customer service has always been top-notch! I personally worked with Wayne Glassoff and he has been super helpful getting our office up and running with 3D printing and has always been a great resource and highly responsive whenever I need anything o...read moreCustomer service has always been top-notch! I personally worked with Wayne Glassoff and he has been super helpful getting our office up and running with 3D printing and has always been a great resource and highly responsive whenever I need anything or have any questions.read less - 9/24/2022
Lisa Greenstein
Exceptional customer service - 7/26/2023
Kristine Keshishyan
My Intraoral scanner was not working. It wouldn’t scan, during the scan the screen was completely blue. I contacted Laura and she logged in remotely and took care of the problem. She was extremely helpful and knowledgeable. Thank you Laura for your o...read moreMy Intraoral scanner was not working. It wouldn’t scan, during the scan the screen was completely blue. I contacted Laura and she logged in remotely and took care of the problem. She was extremely helpful and knowledgeable. Thank you Laura for your outstanding service. Thank you.read less - 12/07/2021
Lance Timmerman
Implant Planning Services Review I Am VERY experienced with "another system" but thought I would give CAD-Ray a try. At at LEAST 1/3 the fee, why not?
VERY happy. Fit GREAT, surgery was uneventful (the best kind) and I am a believer! This is a great company and great PEOPLE to...read moreI Am VERY experienced with "another system" but thought I would give CAD-Ray a try. At at LEAST 1/3 the fee, why not?
VERY happy. Fit GREAT, surgery was uneventful (the best kind) and I am a believer! This is a great company and great PEOPLE too! 5 stars aren't enough. Just like the Burj Al Arab, this is 7 star!read less - 3/03/2015
David Forrest
I have used a medit scanner i purchased from CAD-Ray for a few years now. I've had nothing but great customer service with them, and their facebook group is great for nearly instant feed back before the days end. I actually just bought another scanne...read moreI have used a medit scanner i purchased from CAD-Ray for a few years now. I've had nothing but great customer service with them, and their facebook group is great for nearly instant feed back before the days end. I actually just bought another scanner from them because they've been awesome to work with and have enjoyed the first one so much. I'm def a long term fan of theirs now.read less - 2/20/2024
Steve Acker
We received our i700 scanner from CAD-Ray yesterday. It was an upgrade from our i500. The scanner is amazing and Laura was amazing in helping us get up and running in no time. Their support, professionalism, and expertise is unmatched. Thanks CAD-Ray...read moreWe received our i700 scanner from CAD-Ray yesterday. It was an upgrade from our i500. The scanner is amazing and Laura was amazing in helping us get up and running in no time. Their support, professionalism, and expertise is unmatched. Thanks CAD-Ray!- Helena from Elite Dentalread less - 12/23/2021
Cole Smith
These guys are great. My favorite part about them is they set you up for success with your products. A lot of dental companies will be happy to sell you big ticket tech item but don't have much to set you up for success. I bought the Medit i500 and t...read moreThese guys are great. My favorite part about them is they set you up for success with your products. A lot of dental companies will be happy to sell you big ticket tech item but don't have much to set you up for success. I bought the Medit i500 and they have tons of videos on how to get it working and working well for you in your office. If you need a much of hand holding they have that our if you are like me and like the do it yourself videos they have that. I am sure you can buy these products all over but it is there service that sets them apart. If to are looking to buy some dental tech use these guys!read less - 6/05/2020
Armen Mirzayan
Are you happy with the support and training you have received with our team at CAD-Ray.com?
Our business grows much like yours, with referrals and recommendations. We would greatly appreciate a quick review / testimonial
NOTE: ...read moreAre you happy with the support and training you have received with our team at CAD-Ray.com?
Our business grows much like yours, with referrals and recommendations. We would greatly appreciate a quick review / testimonial
NOTE: All testimonials are submitted by verified owners.read less - 5/08/2021
Frank DeLuca from CAD-Ray has been absolutely awesome from day one. Readily available and very knowledgeable to provide support when needed. - 1/25/2023
Caleb King
Kaila Larson is the support specialist for our office and has been outstanding. She gets back to us quickly with any questions we have, and will log into the computer and fix issues so we don't even have to worry about them. She is extremely knowled...read moreKaila Larson is the support specialist for our office and has been outstanding. She gets back to us quickly with any questions we have, and will log into the computer and fix issues so we don't even have to worry about them. She is extremely knowledgeable about the MEDIT scanner and the supporting software. She responds to calls and texts or emails and will communicate with us in whatever way is most convenient for our office. She has saved us hours of time and headache by always being available to help.read less - 5/25/2022
DERYCK PHAM
STOP SEARCHING NOW!
Best bang for your buck scanner on the market. we have been using out medit for 8 months now. love our crowns, margins are fantastic. almost no adjustments needed at all. maybe one in ten crowns might have to adjust mesial or...read moreSTOP SEARCHING NOW!
Best bang for your buck scanner on the market. we have been using out medit for 8 months now. love our crowns, margins are fantastic. almost no adjustments needed at all. maybe one in ten crowns might have to adjust mesial or distal to get crown to drop in. occlusion is always spot on. patients love the technology and WOW factor -"SOOO COOOLLL." customer service is great also! dont waste your money on anythign else. our lab even comments on how easy it is to deal with medit and how good the scans are. they recommend it to their other doctors now as well.read less - 10/09/2019
Fantastic Scanner. Has changed the way I practice dentistry. Opens up more time in my schedule and opens up new methods to allow for more consistent, satisfactory results. Customer service is fantastic. Feels like friends are on the other side of the...read moreFantastic Scanner. Has changed the way I practice dentistry. Opens up more time in my schedule and opens up new methods to allow for more consistent, satisfactory results. Customer service is fantastic. Feels like friends are on the other side of the phone. Good work CAD-Ray!read less - 12/08/2021
Ernesto Carmona
When I decided to purchase a digital scanner I decided on user experience. They have provided the best experience I could have asked for, from online support, Facebook support, and in person courses. There is no better team to buy Medit from period...read moreWhen I decided to purchase a digital scanner I decided on user experience. They have provided the best experience I could have asked for, from online support, Facebook support, and in person courses. There is no better team to buy Medit from period. Do yourself a favor and buy from them if you are in the market for an intraoral scanner.read less - 6/16/2020
Matt McReynolds
These guys are ALWAYS there to help if you get stuck. I’ve been happy with the mill (coritec one) and scanner (i500) I bought from them 2 years ago. I’d do business with them again. - 7/01/2021
Kenneth Gould
A most helpful, detailed, easy to follow, personal primer via Zoom on integrating the i700 scanner into our practice. Well done! Thank you Kaila! - 5/03/2022
Artin Sakhaee
The support is even better then the camera itself. I used many other scanners and this is by far the best one. Recommended to many people. Looking to purchase a second one for my practice. The use and results are amazing. No adjustments to the p...read moreThe support is even better then the camera itself. I used many other scanners and this is by far the best one. Recommended to many people. Looking to purchase a second one for my practice. The use and results are amazing. No adjustments to the prosthetics at all.read less - 7/15/2020
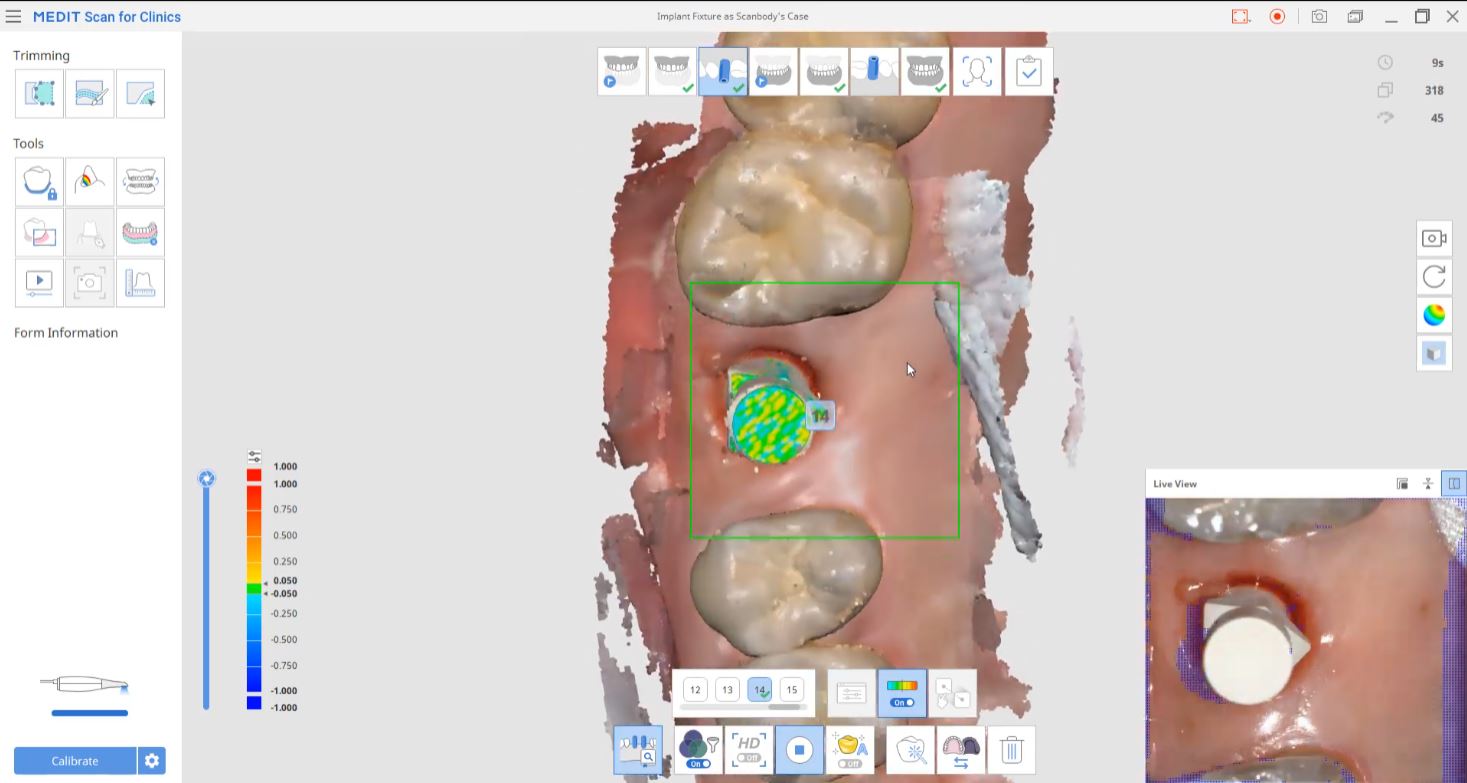
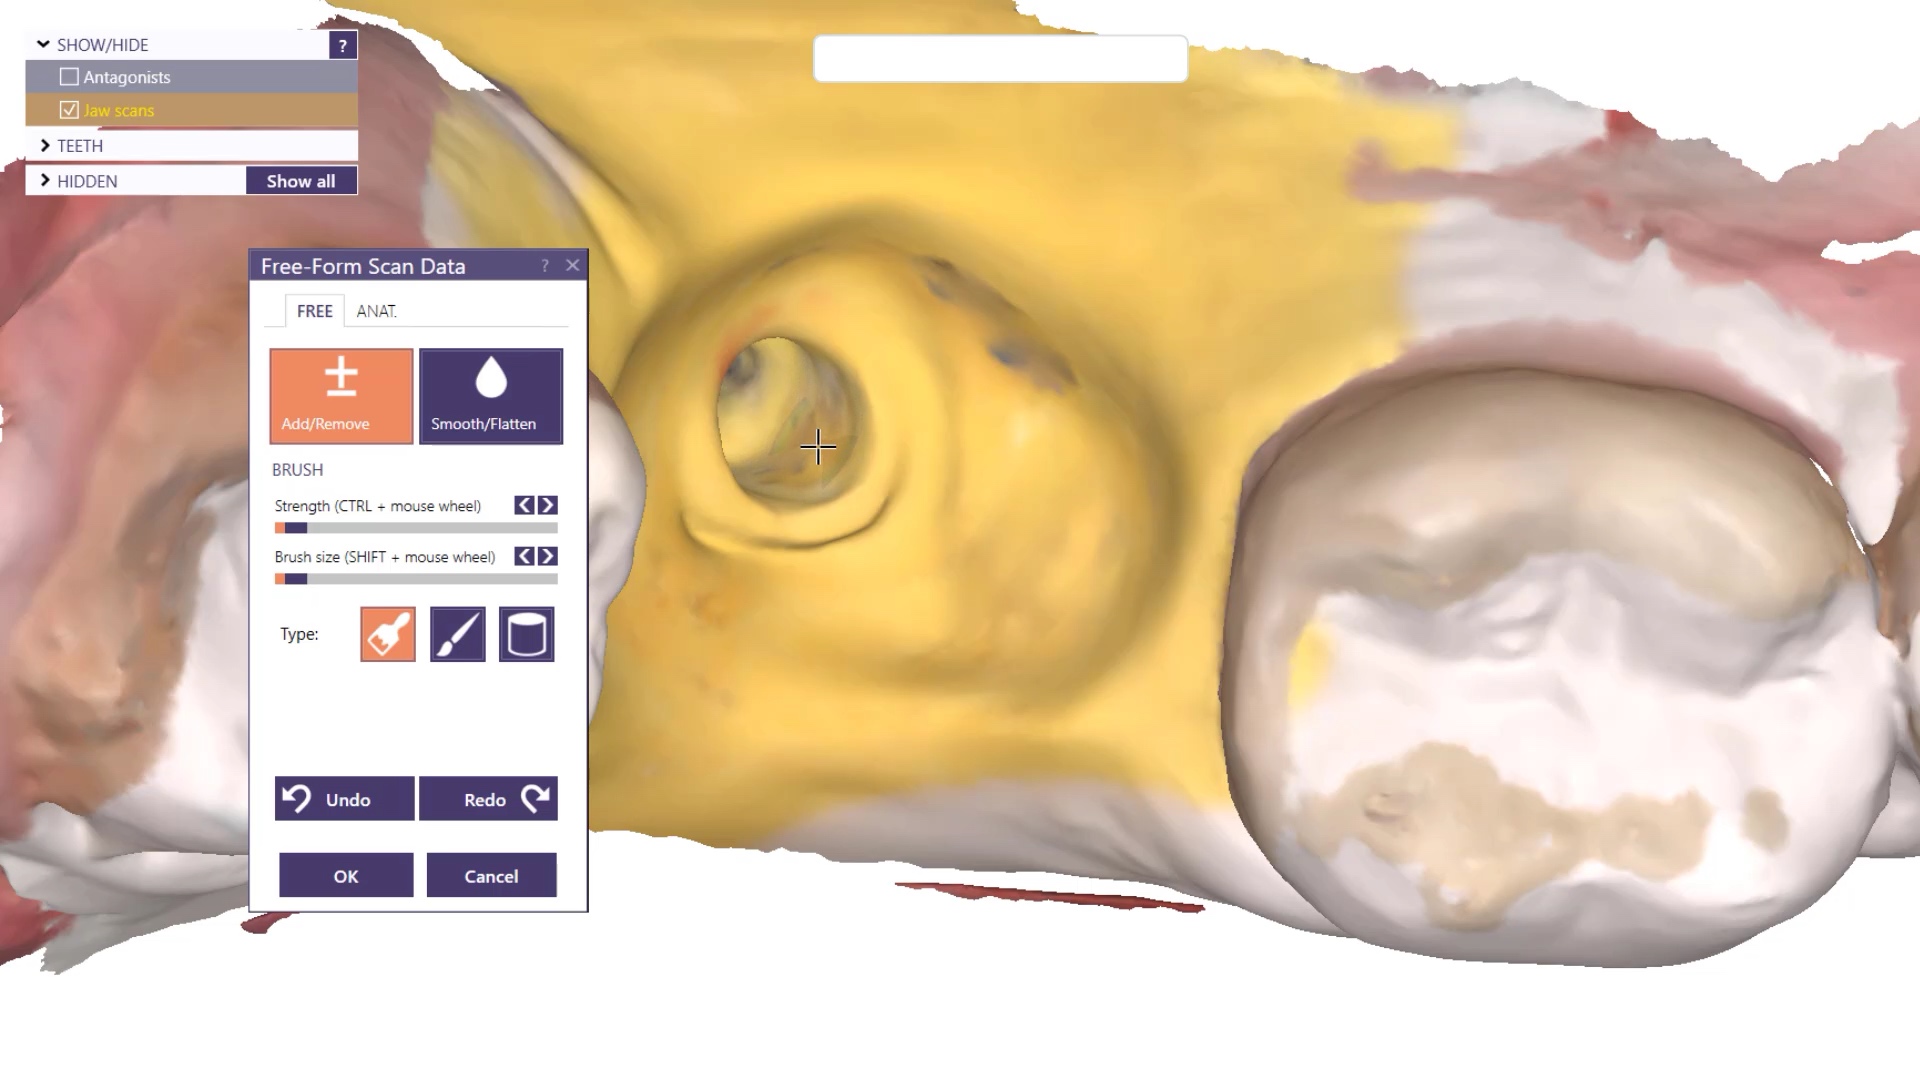
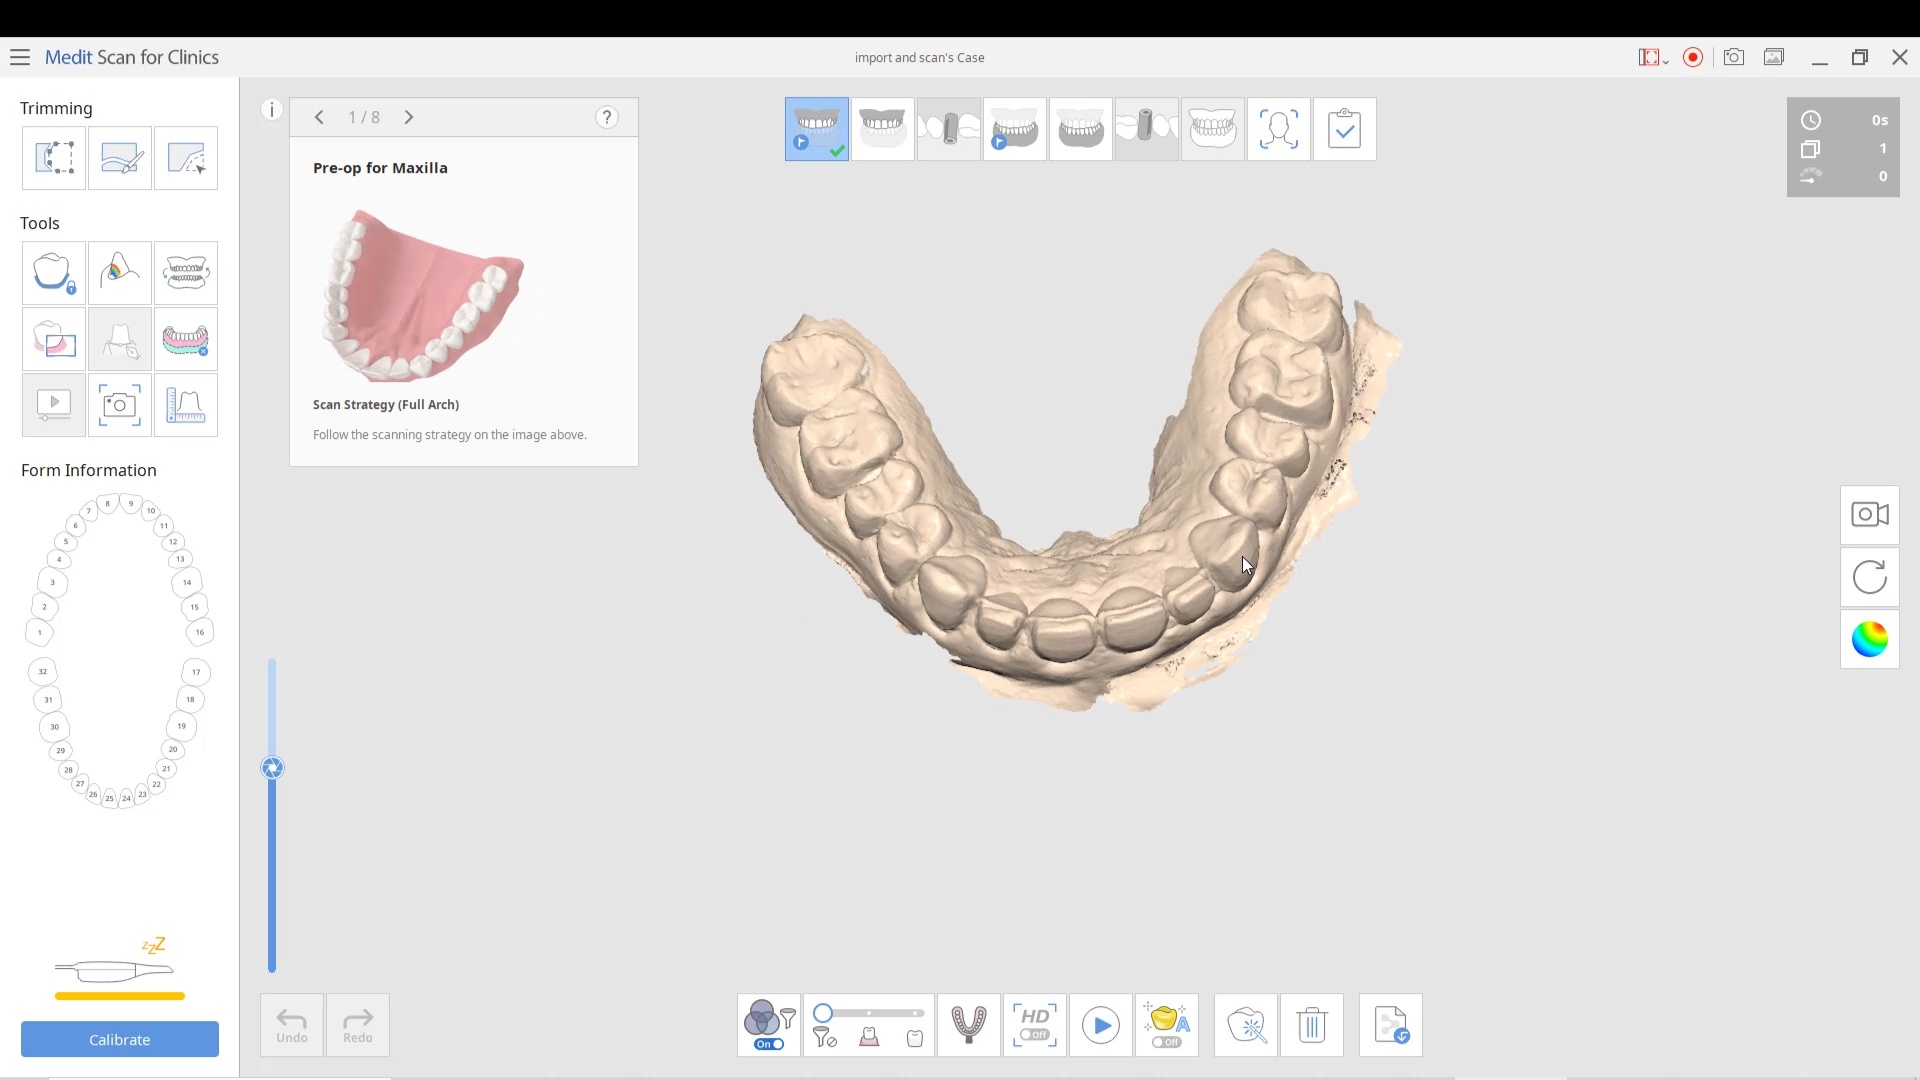
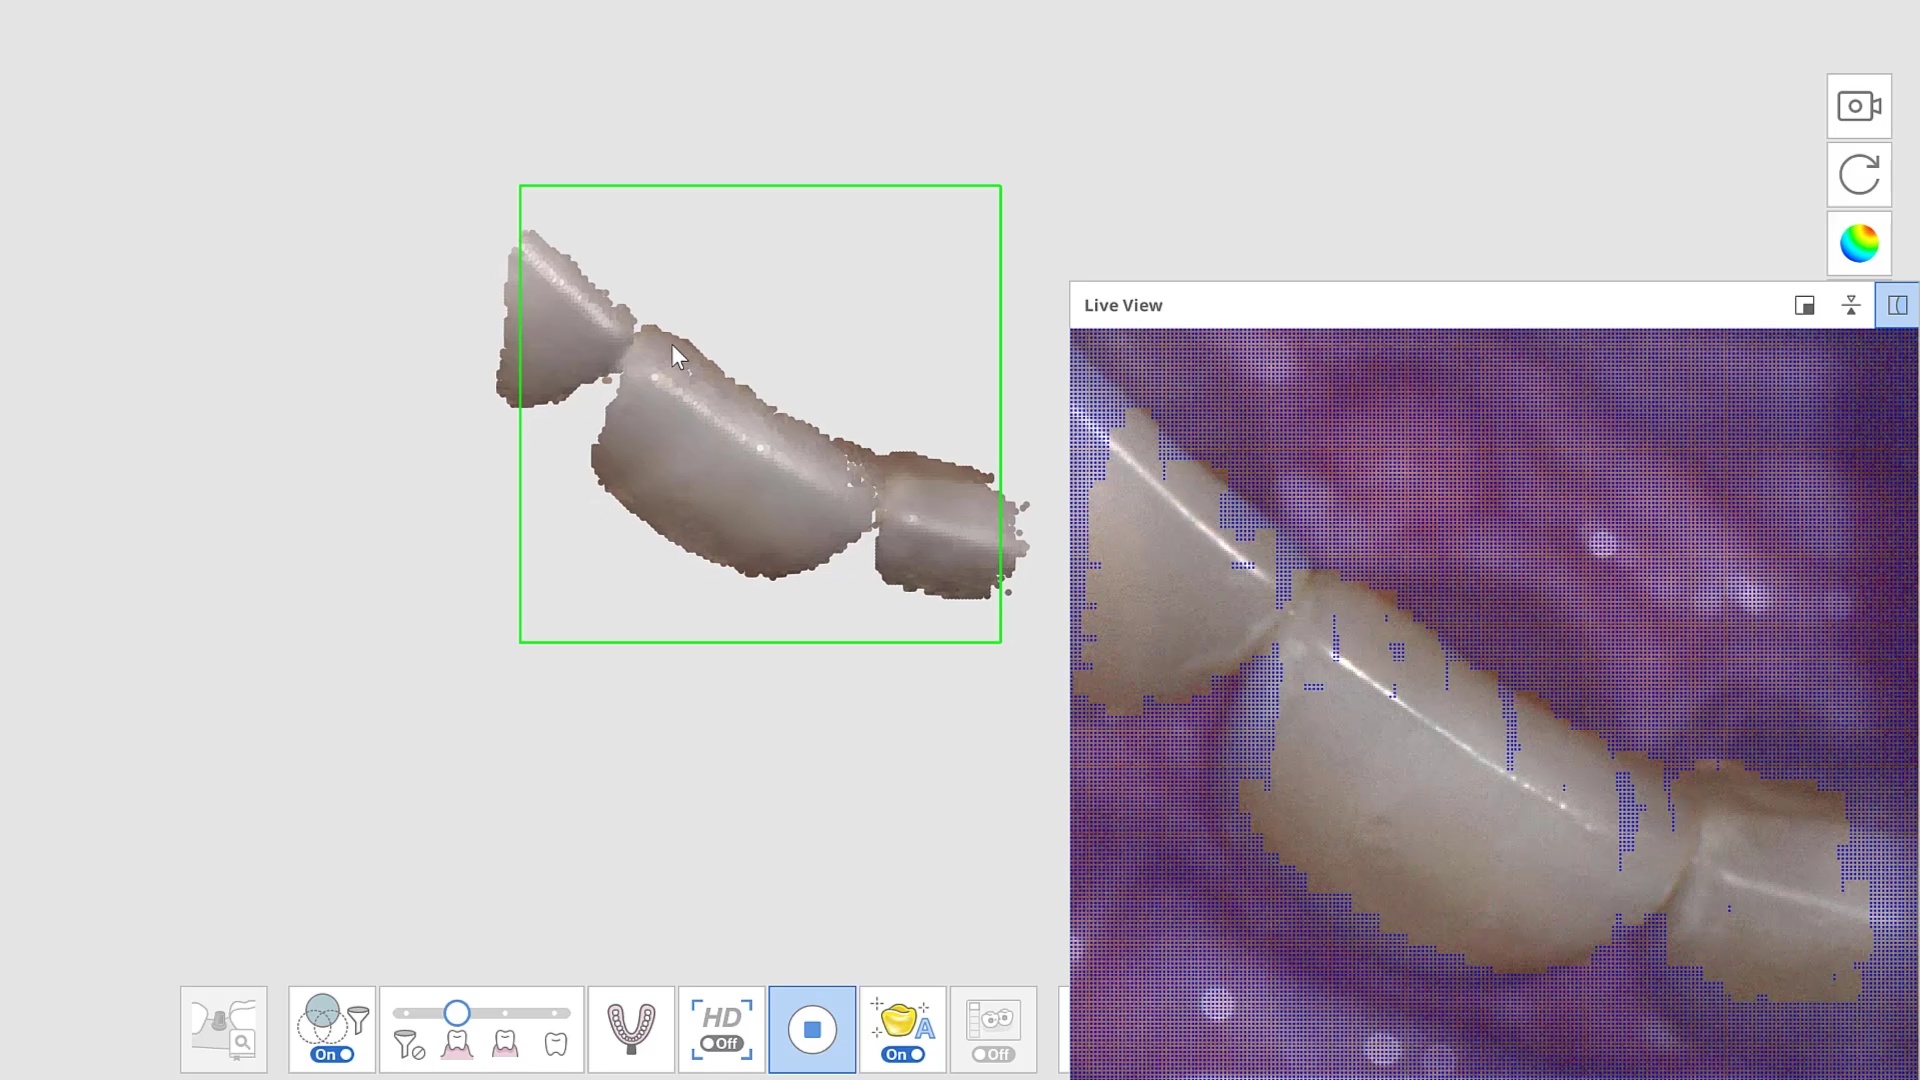
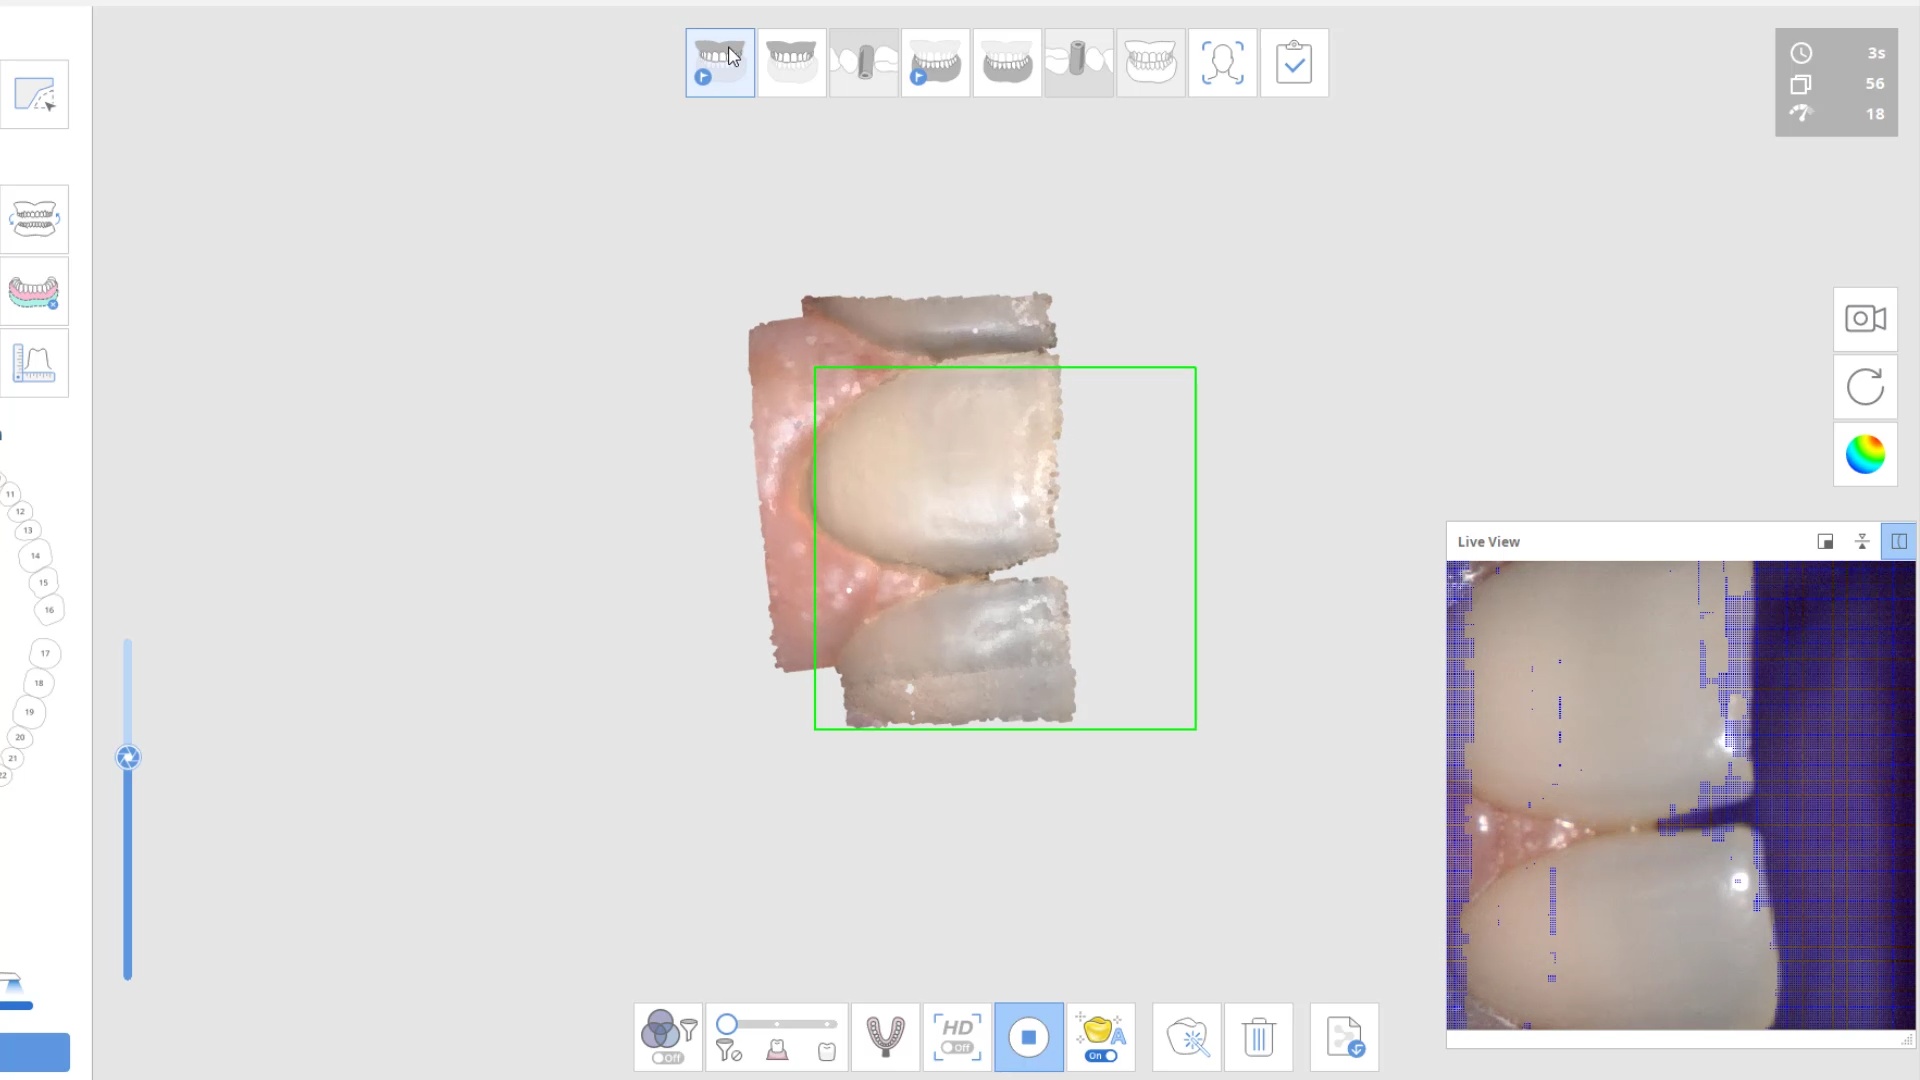
Here is why the Medit i700 is the best intra-oral scanner on the market if you do any kind of implant restorations. There are so many options and tools that are leap years ahead of other scanners and their software. Medit can automatically identify the scanbody for you so you don’t have to do cartwheels and gymnastics to pick up all of the scanbody. This is in part 1 of the video.
For advanced users, we are sick of dealing with scanbodies and checking to make sure they are seated all the way and not binding on the tissue or bone, so we developed this technique of just scanning the fixture itself. It is not ideal just yet, but it will be the future, as the inside of the fixture is too shiny. i just used some old cerec spray to mask the topography for this demonstration.
oh, and really, no one else can show you how to milk that medit like cad-ray.com can. we use it well beyond what it was intended for and frankly you are wasting your time and money with most others. contact Frank DeLuca, Frank Weinstein, Laura Geney, Nick Statly, Damien Bonner, Jonathan Acker in the US or Milos Gedosev, Mariangela Di Nato, Roddy MacLeod in Europe for more information
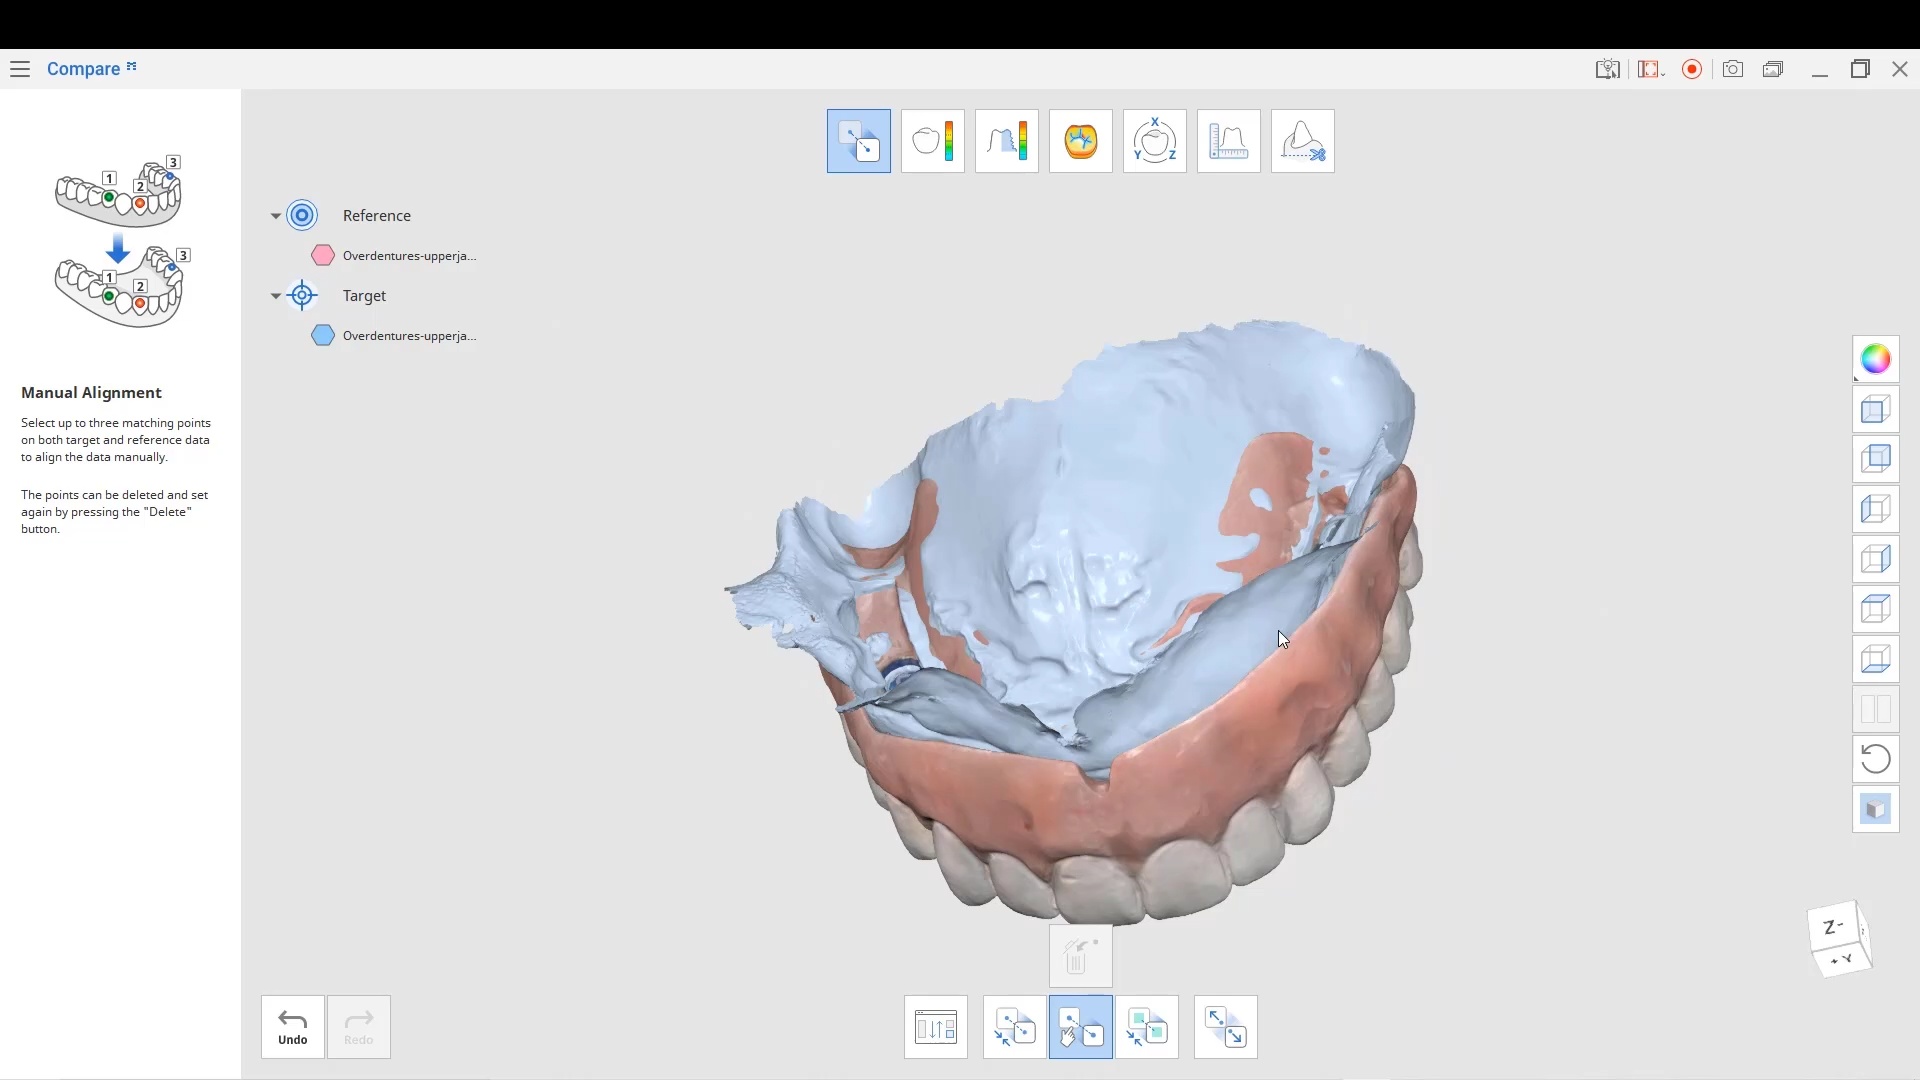
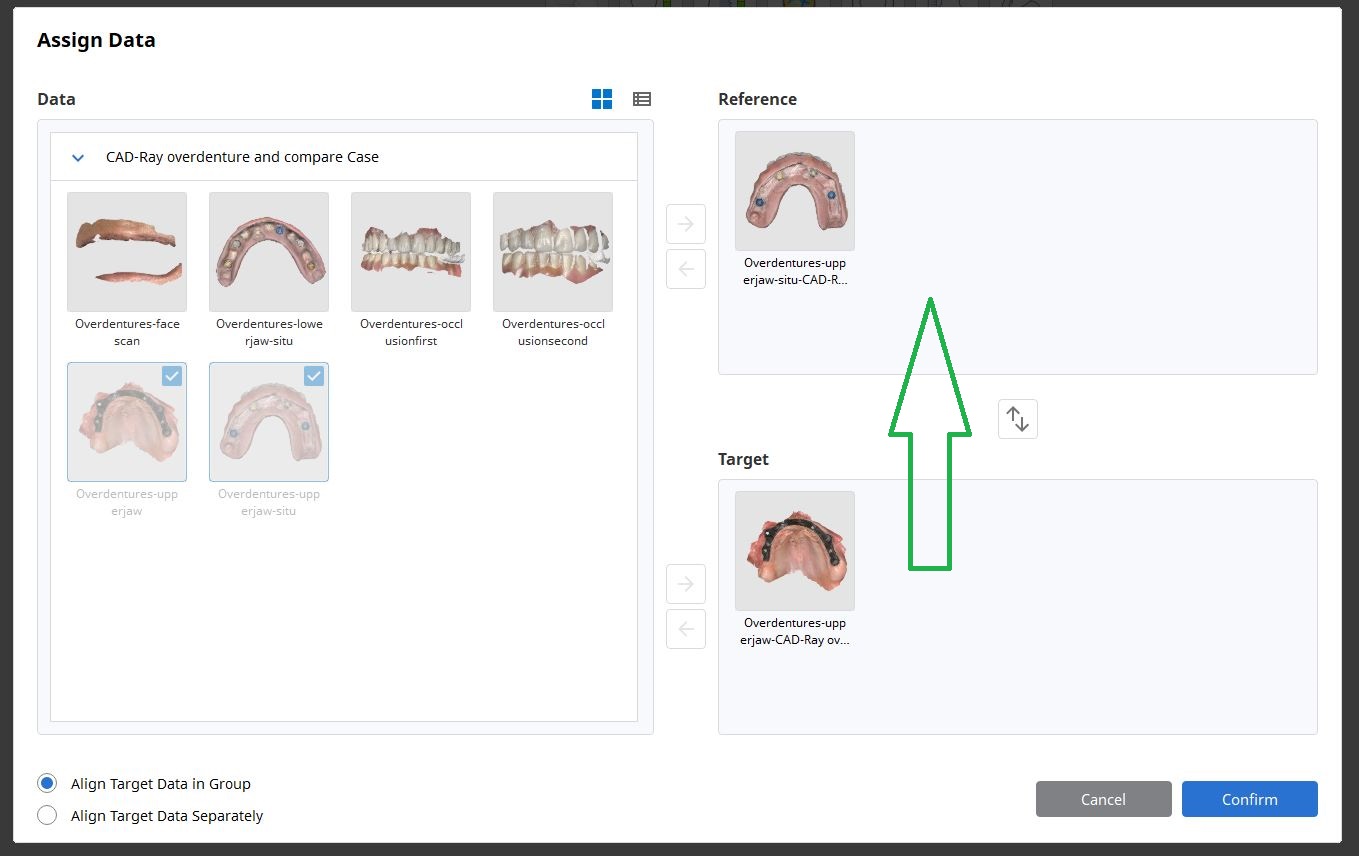
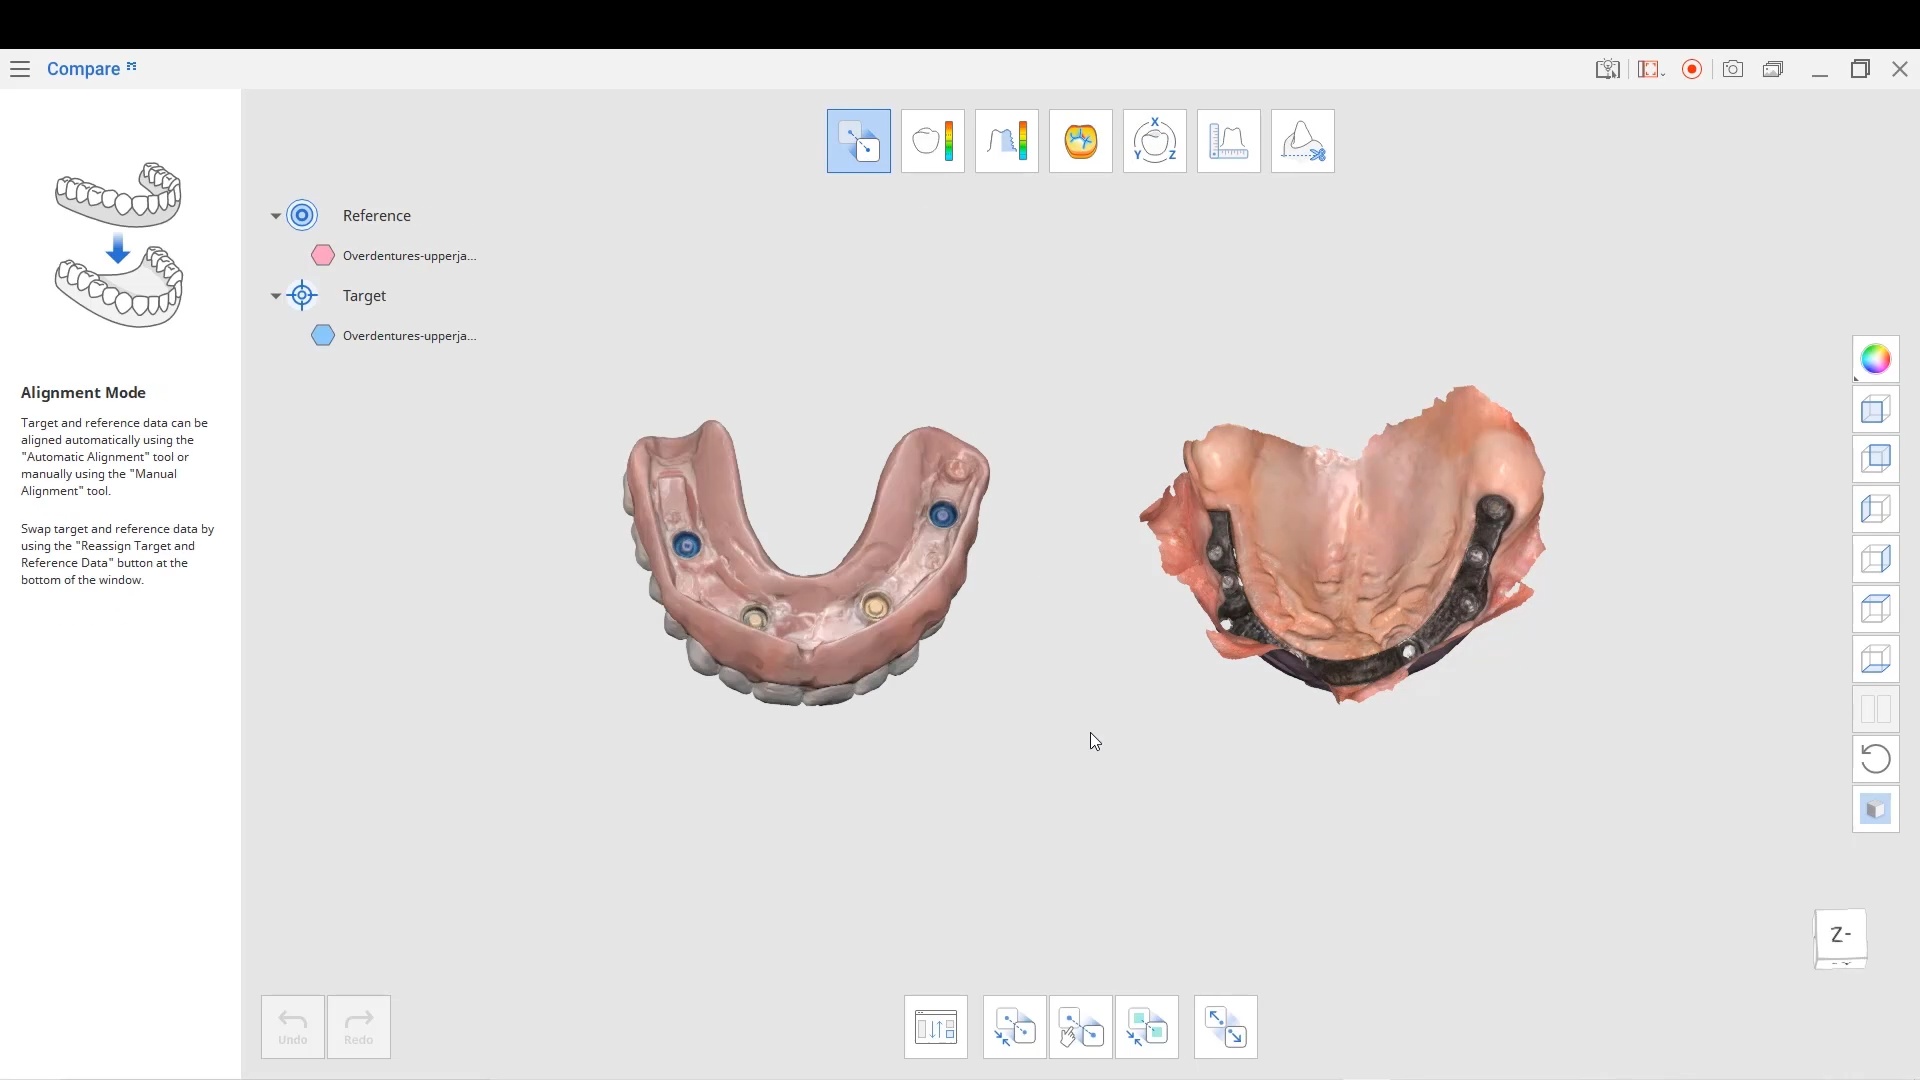
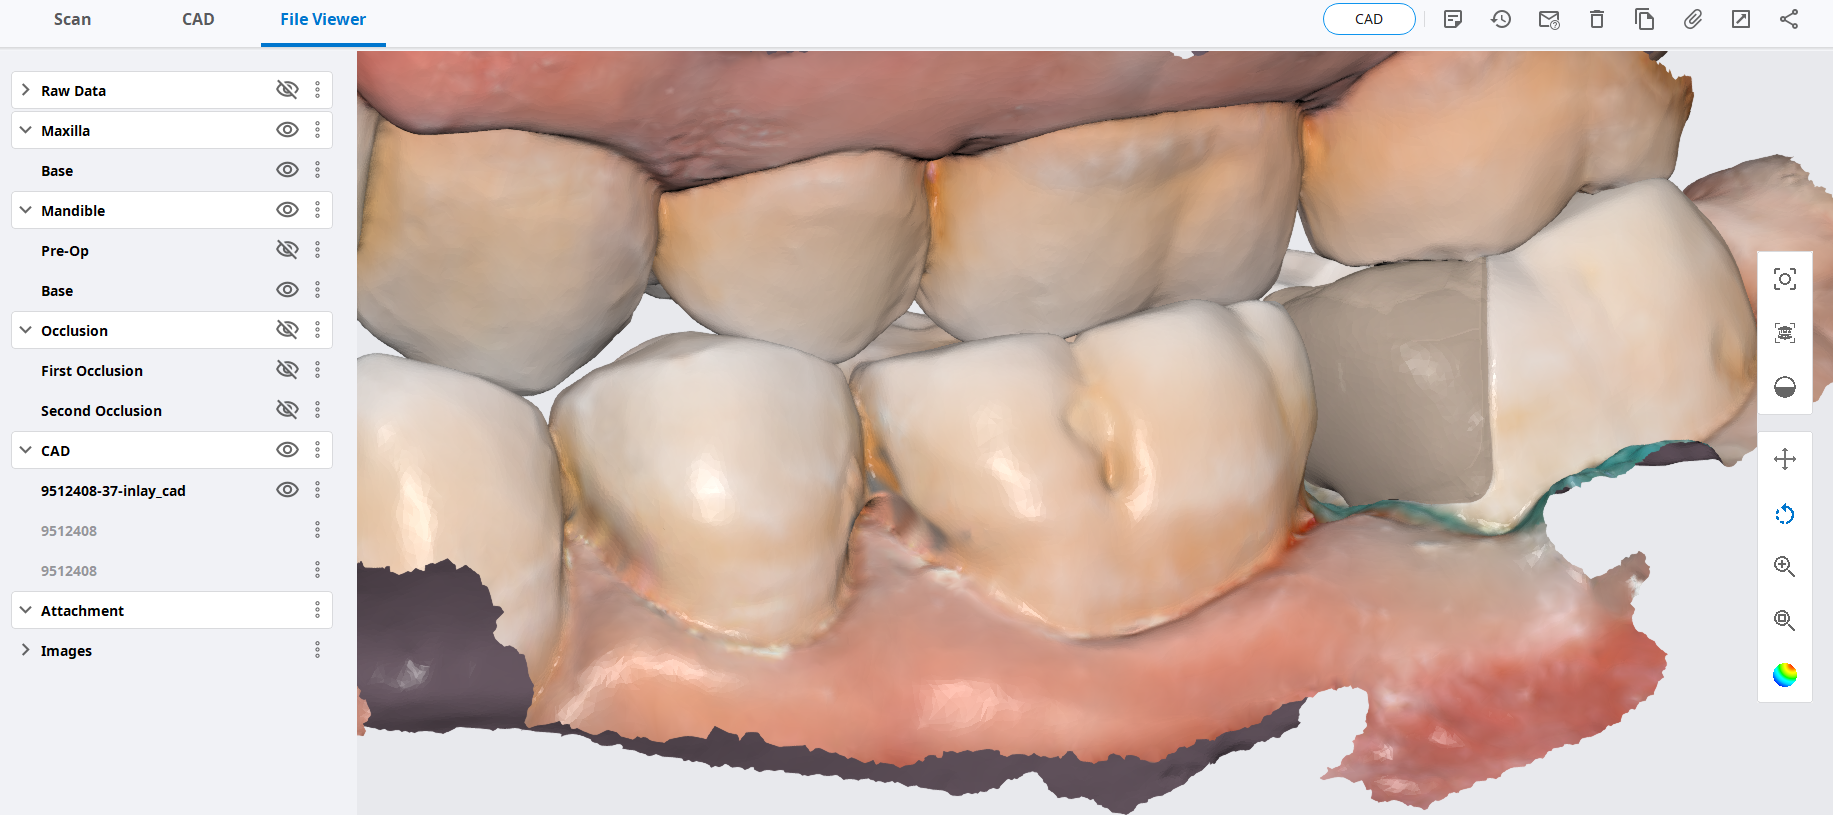
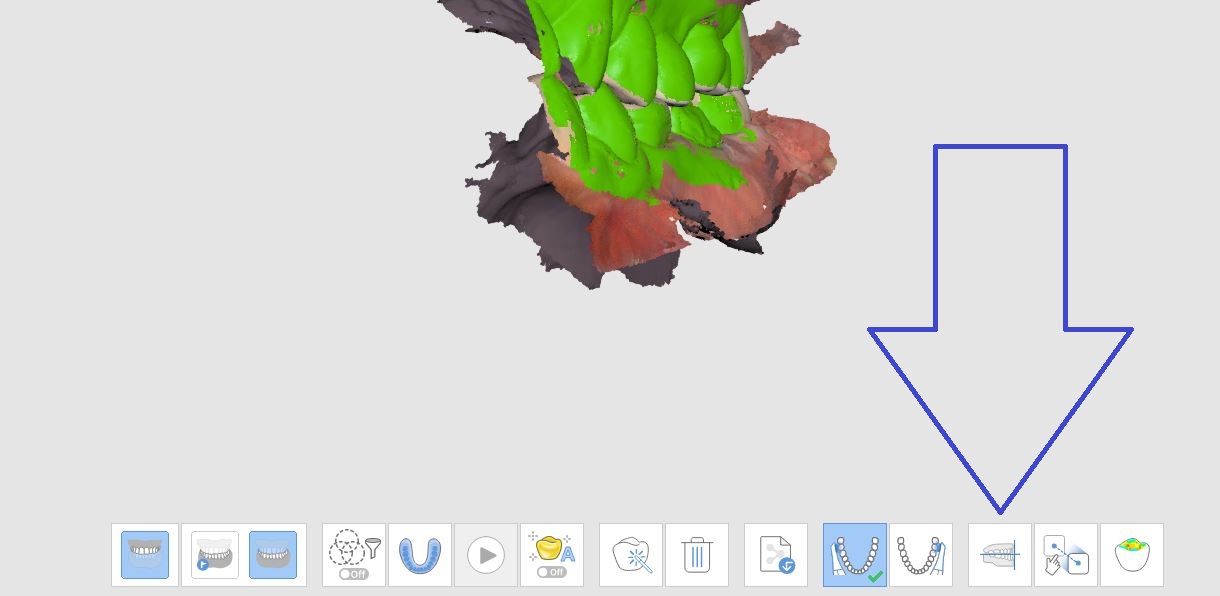
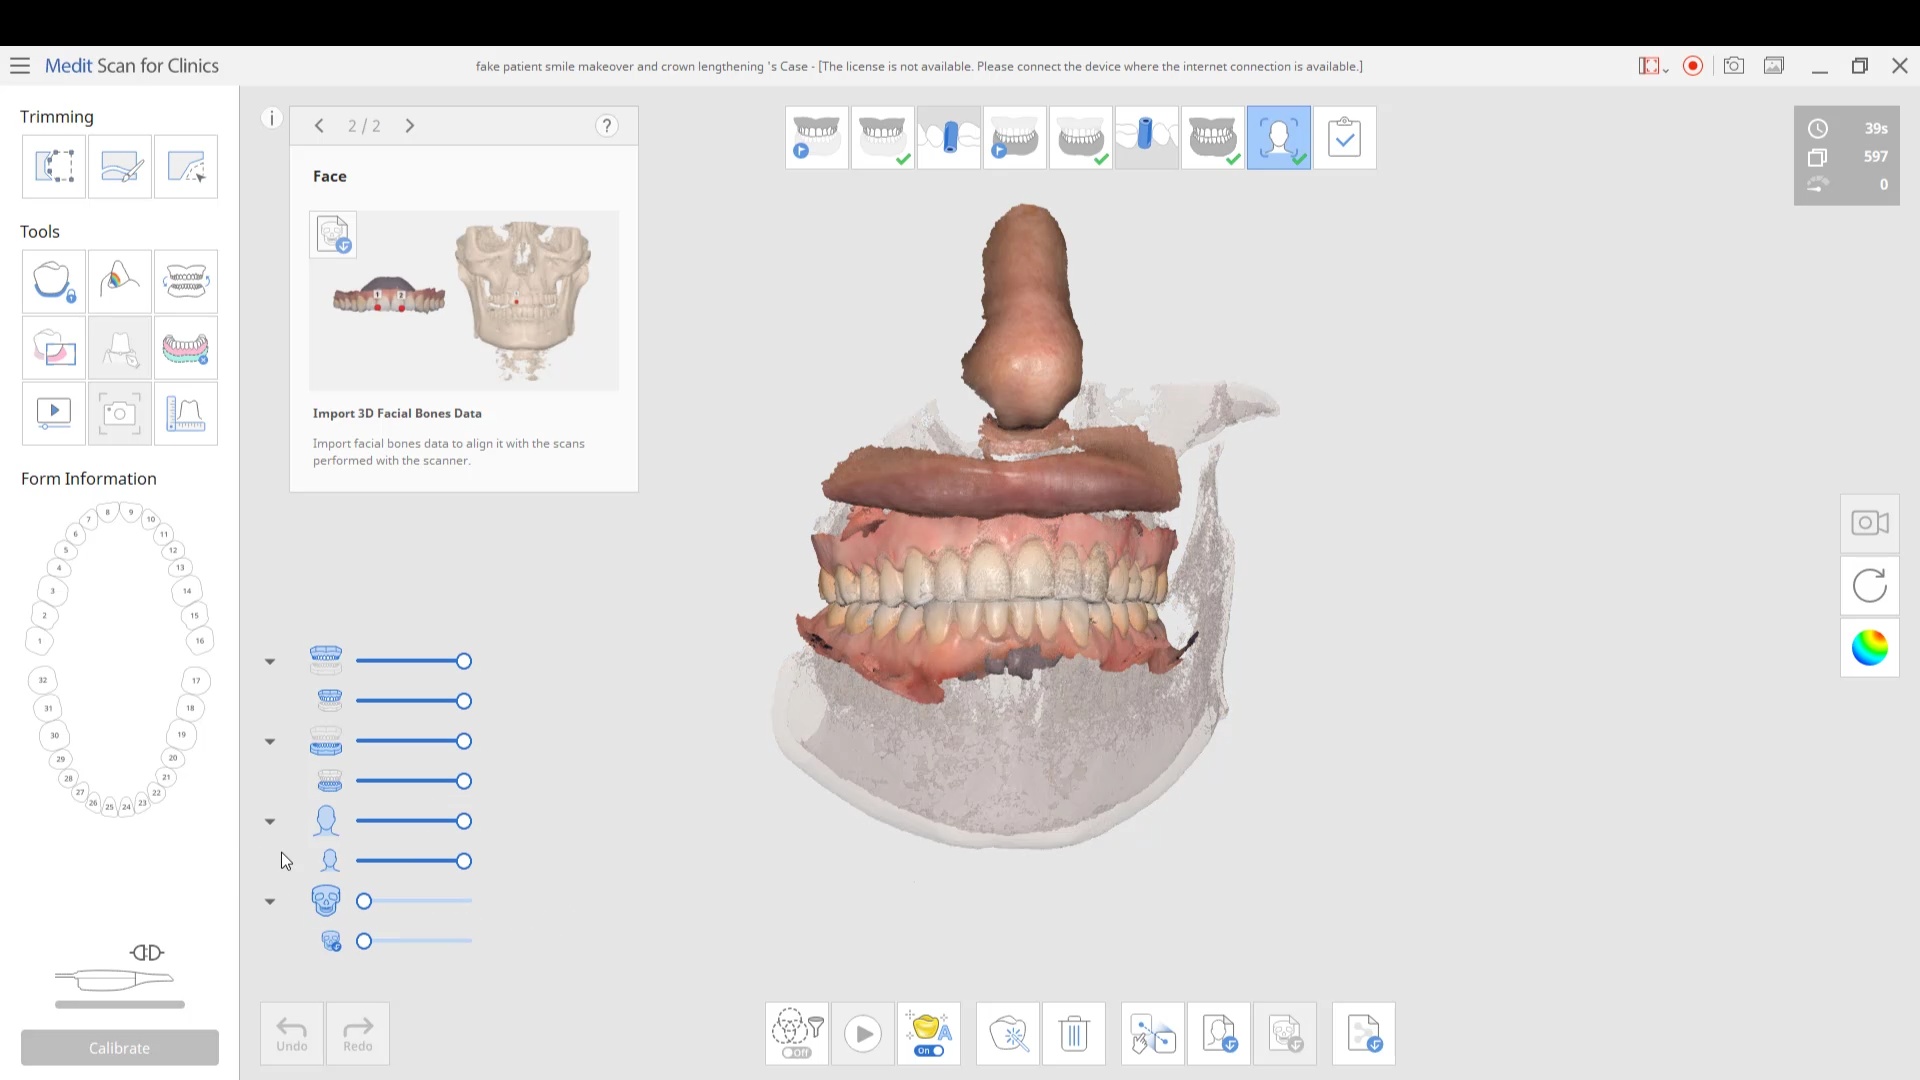
This case shows how to relate models to each and maintain their relationships. It features the power of the Medit Compare app that lets you duplicate models, trim them, modify them to your liking. There are some very useful features in this app that can come in very handy
an important matter to remember is the “direction of travel” which is taking models from the Target folder and moving it to relate it to the Reference folder.
All models placed in each folder will maintain their relationships to each other when traveling to connect with the other models. Inverting models will also come in handy for advanced users. You can see the full video and download the case and design along here
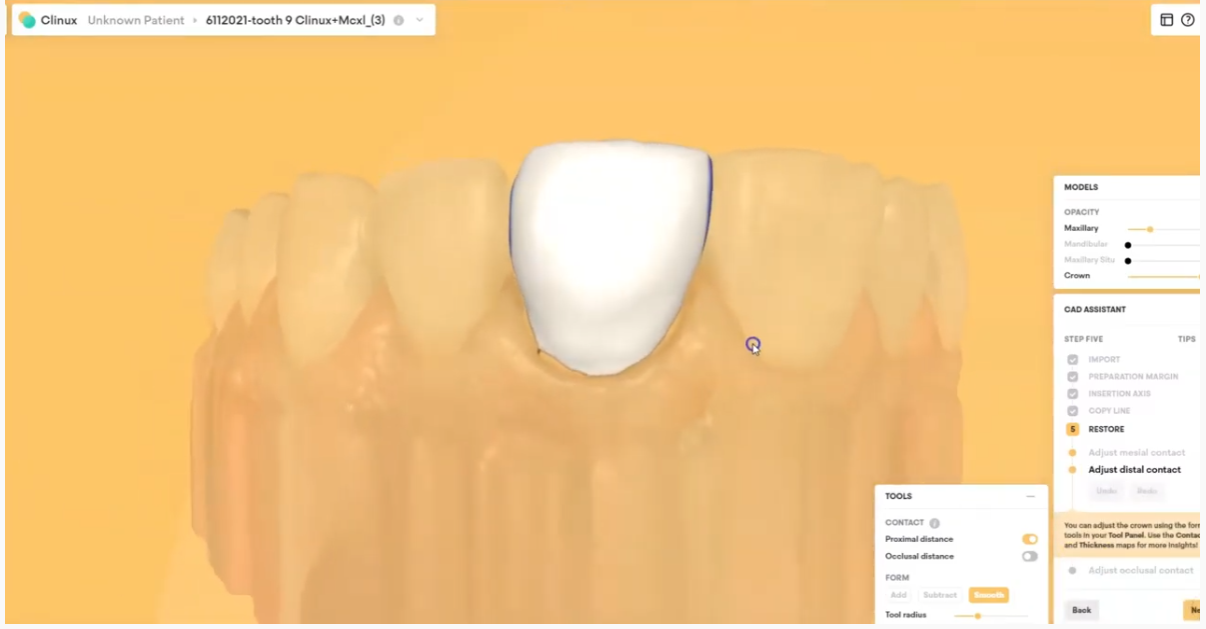
The CAD-Ray team is happy to announce that CAD design software has experienced a breakthrough. One of the hurdles of using design software has always been that it was created with lab technicians in mind; the rationale being that technical staff would be using it more than clinicians. It is no wonder that many still send off their scans to labs to be designed “by the experts.”
With the boom in digital and CAD/CAM dentistry, many offices are finally making the leap to bringing some or all of that workflow in-house to be done chairside (as they should). While there are many solutions available to incorporate one or more aspects of the digital dentistry workflow into your practice, it’s safe to say that the innovative design of Clinux is a turning point for design software.
Clinux is the result of collaboration by a team of experts from the most reputable and recognizable brands in the dental industry, all previously involved with advanced technology and equipment. It is made by those who have seen the pain points of the best programs in the dental world. They came up with a plan to eliminate the confusing barriers to simple plug and play design. Clinux is made for dentists in mind, not lab technicians. Less time spent onboarding, less clicks to your finished designs, and clear, reasonable fees all result in the first dentist-friendly CAD design software. Best of all, storage is not required. It is the first CAD design software that operates in the cloud.
Clinux; it’s completely independent, and curiously intuitive. It’s reasonably (and transparently) priced and very accommodating to workflow integration. Combined with the power of Medit, it is easily the most portable and efficient digital solution you’ll find anywhere. As always, the CAD-Ray team, the leader at post-sale technology support will be in your corner with its White Glove service. We encourage you to check it out and see for yourself…
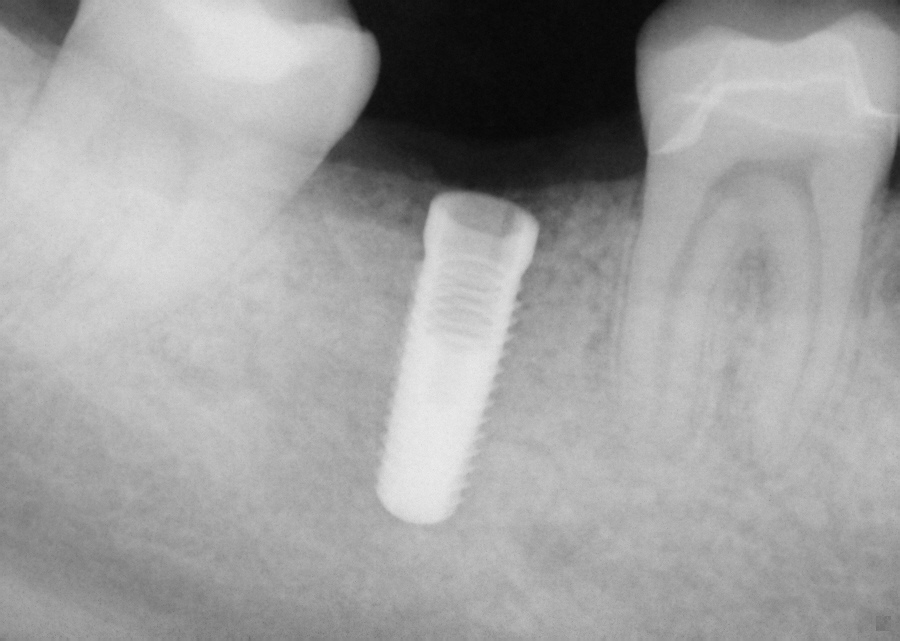
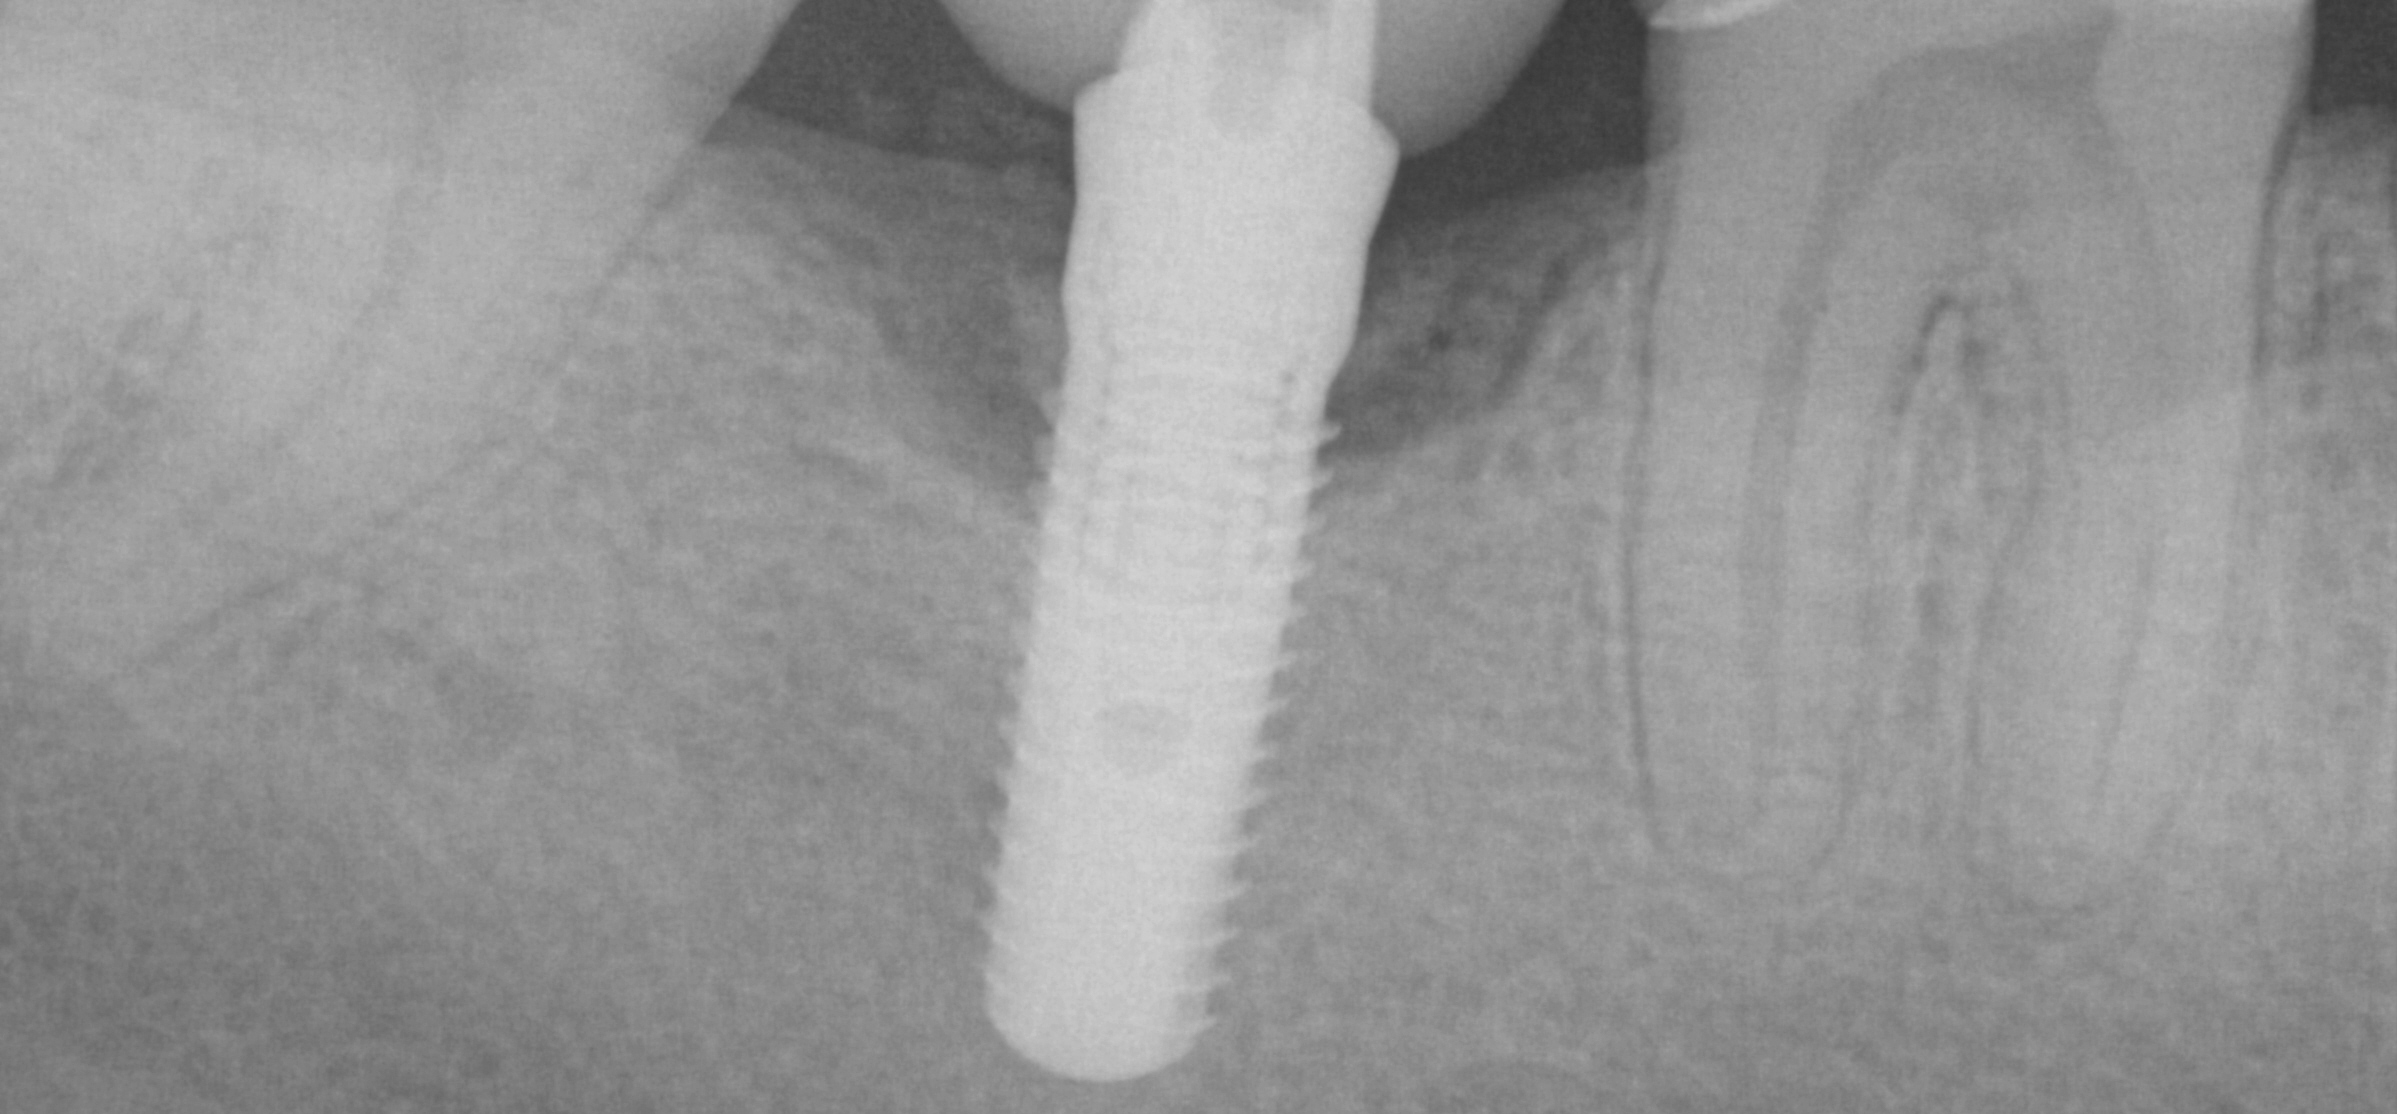
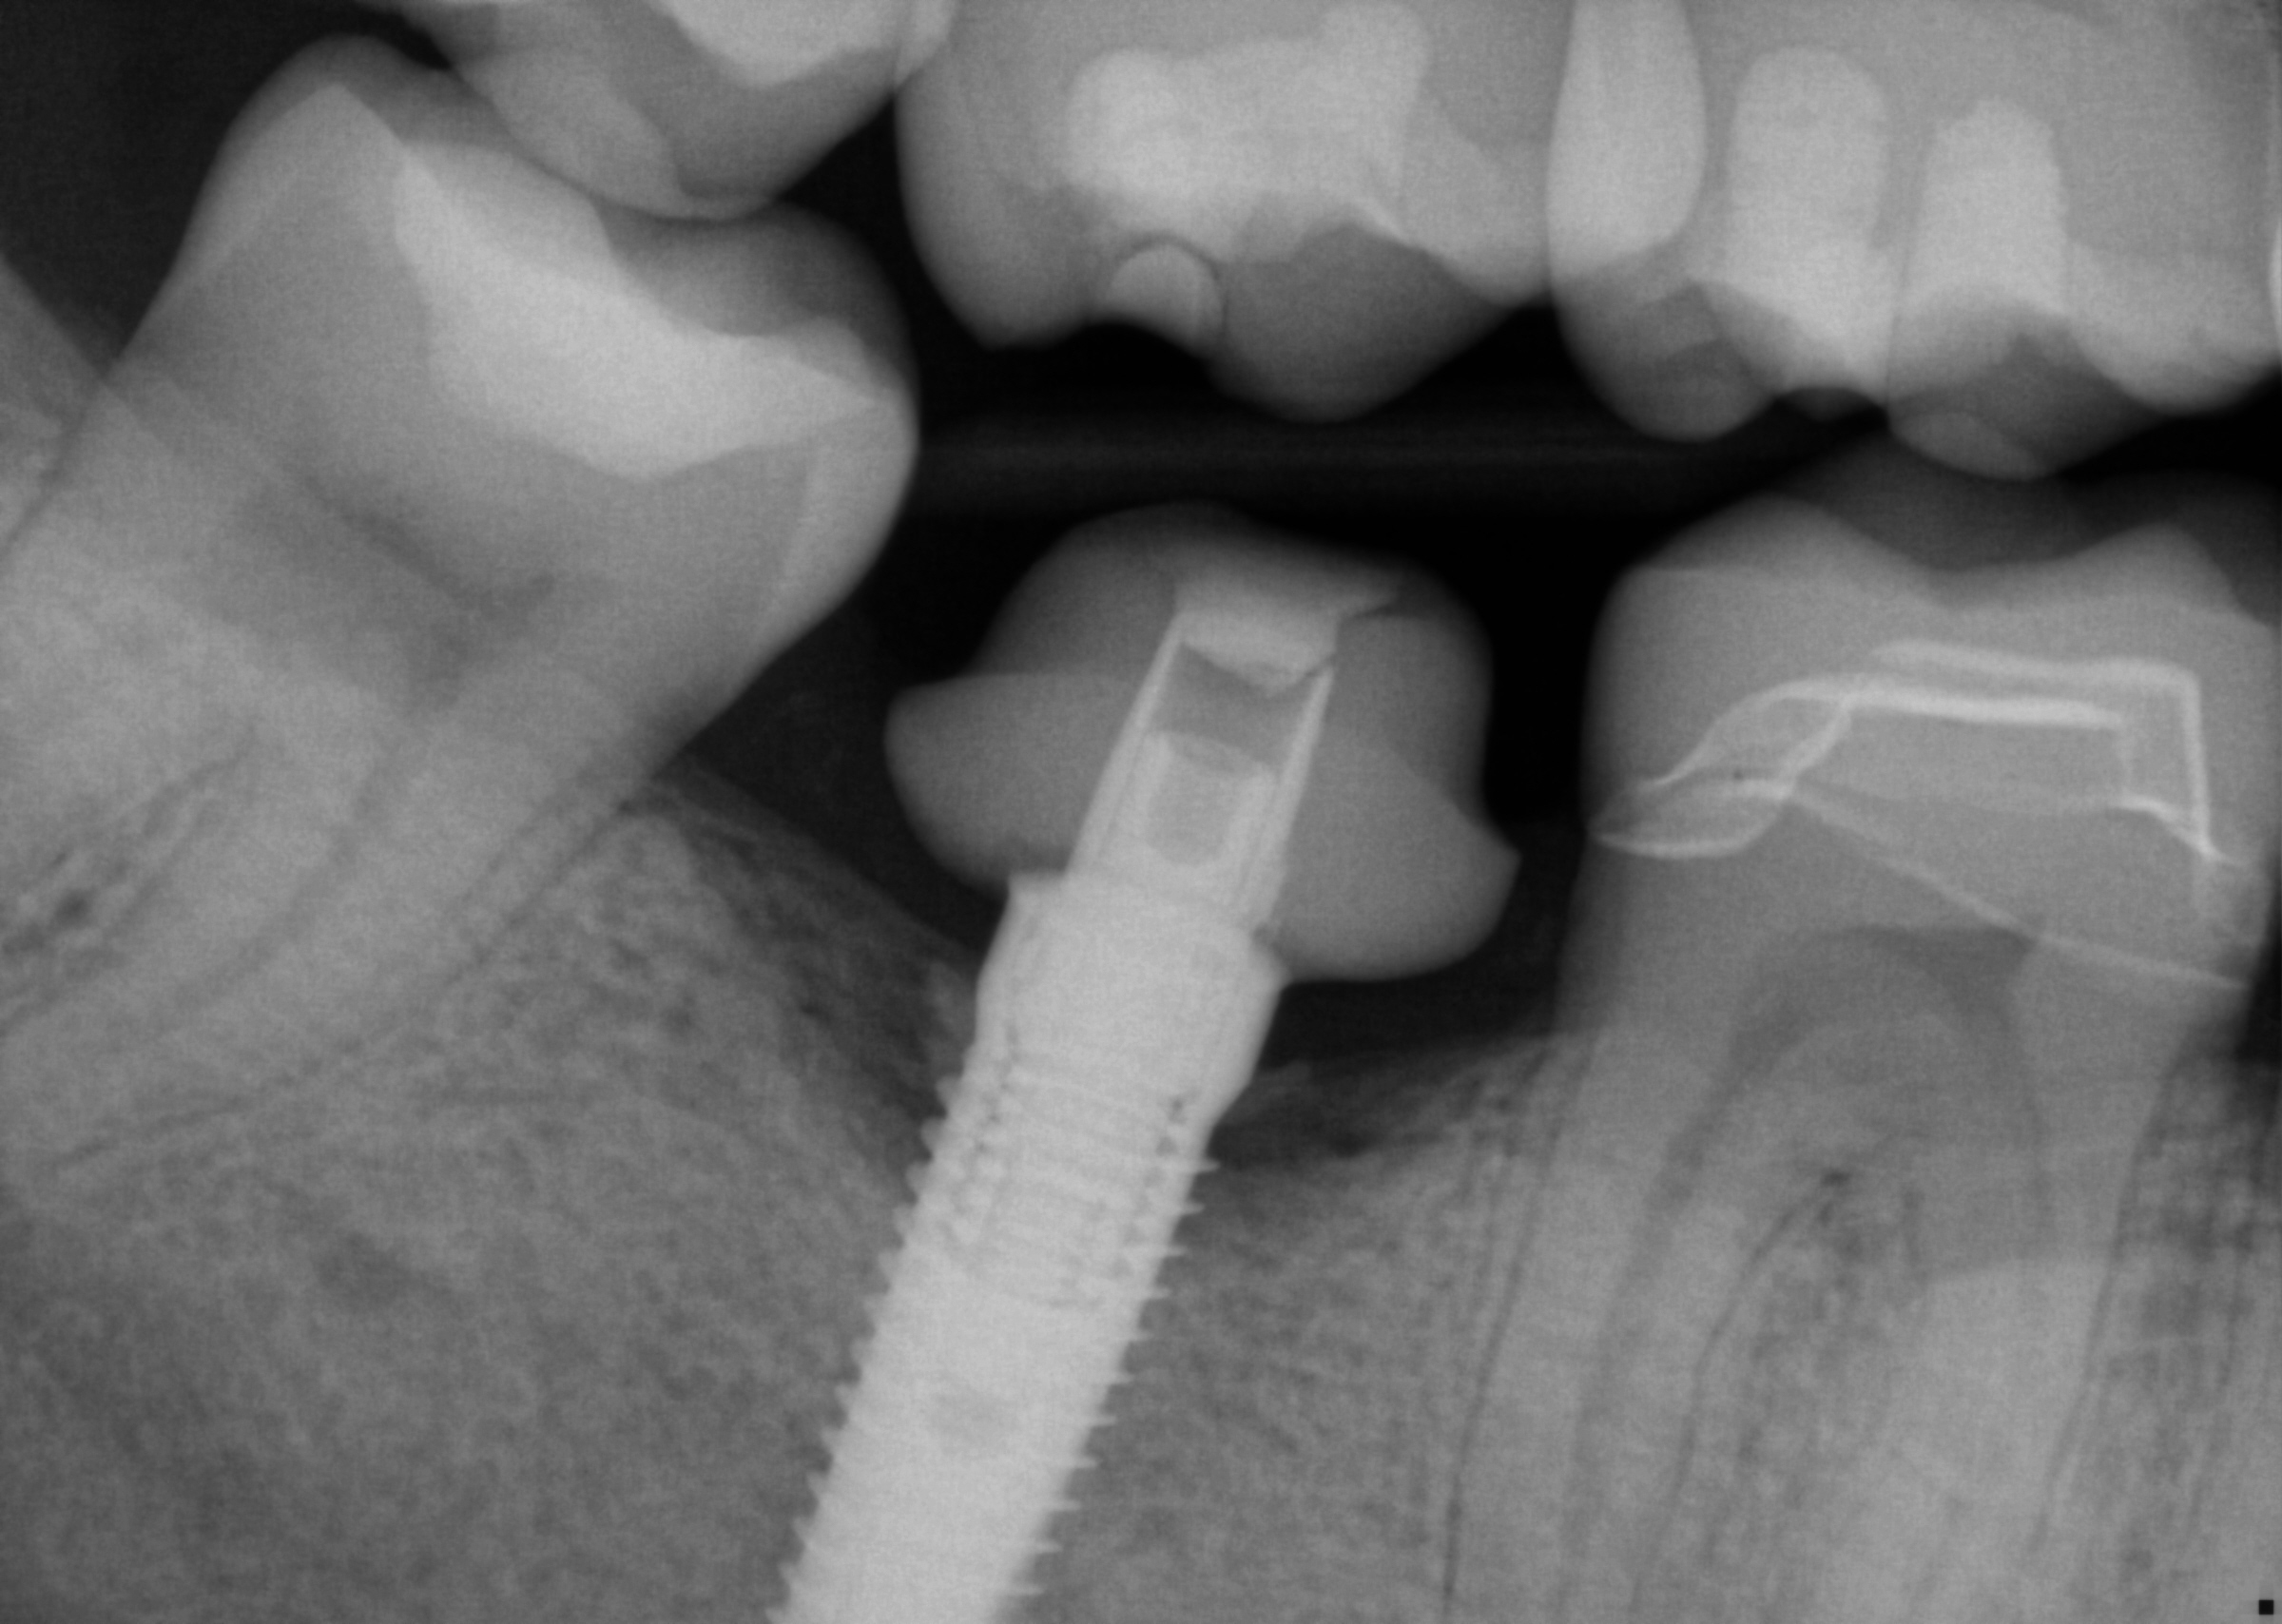
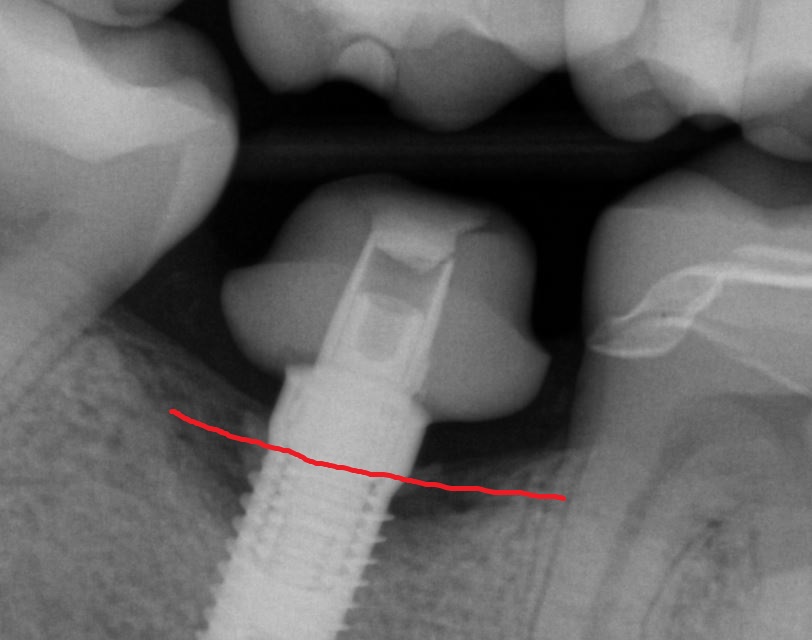
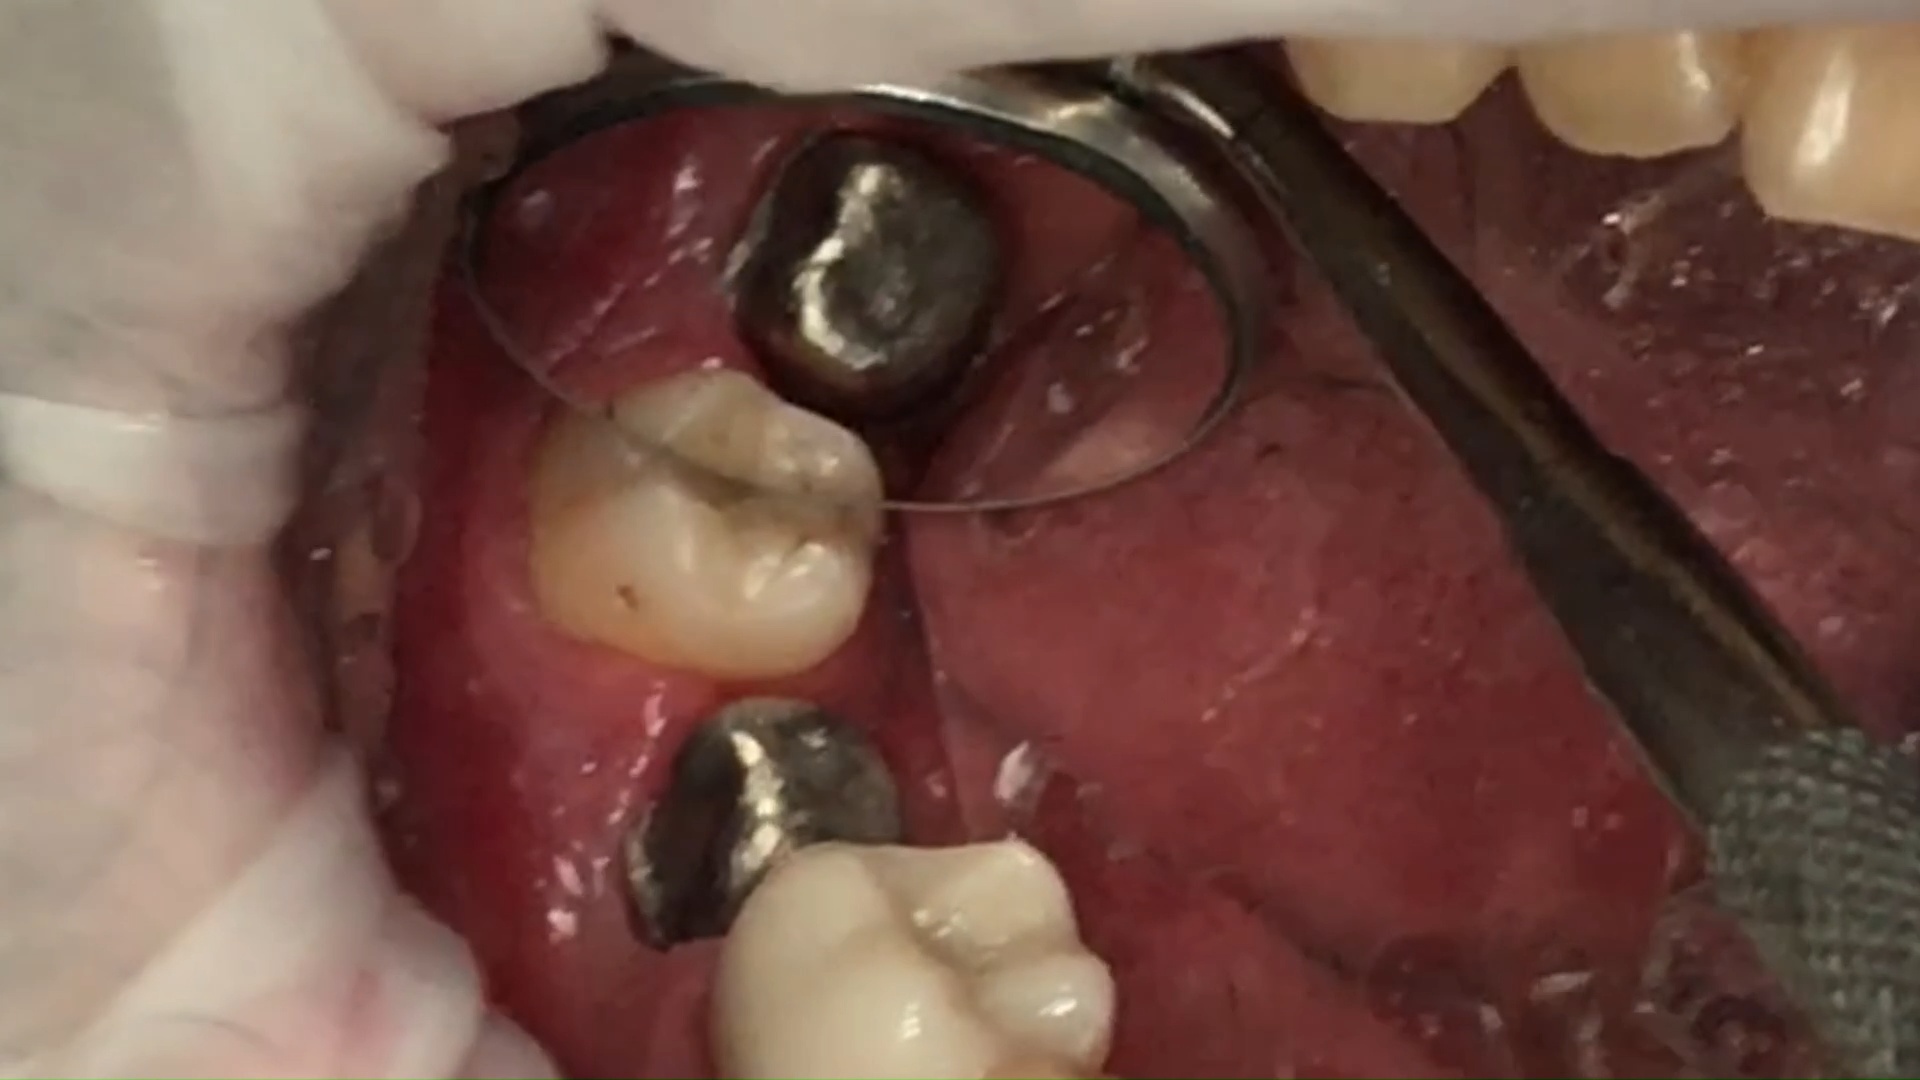
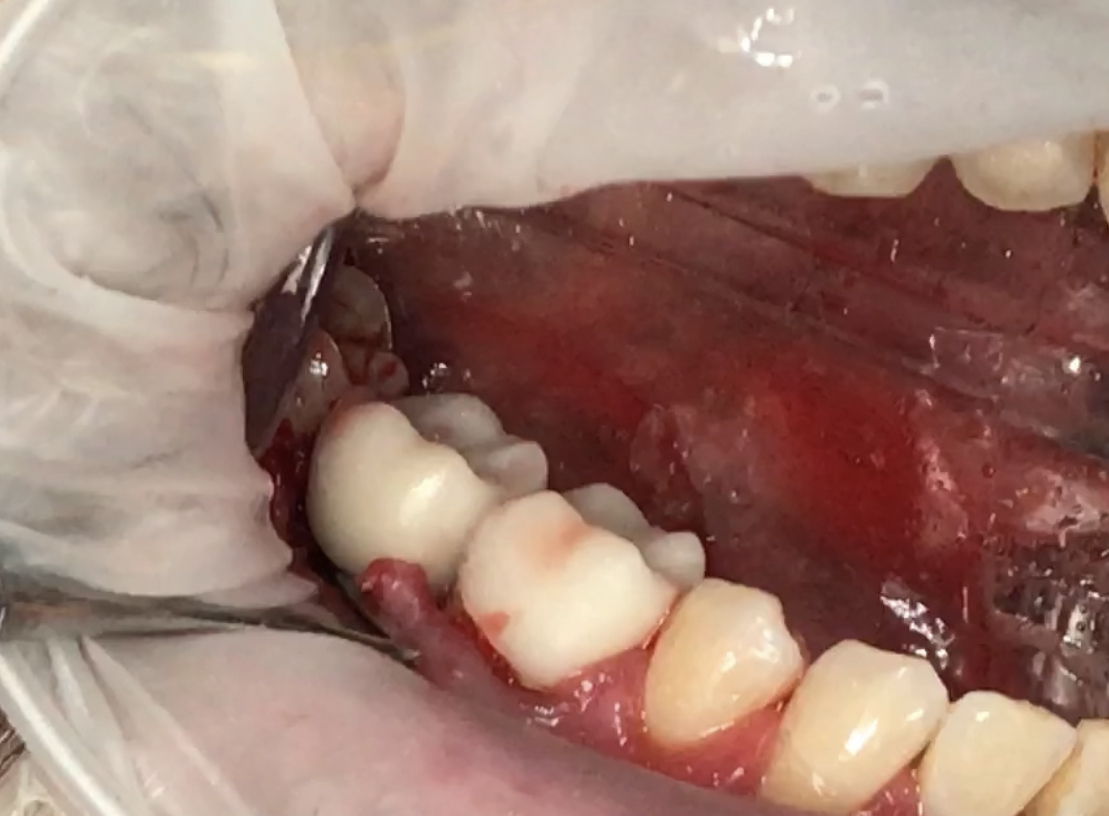
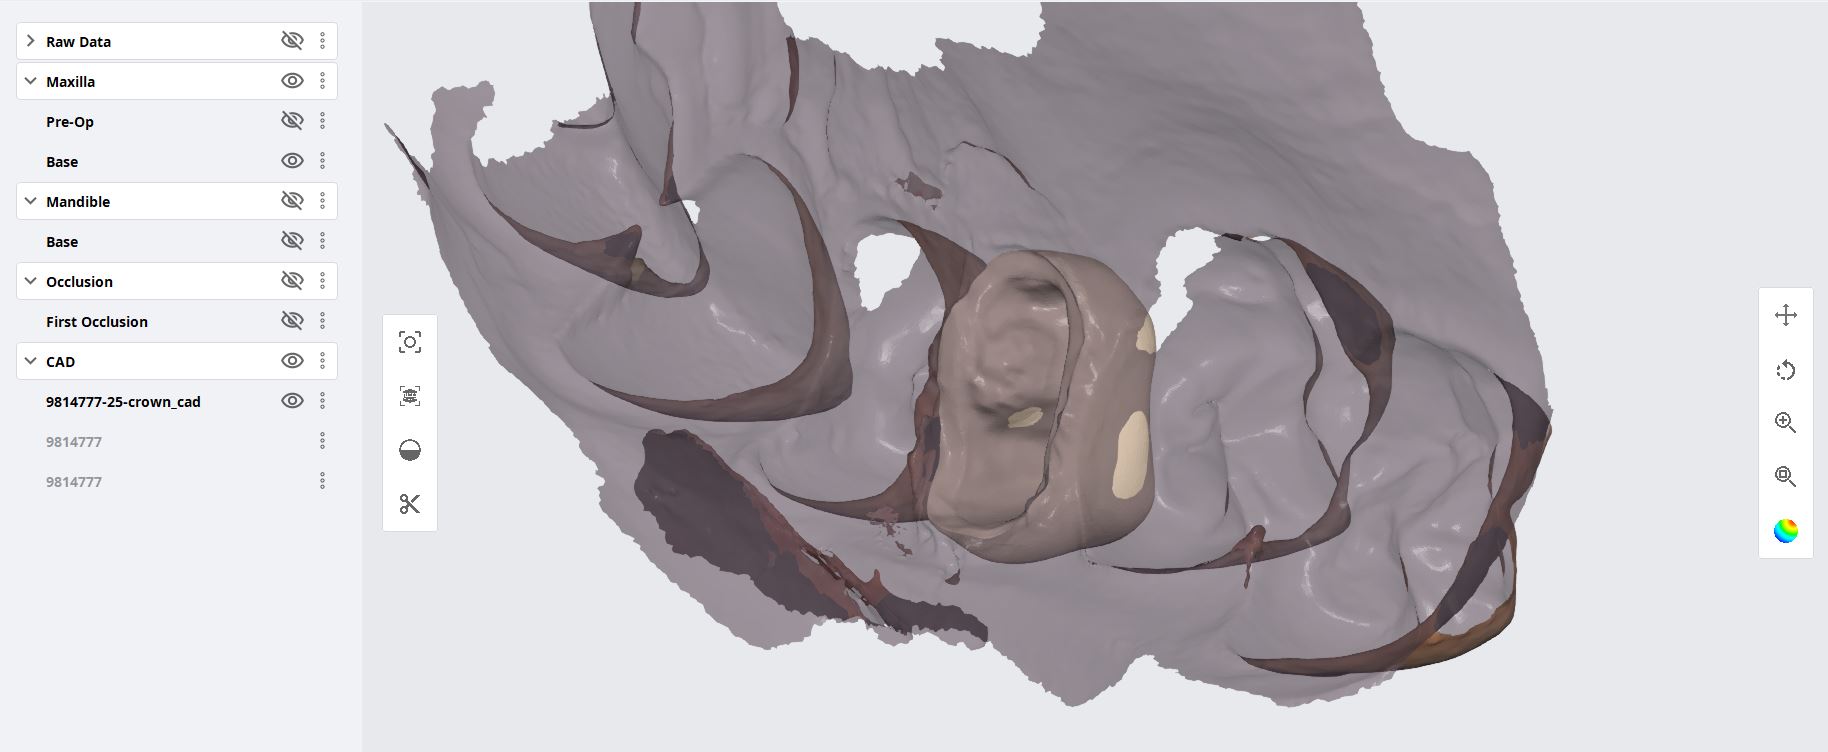
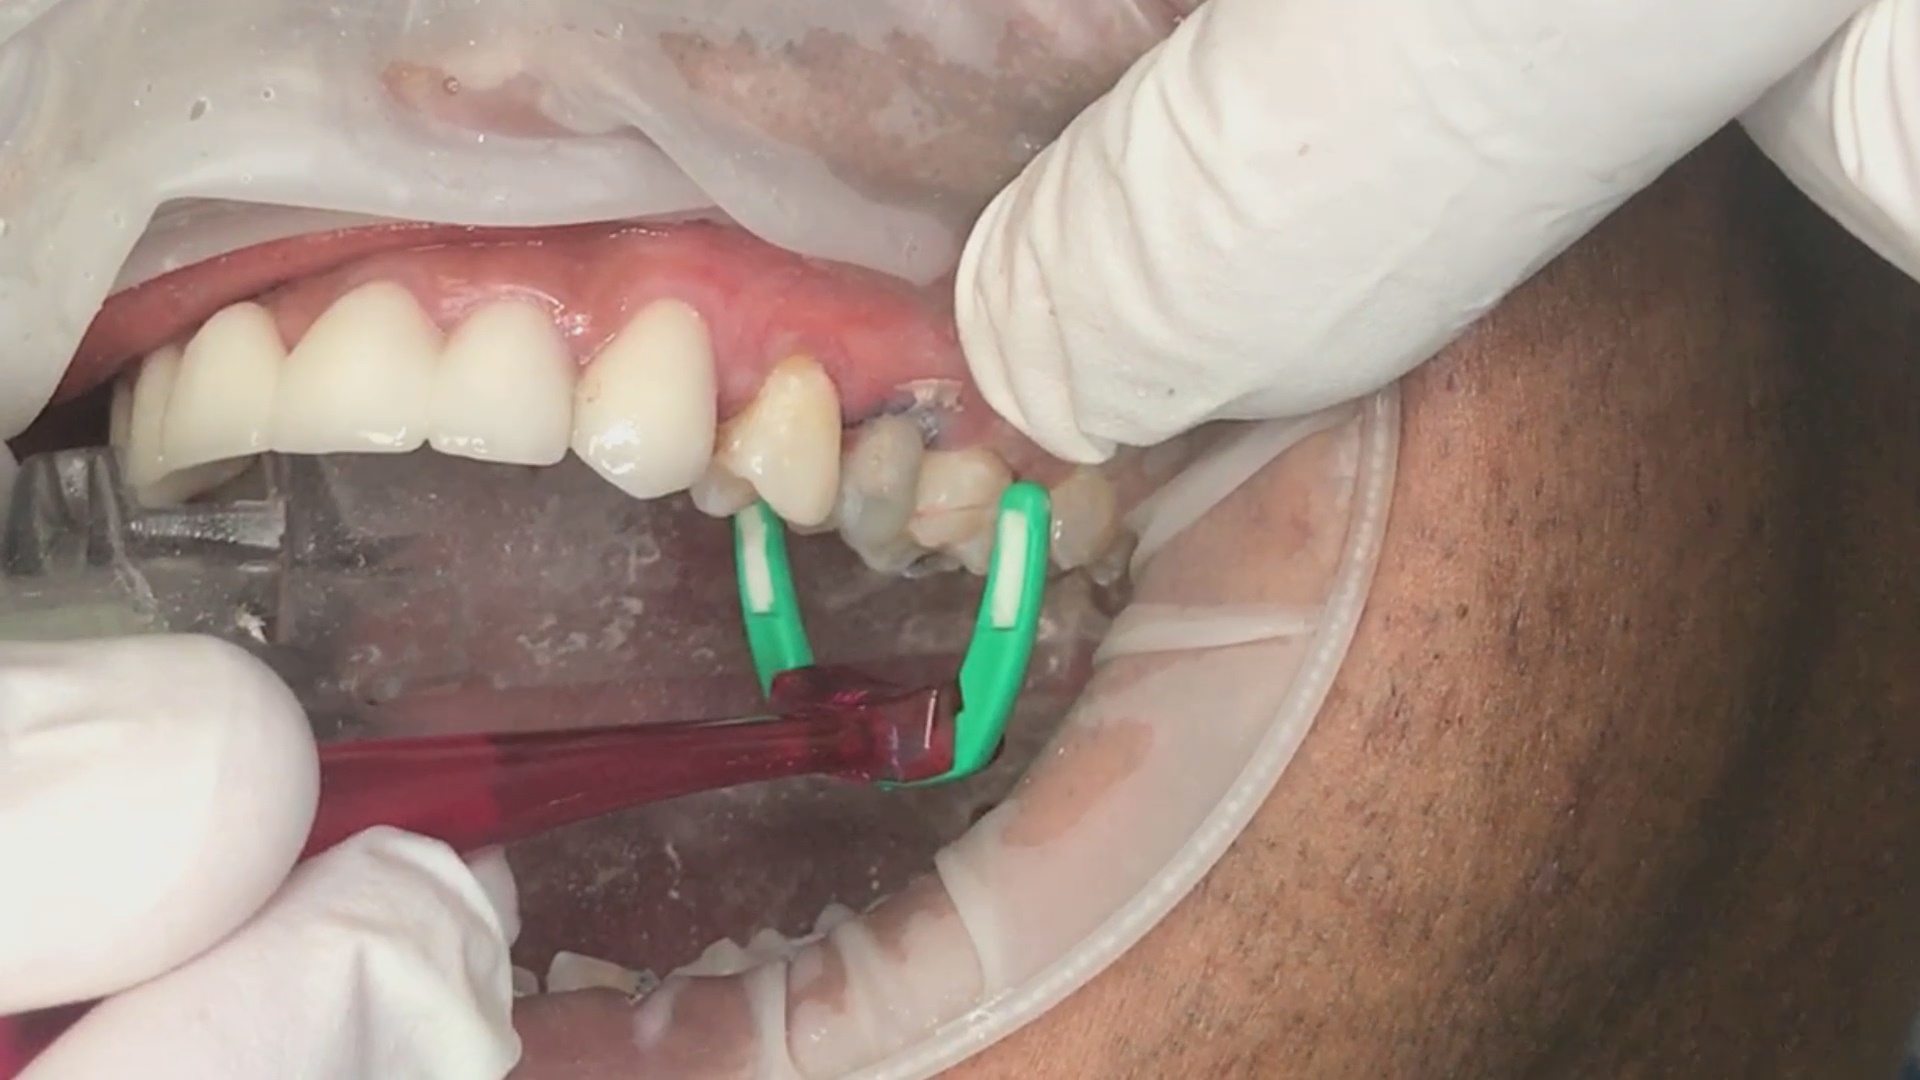
This implant was initially placed at the crest of the ridge in 2012. its placement did not allow proper emergence profile and subsequently lost bone around the head of the implant by 2015. The lack of blood flow to the crest of the bone at the cortical plate certainly could have contributed to its demise. By 2015, the bacteria trap forced a new restoration to be placed which also ultimately lead to chronic inflammation due to improper contours. The implant itself was well integrated and the decision was made to remove the top 3-5 mm of the implant and treat it as a cast post and core.
You can see how the Medit i700 was used to mix intra-oral scans with a PVS impression to capture the fixture. Advanced users can utilize the stl of the implant itself to fabricate a post and core digitally.
The post and core and the emax restoration were returned for delivery. The emax was not crystalized until after the abutment was cemented and then it was tried in by itself to assure proper contours and contacts. The great feature of lithium dissilicate is that you can add contact and glaze at the same time, which was required here as the mesial contact was weaker than desired after some minor adjustments
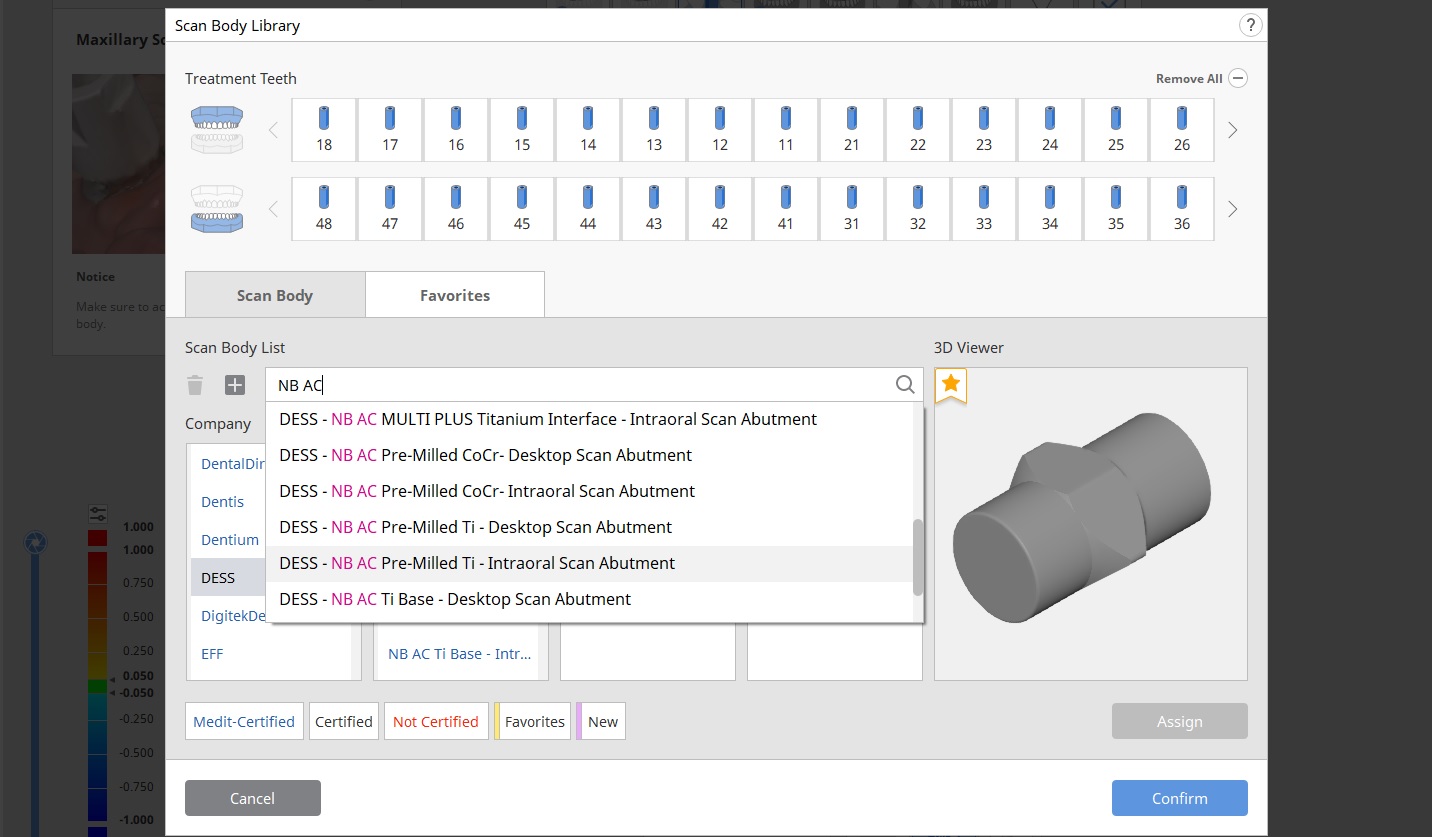
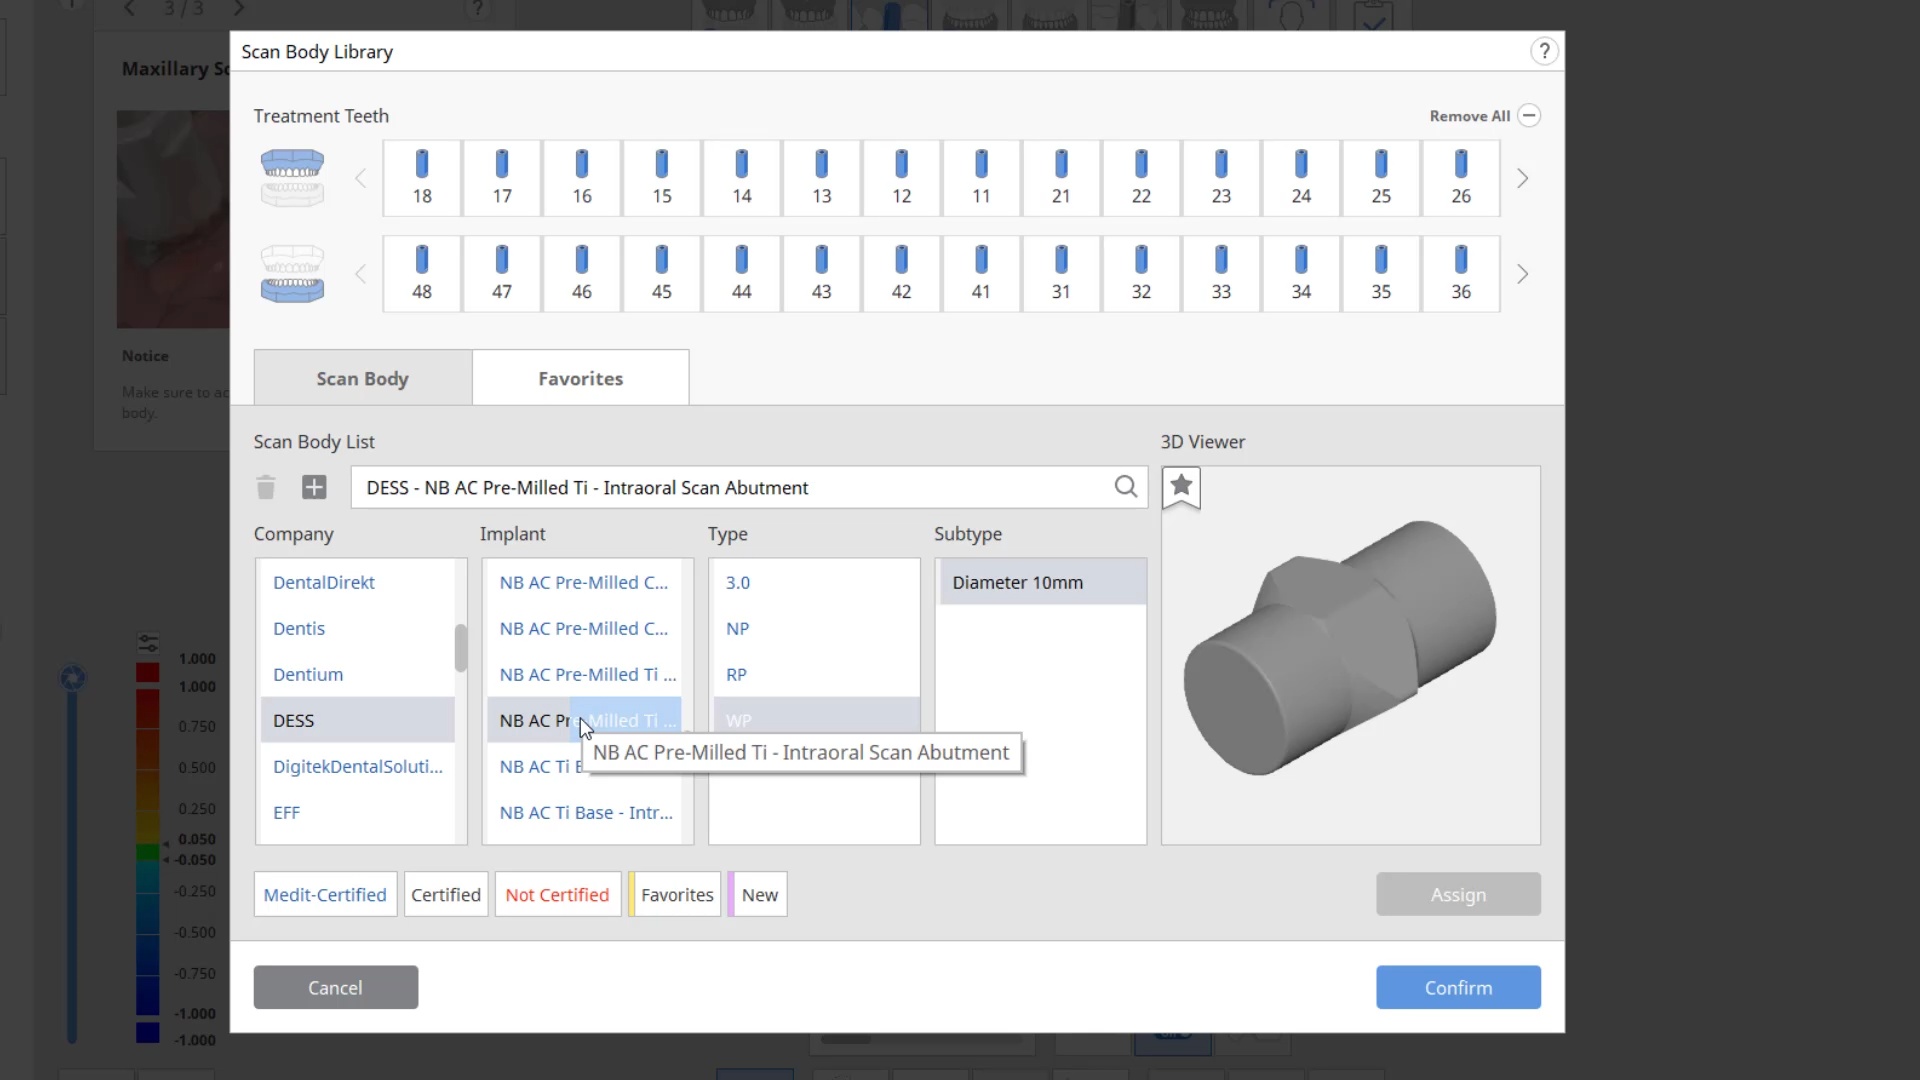
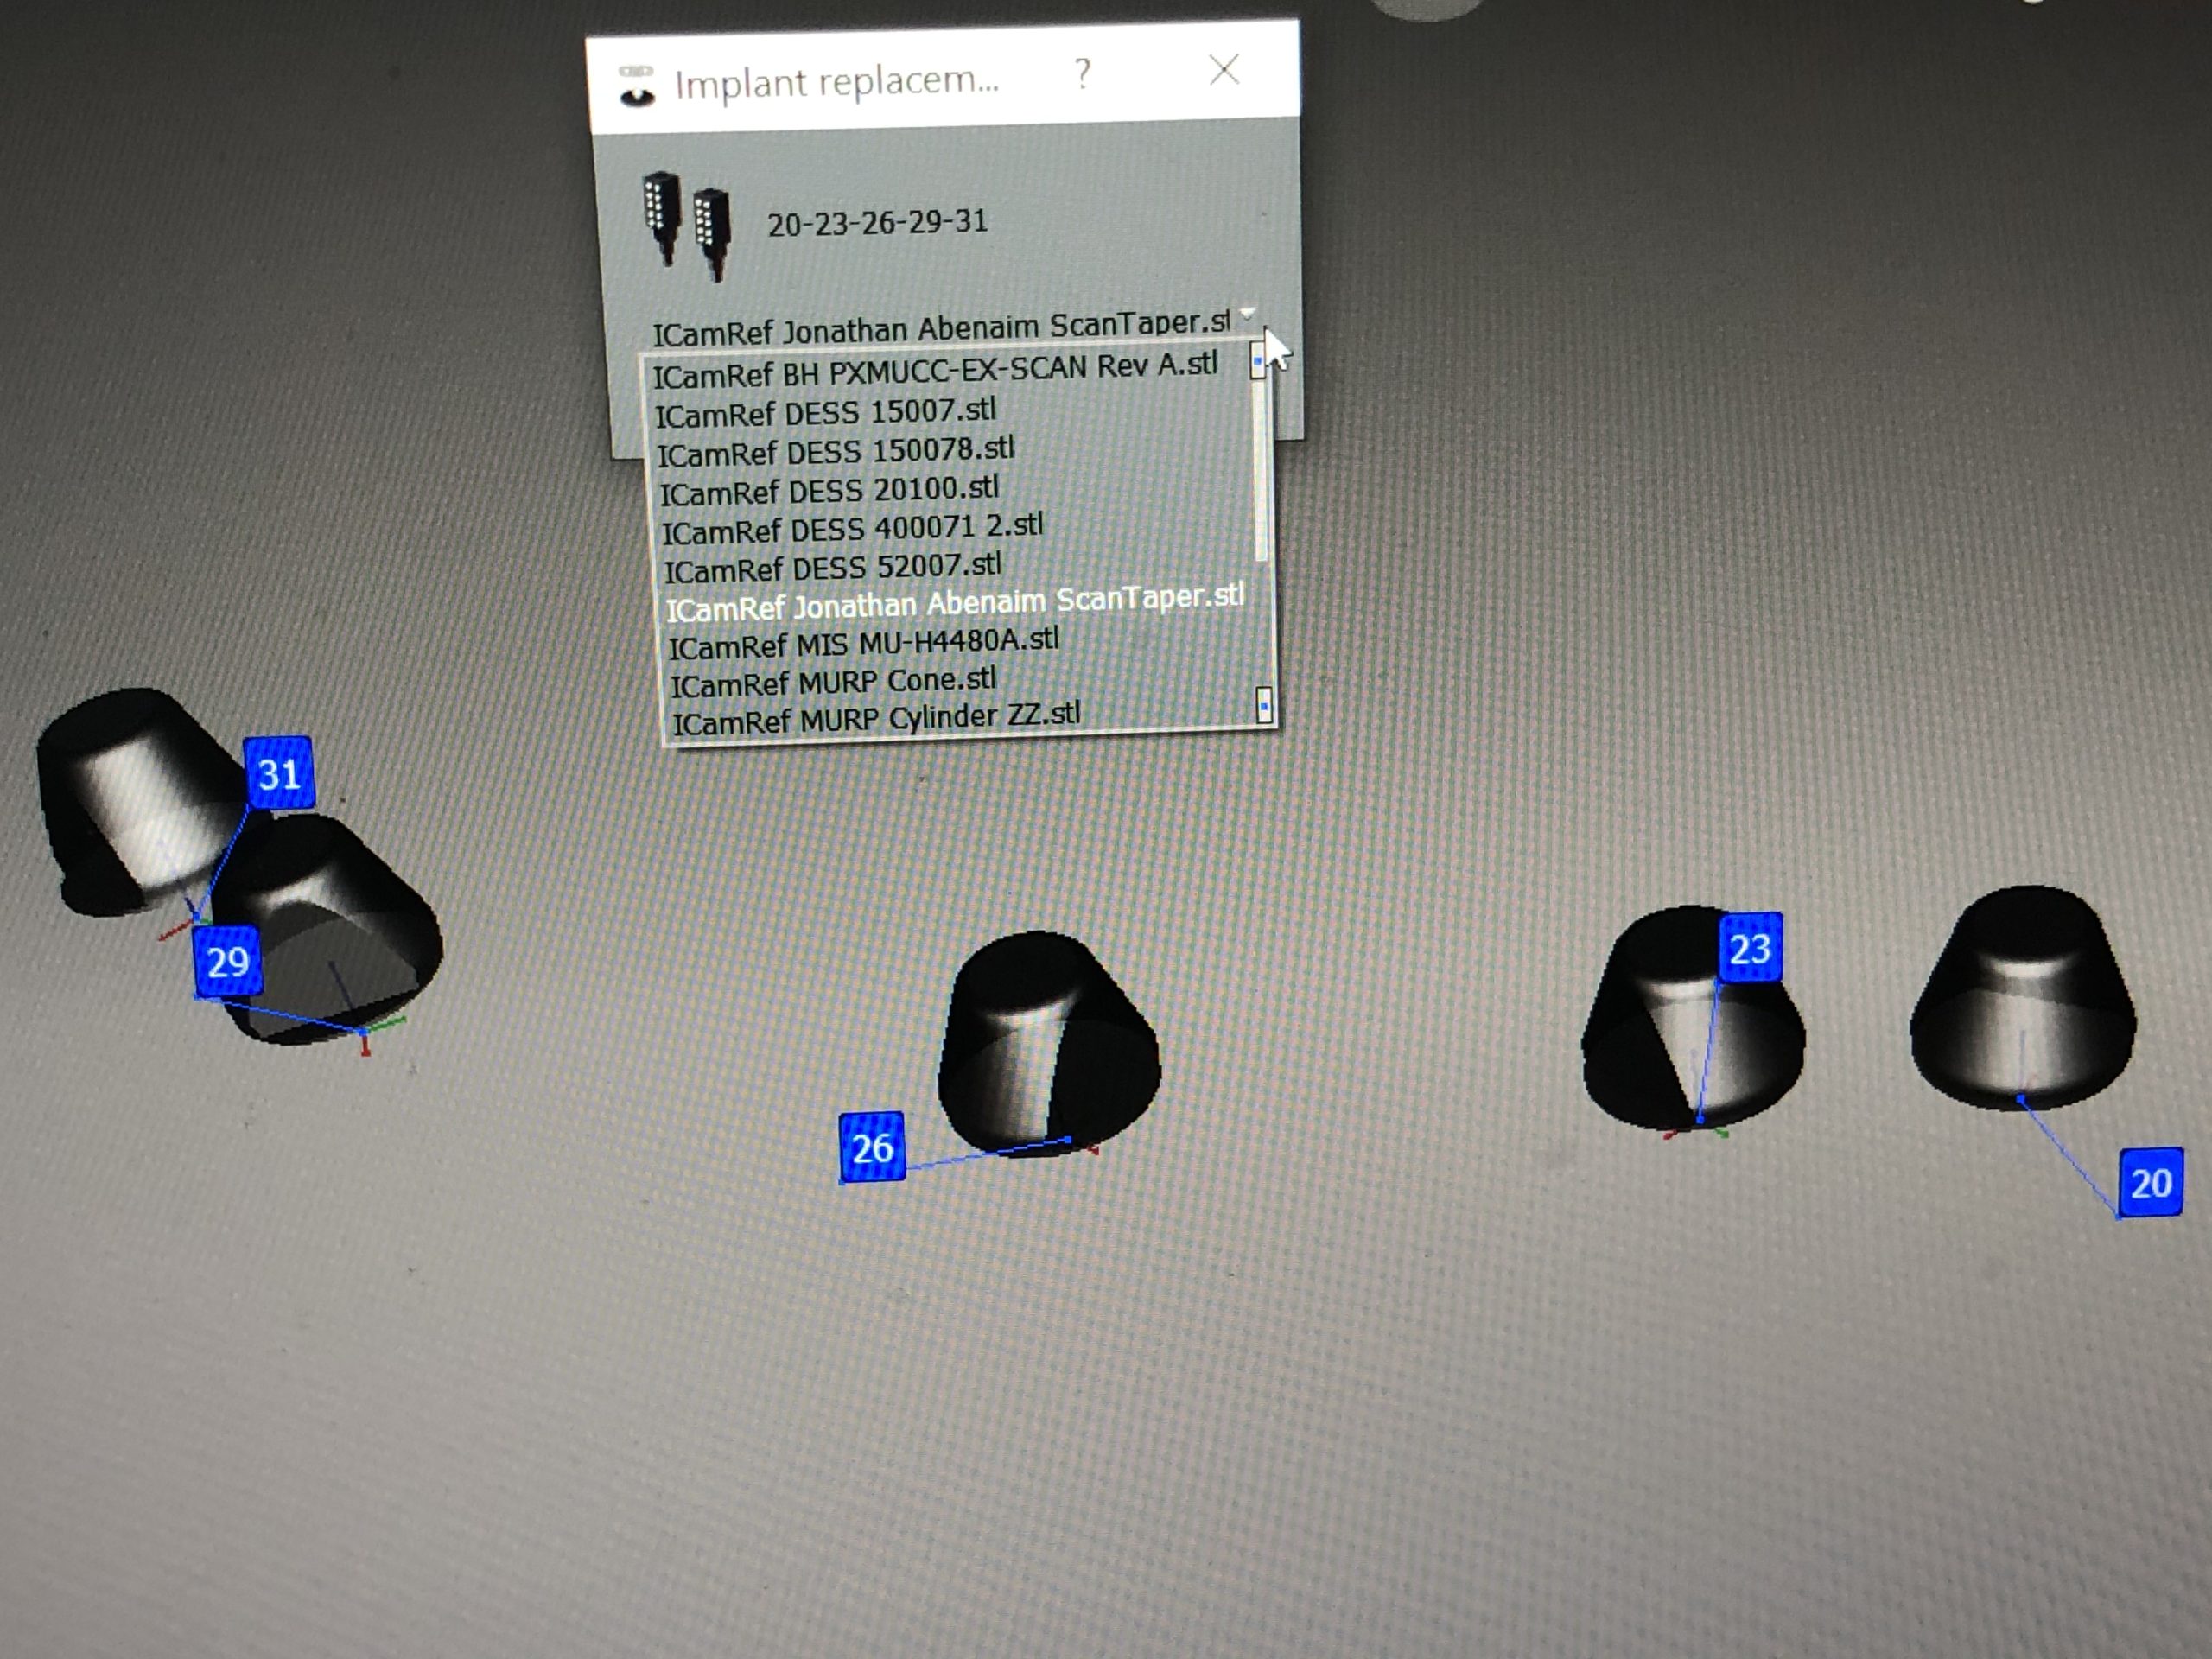
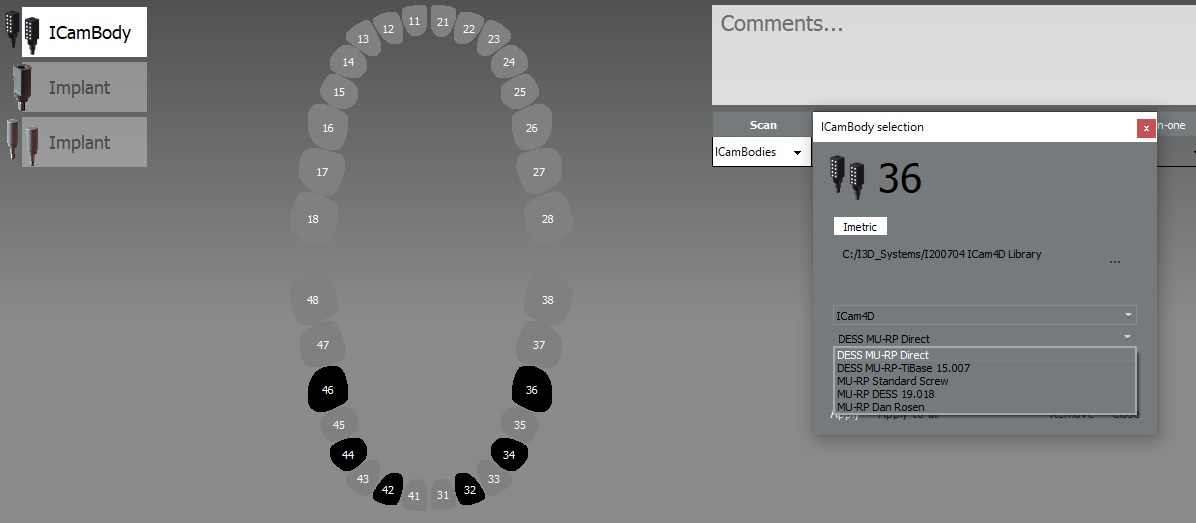
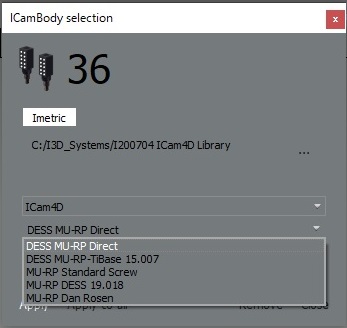
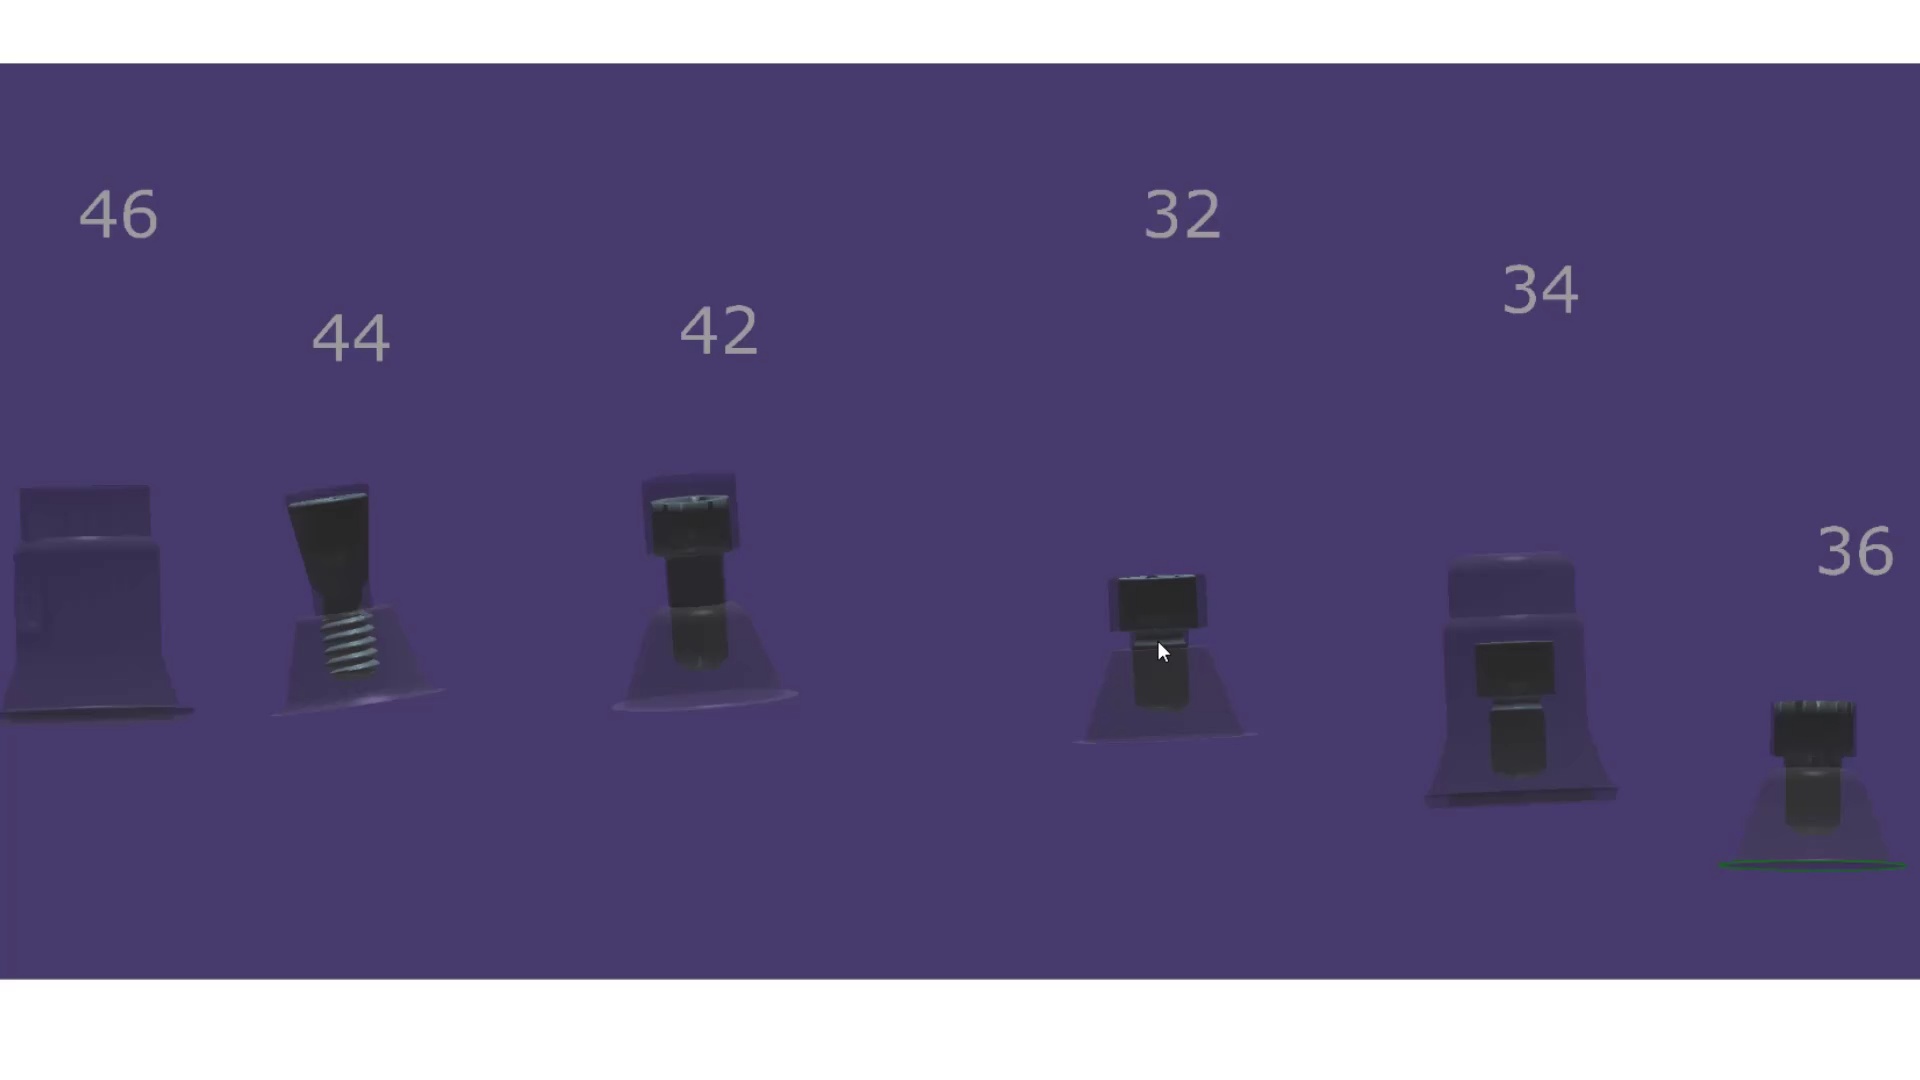
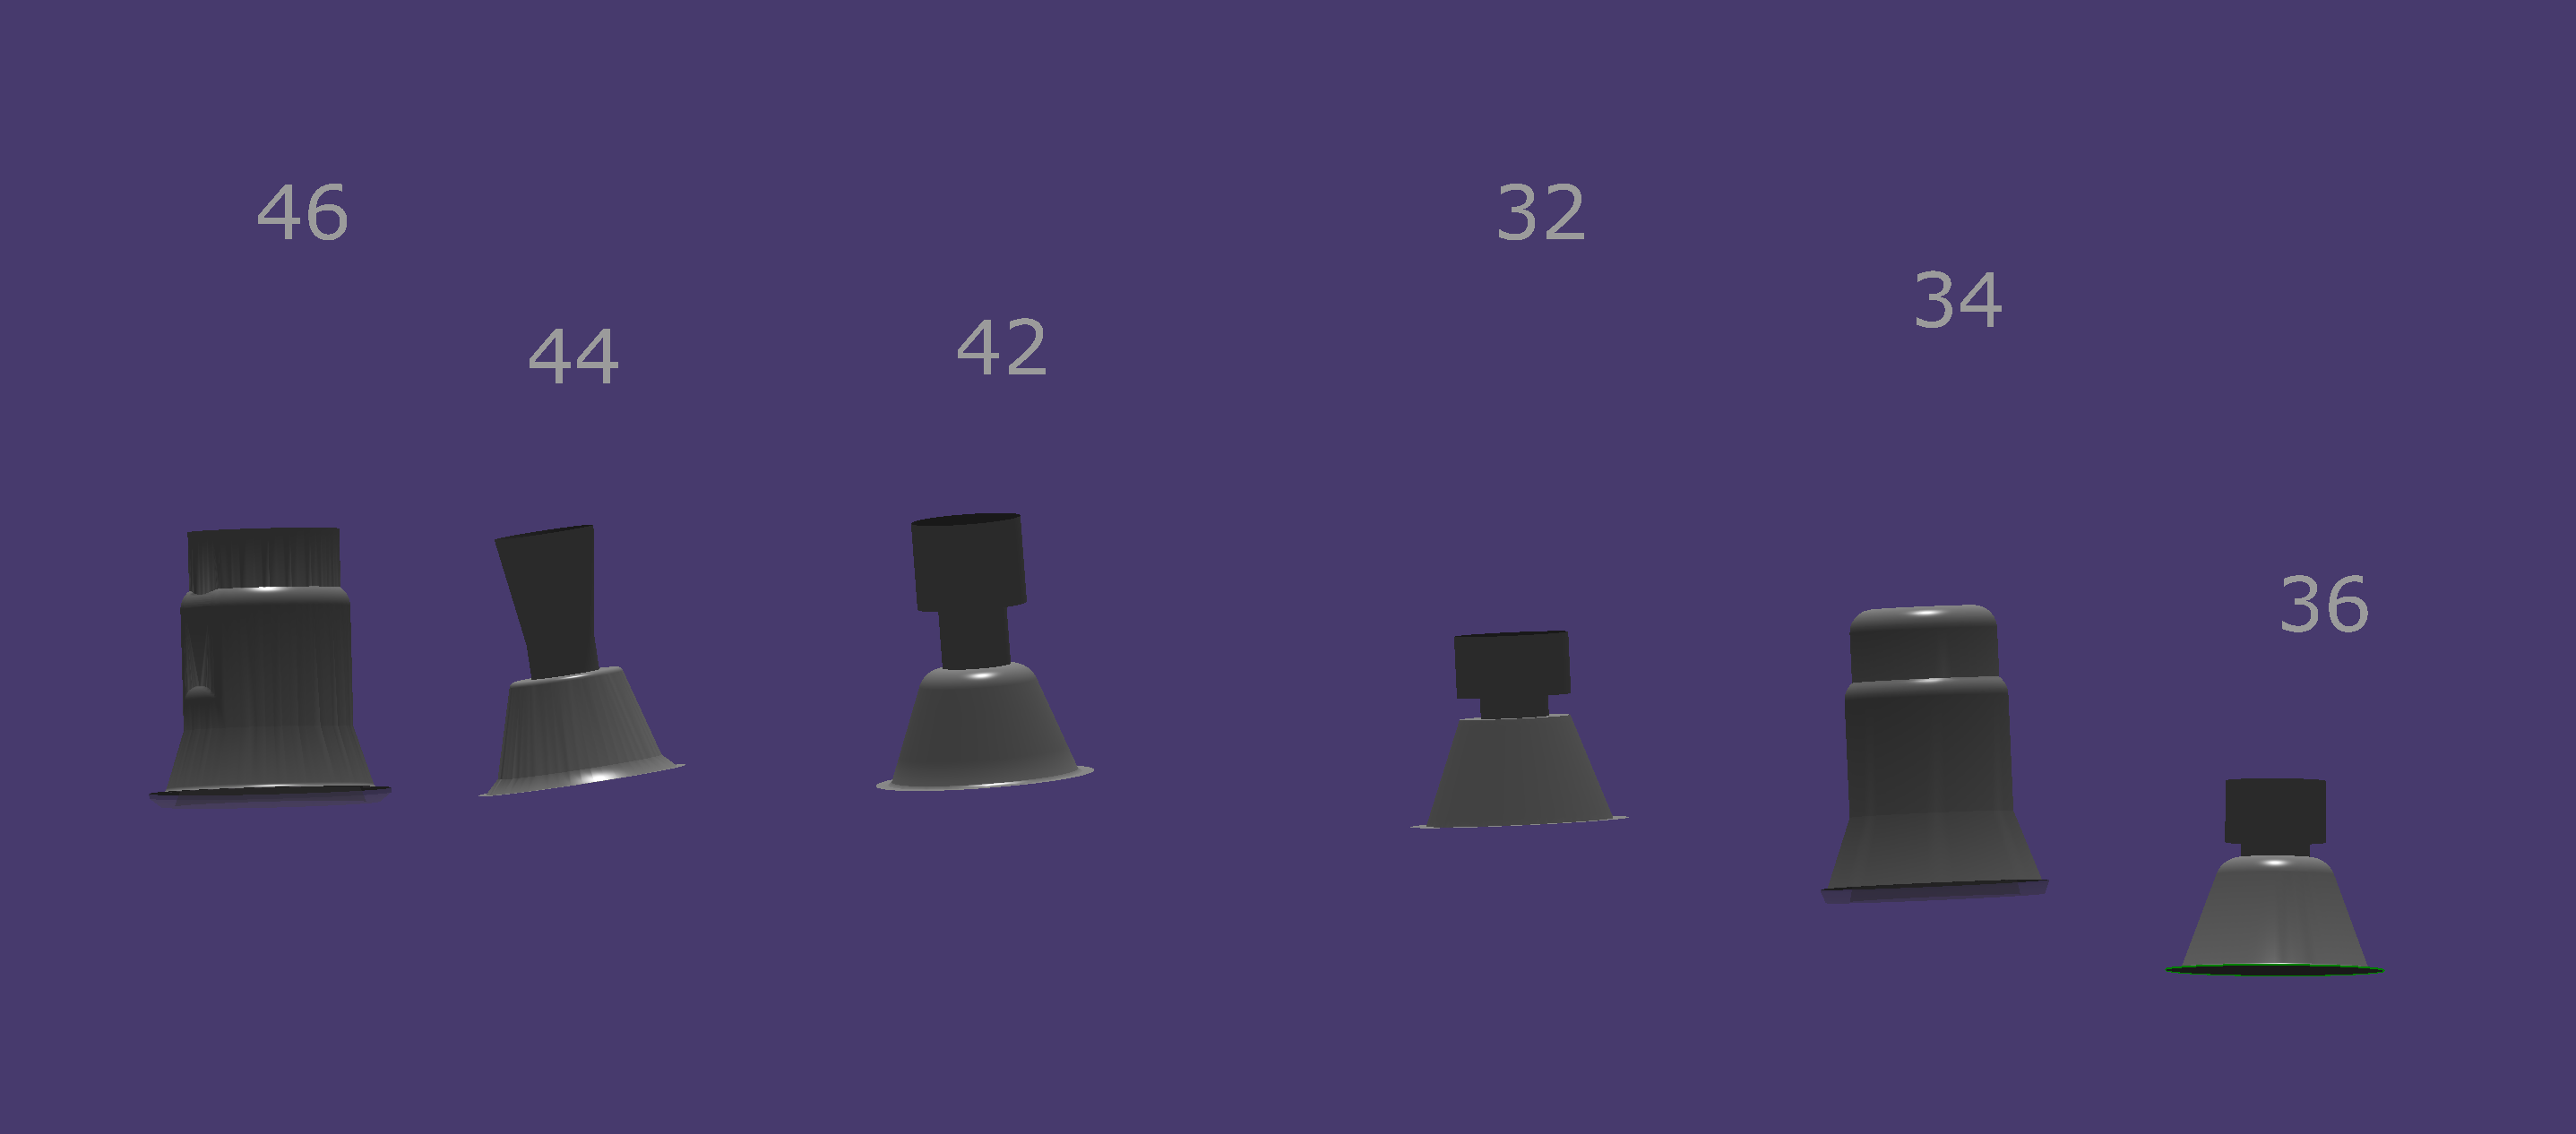
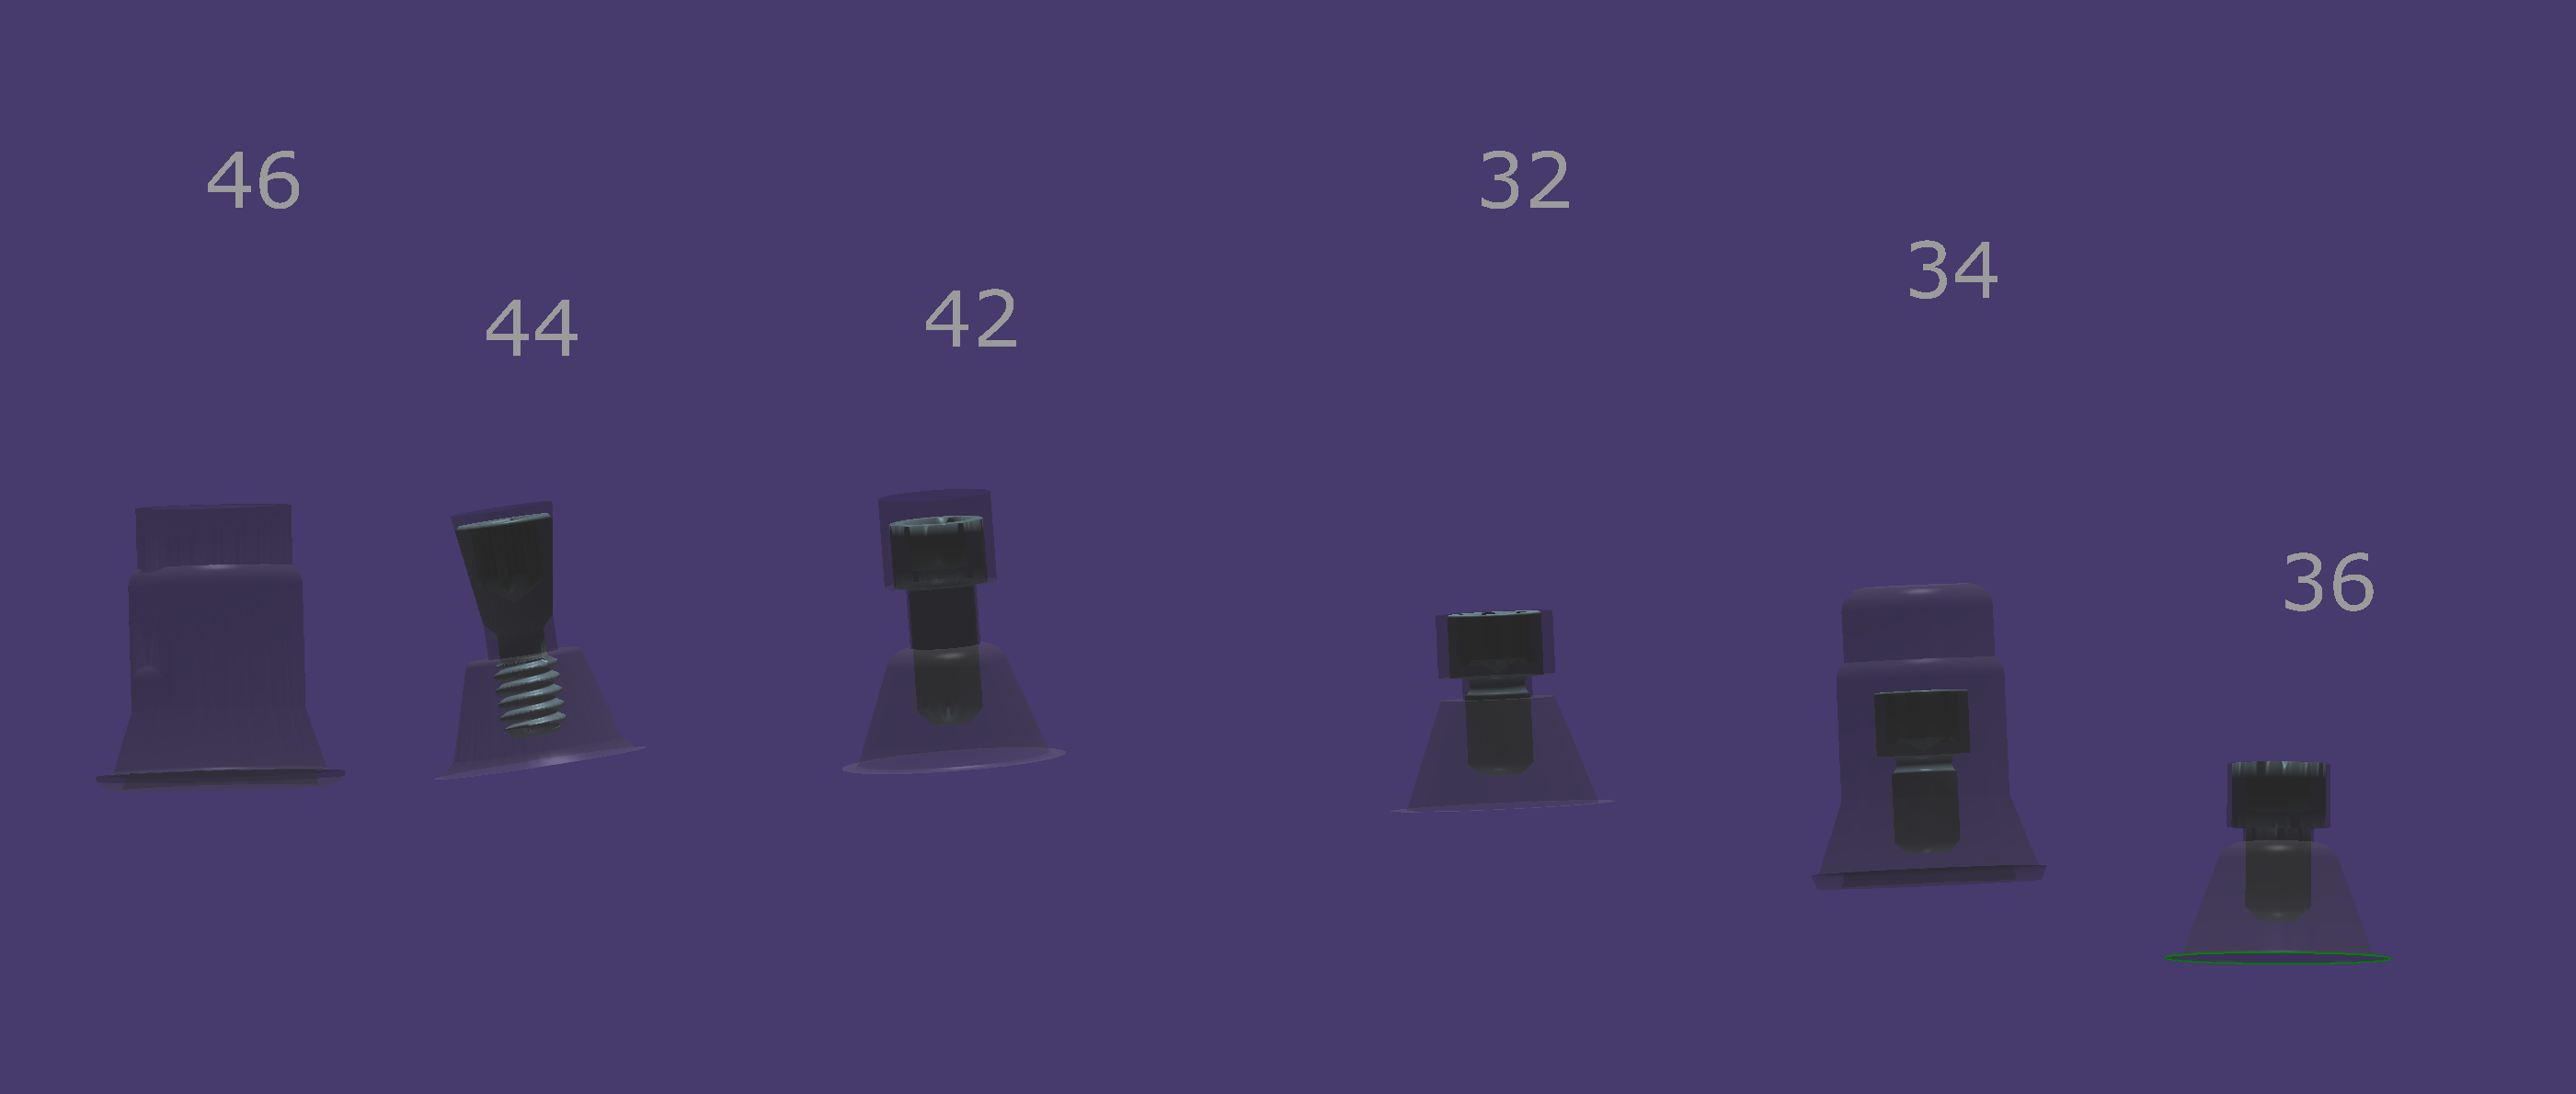
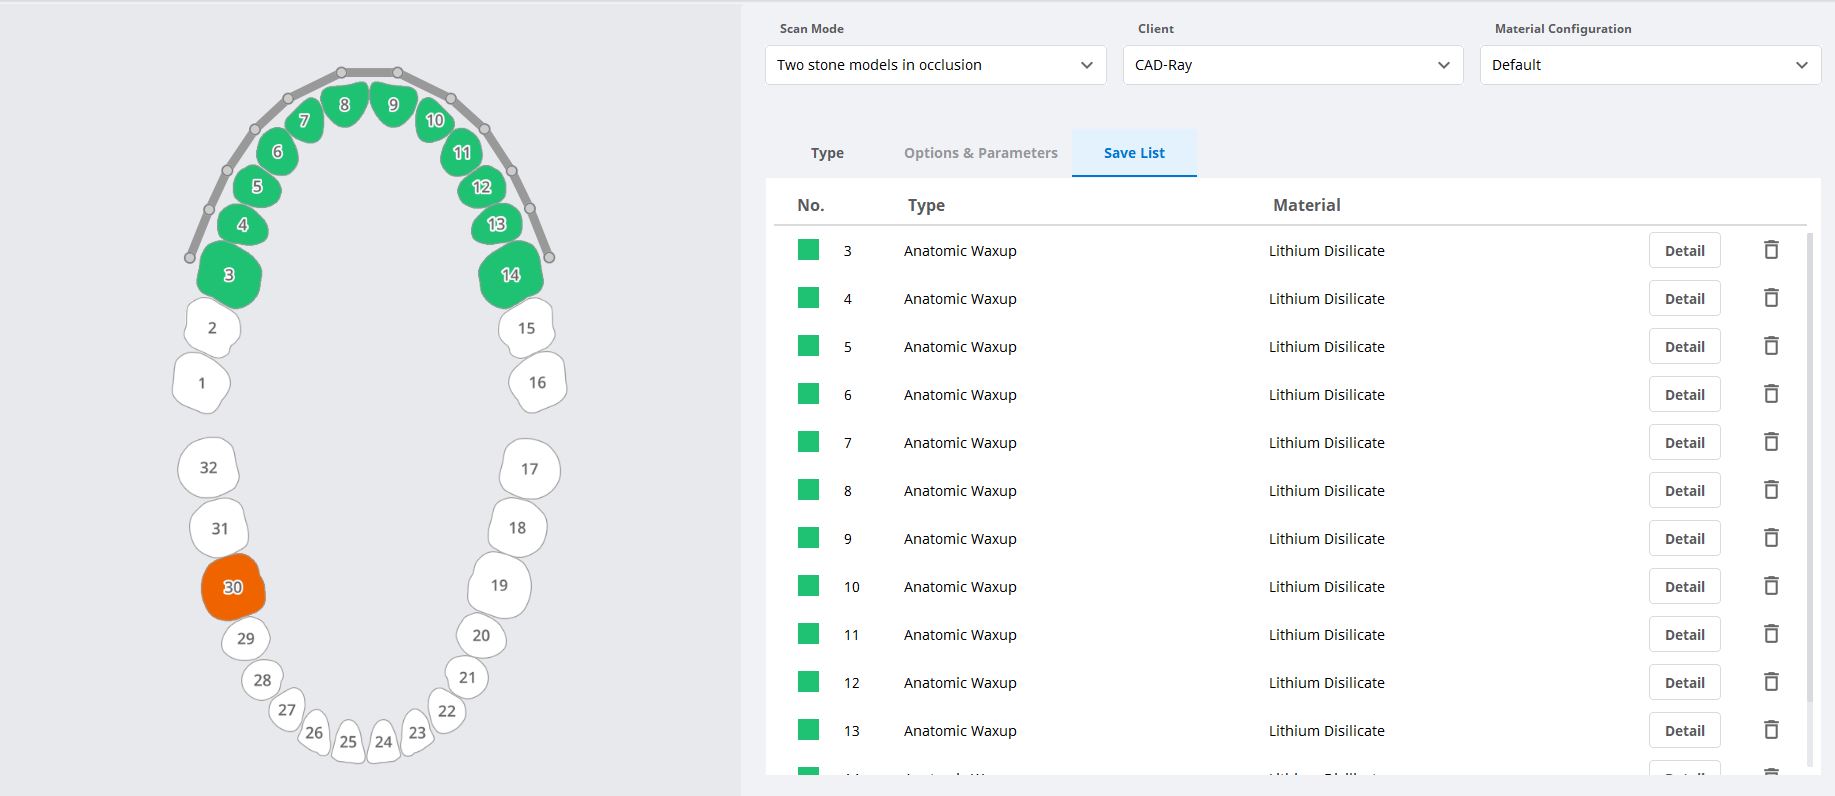
To use the Artificial Implant Suprastructure Identification Software to identify a scanbody, you have to understand how it is listed in the library. It is not listed by the name of the implant company but rather the manufacturer that fabricates that implant lines scanbody. For example, there are multiple choices for Nobel Active Conical Connection scanbodies. The easiest way to find them is to search for the pre-loaded brands, but be aware of the routing abbreviations many companies utilize. For Nobel Active, usually NB AC is used.
Then you must choose whether you are going to fabricate a Ti-Base or a Custom Abutment, and whether you are using an intra-oral or extra oral scanbody. The connection type (diameter) and the material (titanium vs. chrome cobalt) also must be selected. Here’s a quick video that illustrates the selection process. You must also consider if a 10 or 14 mm diameter blank is going to be used to mill the product. In molar areas, a size 14 is preferred so that you can reach the outer most boundaries of your desired margins, whereas a 10 mm blank may be too narrow and small for a molar.
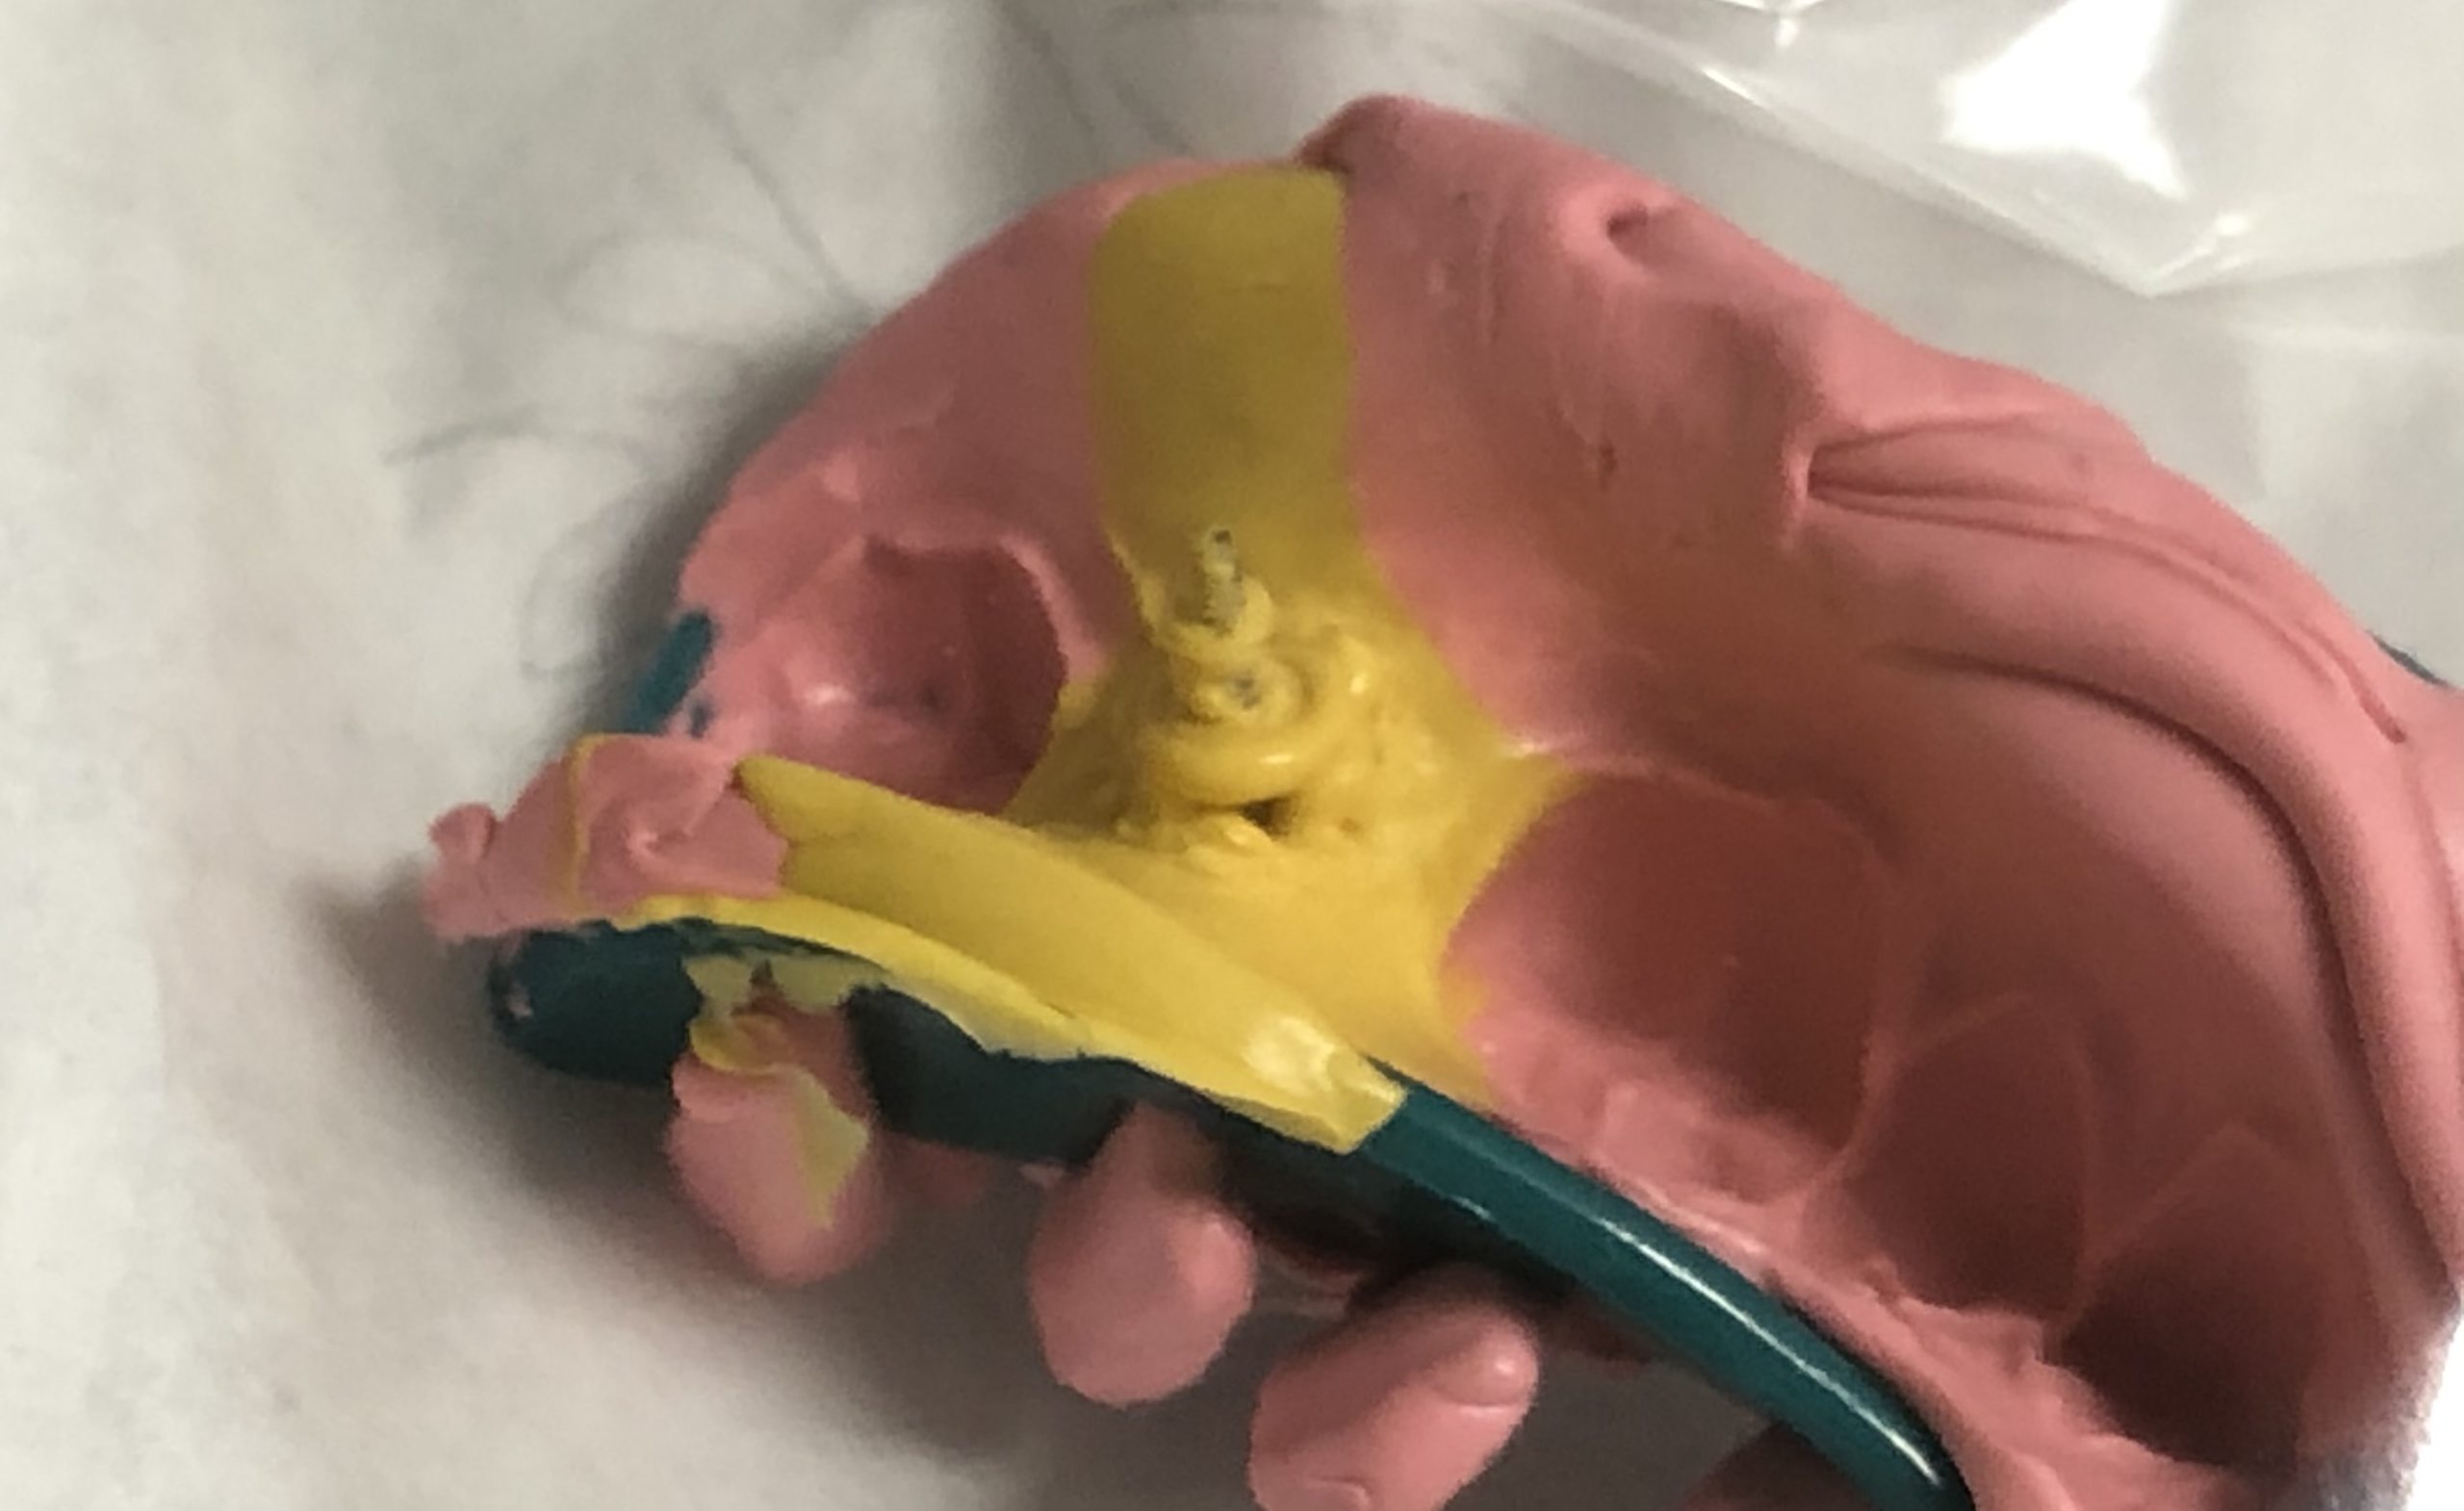
A fracture and worn overdenture greater than 10 years old was duplicated digitally where the lab was able to follow the vertical dimension and tooth position from digital impressions taken by the Medit i500. Clinically, we advise that you place the housings before taking the impressions to accommodate enough space for the chairside reline. In this particular case, most of the reline and imaging was done extra-orally
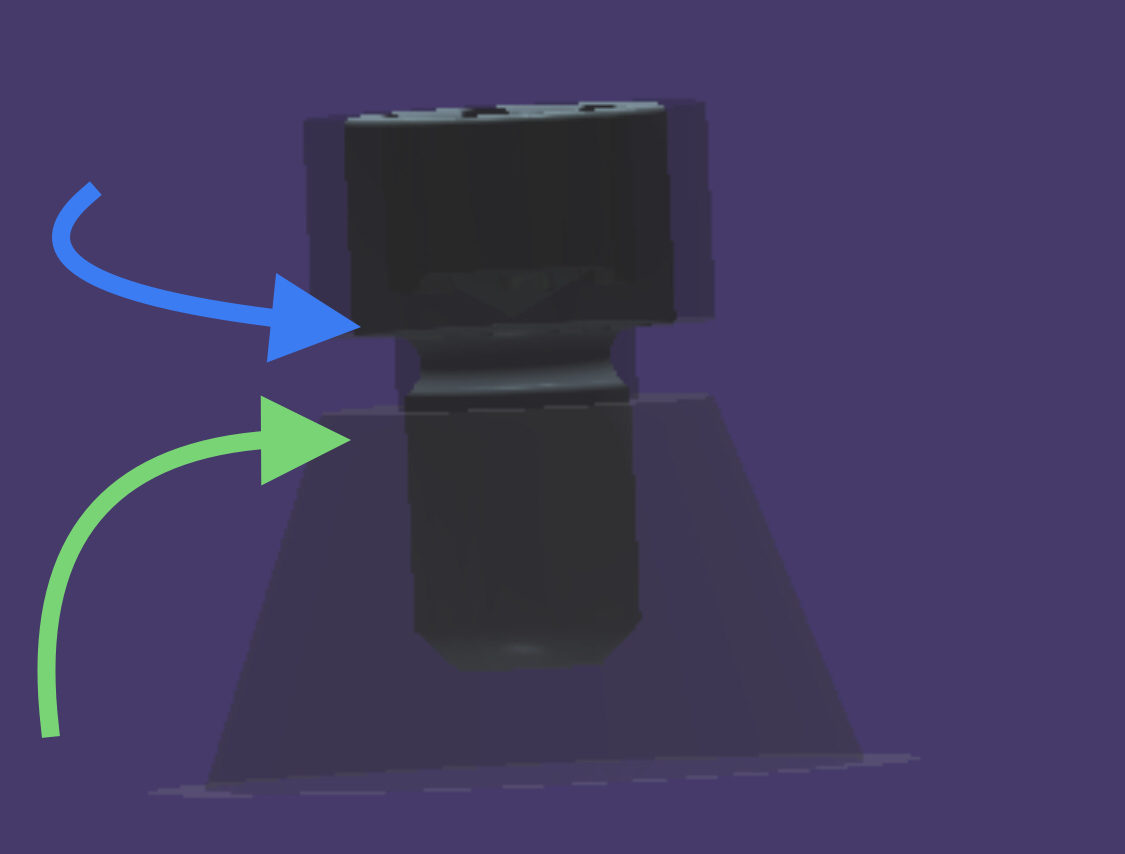
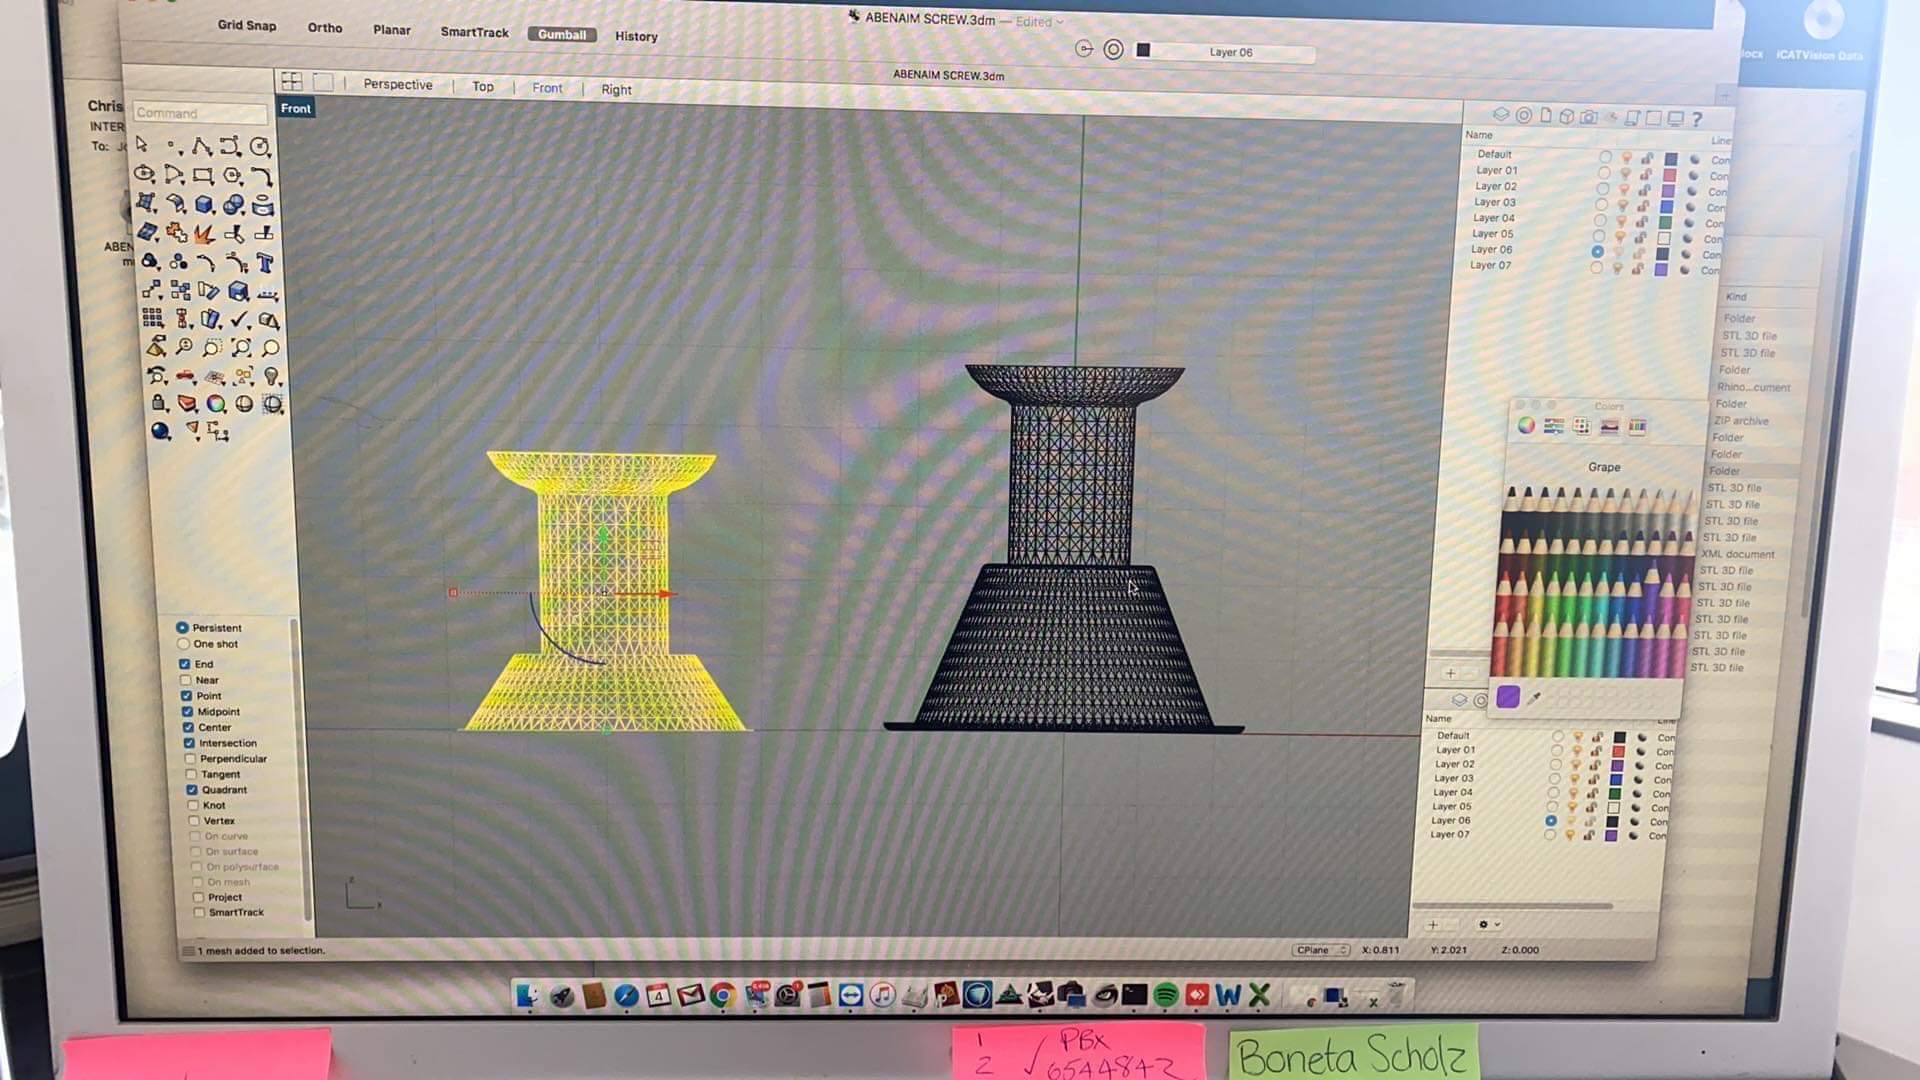
There is a lot of focus nowadays on the connection between the screw and the MUA and top clinicians are recognizing this to be the most vulnerable part of full arch prosthetics.
An issue to consider the space between the green and the blue arrows on the following photo and how some have designed solutions around the small area that is prone to chirping or breakage during milling or printing
“The powerball screw by Dr Jonathan Abenaim is one of a kind. Finally a screw designed to skip the tibase with the material in mind. It is rounded to provide gentle forces that are transferred to the body of the screw instead of the weak threads where the the screw is the weakest. It has the ability to be used in Zirkonia and pmma with no tibase. Its angle can be corrected up to 20 degrees. With our proprietary biaxial screw head the screw head is robust and cannot be stripped.”
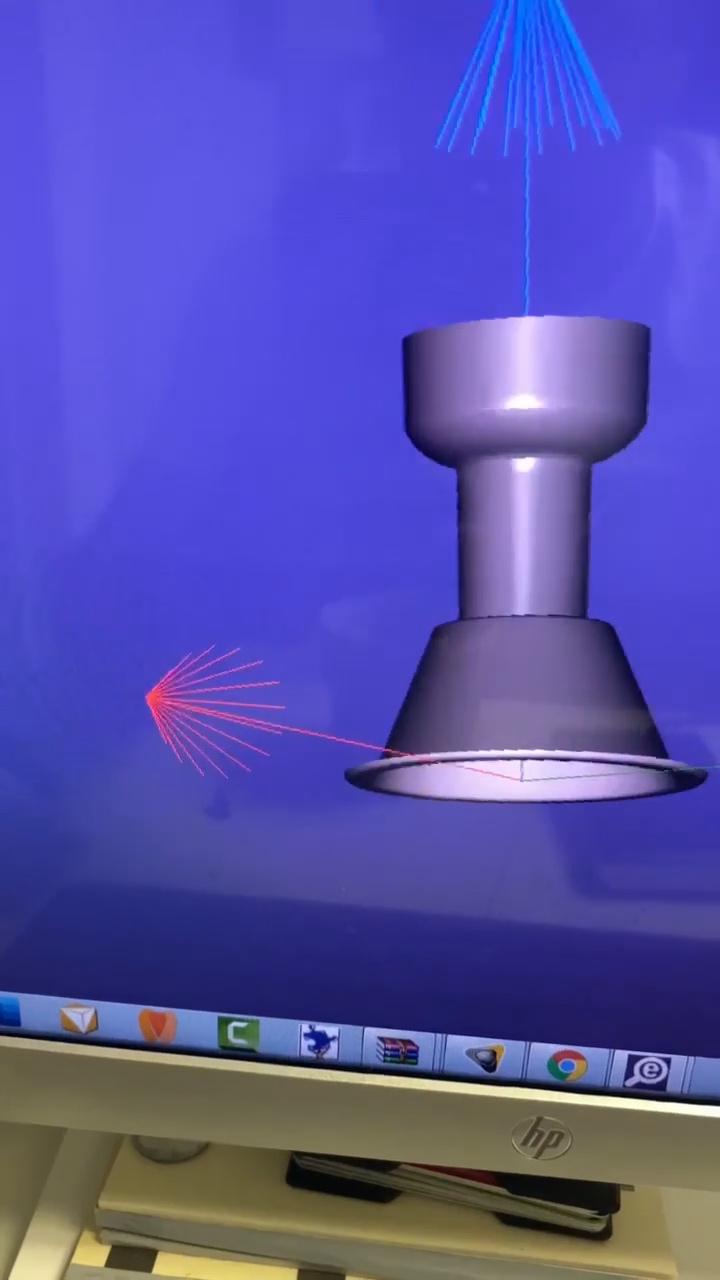
When setting up case in photogrammetry, you can select the type of screw you will be using for the prosthesis so that it gets incorporated into the design of the prosthesis. There is a trend developing where doctors prefer to mill or print directly to the Multi-Unit Abutment and a standard screw won’t suffice.
In Imetric’s ICam software you can chose which screw design you prefer which are often used to provide adequate spacing for the material and adequate length to engage the screw to the platform. Properly labeling the suprastructure at start up will provide the geometry you will need for the manufacturing.
We have an MO a DO on adjacent teeth that need to be done and a crown in between. It took only 90 minutes to do all 3. I prepped the crown and got that milling and while it was milling I restored the adjacent teeth. I then tried the crown in. what’s great about lithium disilicate vs zirconia chairside is that I can easily add a contact on with powder while its crystalizing. or I can adjust the composites to nail the contacts. so we leverage mill time and oven time with prep time. Said another way, it takes me the exact same amount of time to do a crown + 2 class two’s as it does to do a single crown
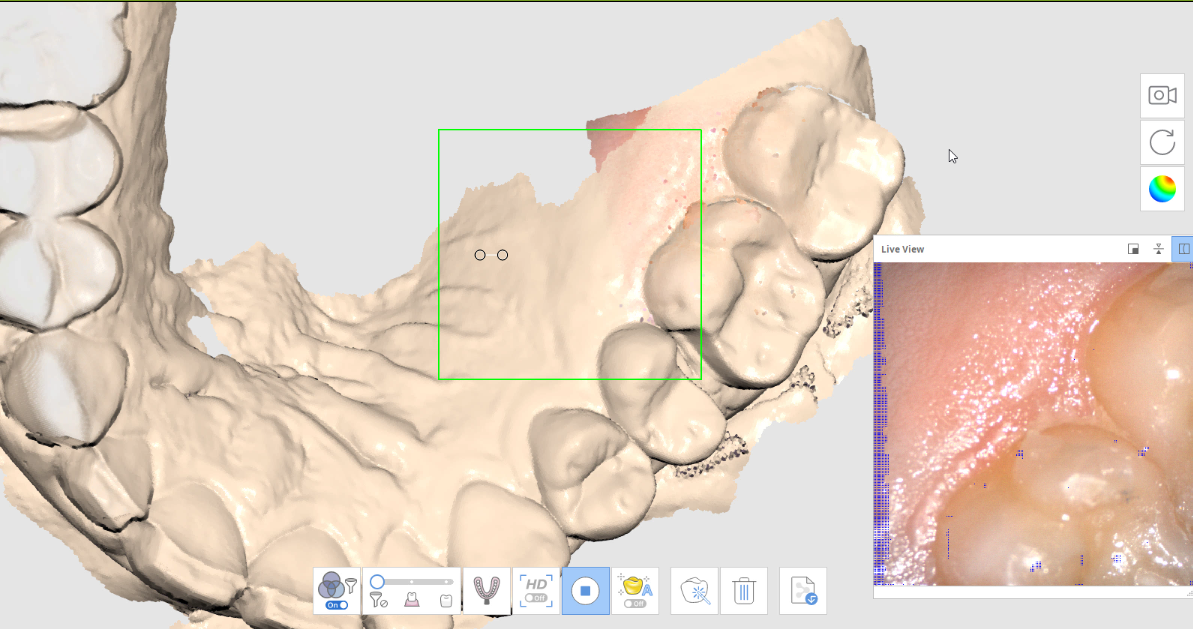
In this video we demonstrate how to use the color extraction feature of the Medit i500 scanner to displace and ignore the pesky tissue and the coronoid process that are annoying you while you try and image the distobucall area of an upper second molar
With Medit i500, there is an incredible feature where you can import a 3D model from source, even another scanner and be able to add live scans to that model. This is a first in the dental industry and has great impact for advanced users who utilize multiple models.
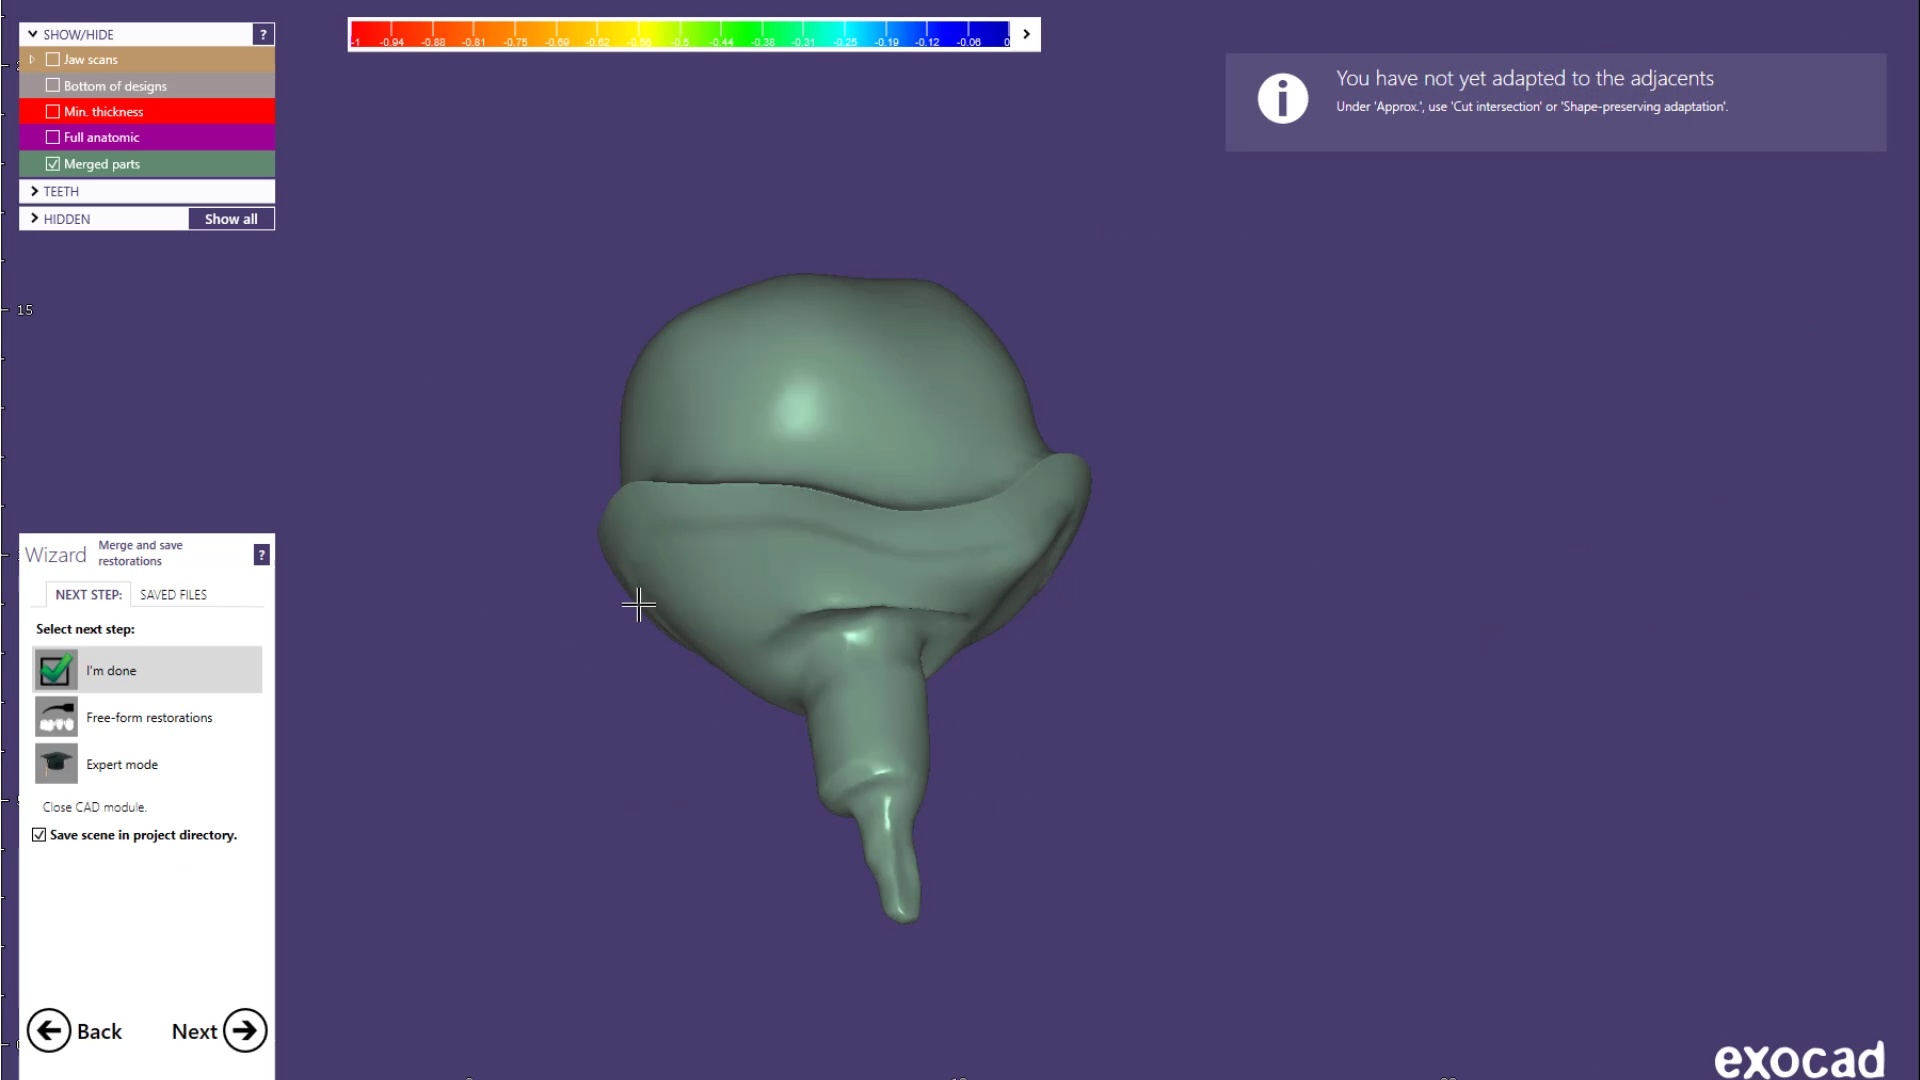
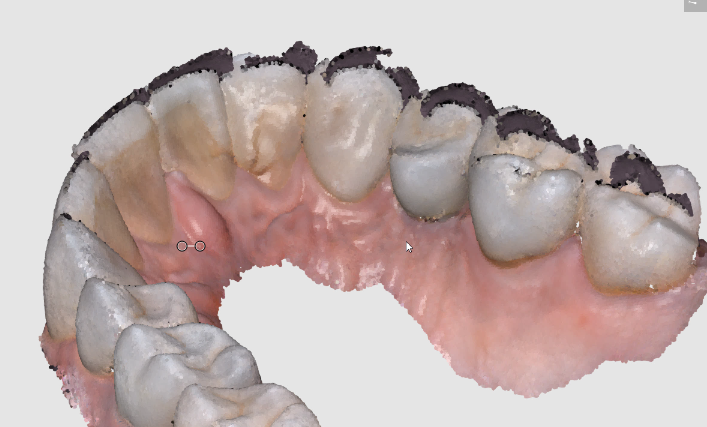
One of the most important lessons a digital dentist has to learn quickly is how to not introduce errors when scanning dentition. The most likely area when s/he can introduce errors is in the anterior area where the incisor are not only narrower than molars but can also have translucent enamel. Add just a little spacing between teeth with diastemas and you can quickly distort the accuracy of the model. This is true of ALL intra-oral scanners in the market
Incisal Translucency / Transparency Causing Model Distortion
There are a few ways you can overcome these issues and the second video highlights some of our preferred methods. The concept is easy- block the light from travelling through the tooth structure and you are set! Watch the videos to learn how to do it
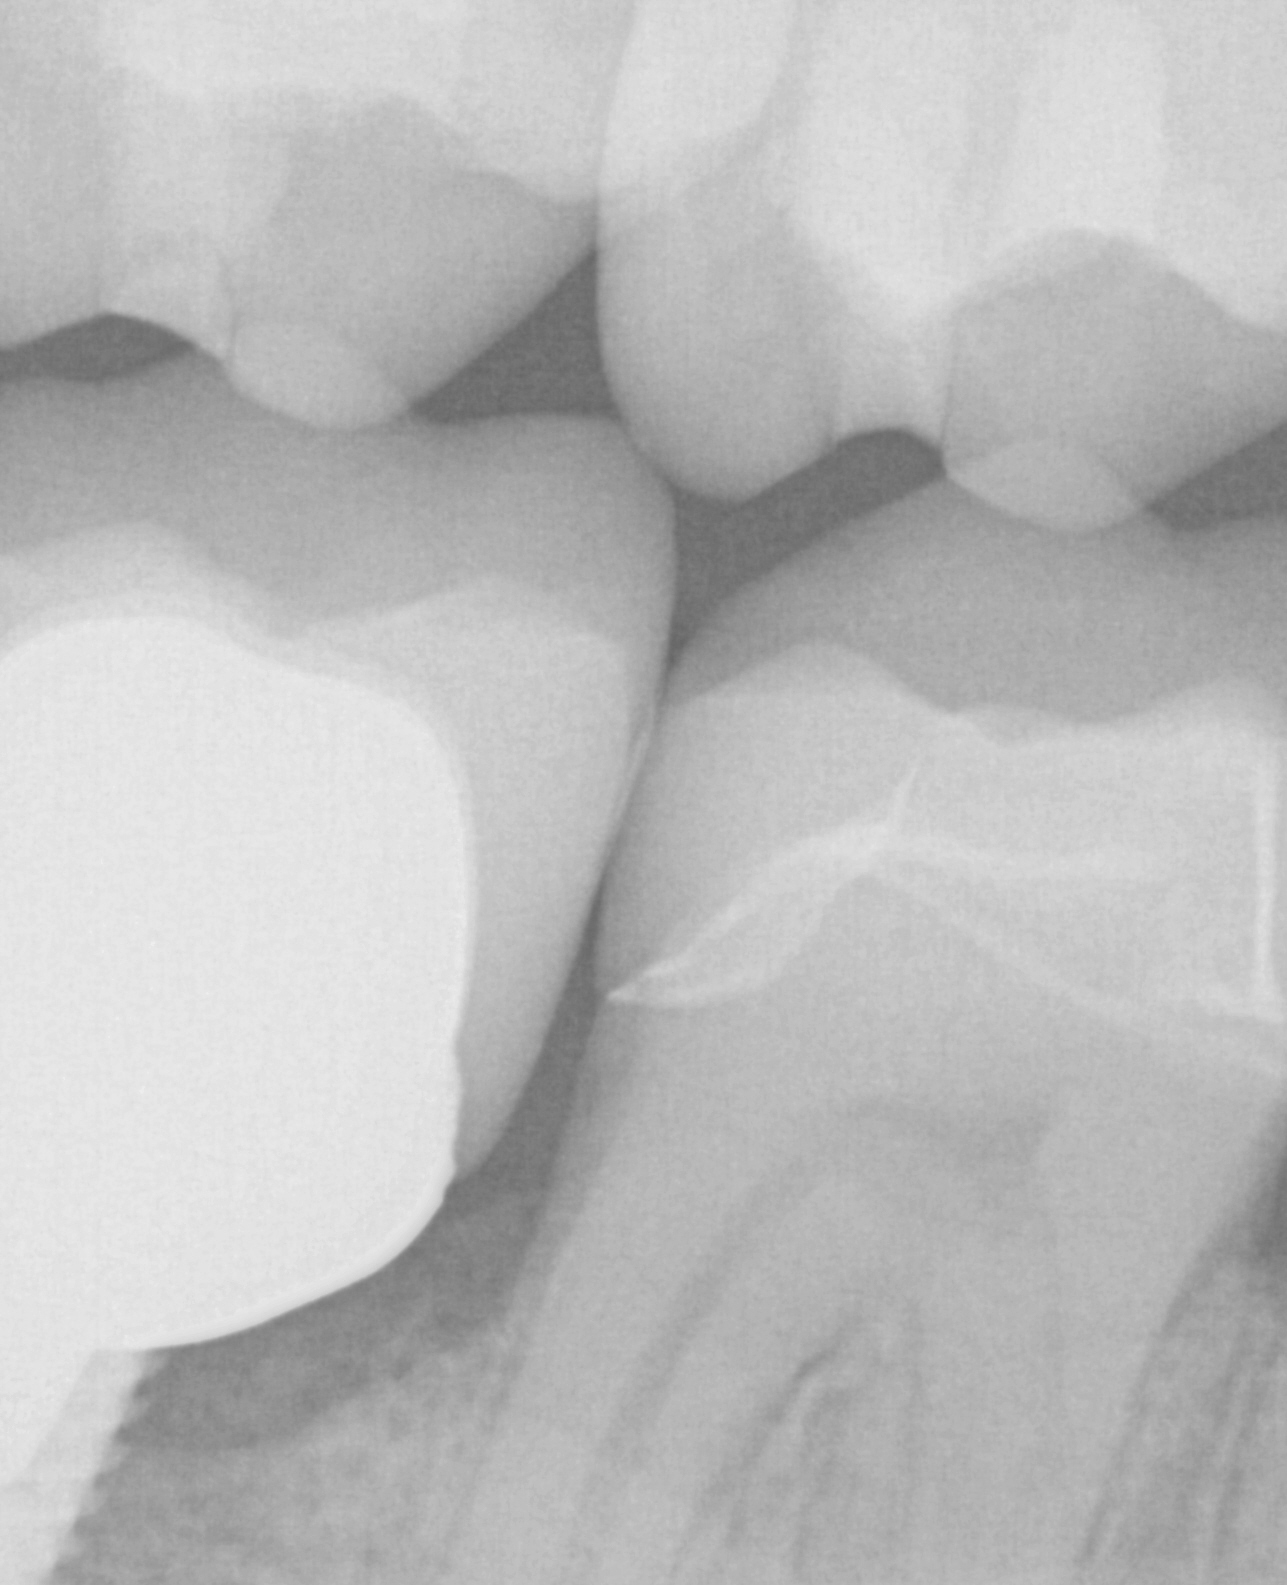
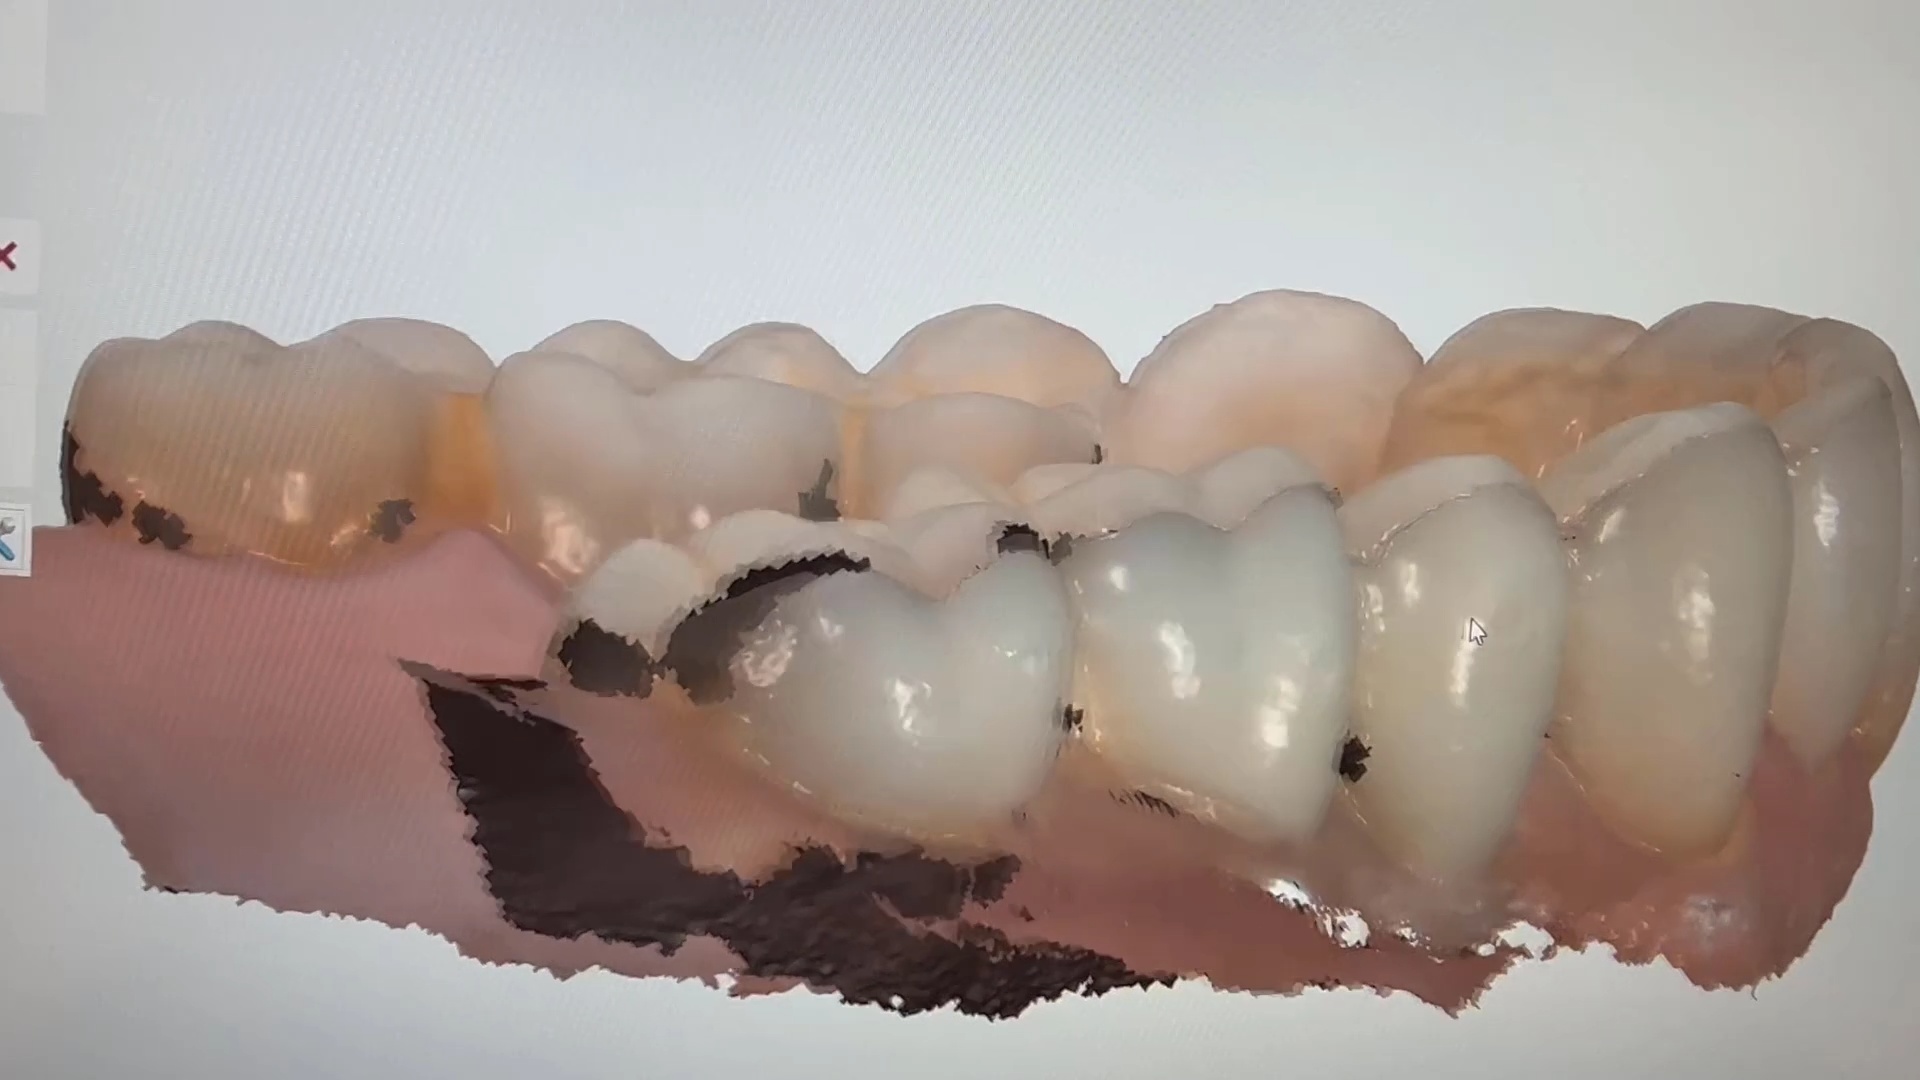
Here are some examples of how light shinning through the enamel and /or ceramic instead of bouncing back resulting in errors in model accuracy. Lesson #1 for every ios user is to know when and where they are likely to introduce error. in dentate cases, it usually is right that the transition from premolar to canine to lateral. The surface area decreases dramatically and if you have translucent enamel and / or material and / or highly reflective surfaces you can “derail” the model building. Here is an exaggerated demonstration
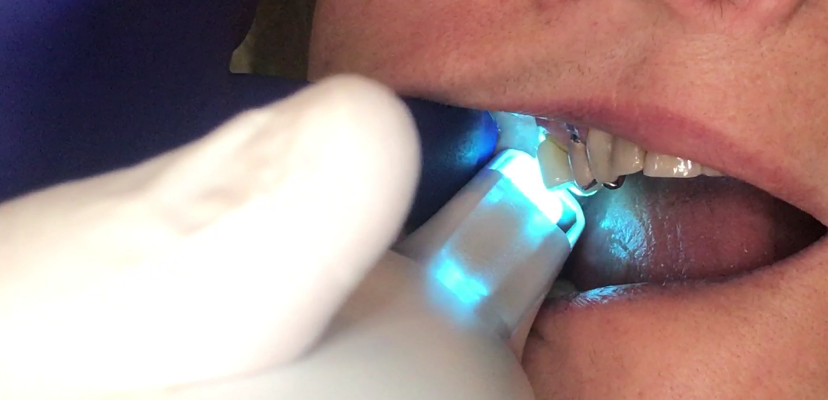
Translucent enamel can also play a role in distorting the cavosurface margins of a inlay or onlay restoration. When imaging from the occlusal, the gingiva below the margins acts as a barrier to block light transmission through the enamel, but as soon as you start to roll the camera to the buccal or lingual, and you have enamel with no substrate behind it to block light transmission, you can introduce errors in the equation with any scanner.
There are many ways to combat this which include powdering the tooth structure, using a rubber dam, or in Medit’s case, you can use the color subtraction filter. You selectively tell the scanner to ignore certain colors and you use that exact color (here, it is the color of the glove) to block light transmission through the enamel. So the software just ignores the blue, but the light is prevented from shining through reducing the errors you would introduce.
Here is another example of the distorted enamel margins on a conservative preparation and how blocking out the light from travelling through the tooth structure leads to crisp visualization of margins without any distortion or artifact
can you explain why we see blurred margins and artifact/distortion between the 2 centrals while in the second image the…
For advanced users of meditlink software, you can skip filling out the Rx form and go straight into scanning. But make sure to properly fill out the CAD Rx form so that all the necessary models are imported into the design software. If you don’t designate the opposing or the Pre-op / Wax-Up in the form, they will not be part of the design equation. Also, this video shows how to select multiple restorations at once.
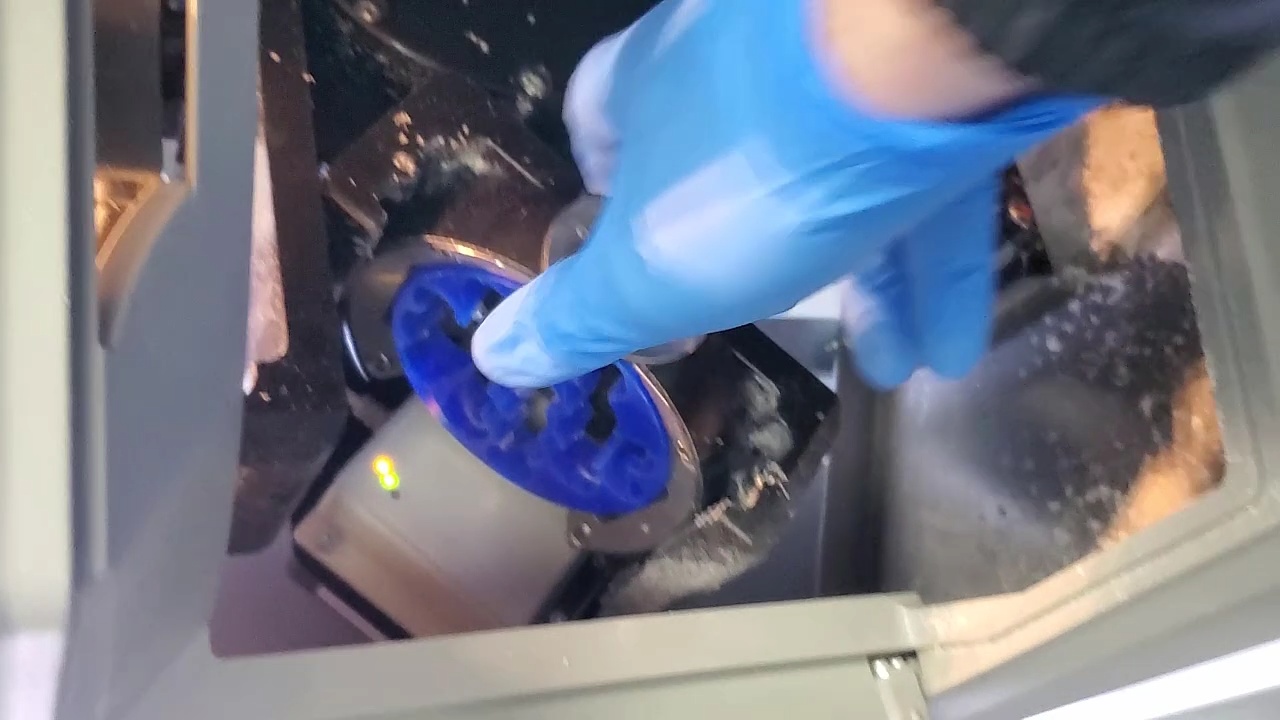
A good maintenances practice for any milling machine is to check that the tip of the drill is getting adequate water, otherwise you may see sparks flying as you are essentially dry milling material that is not supposed to be dry milled leading to drill and block breakage. We recommend that you run the water for a minute or two at the start of the day and check and make sure the spray is right on the tip of the drill. A simple ortho wire can help unclog the ports and redirect the water spray to where it belongs.
At CAD-Ray, we have now designed over 20,000 implant cases since 2013. One of the most common requests we get is from doctors doing full arches and their desires to reduce the conversion time. A simple thought to keep in mind is that A LOT can be derived from the actual implant plan, even if you don’t do the surgery guided. You can extract the digital implant positions and fabricate temps and based on your level of experience, your conversion / temporary time can drastically reduce.
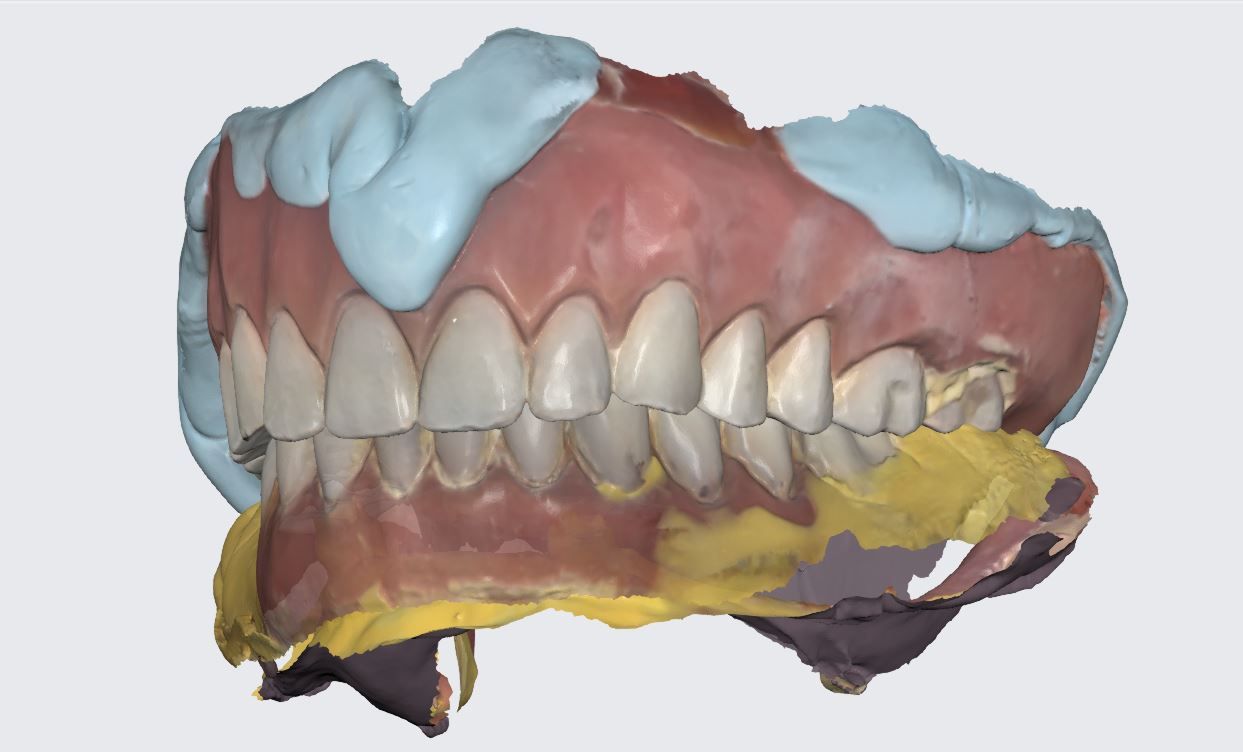
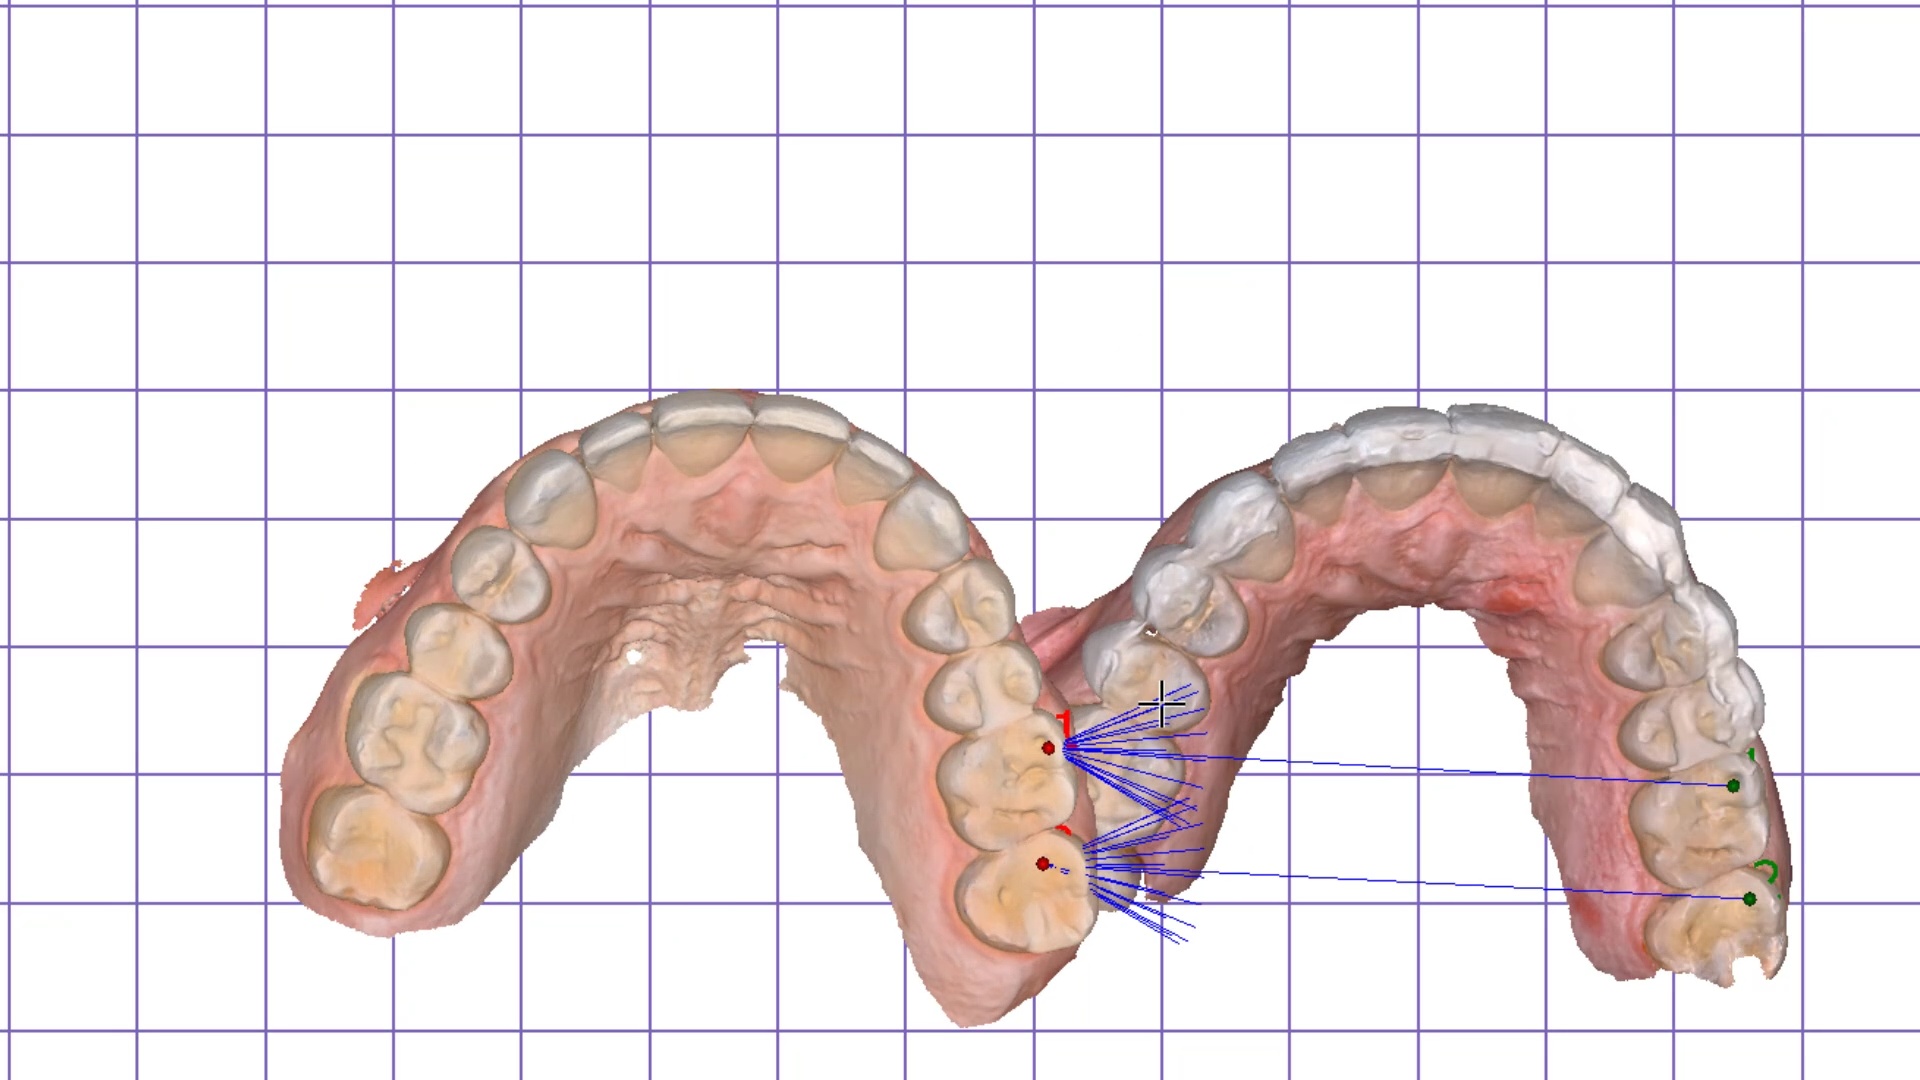
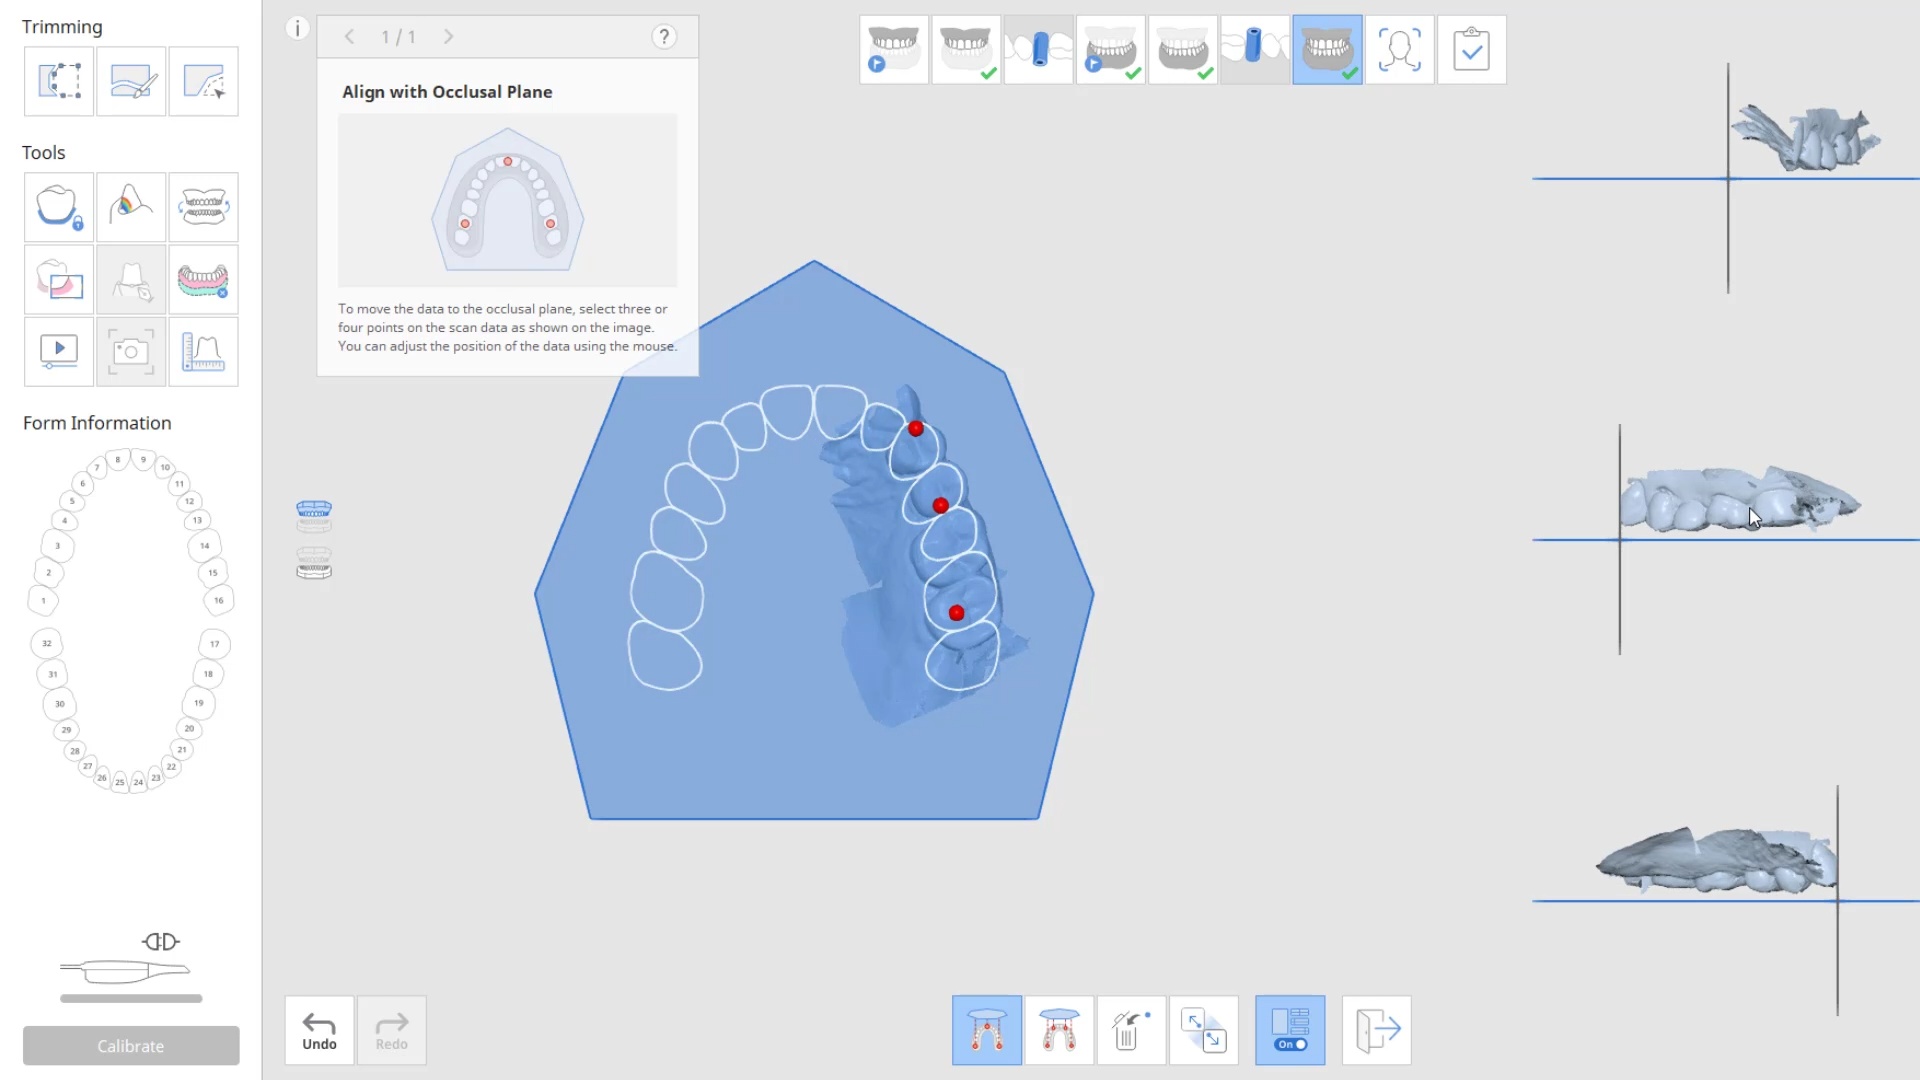
Another very helpful matter to keep in mind is a concept we preach a lot at our courses. It deals with relating models to each other, both automatically and manually. This can be a CT scan to an intra-oral scan, or a pre-op to a post op. You just have to find redundant landmarks for the software to merge the models together. One thing to keep in mind, particularly with the Medit i500 is that when you merge models to each other and process it, their relationship to each other is preserved.
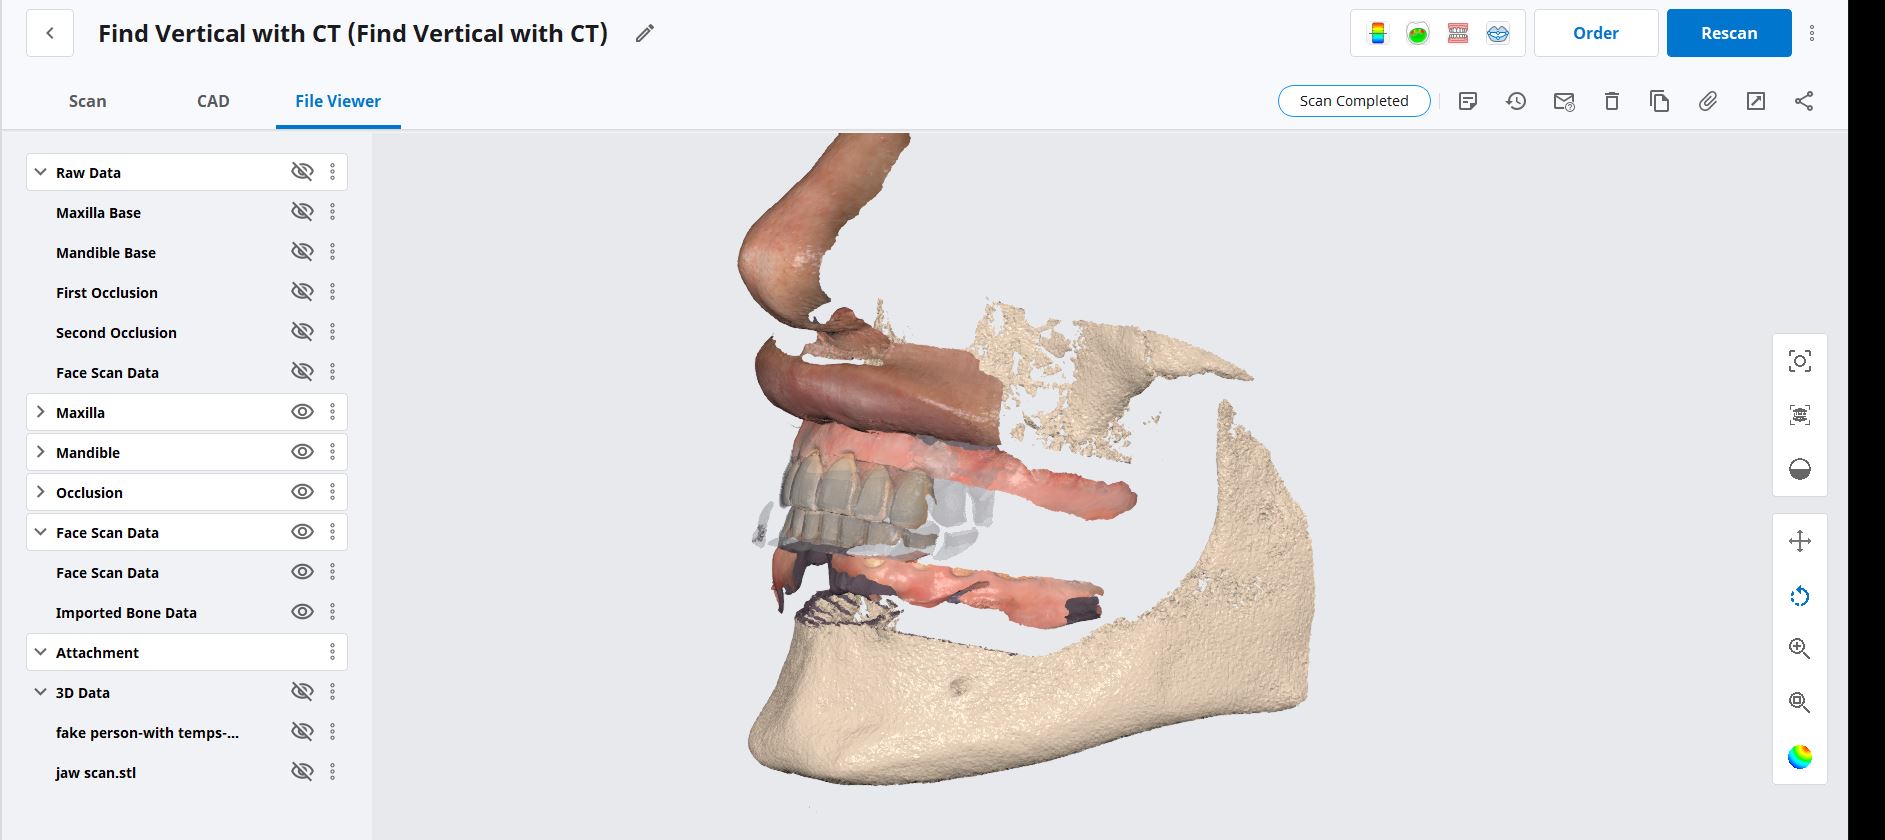
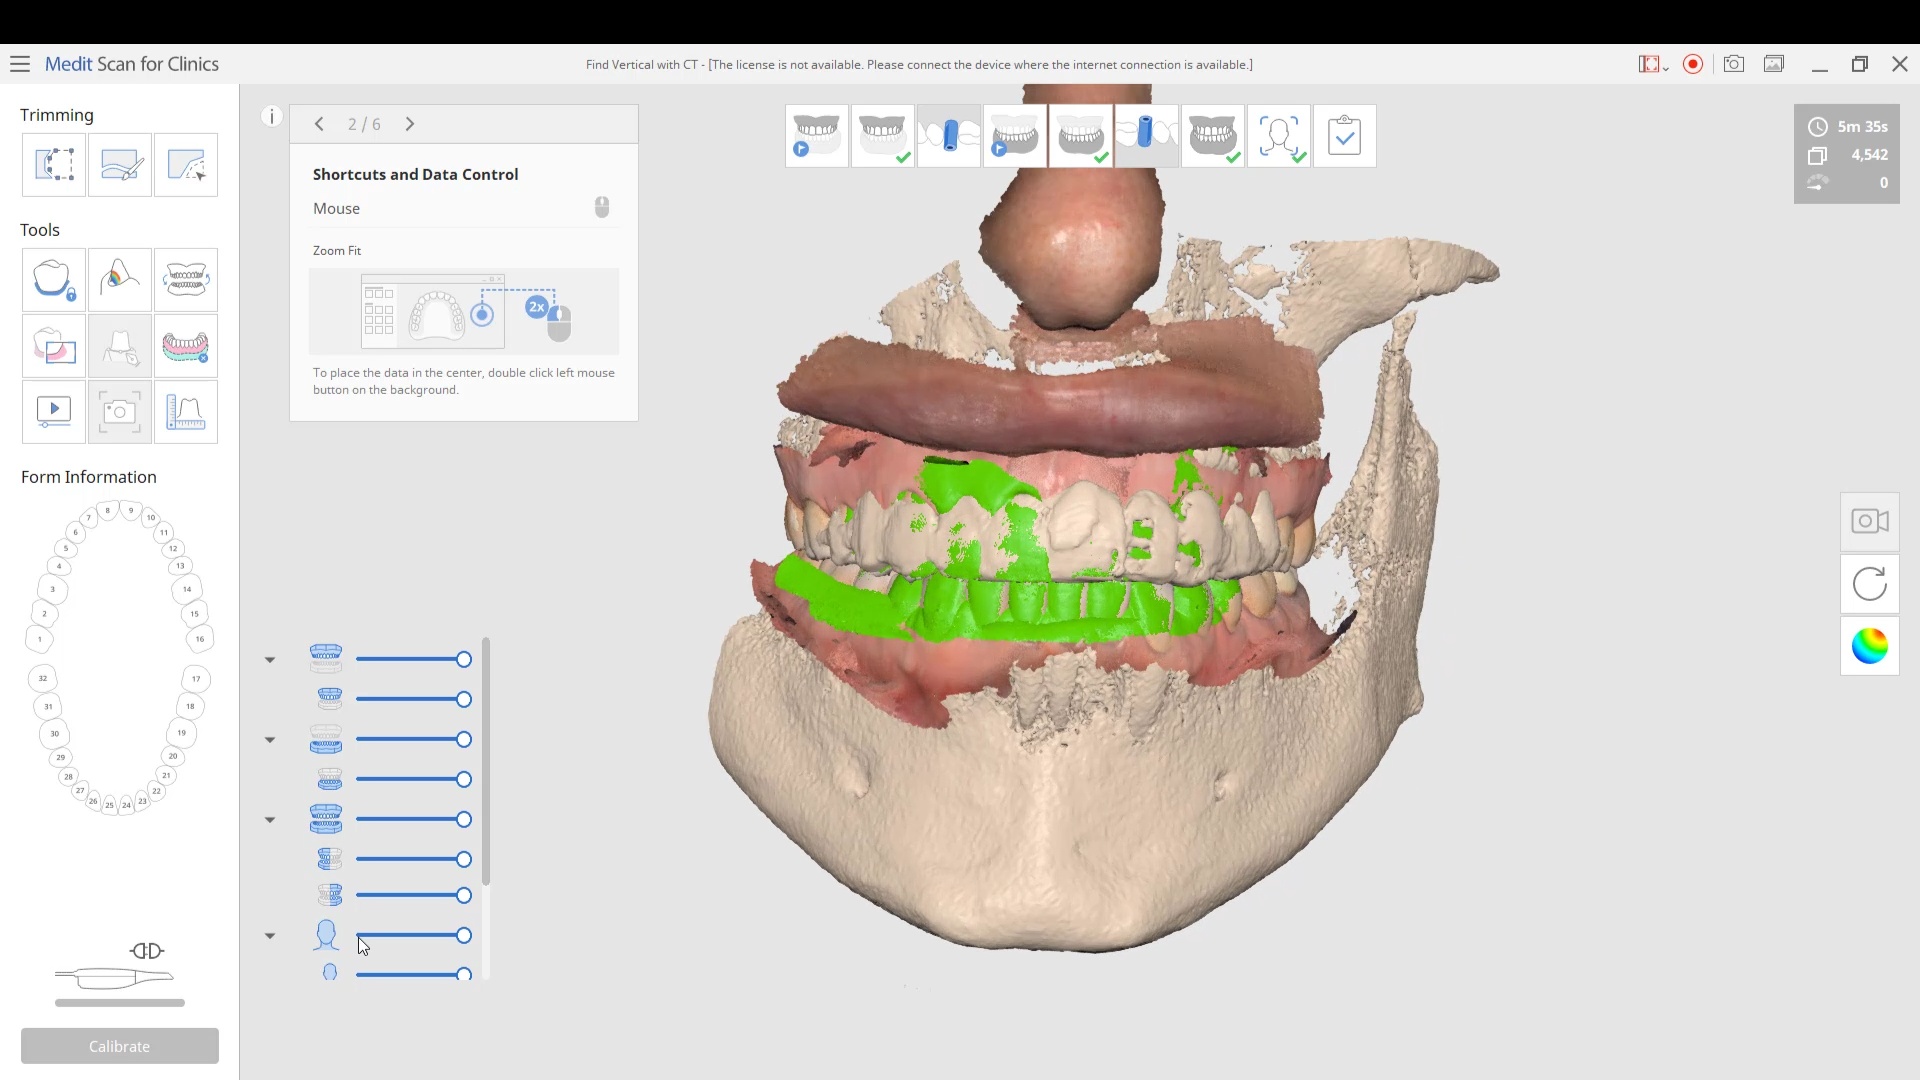
There is a lot of benefit that can be derived from that. For example, in this video, we have the dicoms converted to surface STL’s which is very easy to do. We also have the intra-oral scan merged to that stl file. You can digitally extract the teeth and do bone reductions, and if you are ever in a bind where you lost track of the vertical dimension, you can use the jaws as the means to related the preop to post-op. Or you can even use the nose if you are really desperate.
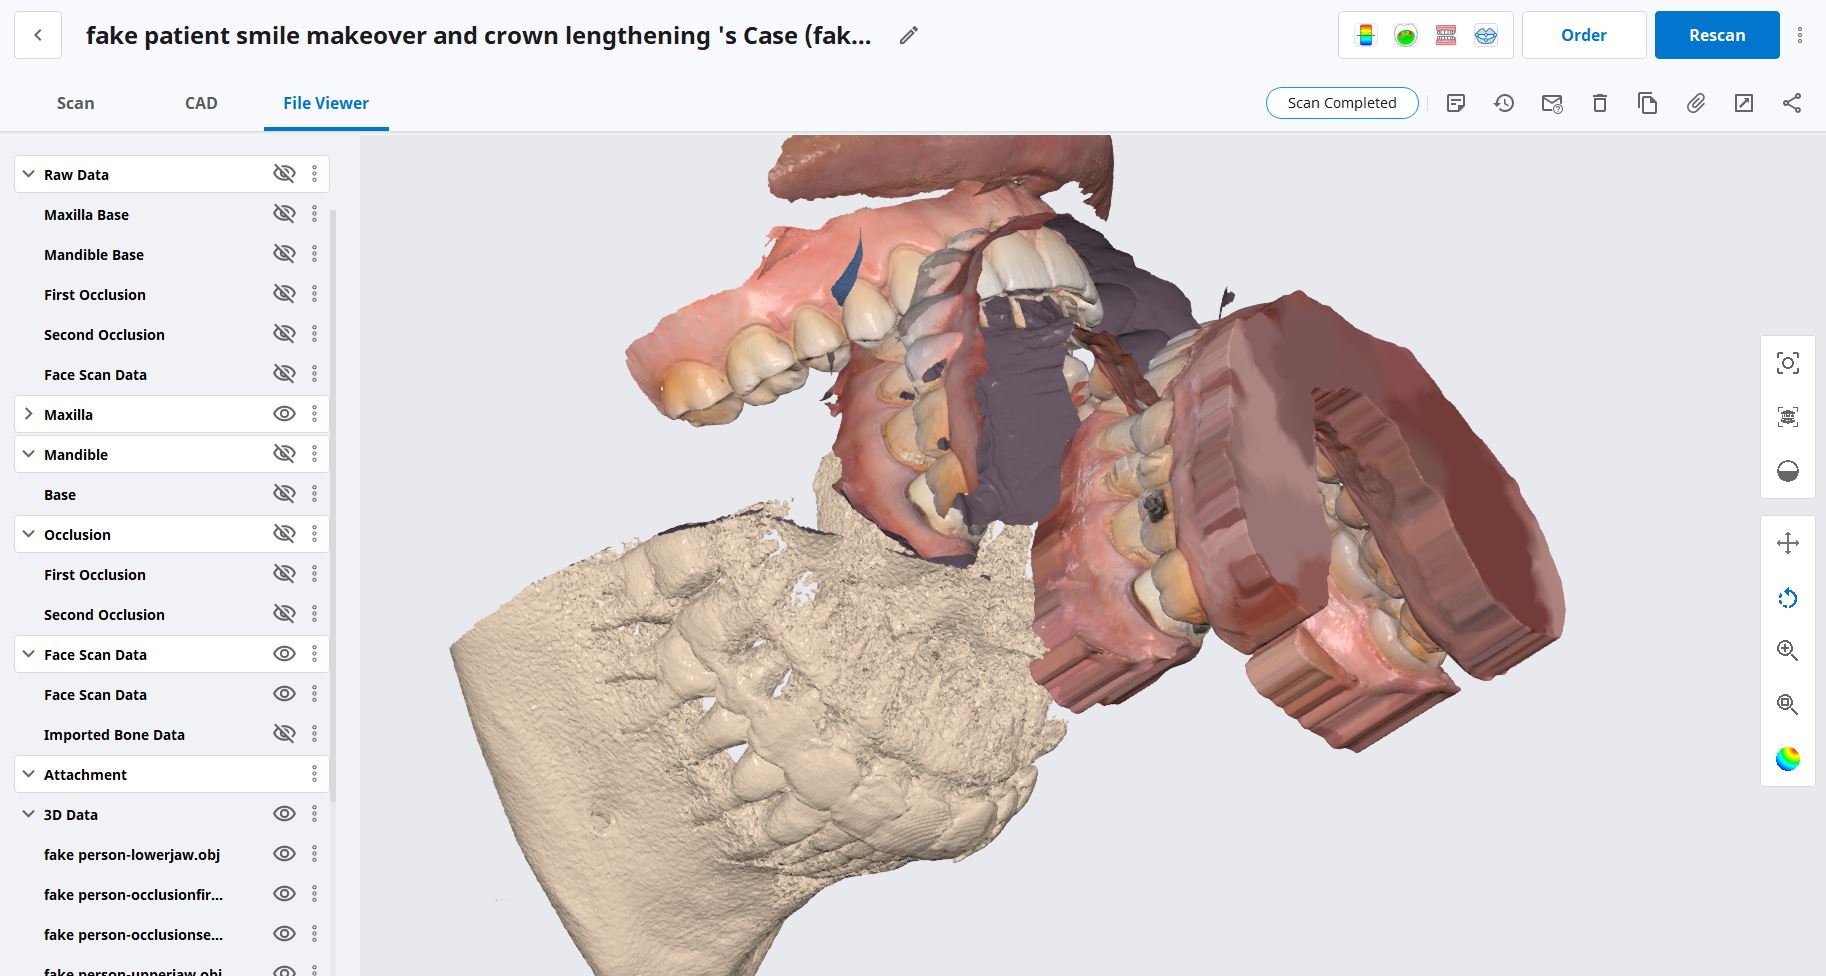
in this case we import multiple models, videos, CT scans, and Face Scans so that our users can utilize all of these features. Click here to enter the member’s section to download the whole case and design along