Heather with CADRay provided wonderful assistance with setting up our new scanner, and was able to work around a minor scheduling issue on my part. Top notch service! - 6/28/2024
Otto Herod
I received my Medit scanner a couple months ago from Cad-ray, and I can't express enough how awesome it is. I have done a ton of research and used the latest IOS from one of the big guys, and due to many software issues I was able to return that mach...read moreI received my Medit scanner a couple months ago from Cad-ray, and I can't express enough how awesome it is. I have done a ton of research and used the latest IOS from one of the big guys, and due to many software issues I was able to return that machine. And thank God, because it was so over priced and came with a $300/month support fee forever! The Medit scanner is as good or better than that one when it was working properly, and for the price it's a no brainier.read less - 9/17/2020
ed borio
I was dragging my feet before purchasing my first scanner because I was apprehensive of the effort required to change to a digital workflow. Laura assured me my fears were overblown and because of her patience and exceptional training abilities it h...read moreI was dragging my feet before purchasing my first scanner because I was apprehensive of the effort required to change to a digital workflow. Laura assured me my fears were overblown and because of her patience and exceptional training abilities it has been a rewarding and relatively seamless transition to the world of scanning. I never dreamed implementation would have been this easy and its attributed to Laura's skillful training ability. The scanner is wonderful and powerful, but we would have never been able to unlock its potential without her assistance.read less - 8/31/2021
I’d like to tell you a story about CAD-Ray.com.I ordered a VHF N4+ from CadRay. About two weeks after the order was placed, they called me up and said, “VHF just got an exclusive with “The Big Boys” so they are cutting ties with all the little indepe...read moreI’d like to tell you a story about CAD-Ray.com.I ordered a VHF N4+ from CadRay. About two weeks after the order was placed, they called me up and said, “VHF just got an exclusive with “The Big Boys” so they are cutting ties with all the little independent distributors. They just called us, and we just found out. What this means is that we won’t be able to provide you service after purchasing the VHF mill that you just bought.”Now, they could have just left it at that. They could have said, “Sorry, it’s out of our hands.” They could have said, “We appreciate your business, but it’s not our fault.” They could have said, “That’s the way the cookie crumbles.”But they didn’t.Frank Weinstein calls me up and tells me that they want to make this right, so they are going to hook me up with a brand new Imes Coritec One+ for the same price as the VHF. The Coritec One+ is like the Mercedes of mills for in-office. This is the new model that just barely came out. It is a 5 axis mill. It does wet and dry milling. It does blocks and pucks. It mills all materials know to man, including Vibranium. It can also fly the space shuttle, and make all your wishes and dreams come true. It’s that good. It came with the laptop, Exocad, all the tools, and all the bells and whistles. It came fully loaded. It came white glove delivered to my office. It came with in office training. It came with the extra bur package. It came with everything and the kitchen sink.So, I paid 36k for a mill, and because of something that was not Cad-Rays fault, they ended up giving me a 60k mill for the same price.In the words of the great Tony Stark: “That’s how Dad did it. That’s how Cad-Ray does it. And it’s worked out pretty well so far.”Thank you Frank Weinstein and Armen Mirzayan for having outstanding customer service and going the extra mile every time.read less - 4/09/2021
Thanh Huynh
I am beyond impressed with Destaney and Cad-Ray! Despite accidentally throwing away my old scanner, which I was supposed to return, their team went above and beyond to advocate for me. Their exceptional support and understanding turned a stressful si...read moreI am beyond impressed with Destaney and Cad-Ray! Despite accidentally throwing away my old scanner, which I was supposed to return, their team went above and beyond to advocate for me. Their exceptional support and understanding turned a stressful situation into a seamless experience. Highly recommend!read less - 8/02/2024
Matt v
Matt Newman was excellent solving a cable problem.! Quick response and good follow up! - 9/11/2024
STAR DENTAL CLINIC
This has changed my way of doing things forever. I can’t live without my Medit scanner. I promote it to all my friends like crazy. Support with Cad ray is awesome. They return calls within seconds. The price for scanner is ridiculously good and the ...read moreThis has changed my way of doing things forever. I can’t live without my Medit scanner. I promote it to all my friends like crazy. Support with Cad ray is awesome. They return calls within seconds. The price for scanner is ridiculously good and the quality of images is amazing. Their website has soo many educational videos. It doesn’t end. I love the ability to mobilize it from one off to another until I buy a second one. I’m can’t wait u til I have the time to learn all the other cool technology cad ray has. It’s amazing.read less - 7/24/2020
Jason Ehtessabian
Fantastic! Scanner went down after a few years, and they had a new one in my office the next morning. Highly recommended. - 8/26/2021
Sonrisas Dental
Support was our main concern, and we chose very carefully. Frank is 100% every step of the way - 1/25/2023
Sherif Gabr
I have been suing the Medit i500 scanner for a little over 2 months now and I have had great success. I have used it for implant cases, immediate dentures and single unit crowns.
What I like the most is that the software is continuously improving ...read moreI have been suing the Medit i500 scanner for a little over 2 months now and I have had great success. I have used it for implant cases, immediate dentures and single unit crowns.
What I like the most is that the software is continuously improving and adding new features.
You really can not ask for more than that! Great product, excellent support and a software development team that listens to their customers feedback!
Very happy with my purchase!!!read less - 2/26/2020
I have had the wonderful experience of working with Ryan at Cad-Ray for the last several weeks and he has been very professional and informative on how to properly use the Medit I700 scanner with regard to the software. I would highly recommend using...read moreI have had the wonderful experience of working with Ryan at Cad-Ray for the last several weeks and he has been very professional and informative on how to properly use the Medit I700 scanner with regard to the software. I would highly recommend using Cad-Ray and contacting Ryan for any of your Medit needs.read less - 1/27/2023
Cole Smith
These guys are great. My favorite part about them is they set you up for success with your products. A lot of dental companies will be happy to sell you big ticket tech item but don't have much to set you up for success. I bought the Medit i500 and t...read moreThese guys are great. My favorite part about them is they set you up for success with your products. A lot of dental companies will be happy to sell you big ticket tech item but don't have much to set you up for success. I bought the Medit i500 and they have tons of videos on how to get it working and working well for you in your office. If you need a much of hand holding they have that our if you are like me and like the do it yourself videos they have that. I am sure you can buy these products all over but it is there service that sets them apart. If to are looking to buy some dental tech use these guys!read less - 6/05/2020
Obdulia Rondon
Thanks for delivering amazing courses. Always thinking beyond dentistry. Thanks for sharing all so selflessly. - 11/13/2022
Steve Blank
I bought the Medit i500 and self installed to save $$$. The web site provided great step by step instructions. The Facebook group filled in the gaps. The software has been continuously upgraded and works great for scanning and tracking cases sent and...read moreI bought the Medit i500 and self installed to save $$$. The web site provided great step by step instructions. The Facebook group filled in the gaps. The software has been continuously upgraded and works great for scanning and tracking cases sent and received. My tip for scanning single crowns: While waiting for anesthesia, Scan the upper and lower quadrants and record the bite. Then i delete the tooth to be scanned. That saves time later after tooth preparation. At that time, switch to HD and scan the prep, done!read less - 6/16/2020
Jay Siddiqui
Amazing support and install, Jesse went through everything and made sure I was comfortable with my equipment before leaving. He also introduced me to the world of anodizing and now I am hooked! Highly recommend them for any tech you may need. - 8/23/2022
jorge lube
I live in Puerto Rico and Cad-Ray made my decision easy when it comes to purchasing Dental equipment. I decided to call after having connection issues with my i700 and Andy responded immediately. He was very pleasant to work with and within 2 days, r...read moreI live in Puerto Rico and Cad-Ray made my decision easy when it comes to purchasing Dental equipment. I decided to call after having connection issues with my i700 and Andy responded immediately. He was very pleasant to work with and within 2 days, received my brand new cord. I can always always rely on Cad-Ray for their incredible support and highly recommend this company to anyone looking to explore digital dentistry.read less - 12/30/2021
Lisa Greenstein
Exceptional customer service - 7/26/2023
Chirag Vaid
I ordered my Medit scanner from them in Feb 2020, so far no issues with support or the product. They are a great company with great support. Disclosure: they did promise me a scanner tip for this review, but in all honestly I was meaning to give it t...read moreI ordered my Medit scanner from them in Feb 2020, so far no issues with support or the product. They are a great company with great support. Disclosure: they did promise me a scanner tip for this review, but in all honestly I was meaning to give it to them anyway.... if you are looking to buy, this is a great way to go about it.read less - 7/19/2020
Yen Tran
Jonathan and Nick have been a great tremendous help. They went out of their ways to help me upgrade my Medit i500 even though I didn’t purchase my Medit i500 scanner from them. They are the largest Medit scanner distributor and they have the custome...read moreJonathan and Nick have been a great tremendous help. They went out of their ways to help me upgrade my Medit i500 even though I didn’t purchase my Medit i500 scanner from them. They are the largest Medit scanner distributor and they have the customers’ interest at heart. They are super responsive to phone calls, emails, and Facebook messages. I highly recommend their servicesread less - 9/01/2021
Logan Riggs
I always rely on Frank to help with any questions or concerns regarding our printer. The best in tampa. - 1/25/2023
Anthony Vu
If you are looking to buy a Medit, you shouldn't look anywhere else to buy it. My Medit i700 was having issues on a Friday and I was able to get Heather from Cad-Ray to troubleshoot the issue. She remoted into my computer to try and troubleshoot the ...read moreIf you are looking to buy a Medit, you shouldn't look anywhere else to buy it. My Medit i700 was having issues on a Friday and I was able to get Heather from Cad-Ray to troubleshoot the issue. She remoted into my computer to try and troubleshoot the issue and helped with getting Medit on board as well. Once it was confirmed it was a hardware issue, I got sent a BRAND NEW Medit i700 OVERNIGHT.Can you believe that? Service and warranty that Cad-Ray offers is really TOP NOTCH.Highly Recommend Cad-Ray for all things MEDIT. Thank you Heather from Cad-Ray for all your help!!!read less - 2/02/2022
John T
Frank and the CAD-Ray crew are awesome! They are always available for support with the technology you purchase from them. - 1/25/2023
Norman Knowles
I have had the original iTero, a Trios 3, and a Carestream CS3600. A staff member broke the lens on the Trios and while waiting 3 weeks for an RMA to send it to Poland for six weeks to get it repaired, Carestream was sniffing around and suggested tha...read moreI have had the original iTero, a Trios 3, and a Carestream CS3600. A staff member broke the lens on the Trios and while waiting 3 weeks for an RMA to send it to Poland for six weeks to get it repaired, Carestream was sniffing around and suggested that I trade in my Trios so I did which began a 4 month nightmare with their piece of junk scanner. Absolutely awful customer service from both 3Shape and Carestream. I needed a scanner and had heard great things about it the Medit i500 at the Florida Academy of Coesmetic Dentistry so I got one. It works really well and Medit keeps adding new and useful features and their architecture is completely open. Two weeks ago, my i500 died so I contacted Cad-Ray surrport and I had a new unit in my office 24 hours later! That's absolutely unheard of in the industry!!! Both Cad-Ray and Medit have positioned themselves to be industry giant killers and they're doing it. The i500 is a phenomenal scanner at a phenomenal price point and service and guidance at Cad-Ray is just plain excellent.If you are thinking about getting a scanner, do it! Just contact Cad-Ray and go for it. You will only be happy about your purchase! Highly recommended!read less - 3/09/2021
Todd Haskin
The medit is one of the best scanners on the market with the best price. Cad ray's support and training is phenomenal and they are very quick to respond. We work with Laura. Highly recommend. - 12/16/2021
kenneth kim
Purchased Medit in 2019. Bang for the buck best investment and will get you started in digital dentistry with ease. No monthly subscriptions and Cad-Ray support is amazing. No regrets. - 6/16/2020
One of the best investments I’ve made for my office. A fraction of the cost compared to cerec. No monthly club fee. Easy maintenance. Saving a ton on lab costs. Milling and designing crowns is honestly my favorite things to do now. - 6/29/2020
I am fairly new to scanning with my Medit I700. I am loving this in my business. It has had its challenges at times but the best part is the accessibility and support from Frank DeLuca. He has been instrumental in helping me when I have a patient in...read moreI am fairly new to scanning with my Medit I700. I am loving this in my business. It has had its challenges at times but the best part is the accessibility and support from Frank DeLuca. He has been instrumental in helping me when I have a patient in the chair and need assistance. I couldn't be more grateful for his help. Thanks, Frank!read less - 12/16/2021
LoAn Huynh
Erika is one of a kind! She truly is patient with me. She has gone above and beyond to help me every time I call her. We have a few locations and she is always prompt in her responses and always manages to find a solution for me. I wish every rep was...read moreErika is one of a kind! She truly is patient with me. She has gone above and beyond to help me every time I call her. We have a few locations and she is always prompt in her responses and always manages to find a solution for me. I wish every rep was reachable ALL THE TIME and helpful! Thank you Erika! ❤️read less - 6/04/2025
Matt McReynolds
Great scanner (medit i500) and mill (coritec one). They were great for an open system that allows me to do just about anything. - 6/16/2020
Jared H
Purchasing my medit i700 from Cad-Ray was a great decision. I did my first training with Kaila and she was fantastic! Super knowledgeable, patient and truly helpful in making sure I was ready to hit the ground running with patient care. I put a call ...read morePurchasing my medit i700 from Cad-Ray was a great decision. I did my first training with Kaila and she was fantastic! Super knowledgeable, patient and truly helpful in making sure I was ready to hit the ground running with patient care. I put a call into cad-ray support in the middle of a case and sure enough Kaila was also the one to answer and handle the situation. She jumped right on my computer and had things fixed in a matter of a few minutes. Awesome support, great staff and overall super positive experience with Cad-ray thus far!read less - 5/06/2022
Archstone Weatherford
Medit i700 intraoral scanner is the first scanner that I actually used on my patients. Before I put my hands on it, I had some prejudices against all scanners. They were bulky, laggy in capturing the images, etc. When I finally had the chance to use ...read moreMedit i700 intraoral scanner is the first scanner that I actually used on my patients. Before I put my hands on it, I had some prejudices against all scanners. They were bulky, laggy in capturing the images, etc. When I finally had the chance to use an intraoral scanner and get introductory training with Laura from CAD-RAY a few weeks ago, I totally changed my view of this product. Very soon, I was able to scan crown, bridge, and even denture cases. Of course, I have had some knowledge about the digital scanner from CEs provided in the past, but being able to apply it in the daily practice in such a short time was beyond my expectations. I would highly recommend MEDIT i700 and training from CAD-RAY.
Big thanks to Laura!
-Lei Fu, D.D.S.read less - 9/12/2021
I purchased my Medit scanner after the ADA meeting in 2018. I did it primarily on the personal recommendation of Armen Mirzayan, the owner of Cad-Ray. I have known Armen for over 15 years (we both were CEREC trainers) and he has always been unbeli...read moreI purchased my Medit scanner after the ADA meeting in 2018. I did it primarily on the personal recommendation of Armen Mirzayan, the owner of Cad-Ray. I have known Armen for over 15 years (we both were CEREC trainers) and he has always been unbelievably knowledgeable about dental technology and was always moving on the cutting edge.
When you see Armen's daily FB posts, it’s obvious that he is constantly pushing the envelope and exploring the limits of the Medit and the processes we use to idealize our push towards completely digital dentistry. Medit owners are fortunate to have Armen finding glitches and pushing for improvements in our scanner.
As far as after sale service, I can’t find a flaw with Cad-Ray. You won’t find a more supportive and dentist-centered company. Armen and Frank do everything to make purchasers happy and back up their sales.
I’ve heard of horror stories when people shopped elsewhere and only positive comments about Cad-Ray.
In summary, buy your Medit and other high tech equipment from Cad-Ray, you will be totally satisfied.
.read less - 10/08/2019
Used CAD-Ray for my Medit scanner purchase, training, and assistance and have had zero problems. They are so quick to respond to inquiries and helping with any minor issues (which have been very minimal). Highly recommend working with this company - 8/27/2021
Tiffany Lee
This is a unique place because it serves both dentists and patients. For patients, this is an imaging center only. There are no diagnostics done here. There is a dentist on staff, but he is only there for imaging purposes, no diagnosis. As a dentist,...read moreThis is a unique place because it serves both dentists and patients. For patients, this is an imaging center only. There are no diagnostics done here. There is a dentist on staff, but he is only there for imaging purposes, no diagnosis. As a dentist, I would say that to be fair a niche place like this couldn't be expected to bill insurances. They would have to hire an entire separate staff to deal with all the thousands of types of insurances you have. For dentists: This is a great service to your patients because if you do not own a 3d x ray machine, you don't have to invest the $200,000.00, you can refer your patients here and cad ray will send you the digital files. You can also send them files to have custom surgical guides made. The folks who work here go out of their way to explain how things work. If you don't have a doctor, they can refer you to a dentist who can diagnose your problems. I always call ahead to make an appointment.read less - 6/02/2018
Evan Bedell
Laura has always been so helpful with the medit when we needed assistance or resources. The training she provided the office was invaluable! She is quick to respond whenever we reach out. 13/10 - would recommend her to anyone looking to get a medit ...read moreLaura has always been so helpful with the medit when we needed assistance or resources. The training she provided the office was invaluable! She is quick to respond whenever we reach out. 13/10 - would recommend her to anyone looking to get a medit scanner.read less - 12/16/2021
Greg Stepka
Highly Recommend working with Cad-Ray. Just purchased a MeditI700. So easy to work with. Training with Destaney was awesome. - 3/19/2024
Francois Dillinger
These guys are the best. They provide so much help and insight with the Medit. I can't say enough great things about them and their continued support. I truly appreciate everything!! - 6/16/2020
North Bakersfield Dental
Excellent customer service and product!! - 3/16/2022
lucas kim
Ordered some scanner parts. Laura was super helpful and replied very quickly. Great customer service! - 6/02/2022
Blake Ferando
I purchased my medit in April of 2019 from Cad-Ray. The support offered is second to none, and the training videos are some of the best out there. Add to that a great support team that is fast to answer questions and issues, its hard to beat Cad-Ray. - 6/19/2020
Miguel DeLeon
I seriously can't believe the amount of support I get from Cad-Ray. I bought a medit scanner 2 months ago through Laura and she was very quick to get it shipped to me. She helped me through the whole process and ensured that I was passed to the right...read moreI seriously can't believe the amount of support I get from Cad-Ray. I bought a medit scanner 2 months ago through Laura and she was very quick to get it shipped to me. She helped me through the whole process and ensured that I was passed to the right people to train me. They were always available whenever I called, even one time I ran into an emergency after hours and Kaila picked up and saved the night. Very cool how they can remote access to my computer and guide me through as if they were right next to me.I also recently bought an Ackuretta Sol printer with Laura's help and she got me paired up with Jessica for my printer training. Jessica is so awesome! She is very knowledgeable and guided me through a lot of troubleshooting and set me up for success.Thank you guys so much!! I will always refer my friends to you all.read less - 4/13/2022
Dixie Jernigan
The customer service we have received while working with Frank DeLuca is second to none! He is incredibly knowledgeable and enthusiastic, as well as always available to help with any issues. We are very pleased with CAD-RAY and relationship that they...read moreThe customer service we have received while working with Frank DeLuca is second to none! He is incredibly knowledgeable and enthusiastic, as well as always available to help with any issues. We are very pleased with CAD-RAY and relationship that they have with their clients.read less - 1/25/2023
Amber Thomas
Andy was very patient and informative during our Medit Training. He made sure that we understood exactly what we needed to know in order to be successful during scans. Since our training we've moved full steam ahead in completing scans for lab fabric...read moreAndy was very patient and informative during our Medit Training. He made sure that we understood exactly what we needed to know in order to be successful during scans. Since our training we've moved full steam ahead in completing scans for lab fabrications of crowns, bridges, and Invisalign. Thanks so much!!!read less - 4/05/2022
Love my Medit! Can’t beat the quality, and the price is even better! Also, great people who are always willing to help! - 6/16/2020
Michael Pagano
I bought a Medit i500 from Cad-Ray. The service was fantastic. This group also does ongoing training to keep you up to date on how to use the technology.I had a minor issue with hardware and Cad-Ray resolved the issues no questions asked!They have a ...read moreI bought a Medit i500 from Cad-Ray. The service was fantastic. This group also does ongoing training to keep you up to date on how to use the technology.I had a minor issue with hardware and Cad-Ray resolved the issues no questions asked!They have a very active online forum that is supportive. I wouldn’t hesitate to purchase more equipment from them!read less - 10/13/2020
DERYCK PHAM
STOP SEARCHING NOW!
Best bang for your buck scanner on the market. we have been using out medit for 8 months now. love our crowns, margins are fantastic. almost no adjustments needed at all. maybe one in ten crowns might have to adjust mesial or...read moreSTOP SEARCHING NOW!
Best bang for your buck scanner on the market. we have been using out medit for 8 months now. love our crowns, margins are fantastic. almost no adjustments needed at all. maybe one in ten crowns might have to adjust mesial or distal to get crown to drop in. occlusion is always spot on. patients love the technology and WOW factor -"SOOO COOOLLL." customer service is great also! dont waste your money on anythign else. our lab even comments on how easy it is to deal with medit and how good the scans are. they recommend it to their other doctors now as well.read less - 10/09/2019
Had a training session for use of my Medit scanner this afternoon, and Heather G. was simply the best.....knowledgeable, patient and a great trainer. She had a wealth of knowledge regarding my scanner and she was so very patient with my computer glit...read moreHad a training session for use of my Medit scanner this afternoon, and Heather G. was simply the best.....knowledgeable, patient and a great trainer. She had a wealth of knowledge regarding my scanner and she was so very patient with my computer glitches! CAD-Ray is number one in my book! Thanks Heather, your time was much appreciated! Dr. Steve Hollisterread less - 5/14/2025
Lake Shore Dental of Tempe
Absolutely the best customer service I have ever seen. I couldn't be happier with the service received. I won't be going anywhere else!! Thank you again. - 2/01/2022
Alec Keon
I was on the fence on getting a scanner for years and finally pulled the trigger. CAD-Ray's support and knowledge has made this one of the best investments in my practice to date. When I spoke with Damien on the phone about my options he literally sa...read moreI was on the fence on getting a scanner for years and finally pulled the trigger. CAD-Ray's support and knowledge has made this one of the best investments in my practice to date. When I spoke with Damien on the phone about my options he literally saved me thousands after figuring out what my exact needs were. I went with the Medit i600, MSI laptop and 3D dental systems cart. The final product looks and feels as premium as it gets.read less - 2/21/2024
Jonathan Mason
I bought a Medit 3 years ago and have had amazing success with both the scanner and the support from Cad-Ray. My scanner recently broke and They were on the phone with my assistant trying to fix the problem, and when it was unfixable, they overnight...read moreI bought a Medit 3 years ago and have had amazing success with both the scanner and the support from Cad-Ray. My scanner recently broke and They were on the phone with my assistant trying to fix the problem, and when it was unfixable, they overnighted a new scanner and helped us set it up. Medit is now available through many dealers, but I would only buy next one from Cad-Ray.read less - 11/03/2022
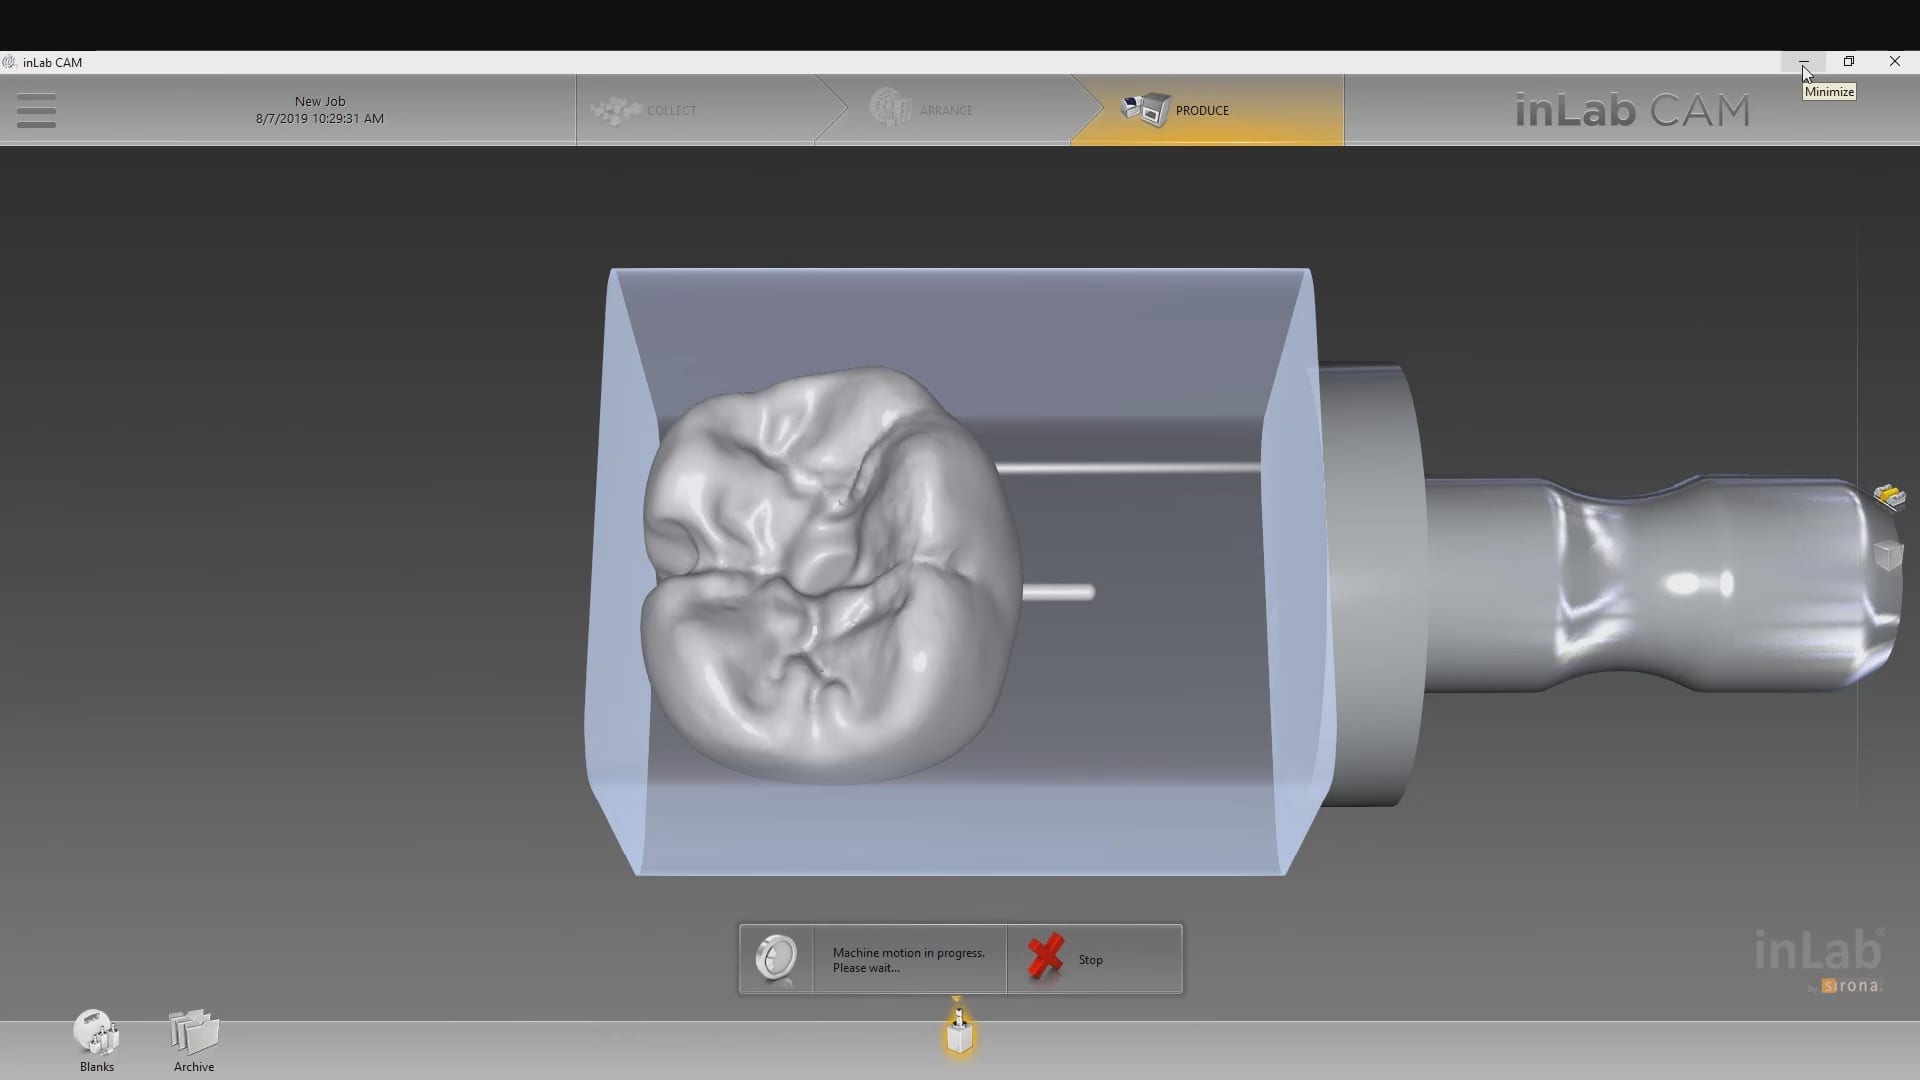
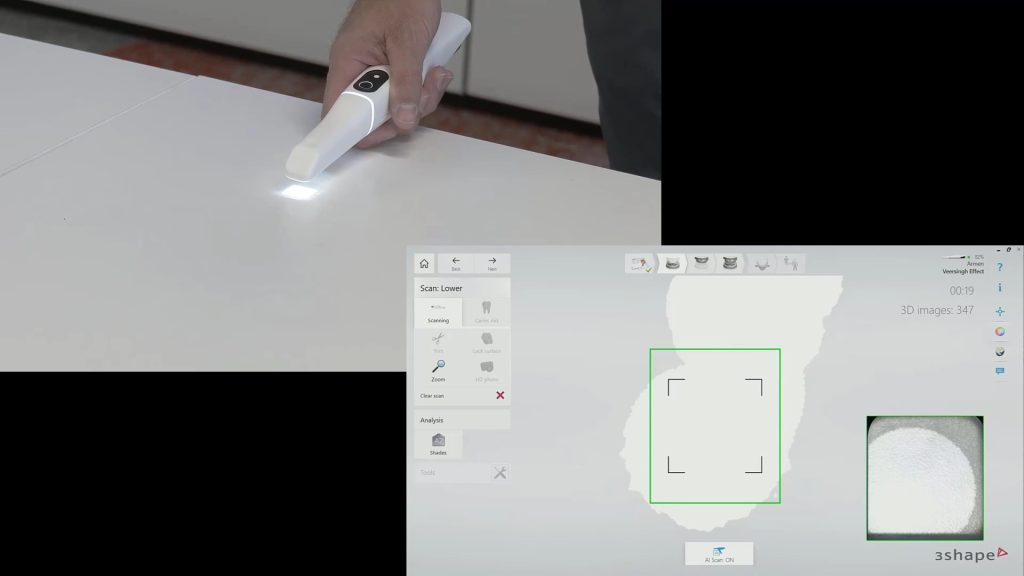
In this video we demonstrate a simple premolar case that is prepared and imaged with the Medit i500, designed in the cad software named exocad and then milled with the imes icor coritec one machine. Pay attention to the order and sequence of events and how we leverage anesthesia time with scanning time.
We have a large library of instructional videos on our site that can be found on our support page that can help you learn everything there is to know about the Medit i500
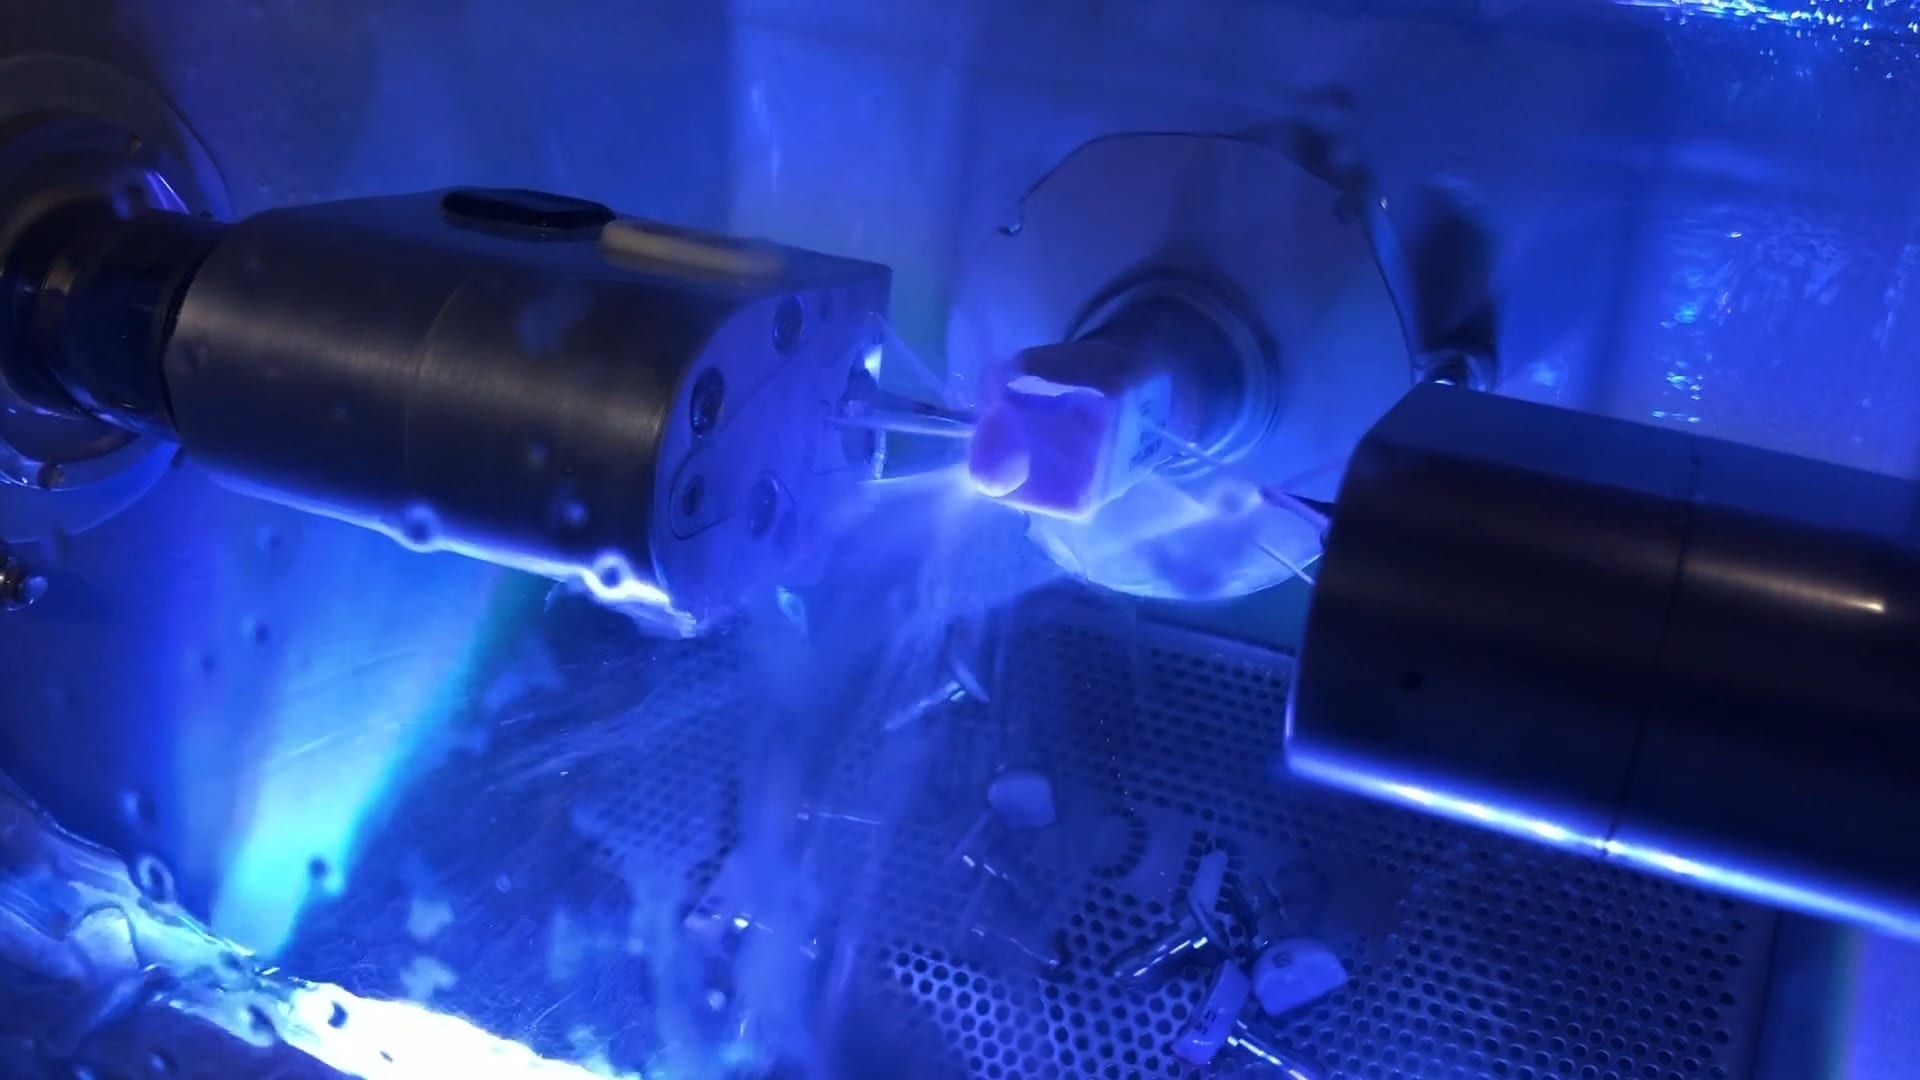
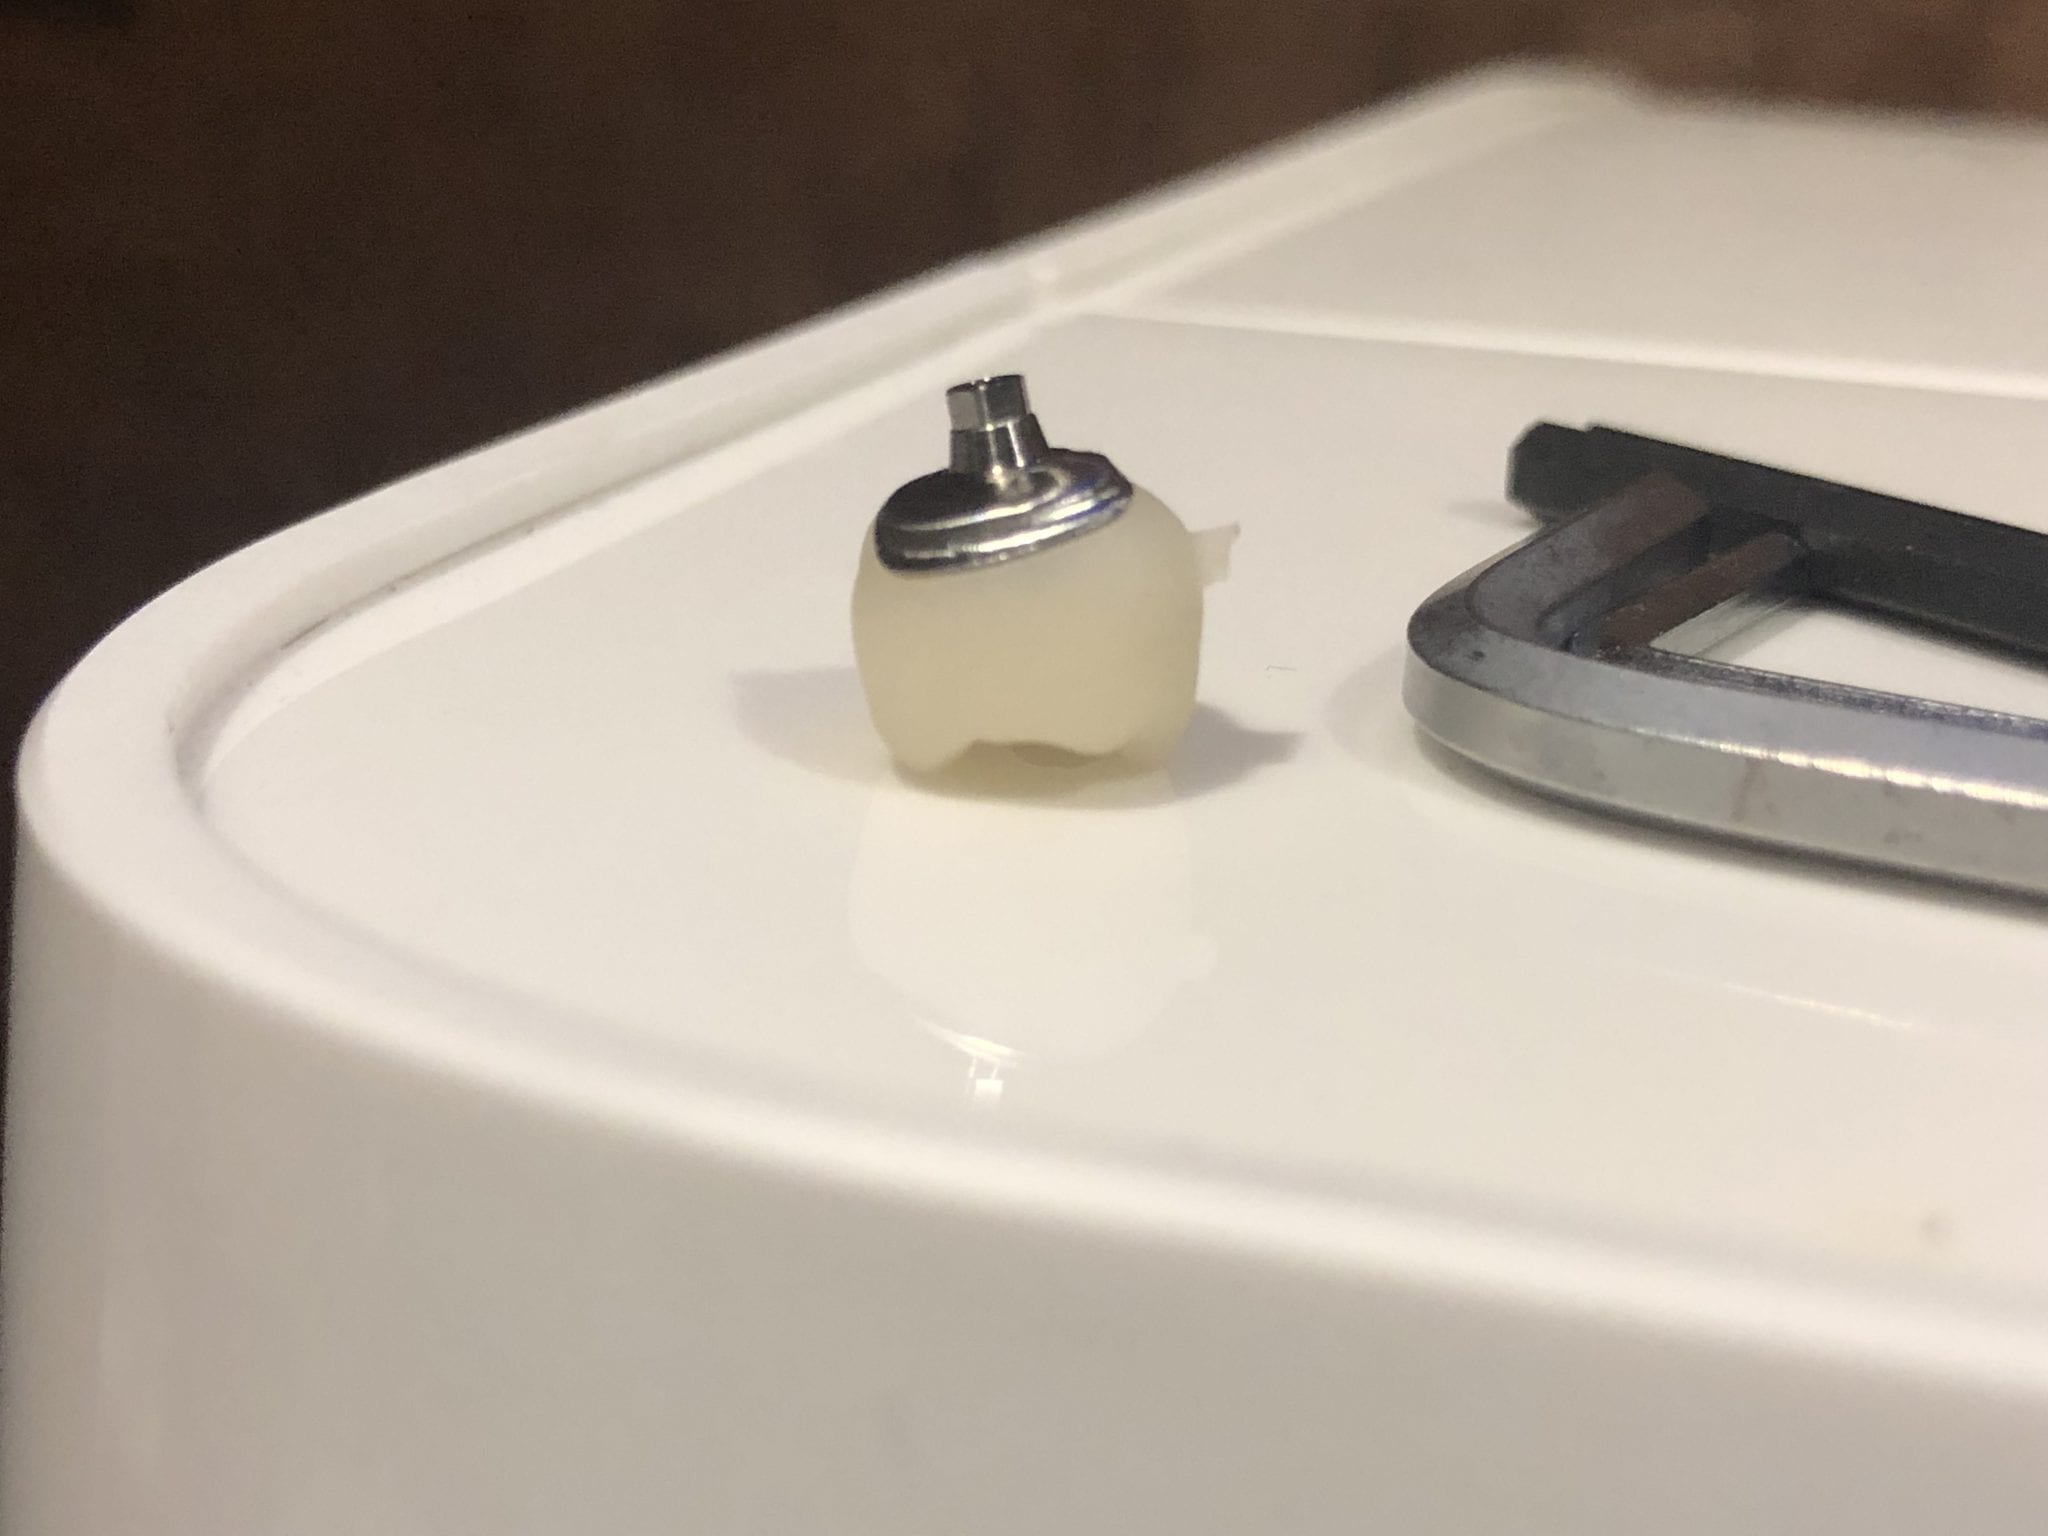
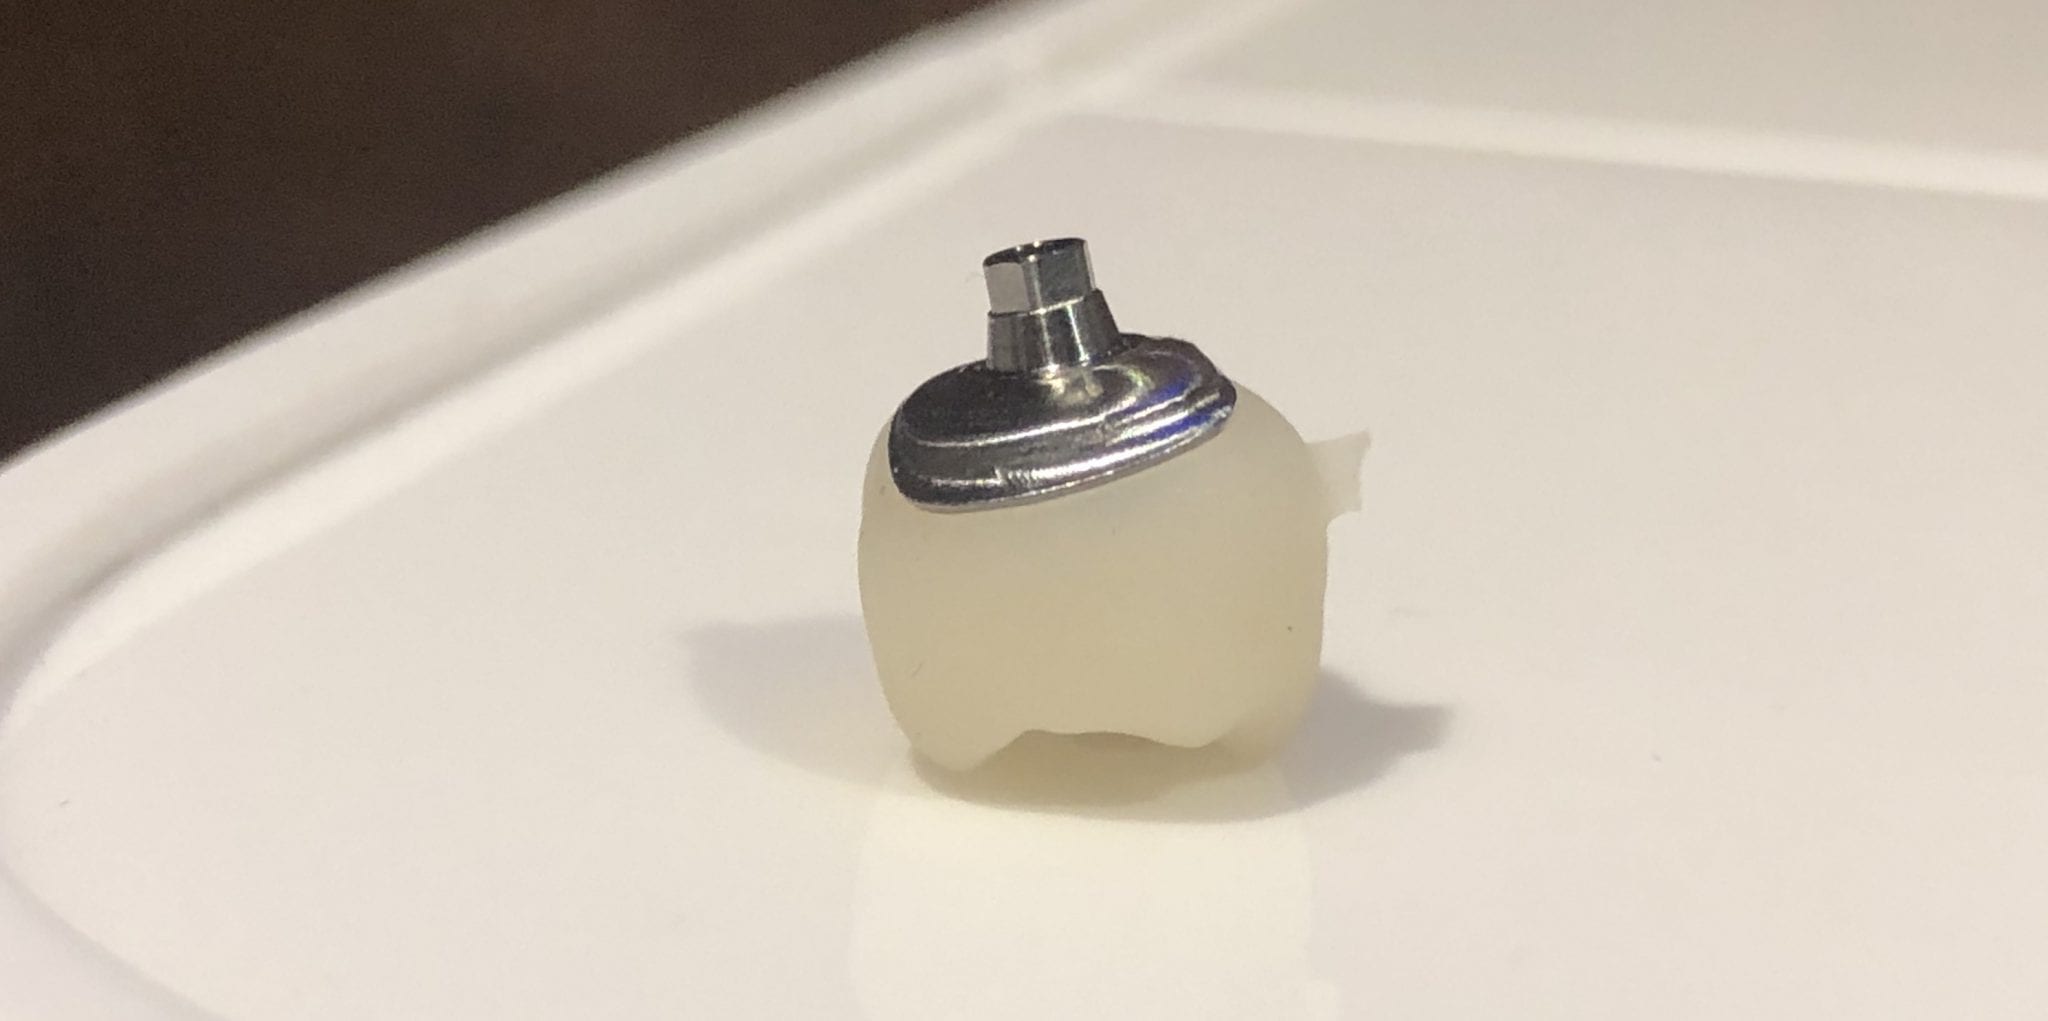
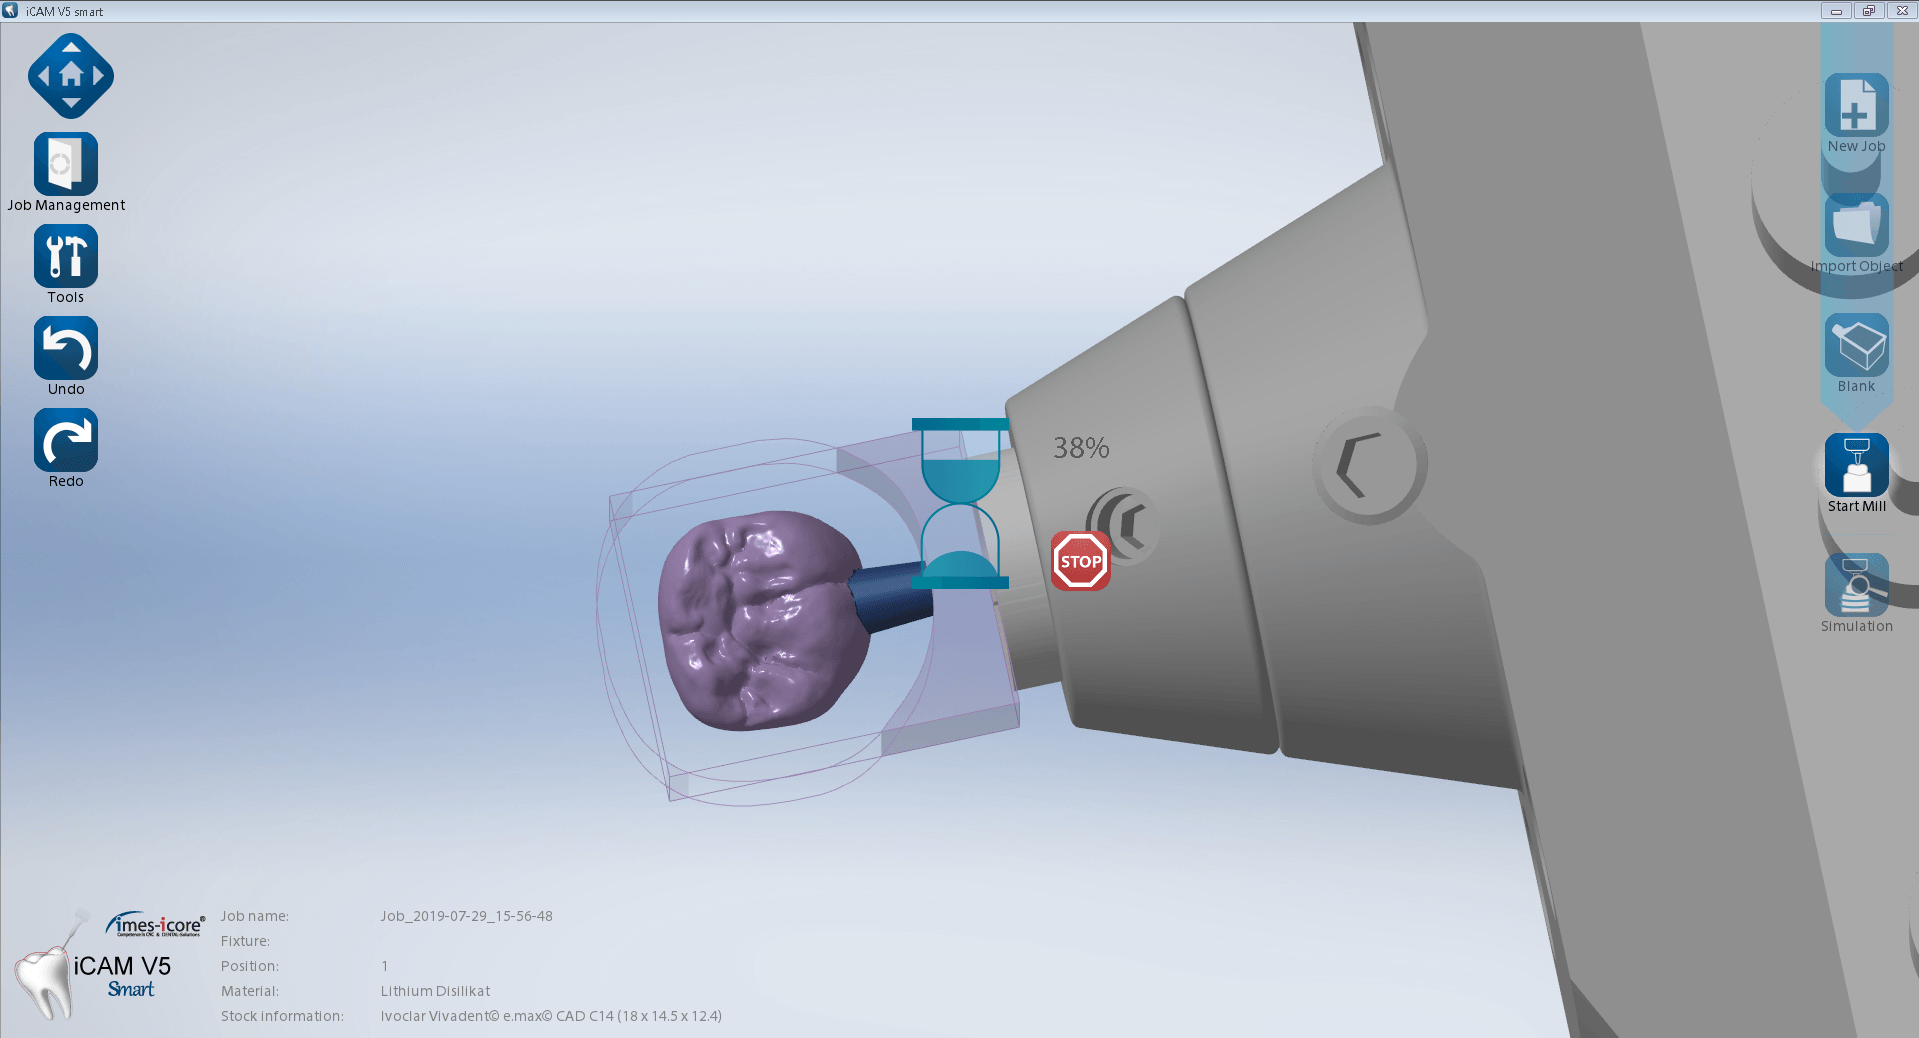
We are very pleased with millbox and the imes icore coritec one for a chairside milling solution. We’ve been testing it for a long time and its CAM (millbox) is very intuitive and the results are always predictable. It can mill titanium abutments, emax, and zirconia blocks.
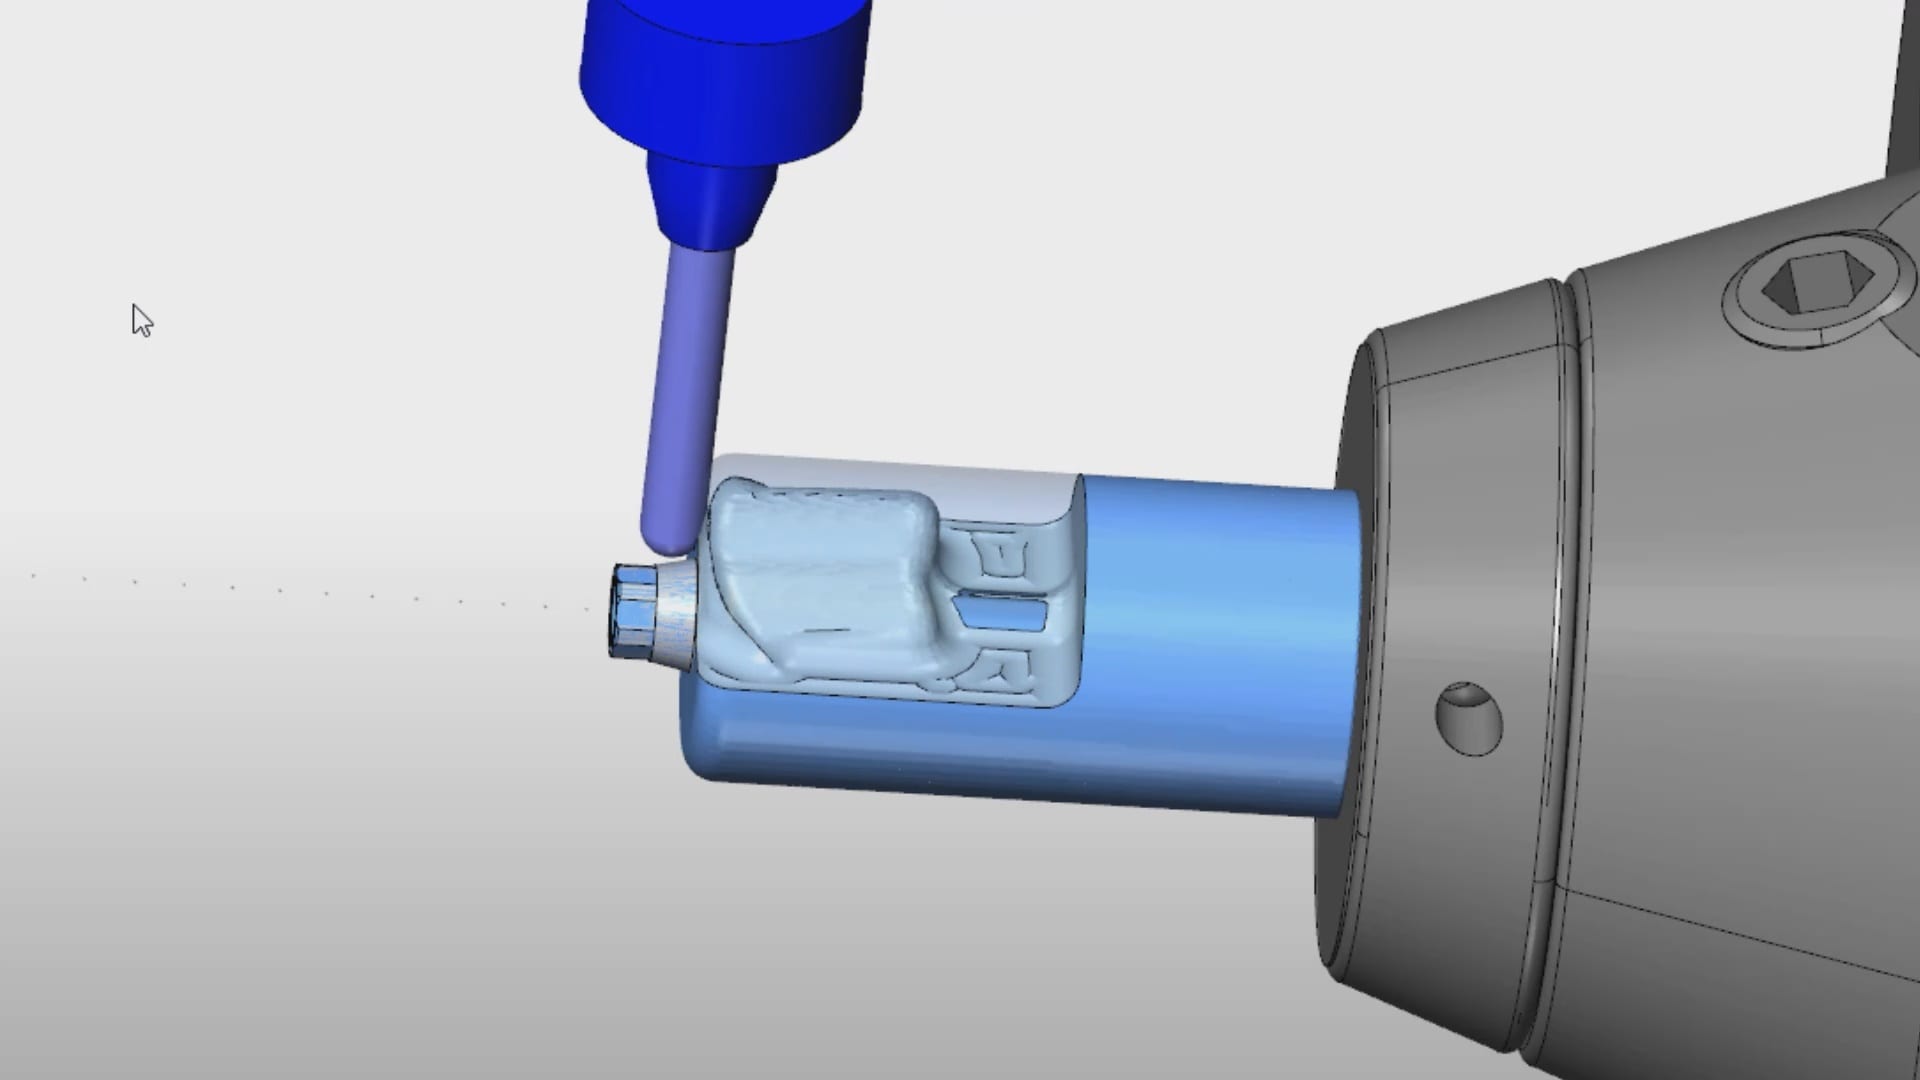
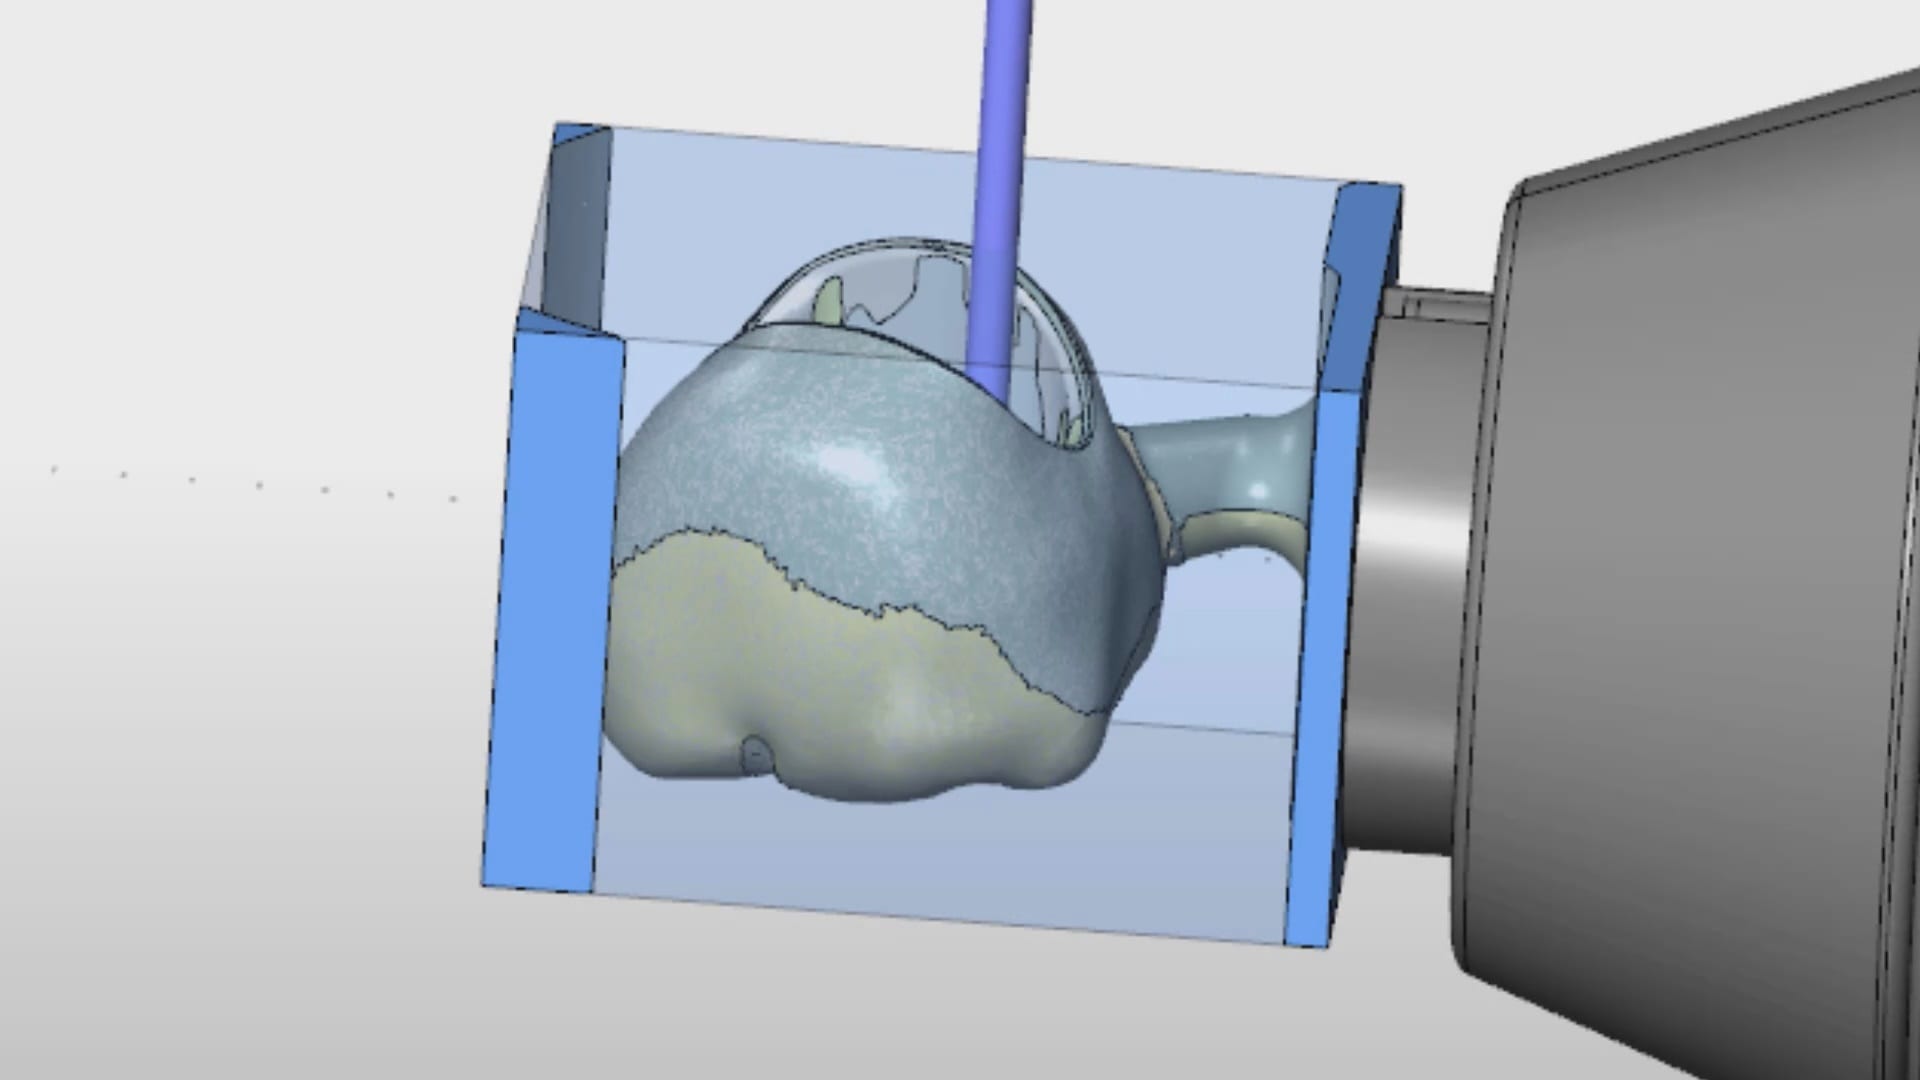
The following videos illustrate how you can image a scanbody intra-orally and then design it in cad software. Here we used exocad to identify the biomax RP implant and designed both the custom titanium abutment and the suprastructure, both of which were milled with the CORiTEC ONE
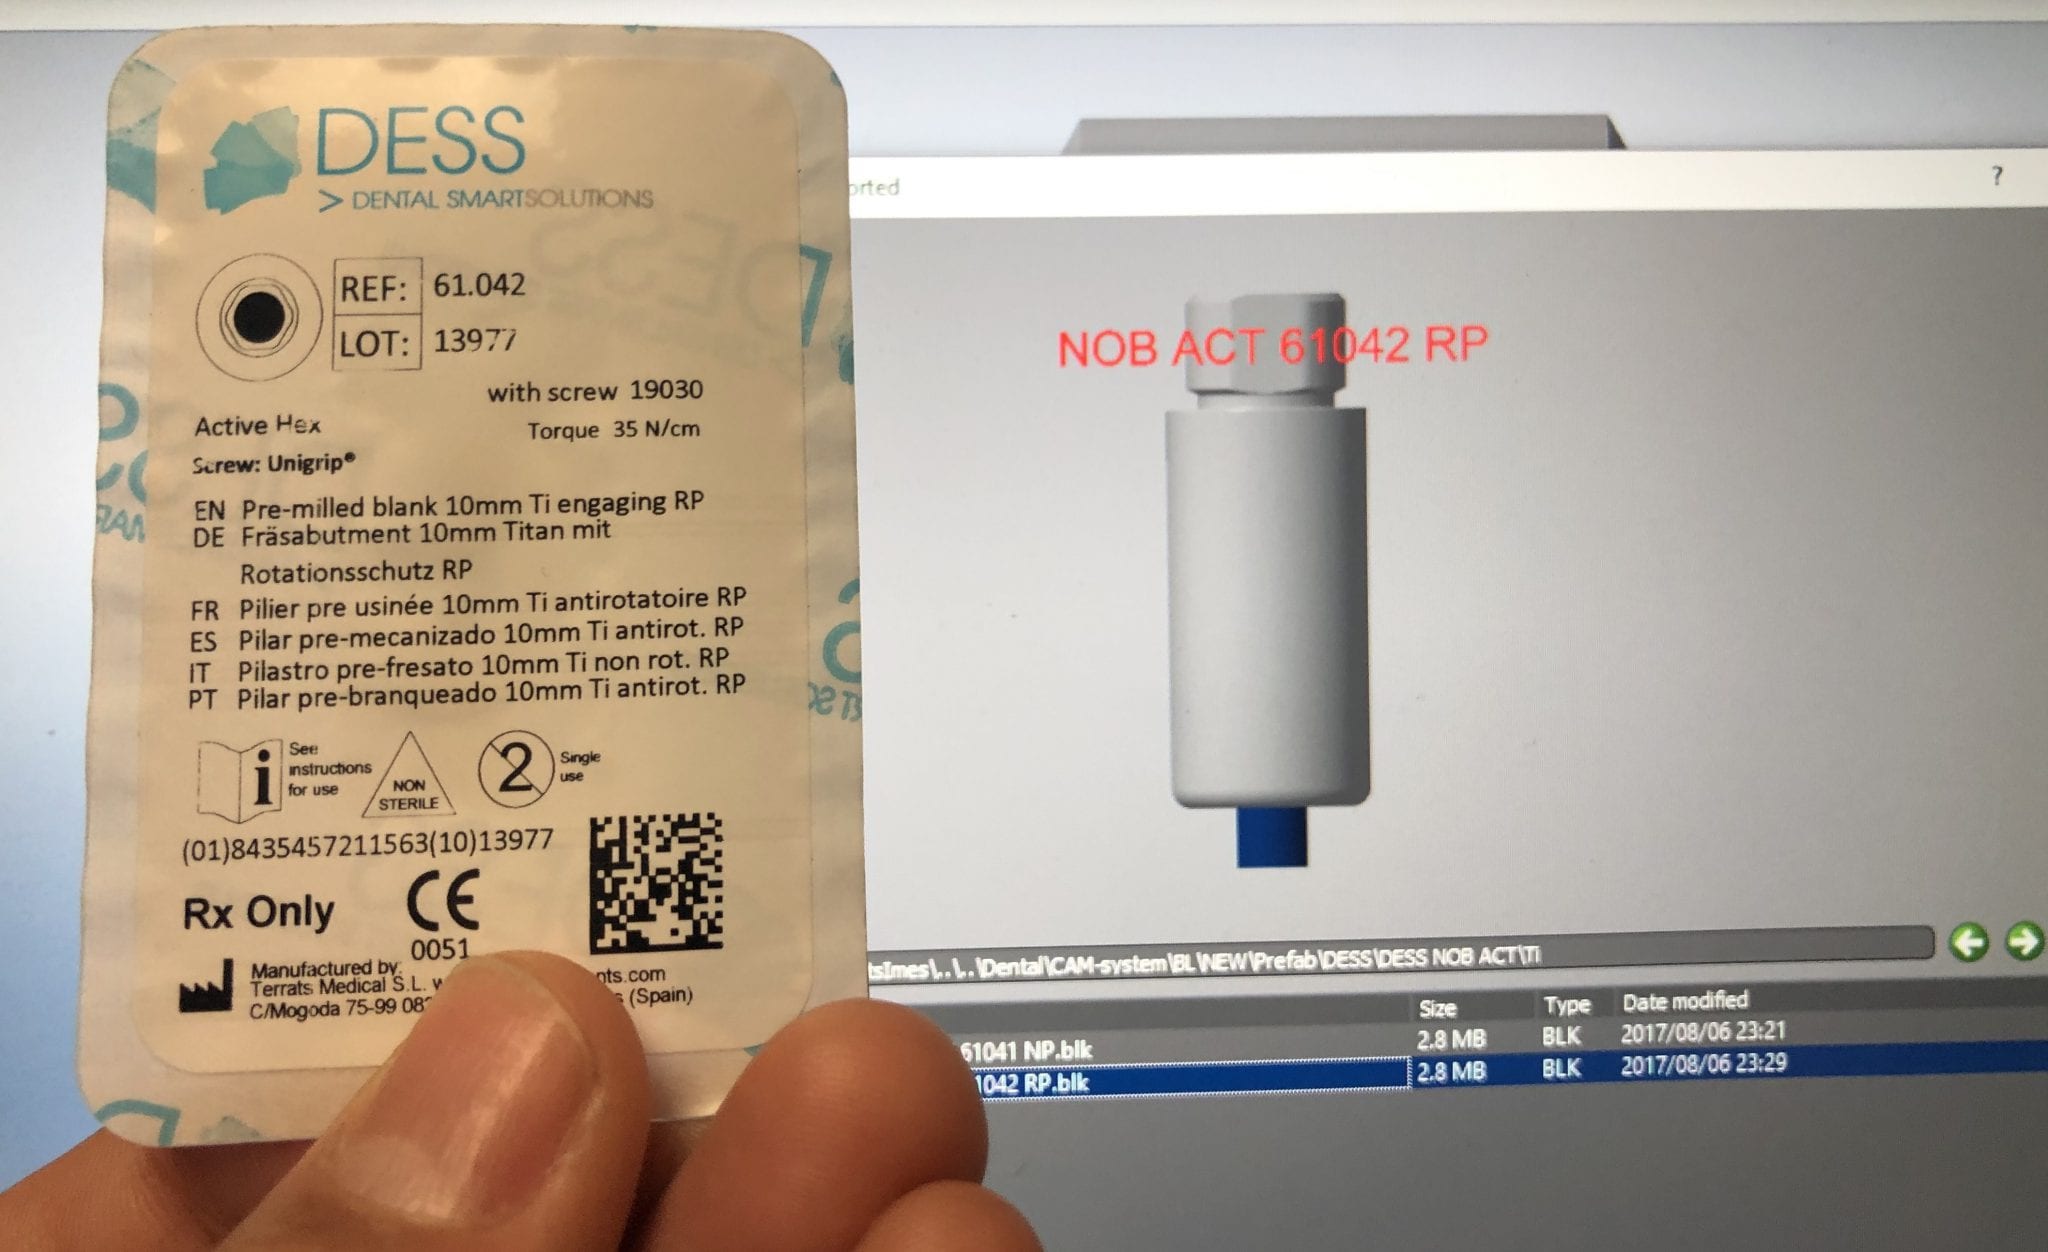
There are so many implant and component libraries in cad/cam dentistry which can lead to a lot of confusion. What we highly recommend is that you visually compare the part numbers that you will be using with the part numbers displayed on the millbox software. One letter or number difference and the mistakes will have a profound impact on the bottom line of a dental practice
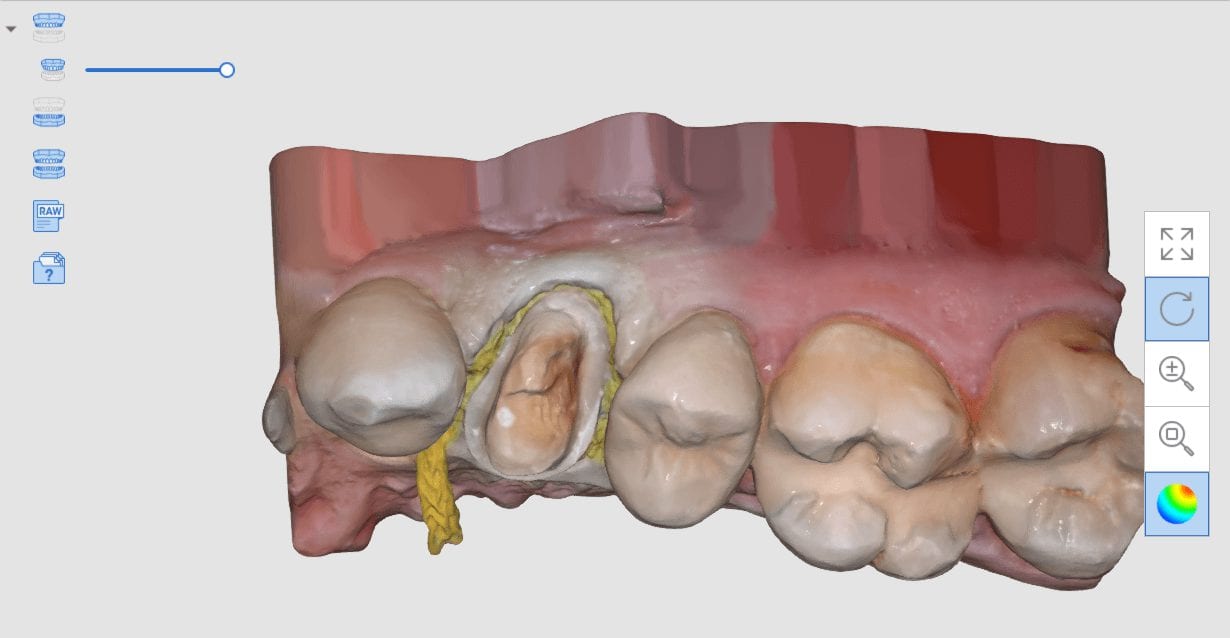
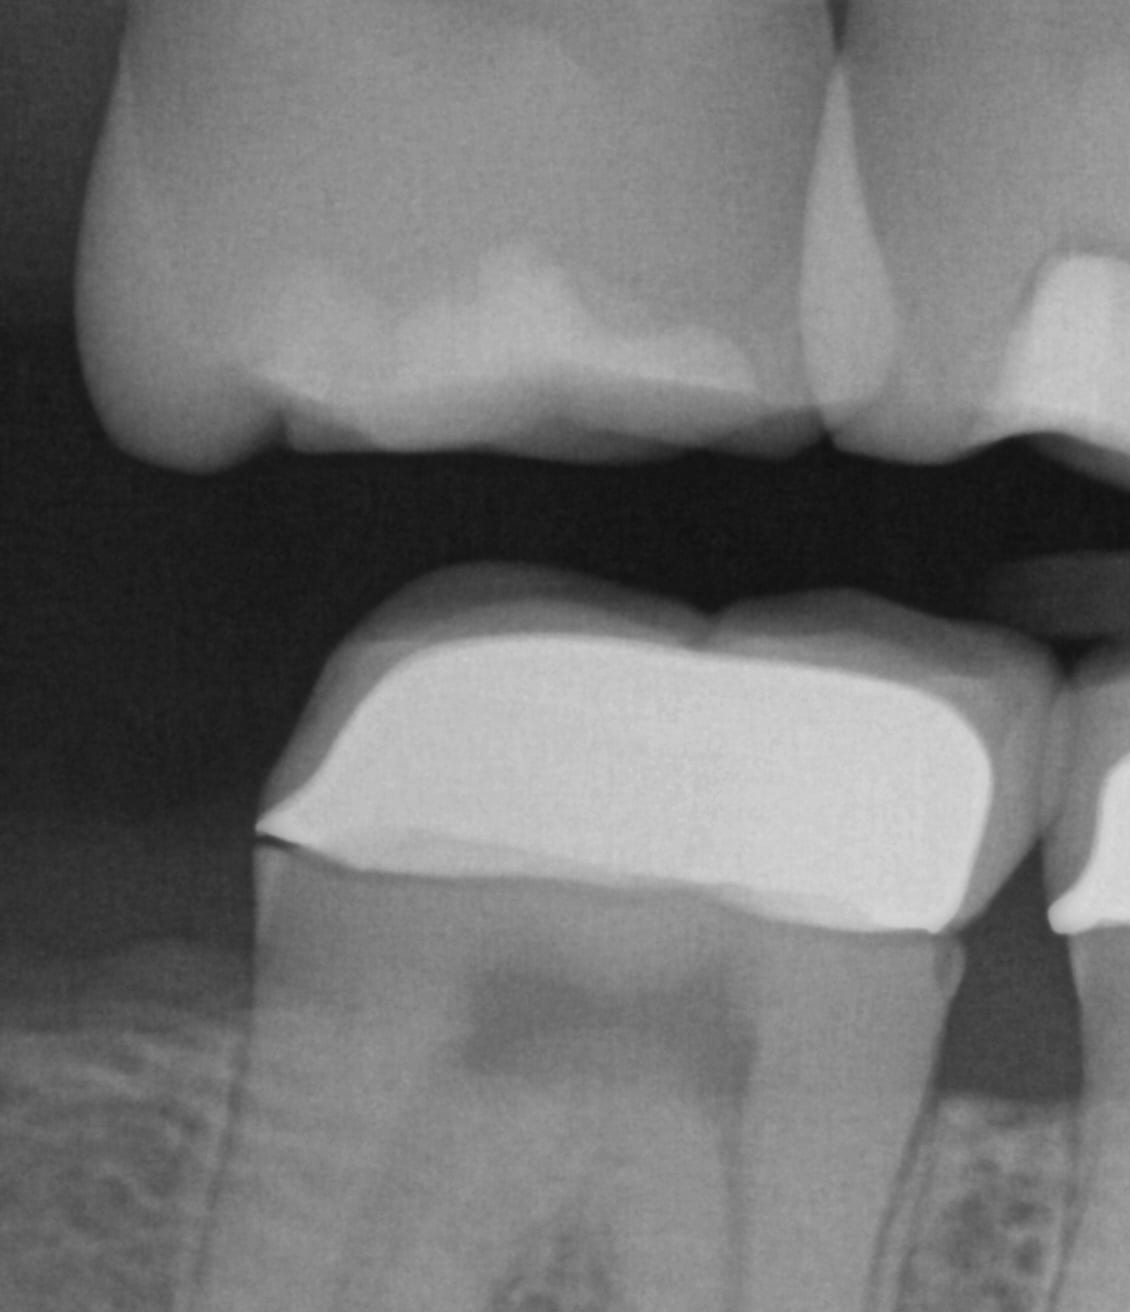
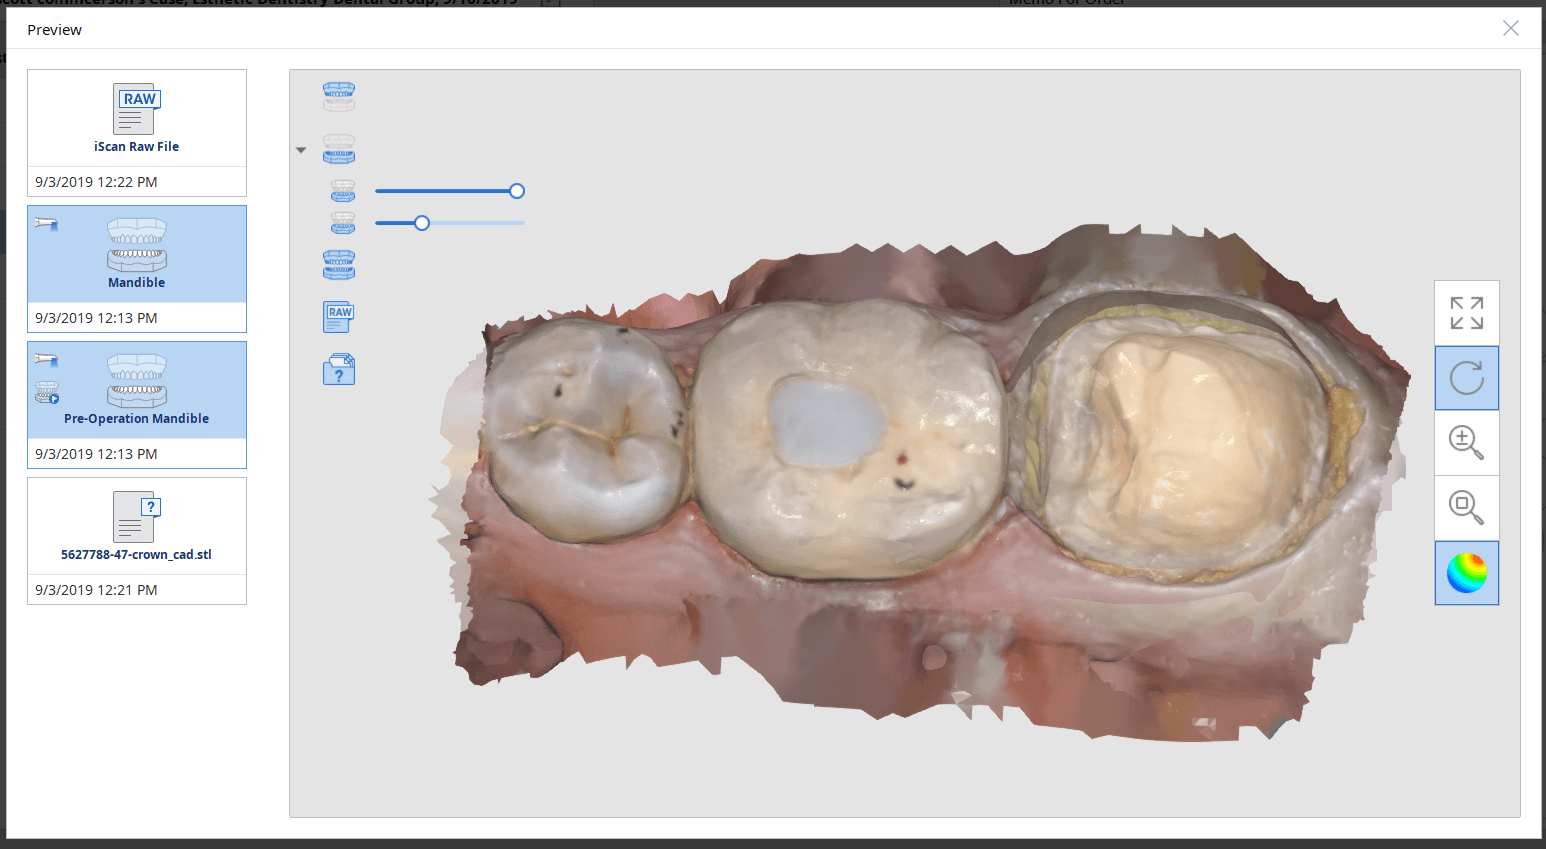
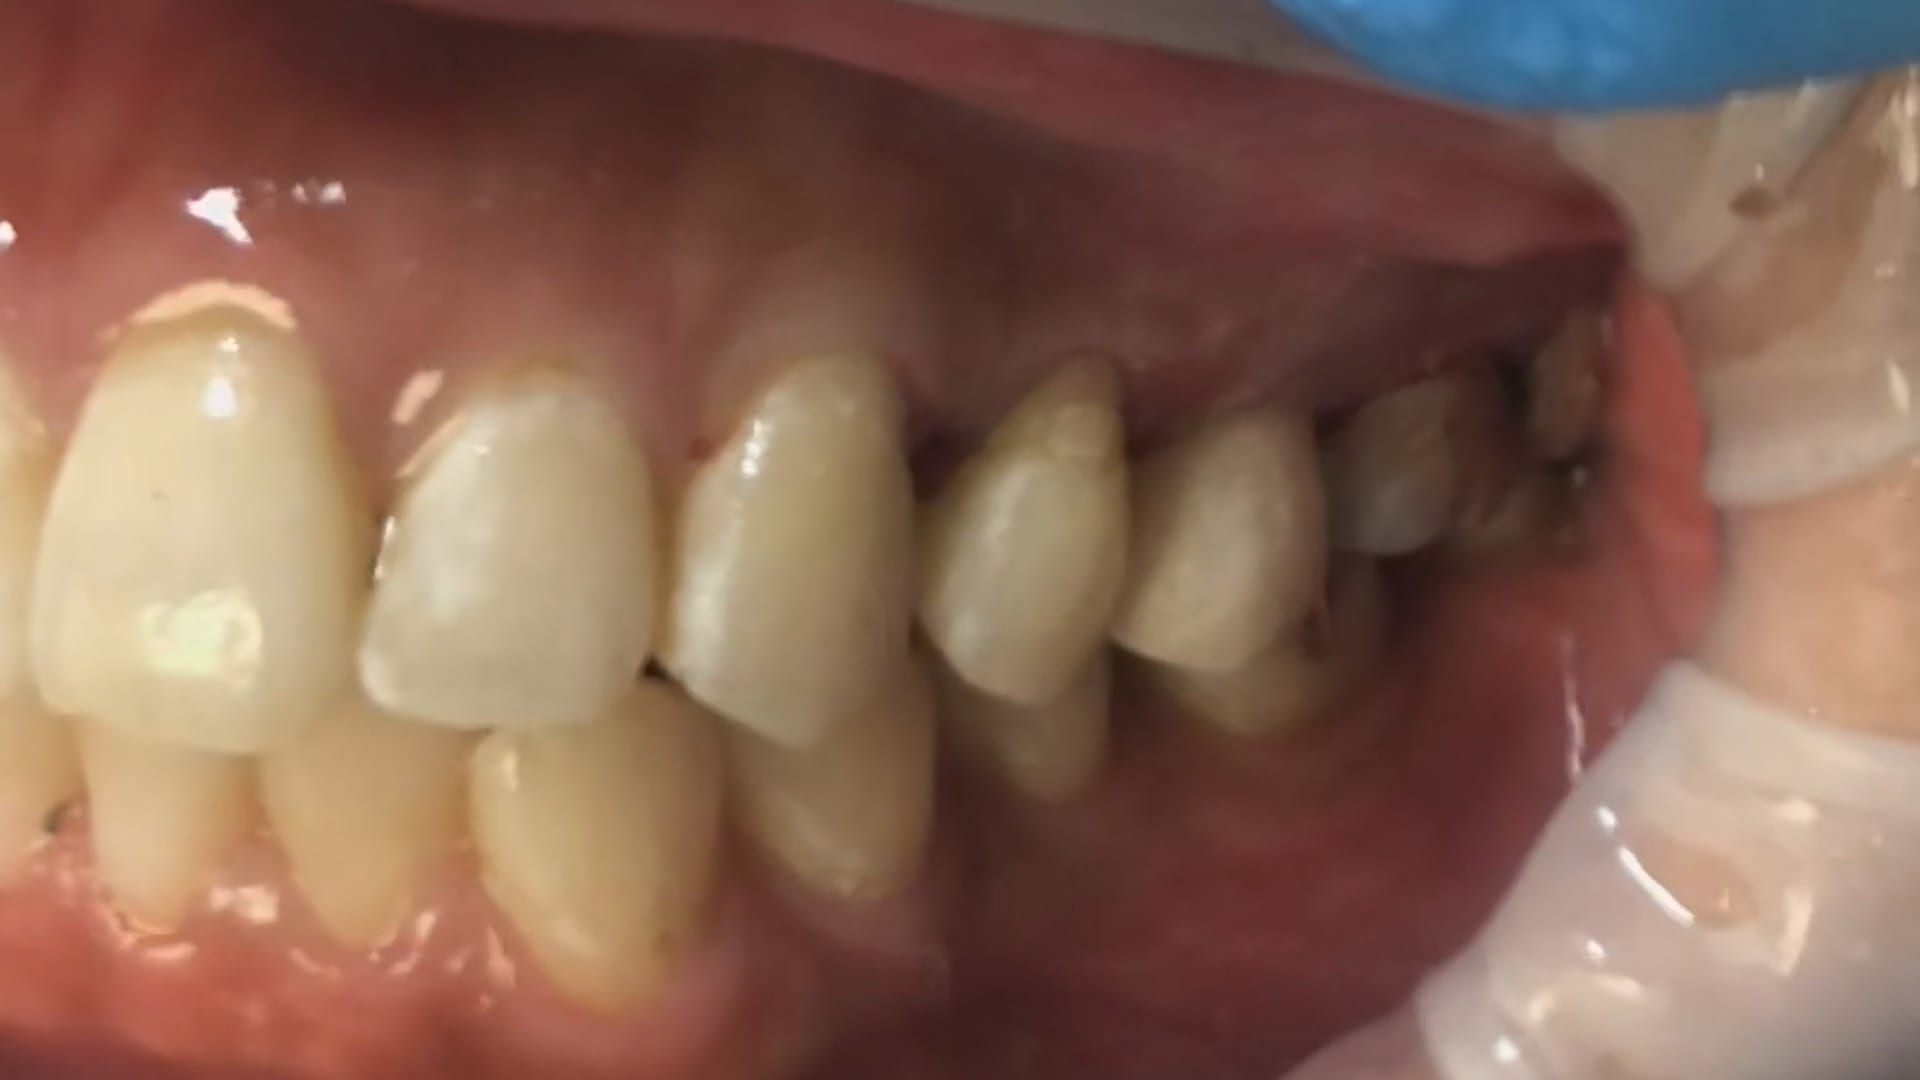
In this case presentation, we feature a crown that needs to be replaced due to open margins and recurrent decay.
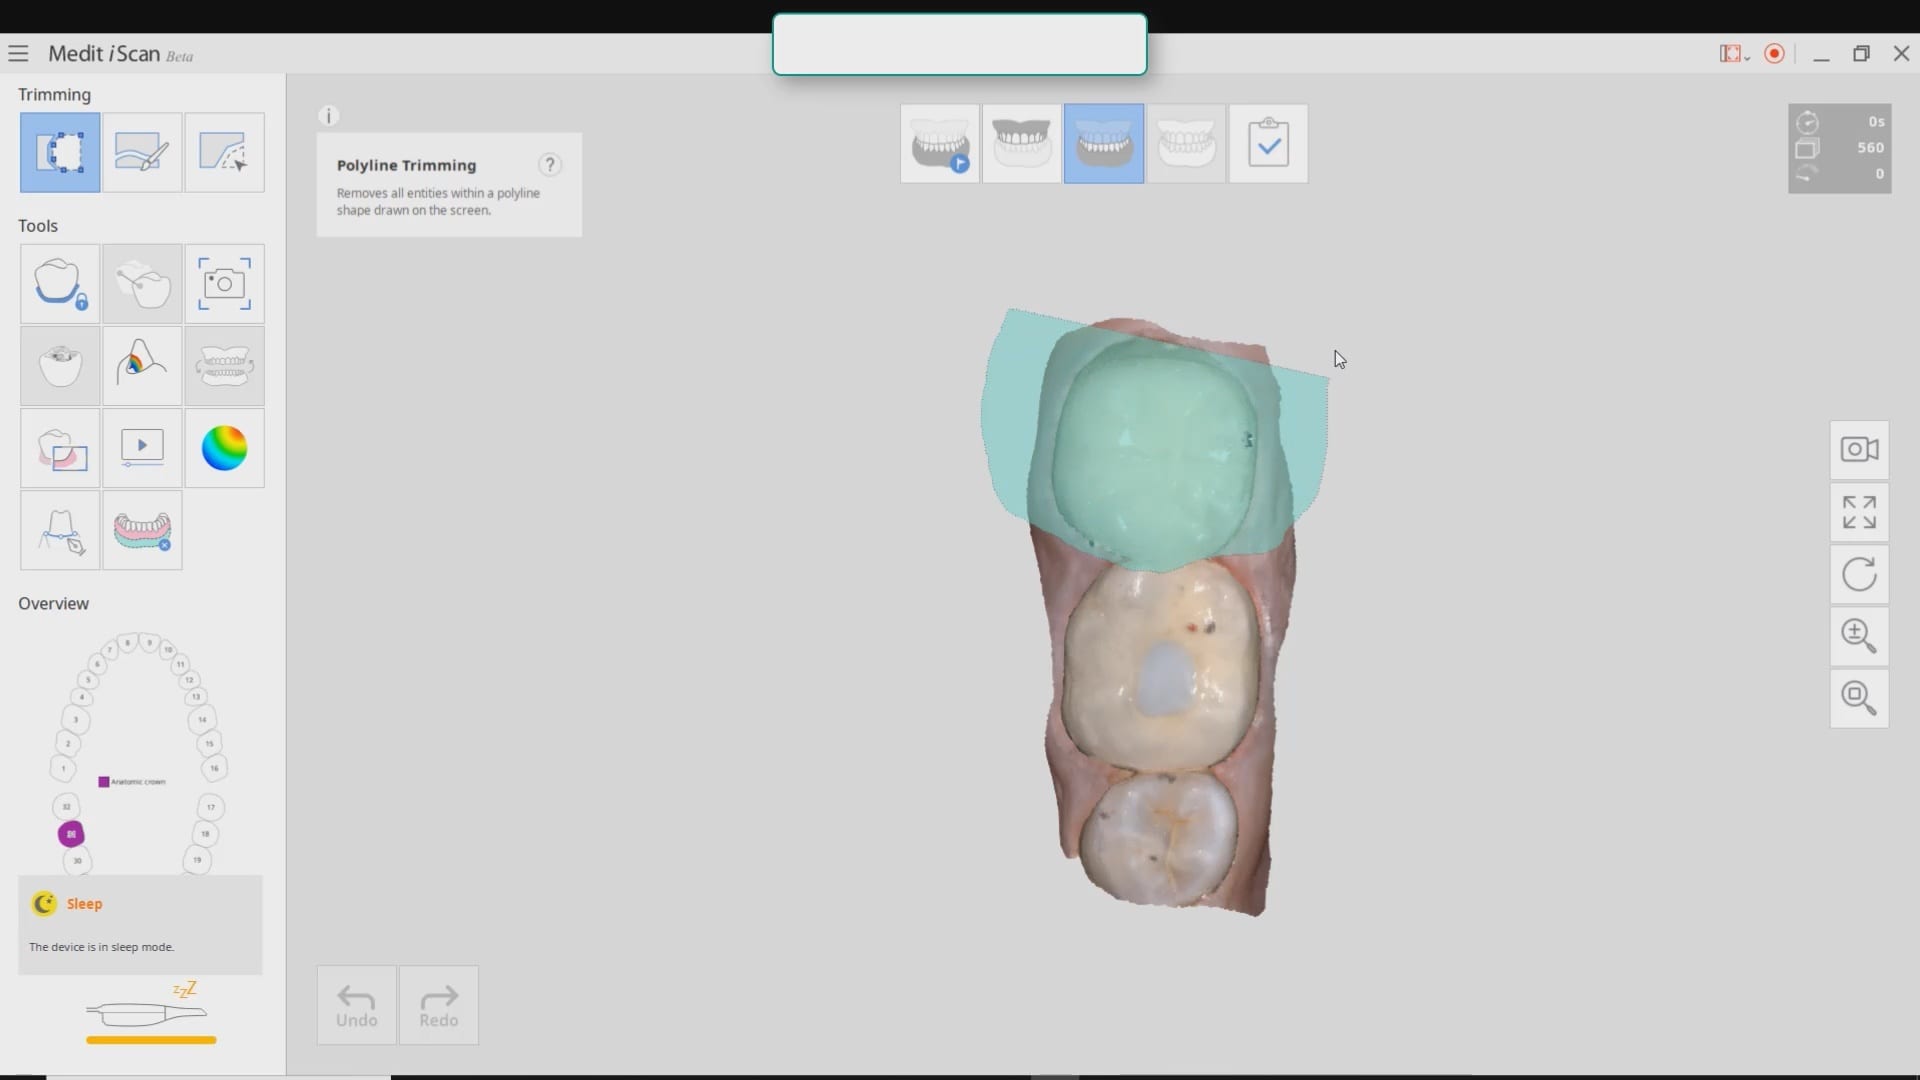
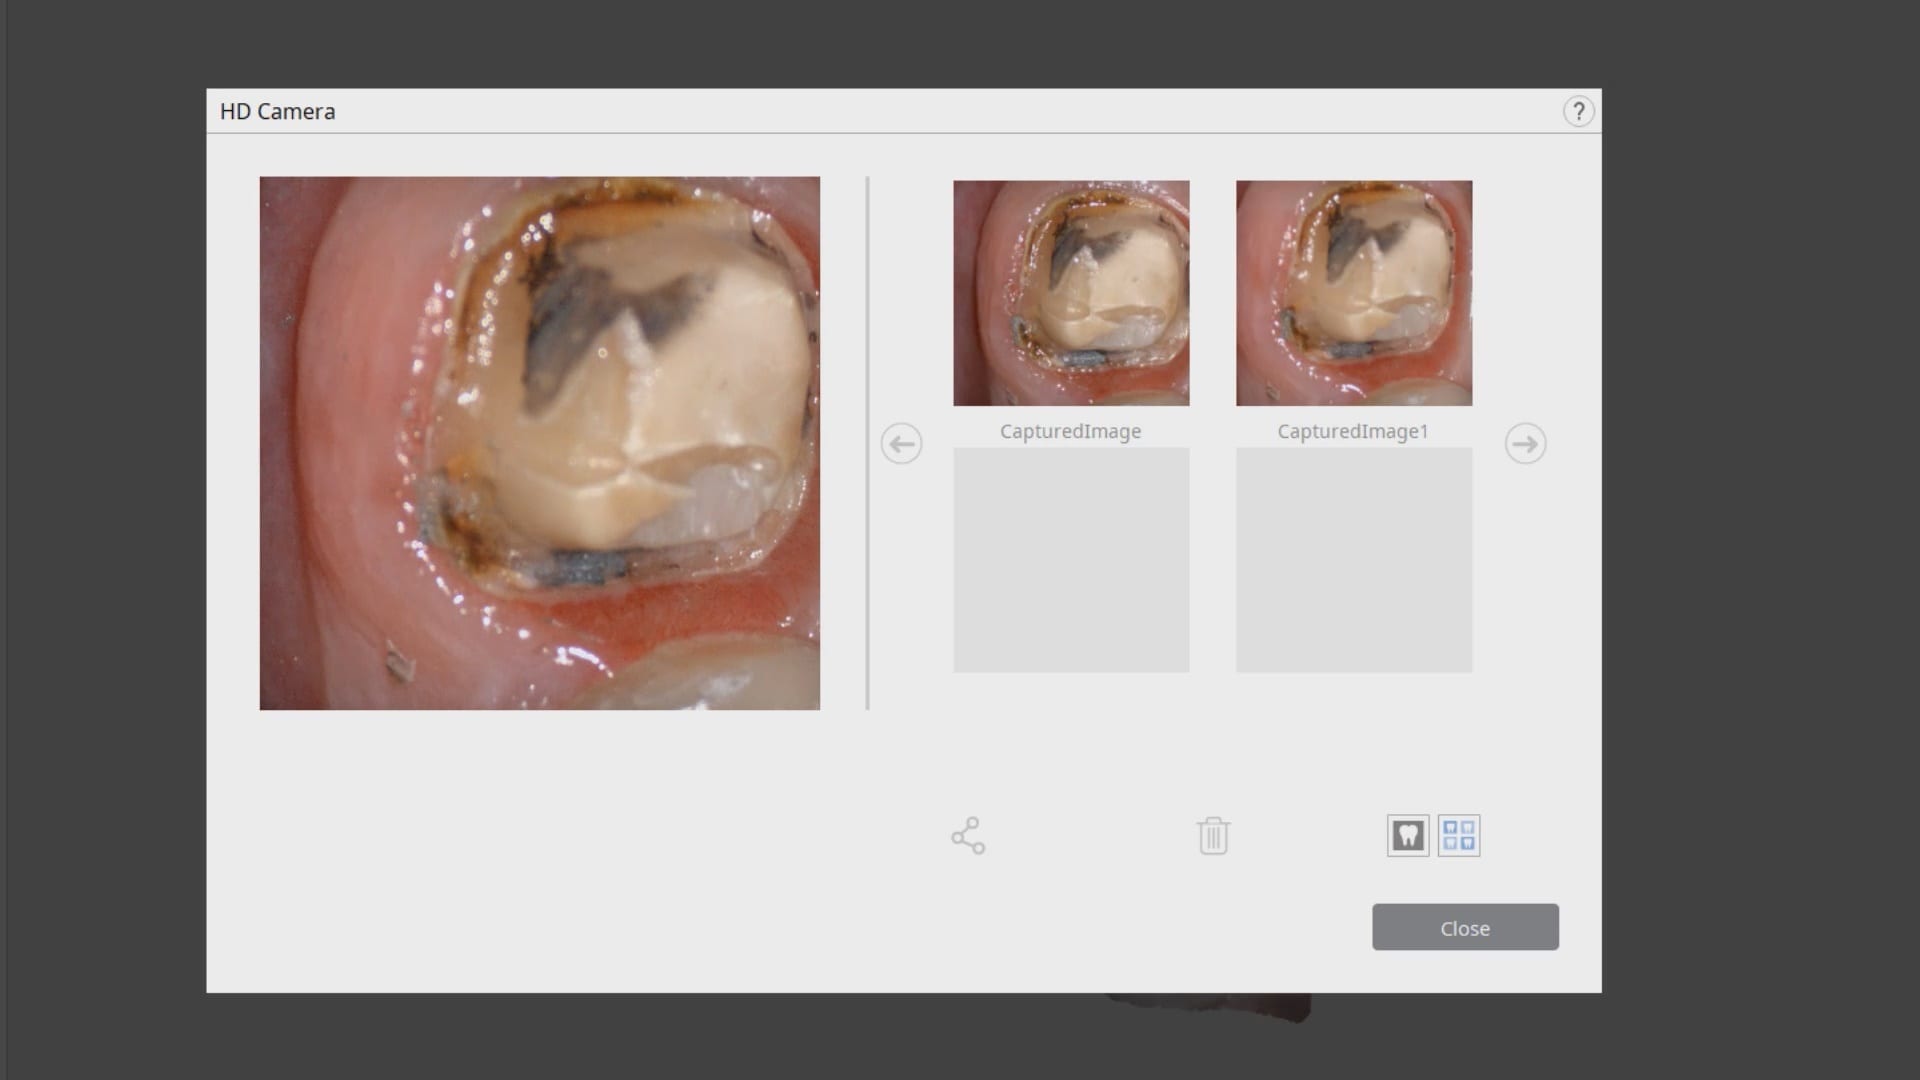
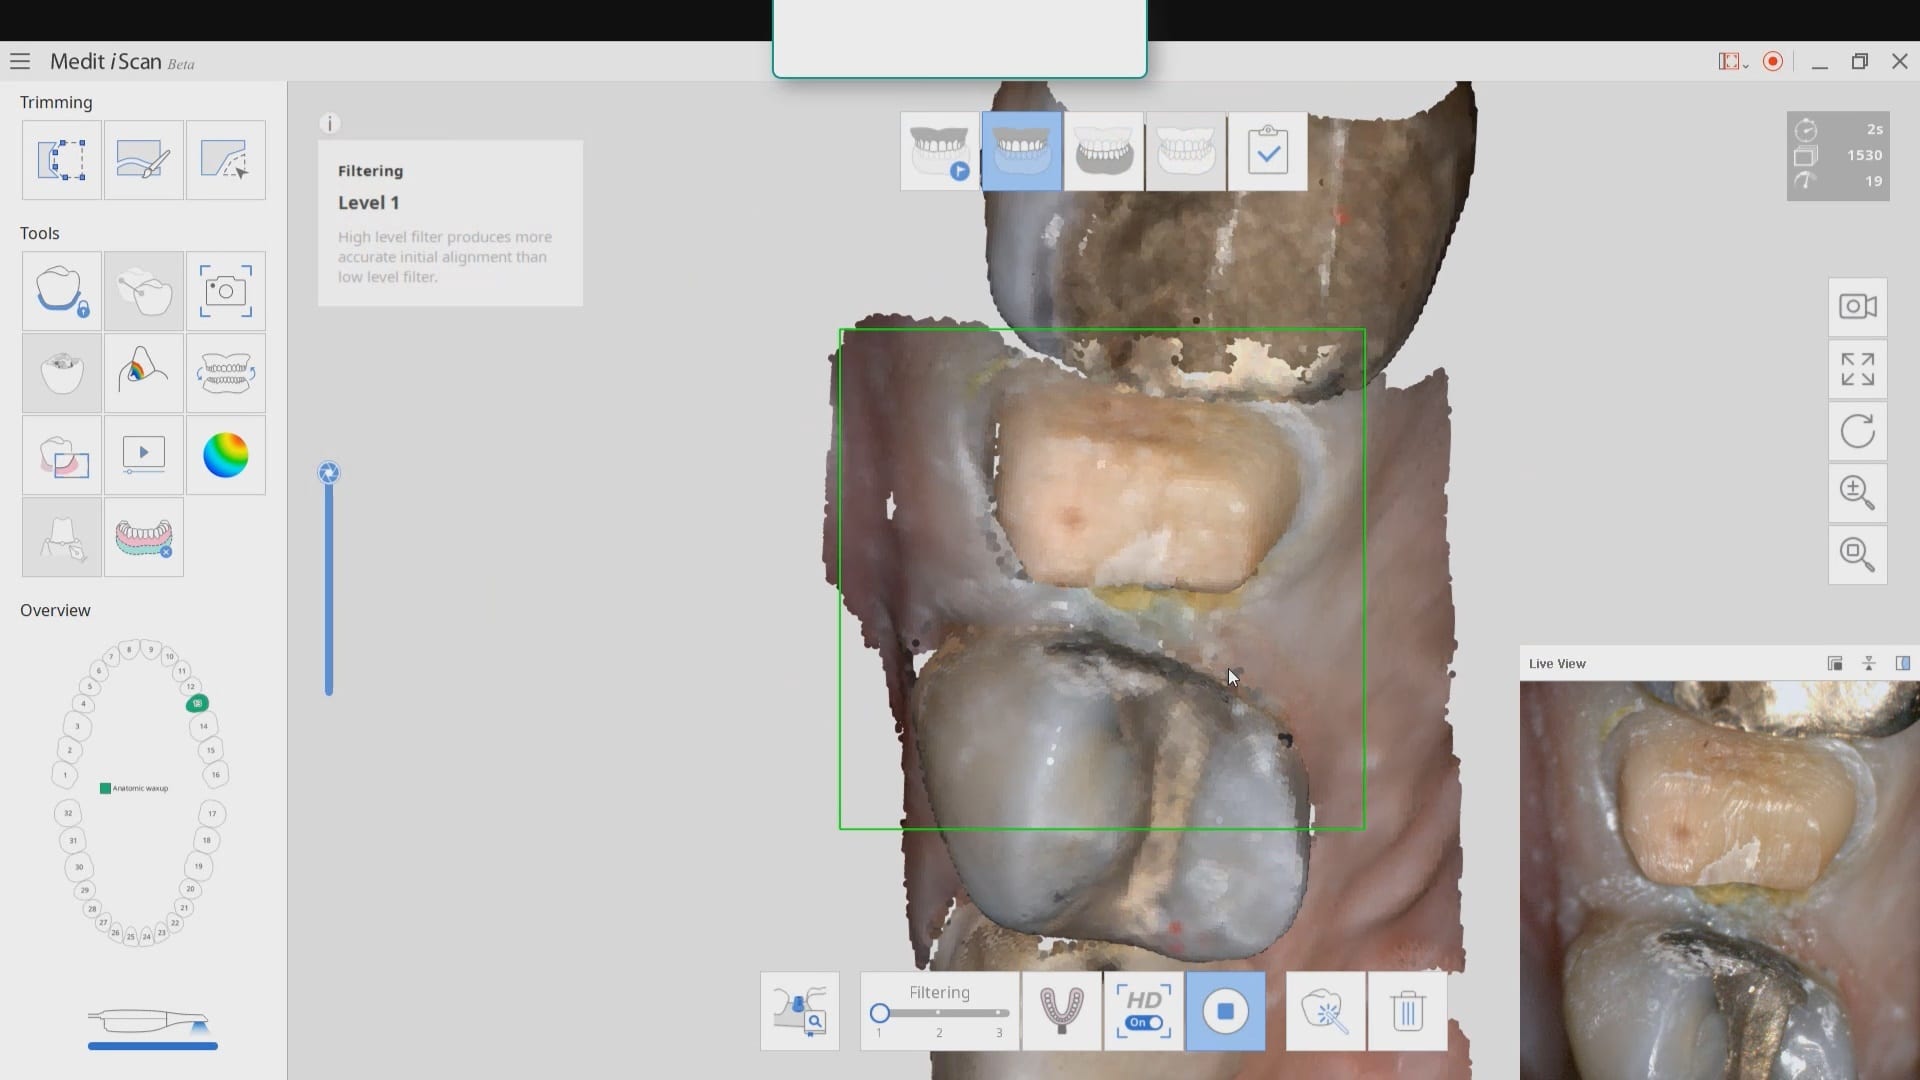
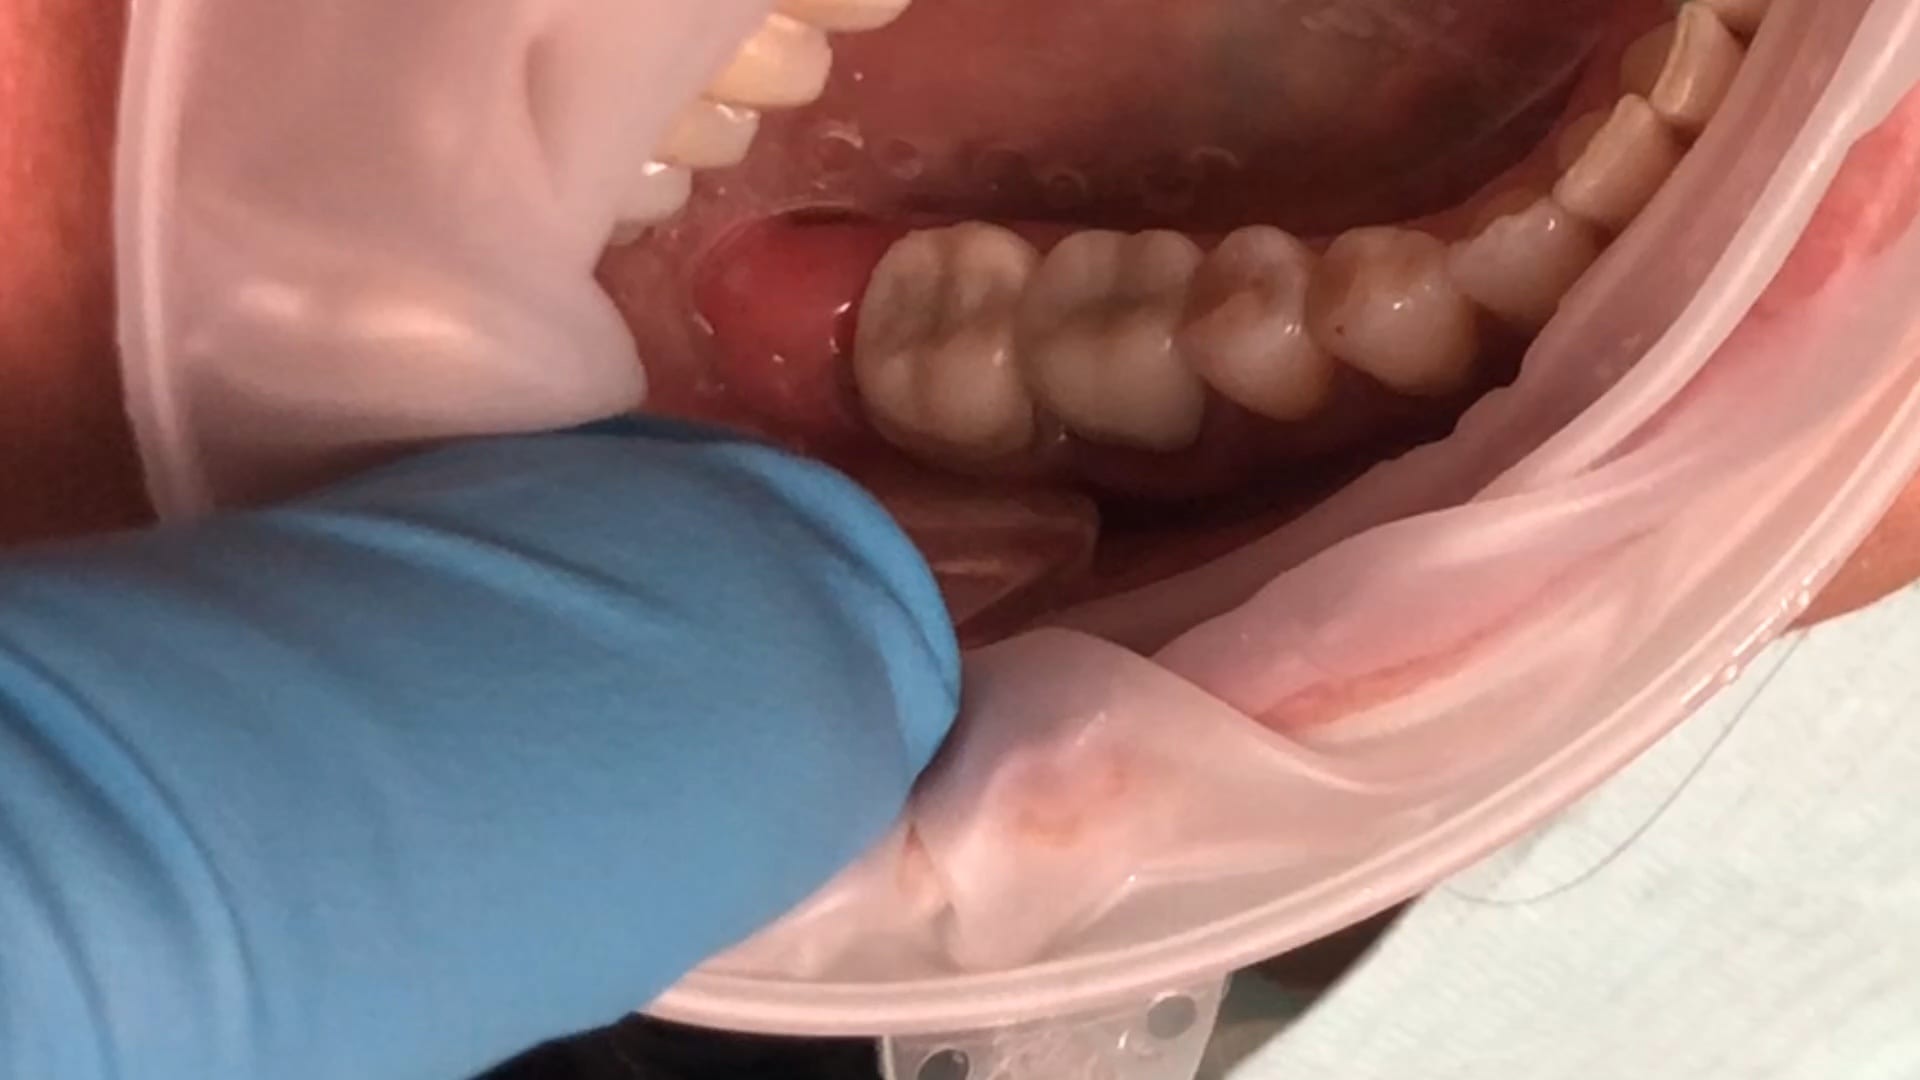
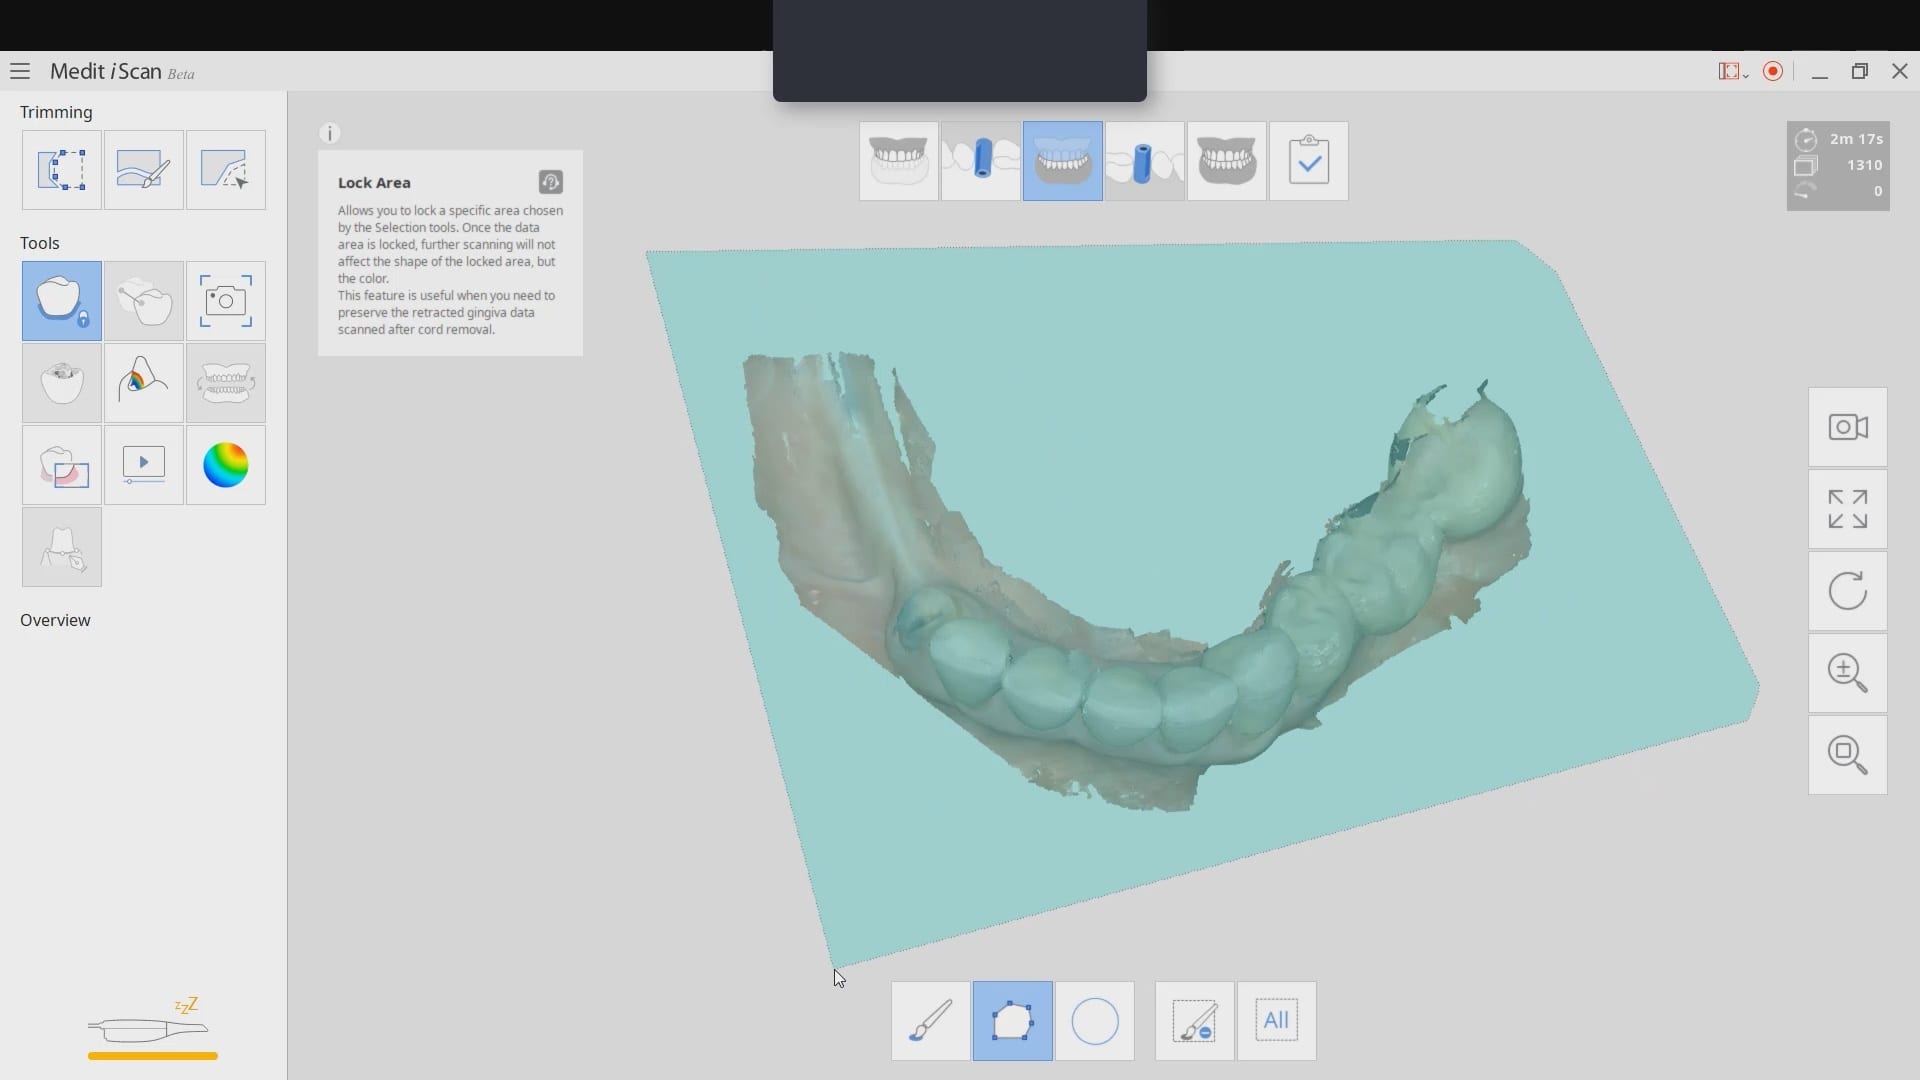
With the Medit i500, after the patient is anesthetized and the area is isolated, the pre-existing crown is imaged in the pre-op catalog box. The area to be prepared is cropped out in anticipation of the imaging the modified preparation.
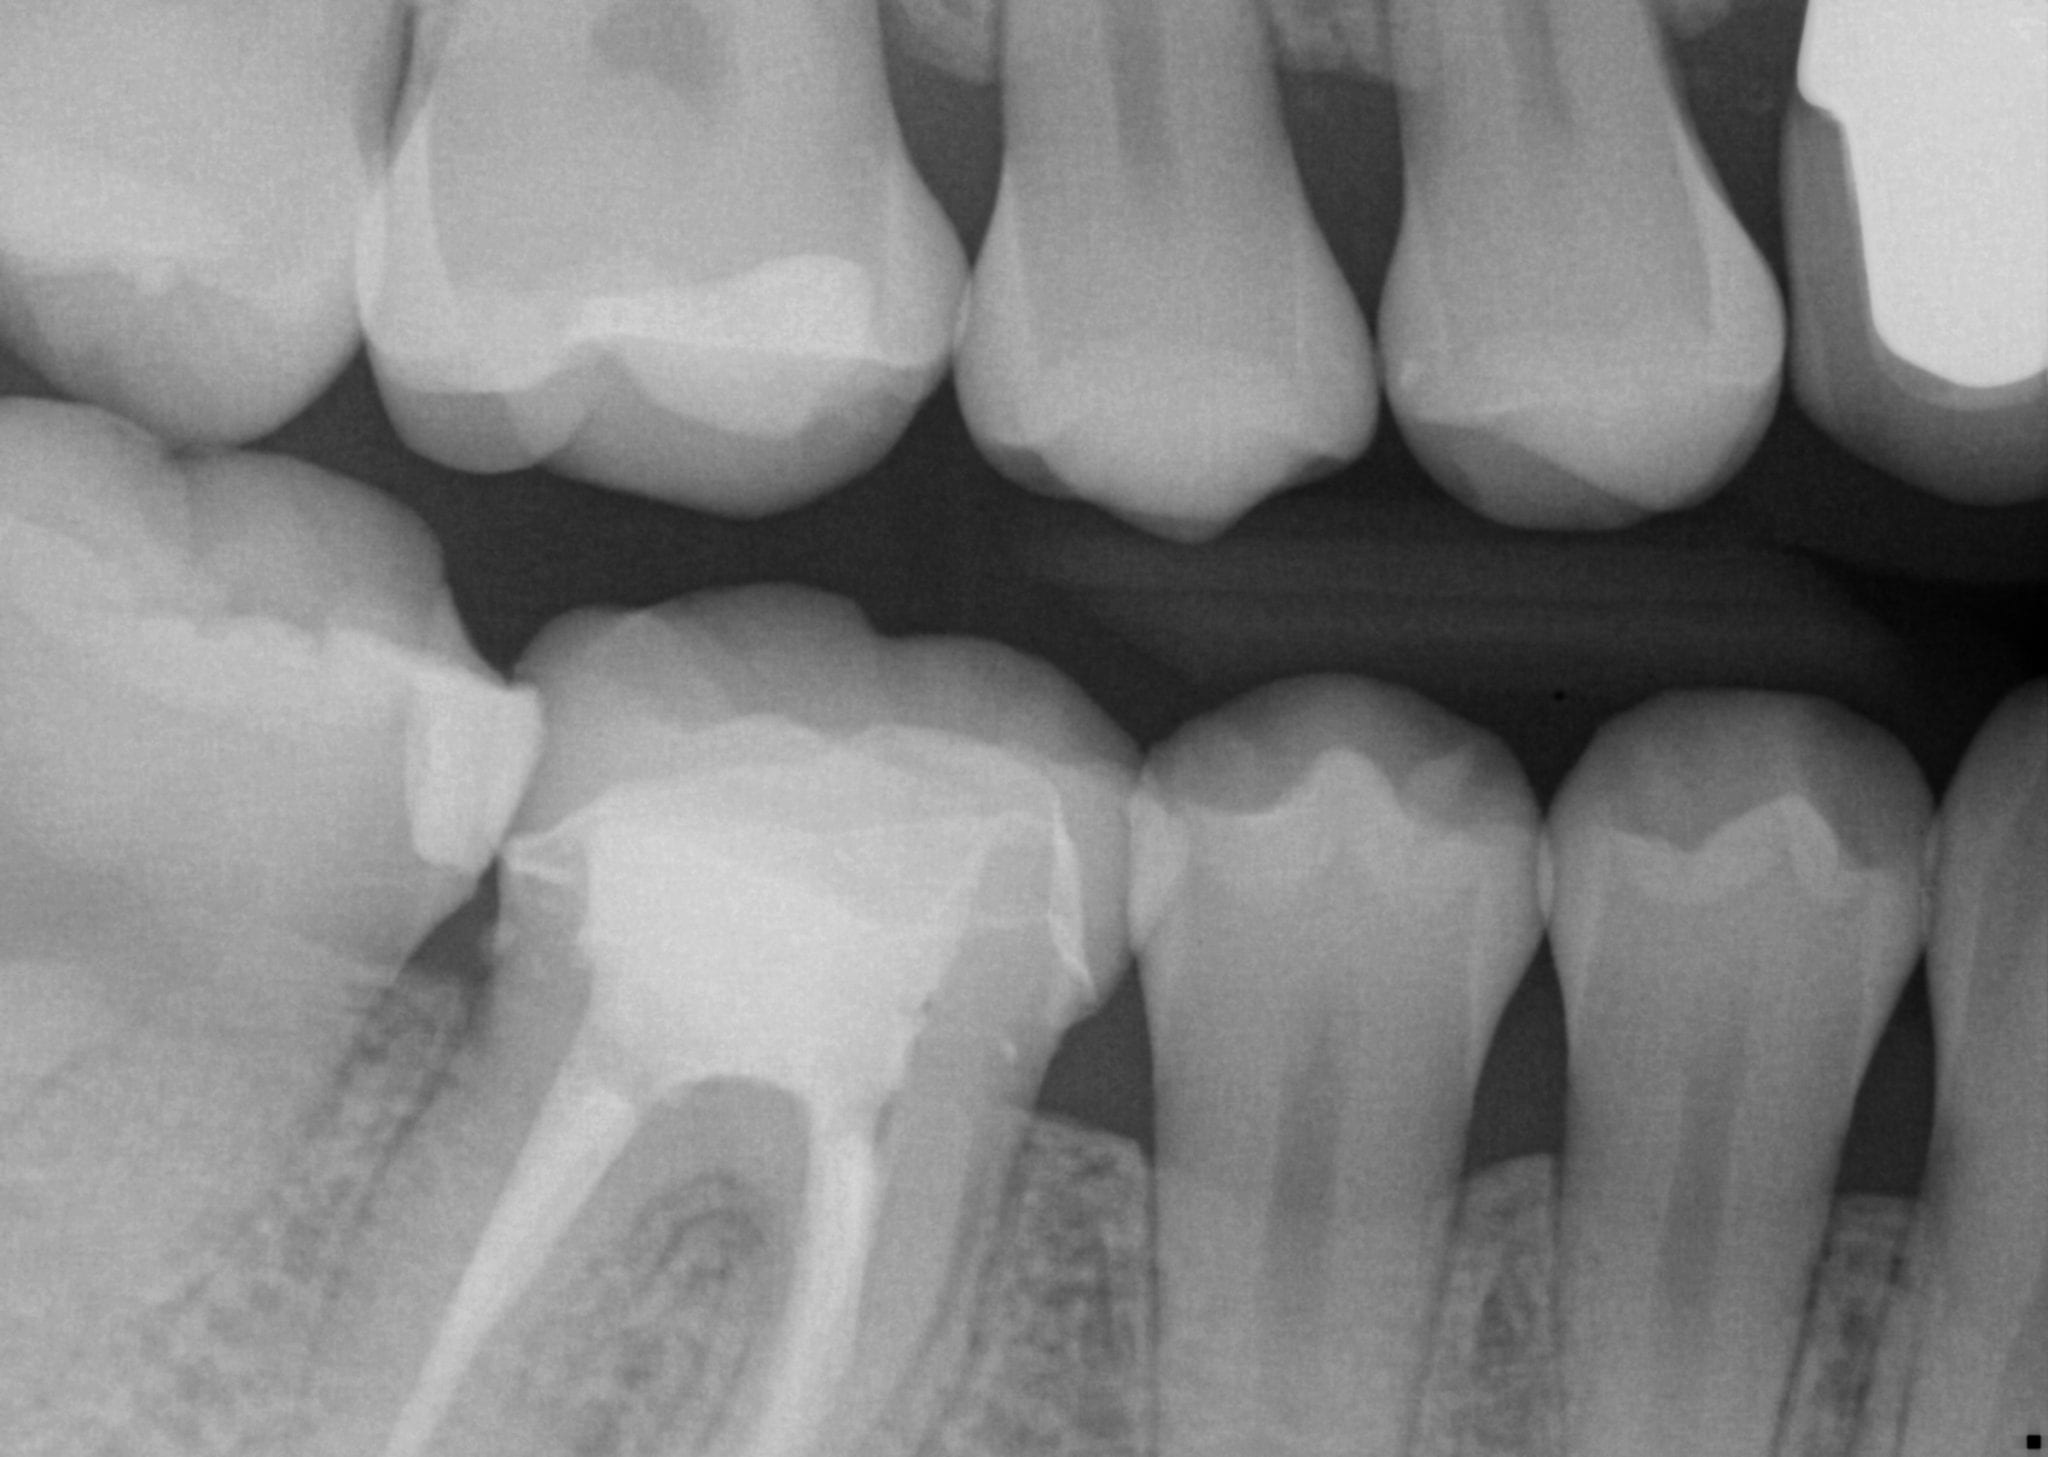
Once the crown is removed, expasyl is packed into the sulcus with a Number 2 cord. With the pre-op bitewings X-ray it was readily apparent that the tissue should be positively displaced in order to capture the margins. It took two layers of cord to achieve hemostasis for imaging with the Medit i500.
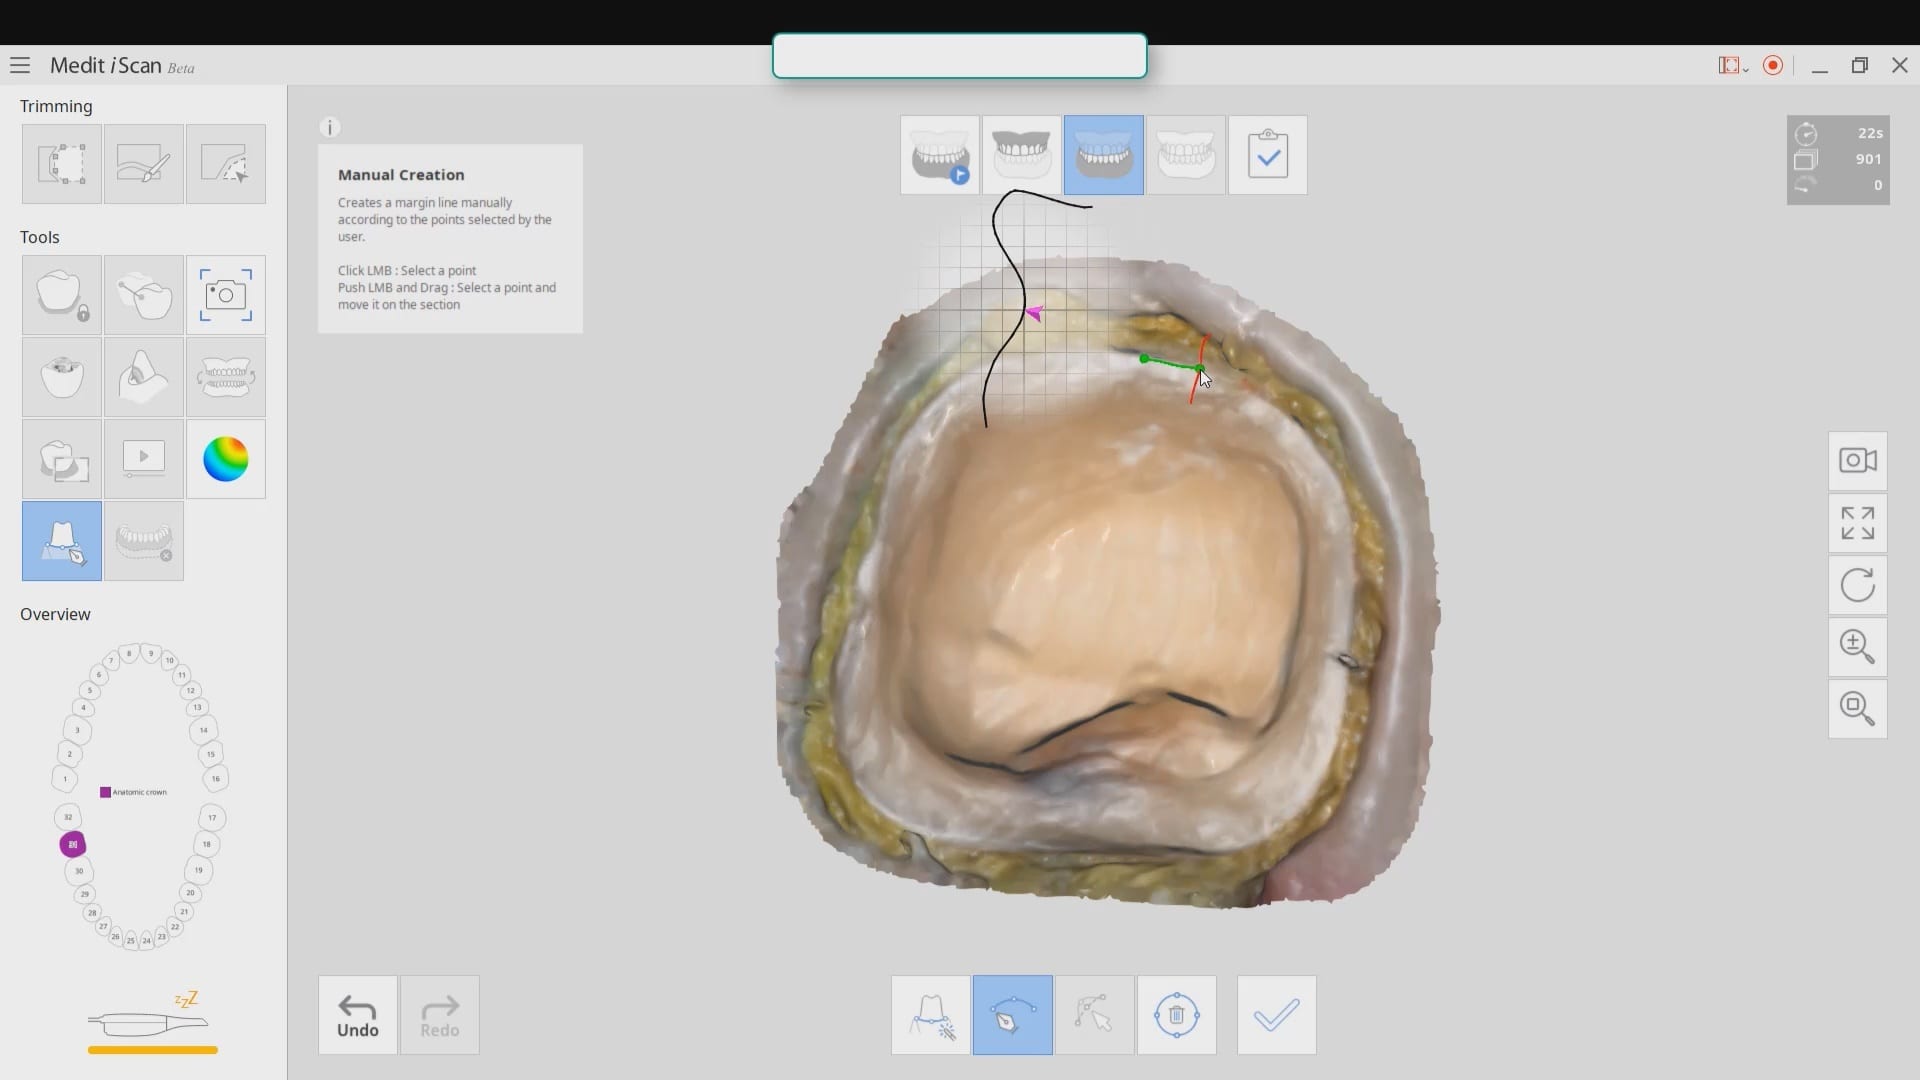
While placing the margin in the native imaging software, it was noted that some tissue was obscuring the margin on the lingual side. The area was isolated both clinically and in the software. It was cropped out and filled in with ‘good data’ after proper protection of the adjacent teeth and margins so that we did not obscure their geometry.
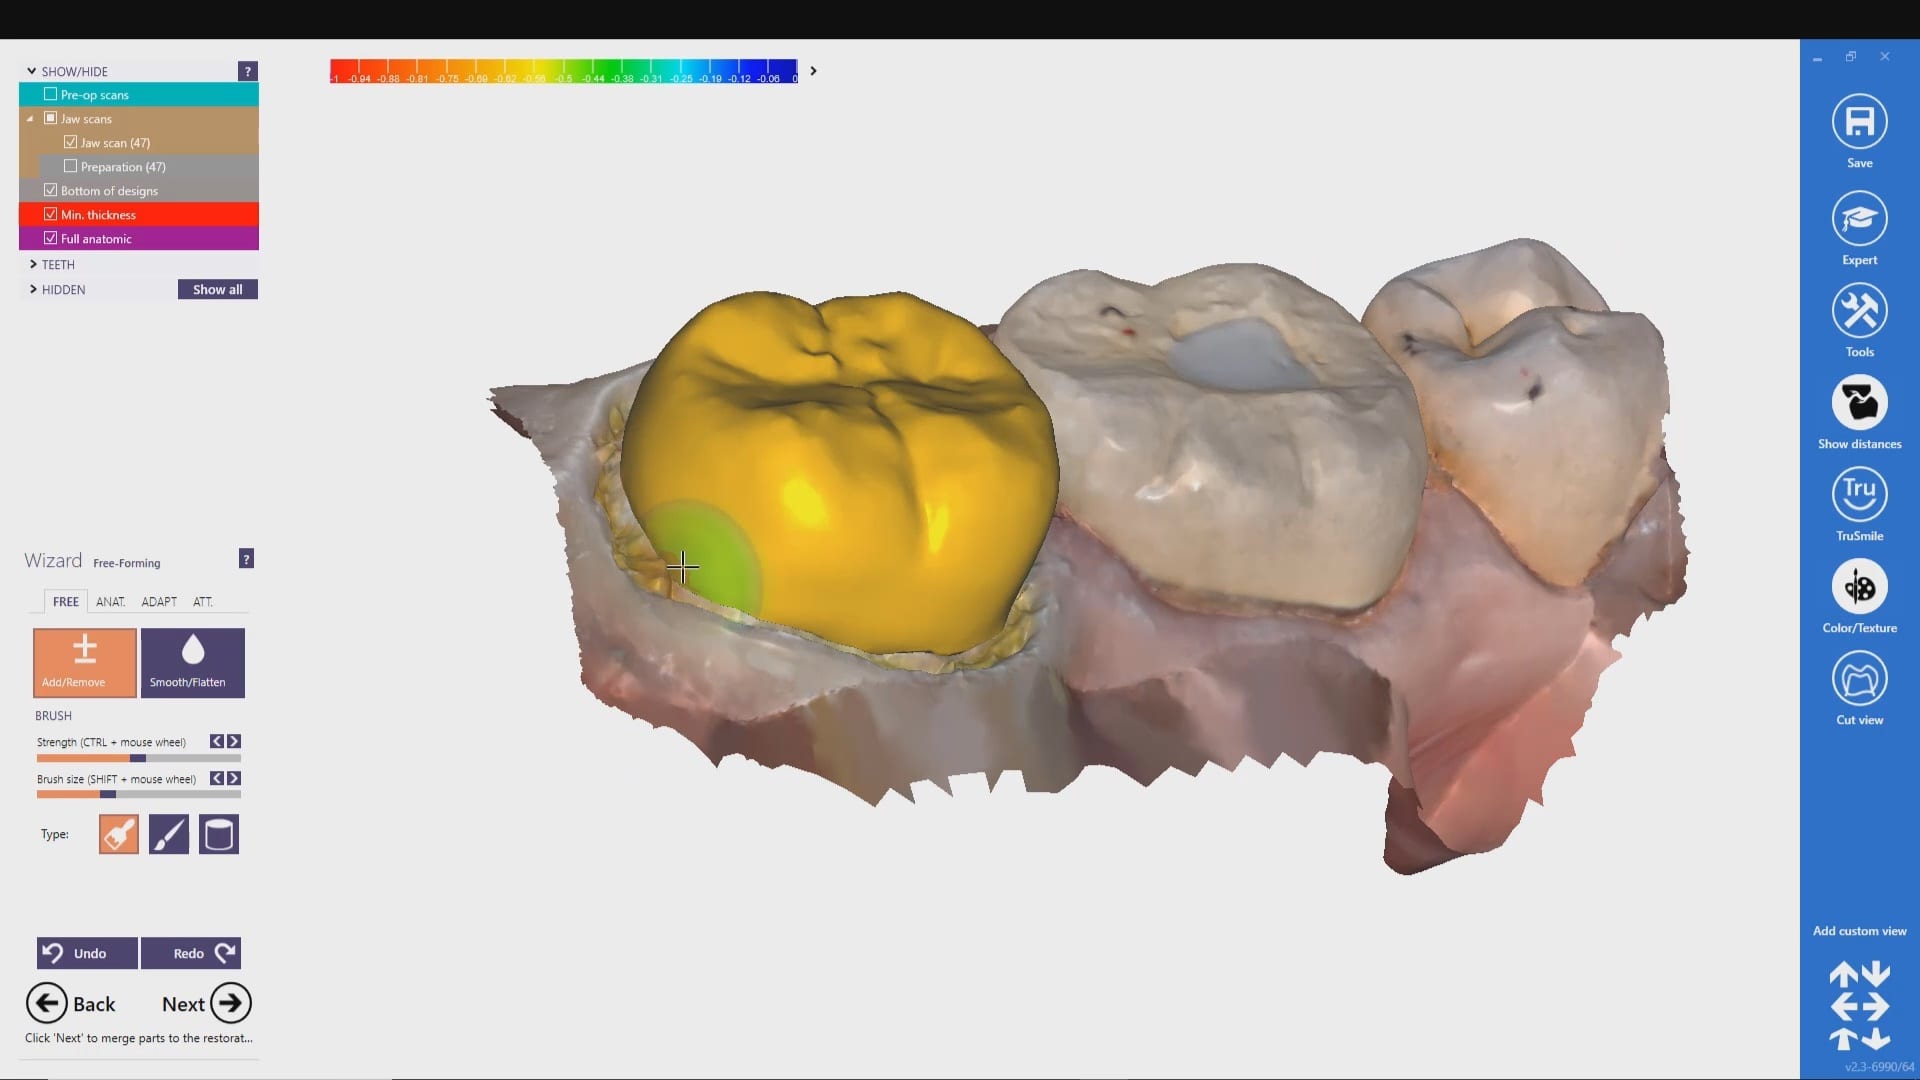
Once the margins are identified and the case is processed it is automatically imported into exocad for design and then sent to the Imes Icore CORiTEC Once for manufacturing. The emax restoration was tried in and then delivered after crystalization.
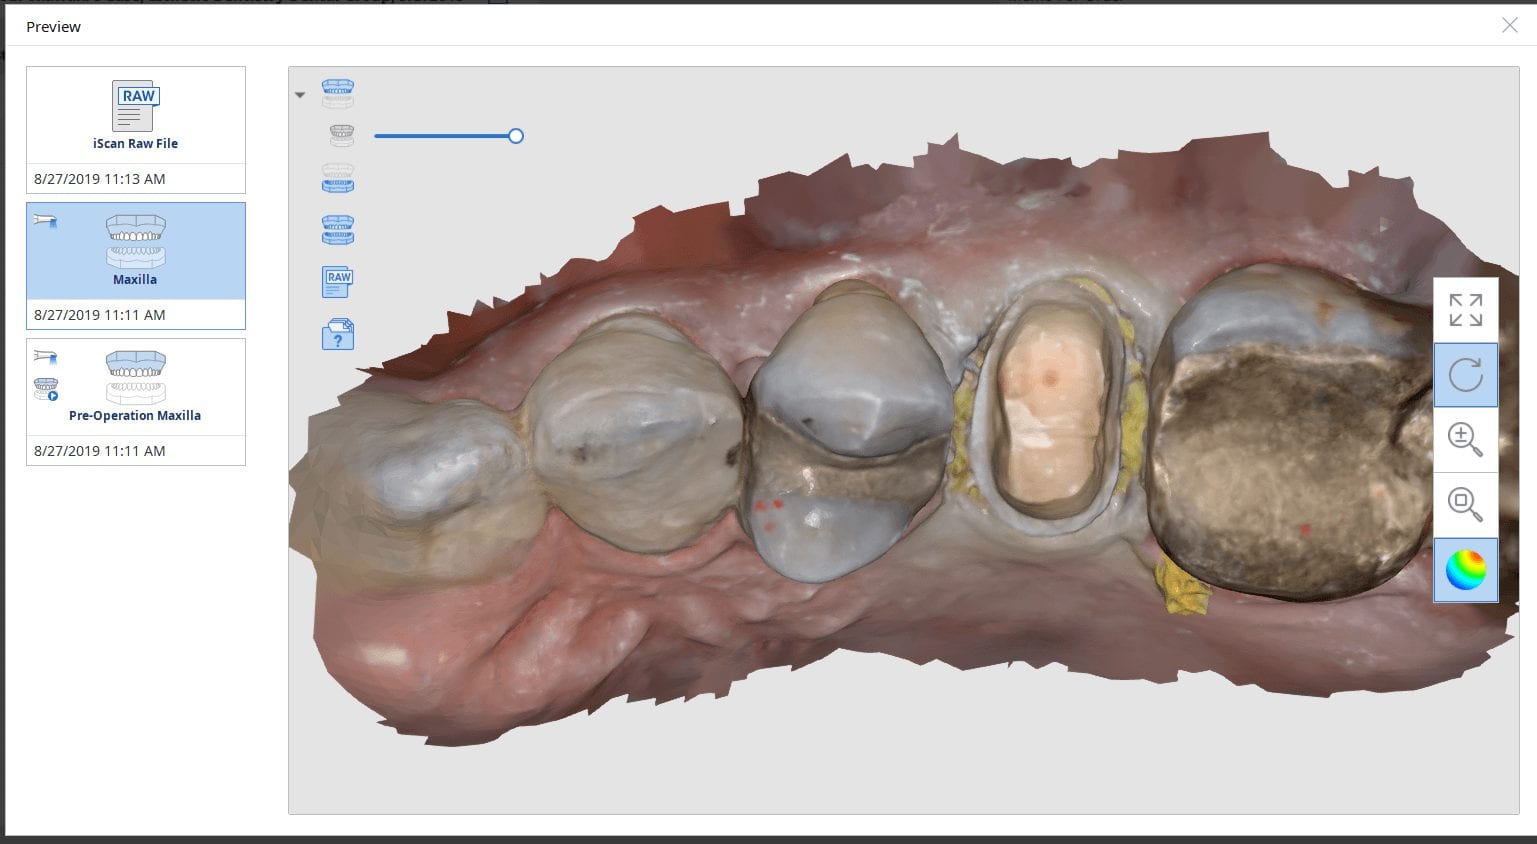
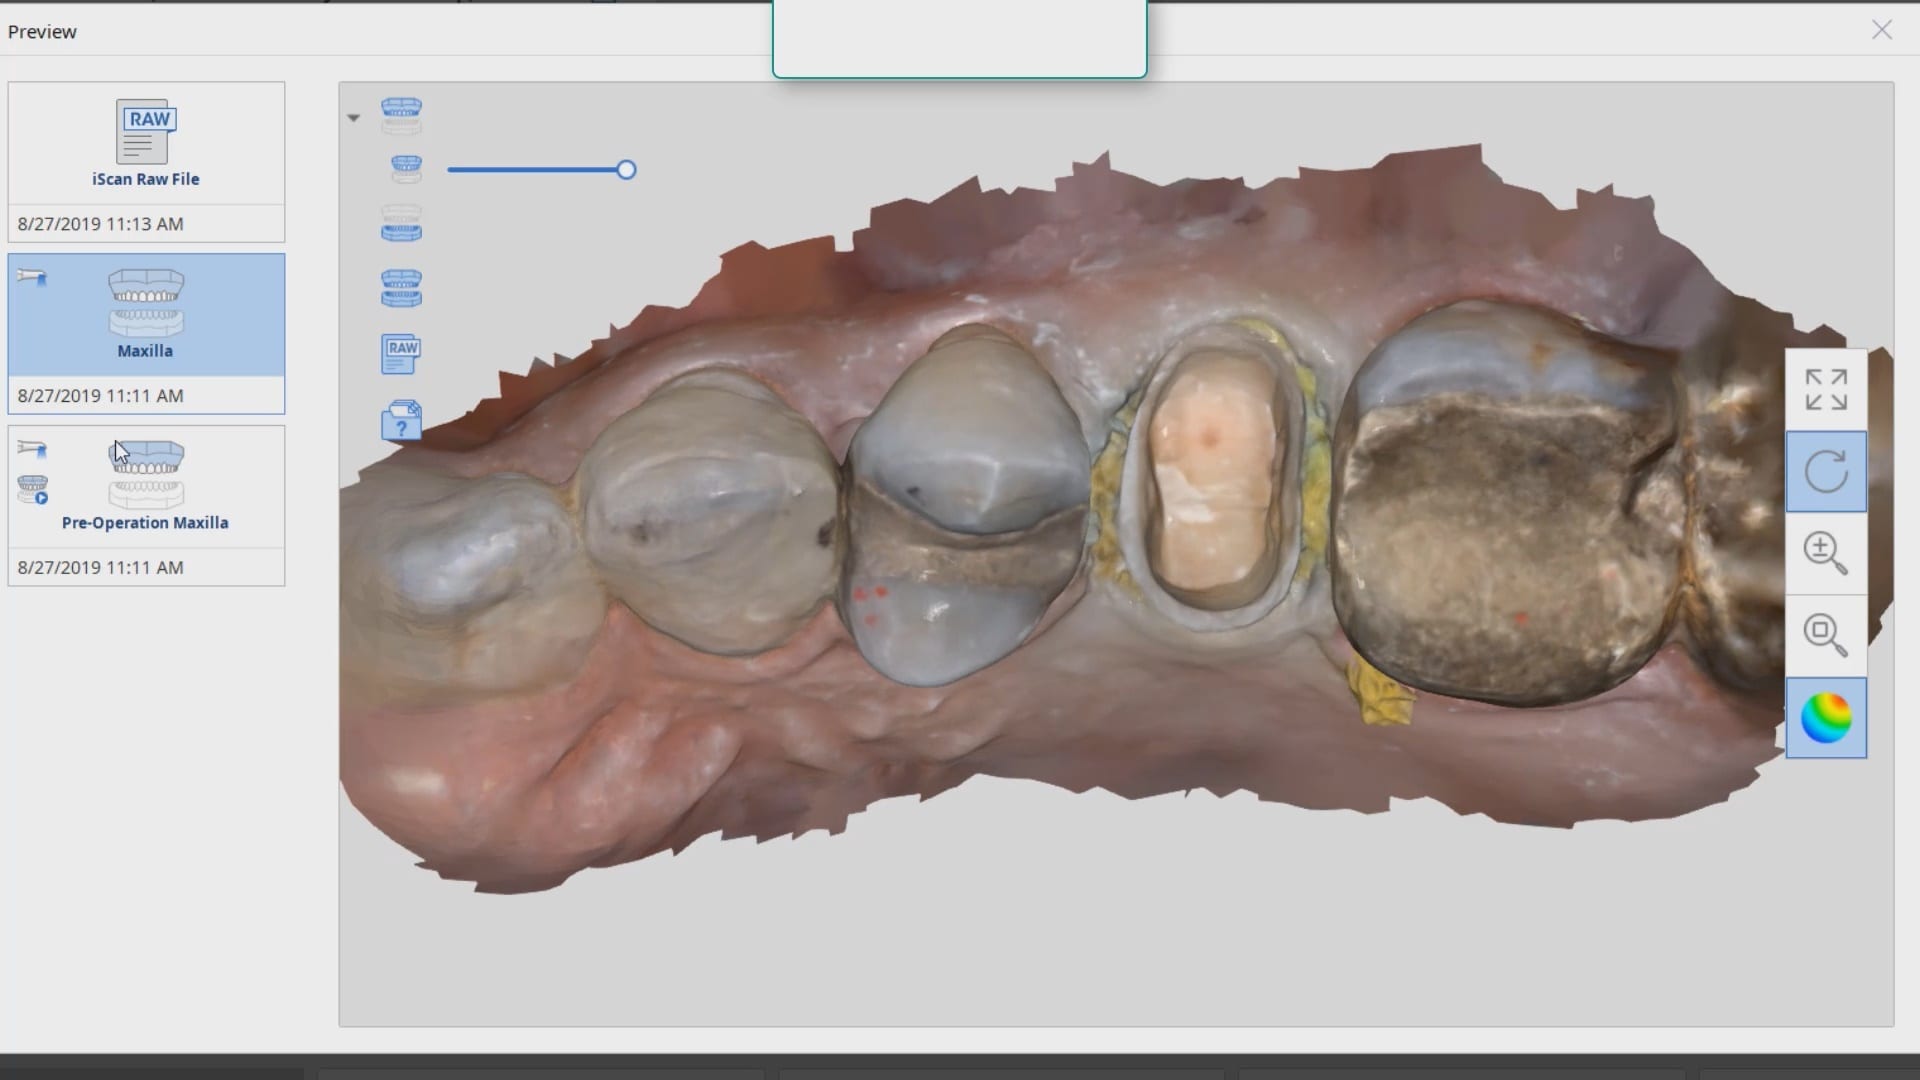
In this article, we demonstrate how to manage a crown replacement on a second upper premolar with the Medit i500, exocad, and the imes icore CORiTEC ONE milling machine. The pre-existing crown was over 2 decades old and the recession revealed a supra-gingival margin. Furthermore, there was no room to improve the anatomy or its outline form as it was in occlusion with the opposing dentition.
A powerful design technique is the copy of the pre-existing crown. Images of the pre-op are taken while the patient is numb and its contours are copied onto the final design of the restoration. This process usually takes a minute or so, after which we milled a size 12 emax block restoration.
One of the most dreaded procedures in dentistry is to cut off a bonded lithium disilicate material. With zirconia, since the bond strength is weak, just “rattling” the crown helps it pop off. You could also debond the restoration with a laser pretty quickly. With emax, you must use copious amounts of water so you don’t fry the pulp. You must also refrain from splitting the crown with a crown remover because you can damage the remaining tooth structure catastrophically.
In this sequence of photos, you will see how we recommend the removal of the bonded restoration. You must first create a trough across the occlusal surface of the crown. Ideally, use a 1.6 mm disposable bur to reach the interface between tooth structure and restorative material. As soon as you reach this junction, take a flat ended diamond bur and start working that same location and remove all the ceramic on the occlusal surface. Staying right at the junction of the material and tooth is the critical part of the process.
After you have removed the occlusal surface, you can take any bur and work the junction one the axial wall. By this time enough work has been done where the walls of the restoration start to break and peel off on their own.
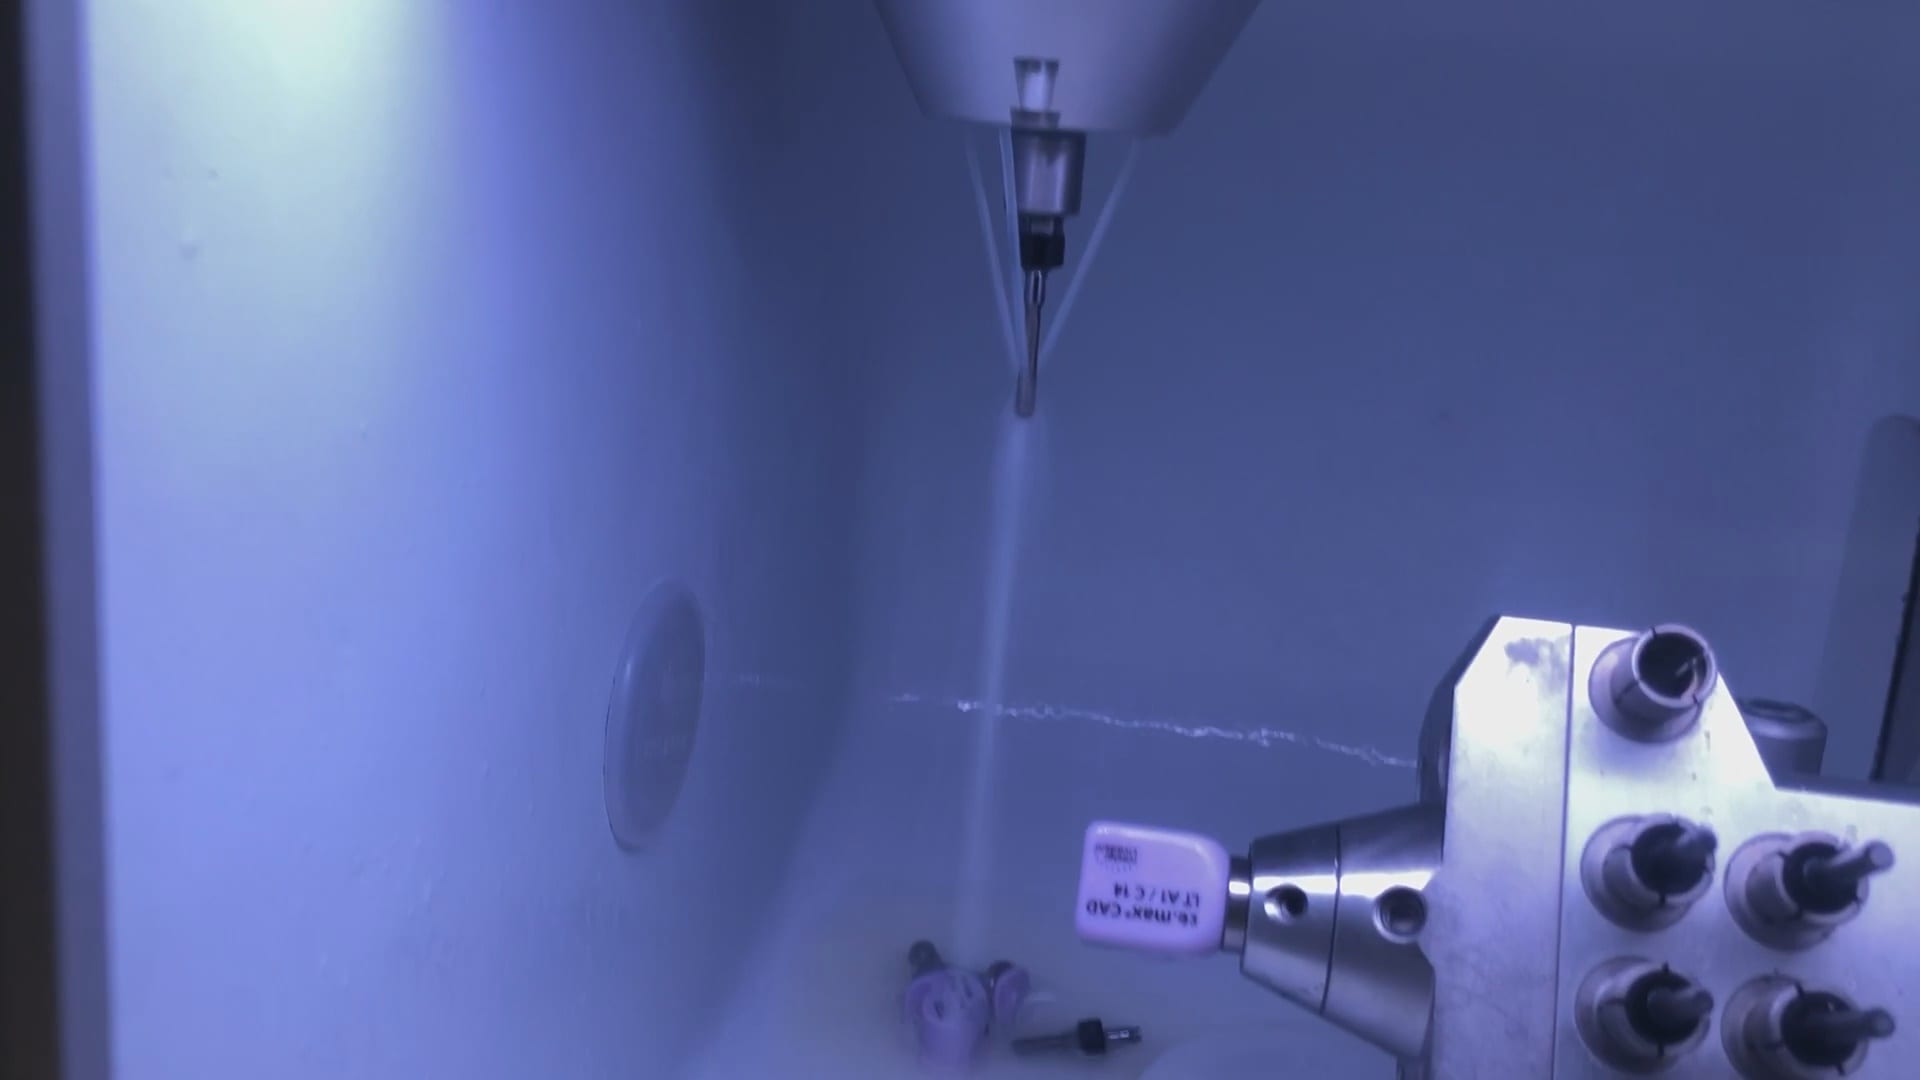
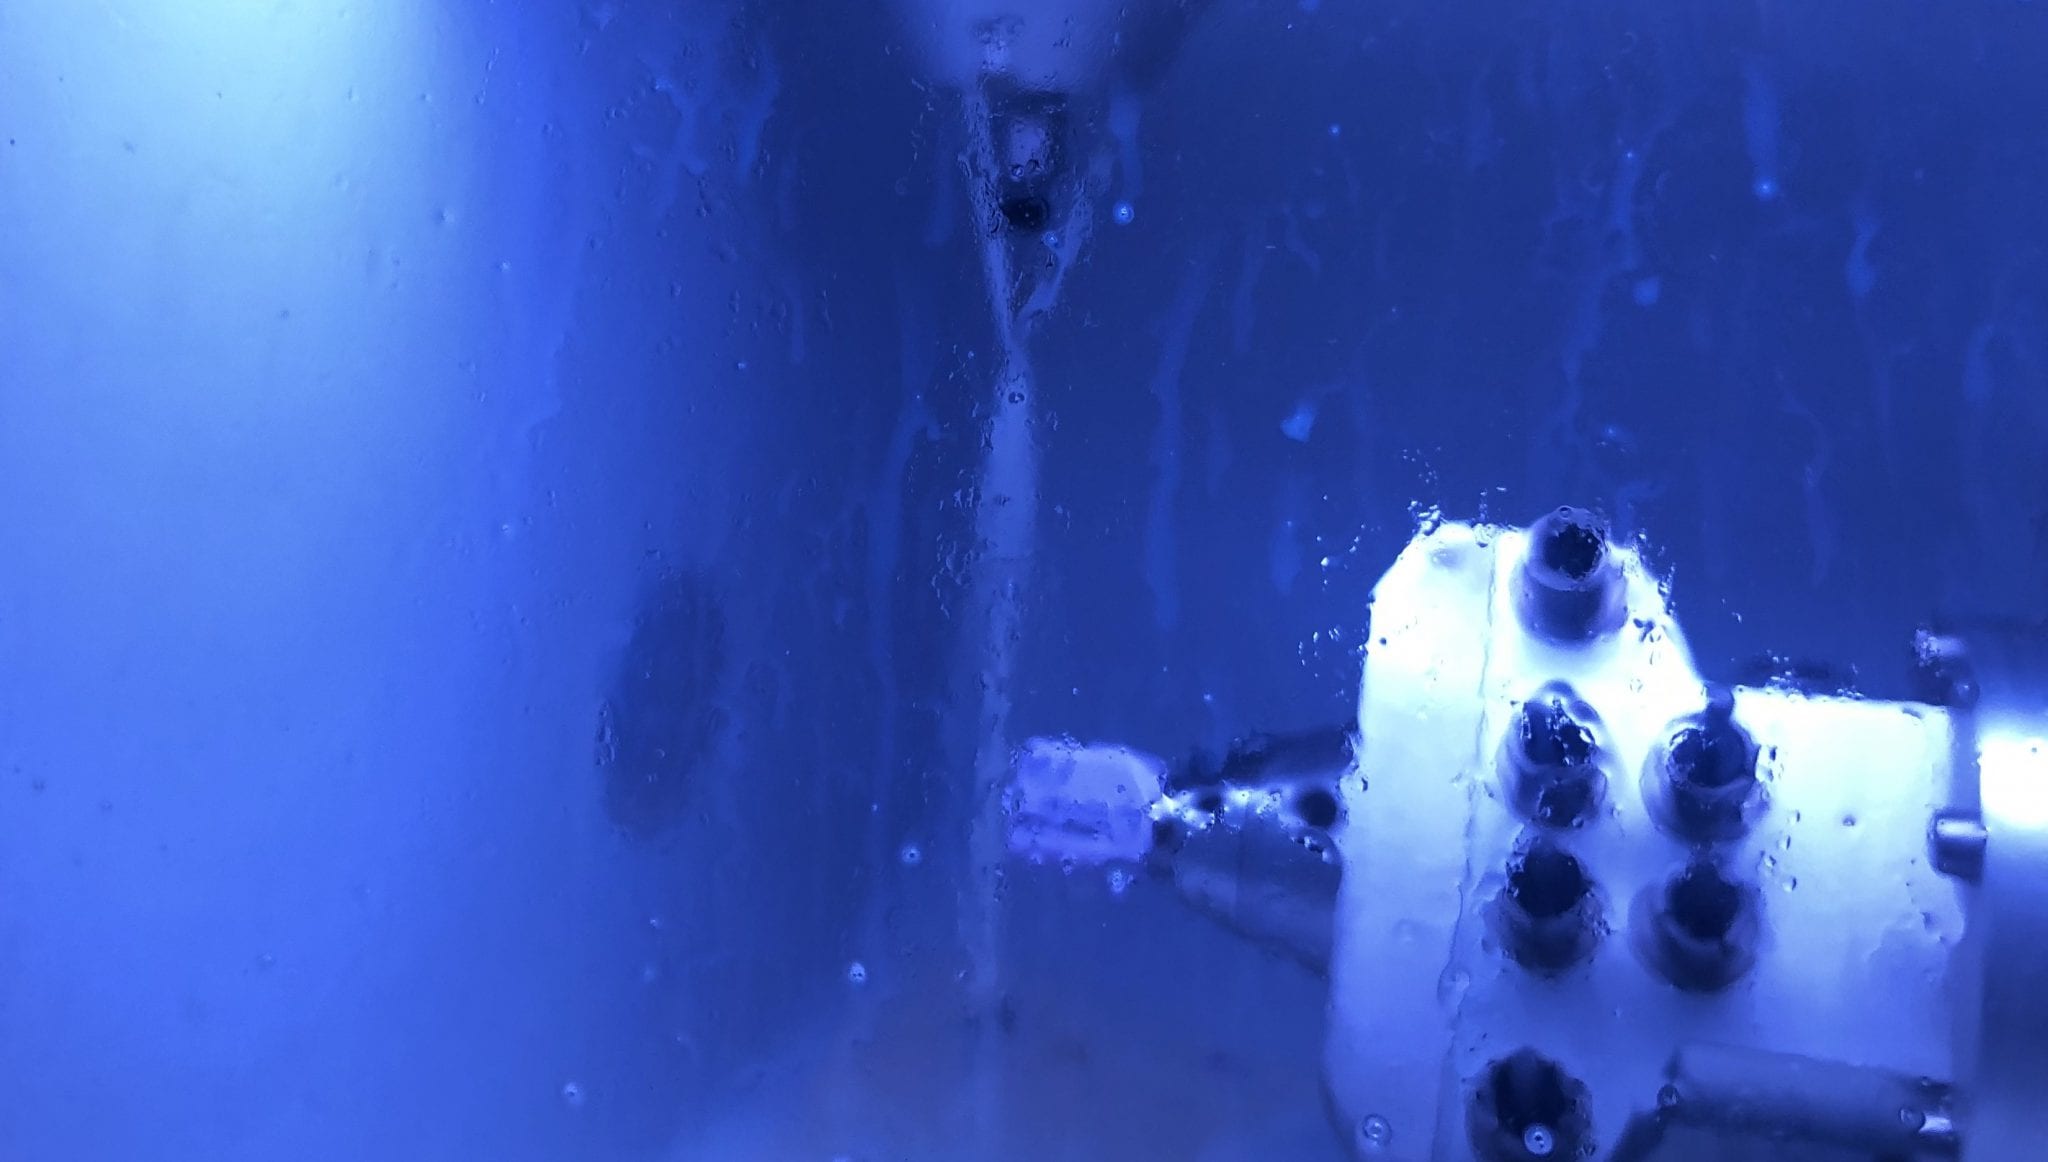
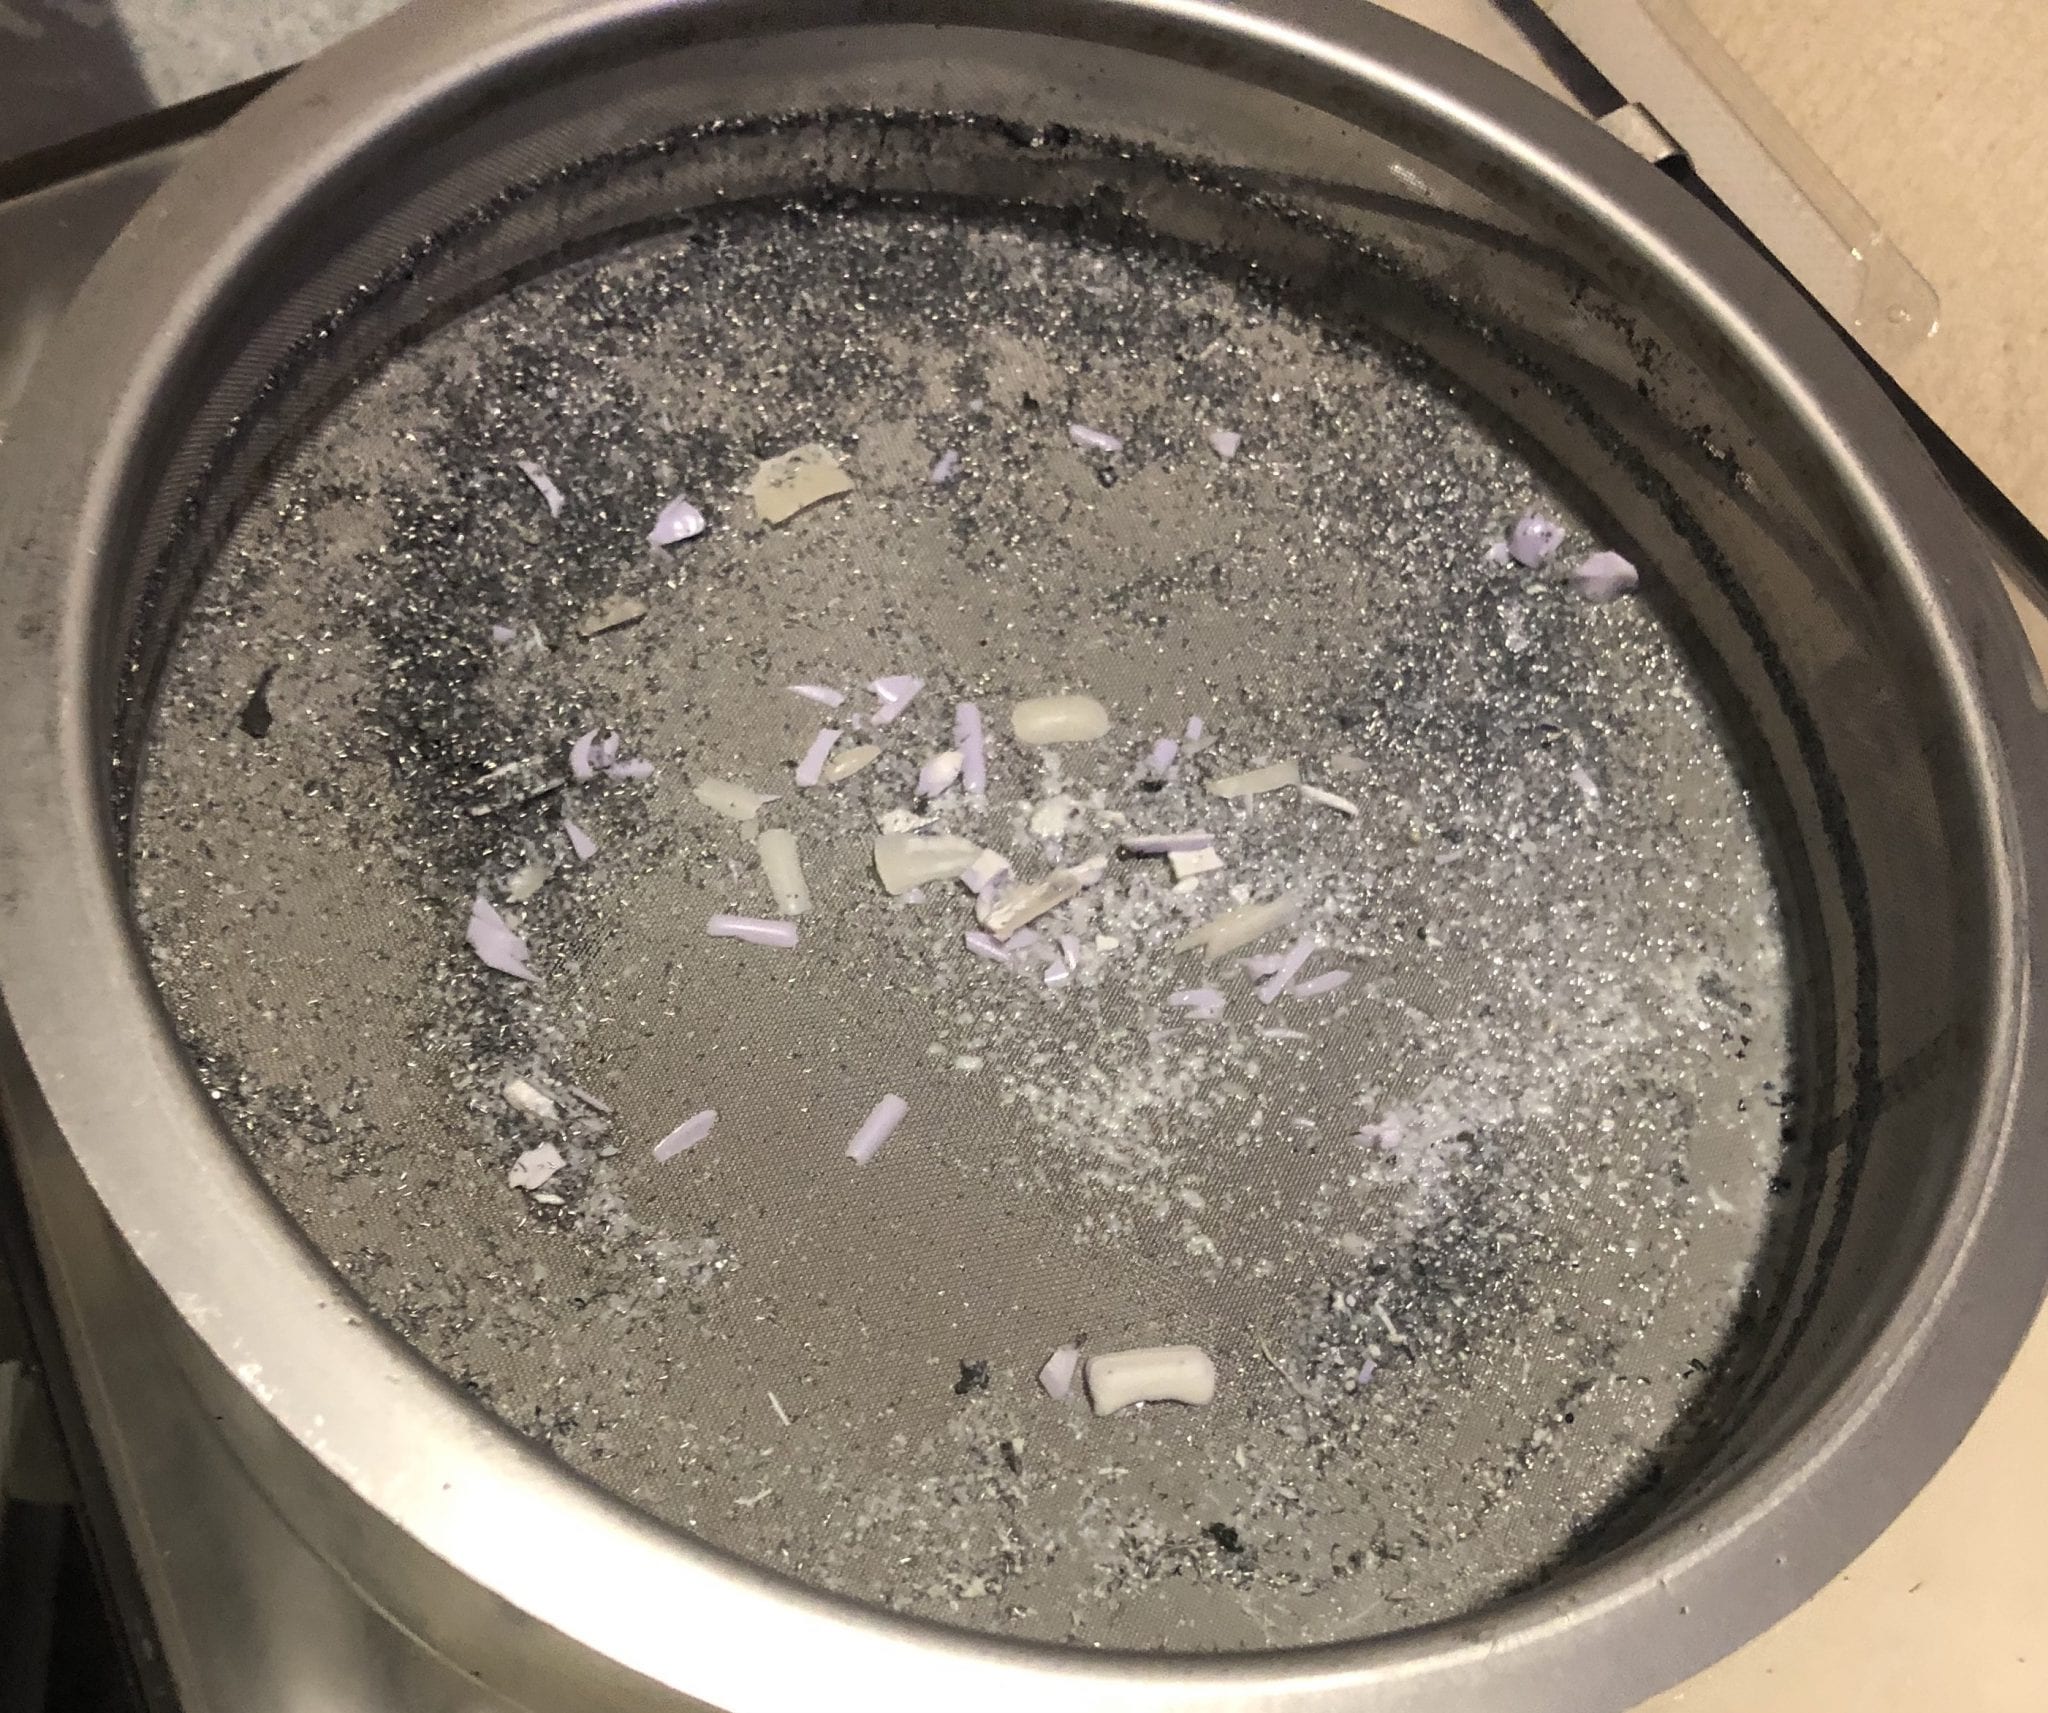
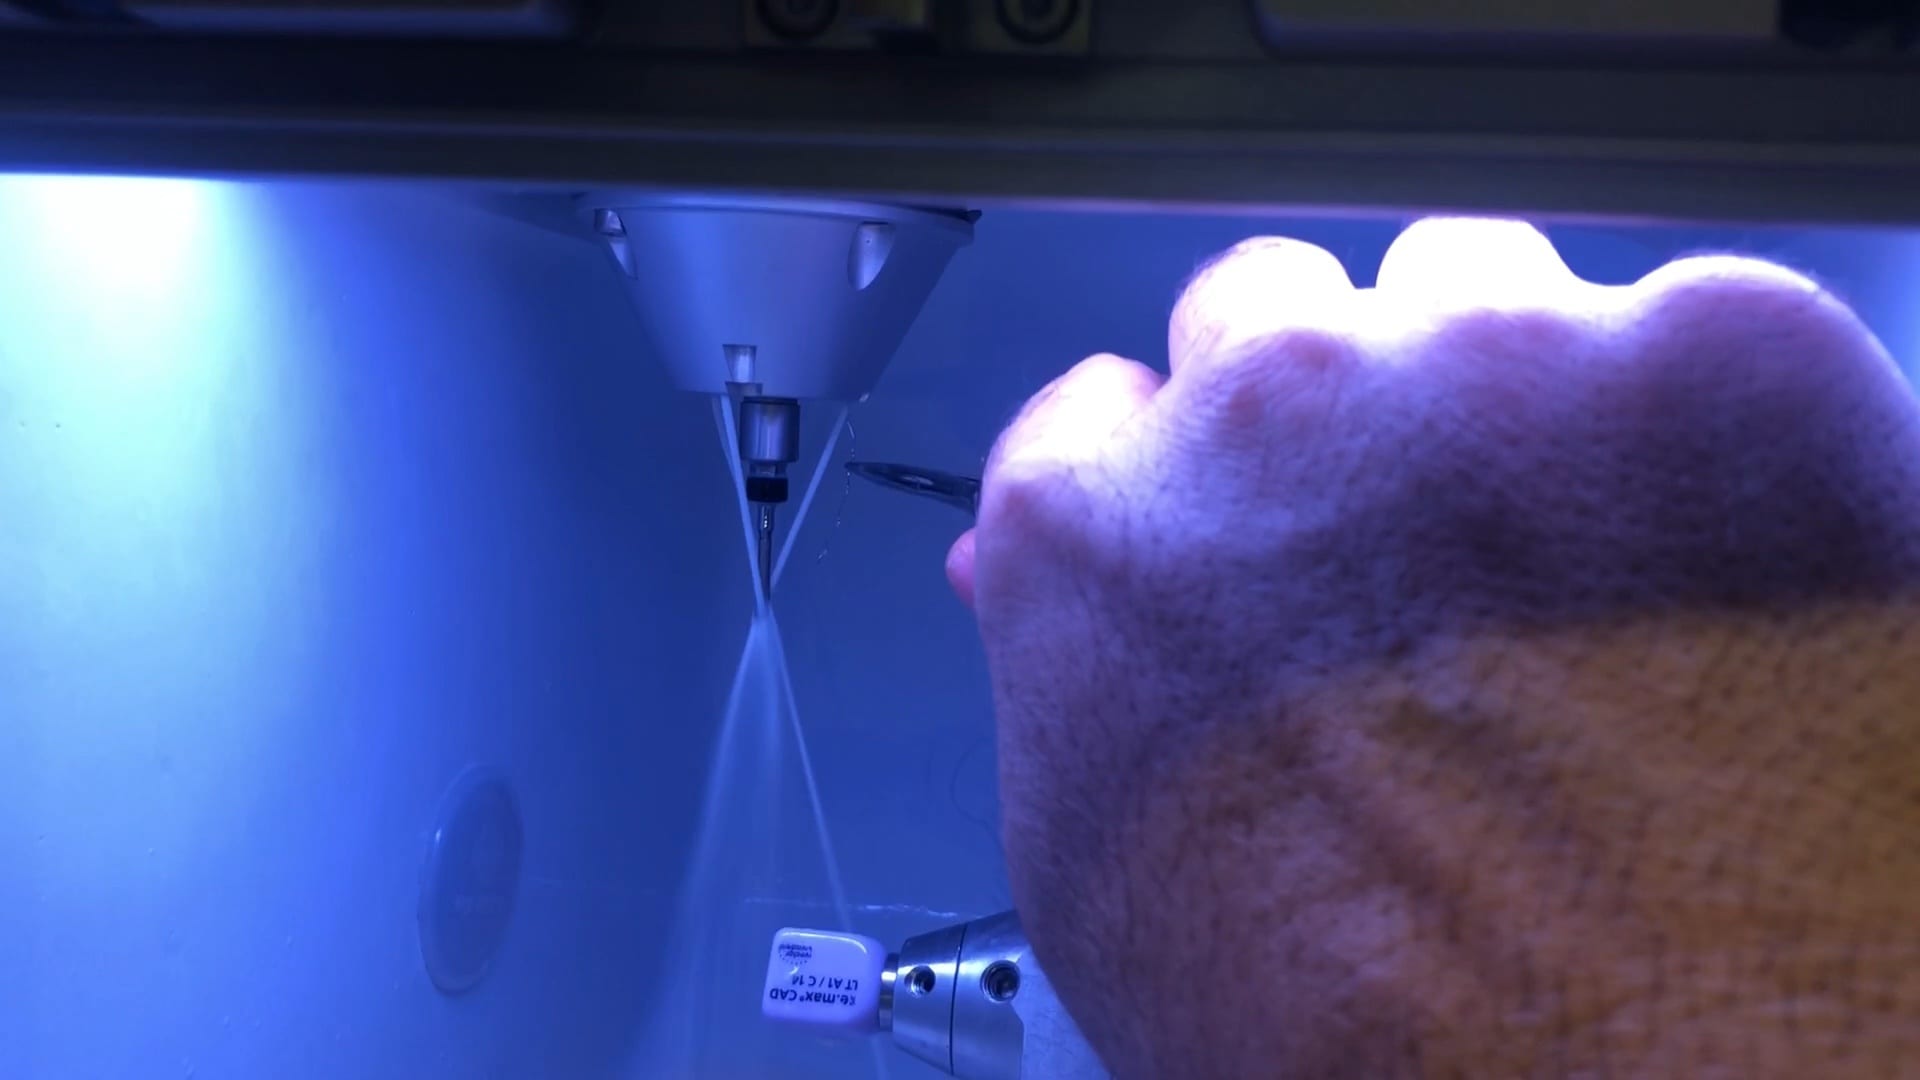
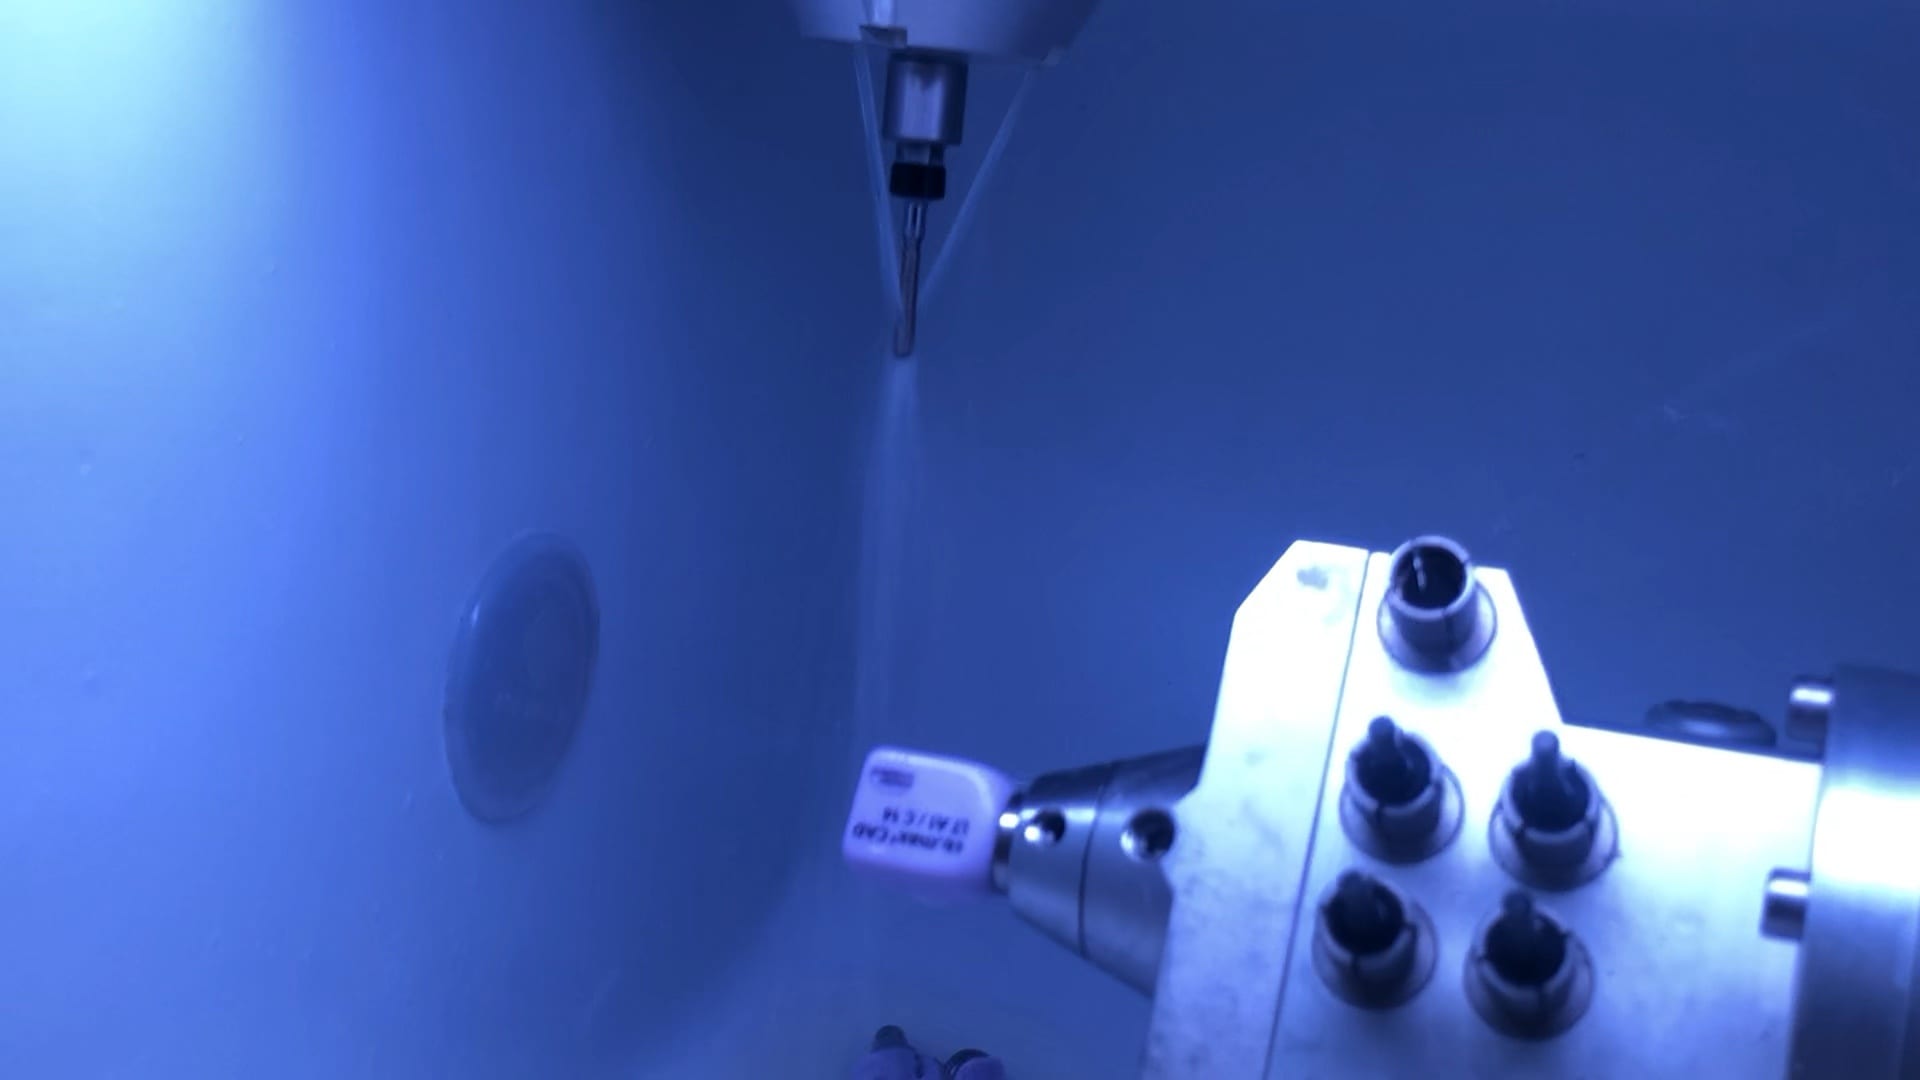
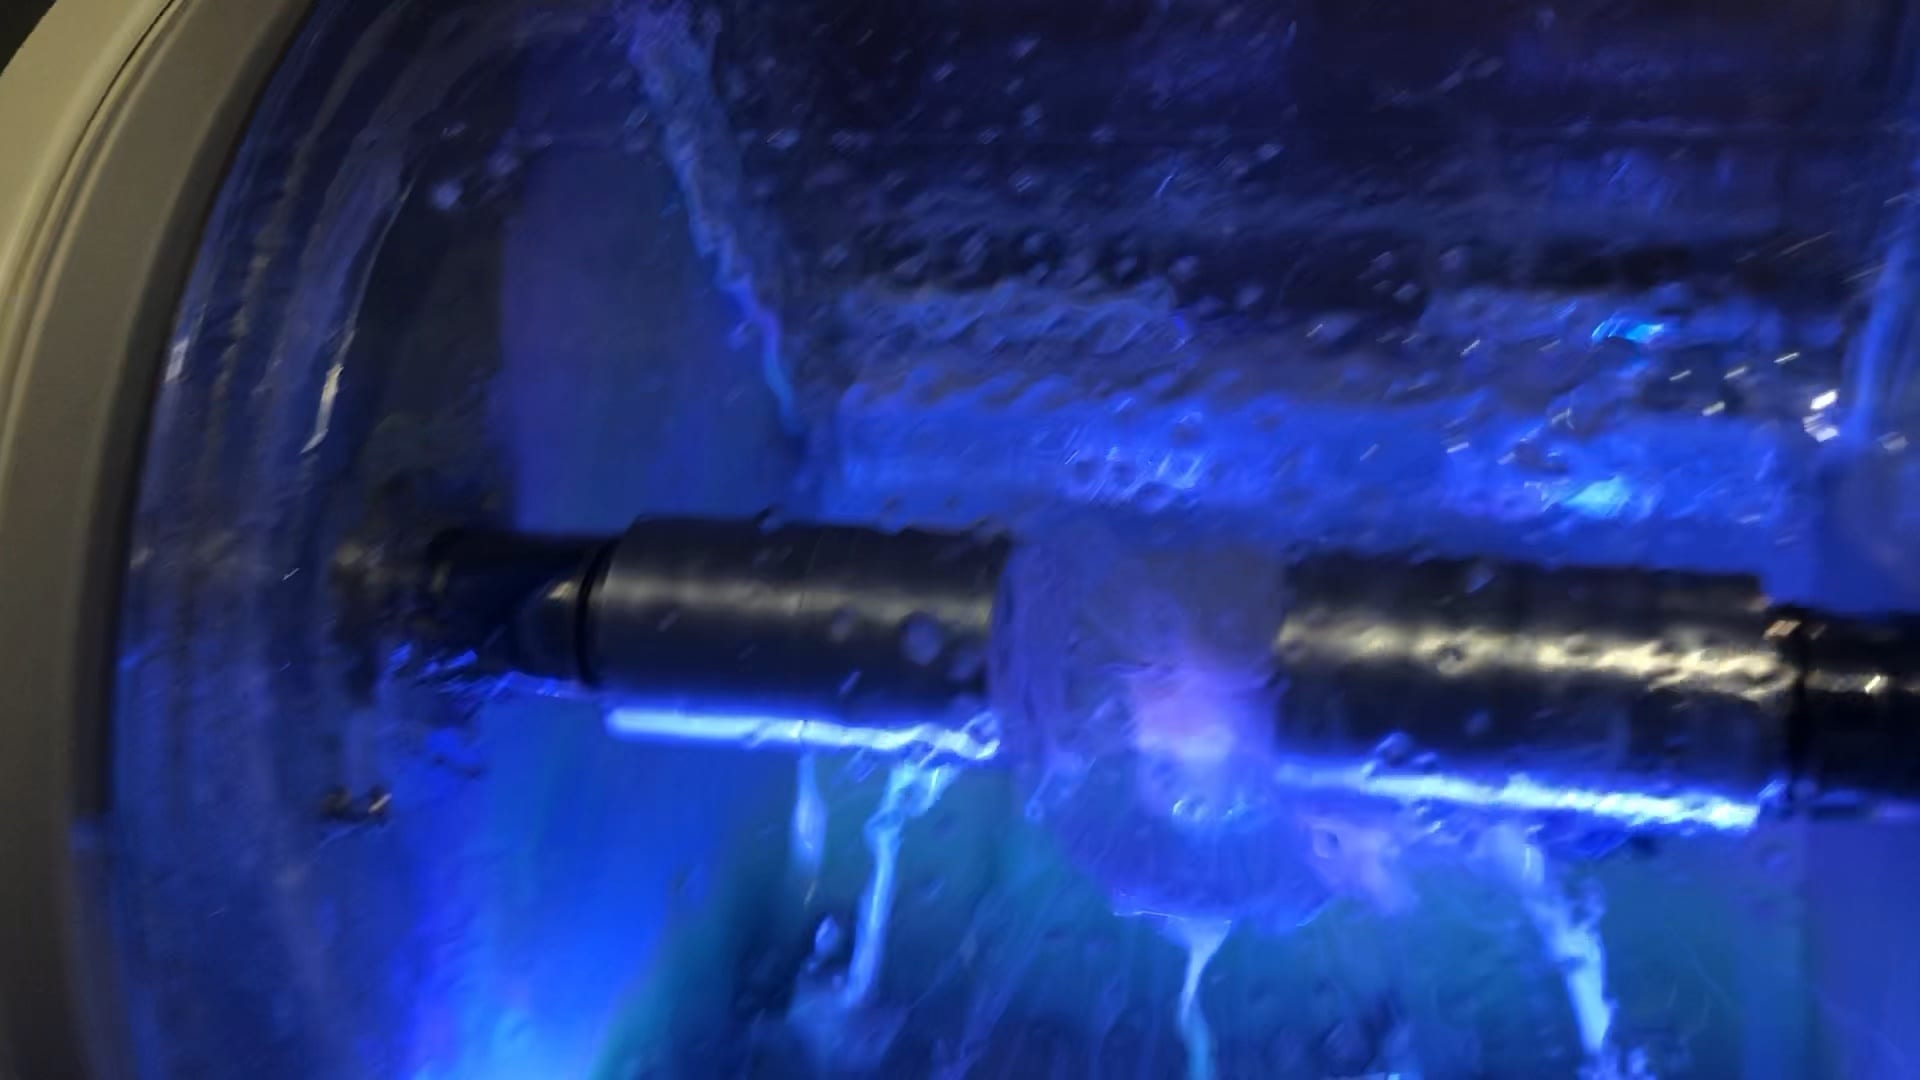
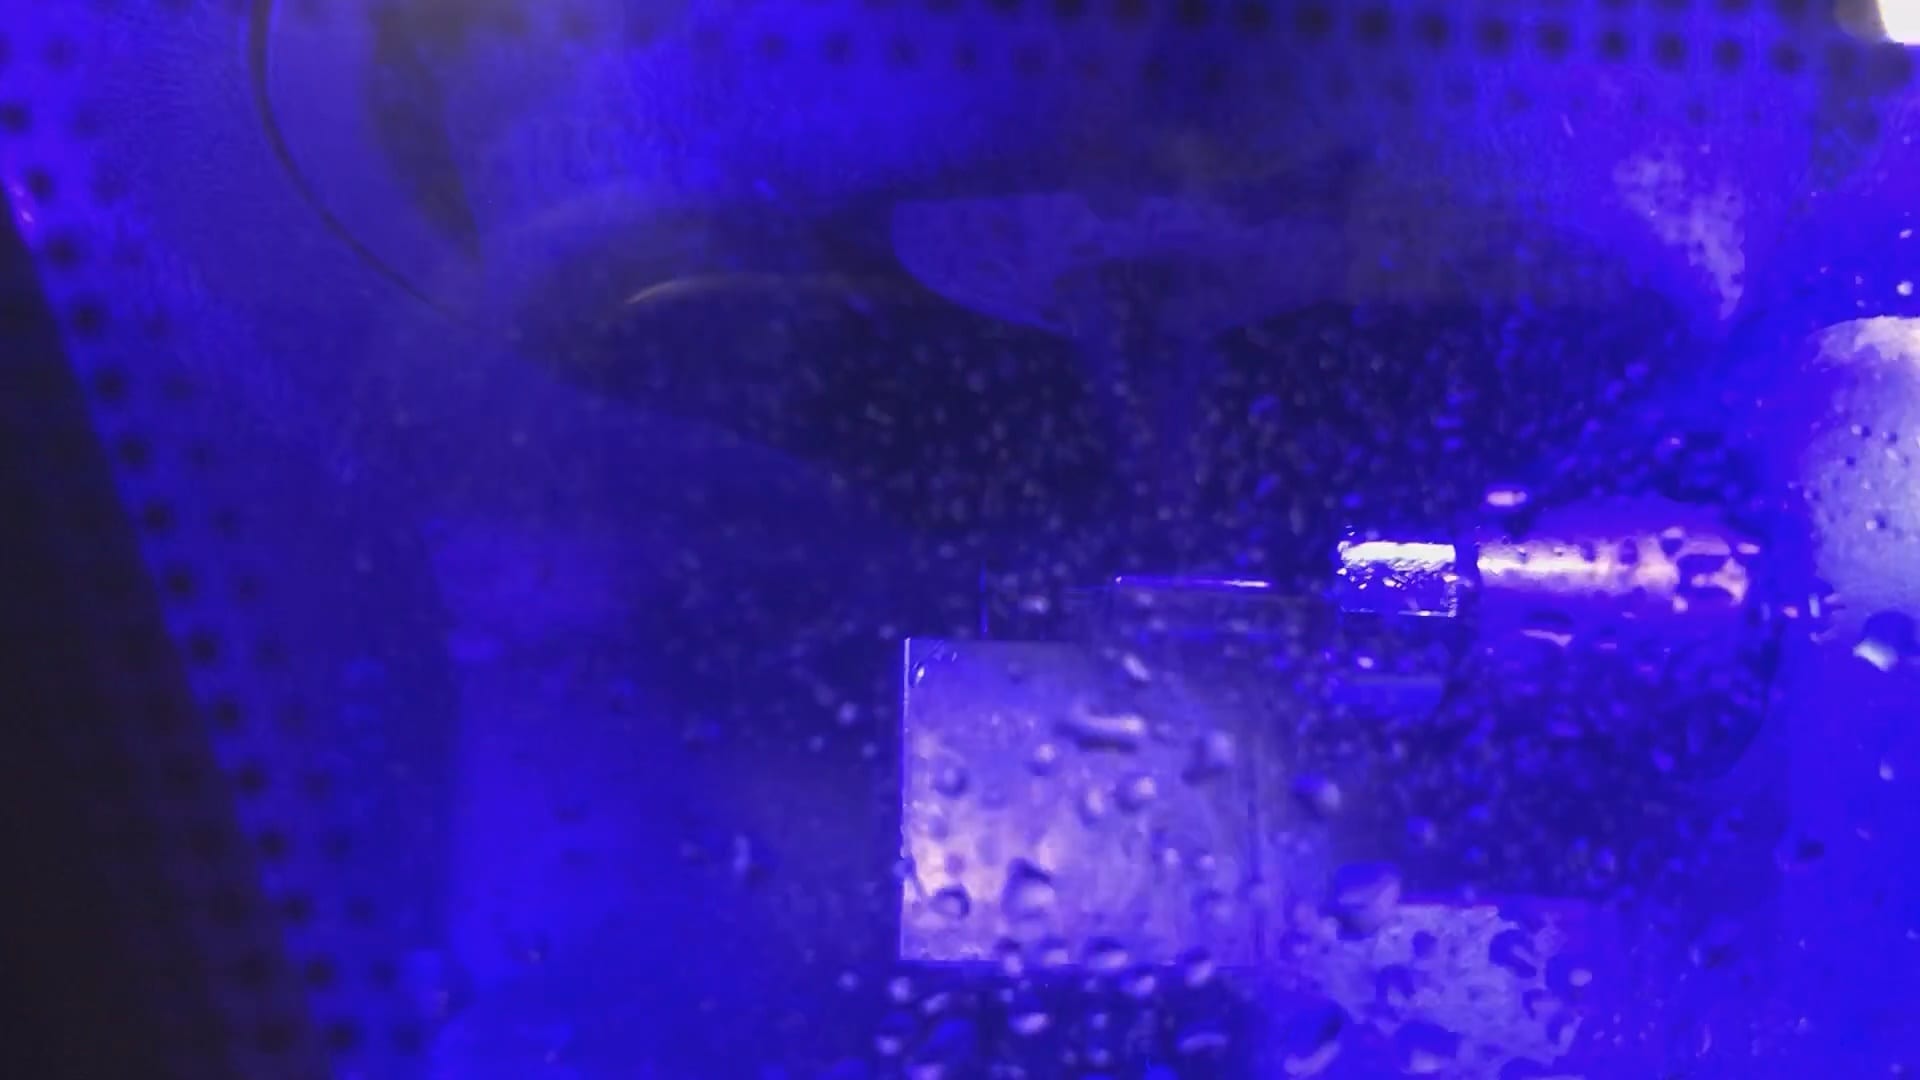
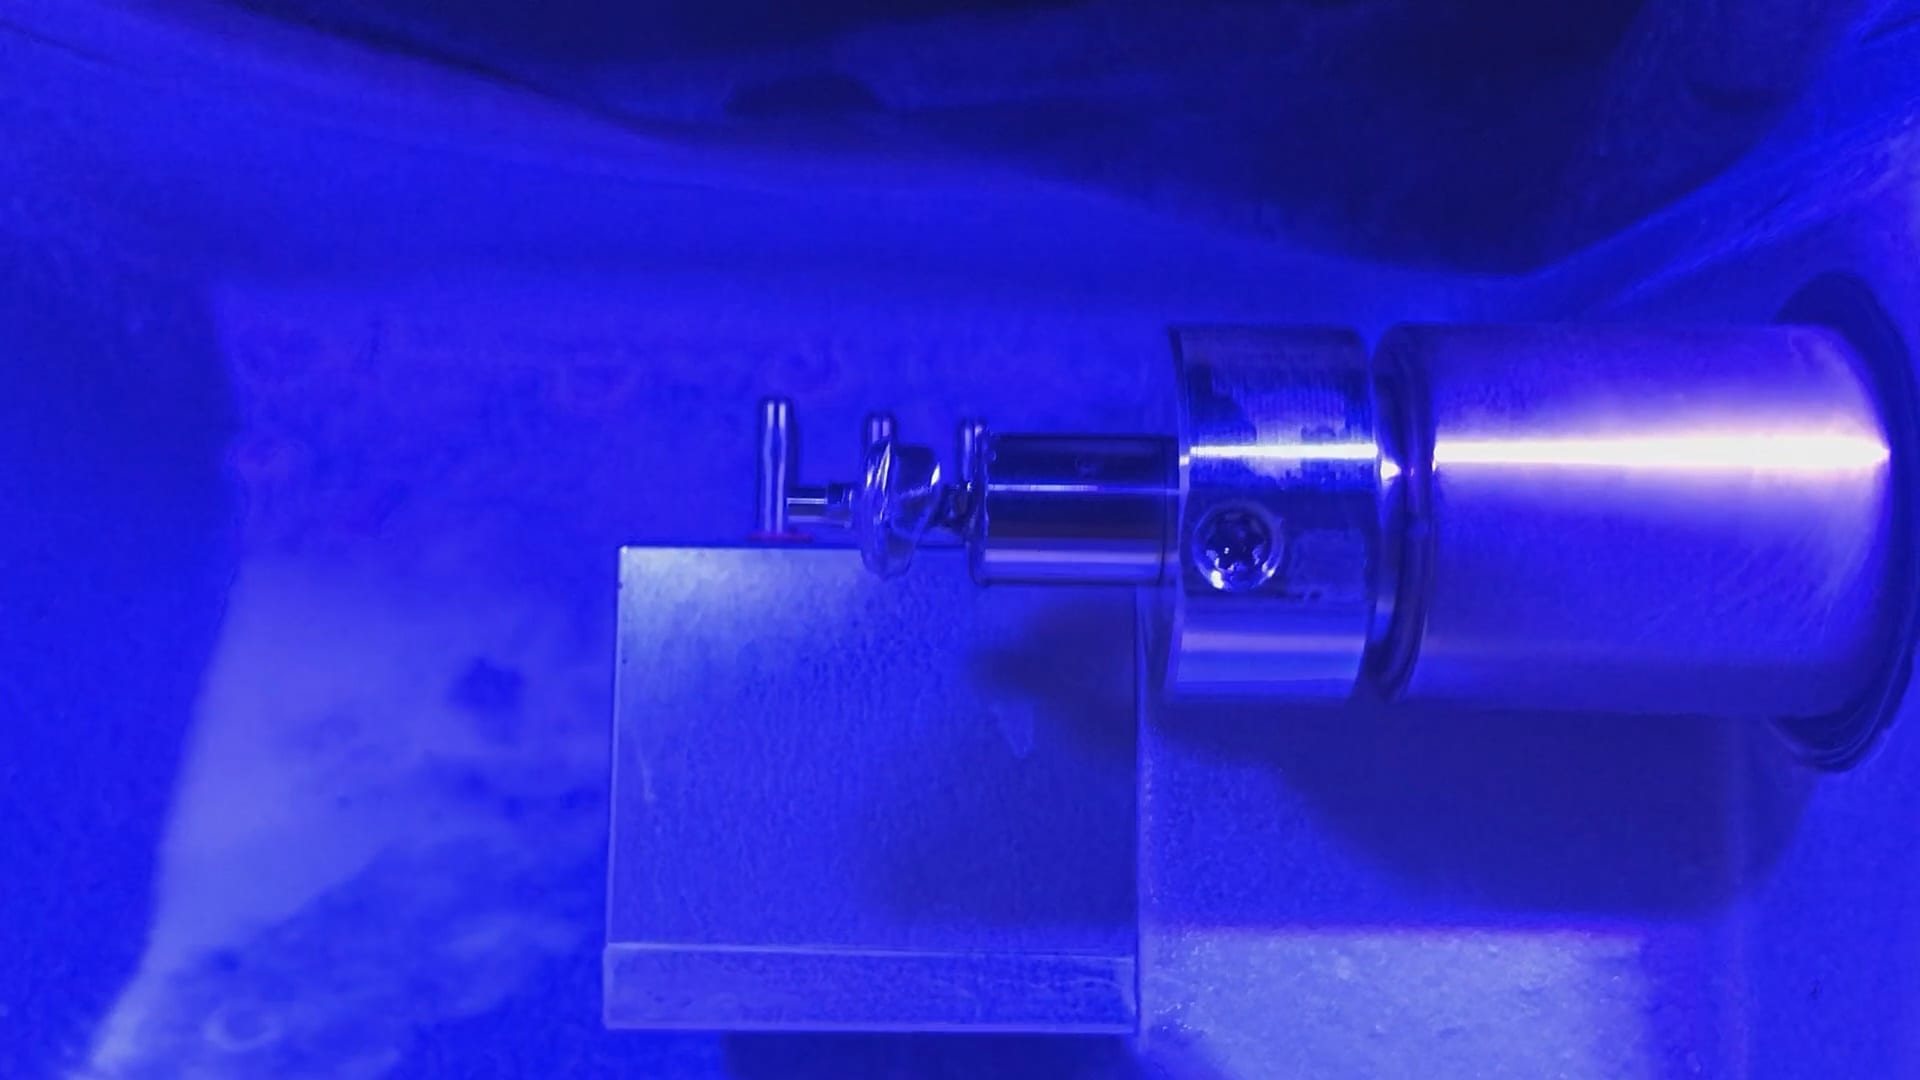
All milling machines have guidelines for proper cleaning and maintanance. The imes icore CORITEC ONE’s spray channels must be kept clean, otherwise they will spray off the target block materials. Essentially you will dry mill ceramic which will damage the material and break the drills very quickly.
You can see how little particles of ceramic and titanium dust can clog the lines.
Here we just used an ortho plier and orthowires to unclog the lines. It’s easiest to have the water spraying so you can identify the channels and see the immediate results.
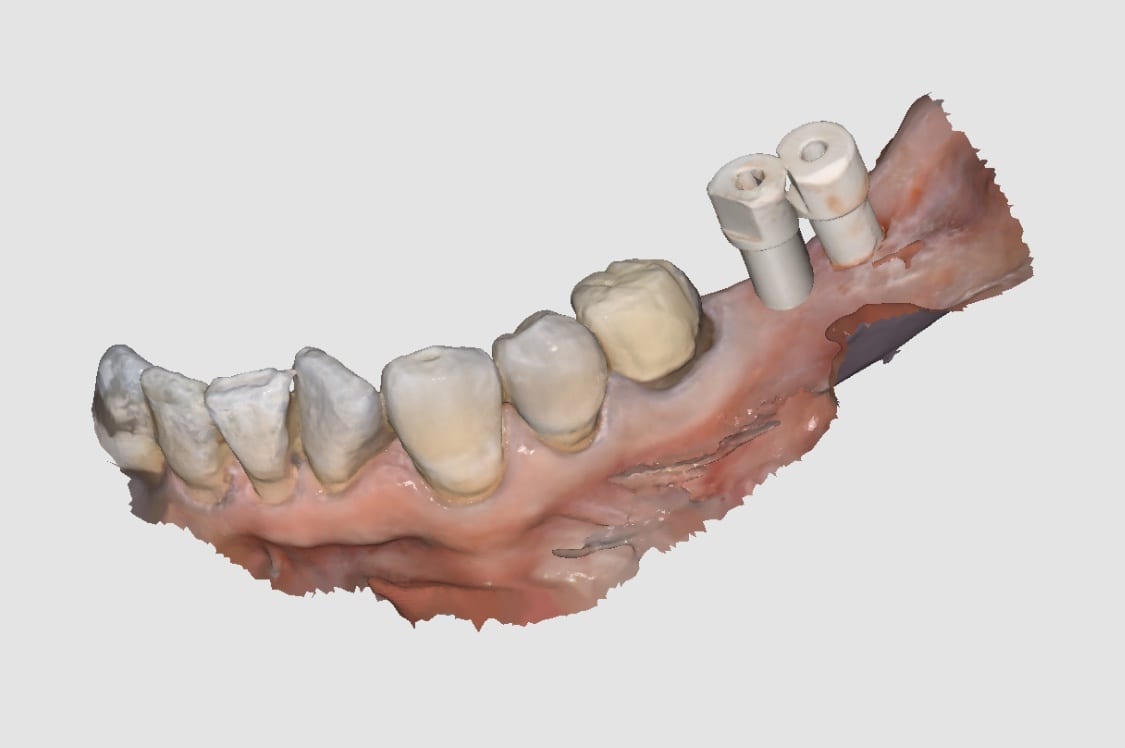
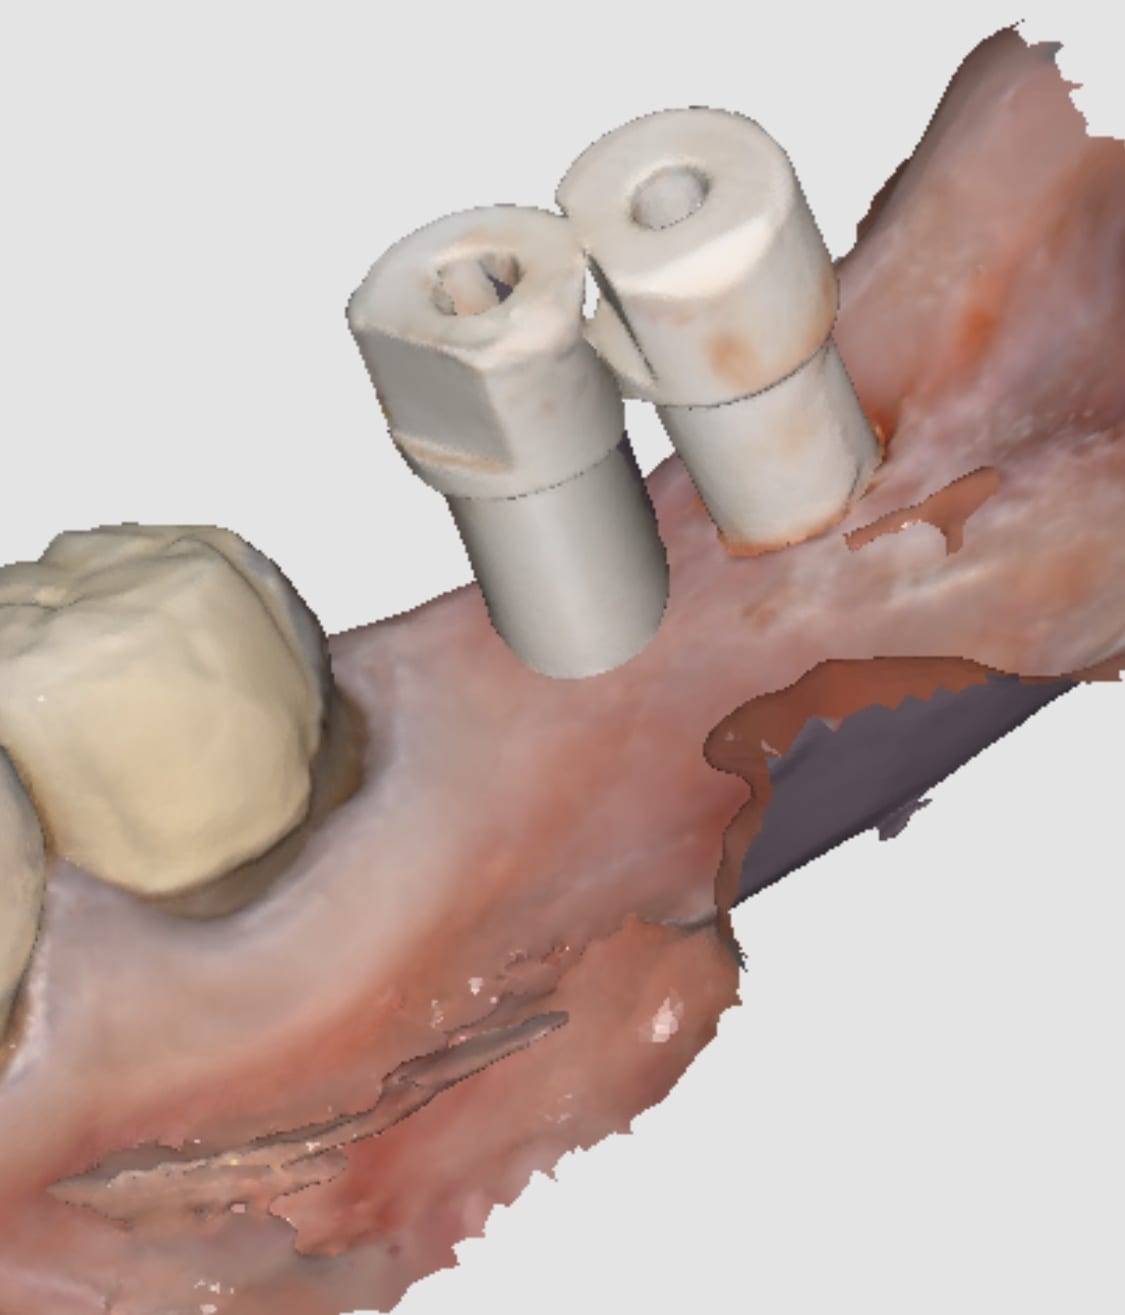
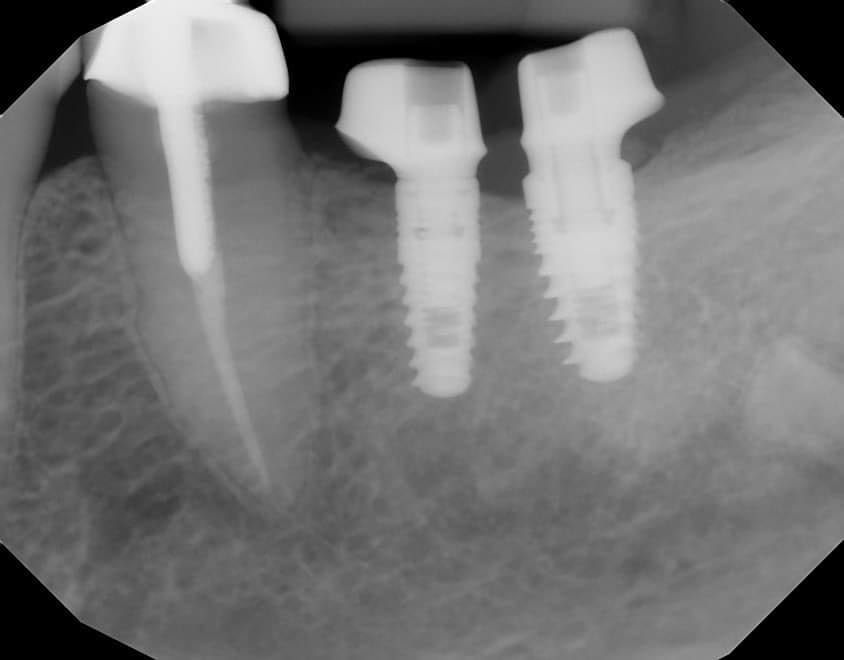
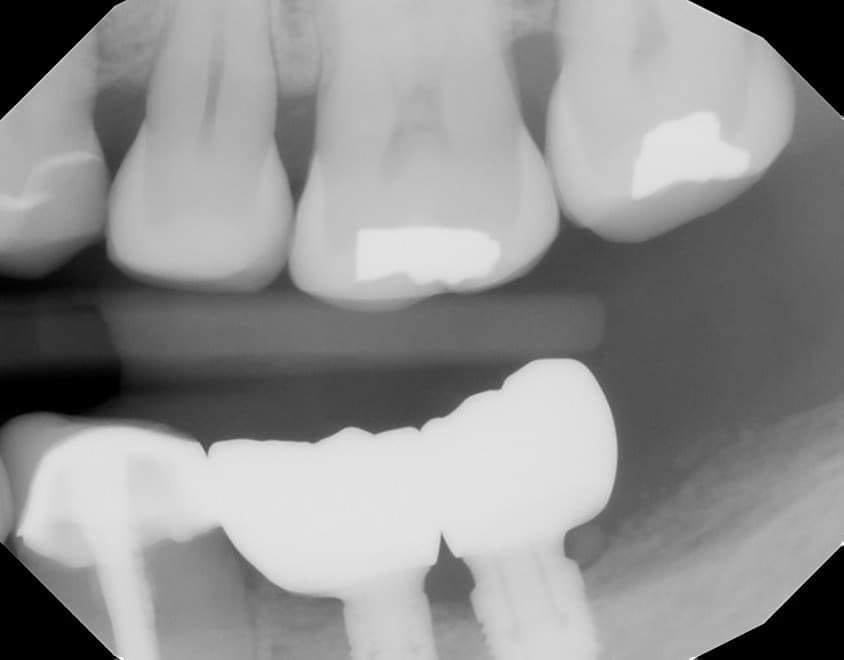
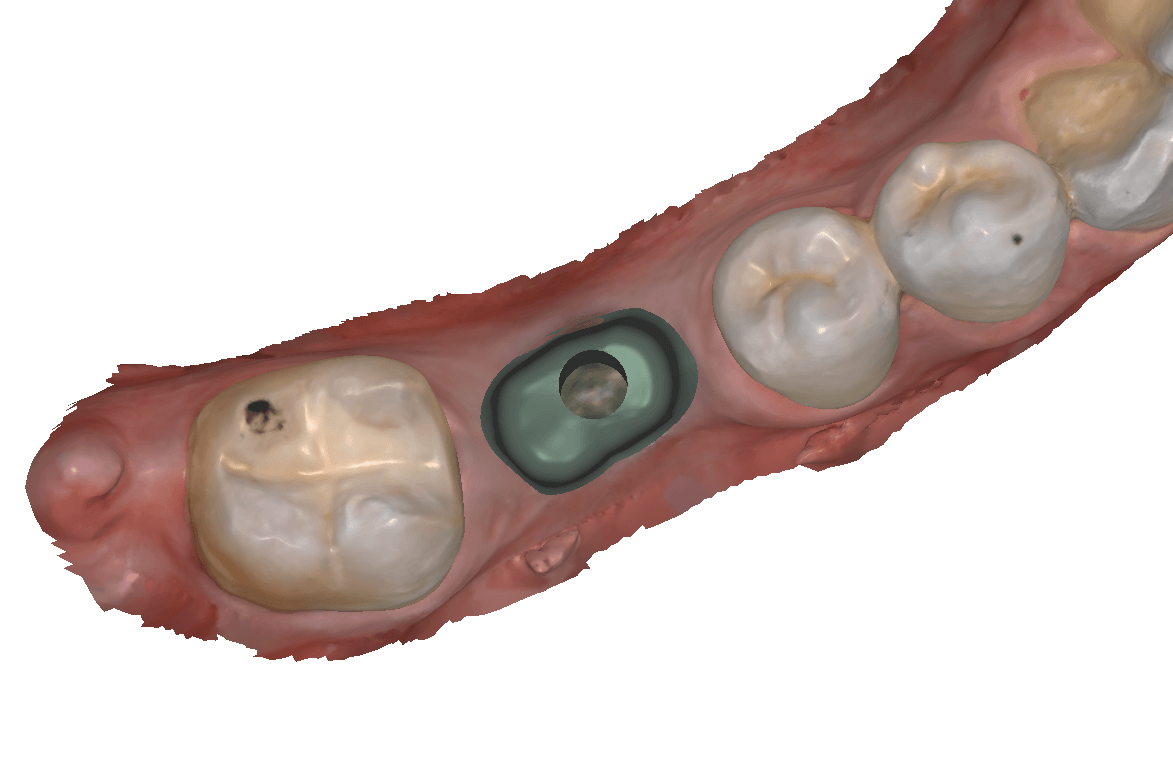
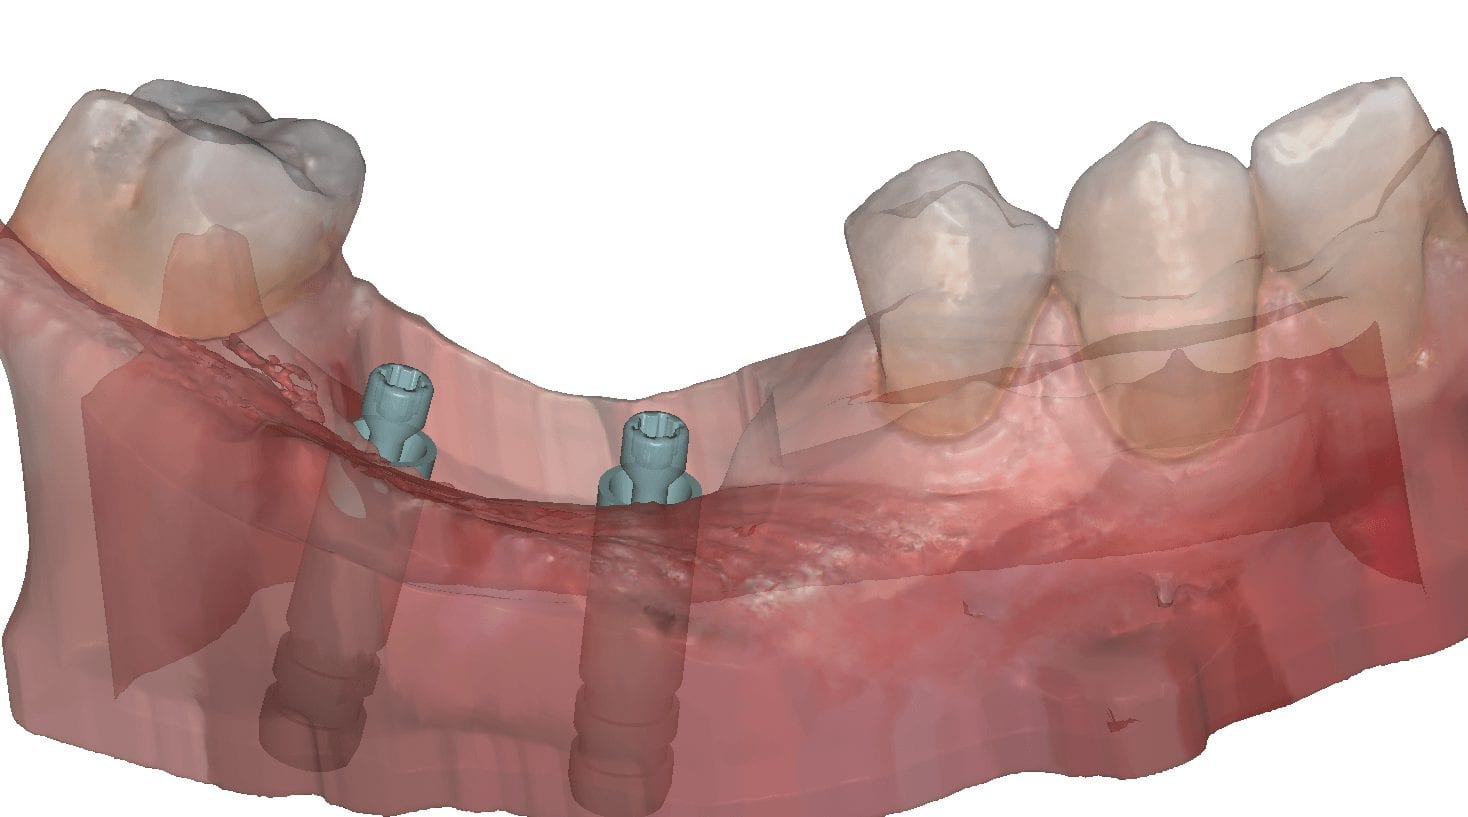
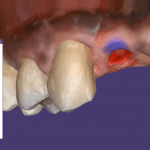
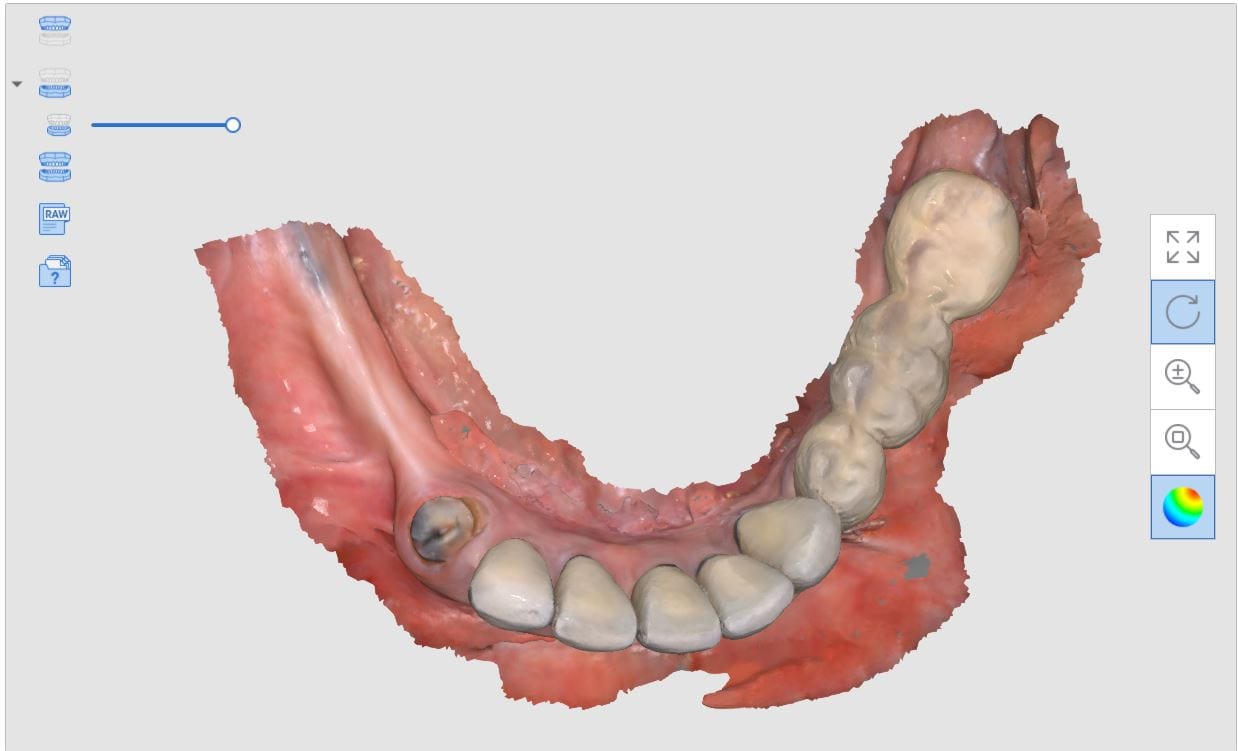
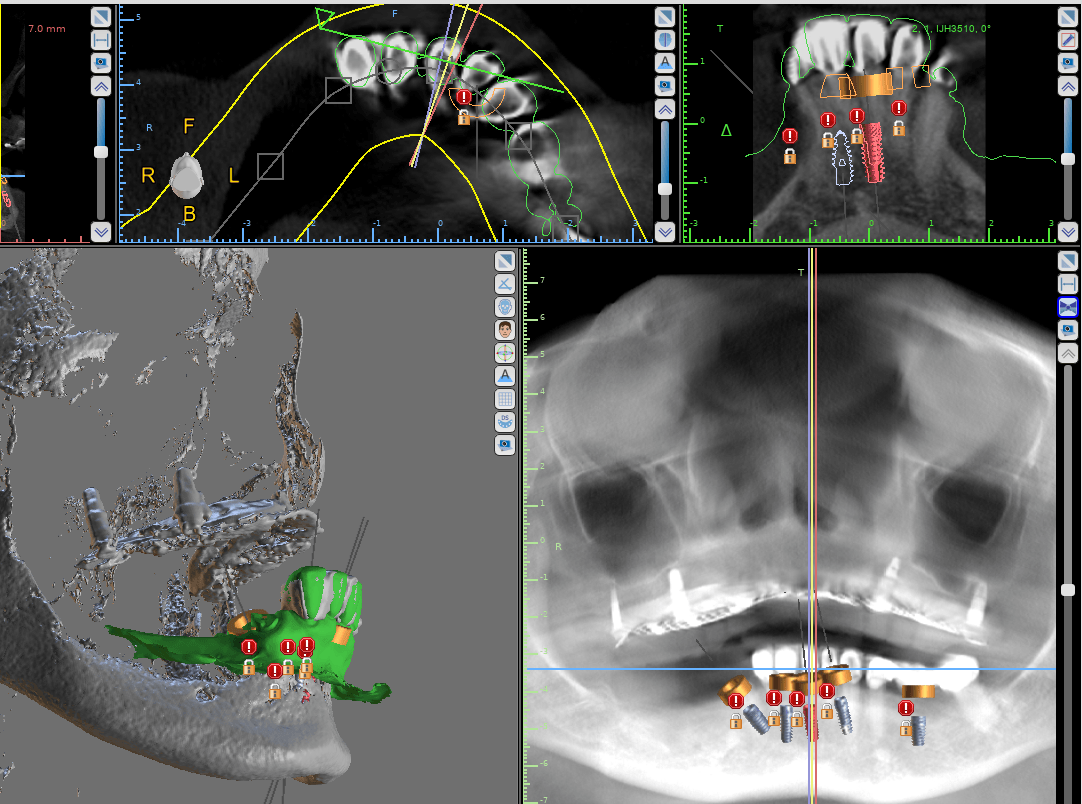
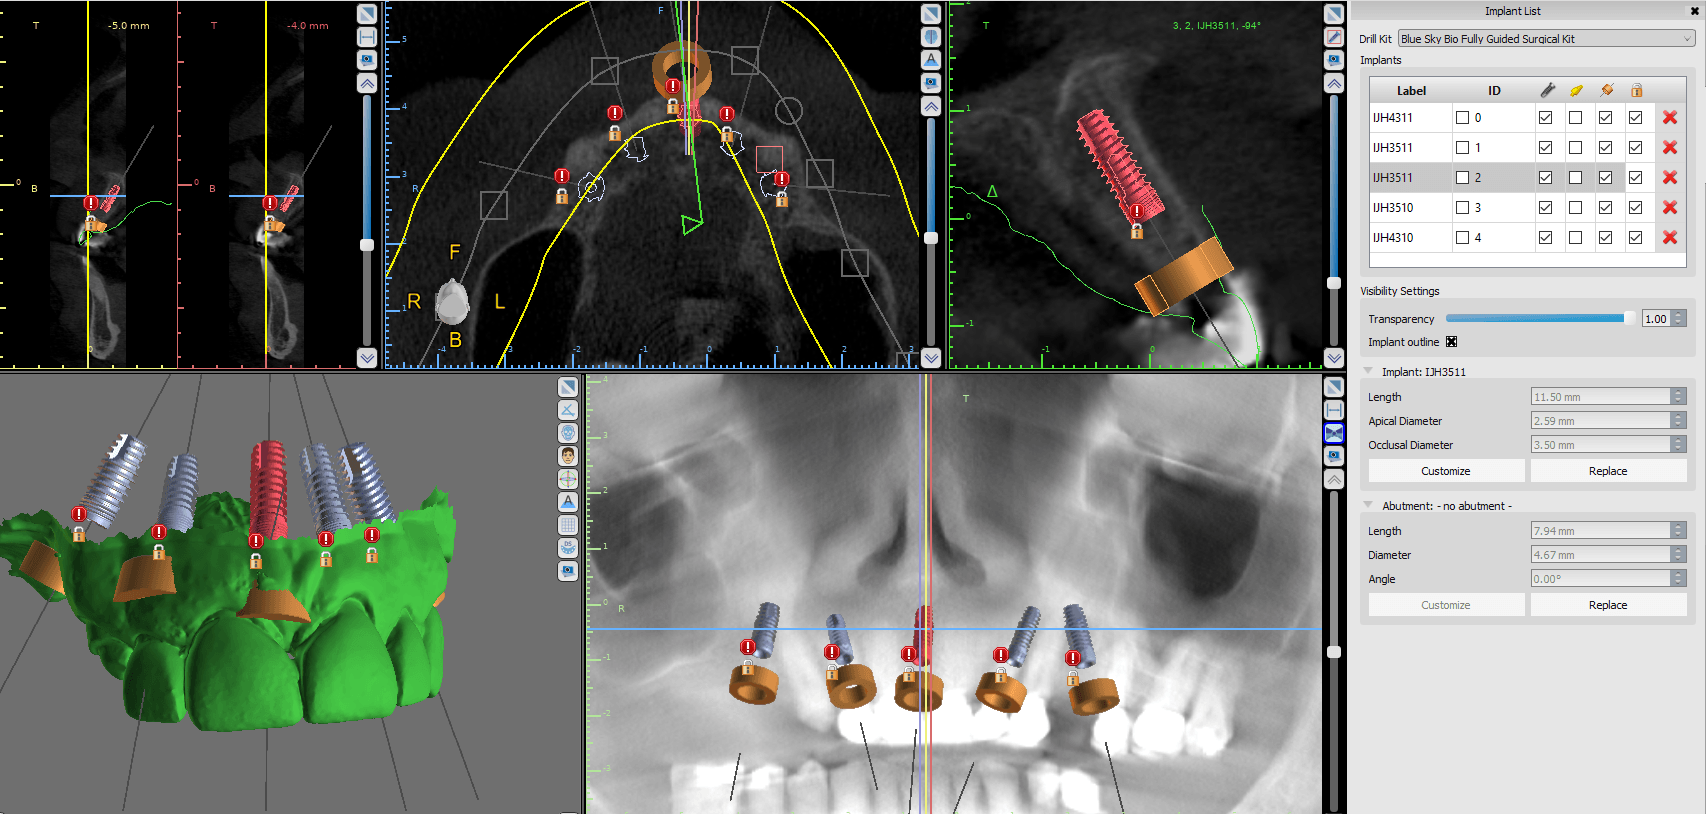
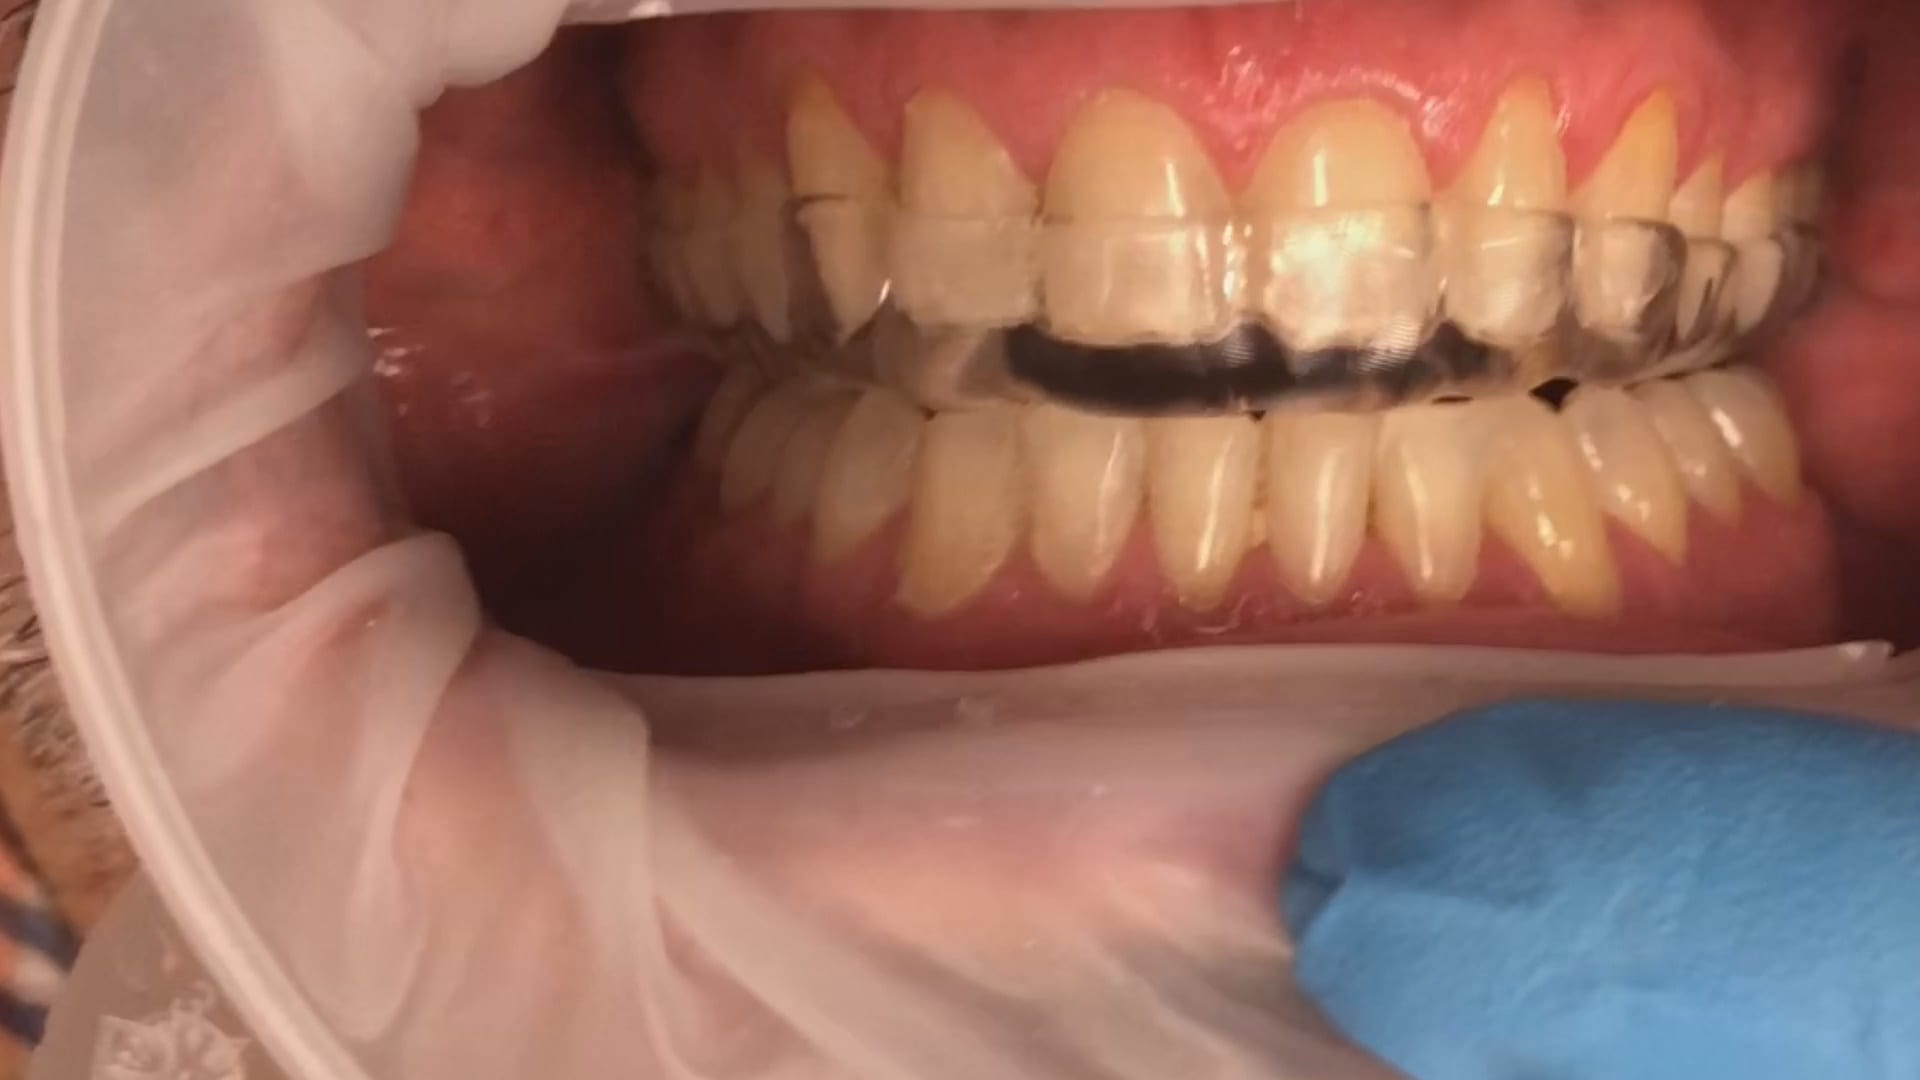
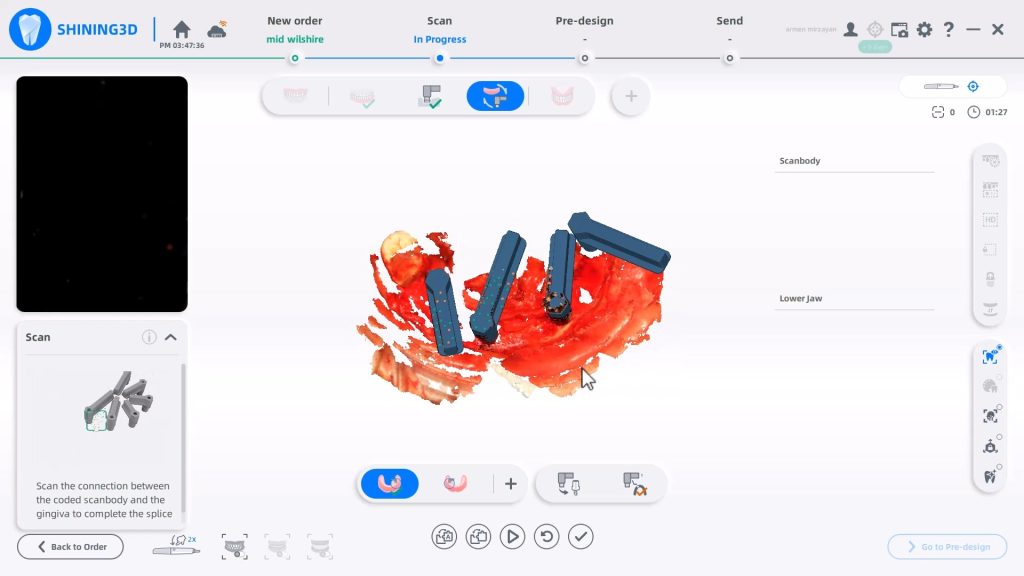
A new feature coming to Medit i500 is the automatic detection of scanbodies while you are imaging. In this clinical case, two implants are placed in the lower left quadrant in a fully guided fashion. Spacing limitations and proximity to vital anatomy did not allow for proper parallelism. This can create all kinds of headaches with analog dentistry where the trays can inadvertently lock in the mouth of distort upon poor up.
With the digital approach, you can scan the gingiva, the arch with easy access to adjacent contacts, and then the scanbodies themselves. What is great is that you do not disturb the primary stability you just achieved by placing physical forces on freshly placed implants.
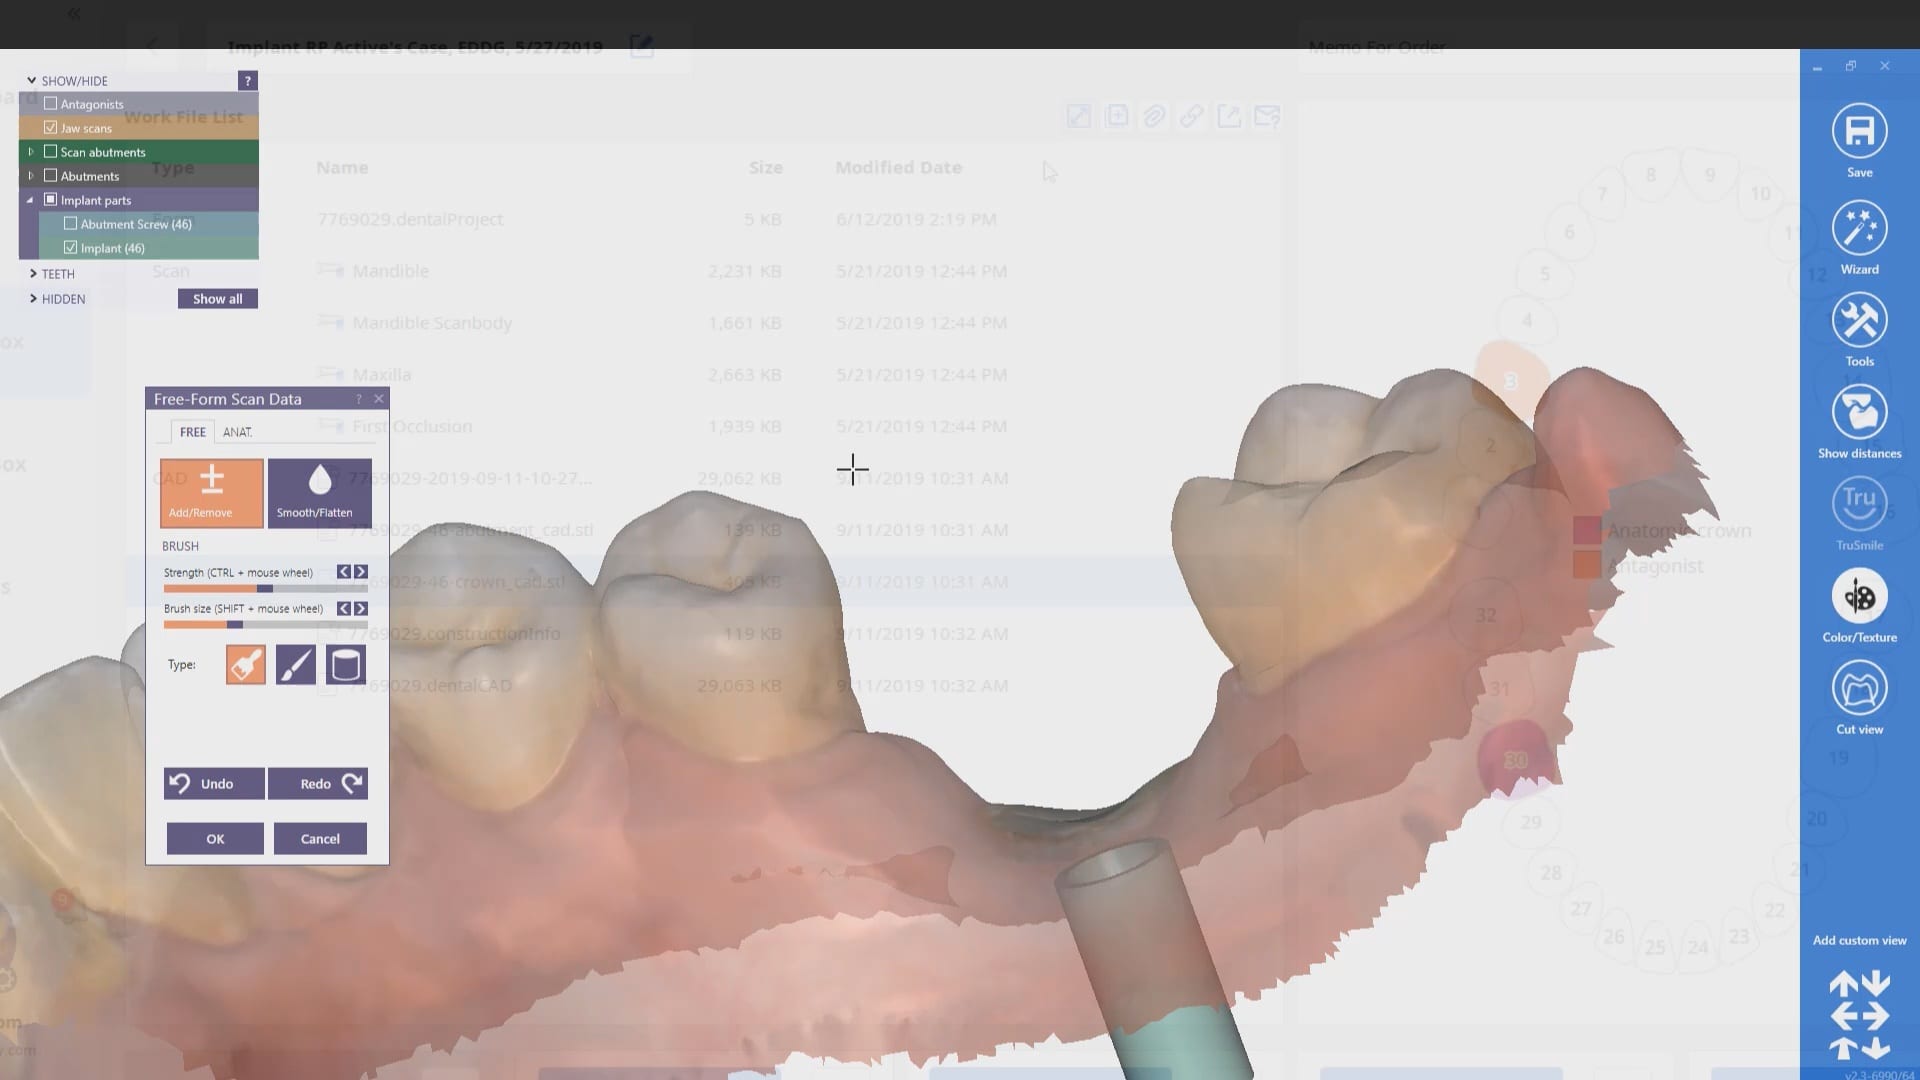
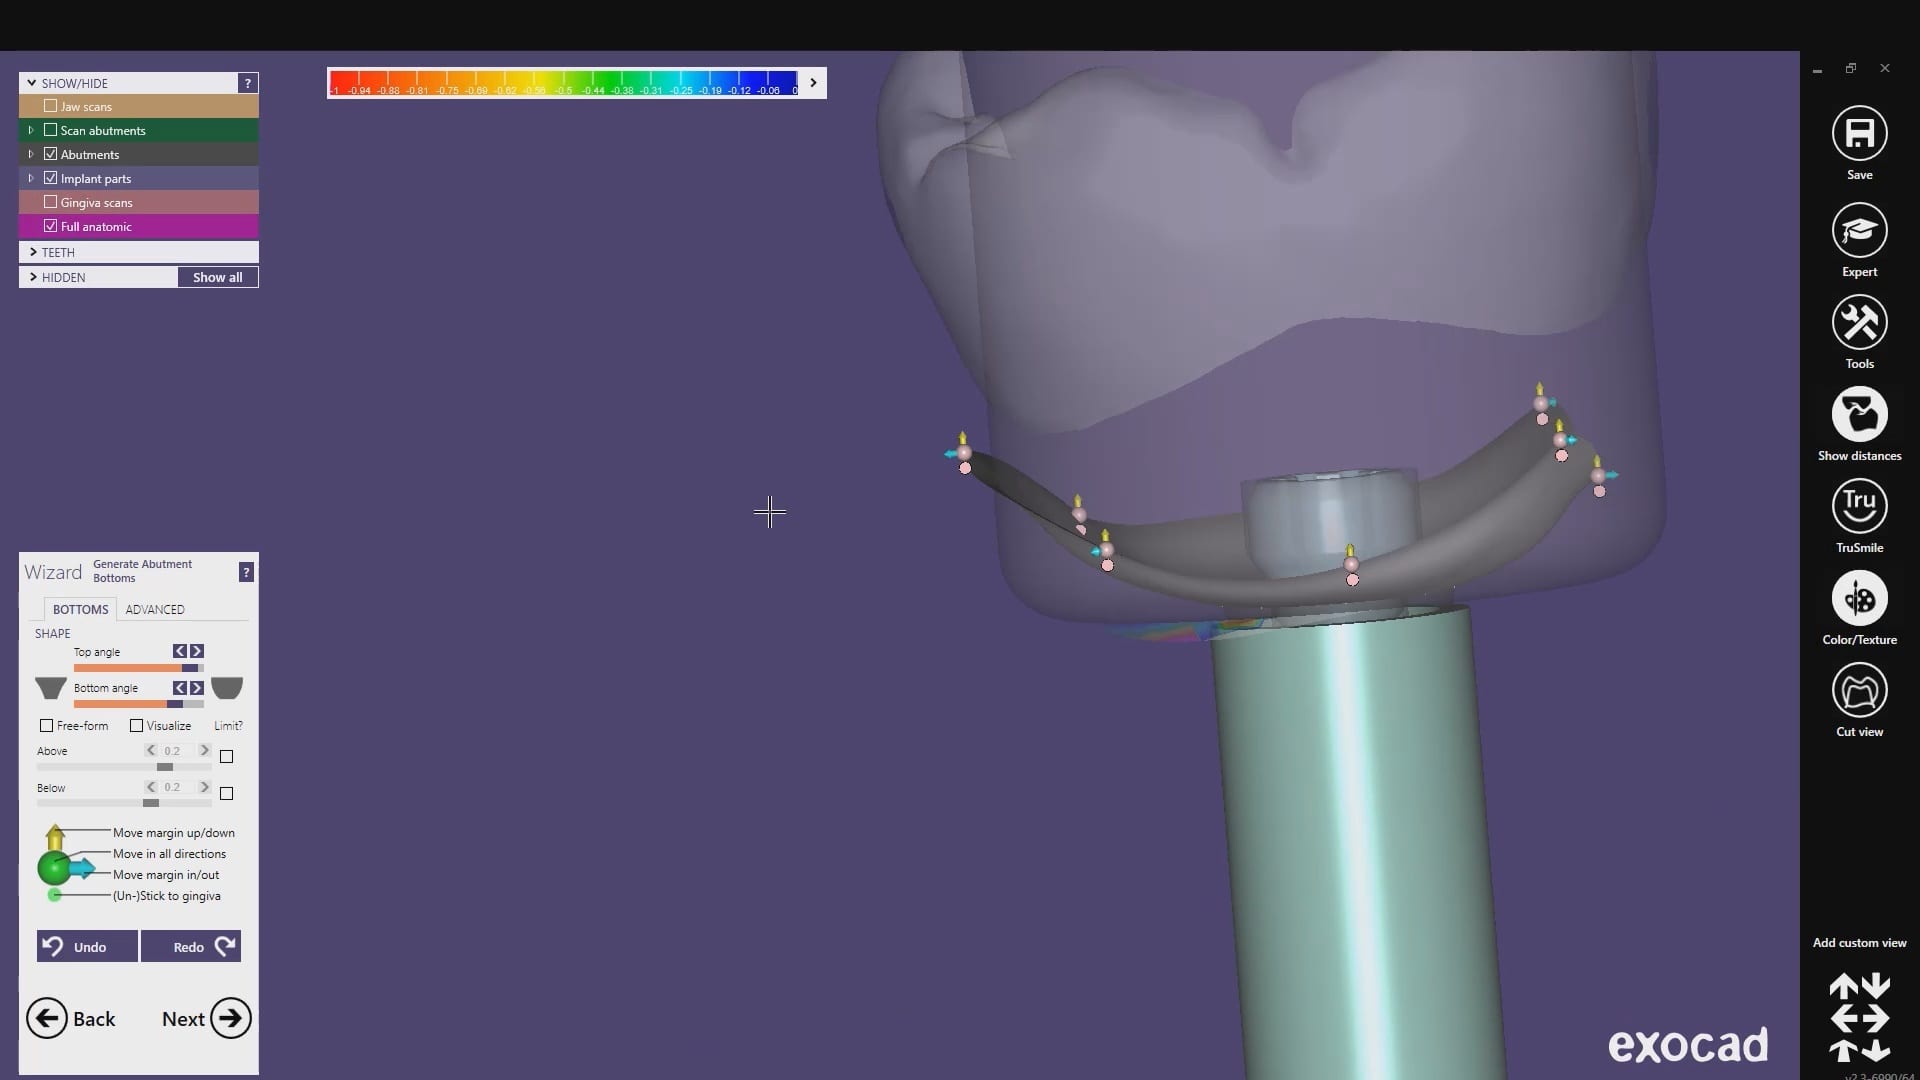
Once the images are captured and the scanbodies are identified, we launch exocad and the data is not only automatically imported into the Computer Aided Design Software, it also plots the fixtures in the correct position and identifies their location and timing so you can proceed with the design of the custom abutment and / or tibase restoration.
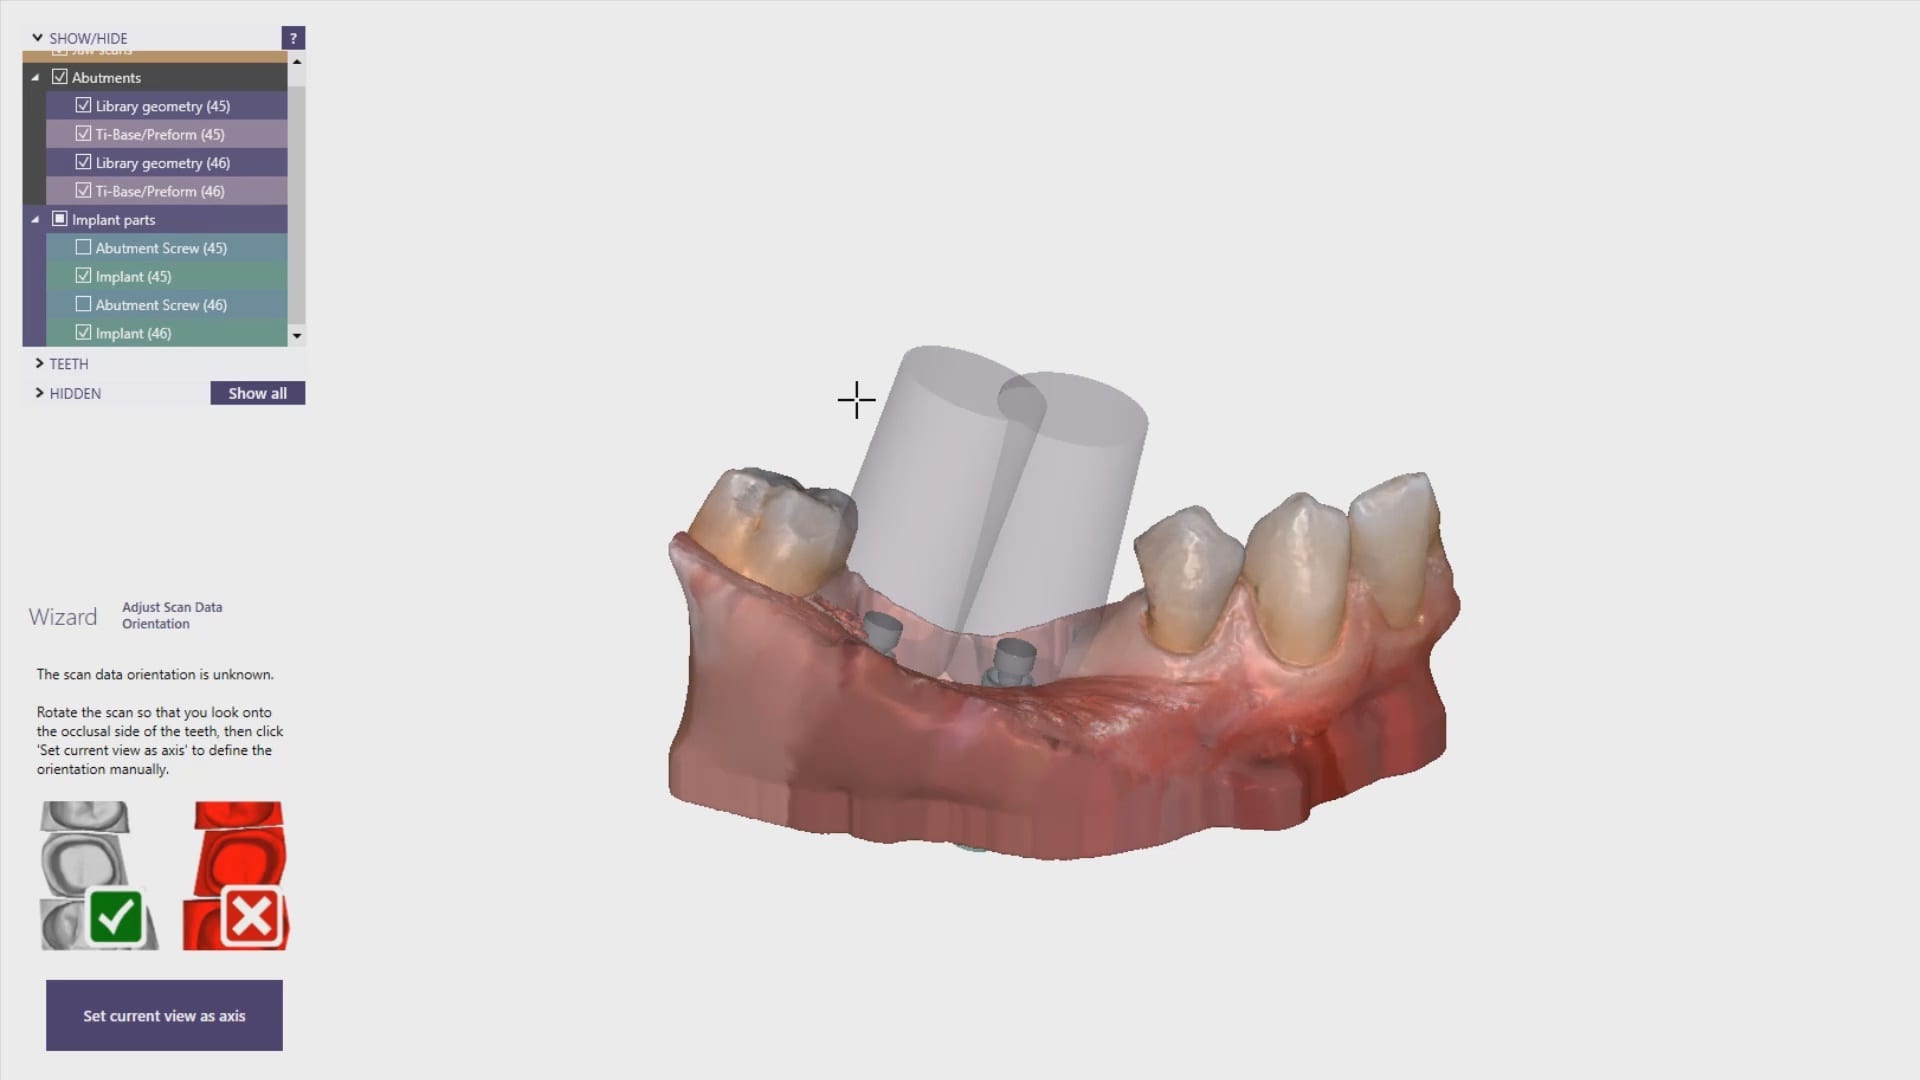
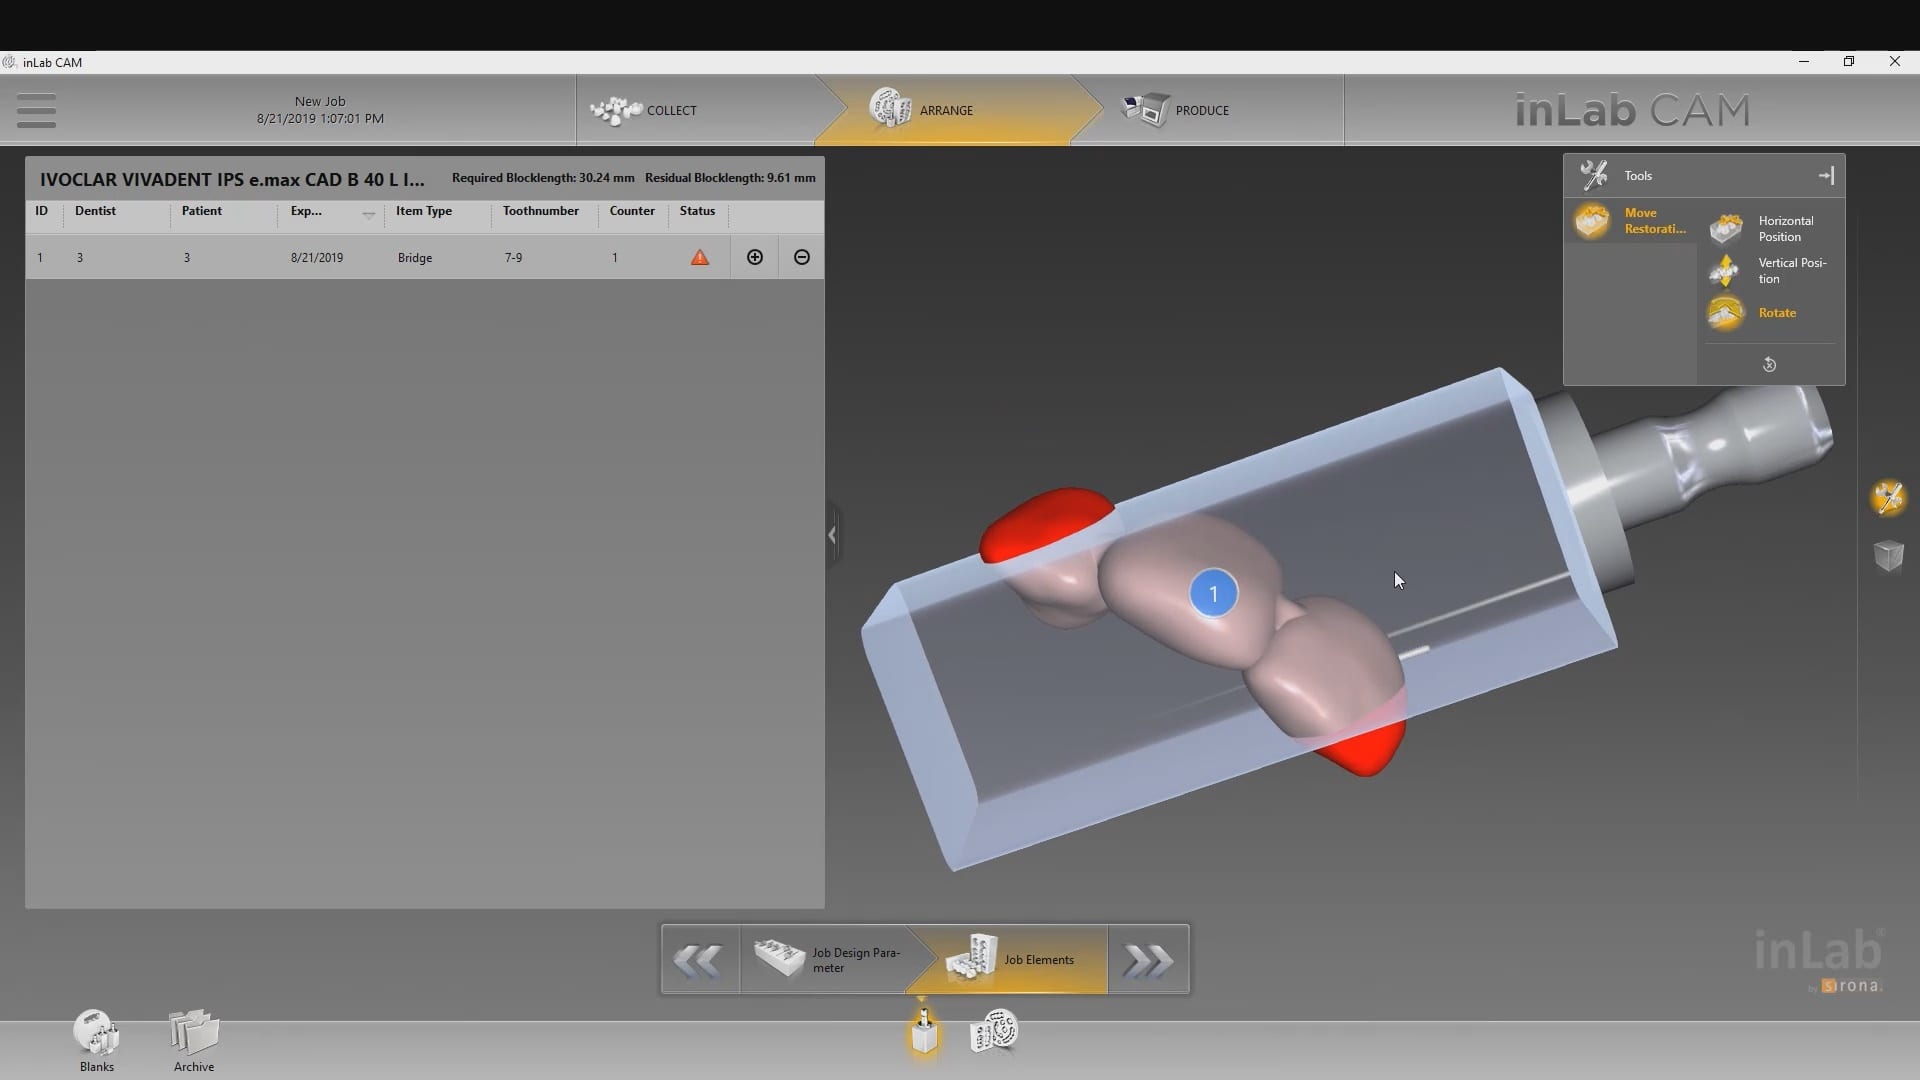
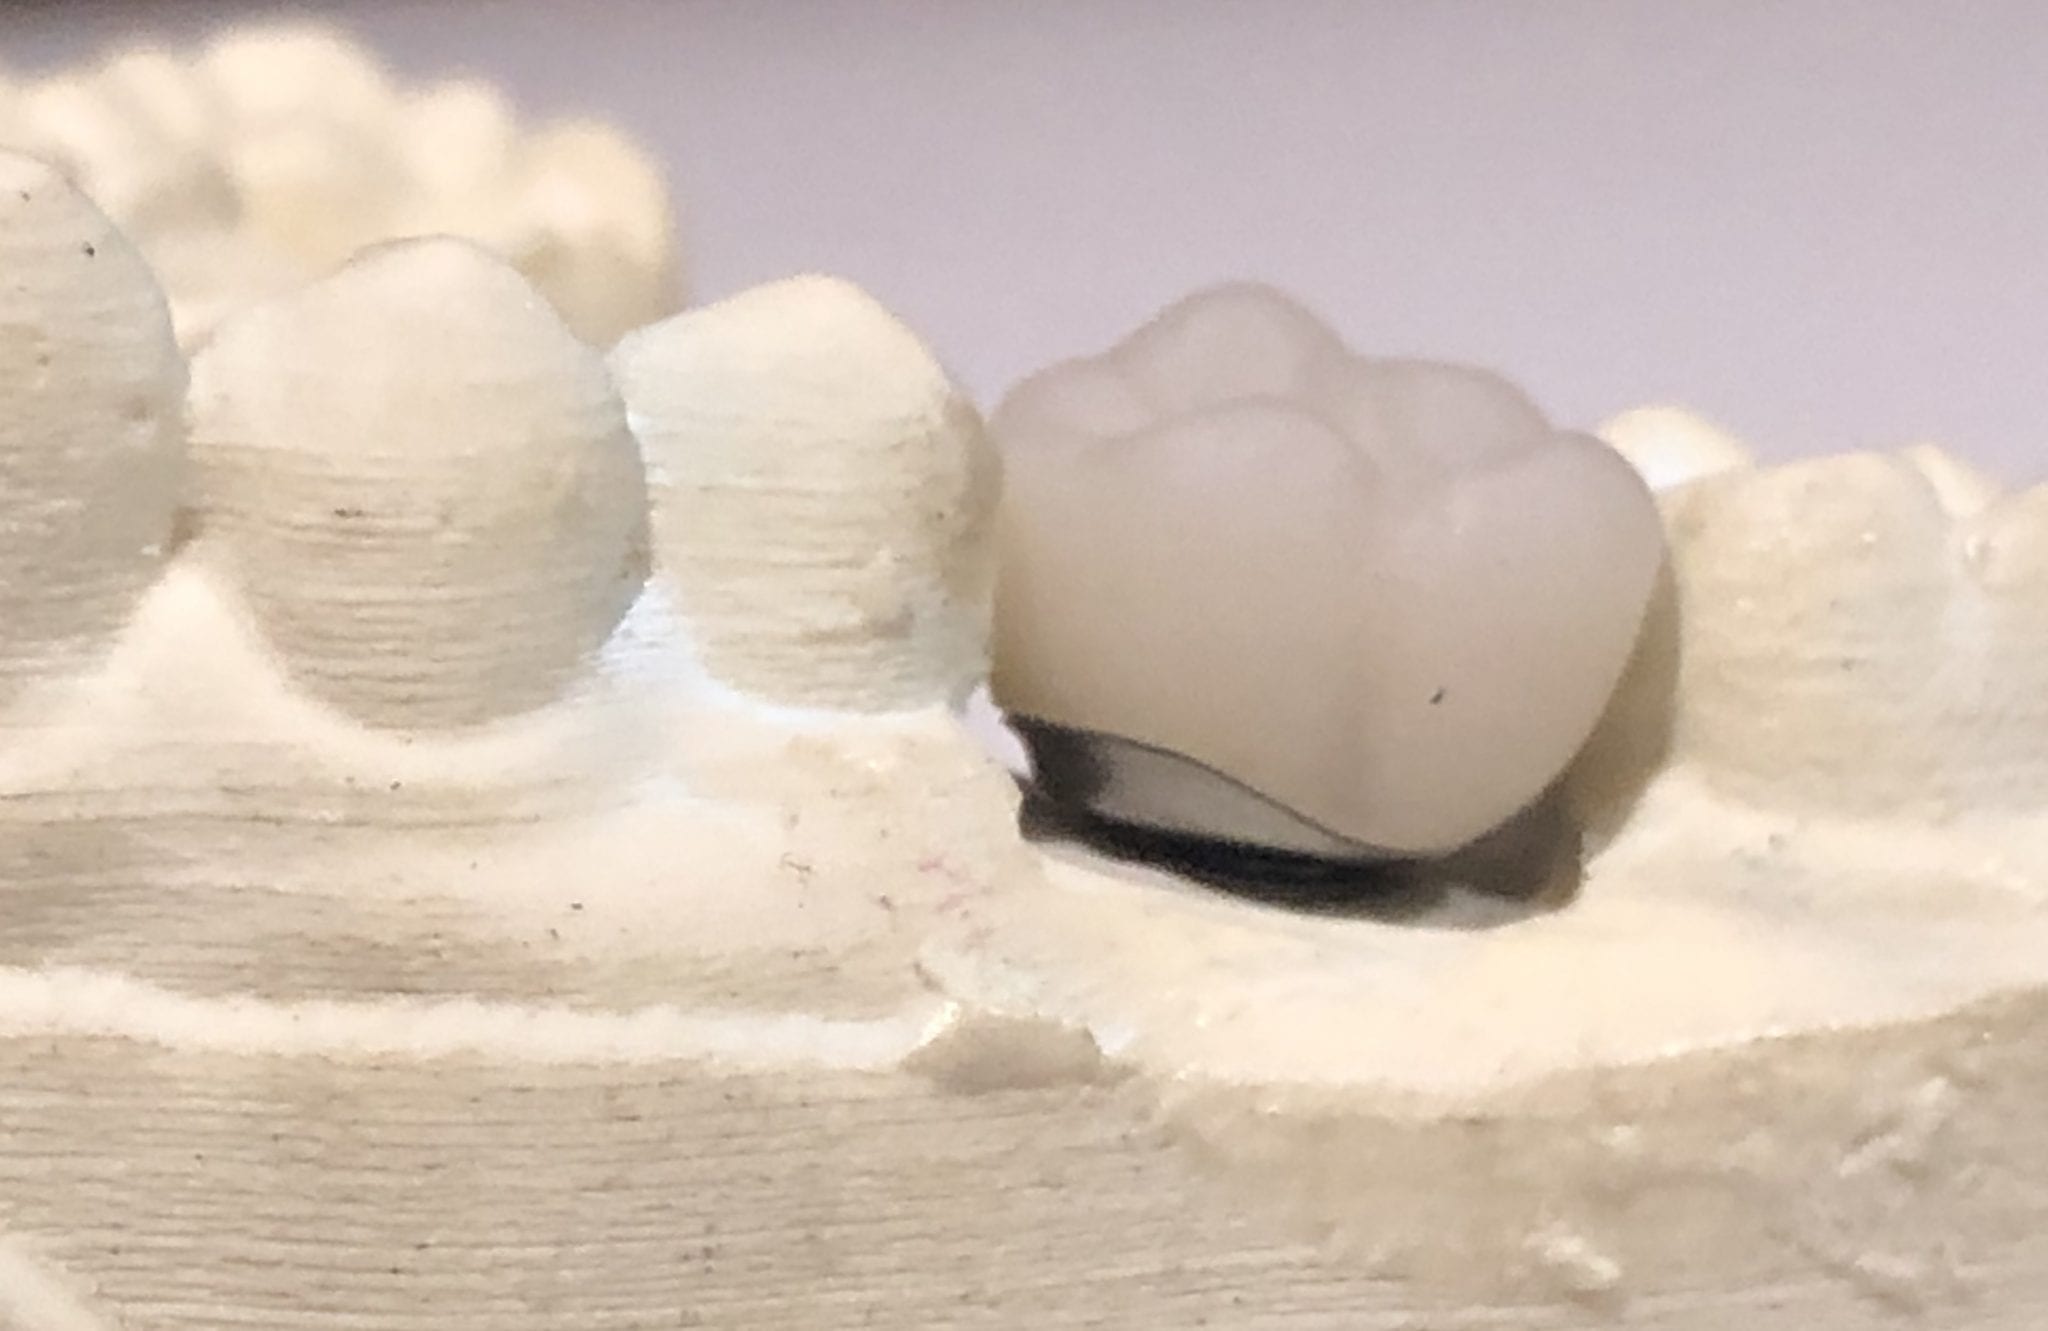
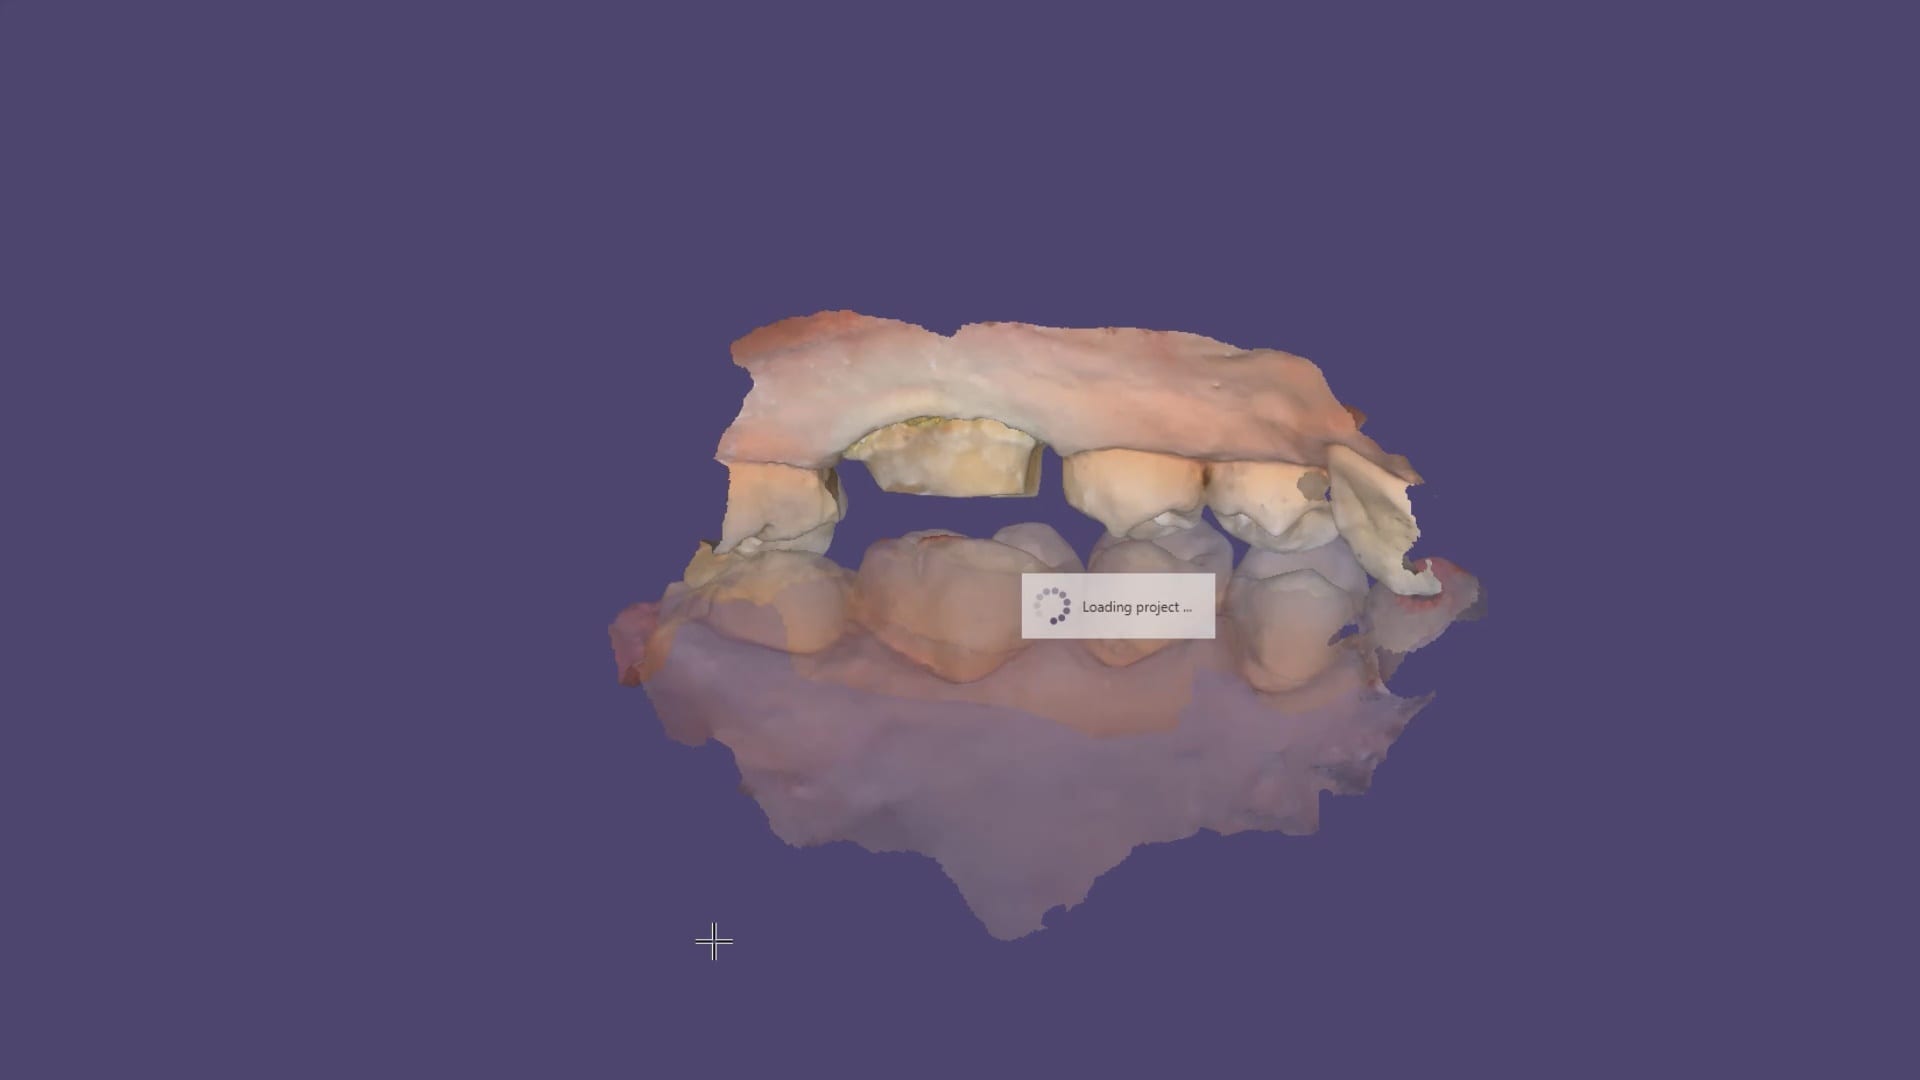
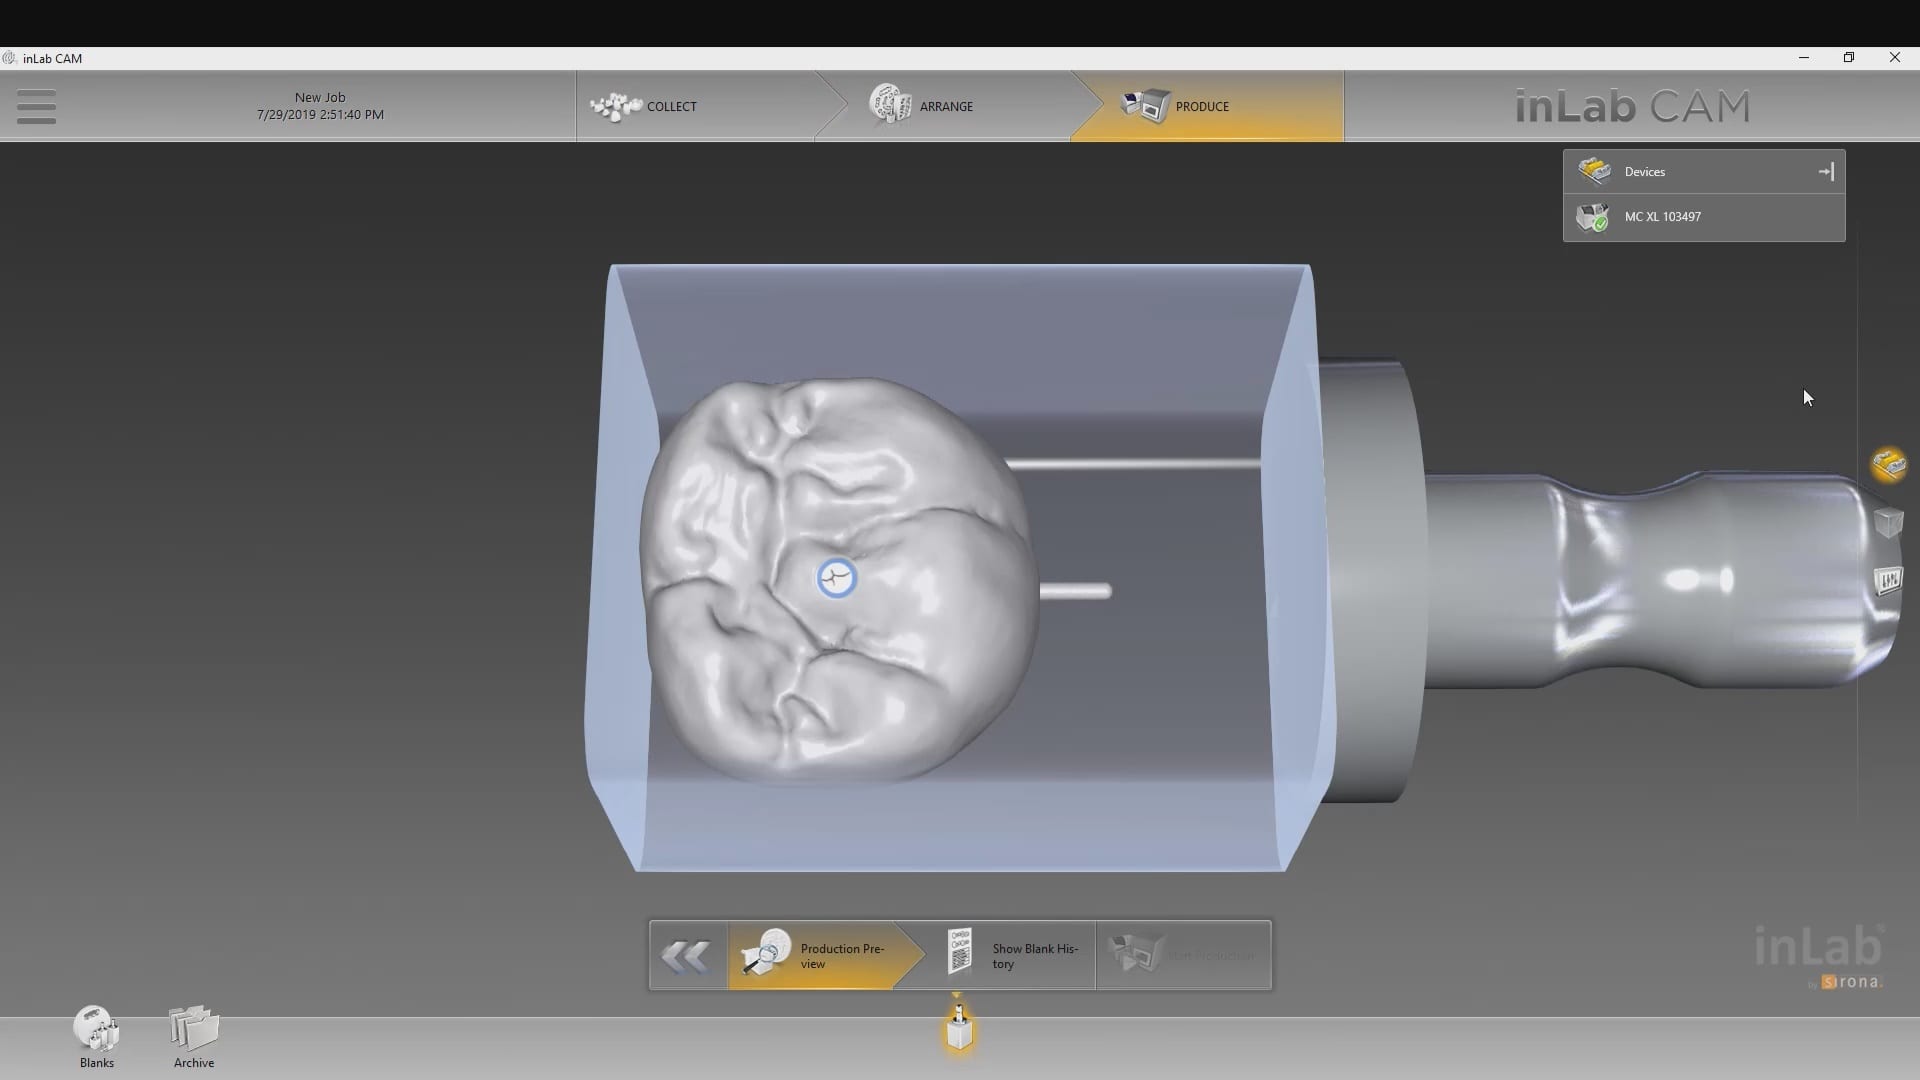
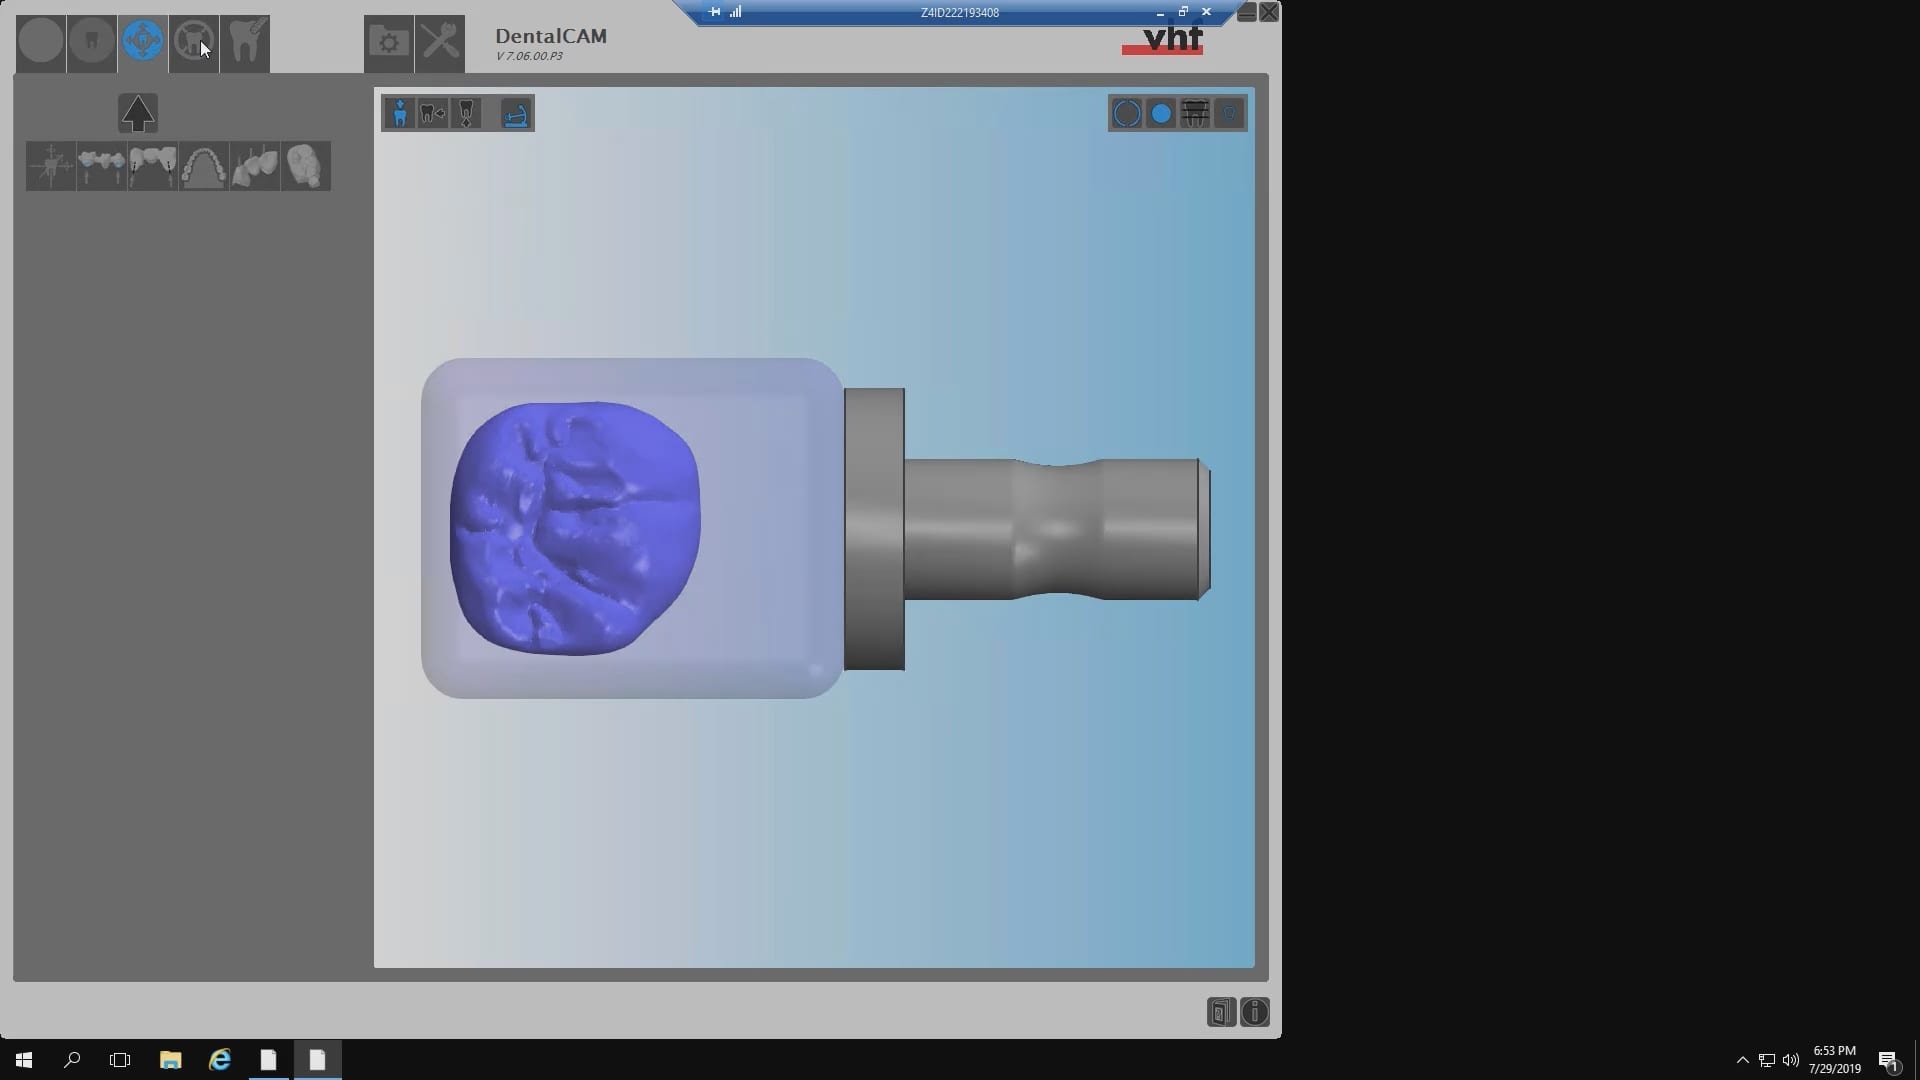
This 4 unit case was imaged in Medit i500 and designed in exocad. The final restoration was taken to CEREC inlab cam. When the construction file is imported into cam, it contains data such as the margin line which is important for the milling machine to know for its tool path calculations.
In this particular situation, the construction file dictated the position of the restoration in the block which would have not allowed for proper milling. Instead of loading the construction file, we imported the stl design, redrew the margins really quickly and were able to mill the two separate (4 unit) case out of a single emax block.
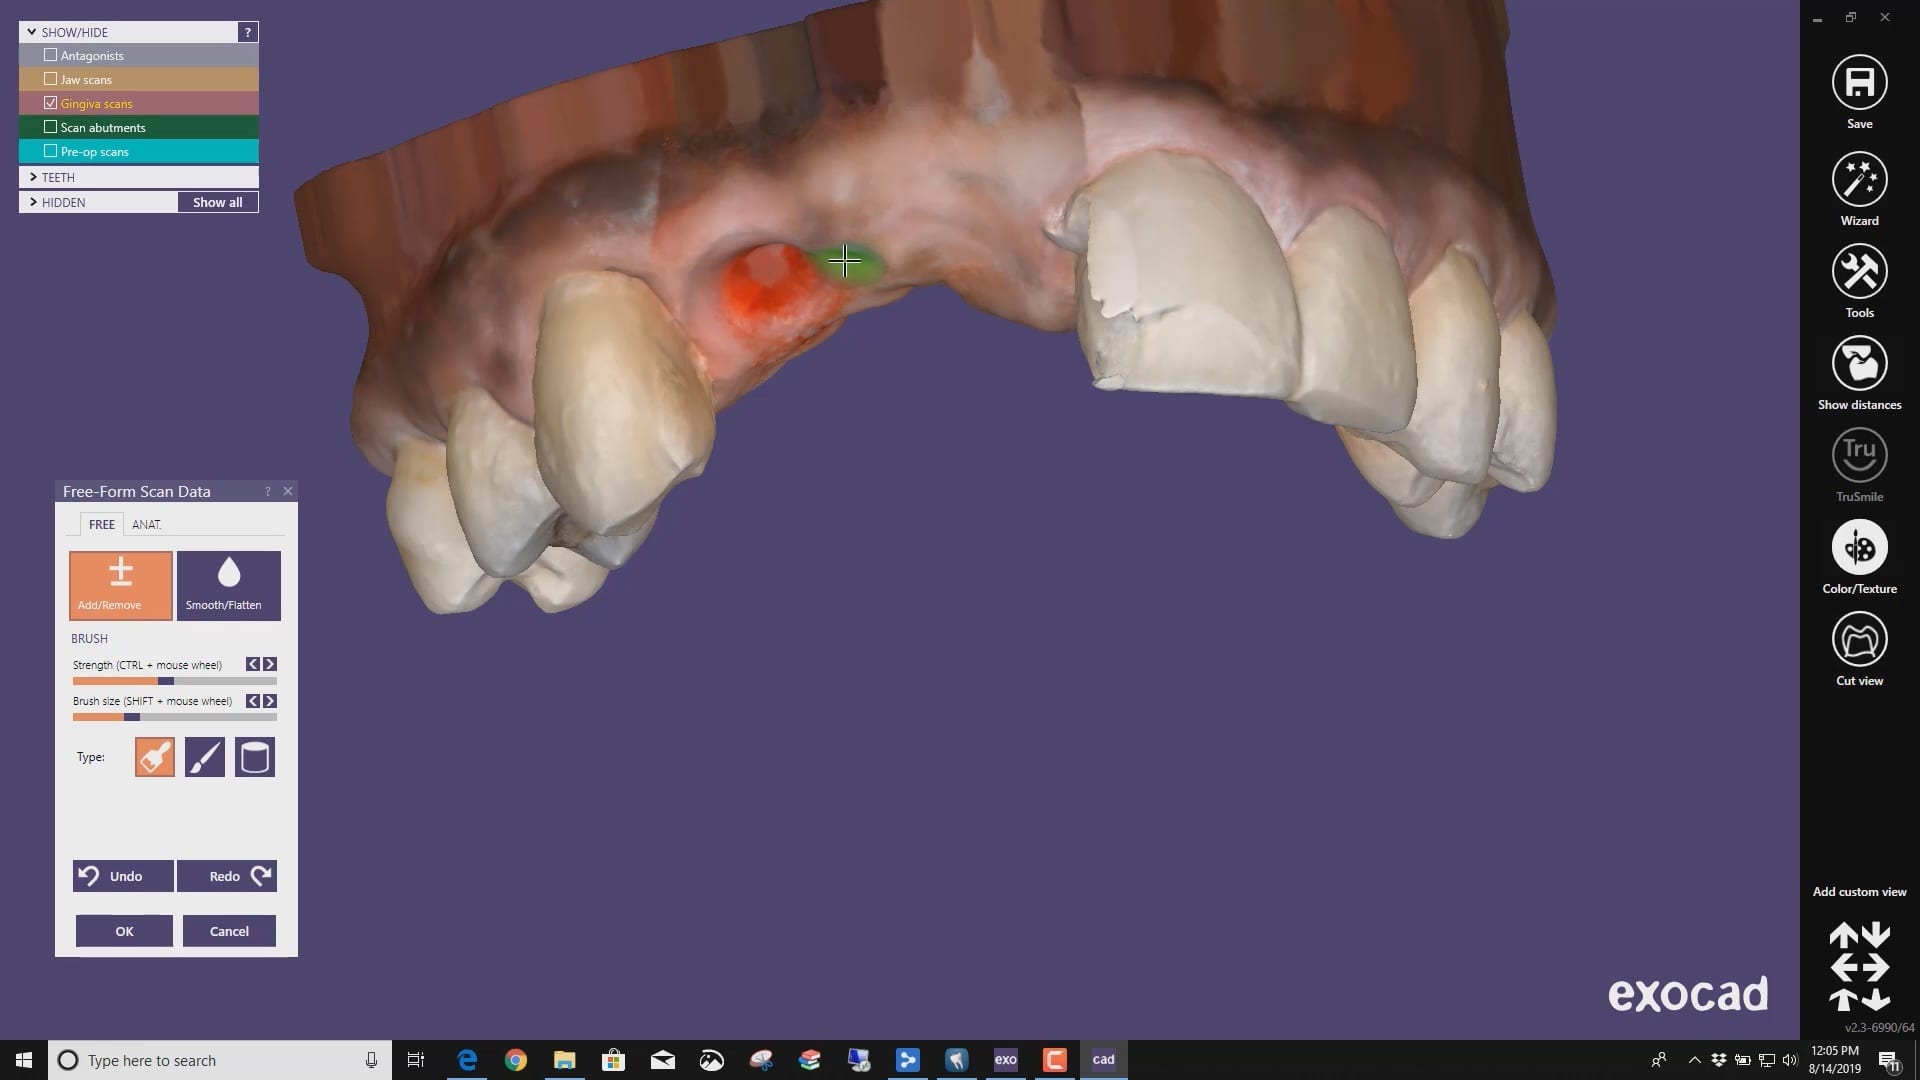
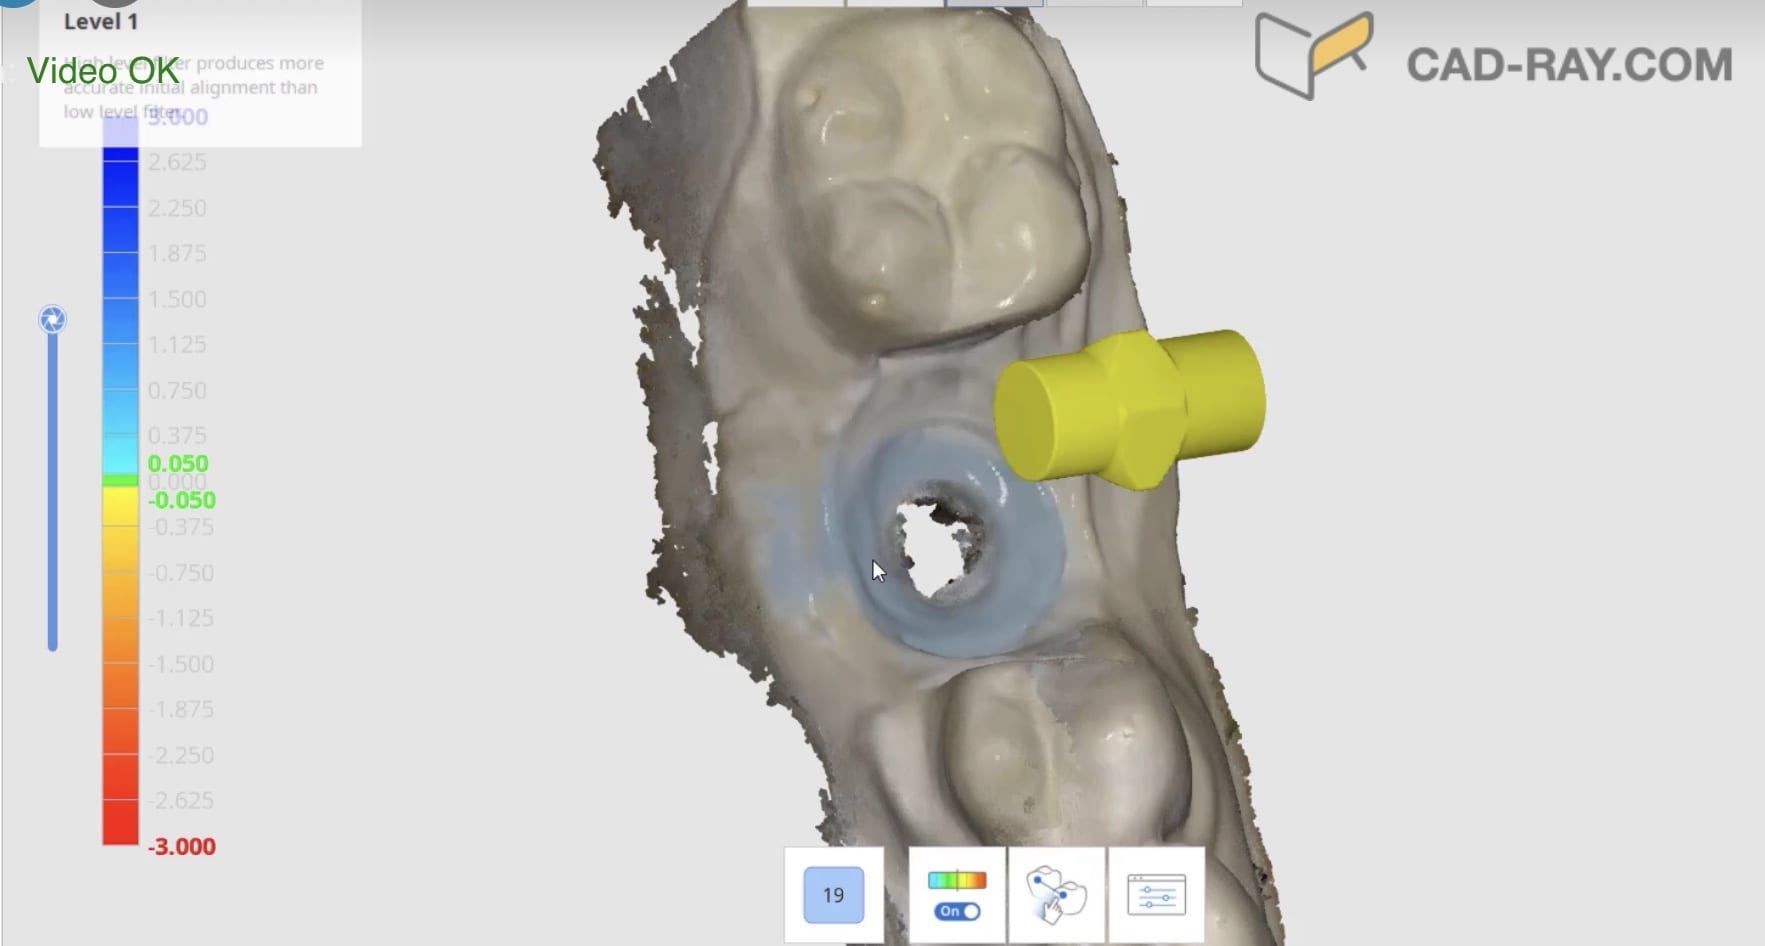
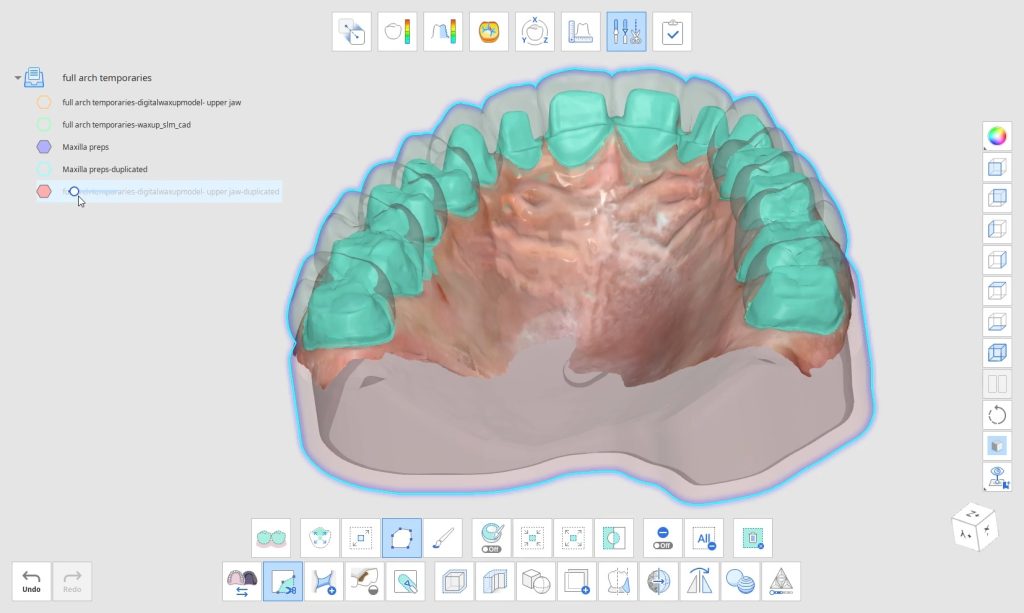
A very common source of frustration for most dentists or those who are new to designing implant crowns is the emergence profile of the abutment or crown. Most of the time, the shape of the tissue dictates the digital design and this article showcases how we used the medit i500 for the intra-oral scan of the patient and then used exocad to design the restorations. Our advanced users can appreciate how we bring the arch model in twice- once as the maxillary model and once as the gingiva model. We then digital sculpt the tissue to create the proper profile yet we still have the original model to reflect back to asses the changes.
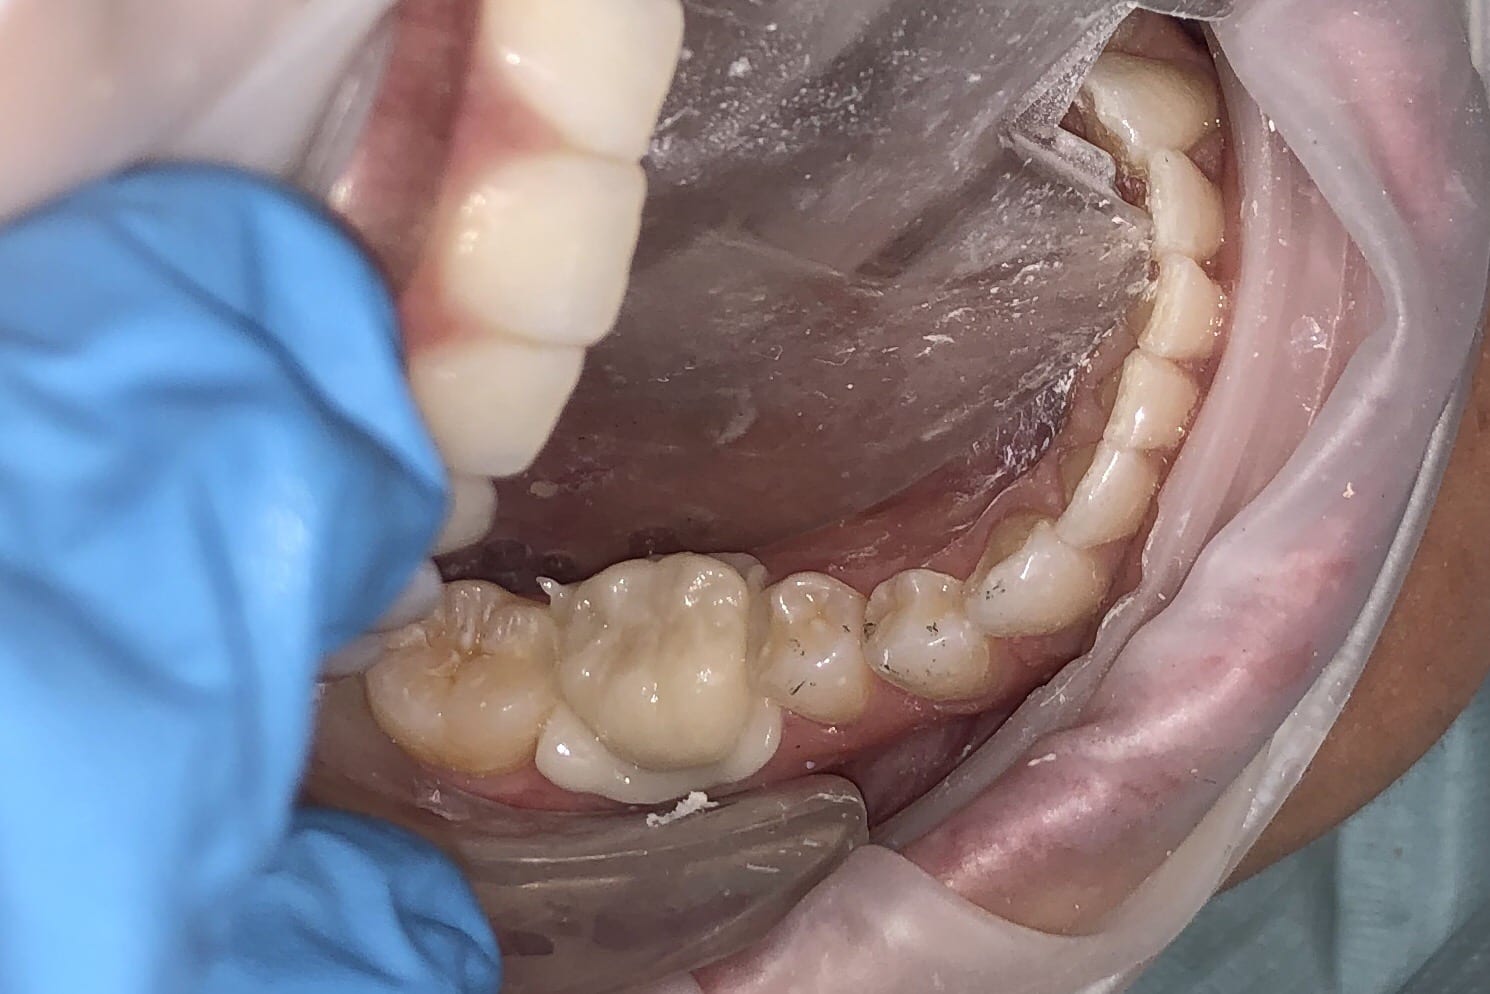
Few things in dentistry that can be as frustrating as seating a second molar restoration, whether you are doing same day dentistry or having a lab made prosthesis delivered. Here is a protocol we recommend that you follow to dramatically reduce surprises and post op adjustments. In this particular clinical case a zirconia crown debonded and we elected to fabricate an in-office emax restoration. The sequence is as follows:
While the patient is anesthetized and you are waiting for the onset of anesthesia, capture the opposing impression and the arch models. Trim away the prep digitally and then proceed to the buccal bite capture
Do NOT capture the bite until you verify clearance. In the sequences of videos that follow, watch how we use the Medit i500 to capture digital pictures of the clearance
Once we verify clearance, we image the bite. You have the option at this point to see how well your occlusal stamps match the digital stamps if you want to. A large deviation may mean the jaw settled or the patient moved during the bite capture. Note that unlike conventional dentistry, you capture the bite here BEFORE the prep is finalized
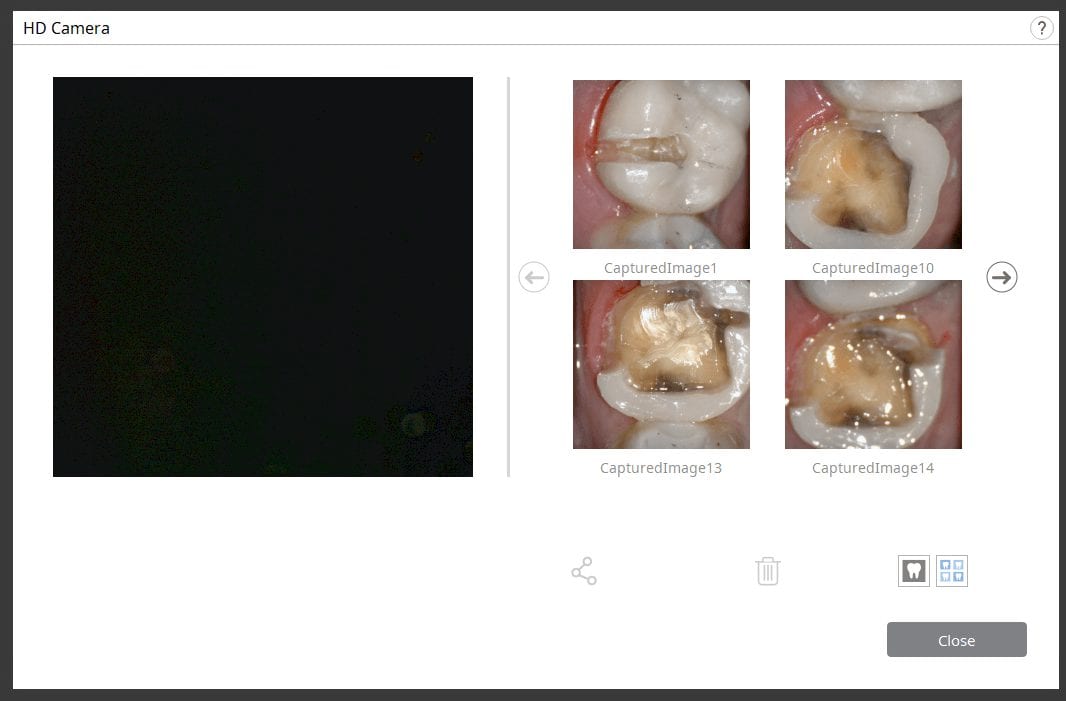
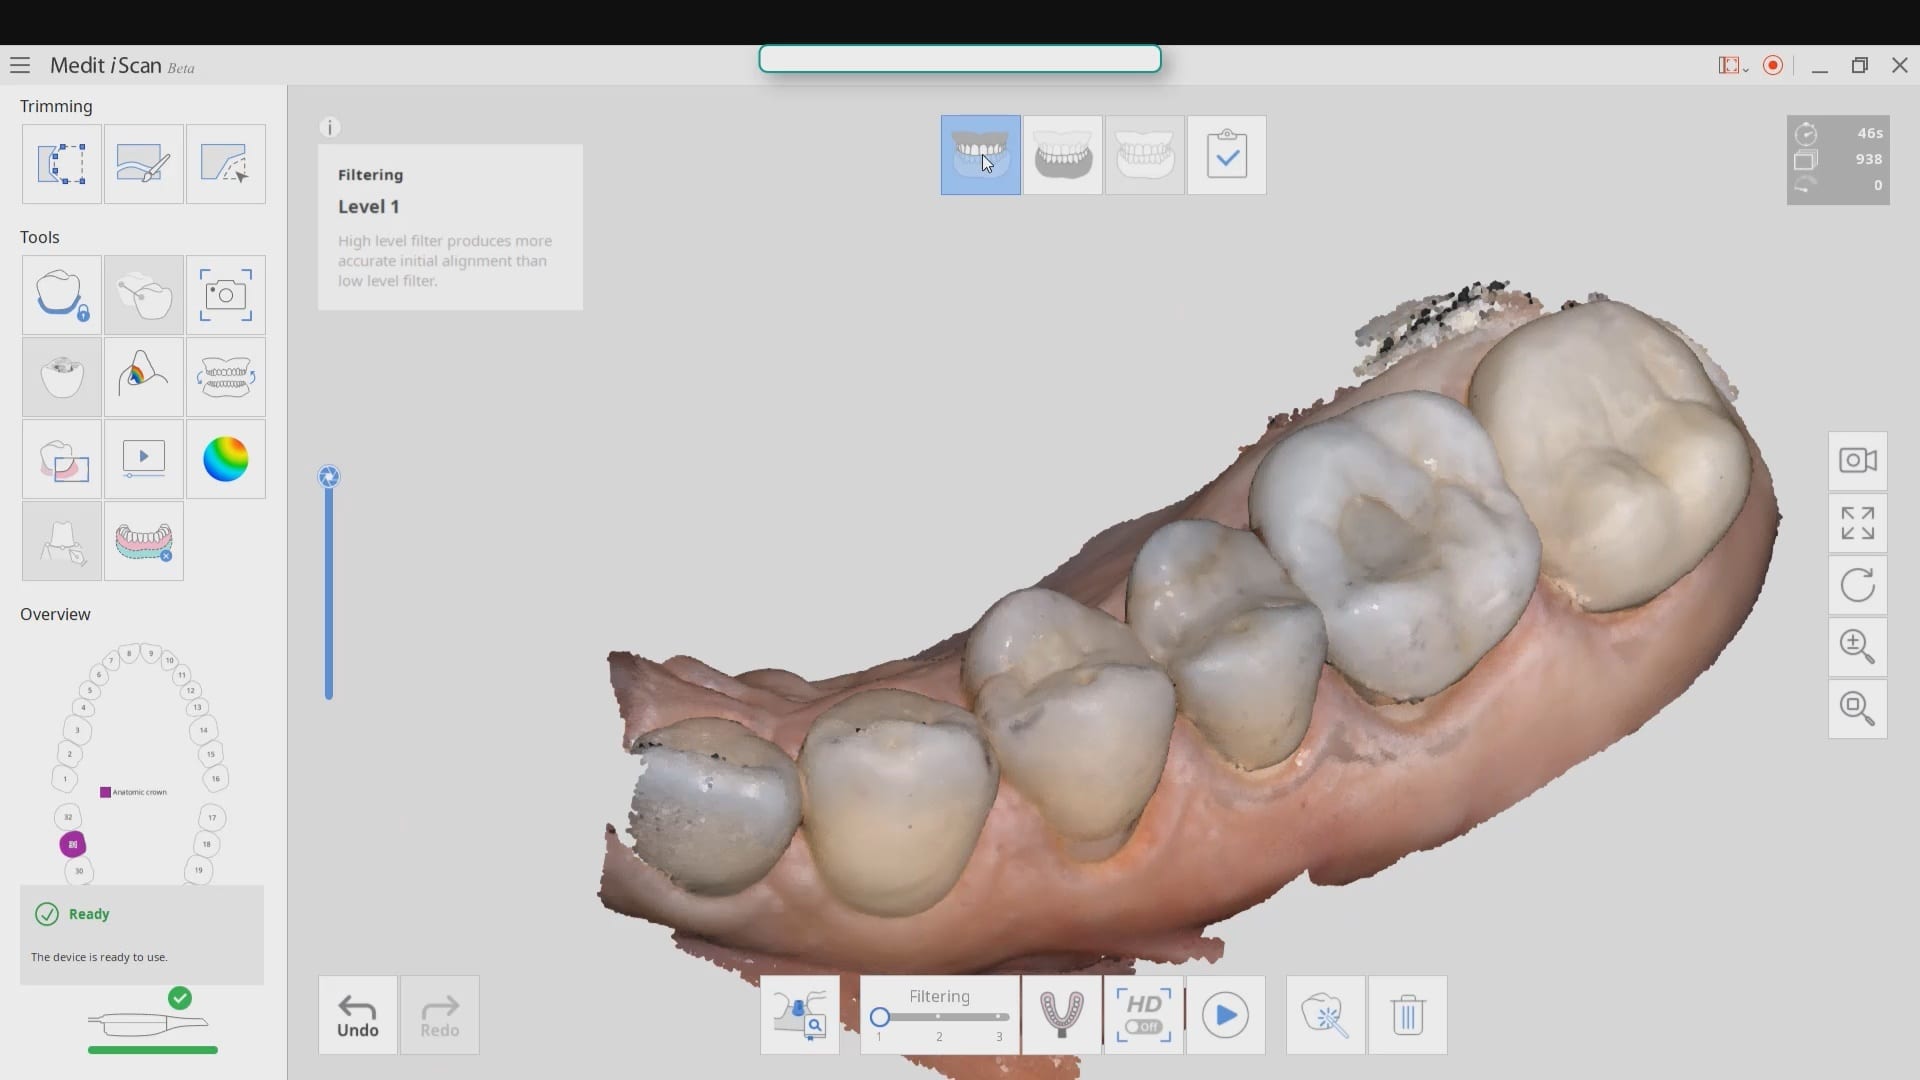
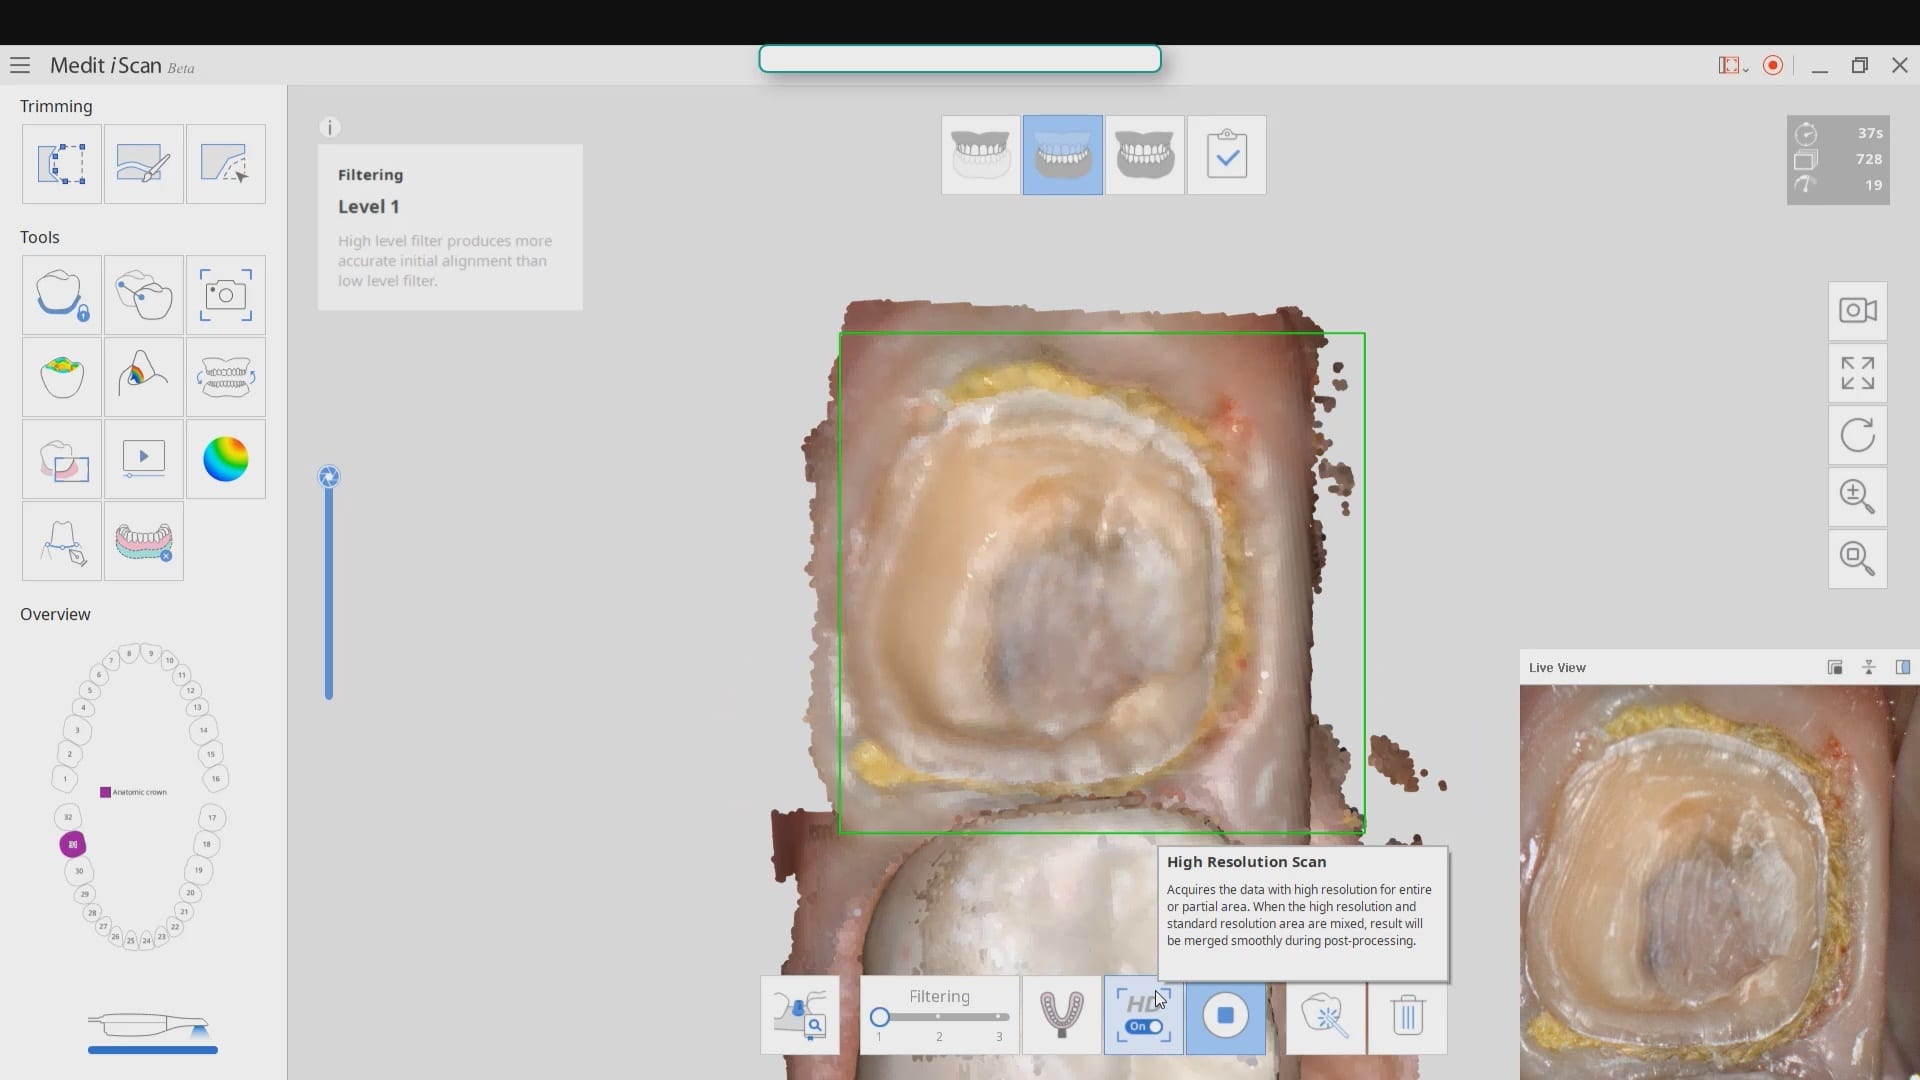
Once you achieve isolation you can finalize the prep and retract the tissue and capture the prep. We elected to capture the preparation in HD mode
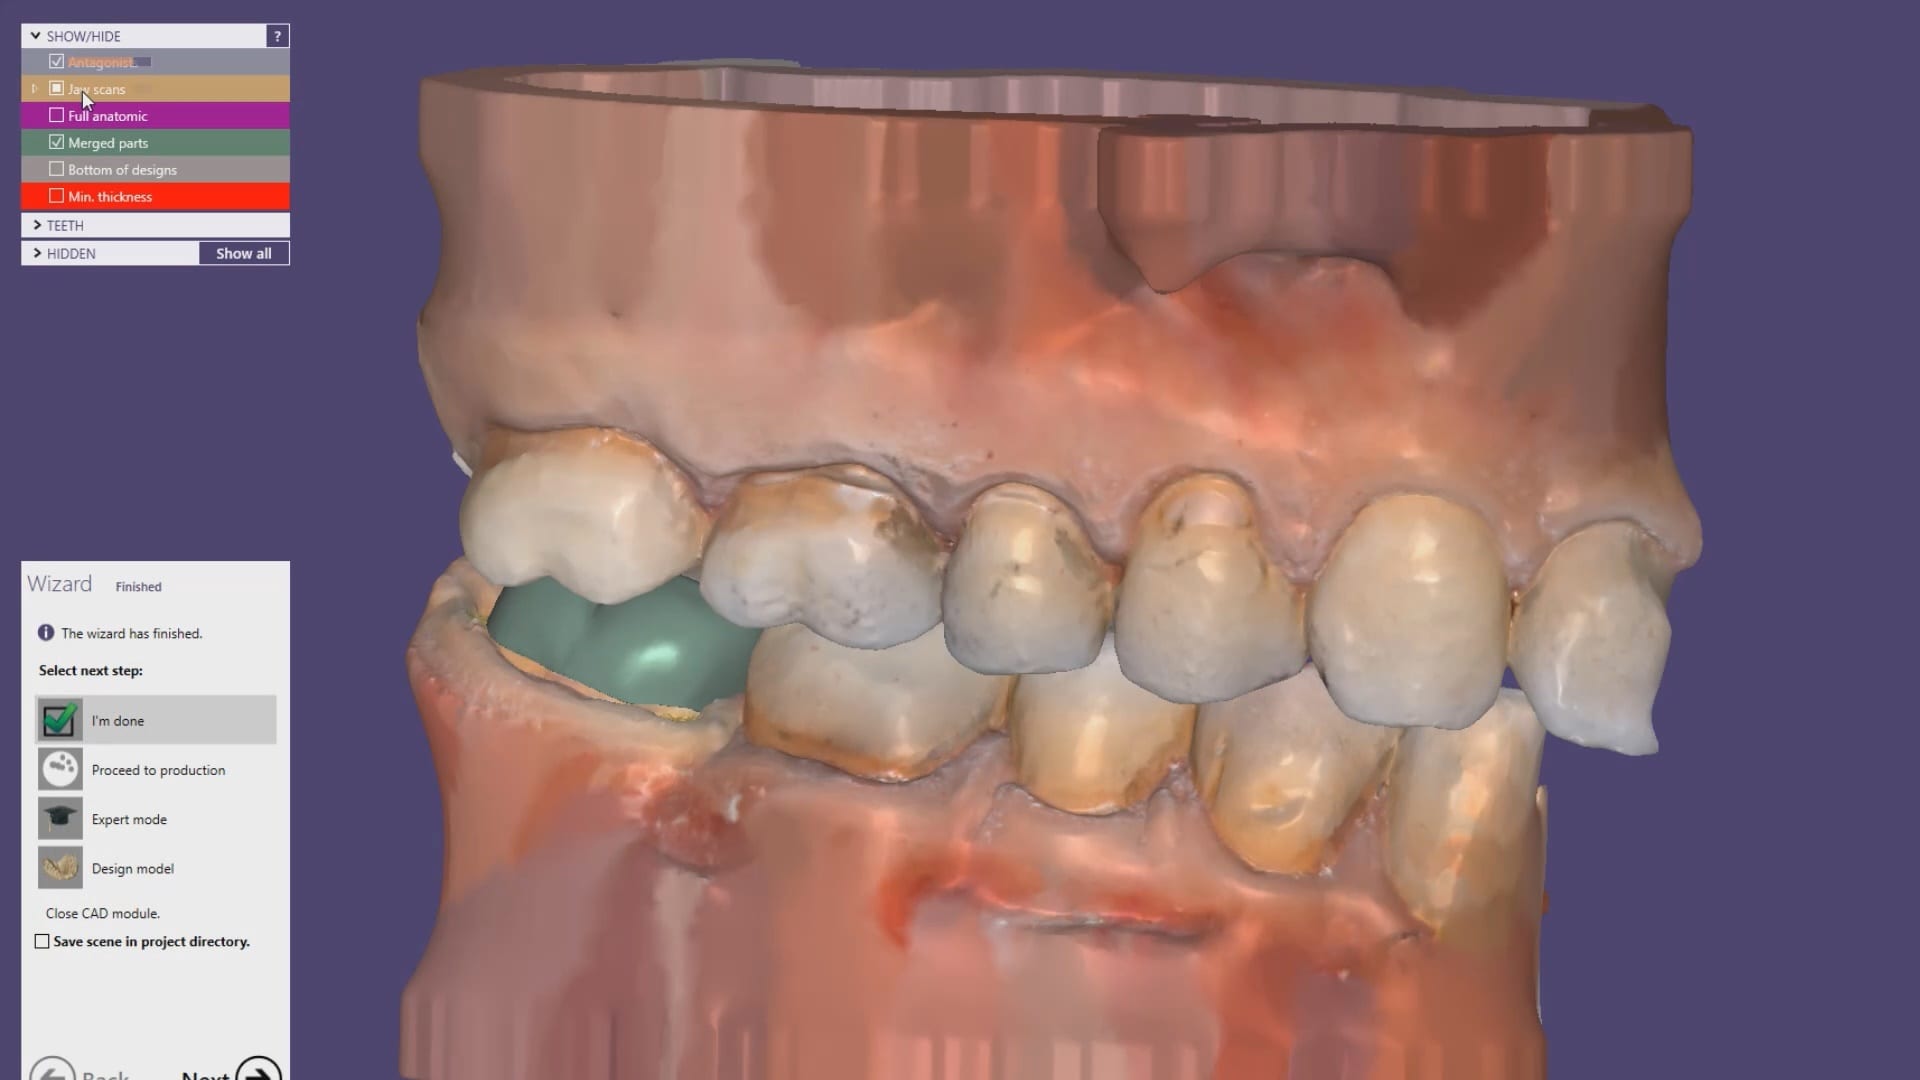
The case is then immediately imported into the CAD software for design and fabrication
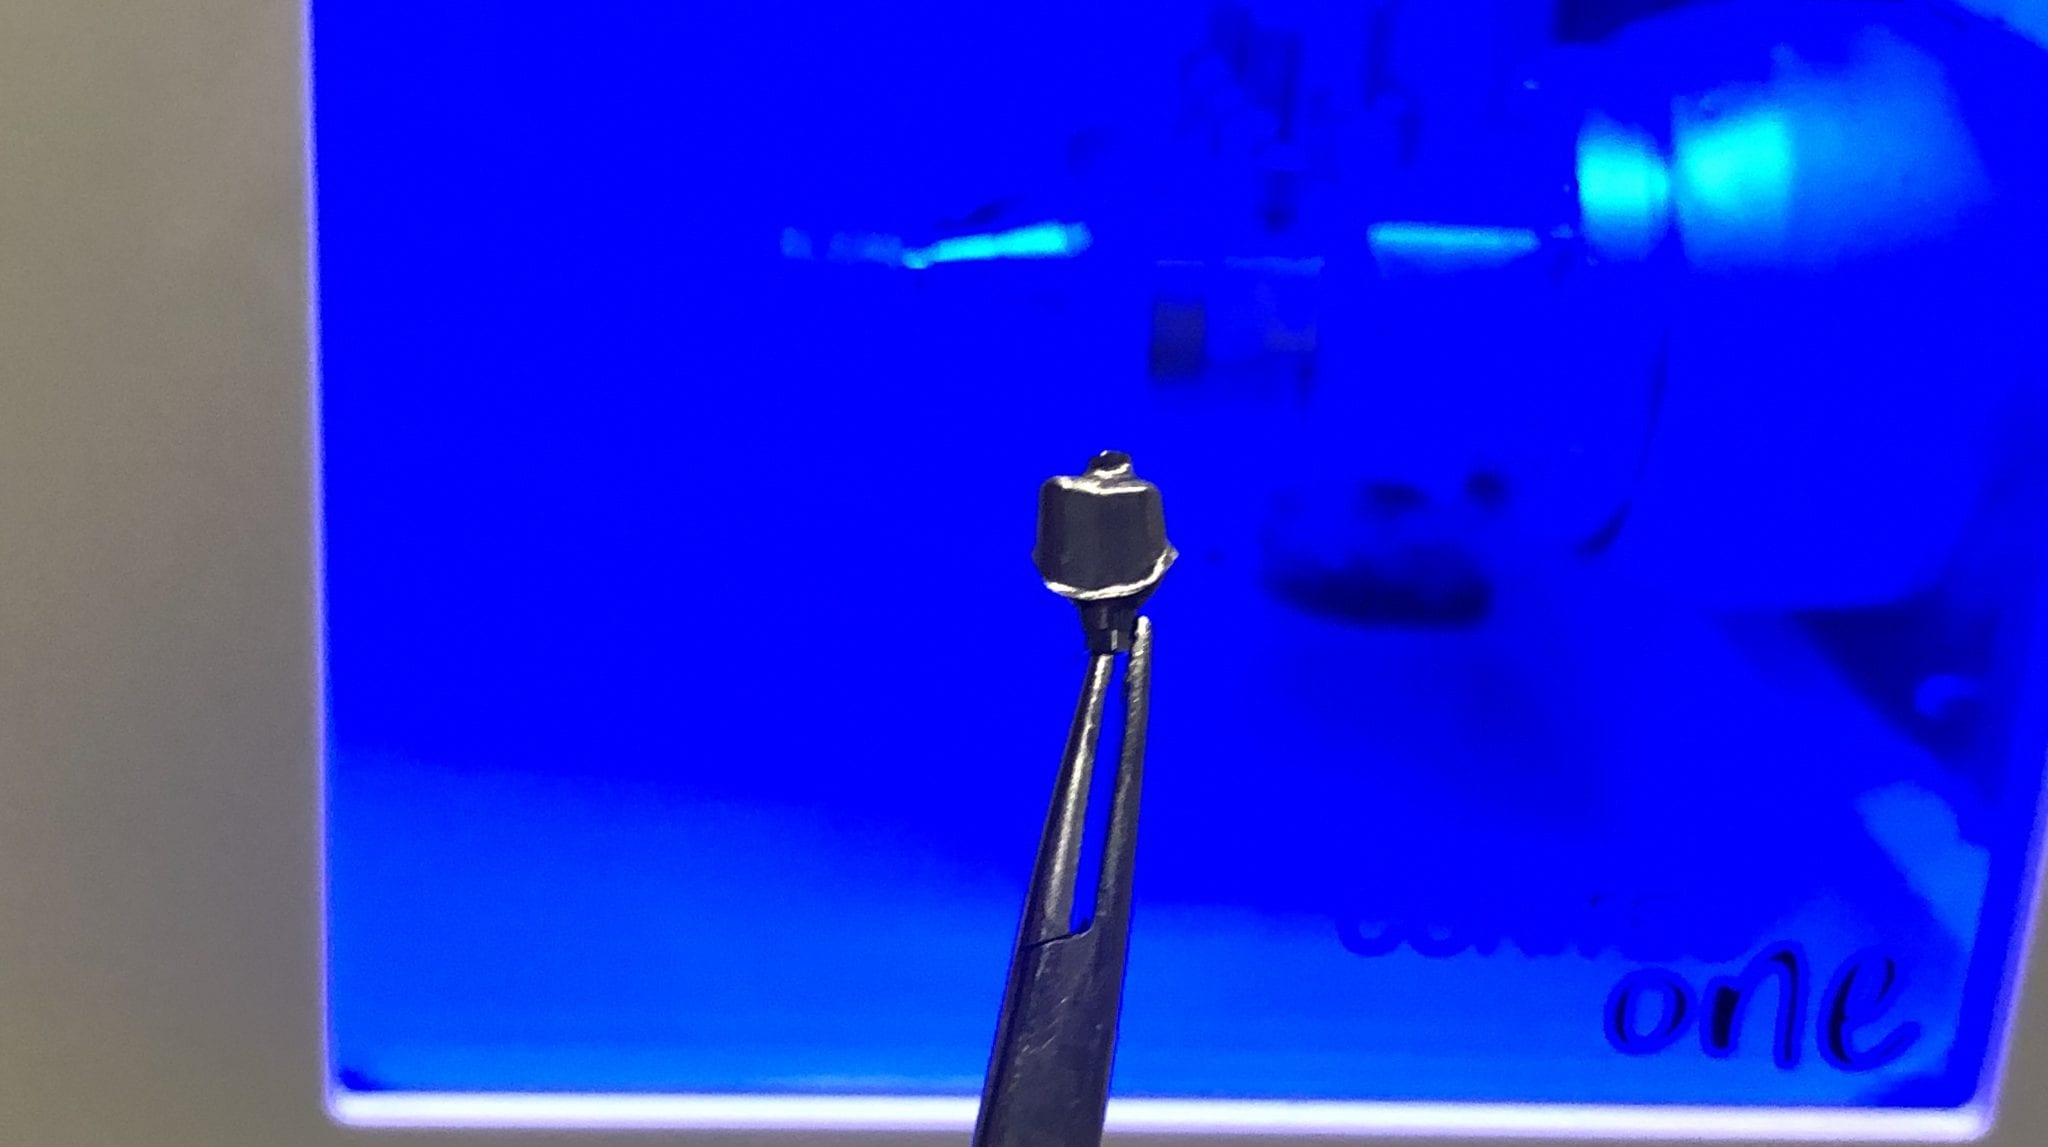
With the Meditlink software you can design a case and then export the designs and take them to any milling machine of your choice. In this demonstration, we use the CORiTEC ONE to mill out the metal abutment in 45 minutes. This procedure is not intended to be a single appointment visit so timing is not critical and you don’t place undue wear and tear on the milling machine.
The crowns were milled with two different milling machines. A Celtra Duo block was used and milled with the CEREC MCXL and retrofitted to the abutment to verify the fit and accuracy. The same crown stl was milled out of Vita material in the imes icore machine. The whole point of the demonstration is that you can take scans from any intra-oral scan, take it to CAD software (in this case exocad) and then export the case and take it to any printer or milling machine of your choice. You must make sure critical information is accurately transferred from your CAD software to your CAM software, which is generally the construction / project file that accompanies the STL files of the prosthetic components
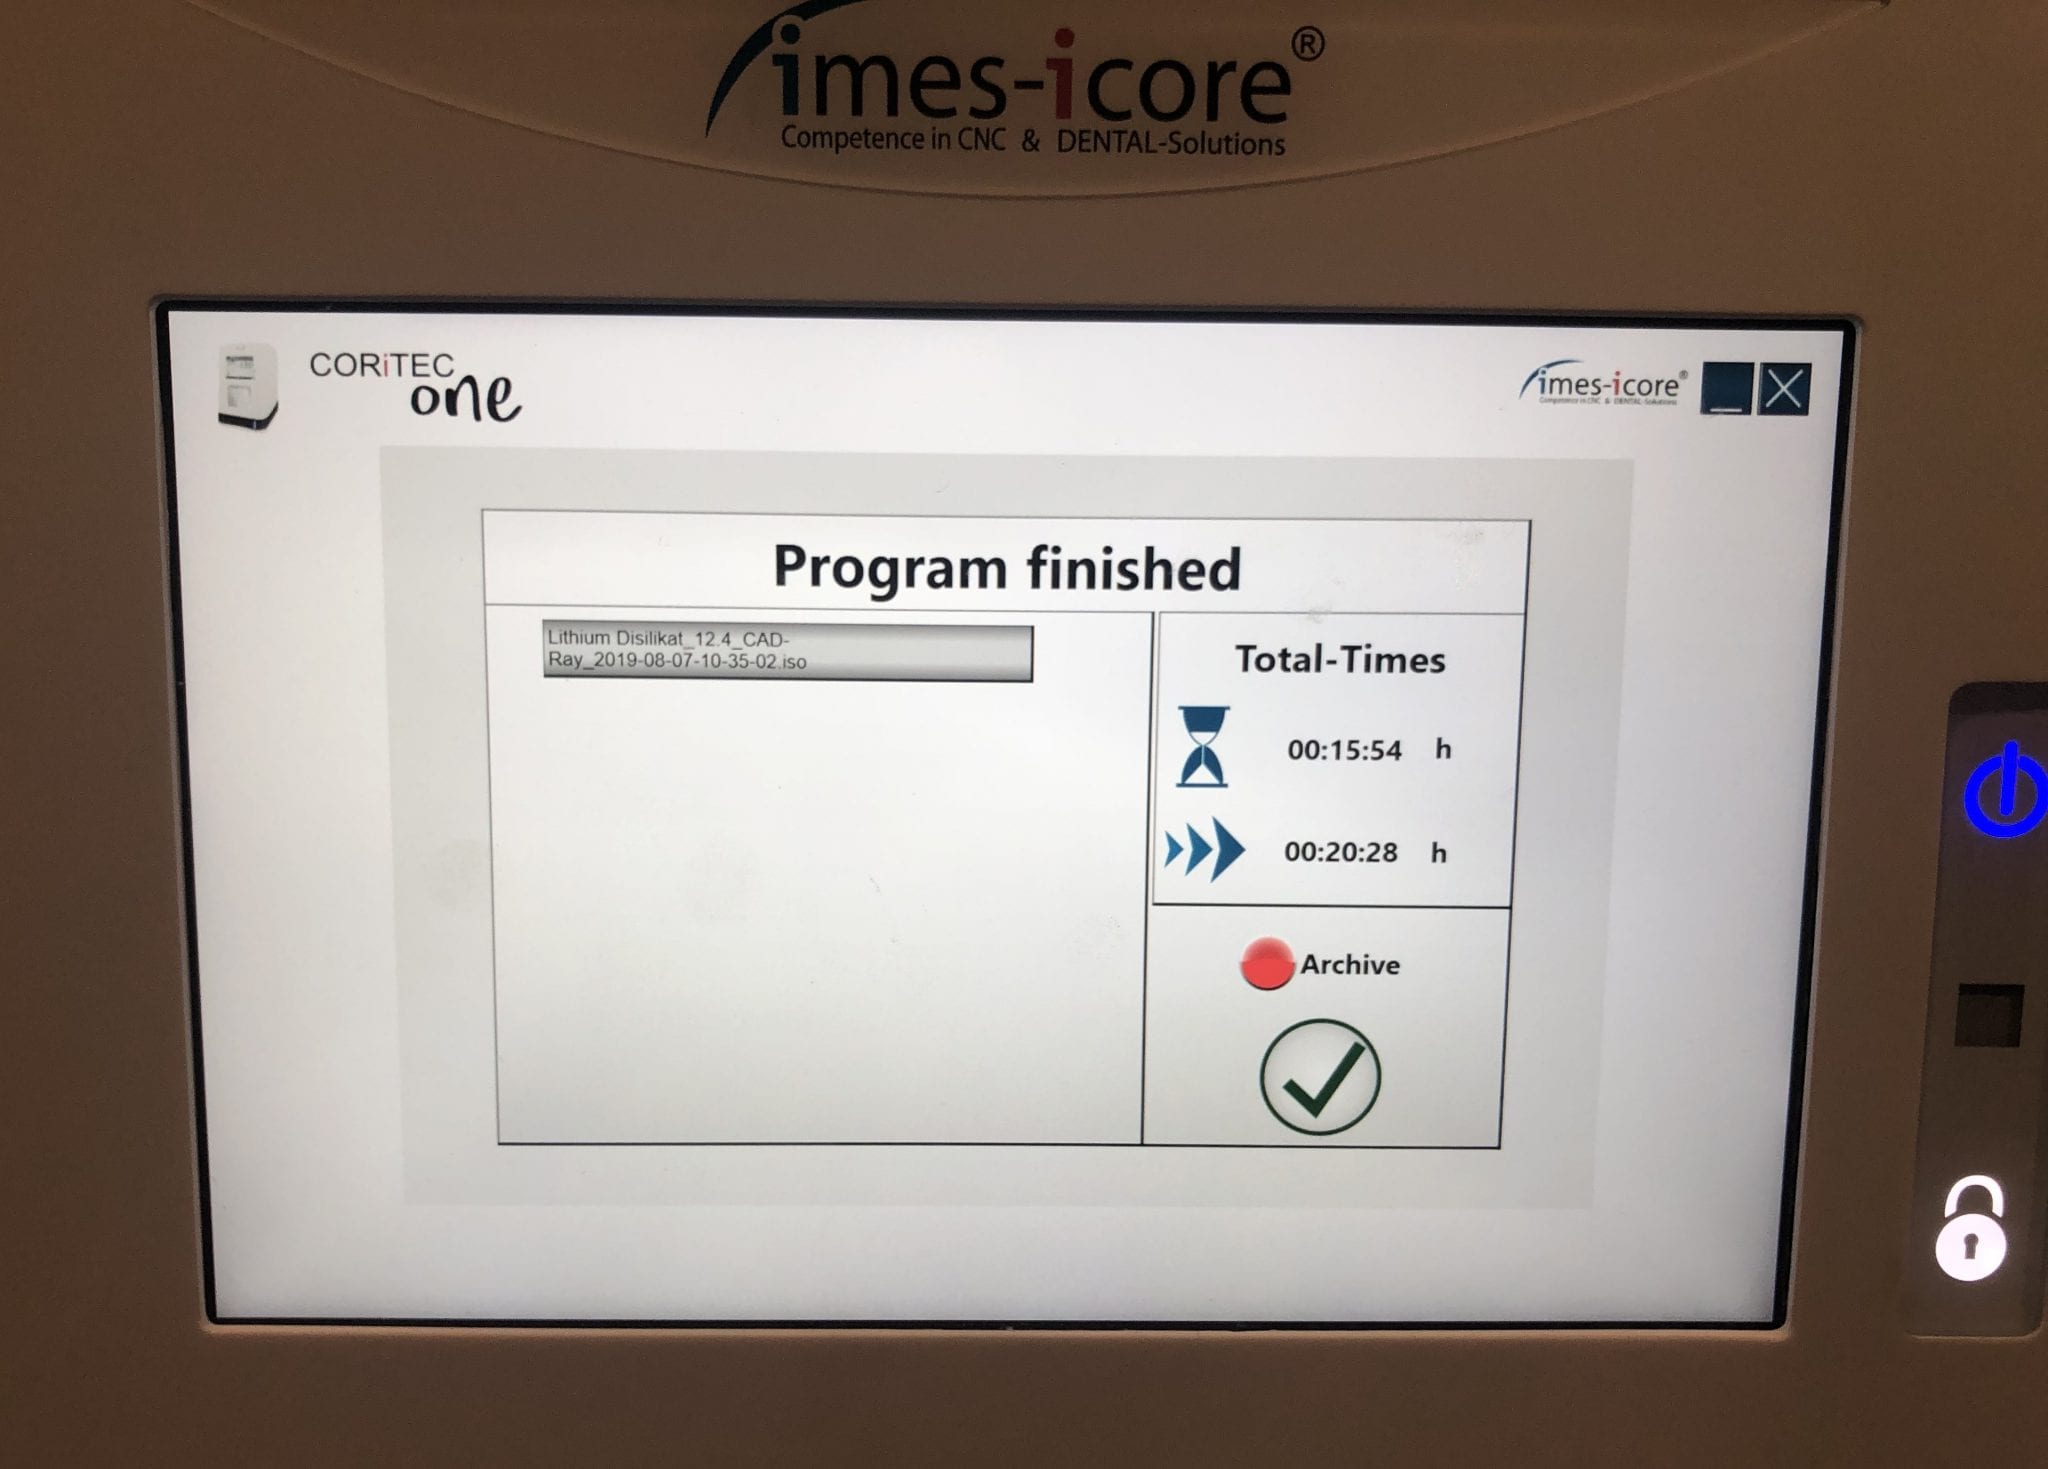
The same crown was milled out of Vita’s Suprinity material in 20 minutes with the imes-icore CORiTEC ONE. Take note of the internal adaptation of the metal abutment and the restoration and how when it is flipped upside down, the restoration does not fall out easily!
When we 3D scan the surface of an object, we plot geometric figures (usually triangles) on the surface of that object which is usually round or has some other geometric shape. A satellite beam hitting the surface of the earth is a good way to visualize the scanning process as the photo illustrates.
As you span across long distances, a meshwork of triangles are plotted together to accurately represent the topography of the object. You can start “veering off track” and forming models that are inaccurate representations of that object if you don’t properly form this framework. There are many variables that can introduce these errors including simple matters like speed of scanning.
Now, with this dental artificial intelligence program, the software can digitally plot and drop known shapes on top of attachments or devices we place in the mouth. Color mapping can let us know if we are staying accurate, on path, or introducing errors and deviations!
Now imagine if you have 6 objects sticking out of a flat plane that this AI program readily recognizes. Identifying these landmarks is the first step, but the bigger significance is that we can scan from object 1 > 2 > 3 > 4 > 6, and when we continuously to image backwards from object 6 to object 1, and our color coding remains the same, we are guaranteed scan accuracy.
People go to 2 extra years of schooling to do accurate work in complex cases, most of which will be replaced with software algorithms like this. This is a serious and significant advancement in dentistry, particularly in implant dentistry. Here’s a video that detail how we use it to restore dental implants.
In the following three videos we walk you through the steps of how the digital “scanbody drop” works to identify the location of an implant fixture. In the demonstration videos, we highlight this upcoming feature and how you an integrate the CAD software for implant designs and restorations. In the final video, we demonstrate how you can take the construction files to the milling machine of your choice and mill out the abutment and/or suprastructure.
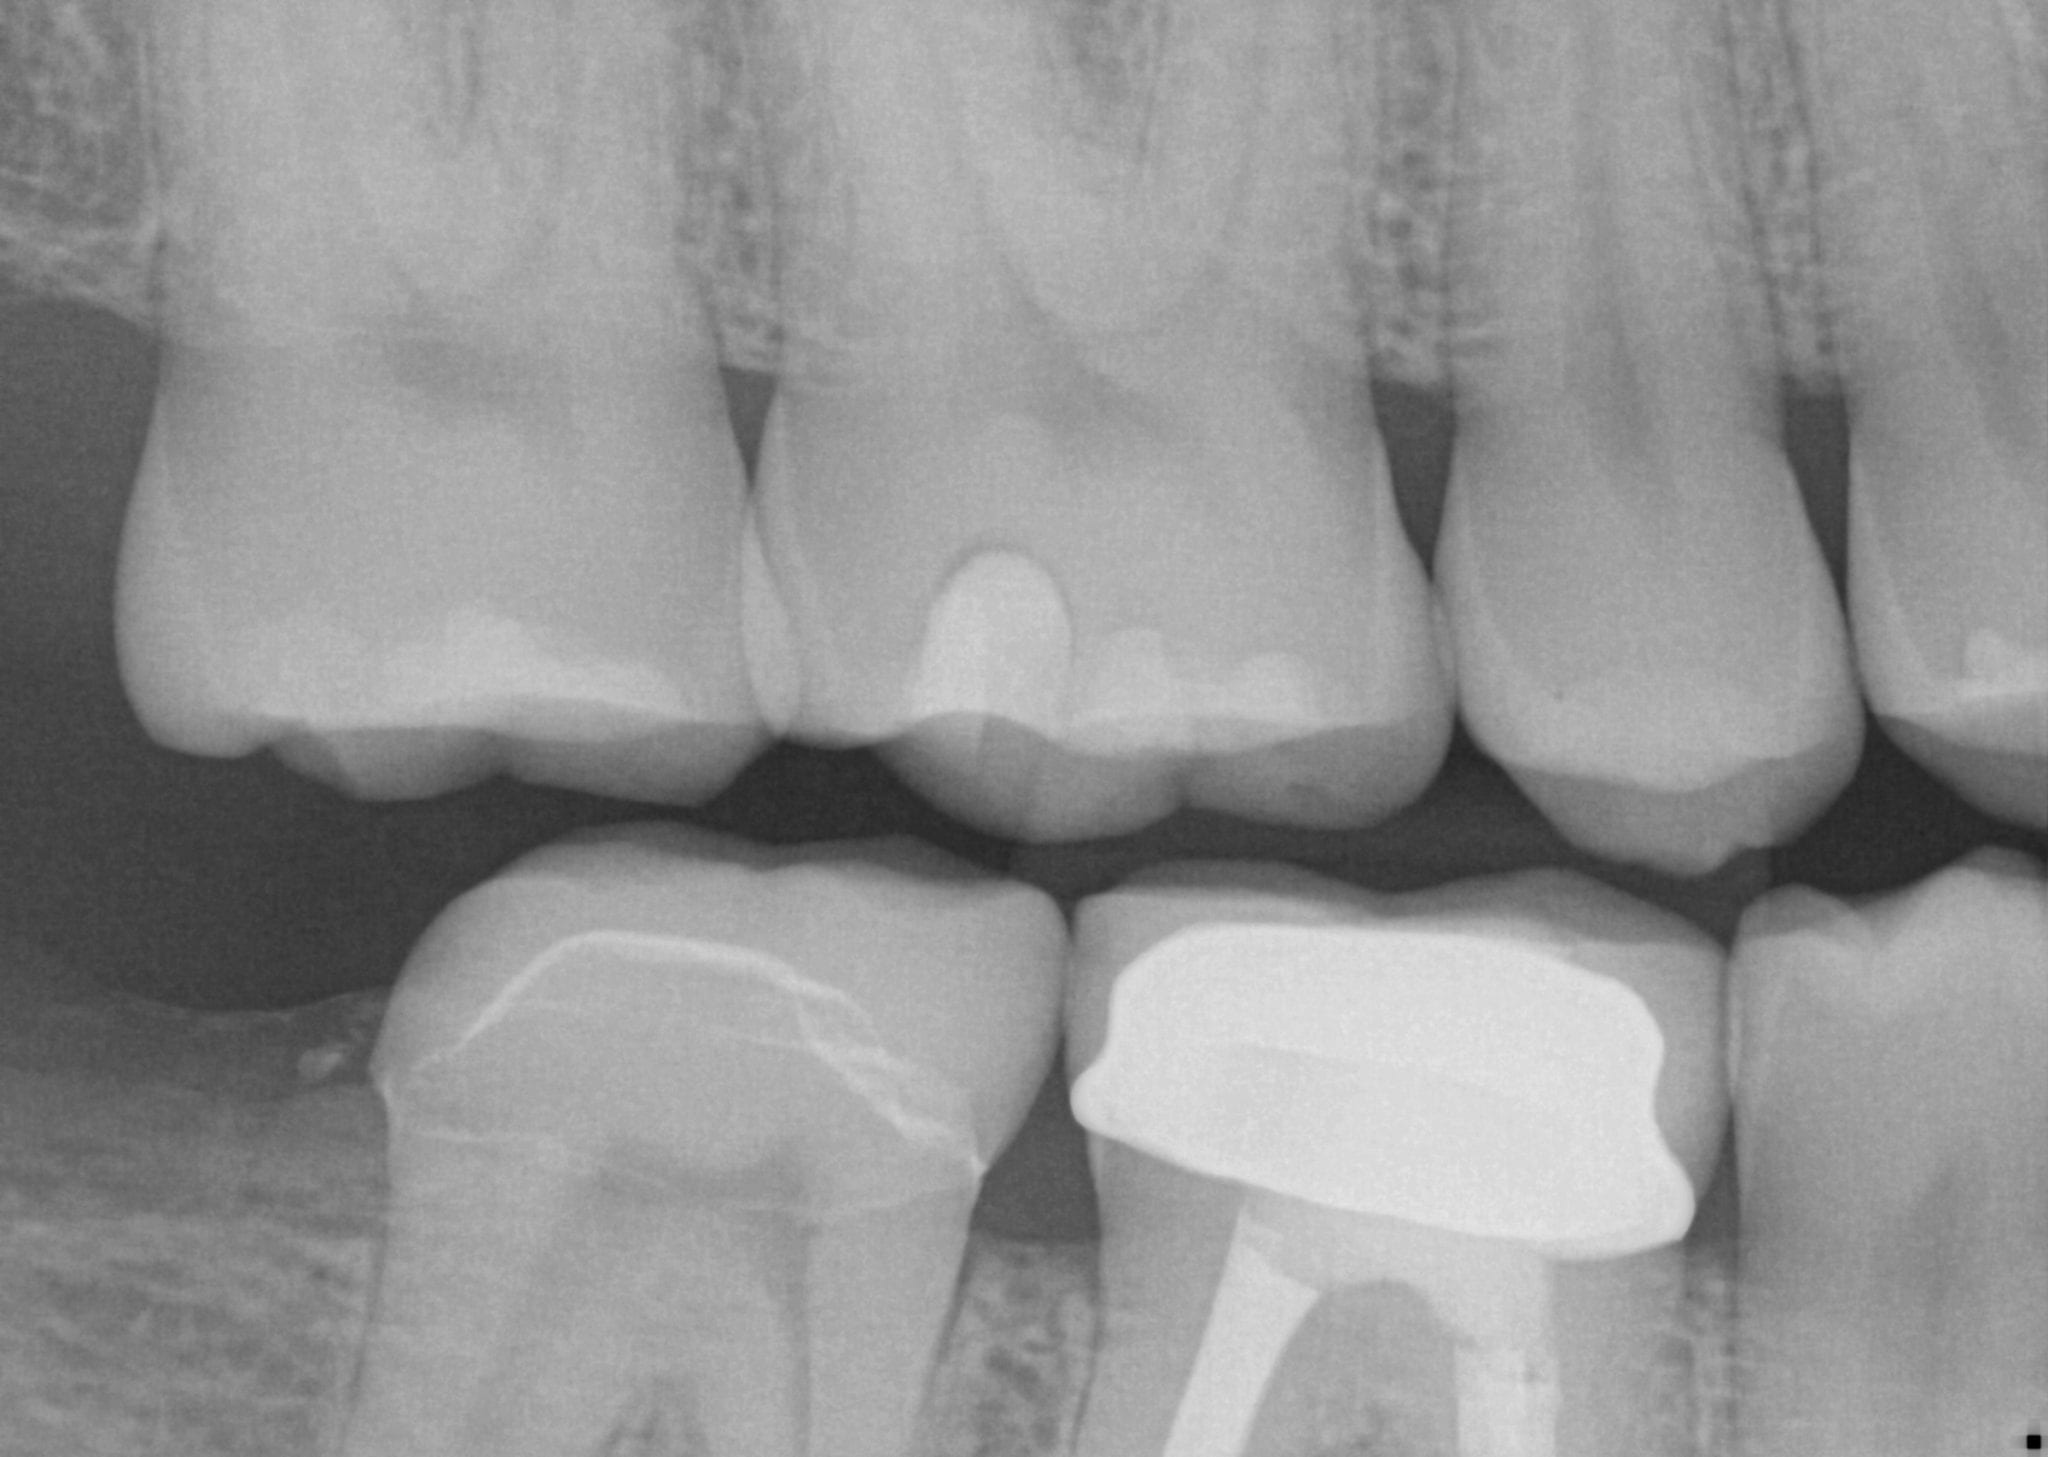
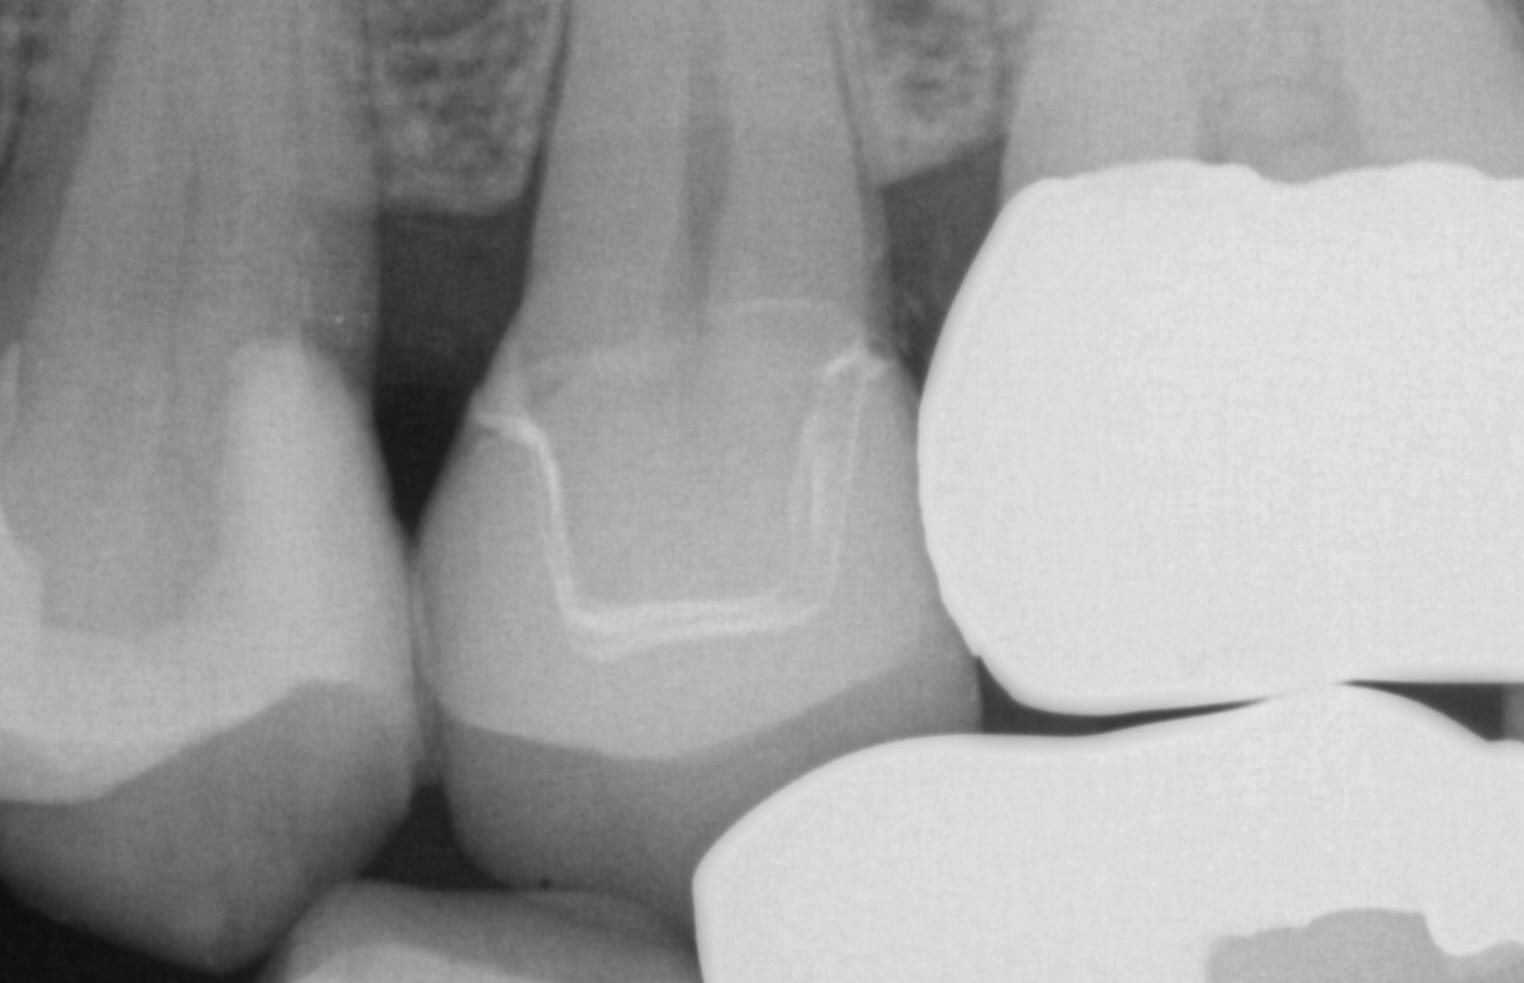
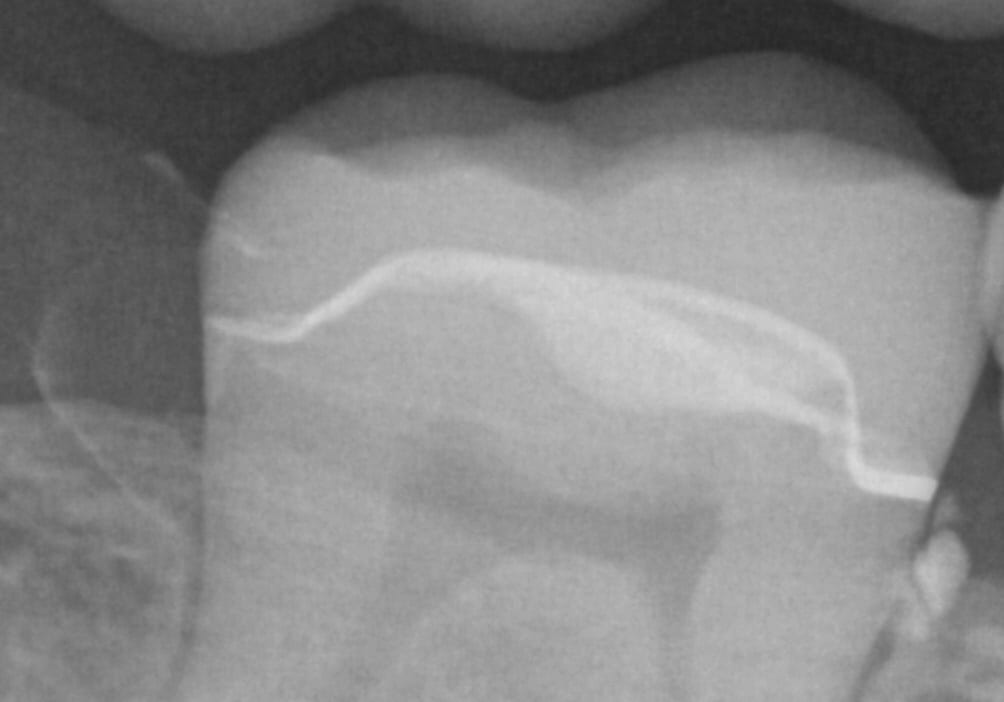
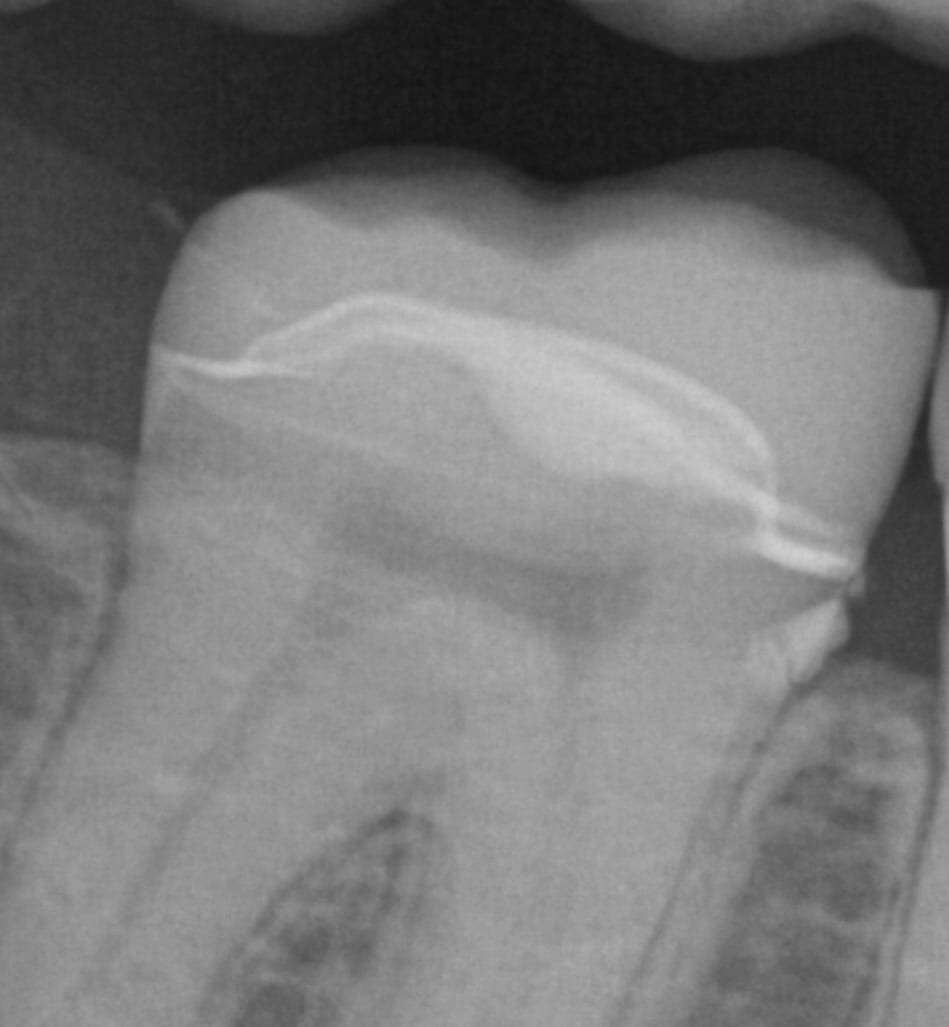
In this case demonstration, we show how you can image in the Medit i500 and follow the most logical steps and sequences to produce a restoration. You capture the preparation, the opposing and bite and once the models are rendered, you can launch the CAD software of your choice. The lower right molar was endontically retreated and the porcelain fused to ceramic crown needed to be replaced as it was overcontoured and impinging on the soft tissue. After the crown was removed, the preparation was refined and impressions were taken. The remaining cotton / cavit / gutta percha was removed right before placement, a NX3 by Kerr was used, which is both build up material and a resin cement. The space between the intaglio of the crown and the pulp chamber was retrofilled at seating time and a final x-ray was taken to make sure there was no excess resin left behind.
Here, we utilize exocad. Once we click on the CAD software button, the software is launched and the models are imported automatically.
Once the case is designed, meditlink walks you through the next step which is to nest the restoration and to mill it with whatever milling machine you choose to utilize. Here, we used the CEREC MCXL, the Z4 from VHF, and the imes icore CORiTEC one.
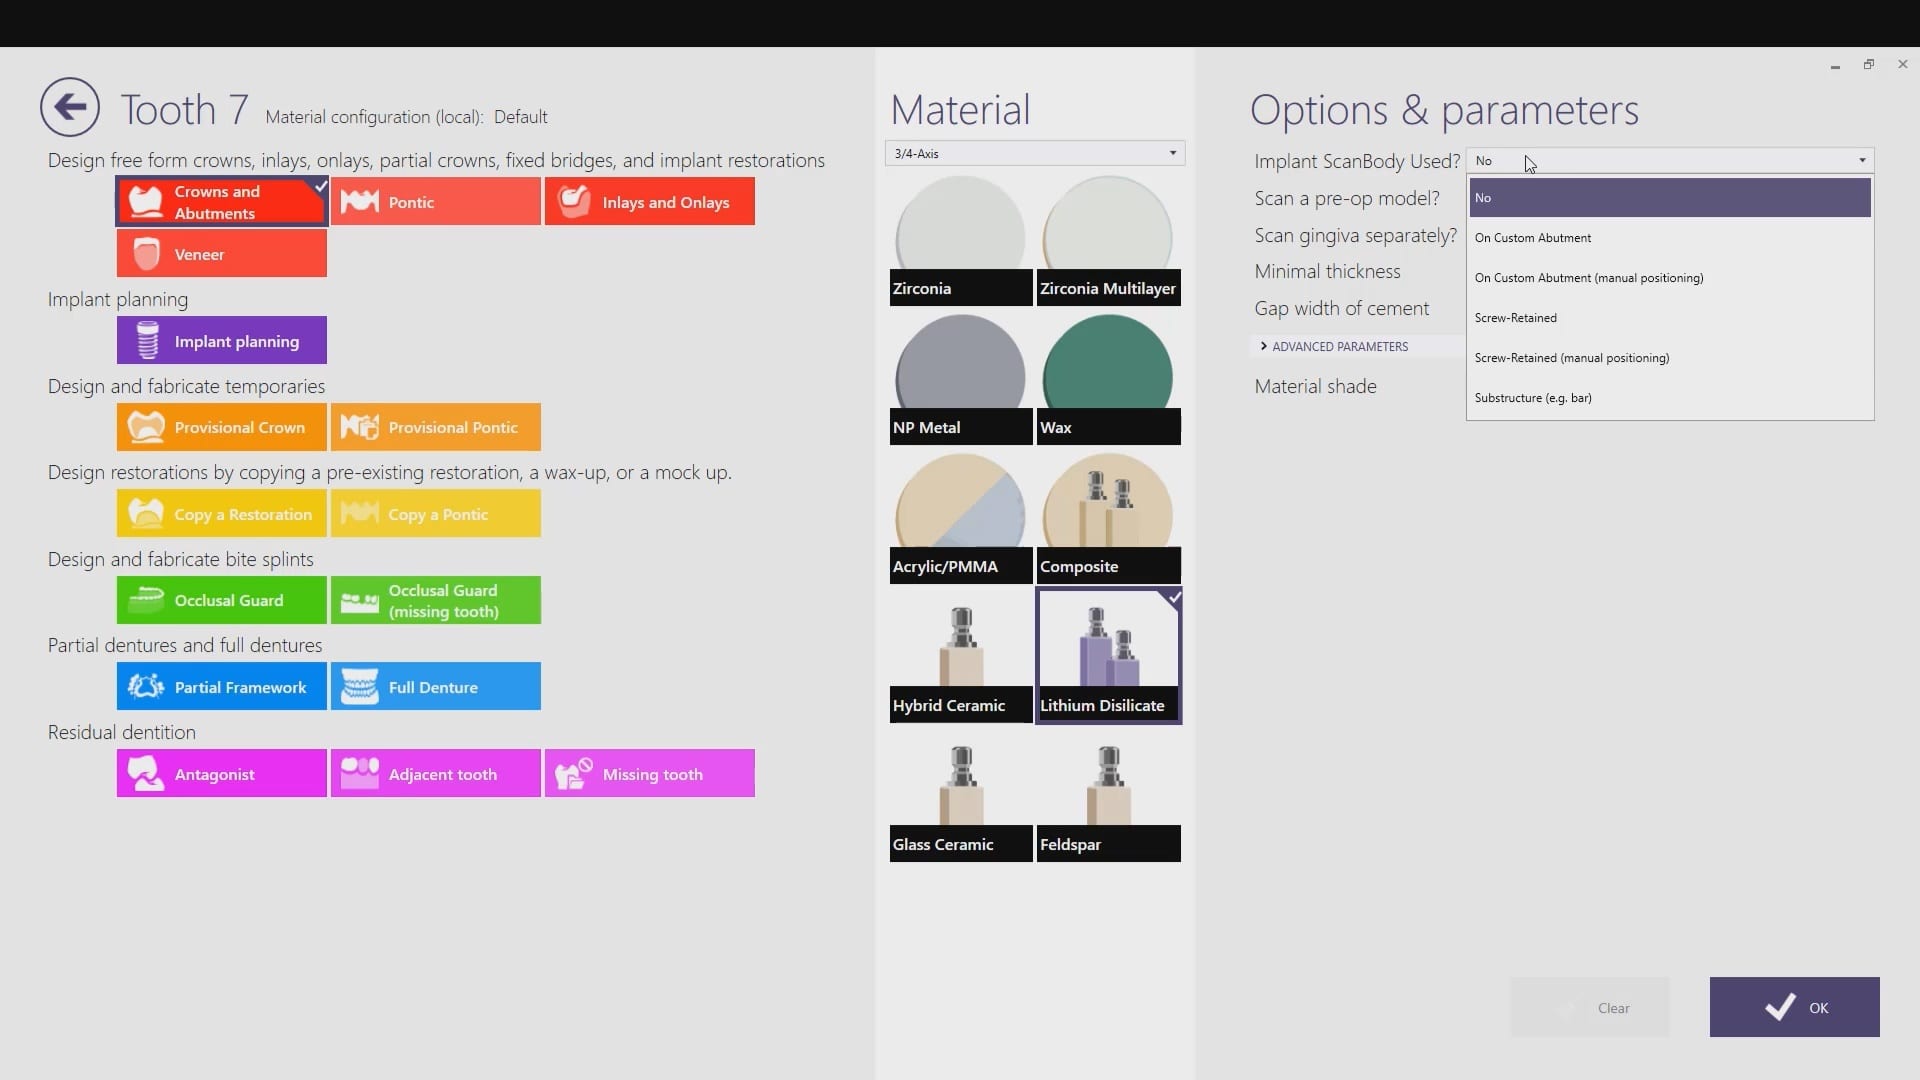
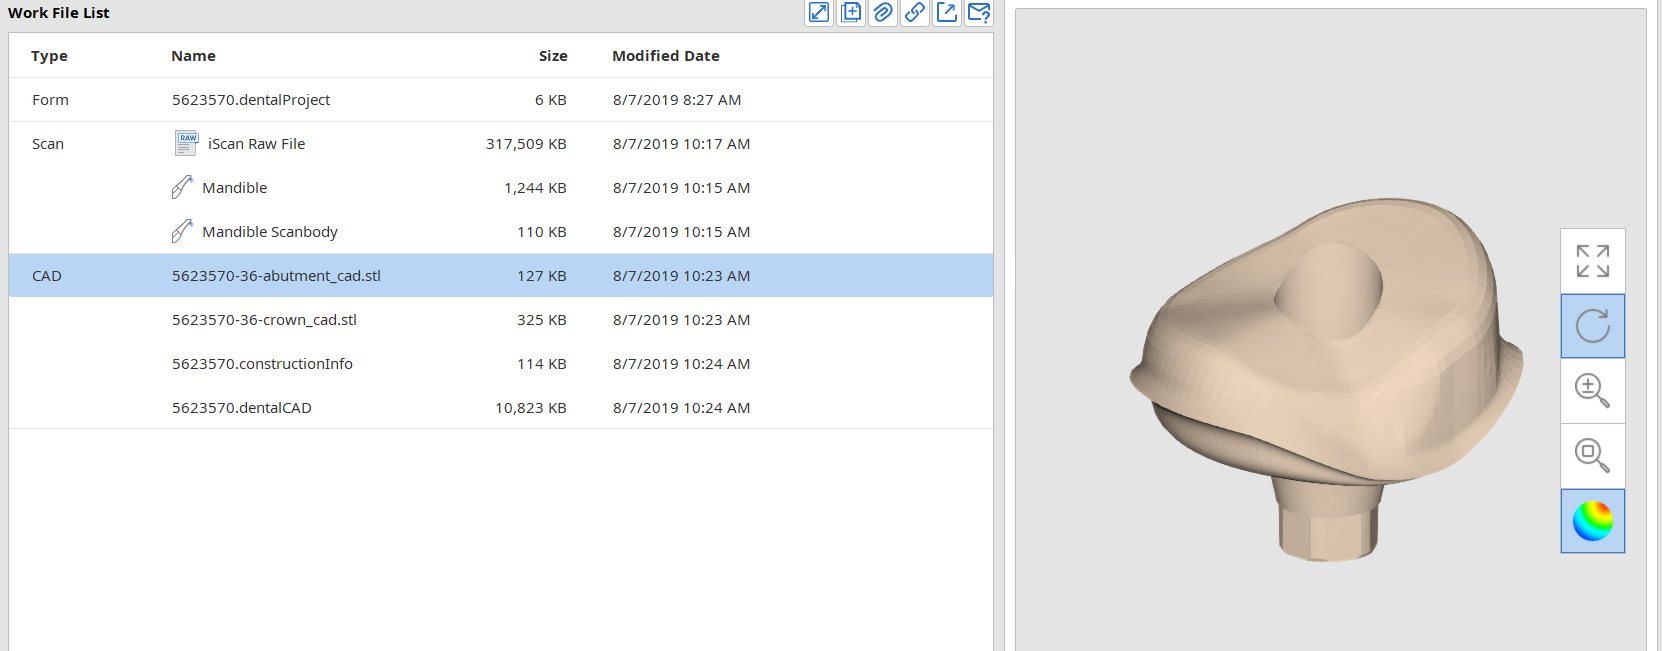
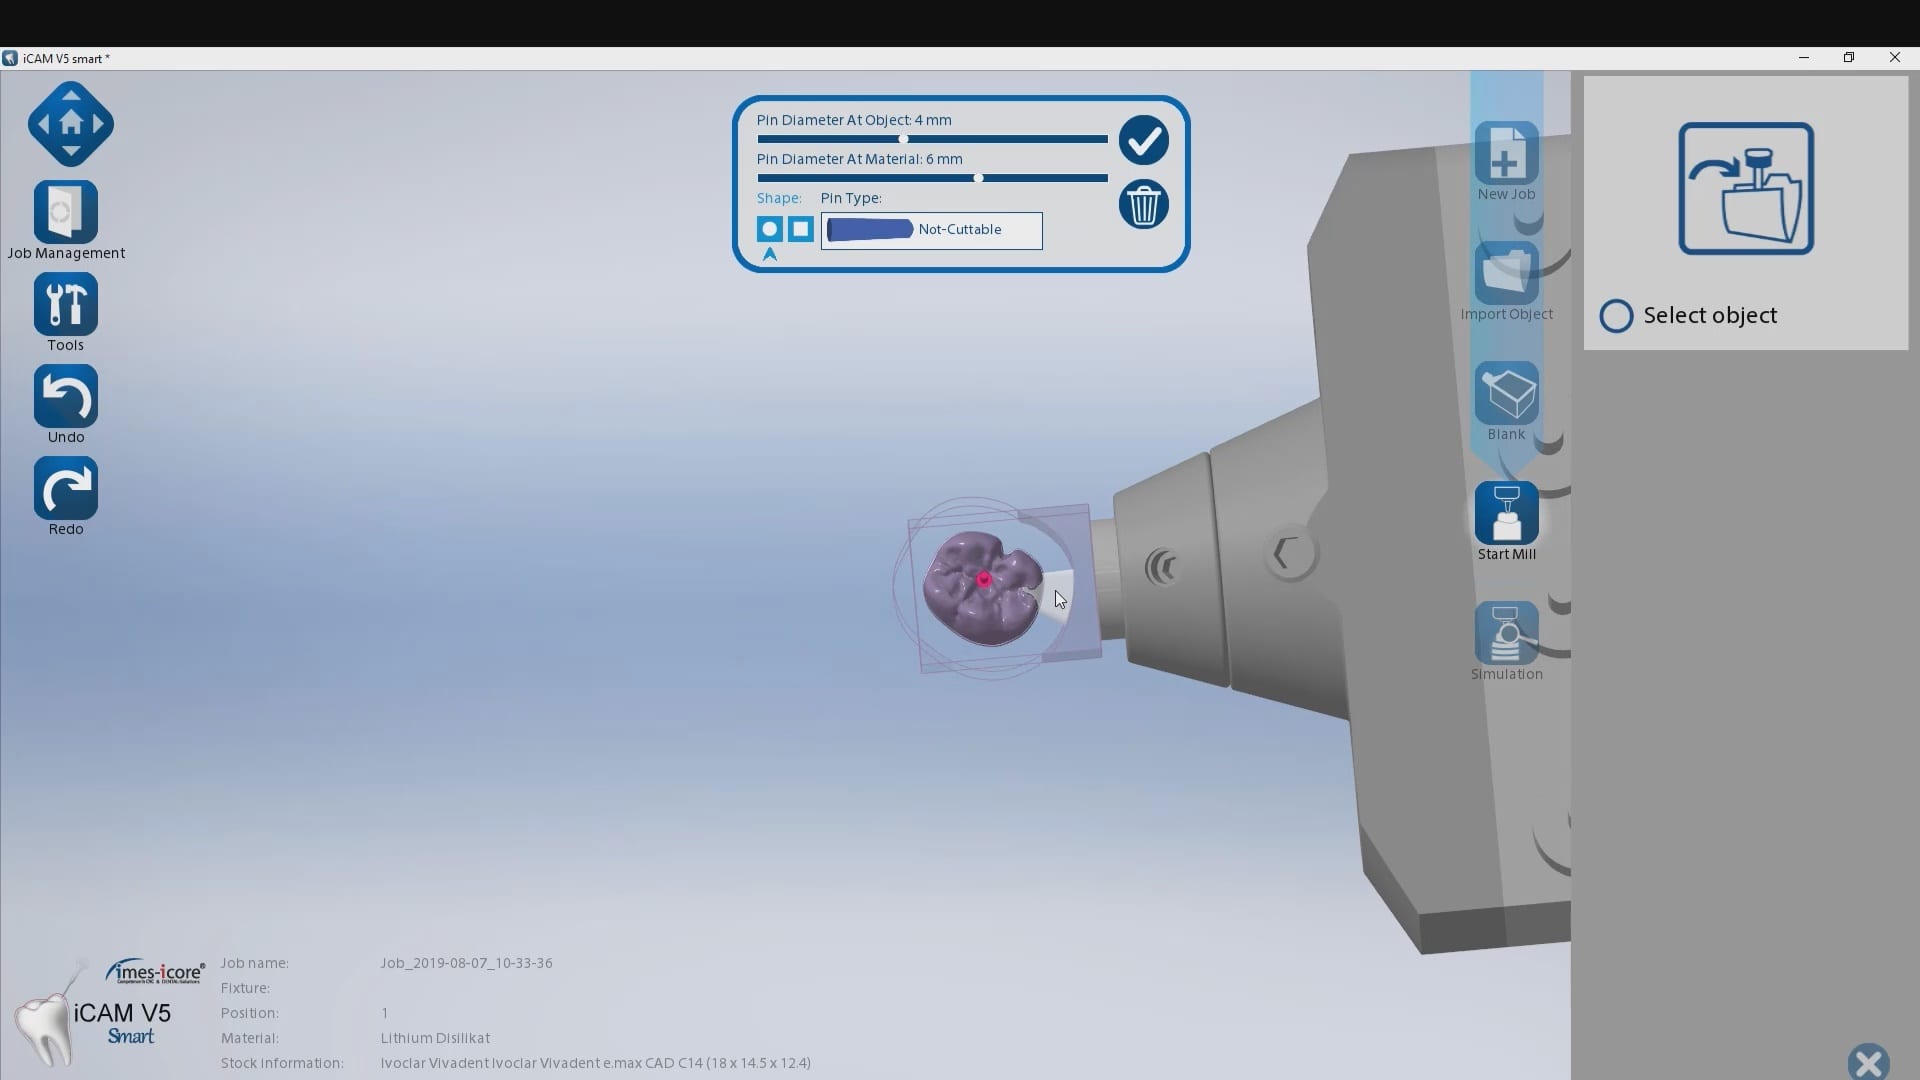
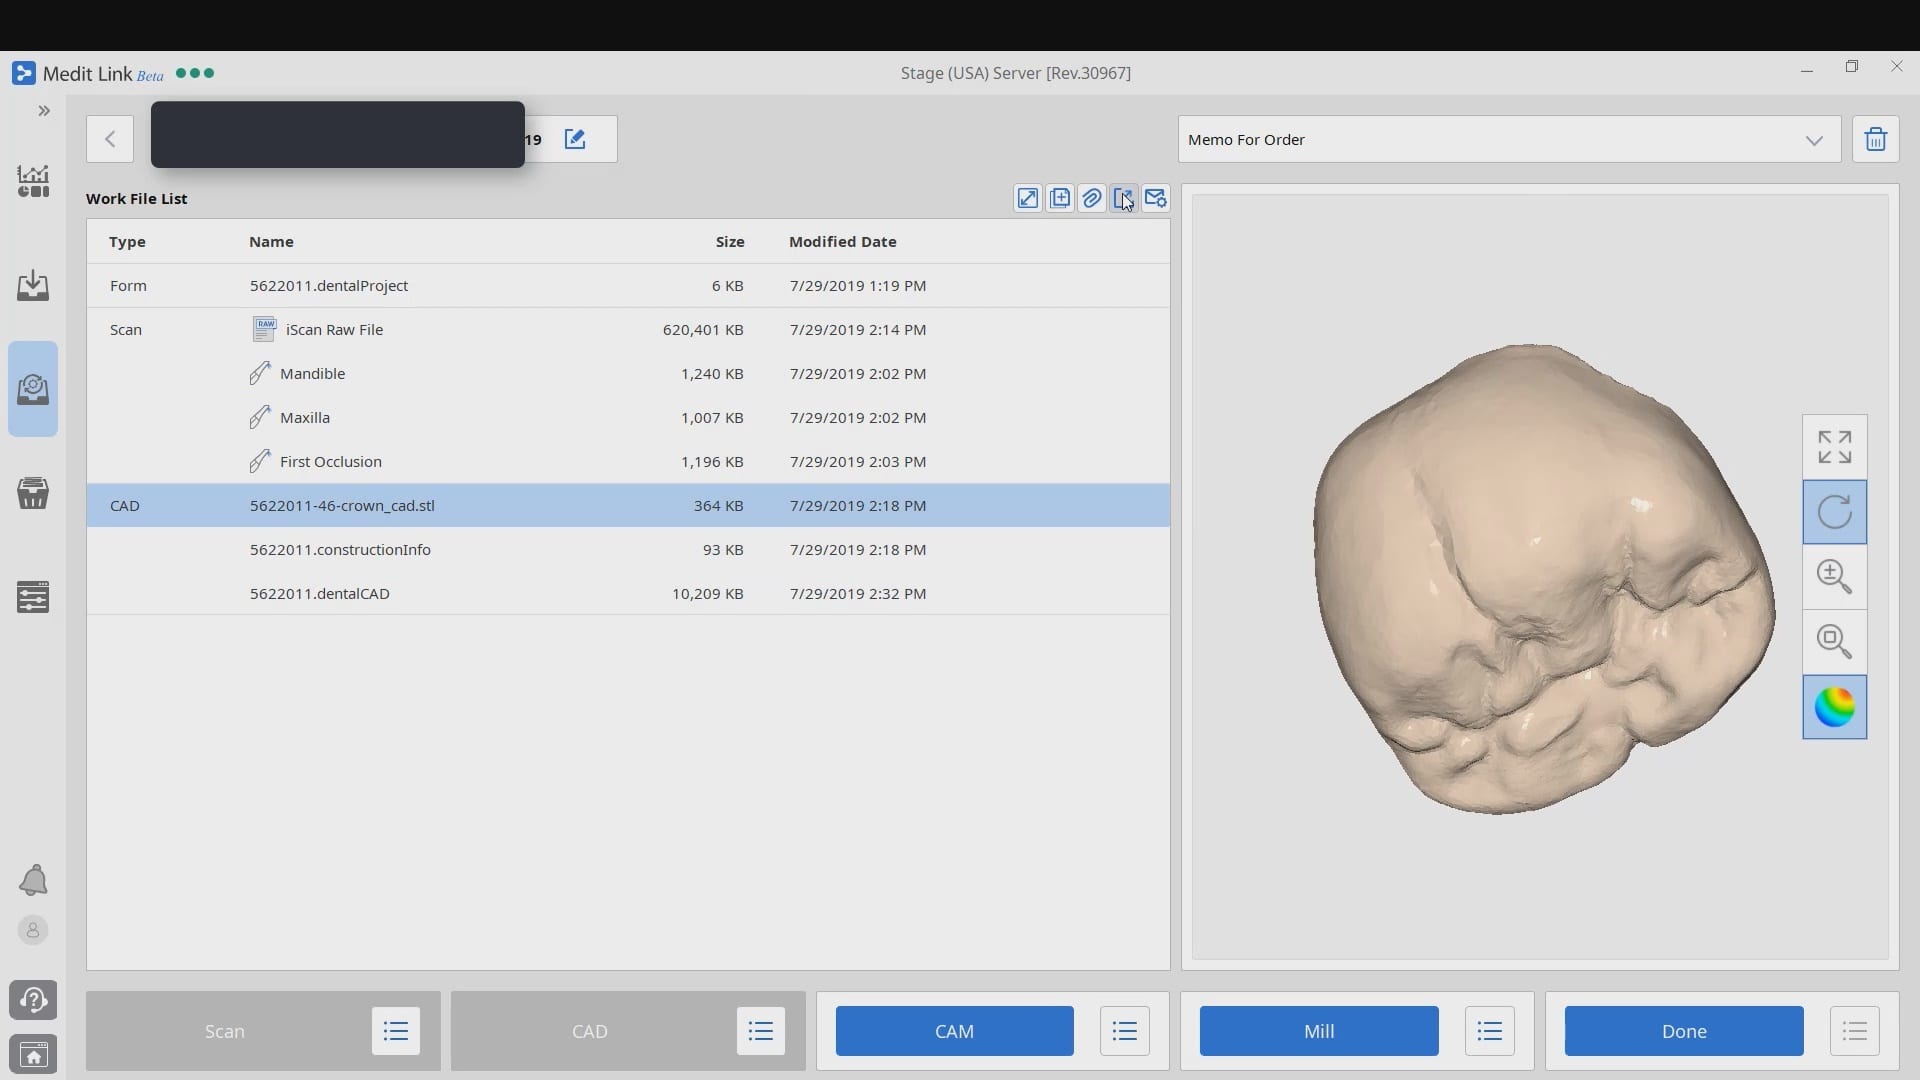
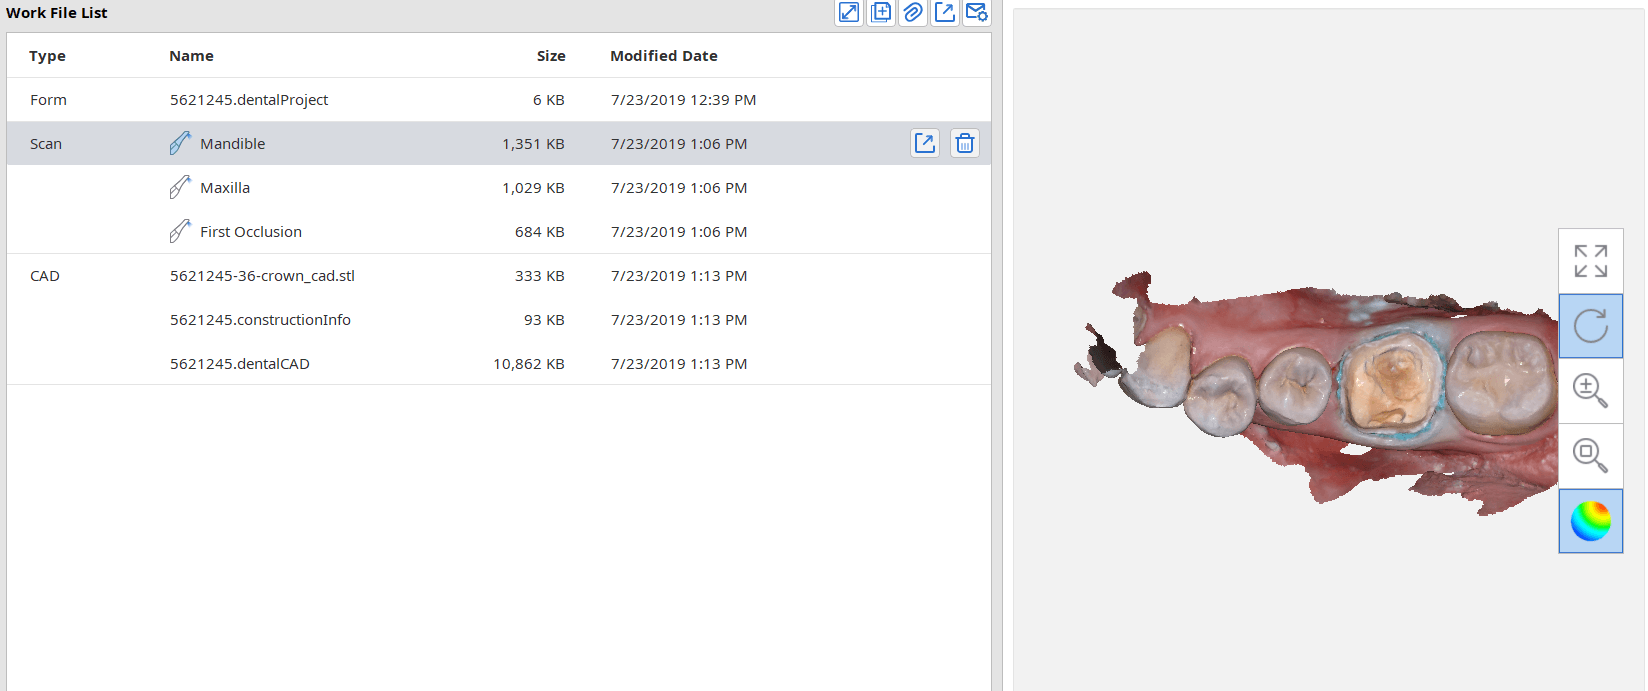
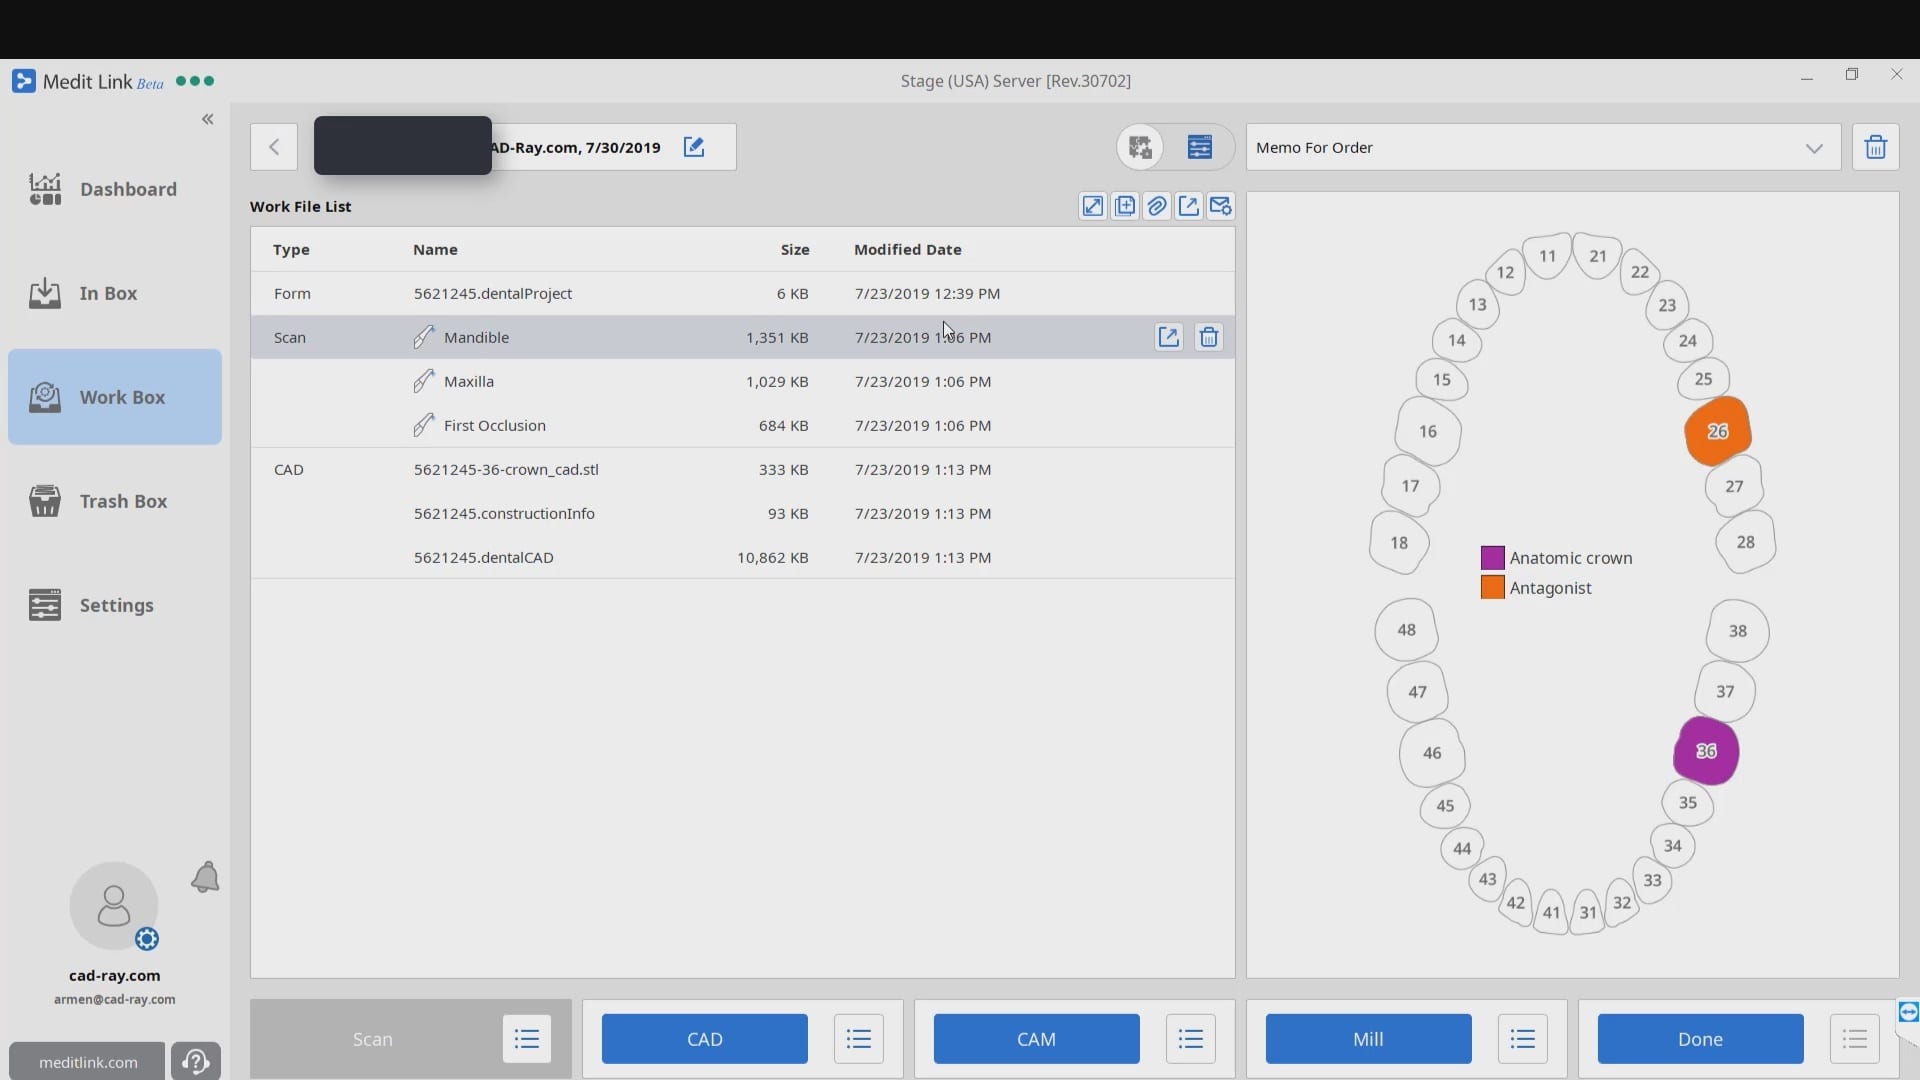
When you start a case in exocad or in Meditlink, you have to define a project or define the job by entering a prescription. A dentalproject file is created that has all the pertinent data, like the type of restoration, the shade, the material, parameter settings,etc..
After the case is designed a dental cad project file is formed, along with the stl file of the restoration, accompanied by the construction information. Once the construction file is formed, the case can be import it into CAM software like cerec inlab. It carries a lot of information like the margin line.
Some CAM software can process simple redirections without the need for any other pertinent information from the construction file, while others require it. Some are so specific that a simple typo or wrong character will lead to mis-production.
In the case of cerec inlab, it’s best to have the construction file accompany the stl of the restorations, although there are numerous work-arounds in case you don’t. Once processed, the restoration is taken to the Mcxl milling machine.
Why are we so focused on teaching this concept ? Because it is critical for milling metal abutment where you have to keep track of an object that is cylindrical and symmetric in shape. The code in these files will dictate the indexing of the connections and how these abutments are milled.
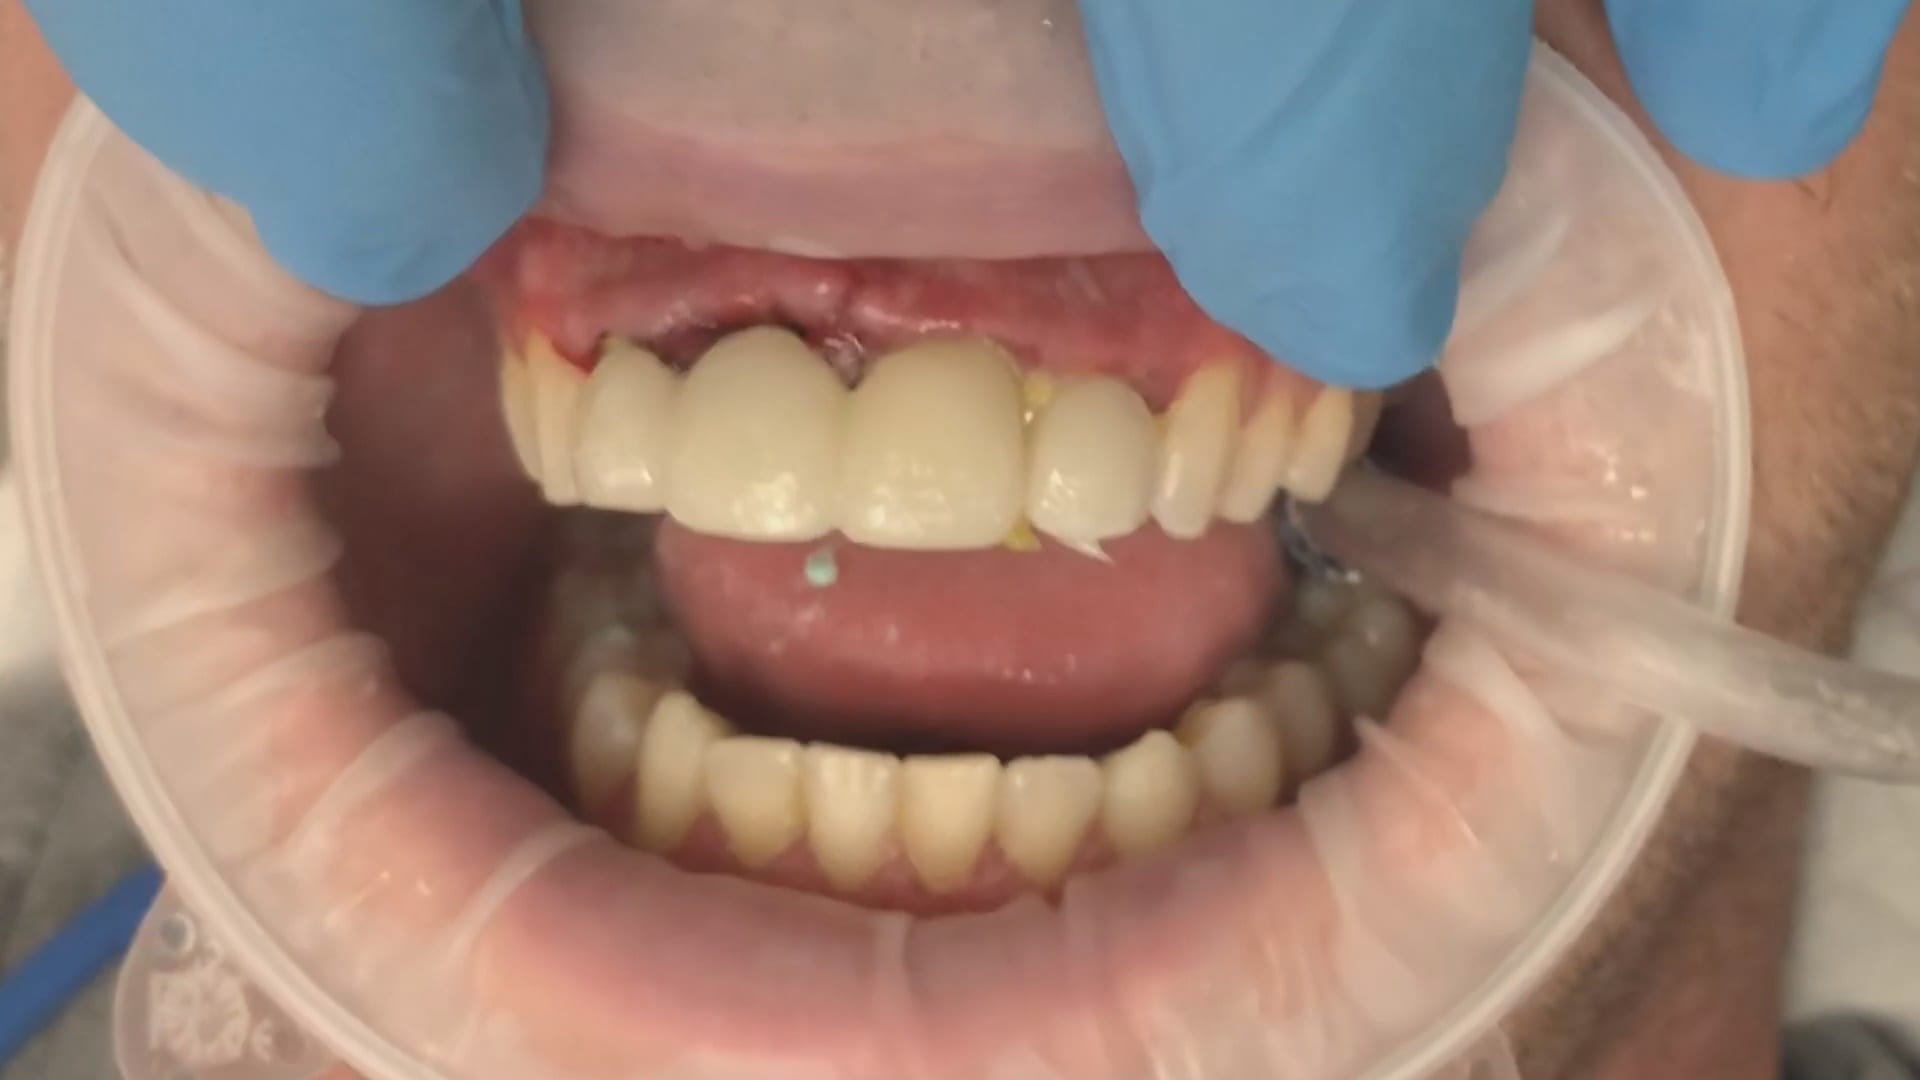
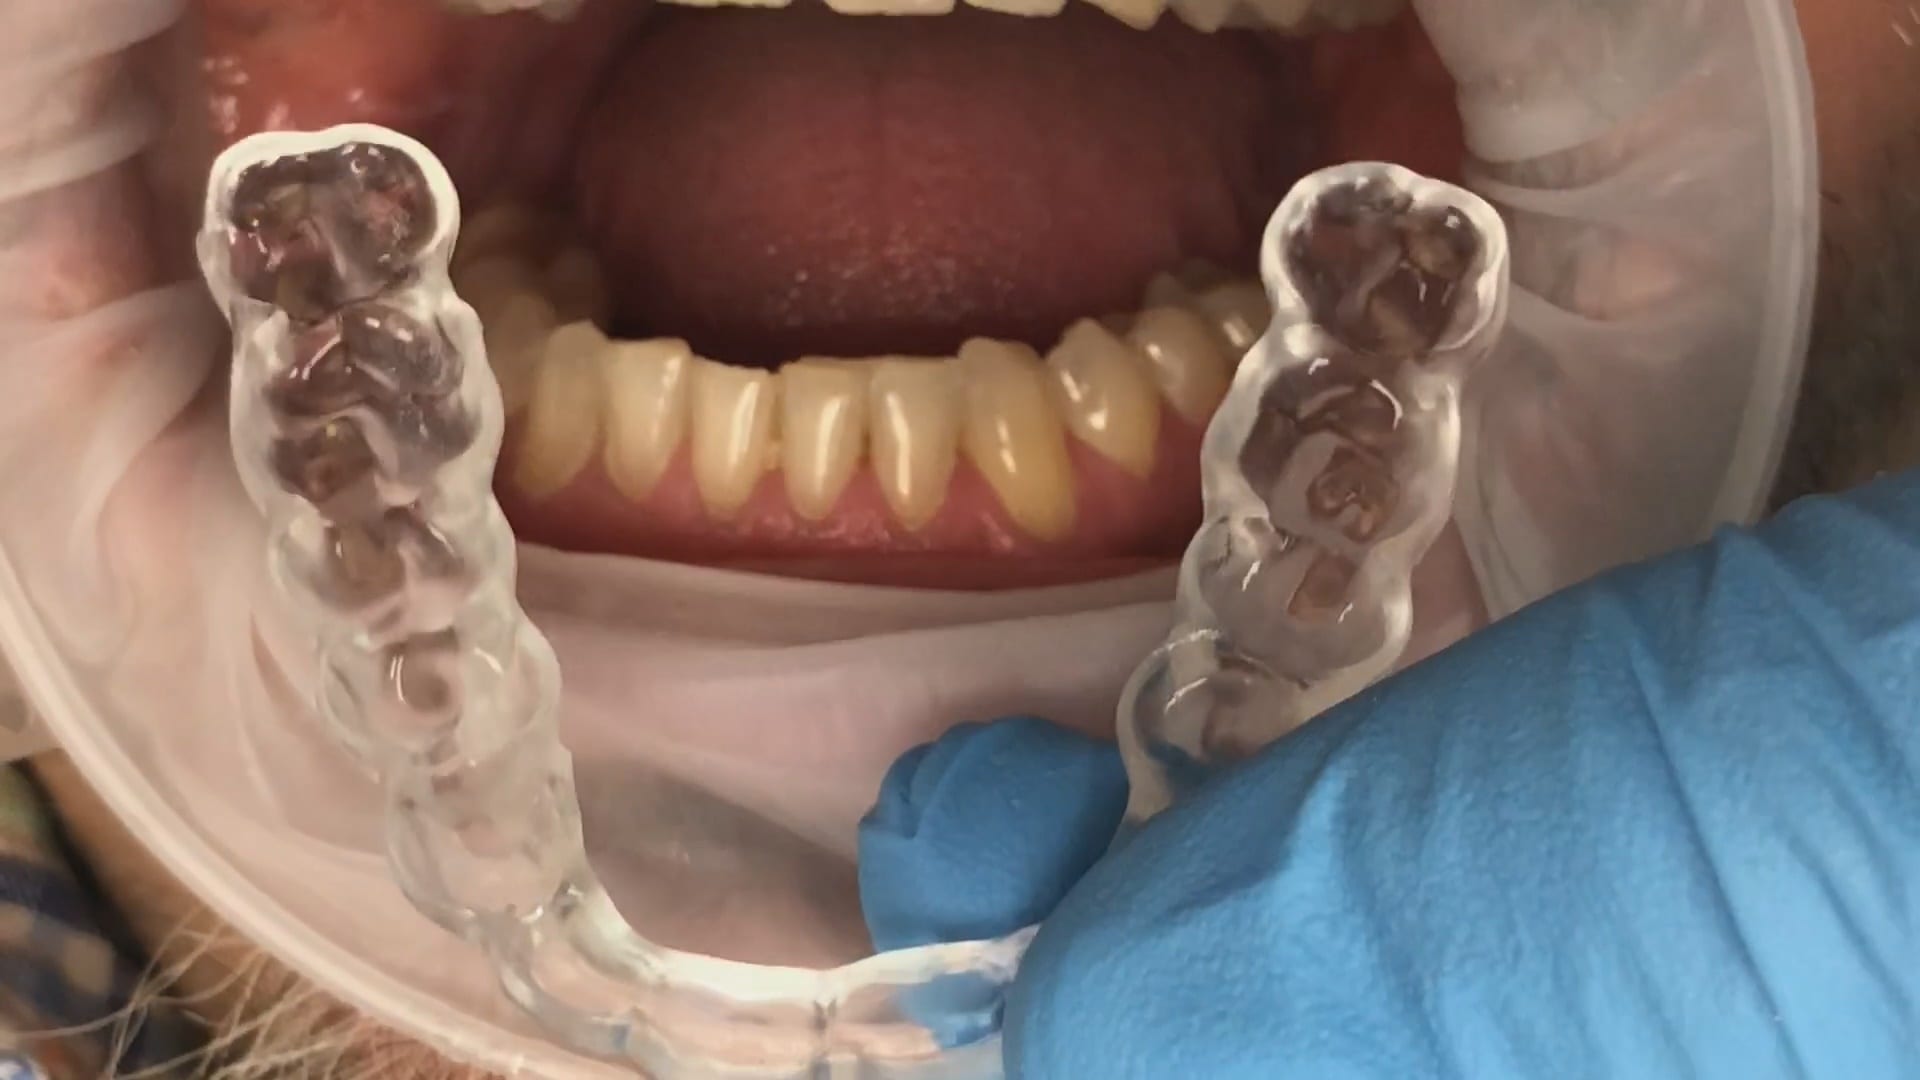
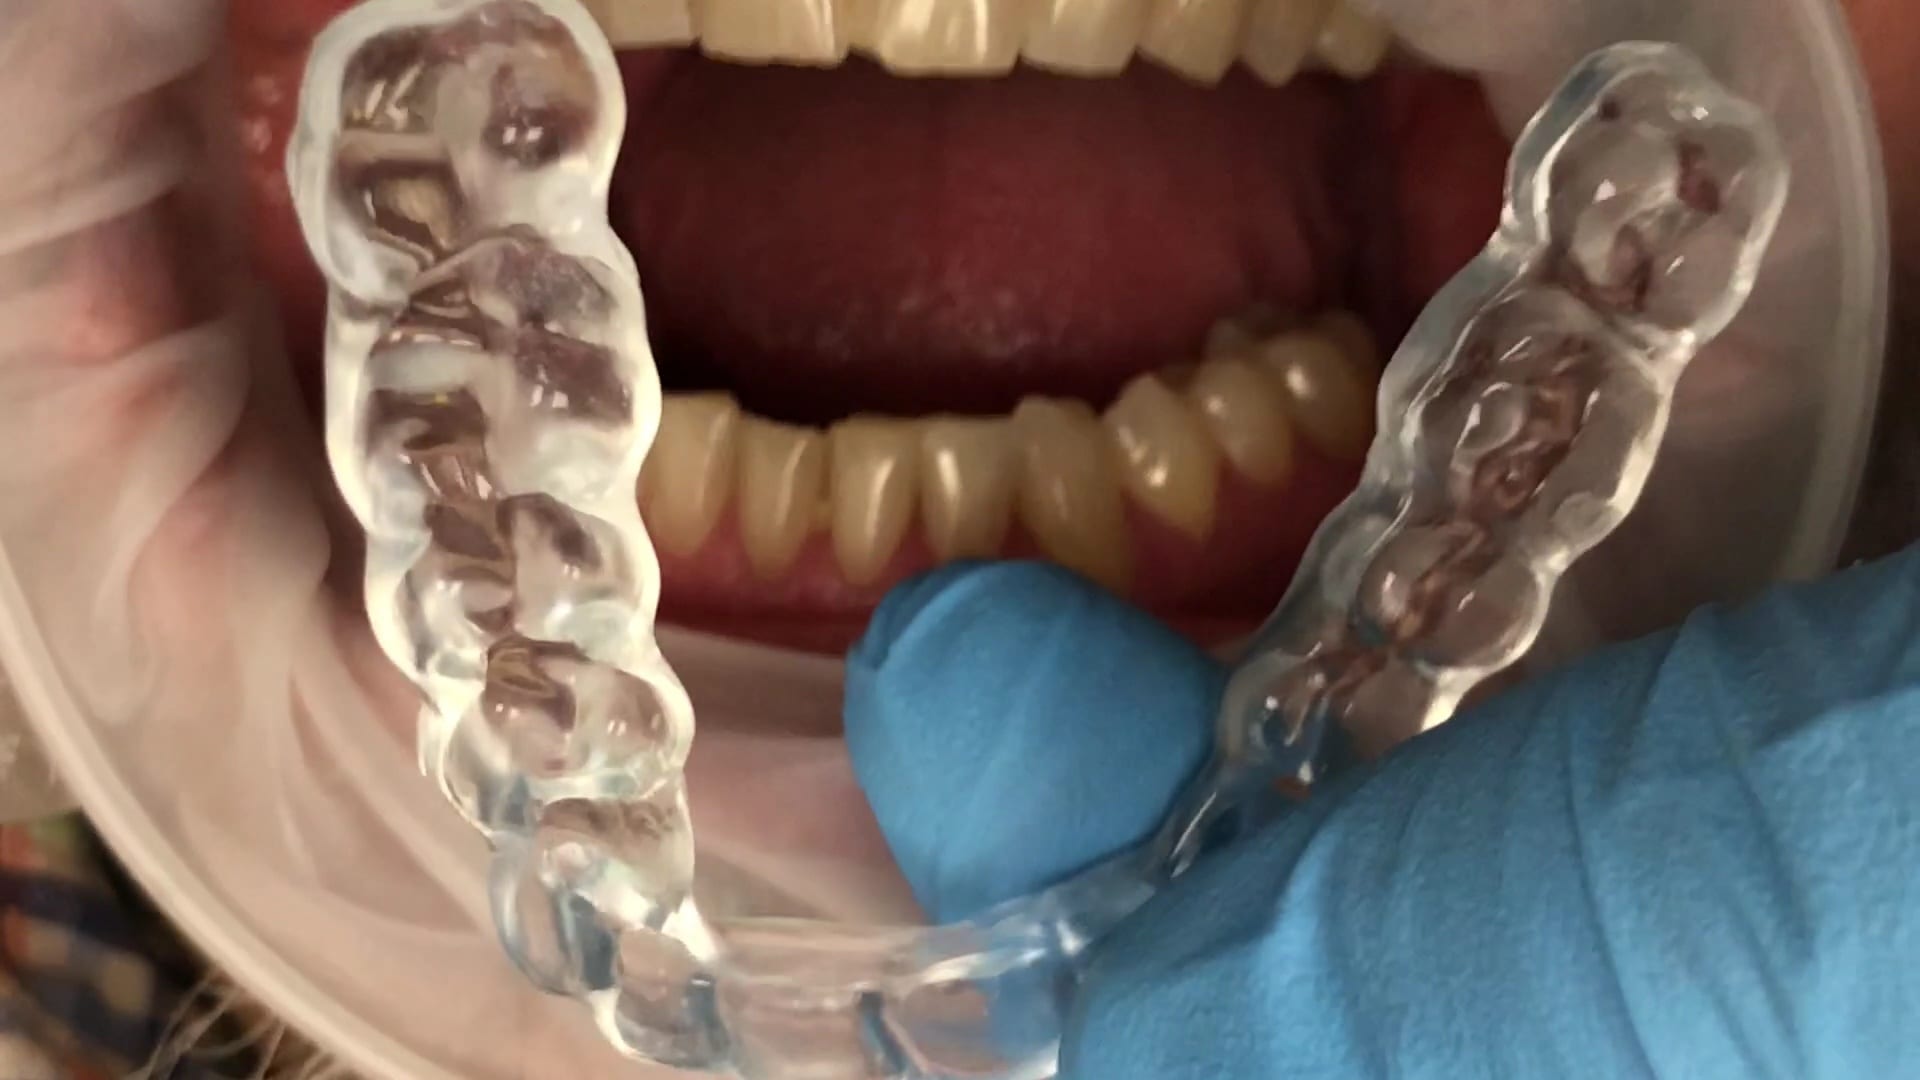
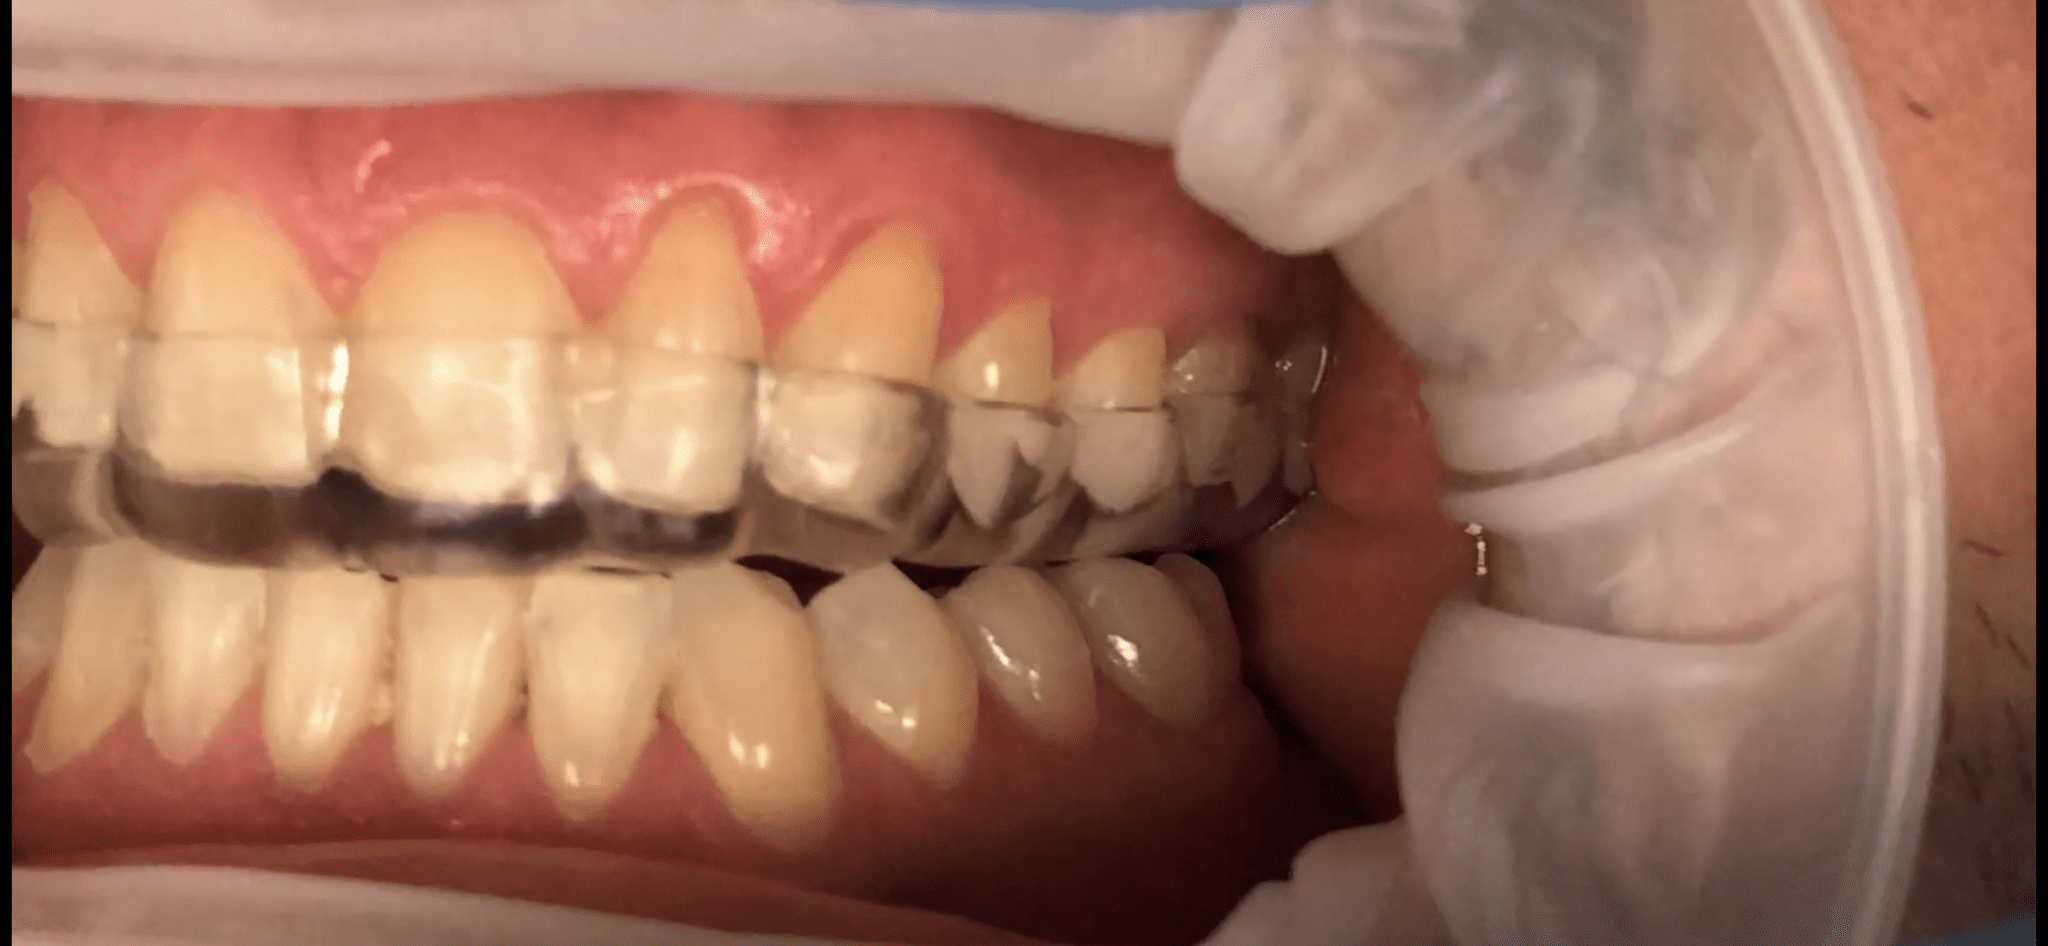
This is the occlusal appliance that was milled and delivered from this patient’s scan approximately 7 days ago. The appliance did not need a single adjustment neither on the occlusal surface, nor in the intaglio.
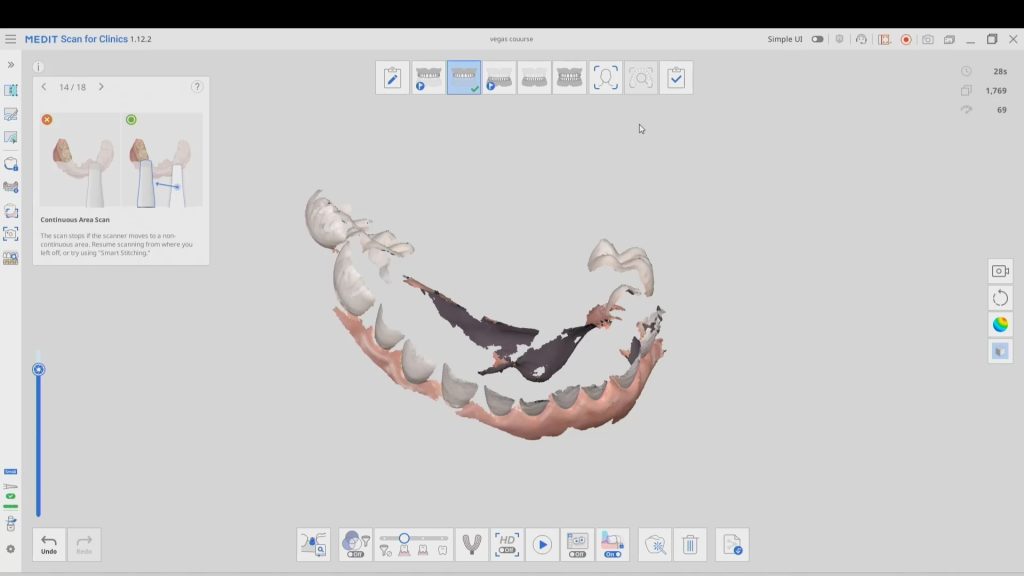
Stitching Abutments One of the most important things to keep in mind when imaging with scanner is to keep a stitching abutments in tact between various models. In dentate cases...
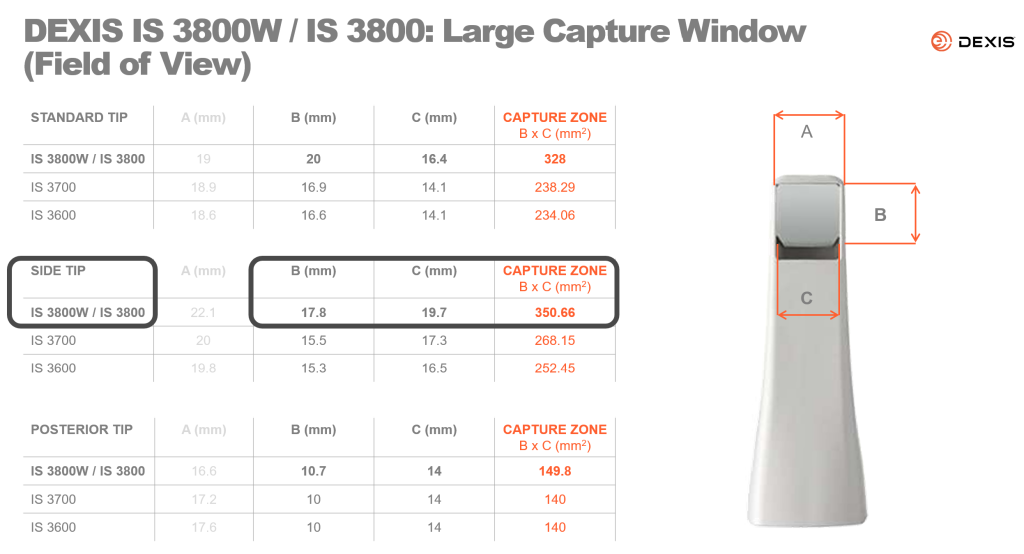
The field of view of or scan area is probably the most important factor to keep in mind with ios. i don’t know of a single study that discusses this...
An often overlooked characteristics of an intra-oral scanner is the scan area / window. The larger the area, the more likely it is that your scanner will stay on track...
In the world of digital dental scanning, precision and accuracy are paramount. To shed light on the potential pitfalls and challenges faced by dental professionals, Dr. Armen Mirzayan of CAD-Ray...
DOWNLOAD THE CASE TO DESIGN ALONG One of the most challenging designs to do chairside is the design of a multi unit temporary that needs to be printed. This is...


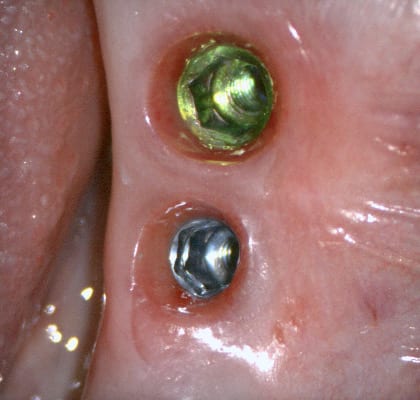


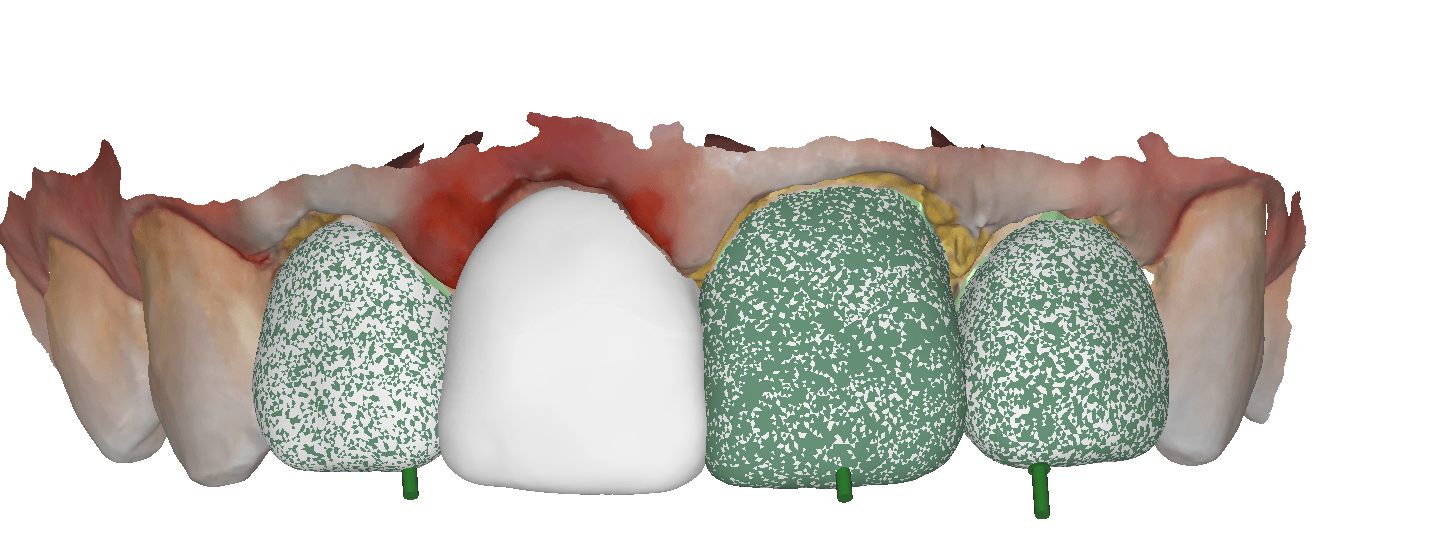


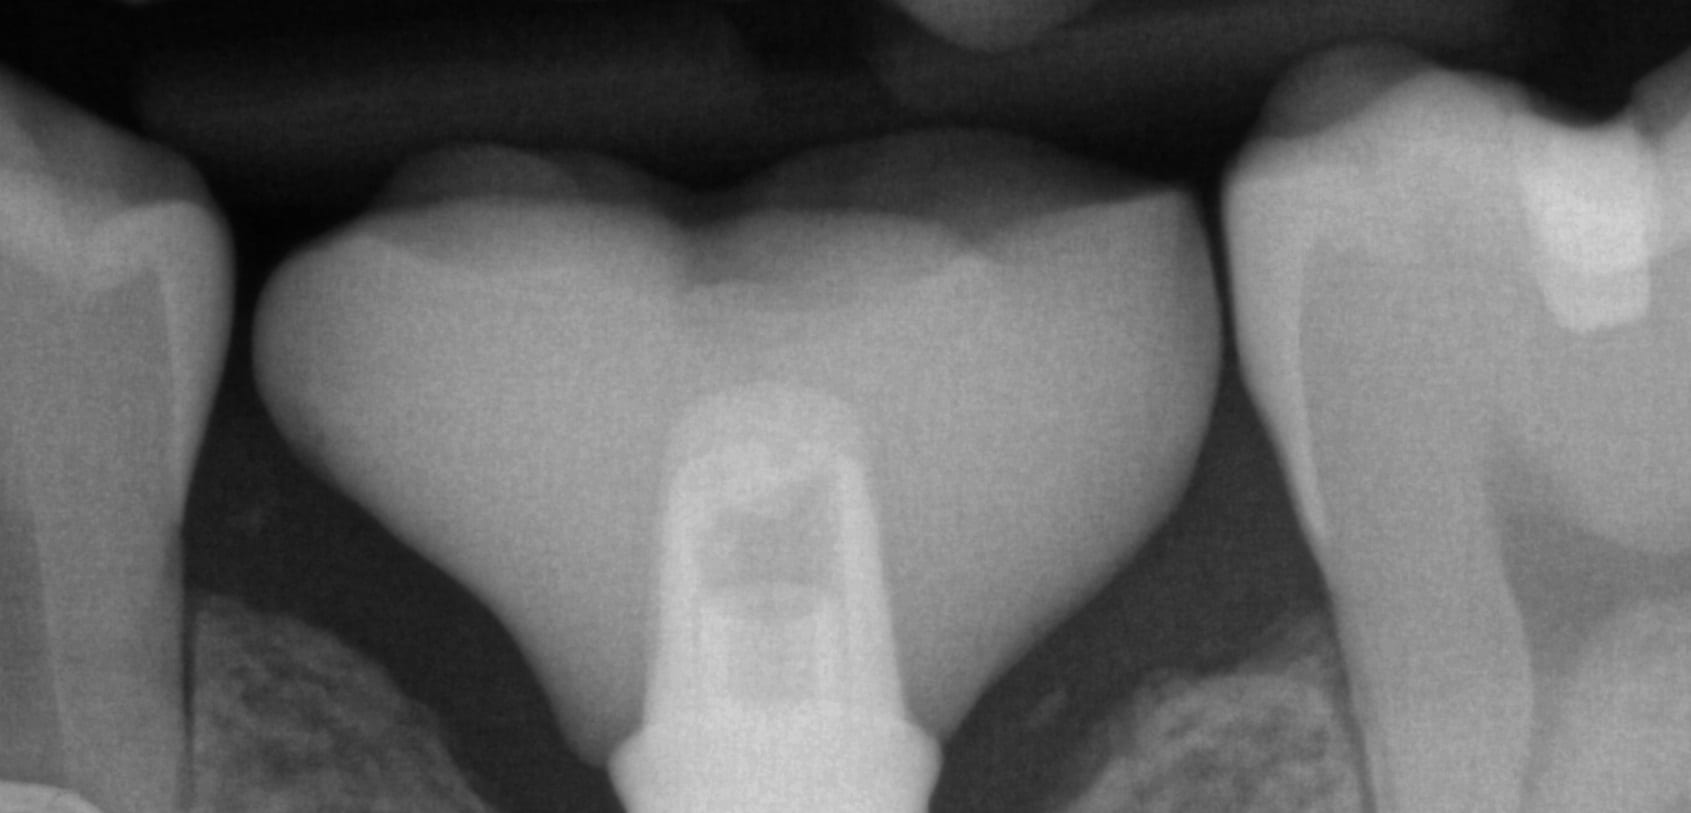
 A very common source of frustration for most dentists or those who are new to designing implant crowns is the emergence profile of the abutment or crown. Most of the time, the shape of the tissue dictates the digital design and this article showcases how we used the medit i500 for the intra-oral scan of the patient and then used exocad to design the restorations. Our advanced users can appreciate how we bring the arch model in twice- once as the maxillary model and once as the gingiva model. We then digital sculpt the tissue to create the proper profile yet we still have the original model to reflect back to asses the changes.


 When we 3D scan the surface of an object, we plot geometric figures (usually triangles) on the surface of that object which is usually round or has some other geometric shape. A satellite beam hitting the surface of the earth is a good way to visualize the scanning process as the photo illustrates.
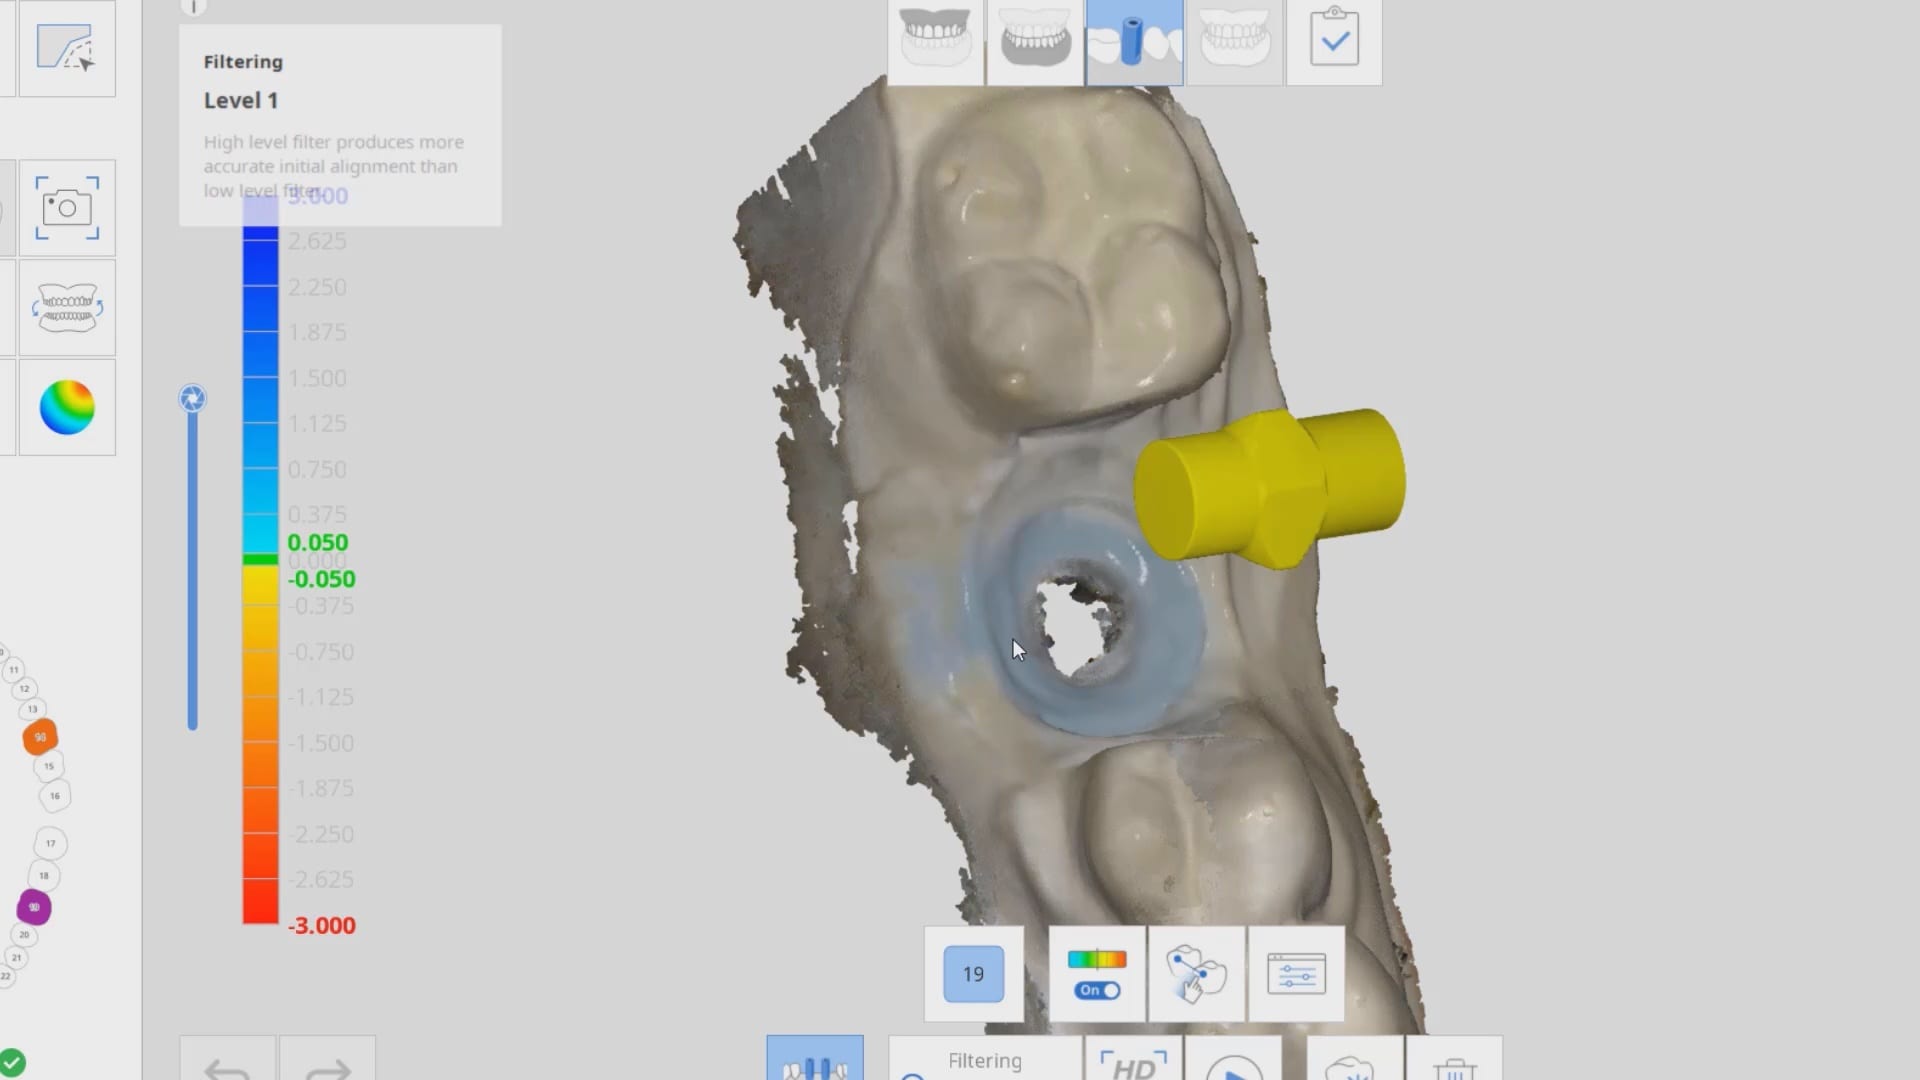


You must be logged in to post a comment.