Kaila Larson is the support specialist for our office and has been outstanding. She gets back to us quickly with any questions we have, and will log into the computer and fix issues so we don't even have to worry about them. She is extremely knowled...read moreKaila Larson is the support specialist for our office and has been outstanding. She gets back to us quickly with any questions we have, and will log into the computer and fix issues so we don't even have to worry about them. She is extremely knowledgeable about the MEDIT scanner and the supporting software. She responds to calls and texts or emails and will communicate with us in whatever way is most convenient for our office. She has saved us hours of time and headache by always being available to help.read less - 5/25/2022
Ryan Crain
I love my Medit and Cad-Ray has been so easy to work with, both from a sales and support standpoint. - 7/16/2020
I ordered my Medit scanner from them in Feb 2020, so far no issues with support or the product. They are a great company with great support. Disclosure: they did promise me a scanner tip for this review, but in all honestly I was meaning to give it t...read moreI ordered my Medit scanner from them in Feb 2020, so far no issues with support or the product. They are a great company with great support. Disclosure: they did promise me a scanner tip for this review, but in all honestly I was meaning to give it to them anyway.... if you are looking to buy, this is a great way to go about it.read less - 7/19/2020
William Huszti
Nicely done Cad-Ray- Thanks for helping me get back to work! The new i700 is our tech fav! - 3/03/2022
Trident Dental
Great help when you need it. Frank, Armen and team will take care of you. - 12/10/2021
Adam Bond
Purchased a Medit i500 from CAD-Ray earlier this year and I really like the scannner. It has great features at a great price point. And the support of the CAD-Ray team has been awesome. They have a great amount of online resources for the DIYers and ...read morePurchased a Medit i500 from CAD-Ray earlier this year and I really like the scannner. It has great features at a great price point. And the support of the CAD-Ray team has been awesome. They have a great amount of online resources for the DIYers and have helpful employees to help after the sale as well. I highly recommend them.read less - 6/16/2020
Kirk Arritt (fldnstrm)
Whatever digital workflow addition you want to add to your dental practice look no further than Cad-Ray. Top notch support and training. - 1/29/2023
Blake Ferando
I purchased my medit in April of 2019 from Cad-Ray. The support offered is second to none, and the training videos are some of the best out there. Add to that a great support team that is fast to answer questions and issues, its hard to beat Cad-Ray. - 6/19/2020
Eric Bailey
Couldn't be happier with the support I've gotten from these guys. Trouble-shooting a problem real time so you can call a patient and get them right back in with a solution is extremely hard customer service to match. Thanks a ton and no question wher...read moreCouldn't be happier with the support I've gotten from these guys. Trouble-shooting a problem real time so you can call a patient and get them right back in with a solution is extremely hard customer service to match. Thanks a ton and no question where I'll be going for any more purchases!read less - 10/06/2021
What can I say ! I have been extremely pleased with my scanner ! I recommend it to all my colleagues ! The support is the best , I bought the extended warranty and my scanner hada small crack and within one day they shipped my a new one ! I can’t wo...read moreWhat can I say ! I have been extremely pleased with my scanner ! I recommend it to all my colleagues ! The support is the best , I bought the extended warranty and my scanner hada small crack and within one day they shipped my a new one ! I can’t work without it ! Thank you !read less - 2/09/2022
Jay Siddiqui
Amazing support and install, Jesse went through everything and made sure I was comfortable with my equipment before leaving. He also introduced me to the world of anodizing and now I am hooked! Highly recommend them for any tech you may need. - 8/23/2022
Yordanka Ivanova
I had been on the market for a scanner for a while and the i700 is my first intraoral scanner purchase. We are still new to the scanning world and its capabilities. Frank DeLuca was my main contact from the beginning and the person who did our traini...read moreI had been on the market for a scanner for a while and the i700 is my first intraoral scanner purchase. We are still new to the scanning world and its capabilities. Frank DeLuca was my main contact from the beginning and the person who did our training. The scanner is incredible and has surpassed our expectations even though we haven’t used it to its full potential yet. Frank has been amazing and always there to guide us every step of the way. Having such fabulous customer service and support from CAD-Ray was key for us when making this purchase decision. Thank you!read less - 6/23/2022
Roger Wilson
CAD-Ray provides the best support around. I started scanning with Medit i500 in 2018 and my dental practice immediately changed for the better.As a rookie, I had a lot of questions and I calledCAD-Ray a lot in the beginning. They were great!Jonathan...read moreCAD-Ray provides the best support around. I started scanning with Medit i500 in 2018 and my dental practice immediately changed for the better.As a rookie, I had a lot of questions and I calledCAD-Ray a lot in the beginning. They were great!Jonathan Acker helped me get set up. Frank Weinstein answered tons of questions. Laura Geney became an important source of information as I moved into scan bodies, AI library, and had hardware questions. I’ve attended classes in Dallas featuring Armen Mirzayan who is incredibly knowledgeable and will tell you the good, bad, and the ugly about digital workflow. The possibilities are endless with scanning technology. I also want to mention Nick Statly who has visited my Dallas office and is a wealth of information. I have to admit that I frequently view the CAD-Ray User Group Face Book page just to pick up a few pearls here and there.I highly recommend CAD-Ray because their support is by far the best in the IOS industry and because their people honestly care about the customer and are truly committed to your success.read less - 12/23/2021
Office NHFD
Frank DeLuca was very helpful even though i didn't buy Medit from Cad ray ! Had an issue and my original dealer was not helpful and i contacted Cad ray thinking it was direct Medit. Frank was extremely nice to log in and do what ever he could until ...read moreFrank DeLuca was very helpful even though i didn't buy Medit from Cad ray ! Had an issue and my original dealer was not helpful and i contacted Cad ray thinking it was direct Medit. Frank was extremely nice to log in and do what ever he could until Medit could take over. would give 7 stars if available.read less - 8/10/2022
Diego Humberto Marquez Rodriguez
I am a very happy customer, the team behind cad ray, is amazing. Ive had small issues, and tech support is always available. I always call for them to help me use new apps, or updates and they stay on the phone with me all thru out, until fixing the ...read moreI am a very happy customer, the team behind cad ray, is amazing. Ive had small issues, and tech support is always available. I always call for them to help me use new apps, or updates and they stay on the phone with me all thru out, until fixing the issue. Andy has helped me several times, and he's a really nice guy too, great attitude, doesn't make me feel dumb when I don't understand. Sometimes it feels like he's part of my office team! Thank you Cad Ray, thank you Andy!read less - 2/01/2023
Alderman Dental
Frank DeLuca from CAD-Ray has been absolutely awesome from day one. Readily available and very knowledgeable to provide support when needed. - 1/25/2023
Meridien Dental
Got my Medit scanner from here. Purchase went very smoothly. Best part is the on going support. Cad-ray team is great with training and ongoing help if your scanner has hiccups here and there with various updates. - 12/11/2023
Ray Voller
There’s nothing like a company with top notch support like Cadray! Frank DeLuca is one of THE most helpful, non- condescending people I’ve ever dealt with! He ALWAYS strives to make us the BEST we can be and almost immediately helps us with any quest...read moreThere’s nothing like a company with top notch support like Cadray! Frank DeLuca is one of THE most helpful, non- condescending people I’ve ever dealt with! He ALWAYS strives to make us the BEST we can be and almost immediately helps us with any questions or problems ( which are minimal with the i700!) HIGHLY recommend this company and their scanner!!read less - 10/06/2022
Lisa Greenstein
Exceptional customer service - 7/26/2023
K. Banani
Amazing customer service. I haven’t ever worked with a company where there is an issue, you can immediately get help and assistance and so far have not had an issue that CADRAY wasn’t able to fix. They made the process buy buying and maintaining a sc...read moreAmazing customer service. I haven’t ever worked with a company where there is an issue, you can immediately get help and assistance and so far have not had an issue that CADRAY wasn’t able to fix. They made the process buy buying and maintaining a scanner seamless. Highly recommend!read less - 2/23/2024
Robert Mabry
I don't scan in my practice my assist does. She says it's awesome. Better than the trios or cerecs we have had in the past. The image quality while designing cases is amazing. Haven't seated a restoration from it yet but expect it to be great as well...read moreI don't scan in my practice my assist does. She says it's awesome. Better than the trios or cerecs we have had in the past. The image quality while designing cases is amazing. Haven't seated a restoration from it yet but expect it to be great as well.read less - 6/16/2020
These guys are great. Always quick to answers questions and trouble shoot. Only a text away...they are spot on. Would purchase from them again in a heart beat......and will soon! We are getting close to adding a second Medit i500 to the office. Every...read moreThese guys are great. Always quick to answers questions and trouble shoot. Only a text away...they are spot on. Would purchase from them again in a heart beat......and will soon! We are getting close to adding a second Medit i500 to the office. Everyone whats to use the one we have!read less - 6/19/2020
Northwest Orthodontics
Every staff member has been very helpful and kind every time we call. Thank you! - 7/24/2024
Ashley Guarisco
Cad-Ray's customer service has been amazing since day one! From getting a quote to setting everything up and doing my first scan. Everyone has been super helpful! Heather Gramley has been awesome, it's like having a tech in my back pocket! They offer...read moreCad-Ray's customer service has been amazing since day one! From getting a quote to setting everything up and doing my first scan. Everyone has been super helpful! Heather Gramley has been awesome, it's like having a tech in my back pocket! They offer tons of training videos and offer one on one training. I would 10/10 recommend them for all of your scanning needs!read less - 11/21/2022
Christopher Chin
This was my intro into intraoral scanning and I did research for quite awhile. The i500 and the team at Cad Ray are top notch. The company has done such a great job putting this scanner in the ranks of the premier ones. With constant updates it gets...read moreThis was my intro into intraoral scanning and I did research for quite awhile. The i500 and the team at Cad Ray are top notch. The company has done such a great job putting this scanner in the ranks of the premier ones. With constant updates it gets better and better (though I’m still behind on updates). My crowns have never been better. They drop right in with no models. I didn’t believe it but I’m loving digital dentistry. I can’t wait to go to the class after COVID calms down!read less - 6/16/2020
Armen Mirzayan's knowledge base sets CAD-RAY.COM apart from all other digital dental-equipment dealers. Not content with linking manufacturer support content, Armen's team provide instant feedback to any equipment queries, in-depth video tutorials, a...read moreArmen Mirzayan's knowledge base sets CAD-RAY.COM apart from all other digital dental-equipment dealers. Not content with linking manufacturer support content, Armen's team provide instant feedback to any equipment queries, in-depth video tutorials, and regular product testing, streamlining, and pushing the boundaries of their products - be it software, hardware, or connectivity between various brands. I highly recommend this team if you want to fully utilise your equipment and have the backup needed going forward!read less - 11/05/2019
Matt Newman was excellent solving a cable problem.! Quick response and good follow up! - 9/11/2024
Lauren Schulte
Frank and the CAD-Ray team are fantastic! They go above and beyond to help their doctors be successful. The CAD-Ray team doesn't just sell you a product and leave you high and dry. Frank is always ready to answer questions and offer support when need...read moreFrank and the CAD-Ray team are fantastic! They go above and beyond to help their doctors be successful. The CAD-Ray team doesn't just sell you a product and leave you high and dry. Frank is always ready to answer questions and offer support when needed. I highly recommend!read less - 1/24/2023
Levy Do
I'm a repeat customer because Cad-Ray's customer service is fast, efficient, and no nonsense. The classes offered for training for particularly for the Medit is awesome and it comes included which is phenomenal. All the classes that I've gotten to at...read moreI'm a repeat customer because Cad-Ray's customer service is fast, efficient, and no nonsense. The classes offered for training for particularly for the Medit is awesome and it comes included which is phenomenal. All the classes that I've gotten to attend so far has been well organized and I left learning very practical things. Remote support team solves my problem right then and there. Recently I had an issue, and instead of me talking to a sales rep who doesn't know what to do, Kaila remoted in and got it fixed just like that. Thank you and great job guys!read less - 4/19/2022
Iggy “Iggy” Deleon
There’s a reason why all cardray reviews are 5 stars only. They have the best people on their team. Jesse is the best trainer and provides above and beyond support. I can’t count the number of times that he’s saved me in the clinic with his designs. ...read moreThere’s a reason why all cardray reviews are 5 stars only. They have the best people on their team. Jesse is the best trainer and provides above and beyond support. I can’t count the number of times that he’s saved me in the clinic with his designs. He’s truly a master at his craft and one of the best assets to the cad ray team!read less - 2/02/2023
Mary Oliverie
Last year when I started looking into the Medit i500 I had my front desk call 3 sellers to get preliminary information. She told me hands down call CAD-RAY and don’t bother with the others. Boy was she right! Frank got us going with all our hardware ...read moreLast year when I started looking into the Medit i500 I had my front desk call 3 sellers to get preliminary information. She told me hands down call CAD-RAY and don’t bother with the others. Boy was she right! Frank got us going with all our hardware needs and trained us until all our questions were answered. Then Jonathon and Armen jumped in at our 2 day live training in Baltimore. I still review my notes to implement all the great ideas. When I get myself in a jam time to time CAD-RAY responds immediately and fixes my problem. Best decision I have made in the practice in a long time - Thank you everyone at CAD-RAY!read less - 10/09/2019
Frank helped me out when 3dbiocad could not help me with my trios issue. Thank you cad-ray. - 9/15/2024
John Allen
fantastic support, I always ask random, specific to me, could be found on a training video, questions and they always quickly tell me how to fix my problem. - 6/16/2020
Linsay N Brandon Jarvis
As a lab we see a lot of scans. Great quality and easy to create great restorations from the Medit offices that send us work.- Jarvis dental lab - 1/29/2019
Peipei Yu
I purchased a Medit scanner in August and I am very happy with the scanner. I was trained on an Omnicam in dental school and used Omnicam for 4 years in my associateship. The speed and quality of the Medit scanner is comparable to a CEREC scanner but...read moreI purchased a Medit scanner in August and I am very happy with the scanner. I was trained on an Omnicam in dental school and used Omnicam for 4 years in my associateship. The speed and quality of the Medit scanner is comparable to a CEREC scanner but you can’t beat the price of the Medit! I would highly recommend this if you are a beginner or pro in digital dentistry!read less - 9/21/2020
Dr. Terry Zervos, DDS,PA.
Today I had to order new tips and Laura was EXTREMELY helpful, Cad-Ray has all the products you need for digital dentistry and they do Education, if you buy Medit scanner from them they include 12 CE training course. Cant just buy a Lamborghini you h...read moreToday I had to order new tips and Laura was EXTREMELY helpful, Cad-Ray has all the products you need for digital dentistry and they do Education, if you buy Medit scanner from them they include 12 CE training course. Cant just buy a Lamborghini you have to learn how to drive it!read less - 7/02/2020
David Weber
Much like dentistry is not a commodity, CAD-RAY's service is not a commodity. What CAD-RAY does so well is not just sell pieces of technology affordably and smoothly, but provides service, training, and insight so these tools can be used meaningfully...read moreMuch like dentistry is not a commodity, CAD-RAY's service is not a commodity. What CAD-RAY does so well is not just sell pieces of technology affordably and smoothly, but provides service, training, and insight so these tools can be used meaningfully and profitably.read less - 12/12/2022
Dr. Steven E. Hollister
Had a training session for use of my Medit scanner this afternoon, and Heather G. was simply the best.....knowledgeable, patient and a great trainer. She had a wealth of knowledge regarding my scanner and she was so very patient with my computer glit...read moreHad a training session for use of my Medit scanner this afternoon, and Heather G. was simply the best.....knowledgeable, patient and a great trainer. She had a wealth of knowledge regarding my scanner and she was so very patient with my computer glitches! CAD-Ray is number one in my book! Thanks Heather, your time was much appreciated! Dr. Steve Hollisterread less - 5/14/2025
Maggie Sh
I’ve been using Medit 500 since spring of 2021 and really like it. The support system has been very good so far. I just called yesterday and spoke with Frank Deluca, he was very informative and helpful. - 12/07/2021
Ravi Sawhney
Fantastic folks. I'm an orthodontist and opened an office in 2020. They helped me find the perfect intraoral scanner to suit my needs. Not too much or too little, and a great price. Every time we have a technical question, a sharp human answers the p...read moreFantastic folks. I'm an orthodontist and opened an office in 2020. They helped me find the perfect intraoral scanner to suit my needs. Not too much or too little, and a great price. Every time we have a technical question, a sharp human answers the phone, troubleshoots, and remotes in when needed-- navigating MS updates and graphics card issues. My i500 died this week. They overnighted me a trade-in at a totally reasonable price, and even shipped me a laptop to drive the i600 while I got a new one (they knew my 2020 laptop wouldn't keep up!). CAD-Ray has consistently hit it out of the park.read less - 4/14/2025
Gregory Camfield
These guys are 1st in class service every time! - 7/08/2022
Artin Sakhaee
The support is even better then the camera itself. I used many other scanners and this is by far the best one. Recommended to many people. Looking to purchase a second one for my practice. The use and results are amazing. No adjustments to the p...read moreThe support is even better then the camera itself. I used many other scanners and this is by far the best one. Recommended to many people. Looking to purchase a second one for my practice. The use and results are amazing. No adjustments to the prosthetics at all.read less - 7/15/2020
A Palmer
I'm a dentist in Maine and have been working remotely with CAD-RAY for about 5 years. They do all my implant planning and fabrication of surgical guides. I just send them a CBCT image and digital impressions and they take care of all the rest, it cou...read moreI'm a dentist in Maine and have been working remotely with CAD-RAY for about 5 years. They do all my implant planning and fabrication of surgical guides. I just send them a CBCT image and digital impressions and they take care of all the rest, it couldn't be smoother. I've only had good experiences with CAD-RAY, and am very grateful for this awesome service they offer.read less - 6/02/2019
Alec Keon
I was on the fence on getting a scanner for years and finally pulled the trigger. CAD-Ray's support and knowledge has made this one of the best investments in my practice to date. When I spoke with Damien on the phone about my options he literally sa...read moreI was on the fence on getting a scanner for years and finally pulled the trigger. CAD-Ray's support and knowledge has made this one of the best investments in my practice to date. When I spoke with Damien on the phone about my options he literally saved me thousands after figuring out what my exact needs were. I went with the Medit i600, MSI laptop and 3D dental systems cart. The final product looks and feels as premium as it gets.read less - 2/21/2024
ryan ku
I've been using this for almost 2 months now and I just love it. At this price point, ROI is a no-brainer. The convenience factor is amazing. I only did the DIY online training and I'm pretty confident doing the scan. I've signed up for the actual ...read moreI've been using this for almost 2 months now and I just love it. At this price point, ROI is a no-brainer. The convenience factor is amazing. I only did the DIY online training and I'm pretty confident doing the scan. I've signed up for the actual course so looking forward to seeing it's greater potentials.read less - 10/14/2019
I bought I500 scanner two years ago. The scanner is great and the service is excellent. I have contacted Heather Gramley and Andy Nova about the updates of my scanner recently. They are absolutely amazing people. They go above and beyond. They repres...read moreI bought I500 scanner two years ago. The scanner is great and the service is excellent. I have contacted Heather Gramley and Andy Nova about the updates of my scanner recently. They are absolutely amazing people. They go above and beyond. They represent the company very well.read less - 7/05/2022
I would like to let you know that Kaila Larson is excellent communicator, personable, professional and knowledgeableI have had the opportunity to talk to her 3 times and it has always been awesome.Regards,Dr Carlos santos - 4/08/2022
Cole Smith
These guys are great. My favorite part about them is they set you up for success with your products. A lot of dental companies will be happy to sell you big ticket tech item but don't have much to set you up for success. I bought the Medit i500 and t...read moreThese guys are great. My favorite part about them is they set you up for success with your products. A lot of dental companies will be happy to sell you big ticket tech item but don't have much to set you up for success. I bought the Medit i500 and they have tons of videos on how to get it working and working well for you in your office. If you need a much of hand holding they have that our if you are like me and like the do it yourself videos they have that. I am sure you can buy these products all over but it is there service that sets them apart. If to are looking to buy some dental tech use these guys!read less - 6/05/2020
Yoav Taub
I purchased my Medit from Cad-Ray just prior to Covid and they have been fantastic in getting me the proper training on the machine, both through there 2 day class as well as the many video's they post on the website. I recently purchased some acce...read moreI purchased my Medit from Cad-Ray just prior to Covid and they have been fantastic in getting me the proper training on the machine, both through there 2 day class as well as the many video's they post on the website. I recently purchased some accessories for a different office and they accidently sent it somewhere else. After a quick email they had my stuff at my door within 24 hrs and they threw in a box of tips which I was not expecting (around $300). It is a pleasure to deal with them!read less - 7/19/2021
Scott Chong
The i500 has been a game-changer for our orthodontic practice. Patients love not having to do alginate impressions. Records appointments and debands take much less time plus there's significantly less clean-up. And it's fast/easy enough to use tha...read moreThe i500 has been a game-changer for our orthodontic practice. Patients love not having to do alginate impressions. Records appointments and debands take much less time plus there's significantly less clean-up. And it's fast/easy enough to use that we've even been able to train summer interns to scans with zero prior dental experience. Our retainers, nightguards, and sleep apnea appliances all showed improved fit with less chair-side delivery time due to accuracy of the scans. Customer support is top-notch. Whenever we've had issues, we get someone immediately and they either talk us through a fix or login via screenshare to help us directly. They have a great loyalty program which gives significant discounts to upgrade to newer units. We recently took advantage and are excited to try out the new i700, especially since they're now Mac-compatible. Simple version: Great intra-oral scanner, easy to use/operate, intuitive software interface, fantastic support.read less - 8/16/2023
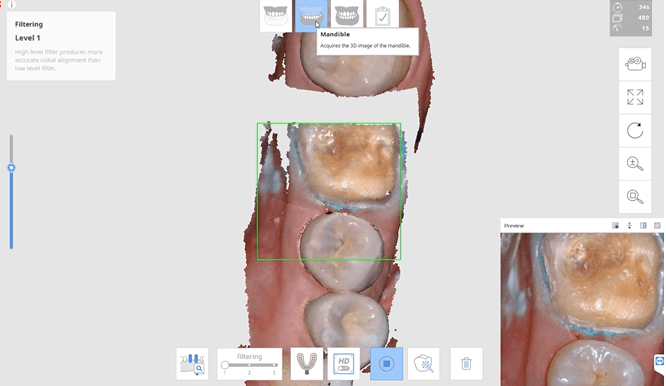
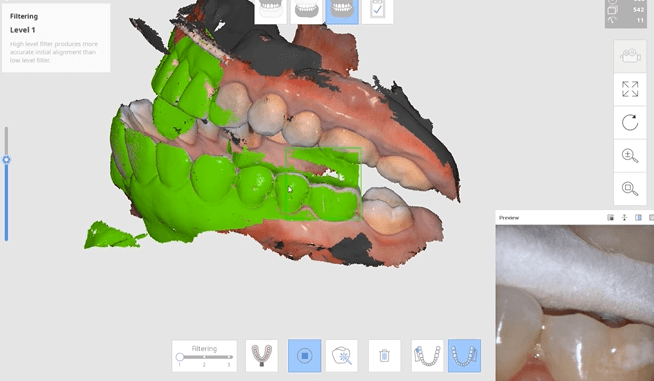
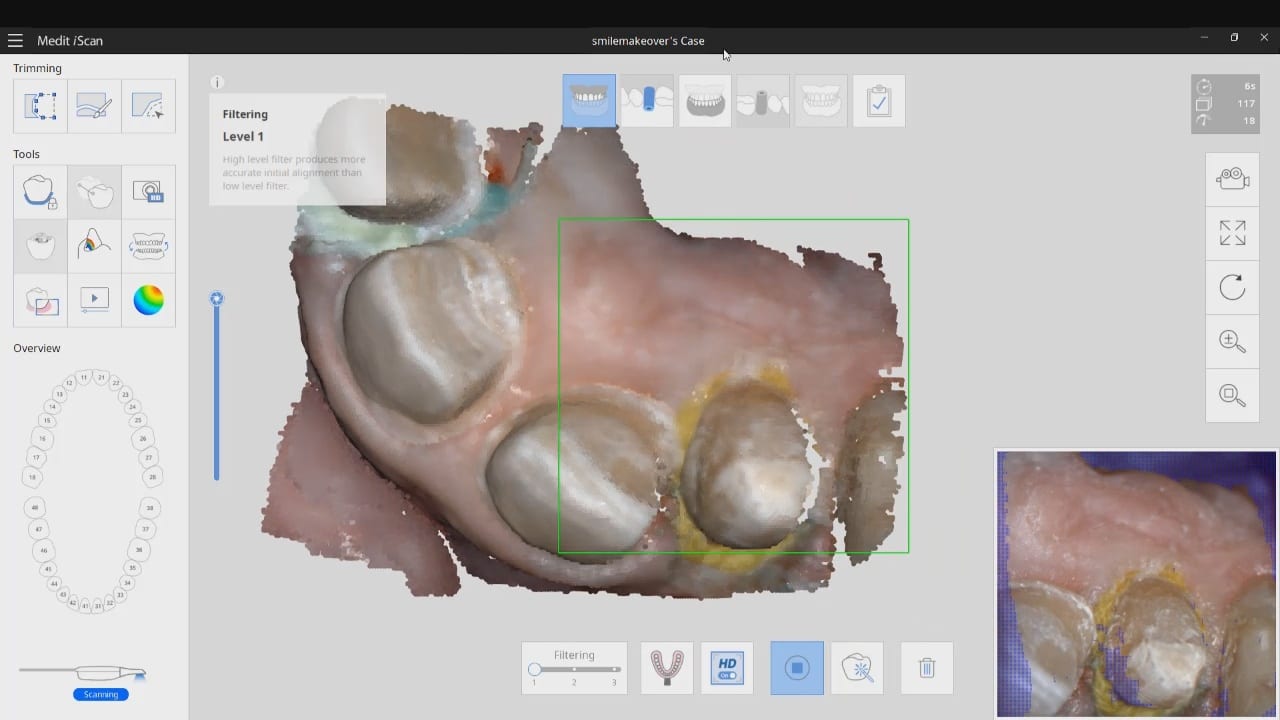
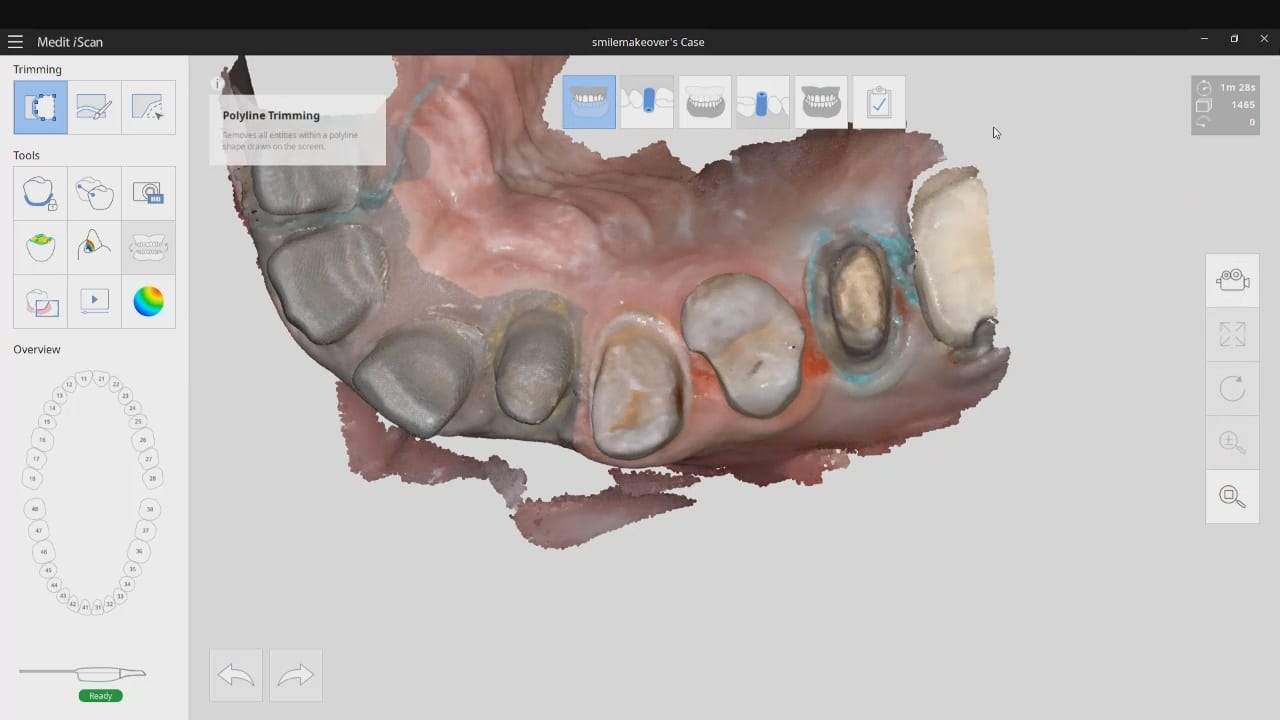
In this video we showcase the set up page of the Medit i500 Lab Version for software version 2.1, where you define the job description, enter parameters, designate the opposing and proceed to the next step where you launch the imaging software.
Captured Impressions While Patient Was Reaching Anesthesia
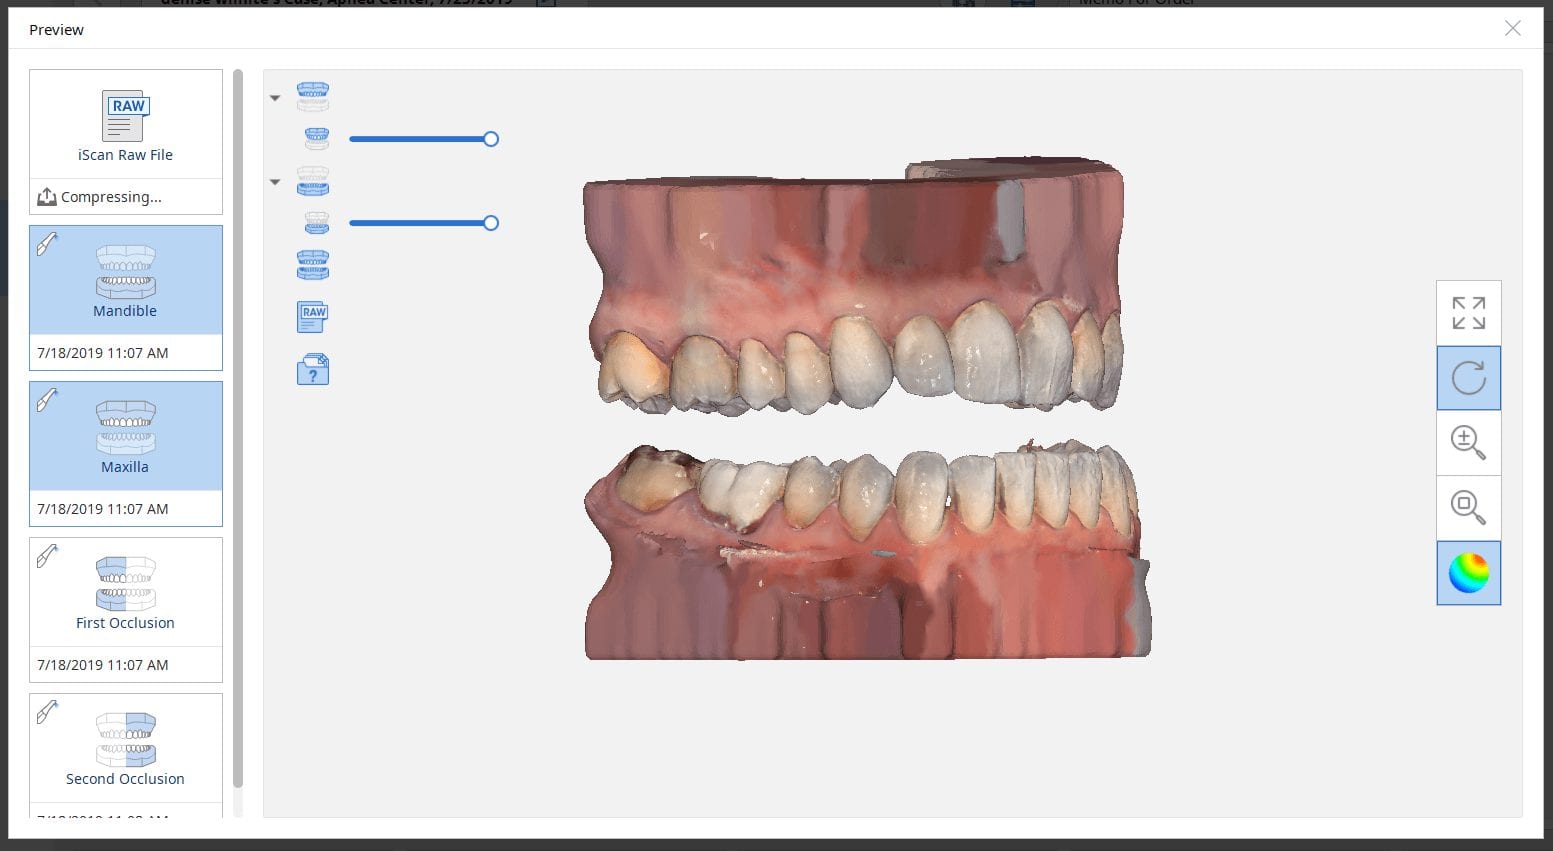
While the patient was reaching anesthesia, the opposing arch was captured along with the preparation model. The area to be prepared was cropped out and once enough reduction was achieved the bite was captured. We highly recommend that you verify reduction and adequate clearance before you capture the final preparation. This way, you have one last ditched effort to verified you will have adequate thickness to your restorative material.
One of the biggest challenges of capturing a bite for an occlusal appliance is to properly tripod the upper arch to the lower arch. With PVS impressions we just send the impressions along with the patient’s bite registration in maximum intercuspation.
A unique advantage we have with digital impressions is that we can capture someone with an open bite while using their own mouth as the articulator. Moreover, with the following technique, you can rest assured you have little adjustments to make to the occlusal guard after it has been fabricated.
Now as we continue to image in the same catalog box, we can gauge if we are on track as the bite model turns green. Notice how when we move from the upper arch to the lower arch, across an open bite, and we maintain a green active box and green model formation, we can rest assured that our case is mounted correctly.
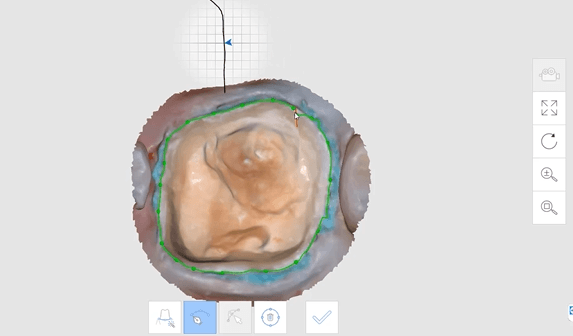
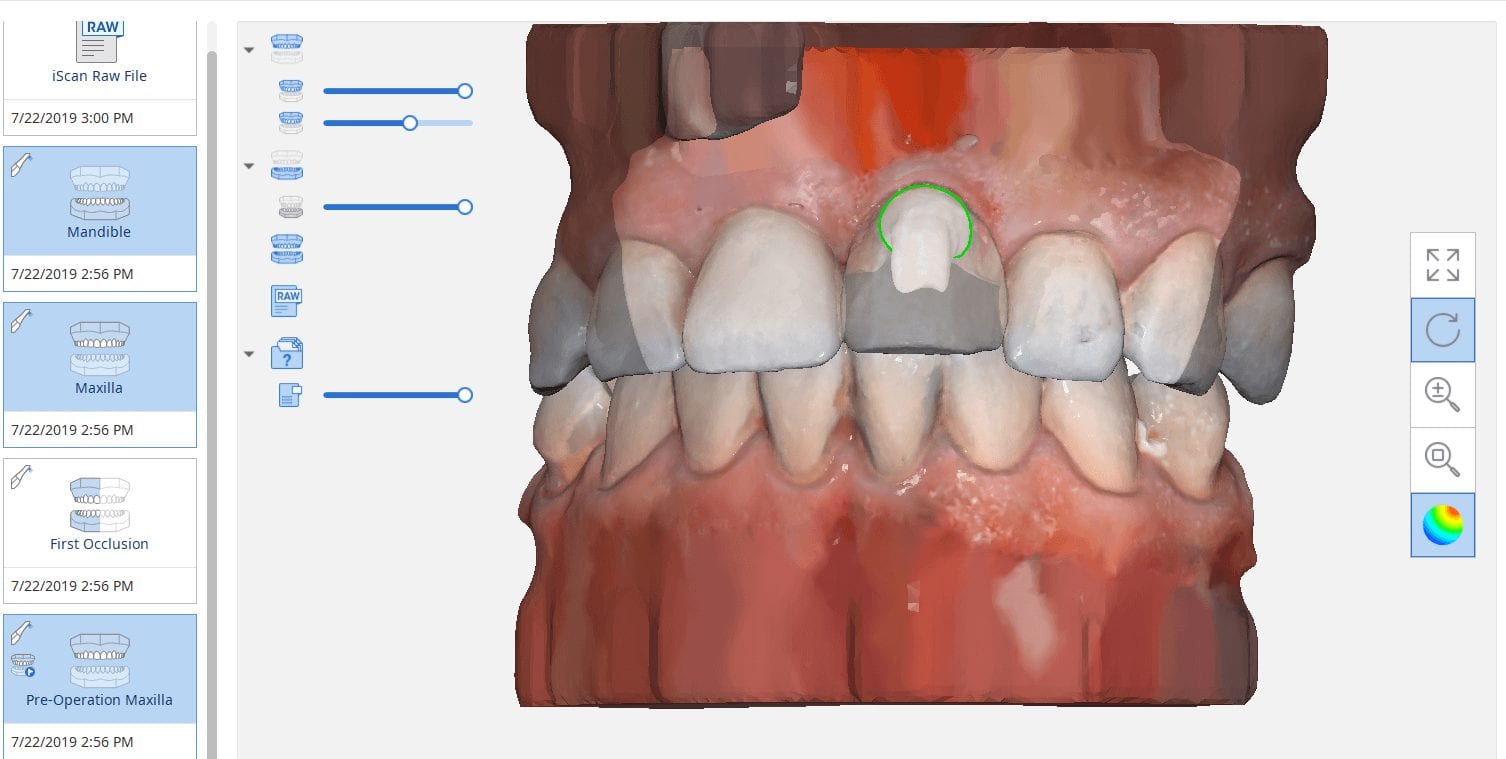
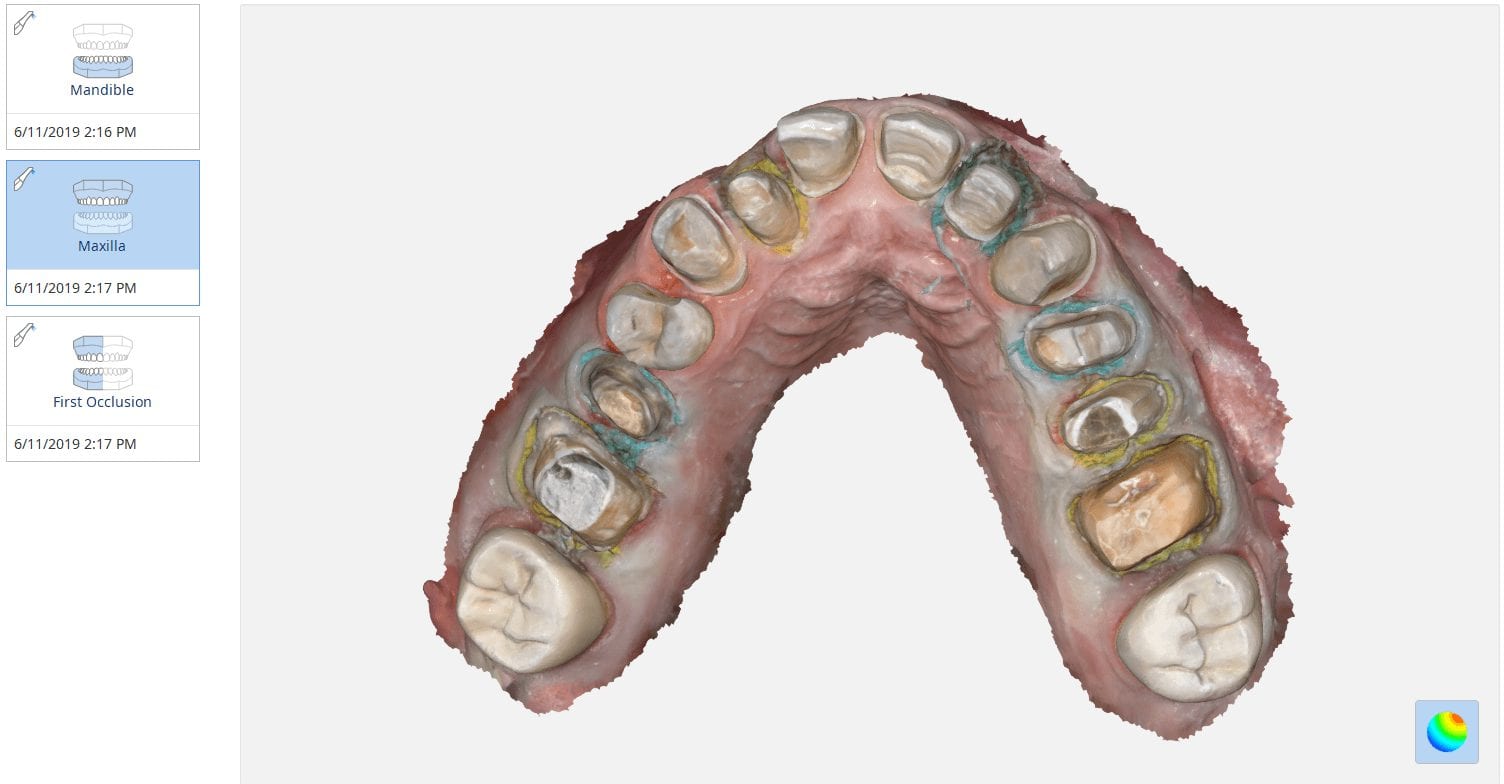
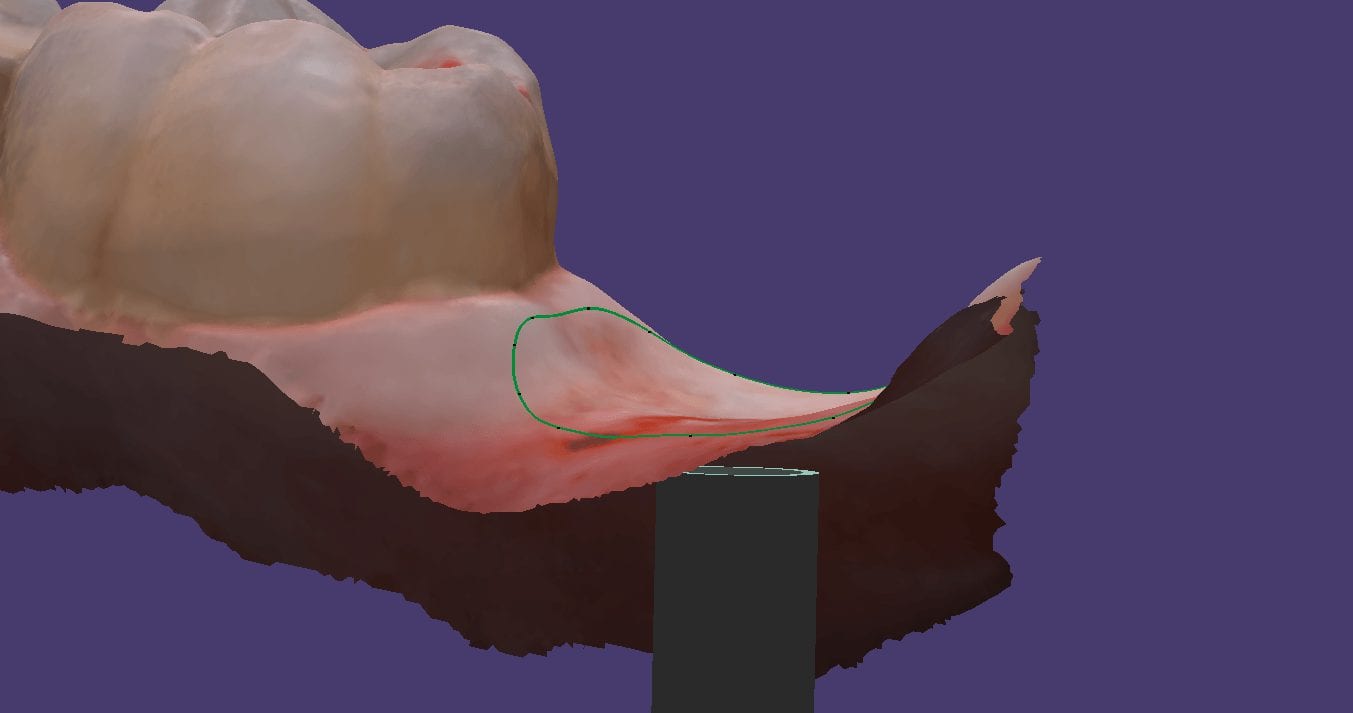
The new Medit i500 software will feature the ability to mark margins in the imaging step before you import the case into a CAD software or send it to the lab. In this article we showcase a case where a 12 year old implant crown needed replacement. The pre-op images were captured, along with the opposing and the bite.
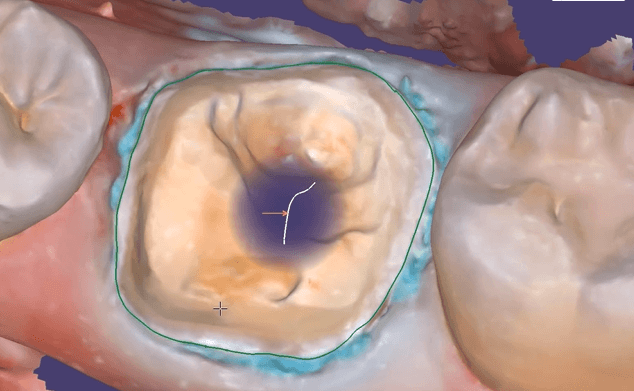
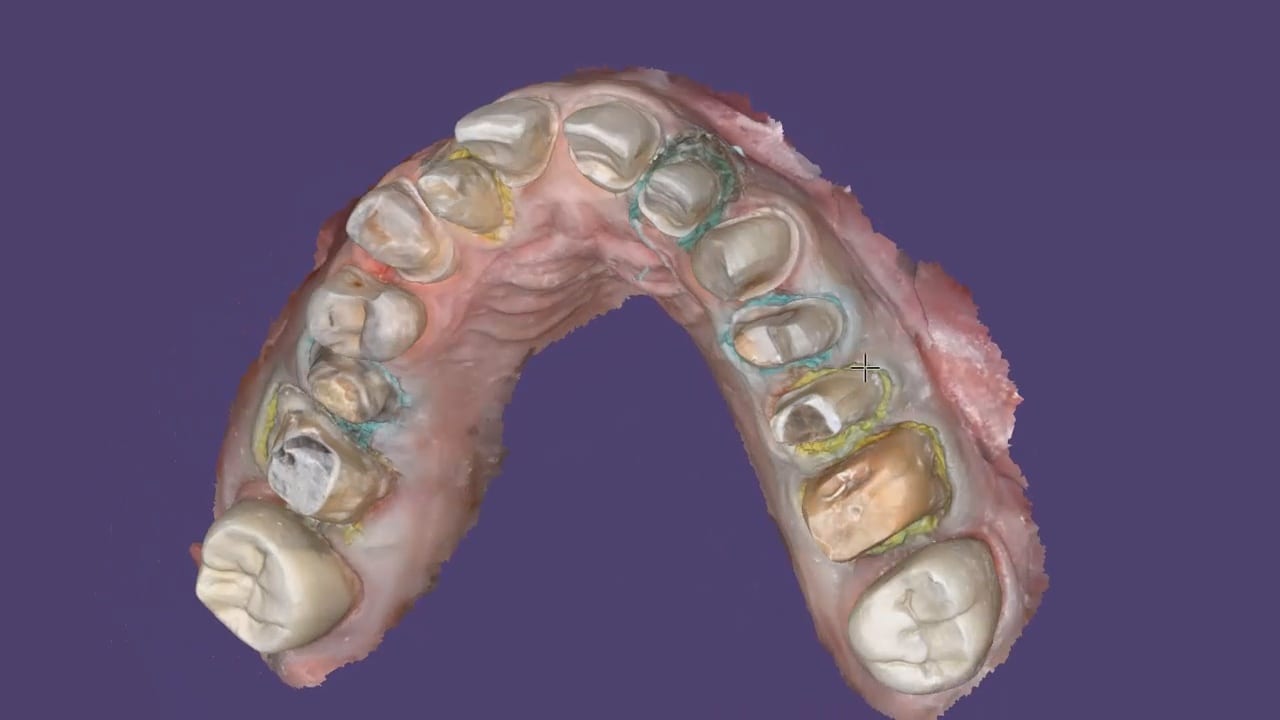
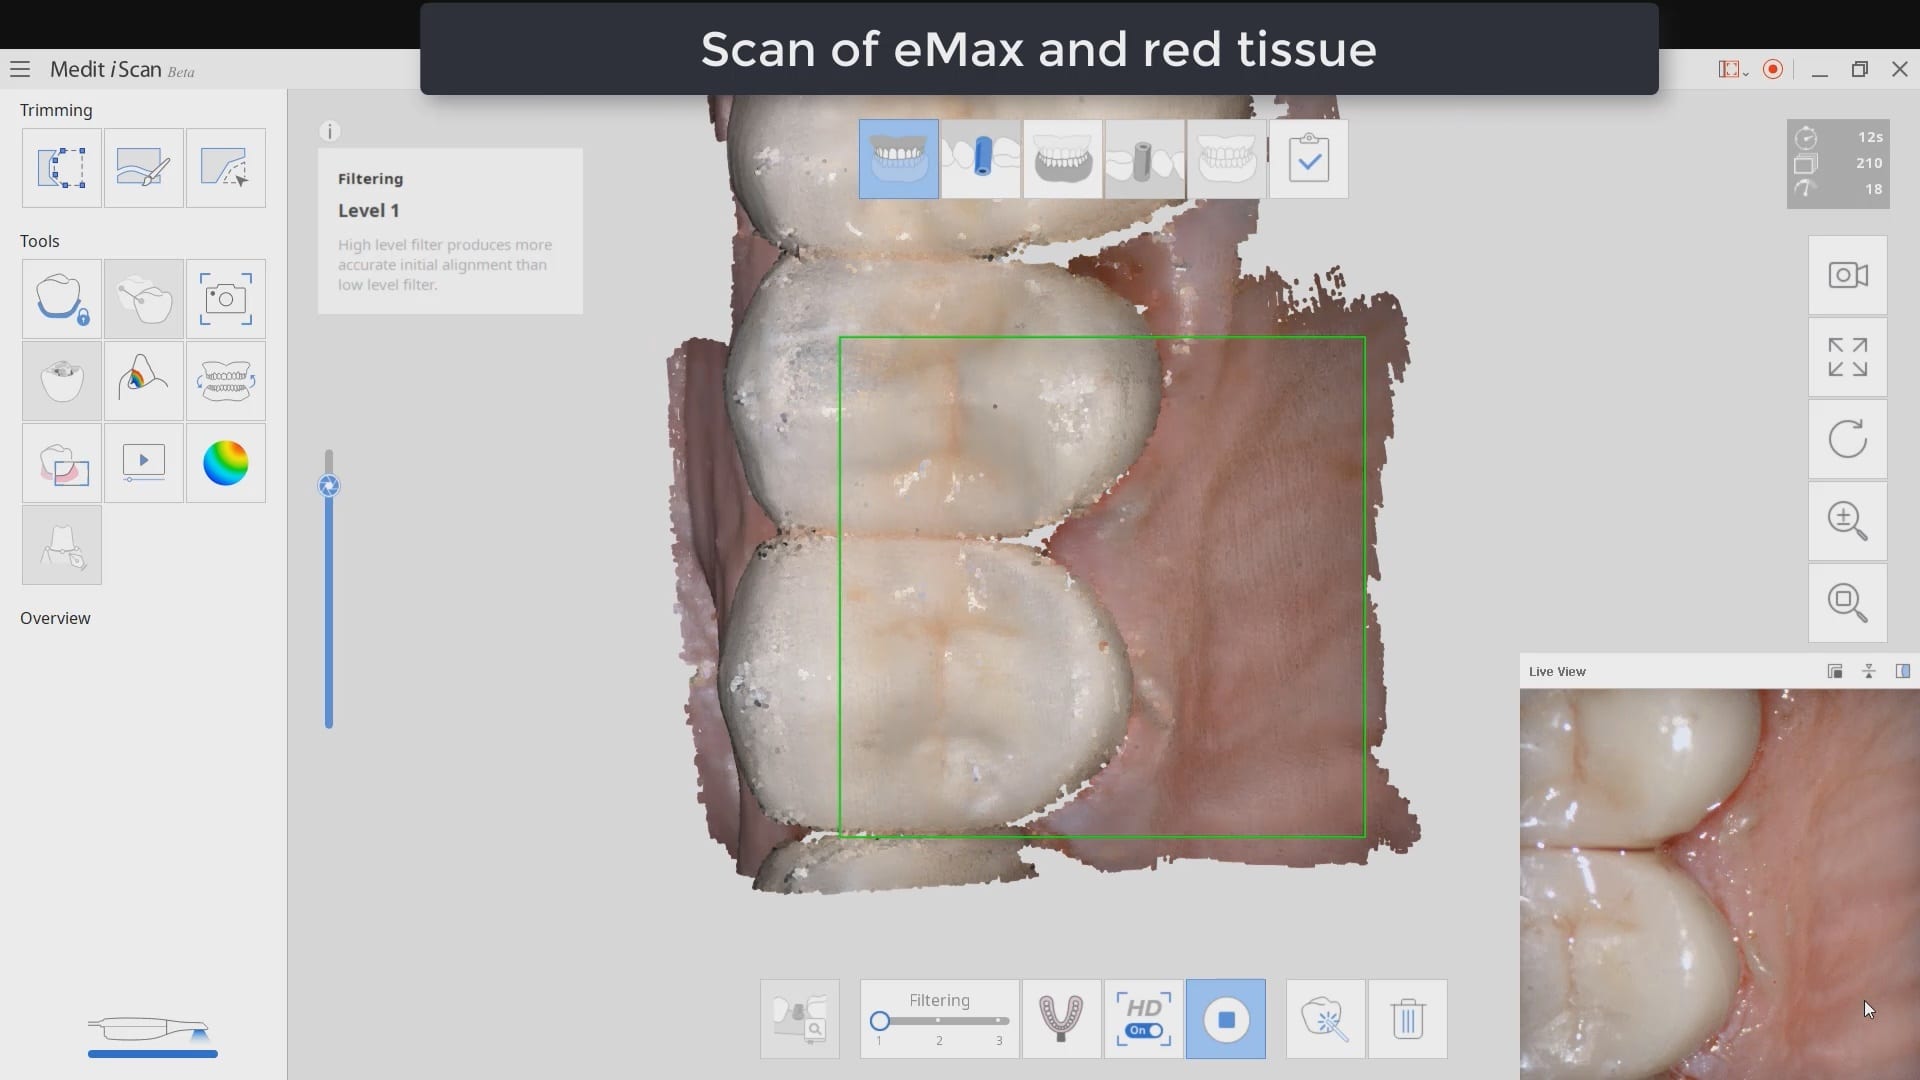
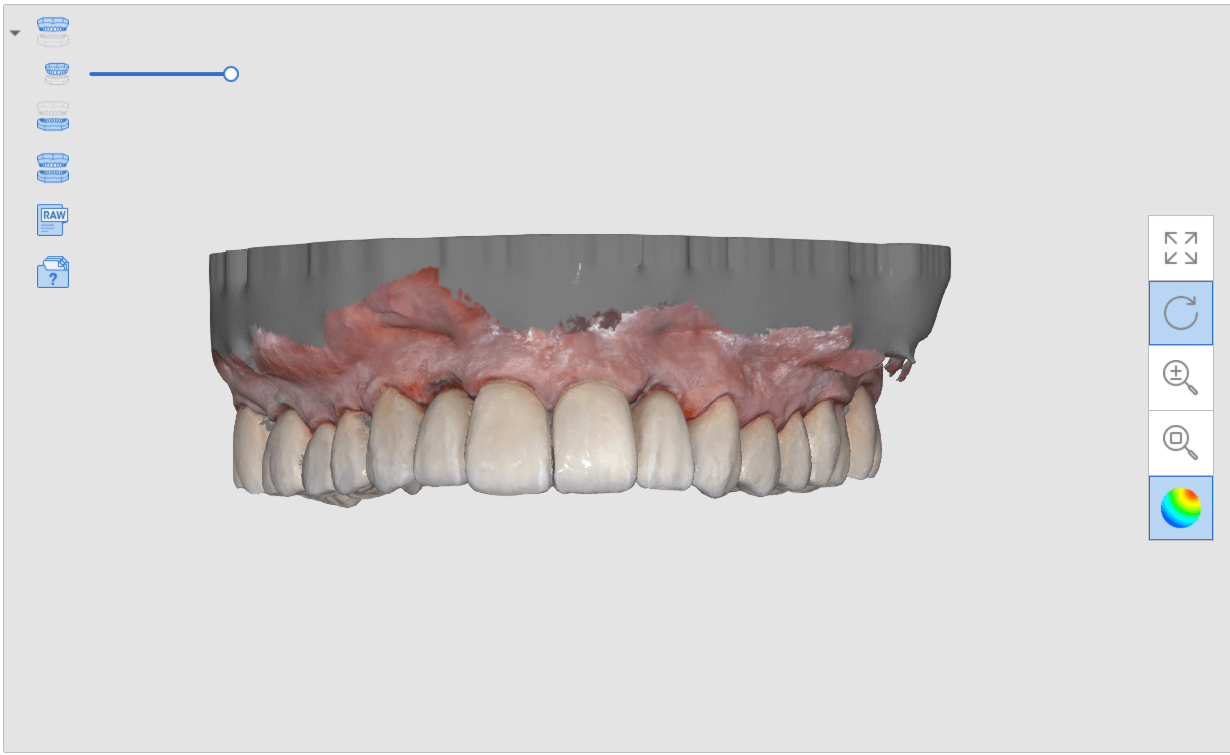
After the area was anesthetized and the crown was removed, expasyl was used to achieve hemostasis and tissue retraction. The margins of the abutment were imaged. Note how we used a feature in the Medit scanner to change the scan light from blue to white, which allows you to pick up red (blood and tissue) that is normally difficult to capture.
Once the margins were captured, we activated the margination tool. You highlight the area you want to address and the meshwork is calculated and processed locally, where you can then designate your margins that are exported to CAD software along with the jaw model, the opposing, the pre-op and the bite.
Alternatively, the traditional way would be to not place the margins in the native Medit software and to place it in the CAD software itself. As you can see both options are very viable and you do not lose any resolution of the scanned data between the imaging program or the design software.
There are multiple ways one can capture the bite for a patient. In this clinical case, we focus on the easiest way to capture two bites (one in maximum intercuspation and the other in an opened vertical dimension and in protrusive for a sleep apnea oral appliance).
The Medit iScan software allows you to capture two bites. Most people treat them as “Left Bite” and “Right Bite”, but the software doesn’t care if you follow this guideline. You can capture full arch bites in maximum intercuspation in one catalog box and then capture a full arch bite in the open / protrusive position in the second bite.
The next step is to clone or duplicate the case, where you set the first desired bite and process the case manually in maximum intercuspation and then in the second cloned case, you manually set the bite to the different occlusal scheme. As our users advance in their experience and knowledge level, they clone the same case multiple times so that they don’t have to re-image the upper and lower jaws multiple times and just capture different bites in all the different case files.
Our super advanced users image multiple bites in any folder they want, process it, and use that digital model to related the jaws together to any position they want in a CAD software like exocad.
The Medit i500 intra-oral scanner has two different software programs to operate, one is of which is geared towards clinical dentistry and the other is geared towards laboratories. Our advanced users are encouraged to use the lab version as it has a lot more functionality. One of them is to directly link to exocad software.
In this particular preview we show you the interface where you can launch the iScan program and define the work order and set all the parameters for your restorations.
Once all the settings are chosen, you launch the Medit scanner and image the case. Here, we defined the custom abutment for the crown and the opposing, which activated the catalog box for the antagonist, the arch, the scanbody, and the buccal bite. All respective images were captured.
Once the implant type is identified then you can design the abutment and crown with great control, where you can contour the underbelly of the abutment to help provide tissue support.
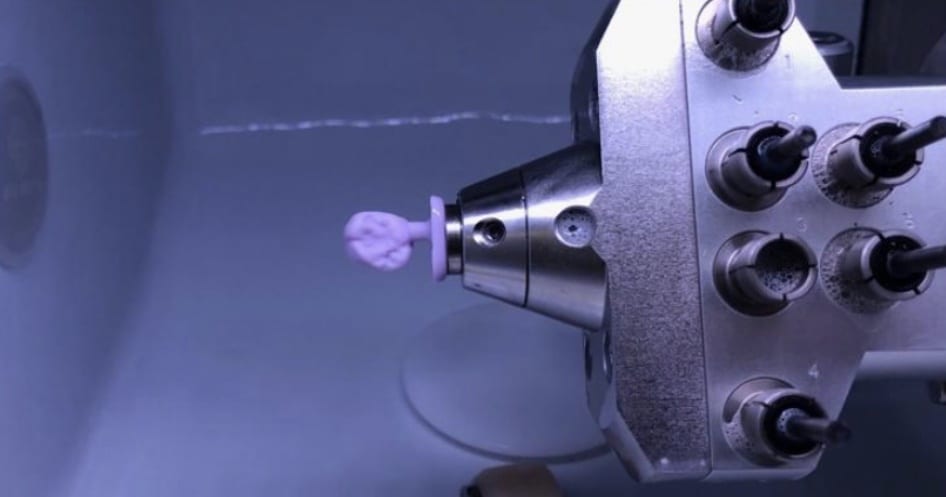
The design and the construction file is taken to the milling machine. Here, we used the CORiTEC ONE to mill the titanium abutment and then the Lithium Disilicate crown. You can see the great internal adaptation when the crown and the abutment are flipped around completely and the abutment does not fall out.
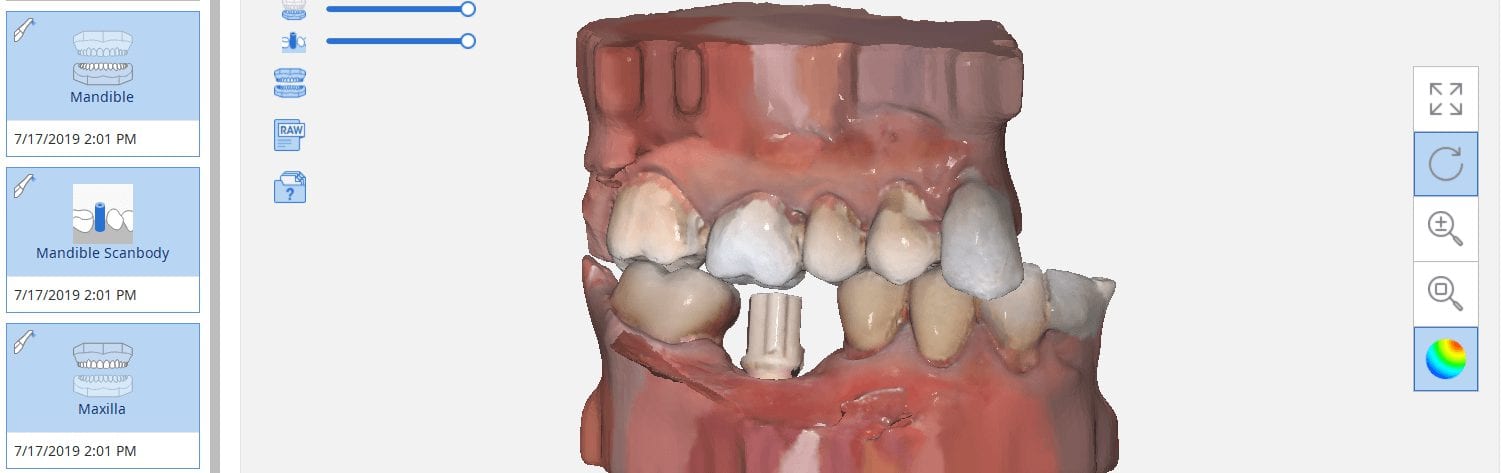
The Medit i500 software can now identify a scanbody and digitally place a virtual one in its location. This has a lot of ramifications. For starters, this great opportunity affords a dentist the ability to image multiple implants in long span edentulous areas, where you would have a clear indication of distortion or artifact introduced during challenging scans.
In this single unit case in the video below, we preview this feature. Once the patient is anesthetized, the isolite was placed to protect the airway and the edentulous area was scanned.
After uncovery of the fixture, the type of scanbody was identified in the menu and the location of the scanbody was identified on the digital model.
Once scanning was resumed, the digital scanbody was placed on top of the intra-oral one. As more data was captured you can appreciate how steadily the software tries to adapt the physical fixture to the digital one.
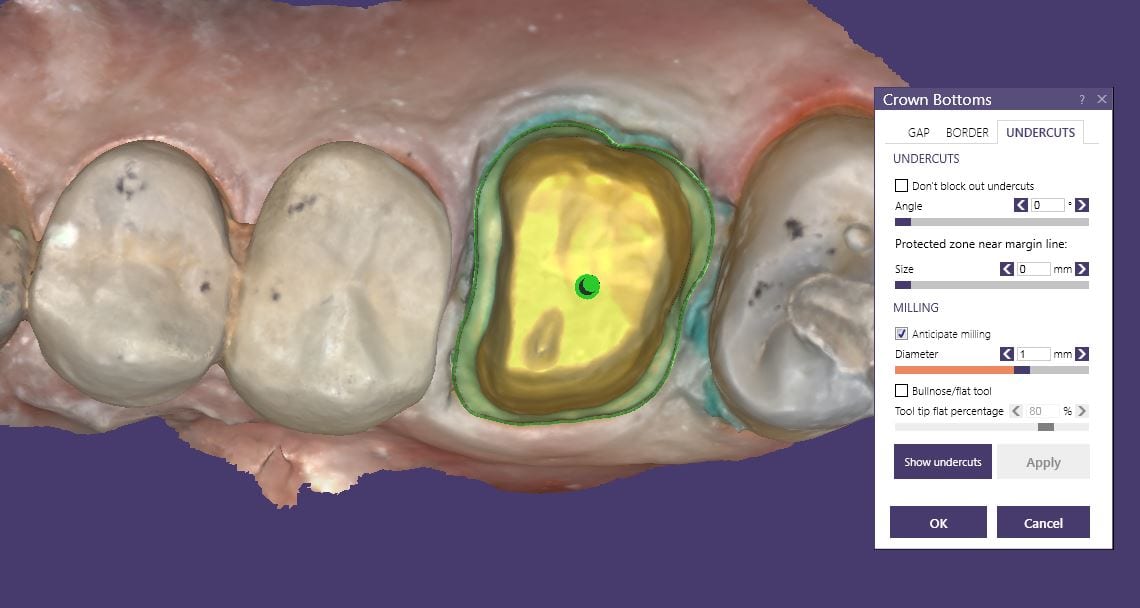
This case shows the amount of control one can have over the fit of a restoration. The upper right first molar was imaged with the Medit i500 and then imported into exocad design software. Once the margins are marked, the user can then define parameters that affect the fit of the restoration.
The diameter of the drill can be taken into consideration; in the design, 1.0 mm was chosen, but ultimately, we used the 0.6 mm bur to mill the intaglio of the emax restoration. The cement gap can be controlled as can the distance from the margin where it takes effect. The minimum thickness parameter also reinforces the material at the margins which will reduce the chances of chipping and ditching at deep chamfer margins. All of this translates into well fitting restorations with little space needed for the resin. That ultimately translates to easier clean up.
The case was milled using a few different materials and at varying speeds to see how thin the margins could be handled and how much detail the 0.6 mm burr can carve into emax and the glass ceramic material
This is an advanced case and won’t make any sense unless you have taken our course on digital dentistry. If you are an advanced user, watch how we break this complex case up into many small manageable segments to create full arch impressions of multiple prepared teeth.
Take note of the fact how the buccal bite is captured over a long course of time. This indicates that the arches are related to each other properly and we have not lost track of the bite. Pay attention to how we operate “independent of time and sequence.”
Digital impressions have turned one of the most complicated and error prone procedures in dentistry into one of the most predictable treatments we can provide.
When taking a physical impression of an impression abutment, you need to secure it to the PVS material so it remains rigid during pour ups. Some choose open trays while others prefer closed trays. When you deal with multiple units, their divergence or convergence can inadvertently lock the tray in the patient’s mouth. Sometimes, the impression abutments impinge on each other and keep you from seating them all the way.
That was a short list of the many things that can go wrong. With a digital impression, you can capture the contacts or the adjacent teeth, the opposing, and the tissue profile very easily. You can then place a scan-body and take an impression of it’s position and identify the location of the fixture.
In the following videos you can see the steps involved and how easy it is to manage the impression and accurately capture the implant location.
In titanium blanks, there is only one place to put the sprue, which is on the occlusal. One might think that this is would be easier to manage, but the trouble is that the titanium blank is cylindrical in shape, and it makes it difficult to keep track of the implant hex position and proper indexing.
There is one important matter to keep in mind when digitally designing an implant abutment for milling from a pre-milled blank. Unlike regular restorations you can design a restoration in (CAD software) and position it in a block , place a sprue in a desired position, and mill (CAM software) the final product.
The solution is to provide data to the milling machine so that it can properly index the titanium blank. To keep it simple, a regular restoration can just be milled from a designed stl file. The titanium pre-milled blanks need accompanying files to the designed stl to properly mill the abutment for indexing purposes. In exocad software, there is a construction file that accompanies the design and the CAM software can read both files and produce a desired result.
In all of our courses, once every user gets comfortable with the software and the camera, we quickly ramp up to reveal the greatest advantage of digital impressions over analog ones. The premise is that digital impressions can create models of data (note the deliberate omission of words like teeth, tissue, etc.) that are independent of time and sequence, and moreover, you can edit or manipulate the captured information.
In this particular case, we demonstrate how the upper anterior eight were prepared and how the preps were captured over an extended period of time. You can appreciate how one case protect margins and preparations from introducing subsequent errors. You can also visualize how you can create models without following a certain pattern.
Once you understand this concept, you can apply multiple ways to tackle the most complex and comprehensive cases and treat them with ease. We would love to host you at one of our courses to teach these principles and how you can take ANY intra-oral scan from any device, take it to CAD software, and take it to ANY milling machine you want. Oh yeah, we can also teach you how to introduce CT data into the mix from any machine to handle an even bigger case.
Click on our courses and events to see future courses. We’ll be adding more dates very soon.
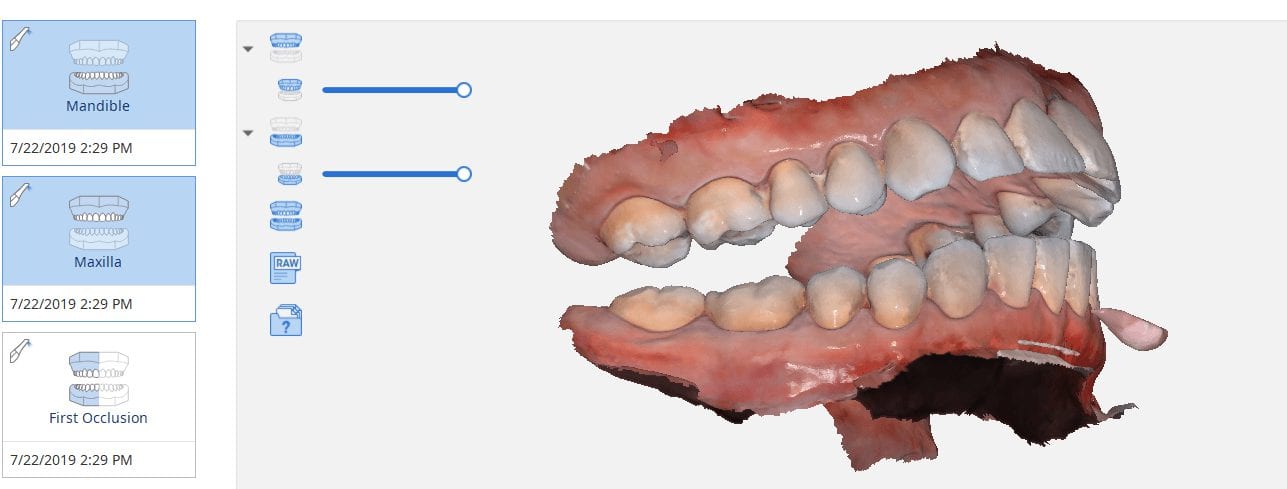
Separate from how we imaged the arches, we think the perfect place to “hand off” a case like this is when you have mounted your upper and lower jaws, the opposing, marked margins, and set the path of insertion. At this point, as a clinician you have provided all the information needs to proceed with the case.
In this simple first molar case, we scan the pre-op condition as there is no room to add any contours to the pre-existing crown. In the video below, you can see how it occludes with the opposing and how it contacts the adjacent teeth. A pre-op scan is taken and the crown is removed. Images of the recurrent decay are taken and the preparation was modified. Final impressions were taken after tissue retraction and hemostasis.
The pre-existing condition must be trimmed away and you want to keep only the areas you want to make contact with in the proposal. This simple method gives you instant proposals where you only modify the contact areas and proceed to production
In just under a decade, we have turned dental implants from the most risky and stress inducing procedures we can perform both surgically and restoratively into one of the most predictable procedures we can perform while drastically reducing the cost of care, whether you fabricate the prothesis yourself or outsource it to a lab.
With guided surgery, the benefits are immeasurable. One good argument is that clinicians can avoid certain surgeries while discovering physical limitations during the planning stage. Furthermore, if performed fully guided, once can generally place the implant exactly where it was digitally planned in 3D on a CT scan.
Restoratively, we also have some tremendous advantages; whether you are performing single units or multiples, digital impressions give you an advantage you never had with physical impressions. In this first video, we emphasize how you and your team should take picture of the scanbody that is being used during the digital impression. It is very easy for you or the lab to mistakenly label digital impression in the design software.
The great benefit of digital impressions is realized when you can capture all of the contact areas of neighboring teeth. Furthermore, you have the ability to digitally sculpt the soft tissue and create the emergence profile for your abutment. When you take the soft tissue profile, the position of the head of the implant, and the contacts of the adjacent teeth into consideration in your design, you stack the odds of a successful restoration into your favor
This case demonstrate some advanced features our CAD-Ray software provides for CAD/CAM users. We first launch meditlink and define the prescription. You can take your time and input your selection at this step, BUT we give you the opportunity to edit it when you launch the CAD software.
You will note that after the imaging is done, the CAD software is launched which allows us to change the job definition. You have two choices for utilizing the pre-op condition with our software; you can either use the pre-op as a reference frame for your design or you can copy it exactly as a replica. The latter is called “Digital Wax-Up” for exocad users.
What we have done is to program the software and its wizard to get you from the model step to instant proposals after you place your margins. We guide you through the steps and ask you to trim away anything you don’t want your proposals to replicate and to only leave behind a shell of the exact form and function you want to keep in your proposals. This instant proposal is a dream for most dentists. It is the quickest way you can get to a design and to fabricate a restoration
At any given time, we are milling restorations with 3 or 4 milling machines. Recently, we designed a restoration with the Medit i500 scanner, designed in exocad, and milled with a chairside mcxl cerec milling machine. Here are the steps we took to do this:
You may have to install some .net framework files from Microsoft. It’s generally an automated installation
Once installed, make sure to have your milling machine turned on and connected. A lot of the functionality is closed if your machine is not on and connected to the PC with the software.
We had to follow certain steps in sequence to get this to work. We had to activate the license in a pre-installed CEREC software and then move that thumbdrive to the machine where the inlab CAM was going to be installed
You can contact Mr. Milos Gedosev who runs DentalCADCAM in Germany and has earned a great reputation over two decades if you have any questions.
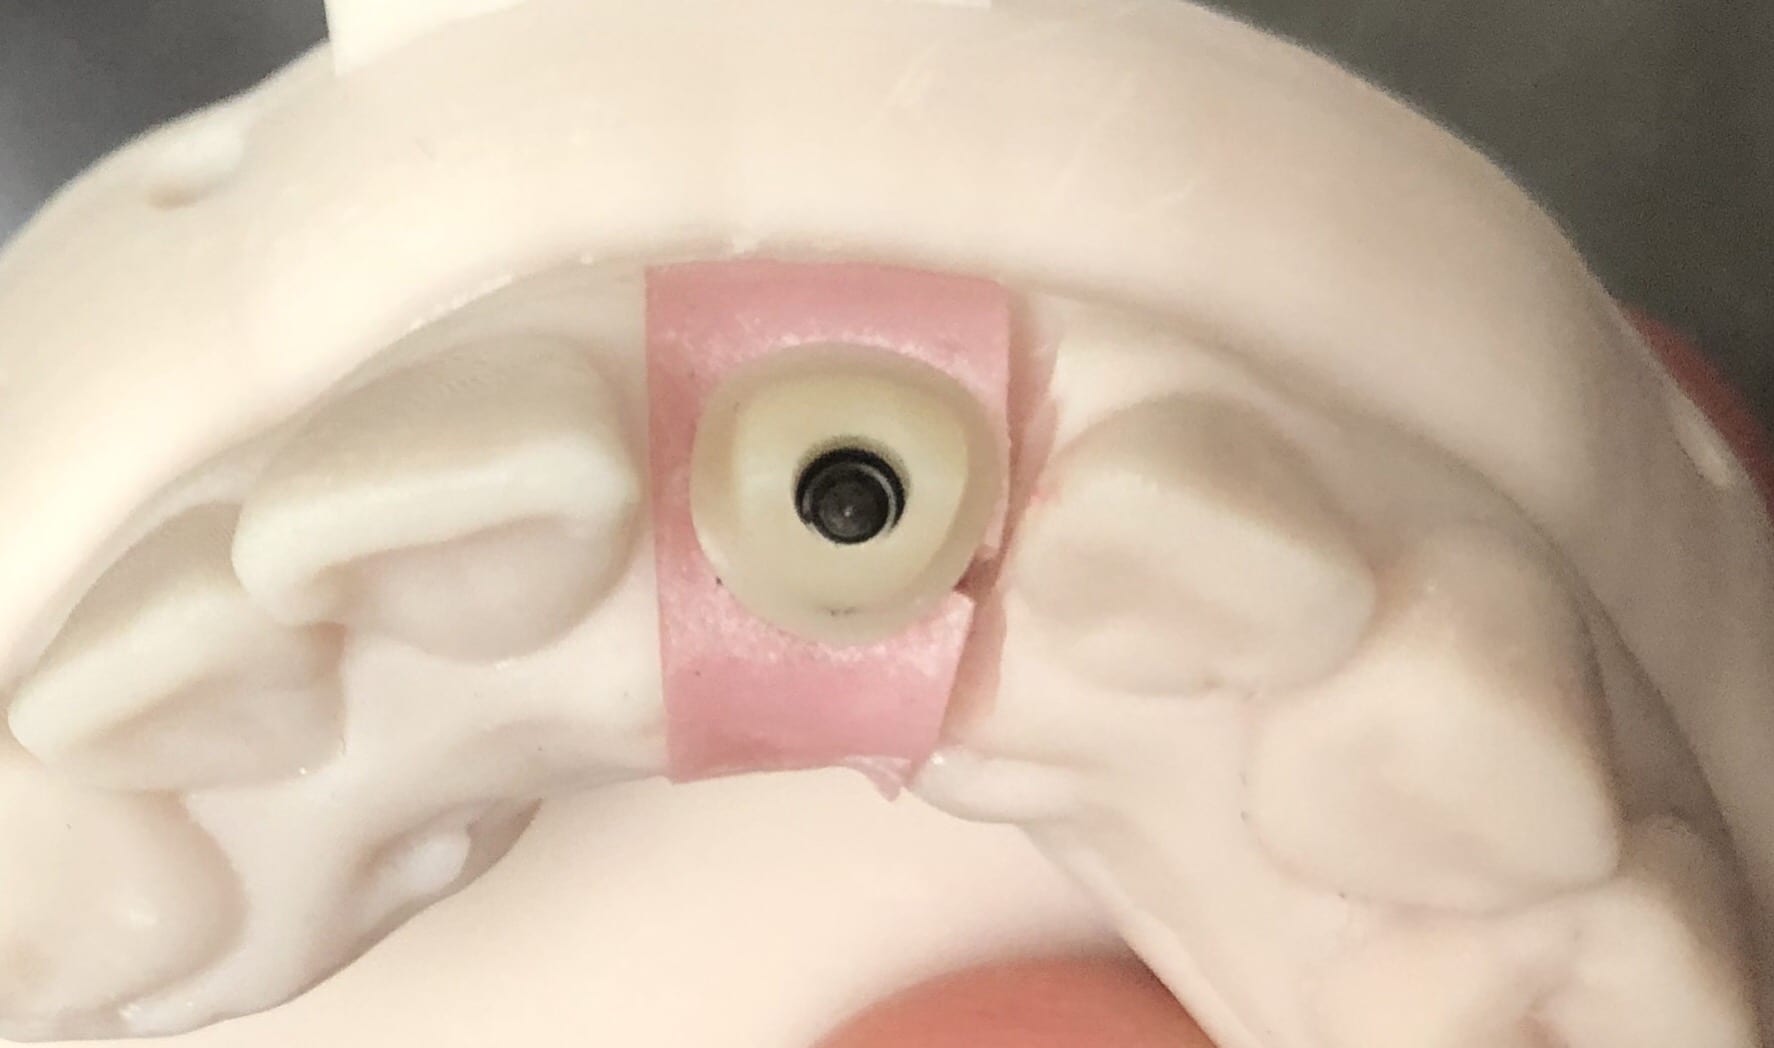
In this video we demonstrate how to capture implant impressions of scan bodies intra-orally with the medit i500 scanner and then design a screw retained crown with our customized CAD-Ray software.
The sequence of steps for a new user are critical. Although it doesn’t matter if you image the opposing arch first or after the arch that is being restored, the steps to capturing the scanbody must be followed in chronological order. You must capture the arch and then the scanbody impression. You should not return to the arch catalog box and add any more data. This can introduce a lot of error in the processing steps
In this video you can appreciate the distinct advantage you have tissue training on a digital model. You can contour to the soft tissue very easily. It is best to do so after you have identified the scanbody, which will pinpoint the location of the fixture. Once you have that in the equation, you can sculpt your tissue to your liking, making sure your abutment margins never drop apically below the head of the fixture
Second molar can often be a difficult clinical case to manage. In this case, we diagnose a cracked tooth. Even though the patient is not symptomatic, the clinical condition and the wear on the second molar dictated a full coverage restoration. In the first video, you can see how the light test was used to show the abrupt transition and lack of light propagation through the second molar
In the second video, you can see how we imaged the pre-existing second molar in the pre-operative condition. Once the patient was completely numb, the second molar was reduced
In this particular case, we demonstrate an emax restoration fabricated with the Z4 milling machine by VHF. In the first video, you can see how the case was set up initially within the software. You will notice how we image the preop, image the opposing and can even image the bite out of sequence, all while the patient is being anesthetized.
Once the preparation is captured, we place the margins and design a crown in exocad. The emax is milled, tried in, and them placed in the oven for crystallization. It is then delivered to the patient. Note how the decay at the contacts of the adjacent teeth was drilled out and restored, while the crown was milling / crystalizing. An immediate post op x-ray was taken to make sure there was no resin left behin
The Z4 Milling Machine can drill emax, zirconia and metal abutments. You can use a scanbody, identify the location of the fixture, design the abutment and mill our either ceramic or metal as the abutment.
Metal abutments in the posterior molar areas, tibases in canine and premolar regions, and angled abutments in incisor area is the general consensus for restoration of choice
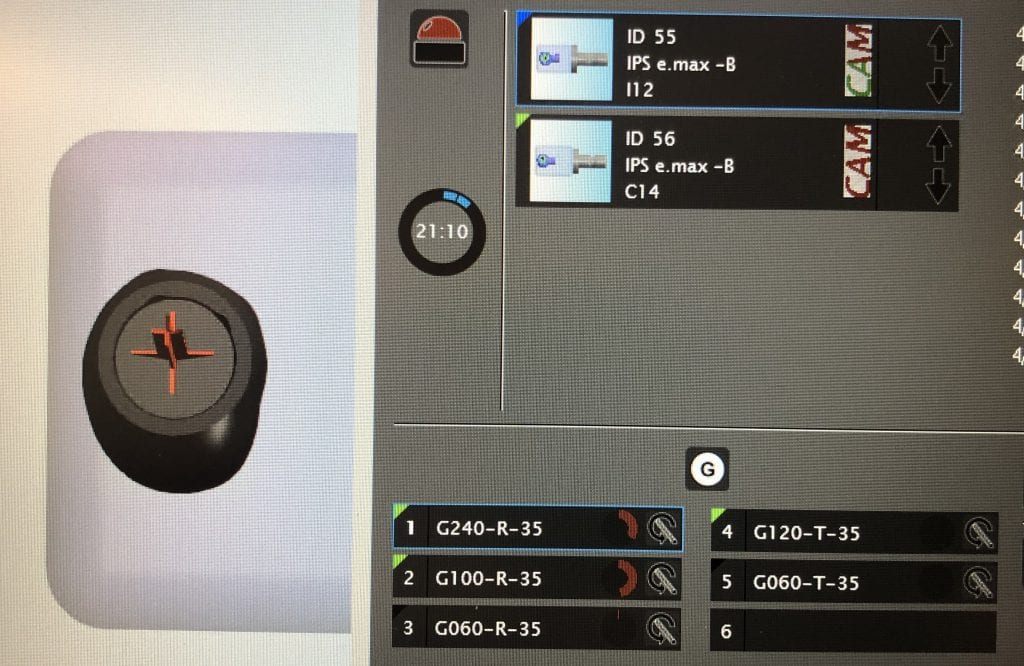
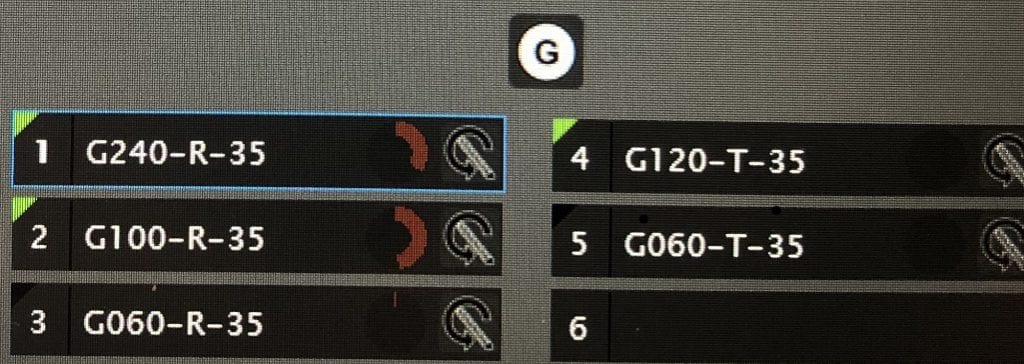
One of the greatest advantages of the Z4 is that it can start milling while it is doing the calculation for milling. Furthermore, you can load multiple designs in preparation of continuous milling. In the picture attached, the CAM software is shown which operates in the background. Most users don’t usually see this interface.
Here you can see how there are 5 drills for the machine. The top tier, consisting of 3 drills, labeled G240, G100, and G060 are all labeled as R. The G120-T and G060-T are used only for a screw access holes